As of the previous chapter, both the menu and game screens are accessible when your program launches. In this chapter, you code the main game mechanics. The logic is similar to what you have already done to create your Blackjack game, so elements of this chapter will feel familiar, although there are unique features to Battlejack that pose new challenges.
The central game mechanic is this: like Blackjack, the goal is to reach 21 first. Unlike Blackjack, an excess of 21 is not a bust but still wins, and the player can “attack” the dealer’s stash of cards.
During the game, the player clicks their deck to draw a card. On their turn, the player may select cards to cancel out a card in the AI’s stash. This is an attack, and an attack may be bolstered by a powerup card if the player has one available. In the meantime, a player’s cards are tallied for their own score in an attempt to reach 21 before the AI does. If the player draws a black card, then at the start of the dealer’s turn, one black card from the player’s hand is added to the dealer’s stash.
If a joker is drawn from either deck, then it destroys the stash of the opposition.
In code, this game requires a lot of data tracking. Your code must keep track of what cards remain in each deck, what cards are in the player’s hands, which of those cards are currently selected as cards to go into battle against the dealer, which cards are in the dealer’s hand, which of the dealer’s cards have been eliminated, the location of each card on the screen, and much more. In Lua terminology, that means you need tables (“classes” or “fields” in other languages).
Card Table
In your Blackjack game, each card was its own Lua table, with a unique self.suit, self.value, and self.img all its own, which you were able to call from your main script when you needed to calculate the total score or when you needed to tell LÖVE which image to draw on the screen.
This is a slightly more complex version of your Blackjack card table. Of course, none of these values mean anything yet. They’re just empty fields that need to be populated by data you feed into the table when generating a new card.
There are still a few more fields needed. First of all, each card needs an image. This would be identical to your Blackjack game were in not for the addition of the Joker to this deck. In fact, you could render the Joker and back images basically the same as all the other cards by naming their image files as you named the face cards (0-joker.png, 0-back.png) but then you need a copy of each in the red and black directories, which is redundant data. There’s nothing wrong, necessarily, with that approach, but it wouldn’t scale were this a much larger game with really big assets, while allowing for deviations in the code is cheap, and worthwhile.
And finally, it’s always important to be able to ascertain an object’s size. A game object’s size is vital for collision detection: it’s how you tell where to draw the next object without drawing on top of the previous one, and it’s how you detect whether the player has clicked one object or another.
Lua has functions specifically for the task of determining image size, but your program is going to scale your graphics down (as in the Blackjack game) so that the screen size can be changed. Technically, you could use Lua’s size detection and multiply the result by your scale. Or, you can enter the size value as part of each card. Both do the same thing, but since the size of objects is used frequently, it’s “cheaper” to do the calculation once and enter the value as a variable than to do the math every time a user interacts with the screen.
The value of the scale variable has yet to be created, but as long as it is defined before card.lua is actually used, there won’t be a problem.
Game State
Currently, entering the game state of your application sets the active STATE to game, which in turn causes the main loop to invoke your custom game.draw() function, which renders a colored background. This all happens in the game.lua file, so open that in Geany so you can make some changes.
The game.lua file is the logical place to define important game-related variables, because it’s within this file that the mechanics and game data tracking happens.
Based on both the card.lua file and your previous experience with your Blackjack game, you can anticipate a few important variables that can be defined whether or not your code has a need for them yet.
Start by defining some environment variables. Eventually, LÖVE needs to know who is running the game so that it can store save files. Lua provides the os.getenv('HOME') function to discover a user’s home directory. In Linux, this is a folder in a directory literally called home, whereas on the Mac, it is a folder within the Users directory, and on Windows it is a location usually on the C drive. The point is, you don’t have to worry about where a user keeps their personal data files, because Lua finds that out for you.
Another thing that changes from system to system is the separator character used to delimit directories from one another. For instance, on the Raspberry Pi, as on any Linux or Mac system, the separator character is a forward slash. The location to any file or folder on the system can be predictably written out in plain text; for example, /home/pi/battlejack/img/joker.png. On Windows, however, the separator character is traditionally a backslash: C:\\My Documents\example\img\joker.png. Lua can detect this for you, too, with its package.config function.
Next, your game needs several tables to serve as decks of cards in various states of play. Create tables called hand and horde to serve as the player and AI active hands, tables called deck and ai to serve as shuffled draw decks for player and AI, a table called back containing the backside of the player and AI decks to serve as the clickable item when a player wants to draw a new card, and a grab table to serve as a staging area for cards a player is about to send into battle.
Finally, create a winner variable to mark whether or not a winner has been found. By default, set it to nil. Pull card data from your configuration file into a variable called set using the inifile function.
The first logical place to call this function is any time a new game begins. The function takes the width of the screen, which is a global variable established in main.lua, and the native size of a card graphic. If you’ve made your own graphics for this game, then you must determine the size of your graphic yourself (you can find it in GIMP, if you’re not sure). The example graphics included with the source code of this book are 790 pixels wide.
The game.scaler() function assumes that approximately six cards should fit horizontally across the screen (WIDE/6). This calculation renders the width of each card in pixels, which itself is important enough to keep in a global variable called slot, which keeps cards from overlapping when being drawn. The slot value divided by the unscaled size of a card provides a decimal number by which all cards may be scaled to fit six across the screen.
With these functions and variables in place, you can at least draw the most rudimentary of cards screen.
The first card you generate is the “top” of the draw deck for the player. Since it’s the back of a card, it has no color or value, so you pass in the "c" and "v" dummy values, which the card library ignores once it sees that the card being generated is of the back type. The card’s X position is set at the left plus the value of pad, a variable set in main.lua to provide padding around the edges of the screen. The card’s Y position is calculated from the height of the screen.
The card generated is added to the back table. Then the same variable is used to generate a second card to represent the AI’s draw deck, using new X and Y values so that the card’s placement is in the top right (across the virtual table) instead of the bottom left. This second card is also added to the back table.
Finally, a proper tabletop is defined. Currently, the game mode only renders a flat color in the background, but Battlejack deserves something more exciting. Rendering an array based on a texture or pattern is pretty common for a game engine, and LÖVE provides the love.graphics.newQuad function to map tiles across a given space. Specifically, this code defines a quad of the width and height of the screen, with tiles sized 150×150 pixels (which happens to be the size of the tile pattern included with the source code of this book). The tile is defined using the d variable to ensure compatibility with whatever system the game is running on, and the tile mode is set to wrap seamlessly across all available space.
Of course, nothing is actually drawn unless it appears in the love.draw() function, which in this program is aliased to the draw() function of whatever STATE the user is in. For game play, the user is in the game state, so you must add your draw commands to game.draw().
After setting the color to white to ensure that everything is drawn at 100% opacity, the tiles are drawn to create the tabletop. Order is important here, so the tabletop must be drawn before cards are drawn, or else the cards will be drawn “under” the table.
To draw the two card decks, you populate a temporary card variable with one object from the back table and use that data to draw the graphic. Since the back table contains relatively little data, manually pulling out an entry is simple (the contents of the other tables that you have created are far more dynamic and require for loops).
Launch your game to verify that all of your code is correct so far. Correct any errors and make adjustments as needed, and then it’s time to set up the deck creation functions.
Deck Building
Like any card game, a key element of Battlejack is the random nature of the game elements. Functionally, that means your program needs a reliable set of methods that you can use repeatedly to create freshly randomized decks of cards based on the card definitions you have set forth in your card definition INI file.
To create decks for Battlejack, you must fill two distinct tables with card definitions: one filled with red cards and the other with black cards. However, it’s part of the game design that there are six black “mole” cards inserted into the player deck, so six cards must be stolen from one deck and inserted into the other. Additionally, a Joker must be placed in each deck but not accidentally stolen when the black “mole” cards are inserted into the player deck. And finally, each deck must be shuffled to ensure unpredictability.
In your game.lua file, create four new functions: game.setsplit(), game.mole(), game.joker(), and game.shuffle().
This code uses a for loop to repeat the same action for as many times (n) as you proscribe when calling the function. The action that it takes is another for loop that iterates over the set variable, which contains the contents of the card section of your INI file, assigns a color to the card definition, and then places the card definition into whatever table you have told it to build into.
Next, you need to steal six cards from the black deck. If you do that immediately after building the decks, however, the same black cards are stolen every time because no randomness has been introduced into the decks. For this reason, you need to develop the shuffle method first.
Launch the game and look at the terminal to see a text list of the cards in each deck.
The next step is to transform all of this setup work into a playable game.
Playable Cards
Playing Battlejack is a three-step process: the user must draw a card, the user must select cards to use in an attack, and then the user must choose a target for an attack. That means your code needs functions to visually produce a card into the player’s hand, to mark cards as selected, and finally, to resolve a battle.
Create a new function called game.cardgen() that accepts a deck as an argument. This function’s job is to parse the next available card definition from a deck to use your card library to create a card object with all the necessary attributes (image, width, height, position, and so on), and to add it to the table representing the player’s hand or the AI horde.
As cards are drawn from a deck, they must be removed from that deck or else the same card would be drawn for eternity. For that reason, the deck table becomes populated with nil entries as the game progresses, so your function must be programmed to skip over empty entries.
Notice that this function is a little different than any of the functions you’ve written so far; it returns either true or false, depending on the results of its calculation. This is a convenience that lets you use the result of a call to the function as a sort of switch; if it returns false, then you know that there’s no reason to continue analyzing a click.
Launch the game and draw some cards.
Battle
Sending cards into battle is also all about click detection. Since the user can select more than one card to combat an enemy card, you must mark selected cards as selected until an enemy target is clicked. You already have a table called grab, and so it serves as a kind of extension of the player’s hand, containing any cards that have been clicked in preparation for battle. Of course, clicking an already grabbed card causes it to be deselected.
Now that you have the ability to detect whether a card has been grabbed yet, you can process mouse clicks. For the action of grabbing a card and adding it to the grab table, you can use a the LÖVE mousepressed function, simply to avoid overloading the mousereleased function with too many checks.
Launch the game and try selecting some cards from your hand.
Visual Effects
Selecting cards for battle should be an exciting prospect in the game. After all, it’s the central mechanic; without this, the game is basically Blackjack. While elevating the card on the table is pragmatically effective, it’s not very flashy.
One way to “sweeten” the act of selecting cards for battle is to add a simple visual effect. You can imagine, for instance, that in a fantasy battle, warriors chosen to go out onto the front line might glow with a magical aura. In video game design terms, that translates to a particle effect.
Particle effects are relatively expensive, so you don’t want to over-use them, especially on a relatively weak platform like the Pi. But as an indicator that something is “hot” and ready for battle, it’s justified.
To set up a particle effect, you must point LÖVE to a graphic that is to be used as the actual particles. This particle serves as the raw material for the effect, and there are a few important attributes to set to keep the effect from devouring your processor and spreading particles all over the screen.
Since the particle graphic itself is quite small, this code uses a while loop to place a particle seed along the top edge of any card in the grab table.
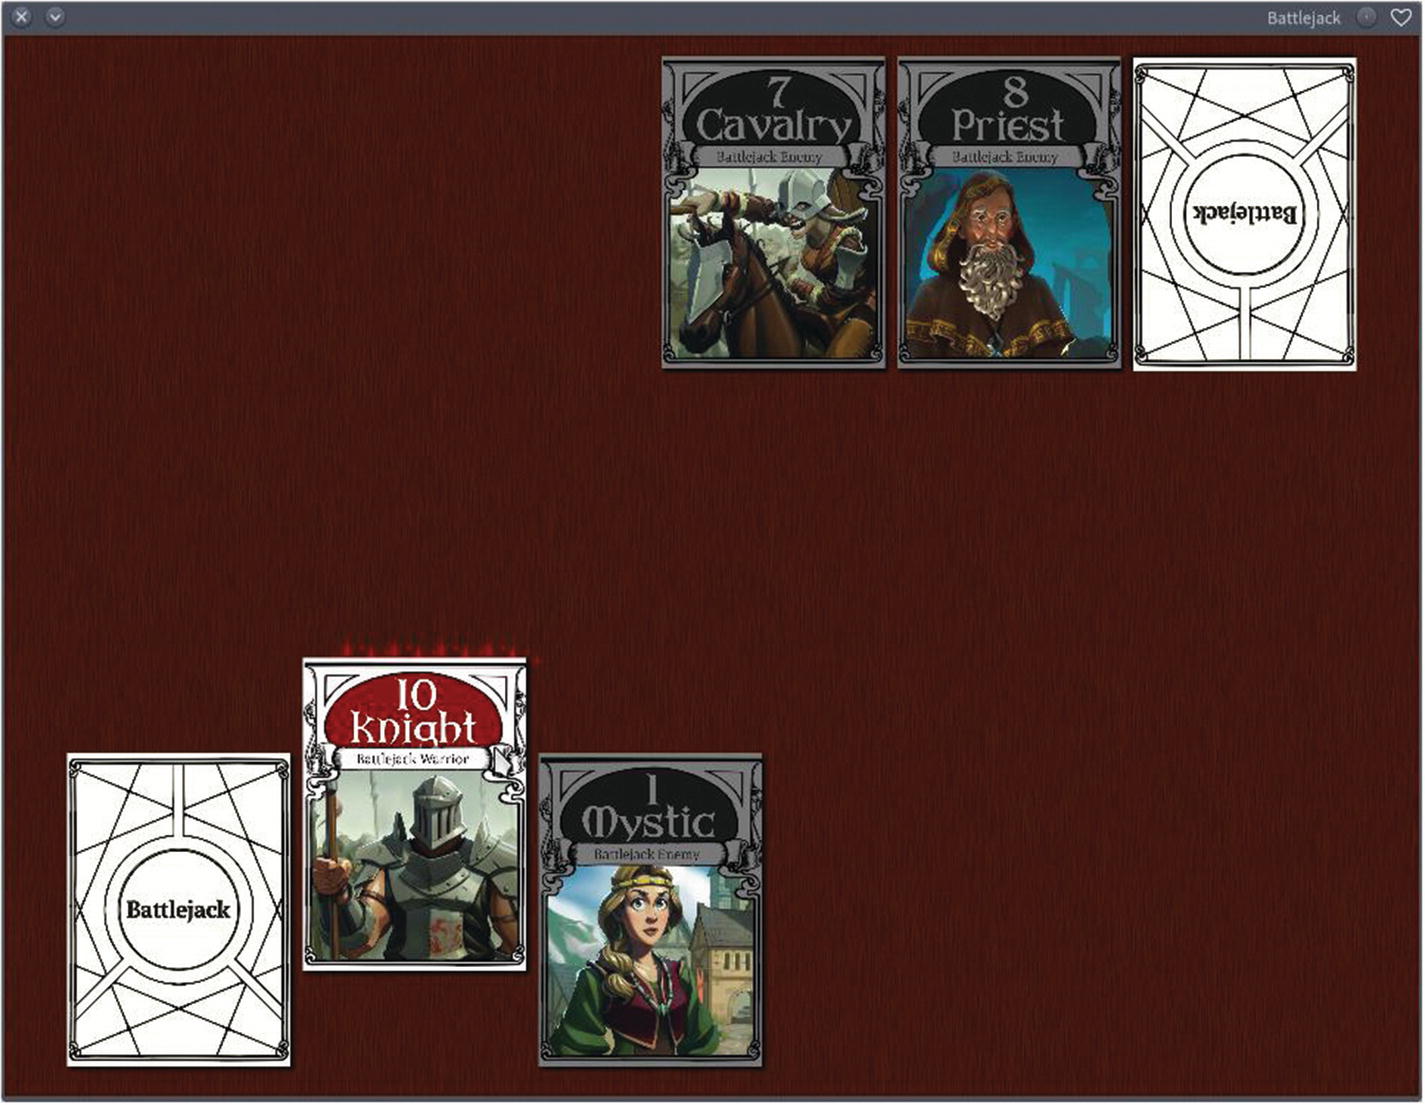
Particle effects used to highlight a selection
Resolving Conflict
To settle the outcome of a card battle, you must compare the player’s cards selected for battle against the AI card being targeted. This happens only if 1 or more cards is present in the grab table, and only when a card in the AI horde has been clicked.
There’s also one important exception to any attack: if the card is a Joker, then all cards in the horde are wiped out.
If you launch your game and draw a few cards, and then press Esc to bring up the menu, and then start a new game, you find that a new game is now, finally, truly a new game.
Resolving battle is still incomplete. Aside from the blast function, it mostly happens within the mousereleased function.
Order is important now. Currently, your mousereleased function checks whether the mouse button is button 1 and then takes action. But the button is always button 1, so new qualifiers are required. For instance, if the mouse button is 1 and there are cards currently grabbed, then check to see if it was a card in the horde table that was clicked. If so, then it’s time to battle. If not, then check that the click was button 1 and that a card in the back table was clicked, and draw a card.
In addition to removing the attacked horde cards, the player’s resources require adjustment. The cards used in the attack are also removed from the player hand. However, this must only happen if the attack is successful, since a player could attempt to attack without enough power to actually remove cards from the field. You must decide through play testing whether a successful attack must be greater than a black card, or if a card that is equal to or greater than a black card is victorious. The sample code here allows for cards both equal in value and greater in value to defeat the opponent.
Launch your game and take out the opposition. There’s no win or lose condition yet, and there may be a few crashes, but the basic mechanic and game play is complete. Your game is now firmly in alpha.