With all of your designs and assets ready, it’s finally time to start coding Battlejack. When you sit down to write code, it’s essential to have the design specs on hand. Here’s a review of how Battlejack works.
When the game launches, the player is greeted with a menu screen that allows the user to start a new game, resume a saved game, adjust settings for full-screen or windowed display, or return to a game already in session.
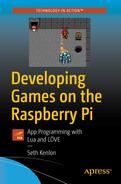
During game play, the user clicks their own deck to draw a card. During their turn, the player clicks and drags cards to either the dealer’s stash to cancel out a card in play, or to their own score box to add their card to their own stash. Onscreen prompts alert the player of their choices Figure 7-1.
Rough draft for the game UI
The first task for this chapter is to build a basic menu screen that successfully proceeds to an empty game screen, with an option to return to the menu screen so a player can save or quit.
Main Framework
Launch Geany and navigate to your battlejack project directory.
Create three new files: main.lua, menu.lua, and game.lua. Since LÖVE always launches a file called main.lua, you must use that as a kind of control center for the different parts of your game. The main.lua file serves as the engine keeping the game open; it invokes the menu and game states.
Your application can only be in one state at a time. A player cannot be in the menu while playing the game. So whenever a game state is activated, it creates a token to designate that it is the current active state.
Your game won’t launch yet, because you’re referencing two empty files, and you call functions that don’t yet exist and use variables that never get set. You fix that in the next section.
Switching Modes
A menu screen needs, at the very least, a few menu selections. It also needs to set the STATE token so that the main loop knows the current game state.
In previous exercises, you have treated all variables equally, but in fact, there are broadly two different kinds of variables: local variables and global variables. A local variable only needs to be used within one Lua file (in other languages, a class), but a global variable can be used across files.
In context of this project, the STATE variable must be a global variable because it is set by either the menu or game, and then is sent back to main for use. Something local to only the menu can be a local variable because no other file in this project ever draws a menu.
Pragmatically, all variables can be global; however, it’s better to differentiate when possible so that your application can manage its memory more effectively.
This code includes a few vital elements: it sets the STATE global variable so that main.lua knows the game state, and it creates the .activate function as a gateway into the menu from the main loop. It also sets up the menu entries.
In this code, you use a for loop to cycle through the number of entries in the menu. For each iteration of the loop, LÖVE prints the corresponding menu entry as defined at the top of the file.
Since the menu is the first and only thing invoked by main.lua, you can now launch your application now to see what you have so far.
The first problem you are likely to notice is that there’s no way to select any of the menu entries. One of the many benefits of LÖVE is its keypressed function , which is perfect for game and menu navigation (this is discussed in the next section).
First, you may as well put in some basic code for the game screen, so that once the menu is operational, you can tell the difference between the menu screen and the game world.
You can’t get there yet, but at least it exists, and with a background color set, you’ll know it when you see it.
Menu Selection
For the player, a visual cue is useful. There are several ways to implement a selection marker for a text menu, but for now, just draw a simple character next to the active entry by checking the value of the selection variable. Of course, at this point, the selection variable can only be 1 because nothing has changed yet in your code; but that won’t be true for much longer.
Update your menu.draw() function so it matches this:
You can launch the game to see the > marker on the first selection.
When a user presses a key on the keyboard, the computer receives a keycode signal. This is known as an input event. Depending on your language and keyboard layout, your operating system translates keycodes to specific letters, numbers, or characters. That’s built into any operating system, and it’s why you can interact with your computer.
The only reason a specific application reacts to a number or character or symbol, however, is because it is programmed to do something when a keypress event is received. LÖVE features the keypressed() function , which listens for keypress events and lets you define what should happen with each keypress event.
For menu navigation, you must define what the menu must do when it receives an Up arrow or a Down arrow event. These events both toggle the active selection, which is currently set to 1 by default. Since the selection variable is set to 1 when the application starts, the active selection is the first in the list. To make the active selection second on the list, the selection variable must be incremented when the Down arrow is pressed, and decremented when the Up arrow is pressed. If you’re good with math, you might detect an exception to this rule already; if not, you’ll discover it soon.
In addition to moving the selection designator around, the menu should respond when the Return key is pressed.
It’s a common convention in games to use the Esc key to call and dismiss a menu screen, so pressing the Esc key goes back to the game screen.
To differentiate when a user is starting a new game and resuming a saved game, the preceding code sample invents some nonexistent functions, such as game.new() and game.load(). It’s alright that these don’t work yet, because you’ll create them later.
If you test the application, you will probably notice that the application crashes if you try to move up from the top selection or down from the bottom selection. If you’re not new to programming, you probably predicted this issue, but if you’re new to all of this, then it’s useful to witness the crash and then to follow the logic and math that causes it.
The selection starts out as 1. Pressing the Down arrow increments selection to 2, then 3, 4, and 5. All of these numbers correspond to the existing five menu entries. If selection gets incremented once more to 6, however, LÖVE doesn’t know what to do because there is no sixth menu entry next to which it can draw the > selection symbol.
To solve this bug, you must catch when selection would normally become either 0 or 6 and impose an existing number. A user would expect a menu selection to wrap: when you scroll past the bottom of a list, the active selection becomes the top of the list.
To do the math to fix a selection that goes out of bounds, create a new function called wrap that requires one argument: the value of selection plus or minus 1, depending on which key was pressed. If that value would result in something less than 1 or higher than menmax, then reset selection to the lowest or highest value, as appropriate, and hand it back to the process that called the function. To save lazy programmers from too much typing, selection is renamed sel for use within this function.
Try your application once more. Scroll through the menu, start a new game, return to the menu, and then quit. The first milestone has been reached: you have the framework that you need for a game and a menu system.
Git
As you have seen by now, there are times during development when an application just can’t be launched, even for testing. Sometimes your code is incomplete, or sometimes you make some choices that render your project unusable. These are all important stages of development, and since it’s through experimentation that most of the really good stuff gets done, it’s not something you ever want to discourage in yourself. And yet, there’s something significant about reaching an important milestone like the one you have just reached. Your project is in a pretty good state right now. Even though there’s really not much to it, your current codebase serves as a solid foundation upon which the rest of the project can be built.
Furthermore, your project is divided into three files at the moment. If you had an assistant, you could save a lot of time by working on the game part and letting your assistant programmer work on the menu part. You’d probably both need access to main.lua, though, so eventually you’d have to come together and figure out what you each added or changed in each file, and then merge your combined work.
In the world of professional software development, this is known as version control, and the most popular version control system right now is Git.
Git was developed when Linus Torvalds and his fellow Linux kernel developers were ejected from a proprietary version control system, and suddenly found that they needed a way to manage lots of changes to hundreds of files between hundreds of developers. The lesson was clear: open source gives the users control of their own data and their own destiny. So, Torvalds developed his own system for managing code. Since then, Git is synonymous with software development. It’s used by Linux, a huge portion of open source projects, Microsoft, Apple, and movie studios (i.e., Weta Digital, Sony, and Industrial Light & Magic), and it’s the backbone of popular coding sites like GitLab and GitHub.
Git has no effect on your application; it’s purely a tracking tool that enables you to maintain fluid backups and different development paths in one place. With Git, you get a running history of your project, with snapshots (called commits in Git terminology) of important moments in each file’s life. This gives you the ability to (figuratively) go back in time and reverse mistakes you made along the way.
Learning Git is more a journey than a destination, but the sooner you start, the better. You already installed Git back when you installed Geany and several other tools, so it’s ready to use.
Tracking
Alternatively, you can use a Git GUI called git-cola. This application is available from dnfdragora, but the latest version available at the time of this writing is included with the this book’s source code. Install the latest version available from these two choices.
The first window prompts you to select either a directory that is tracked by Git or (as in this case) a directory where you want to enable Git tracking. Click the New button and select your project folder. By selecting an untracked directory, you allow git-cola to enable Git tracking of that location.
A directory being tracked by Git is usually called a Git repository, or a Git repo for short.
Adding Files
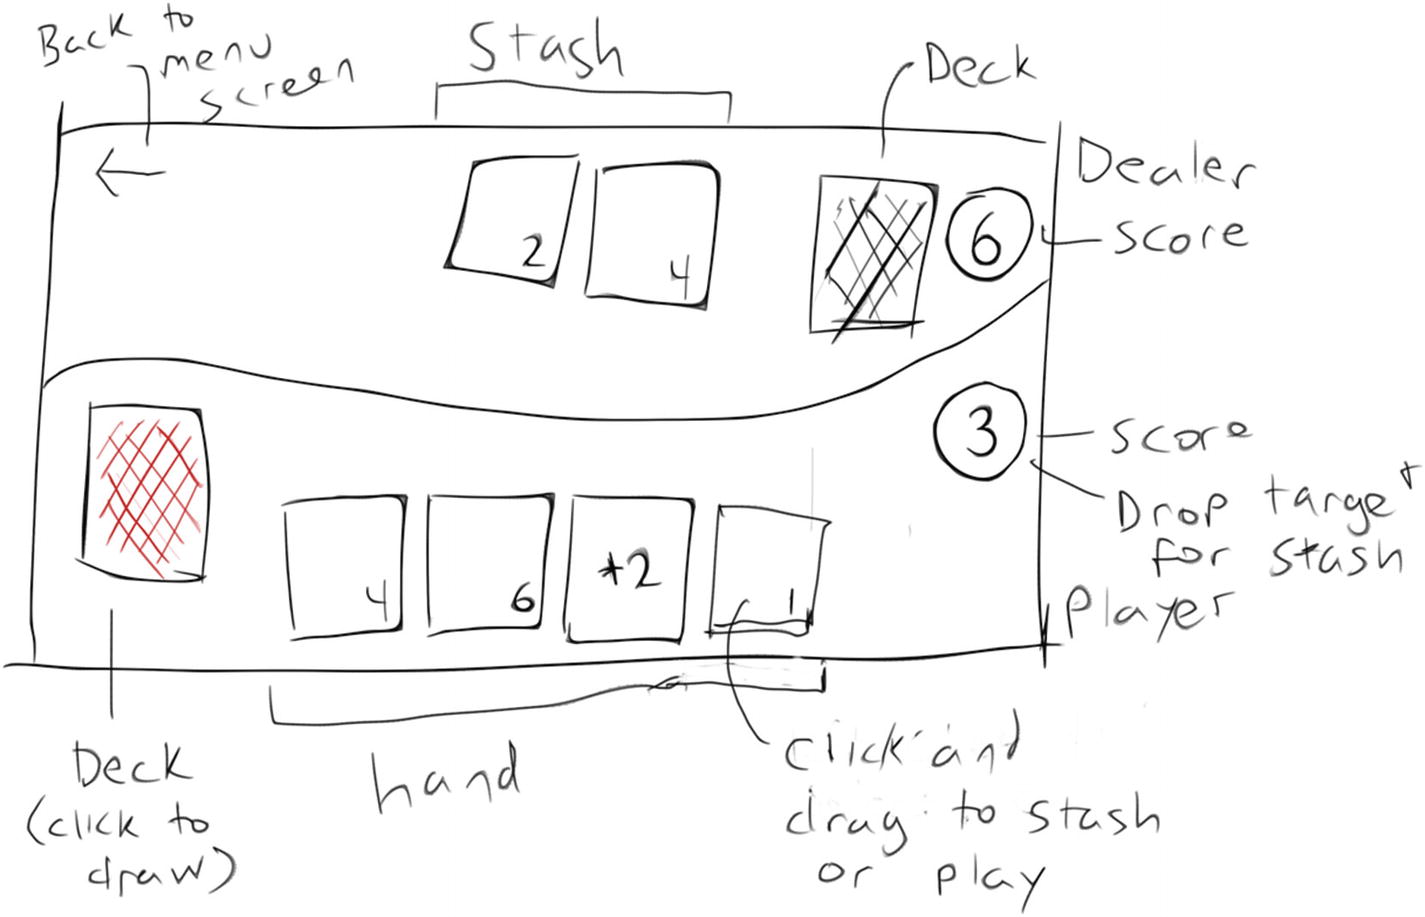
Untracked files in git-cola
If you prefer to work within git-cola, add files by selecting them in the Status pane, and then right-click and select Stage Selected. This stages those files to be committed.
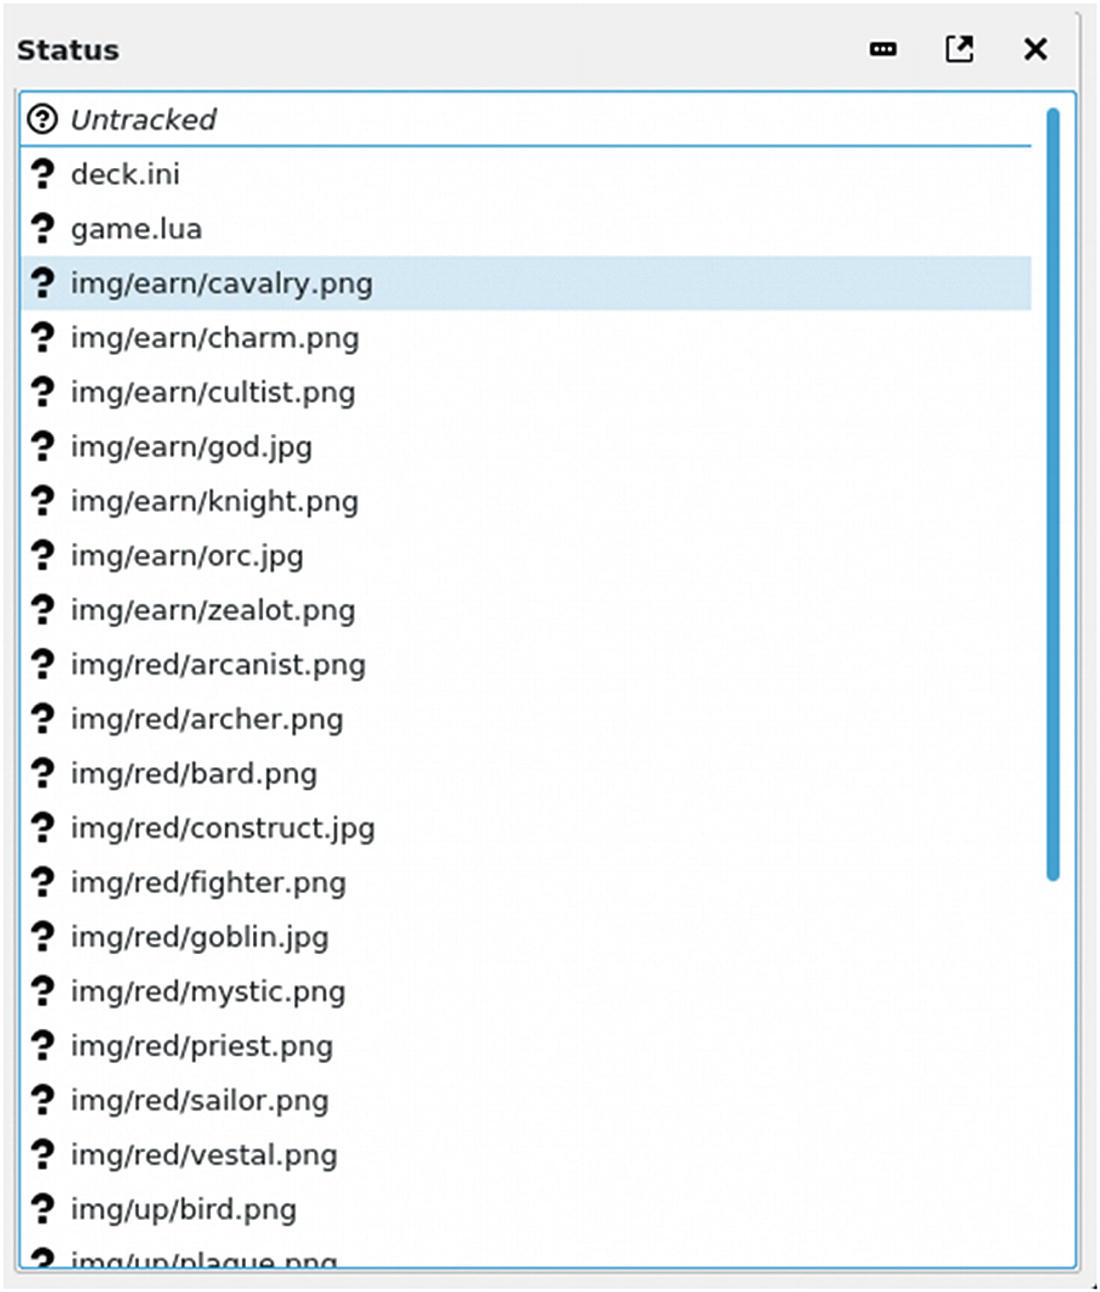
Git commit in git-cola
With your files committed, you can continue to develop with a peace of mind, knowing that if you ever get too far off track, you can always return to this point in your project’s history.
Restoring
With everything safely committed to your Git repository, try breaking your project and then restoring from a previous commit.
Now launch the game and try to start a new game. Previously, starting a new game shows a new screen, but now that you’ve made a bad edit, it crashes LÖVE.
Run your game now and start a new game. The game is back in working order.
To revert a file to the most recent commit using git-cola, find the changed file in the Modified section of the Status pane. Right-click it and select Revert Unstaged Edits.
You’ll get a chance to do more with Git as you continue to work. The next logical step in your game’s development is to focus on the part of the game that really matters: the game!