© Seth Kenlon 2019
Seth KenlonDeveloping Games on the Raspberry Pihttps://doi.org/10.1007/978-1-4842-4170-7_3

3. Modular Programming with LÖVE

Seth Kenlon1 
(1)
Wellington, New Zealand
 

The dice game in Chapter 2 was created in one file. Small programs, usually called scripts, are often only one file, but the larger an application gets, the less convenient it is to write it all in one monolithic file. After all, most large applications aren’t written by just one developer but a whole team, and only one person can work on a file at a time. Game engines are pieces in a modular system, since the engine is useless to users without a game. Additionally, if you keep your code modular, you might be able to reuse a file from one project in the next project.

In this chapter, you set up a typical project directory and program a modular Blackjack game using a custom card dealer library (see Figure 3-1). The game allows a player to click an empty deck of cards to draw a card and compete against the computer in an effort to get as close to 21 without exceeding it. When the player decides to stop drawing new cards for fear of exceeding 21, the player clicks the game table to signal that their hand is complete. The game keeps a running total of card values, and detects and announces a winner. The player may click the deck again to start a new game.
../images/467765_1_En_3_Chapter/467765_1_En_3_Fig1_HTML.jpg
Figure 3-1.

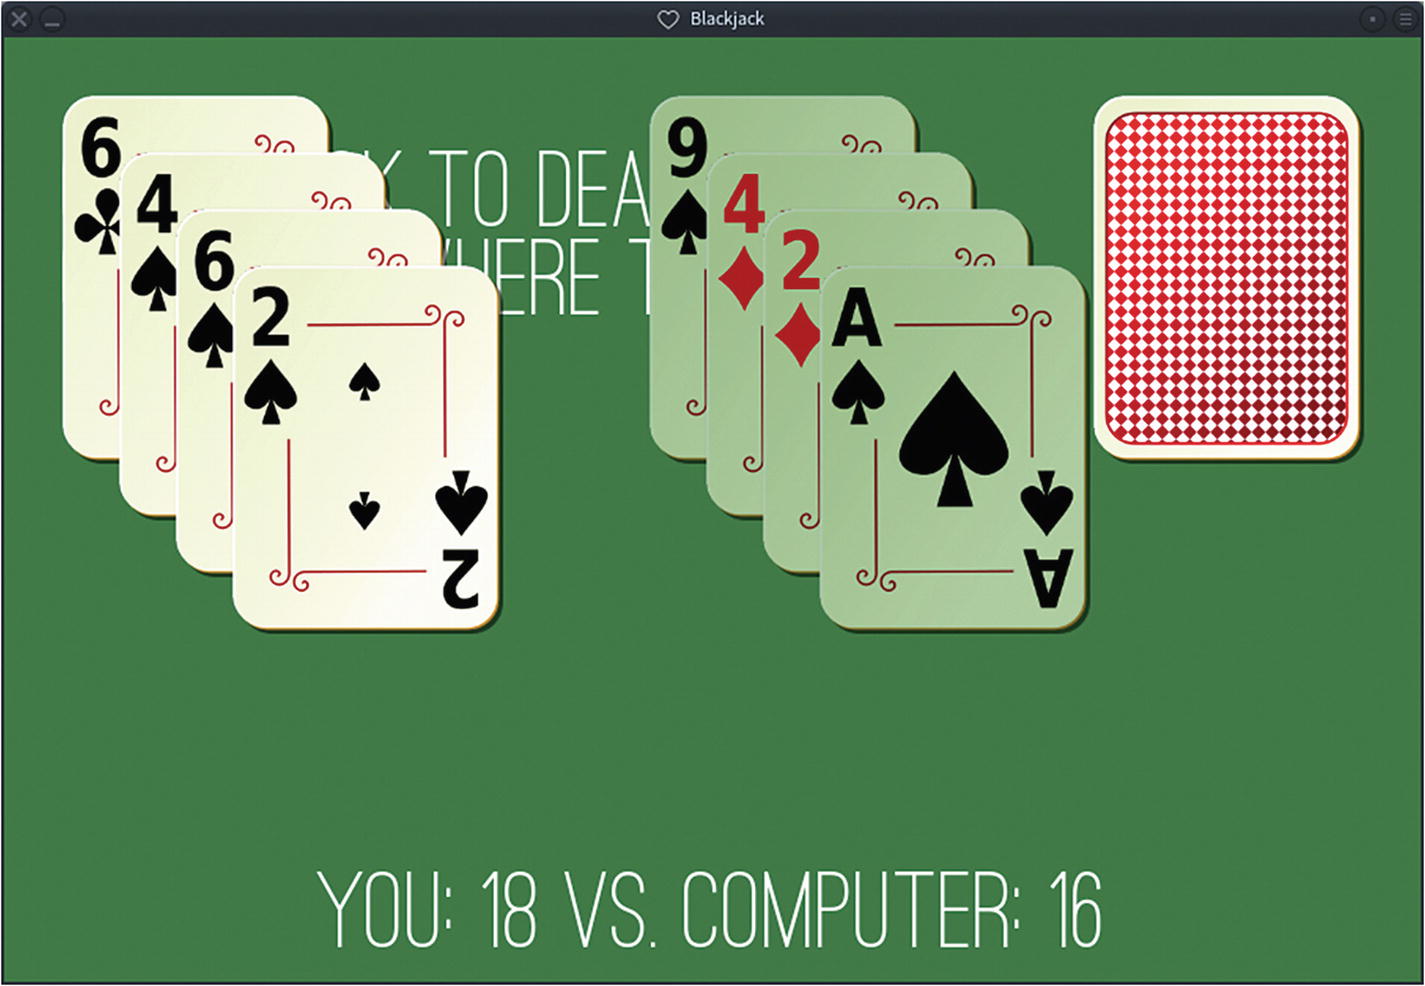
The card game you’re about to make with Lua

Project Directory

There is no rule for how you organize your code, but there is a general convention, especially within the open source software world. You can get a feel for this convention if you browse a few open source projects online, and you’ve already implemented some principles as you created your dice game.

First, your code should have its own directory. You already have a directory called dice in your home folder, so create one for your new game. You can make a new directory from your Enlightenment desktop or in a terminal.
$ mkdir ~/blackjack
For your dice game, you created directories for images and fonts, so create those directories in your new project directory.
$ mkdir ~/blackjack/img
      $ mkdir ~/blackjack/font
One of the primary goals of this project is to learn to use more than one file of Lua code. Your project directory would get pretty untidy if you kept all of your code files in the main folder, so make a directory for your source code. It’s common for source code to be kept in a directory called src.
$ mkdir ~/blackjack/src

That takes care of the obvious folders, but there are also a few files that most people expect to find in a software source directory: README and LICENSE.

A README file tells a casual observer what your project is, what code it contains, and so on. You can create the file now and fill it in later. Give it the .md extension to help online hosting services recognize it as documentation.
$ mkdir ~/blackjack/README.md

The LICENSE file tells anyone looking at your source how they may use your code. There are several varieties of open source licenses, listed in detail at gnu.org/licenses/license-list.html.

As the author of the code, I license the program that you are about to copy and learn from under the GNU Public License version 3 (GPLv3). This grants you permission to redistribute, or even sell, and modify it as you wish, as long as you give everyone else permission to do the same. As open source licenses go, this is a common and sensible agreement: you get to do whatever you want to do with the code as long as you let the next person in line do whatever they want.

Many popular open source licenses are aggregated for convenient download at https://gitlab.com/everylicense/everylicense . As a developer, you use a license every time you start a project, so you may as well have the common ones handy. Since the everylicense project is kept as a Git repository, the process of downloading and keeping it updated is best done with Git, which you installed while setting up your developer environment. The act of downloading a Git project (or repository in Git terminology) from the Internet to your computer is called making a clone. In this command, the \ character allows you to type one command on several lines. If your terminal automatically wraps your text (most do), then you don’t have to type the \ character (but it won’t hurt if you do).
$ git clone \ 
https://gitlab.com/everylicense/everylicense.git \
~/everylicense.clone
Copy the GNU Public License version 3 from the everylicense directory into your code directory, and then rename it LICENSE. You know how to do this in your graphical file manager, but you can do it all in one step from a terminal.
$ cp ~/everylicense.git/gnu_gpl_3/gpl-3.0.txt ~/blackjack/LICENSE

That takes care of all the bureaucracy and preparation. Now you need to build a virtual card deck.

Classes and Objects

In the dice game, you had two dice “objects” to code. An object in code is a little bit like a mold in real life: the code defines the basic properties of an object, and usually allows customization, as needed. Object-oriented programming (OOP) is the prevailing means of developing software today, so learning to structure your code into objects is important, and by the end of this book, it’s something you’ll do naturally.

For the dice game, you coded each object separately because there were only two die. This time, you are writing a game involving 52 playing cards, so it doesn’t make sense to code each card separately, just as programmers in major game studios don’t manually code every single enemy you have to fight.

When a program requires lots of different objects with basically the same properties, you can use a class. A class is a snippet of code—usually stored in its own unique file—that your main program uses as a template when building an object in your game. This template not only generates an object for your program, it creates a whole infrastructure with variables and other properties unique to that one instance of the object.

Open Geany and create a new, empty file called card.lua . Technically, Lua doesn’t have classes, but it has tables that can be treated like classes. You’ve already created a table for the dice game, so some of this process may seem familiar to you.

First, establish a table called Card to represent a single card in a deck. In this case, the table can be empty.
Card = {}

Next, create a function called Card.init (the word init is a common programming term meaning initialize or create). For the dice game, you used functions, such as math.random()and love.load() , included in Lua. This time, you are creating your own function.

The same way the math.random function requires numbers as arguments, your Card function needs to know what kind of card to create. Since that is expected to be different each time you create a card, you use variables to represent them in this template.
function Card.init(suit,value)
    local self = setmetatable({}, Card)
    self.suit = suit
    self.value = value
    return self
end

In this Card.init function , you establish a local variable called self, which uses a special Lua extension called a metatable, as a kind of container for all the properties about that individual instance of a card. A card’s self variable ensures that each card can keep track of whatever makes it unique.

Since each card created gets unique memory out of your computer’s RAM, each one can track properties such as its suit and value. At the end of the creation process, the Card class alerts your main program of its self data, which you can use in your game.

Save the card.lua file and create a new one called main.lua .

A Lua program knows where to look for the standard Lua functions, but Lua doesn’t know anything about your own custom Card class. So that you can use your custom function, you use the require keyword.
require("card")

This prompts Lua to search the current directory for a library called card.

To create a card using your function, create a new variable and invoke your function, along with two arguments: one for the suit you want your new card to belong to and one for the face value.

Since this is just a simple example, you won’t see your card on screen, so use Lua’s print function to print the specifics about the card you have just created.
local card = Card.init("hearts",8)
print(card.suit)
print(card.value)
Use the terminal at the bottom of the Geany interface to run the program.
$ cd ~/blackjack
$ lua ./main.lua
hearts
8
Try adding some more cards, and then print the results.
local card0 = Card.init("hearts",8)
local card1 = Card.init("diamonds",2)
local card2 = Card.init("spades",6)
print(card0.suit .. " " .. card0.value)
print(card0.suit .. " " .. card1.value)
print(card0.suit .. " " .. card2.value)
$ lua ./main.lua
hearts 8
diamonds 2
spades 6

Your class produces, upon request, a card “object.” It’s not a physical object, but it’s a virtual playing card with unique properties from the next. Each “object” is produced by filling a variable with a table containing preset variables that you have defined as an inherent attribute of the object. This is an important principle in modern programming because it lets you make templates for constructs in your program that you want to use over and over again.

Randomized Cards

Now that you have a card-producing Lua library, you must use it in a way that is useful in a game of Blackjack.

Blackjack is a simple game of chance and calculated risk. Each player draws a card and adds it to their hand until they are as close to 21 as possible. When both players are satisfied, they compare their hands. The player closest to 21 wins. If a player goes over 21, they lose.

It’s important for Blackjack to be random. Your dice game also used random numbers, so you know that when producing a random number, you constrain Lua with a minimum and a maximum value. But Lua has no knowledge of playing cards, so you can’t just tell it to randomly pick a suit or a face card. However, you can create a table listing each suit and a table listing each possible face value and then tell the computer to pick from those numbered lists.

Change your main.lua file so that it matches this simple LÖVE project:
require("card")
WIDE = 900
HIGH = 600
suits  = { "hearts","spades","clubs","diamonds" }
values = { "Ace","2","3","4","5","6","7","8","9","10","Jack","Queen","King" }
hand   = {} -- player hand
total  = 0  -- player score
comp   = {} -- computer hand
ai     = 0  -- computer score
love.window.setTitle(' Blackjack ')
love.window.setMode( WIDE,HIGH )
function love.load()
end
function love.draw()
end

This sets up a LÖVE window, an empty table to represent the player and their computer opponent, and a basic skeleton for your code.

This also creates two tables containing card data. Like many languages, Lua can extract an item from a list by number (although unlike many languages, Lua starts counting a list at 1 rather than 0). You can see this at work by launching a Lua shell in a terminal either in the lower pane of Geany or elsewhere on your system.
$ lua
> suits = { "hearts","diamonds","spades","clubs" }
> print(suits[1])
hearts
> print(suits[4])
clubs
You can also analyze the table itself. For instance, with the # symbol, you can see the number of items that are in the table.
> print(#suits)
4
You can also add items to the end of a table.
> suits[5] = "joker"
> print(suits[5])
joker

Since you already know how to get a random value from Lua, you can use your card generator library to produce a card object with a random suit and value.

There are a lot of drawing cards in Blackjack, and there are two players that need cards. If you tried to write the code for a new card every time your game needs to generate a card, you’d end up with hundreds of lines of inefficient code. What your program needs is a card generation function that you can call whenever a new card is required. At the very bottom of your file, enter this code:
function cardgen()
    local c = math.random(1,4)
    local s = suits[c]
    local c = math.random(1,13)
    local v = values[c]
    card = Card.init(s,v)
    return card
end
To use the random function, you must initiate a random seed, so change your love.load() function to
function love.load()
    math.randomseed(os.time())
end

This function creates a temporary variable called c and gives it a random number between 1 and 4. Then it creates another temporary variable called s and uses c to select one item from the suits table. It does basically the same thing with the values table for a variable called v, and then it calls your card generator library to create a new card with whatever random results are in the s and v variables.

At the end of the function, there is a return statement. This means that after the function runs, it outputs information, which can be assigned to a variable.

If a player draws a card, then the player also needs a hand where those cards can be placed. That’s what the empty player and comp tables are for. Add this to the bottom of your file:
function love.mousereleased(x,y,button)
    if button == 1 then
        var = cardgen()
        hand[#hand+1]=var
        total = total+var.value
    end
end

Like your dice game, user interaction is a simple mouse click. The mousereleased function of LÖVE sends a variety of information, including where on the screen the mouse was released, and which physical button on the mouse was released. You don’t have to use the information, but it lets you be precise about what input you want your game to respond to.

In this code, the left mouse button triggers the creation of a new card object by creating a variable called var, which is assigned the output of your card generator function. Your card generator function, of course, calls your card library so that var contains a table detailing the suit and value of a card.

Once the card has been created, the var variable containing the card is copied into the player’s hand. When you add an item to a table, you must add it to the end of the list; so to specify where in the table the new card goes, you use the #hand shorthand to get the current length of the table plus 1.

After the card has been added to the player’s hand, tally up the current total score for the player. The value of each card is contained in the card’s table. The current card is still going by the name var, so you add whatever is contained in total to var.value.

There are still no graphics being drawn, so add some text to help you see that your application is working up to this point. You can use whatever font you want, but this sample code uses Ostrich from TheLeagueofMoveableType.com.

Note

As a courtesy to the person who created the font you use, credit the font in your README file.

function love.load()
    math.randomseed(os.time())
    font = love.graphics.setNewFont("font/ostrich-sans-regular.ttf",72)
    love.graphics.setColor(1,1,1)
end
To print the card and total score on screen, you must loop over each card in the player’s hand table. For each entry in a table, there are technically at least two values: an index number and the actual entry. Lua’s ipairs function unpacks a table for you, placing each pair into two variables of your choice.
function love.draw()
    for i, card in ipairs(hand) do
        love.graphics.clear()
    love.graphics.printf(card.suit .. " " .. total, 0, HIGH-76,WIDE, 'center')
    end
end
At this point, the application runs, but there’s a serious bug. Launch it and see if you encounter the bug. Better still, see if you can identify the problem.
$ cd ~/blackjack/
$ love .

The problem lies in how the cards are scored. Some cards are listed as numbers, but others are face cards. Lua can’t very well add “Jack” to the total score, so it crashes.

The obvious solution to this problem is to change the King, Queen, and Jack values to 10, and the Ace value to 1. However, if the King and Queen and Jack are all changed to 10, there’s no way to tell them apart when randomly choosing which to display.

So instead, create a function to process the cards’ values. In this sample, the value passed to the function becomes c while being processed. That means that when you call the function, it requires an argument. Add this to the bottom of your file:
function face(c)
    if c == "Jack"
    or c == "King"
    or c == "Queen" then
        val=10
    elseif c == "Ace" then
    val=1
    else
    val=tonumber(c)
    end
    return val
end
Use this function before adding the value of a card to the total score so that you are no longer trying to do mathematics on words and numbers. Notice that when you call the face function, you pass var.value to it so that it knows what to process.
function love.mousereleased(x,y,button)
    if button == 1 then
        var = cardgen()
        hand[#hand+1]=var
    val = face(var.value)
    total = total+val
    end
end

Launch your game again. You can keep drawing cards endlessly. No bugs!

Graphics

A game of cards using names and numbers is effective, but not pretty. To make this a real people-pleasing game, you need graphics. Then again, 52 cards are a lot of graphics to come up with. Luckily, a few people on OpenClipArt.org have already done the work for you, posting them as free assets with no recompense required. Download the cards from this book’s code repository, or make your own.

Note

While OpenClipArt.org requires nothing in return, it’s considered good form to credit those who have helped you make a project. For this reason, you should open your README file in Geany and thank the OpenClipArt.org artists whose work you are using: mariotomo, nicubunu, and notklaatu.

Place the .png files in the img folder of your code directory. They must be named in the Value-of-suit.png format; for example, 2-of-hearts.png.

When drawing objects in a window, it’s typically useful to establish variables for padding and scale. These both act as an easy, standard location to make global changes in the event that your screen size changes or you start running out of room. Add these variables to the top of your file (the first two lines are for context):
WIDE = 900
HIGH = 600
pad   = WIDE*0.04
scale = 0.66
When your game uses your card library to generate a new card, it can use these graphics as the card’s visual representation. For that to work, though, your card library must have a space in its table to hold a reference to the appropriate graphic. You did this sort of assignment in your dice game. Open card.lua and change it to look like this:
Card = { }
function Card.init(suit,value)
    local self = setmetatable({}, Card)
    self.suit = suit
    self.value = value
    self.img = love.graphics.newImage( "img/" .. self.value .. "-of-" .. self.suit .. ".png")
    return self
end

Now whenever a new card is created, the card object is assigned a graphic with a filename corresponding to its randomly selected suit and name.

Start with the easy graphic first: the one that doesn’t change. The deck from which a player draws new cards is represented by the back of a playing card. This virtual deck sits in the upper-right corner of the game screen, serving as a visual cue for the player, as well as an actual button. To render this graphic, you must generate a card object for it using your card library; but since it’s only needed once, you create it in the love.load() function .
function love.load()
    math.randomseed(os.time())
    playback= Card.init("card","back")         -- create a deck graphic
    slot = playback.img:getWidth()*scale       -- calculate card sizes
    love.graphics.setBackgroundColor(0.3,0.5,0.3) -- green
    font = love.graphics.setNewFont("font/ostrich-sans-regular.ttf",72)
    love.graphics.setColor(1,1,1)
end

Since your game will draw multiple cards on the screen, it’s helpful to have a variable representing the size of a virtual card. In the preceding code, the slot variable is assigned to the results of the getWidth function performed on the playback card multiplied by the current scale. This allows you to use slot to represent any space occupied by a card. In the real world, you would use inches or centimeters, but those don’t mean much on screens, so for this game, you use slot instead.

In addition to creating the deck and a variable for one unit of card measure, this code sample sets the background of the game window to green.

Next, draw the card deck and some instructions for the player using your new padding and scale variables to control placement. Additionally, instead of just rendering text describing the cards that the player has drawn, you can draw the actual cards by looping through the hand table and drawing whatever image is assigned to each entry.
function love.draw()
    love.graphics.printf("Click deck to deal.",pad,66,WIDE,'left')
    love.graphics.printf("Click anywhere to hold.",pad,122,WIDE,'left')
    love.graphics.draw(playback.img,WIDE-slot-pad,pad,0,scale,scale,0,0)
    for i, card in ipairs(hand) do
        love.graphics.draw(card.img,pad*i,pad*i,0,scale,scale,0,0)
    end
end
The instructions state that a player must click the card deck to draw a card, and click anywhere else to hold, which is Blackjack jargon for not drawing any more cards. So instead of accepting any click as a draw action, limit the “hot” area of the screen to just the location of the deck. To do this, you analyze the X and Y coordinates of each click, which is sent to you automatically by LÖVE’s mousereleased function.
function love.mousereleased(x,y,button)
    if button == 1
    and x > WIDE-slot-pad
    and y < slot*1.5 then
        var = cardgen()
        hand[#hand+1]=var
    val = face(var.value)
    total = total+val
    else
    hold = true
    end
end

Launch your project. The deck should appear in the upper-right corner; the instructions are on the right. If you click the green tabletop, nothing happens, but if you click the card deck, you are dealt a new card. This happens until the cards flow right off the screen.

Competition

Blackjack can be a solitaire game in real life, but people playing competitive computer games usually expect a definitive win and lose condition. That means you need to program an opponent.

According to the Internet, the prevailing opinion on Blackjack is to hold at around 17. This being the only real “strategy” (such as it is), programming an AI is a simple conditional: if the computer’s hand is 17 or higher, then the computer must hold. To make the game a little more exciting, you can make the computer more reckless than popular strategy dictates by setting its hold tolerance to 16 or 15.

The AI’s draw action is basically the same as the player’s, except that the computer’s hand table is called comp and its score is ai.
function love.mousereleased(x,y,button)
    if ai < 16 then
        var = cardgen()
        var = cardgen()
        comp[#comp+1]=var
        val = face(var.value)
        ai = ai+val
        print(var.value)
    end
    if button == 1
    and x > WIDE-slot-pad
    and y < slot*1.5 then
        var = cardgen()
        hand[#hand+1]=var
        val = face(var.value)
        total = total+val
    else
        hold = true
    end
end

Notice that the computer takes its turn before the player. This means that whether or not the player is drawing a card or holding, the computer still has the opportunity to take a turn.

Drawing the computer’s hand on the screen is also basically the same as drawing the player’s hand. It uses a loop over the computer’s hand, with a different offset so that the computer’s cards aren’t rendered on top of the player’s. To further help the player differentiate between hands, add a tint to the computer’s hand.
function love.draw()
    love.graphics.printf("Click deck to deal.",pad,66,WIDE, 'left')
    love.graphics.printf("Click anywhere to hold.",pad,122,WIDE, 'left')
    for i, card in ipairs(hand) do
        love.graphics.draw(card.img,pad*i,pad*i,0,scale,scale,0,0)
    end
    for i, card in ipairs(comp) do
        love.graphics.setColor(0.7,0.8,0.7)
    love.graphics.draw(card.img,(WIDE*0.33)+(76)+(pad*i),pad*i,0,scale,scale,0,0)
    love.graphics.setColor(1,1,1)
    end
    love.graphics.draw(playback.img,WIDE-slot-pad,pad,0,scale,scale,0,0)
end

Just because the computer chooses to hold doesn’t necessarily mean that the player is going to hold, so a hold flag can only be set by the player, which is currently the else statement in the player’s mousereleased action.

Once a player chooses to hold, the game is over. At that point, you could program a pop-up box to ask if the player wants to play another hand. However, when designing an interface, it’s better to default to success as often as possible. A player knows how to exit the game, so there’s no reason to bother them with prompts. That means if the player has decided to hold, the game should just start over. For that to happen, you need a reset function.

For a new game to start, hands and scores must be set back to empty, and the hold flag must be cleared. Your reset function doesn’t need any information and it doesn’t return any data, it just clears everything out when called. Add it to the bottom of your main.lua file.
function reset()
    total = 0
    hand = {}
    comp = {}
    ai = 0
    hold = false
end
It’s good practice to declare globally significant variables early, so add a hold variable set to false at the top of your file. The first two lines are for context.
pad   = WIDE*0.04
scale = 0.66
hold  = false

A reset is called when two things are true: the player has decided to hold, but the player has clicked somewhere on the screen. However, since clicking the table is also a sign to hold, some safeguards need to be introduced to prevent clicking the table from both starting a new game and signaling the end of that new game. A simple way to prevent a premature endgame signal is to ensure that the player has at least one card on the table before flagging a hold or a reset.

Change your mousereleased function to its final version.
function love.mousereleased(x,y,button)
    if hold == true
    and total > 1 then
        reset()
    end
    -- computer
    if ai < 16 then
        var = cardgen()
    var = cardgen()
    comp[#comp+1]=var
    val = face(var.value)
    ai = ai+val
    end
    if button == 1
    and x > WIDE-slot-pad
    and y < slot*1.5 then
    var = cardgen()
        hand[#hand+1]=var
    val = face(var.value)
    total = total+val
    elseif #hand >= 1 then
        hold = true
    end
end

Launch the game to verify that it’s working and to see what’s missing.

Winning

All that’s left now is to detect and declare a winner. Sometimes, it’s easier to detect failure than success, so the first thing you can do is add a watcher function to check whether or not the player has exceeded 21. If ever a player’s hand exceeds 21, then there’s no way for the player to win, so the hold flag can be set immediately to bring the game to an end.

LÖVE’s love.update(dt) function is similar to the love.draw() function , except it doesn’t draw anything on screen, it just runs logic code in the background.
function love.update(dt)
    if tonumber(total) > 21 then
        hold = true
    end
end

The Lua tonumber method is a safeguard to ensure that the content of total is definitely treated as a number and not a string. It’s not very likely that LÖVE would get confused about that, or that total would contain a string, but since it’s a math operation, it doesn’t hurt to ensure that both sides of the equation are numbers.

Detecting a winner is a little more complex. The player wins if
  • Their hand is less than or equal to 21

  • But also greater than the computer’s hand

  • If the computer’s hand is greater than 21

Furthermore,
  • It’s a tie if both hands are equal

  • It’s a bust if both hands are greater than 21

Add a winner function at the end of your file. It returns data about the winner. The if statement happens in the order it is written, so if you check only to see whether the computer’s hand is more than 21, then no other condition in which that is true will ever happen.
function winner()
    if tonumber(total) <= 21
    and tonumber(total) > tonumber(ai) then
    win = "You"
    elseif tonumber(total) <= 21
    and tonumber(ai) == tonumber(total) then
    win = "Tie"
    elseif tonumber(ai) > 21
    and tonumber(total) > 21 then
    win = "Bust"
    elseif tonumber(ai) > 21
    and tonumber(total) <= 21 then
    win = "You"
    else
    win = "Computer"
    end
    return win
end

There can be no win condition unless a hold has either been chosen or imposed, so it’s safe to only call the winner function if hold is true. You can check this in the love.draw() section of your code, using this as an opportunity to display on screen a running total of each hand until a winner is announced.

Add this code to the end of your love.draw() function , just above the final end line. The first line is for context.
    love.graphics.draw(playback.img,WIDE-slot-pad,pad,0,scale,scale,0,0)
    if hold == false then
    love.graphics.printf("You: " .. total .. " vs. Computer: " .. ai, 0, HIGH-76,WIDE, 'center')
    else
    win = winner()
    love.graphics.printf("Winner: " .. win .. "!!", 0, HIGH-76,WIDE, 'center')
    end

The game is complete. Launch it to try it out.

To distribute your new game easily, you can follow the same procedure as you did for your dice game. Zip the files and directories required to play, and then launch from the desktop.
$ cd ~/blackjack
$ zip blackjack.love -r main.lua card.lua font img

Open a desktop window to your blackjack folder and double-click blackjack.love. Your game launches just like any normal application. You can send this file to anyone you want to, and as long as they install LÖVE, they can play your game.

Homework

Here are some tasks to explore after reading this chapter.
  • The computer only gets one final turn if the player holds. Introduce a second hold variable, such as aihold, to detect when the computer has decided to hold, regardless of what the player has done. Calculate the winner only after both the computer and the player have decided to hold.

  • Ostensibly, your deck of cards should only have one of each card in it, but in the current state of the code, there is a chance that the same card could be generated twice. Can you come up with a way to ensure that once a card has been drawn, there is no chance of it being drawn again until the next round? Hint: the answer may involve another set of tables.

  • The Planter application at https://gitlab.com/planter/planter allows you to create project directory templates so that you don’t have to manually set up a project’s skeleton every time you start something new. Try to install it, and then try to use it.