Most Raspberry Pi projects need a display of some kind, unless it is being used as an embedded system. These days there are nice HDMI monitors and nice touch screens available. But these displays still command a fair investment. This chapter will explore inexpensive, used VGA monitors. With the correct type of adapter and Pi configuration, you can repurpose some used VGA LCD screens. VGA monitors will eventually become scarce, but while they last, they are a boon to the maker.
VGA Converters
One of the great things about the Raspberry Pi Zero is that you get a video interface for free (or split the Zero’s price of $5 in two: $2.50 for the Broadcom video core and $2.50 for the CPU). This is a spectacular feature that cannot be matched in the Arduino world.
Using the Pi’s video interface naturally requires a monitor. This chapter explores how to use a VGA monitor on a Raspberry Pi using a VGA converter. VGA monitors can be a bit finicky, however, so I’ll also discuss video settings to allow you tune your Pi to match the monitor.
I purchased an HDMI to VGA converter on eBay for the unbelievable price of $2.80. My own experience with it so far has been very good. There doesn’t seem to be any manufacturer information on the outside. It is possible that it has not been tested against the North American and European radio emissions standards, so buyer beware.
Warning
When shopping on eBay, be careful not to buy a simple cable adapter. You need more than a cable/adapter to make this work, so check the description carefully. Usually the cable/adapter auction information will include a warning that “converter is needed when connected to the PC and TV.”
The unit I purchased includes an electronic converter circuit, which obtains its power from the HDMI cable. The only suitable unit that I am aware of looks like the one in Figure 3-1.
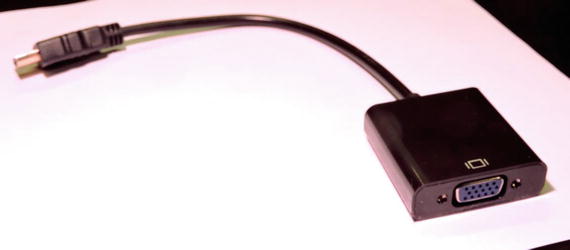
Figure 3-1. HDMI to VGA adapter
I already owned several VGA monitors, but I wondered about general VGA monitor availability. They are bound to be more plentiful presently given that everyone is switching to HDMI monitors. A search on Kijiji quickly confirmed that they can be had for as little as $20 (and probably less by the time you read this). For example, one $20 monitor I found being sold was a Samsung SyncMaster 193V 19-inch LCD monitor. The native resolution was 1280×1024. Such a deal!
With a VGA converter and a cheap VGA monitor, you can strap the Pi on the back of the monitor and have a cheap self-contained display terminal. With the Pi 3, you could have a self-contained Linux terminal with WiFi and Bluetooth.
Resolution and Refresh Rates
Despite that the converter does the heavy lifting, you may need to make some adjustments to the Pi’s display mode to be compatible with your VGA prize. Consider the following monitor spec-related items:
Native and supported resolutions (for example, 1280×1024)
Vertical refresh rate (for example, 75Hz)
Horizontal refresh rate (for example, 81kHz)
If your monitor supports 1024×768 or greater resolution, you may find that you can use the default Pi settings. Install the adapter and boot up the Pi to see whether it works.
If not, don’t give up yet—you may be able to reconfigure the Pi for a lower resolution. The flexibility of Broadcom VideoCore is amazing when you consider the price of the $5 Raspberry Pi Zero or other Pi model.
/boot/config.txt
The all-important config.txt file is located in your /boot partition. Edit that file carefully to instruct the Pi to use different video configurations.
Some have suggested that you need to set the parameter hdmi_force_hotplug=1. I left it commented out in my own testing and didn’t need it. However, if you get a black screen, you may want to set it by uncommenting the parameter line to read as follows:
hdmi_force_hotplug=1 These are the parameters of main concern for your monitor:
hdmi_group
hdmi_mode
The hdmi_group parameter can take one of three values from Table 3-1.
Table 3-1. hdmi_group Values
Value | Description |
|---|---|
0 | Default; use the preferred group reported by the EDID |
1 | Consumer Electronics Association (CEA) |
2 | Display Monitoring Timing (DMT) standard |
The hdmi_mode parameter is much more comprehensive in the range of values possible. Table 3-2 lists hdmi_mode values that are possible when hdmi_group=1 (CEA).
Table 3-2. CEA hdmi_mode Values [1]
hdmi_mode | Resolution | Refresh | Modifiers and Notes |
|---|---|---|---|
1 | VGA | ||
2 | 480p | 60Hz | |
3 | 480p | 60Hz | H |
4 | 720p | 60Hz | |
5 | 1080i | 60Hz | |
6 | 480i | 60Hz | |
7 | 480i | 60Hz | H |
8 | 240p | 60Hz | |
9 | 240p | 60Hz | H |
10 | 480i | 60Hz | 4x |
11 | 480i | 60Hz | 4x H |
12 | 240p | 60Hz | 4x |
13 | 240p | 60Hz | 4x H |
14 | 480p | 60Hz | 2x |
15 | 480p | 60Hz | 2x H |
16 | 1080p | 60Hz | |
17 | 576p | 50Hz | |
18 | 576p | 50Hz | H |
19 | 720p | 50Hz | |
20 | 1080i | 50Hz | |
21 | 576i | 50Hz | |
22 | 576i | 50Hz | H |
23 | 288p | 50Hz | |
24 | 288p | 50Hz | H |
25 | 576i | 50Hz | 4x |
26 | 576i | 50Hz | 4x H |
27 | 288p | 50Hz | 4x |
28 | 288p | 50Hz | 4x H |
29 | 576p | 50Hz | 2x |
30 | 576p | 50Hz | 2x H |
31 | 1080p | 50Hz | |
32 | 1080p | 24Hz | |
33 | 1080p | 25Hz | |
34 | 1080p | 30Hz | |
35 | 480p | 60Hz | 4x |
36 | 480p | 60Hz | 4xH |
37 | 576p | 50Hz | 4x |
38 | 576p | 50Hz | 4x H |
39 | 1080i | 50Hz | Reduced blanking |
40 | 1080i | 100Hz | |
41 | 720p | 100Hz | |
42 | 576p | 100Hz | |
43 | 576p | 100Hz | H |
44 | 576i | 100Hz | |
45 | 576i | 100Hz | H |
46 | 1080i | 120Hz | |
47 | 720p | 120Hz | |
48 | 480p | 120Hz | |
49 | 480p | 120Hz | H |
50 | 480i | 120Hz | |
51 | 480i | 120Hz | H |
52 | 576p | 200Hz | |
53 | 576p | 200Hz | H |
54 | 576i | 200Hz | |
55 | 576i | 200Hz | H |
56 | 480p | 240Hz | |
57 | 480p | 240Hz | H |
58 | 480i | 240Hz | |
59 | 480i | 240Hz | H |
Table 3-3 lists the modifiers used in Table 3-2.
Table 3-3. Modifiers Used in Table 3-2
Flag | Meaning |
|---|---|
H | Means 16:9 variant of normal 4:3 mode |
2x | Pixels are doubled |
4x | Pixels are quadrupled |
R | Reduced blanking, resulting in lower clock rates |
The hdmi_mode values listed in Table 3-4 apply when htmi_group=2 (DMT) [1].
Table 3-4. DMT hdmi_mode Values [1]
hdmi_mode | Resolution | Refresh | Notes |
|---|---|---|---|
1 | 640×350 | 85Hz | |
2 | 640×400 | 85Hz | |
3 | 720×400 | 85Hz | |
4 | 640×480 | 60Hz | |
5 | 640×480 | 72Hz | |
6 | 640×480 | 75Hz | |
7 | 640×480 | 85Hz | |
8 | 800×600 | 56Hz | |
9 | 800×600 | 60Hz | |
10 | 800×600 | 72Hz | |
11 | 800×600 | 75Hz | |
12 | 800×600 | 85Hz | |
13 | 800×600 | 120Hz | |
14 | 848×480 | 60Hz | |
15 | 1024×768 | 43Hz | DO NOT USE |
16 | 1024×768 | 60Hz | |
17 | 1024×768 | 70Hz | |
18 | 1024×768 | 75Hz | |
19 | 1024×768 | 85Hz | |
20 | 1024×768 | 120Hz | |
21 | 1152×864 | 75Hz | |
22 | 1280×768 | Reduced blanking | |
23 | 1280×768 | 60Hz | |
24 | 1280×768 | 75Hz | |
25 | 1280×768 | 85Hz | |
26 | 1280×768 | 120Hz | Reduced blanking |
27 | 1280×800 | Reduced blanking | |
28 | 1280×800 | 60Hz | |
29 | 1280×800 | 75Hz | |
30 | 1280×800 | 85Hz | |
31 | 1280×800 | 120Hz | Reduced blanking |
32 | 1280×960 | 60Hz | |
33 | 1280×960 | 85Hz | |
34 | 1280×960 | 120Hz | Reduced blanking |
35 | 1280×1024 | 60Hz | |
36 | 1280×1024 | 75Hz | |
37 | 1280×1024 | 85Hz | |
38 | 1280×1024 | 120Hz | Reduced blanking |
39 | 1360×768 | 60Hz | |
40 | 1360×768 | 120Hz | Reduced blanking |
41 | 1400×1050 | Reduced blanking | |
42 | 1400×1050 | 60Hz | |
43 | 1400×1050 | 75Hz | |
44 | 1400×1050 | 85Hz | |
45 | 1400×1050 | 120Hz | Reduced blanking |
46 | 1440×900 | Reduced blanking | |
47 | 1440×900 | 60Hz | |
48 | 1440×900 | 75Hz | |
49 | 1440×900 | 85Hz | |
50 | 1440×900 | 120Hz | Reduced blanking |
51 | 1600×1200 | 60Hz | |
52 | 1600×1200 | 65Hz | |
53 | 1600×1200 | 70Hz | |
54 | 1600×1200 | 75Hz | |
55 | 1600×1200 | 85Hz | |
56 | 1600×1200 | 120Hz | Reduced blanking |
57 | 1680×1050 | Reduced blanking | |
58 | 1680×1050 | 60Hz | |
59 | 1680×1050 | 75Hz | |
60 | 1680×1050 | 85Hz | |
61 | 1680×1050 | 120Hz | Reduced blanking |
62 | 1792×1344 | 60Hz | |
63 | 1792×1344 | 75Hz | |
64 | 1792×1344 | 120Hz | Reduced blanking |
65 | 1856×1392 | 60Hz | |
66 | 1856×1392 | 75Hz | |
67 | 1856×1392 | 120Hz | Reduced blanking |
68 | 1920×1200 | Reduced blanking | |
69 | 1920×1200 | 60Hz | |
70 | 1920×1200 | 75Hz | |
71 | 1920×1200 | 85Hz | |
72 | 1920×1200 | 120Hz | Reduced blanking |
73 | 1920×1440 | 60Hz | |
74 | 1920×1440 | 75Hz | |
75 | 1920×1440 | 120Hz | Reduced blanking |
76 | 2560×1600 | Reduced blanking | |
77 | 2560×1600 | 60Hz | |
78 | 2560×1600 | 75Hz | |
79 | 2560×1600 | 85Hz | |
80 | 2560×1600 | 120Hz | Reduced blanking |
81 | 1366×768 | 60Hz | |
82 | 1080p | 60Hz | |
83 | 1600×900 | Reduced blanking | |
84 | 2048×1152 | Reduced blanking | |
85 | 720p | 60Hz | |
86 | 1366×768 | Reduced blanking |
There is a pixel clock limit that limits the highest resolution to 1920×1200 at 60Hz with reduced blanking [2].
After making changes to your /boot/config.txt file, be sure to sync the file system to flush out unwritten disk file changes (even though the system shutdown should normally take care of this). After a reboot, you should be able to test your VGA monitor hookup.
Confirming Resolution
Sometimes after a bootup it is obvious what the new resolution is. At other times, the change can be subtle, leaving you to wonder whether anything actually changed. So, how do you confirm?
The frame buffer set command (fbset), when used with the -s option, can show you information about the current display mode. The following was displayed when I attached my Dell 1707FPT monitor and allowed the Raspberry Pi to default for the display:
$ fbset -smode "1280x1024"geometry 1280 1024 1280 1024 16timings 0 0 0 0 0 0 0rgba 5/11,6/5,5/0,0/16endmode
When configured for low-resolution VGA, I was able to boot with this display mode using a lesser monitor:
$ fbset -smode "640x480"geometry 640 480 640 480 16timings 0 0 0 0 0 0 0rgba 5/11,6/5,5/0,0/16endmode
When choosing video modes for your monitor, be sure to stay within the refresh rate limits of your monitor. They need not be exact, but vertical refresh rates should be close to, but not exceed, the rating.
Summary
The Raspberry Pi Zero is great for its size and price. Attach a low-cost VGA monitor, and you can create a killer project for cheap. The Zero or Pi 3 is small enough that it might even mount the unit inside of the monitor casing. Be sure to check out your local used market for VGA deals. You may even find friends or family willing to give you VGA monitors, knowing that you have a use for them.
Bibliography
“RPiconfig.” RPiconfig. N.p., n.d. Web. 30 Jan. 2016. < http://elinux.org/RPiconfig >.
“Raspberry Pi: Does RPi Support Resolution of 2560x1440?” Raspberry Pi: Does RPi Support Resolution of 2560x1440? N.p., n.d. Web. 30 Jan. 2016. < www.raspberrypi.org/phpBB3/viewtopic.php?f=26&t=20155&p=195417&hilit=2560x1600#p195443 >.