Raspberry Pi computers are attractive for embedded styled solutions due to their small size and low cost. This chapter will draw on earlier chapters to allow you to build a stand-alone embedded music player box.
To expedite the software effort, the MPD/MPC software will be used, which is easily installed on your Pi. The Music Player Daemon (MPD) component is the process that runs in the background to stream the music. The companion command-line control program mpc gives you control of it. Using this combined with a small LCD display, rotary control, and a digital volume control, you can build a small embedded music playing box. The rotary control will choose music selections (or Internet radio stations), the LCD will display the selections chosen, and the volume control sets the volume at the twist of a knob.
Audio Preparation
If you’re already a user of MPD/MPC on your Raspberry Pi, you can skip this section. Otherwise, let’s take a moment to prepare for and install some software.
Raspbian Linux is always being improved upon and updated. If you haven’t done this in a while, it is probably useful to do some updating and upgrade now.
$ sudo apt-get updateThis will update a number of packages that are currently installed. You may also want to upgrade Raspbian with this:
$ sudo apt-get upgradeIf you choose to skip the upgrade step but run into problems with the MPD/MPC software later, then you might want to try again after upgrading.
The next step is to install the MPD software.
$ sudo apt-get install mpd mpcThe MPD package is the daemon that runs in the background and actually performs the streaming of music files or Internet radio stations. The MPD package contains the command-line program mpc, which allows you to control MPD through various command-line options. There will be a number of package dependencies, which will automatically install as part of this. This process is fairly painless.
Next you need to make some decisions about where your sound will be coming out of. I am using the audio output jack of the Pi 3, but others may prefer to play audio to their HDMI device instead (which is the default). Depending upon what you decide, you may have to configure your audio system to get it operational.
There are a couple of helpful commands available to aid you in testing your audio output. One is the aplay command. If you use the find command as follows, you can find several WAV files to try:
$ find /usr/share -name '*.wav'Or you could just try to play the file shown next using the aplay command (see the following text about alsa-utils if aplay is not installed):
$ aplay /usr/share/scratch/Media/Sounds/Electronic/ComputerBeeps1.wavIf everything is working, you should be able to hear audio. If you don’t hear anything yet, don’t panic. It might be working but is muted or at a low volume setting. The easiest way to check this is by using the alsamixer command.
$ alsamixerIf it isn’t already installed, you may need to install it with this:
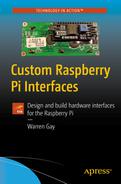
$ sudo apt-get install alsa-utilsThis will bring up a screen that will allow you to view the available sound controls and change the volume. Figure 12-1 shows my Pi’s simple setup.
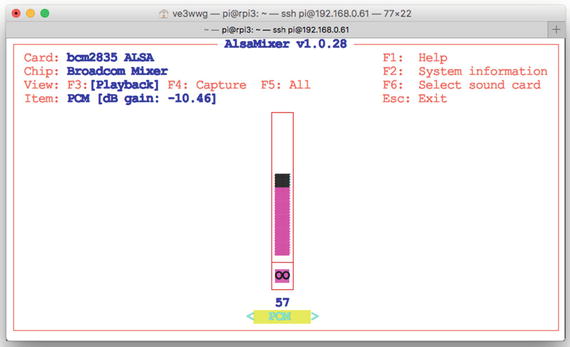
Figure 12-1. The alsamixer command screen
In Figure 12-1, I have only one sound device, labeled “PCM.” The volume shown is 57 percent, and it can be increased by pressing the up arrow key. To exit the program, press the Escape key.
Some Raspberry Pi owners have more discriminating tastes in their audio fidelity and may use devices like the HiFiBerry DAC+ or similar. Because of the broad scope of configuration for audio devices for the Pi, you may have to reach out to forums or seek help through Google.
MPD/MPD
Once you have your audio functional, it is time to try out MPD/MPC. After installing MPD, you should have the file /etc/mpd.conf, which can be tailored to your needs. If you’re running a simple setup like mine, you may want to edit it so that you have an audio device like this:
audio_output {type "alsa"name "My ALSA Device"device "hw:0,0" # optional}
After making MPD configuration changes, you should restart the daemon.
$ sudo service mpd restartThis should get your earphone jack working as a sound source. There is some additional Pi-specific help at [2]. The configuration for MPD can be quite involved, but fortunately the help available on the Internet is plentiful.
Make sure that the daemon is running, either automatically started or manually started. To check that it is running, you can do this:
$ ps aux | grep mpdmpd 530 0.0 2.6 138076 25020 ? Ssl 18:24 0:00 /usr/bin/mpd --no-daemon
If you don’t see it running, you can manually start it with this:
$ sudo service mpd startThe next step is to make sure you have media that can be played. For demonstration purposes, I uploaded a few Mark Knopfler MP3 files to my Pi (a good place for them is in your ∼pi/Music directory). Once you have some music media, you need a playlist. To check your current playlist, use the mpc command.
$ mpc playlistWhen you’re setting this up for the first time, the playlist will be empty. I will be using MP3 music files for this chapter, but you can use streaming Internet services as well. But for simplicity, I advise that you use MP3 files initially.
Note
mpc help will list helpful information for all of the mpc subcommand options.
If you have a playlist already and you want to start over, you can issue the mpc command.
$ mpc clearThis will clear your playlist, which can be verified with the following:
$ mpc playlistThe general way that you add a resource to your playlist is with the following command:
$ mpc add URIThere seems to be no wildcard way to add several MP3 files, so you must use the shell to help.
$ for f in ∼/Music/*.mp3 ; do mpc add "file://$f" ; doneThis causes the bash shell to loop over all MP3 files in the ∼/Music directory, issuing the mpc add command for each file (note the added "file://" in front of the $f variable). The text "file://$f" should always be in double quotes so that spaces in the file name do not cause problems.
Once you have done this, you should be able to display your playlist.
$ mpc playlistMark Knopfler - 5.15 A.M.Mark Knopfler - All That Matters...Mark Knopfler - Postcards from ParaguayDire Straits & Mark Knopfler - Sailing To PhiladelphiaMark Knopfler - Song for Sonny ListonMark Knopfler - Stand Up GuyMark Knopfler - Sucker RowDire Straits & Mark Knopfler - The Long Road (Theme From ''Cal'')Mark Knopfler - The Trawlerman's SongDire Straits & Mark Knopfler - What It IsMark Knopfler - Whoop De DooDire Straits & Mark Knopfler - Why Aye Man
Make sure your volume is established at some reasonable level. This can be controlled through the mpc command, which you will leverage in the demonstration program.
$ mpc volumevolume: 81%$ mpc volume 85volume: 85% repeat: on random: off single: off consume: off
The first command just queries the current volume setting, while the second sets the volume to 85 percent.
To start a particular selection playing, you can indicate the track using a 1-based selection number. The following command starts the fifth playlist item:
$ mpc play 5Mark Knopfler - Boom, Like That[playing] #5/23 0:00/5:49 (0%)volume: 85% repeat: on random: off single: off consume: off
The status of the MPD daemon can be displayed with the status subcommand (which you’ll also use in the demonstration program).
$ mpc statusMark Knopfler - Boom, Like That[playing] #5/23 1:23/5:49 (23%)volume: 80% repeat: on random: off single: off consume: off
Finally, the MPD daemon can be told to stop.
$ mpc stopMany more subcommands and options are available, which can be viewed with the mpc help command. I’ve listed only the bare essentials as they apply to the demonstration program.
Hardware Setup
Before the demonstration C++ code is presented, let’s look at the hardware setup and test each of the components involved. For this project, you have the following hardware elements connected to the Pi 3:
These controls are allocated to the following mpd functions:
The LCD shows the current selection playing, as well as the selection being chosen when the rotary control is moved.
The rotary control allows you to select any selection from your playlist. Choosing selection 0 causes the mpd daemon to stop playing.
The potentiometer is used to set the MPD volume control, from 0 to 100 percent volume.
Figure 12-2 shows my own breadboard setup. The rotary control in the center has the round knob, while the volume control is to the right and can be seen with a chicken-head knob. The ADC PCB for the volume control is at the upper near right of the breadboard in the figure. The PCB to the right of that is the 3V to 5V level converter for the I2C connection to the LCD.
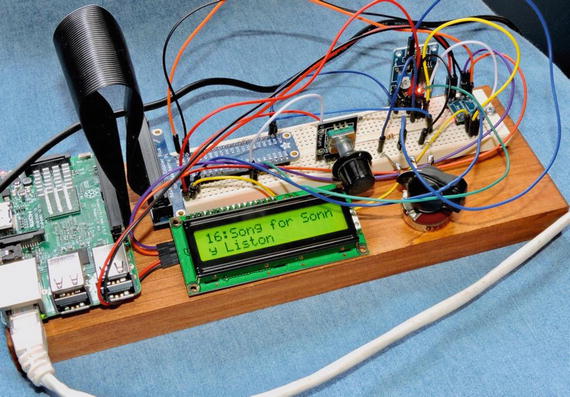
Figure 12-2. MPC hardware setup: LCD, rotary control, and volume control (with chicken-head knob)
While there is much more you could add to this arrangement like a pause push button, and so on, this example was kept basic to make the code simpler to explain. This also leaves an opportunity for you to expand this, adding fast-forward and reverse controls, for example.
The rotary control was wired as used in Chapter 8. Likewise, the LCD wiring was the same as in Chapter 4. Finally, the ADC is wired as presented in Chapter 6. The potentiometer is wired so that the wiper arm goes to the ADC input AIN3 (don’t forget to remove the jumper P6). The other ends of the potentiometer are wired to +3.3 volts and ground (review Chapter 7’s Figure 7-4).
Test Volume Control
The volume control is perhaps the simplest to test first, so wire that up and test it with the readadc program presented in Chapter 6.
$ cd ./pcf8591$ ./readadc230
Adjust the knob and check for a change in successive readings. If the control seems backward, reverse the outer +3.3V and ground connections to the potentiometer.
Test Rotary Control
To make sure you have the rotary control wired up correctly, check it with the yl040c program presented in Chapter 8.
$ cd ./YL-040$ ./yl040cMonitoring rotary control:Step +1, Count 1Step +1, Count 2Step +1, Count 3Step +1, Count 4Step -1, Count 3Step -1, Count 2Step -1, Count 1Step -1, Count 0Step -1, Count -1^C
If you see event messages like these as you rotate the control, then it is operational.
Test LCD
Finally, make sure the 16×2 device is operational. Use the lcd program presented in Chapter 4.
$ cd ./pcf8574$ ./lcd
If the display is operational, you should see the display shown in Figure 4-10.
Caution
Don’t rush the hookup of the LCD device because 5V levels are involved. Make sure the level converter is properly connected before wiring up the Pi’s I2C signals SDA and SCL.
The mpcctl Program
Now that you know the hardware controls are working, you can now compile and run the mpcctl demonstration program. If the program is not yet compiled, do so now.
$ cd ./mpd$ make
If you had to choose different GPIO ports and/or I2C addresses for your hardware, you must customize these in the source code mpcctl.cpp. If, for example, your volume control requires changes, edit the following lines:
023 static const char *i2c_device = "/dev/i2c-1";...025 static uint8_t adc_i2c_addr = 0x48; // I2C Addr for pcf8591 ADC026 static uint8_t adc_i2c_ainx = 3; // Default to AIN3
If your rotary control used different GPIO numbers than the ones I’ve used, edit the following line, changing the values 20 and 21:
305 Flywheel rsw(*gpio,20,21); // Flywheeling controlFinally, if your LCD I2C address is different, then edit the value 0x27 in the following line:
408 LCD1602 lcd(0x27); // LCD classMain Program
This application is written in C++ to take advantage of its library resources (STL) but using only the most basic C++ features to keep the program smaller. The mpcctl program is organized using the following threads of control:
The main program
Thread 1, the rotary control
Thread 2, mpd status update
Thread 3, LCD display
Thread 4, volume control
It is possible to poll all of these controls in one thread, but the code becomes more difficult from a design and readability standpoint. There are also some operations such as loading a playlist that can be time-consuming and can make the controls unresponsive. Having each control managed by its own thread makes the software design simpler. However, the inter-thread interaction requires some special care. As so often is the case, there are many trade-offs.
The STL makes the creation of a thread simple, as you’ll see in Listing 12-1. It requires only that you include the STL thread header file and use the std::thread type.
Listing 12-1. The mpcctl Main Program
016 #include <thread>...243 static void244 update_status() {...269 }...276 static void277 lcd_thread(LCD1602 *plcd) {...297 }...303 static void304 rotary_control(GPIO *gpio) {...372 }...378 static void379 vol_control() {...399 }...405 int406 main(int argc,char **argv) {407 GPIO gpio; // GPIO access object408 LCD1602 lcd(0x27); // LCD class409 int rc;410411 // Check initialization of GPIO class:412 if ( (rc = gpio.get_error()) != 0 ) {413 fprintf(stderr,"%s: starting gpio (sudo?)\n",strerror(rc));414 exit(1);415 }416417 // Initialize LCD418 if ( !lcd.initialize() ) {419 fprintf(stderr,"%s: Initializing LCD1602 at I2C bus %s, address 0x%02X\n",420 strerror(errno),421 lcd.get_busdev(),422 lcd.get_address());423 exit(1);424 }425426 i2c_fd = open(i2c_device,O_RDWR);427 if ( i2c_fd == -1 ) {428 fprintf(stderr,"Warning, %s: opening %s\n",429 strerror(errno),430 i2c_device);431 }432433 lcd.clear();434 puts("MPC with Custom Controls");435 lcd.set_cursor(false);436437 std::thread thread1(rotary_control,&gpio);438 std::thread thread2(update_status);439 std::thread thread3(lcd_thread,&lcd);440 std::thread thread4(vol_control);441442 thread1.join();443 thread2.join();444 thread3.join();445 thread4.join();446447 return 0;448 }
The first thing the main program does is to instantiate the GPIO class (gpio). In the constructor, some code runs that requires root access (hence the need to run the program as setuid).
406 main(int argc,char **argv) {407 GPIO gpio; // GPIO access object
To check on the success of the constructor, you must check for it later with a call to the GPIO::get_error method.
411 // Check initialization of GPIO class:412 if ( (rc = gpio.get_error()) != 0 ) {
Line 412 checks to make sure that the GPIO access was granted. Otherwise, the rotary control will not function.
Immediately after instantiating the GPIO class in line 407, the LCD1602 class is instantiated as lcd with I2C address 0x27. Line 418 checks that the lcd object initialized successfully.
408 LCD1602 lcd(0x27); // LCD class...418 if ( !lcd.initialize() ) {
For the benefit of the volume control, the I2C bus defined at line 023 is opened and saved as i2c_fd in line 024.
023 static const char *i2c_device = "/dev/i2c-1";024 static int i2c_fd = -1;...426 i2c_fd = open(i2c_device,O_RDWR);427 if ( i2c_fd == -1 ) {
The volume control has been coded as an optional device. A warning is issued if the PCF8591 ADC is not found.
433 lcd.clear();434 puts("MPC with Custom Controls");435 lcd.set_cursor(false);
These lines simply clear the LCD and turn off the LCD cursor.
The main program then creates four threads of control.
437 std::thread thread1(rotary_control,&gpio);438 std::thread thread2(update_status);439 std::thread thread3(lcd_thread,&lcd);440 std::thread thread4(vol_control);
The function rotary_control is passed the address of the instantiated GPIO object, since it will need it to read two inputs. Likewise, function lcd_thread also receives a pointer to the instantiated LCD1602 object. The other two threads, update_status and vol_control, receive no arguments.
At this point, these four thread functions run in parallel within the same process memory space. Since the Pi 2 and 3 have four cores, it is possible that these functions truly execute simultaneously at times. An htop display in Figure 12-3 illustrates the executing threads and their CPU utilization.
Figure 12-3. Sample htop display of the mpcctl program executing
Modifying the usleep(3) calls in the code will increase or decrease the CPU utilization. With increased sleep times, the CPU overhead decreases but normally at the cost of responsiveness of the controls.
The remainder of the main program is a series of joins.
442 thread1.join();443 thread2.join();444 thread3.join();445 thread4.join();
These block the main thread from continuing until those threads terminate. With the mpcctl.cpp code as written, this never happens. This program could be enhanced to set a shutdown flag for all the threads and have them terminate. Then the main program would successfully join and exit. That is left as an exercise for you.
When you want the program to exit, just press Control-C. This will kill all threads and the main program simultaneously.
Rotary Encoder Thread
Listing 12-2 shows the rotary encoder thread. The pointer to the main program’s GPIO object is passed into the thread by a pointer gpio.
Listing 12-2. The Rotary Encoder Thread
303 static void304 rotary_control(GPIO *gpio) {305 Flywheel rsw(*gpio,20,21); // Flywheeling control306 std::string title; // Current playing title307 time_t last_update, last_sel;308 std::vector<std::string> playlist;309 int pos = 0, of = -1, last_play = -1;310 int rc;311312 // Initialize:313 load(playlist);314 get_mpc_status(title,pos,of);315 if ( pos >= 0 )316 last_play = pos;317 last_update = last_sel = time(0);318319 for (;;) {320 rc = rsw.read(); // Read rotary switch321 if ( rc != 0 ) { // Movement?322 // Position changed:323324 if ( current_pos > -1 ) {325 pos = current_pos; // Now playing a different tune326 current_pos = -1;327 }328329 if ( playlist.size() < 1 ) {330 put_msg("(empty playlist)");331 } else {332 pos = (pos + rc);333 if ( pos < 0 )334 pos = -1;335336 if ( pos >= int(playlist.size()) )337 pos = playlist.size() - 1;338339 if ( pos >= 0 ) {340 std::stringstream ss;341 ss << (pos+1) << '>'<< song_title(playlist[pos].c_str());342 std::string text = ss.str();343344 put_msg(text.c_str());345 } else {346 put_msg("(Stop)");347 }348 last_sel = time(0);349 }350 } else {351 // No position change352353 time_t now = time(0);354 if ( now - last_update > 60 ) {355 // Everything 60 seconds, update the356 // playlist in case it has been changed357 // externally358 load(playlist);359 last_update = now;360 } else if ( now - last_sel > 1 ) {361 // Start playing new selection362 if ( last_play != pos ) {363 mpc_play(title,pos,of);364 last_play = pos;365 }366 last_sel = time(0);367 }368369 usleep(200); // Don't eat the CPU370 }371 }372 }
The Flywheel class is instantiated in line 305, using GPIO pins #20 and #21.
305 Flywheel rsw(*gpio,20,21); // Flywheeling controlAs part of the thread initialization, it performs the function load() to load the playlist into the std::vector<std::string> container named playlist. Then the current title (if any), position (pos), and number of playlist entries (of) are returned through pass-by-reference arguments to the call to get_mpc_status(). All of this information comes from executing the mpc command using a pipe (more about this later).
313 load(playlist);314 get_mpc_status(title,pos,of);
The main loop of this thread begins here:
319 for (;;) {320 rc = rsw.read(); // Read rotary switch321 if ( rc != 0 ) { // Movement?322 // Position changed:
Here you read the rotary switch in line 320 and check to see whether there were any rotation events (variable rc). If so, you enter the block of code starting with line 322.
There is a somewhat difficult interaction between what is playing now and the rotary control. If the control has not been touched for one or more tracks, you could be at a selection point beyond what you last recorded in the local variable pos. So, you share the variable current_pos between the thread update_status() and the rotary_control() threads.
029 static volatile int current_pos = -1; // Last song playing statusNote the volatile attribute for current_pos. Without this attribute, compiler optimization in one thread may not see a change made by another thread because of holding the value in a register. In this program, you don’t use a mutex for this value, since the read or write of an int value is atomic on this platform. Otherwise, this is considered bad practice and would not be permitted in mission-critical software. In this program, you want to avoid threads interlocking more than is necessary because that affects the responsiveness of the controls.
With that background, you arrive at the following code:
324 if ( current_pos > -1 ) {325 pos = current_pos; // Now playing a different tune326 current_pos = -1;327 }
The thread examines current_pos, and if it’s found to be greater than or equal to zero, it knows that a new selection has been established by the other thread. When this happens, you reset the local variable pos to that value and perform the rotary adjustment based upon that. Otherwise, line 332 just adjusts the selection as per usual.
332 pos = (pos + rc);With the rotary adjustment made, you update the LCD display.
341 ss << (pos+1) << '>'<< song_title(playlist[pos].c_str());342 std::string text = ss.str();343344 put_msg(text.c_str());
The 16×2 LCD is rather limited for space, and the rotary control thread shares the display with the update_status() thread. That thread shows the current title playing. In the display, the > is used for rotary control updates.
18>Sucker RowThe now-playing display uses a colon (:).
18:Sucker RowWhen there is no rotary control movement, the else block starting at line 350 is performed. The code updates its playlist every minute with the code in lines 354 to 359. The main drawback to this is that this can cause a pregnant pause in reaction to rotary control movement, should that begin during this load. If you have no plans to update the playlist external to mpcctl, then this code block can be commented out.
The next block checks to see whether the position has changed. If so, it tells the MPD to start playing a new selection (line 363). This is tricky because you don’t want to issue play commands while the control is still rotating. So, the code checks to see whether at least one second has passed in line 360, without further rotary events.
360 } else if ( now - last_sel > 1 ) {361 // Start playing new selection362 if ( last_play != pos ) {363 mpc_play(title,pos,of);364 last_play = pos;365 }366 last_sel = time(0);367 }
Finally, at the end of the rotary control thread, you give up the CPU for a short period of time (200μsec) to allow other processes to run.
369 usleep(200); // Don't eat the CPULowering this value increases the rotary control responsiveness but eats more CPU cycles. Lowering this time reduces CPU overhead, but the flywheeling effect is usually the first casualty.
LCD Thread
The purpose of this thread is to update the LCD display. It must arbitrate the requests of different threads wanting to display. The LCD thread operates in a lazy loop, as shown in Listing 12-3.
Listing 12-3. The Lazy LCD Thread
276 static void277 lcd_thread(LCD1602 *plcd) {278 LCD1602& lcd = *plcd; // Ref to LCD class279 std::string local_title;280 bool chgf;281282 for (;;) {283 mutex.lock();284 if ( disp_changed ) {285 disp_changed = false;286 chgf = local_title != disp_title;287 local_title = disp_title;288 } else {289 chgf = false;290 }291 mutex.unlock();292293 if ( chgf ) // Did info change?294 display(lcd,local_title.c_str());295 else usleep(50000);296 }297 }
This thread is passed a pointer to the LCD1602 class through argument plcd. This is then assigned to the reference variable in line 278 so that access is as if the class was declared locally as lcd. This isn’t required but is more convenient than working with a pointer.
The lazy loop starts in line 282. For safe access to the title to be displayed, a mutex named aptly as mutex is locked in line 283.
031 static std::mutex mutex; // Thread lock032 static volatile bool disp_changed = false; // True if display changed033 static std::string disp_title; // Displayed title...282 for (;;) {283 mutex.lock();284 if ( disp_changed ) {285 disp_changed = false;286 chgf = local_title != disp_title;287 local_title = disp_title;288 } else {289 chgf = false;290 }291 mutex.unlock();
Since disp_title is an object of type std::string, you must use a mutex for multithreaded access to it. The std::string object will be calling upon malloc(3) and realloc(3) for buffer management, so this is not something that should be interrupted.
So, line 283 blocks until exclusive access is granted to the calling thread. Then the Boolean value disp_changed is checked, and when true, the new disp_title value is copied to local variable local_title. The local variable chgf is also set to true in this case (line 286). Otherwise, chgf is set to false (line 289). At the end of the block, the mutex is unlocked so that other threads can acquire the lock (line 291).
When the flag chgf is true, you then update the LCD display using a helper function named display() in line 294. Otherwise, the thread sleeps for 50ms.
293 if ( chgf ) // Did info change?294 display(lcd,local_title.c_str());295 else usleep(50000);
Listing 12-4 shows the helper display routine.
Listing 12-4. The Helper Function display()
221 static void222 display(LCD1602& lcd,const char *msg) {223 char line1[17], line2[17];224225 puts(msg);226227 strncpy(line1,msg,16)[16] = 0;228 lcd.clear();229 lcd.set_cursor(false);230 lcd.putstr(line1);231232 if ( strlen(msg) > 16 ) {233 strncpy(line2,msg+16,16)[16] = 0;234 lcd.moveto(2,0);235 lcd.putstr(line2);236 }237 }
The purpose of this routine is to split the text supplied in msg into two 16-character segments in buffers line1 and line2. Line 225 just copies msg to standard output as is. But lines 227 to 230 extract line1 for the LCD display.
If there is a line 2, lines 232 to 236 are performed to display it.
MPC Status Thread
Another of the executing threads is the one that checks the currently playing track. It is presented in Listing 12-5.
Listing 12-5. The Update Now Playing Status Thread
243 static void244 update_status() {245 time_t now;246 std::string title;247 int cpos = 0, epos = -1;248249 for (;;) {250 now = time(nullptr);251252 // While status info is stale253 while ( now - changed > 1 ) {254 changed = now;255256 if ( get_mpc_status(title,cpos,epos) ) {257 if ( cpos >= 0 ) {258 std::stringstream ss;259260 ss << (cpos+1) << ':' << song_title(title.c_str());261 put_msg(ss.str().c_str());262 } else {263 put_msg(title.c_str());264 }265 }266 }267 usleep(10000);268 }269 }
This thread executes a loop starting in line 249. It checks the current time in line 250 and then determines how many seconds have elapsed since the last change (variable changed in line 253). If there has been at least one second elapsed since the last change, the helper routine get_mpc_status() is called in line 256. Arguments title, cpos, and epos are passed by reference and are updated by the function call. If a non-negative cpos value is returned, you send a “now playing” message to the LCD by calling put_msg(). If the value of cpos is negative, it is a message like “Stopped” and is displayed in line 263.
The helper routine put_msg() is used to provide the message to the display thread safely.
090 static void091 put_msg(const char *msg) {092093 mutex.lock(); // Lock mutex094 if ( strcmp(msg,disp_title.c_str()) != 0 ) {095 disp_title = msg; // Save new message096 disp_changed = true; // Mark it as changed097 }098 changed = time(0); // Hold off status update099 mutex.unlock();100 }
The mutex is locked in line 093, and a check is made in line 094 to see whether the message is any different than the one you have already. If it differs, then disp_title is set to the new message and the value disp_changed is set to true. The time held in variable changed is updated to the current time.
Volume Control Thread
The last main component is the volume control thread. This is another lazy thread, which quietly determines whether the potentiometer has changed in value. The thread is presented in Listing 12-6.
Listing 12-6. Volume Control Thread Within mpcctl.cpp
378 static void379 vol_control() {380 int pct, last_pct = -1;381382 for (;;) {383 pct = read_volume();384 if ( pct != last_pct ) {385 std::stringstream ss;386387 ss << "mpc volume " << pct << " 2>/dev/null 0</dev/null";388 FILE *pfile = popen(ss.str().c_str(),"r");389 char buf[2048];390391 while ( fgets(buf,sizeof buf,pfile) )392 ; // Read and discard output, if any393 pclose(pfile);394 last_pct = pct;395 } else {396 usleep(50000); // usec397 }398 }399 }
The main loop starts in line 382, checking the potentiometer reading. The value returned is in percent (variable pct). If this value has changed, then the code in lines 385 to 394 are performed to change the mpd volume. The string stream ss (line 385) is used to construct a command of the following format:
mpc volume <pct> 2>/dev/null 0</dev/nullwhere the percentage value is supplied in place of <pct> in the previous line. A read pipe is opened in line 388.
388 FILE *pfile = popen(ss.str().c_str(),"r");For non-C++ folks, the ss.str() converts the string stream to a std::string. The appended method .c_str() converts that to a C string that popen(3) can use. The second argument indicates that you will read ("r") from the command pipe. While there is no data of interest in this case, you read and discard any lines of data in lines 391 and 392. If you were to prematurely close the pipe, this might kill the mpc command that you started with a SIGPIPE signal.
Finally, line 393 closes the pipe using pclose(3). Don’t make the mistake of using fclose(3) for an open pipe. Since popen(3) performs a fork(2) to create a new process (the mpc command), one of the wait system calls must be called to clean up the process status held by the kernel. The pclose(3) performs this necessary housekeeping. Failure to do this will result in zombie processes.
Program Summary
Much effort was put into keeping this demonstration program small, but you can see how complexity collects like a magnet. Yet, by breaking the process into four threads, some of the complexity is reduced, with the individual functions becoming four relatively simple threads. The alternative would be a complicated state machine.
Let’s summarize how mpcctl.cpp controls the Music Player Daemon using the mpc command and the popen(3) library function (for lines not shown earlier, view the source file mpcctl.cpp):
mpc volume <pct> (line 388), set volume
mpc status (line 159), query status and “now playing”
mpc playlist (line 173), load the playlist into mpcctl
mpc play <selection> (line 205), start the playing of a selection
mpc stop (line 206), stop playing
The alternative to using the mpc command, which communicates with the mpd daemon process, is to use the libmpd library. But the investment in code development for that approach is much higher.
Summary
This chapter presented an embedded Raspbian application involving a hardware rotary selection control, a small dedicated LCD, and a volume control. This is just the beginning of what is possible. For example, you could add a pause push button and fast-forward/backward controls. The latter could be accomplished with another rotary control that includes a push button. Push to pause or rotate to go forward/backward in a given track.
For an application like this, it is easy to see how custom hardware controls are far superior to using a standard computer keyboard and mouse. Your largest challenge may lie in knowing when to stop adding to the custom controls design.
Bibliography
“Music Player Daemon.” Atom News. N.p., n.d. Web. 29 Oct. 2016. < https://www.musicpd.org/ >.
“Rpi Music Player Daemon.” ELinux.org. N.p., n.d. Web. 31 Oct. 2016. < http://elinux.org/Rpi_Music_Player_Daemon >.