Table of Contents for
Packet Analysis with Wireshark
 Packet Analysis with Wireshark
Published by
Packt Publishing, 2015
Packet Analysis with Wireshark
Published by
Packt Publishing, 2015
- Cover
- Table of Contents
- Packet Analysis with Wireshark
- Packet Analysis with Wireshark
- Credits
- About the Author
- About the Reviewers
- www.PacktPub.com
- Preface
- What you need for this book
- Who this book is for
- Conventions
- Reader feedback
- Customer support
- 1. Packet Analyzers
- Introducing Wireshark
- Other packet analyzer tools
- Summary
- 2. Capturing Packets
- Troubleshooting
- Wireshark user interface
- Wireshark features
- Tcpdump and snoop
- References
- Summary
- 3. Analyzing the TCP Network
- TCP connection establishment and clearing
- TCP data communication
- TCP close sequence
- Lab exercise
- TCP troubleshooting
- TCP latency issues
- Wireshark TCP sequence analysis
- References
- Summary
- 4. Analyzing SSL/TLS
- The SSL/TLS handshake
- Key exchange
- Decrypting SSL/TLS
- Debugging issues
- Summary
- 5. Analyzing Application Layer Protocols
- BOOTP/DHCP
- DNS
- HTTP
- References
- Summary
- 6. WLAN Capturing
- Analyzing the Wi-Fi networks
- Wi-Fi sniffing products
- Summary
- 7. Security Analysis
- The DOS attack
- Scanning
- ARP duplicate IP detection
- DrDoS
- BitTorrent
- Wireshark protocol hierarchy
- Summary
- Index
So far, we have seen packets captured on Ethernet. In this chapter we will learn how to capture WLAN network traffic, and use effective display filters for all the frames, by covering the following topics:
- WLAN (802.11) capture setup and the monitor mode
- 802.11 capturing with tcpdump
- 802.11 display filters
- Layer-2 datagram frame types and Wireshark display filters
- 802.11 auth process
- 802.1X EAPOL
- 802.11 protocol stack
Wireshark depends on the operating system on which it's running (and on the drivers for the wireless adapter) for monitor mode support.
For Linux, the 802.11 wireless toolbar (View | Wireless Toolbar) provides excellent options to enable the monitor mode and set the channel for cfg80211 devices. This even supports multiple network interfaces for multi-channel captures; refer to https://wiki.wireshark.org/CaptureSetup/WLAN for detailed instructions.
The MAC OS has a wireless adapter, and the monitor mode is supported. On Windows, the monitor mode is not supported; you need a commercial adaptor for this, such as the AirPcap USB adapter.
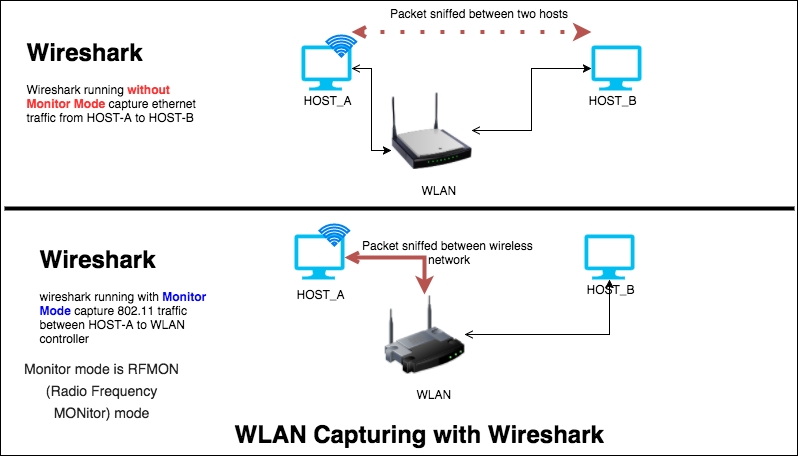
The WLAN (IEEE 802.11) capturing process is slightly different from capturing Ethernet traffic in Wireshark. By default, when we start capturing traffic in a Wi-Fi network, it captures traffic between two endpoints (HOST-A and HOST-B). To capture the Wi-Fi traffic, Wireshark has to run in the monitor mode—RFMON (Radio Frequency Monitor) mode—which allows a computer with a wireless network interface controller (WNIC) to monitor all traffic received from the AP (Access Point), as shown in the screenshot:
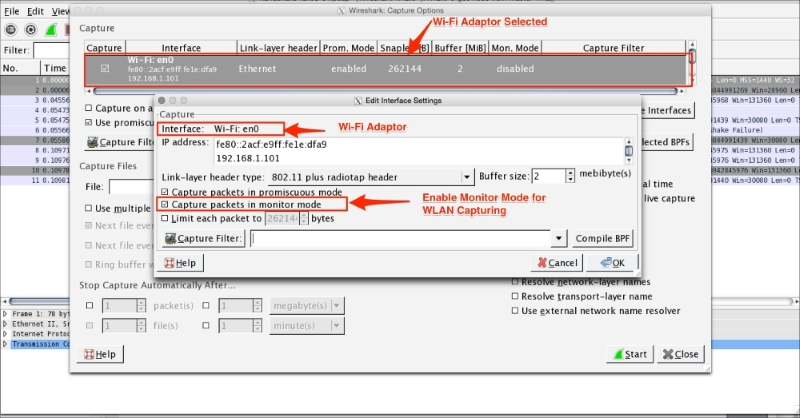
The monitor mode is supported only on IEEE 802.11 Wi-Fi interfaces, and only on some operating systems. To enable the monitor mode in a Wi-Fi interface, perform these steps in Wireshark:
- Click on Capture | Options.
- Select the active Wi-Fi adaptor. Double-click on the interface setting; a window will appear.
- Enable the Capture packets in Monitor mode option.
- Click on OK.
- Start the capture.
You should see the following screen:
When the monitor mode is on, the adapter captures all the packets transmitted on the channel. These include:
- Unicast packets
- Broadcast packets
- Control and management packets
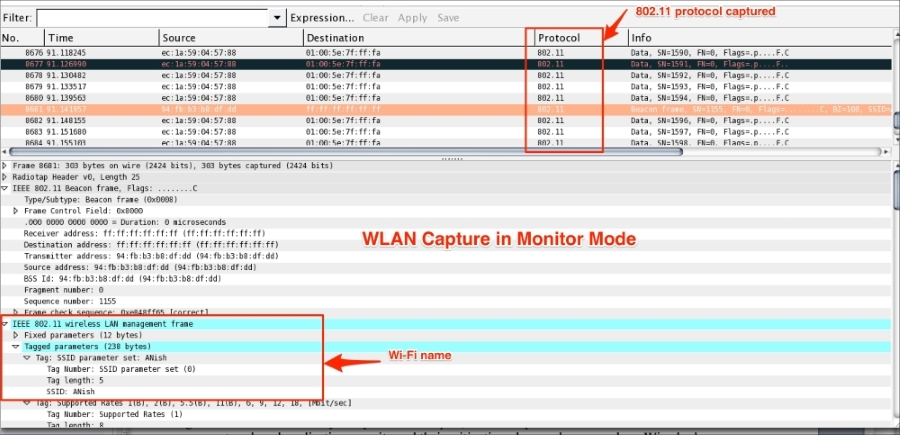
Once the packet capture starts, Wireshark will start displaying the 802.11 protocol packet exchange between source and destination, as shown in the following screenshot (or open the packet capture 802.11.pcap file in Wireshark). Packet capture in the monitor mode will not be associated with any of the access points and the user can see only 802.11 frames, which include non-data (management and beacon) frames, as shown:
To perform a wireless packet capture using tcpdump, execute the following command. The tcpdump with –I option will turn the monitor mode on:
bash $ tcpdump -I -P -i en0 -w 802.11.pcap
The output obtained is as follows:
tcpdump: WARNING: en0: no IPv4 address assigned
tcpdump: listening on en0, link-type IEEE802_11_RADIO (802.11 plus radiotap header), capture size 65535 bytes
^C52 packets captured
52 packets received by filter