Table of Contents for
Windows Malware Analysis Essentials
 Windows Malware Analysis Essentials
Published by
Packt Publishing, 2015
Windows Malware Analysis Essentials
Published by
Packt Publishing, 2015
- Cover
- Table of Contents
- Windows Malware Analysis Essentials
- Windows Malware Analysis Essentials
- Credits
- About the Author
- Acknowledgments
- About the Reviewer
- www.PacktPub.com
- Preface
- What you need for this book
- Who this book is for
- Conventions
- Reader feedback
- Customer support
- 1. Down the Rabbit Hole
- Signed numbers and complements
- Boolean logic and bit masks
- Breathing in the ephemeral realm
- Sharpening the scalpel
- Performing binary reconnaissance
- Exploring the universe of binaries on PE Explorer
- Getting to know IDA Pro
- Entropy
- Summary
- 2. Dancing with the Dead
- Registers
- The initiation ritual
- Preparing the alter
- Code constructs in x86 disassembly
- Summary
- 3. Performing a Séance Session
- Debriefing – seeing the forest for the trees
- Preparing for D-Day – lab setup
- Whippin' out your arsenal
- Summoning the demon!
- Post infection
- Exorcism and the aftermath – debrief finale!
- Summary
- 4. Traversing Across Parallel Dimensions
- Alice in kernel land – kernel debugging with IDA Pro, Virtual KD, and VMware
- Summary
- 5. Good versus Evil – Ogre Wars
- Encoding/decoding – XOR Deobfuscation
- Malicious Web Script Analysis
- Byte code decompilers
- Document analysis
- Redline – malware memory forensics
- Malware intelligence
- Summary
- Index
Just knowing one particular skill and being efficient is a thing of the past. As malware and the threat landscape itself is polymorphic in concept and design, the approach is be more than the archaic methodology of creating signatures. To know the threat actors and gather intelligence, a multi-pronged approach of the three essential grounds that have to be covered are:
- Surveillance and monitoring
- Analyses and visualization
- Sandboxing and reporting
We will cover some tools and as to how they relate towards coming towards the goals one step closer:
- Modern Honey Network: This can be found at http://threatstream.github.io/mhn/ and https://github.com/threatstream/mhn
- Malware Control Monitor: This can be found at https://github.com/marcoramilli/malcontrol
- Canari: This can be found at https://github.com/allfro/canari
- Malcom: This can be found at https://github.com/tomchop/malcom
- Cuckoo Sandbox: This can be found at https://github.com/cuckoobox/cuckoo
- Malware samples crawler: This can be found at http://maltrieve.org/
To get an idea of how effective these tools already are, head to www.malwr.com for sandboxing and reporting.
Create an account and start submitting samples and researching the existing analysis reports. The interface is very intuitive and easy to use.
You need to use a Linux distro for the rest of the tools in the preceding list. They mostly use Python, but the dependencies and libraries will be more conveniently installed rather than trying to port everything to a Windows/OSX platform. Set up an account in Github and install git in your Linux distro.
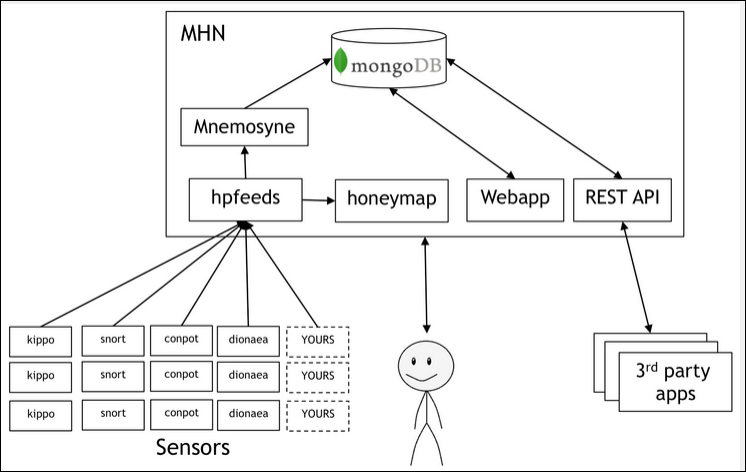
MHN – Multi-snort and honeypot sensor management, uses a network of VMs, small footprint SNORT installations, stealthy dionaeaas, and a centralized server for management
Modern Honey Network uses a set of sensors to gather network-related attack data. It performs analysis on the attacks and maps the attack parameters to a world map view while maintaining copious amounts of information about the attack, thus making it very visual and intuitive to work with Honeypots. This schematic is taken from http://threatstream.github.io/mhn/.
It is a good idea to use a public cloud provider for server access that can be configured as a Honeypot. The IP address given by the provider will be used for MHN server access later on.
The MHN server installation commands are listed next (to be run as root):
$ cd /opt/
$ git clone https://github.com/threatstream/mhn.git
$ cd mhn/scripts/
$ sudo ./install_hpfeeds.sh
$ sudo ./install_mnemosyne.sh
$ sudo ./install_honeymap.sh
$ sudo ./install_mhnserver.sh
Following is the list of supported Honeypots:
- Suricata
- Dionaea
- Conpot
- Kippo
- Amun
- Glastopf
- Wordpot
- ShockPot
- p0f
- Elastichoney
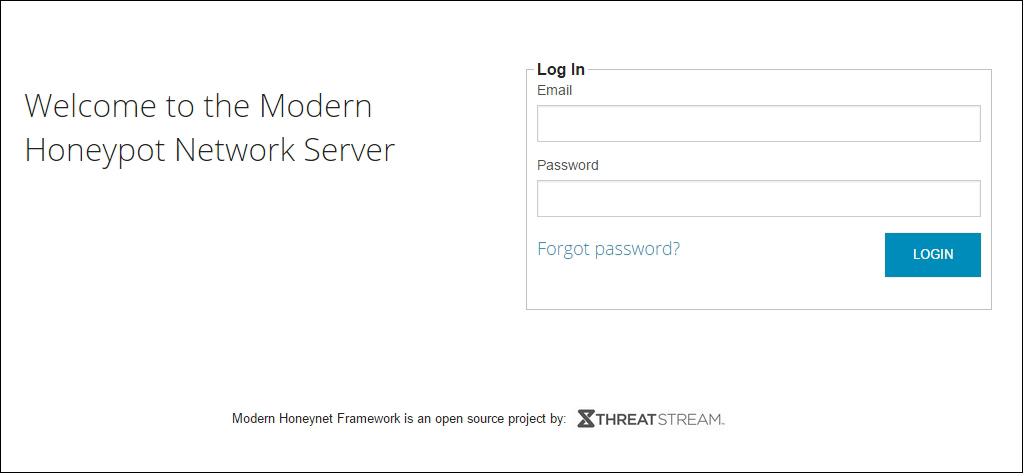
Use your login details during installation (username and password) and log into the MHN server using your web browser and the dedicated server provider IP address:
Log in and check the Attack Stats, which provides a priority list of the attack parameters - IP addresses, ports, and attack signatures:
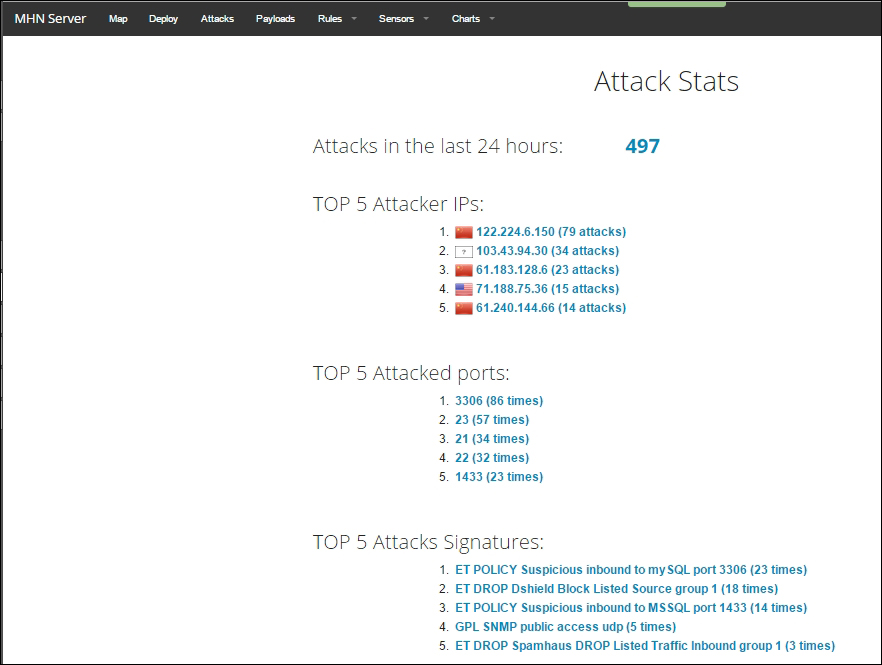
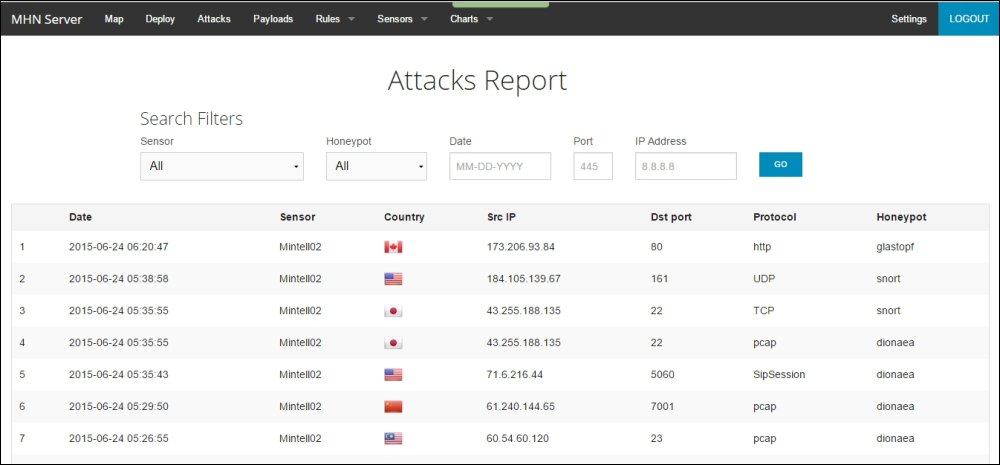
To drill down further and gather more intel on the attacks, the Attacks Report view provides a set of search filters for all the recorded attacks, with pertinent details such as the source and destination ports, the network protocol, the honeypot sensor type, the origin of attack, and the timestamps.
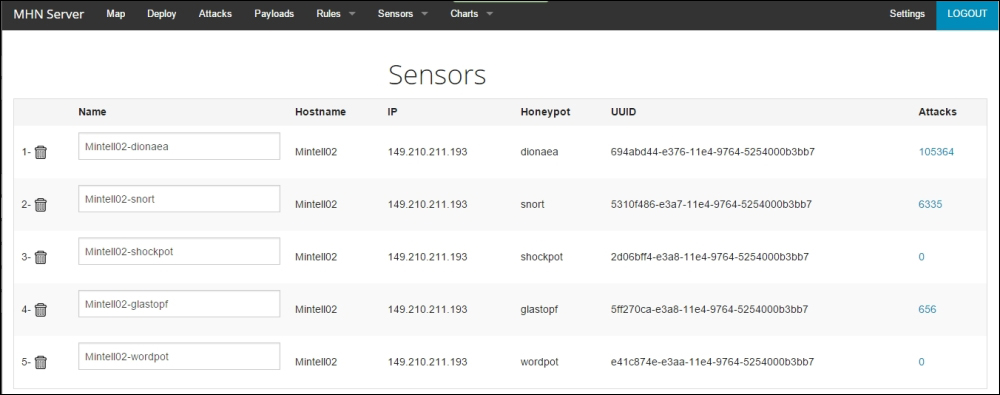
To get a better idea of the sensors being deployed, navigate to the Sensors view to gather stats or configure them:
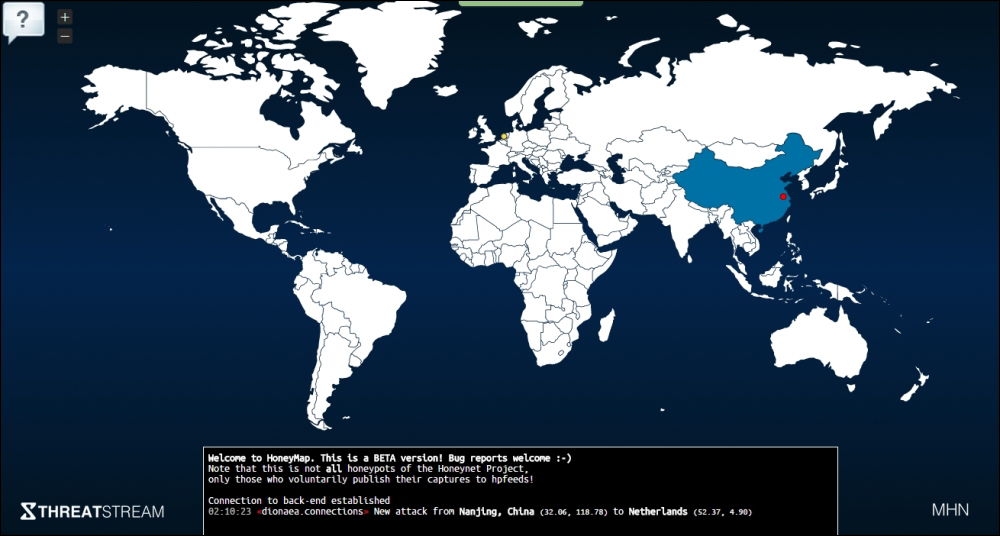
Finally, the Map view gives the geographic context. The bottom pane is scrollable and displays the log of attacks with relevant details:
In order to deploy more Honeypots, navigate to the Deploy view:
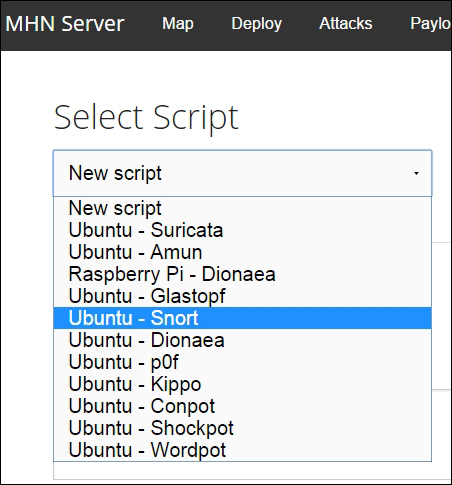
You can then use the command shown for quick installation:

Find out more at https://www.threatstream.com/blog/mhn-modern-honey-network.
MHN provides a simplified approach to deploying Honeypots and at this point in your installation, you have surveillance, monitoring, and visualization taken care of.
You can learn more about honeypots at: https://www.honeynet.org/node/315
http://old.honeynet.org/tools/index.html and https://www.honeynet.org/project
From the site description – "Gathering open data from malware analysis websites and visualize threat impact with this comprehensive Malware Control Monitor project". Installation is straightforward and you have to install a few dependencies-mongodb, git and Nodejs, get a API Key for MapBox (https://www.mapbox.com/), post installation, type:
git clone git@github.com:marcoramilli/malcontrol.git
cd malcontrol.git
npm install
and then;
grunt
npm start
then go to localhost: 8080
Malware Control Monitor project depicting the malware threats across the globe
Malcontrol scrapes the following services and builds reports on each threat, exposed as a clickable url for the report:
- Malwr
- Phishtank
- Urlquery
- Virscan
- Webinspector
- Domainlist
- malc0de
- vxvault
The following is an excerpt from the site description – "A background node scrapes websites to grab malware informations and fills up a mongodb database. An API node serves API useful to frontend layer."
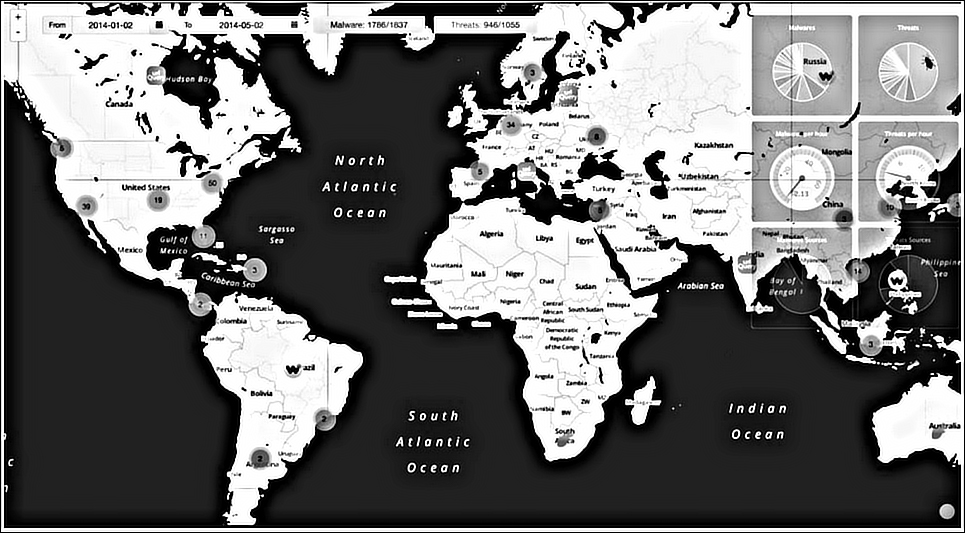
A world map displays the locations of all the geolocalized malwares and threats detected by the scrapers, using markers. Every single marker has the shape of the logo of the scraped source of origin. Markers can be grouped, zoom map to see detailed information. Some useful charts are displayed on the right side showing all the information supplied by the backend's API.
A view of geo-localized malwares and threats detected by the scrapers
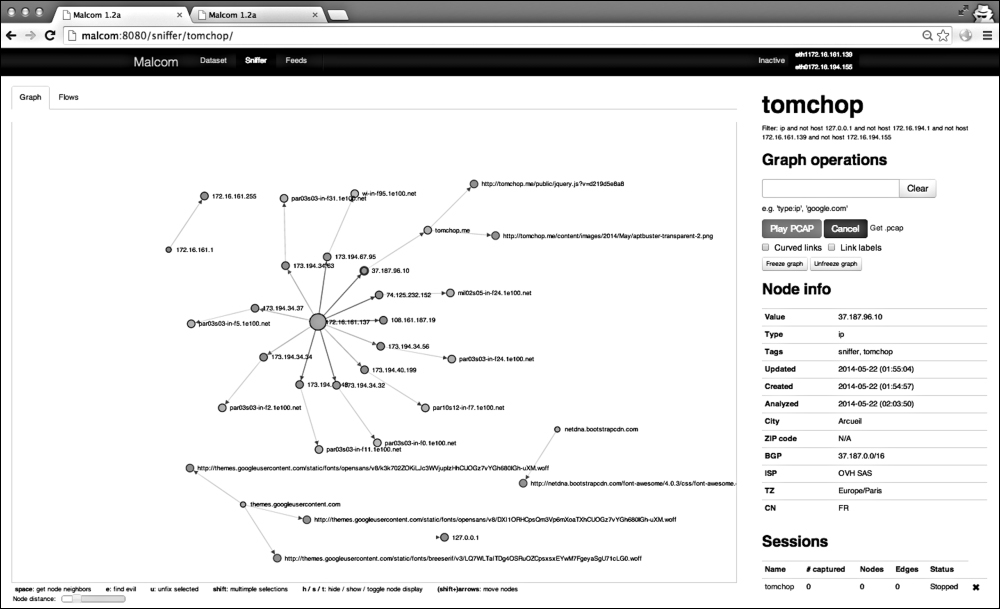
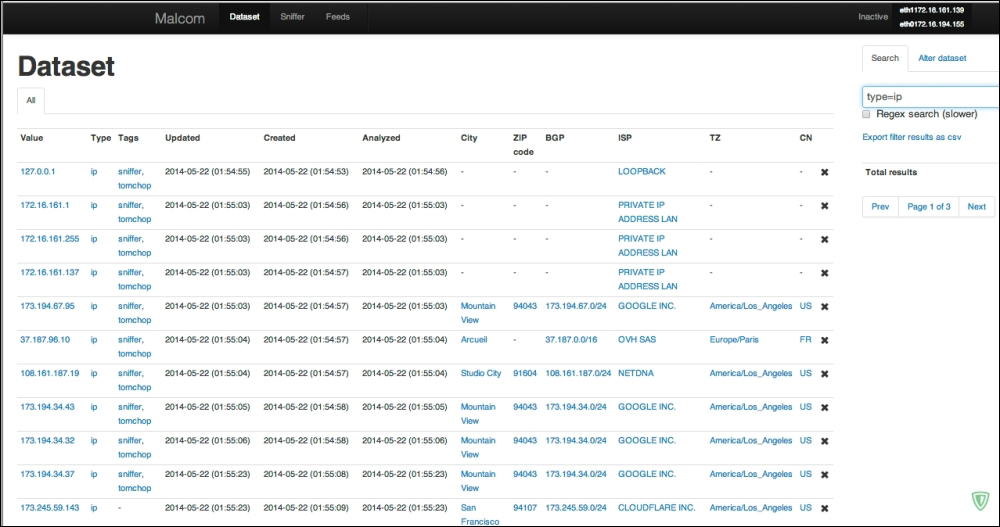
Malcom – Malware Communication Analyzer (shown in the preceding image) is useful for network traffic visual analysis and cross-referencing that data with the malware sources; and Canari employs custom-made Maltego transforms that help in links based analysis of malware, penetration testing, and anything that requires deeper analysis.
With Malcom (fully written in Python - see the installation steps on https://github.com/tomchop/malcom), you can:
- detect central command and control (C&C) servers
- understand peer-to-peer networks
- observe DNS fast-flux infrastructures
- quickly determine if a network artifact is 'known-bad'
From the description on the site – "The aim of Malcom is to make malware analysis and intel gathering faster by providing a human-readable version of network traffic originating from a given host or network. Convert network traffic information to actionable intelligence faster."
Gathering malware samples is a tedious job and any tool that helps alleviate this task is worth using. While you can make use of the malware sharing sites and repositories, aggregating it all is not always a very convenient process. Install dependencies a priori - sudo apt-get install python-dev. Maltrieve supports Cuckoo analysis as well. The commands are self explanatory, after you run Maltrieve as python maltrieve.py for the Python installation or just maltrieve on the console for normal installation.
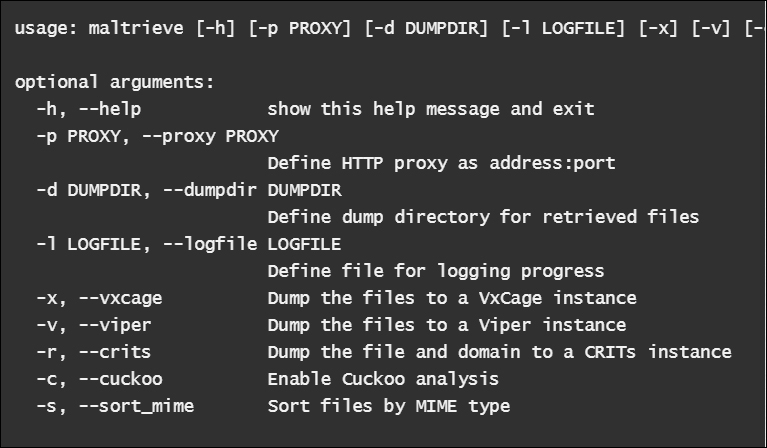
Maltrieve crawls the following sites:
- Malc0de: This can be found at http://malc0de.com/rss
- Malware Domain List: This can be found at http://www.malwaredomainlist.com/hostslist/mdl.xml
- Malware URLs: This can be found at http://malwareurls.joxeankoret.com/normal.txt
- VX Vault: http://vxvault.siri-urz.net/URL_List.php
- URLquery: http://urlquery.net/
- CleanMX: http://support.clean-mx.de/clean-mx/xmlviruses.php?
- ZeusTracker: https://zeustracker.abuse.ch/monitor.php?urlfeed=binaries
A nice and maintained list of sites for malware collection can be found at: http://www.kernelmode.info/forum/viewtopic.php?f=16&t=308-
- http://support.clean-mx.de/clean-mx/viruses.php
- http://malshare.com/ (registration required)
- http://malc0de.com/database/
- https://zeustracker.abuse.ch/monitor.php?browse=binaries
- http://www.sacour.cn/showmal.asp?month=8year=2012
- http://malwaredb.malekal.com/ (registration required)
- http://blog.urlvoid.com/new-list-of-dangerous-websites-to-avoid
- http://www.scumware.org
- http://www.threatlog.com
- http://adminus.net (For sample requests, use contact email adminus.xs(at)gmail(dot)com)
- http://jsunpack.jeek.org/?list=1 (RSS feed)
- http://www.malwareurl.com/ (free registration required)
- http://www.offensivecomputing.net/ (malware repository, free registration required to download)
- http://vxvault.siri-urz.net/ViriList.php (password required, unknown at present)
- http://vxvault.siri-urz.net/URL_List.php
- http://contagiodump.blogspot.com/2011/03/take-sample-leave-sample-mobile-malware.html (Mobile malware samples)
- http://virussign.com/downloads.html (registration required)
- http://www.nothink.org/viruswatch.php
- http://dashke.blogspot.com/
- http://malware.lu/ (registration required to download)
- http://www.nictasoft.com/ace/malware-urls/
- http://virusshare.com/
- http://labs.sucuri.net/
- http://freelist.virussign.com/freelist/
- http://malwareurls.joxeankoret.com/normal.txt
- http://malwared.malwaremustdie.org/index.php?page=1
- http://ytisf.github.io/theZoo/
- http://amtrckr.info/
https://www.virustotal.com/ provides a monthly paid premium service for malware intelligence that allows sample downloading and regular malware feeds and reports. They only cater to organizations or companies and you can explore this asset once you have gone over the other more accessible avenues.
Joe sandbox at http://www.joesecurity.org/ from Switzerland is an excellent commercial sandbox with one of the most detailed sandbox reports (generic signatures, classifications, and threat scores) for all the executable file types and documents for Windows XP onwards, as well as android application packages and Mac OSX mach-o binaries. Its technical accuracy and diversity sets it apart from its competition with an excellent feature set comprising of hybrid code analysis (code analysis based on dynamic memory dumps), execution graph analysis, adaptive execution, extensive behavior signature set, Yara rule generator, and cookbooks (automated custom configuration of the analysis procedure using scripts). This is highly recommended.
Cuckoo Sandbox at http://www.cuckoosandbox.org/ is behind the malware analysis site www.malwr.com. Cuckoo is described as an open source automated malware analysis system.
Cuckoo features:
- Retrieves files from remote URLs and analyze them
- Traces relevant API calls for behavioral analysis
- Recursively monitors newly spawned processes
- Dumps generated network traffic
- Runs concurrent analysis on multiple machines
- Supports custom analysis package based on AutoIt3 scripting
- Intercepts downloaded and deleted files
- Takes screenshots during runtime
Formats:
Installation can be a little tricky on Linux if you are new to it, though once done it works like a charm. Since this requires the core Cuckoo daemon component cuckoo.py to run in the Linux host and the analyzer agent.py in the VM with Windows XP to be installed, you cannot make this into a VM based sandbox without some serious tweaking, as you cannot run a VM guest inside a VM guest. You can use Qemu, Bochs, or Linux KVM for this purpose, but then you have to work around with the source code beyond what is natively supported by Cuckoo.
The analysis assets are deposited at storage/analysis/<Analysis ID> with the reports in json, html, maec, and mongodb formats which can be further customized as required.