Table of Contents for
Python for Secret Agents
 Python for Secret Agents
Published by
Packt Publishing, 2014
Python for Secret Agents
Published by
Packt Publishing, 2014
- Cover
- Table of Contents
- Python for Secret Agents
- Python for Secret Agents
- Credits
- About the Author
- About the Reviewers
- www.PacktPub.com
- Preface
- What you need for this book
- Who this book is for
- Conventions
- Reader feedback
- Customer support
- 1. Our Espionage Toolkit
- Getting more tools – a text editor
- Confirming our tools
- Background briefing – math and numbers
- Handling text and strings
- Organizing our software
- Working with files and folders
- Solving problems – recovering a lost password
- Summary
- 2. Acquiring Intelligence Data
- Using a REST API in Python
- Organizing collections of data
- Solving problems – currency conversion rates
- Summary
- 3. Encoding Secret Messages with Steganography
- Using the Pillow library
- Some approaches to steganography
- Detecting and preventing tampering
- Solving problems – encrypting a message
- Summary
- 4. Drops, Hideouts, Meetups, and Lairs
- Finding out where we are with geocoding services
- How close? What direction?
- Compressing data to make grid codes
- Decoding a GeoRef code
- Creating natural area codes
- Solving problems – closest good restaurant
- Summary
- 5. A Spymaster's More Sensitive Analyses
- Creating Python modules and applications
- Creating our own classes of objects
- Comparisons and correlations
- Writing high-quality software
- Solving problems – analyzing some interesting datasets
- Summary
- Index
We're going to add some cool Python software to process images. The Pillow package is a sophisticated image-processing library. This library provides extensive file format support, an efficient internal representation, and fairly powerful image processing capabilities. For more information, visit https://pypi.python.org/pypi/Pillow/2.1.0. The Pillow documentation will provide important background in what needs to be done. The installation guide on the PyPi web page is essential reading, you will get some additional details here. The core Pillow documentation is at http://pillow.readthedocs.org/en/latest/.
Note that Pillow will install a package named PIL. This assures that Pillow (the project) creates a module that's compatible with the Python Imaging Library (PIL). We'll be importing modules from the PIL package, even though we'll be installing software created by the Pillow project.
If you're a Windows agent, then you can skip this section. The folks who build Pillow have you firmly in mind. For everyone else, your OS may not be Pillow ready.
Before installing Pillow, some supporting software infrastructure must be in place. Once all the supporting software is ready, then Pillow can be installed.
We need to have the following libraries in our GNU/Linux configuration. Odds are good that these files are already present in a given distribution. If these files aren't present, it's time to perform some upgrades or installations. Install the following:
- libjpeg: This library provides access to JPEG images; versions 6b, 8, and 9 have been tested
- zlib: This library provides access to compressed PNG images
- libtiff: This library provides access to TIFF images; versions 3.x and 4.0 have been tested
- libfreetype: This library provides type-related services
- littlecms: This library provides color management
- libwebp: This library provides access to the WebP format
Each Linux distribution has a unique approach to installing and configuring the libraries. We can't cover them all.
Once the supporting libraries are in place, we can use the easy_install-3.3 pillow command. We'll review this in the Installing and confirming Pillow section.
To install Pillow on a Mac, we require three preliminary steps to be performed. We'll need Xcode and homebrew, then we'll use homebrew.
To get Xcode for Mac OS X, visit https://developer.apple.com/xcode/downloads/. Every Mac OS X agent should have Xcode, even if they're not going to write native Mac OS X or iOS apps.
When installing Xcode, we must be sure that we also install the command-line developer tools. This is another big download above and beyond the basic XCode download.
Once we have Xcode command-line tools, the second preliminary step is to install Homebrew from http://brew.sh. This application builds and installs GNU/Linux binaries for Mac OS X. Homebrew is not directly related to Python; this is a popular Mac OS X developer tool.
The Homebrew installation is a single line entered in the terminal window:
ruby -e "$(curl -fsSL https://raw.github.com/Homebrew/homebrew/go/install)"
This will use the curl program to download the Homebrew installation kit from GitHub. It will use Ruby to run this installation program, building the various Homebrew tools and scripts. The Homebrew installation suggests using brew doctor to check the development environment. There may be some cleanup to do before proceeding.
The third step is to use the brew program to install the required additional libraries for Pillow. This command line will handle that:
brew install libtiff libjpeg webp littlecms
Periodically, we may need to upgrade the libraries Homebrew knows about. The command is simply brew update. We may also need to upgrade the various packages we installed. This is done using brew upgrade libtiff libjpeg webp littlecms.
When we've finished the three preliminary steps, we can use the easy_install-3.3 pillow command. We'll review this in the Installing and confirming pillow section.
Once all the required supporting tools are in place (or you're a Windows agent), the next step is to install Pillow.
This should amount to the following command:
sudo easy_install-3.3 pillow
Windows agents must omit the sudo command that prefixes the easy_install command.
Part of the output will look something like this (details will vary):
--------------------------------------------------------------------
PIL SETUP SUMMARY
--------------------------------------------------------------------
version      Pillow 2.4.0
platform     darwin 3.3.4 (v3.3.4:7ff62415e426, Feb  9 2014, 00:29:34)
             [GCC 4.2.1 (Apple Inc. build 5666) (dot 3)]
--------------------------------------------------------------------
--- TKINTER support available
--- JPEG support available
*** OPENJPEG (JPEG2000) support not available
--- ZLIB (PNG/ZIP) support available
--- LIBTIFF support available
*** FREETYPE2 support not available
*** LITTLECMS2 support not available
--- WEBP support available
--- WEBPMUX support available
--------------------------------------------------------------------
To add a missing option, make sure you have the required
library, and set the corresponding ROOT variable in the
setup.py script.

To check the build, run the selftest.py script.
This tells us that some libraries were not available, and we can't do every kind of processing. If we don't intend to work with JPEG2000 files or do complex color management, this is acceptable. On the other hand, if we think we're going to do more complex processing, we may need to track down additional modules and redo our Pillow installation.
The Pillow installation creates PIL. The top-level package will be named PIL.
We can test Pillow using it's own internal test script, PIL.selftest. Otherwise, we can use it like this:
>>> from PIL import Image
If this works, then the PIL package is installed. We can then open an image file to see whether things are working properly. The following code shows us that PIL happily opened an image file for us:
>>> pix= Image.open("1drachmi_1973.jpg")
>>> pix
<PIL.JpegImagePlugin.JpegImageFile image mode=RGB size=198x194 at 0x10183BA90>
This shows us that PIL was able to save the file in a different format:
>>> pix.save("test.tiff")This simple-looking step requires Pillow do a tremendous amount of computation to convert from one format to another.
Image files are encoded in a form that makes them handy for reading and writing, but not so useful for detailed processing. We'll need to decode an image from the file format to a useful internal representation. Pillow greatly simplifies the processes of decoding and encoding image files. Our general strategy for working with an image file is to start with the following recipe:
from PIL import Image
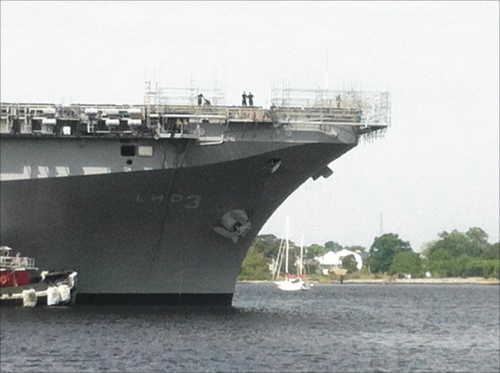
pix= Image.open("LHD_warship.jpg")Pillow extracts a number of interesting attributes from the image metadata. There's a complex hierarchy of additional information that comes along with the image. We'll review some of this metadata in detail.
At the top level, there are some pieces of information that describe some details of the encoding. These are available in a dictionary that is the info attribute of the pix object we created. We can use the keys() method of a dictionary to see what's present in the metadata, as shown in the following snippet:
>>> pix.info.keys()
dict_keys(['jfif_density', 'icc_profile', 'jfif_version', 'jfif', 'exif', 'jfif_unit', 'dpi'])
Of these keys, the value mapped to the exif key is often the most interesting. This is the exchangeable image file format data that provides additional details about the image. The other items are technical details about the image encoding.
The Exif data isn't automatically decoded by Pillow. We need to use the _getexif() method to see what's in the exif key for the image. Note the leading _ sign to this name. This is atypical. This method will give us a dictionary of tags and values. Here's an example:
>>> exif= pix._getexif()
>>> exif.keys()
dict_keys([36864, 37121, 37378, 36867, 36868, 41989, 40960, 37383, 37385, 37386, 40962, 271, 272, 37521, 37522, 40963, 37396, 41495, 41988, 282, 283, 33434, 37500, 34850, 40961, 34853, 41986, 34855, 296, 34665, 41987, 41990, 42034, 33437, 305, 306, 42035, 42036, 41729])
This doesn't look too useful. The good news is that the numeric codes are defined in a separate module. We can use a dictionary lookup to translate numeric codes to words. Here's an example:
>>> import PIL.ExifTags
>>> for k, v in pix._getexif().items():
...     print( PIL.ExifTags.TAGS[k], v )
This will iterate through the Exif tags and values, translating the tag values to words. Now we can find the useful identifying information about the image. The output shows us details like these:
  Software 7.1.1
  DateTime 2014:05:10 09:59:22
  LensMake Apple
  LensModel iPhone 4 back camera 3.85mm f/2.8
Of these Exif tags, the number 34853, the GPSInfo tag form a subdictionary with yet more cryptic numeric keys. This secondary set of numeric codes are defined by the PIL.ExifTags.GPSTAGS mapping.
This leads us to something like the following to dump the information for an image:
    img= Image.open(name)
    print( name, img.format, img.mode, img.size )
    for key in img.info:
        if key == 'exif':
            for k,v in img._getexif().items():
                if k == 34853: # GPSInfo
                    print( " ", PIL.ExifTags.TAGS[k], v )
                    for gk, gv in v.items():
                        print( "  ", PIL.ExifTags.GPSTAGS[gk], gv )
                else:
                    print( " ", PIL.ExifTags.TAGS[k], v )
        elif key == 'icc_profile':
            print( key ) # Skip these details
        else:
            print( key, img.info[key] )
This will iterate through the top-level .info dictionary associated with the image. Within this top-level .info dictionary, if the key is exif, we'll iterate through the Exif dictionary items. Within the Exif dictionary, we'll translate the numeric keys to meaningful strings. If we find the key, 34853 (GPSInfo), we know that we have another dictionary that is more deeply nested. We'll use another nested for loop to iterate through the items of the GPSInfo dictionary, translating those keys to useful strings.
We might see this kind of output.
Common_face_of_one_euro_coin.jpg JPEG RGB (320, 312)
  ExifOffset 26
  ExifImageWidth 320
  ExifImageHeight 312
jfif_version (1, 1)
jfif_unit 0
jfif_density (1, 1)
jfif 257
In this output, the Exif data isn't too interesting. The other details don't seem useful either.
When we look at a picture that's richly detailed with metadata, there might be over 30 individual pieces of Exif data. For example, here's a section of some Exif data found in one image:
  DateTimeOriginal 2009:03:18 04:24:24
  DateTimeDigitized 2009:03:18 04:24:24
  SceneCaptureType 0
  MeteringMode 3
  Flash 16
  FocalLength (20, 1)
  ApertureValue (35, 8)
  FocalPlaneXResolution (257877, 53)
  Make Canon
  Model Canon EOS DIGITAL REBEL XSi
This can tell someone a lot about how the picture was taken.
When we have pictures taken with modern cameras (such as phone cameras) with GPS data, some additional information is packed into the Exif. For some cameras, we'll find this kind of information as follows:
   GPSLatitudeRef N
   GPSLatitude ((36, 1), (50, 1), (4012, 100))
   GPSLongitudeRef W
   GPSLongitude ((76, 1), (17, 1), (3521, 100))
The GPS coordinates from the camera are a little odd looking. We can turn each of these tuple-of-tuples structures into numbers such as 36°50′40.12″N and 76°17′35.21″W. Once we have the location, we can figure out where the picture was taken.
A quick check on the nautical chart 12253 shows that the picture was taken from a dock in Norfolk, Virginia. Every secret agent has a set of nautical charts, right? If not, visit http://www.nauticalcharts.noaa.gov/mcd/Raster/.
The ICC profile shows the details of color and rendering for the image. For details on the data encoded here, see the applicable specifications from http://www.color.org/specification/ICC1v43_2010-12.pdf. It's not clear that this information is very helpful for what we're doing.
What's more helpful is looking at the picture. LHD 3 painted on the hull seems to be important.
The Pillow software allows us to perform a number of manipulations on the image. We can, without too much additional work, resize, crop, rotate, or apply any number of filters to an image.
The most important reason for using PIL is that we have a reproducible, automated process. We can find many kinds of manual image manipulation software. The problem with these desktop tools is that a manual sequence of steps is irreproducible. The benefit of using Pillow for this manipulation is we know precisely what we did.
One common resizing is to create a thumbnail image from a larger image. Here's how we can create useful thumbnail versions of a collection of images:
from PIL import Image
import glob
import os

for filename in glob.glob("*.jpg"):
    name, ext = os.path.splitext( filename )
    if name.endswith("_thumb"):
        continue
    img = Image.open( filename )
    thumb= img.copy()
    w, h = img.size
    largest = max(w,h)
    w_n, h_n = w*128//largest, h*128//largest
    print( "Resize", filename, "from", w,h, "to", w_n,h_n )
    thumb.thumbnail( (w_n, h_n), PIL.Image.ANTIALIAS )
    thumb.save( name+"_thumb"+ext )
We've imported the modules we need: PIL.Image, glob and os. We used glob.glob("*.jpg") to locate all of the JPEG files in the current working directory. We used os.path.splitext() to tease apart the base filename and extension. If the filename already ends in _thumb, we'll continue the for loop. No more processing will happen for this filename; the for statement will advance to the next item in the glob sequence.
We opened the image file and immediately created a copy. This allows us to work with the original image, if we need to, as well as work with the copy.
We've extracted the size of the original image and assigned each item of the tuples to two separate variables, w and h. We picked the largest of the two dimensions using the max() function. If the picture was in the landscape mode, the width will be largest; if the picture was in the portrait mode, the height will be largest.
We've computed the size of the thumbnail image, w_t and h_t. The pair of calculations will assure that the largest dimension is limited to 128 pixels and the smaller dimension will be scaled proportionally.
We used the thumbnail() method of the thumb object, which is a copy of the original image. We provided a two-tuple with the new dimensions. It's essential that we include () around (w_n, h_n) to create a tuple for the first argument value to the thumbnail() method. We also provided the resample function to use; in this case, we used the PIL.Image.ANTIALIAS function, as this produces good (but slow) results.
Here's the thumbnail of our LHD warship:
The image is pretty small. This makes it good for attaching it to an e-mail. However, for more serious intelligence work, we'll need to blow it up, crop it, and enhance it.
When we look at our LHD warship image, we notice that the ship number is almost visible on the bow. We'd like to crop that portion of the image and perhaps, blow it up. Cropping without a visual editor involves a certain amount of hit-or-miss processing.
Even from the command line, we can crop an image interactively by using the show() method of an image, as shown in the following code:
>>> from PIL import Image
>>> ship= Image.open( "LHD_warship.jpg" )
>>> ship.size
(2592, 1936)
We can try different bounding boxes until we locate the logo. One way to start is to break the image into thirds in each direction; this leads to nine sections, computed via relatively simple rules as follows:
>>> w, h = ship.size
>>> ship.crop( box=(w//3,0,2*w//3,h//3) ).show()
>>> ship.crop( box=(w//3,h//3,2*w//3,2*h//3) ).show()
The bounding box for a crop operation requires a four-tuple with the left, top, right, and bottom sides, in that order. The values must be integers and the () brackets are required to create four-tuple, instead of four separate argument values. The horizontal dividing lines are at 0, w//3, 2*w//3, and w. The vertical dividing lines are at 0, h//3, 2*h//3, and h. We can use various combinations to locate the various sections of the image and show each section.
Entering formulae like this is error prone. It's much nicer to work with a bounding box defined by a top-left coordinate pair. We can fiddle in a width and compute the height to maintain the picture's proportions. If we use something like the following, we only have to tweak the x and y coordinates:
>>> p=h/w
>>> x,y=3*w//12, 3*h//12
>>> ship.crop( box=(x,y,x+600,int(y+600*p)) ).show()
>>> x,y=3*w//12, 5*h//12
>>> ship.crop( box=(x,y,x+600,int(y+600*p)) ).show()
We can fiddle with the x and y values. Then we can use the up arrow key to fetch the ship.crop().show() line back again. This allows us to step through the image manually, just changing x and y.
We can do a little better at generalizing the bounding boxes of image sections. Consider this list of fractions:
>>> from fractions import Fraction
>>> slices = 6
>>> box = [ Fraction(i,slices) for i in range(slices+1) ]
>>> box
[Fraction(0, 1), Fraction(1, 6), Fraction(1, 3), Fraction(1, 2), Fraction(2, 3), Fraction(5, 6), Fraction(1, 1)]
We have defined the number of slices we want to make. In this case, we'll divide the image into 1/6, giving us 36 individual boxes. We then computed the slice+1 lines at positions between  and
and  . Here is an illustration that shows the slicing of the image into a 6 x 6 grid. Each cell has a boundary defined by the
 box sequence:
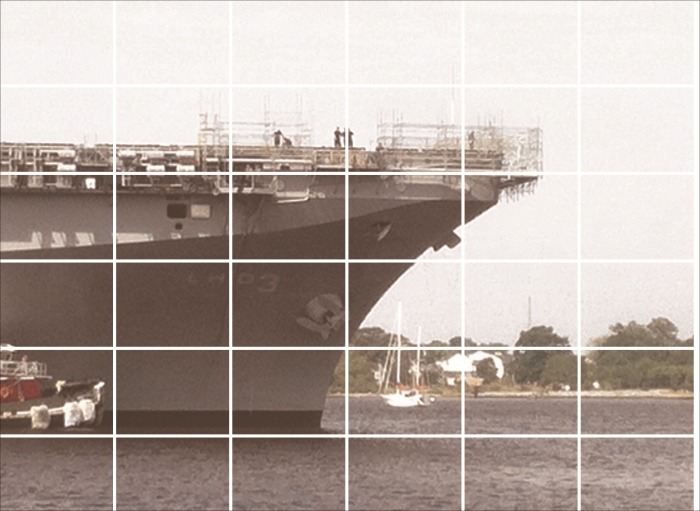
This uses the following pair of nested for loops with the box fractions to generate the individual boundaries for various pieces of the image:
for i in range(slices):
    for j in range(slices):
       bounds = int(w*box[i]), int(h*box[j]), int(w*box[i+1]), int(h*box[j+1])
Each boundary box has the left, top, right, and bottom side as a four-tuple. We've picked values of two variables to enumerate all 36 combinations from (0,0) to (5,5). We've picked two adjacent values from our list of fractions, lines. This will give us all 36 bounding boxes from top-left to bottom-right.
We can then crop our original image using each of these definitions of box and show all 36 slices, looking for the one that's closest to the subject matter we're looking for. Also, we might want to resize each image and make it twice as big.
We can use the following to show each box:
print( bounds )
ship.crop( bounds ).show()
This will display the original image cropped to each of the slices. The bounds object is a four-tuple with the boundary information.
We can slightly optimize the expression that computes the bounds using the map() function:
bounds = map( int, (w*box[i], h*box[j], w*box[i+1], h*box[j+1]) )
The map() function will apply a function to each element of the associated collection. In this example, we apply the int() function to each value of the bounding box. It turns out that this is the image we want:
slices = 12
box = [ Fraction(i,slices) for i in range(slices+1) ]
bounds = map( int, (w*box[3], h*box[6], w*box[5], h*box[7]) )
logo= ship.crop( bounds )
logo.show()
logo.save( "LHD_number.jpg" )
We've cropped the image using two adjacent boxes. The boxes at (3,6) and (4,6) incorporate the ship's identification number nicely. We created a single four-tuple with the combined bounding box and cropped the original image to pick up just the logo. We used the show() method of the logo object, which will pop up an image viewer. We also saved it so that we'd have a file we could work with later.
We might want to resize the cropped image. We can use code like this to blow up the image:
w,h= logo.size
logo.resize( (w*3,h*3) )
This will use the original size as a basis so that the expanded image retains the original proportions. As with other operations, the size is given as a tuple and the inner () brackets are required to define a tuple. Without the inner () brackets, these would be two separate argument values.
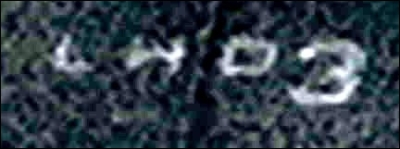
Here's the cropped image:
That's kind of murky and hard to work with. We'll need to enhance it.
The original picture is pretty grainy. We'd like to enhance the details of the slice we found. Pillow has a number of filters than can help modify an image. Unlike popular TV shows and movies, there's no enhance feature that magically makes a poor image spectacular.
We can modify an image, and sometimes, it's more usable. We can also modify an image and leave it no better than we found it. The third choice—not often available to secret agents—is that we might make the results more artistic than the original image.
We have three modules in the Pillow package that contain filter-like processing:
ImageEnhanceImageFilterImageOps
The ImageEnhance module contains enhance class definitions. We create an enhancer object by binding an enhancer and an image. We then use that bound object to create enhanced versions of a given image. An enhancer allows us to make many incremental changes to an image. We can think of these as simple knobs, which might be turned to tweak the image.
The ImageFilter module contains filters functions that will revise the image, creating a new image object that we might save. These various kinds of filter objects are plugged into the image's filter() method. A filter can be imagined as a way to reduce the volume of information in the image; the image is usually simpler after being filtered.
The ImageOps module contains functions that transform one image to create a new image. These are different from filtering and enhancing. They're not necessarily reducing the data nor are they simple knobs to tweak an image. The ImageOps module tends to perform more complex transformations.
We'll start out with some simple enhancers in the PIL.ImageEnhance module, specifically, the Contrast class. We won't present each individual class; the more systematic exploration is for field agents.
We'll start with one of the four enhancers: the Contrast class. Here's how we can use it:
>>> from PIL import ImageEnhance
>>> e= ImageEnhance.Contrast(logo)
>>> e.enhance(2.0).show()
>>> e.enhance(4.0).show()
>>> e.enhance(8.0).show()
This builds an enhancer, based on the specific algorithm and the image we're working with. We've assigned this enhancer to the e variable. We then performed an enhance operation with a specific parameter value and showed the resulting image.
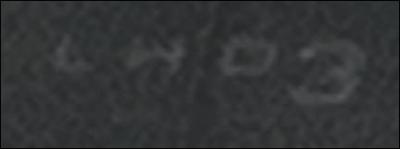
The last image is pretty nice. We can save a copy of this image with e.enhance(8.0).save( "LHD_Number_1.jpg" ).
Here's how the logo looks with the Contrast enhancement set to 8:
Someone might be able to work with this image. As a field agent, you'll need to experiment with the other three enhancement filters: color, brightness, and sharpness. You might be able to extract even more detail from the image.
This is the first step in defining a reproducible, automated process. Using Python from the command line means that we have a record of precisely what we did. We can reduce the process to an automated script.
We've looked at the ImageEnhance module to improve an image. We can also filter via the image's filter() method. The ImageFilter module defines 18 different filters. When we use a filter, we'll provide the filter object to the Image.filter() method.
We'll pick just one of these filters. The ImageFilter.EDGE_ENHANCE module seems to be helpful for distinguishing between the light-colored letter and the dark-colored background. Emphasizing on the transition in color might make the letters more visible.
Here's an example of using the ImageFilter.EDGE_ENHANCE filter in the filter() method of an image:
>>> from PIL import ImageFilter
>>> logo.filter( ImageFilter.EDGE_ENHANCE ).show()
We've used the filter method to create and show a new image.
While this is good, it seems like our enhancement attempts might work better with the ImageEnhance.Contrast class we used earlier. Here's how we can apply a sequence of transformations.
The following code applies the specific filter to the image and creates a new image:
>>> e.enhance(8.0).filter( ImageFilter.EDGE_ENHANCE ).save( "LHD_Number_2.jpg" )
We've created an enhanced image and then applied a filter to it. This creates something even more crisp and possibly more usable than the original image.
This is our filtered and enhanced image:
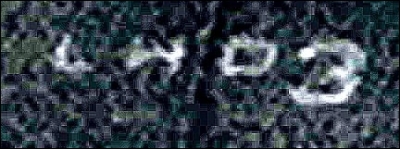
The filter has made some minor changes to the previously saved image. The edge on the lower loop of 3 might be a bit more crisp. We'll need to change some more things.
Some filters (such as the EDGE_ENHANCE object) have no parameters or options. Other filters have parameters that can be applied to change the way they work. For example, the ModeFilter() will reduce a given section of the image to the most common color value within that section; we provide a parameter for the number of pixels to consider when computing the mode.
Here's an example of combining several operations to create a new image:
>>> p1= e.enhance(8.0).filter( ImageFilter.ModeFilter(8) )
>>> p1.filter( ImageFilter.EDGE_ENHANCE ).show()
This seems to be tending towards art and away from proper intelligence gathering. However, a good field agent will work with some additional filters and filter parameters to look for better enhancement techniques.
We've looked at the ImageEnhance module to improve an image. We've also looked at a few other filters in the ImageFilter module. The ImageOps module provides 13 additional transformations that we can use to improve our image.
We'll look at the ImageOps.autocontrast() function, as shown in the following snippet. This will adjust the various pixels so that the brightness levels fill the entire 8-bit space from 0 to 255. An image that's dark or washed out lacks contrast, and the pixels are all piled up at the dark end or the bright end of the spectrum.
>>> from PIL import ImageOps
>>> ImageOps.autocontrast( logo ).show()
>>> logo.show()
This shows an image with autocontrast applied and the original image. This shows the striking difference between the original clipping and an image that uses the full range from dark to light. That seems to be just what HQ would want.
Let's tweak the contrast a little further to really make the numbers stand out:
>>> ac= ImageEnhance.Contrast( ImageOps.autocontrast( logo ) )
>>> ac.enhance( 2.5 ).save( "LHD_Number_3.jpg" )
This seems to be the most startling enhancement we can do:
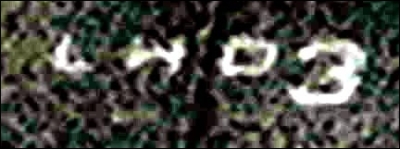
This might be good enough. A competent field agent should play with the rest of the ImageOps transformations to see whether more improvement is possible.
At this point, we have the outline for a reproducible, automated process. We know precisely what we did to enhance the image. We can use our series of experiments to create an automated script for image enhancement.