Table of Contents for
Defensive Security Handbook, 1st Edition
 Defensive Security Handbook, 1st Edition
Published by
O'Reilly Media, Inc., 2017
Defensive Security Handbook, 1st Edition
Published by
O'Reilly Media, Inc., 2017
- nav
- Cover
- Defensive Security Handbook
- Defensive Security Handbook
- Foreword
- Introduction
- 1. Creating a Security Program
- 2. Asset Management and Documentation
- 3. Policies
- 4. Standards and Procedures
- 5. User Education
- 6. Incident Response
- 7. Disaster Recovery
- 8. Industry Compliance Standards and Frameworks
- 9. Physical Security
- 10. Microsoft Windows Infrastructure
- 11. Unix Application Servers
- 12. Endpoints
- 13. Password Management and Multifactor Authentication
- 14. Network Infrastructure
- 15. Segmentation
- 16. Vulnerability Management
- 17. Development
- 18. Purple Teaming
- 19. IDS and IPS
- 20. Logging and Monitoring
- 21. The Extra Mile
- A. User Education Templates
- Index
- About the Authors
- Colophon
Chapter 10. Microsoft Windows Infrastructure
While it may be the bane of every security professional’s existence, Microsoft is being used in public and private infrastructures both small and large across the world. It is by far the most in-use operating system and also the most commonly misconfigured. Misconfigurations in Windows operating systems and software contribute to a large amount of security issues and compromises. Exploit Database currently has over 8,000 exploits running under the Windows platform.
With the staggering amount of verticals that Microsoft currently covers, we will stick to where it comes into play in the enterprise environment and the biggest bang for your buck for security wins. In this chapter we will cover some quick wins such as moving off of older operating systems and turning off open file sharing, as well as in-depth best practices regarding Active Directory, Enhanced Mitigation Experience Toolkit, and Microsoft SQL. Performing these steps significantly decreases the attack surface and detection capabilities (and also might help you sleep better at night).1
Quick Wins
There are a few standard no-brainers that we should get out of the way in the beginning.
Upgrade
The first and foremost “quick win” is upgrading endpoints to a supported operating system. While corporations struggle to move off of Windows XP (and shockingly, even older operating systems) the threats keep piling up and the technology forges on. What makes it that much harder for enterprise environments to make the switch is that many proprietary software packages for different industries were specifically written for XP and Server 2003. Vulnerabilities like MS-08-067, which is an easy remote code execution bug, are still commonly found. Often, situations arise either from a pesky vendor-controlled system or other type of device that leaves you in the unfortunate position of not being able to apply updates. In cases like these the devices should remain off of the network as a matter of policy. If this is not viable, the next secure option would be to have them on private VLANs or an air-gapped network. We cover more on these in Chapter 15.
Another challenge is that security takes a back seat when there is no real communication to stakeholders on the possibility of profit loss. When businesses cling to old technology for whatever reason, their security risk goes up. The lack of support means that you are no longer protected from any new exploits, will not receive fixes for software bugs, or have the ability to take advantage of new features. Paying for prolonged support on defunct technology just delays the inevitable.
Migrating off of a platform that has been in use for such a long period of time has its own costs in the form of many different software upgrades, data migration, and even possibly having to switch to new vendors. However, remaining on an unsupported and outdated version presents the inherent risk of data loss, network outages, breaches, and/or fines. It’s difficult to show the full cost of impact prior to these actually happening. As shown in Figure 10-1, XP users are down almost a full 6% in the last year, still holding on at almost 11% market share, even though support ended in April 2014.

Figure 10-1. Desktop operating system market share Q1 of 2016
Third-Party Patches
Surprisingly, another commonly overlooked protection is some type of software update platform. Windows Server Update Services (WSUS), System Center Configuration Manager (SCCM), and other third-party applications can keep the endpoints up-to-date with the latest security patches. Not only should you worry about regular Windows system patches, but there should also be a focus on outdated versions of commonly exploited software such as Java, Adobe Reader, Firefox, and others that are currently in use.
During the asset management process you will have determined what software exists in the environment. You should also ask yourself if it really needs to be there. Do all endpoints really need Adobe Flash? (Hint: no, they don’t.)
Open Shares
Open shares can cause all kinds of security problems. From saved credentials and trade secrets to PII and other sensitive data, file shares can house some extremely important assets. This nmap command should be run on a regular basis to alert on any new open shares (line breaks added for readability):
nmap -T4 -v -oA myshares --script smb-enum-shares –script-args
smbuser=MyUserHere,smbpass=MyPassHere -p445 192.168.0.1-255
&& cat myshares.nmap|grep ‘|\|192’|awk ‘/[0-9]+\.[0-9]+\.[0-9]+\.
[0-9]+/ { line=$0 } /\|/ { $0 = line $0}1’|grep \||grep -v -E
‘(smb-enum-shares|access: <none>|ADMIN\$|C\$|IPC\$|U\$|access: READ)
’|awk ‘{ sub(/Nmap scan report for /, “”); print }’ >> sharelist.txt
This can also be accomplished by using PowerShell:
$servers = get-content c:\temp\servers.txt
#Provide an account that has rights to enumerate the shares
$cred = get-credential
get-wmiobject Win32_Share -computer $servers -credential $cred |
select __server,name,description,path | export-csv
c:\temp\sharereport.csv -notype
Active Directory Domain Services
Active Directory Domain Services (AD DS) is a large part of the foundation of many infrastructure designs. It is a main building block and is relied upon for many things, including authentication, permissions, and asset identification:
AD DS provides a distributed database that stores and manages information about network resources and application-specific data from directory-enabled applications. Administrators can use AD DS to organize elements of a network, such as users, computers, and other devices, into a hierarchical containment structure. The hierarchical containment structure includes the Active Directory forest, domains in the forest, and organizational units (OUs) in each domain.
Microsoft Technet
While the structure alone should not be solely relied upon for AD security, it can be used as a good aid and to provide a commonsense structure. Being able to grow and adapt this structure as the organization grows and modifies is essential to prevent the restructuring and redesigning of the layout. From here, we can take a top-down approach to designing the security around the forest.
Forest
The forest acts as a security boundary for an organization and defines the scope of authority for administrators.
Microsoft Technet
While many organizations will have one forest with only one domain, there are also environments with large footprints that may have gone through many acquisitions of smaller companies (see Figure 10-2). This can make it difficult to balance the possibly large number of forests that may or may not have security access between other forests or domains.
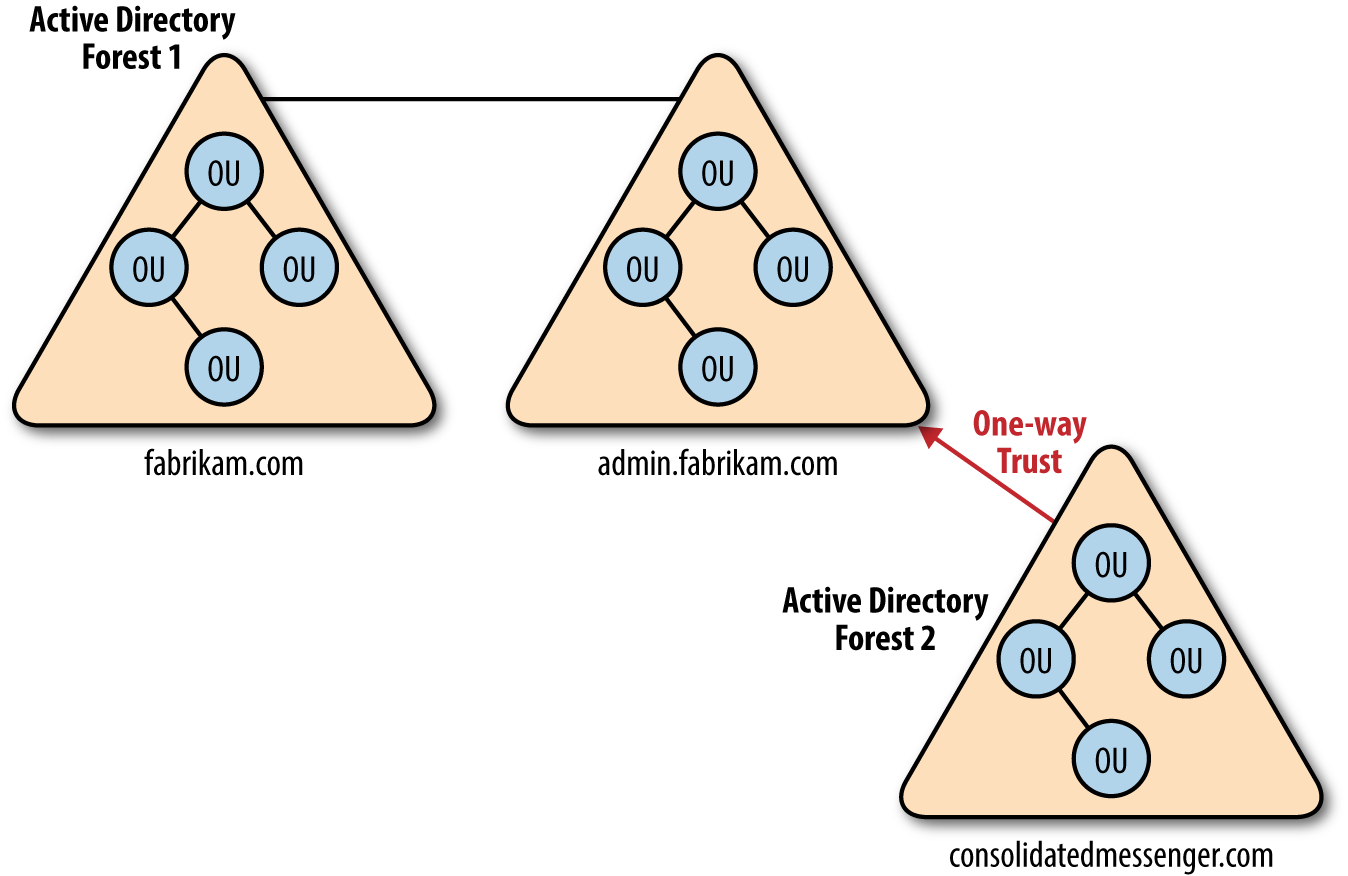
Figure 10-2. A forest can be a collection of domains or a single domain
Cross Domain and Forest Trusts, while helpful, can weaken the security between organizational containers by allowing authentication between resources. They should only be used when the proper stakeholders have recognized the risk associated with them.
The risks surrounding trusts are in the authentication ability from one domain or forest to another. For example, a malicious user with administrative credentials who is located in a trusted forest could monitor network authentication requests from the trusting forest to obtain the security ID (SID) information of a user who has full access to resources in the trusting forest, such as a domain or enterprise administrator. These risks can be mitigated with both SID filtering and selective authentication. Controlling authentication in this way provides an extra layer of protection to shared resources by preventing them from being randomly accessed by any authenticated user in the trusted distributed user forests. Now if one of these user forests is attacked and requires a rebuild, the entire trusting forest won’t have to be rebuilt from the ground up.
Domain
Domains should never be considered a security boundary. Any level domain account can query the Active Directory database (ntds.dit), which is located on any DC. The functionality exists to pull down the entire structure with everything in it, from computer names to administrator roles, to service accounts. The domain should be used purely as a structural container.
Domain Controllers
What happens if someone steals one of my domain controllers?
There is only one correct answer:
You flatten and then rebuild the entire forest.
Domain controllers are the building blocks of Active Directory Domain Services. They house the Flexible Single Master Operation (FSMO) roles that control the different moving parts that make a domain work. They can be the keys to the castle and should be ferociously guarded.
FSMO roles are the seven special roles that domain controllers can be configured as. The layout of a domain and how many forests there are will dictate where the FSMO roles are best placed. The roles include PDC Emulator, RID Master, Schema Master, Domain Naming Master, Infrastructure Master, Domain DNS Zone Master, and Forest DNS Zone Master. There is also a role called a Global Catalog (GC) that, while not an FSMO role, will still play a part in determining placement of them. There are a few standard rules to abide by to ensure they are placed properly:
Rule 1: The PDC Emulator and RID Master roles should be on the same server by themselves. The PDC Emulator is a large consumer of RIDs and is heavily utilized.
Rule 2: The Infrastructure Master should not be placed on a GC unless there is only one forest or unless every DC in the forest has a GC.
Rule 3: The Schema Master and Domain Naming Master should be on the same server, which should also be a GC.
By default, all roles are placed on the first promoted DC in the forest and can be migrated to additional DCs as they are created.
Note
At no point in time should a domain controller be a dual-purpose server, be easily accessible, or be treated like a standard workstation.
In datacenters, physical domain controllers should be installed in dedicated secure racks or cages that are separate from the general server population. When possible, domain controllers should be configured with Trusted Platform Module (TPM) chips and all volumes in the domain controller servers should be protected with some type of drive encryption.
Remote domain controllers can be set up as read-only with only certain parts of the AD structure being replicated. While it may be less likely that you would have an entire server rack dedicated to an offsite DC, there are other options you can take, such as a small form factor server placed inside a locked cage, with the cage somehow bolted into the ground. While it may seem like overkill, many times we’ve seen DCs sitting in broom closets or break rooms.
Groups
There are strict guidelines for what AD groups are and are not used for, because the nesting and assigning of groups can get quite messy. To properly prepare and implement these groups, you should adhere to the following practices:
- Place users into global groups
- Place global groups into domain local groups
- Place domain local groups on the access control lists of the data stored on the servers
If there are multiple domains and universal groups are desired:
- Place global groups containing users into universal groups
- Place universal groups into the domain local groups
- Place domain local groups on the access control lists
In addition to the security benefits of proper user nesting, following this standard can save a significant amount of hassle. When users leave the organization for any reason and their accounts are subsequently deleted, you won’t end up with unresolved SIDs all over the place. If you are working through the issue of cleaning this up in your organization, Microsoft has a wonderful tool called SID Walker that can assist in removing old unresolved SIDs across the network.
Accounts
One of the largest hurdles companies can face is the massive amount of user accounts that are members of the Domain Administrator’s Built-In group (or any other type of admin-level group). It is in the best interests of the design and security of the organization to do ample research on each application’s access permissions. If you are lucky enough to build a domain from the ground up it is significantly easier, while retroactively performing it is significantly more work. Working with application analysts and vendors on file access, processes, and services will allow only the necessary permissions to be delegated at both an endpoint and server level. This can be accomplished with a variety of tools such as the Microsoft SysInternals Suite, Wireshark, system logs, and application logs.
Many data stakeholders, server administrators, and other high-level access staff may request Domain Admin–level access because honestly, when it’s used the application being installed or the task being performed just works. There is no need to know what files are being modified, what is being accessed, or what tasks are being performed when it’s just allowed by default by giving the highest access available.
The use of service accounts is highly recommended. Service accounts are just that, accounts that are strictly used for controlling services and will never perform interactive logons. Keep a standard naming convention for these accounts, such as “service-txvbserver-mssql,” to allow ease of monitoring and alerting.
Local Administrator Password Solution (LAPS) is a free software from Microsoft that will perform random password allocations to local administrator accounts. This provides another added layer of security, making it difficult for an attacker to perform lateral movements from one device to the next.
Group Policy Objects
Group Policy Objects (GPOs) are used to centrally manage hardware and software settings in a domain configuration. They are broken up into both local and domain policies and can be applied to specific accounts or containers in a certain order to see differing results. GPOs can be a full-time job to maintain in some domains. With the massive amount of available settings, it can become a hassle and extremely complicated to keep track of them.
It’s one of the less glamorous jobs and sometimes is left alone as long as it’s somewhat working. Knowing and being able to plot out the order of operations for GPO processing, as well as a deep dive into each policy and setting, can not only improve the security of an organization, but speed up login times as well. While we won’t cover much when it comes to the actual design of the AD structure, there are many suitable resources for best practice structure guides.
Instead of starting from scratch attempting to build a secure GPO by going through each individual setting, there are fully configured templates available for use. National Institute of Science and Technology, or NIST, has a secure base set of GPOs that can be downloaded off of its website. A great first step for any organization would be to include these on any base image in the local policy. This will give the added benefit of a standard set of security settings if a computer is either taken off of the domain or somehow not added to it.
The NIST GPOs contain settings such as a standard password security requirements, disabling LM hashes for domain account passwords, disabling the local guest account, and preventing cached user credentials, as well as hundreds of other user and computer settings. They can be found well-laid out and documented on the website, along with the downloads and revision history.
Going one step further, the hands of server and desktop administrators can be forced to follow proper process while performing new installs. While it is not possible to create a GPO linked to the default Computers or Users OU in Active Directory, it is possible to force all newly created accounts to whatever OU makes the most sense. This gives the ability to only allow certain functions that will prompt the helpdesk or other administrator to move the account to the correct location. With a simple command running in an elevated PowerShell session, all of the computers that are joined to the domain will automatically end up in the OU of your choosing. Now this gives the ability to control the new default location of these accounts:
redircmp"OU=BOBSTEAM,OU=ALLTHEHACKERS,DC=YAYBLUETEAM,DC=local"
EMET
So first things first. A little explanation of the Enhanced Mitigation Experience Toolkit (EMET) from Microsoft straight from its website:
The Enhanced Mitigation Experience Toolkit (EMET) is a utility that helps prevent vulnerabilities in software from being successfully exploited. EMET achieves this goal by using security mitigation technologies. These technologies function as special protections and obstacles that an exploit author must defeat to exploit software vulnerabilities. These security mitigation technologies do not guarantee that vulnerabilities cannot be exploited. However, they work to make exploitation as difficult as possible to perform.
EMET works by injecting an EMET.dll into running executables to provide memory-level protections and mitigations against common exploit techniques. Nothing is perfect—several individuals have demonstrated how to circumvent EMET; however, it does become much more difficult and has to be built into the exploit.
If you are new to EMET, you first need to install it, baseline your applications, and create templates for which types of applications will be covered within it. The big misconception for large organizations is that deploying EMET will break everything. The truth of the matter is that EMET only protects what is specified, tested, and configured within the configuration profile (XML). Applications need to be specifically configured to be protected under EMET.
EMET Support
Microsoft has decided to only support EMET until July 2018, as a majority of its controls are automatically included into newer operating systems. However, we still recommend installing it on Windows endpoints at this time.
Basic Configuration
Once the installation is complete, you should notice an icon on the bottom right of your screen that looks like a lock:

Double-click the lock icon, and the default interface for EMET 5.1 will be displayed, as shown in Figure 10-3.
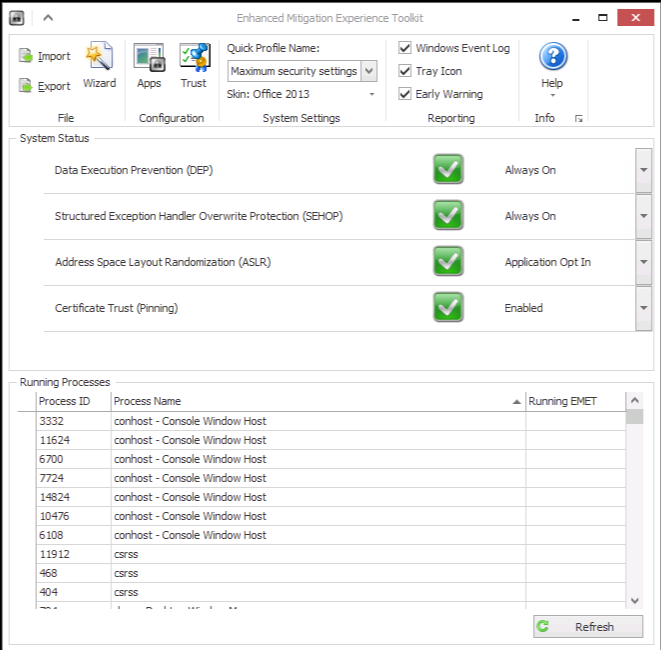
Figure 10-3. EMET 5.1 interface
The lower section of “Running Processes” contains the applications that are currently protected by EMET. By default, EMET will protect common applications such as Java, Adobe, and Internet Explorer. It does not, however, protect anything that is not specified other than these common applications. Since we previously specified “Use Recommended Settings,” it will select the default applications just mentioned.
Note
A protected application would have a green check mark under “Running EMET” on the lower righthand side.
Since EMET works by injecting a DLL into the executables memory space, whenever we configure any new process to be protected by EMET, it will require us to close the application or service and restart it. It does not require a full restart, just the services or applications themselves.
In the System Status section of EMET, ensure that DEP is set to Always On, SEHOP to Always On, and ASLR to Application Opt In. The next is certificate trust pinning, which checks certificate security. This setting can be troublesome when deployed to common workstations and endpoints due to the fact that the certificate management field in most of the internet is extremely messed up. This will typically trigger alerts for the end user and cause confusion. You may want to disable this feature for endpoints.
In the top middle of the screen, we recommend configuring the settings for the Quick Profile Name field to Maximum Security Settings.
Next, select the Apps button on the top middle left to open the application window, as shown in Figure 10-4.
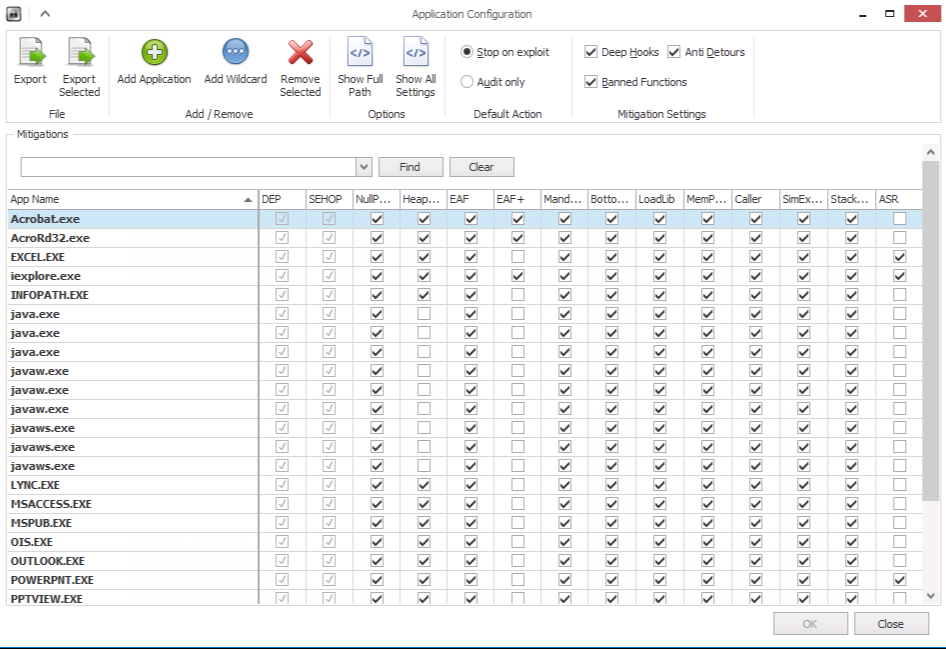
Figure 10-4. EMET 5.1 application configuration
On the top left, ensure that Deep Hooks, Anti Detours, and Banned Functions are selected. These should all be highlighted as these are default configurations of EMET 5.x. Also ensure “Stop on exploit” is selected. The only time you need to deploy “Audit only” is when initial testing is being done and you are experiencing application crashes. EMET will notify you when it blocks something from running versus actually stopping it. The protections can then be fine-tuned to not block a certain protection for normal application functionality.
Custom Configuration
Enterprise users and tech-savvy folks will want to incorporate additional applications for added protection. This is highly recommended for enterprise deployments as it provides uniform configuration. If templates are being created, they should be broken up into two separate categories, one for servers and another for workstations/endpoints.
To add a new application, you can simply select “Add Application” and point EMET to an executable you want protected. Protection mechanisms can be broken up as follows:
- Client-side attacks
-
Applications that can be used against a workstation or server that can be leveraged for remote code execution (RCE). These are typically third-party applications that accept some form of input, whether it’s a file or commands. For example, Foxit Software is a PDF reader commonly used as a replacement for Adobe.
- Server/service attacks
-
These are categorized as services, ports, and protocols that could be subject to attack. A little bit of caution is required here because Microsoft’s stance has been to protect mostly client-side attacks from exploitation. However, common services are also frequently attacked. EMET can be deployed on services in order to add additional protection. A common deployment scenario that we typically see is placing EMET over IIS, SMTP (transport), RDP, SMB, RPC, and other commonly attacked services.
Warning
Please note that this is not a recommended practice from Microsoft. However, we haven’t seen any compatibility issues in our experience by placing EMET on these services.
Once you have determined what applications to add, there’s another section that makes it super simple to configure common services that are already running. Exit out of the apps menu and go back to the original EMET home screen. Under the section “Running Processes” is a list of all processes running on the current system. Skim through the processes and identify the services you want to protect. Simply right-click the executable process and select Configure Process. This will automatically add EMET to the applications list for protection.
Enterprise Deployment Strategies
For enterprise users, there are two main deployment methods that work successfully for both small and large organizations. The first is handling configuration changes through patch management software, such as System Center Configuration Manager (SCCM). Changes can be made to the template and the XML pushed to each system through SCCM, when changes are needed for compatibility or enhancements. EMET can also be managed through group policy; however, the group policy settings are limited in nature and do not have the same granularity as utilizing the XML deployment methods.
One major catch is also creating a scheduled task to perform an EMET_Conf -refresh upon logon to ensure the latest policies are pushed when a new user logs in to her machine.
The second method, which is a more resilient option, is to automatically refresh EMET policies via a scheduled task and a remote file share. In this case, EMET would be configured completely, tested with a pristine XML, and then exported. This can be done either through the GUI or from inside the EMET directory. The command to run is:
EMET_Conf.exe –export EMET_Endpoint_Profile.xml
The template will now be exported appropriately. Either select a current GPO from the environment or create a new one for this purpose. Select properties on the GPO, grab the Unique GUID, and document the number (looks something like {343423423-32423432-324324-324-32432}).
Next, go to the sysvol share on a domain controller and navigate to sysvol\domain\Policies\{my-gpo-guid}.
Place the EMET_Endpoint_Profile.xml file under that group policy object.
Now that you have your profile here, whenever you need to make changes just replace the XML file in this location (either for endpoint or server or both).
Note
The XML profile name must remain the same since we will be creating a scheduled task that calls the specific file.
Since this is a sysvol share, anyone that is a part of the domain users group will have access to this group policy object and file in order to import it eventually into EMET.
We now need to add a scheduled task to group policy. There are two different options: the first is creating a scheduled task upon logon (the most common deployment) and the other second is having it run at certain intervals (say, every hour). Under the group policy that has been selected, navigate to Computer configuration→Preferences→Control Panel Settings→Scheduled Tasks, and select New Scheduled Task, as shown in Figure 10-5.
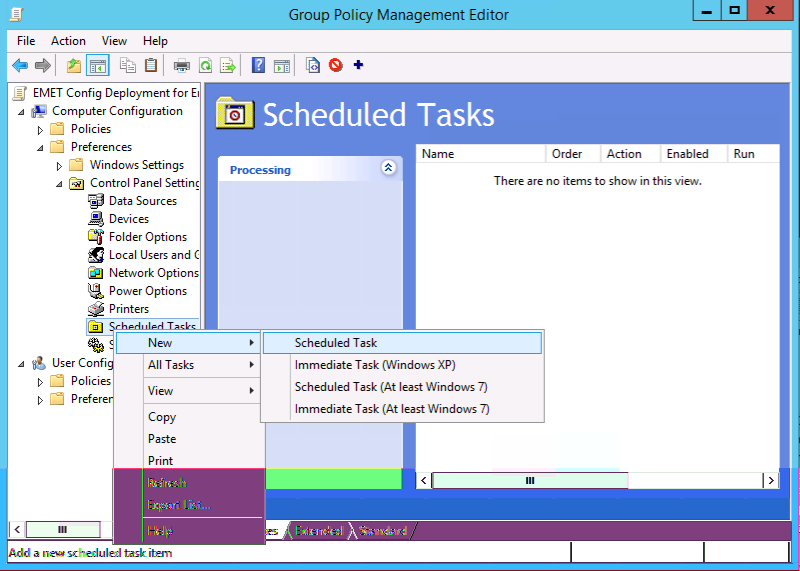
Figure 10-5. Adding a scheduled task
Select a name (in this case, we used “EMET Update”), navigate to the EMET 5.1 program files directory, and select the “EMET_Conf.exe” executable. For arguments, use the --import flag with EMET, which will import the XML file and select your domain controller to pull the group policy from. In this case we used the example of “serverdc1” and provided the path to our GPO, and pointed to the EMET_Endpoint-Profile.xml that was just created (see Figure 10-6).
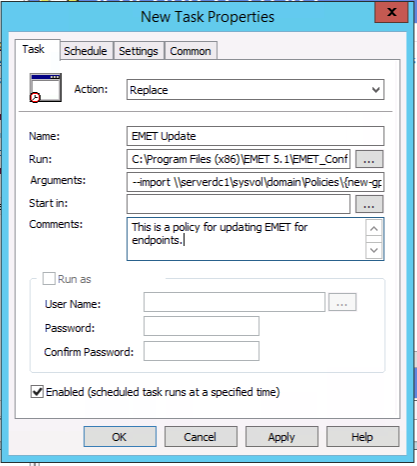
Figure 10-6. New scheduled task
You can also specify when to run this XML file: upon logon, daily, hourly, weekly, or whatever your personal preferences are.
There will now be a scheduled task and whenever the XML file is replaced in that group policy folder it will automatically refresh to the user population without the need to deploy additional packages companywide through something like SCCM.
MS-SQL Server
SQL Servers can be a very easy target for attackers if not configured and patched properly. A wide variety of tools and methods provide privilege escalation and access to database information. In later chapters we will cover certain ways to implement security by obscurity as additional protection, as well as a type of “canary in the coal mine” type of honeypot that will also aid in the overall security monitoring.
When Third-Party Vendors Have Access
It is a common practice to give vendors support access to the database or database server that they support. Some security considerations that are vendor-specific are:
-
Require the vendors to use SQL Server’s native security instead of one predefined account for all user connections. When only one user account accesses the data, accountability is lost.
-
When new applications are purchased, ensure that clients will not be connected to the SQL Server using a login and password stored in a connection string.
-
Audit vendor configurations when new applications are purchased.
-
Ensure that the vendor does not store unencrypted logins and passwords required by the application in .sql files, .xml files, .cfg files, .ini files, or record them in .log files.
-
Ensure the authentication and activity of vendor accounts are monitored, as well as disabled when not in use.
-
Do not allow the vendor to control/use the SA login. A vendor should not require the SA login for equipment that your organization owns.
-
Do not store SQL logins and passwords unencrypted in plain text files of any kind.
MS SQL Authentication
SQL Server supports two authentication modes. The mode is selected during installation, but can also be changed later. When authentication modes are changed, all client connections will also need to be changed to the new mode in order for the server to remain operational. The security mode required is determined by the type of client connections used with the application databases on the SQL Server. If all client applications support trusted connections, use Windows Authentication mode. If some clients do not support trusted connections, use Mixed mode:
- Windows Authentication mode
-
This method relies solely on Windows authentication of the login. Connections using this mode are known as trusted connections. This is the most secure mode, as it does not send logins and passwords over the network unencrypted. Use Windows Authentication mode whenever possible. When Windows Authentication is enabled, Windows credentials are trusted to log on to SQL Server and passwords are not passed across the network during authentication.
- Mixed Authentication mode
-
Logins can be authenticated by Windows Authentication or by SQL Server Authentication. Mixed mode is available for backward compatibility with legacy systems. In order to access data from a SQL Server database, a user must pass through two stages of authentication—first at the SQL Server level using a SQL login and then at the database level using a database user.
SA User Security
SA is the built-in system administrator account that exists on every MS SQL Server. Because it is well-known and has full rights on the SQL Server, it is often targeted by malicious people. The SA login cannot be deleted. The SA login can be renamed, but that doesn’t change its SID (which is always 0x01) and it can still be found. Members of the sysadmin fixed server role have complete control of the SQL Server.
Some general SQL authentication best practices are:
-
Have a strong password (as required by the SQL install).
-
Limit the number of logins with sysadmin privileges.
-
The service account running MS SQL needs to be a sysadmin with a strong password.
-
Always run SQL Server services by using the lowest possible user rights, such as a minimally privileged domain account. Many server-to-server activities can be performed only by a domain user account. Avoid granting additional permissions to this account.
-
Never connect clients to the database using the SA account in any connection string, ODBC connection, OLE initialization file, etc. This includes interfaces and report writers. Use the least powerful login possible.
-
Never store the SA password in a file of any kind other than password safe. No sysadmin password should ever be stored.
-
Avoid using the SA login; pull it out for emergencies only.
If Windows Authentication is being used, the SA account is disabled.
Enable it, assign a strong password, disable it again, and set up monitoring of any account activity surrounding its use. Why? A malicious person can easily change the server to Mixed Authentication mode by updating the registry and restarting the SQL service. They then have the ability to change the SA password to one of their choosing.
To change this setting in SQL Server Management Studio, right-click the server and select Properties→Security page. Under Server Authentication, click the radio button for SQL Server and Windows Authentication mode, enter and confirm a strong password, and click OK to save the change. Following this step, go back to the security page and set the authentication mode back to Windows Authentication and click OK to save.
Conclusion
There are countless configuration possibilities across all Microsoft products, however we hope that this will at least cover the low-hanging fruit and give you the ability to tackle the next hurdle in the environment. A great number of commonly scripted offensive attack scenarios can be mitigated by creating a structured and least privileged Microsoft environment. While Microsoft products can be the bulk of an enterprise organization, it is far from the only operating system that you need to consider. We will also cover Linux and Mac operating systems in later chapters.
1 We’re not doctors, no guarantee.