Table of Contents for
RESTful Rails Development
 RESTful Rails Development
Published by
O'Reilly Media, Inc., 2015
RESTful Rails Development
Published by
O'Reilly Media, Inc., 2015
- Cover
- nav
- RESTful Rails Development
- RESTful Rails Development
- section
- Preface
- Preface
- 1. From Hypertext to Hyperdata
- 2. Getting Started with Ruby on Rails
- 3. First Adventures in API Design
- 4. The REST of the World
- 5. Designing APIs in RoR
- 6. Asynchronous REST
- 7. Testing RESTful Services
- 8. Microservices and Microapplications
- 9. Mapping Data Streams onto an Application UI
- 10. Deploying an API
- 11. Managing an App Ecosystem
- 12. Consuming Data Streams: Integrating External APIs in Your Application
- 13. Device-Independent Development
- 14. Data Analytics
- 15. Scaling Gracefully
- 16. Privacy and Security
- A. HTTP Quick Reference
- Index
- About the Author
- Colophon
Chapter 13. Device-Independent Development
When you develop a web app you are in fact developing an application expected to run on a number of different devices, which will interact with it in a way that will feel both web-like and native at the same time. When you access Gmail or Twitter or Facebook, you are still accessing a website and interacting with it in a way that resembles the way you would surf a website, even though it feels like a software application with an interface and functionality that do not really follow the typical website model. Furthermore, the Web is not accessed only by personal computers. There are mobile devices and tablets of all species and form factors surfing and exploring apps and websites, and there are also other kinds of devices and hardware platforms that just consume data. In this chapter we will see how you can easily integrate these classes of devices and have your application not only cover the mobile app space, but also serve customers in the IoT field.
Web Development Is a Broad Term
Web development has evolved considerably over the last few years. In the beginning, we were used to interacting with static websites, but as websites grew in complexity we started to get used to pages that were more like applications than simply browseable text documents.
When you are developing for the Web, you are developing for a multitude of devices that will need to access the same application seamlessly. There are different advantages to developing rich graphical applications that are able to work cross-platform on the Web, rather than native applications. Native applications need to be developed for each and every target device, and often in different languages. On the other hand, the Web is already cross-platform by design. Any device that can access the Internet and has a browser can access your application.
Web applications feel and act more like native applications than simply hypertext or old-fashioned static websites. By the term native application, we mean a software program that exposes a graphical user interface (GUI). In a GUI, users can manipulate graphical elements, as opposed to just interacting with the application through text commands. Web applications are therefore evolving into complex graphical applications that can also use hyperlinks to navigate to and communicate with resources on the Web.
The great advantage of the Web as a communication platform is the possibility to easily find resources through URLs. URLs can be easily shared and bookmarked, and this key feature makes web applications superior collaboration tools.
We can think of web applications as interfaces to complex systems, comprising a number of different APIs and feeding different interfaces on a variety of devices (not just personal computers). We can also use web frameworks to develop applications not only for the Web, but for a variety of platforms.
Developing for Mobile
Developing for mobile, handheld devices means developing for platforms that might have different energy constraints, lower and different resolutions, diverse operating systems, and different browsers used to access the Web. In such a scenario, making a “mobile application” can actually mean three different things: you can either develop a native application in the language of the platform you choose, or develop an HTML app that can be used cross-platform, or develop a hybrid application. A hybrid application will use some aspects specific to the platform where it will be running, while also implementing part of its logic in HTML.
Usually native applications make better use of the platform-specific features and HTML apps do feel a bit clumsier, but things are evolving rapidly, and more often than not you might ponder the two options and find equal benefits in both of them.
The benefit of developing in HTML directly is that you will be able to reuse the majority of your code on different devices, while if you develop a native app you will be able to make the most of the device-specific settings and system characteristics.
There are also a variety of solutions and frameworks that will allow you to write your app in a language that you already know, like JavaScript, HTML5, or Ruby, and translate it for you into a native application.
Finally, different platforms are already moving toward native HTML development environments. Firefox OS, an open source mobile operating system developed by Mozilla, is one of these.
Build native applications in a language you already know
Learning yet another language and becoming proficient with it is a challenge that we are not always willing to accept. This is especially true when we are already overloaded with developing and running a product on our own. In such a situation, we might consider developing in a framework that will do the hard work of translating the app to the native device language for us.
We have a few options to do this in Ruby already, such as the following:
- RubyMotion
- A toolchain that lets you quickly develop and test native apps for iPhone, iPad, Mac, and Android (beta) using Ruby.
- MobiRuby
- A wrapper for mruby, which is a minimalistic implementation of Ruby. It is maintained and developed by the chief designer of Ruby, Matz.
You can also choose a framework that lets you develop in HTML5 or JavaScript, like:
- PhoneGap
- An open source framework for quickly building cross-platform mobile apps using HTML5, JavaScript, and CSS.
- Titanium by Appcelerator
- A development environment for creating native applications across different mobile devices and OSes including iOS, Android, and BlackBerry, as well as hybrid and HTML5 apps. It includes an open source SDK, an Eclipse-based IDE, an MVC framework, and Cloud Services to integrate a mobile backend.
Streaming Data into a Firefox OS App
Firefox OS is the operating system designed for mobile devices developed by Mozilla and the Firefox community. It is designed to use HTML5 entirely and comply with open web standards.
The interesting aspect of Firefox OS for web developers is that the entire user interface is a web app capable of displaying and launching other web apps. Therefore, you can easily develop and modify Firefox OS apps and user interfaces using your knowledge of HTML, CSS, and JavaScript. This means that you get direct enhanced access to the mobile device hardware and services, like you would if you were to build a native app on Android or iOS.
Firefox OS is based on a Linux kernel booting into a Gecko-based runtime. Gecko is the rendering engine on Firefox OS used to display web content.
Gecko
Gecko is the layout engine developed by Mozilla and used in different Mozilla projects. Its original name was NGLayout, but that was changed along the road. Gecko’s function is to read web content, such as HTML, CSS, XUL, and JavaScript, and render or print it. In XUL-based applications Gecko is used to render the application’s user interface as well.
At the UI layer of Firefox OS we find Gaia, which is responsible for drawing everything that appears on the screen after the OS starts up and for handling the fundamental functions of the phone such as settings, calls, SMSes, taking and storing photos, etc.
Gaia is entirely written in HTML, CSS, and JavaScript. It interfaces with the underlying operating system and the device hardware through web APIs implemented by Gecko.
Gaia is designed to run on Firefox OS devices, but it can be implemented on other operating systems and web browsers; however, its functionalities might depend on the capabilities of the browser and device in use.
Gaia
Gaia is the user interface application for Firefox OS devices, designed as a web application running on top of the Firefox OS software stack.
Firefox has also developed the Firefox Marketplace, a channel for publishing web applications and making them discoverable by users of Firefox OS, Firefox for Android, and Firefox for Desktop.
Mozilla marketplace was built with the goal of bringing openness, freedom, and user choice to the world of mobile apps. At the same time it also provides a platform to publish applications across different devices. Figure 13-1 illustrates the process of publishing an app to the marketplace.
An installable open web app is just a normal web application or website, built using familiar web technologies like HTML, CSS, and JavaScript. The difference resides in a set of additional feature that are made available on the Firefox platform.
Therefore, your starting point to create an open web app is just to build a web application with the technologies that you are already familiar with. To identify this as an installable web app, you add a manifest.webapp file to the web app root directory.
The manifest defines a set of properties of the app, such as its name, icons, and localization information. Most importantly, the manifest also defines the permissions the app needs to access device APIs to use features like the camera, device storage, Bluetooth, and SMS.
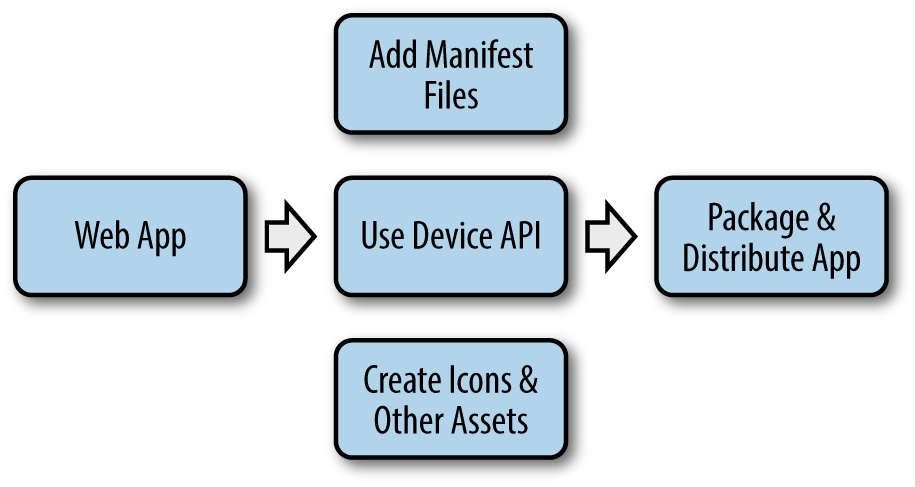
Figure 13-1. The process of publishing an open web app to the Firefox Marketplace
At this point, you might want to modify your web app and add additional functionality that makes use of the device APIs for which you have requested access in the manifest. For example, if you would like your app to be able to use the phone’s camera, you will need to add code to enable that.
Finally, you need to create the assets needed by your app, such as icons and images; then you can package and distribute it on the Firefox Marketplace.
Your app can be published to the Firefox Marketplace in a variety of ways. You have the choice to say if your app is a simple self-published hosted app (in which case you’ll have to write your own install functionality), or a packaged app distributed via the Firefox Marketplace (which handles the install functionality for you).
As this quick overview illustrates, Firefox OS is the perfect platform to start supporting mobile devices and quickly prototype a simple application.
Developing an Internet of Things App
The Internet of Things (IoT) is the interconnection of embedded computing devices and/or networks within the existing Internet infrastructure. It includes a variety of devices and networks of devices, from smart thermostats to biochips, and therefore IoT applications span a range of different protocols and domains. The fact that many IoT devices are embedded platforms implies a number of constraints and challenges involving minimizing the environmental and energy impact of such platforms, building adaptable and flexible products, taking telecommunication technologies into the physical world, and more. IoT devices often use short-range low-power WiFi for Internet connectivity, or carry solar cells to save battery power or to be energy independent. Yet this doesn’t mean that IoT devices cannot connect to the Web. Depending on the device specification and on the application scope, an IoT device or a network of IoT nodes can also be a node in a web app, or run a web app itself. This simple concept has been called the Web of Things (WoT), a term that refers to the idea of fully incorporating everyday physical objects into the World Wide Web by giving them a RESTful API. Devices like the Arduino or Raspberry Pi, for example, are perfectly capable of running a web server while also interfacing with various environmental sensors.
Rails on the Raspberry Pi
The Raspberry Pi feels like the perfect device to install a Ruby on Rails server on so you can start to experiment a bit with the kinds of applications that we have been building throughout this book.
The Raspberry Pi, as shown in Figure 13-2, is a low-cost minicomputer (starting at about $40), about the size of a credit card. It can be plugged into an external monitor or a TV, and is capable of performing an incredible variety of tasks. This is because a Raspberry Pi is capable of being programmed to do anything a desktop computer can do; it is also very portable and can easily interact with the outside world through sensors. Therefore, the Raspberry Pi has been used in a wide range of projects, from music machines to weather stations, from TV media centers to home automation projects, from arcade video games consoles to mini web servers.
Raspberry Space
If you thought the limit of the Raspberry Pi was the sky, think again.
If you have bought a new Raspberry Pi (even a model B+), your standard system, Raspbian, comes with a system Ruby (1.9.3p194) installed. This means you need to update.
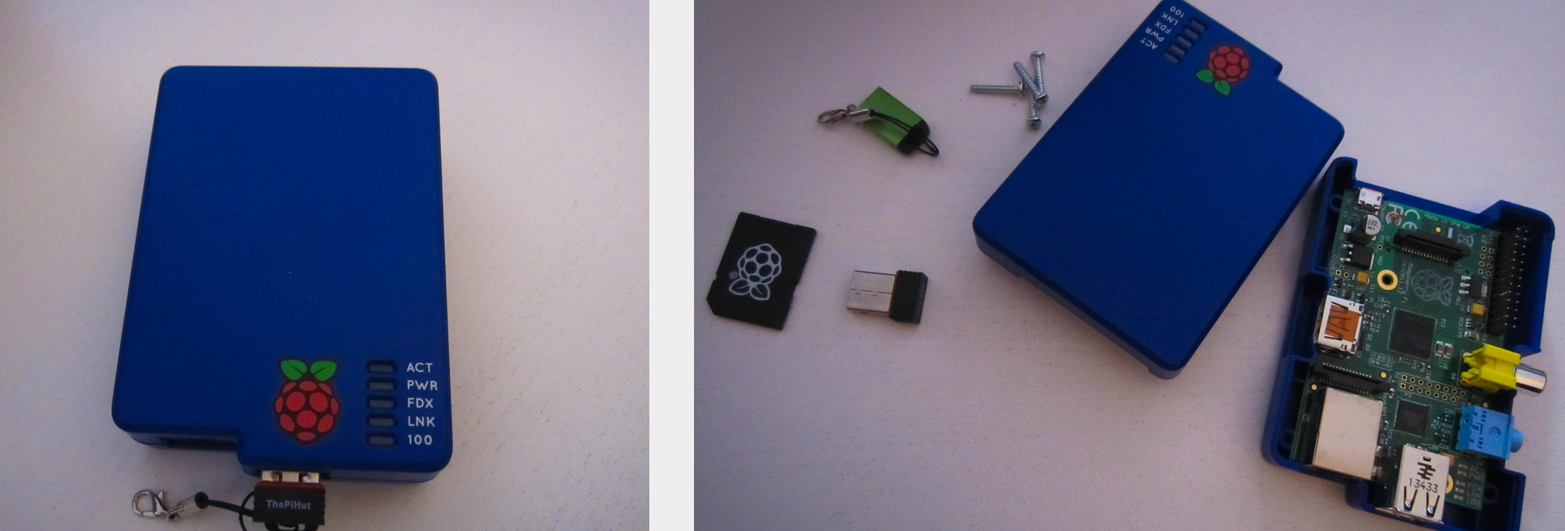
Figure 13-2. A Raspberry Pi kit
We will use rbenv to install Ruby, and since the Raspberry Pi comes with git pre-installed it won’t be too complicated. In a terminal window, run:
$gitclonehttps://github.com/sstephenson/rbenv.git~/.rbenv
Then export the rbenv folder to your PATH:
$echo'export PATH="$HOME/.rbenv/bin:$PATH"'>>~/.bashrc
And finally, run:
$echo'eval "$(rbenv init -)"'>>~/.bashrc
The last (optional) step is to install ruby-build:
$gitclonehttps://github.com/sstephenson/ruby-build.git\~/.rbenv/plugins/ruby-build
As mentioned when we set up our environment in Chapter 2, ruby-build is an rbenv plug-in. It provides the rbenv install command needed to compile and install different versions of Ruby on Unix-like systems.
If you want precise control over Ruby version installation, you can use ruby-build without rbenv; or, if you just want to stick with the system’s Ruby version, you can use rbenv without ruby-build.
At this point we will have to install some dependencies that we need to successfully run a Ruby on Rails application. The first step is to update our system packages:
$sudoapt-getupdate
Then we can start installing the needed libraries:
$sudoapt-getinstallautoconfbisonbuild-essential$sudoapt-getinstalllibssl-devlibyaml-devlibreadline6$sudoapt-getinstalllibreadline6-devzlib1gzlib1g-dev$sudoapt-getinstall-yopenssllibreadline6-devgit-core$sudoapt-getinstallzlib1glibssl-dev$sudoapt-getinstall-ylibyaml-devlibsqlite3-devsqlite3$sudoapt-getinstall-ylibxml2-devlibxslt-dev$sudoapt-getinstall-yautoconfautomakelibtoolbison$sudoapt-getinstallinstallruby-dev
We are now ready to install Ruby:
$rbenvinstall2.1.5$rbenvglobal2.1.5
Please note that this process might take a long time to finish.
With rbenv it is a good practice to run rehash after installing every new command-line tool on your machine:
$rbenvrehash
This ensures that the new commands are properly shimmed and available in the environment (see “rbenv” for details).
At this point we want to tell the Raspberry Pi not to install documentation for any of the gems we require. This option is particularly useful since the Raspberry Pi works with limited processing resources and disk space. We can do this by running the following command:
$echo'gem: --no-ri --no-rdoc'>>~/.gemrc
Also, Rails needs a JavaScript runtime available. We will install both ExecJS and Node.js.
ExecJS is a gem that allows you to run JavaScript code from Ruby. It chooses the best runtime available to evaluate your program, then returns the result to you as a Ruby object.
Node.js is a platform built on top of Google Chrome’s JavaScript runtime that is designed to facilitate the development of scalable, lean network applications in JavaScript. Its event-driven, nonblocking I/O model makes Node.js both lightweight and efficient, ideal for data-intensive real-time applications that run across distributed devices.
To install both of them we will run:
$geminstallexecjs$sudoapt-getinstallnodejs
Now, we can finally install Rails:
$geminstallrails$rbenvrehash
With that done, we can now pull our repository from Git and start to set up our application.
Creating the Raspboard App
The idea here is to create a dashboard that can pull information from different sources and display it in an informative way. To achieve this we will use Dashing, a Sinatra-based framework that lets you build dashboards designed to be consumed on a TV screen.
Sinatra is basically a framework like Rails, with a focus on being small, flexible, and minimalistic. Unlike Rails, it does not follow the Model-View-Controller pattern.
Sinatra
Sinatra is an alternative to Ruby on Rails that is small, lightweight, and minimalistic. It’s a free and open source web application library written in Ruby, dependent on the Rack web server interface. The framework can be used to quickly create web apps in Ruby with minimal effort.
We’ll run the dashboard on our Raspberry Pi, and the APIs that we have built up to now in Rails will be used to feed the dashboard.
Dashing can be installed as a gem from the command line:
$geminstalldashing
Once installed, you can create a new Dashing app as follows:
$dashingnewraspboard
Then cd into your new app directory:
$cdraspboard
And bundle:
$bundle
To start the Dashing server, just type:
$dashingstart
Then point your browser at http://localhost:3030 and enjoy your new board.
A new Dashing project comes with some sample widgets and sample dashboards that you can customize. The directory structure of a Dashing application is as follows:
- assets
- This folder contains the image and font files, and JavaScript/CoffeeScript libraries. Dashing uses Sprockets for asset packaging.
- dashboards
- This folder contains one .erb file for each dashboard, which contains the layout for the widgets.
- jobs
- This is where Ruby jobs for fetching data are stored (e.g., for calling third-party APIs like YouTube, Twitter, or our Wikipin application).
- lib
- This folder holds optional Ruby files.
- public
- The public folder is where you put any static files that your app serves. This is where you would keep the app favicon or a custom 404 page.
- widgets
- This folder contains all the .html, .css, and .coffee files for individual widgets.
Sprockets
In the words of its creator, Sam Stephenson, “Sprockets is a Ruby library for compiling and serving web assets. It features declarative dependency management for JavaScript and CSS assets, as well as a powerful preprocessor pipeline that allows you to write assets in languages like CoffeeScript, Sass, SCSS, and LESS.”
More info on Sprockets can be found at http://bit.ly/rack-sprockets.
Our objective in this section is to create a Dashing board and add a weather widget. We will begin by modifying the sample board (you can check out the Dashing demo online).
The first step is to create a module that can interact with our Weather API service. We will create it in the lib/ folder and call it weather.rb:
require'net/http'require'json'moduleWeatherWEATHER_URL="http://api.openweathermap.org/data/2.5/weather?"defget_weather(lat,lon)forecast={forecast:send_request("#{WEATHER_URL}lat=#{lat}&lon=#{lon}")}endend
To send the request to our weather service we will make use of our Restful module from Chapter 8. You can copy it from there (see “Discovering the /lib Directory”) as it is going to stay the same. We will also use the Wikipin module to retrieve our location and eventually places of interest around us. You can copy that from Chapter 8 as well. Rest assured that the complete Raspboard GitHub repository will contain all the libraries used in this project.
Now we need to create a weather job that will fetch the weather information we need. We will create it under the jobs/ directory and again call it weather.rb:
# To begin with we include all the modules we needincludeRestfulincludeWeatherincludeWikipin# Here for simplicity we hardcode a default location.# In this case these are the coordinates for Barcelona, Spain:LOCATION="41.23,2.09"# The following method finds your location through your IPdefsuggestions_by_ipifip=="127.0.0.1"get_weather("41.23","2.09")elseblock=Walk.request_block(ip).doc["ip_block"]ifblocklongitude=block["point"].scan(/\(([^\)]+)\)/).last.first.split(" ")[0]latitude=block["point"].scan(/\(([^\)]+)\)/).last.first.split(" ")[1]make_forecast(latitude,longitude)endendenddefmake_forecast(latitude,longitude)forecast=get_weather(latitude,longitude)end# This is the actual scheduler. You do not need to actually# run it every 1m.SCHEDULER.every'1m',:first_in=>0do|job|location=LOCATION.split(',')iflocation@forecast=make_forecast(location[0],location[1])else@forecast=suggestions_by_ipend# Here is where we define the fields in our data object.# We will use these later.if@forecastsend_event('weather',{name:@forecast[:forecast].doc["name"],country:@forecast[:forecast].doc["sys"]["country"],coord:@forecast[:forecast].doc["coord"],code:@forecast[:forecast].doc["weather"][0]["id"]})end
Once we have created our job we can create our actual widget. This will be composed of three files in the widgets folder. We will call this weather:
widgets/|weather/||||weather.coffee# The JavaScript file handling the events||weather.html# The HTML template||weather.scss# The CSS stylesheet
The JavaScript file handling the events is going to be quite simple in this case:
classDashing.WeatherextendsDashing.Widgetready:-># This is fired when the widget is done being rendered.# We do not need to implement this.onData:(data)->ifdata# Here is where we use the code from the data object to display# a weather icon.# One thing you need to do is modify the CSS class so that the# weather code returned from the API of your choice will match# the weather icon.$('i.climacon').attr'class',"climacon wi wi-night-#{data.code}"
Next is the HTML template for the widget:
<iclass="climacon wi"></i><h1 class="name" data-bind="name"></h1><h3class="country"data-bind="country"></h3><p class="updated-at" data-bind="updatedAtMessage"></p>
And finally the CSS stylesheet, written using Sass:
//-------------------------------//-------------------------------//Sassdeclarations//-------------------------------//--------------------------------$background-color:#9c4274;$title-color:rgba(255,255,255,0.7);$moreinfo-color:rgba(255,255,255,0.3);$weather-background:rgba(255,255,255,0.2);//-------------------------------//-------------------------------//Widget-weatherstyles//-------------------------------//-------------------------------.widget-weather{background-color:$weather-background;i.wi{color:#fff;font-size:500%;}.title{color:$title-color;}.more-info{color:$moreinfo-color;}.updated-at{color:rgba(255,255,255,0.7);}}
We will also include Weather Icons to have a nice weather widget. You can download the set, with CSS included, from http://bit.ly/weather-icons.
To use the CSS stylesheet included in Weather Icons, we will have to modify the way it loads external assets, like the actual font files:
@font-face{font-family:'weathericons';src:url('../assets/weathericons-regular-webfont.eot');src:url('../assets/weathericons-regular-webfont.eot?#iefix')format('embedded-opentype'),url('../assets/weathericons-regular-webfont.woff')format('woff'),url('../assets/weathericons-regular-webfont.ttf')format('truetype'),url('../assets/weathericons-regular-webfont.svg#weathericons-regular-webfontRg')format('svg');font-weight:normal;font-style:normal;}
With our Dashing app, once our assets are compiled these will be located not in the fonts folder, but in the assets folder.
You can now start modifying the CSS so that the weather code matches with icons in the Weather Icons set. For example, for a clear day you could use:
.wi-day-800:before{content:"\f00d";}
Figure 13-3 shows our final result.
It is certainly possible to extend our boards to include more useful information. The GitHub repository already includes a widget suggesting YouTube videos. You can try to integrate the API from the last chapter to suggest Radiohead videos to watch if the weather is bad, or a place to visit otherwise.
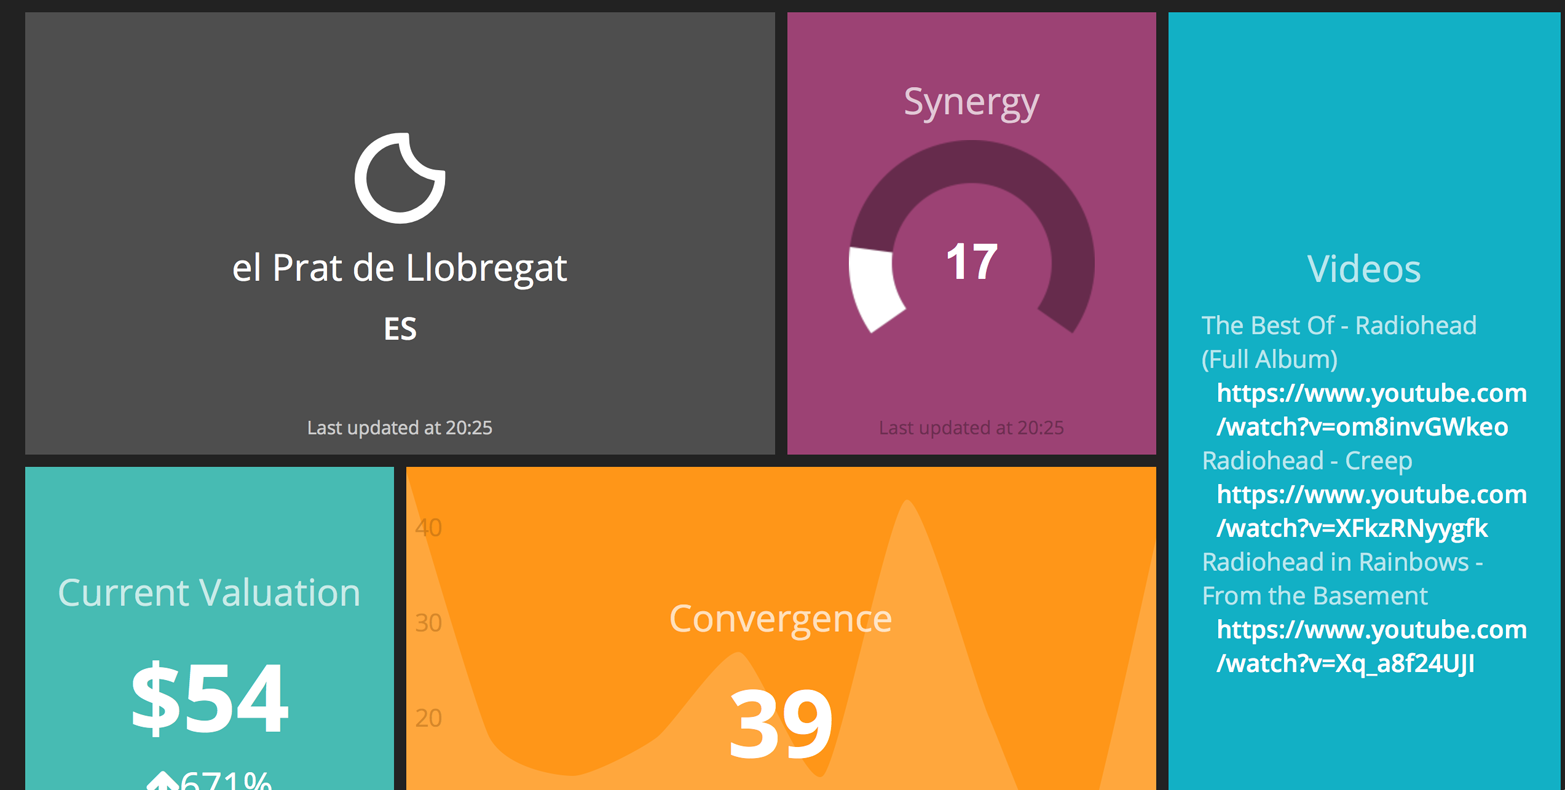
Figure 13-3. The Raspberry Pi dashboard project (final screenshot)
Note
The Raspboard GitHub repository can be accessed at http://bit.ly/raspboard.
Wrapping Up
In this chapter we have seen how we can design and develop device-independent applications, and how this approach to software development can be extended to different platforms. In the next chapter we will talk about analytics and how you can monitor and keep control over different data sources in your application.