Table of Contents for
RESTful Rails Development
 RESTful Rails Development
Published by
O'Reilly Media, Inc., 2015
RESTful Rails Development
Published by
O'Reilly Media, Inc., 2015
- Cover
- nav
- RESTful Rails Development
- RESTful Rails Development
- section
- Preface
- Preface
- 1. From Hypertext to Hyperdata
- 2. Getting Started with Ruby on Rails
- 3. First Adventures in API Design
- 4. The REST of the World
- 5. Designing APIs in RoR
- 6. Asynchronous REST
- 7. Testing RESTful Services
- 8. Microservices and Microapplications
- 9. Mapping Data Streams onto an Application UI
- 10. Deploying an API
- 11. Managing an App Ecosystem
- 12. Consuming Data Streams: Integrating External APIs in Your Application
- 13. Device-Independent Development
- 14. Data Analytics
- 15. Scaling Gracefully
- 16. Privacy and Security
- A. HTTP Quick Reference
- Index
- About the Author
- Colophon
Chapter 2. Getting Started with Ruby on Rails
This is a “getting started with Ruby on Rails” chapter—although it will not entirely be a “how to get Rails working” chapter. Our starting point will be exploring Rails by setting up the environment; I will then introduce the Rails application architecture, and finally we will create our first "Hello Rails" API.
Getting to Know Ruby on Rails
Ruby on Rails is a Model-View-Controller (MVC) framework. MVC is a software architectural pattern that divides a given application into three interconnected logic blocks. In the three blocks, the internal representation of some information or object (the model) is separated from the way the user interacts with this information (the controller) and the way this information is presented to the user (the view).
This means that in Rails there is a place where each line of code belongs: all the different models and controllers in your application interact in a standard way. Rails is also designed with the philosophy of favoring convention over configuration. Generally speaking, the developer doesn’t need to write any external metadata; everything just works.
Rails is also agile by design, and it handles changes very well. As a framework Rails was built around individuals and interactions rather than processes and tools; it favors working code over extensive documentation, transparency over complex configurations, customer collaboration over elaborate processes. Rails is built around the idea that a group of developers and their favorite editors can just start coding, and this is immediately reflected in what the users see. Rails has been lowering the barriers of prototyping and deploying for programmers and startups, and we are going to see how it can do the same for the next generation of RESTful web APIs.
Setting Up Ruby and Rails
Setting up your Rails environment is probably the hardest part of getting started with Rails. If you are familiar with Rails or with programming in general, you probably know the joy and frustration of setting up a working coding environment on a new computer. That’s exactly what we are going to do now.
The version of Ruby recommended for the current version of Rails (4.2 at the time of writing) on rubyonrails.org is 2.2. If you have an older working version of Ruby and you do not feel like updating it right now, just bear in mind that some things might be slightly different. You should also consider that Ruby 1.8.x has not been supported since Rails 3.2, while Ruby 1.9.3+ will be supported until Rails 5.
The procedure to install Ruby will vary depending on the system you are using. Generally speaking, there are three possibilities:
- Install from source
-
You can download Ruby and compile it yourself.
- Use an installer
-
Windows users can use RubyInstaller. For Mac OS X users, Ruby is included with the developer tools.
- Use a version manager
-
Like rbenv or RVM.
rubyonrails.org recommends managing your Ruby installation through rbenv, although there is some controversy on the matter. Both rbenv and RVM are extremely easy to use: rbenv is lighter and has fewer features; RVM is more complete and mature.
In reality, rbenv “only” manages Ruby environments, allowing you to switch quickly between them, either locally or as a system-wide default. RVM manages not only the Ruby environment but also Ruby gems. Some say this is too much work for RVM, especially when Rails provides another tool to manage gems, Bundler.
If you are interested in the differences between RVM and rbenv, I recommend you start reading some of the endless discussions in the community. It is always interesting to get to know different points of view. We will follow rubyonrails.org’s suggestion and consider rbenv our standard Ruby environment manager; nevertheless, we will go through RVM installation as well, in case you prefer that option.
RVM
RVM is a command-line tool that allows you to easily install, manage, and work with multiple Ruby environments from interpreters to sets of gems.
The website provides a quick guided install option as well as detailed documentation explaining the different ways in which users can install RVM on their machines.
There are three installation modes for RVM:
- Single user
- RVM is installed within a particular user’s $HOME.
- Multiuser
- RVM is usable by every user on the system. This is usually needed by server administrators.
- Mixed mode
- RVM is usable by all users on the system, but it will also provide isolated rubies/gemsets within a user’s $HOME.
We are going to assume you will be installing the latest release version in single-user mode. If this is the case, you just have to execute a simple command to install rvm with ruby and rails:
$\curl-sSLhttps://get.rvm.io|bash-sstable--ruby--rails
Note
If you wish to find out more, or you need other installation options, the RVM website will guide you through the installation procedures.
RVM is a powerful tool that does much more than just managing Ruby versions. In fact, it has been developed as a collection of tools to solve problems that Ruby developers often face. I recommend you read the documentation and project FAQ before making any decision regarding which is your perfect environment manager tool (if you haven’t got one already).
The important thing to note is that RVM is a complete package manager. This means it will manage both your Ruby and your Rails versions, unlike rbenv, which is mainly a Ruby manager.
rbenv
rbenv manages your Ruby installation. For Rails and gemset management, you should rely on Bundler. Bundler is an environment manager for Ruby projects that allows you to track and install the exact needed gems and versions. We will talk about Bundler when configuring our “Hello Rails” app in a few pages.
Unfortunately, you cannot use both rbenv and RVM; you need to pick one of the two. So, if you already have RVM installed and you would like to try rbenv, please make sure to fully uninstall RVM and remove any references to it from your shell initialization files before proceeding.
rbenv works by intercepting Ruby commands using shim executables injected into your PATH. It will then determine which Ruby version has been set for a particular application, and will pass your commands to the specified Ruby installation.
A shim in computer programming is a small library that intercepts API calls, changes the arguments passed, and handles or redirects the operations transparently.
rbenv inserts a directory of shims at the beginning of your PATH:
~/.rbenv/shims:/usr/local/bin:/usr/bin:/bin
rbenv then matches every Ruby command across every installed version of irb, gem (the Interactive Ruby Shell), rake, ruby, and so on.
Shims are used to pass the command along, so that if you run:
$rake
with rbenv installed the following will happen:
- The operating system will search your PATH for an executable file named rake.
- It will find the rbenv shim named rake at the beginning of your PATH, because this is where all the rbenv shims are located.
- It will run the shim named rake, which will pass the command along to rbenv, which in turn will forward it to the correct Ruby version.
To install rbenv you need some basic Git knowledge, or if you are on OS X you can use Homebrew. Homebrew is a package manager for OS X, a little bit like apt-get if you are familiar with the Debian system. You can download Homebrew from http://brew.sh.
Assuming that you are using Git, the first step will be to check out rbenv into a folder you have created beforehand by using the command:
$mkdir~/.rbenv
Note that this is a dot folder. A dot folder is a hidden directory that is not displayed by default. Hidden folders (or files) are usually used for user preferences or to store some utility state.
Now, execute the git command to clone the rbenv remote repository:
$gitclonehttps://github.com/sstephenson/rbenv.git~/.rbenv
Then add ~/.rbenv/bin to your PATH for access to the rbenv command-line utility:
$echo'export PATH="$HOME/.rbenv/bin:$PATH"'>>~/.bash_profile
If you are using Ubuntu Desktop you’ll need to modify your ~/.bashrc instead of ~/.bash_profile. If you are using Zsh, you should modify your ~/.zshrc file instead of ~/.bash_profile.
The next step is adding rbenv init to your shell to enable shims and autocompletion:
$echo'eval "$(rbenv init -)"'>>~/.bash_profile
As pointed out in the previous step, you should use ~/.bashrc on Ubuntu, or ~/.zshrc for Zsh.
Finally, you can restart your shell to apply the PATH changes. Opening a new tab or window usually will do.
To check if rbenv has been set up successfully, run:
$typerbenv#=> "rbenv is a function"
As an optional step you can also install ruby-build, an rbenv plug-in that provides the rbenv install command, which simplifies the process of installing new Ruby versions. I recommend installing ruby-build.
To do this, run:
$gitclonehttps://github.com/sstephenson/ruby-build.git~/.rbenv/plugins/ruby-build
After ruby-build is installed, you can run rbenv install -l to check the list of available Ruby versions.
To install the latest Ruby version, simply run:
$rbenvinstall2.2.2
Now that you have a fresh version of Ruby installed, you might want to set it. To set a local application-specific Ruby version, simply run the command:
$rbenvlocal2.2.2
To unset the local Ruby version, run this instead:
$rbenvlocal--unset
You can also decide to set a global default Ruby version. This is easily accomplished with the commands:
$rbenvglobal2.2.2$rbenvrehash
The rbenv rehash command is used to make sure that the shims in the rbenv directory match the correct Ruby commands across every installed version of Ruby.
Finally, do a system-wide gem update to make sure that all your gems are at the latest version:
$gemupdate--system
Note
Please refer to the rbenv repository for specific rbenv documentation.
Using an Installer
Using an installer can be the quickest way to set up your Ruby on Rails environment. All you have to do is download a package, and wait for the installer to do the hard work while you are pouring yourself some tea.
RailsInstaller can do this for you.
The Architecture of a Rails App
Rails is an open source web application framework built in Ruby. It is a full stack framework created by David Heinemeier Hansson in 2004–2005.
Rails is designed as a Model-View-Controller framework (Figure 2-1). MVC can be considered an architectural abstraction of object-oriented programming. The idea behind MVC is that it is possible to create a direct connection between what the user sees and what the programmer actually writes. The user-facing interface of the MVC framework—i.e., what the users see—is the view part. The model is the actual application logic: models describe the objects within an application. The controller defines the actions happening between views and models. In other words, controllers define how models are accessed from the views.
Model-View-Controller
MVC is a pattern for graphic user interface (GUI) software design, formulated by Trygve Reenskaug in 1979 while he was visiting the Xerox Palo Alto Research Center (PARC).
MVC was conceived as a solution to the problem of a user having to deal with large and complex data sets, creating the illusion for the user of seeing and manipulating the domain information directly. We can see how the MVC approach seems natural for RESTful applications and Rails.
In an MVC architecture, the model is where the state of the application resides. This state can either be transient or permanent. When the state is permanent it can be stored outside of the application—for example, in a database.
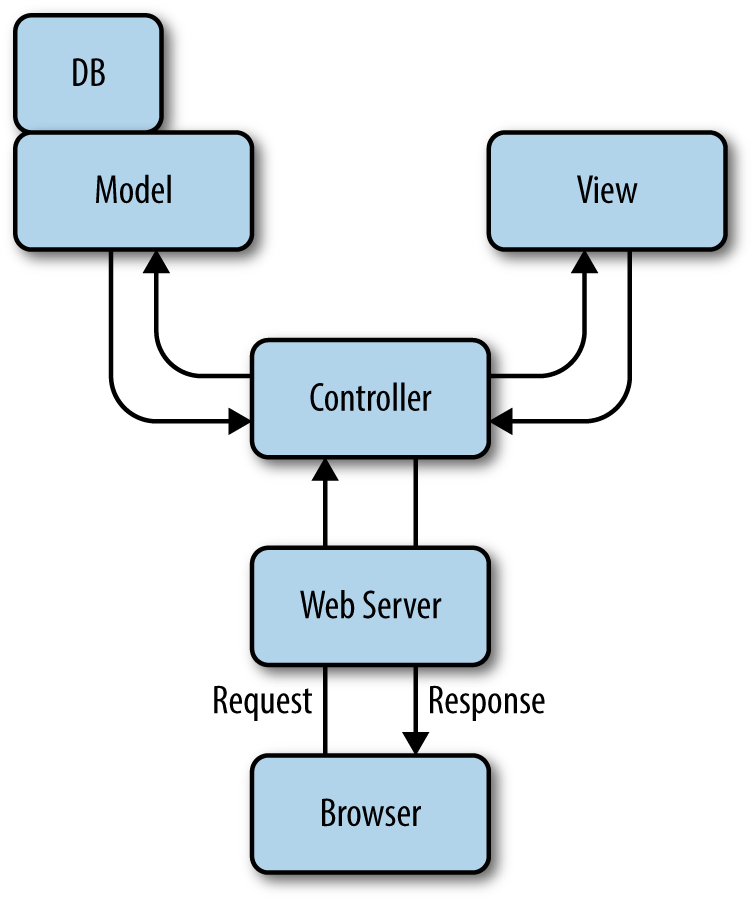
Figure 2-1. The MVC abstraction
The model is more than just the data it describes, though. You can think of the model as both the data object and the constraints associated with it.
The view, simply put, is the user interface. This is based on the data contained in the model and the actions passed by the controller.
The view itself never modifies the data; it just displays it. Many views could access the same model, and one view could ideally access more models.
The view creates all or some parts of a page that is displayed by the browser. Simply put, the most basic view is just some HTML code that displays some text.
Dynamic content in Rails is handled through templates. At the time of writing there are many (maybe countless) templating schemes available, the most common of which are Erb, slim, and haml. We will cover templating schemes in more detail in Chapter 9, when we map data streams into the application UI.
The controller is the logical center of a Rails application. It receives and handles events from the outside world, interacts with the model, and displays data back to the user through the appropriate view.
Most of the interaction between the user (view), controller, and data (model) is handled by Rails transparently. As a developer you can comfortably concentrate on application functionality. This aspect particularly makes Rails applications easy to develop and maintain.
The controller is also responsible for managing caching, helper modules, and user sessions.
In Rails applications, the web server will send requests to a router, which will forward the requests and parse them accordingly. The router identifies a particular method in the controller, which in Rails is called an action. The action might retrieve or interact with some data in the model, invoke other actions, and so on. The final result is sent to the view to be rendered for the user.
The MVC architecture provides a clear structure for programming and designing an application. Ruby on Rails is no different. Rails provides and enforces a structure; models, views, and controllers are developed separately with different functionality. The icing on the cake of Rails is that everything is put together as the program executes by using intelligent defaults already provided in the framework. This means the developer can concentrate on creating the application logic and forget about the rest. We will better understand how models, views, and controllers work in the next chapter, when we get our hands dirty with some actual development.
Object-Relational Mapping
Object-oriented programming (OOP) has always found it difficult to translate the object model into entity–relationship tables like those used in database management systems such as MySQL.
Object-relational mapping (ORM) is the process of converting data models built following OOP paradigms into entity–relationship database records. Using ORM, the properties and relationships of an object can be easily written to the database without having to translate programming logic into SQL statements, which means less database access code is required.
In Rails this is accomplished by Active Record, an implementation of the Active Record pattern introduced by Martin Fowler for objects carrying both persistent data and behavioral logic that operates on the data.
Active Record is responsible for handling all the operations that Rails uses to persistently store data. It provides several mechanisms related to the creation and use of model objects. For example, it allows us to:
- Represent models and their data.
- Represent associations between models.
- Represent inheritance hierarchies through related models.
- Validate models before they get persisted to the database.
- Perform database operations in an object-oriented fashion.
The last point is particularly important for Rails developers. Although you should always have a clear picture of the database supporting your application and how your code uses it, with Rails you can design your app by only thinking in terms of programming objects, without having to create an entity–relationship diagram.
Rails achieves this by providing some standard conventions that, if followed, do not require the programmer to write much configuration—and in some cases, no configuration at all—when creating Active Record models.
The idea is that explicit configuration should be needed only when you cannot follow the standard conventions. It is assumed that most web applications will use the default configuration.
ORM assumes you are using a relational database. There are also object-oriented databases available, and if you plan to use one of these you won’t be using Active Record; instead, you’ll use a different gem with a similar API to Active Record that provides object document mapper (ODM) functionalities for NoSQL database systems.
Bundler
Bundler is the default gem manager for Rails. Its stated mission is to “[manage] an application’s dependencies through its entire life, across many machines systematically and repeatably.”
Getting Bundler set up on your system is quite easy. Open a terminal window and run:
$geminstallbundler
With Bundler, dependencies are declared in a file at the application root. This file is called the Gemfile.
A Gemfile requires at least one gem source, a URL for a RubyGems server. If you run:
$bundleinit
a Gemfile with the default rubygems.org source will be generated:
# A sample Gemfilesource"https://rubygems.org"# gem "rails"
If possible, use https so your connection to the rubygems.org server will be verified with SSL. When you generate a new Rails application, this is done for you by Rails.
You can declare with Bundler the gems that you need, including version numbers:
source'https://rubygems.org'gem'rails','4.1.0.rc2'gem'rack-cache'gem'nokogiri','~> 1.6.1'
Most of the version specifiers are self-explanatory, but others have a special meaning.
For example, >= is self-explanatory, whereas ~> 2.0.3 is identical to >= 2.0.3, and < 2.1. ~> 2.1 is identical to >= 2.1 and < 3.0. ~> 2.2.beta will match prerelease versions like 2.2.beta.12.
Choosing an Editor
Ruby on Rails doesn’t have a so-called standard IDE that the majority of programmers use. Rails programmers tend to use all kinds of editors to write their code; we all have our particular tastes and preferences.
A noncomprehensive list of editors used, in no particular order, includes:
- Vim
- Emacs
- RubyMine (the closest thing to an IDE, probably)
- Aptana RadRails
- TextMate
- NetBeans
- Sublime Text 2
- RDT (Ruby Development Tools plug-in for Eclipse)
Choosing your perfect editor is really a matter of personal taste, though developers often get into editor wars.
Note
If you don’t believe me, check out https://xkcd.com/378/.
Hello Rails
To make sure that everything was installed correctly and to familiarize ourselves a bit with Rails, we are going to generate a simple “Hello Rails” API. This is like the standard “Hello Rails” app, except at this point we are not creating a view but an API returning a JSON representation of the “Hello Rails” string.
Start by verifying that Ruby was installed correctly:
$ruby-vruby2.1.2p95(2014-05-08revision45877)[x86_64-darwin13.0]
Also, make sure that SQL is installed on your system. Most *nix systems will already have SQLite installed; if you are using Windows, you can check the SQLite website for installation instructions. This command:
$sqlite3--version
should return the version of SQLite that is installed.
If you have set up your environment with RVM, chances are you already have Rails installed. If not, you can install it by using the gem install command provided by RubyGems:
$geminstallrails
To verify that everything has been installed correctly, run the following:
$rails--version
Rails comes with a set of scripts, called generators, designed to make developement easier and faster. The new application generator creates everything that is necessary to start working on a new app. To use the generator, navigate to your workspace directory in a terminal window and type:
$railsnewhello_rails
Rails will create a skeleton app for you and run bundle install at the end with a default Gemfile. You will see a list of create actions, and then Bundle fetching gems and resolving any dependencies:
createcreateREADME.rdoccreateRakefilecreateconfig.rucreate.gitignorecreateGemfilecreateapp...runbundleinstallFetchinggemmetadatafromhttps://rubygems.org/..........Fetchingadditionalmetadatafromhttps://rubygems.org/..Resolvingdependencies...Usingrake(10.3.2)...Yourbundleiscomplete!Use`bundle show [gemname]`toseewhereabundledgemisinstalled.
The list of autogenerated files and folders constitutes the Rails app structure:
- app/
- This folder contains the controllers, models, views, helpers, mailers, and assets for your application.
- bin/
- This folder contains startup scripts and other scripts used for deploying or running your app.
- config/
- Files in this folder are used to configure aspects like routes and databases. We will incrementally discover files in this folder as we start developing different aspects of our applications.
- config.ru
- This file contains the Rack configuration for Rack-based servers used to start the application.
- db/
- This folder is where the current database schema is stored, as well as all database migrations.
- Gemfile
- This file specifies the gem dependencies needed for your Rails application.
- Gemfile.lock
- This is where Bundler records the exact versions of all the gems that were installed. When the same library/project is loaded on another machine, running
bundle installwill look at Gemfile.lock and install the exact same versions, rather than just using the Gemfile and installing the most recent versions. - lib/
- This folder contains extended libraries.
- log/
- This folder contains the application logs.
- public/
- This folder contains static files and compiled assets.
- Rakefile
- This file locates and loads tasks that can be run from the command line. Rather than changing the Rakefile, you should add your own tasks by adding files to the lib/tasks directory of your application.
- README.rdoc
- This is a brief instruction manual for your application. You should edit this file to tell others what your application does, how to set it up, and so on.
- test/
- This folder contains unit tests, fixtures, and other test apparatus. These are covered in “Testing RESTful Services”.
- tmp/
- This folder holds temporary files (such as cache, PID, and session files).
- vendor/
- Third-party code goes in this folder. In a typical Rails application, this includes vendored gems.
Now we want to check if the newly generated app works. To do this, we will just start the Rails server:
$railsserver=>BootingWEBrick=>Rails4.0.4applicationstartingindevelopmentonhttp://0.0.0.0:3000=>Run`rails server -h`formorestartupoptions=>Ctrl-Ctoshutdownserver[2014-07-2113:29:27]INFOWEBrick1.3.1[2014-07-2113:29:27]INFOruby1.9.3(2013-11-22)[x86_64-darwin13.0.2][2014-07-2113:29:27]INFOWEBrick::HTTPServer#start:pid=25171port=3000
WEBrick is a web server distributed with Ruby by default. To see your application in action, open a browser window and navigate to http://localhost:3000. You should see the page in Figure 2-2.
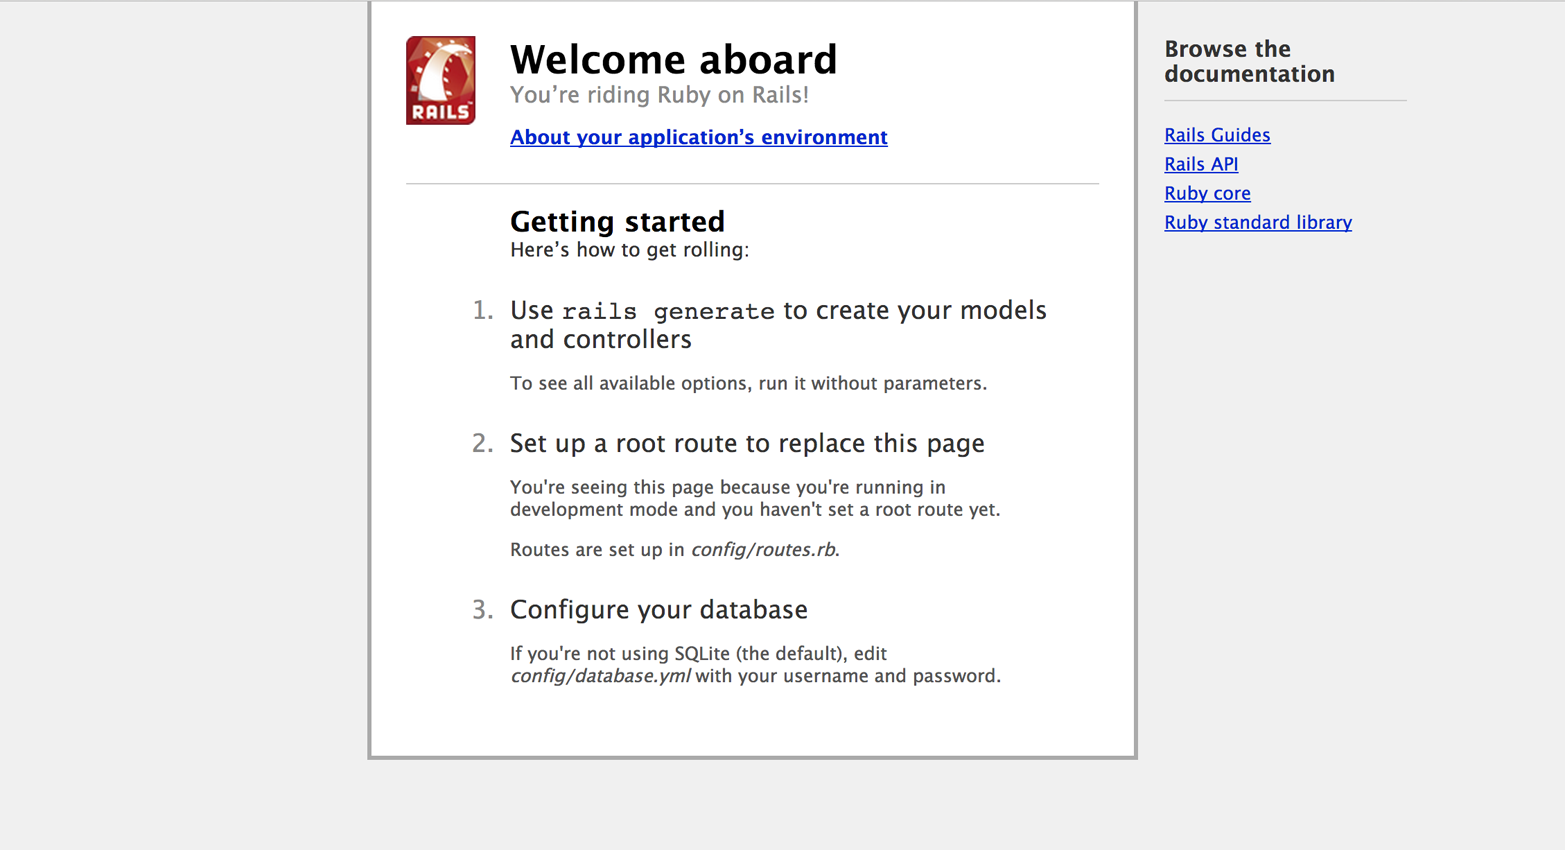
Figure 2-2. The default index screen of a Rails app
It’s now time for Rails to say hello in JSON format. The idea is to write an extremely simple API with a single endpoint. When this is called it will just say “hello.”
The first step is to write a simple model. It doesn’t need to be stored in the database; it just needs to produce a JSON “hello” string. Create a file called hello.rb in app/models/.
We are going to define a Hello class with a simple to_json method. The method will simply return a JSON-formatted string, "{"hello": "<text>!"}":
require'json'classHellodefto_json(text)returnJSON.parse("{\"hello\":\"#{text}!\"}")endend
We are also going to generate a controller for our app. In a terminal window, type:
$railsgeneratecontrollersayhello
This will generate a controller called say with an action hello:
createapp/controllers/say_controller.rbrouteget"say/hello"invokeerbcreateapp/views/saycreateapp/views/say/hello.html.erbinvoketest_unitcreatetest/controllers/say_controller_test.rbinvokehelpercreateapp/helpers/say_helper.rbinvoketest_unitcreatetest/helpers/say_helper_test.rbinvokeassetsinvokecoffeecreateapp/assets/javascripts/say.js.coffeeinvokescsscreateapp/assets/stylesheets/say.css.scss
Note that not only the controller file was generated—Rails also took care of generating possible HTML, test, helper, JavaScript, and CSS files, to make sure your app skeleton is kept consistent with a standard configuration.
Of course, you can always delete the files you do not need and will not use. Or, if you don’t want Rails to generate the controller and the associated files, you can create a new say_controller.rb file in app/controllers/ and take it from there.
In your favorite editor, navigate to app/controllers/say_controller.rb, and modify it like this:
classSayController<ApplicationControllerdefhello@hello=Hello.newifparams[:user]render:json=>@hello.to_json(params[:user])elserender:json=>@hello.to_json("Rails")endendend
This will produce a controller answering only to JSON format with a hello message. If you add a user param to the URL, it will say “Hello <user>.”
To try it out, with the Rails server running, visit http://localhost:3000/say/hello.json?user=John in your browser.
Test-Driven Development
Test-driven development (TDD) is an approach to software development suggesting that you should first write the tests for some code, and then go ahead and write the actual code that would make those tests pass.
TDD has been embraced by many companies and developers for a while, especially in the Rails world. With time, though, some people have realized that TDD can best be applied to static testing done via unit testing. Unit testing is a testing procedure that takes individual units of a software application, such as one or more modules or procedures, and applies a set of tests to check if these are correct.
While unit testing verifies that individual modules are correct in isolation, facilitates incremental development and refactoring, and allows for bugs to be discovered early, many applications are data driven, and issues are often found at the intersections of particular data circumstances, configurations, and actual code. In this case, although models can still be unit tested efficiently, functional testing of the app as a whole, with actual data, is needed to consider the code sufficiently tested.
Testing was embraced by the Rails framework from the early days. In a way, we could say TDD is part of the DNA of Rails. Because every application interacts with a database, Rails relies on a test database populated with sample data for efficient testing. Functional testing is also possible to simulate browser requests, so you do not have to click through your application several times in your browser to make sure it works.
Rails creates a test folder called test/ every time a new Rails project is created using the command rails new application_name. The test folder is already structured so that the models directory contains tests for the models, the controllers directory contains tests for the controllers, and the integration directory contains tests involving a number of controllers interacting.
There is also another folder nested under test. This is the fixtures folder, and it will contain test data. The test_helper.rb file in test contains the default test configuration for the Rails application.
When our controller was generated, a test class was also created in test/controllers/say_controller_test.rb. By default the file contains a simple test asserting that calling the defined method succeeded:
require'test_helper'classSayControllerTest<ActionController::TestCasetest"should get hello"doget:helloassert_response:successendend
To run all of the tests for the application (in our case, just this single one), run rake test in a terminal window:
$raketest# Running:.Finishedin0.045843s,21.8136runs/s,21.8136assertions/s.1runs,1assertions,0failures,0errors,0skips
The test is running and succeeding. How exciting. Let’s write some more!
The first test we are going to write is going to assert that if no parameters are passed to the hello method, the response will be "{"hello":"Rails!"}":
require'test_helper'classSayControllerTest<ActionController::TestCasetest"should get hello"doget:helloassert_response:successendtest"should say hello rails in json"doget:helloassert_equal"{\"hello\":\"Rails!\"}",@response.bodyendend
Let’s run it again:
$raketest# Running:.Finishedin0.011128s,179.7268runs/s,179.7268assertions/s.2runs,2assertions,0failures,0errors,0skip
Now we want to make sure that if we pass a user parameter, the response is going to be "{"hello":"<user!>"}":
require'test_helper'classSayControllerTest<ActionController::TestCasetest"should get hello"doget:helloassert_response:successendtest"should say hello rails in json"doget:helloassert_equal"{\"hello\":\"Rails!\"}",@response.bodyendtest"should say hello john in json"doget(:hello,{'user'=>"John"})assert_equal"{\"hello\":\"John!\"}",@response.bodyendend
Let’s run it one last time:
$raketest# Running:.Finishedin0.015381s,195.0458runs/s,195.0458assertions/s.3runs,3assertions,0failures,0errors,0skips
Our tests are running, and we have verified that our code behaves the way we intended! I personally believe in TDD, although there is a bit of controversy around the issue and some developers have started to write blog posts claiming that TDD is dead. We are going to keep writing simple tests for our code to keep up the habit, but if you think the exercise is tedious, you can just skip the testing part.
Wrapping Up
In this chapter, we started to experiment with Rails development. I hope you had some instant gratification and you are now ready to roll up your sleeves and start creating and designing amazing RESTful services.