Table of Contents for
RESTful Rails Development
 RESTful Rails Development
Published by
O'Reilly Media, Inc., 2015
RESTful Rails Development
Published by
O'Reilly Media, Inc., 2015
- Cover
- nav
- RESTful Rails Development
- RESTful Rails Development
- section
- Preface
- Preface
- 1. From Hypertext to Hyperdata
- 2. Getting Started with Ruby on Rails
- 3. First Adventures in API Design
- 4. The REST of the World
- 5. Designing APIs in RoR
- 6. Asynchronous REST
- 7. Testing RESTful Services
- 8. Microservices and Microapplications
- 9. Mapping Data Streams onto an Application UI
- 10. Deploying an API
- 11. Managing an App Ecosystem
- 12. Consuming Data Streams: Integrating External APIs in Your Application
- 13. Device-Independent Development
- 14. Data Analytics
- 15. Scaling Gracefully
- 16. Privacy and Security
- A. HTTP Quick Reference
- Index
- About the Author
- Colophon
Chapter 9. Mapping Data Streams onto an Application UI
In this chapter we are going to venture into aspects of frontend programming and user interface (UI) design. We are going to discover Ember.js, a JavaScript framework, and a different MVC pattern. This is almost a non-Rails chapter, in which we discover how data streamed from our APIs is integrated into a web application to build what is defined as the user experience (UX). The application that will be designed and built in this chapter will use the Citywalks API and display the user’s walks on a map.
Wanderings in Frontend Land
Up to this moment we have been developing API-only applications. You may look at these apps as a sort of skeleton upon which different products can be built. Once you have some data streams, you can combine them in a way that others—users and services—can also consume and reuse.
Therefore, depending on what application you are working on, at a certain point you will need to venture into frontend programming.
Frontend development is defined as the development of those elements of an application that the user sees and directly interacts with. Ultimately users cannot directly interact with JSON; they will need visual elements to manipulate the information that the application is receiving from the different data points.
The widely held misconception about frontend development is that it mainly means creating the application’s graphical interface—i.e., arranging the information containers and action elements in a way that the user will find both visually appealing and intuitive and pleasant to use.
As we have seen, a core concept of RESTful services is that each call is stateless. Either the server or the client will have to retain state information. Sometimes, though, managing state only on the server side becomes both difficult and expensive.
Before Ajax, most websites were mostly static documents, served from the server as a response to an HTTP page request and with a single HTTP response, which contained the full HTML document.
With websites evolving into web applications and becoming more complex, clients and servers now rely less on passing actual markup information and more on passing just data. In this scenario, JavaScript frameworks have become an important aspect of web application development.
There are a number of situations for which you should consider stateful web front-end development. Imagine for a minute that the user has sent a request to the server by clicking a button. Certainly, you could grey out the button or display a circling wheel while you wait for the server to confirm that the action has been performed. Now imagine that you know that 99% of the time when you click the button the request is going to complete successfully—you might feel more inclined to hide the button and show the result to the user right away, without waiting for the server to reply. This will ensure a smoother interaction with the app, and in the infrequent event that the request fails, you can always show an error message and restore the previous state in the UI.
Using a framework ensures that your application will behave similarly to a native application, even if it is on the Web.
Furthermore, a framework has a number of advantages over the use of jQuery libraries only. jQuery works well if you just want to add light interactivity to your app. If you start introducing more state information to your application, you have to store data in your document object model (DOM), usually in data-* attributes, which implies having to create a system to easily find and fetch those attributes based on where and when events were triggered.
Generally speaking, a software framework is a set of code libraries, tools, APIs, compilers, and support programs, creating a reusable software environment that provides particular functionality as part of a larger software platform. A software framework facilitates the development of software applications, products, and solutions.
There are a variety of JavaScript frameworks available, and choosing the best framework certainly depends on a number of different factors and your application’s unique characteristics and goals.
In the following sections of this chapter we are going to introduce and use Rails templating options, although our goal is to handle the frontend of our application completely in JavaScript by venturing into Ember.js and one-page app development. I just felt that in a book about building APIs in Rails it was important to briefly touch on how we can combine everything in an application frontend.
In the words of the Ember.js core team, “Ember.js is a framework for creating ambitious web applications.” What “ambitious” really means will be explored in the next sections.
Rendering and Templating in Rails
When a request reaches the Rails server it is handled by Action Pack and split between the controller and view parts. The controller part is handled by the Action Controller module, while the view part is Action View’s responsibility. More specifically, Action Controller will take care of communicating with the database and performing CRUD actions where necessary. Action View is responsible for compiling the responses and rendering them.
In a normal Ruby on Rails application for each controller there is an associated directory in app/views, where the template view files associated with that controller are located.
These files are used to render the view resulting from the performed controller action.
There is also a specific naming convention in Rails, where the views share their names with the associated controller actions. So, for example, an index controller action will be associated with an index view template, and so on.
Action View templates can be written in several ways. For example, if the template file has a .erb extension it will use a mixture of ERB (included in Ruby) and HTML. If the template file has a .builder extension, the Builder::XmlMarkup library is used instead.
Other common possibilities when it comes to templating are Slim and Haml.
Slim is a template language designed to reduce the template syntax by removing as much as possible from the standard HTML template without losing functionality or becoming cryptic.
Therefore, Slim doesn’t use closing tags or other HTML elements. A .slim HTML template will look like this:
doctypehtmlhtmlheadtitleSlim Welcome!metaname="keywords"content="template language"metaname="author"content=authorjavascript:alert('Slim supports embedded JavaScript!')bodyh1Slim markup examples#contentpThis example shows you what a basic Slim file looks like.
Haml is another templating option in Rails; its name is an acronym for HTML Abstraction Markup Language. The main idea behind Haml is markup should be beautiful, so template creation can be simplified and accelerated.
Haml aims at avoiding repetition by relying on indentation more than text to determine how and where elements and block of codes begin and end. Because Haml relies on indentation, the resulting templates are cleaner while also being easier to write, read, and maintain, since the XML and HTML document structure is naturally preserved.
A simple .haml HTML file will look like this:
%html
  %head
    %title Haml Welcome!
    %meta{:name => "keywords" :content => "template language"}
    %meta{:name => "author" :content => @author}
    :javascript:
      alert('Haml supports embedded JavaScript!')
  %body
  %h1 Haml markup examples
  #content
    %p
      This example shows you what a basic Haml file looks like.
Action View Documentation
Complete Action View documentation can be reviewed at the Ruby on Rails Guides.
Ember.js: A Framework for Creating Ambitious Web Applications
Ember.js is a highly opinionated JavaScript framework that will structure your application into logical abstraction layers and will force the development model to follow object-oriented paradigms as much as possible. Ember.js has a strong Model-View-Controller (MVC) architecture and promises to be built and designed for productivity and with developer ergonomics in mind.
The Ember.js MVC implementation enriches both the controller and the view layers of the application, while also introducing some extra concepts at each layer of the MVC architecture.
Personally, I am very opinionated about Ember.js, since I consider it the closest mapping to a JavaScript framework of Rails development logic. I also think it might be easier to learn and use if you come from a Ruby on Rails background. This is because Ember.js provides “Rails-like” defaults by convention for common coding patterns, intelligent memory management, built-in integration testing, and a client-side persistence solution called ember-data.
The framework was created by Yehuda Katz, a member of the jQuery, Ruby on Rails, and SproutCore core teams. To understand where Ember sits today in the development community, we have to look a bit at its past and its origins.
Ember.js came out of another JavaScript framework called SproutCore. SproutCore is a JavaScript framework created with the objective of allowing developers to create web applications with a UX comparable to that of a native desktop app. While SproutCore is now released under the MIT license, it was first developed at Apple as the framework powering Apple’s MobileMe web applications (now iCloud).
SproutCore was the first JS framework to push the MVC paradigm and take a widget-based approach to UI design. These concepts are now very popular, but back in 2007 they were really innovative.
The creator of SproutCore, Charles Jolley, left Apple in 2010 and started a company with Tom Dale and Yehuda Katz, who were also working on Rails and jQuery. Due to diverging opinions on the direction that SproutCore was taking, some core members of the project started Project Amber, a rewrite of SproutCore that, among other things, added Yehuda Katz’s Handlebars library for templating. This new version of the framework was soon renamed to Ember.js due to a naming conflict with an existing JavaScript project.
Ember.js is maintained by a group of open source developers, independently of venture capital and giant corporations, as a true community project.
Announcing Amber.js
Yehuda Katz’s blog post announcing Amber.js gives historical insight into how and why Ember.js was created.
Designed for Application Development
The core idea behind Ember.js is to allow web applications to compete with native desktop apps in terms of complexity of user interaction, while still maintaining the agility of a web app.
Some of the patterns and techniques used in Ember.js are already established in native JavaScript and more generally in web development. Ember therefore borrows from the MVC paradigm and mixes in web-specific solutions aimed at making web apps more robust and lightweight.
There are a number of reasons to choose Ember.js above other frameworks (or not). My reasons for introducing Ember in this book were the following:
- Ember.js is an open source project, and there isn’t a single, big corporation behind it.
- Some aspects of its logic, like the MVC pattern, make it easier to grasp if you come from Rails.
- It is currently being used in different projects in production, so people are starting to get excited about it.
- Like Rails, Ember follows strong conventions and is very opinionated.
TodoMVC
If you need help choosing a JavaScript framework, you might find it helpful to compare all of them in a simple application scenario: a Todo app. TodoMVC is a project that offers the same Todo application implemented using MV* concepts in most of the popular JavaScript MV* frameworks of today.
MVC Paradigm of Frontend
Ember.js tries to combine the tools and concepts of native GUI frameworks with the very feature that makes the Web so powerful: the URL.
There are a few concepts that Ember.js introduces and that constitute the core structure of an Ember.js application:
- Templates
-
An Ember.js template is written in the Handlebars templating language and describes the app’s user interface. Each template is backed by a model, and the two are closely coupled. This means that the template automatically updates itself if the model changes.
Note
Handlebars is a library that allows you to create semantic templates easily and effectively.
Ember.js templates, in addition to plain HTML, can contain expressions, outlets, and components. An expression is something like a variable that allows us to include some information from the model in the HTML. An outlet is used instead to display some templates, depending on the route. A component is a custom HTML element.
- Router
- The Ember.js router translates a URL into a series of nested templates. As the templates being shown to the user change, Ember automatically updates the URL in the browser’s address bar. This means that if a user shares the URL with someone else, that person is assured of seeing the same content.
- Components
- A component is a reusable control: a custom HTML tag whose behavior is implemented in JavaScript and whose appearance is described using Handlebars templates.
- Models
- Models are objects that store persistent state; templates display the models to the user by turning them into HTML.
- Route
- Routes are what tell the templates which models they should display.
- Controllers
- Controllers are objects that store application state. A template can have both a controller and a model and can retrieve properties from both.
Rails MVC Versus Ember.js MVC
Both Rails and Ember.js use the MVC paradigm, yet there are some differences between the two implementations.
The Rails request lifecycle flows in the following order:
- First, the Rails router receives an HTTP request from the browser or client application. This is passed to the designated controller that will handle it.
- Then the controller receives the HTTP parameters, and instantiates the model(s) necessary for that action.
- The model retrieves the requested objects from the database.
- The controller passes the requested model(s) back to the view, which renders them.
- The view generates a text response (e.g., in HTML, JSON, JavaScript format), and interpolates Ruby objects where needed.
- The controller’s response is returned to the router, and the router sends it to the client.
Figure 9-1 illustrates.
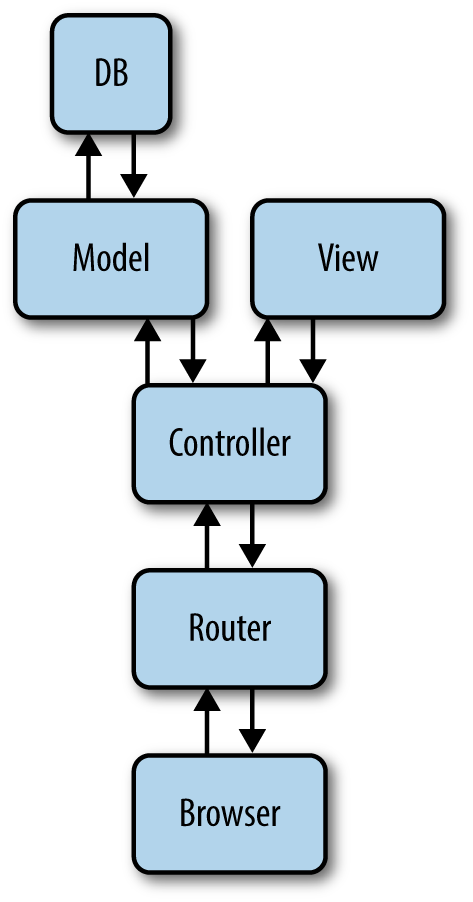
Figure 9-1. The MVC model in Rails
Ember.js instead uses what is called a run loop. This is where Ember’s internals and most of the application code gets executed. Ember uses the run loop to batch, order, and reorder actions in the optimal way.
In the run loop tasks are scheduled in specific queues that have a certain priority and are processed and completed according to that priority order.
Please note that within the run loop when we refer to the model and controller, we are referring to the Ember.js concepts, not the Rails ones, and therefore we are talking about actions that happen in the browser.
In web browsers, some of the Ember run loop’s concepts are natural. For example, web browsers already batch changes to the DOM, so Ember’s approach of batching similar work allows for better pipelining and further optimization.
You might of course decide to run your own optimizations on a case-by-case basis, but with Ember.js you get classes of optimization for free that can be applied across the entire application.
The run loop is started either through an event triggering an action, or by visiting a URL directly (for example, by writing it in the browser’s address bar).
The Ember.js run loop works in the following order:
- The router answers a request from the browser, requests the necessary model data, and performs the controller action.
- The router will now render the template for the requested resource.
- The template will now get its properties from the controller. Since the template doesn’t know where a property it displays is defined, the controller acts as a decorator for the model, providing that property, either by itself or through its model.
Figure 9-2 illustrates the Ember.js run loop.
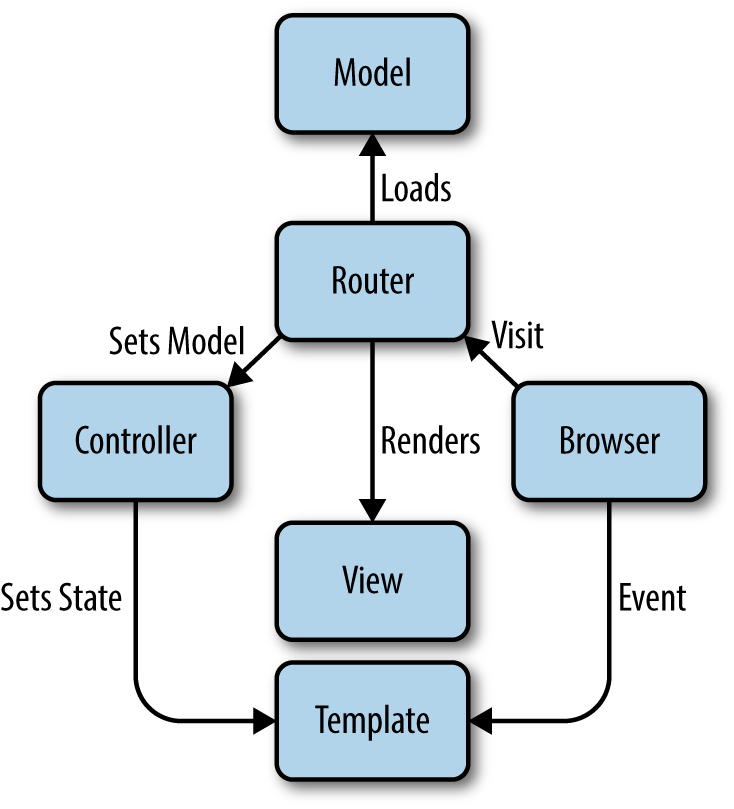
Figure 9-2. The MVC model in Ember.js
Work in Ember is scheduled in the form of function invocations on certain queues. These queues already have a priority assigned and are processed to completion in the following order:
["sync","actions","routerTransitions","render","afterRender","destroy"]
The sync queue has the highest priority and the destroy queue the lowest. The “Understanding Ember.js” guide describes what happens in these queues as follows:
- The
syncqueue contains binding synchronization jobs.- The
actionsqueue is the general work queue and will typically contain scheduled tasks, e.g., promises.- The
routerTransitionsqueue contains transition jobs in the router.- The
renderqueue contains jobs meant for rendering; these will typically update the DOM.- The
afterRenderqueue contains jobs meant to be run after all previously scheduled render tasks are complete. This is often good for third-party DOM manipulation libraries, which should only be run after the entire DOM tree has been updated.- The
destroyqueue contains jobs to finish the teardown of objects other jobs have scheduled to destroy.
According to the guide, the jobs in the queues are executed according to the following algorithm:
Planning the Application
I have said that Ember.js has many aspects in common with Ruby on Rails. One of these is certainly that Ember.js favors convention over configuration.
Another similar feature that Ember.js possesses is its command-line utility, Ember CLI.
Broccoli
Ember CLI’s asset pipeline is provided by Broccoli. Broccoli is a fast, reliable asset pipeline, supporting constant-time rebuilds and compact build definitions. It is comparable to the Rails asset pipeline in scope, although it runs on Node and is backend-agnostic.
Getting Started with Ember.js
Ember CLI provides a strong conventional project structure. It will allow us to quickly structure our Ember.js application while also maintaining a clear view of its architecture.
Before diving into Ember.js, though, we need to get our system ready.
Prerequisites
To run Ember CLI we need to install Node.js. This is used by Broccoli, and it’s required because Ember uses the npm installer.
Note
According to its website, “Node.js is a platform built on Chrome’s JavaScript runtime for easily building fast, scalable network applications. Node.js uses an event-driven, non-blocking I/O model that makes it lightweight and efficient, perfect for data-intensive real-time applications that run across distributed devices.”
To install Node.js please refer to its website, or use your preferred package manager, such as brew.
After installing Node, verify that it is set up correctly by typing the following commands on the command line:
$node--help$npm--help
Both should output the help text.
Once Node has been installed you can install Ember CLI globally with:
$ npm install -g ember-cli
This will give you access to the ember command-line runner.
You will also have to install the Bower package manager, in order to keep your front-end dependencies (including JQuery, Ember, and QUnit) up-to-date. This is accomplished by running:
$ npm install -g bower
By default in Ember CLI your integration tests will run on PhantomJS. You can install it via npm as well:
$ npm install -g phantomjs
We are now ready to create our first Ember.js application:
$ ember new walks
$ cd walks
$ ember server
Navigate to http://localhost:4200 to see your new app in action. To test the app, navigate to http://localhost:4200/tests.
There are a number of packages that we need for this project. Packages are declared in the bower.json file, which is a sort of Gemfile.
Once the packages are specified, you can install them by running:
$bowerinstall
Our bower.json file contains the following packages:
{"name":"walks","dependencies":{"handlebars":"~1.3.0","jquery":"^1.11.1","ember":"1.7.0","ember-data":"1.0.0-beta.10","ember-resolver":"~0.1.7","loader.js":"stefanpenner/loader.js#1.0.1","ember-cli-shims":"stefanpenner/ember-cli-shims#0.0.3","ember-cli-test-loader":"rwjblue/ember-cli-test-loader#0.0.4","ember-load-initializers":"stefanpenner/ember-load-initializers#0.0.2","ember-qunit":"0.1.8","ember-qunit-notifications":"0.0.4","qunit":"~1.15.0","ember-leaflet":"master","leaflet-plugins":"1.0.1"}}
Some of the packages specified are added by default by Ember CLI; others, like the Leaflet plug-in, need to be added manually.
Modeling Data
With Ember.js we need to model the data that we are going to consume in our application. In a way this is very similar to defining a model in a Rails application.
We can generate a model with:
$embergeneratemodelwalk
This will create a file named walk.js under app/models, while also generating test files under tests/units/models.
A model is a class where the properties and behavior of the data that you present to the user are defined. Models also define persistent data that is stored in a database.
To help us define our Ember.js model, we can go back to our Citywalks Rails application and see how our Walk model was defined:
classWalkincludeMongoid::DocumentincludeMongoid::Timestamps::CreatedincludeActiveModel::SerializerSupportextendWikipinextendRestfulincludeWikicatfield:title,type:Stringfield:author,type:Stringfield:pins,type:Arrayfield:location,:type=>Arrayfield:categories,:type=>Arrayindex({location:"2d"},{min:-200,max:200})validates:pins,length:{minimum:0,maximum:10}end
This can be almost literally translated into Ember.js:
importDSfrom'ember-data';exportdefaultDS.Model.extend({author:DS.attr('string'),categories:DS.attr('string'),title:DS.attr('string'),location:DS.attr('string'),points:DS.attr(),created_at:DS.attr('date')});
Ember Data
Ember Data is a library for managing models within Ember.js applications; it is included in Ember CLI by default.
Once we have defined the model, we define how the data is streamed into our applications. To do so we are going to edit application.js in app/adapters:
importDSfrom'ember-data';exportdefaultDS.ActiveModelAdapter.extend({namespace:'api/v1',host:'http://localhost:3001',corsWithCredentials:true});
Here we define the namespace of our API and the host endpoint, and we specify to allow CORS.
The last step is defining our route files.
Routing in Ember.js
Ember.js applications are usually designed to be single-page apps. The idea of a single-page app is that the user doesn’t have to navigate between different pages; instead, it is the application that is responsible for transitioning through many different states.
When you build a monolithic application in Rails or another framework, you are able to respond to certain questions regarding the state of the app by either querying the database or requesting the status from the server. It is Rails that specifically generates the HTML that the web application returns. Ember.js provides similar tools to answer questions about the status of the application while also being able to interact more deeply with the user.
Application states in Ember.js are represented by URLs. Route handlers are defined in Ember for each URL in the application. At each moment, one or more route handlers are active in an Ember application. An active handler changes either when the user has interacted with a view, therefore changing the URL via an action, or when the URL has been changed manually (for example, via the back or forward buttons in the browser).
Whenever the URL changes, the active route handler will render or update the template, update the controller to represent a model, or perform a redirect to a different URL.
We are now going to define the routes for our Walks application as follows:
importEmberfrom'ember';importconfigfrom'./config/environment';varRouter=Ember.Router.extend({location:config.locationType});// Here is where we define the resource route and// the path to the individual resource:Router.map(function(){this.resource('walks',function(){this.resource('walk',{path:'/:walk_id'});});});exportdefaultRouter;
Ember CLI helps you structure your route files by defining a routes folder at the beginning.
Here we define an index.js route file for the index of the application:
importEmberfrom"ember";varIndexRoute=Ember.Route.extend({model:function(){return['red','yellow','blue'];}});exportdefaultIndexRoute;
We have defined a static color array to be returned, just to try it out :). We will see how this can be included in our templates in the next section.
Next, we define a general walk.js route file:
#Herewedefinehowweaccessthesinglewalkobject.importEmberfrom'ember';exportdefaultEmber.Route.extend({model:function(params){returnthis.store.find('walk',params.walk_id);}});
The last route file that we are going to need is an index.js file within the walks folder. It is going to be defined as follows:
importEmberfrom'ember';exportdefaultEmber.Route.extend({model:function(){returnthis.store.findAll('walk');}});
This simply tells our application to list all walks from our store.
Defining the Templates
Ember.js uses the application template as the default template that is rendered when the application starts.
Here we define where decorative content, like the header or footer, goes. Note that at least one {{outlet}} needs to be defined. {{outlet}} is the placeholder that the application router fills with the template for the URL.
The application template file is called application.hbs. In our case it’s defined as follows:
<h2id='title'>WelcometoEmber.js</h2>#Herewedefineourapplicationmenu:<ul><li>{{link-to'Home''index'}}</li>// You can just list all walks or have the API figure// out your location.// I have opted for sending a specific location to the API.<li>{{#link-to'walks'(query-paramslocation="41.23,2.09")}}Walks{{/link-to}}</li></ul><hr>{{outlet}}
The next template that we are going to define is the index.hbs file within the app/templates folder. Here we will tell our app to display our colors in a bulleted list:
{{#eachcolorinmodel}}<li>color:{{color}}</li>{{/each}}
This is a very common expression in Ember.js: if you need to enumerate over a list of objects, Handlebars provides the {{#each}} helper.
The template inside of the {{#each}} block will be repeated once for each item in the array, with the item set to the color keyword.
The last template that we are going to need for our small project is the index.hbs template within the templates/walks folder. Here we define how we are going to display all the walks that we will retrieve:
<ul>{{#eachwalkinmodel}}<li><p>Walk:{{walk.title}},</p><p>Author:{{walk.author}}</p><p>Location:{{walk.location}}</p>{{#eachpointinwalk.points}}<p>pin:{{point.title}}</p><p>{{point.point.latitude}},{{point.point.longitude}}</p>{{/each}}</li>{{else}}<li>Nowalksfound.</li>{{/each}}</ul>// We will understand what this means better in a few paragraphs{{leaflet-mapwidth="600px"height="400px"latitude="41.23"longitude="2.09"zoom=10walks=walksMarkers}}
The last part of the template is a map to display our point of interest. We are going to use the Leaflet library and we are going to configure it in the next section. There we are going to discover some more interesting aspects of Ember.js, controllers and components.
Writing a Component
Components can be defined as custom HTML elements. Components in Ember follow the specification for HTML components as defined by the W3C.
Note
The W3C is currently working on the Custom Elements specification.
Ember’s components implementation has been developed to adhere as closely as possible to the W3C specification, so when custom elements become widely available in browsers, it should be possible to migrate your Ember components to the W3C standard for use by other frameworks.
To understand components, you have to take a step back in the history of the Web. HTML was designed at a time when the browser was a simple document viewer. Developers looking to build great web apps need something more powerful than just HTML tags. Tags limit developers, since they are restricted to what has already been defined in the HTML specifications. Imagine, though, if you could define your own application-specific HTML tags, and then implement their behavior using JavaScript...
This is what Ember.js permits, by embracing HTML and adding powerful new features that make it easier to build web apps.
To highlight the power of components, we are going to use one to define our simple map. Running this command:
$embergeneratecomponentleaflet-map
will generate a leaflet-map.js file within the components folder. We are going to edit it as follows:
importEmberfrom'ember';exportdefaultEmber.Component.extend({attributeBindings:['style'],width:'800px',height:'400px',latitude:'41.23',longitude:'2.09',zoom:'5',walks:[],style:function(){return['width:'+this.get('width'),'height:'+this.get('height')].join(';');}.property('width','height'),didInsertElement:function(){varwalks=this.get('walks');varcenter=[this.get('latitude'),this.get('longitude')];varzoom=this.get('zoom');varmap=L.map(this.get('element'));this.set('map',map);// set the view to a given place and zoommap.setView(center,zoom);// add an OpenStreetMap tile layerL.tileLayer('http://{s}.tile.osm.org/{z}/{x}/{y}.png',{attribution:'© <a href="http://osm.org/copyright">OpenStreetMap</a> contributors'}).addTo(map);walks.forEach(function(walk,ind){varmarkers=[];walk._data.points.forEach(function(point,index){// add a marker in the given location, attach some// pop-up content to it, and open the pop-upL.marker(point.point.latitude,point.point.longitude).addTo(map).bindPopup(point.point.title).openPopup();});});},willRemoveElement:function(){varmap=this.get('map');if(map){map.remove();}}});
We are also going to define an extension to the walks controller. Running this command:
$embergeneratecontrollerwalks
will create an index.js file within controllers/walks:
importEmberfrom'ember';exportdefaultEmber.ArrayController.extend({walksMarkers:function(){varmarkers=this.filter(function(walk){returnwalk.get('points');});returnmarkers;}.property('@each.markers')});
Exploring Walks Through Categories
Now we can start to think about creating walks and categorizing them.
Here is where our WikiCat API could be useful. We could retrieve our top categories, or the category graph of a given category (like shopping or arts), and start exploring walks in the graph.
What we would like, then, is a way to query our walks table with a set of tags. This is easily accomplished in MongoDB and through Mongoid with the following query:
Walk.in(categories:["Science","Sports"])
We can include this in the walks controller, or create an endpoint to return categorized walks.
Wrapping Up
In this chapter we learned about EmberJS and saw how it is possible to map different data streams to the same application UI. In the next chapter we will learn about API management and deployment and we will see our APIs live on the Web.