Table of Contents for
RESTful Rails Development
 RESTful Rails Development
Published by
O'Reilly Media, Inc., 2015
RESTful Rails Development
Published by
O'Reilly Media, Inc., 2015
- Cover
- nav
- RESTful Rails Development
- RESTful Rails Development
- section
- Preface
- Preface
- 1. From Hypertext to Hyperdata
- 2. Getting Started with Ruby on Rails
- 3. First Adventures in API Design
- 4. The REST of the World
- 5. Designing APIs in RoR
- 6. Asynchronous REST
- 7. Testing RESTful Services
- 8. Microservices and Microapplications
- 9. Mapping Data Streams onto an Application UI
- 10. Deploying an API
- 11. Managing an App Ecosystem
- 12. Consuming Data Streams: Integrating External APIs in Your Application
- 13. Device-Independent Development
- 14. Data Analytics
- 15. Scaling Gracefully
- 16. Privacy and Security
- A. HTTP Quick Reference
- Index
- About the Author
- Colophon
Chapter 10. Deploying an API
In this chapter we are going to see what options we have when it comes to deploying our API. Do we need an API management service? What services do we need to be provisioned and managed by third parties, and what can we develop in house? We will see how to deploy one of our APIs to OpenShift, a PaaS solution that can be used to deploy and host applications in the public cloud if you are not ready to invest in infrastructure. We will also familiarize ourselves with concepts like reverse proxies and we will practice with technologies like Ngnix.
How Is an API Deployed?
A RESTful API ultimately lives on the Web, or on a communication network where different parties can expose and consume data streams.
There are different aspects that need to be considered when deploying on the public cloud. For example, would an API management solution help you deploy your API? Or should you consider deploying with infrastructure developed and maintained in house? Which services are you ready to maintain yourself, and which would you like to have provisioned and managed by some third-party service?
There isn’t a general rule of thumb on how to decide which services you’d like to have managed externally and which you’d like to manage and develop in house. Generally speaking, everything that you develop yourself will go through the same design and development stages that your main product has gone through. So, the real question here is: do we have the resources and time to develop and maintain it ourselves?
Most of the time it is more economically viable to externalize the services that are not directly part of your core product or business, especially if your product is a one-person show. This way you can keep your focus on developing your main product without having to worry about the rest.
API Management
API management platforms offer a set of services and built-in strategies that you can use as guiding principles when working with developers and creating an application ecosystem.
There are different areas where an API management platform can help in your product development. These are:
- Design
- Documentation
- Analytics
- Access
- Scalability
Design
API management platforms can offer the possibility to write an API mockup in a short time. You model the endpoints and what data should be returned, then share it with other stakeholders and let them use it for a test flight.
You are not writing any code yet; you are just defining what your API should do, and you are using the API management service infrastructure to test whether your assumptions actually make sense.
You can automatically create and run mock servers, tests, validations, proxies, and code samples in your language bindings. This way, once you start coding your actual product you can be sure you are going in the direction you intended.
Prototyping your API in a test environment can really speed up the design and development stages. Plus, since you’ve already planned how your API will be used by possible applications, once you start implementing you are already iterating.
An alternative to an API management platform in this case is to use one of the open source tools that are available and adjust it to your needs.
Note
Two useful tools available at the time of writing are API Blueprint and APITools.
API Blueprint is a tool for documenting and mocking your APIs at the time of design. It facilitates cooperation among various teams and stakeholders when planning an API product, but can also be used during your whole API lifecycle.
APITools is a hosted proxy service that can be used to wrap API calls and modify their data flows before sending everything to your application.
Documentation
Great documentation is paramount when exposing an API, either to your company or to the public on the Internet. Well-written documentation takes a lot of effort and time, but it is the key element to excite developers about your product. If developers are going to invest time and money in applications that will use your service, they need to be convinced that your API can be an important and useful component for their projects.
API management systems can expose a list of tools to create quality documentation right from your code or your method definitions. Also, they can be linked directly to your code base, so every time you push a change your documentation can be immediately updated.
The alternative once again is to use configurable open source libraries for the same purpose. You won’t have to reinvent the wheel, but you will be responsible for updating your documentation if something changes in your code base, and for keeping your dependencies up to date.
Note
apiDoc is one useful tool that creates documentation from API descriptions in your source code.
Analytics
API management platforms can also offer complete analytics solutions to monitor your API traffic. Which developers are making the most requests? Which methods are called the most? These questions can be answered easily if the platform you are using has built-in reporting and analytics services.
A management platform can also provide something more than just usage data. For example, it could offer the possibility to reach out to developers if some specific event happens, or reach out to customers that aren’t actively using your service.
Of course, you can achieve the same results if you choose to actively and personally monitor your server calls. Especially regarding analytics, the open source community offers a vast range of tools and software that can easily fit your specific use case.
Note
One option here is Sensu, an open source monitoring framework providing an agent, message bus, and event processor. It provides a platform to build upon, enabling developers and operations teams to compose comprehensive telemetry and monitoring systems to meet unique business requirements.
Access
Access and key provisioning is probably the one aspect of deploying an API where a management platform delivers most of its value. A platform may in fact offer key provisioning, traffic, lifecycle, and security management capabilities from a simple dashboard.
This means that with your API you only have to authorize a single application, the management platform, which will be responsible for provisioning API keys and handling the authorization process for all your developers and, eventually, their customers.
Another advantage of using a management platform is that you do not need to support a number of authentication and authorization standards to make sure your customers can easily integrate your product into their infrastructures. You are free to choose the methods you prefer, and you can let the management platform worry about the rest.
Alternatively, you can provide authentication and authorization within your Rails application.
Scalability
An API management solution will certainly help you to scale your service, simply because it will take care of some of the design, development, and maintenance work that managing an app ecosystem requires.
The management platform is already designed to scale with your users and traffic, especially if it also offers to host your API. In this case you only have to concentrate on developing your core product, and you can forget about operations and management hassles.
PaaS Solutions
Platform as a Service (PaaS) is a category of cloud computing services providing both a computing platform and a solution stack as a service. There are different service models in the various cloud computing solutions. PaaS is only one possibility; many providers also offer Infrastructure as a Service (IaaS) and Software as a Service (SaaS) solutions. PaaS solutions provide a bit of both, since you can easily create an application using a set of tools and libraries from the PaaS provider, while also hosting it on their infrastructure.
You can also easily control software deployment and configuration settings, while the PaaS provides the networks, servers, storage, and other services that are required to host your app.
The main advantage of PaaS solutions is that they facilitate the deployment of applications or services without the added cost and complexity of buying and managing the underlying hardware and software and provisioning hosting capabilities. The initial cost is low, and it grows incrementally as your service usage increases. PaaS solutions are self-service and have best practices built in; they facilitate and support resource sharing, automated deployment, management services, lifecycle management, and reuse.
We are going to use a PaaS solution to host one of our APIs: the Wikipin API. In particular, we are going to use OpenShift by Red Hat, since it is an open source solution that can also be installed on premises if desired.
Deploying the Wikipin API on OpenShift
OpenShift is Red Hat’s PaaS, and it comes in three different versions: OpenShift Origin, OpenShift Online, and OpenShift Enterprise.
OpenShift Origin is the free and open source version of OpenShift, as well as the upstream project for the other two versions. All changes committed, both from Red Hat and from external contributors, go through the public repository. OpenShift Origin is not offered as PaaS, but is intended to be installed on your own infrastructure. We are not going to cover the installation steps required to get OpenShift up and running on premises; instead, we will be covering the steps needed to get up and running on OpenShift PaaS.
The OpenShift Origin repository is packed and released as a new version of OpenShift Online every three weeks or so (the length of a sprint). OpenShift Online is hosted on Amazon Web Services (AWS), but to use it you just need to create an account with OpenShift. All the DevOps work, including updating the OS and managing networks, is covered by the OpenShift operations team, so that you are free to focus on your application.
The last version of OpenShift is OpenShift Enterprise. This version allows you to take a complete PaaS solution and run it anywhere you wish. It is packaged with Red Hat Enterprise Linux and is fully supported by Red Hat; it’s intended for customers who are looking for stability and a production-ready solution out of the box.
OpenShift uses some specific terminology for its environment. I will briefly explain it here, but I recommend that you have a look at the documentation.
A gear on OpenShift is the server container where your application is hosted. OpenShift currently offers three types of gears, depending on your needs.
A cartridge is a sort of plug-in that you install to enable certain functionality. Cartridges can be used to enable a certain database or your language of choice.
Applications on OpenShift expose only HTTP port 80, HTTPS port 443, and SSH port 22. Beta WebSocket support is also provided.
Note
A great resource on OpenShift is Katy Miller and Steve Pousty’s Getting Started with OpenShift: A Guide for Impatient Beginners (O’Reilly).
In order to work with OpenShift you also need to be a little familiar with git and ssh.
Git is a free and open source distributed version control system; it is what you will use to push and deploy your code to OpenShift. There are a multitude of introductory documents about Git; one that I can recommend is Al Shaw’s “Get Started with Git”.
Secure Shell (SSH) is a cryptographic network protocol for secure data communication. I will assume a basic knowledge of the two technologies. A great starting point to learn ssh is SSH, The Secure Shell: The Definitive Guide by Daniel J. Barrett and Richard E. Silverman.
Preliminary Steps
Before getting started deploying your application, you’ll need to create an OpenShift account and install the rhc command-line tools.
You can sign up for an OpenShift account at http://bit.ly/openshift-signup.
Instructions on how to install the rhc tools can be found at http://bit.ly/openshift-tools.
Note
If you use rbenv for managing Ruby, you also need to run rbenv rehash.
Check that rhc has been installed correctly by typing:
$rhcUsage:rhc[--help][--version][--debug]<command>[<args>]CommandlineinterfaceforOpenShift.
If you want to see all the cartridges available, just type:
$rhccartridges
Meet Jenkins
Jenkins is an open source continuous integration tool written in Java, allowing developers to run their tests automagically every time they push to a branch.
Before actually meeting Jenkins and discovering what it can do for you, we will first take a step back and praise the practice of continuous integration and continuous deployment.
When developing a large project, integrating new features can become a long and painful process if not done properly. Continuous integration tries to solve this problem.
The term continuous integration (CI) was first introduced by Martin Fowler in 2000, in his famous blog post about his experience of applying CI at ThoughtWorks.
CI is in practice just about a workflow that encourages teams to integrate their code several times a day to avoid integration conflicts, while also being able to deploy features and fixes at the same rate. Continuous integration is, therefore, the practice of testing each change made to your code base automatically, in a test-driven development environment, as early as possible.
So what is Jenkins, and what can it do for you? Jenkins is an application used to monitor and execute repeated jobs, like building a software project or a simple cron job. It is particularly focused on the following two tasks:
- Building and testing software projects continuously, providing an easy-to-use CI system
- Monitoring the execution of jobs that are run externally (even on remote machines) like cron jobs
Jenkins can easily be run on OpenShift as a standalone application. To create a Jenkins application on OpenShift, run:
$rhcappcreatejenkinsjenkins-1
You need to write down the administrator username and password that are created and returned by rhc. These will be needed to administer Jenkins.
Once a Jenkins application has been created, you can access the user interface at https://jenkins-<namespace>.rhcloud.com.
You can also enable Jenkins for a previously created application. From your OpenShift dashboard, go to Applications, click on the application you want to edit, then click on “Enable Jenkins” under “Continuous Integration” (see Figure 10-1).
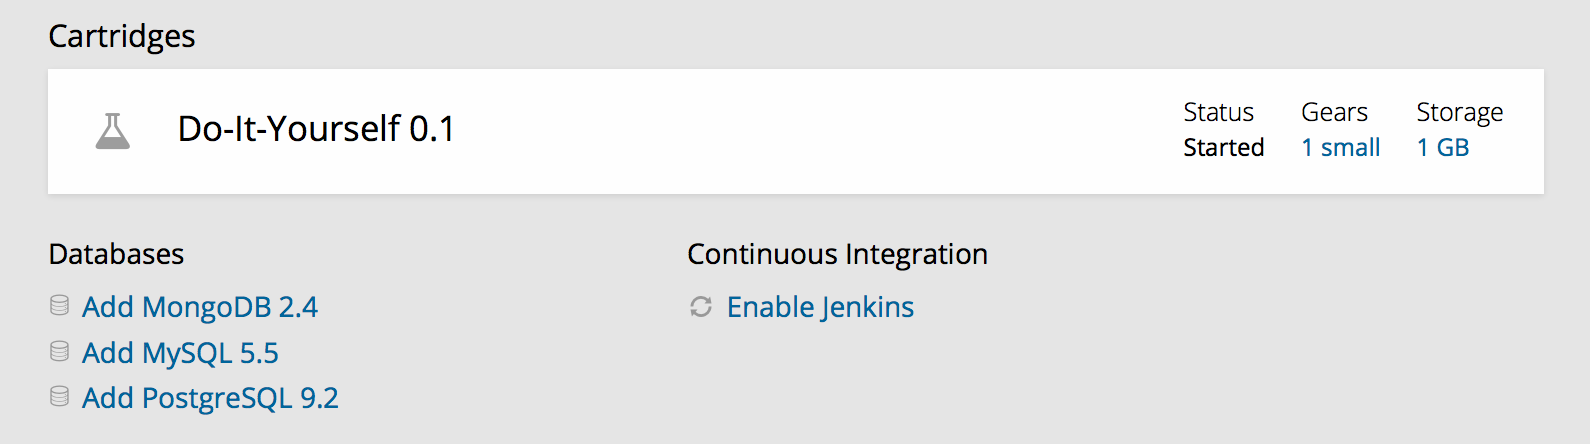
Figure 10-1. Enabling Jenkins on OpenShift
You can perform all management tasks on Jenkins from its web interface. The basic Jenkins workflow will follow these simple steps:
- As you commit and push new code to a repo, Jenkins runs a full series of tests.
- With OpenShift, if the tests and build are successful, the new code gets deployed. In case of failure, the old code continues to run with no downtime related to the push.
Users can always go to the web interface to check the persistent build history maintained by Jenkins about their projects and builds, as seen in Figure 10-2. Through the web interface they can also trigger and customize builds, manage resources and plug-ins, and interact with many other features.
So, when your code is pushed, the build/test/deploy sequence in Jenkins is triggered. Jenkins uses a scheduling process that involves creating a temporary builder for the application. A node (also known as a slave) is created on the Jenkins side, and a corresponding builder application is created in OpenShift. If the node/builder already exist at scheduling time, the existing builder will be used and the build will fire immediately.
Note that on OpenShift the node and builder application will consume one gear each. Nodes and builder applications are automatically deleted and the corresponding gears are freed after 15 idle minutes.
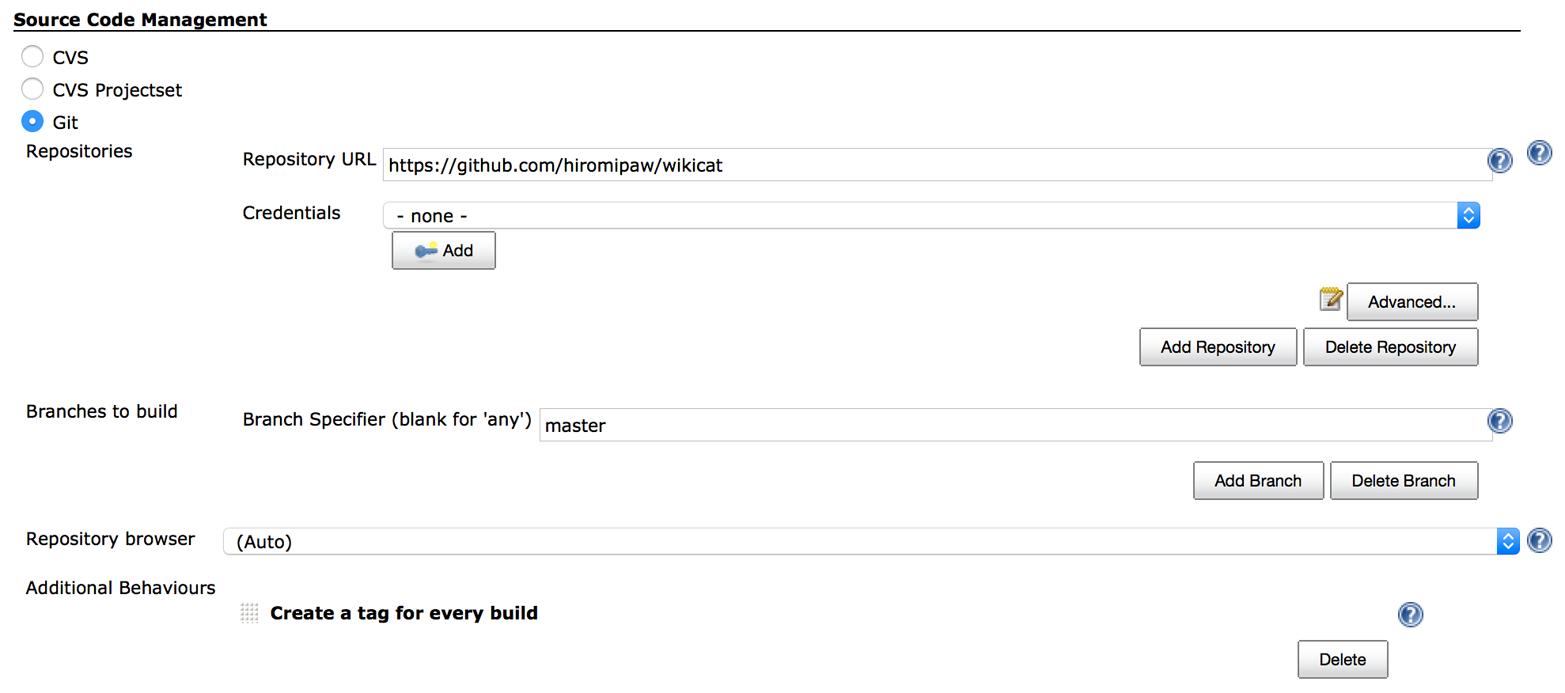
You can also use Jenkins running on OpenShift to execute the tests of an application stored in a GitHub repository. To do so, you have to create a new item and choose “Build a free-style software project.” Then fill in the GitHub information for your project, as shown in Figures 10-3 and 10-4.
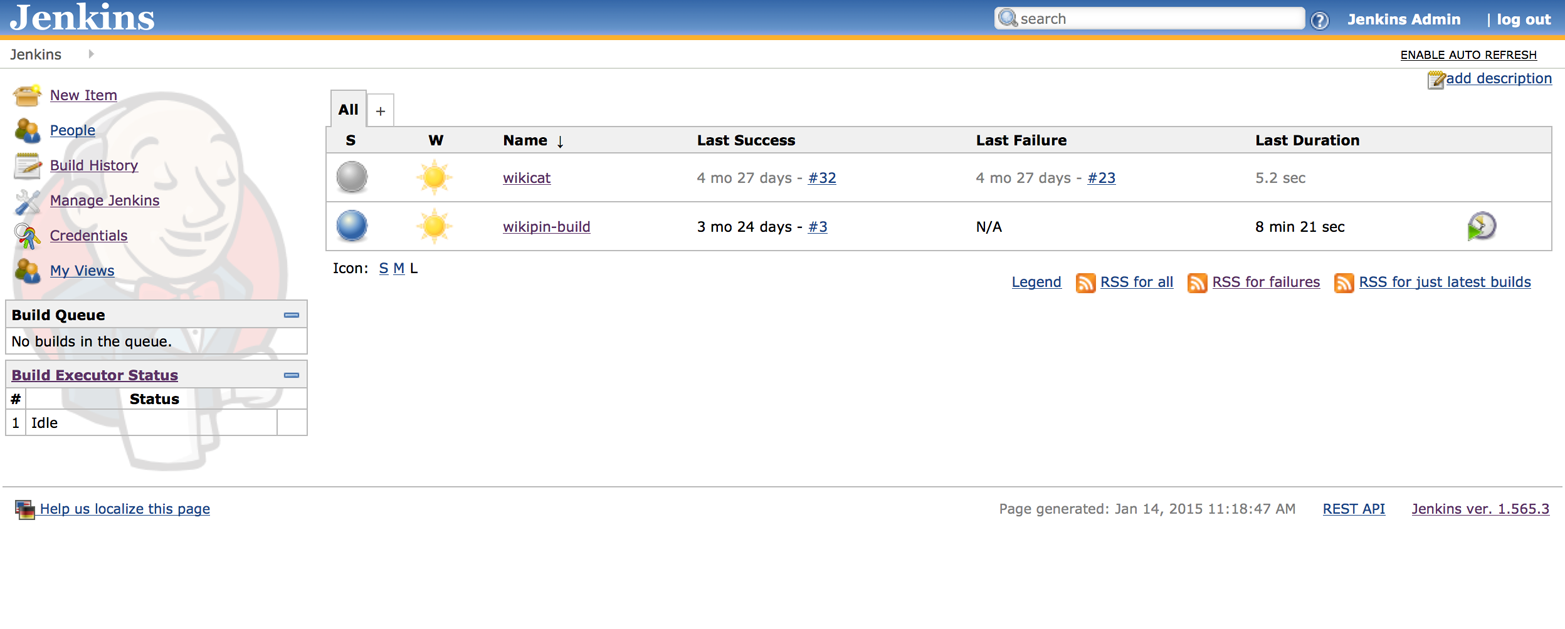
Figure 10-2. Jenkins web interface running on OpenShift
In your Jenkins project configuration, you will also need to specify information about the build environment (the version of Ruby that you want to test your project against, if you want to use an rbenv- or RVM-managed environment, and what gems—for example, bundler, rake, mysql—are preinstalled) and the build itself. This may include what command you want to execute at build time (e.g., bundle install) and which rake task you want to run (e.g., test).
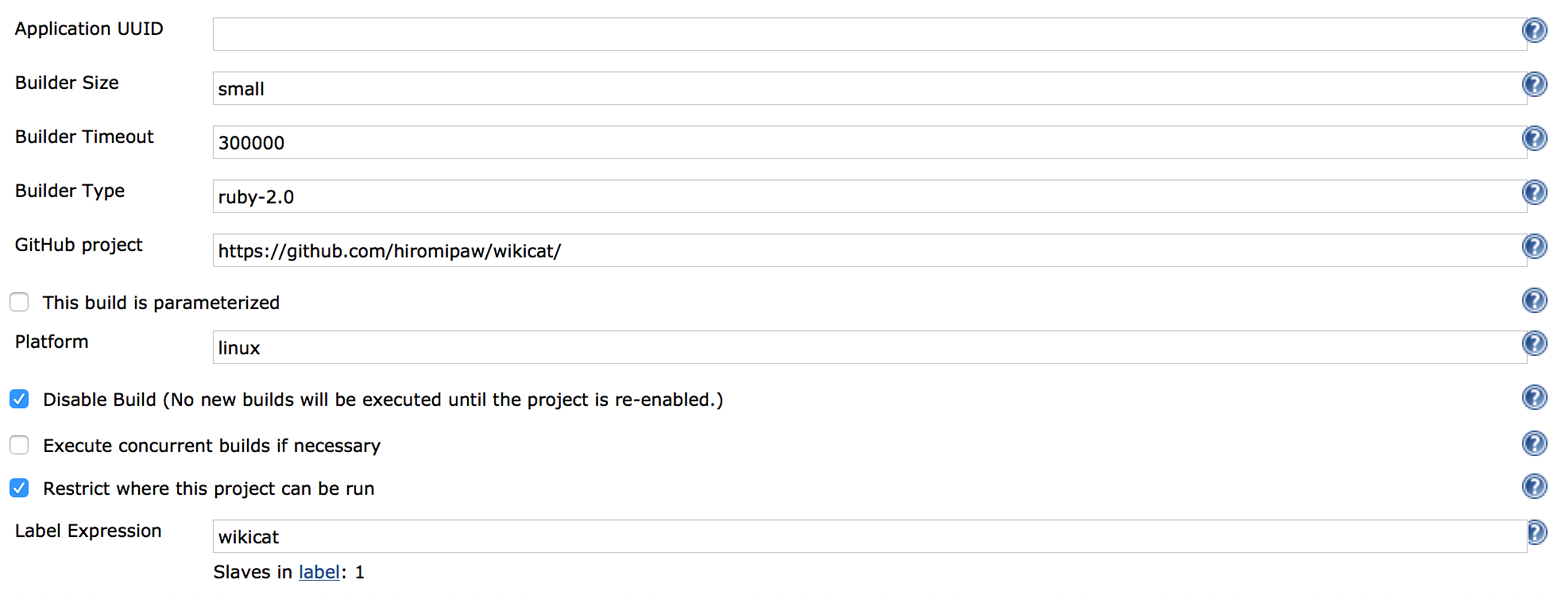
Figure 10-3. Add your GitHub repository URL
To troubleshoot errors that you might encounter while building/testing/deploying with Jenkins, you might want to look at applications logs showing compilation and test failures. These are available via the Jenkins web UI under the corresponding node’s build history and will usually help you find the problem.