Table of Contents for
RESTful Rails Development
 RESTful Rails Development
Published by
O'Reilly Media, Inc., 2015
RESTful Rails Development
Published by
O'Reilly Media, Inc., 2015
- Cover
- nav
- RESTful Rails Development
- RESTful Rails Development
- section
- Preface
- Preface
- 1. From Hypertext to Hyperdata
- 2. Getting Started with Ruby on Rails
- 3. First Adventures in API Design
- 4. The REST of the World
- 5. Designing APIs in RoR
- 6. Asynchronous REST
- 7. Testing RESTful Services
- 8. Microservices and Microapplications
- 9. Mapping Data Streams onto an Application UI
- 10. Deploying an API
- 11. Managing an App Ecosystem
- 12. Consuming Data Streams: Integrating External APIs in Your Application
- 13. Device-Independent Development
- 14. Data Analytics
- 15. Scaling Gracefully
- 16. Privacy and Security
- A. HTTP Quick Reference
- Index
- About the Author
- Colophon
Chapter 8. Microservices and Microapplications
In this chapter we are going to introduce some concepts regarding service-oriented architecture (SOA) and microservices architectures. We will develop a new API to discover possible thematic walks based on the user’s location. To find the user’s location we are going to build a different service that will return the user’s geographical coordinates given her IP address. The same service will also return a list of geotagged Wikipedia articles that we can use as points of interest for our Citywalks API. We will deploy the new API on OpenShift, a Platform as a Service (PaaS) solution by RedHat, and we will access it from our local machine.
Basics of SOA and Distributed Systems Design
When we talk of service-oriented architecture, we really mean a set of design patterns, both for software systems and architectures. Here, “service” refers to a self-contained unit of functionality that provides one or more actions using defined protocols instead of APIs. A protocol describes how services pass and parse messages using descriptive metadata.
SOA patterns and paradigms have been designed for large distributed systems, where every computer runs a number of services, and each service can exchange information with any other service in the network. SOA is designed to make it relatively easy for computers connected over a network to cooperate, allowing, among other things, the physical distribution of each service across a network of interconnected computers.
SOA aims at building more flexible distributed systems, as opposed to monolithic architectures. By enabling the design of more loosely coupled services, SOA makes it easier to scale and maintain complex, large applications.
SOA services are an abstraction of actual business units performing a specific action or set of actions. SOA paradigms are therefore applied at different levels of the design process:
- Architecture
- Processes
- Governance
SOA patterns are closely linked to the business functions and processes of a set of technologies that span large distributed systems. SOA services are concerned mainly with the business value of a unit or interface. This concept is based on three important technical points:
- A service contains some business functionality. This can be a simple function like updating or retrieving customer data or something more complex, like placing an order for a certain product.
- The underlying infrastructure that distributes business processes between multiple services and systems is called the enterprise service bus (ESB).
- Because business processes are distributed over multiple physical machines, it is said that SOA systems are loosely coupled. This means that systems’ interdependencies are reduced to allow independent development of different services.
SOA involves more than just the technical aspects of creating large distributed applications of interoperating services. SOA is in fact a business architectural set of patterns as much as it is a technological one.
On the other hand, there are certainly different analogies that we can trace between large distributed systems and open applications. These aspects, which are at the core of SOA design, can also be applied to RESTful development. Let’s analyze these in order.
Legacies
Large distributed systems often have different legacy services, or just old units of code, in their architecture. Having to deal with legacies usually involves carefully adapting the structure of an existing system while dealing with old platforms and backward-compatibility issues. Sometimes SOA design is even considered a possible approach for the maintenance of a large system.
In such situations, following REST patterns is certainly a big advantage. RESTful services communicate with one another by exposing uniform interfaces. Legacies can thus easily be “hidden” behind a REST connector that can translate messages between the legacy system and the REST architecture.
Heterogeneity
Heterogeneity is the property of having diverse components in a system. Diversities are in a way unavoidable, no matter how hard you try: even in a monolithic and rather small application, as you try to scale that application it will reach a certain point where you will have to deal with diversity. Diversity can be seen as an emergent property of the process of scaling an application from blueprint design to production.
All large systems tend to become very heterogeneous, since different components and functions are developed with different purposes, at different times, with different technologies and programming languages (Figure 8-1). Scaling a system is hardly a harmonic process, although harmonization can help you in scaling your application.
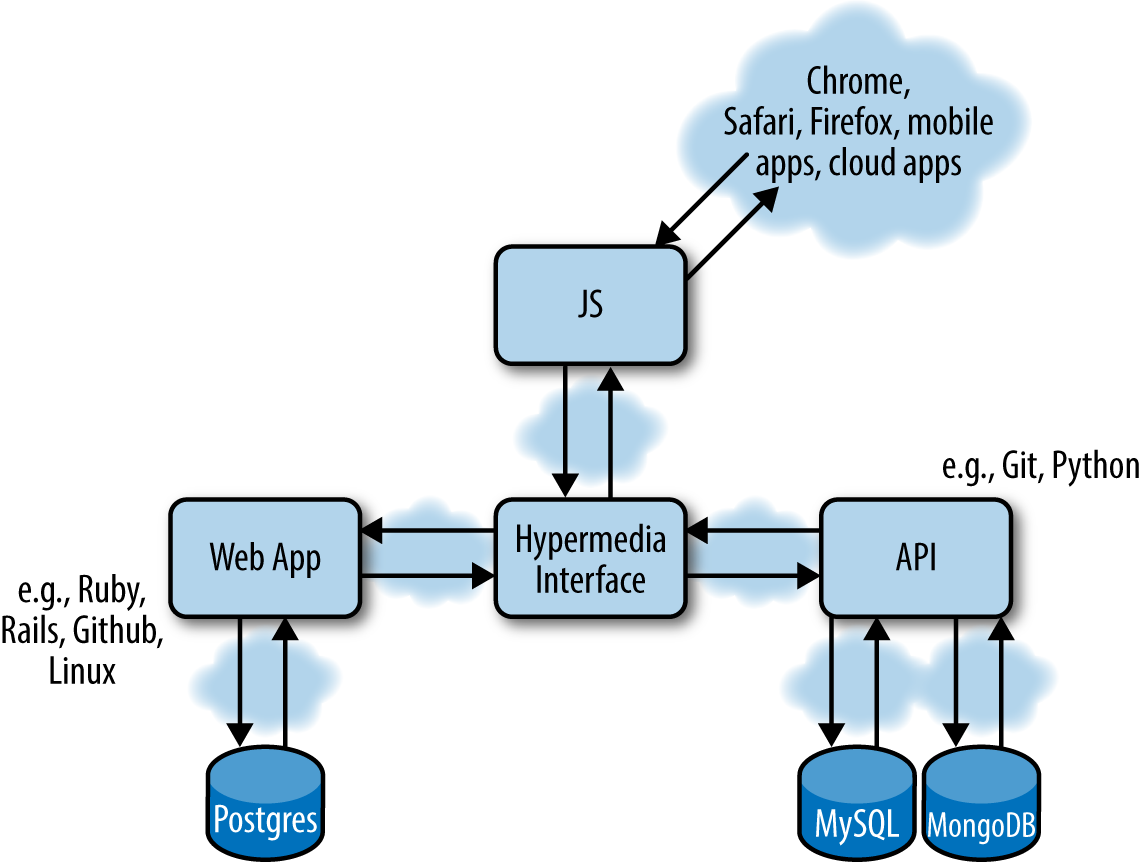
Figure 8-1. An example of a small application using different repositories, open source libraries, databases, programming languages, operating systems, and cloud platforms
Generally speaking any distributed system, complex application, or code base, once it has grown to a certain size, will reach a point where maintenance and iterative feature development become a problem.
This happens for a number of reasons, including:
- The difficulty of rewriting part of the software or system
- The learning curve for new developers to start contributing to the project
This suggests that when a system component gets to a certain size, it becomes very difficult to add new features quickly. Furthermore, you cannot fix bugs quickly, and you cannot throw it away easily when it becomes obsolete, because rewriting the existing functionality might require a big investment of time and money.
So, when you have an opportunity to avoid having to deal with or even design very large components, you should always do that.
SOA paradigms would suggest decoupling complex systems into self-contained units that serve fewer functions and can be developed independently over time. In SOA terms, this is considered an investment.
In RESTful development we can apply the same paradigms and design simple APIs that serve a limited number of functions and communicate with one another to exchange information and messages.
Complexity
Large distributed systems are often very complex. More importantly, they might be owned or maintained by different departments within an organization, or totally different companies. Integrating different systems may result in an added layer of complexity to overcome.
If each system, or application function, exposes a RESTful API, complexity can be resolved at the unit level and with almost total independence from the overall system design, as long as we ensure that the different units can continue communicating and exchanging information and messages.
Redundancy
Large systems all have a certain amount of redundancy. Some of this might just be accidental, but some might be intentional and managed, since not all data can be normalized and stored in a single place.
Integrating and consuming data that is spread across different heterogeneous systems is one of the problems shared by open applications that are sometimes operating on and sharing the same streams of data.
Microservices Paradigms
A microservice is a small, self-contained service, focused on doing one thing and doing it well. An example of a microservice is that of a separate, independent operating system process living on its own physical (or virtual) machine and performing a very specific function.
Microservices architectures are based on three main concepts:
- Microservices are independent operating system processes.
- Microservices are self-contained, highly decoupled processes.
- Microservices use language-agnostic APIs to communicate.
These three main aspects of microservices introduce a number of advantages. The main advantages of building a microservices-based architecture derive from the idea that everything is self-contained. This concept of self-containment is extended to the point that the actual functions that the service provides (and the code sustaining them) live in their own processes.
Also, because microservices use language-agnostic APIs to communicate with other services, a microservice can be technologically independent from the rest of the system, allowing the service designer to pick the most appropriate tools for each service instead of just adhering to an imposed standard.
Because of the independence of each unit, in a microservices environment new technologies are adopted more quickly. In a monolithic application scenario, each small change can severely impact the overall performance and stability of the system. In a microservices architecture, the risks and barriers of introducing new technologies are lowered, as the impact of a change in the system is contained at the single-microservice level. This allows for technological and architectural heterogeneity of the overall system design.
At the same time, with microservices architectures it is easier to isolate problems in the system, and the rest of the system can continue working independently. Microservices hence allow for more resilient and significantly more stable systems.
Microservices architectures are also easier to scale. Since each service can be developed independently and the system doesn’t have to scale all together, we can scale on demand—i.e., scale different parts of our system at different moments.
The Evolutionary Approach
A microservices architecture is composed of a set of independent units or system processes performing independent functions and communicating via some language-independent API. While microservices are an exciting topic at the moment, we need to take a step back and focus on the fact that they are part of our applications’ inner workings, both at the frontend and the backend level. This functionality of an application or service is hidden, or made transparent, to the end user. Ultimately, when a web or mobile application is accessed via the Web, the user does not now how many microservices are working behind it, nor what APIs are used or external services are called. In this sort of scenario it is important to maintain the overall vision of the aggregated system design.
Microservices introduce a number of benefits concerning the interdependency and flexibility of a system architecture. However, they also carry some complexity emerging from having a large set of movable parts, so there is a trade-off between small and smaller.
The biggest risk of microservices architectures is in fact losing control over a growing number of independent services and movable parts. Ironically, we could end up having the same problems as with big monolithic applications:
- Not knowing which part of the application is performing a certain function
- Not knowing which part of the application is failing
- Not knowing how to better scale certain functionality spread across a large number of small processes
A common approach when designing microservices applications is reasoning around business capabilities, or mere application logic.
This approach can be considered in a way evolutionary; your application actually evolves from having a set of core simple functions into offering more services.
So, the first step in the design process is identifying the set of core functions that the system will provide. Then, instead of addressing this set of problems by separating them across the application layers that will solve these problems, each problem is solved independently at all layers (i.e., data storage, backend, and frontend). Figure 8-2 illustrates this approach.
Thinking in Terms of Microapplications and Services
The idea of developing microapplications follows in the footsteps of microservices architecture design and SOA paradigms. A microapplication is an independent system solving a simple problem and sharing data with other applications and services through RESTful APIs.
Microapplications, like microservices, are self-contained and can be developed and scaled independently, while at the same time facilitating technological innovation.
An example of a microapplication is our Wikipedia categories API. The application returns through an API the category graph of a certain keyword. By itself it is not a complex application, but it could be coupled with a nice frontend layer to create interesting visualizations of the link graphs of the categories queried.
The categories API could also be part of one or more microapplications solving a different set of problems that might require some category knowledge. We could envisage any number of applications that require some sort of semantic knowledge of keywords to provide a better user experience. Using the categories API would free these applications from having to develop their own solutions—they could just integrate with our API and concentrate only on solving their own business problems.
This idea of building open platforms and enriching the Web with hypermedia APIs that can be easily accessed and integrated into a web of communicating applications follows in more than one way the idea of open source software.
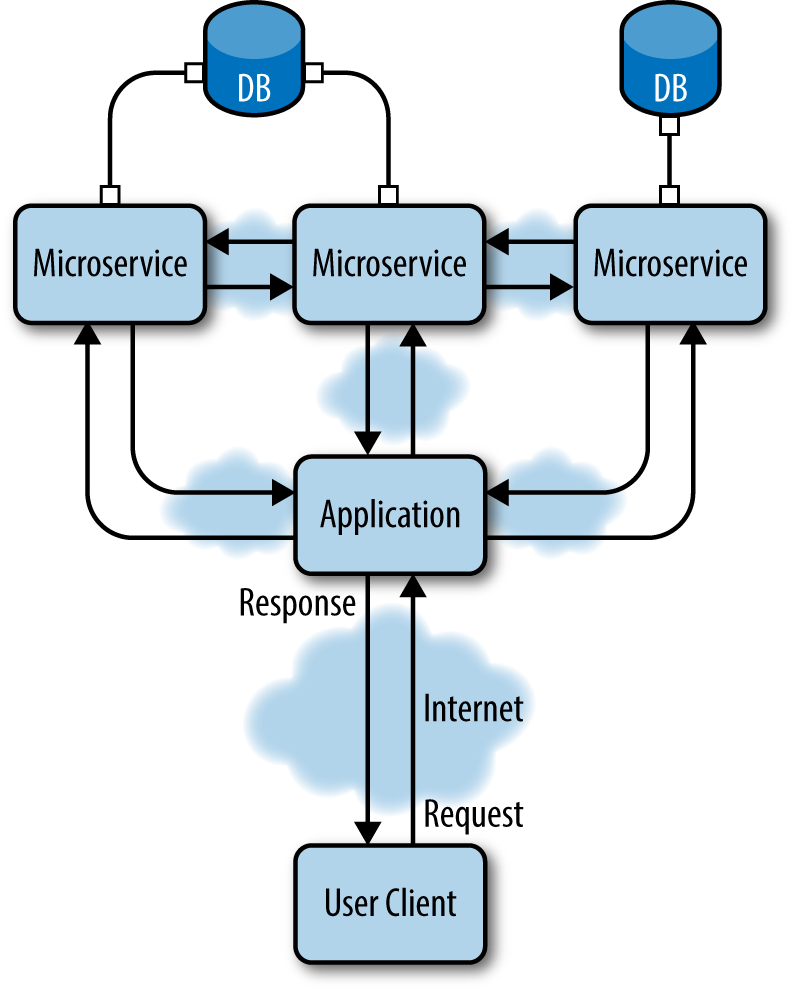
Figure 8-2. Microservices communicate using language-agnostic APIs and provide specific functions across all layers of an application architecture: data storage, backend, frontend
Certainly there are many different problems that haven’t been tackled yet, but hyperdata, APIs, and the microapplications design patterns provide the basis to start developing very complex systems. While solving one simple problem at a time, you will notice that you will be creating a platform of independent services. By solving minimal classes of problems, each of these applications will be easier to design, develop, and scale. This approach also provides an unprecedented level of logical independence and facilitates a culture of quicker technological innovation.
The Thematic Walks API
The thematic walks API we will develop next is a service that searches for geographically tagged Wikipedia articles, filtered on categories. We will call it Citywalks. The user can query the API by providing geographical coordinates; otherwise, the user’s IP address will be used to identify the geographical origin of the query.
The architecture of this service is composed of the Citywalks API, the Wikipin API, and the WikiCat API (see Figure 8-3). The WikiCat API is the example application developed throughout the previous chapters, while the Wikipin API is a service returning geolocated Wikipedia articles based on the provided geographical coordinates or the positioning of the user’s IP address.
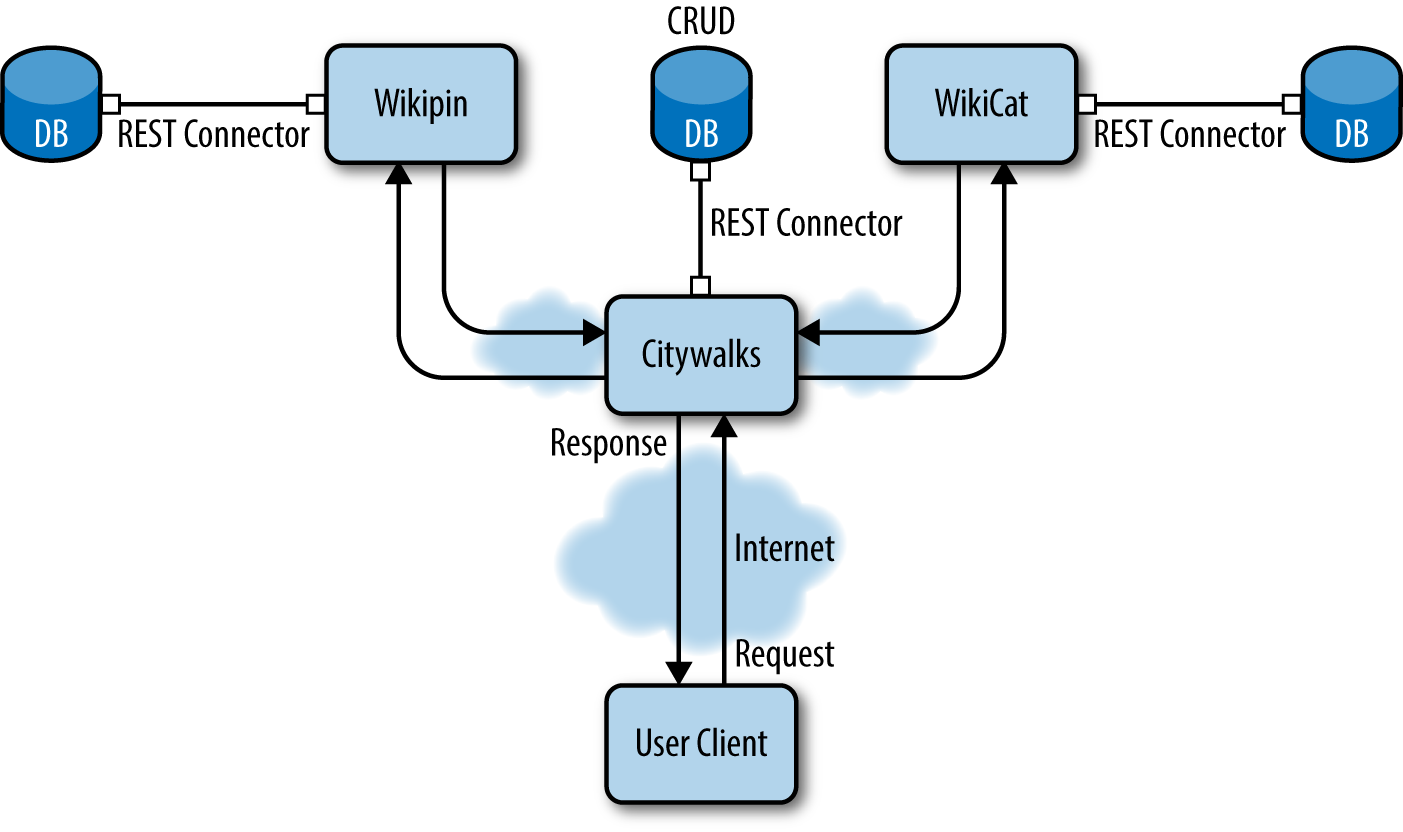
Figure 8-3. REST architecture for the Citywalks API—the Wikipin and WikiCat services for geographical points of interest and categories, respectively, are developed as independent services
The Wikipin API
Wikipin is an application that returns geolocated Wikipedia articles based on the provided location or on the requesting client’s IP address.
Geolocated articles are provided from a database dump from Wikipedia, while the IP geolocation mechanism is based on MaxMind’s IP geolocation databases.
Note
MaxMind’s downloadable databases can be found at the MaxMind Developer Site.
The Wikipedia georeferenced article dataset can be downloaded from the GeoNames database. The dataset is also available as a webservice.
Edited links to the dumps can be found at http://bit.ly/wikipin.
For this API application we are going to use rails-api with PostgreSQL and PostGIS. PostgreSQL is a popular object-relational database management system (ORDBMS) focused specifically on extensibility and standards compliance. It implements the majority of SQL standards and syntax, which will allow us to import the Wikipedia database dumps easily. Because we want to learn how to develop a platform of independent applications, we’ll take this opportunity to try a different DBMS. For this next application, we will use PostgreSQL.
Note
For a list of companies currently using PostgreSQL, see http://www.postgresql.org/about/users/.
We are also going to use PostGIS, for geographical queries. PostGIS is a spatial database extender for PostgreSQL: it adds support for geographic objects, enabling location queries to be run in SQL.
Installing PostgreSQL
You can install PostgreSQL and PostGIS from multiple sources, depending on the operating system used and your personal preferences.
Binaries to install PostgreSQL on different operating systems are available on the website.
If you are on Mac OS X, you can also use brew to install the package:
$brewinstallpostgres
Or you can use Postgres.app. Postgres.app contains a full-featured PostgreSQL installation in a single package, while also providing an intuitive way to manage your database instances.
To install PostGIS, you can rely on this official list of binaries provided for different operating systems.
On Mac OS X, you can use brew directly:
$brewinstallpostgis
If you have used Postgres.app, PostGIS should be included.
Creating the app
Once our database and extensions have been installed, we can create our application API by running:
$rails-apinewwikipin
Since we are using PostgreSQL, we also have to install the Postgres (pg) gem for our system:
$geminstallpg
Our Gemfile for the Wikipin application will include it as well, together with a set of tools and extensions for spatial connection adapters in Active Record:
source 'https://rubygems.org'
gem 'rails', '4.1.4'
gem 'rails-api'
gem 'spring', :group => :development
gem 'pg' # PostgreSQL gem
# RGeo Active Record patched version
gem 'rgeo-activerecord',
:git => 'https://github.com/nopressurelabs/rgeo-activerecord',
:branch => 'master'
# Active record PostGIS adapter
gem 'activerecord-postgis-adapter'
# Serializer for JSON
gem 'active_model_serializers'
RGeo::ActiveRecord is an optional RGeo module that provides spatial extensions for Active Record. RGeo also provides a set of helpers for writing spatial Active Record adapters and location-aware applications.
We have also added the ActiveModel::Serializer gem to the Gemfile. We will use this gem consistently to serialize JSON in our APIs project through out this book.
Note
Please note that I have patched RGeo::ActiveRecord to fix an issue where calling:
self.lonlat=Pin.rgeo_factory_for_column(:latlon).point(self.longitude, self.latitude)
fails to return a factory and returns a proc instead if no params were passed.
Both in the examples here and in the repository, I used this patched version of the adapter. You can either use my version or use the official adapter (which has been developed in the meantime) by calling it like this:
self.lonlat=Pin.rgeo_factory_for_column(:latlon,{}).point(self.longitude, self.latitude)
Run bundle install to install the gems.
The last thing left to do before we start to code our application is to configure the database in config/database.yml.
This is a file used to specify our database configuration in YAML format (rhymes with camel). YAML is a human-readable data serialization format that draws ideas from different programming languages, and XML. YAML syntax was designed to be easily readable and easily mapped to data types common to most high-level languages.
The database.yml file is structured in such a way that you can specify some default options and then a set of fields for each different environment. Our default options will include some encoding and access information, but also other information like pool size and timeout.
The pool field sets the maximum number of simultaneous database connection slots available. We will leave this at 5 for the moment, but setting this number correctly is quite important to allow your application to scale when traffic increases or to solve concurrency issues.
The timeout field defines the number of seconds to block and wait for a connection before giving up and raising a timeout error. It is expressed in milliseconds (default 5,000, or 5 seconds).
The default configuration looks like this:
default: &default
encoding: utf-8
username: postgres
password: password5
pool: 5
timeout: 5000
su_username: postgres_su # a superuser for the database
su_password: # the superuser's password
You do not have to change the default username and password, but if you want to you can run the following command:
$ sudo -u postgres psql postgres
# \password postgres
Enter new password:
If you want to create a superuser, you have to run this command instead:
$ createuser --interactive postgres_su
Shall the new role be a superuser? (y/n) y
Next, set the development and test options as follows:
development: <<: *default
adapter: postgis
database: wikipin_db_dev
postgis_extension: postgis # default is postgis
schema_search_path: public,postgis
test:
adapter: postgis
<<: *default
database: wikipin_db_test
Generating the models
At this point we are going to generate our models for the geolocated articles and our IP block and location objects.
The IP block object describes the IP address block and contains some information regarding the origin city and country (see Figure 8-4).
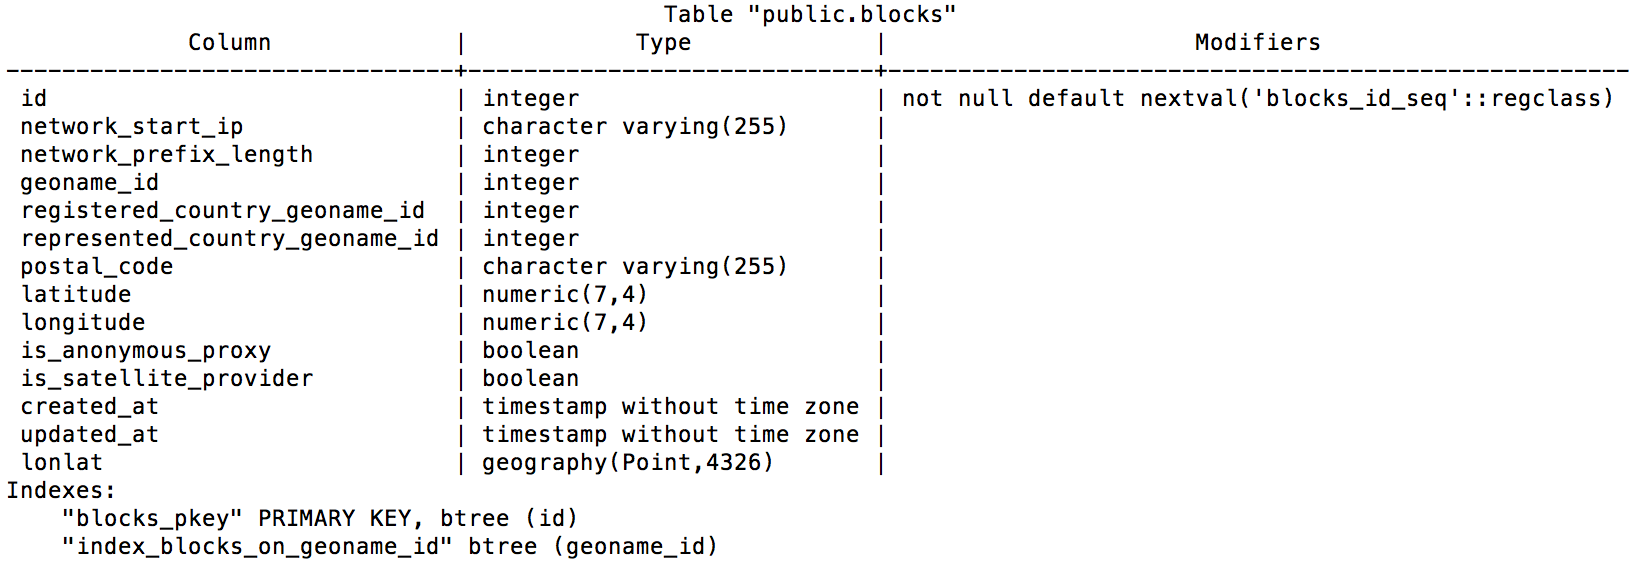
Figure 8-4. IP block table schema
We are going to use the Rails generator to generate the model class and migrations:
$ rails generate model block \
  network_start_ip:string network_prefix_length:integer \
  geoname_id:integer registered_country_geoname_id:integer \
  represented_country_geoname_id:integer postal_code:integer \
  "latitude:decimal{7,4}" "longitude:decimal{7,4}" \
--fixture false
The location table describes a city and its geographical information (Figure 8-5). It is used so that we can obtain the actual city where an IP block is located. The Location model and table won’t be used in this chapter.
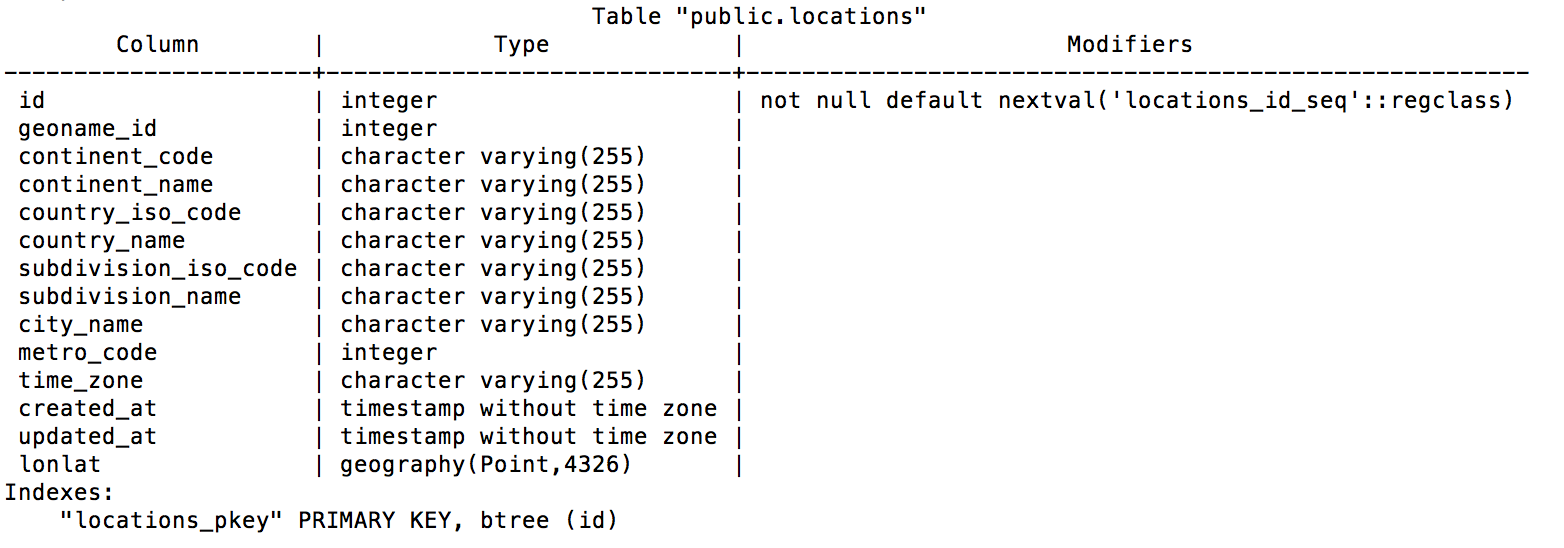
Figure 8-5. Location table schema
Note
How would you use the Location model to further enhance the Wikipin API?
At this point we will generate the Location model and run the respective migrations:
$ rails generate model location \
  geoname_id:integer continent_code:string continent_name:string \
  country_iso_code:string country_name:string \
  subdivision_iso_code:string subdivision_name:string \
  city_name:string metro_code:integer time_zone:string \
  --fixture false
We will also need another model: the Pin model. From the database point of view, the pin table describes a geotagged Wikipedia article with its url corresponding to a Wikipedia page (Figure 8-6).
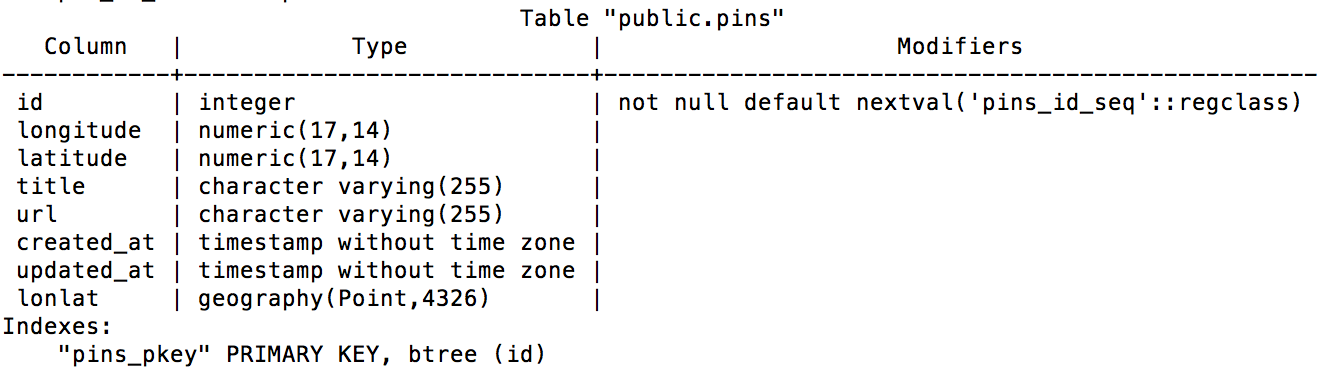
Figure 8-6. Pin table schema
We are now going to generate the Pin model as follows:
$ rails generate model pin \
  id:integer "longitude:decimal{17,14}" "latitude:decimal{17,14}" \
  title:string url:string \
  --fixture false
Once our models have been created we can run the rake tasks necessary to generate our database and run the migrations:
$ rake db:create db:migrate
Let’s familiarize ourselves a bit with our database by running a Postgres console and checking the results of our past actions:
$ psql
Once we are in the Postgres console, we can list all our databases:
\list
You should see the Wikipin development and test databases.
We can then connect to a specific database:
\c wikipin_db_dev
and list all the tables for the connected database:
\d
If we want to show a specific table we just have to run \d <table_name>:
\d blocks
Now we can copy the comma-separated values (CSV) dumps to our database:
COPY pins FROM '<full path>/wikipedia_articles_201107.csv'
    DELIMITER ',' CSV;
COPY blocks FROM '<full path>/GeoLite2-City-Blocks.csv'
    DELIMITER ',' CSV;
COPY locations FROM '<full path>/GeoLite2-City-Locations.csv'
    DELIMITER ',' CSV;
Defining the models
To be able to make geographical queries through PostGIS we need to define some factory logic that will set the location information for each record.
This is accomplished through the RGeo gem, which offers a flexible type system for geographical coordinates that can be quickly interpreted by analyzing the database columns containing these coordinates. For example, with RGeo it is possible to configure objects that exhibit certain properties based on their serialization, validation, coordinate system, or computation settings.
These settings are embodied in the RGeo factory, set within the model by calling set_rgeo_factory_for_column to use a particular combination of settings that Active Record uses for a specific column.
Most of the RGeo settings that we are going to define for the models will be shared methods and functionality. Because we do not want to repeat ourselves, we are going to introduce and use Rails concerns.
Concerns are parts of code that allow your application to be better organized, while keeping the models and controllers skinny without having to repeat shared snippets of code. Rails includes a concerns subfolder both in the controllers and the models folders.
We are therefore going to define the GeoFactory concern in models/concerns/geo_factory.rb:
moduleGeoFactoryextendActiveSupport::Concern# The geo_factory function sets the actual latitude-longitude point# on the database column by using the values of latitude and# longitude.defgeo_factoryself.lonlat=self.class.rgeo_factory(self.longitude,self.latitude)end# We define our class methodsmoduleClassMethodsdefrgeo_factory(longitude,latitude)self.rgeo_factory_for_column(:latlon).point(longitude,latitude)end# We define a find_near function to search records in a# given radiusdefself.find_near(lon,lat,radius=0.5)factory=RGeo::Geographic.spherical_factorysw=factory.point(lon+radius,lat+radius)ne=factory.point(lon-radius,lat-radius)window=RGeo::Cartesian::BoundingBox.create_from_points(sw,ne).to_geometryself.where("lonlat && ?",window)endend
Note
There is a subtle difference between class and instance methods:
classFoodefself.barputs'class method'enddefbazputs'instance method'endendFoo.bar# => "class method"Foo.baz# => NoMethodError: undefined method 'baz'forFoo:ClassFoo.new.baz# => instance methodFoo.new.bar# => NoMethodError: undefined method 'bar'for#<Foo:0x1e820>
Now we are going to define the actual Block model:
classBlock<ActiveRecord::Base# We include the concernincludeGeoFactory# The following line sets a geographic implementation# for the :lonlat column:set_rgeo_factory_for_column(:lonlat,RGeo::Geographic.spherical_factory(:srid=>4326))# And that is actually it!end
Note
SRID stands for Spatial Reference System Identifier: it represents a unique value used to unambiguously identify projected, unprojected, and local spatial coordinate system definitions. The actual value 4326 comes from the World Geodetic System (WGS), a standard used in cartography, geodesy, and navigation.
The same implementation is also used for the Pin and Location models.
Working on the controllers
In this section we are going to define the controllers for the pin and block resources.
We have seen how concerns help developers keep their models and controllers DRY, their application code organized, and their methods skinny. Therefore, we are also going to use concerns at the controller level.
First we are going to define the FindBlock concern in controllers/concerns/find_block.rb. This concern is used to find the correct IP block on request, or given an ip_address parameter:
moduleFindBlockextendActiveSupport::Concern# This snippet of code is executed when the concern is included,# but only for the get_block action.includeddobefore_filter:find_block,only::get_blockend# Here we set the IP address of the request. If the ip_address# param is present we use this; otherwise we use the request# remote_ip.defset_ipifparams[:ip_address]params[:ip_address]elserequest.remote_ipendend# Then we find the IP block corresponding to the IP addressdeffind_blockip=set_ip# Here we do a bit of cosmetic work on the IP string because we# actually want to find the block, not the single IP address.# We remove the last part of the address (last octet)# and replace it with 0.@block=Block.where(:network_start_ip=>"::ffff:#{ip.rpartition(".")[0]}.0").firstend# And that's it!end
Working with Requests’ IP Addresses
Please note that in a real-world application scenario, the remote IP address depends upon different network factors. Your Rails server might in fact receive a relative IP address depending on your network configuration.
To generate the block controller you can run:
$railsgcontrollerapi/v1/block
Now we are going to define two actions in the controller. One will be a show action to just find and display the IP block by ID. The second will be used to find the block by IP address:
classApi::V1::BlocksController<ApplicationController# Include the concernincludeFindBlock# Use JSONrespond_to:json# Find the block by ID.# If a block is found, render JSON through the serializer;# else render an error. We are going to define both the serializer# and the error object later.defshow@block=Block.find(params[:id])if@blockrender:json=>@block,serializer:BlockSerializer,root:"ip_block"else@error=Error.new(:text=>"404 Not found",:status=>404,:url=>request.url,:method=>request.method)render:json=>@error.serializerendend# The block of this method is fetched through the concern.# If found it is serialized and rendered; otherwise an error is# returned.defget_blockif@blockrender:json=>@block,serializer:BlockSerializer,root:"ip_block"else@error=Error.new(:text=>"404 Not found",:status=>404,:url=>request.url,:method=>request.method)render:json=>@error.serializerendend# And that is it!end
We will define the error object as a nonpersistent model. Since it is not persistent the error object will not use Active Record, although some “automagic” performed by Active Record might actually be useful for our goal:
classError# ActiveModel::Validations provides a full validation framework# to your objects; ActiveModel::Conversion handles default# conversions #to_model, #to_key, #to_param, and #to_partial_path;# and finally ActiveModel::Naming creates a model_name method on# your object.includeActiveModel::ValidationsincludeActiveModel::ConversionextendActiveModel::Naming# We need to define the set of attributes that can be accessed.# The method attr_accessor defines a named attribute for the# module and creates an instance variable (@name) and a# corresponding access method to read it.# It also creates a method called name= to set the attribute.attr_accessor:text,:status,:url,:methoddef_links{:url=>request,:entry=>entry}end# This method serializes the request objectdefrequesthref=URI::encode(url){:href=>href,:method=>method,:rel=>"request"}end# This method specifies a default entry point to return to# the clientdefentryhref=URI::encode("/api/v1"){:href=>href,:method=>"GET",:rel=>"entry point",:params=>params}end# Here is how we display the params submitted through the querydefparams{:point=>{:value=>"{lon},{lat}",:optional=>true},:title=>{:value=>"text",:optional=>true}}end# The following method serializes the error objectdefserializer{:error=>{:url=>url,:text=>text,:status=>status,:method=>method,:_links=>_links}}end# Here the error object and its attributes are initializeddefinitialize(attributes={})attributes.eachdo|name,value|send("#{name}=",value)endend# Here we just define the object as nonpersisted;# therefore we are not saving it to the database.defpersisted?falseend# And that's it!end
Now let’s move on to the pin controller. First we need to define our concern to retrieve pins based on the user’s IP address or on submitted geographical coordinates:
moduleEntryFilteringextendActiveSupport::Concern# We want to perform only the entry_action for the index methodincludeddobefore_filter:entry_action,only::indexend# point is a string containing geographical coordinates in# the form {logitude},{latitude}defpins_by_point(point)point=point.split(',')@pins=Pin.find_near(point[0].to_f,point[1].to_f)end# If no coordinates are sent, we will try to locate the IP# and retrieve pins close to the IP locationdefpins_by_ip(ip)block=Block.where(:network_start_ip=>"::ffff:#{ip.rpartition(".")[0]}.0").firstifblockPin.find_near(block.longitude.to_f,block.latitude.to_f)endend# Finally, our entry_action fetches pins by IP if no# point param is provideddefentry_actionifparams[:point]@pins=pins_by_point(params[:point])else@pins=pins_by_ip(request.remote_ip)endend# And that's it.end
Finally we can define the pin controller, with an index action and a show action:
classApi::V1::PinsController<ApplicationControllerincludeEntryFilteringrespond_to:json# Here we display the pins fetched by location.# If no pins are provided we send an error:defindexif@pinsrender:json=>@pins,each_serializer:PinSerializer,root:"pins"else@error=Error.new(:text=>"404 Not found",:status=>404,:url=>request.url,:method=>request.method)render:json=>@error.serializerendend# Finally we find the pin by ID and return it serialized.# If no pin is found, we return an error:defshow@pin=Pin.find(params[:id])if@pinrender:json=>@pin,serializer:PinSerializer,root:"pin"else@error=Error.new(:text=>"404 Not found",:status=>404,:url=>request.url,:method=>request.method)render:json=>@error.serializerendend# And that is it.end
You can go ahead and define the pin and block serializers. The full code is available in the Wikipin GitHub repository.
The Citywalks API
The Citywalks API is a service that returns and creates geolocated routes within a certain location radius. It uses the Wikipin API to discover Wikipedia articles that are geolocated nearby and connects them in a possible route that the user can walk. Each article contains category information, so users could potentially create thematic walks related to specific categories. We will explore this aspect in the next chapter, when we will venture into creating a proper web application using the APIs that we have been developing up to this point.
The Citywalks API will be a rails-api application and will use MongoDB as a database. MongoDB (from “humongous”) is an open source document database written in C++.
So what is a document database? A document database uses documents instead of tables. Documents are like objects, and they map nicely to programming language data types; also, embedded documents and arrays reduce the need for join operations, and using a dynamic schema makes polymorphism easier. A MongoDB deployment hosts a number of databases. A database holds a set of collections. A collection holds a set of documents. A MongoDB collection is similar to a SQL table. A document is a set of key/value pairs and can be compared to a record in a SQL table. We also said that documents have a dynamic schema. This means that documents in the same collection do not need to have the same set of fields or structure, and common fields in a collection’s documents may hold different types of data.
Note
If you want to understand the difference between MongoDB and SQL terminology, check out the SQL to MongoDB Mapping Chart.
The object document mapper (ODM) for MongoDB that we will use is Mongoid (pronounced mann-goyd).
Note
Mongoid is an ODM for MongoDB written in Ruby by Durran Jordan. The philosophy of Mongoid is to provide a familiar API to Ruby developers who have been using Active Record or DataMapper, while leveraging the power of MongoDB’s schemaless and performant document-based design, dynamic queries, and atomic modifier operations.
To create a Rails API application with Mongoid, we need to tell Rails to skip Active Record, since Mongoid will take its place:
$rails-apinewcitywalks--skip-active-record
This will insert the following lines into config/application.rb:
require"active_model/railtie"# require "active_record/railtie"require"action_controller/railtie"require"action_mailer/railtie"require"action_view/railtie"require"sprockets/railtie"require"rails/test_unit/railtie"
Finally, we edit the Gemfile:
source'https://rubygems.org'gem'rails','4.1.4'# Patched locally because of issue:# https://github.com/rails-api/rails-api/issues/142gem'rails-api',:git=>'https://github.com/nopressurelabs/rails-api',:branch=>'master'gem'moped',github:'mongoid/moped'gem'mongoid','~> 4.0.0',github:'mongoid/mongoid'gem'bson_ext'gem'spring',:group=>:development# Serializer for JSONgem'active_model_serializers'# CORSgem'rack-cors',:require=>'rack/cors'
It is time to initialize our application. First we bundle:
$bundleinstall
Then we run:
$rakedb:create
Rack CORS Middleware
Rack::Cors provides support for Cross-Origin Resource Sharing (CORS) for Rack-compatible web applications.
The CORS spec allows web applications to make cross-domain Ajax calls without using workarounds such as JSONP.
Cross-Origin Resource Sharing is a mechanism defined by the W3C, and it is used to enable client-side cross-origin requests. The mechanism defines the specifications that enable an API to make cross-origin requests to some resources. For instance, if an API is used on http://example.org resources, a resource at http://hello-world.example can opt in to using the mechanism (e.g., by specifying Access-Control-Allow-Origin: http://example.org as a response header), which would allow that resource to be fetched cross-origin from http://example.org.
Discovering the /lib Directory
The Citywalks API will use the WikiCat API to find categories about pins and the Wikipin API to actually find pins nearby.
To fetch data from external sources we will have to write some logic that will make a REST call fetch and parse some data. The code that we are going to need to do this is not strictly related to our core app. It does not belong to our models or our controllers, nor does it extend them.
This code lives in the /lib directory.
The first module that we are going to write is going to handle REST requests and responses, while also creating meaningful errors in case something goes wrong. Create a new document under /lib called restful.rb and define it as follows:
require'net/http'require'json'moduleRestfuldefsend_request(end_point)request_url=URI.parse(URI.encode(end_point))log"Request URL:#{request_url}"res=Net::HTTP.get_response(request_url)unlessres.kind_of?Net::HTTPSuccessraiseRestful::RequestError,"HTTP Response:#{res.code}#{res.message}"endResponse.new(res.body)endclassRequestError<StandardError;end# Response object returned after REST call to service.classResponsedefinitialize(json)@doc=JSON.parse(json)end# Return JSON object.defdoc@docend# Return true if response has an error.defhas_error?!(error.nil?||error.empty?)end# Return error message.deferror@doc.has_key?"error"end# Return error code.deferror_codeif@doc.has_key?"error"@doc["error"]["status"]endendendprotecteddeflog(s)ifdefined?RAILS_DEFAULT_LOGGERRAILS_DEFAULT_LOGGER.error(s)elsifdefined?LOGGERLOGGER.error(s)elseputssendendend
Now we are going to define two similar modules: one for the Wikipin API and one for the WikiCat API.
We will start by creating a wikicat.rb file under /lib, defined as follows:
require'net/http'require'json'moduleWikicat# Here we define the API version and the endpoints# we are going to useCAT_VERSION='1.0'CAT_SERVICE_URL='http://0.0.0.0:3000'PIN_SERVICE_URL='http://wikipin-nopressurelabs.rhcloud.com'# Given a pin's relative URL will get the pin's upper category graphdefpin_upper(pin)get_pin=self.class.send_request("#{PIN_SERVICE_URL}#{pin}")cat=get_pin.doc["pin"]ifcatsub_category=cat["title"]request_upper_graph(sub_category).doc[sub_category]endend# Given a pin's relative URL will get the pin's lower category graphdefpin_lower(pin)get_pin=send_request("#{PIN_SERVICE_URL}#{pin}")cat=get_pin.doc["pin"]ifcatsub_category=cat["title"]request_lower_graph(sub_category).doc[sub_category]endend# Fetch the actual upper category graphdefrequest_upper_graph(category)self.class.send_request("#{CAT_SERVICE_URL}/api/v1/graph/up/#{category.gsub!(/\s/,'_')}")end# Fetch the actual lower category graphdefrequest_lower_graph(category)self.class.send_request("#{CAT_SERVICE_URL}/api/v1/graph/#{category.gsub!(/\s/,'_')}")endend
Now we will create a wikipin.rb file under /lib, defined as follows:
require'net/http'require'json'moduleWikipinPIN_VERSION='1.0'PIN_SERVICE_URL='http://wikipin-nopressurelabs.rhcloud.com'# Here we make the call to get the pins available for our# position.# We can either provide a point with latitude and longitude# or have the service locate us through our IP address.defrequest_pins(point=nil)# point = "lon,lat"ifpointsend_request("#{PIN_SERVICE_URL}/api/v1/pins/?point=#{point}")elsesend_request("#{PIN_SERVICE_URL}/api/v1/pins")endend# Here we request the IP address block informationdefrequest_block(ip)send_request("#{PIN_SERVICE_URL}/api/v1/blocks?ip_address=#{ip}")end# Here we simply get the pindefget_pin(pin)send_request("#{PIN_SERVICE_URL}#{pin}")endend
The /lib directory is a great place to start testing code that you would like to extract from the app, and eventually into a Ruby gem. Moving code there allows you to test it in isolation. Also, this forces you to write the code as an independent class from your app. Then, if you are satisfied with what you have obtained, you can easily extract it into an external gem.
Defining the Models
Now that we’ve defined the build logic, we can go back to our app to define our actual models.
The first model that we are going to need is a Walk model. We will start by creating a walk.rb file under app/models:
classWalkincludeMongoid::DocumentincludeMongoid::Timestamps::CreatedincludeActiveModel::SerializerSupport# Remember the difference between extend and include?extendWikipinextendRestfulincludeWikicat# These are the fields that the Walk model contains.field:title,type:Stringfield:author,type:Stringfield:pins,type:Arrayfield:location,:type=>Arrayfield:categories,:type=>Arrayindex({location:"2d"},{min:-200,max:200})validates:pins,length:{minimum:0,maximum:10}end
Then we create the index in our database dynamically by just running:
$rakedb:mongoid:create_indexes
We also need to define a nonpersistent error object. It will be identical to the error object defined earlier in this chapter, so I will not repeat the same code (you can find the code in the repository).
Building the Controllers
The walks controller will allow us to perform all the CRUD operations on the walk resource. We want to be able to list all the walks, create walks, delete walks, and modify walks:
classApi::V1::WalksController<ApplicationControllerrespond_to:json# Here we include two concerns that will be defined later on# and will be used to create and locate walks.includeWalkLocatorincludeWalkCreator# before_action is a filter.# Filters are methods that are run before,# after, or "around" a controller action.# Filters are inherited, so if you set a filter on# ApplicationController, it will be run on every controller# in your application.before_action:set_walk,only:[:show,:edit,:update,:destroy]defindexif@walksrender:json=>@walks.to_a,each_serializer:WalkSerializer,root:"walks"else@error=Error.new(:text=>"404 Not found",:status=>404,:url=>request.url,:method=>request.method)render:json=>@error.serializerendend# GET /walks/1# GET /walks/1.jsondefshowif@walkrender:json=>@walk,serializer:WalkSerializer,root:"walk"else@error=Error.new(:text=>"404 Not found",:status=>404,:url=>request.url,:method=>request.method)render:json=>@error.serializerendend# GET /walks/1/editdefeditend# GET /walks/newdefnew@walk=Walk.newend# POST /walks# POST /walks.jsondefcreate@walk=initialize_walk(walk_params)if@walk.saverender:json=>@walk,serializer:WalkSerializer,root:"walk"elserender:json=>@walk.errorsendend# PATCH/PUT /walks/1# PATCH/PUT /walks/1.jsondefupdateif@walk.update(walk_params)render:json=>@walk,serializer:WalkSerializer,root:"walk"elserender:json=>@walk.errorsendend# DELETE /walks/1# DELETE /walks/1.jsondefdestroyif@walk.destroyrender:json=>{:head=>ok}elserender:json=>@walk.errorsendendprivate# Use callbacks to share common setup or constraints# between actions.defset_walk@walk=Walk.find(params[:id])end# Never trust parameters from the scary Internet;# only allow the whitelist through.defwalk_paramsparams.require(:walk).permit(:title,:author,:location,:pins,:categories)endend
Now we define the concerns that we have included in our controller. The first one will be used to locate walks:
moduleWalkLocatorextendActiveSupport::Concernincludeddobefore_filter:entry_action,only:[:index]enddefwalks_by_point(point)point=point.split(",")@walks=Walk.geo_near([point[0].to_f,point[1].to_f]).sphericalenddefwalks_by_ip(ip)ifip="127.0.0.1"walks_by_point("41.23,2.09")elseblock=Walk.request_block(ip).doc["ip_block"]ifblocklongitude=block["point"].scan(/\(([^\)]+)\)/).last.first.split(" ")[0]latitude=block["point"].scan(/\(([^\)]+)\)/).last.first.split(" ")[1]Walk.geo_near([longitude.to_f,latitude.to_f]).sphericalendendenddefentry_actionifparams[:location]@walks=walks_by_point(params[:location])else@walks=walks_by_ip(request.remote_ip)endendend
The second concern will be used to create walks:
moduleWalkCreatorextendActiveSupport::Concerndefinitialize_walk(params)params[:location]=set_location(params[:location])params[:pins]=params[:pins].split(",")Walk.new(params)enddefset_location(location)iflocationlocation=location.split(",")[location[0].to_f,location[1].to_f]elseblock=retrieve_position(request.remote_ip)ifblocklongitude=block["point"].scan(/\(([^\)]+)\)/).last.first.split(" ")[0]latitude=block["point"].scan(/\(([^\)]+)\)/).last.first.split(" ")[1][longitude.to_f,latitude.to_f]endendenddefretrieve_position(ip)Walk.request_block(ip).doc["ip_block"]endend
Now if everything is working as expected we will be able to make a POST request to our API and actually create a walk with some test pins:
$curl--data"walk\[author]=<username>&walk[title]=first-walk&\walk[location]=2.09,41.23&\walk[pins]=/api/v1/pins/27,/api/v1/pins/28"\http://0.0.0.0:3001/api/v1/walks
Wrapping Up
In this chapter we explored the concepts of SOA, microservices, and microapplications. We have extended our multi-API platform and started connecting things together.
In the next chapter we will venture into frontend land. We will specifically see how we can map different data streams to the same application UI. We will also learn some Ember.js basics.