Table of Contents for
Opa: Up and Running
 Opa: Up and Running
Published by
O'Reilly Media, Inc., 2013
Opa: Up and Running
Published by
O'Reilly Media, Inc., 2013
- Cover
- Opa: Up and Running
- Opa: Up and Running
- Preface
- I. Coding a Mini Wikipedia
- 1. First Steps: Getting to Know Opa
- 2. Opa Fundamentals
- 3. Servers, Resources, and URLs
- 4. Data Storage
- 5. Building the UI in HTML and CSS
- II. Coding a Mini-Twitter
- 6. The Web Chat App
- 7. More Advanced Features of Opa
- 8. User Management
- 9. Building Reactive UIs: New Messages with a Real-Time Preview
- 10. Data Storage and Querying: Storing and Fetching Relevant Messages
- About the Authors
- Colophon
- Copyright
Chapter 9. Building Reactive UIs: New Messages with a Real-Time Preview
We will now work on a modal window to post new messages in Birdy. As in the micro-blogging app developed earlier, we want certain markup to be interpreted in a special way. More precisely:
-
#topictext should indicate messages about a given topic. -
@usershould indicate that the message is directed to the given user. - http://example.com-like text should be interpreted as links.
Those three elements will be formatted in a special way. This formatting will be shown to the user in a live preview, which is a preview of the final rendering of the message updated with every keystroke. A UI in which the interface reacts continuously to user events is called a reactive UI.
Let’s get started!
Parsing
To analyze all the special elements in our messages, we will need to parse them. Parsing is the process of analyzing text to determine its structure. The code that performs such an analysis is called a parser. Opa offers extensive support for building parsers, so let’s begin by exploring this support.
Note
A popular set of rules for parsing goes by the name context-free grammar (CFG). Opa does not use CFG, and instead uses a newer set of rules known as parsing expression grammar (PEG). You do not need prior knowledge of these rules to understand the concepts presented in this chapter. We just wanted you to know about them!
Parsing is somewhat similar to pattern matching. Pattern matching analyzes an arbitrary data structure and computes some value depending on the result of this analysis. Parsing is a similar process, only the input is a string. In Opa, parsing can also be applied to one of the foundation data types of web apps: XML. Therefore, parsing in Opa is a way to compute a result depending on the value of a string or an XML fragment; but this book only covers parsing of strings.
The code that performs parsing is called a parser. Opa offers extensive
support for building parsers, so let’s begin by exploring it.
Opa parsers are introduced with the parser keyword followed by a number of
cases. Each case follows this scheme:
caseEXPR:VALUE
This consists of the case keyword (just like in pattern matching) and then
a parsing expression (more on that shortly) and the value corresponding
to the given case (again, just like in pattern matching).
Cases are evaluated one by one, in order. Similar to pattern matching,
the first succesful VALUE is used. Note that VALUEs in all
parser cases must be of the same type t, and then the type of the complete
parser expression is Parser.general_parser(t).
Now let’s explore the parsing expressions. The simplest one is just an explicit literal string where the parsed string contains the given text. Hence, the simplest parser one can write is:
simple_parser=parser{case"Hello Opa":{success}}
This has only one case, which expects the precise Hello Opa text. It
has type Parser.general_parser({success}). The main function that uses
such parsers is:
Parser.try_parse(parser,text)
This function takes two arguments: the first one is the parser to be used and the second
one is the text (string) to parse. The result is option(t) if parser
was of type Parser.general_parser(t), i.e., it is an optional value of the
type produced by the parser.
For example, we will have the following two results:
Parser.try_parse(simple_parser,"Hello Opa")==some({success})Parser.try_parse(simple_parser,"Hello")==none
Parsing Expressions
Let’s continue to extend our arsenal of parsing expressions.
A set of collating elements between square brackets is a range expression,
which parses a single provided character if it belongs to the given set.
It also allows ranges using a hyphen (-); for example, [a-zA-Z_] is an expression that accepts
a letter (lowercase or uppercase) or an underscore character.
Next in line is the sequence expression. If E1 and E2 are parsing
expressions, E1 E2 is a parsing expression that means “parse E1
and then E2”.
On to the repetition expression. If E is a parsing expression,
E+ and E* are valid expressions, the former denoting one or more
occurrences of E and the latter denoting zero or more occurrences of E. Note that
as many occurrences as possible are consumed from the input. Hence, the
parsing expression [ab]* [a] will never succeed: [ab]* will consume
all as from the input and there will be none left for the final [a]
to match against. We say that the repetition operator of PEG is greedy,
meaning it consumes as much as it can from the input.
Tip
CFG is different from PEG in two main ways:
- PEG is greedy: it consumes as much input as possible.
-
The choice operator in PEG is prioritized: if a certain
caseexpression succeeds, other ones will never be tried.
Both properties make writing PEG easier, as their behavior is more easily predictable than in CFG.
We are now ready to write a parser for an arbitrary word consisting of a sequence of letters, digits, underscores, and hyphen characters:
word=parser{caseword=([a-zA-Z0-9_\-]+)->Text.to_string(word)}
Here we have escaped the hyphen in the
range operator, as it’s meant as a hyphen operator and not part of a range,
like in [a-z].
Second, as you saw earlier, every expression has a default parsing value
associated with it. For instance, the range operator gives the character
that was parsed and the repetition operators give a list of values of
parsed elements. So the [a-zA-Z0-9_\-]+ expression would give us a
list of parsed characters. Since we’re not interested in individual characters,
but rather in the complete parsed text, we put the expression in parentheses,
which has precisely this effect: the result of parsing (E) is always the
text that was consumed while parsing E.
Finally, for efficiency, parsing uses a special data type of text,
which is better suited for complex text manipulation than the default string type.
It’s easy to convert from text to the more classic string using the Text.to_string function, which is part of the standard Opa library.
With all this knowledge at hand, we can turn to our original task: parsing
Birdy messages. This task essentially consists of extracting three
types of elements from the message: user mentions (@user), topic mentions
(#topic), and links (http://example.com). Here is a parser
that recognizes those elements:
element=parser{case"@"user=word:~{user}case"#"topic=word:~{topic}case&"http://"url=Uri.uri_parser:{link: url}}
This parser consists of three cases:
-
An
@character followed by a word, indicating a reference to the given user -
A
#character followed by a word, indicating a reference to the given topic -
A link starting with the
http://string
This last case requires some additional explanation. We use a URI parser from the standard library, Uri.uri_parser.
However, this parser is liberal as it accepts go.To as a valid
URL. Indeed, as most users omit http:// from URLs, go.To can be interpreted as a URL (and the domain exists), but it can also just be a missing whitespace in a sentence as in “We should go.To be there…”.
Therefore, we put an additional restriction that the URL should start with the http:// string.
This is where the new &exp construction comes in. It tries to parse
using exp, and if that fails, the &exp expression fails too.
However, if it succeeds, the parsing continues, but as though the
parsing of exp consumed no input. In other words, this allows us to
check whether exp would succeed at this point in the input, without
really performing this parsing (in a sense). This operator is called
a logical predicate. It allows us to perform a look-ahead in the
parsed input. It has important implications for the expressive power
of PEG, but this is a subject beyond the scope of this book.
We are now ready to write a parser for a message segment, which can be either one of the special elements mentioned earlier (user, topic, or link) or a piece of text:
segment_parser=parser{case~element:elementcasetext=word:{~text}casec=(.):{text: Text.to_string(c)}}
This parser has three cases:
- The first one takes care of special elements.
- The second one parses a word (as we defined it earlier) as text.
- The last one just consumes a single character.
Now a message simply consists of a number of such segments, and therefore, we can parse it with:
msg_parser=parser{caseres=segment_parser*:res}
You may be wondering why we needed two separate cases for a word
and a single character in the segment_parser. If we keep only the
case for a single character, the message xxhttp://example.go would
be parsed as text xx, followed by a link to http://example.go. This
does not match our needs, and therefore, we parse one word at a time
which, in this case, would result in the text xxhttp, followed by three
special characters: ://. We still need the case for a single
character to consume all characters that are not covered by the word
case (punctuation marks and such).
Modeling Messages
We are now ready to provide a model for Birdy messages. We create a model file,
src/model/msg.opa, and add it to the project (i.e., to the
opa.conf file).
We then provide a definition for a message, Msg.t, which consists
of the message content (content), its author (author), and the date it was
published (created_at). We make it abstract as well:
abstracttypeMsg.t={string content,User.t author,Date.date created_at}
We also introduce a type for a message
segment, Msg.segment, in the sense introduced in the previous section:
typeMsg.segment={string text}or{Uri.uri link}or{User.name user}or{Topic.t topic}
Finally, we build a Msg module, with
two accessory functions for message fields and a function to create
a new message, as well as the parser we developed previously.
We expose this parser as an analyze function, which takes a message,
Msg.t, and returns the list of segments, list(Msg.segment), it is
composed of:
moduleMsg{functionMsg.t create(User.t author,string content){{~content,~author,created_at:Date.now()}}functionget_author(Msg.t msg){msg.author}functionget_created_at(Msg.t msg){msg.created_at}privatefunctionlist(Msg.segment)analyze(Msg.t msg){word=parser{caseword=([a-zA-Z0-9_\-]+)->Text.to_string(word)}element=parser{case"@"user=word:~{user}case"#"topic=word:~{topic}case&"http://"url=Uri.uri_parser:{link: url}}segment_parser=parser{case~element:elementcasetext=word:{~text}casec=(.):{text: Text.to_string(c)}}msg_parser=parser{caseres=segment_parser*:res}Parser.parse(msg_parser,msg.content)}}
Rendering Messages
It’s time to turn our attention to the user interface. Let’s create an src/view/msg.opa file; we’ll use
the same filename as before, as we are still dealing with messages, but
we’ll put it in the view directory. Also, the model
code was placed in the Msg module, but all the code of this chapter will
go into the MsgUI module. We’ll then add it to the project as usual, in src/opa.conf.
We will first write a function to show (render) a message to the user:
functionxhtml render(Msg.t msg){msg_author=Msg.get_author(msg)<divclass=well><pclass="author-info"><strong><ahref="/user/{msg_author}">@{msg_author}</a></strong><span>{Date.to_string(Msg.get_created_at(msg))}</span></p><p>{List.map(render_segment,Msg.analyze(msg))}</p></div>}
This function creates a <div> with a well class, which is Bootstrap
markup for a page element with an inset effect. The element consists of
two paragraphs (<p>). The first one contains a <strong> tag (bold text)
which contains a link to the author, msg_author, and a <span> tag
which contains the message creation date. Note how we use accessor methods from
the Msg module; this is because the Msg.t type is abstract, and hence,
its structure is only visible in the birdy.model package and outside of
it must be manipulated with functions from that package. This is
data abstraction at work.
The second paragraph contains the text of the message itself. To obtain
it, we use the Msg.analyze function which gets the list of the message segments,
and then we use the List.map function to convert each
segment into its HTML representation using the following render_segment
function:
privatefunctionrender_segment(Msg.segment seg){match(seg){case~{user}:<b><aclass=ref-user href="/user/{user}">@{user}</a></b>case~{topic}:<i><aclass=ref-topic href="/topic/{topic}">#{topic}</a></i>case~{link}:<ahref={link}>{Uri.to_string(link)}</a>case~{text}:<>{text}</>}}
This function just does the pattern matching of the segment type, and for
every possible variant produces its HTML representation: both user
mentions and topics are rendered as links, the former with a bold
style (<b>) and linking to /user/[USERNAME] URLs and the latter with
italics (<i>) and linking to /topic/[TOPICNAME]. We will talk about
how we are going to handle those URLs in User and Topic Pages.
Link segments are just rendered as HTML links (<a>) and text as normal text.
There is one small caveat. If you try to use the preceding code to render a message, you will be greeted with the following message:
Can'tmake an xmlwith{email:.email;username:string}
This is because in the earlier snippet, in the render function, we used
an insert with a User.t value of the message author:
[...]<strong><ahref="/user/{msg_author}">@{msg_author}</a></strong>[...]
The error message essentially says that the Opa compiler does not know
how to display values of that type. We can instruct it by creating an
xmlizer, which is a special function that converts an arbitrary data type
to HTML. For User.t values, it could look as follows:
@xmlizer(User.t)functionuser_to_xml(user){<>{user.username}</>}
The return type of this function must be of type xhtml.
The only special thing about this function is the @xmlizer(User.t) annotation,
which translates to “This is a function that converts User.t values into HTML.”
There is an equivalent mechanism of stringifiers and an @stringifier(type)
annotation, which are used for conversions to strings:
@stringifier(User.t)functionuser_to_string(user){user.username}
Let’s add those two functions to our User module.
Reactive UI: Live Preview
We will now work on the feature that allows users to enter new messages. To make it more user-friendly, we will add a real-time preview that displays the formatted message while the user is typing.
Let’s start by creating an interactive button that opens a modal window for entering a new message:
window_id="msgbox"functionhtml(){match(User.get_logged_user()){case{guest}:<></>case{user:_}:<aclass="btn btn-primary pull-right"data-toggle=modal href="#{window_id}"><iclass="icon-edit icon-white"/>New message</a>}}
The feature of adding new messages is only available to logged-in users who will see
a Bootstrap button that opens the modal window identified by
window_id [you learned how to deal with modal windows in
Bootstrap Widgets: Modal Windows]. For unlogged guests, we just return an empty snippet.
Now we will work on the modal window itself:
private preview_content_id="preview_content"private input_box_id="input_box"functionmodal_window_html(){match(User.get_logged_user()){case{guest}:<></>case~{user}:win_body=<textareaid={input_box_id}onready={update_preview(user)}onkeyup={update_preview(user)}placeholder="Compose a message"/><divid=#preview_container><pclass=badge>Preview</p><divid={preview_content_id}/></div>win_footer=<>Post button will appear here</>Modal.make(window_id,<>What's on your mind?</>,win_body,win_footer,Modal.default_options)}}
Again, we only create this for logged-in users. The modal
body contains a <textarea> with an input_box_id for the user’s message and a <div> element with the preview_content_id preview. Besides that, the input
text area contains a placeholder and event handlers for onready and onkeyup events, both
invoking the update_preview function. This means this function will be called when the window is created (onready) and every time the user edits the message (onkeyup), and will
update the live preview. In the modal footer, for the moment, we add some temporary text for the forthcoming Post button.
Here is a very simple event handler, the update_preview function:
privateclientfunctionupdate_preview(user)(_){msg=Dom.get_value(#{input_box_id})|>Msg.create(user,_)#{preview_content_id}=render(msg)}
In the preceding code, first we get the content of the text box with Dom.get_value, and then we turn it
into a message with the Msg.create function that we wrote previously.
In the last line of the function, we update the preview container (accessing
it by its ID: preview_content_id) with the rendered version of the message,
obtained with our render function.
All that remains to be done is to hook up our message creation button.
For the best user experience we will make it accessible all the time, and
therefore place it in the top bar of the app. To do so, we add a call to
MsgUI.html in the html function in src/view/topbar.opa:
functionhtml(){<aclass=brand href="/">Birdy</a><+>MsgUI.html()<+>user_menu()}
It’s better to place the modal window content outside of the top bar, to minimize the depth of the HTML structure. Therefore, we add some modal window HTML to the page_template function in src/view/page.opa:
functionpage_template(title,content){[...]<divid=#main><spanid=#noticeclass=container>{notice}</span>{content}{Signin.modal_window_html()}{Signup.modal_window_html()}{MsgUI.modal_window_html()}</div>[...]}
We’re done! If you compile and run your Birdy application, after signing in you should see the “New message” button in the top bar similar to Figure 9-1.

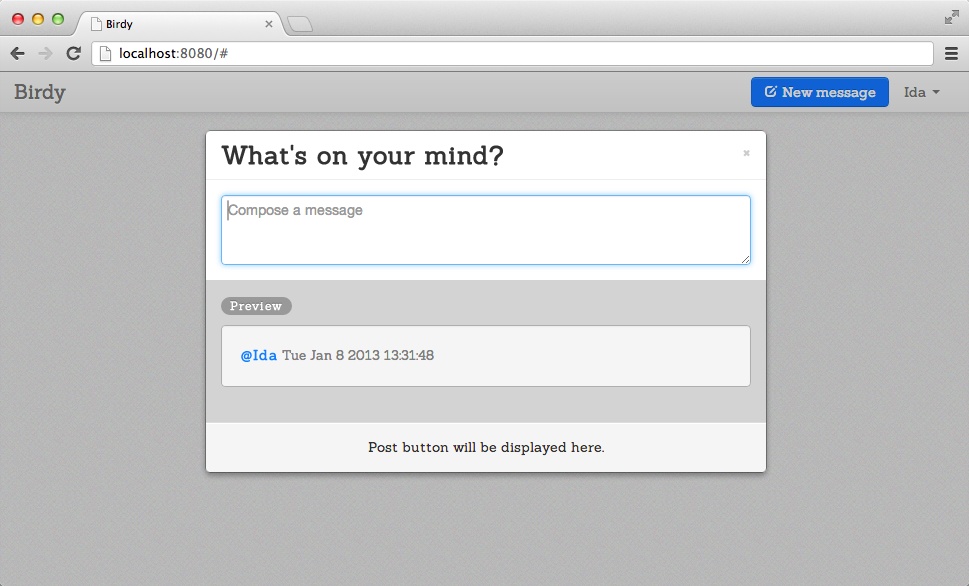
Clicking on the “New message” button results in a modal window similar to the one shown in Figure 9-2.
Let’s make the following two improvements to this page:
- Add a message submission button to the modal window.
- Add an info box indicating how many characters have been entered. Let’s stick to the micro-blogging tradition and limit messages to 140 characters in length.
In addition to this, the character counter will switch to a warning mode when the message size limit is approached, and to an error mode once the limit has been exceeded. In this last case, the submission button will also be disabled.
We’ll start with a few constants for characters limits and UI element identifiers:
private MAX_MSG_LENGTH=140private MSG_WARN_LENGTH=120private chars_left_id="chars_left"private submit_btn_id="submit_btn"
Getting the current message and closing the window are tasks that will now be performed in more than one place, so it is better to factor them out into dedicated functions:
privateclientfunctionget_msg(user){Dom.get_value(#{input_box_id})|>Msg.create(user,_)}privateclientfunctionclose(){Modal.hide(#{window_id})}
Now let’s place the character counter and Post button HTML elements to the win_footer in the modal_window_html function. For a nicer display, we would like to place the character counter on the left side of the footer, and the Post button on the right side. We will use a parent <span> element with Bootstrap’s pull-left class to float the character counter to the left. We will use Bootstrap’s pull-right and btn btn-large btn-primary classes for a nice, highly visible Post button:
[...]win_footer=<spanclass="char-wrap pull-left"><spanid={chars_left_id}class="char"/>characters left</span><buttonid={submit_btn_id}disabled=disabled class="pull-rightbtnbtn-largebtn-primarydisabled"onclick={submit(user)}>Post</button>[...]
Now we need the submit function that is invoked once the user decides to
approve and post his message:
privatefunctionsubmit(user)(_){get_msg(user)|>Msg.store;Dom.clear_value(#{input_box_id});close();Client.reload();}
In the four lines of this function we respectively are doing the following, in the order shown:
-
Constructing the message and storing it by invoking
Msg.store - Clearing the input box so that the creation of the next message will start with an empty box
- Closing the modal window
- Reloading the page to see the posted message
Note
After we enter a message, it does not appear on the current page, even if it belongs there. One can see it only after refreshing the browser window. We solve this problem by always enforcing page refresh after publishing a new message. We’ll return to this problem in Chapter 10.
The function that stores messages belongs to the Msg module in src/model/msg.opa.
For the moment, we will write an empty temporary function that will be replaced with a real
one when we discuss storage in Chapter 10.
functionstore(Msg.t msg){void}
The last remaining bit is to update the update_preview function:
privateclientfunctionupdate_preview(user)(_){msg=get_msg(user)#{preview_content_id}=render(msg)// show statusmsg_len=Msg.length(msg)#{chars_left_id}=MAX_MSG_LENGTH-msg_len remove=Dom.remove_class add=Dom.add_class remove(#{chars_left_id},"char-error");remove(#{chars_left_id},"char-warning");remove(#{submit_btn_id},"disabled");Dom.set_enabled(#{submit_btn_id},true);if(msg_len>MAX_MSG_LENGTH){add(#{chars_left_id},"char-error");add(#{submit_btn_id},"disabled");Dom.set_enabled(#{submit_btn_id},false);}elseif(msg_len>MSG_WARN_LENGTH){add(#{chars_left_id},"char-warning");}}
The first two lines in the preceding code just update the message preview using the get_msg function that we factorized.
Then we check the message length, using the Msg.length function that we need to add to the message model:
functionint length(Msg.t msg){String.length(msg.content)}
Note
The Dom.add_class (resp. Dom.remove_class) is a function that adds (resp. removes)
a certain style class to a given HTML element. DOM classes are a set in that each element can have several classes. A common mistake web developers make is to write code in JavaScript, such as:
if$('foo').class==bar
instead of:
ifclass_contains($('foo'),bar)"
Opa makes it harder to make this kind of mistake.
We then remove all the warning/error styling from the element indicating the number
of characters left and set the Post button to the enabled state. If the message is over its length limit, we add a char-error class to the counter element and disable the Post button.
If the message is only over the warning threshold, we just add a char-warning
to the counter element.
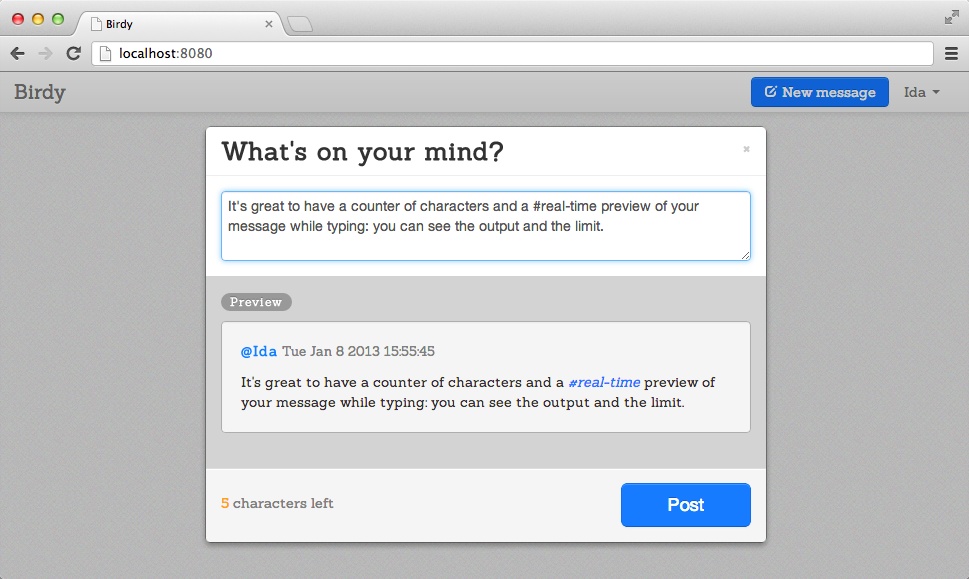
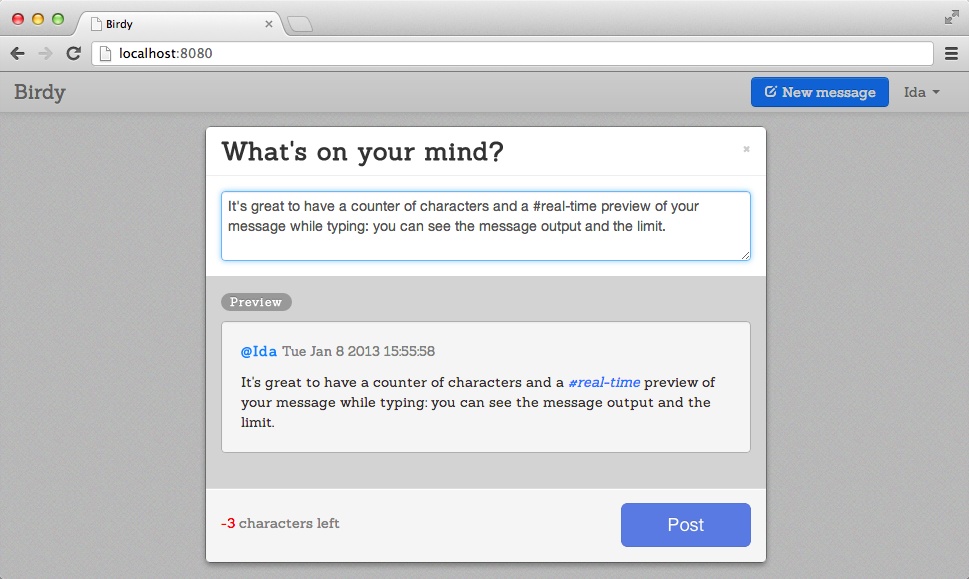
We are done! In Figure 9-3, the character count number is in orange to warn that only 5 characters are left. In Figure 9-4, the character count number is in red to indicate that we passed 140 characters limit. Both figures show the final version of the modal window we created in this chapter.
Summary
In this chapter you learned how to:
- Use parsing for modeling
- Render messages
- Build a real-time preview
In Chapter 10 we will talk about data storage and retrieval. We will extend Birdy with real storage of new messages and with pages containing all messages for a given user or topic.