Table of Contents for
Opa: Up and Running
 Opa: Up and Running
Published by
O'Reilly Media, Inc., 2013
Opa: Up and Running
Published by
O'Reilly Media, Inc., 2013
- Cover
- Opa: Up and Running
- Opa: Up and Running
- Preface
- I. Coding a Mini Wikipedia
- 1. First Steps: Getting to Know Opa
- 2. Opa Fundamentals
- 3. Servers, Resources, and URLs
- 4. Data Storage
- 5. Building the UI in HTML and CSS
- II. Coding a Mini-Twitter
- 6. The Web Chat App
- 7. More Advanced Features of Opa
- 8. User Management
- 9. Building Reactive UIs: New Messages with a Real-Time Preview
- 10. Data Storage and Querying: Storing and Fetching Relevant Messages
- About the Authors
- Colophon
- Copyright
Chapter 3. Servers, Resources, and URLs
Applications contain resources (images, scripts, styles, etc.), and they need to navigate between different pages with different URLs. In this chapter, we will explore how to create a more generic application.
Web Resources
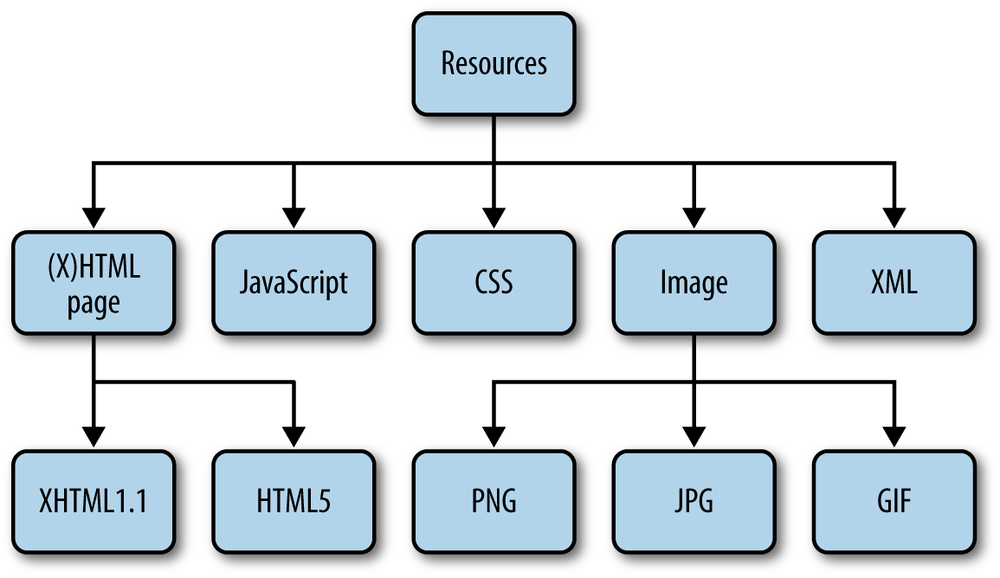
A resource is anything that can be sent from the server to the client. Figure 3-1 presents different types of web resources, including:
- HTML content
- JavaScript code
- Cascading Style Sheets (CSS)
- Images (in PNG, JPG, or GIF formats)
- XML files
Embedding (Static) Resources
Opa contains directives to embed resources. The simplest one is @static_resource:
resource logo=@static_resource("img/logo.png")
The string given as the argument to this directive is a path to the resource, which can be relative to the directory from which the project will be compiled.
This directive acts as a function; that is, you can bind its result to a variable
(here, logo) and use it in your program. The type of this variable is resource,
which is an object that can be sent from the server in response to the client’s
request.
Sometimes you may have several resources you want to use: for example, a
directory full of images. Instead of including each image one by one, you can use @static_resource_directory:
resources=@static_resource_directory("resources")
This line of code will include all resources based on all files from a given directory (here, resources) and its
subdirectories.
What is the type of this variable?
Such an embedded directory is represented as a mapping from filenames (string)
to resources (resource), and hence has the type map(string, resource).
We will talk more about maps in Maps (Dictionaries).
Note
The counterparts of those two directives are @static_content and
@static_content_directory, and they expose the content of the external files
without wrapping them up as resources.
Serving Resources
Embedding resources is the first step. The next step is to instruct
the web server to serve them for certain requests. Remember the Server.start
function and how you used it in your first Opa app in Writing and Running the Code?
The second argument defines how different requests should be handled.
To serve resources from the resources directory you first need
to embed them:
resources=@static_resource_directory("resources")
Now you need to create a server for them:
Server.start(Server.http,{resources:resources})
Note that before you used a {title: ..., page: ...} variant for this second
argument to create a single-page app, that is, to direct all client requests
to page. This new variant, {resources: ...}, creates a server that just
responds to requests for resources.
Imagine that the local resources directory has the following structure:
+-resources+-imgs|+-opa-logo.png+-css|+-style.css
In this case, running the preceding application and directing the browser to
http://localhost:8080/resources/css/style.css would give you the stylesheet.
What if you tried some other URL? This would result in the infamous
"Error 404: Not Found" error.
OK, so what if you wanted to extend your “Hello web” application slightly and use some resources in it? You could use two servers:
// serve resourcesServer.start(Server.http,{resources:@static_resource_directory("resources")})// serve the main pagefunctionpage(){<imgsrc="resources/img/logo.png"alt="Opa"/><hr/><h1>This is a demo of a very simple Opa app.</h1>}Server.start(Server.http,{title:"Hello web",page:page})
Note how this code combined the directive to embed the resources and the server declaration in one; this is entirely permissible.
What happens if you declare more than one server? For every request, the servers will be tried one by one. If a request can be handled by the resources server, it handles it. Otherwise, the request will be handed over to the second server, which in this case can handle each and every request.
Warning
Be aware that the order of the servers does matter. If you swapped the declarations, all URLs would be handled by your “one page server” and hence no resources would ever be served.
Another way to achieve the same effect is to simply use a list of
servers in the second argument of Server.start. In this case, the preceding program
could be written more concisely as:
functionpage(){<imgsrc="resources/img/logo.png"alt="Opa"/><hr/><h1>This is a demo of a very simple Opa app.</h1>}Server.start(Server.http,[{resources:@static_resource_directory("resources")},{register:{css:["/resources/css/style.css"]}},{title:"Database Demo",page:page}])
Note
In the preceding code, we used square brackets to introduce the list. Therefore, each list item is inside the curly braces, separated from the others by a comma.
Now compile your application:
Demo:~ ida$ opa simple_demo.opaAnd run it:
Demo:~ ida$ ./simple_demo.js
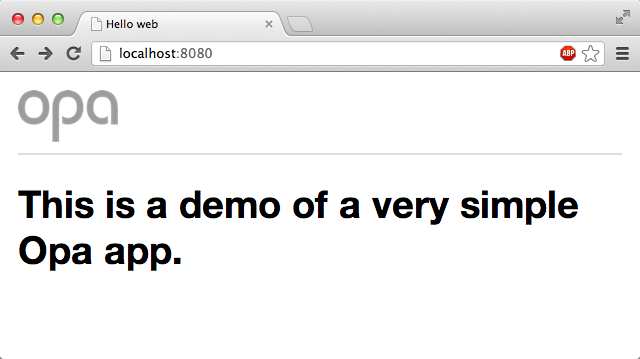
Http serving on http://Demo.local:8080When you open it in the browser, you will see input similar to that shown in Figure 3-2, which has a little CSS file included.
Note
You will learn how to use embedded CSS stylesheets in Adding Style (CSS), where we will talk about creating user interfaces.
Constructing (Dynamic) Resources
In addition to embedding static, ready-to-use resources, it is also possible to create them on the fly. You will rarely do this for such things as images and stylesheets, but you will often do this to create HTML pages dynamically; for example, pages based on the state of the database or on user input.
Opa offers many functions for this; the ones we will typically use are:
xhtmlResource.page(string title,xhtml body)xhtmlResource.styled_page(string title,list(string)stylesheets,xhtml body)
Resource.page takes two parameters, title and content, and
constructs a page resource with this data. Resource.styled_page
is similar, but it takes one extra argument: a list of URLs of
CSS stylesheets to be used to style the application. You will see an
example of how to use it in the following section.
URL Dispatching
All the applications you have developed so far have consisted of just a single page, but in practice most bigger sites will have multiple pages. The standard way to handle this is with Uniform Resource Locators, more commonly known as URLs.
With what you’ve learned so far, it is very easy to build sites consisting
of multiple pages. You can do this via yet
another variant of the argument accepted in the Server.start
function: {dispatch: dispatch_fun}, where dispatch_fun is a
function that takes a structured URL as an argument and produces
a resource to deliver to the user. This process is often referred to
as URL dispatching.
You learned about resources in Web Resources and about how to create them dynamically in Constructing (Dynamic) Resources. But what is a structured URL? It is a structural representation of a URL with all its components separated. Since your application will work within a single domain, you are working with relative URLs here, or URLs relative to the domain of the application, without the scheme and domain parts.
Here is the definition of the type representing such URLs in Opa:
typeUri.relative={list(string)path,list((string,string))query,option(string)fragment,bool is_directory,bool is_from_root}
The preceding code consists of the following:
-
A
pathsplit into a list of directories separated by a slash (/) -
A
queryconsisting of a list of pairs of key-value associations -
An optional
fragment(we will discuss options in more detail later) -
is_from_rootandis_directory, which denote, respectively, whether the string representation of thepathstarts or ends with a slash (/)
For example, consider the following address within a website:
/over/there/index.html?type=animal;name=ferret#nose
The structured representation of this address in Opa will be:
{path:["over","there","index.html"],query:[("type","animal"),("name","ferret")],fragment:some("nose"),is_from_root:true,is_directory:false}
Due to HTTP, the fragment identifier is not transmitted from the client to the server via a normal web request.
To practice URL dispatching in Opa, let’s write a simple
program that will construct a page consisting of the relative
address requested by the user. If that address refers
to a path starting with bold, the remaining part of the address
will be printed in bold. If it starts with italic, it will be shown in italic.
Hopefully, the following short program should not be too difficult to understand now:
functionstart(url){match(url){case{path:["bold"|text]...}:Resource.page("Bold",<b>{text}</b>)case{path:["italic"|text]...}:Resource.page("Italic",<i>{text}</i>)case{~path...}:Resource.page("Regular",<>{path}</>)}}Server.start(Server.http,{dispatch:start})
Summary
In this chapter you learned how to deal with URLs and resources in Opa. Specifically, you learned:
- What web resources are
- How to embed them in an Opa server
- How to serve resources to application users
- How to create dynamic HTML resources
- How to dispatch URLs, that is, serve different content for different URLs
In the next chapter you will learn about data storage, or how to permanently store some application data in a database.