Table of Contents for
Opa: Up and Running
 Opa: Up and Running
Published by
O'Reilly Media, Inc., 2013
Opa: Up and Running
Published by
O'Reilly Media, Inc., 2013
- Cover
- Opa: Up and Running
- Opa: Up and Running
- Preface
- I. Coding a Mini Wikipedia
- 1. First Steps: Getting to Know Opa
- 2. Opa Fundamentals
- 3. Servers, Resources, and URLs
- 4. Data Storage
- 5. Building the UI in HTML and CSS
- II. Coding a Mini-Twitter
- 6. The Web Chat App
- 7. More Advanced Features of Opa
- 8. User Management
- 9. Building Reactive UIs: New Messages with a Real-Time Preview
- 10. Data Storage and Querying: Storing and Fetching Relevant Messages
- About the Authors
- Colophon
- Copyright
Chapter 8. User Management
Managing user accounts is one of the main features of any real application. We would like Birdy users to sign up with their email first, and then be able to sign in.
To create an account, the user will sign up with his email and create his username and password. He will then receive an account activation link via email. After he activates his account, the user will be able to sign in and start posting messages.
Usually, the “Sign in” link for accounts is placed in the top-right corner of the top bar, so that’s what we’ll do here. We will place the “Sign up” button in the center of the home page. Both links will activate a modal window that contains the login or registration form.
In this chapter you will:
- Create a modal window for registration and learn how to quickly handle Bootstrap components
- Create a registration form and learn how to handle forms
- Create new user accounts
- Send registration code via email and learn how to send emails
- Handle account activation links and learn how to handle data encoded in URLs
- Track a logged-in user throughout the site and learn how to handle user-associated data
Setting Up the View
Before we jump into proper login/registration features, let’s take a moment to slightly customize the default view to better suit the needs of our application.
First, take a look at the code of the view part of the application,
as it was generated by opa create. You will find it in
src/view/page.opa and it should look as follows:
modulePage{// View code goes herefunctionpage_template(title,content){html=<divclass="navbar navbar-fixed-top"><divclass=navbar-inner><divclass=container><aclass=brand href="./index.html">birdy</></div></div></div><divid=#mainclass=container-fluid>{content}</div>Resource.page(title,html)}functiondefault_page(){content=<divclass="hero-unit">Page content goes here...</div>page_template("Default page",content)}}
This code defines a Page module with two functions: page_template,
which is a template of any page, parameterized by its title and
content; and default_page, a default page using
the page_template function and which, for now, is set up to be displayed
for every page of the application (we will explain this in more detail later).
Tip
To learn more about fixed versus fluid layouts in Bootstrap, as well as many other aspects of the application, visit the project’s website.
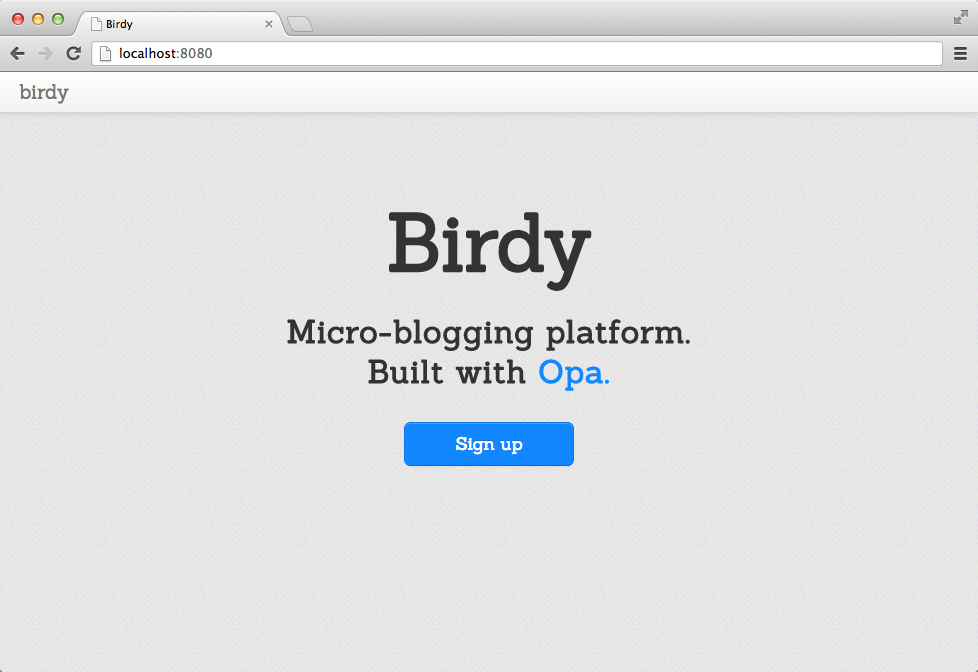
Now we will build the Birdy home page using page_template and Bootstrap’s hero-unit element. Hero-unit is a clearly visible box for taglines and other important content.
We will put the HTML content of the home page into the main_page_content value:
main_page_content=<divclass=hero-unit><h1>Birdy</h1><h2>Micro-blogging platform.<br/>Built with <ahref="http://opalang.org">Opa.</a></h2></div>
We won’t use the default_page function. Instead, we will create a main_page function
and use a page_template function to display the content:
functionmain_page(){page_template("Birdy",main_page_content)}
The last thing to do is to register main_page
as the default page of the application. This is taken care of by the
controller, the code of which is in src/controller/main.opa.
We talked about URL dispatching in URL Dispatching, so the
code in that file should not present any surprises and all we have to do for
now is replace Page.default_page with Page.main_page:
moduleController{// URL dispatcher of your application; add URL handling as neededdispatcher={parser{case(.*):Page.main_page()}}}
After making those changes, run the application and it should look like Figure 8-1.

Bootstrap Widgets: Modal Windows
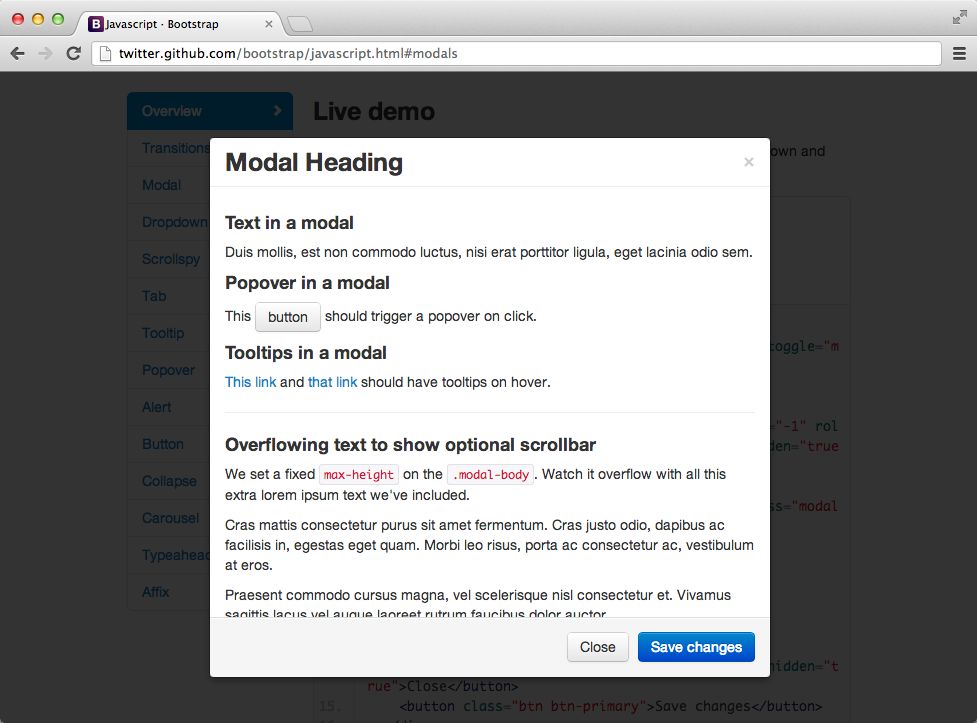
We will use Bootstrap to build the modal window UI so that we don’t have to deal with graphical widgets manually in Opa: don’t reinvent the wheel unless you have to! Modal windows are windows that block the main application and require the user to interact with the window before returning control back to it. Figure 8-2 presents a demo of a modal window from the Bootstrap page.
To offer these features, Bootstrap provides the CSS and DOM nomenclature we discussed in previous chapters, as well as a set of components with interaction aspects implemented in a JavaScript library.
Opa is directly and fully compatible with JavaScript, so it will be very easy to use this library and others.
We will start by creating the “Sign up” feature and its user interface.
First we’ll create a new View file, src/view/signup.opa, and add it
to the project by modifying the view part of opa.conf.
Then we’ll import the stdlib.widgets.bootstrap.{modal}
package, which provides the Bootstrap’s modal window, drop-down, and alert features
in the opa.conf file:
[...]birdy.view:importbirdy.modelimportstdlib.widgets.bootstrap.{modal}importstdlib.themes.bootstrap src/view/page.opa src/view/signup.opa[...]
Note that we are splitting the view into several source files and placing them in a view subdirectory.
For now, in the Signup module we would like to have two pieces of the user interface:
the modal window and a button to activate it. Since the id attribute of the
window will be used to identify it, it is a good practice to make a
constant referring to it:
moduleSignup{window_id="signup"}
Now we will create the code for the modal window itself. For this, we will use
the Modal.make function of the bootstrap.modal package. It takes five
arguments: the window identifier, HTML markup of its header, body, and footer, and
the options for the modal window.
functionmodal_window_html(){win_body=<div>Sign up form will appear here</>win_footer=<>Submit button will appear here</>Modal.make(window_id,<>New to Birdy?</>,win_body,win_footer,Modal.default_options)}
For now, win_body and win_footer are just placeholders for the registration form and the Submit button that we will put there in Form Handling in Opa: Registration Form.
It is time to create a “Sign up” button on the home page that will fire up the modal window. It will be
just a regular HTML link, with the data-toggle=modal attribute (which indicates
that it’s a toggle for the modal window) and the href attribute pointing to the
ID of the window:
  signup_btn_html =
    <a class="btn btn-large btn-primary" data-toggle=modal href="#{window_id}">
      Sign up
    </a>
}
With those two elements in place, we can put the markup for the modal window, which is invisible
by default until window opening is triggered, in page_template in src/view/page.opa:
functionpage_template(title,content){html=<divclass="navbar navbar-fixed-top"><divclass=navbar-inner><divclass=container><aclass=brand href="./index.html">birdy</></div></div></div><divid=#mainclass=container-fluid>{content}{Signup.modal_window_html()}</div>Resource.page(title,html)}
Here is the code to place the “Sign up” button into main_page_content:
main_page_content=<divclass=hero-unit><h1>Birdy</h1><h2>Micro-blogging platform.<br/>Built with <ahref="http://opalang.org">Opa.</a></h2><p>{Signup.signup_btn_html}</p></div>
Our application now looks similar to Figure 8-3, which has some additional style.
Form Handling in Opa: Registration Form
Web forms are used to collect input from the user. Opa makes it very easy
to use them by means of the stdlib.web.forms package, which we first
need to import in the opa.conf file:
importstdlib.web.forms
The two main modules of this package are Field and Form. The former
one is used to create fields of the form and the latter to compose a form
of them.
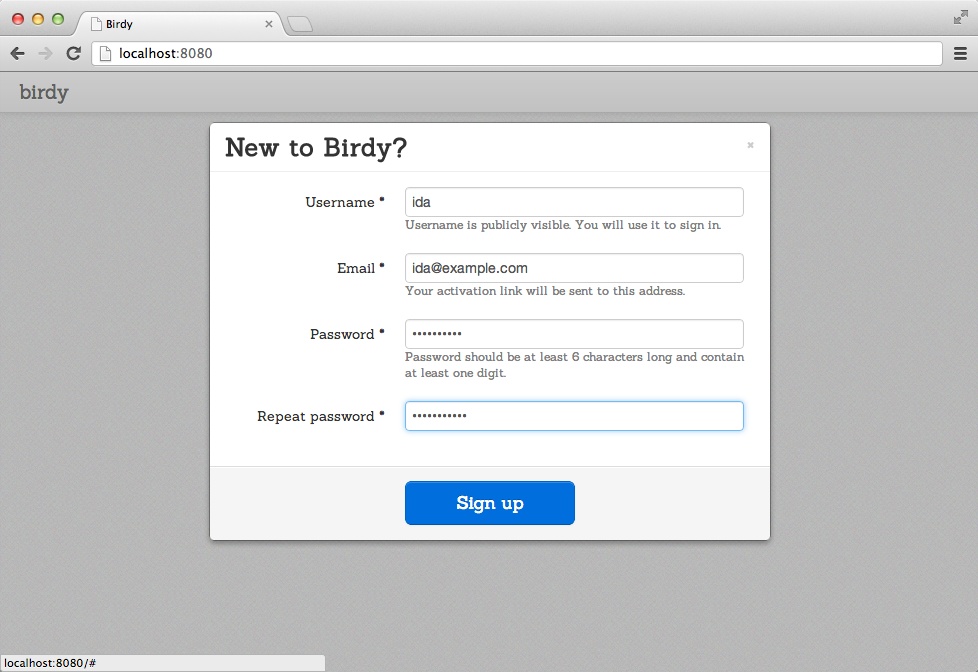
Our registration form will consist of four fields: one each for entering the username, email, password,
and a repetition of the password (used to rule out the possibility of making
a typo while providing the password). We will turn each field
into a private variable in our Signup module. For instance, the one for
the username field will look as follows:
private fld_username=Field.text_field({Field.newwithlabel:"Username",required:{with_msg: <>Please enter your username.</>},hint:<>Username is publicly visible. You will use it to sign in.</>})
We used the Field.text_field function to create a new text field. The type
of the field will influence the type of the value we obtain when reading the
state of the field. The text field will give us a value of type string, but,
for instance, the input field for an email will return a value of type Email.email.
What if the user enters text that is not a valid email address? We will discuss that topic in a moment.
There is only one argument to the Field.text_field method, and it is a record
with a description of this field. It is usually a good idea to extend the
default Field.new value, only alerting the relevant aspects. In our case,
we:
-
Provide the
labelfor this field, which is the text that the user will see as the description of the field -
Provide the
hint, which is additional information about the field that is displayed to help the user fill in the field -
Indicate that the field is
requiredand provide the error message (with_msg) that will be displayed to the user if the user leaves the field empty
In a similar manner, we can create a field for the user’s email, but now using the
Field.email_field function:
private fld_email=Field.email_field({Field.newwithlabel:"Email",required:{with_msg: <>Please enter a valid email address.</>},hint:<>Your activation link will be sent to this address.</>})
Next in line is the field for the password:
private fld_passwd=Field.passwd_field({Field.newwithlabel:"Password",required:{with_msg: <>Please enter your password.</>},hint:<>Password should be at least 6 characters long and contain at least one digit.</>,validator:{passwd: Field.default_passwd_validator}})
We use the Field.passwd_field which also creates a field with an associated value
of type string, but the field shows asterisks instead of the actual text to
protect the password from onlookers, and the obtained string value is a hashed
value of the password, ready to be stored in the database. Storing plain-text
passwords is unacceptable from the point of view of security, and this feature
of Opa form management enforces the good practice of properly processing the
password before storing it.
Whenever a web application or service is able to send you an email that contains your password in clear text (e.g., when you’ve forgotten it), you know you are in trouble!
The only other new aspect is the validator, which is a passwd validator for
password, and is parameterized by the specification of the site’s requirements
on the passwords that can be used by its users. In this case, we are happy with
the default specification of Field.default_passwd_validator, which corresponds
to the requirements that are outlined in the hint.
Finally, our last field is the repeated password:
private fld_passwd2=Field.passwd_field({Field.newwithlabel:"Repeat password",required:{with_msg: <>Please repeat your password.</>},validator:{equals: fld_passwd, err_msg: <>Your passwords do not match.</>}})
The only new piece here is the equals validator that checks that a value
of the field is precisely the same as the previous one, fld_passwd here.
The beauty of Opa’s type safety is also visible here: we can only enforce
equality for two fields of the same type. If we tried to ensure equality of, for example,
one field with an email and another one with a password, we would end up with
a compile type error message.
Now that we have all the fields in place, we can construct a form with those fields
and put it in place of the previous placeholder in our modal window. The new
version of the modal_window_html function becomes:
functionmodal_window_html(){form=Form.make(signup,{})fld=Field.render(form,_)form_body=<>{fld(fld_username)}{fld(fld_email)}{fld(fld_passwd)}{fld(fld_passwd2)}</>win_body=Form.render(form,form_body)win_footer=<ahref="#"class="btn btn-primary btn-large"onclick={Form.submit_ action(form)}>Sign up</>Modal.make(window_id,<>New to Birdy?</>,win_body,win_footer,Modal.default_options)}
Let’s go through this code step by step. First, we create a new empty form
by calling the Form.make function. It takes two arguments: a function to call
on successful form submission (signup, which we will write next) and
a configuration record, which allows a certain degree of customization for the
form. Here we are happy with the defaults, and therefore just supply it with
an empty record.
Second, we construct form_body, which is just a regular xhtml value. We place
form fields there with calls to the Field.render function, which takes two arguments:
the form and its field to render. Since we will be repeatedly displaying fields
of a single form, we first create a convenient abbreviation, fld, and use it
subsequently to construct the form_body value.
Then, we replace the previous placeholder that we used for the window body
(win_body) with the form, which we get using the Form.render function
with two arguments: the form and its body.
Finally, we add a “Sign up” button. Its onclick event invokes the Form.submit_action
function, which takes care of form processing by doing the following:
- It validates all form fields and informs the user if there are any errors.
-
If the form validation is successful, it calls the function responsible for form processing, which was provided in the
Form.makefunction (signupin our case). We will discuss this in more detail.
It is worth noting that Opa takes care of all the form handling for us, including (client-side) form validation, presentation of error messages, and presentation of explanatory text to the user (optionally, only for the active field), among other features.
Now it is time to focus on the missing signup function, which is called
when the form validates successfully:
privateclientfunctionsignup(_){email=Field.get_value(fld_email)?error("Cannot read form email")username=Field.get_value(fld_username)?error("Cannot read form name")passwd=Field.get_value(fld_passwd)?error("Cannot read form passwd")Modal.hide(#{window_id})new_user=~{email,username,passwd}#notice=match(User.register(new_user)){case{success:_}:Page.alert("Congratulations! You are successfully registered. You will receive an email with account activation instructions shortly.","success")case{failure:msg}:Page.alert("Your registration failed:{msg}","error")}}
First, we read the values of the three form fields using the Field.get_value function.
The fourth, repeated password, being redundant, is skipped.
On the next line we hide the modal window, with Modal.hide.
Then we construct a record, new_user, holding all user-provided information, and call a function to register this new user,
User.register, which we will build in Modeling and Adding Users.
This function will return a value of type outcome(void, string). Depending on
this outcome, we construct an appropriate alert message and put its content in the
element with the notice ID, which will be used for system messages
and which we will pass to the function page_template:
<spanid=#noticeclass=container>{notice}</span>
...<divid=#mainclass=container><spanid=#notice/>{content}</>...
Alerts
Let’s discuss Page.alert now. As you can see, this function contains two
parameters: the first represents the text message that will be displayed, and the second corresponds to the class of the Bootstrap alert box.
Bootstrap has several styles for alert messages: we will use the classes .error and .success.
The HTML structure of all alerts is the same, but we will need to change the class and
message for each alert.
Let’s add alert to the import stdlib.widgets.bootstrap package of the configuration file:
[...]birdy.view:importbirdy.modelimportstdlib.widgets.bootstrap.{modal,alert}[...]
Now we’ll create an alert function in src/view/page.opa that will take those two parameters:
functionalert(message,cl){<divclass="alert alert-{cl}"><buttontype="button"class="close"data-dismiss="alert">×</button>{message}</div>}
We also need to add notice as a third argument to our page_template function.
Then, we will display the alert message inside the HTML element, #notice div.
functionpage_template(title,content,notice){html=<divclass="navbar navbar-fixed-top">...</div><divid=#mainclass=container-fluid><spanid=#noticeclass=container>{notice}</span>{content}{Signup.modal_window_html()}</div>Resource.page(title,html)}
Finally, we should also update the main_page function:
functionmain_page(){page_template("Birdy",main_page_content,<></>)}
Modeling and Adding Users
So far you’ve learned about the view part of the registration process, so now it is time to turn our attention to the model.
We will need to create two new files:
-
src/model/user.opa, which will contain a
Usermodule representing a user of our application -
src/model/topic.opa, for the
Topicmodule
Let’s add them to the src/model/opa.conf file:
[...]birdy.model:src/model/data.opa src/model/user.opa src/model/topic.opa
Before we start working on model files, let’s learn some type definitions.
Tip
Type definitions can only be given at the top level, outside of all modules.
However, it is customary to use the same prefix; for instance, to use the
User.xxx pattern for all type definitions related to the User module.
We will follow this convention.
Let’s start with a type definition for the username:
abstracttypeUser.name=string
This is an abstract type. This means the type can be treated as a string within the package in which this type declaration occurs; however, outside of this package it is opaque, and therefore can only be manipulated by functions from the package. This is a very powerful abstraction mechanism that allows you to hide implementation details and expose only those operations on values of a given type that you choose to expose. It also helps tremendously in terms of making sure that value invariants are preserved, as we will discuss soon.
Then we introduce the user’s status:
abstracttypeUser.status={active}or{string activation_code}
The user account can be either active or awaiting activation, in which case we
store the activation_code.
We then declare a type for topics in /src/model/topic.opa:
abstracttypeTopic.t=string
This is just a synonym for a string, but by making it abstract we
make sure that it is opaque and can only be manipulated within the package.
We are now ready to give a definition of the user’s account in the src/model/user.opa file:
abstracttypeUser.info={.email email,string username,string passwd,User.status status,list(User.name)follows_users,list(Topic.t)follows_topics}
This definition consists of the user’s email, username, password (passwd), status,
a list of people the user is following (follows_users), and the list of topics
the user follows (follows_topics, a feature that is sadly missing in the Twitter
service).
With those declarations in place, we will provide the following database definition, consisting of a set of users indexed by their usernames in src/model/data.opa:
databasebirdy{User.info/users[{username}]}
You can choose to have many separate database declarations in modules to which they relate, or one central declaration in a dedicated place. For Birdy, we chose the latter approach.
Now we are ready to write our User.register function in src/model/user.opa:
exposedfunctionoutcome register(user){activation_code=Random.string(15)user={email:user.email,username:user.username,passwd:user.passwd,follows_users:[],follows_topics:[],status:{~activation_code}}x=?/birdy/users[{username:user.username}]match(x){case{none}:/birdy/users[{username:user.username}]<-user send_registration_email({~activation_code,username:user.username,email:user.email}){success}case{some:_}:{failure: "User with the given name already exists."}}}
Let’s digest the code step by step. First, we randomly generate the activation_code
for the new user. The Random.string function constructs a string of a given length
consisting exclusively of lowercase letters. A more generic
Random.generic_string function is also available, which takes a string s and a number n and
constructs a random string of length n consisting of characters present in s.
Next, we construct a value, user, that represents a new user (it will be of type
User.info). Finally, we query the database and check whether a user with the given name already exists. If that is the case, we return failure, indicating
that the username is already taken. Otherwise, we add this value to the database,
invoke send_registration_email (we will work on that next), and
indicate success.
Account Creation Notification: Sending Emails
The next step is to send an email to the user, in order to verify that her email address is correct. The email will contain a link with the randomly generated activation code. By clicking on it, the user will complete account activation.
First we will import two packages, stdlib.web.mail and stdlib.web.mail.smtp.client, into the model part of the configuration file. The former is a generic package for email-related activities and the latter is the client for the SMTP, the protocol used for sending emails.
birdy.model:importstdlib.web.mailimportstdlib.web.mail.smtp.clientsrc/model/data.opa src/model/user.opa[...]
At the same time, we’ll update the view part by adding the import stdlib.web.client
package:
birdy.view:[...]importstdlib.web.client
The stdlib.web.mail package contains, among other things, these two type definitions:
type.content={string text}or{xhtml html}or{string text,xhtml html}type.send_status={void bad_sender}or{void bad_recipient}or{void sending}or{string ok}or{string error}
The stdlib.web.mail.smtp.client contains, among other things, two functions for
sending email:
.send_status try_send(.email from,.email to,string subject,.content content,.options options)void try_send_async(.email from,.email to,string subject,.content content,.options options,(.send_status→void)continuation)
The Email.content type defines the content of the email, allowing the user to provide
only a text version, only an HTML version, or both. Then the first five arguments of
both functions are the same and include the email address of the sender (from) and
recipient (to), the email subject, the email content, and sending options.
Tip
Most modern email clients accept rich HTML emails, but some accept only plain-text messages. Therefore, most email messages contain both versions of the content. If you provide only the HTML content of the message to Opa’s email sending functions, the plain-text version will be automatically generated from it.
The try_send function sends the email synchronously, returning the status of
the operation. The try_send_async function sends it asynchronously, and
once the sending is complete, it invokes the continuation function with the status
of the operation.
Now let’s write the missing send_registration_email function, where we use the
asynchronous method of sending emails and ignore the status:
privatefunctionsend_registration_email(args){from=.of_string("no-reply@{Data.main_host}")subject="Birdy says welcome"email=<p>Hello{args.username}!</p><p>Thank you for registering with Birdy.</p><p>Activate your account by clicking on<ahref="http://{Data.main_host}{Data.main_port}/activation/{args.activation_code}">this link</a>.</p><p>Happy messaging!</p><p>--------------</p><p>The Birdy Team</p>content={html:}continuation=function(_){void}SmtpClient.try_send_async(from,args.email,subject,content,.default_options,continuation)}
The email contains an activation link that consists of the name of the domain
at which the application is deployed (which is parameterized as a constant),
followed by the /activation/ path and then the sequence of characters constituting
the activation code itself.
If we deploy our application on the example.com domain, the Data module
should contain a constant declaration:
moduleData{main_host="example.com"}
An example activation link would be:
http://example.com/activation/swxrjvaprz
To be able to test emails deploying the application locally, we will declare main_host and main_port separately:
moduleData{main_host="localhost"main_port=":8080"}
As you can see, sending emails does not differ much from constructing regular web pages (although clearly you should refrain from using event handlers in email messages), allowing code reuse between those two features.
Now you can run the application and test the sign-up form. It should look similar to Figure 8-4, which has some additional styling.
Activating a User Account Without an Activation Email
Before we more forward, we would like to show you how to add an option to be able to test the application locally without sending users’ activation links via email.
We have to modify our user register function and add an additional user status of
NO_ACTIVATION_MAIL, which should be set to active like so:
exposedfunctionoutcome register(user){activation_code=Random.string(15)status=#<Ifstatic:NO_ACTIVATION_MAIL>{active}#<Else>{~activation_code}#<End>user ={email:user.email,username:user.username,passwd:user.passwd,follows_users:[],follows_topics:[],~status}x = ?/birdy/users[{username:user.username}]match (x){case{none}:/birdy/users[{username:user.username}]<-user#<Ifstatic:NO_ACTIVATION_MAIL>void#<Else>send_registration_email({~activation_code,username:user.username,email:user.email})#<End>{success}case{some:_}:{failure:"User with the given name already exists."}}}
In the function <Ifstatic> , <Else> and #<End> are compilation directives. So, if you run
your Birdy application using this command:
Moorea:~ ida$ NO_ACTIVATION_MAIL=1 make runall new users’ accounts will be activated immediately following registration. No account activation email will be sent. We will use this command for Birdy testing so that we don’t need to set a domain name.
Account Activation: URL Data Handling
The last thing we need to do to complete the registration process is to handle user account activation.
We need to handle URLs of the form /activation/ACTIVATION_CODE that
we generated previously. This is the role of the controller. First, let’s change its style, from parsing against an unstructured string to matching
against a structured representation of a URL, as we discussed in URL Dispatching.
To do that, we first replace { custom: Controller.dispatcher } with
{dispatch: Controller.dispatcher } in the server definition in
src/controller/main.opa. Then we need to change
the definition of the Controller.dispatch function accordingly. The
new version will look as follows:
functiondispatcher(Uri.relative url){match(url){case{path:["activation",activation_code]...}:Signup.activate_user(activation_code)default:Page.main_page()}}
We’ve included two cases here. The first one handles URLs following the pattern
/activation/ACTIVATION_CODE and dispatches rendering of those requests
to Signup.activate_user, with the given ACTIVATION_CODE as the only
function argument. The second one is a catchall case that dispatches
all other requests to the main page that we developed previously.
That was the controller part. Now let’s change the view part. We need to add the function activate_user to our Signup module:
functionactivate_user(activation_code){notice=match(User.activate_account(activation_code)){case{success:_}:Page.alert("Your account is activated now.","success")<+><divclass="hero-unit"><divclass="well form-wrap">{Signin.form()}</div></div>case{failure:_}:Page.alert("Activation code is invalid.","error")<+>Page.main_page_content}Page.page_template("Account activation",<></>,notice)}
This produces a page using Page.page_template. The content depends on the
result of the call to the model function User.activate_account, which
tries to activate the user account with the given activation code. Depending
on whether that is successful or not, we display to the user an appropriate
notification message placing it inside the notice element.
Finally, let’s set the model part and the User.activate_account function:
exposedfunctionoutcome activate_account(activation_code){user=/birdy/users[status==~{activation_code}]|>DbSet.iterator|>Iter.to_list|>List.head_optmatch(user){case{none}:{failure}case{some:user}:/birdy/users[{username:user.username}]<-{userwithstatus:{active}}{success}}}
Note that we use pipes here. A pipe, |>, takes the result and sends it to the following function.
First, we search for all accounts whose status is inactive and whose activation code corresponds to the one given as a parameter to this function. That gives us a database set, which we then convert to a list and try to get its head.
If there is no head in the list, this means no user account is pending
with the given activation code, so we respond with a {failure} result. Otherwise,
we have the corresponding user and we just update his status to {active}
and return {success}, in which case he will see the notification message saying that
activation was successful. Now the user can sign in, so it is
time to develop the login feature for our application.
Keeping Track of Logged-In User: Handling User Associated Data
How do we keep track of information related to the currently connected user?
Before we answer that question, let’s begin with two user-related type definitions, in the src/model/user.opa file:
typeUser.t={.email email,User.name username}
Values of type User.info contain all the information about the user,
including his (hashed) password. Therefore, we should be careful with
passing those values to the client side, as that would be inefficient: most of this data is not needed most of the time, and moreover, the values
contain sensitive information.
A typical approach in such a situation is to create a simplified type
containing a subset of the data and use it in most of the places. This
is the role of the User.t definition. For more complex types, it often
makes sense to create simplified “views” on a type, as one of the
fields. In our case, that would mean:
typeUser.t={.email email,User.name username}abstracttypeUser.info={User.t data,string passwd,User.status status,list(User.name)follows_users,list(Topic.t)follows_topics}
But for our application, we will stick with the previous definitions instead.
We can now introduce a type to store information about the currently logged-in user:
typeUser.logged={guest}or{User.t user}
You can see that this type is functionally equivalent to
option(User.t), as it essentially stores an optional value of
type User.t. But having such dedicated descriptive types often
leads to much cleaner code and easier understanding of the code.
So now we are ready to answer the question we posed earlier: how do we
associate data with the currently connected user? In Opa, this is
achieved with the UserContext module:
privateUserContext.t(User.logged)logged_user=UserContext.make({guest})
The UserContext.make function creates a new user-aware value, and the
argument given to it is the initial value for every user. We can then
read it with the UserContext.get function or modify it with UserContext.set,
in which case it will only be modified for the relevant user.
Warning
Association of UserContext values with users is short-lived and does
not survive a server restart or cookie-cleaning operation. All
values that need to be persisted in a longer context should be stored
in the database.
To get username and email out of User.info, we will use the following function:
privatefunctionUser.t mk_view(User.info info){{username:info.username,email:info.email}}
We can now write the login function:
exposedfunctionoutcome(User.t,string)login(username,passwd){x=?/birdy/users[~{username}]match(x){case{none}:{failure: "This user does not exist."}case{some:user}:match(user.status){case{activation_code:_}:{failure: "You need to activate your account by clicking the link we sent you by email."}case{active}:if(user.passwd==passwd){user_view=mk_view(user)UserContext.set(logged_user,{user:user_view}){success:user_view}}else{failure:"Incorrect password. Try again."}}}}
We query the database for a user with the given username, and if it is absent,
we fail with the “This user does not exist.” message. Otherwise, we check the user’s
status. If it’s awaiting activation, we fail with the appropriate
message. Finally, we compare the user’s password with the given one. If
they match, we use UserContext.set to note that the user is now
logged in, and we succeed with the value representing the user;
otherwise, we fail with “Incorrect password…”
We can now turn our attention to the view layer. Let’s create a
new file, src/view/signin.opa, with a new Signin
module and add it to the configuration file.
We begin by constructing the login form; first, we create its fields:
window_id="signin"private fld_username=Field.text_field({Field.newwithlabel:"Username",required:{with_msg: <>Please enter your username.</>}})private fld_passwd=Field.passwd_field({Field.newwithlabel:"Password",required:{with_msg: <>Please enter your password.</>}})
No surprises here: just two fields for the username and password, and we saw them both in the sign-up form. Now let’s build the form itself:
privatefunctionregister(_){Modal.hide(#{window_id});Modal.show(#{Signup.window_id});}functionmodal_window_html(){form=Form.make(signin(none,_),{})fld=Field.render(form,_)form_body=<>{fld(fld_username)}{fld(fld_passwd)}<divid=#signin_result/><divclass="control-group"><divclass="controls">New to Birdy? <aonclick={register}>Sign up</>.</div></div></>win_body=Form.render(form,form_body)win_footer=<ahref="#"class="btn btn-primary btn-large"onclick={Form.submit_ action(form)}>Sign in</>Modal.make(window_id,<>Sign in</>,win_body,win_footer,Modal.default_ options)}
This code is very similar to its sign-up counterpart. Perhaps the only novel part is
that the form body, apart from the two fields, contains a link allowing a user without an
account to sign up. The onclick action of this link simply closes the sign-in modal
window and opens the one for signing up.
To handle the sign-up action, we will call modal_window_html in page_template
in src/view/page.opa:
functionpage_template(title,content){[...]<divid=#mainclass=container-fluid>{content}{Signin.modal_window_html()}{Signup.modal_window_html()}</div>[...]}
For a better user experience, we will add the following function that displays the “Sign in” form on the page where the user is redirected after successful account activation:
functionform(){form=Form.make(signin(some("/"),_),{})fld=Field.render(form,_)form_body=<divclass="signin_form"><legend>Sign in and start messaging</legend>{fld(fld_username)}{fld(fld_passwd)}<ahref="#"class="btn btn-primary btn-large"onclick={Form.submit_action(form)}>Sign in</></div>Form.render(form,form_body)}
The last bit is the signin function to be called to process the form:
privatefunctionsignin(redirect,_){username=Field.get_value(fld_username)?error("Cannot get login")passwd=Field.get_value(fld_passwd)?error("Cannot get passwd")match(User.login(username,passwd)){case{failure:msg}:#signin_result=<divclass="alert alert-error">{msg}</div>Dom.transition(#signin_result,Dom.Effect.sequence([Dom.Effect.with_duration({immediate},Dom.Effect.hide()),Dom.Effect.with_duration({slow},Dom.Effect.fade_in())]))|>ignorecase{success:_}:match(redirect){case{none}:Client.reload()case{some:url}:Client.goto(url)}}}
Here we fetch the values of the form fields and invoke the model’s User.login function.
In case of failure, we put an error message in the signin_result placeholder and
then perform a simple animation to fade in this message. In case of success, we
redirect the user to her wall page, the /user/USERNAME URL, which will contain the
user’s own messages, messages posted by users she follows, and messages mentioning topics she follows;
a first-time user will land on an empty page where she can start posting messages.
We will develop this later in User and Topic Pages.
We need to add an accessory function in the User module for the username exposed
as a string (remember that the User.name type is abstract):
functionstring get_name(User.t user){user.username}
The User’s Top-Bar Menu
As we decided in the beginning of the application development process, the “Sign in” link should be placed on the top bar of the page. To do this, we will create a contextual element that displays a “Sign in” link for users who have not yet logged in, and a drop-down menu with a link to log out (or other features) for logged-in users.
We will need to know who is logged in and be able to log them out, so let’s start
by adding two appropriate functions in our User module:
functionUser.logged get_logged_user(){UserContext.get(logged_user)}functionlogout(){UserContext.set(logged_user,{guest})}
Since we will be using a drop-down menu, let’s add dropdown to the
import stdlib.widgets.bootstrap package of the configuration file,
create a new src/view/topbar.opa
file with a Topbar module in the birdy.view package, and add it to
the configuration file as well.
In our Page module, we will move the top-bar markup to this newly created
Topbar module, so we replace this:
...<divclass=container><aclass=brand href="./index.html">birdy</></div>...
with this:
...<divclass=container>{Topbar.html()}</>...
Now we will add the HTML elements taken from the Page module to the Topbar module.
We will also create a user_menu element.
functionhtml(){<aclass=brand href="/">Birdy</a><+>user_menu()}
Now let’s use the Bootstrap nav element to style the “Sign in” link and the drop-down menu:
signinup_btn_html=<ulclass="nav pull-right"><li><adata-toggle=modal href="#{Signin.window_id}">Sign in</a></li></ul>functionuser_menu(){match(User.get_logged_user()){case{guest}:signinup_btn_htmlcase~{user}:user_box(user.username)}}
The user_menu function checks whether the user is currently logged in. If the user is logged in,
we add the user_box to the top bar; if not, we include a reference to the “Sign in” link.
privatefunctionuser_box(username){id=Dom.fresh_id()<ulid={id}class="nav pull-right"><liclass="dropdown"><ahref="#"class="dropdown-toggle"data-toggle="dropdown">{username}<bclass="caret"></b></a><ulclass=dropdown-menu><li><aonclick={logout}href="#">Sign out</></></></></>}
The user_box function first obtains a unique DOM ID for the drop-down menu.
Thus far, we have always used manually chosen identifiers, which is fine for fixed
elements, and therefore, we could have used them here as well. However, if we generate DOM
elements programmatically, we may need some other way of
assigning identifiers to them. This is the role of Dom.fresh_id.
Once again we will use the Bootstrap nav element to style our username link and a dropdown menu.
We create a <ul> element with appropriate markup for a Bootstrap drop-down
menu. Use of the data-toggle attribute with Bootstrap allows us to activate the menu by clicking
on the username link. The drop-down menu items are encoded via the <ul> tag.
For now we only have a single entry for Sign out, which calls the logout function when the user logs out:
privatefunctionlogout(_){User.logout();Client.reload()}
The logout function logs the user out and reloads the page, via Client.reload,
to refresh the top bar; our element will now indicate that no user is logged in.
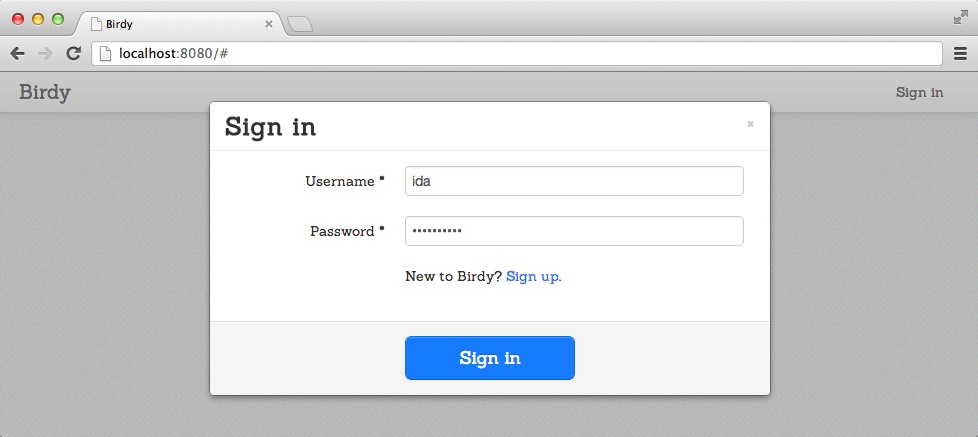
Compile and run your Birdy application now to test the “Sign in” form, which should look similar to Figure 8-5.
Exercise
The activation mechanism provided in the application is pretty simple. In particular, nothing prevents conflicts between the activation of different users. Can you fix that?
Summary
In this chapter you learned how to:
- Build user registration and user login forms using modals
- Send user registration emails
- Handle user account activation
- Track logged-in users
- Manage URLs and more