Table of Contents for
Opa: Up and Running
 Opa: Up and Running
Published by
O'Reilly Media, Inc., 2013
Opa: Up and Running
Published by
O'Reilly Media, Inc., 2013
- Cover
- Opa: Up and Running
- Opa: Up and Running
- Preface
- I. Coding a Mini Wikipedia
- 1. First Steps: Getting to Know Opa
- 2. Opa Fundamentals
- 3. Servers, Resources, and URLs
- 4. Data Storage
- 5. Building the UI in HTML and CSS
- II. Coding a Mini-Twitter
- 6. The Web Chat App
- 7. More Advanced Features of Opa
- 8. User Management
- 9. Building Reactive UIs: New Messages with a Real-Time Preview
- 10. Data Storage and Querying: Storing and Fetching Relevant Messages
- About the Authors
- Colophon
- Copyright
Chapter 5. Building the UI in HTML and CSS
In this chapter we will focus on building the user interface. The first step is to create the presentation layer in Opa.
HTML Markup
For presentation, Opa uses the modern web standards HTML5 and CSS3 [we will discuss these in more detail in Adding Style (CSS)]. You already saw a glimpse of how Opa deals with HTML in Writing and Running the Code and we will expand on that here.
Tags and Attributes
Recall from our earlier discussion that HTML can be included verbatim in Opa programs, and that it can be returned from functions as shown here:
functionsample_page(){<header><h3>HTML in Opa</h3></header><article><divclass="container"><p>Learning by examples.</p></div></article>}
Now, there are few things to keep in mind when writing HTML snippets in Opa code:
-
The name of the closing tag is optional, so
<tag>...</tag>can be shortened to<tag>...</>. - If the attribute consists of a single string with no special characters (i.e., it consists of only letters, digits, and an underscore) the quotes around it can be omitted.
-
Double quotes (as in
attr="...") are required; single quotes (as inattr='...') are not.
When you apply the first two rules in this list, you can rewrite the preceding snippet as follows:
functionsample_page(){<header><h3>HTML in Opa</></><article><divclass=container><p>Learning by examples.</></></>}
Opa also features web templates, known as markdown templates, in its standard library.
Inserts
We’ve discussed the basics of static HTML, but things get much more interesting when you have to generate the HTML programmatically. In Opa, this is mainly achieved using inserts, which we will explain now.
If you happen to know JavaScript (do not worry if you don’t) you are used to writing code like this:
x+" + "+y+" = "+(x+y);
Opa’s equivalent is the following:
"{x}+{y}={x+y}";
This is both shorter and more readable.
The parts of the string between the curly braces {...} are the expressions that are evaluated,
converted to strings (more on the rules for converting to strings later), and inserted at those
points in the string literal. This mechanism is easy, readable, and quite importantly, safe,
as before “injecting” the computed value it automatically gets properly escaped depending
on the object you are inserting to.
This is because inserts work not only on strings, but also, for instance, in HTML
fragments. Therefore, you could rewrite the sample_page function by first writing a generic
function to generate page markup:
functiongen_page(header,class,content){<header><h3>{header}</h3></header><article><divclass={class}><p>{content}</p></div></article>}
The inferred type of this function is as follows:
functionxhtmlgen_page(xhtmlheader,stringclass,xhtmlcontent) { ... }
xhtml is the HTML type in Opa. Both header and content are HTML fragments that
will be inserted in appropriate places, whereas class is a string identifier.
Now you can rewrite your original sample_page function with a simple call:
functionsample_page(){gen_page(<>HTML in Opa</>,"container",<>Learning by examples.</>)}
Note
The empty tags, <>...</>, in the second and third arguments of this call are used in
Opa as HTML text delimiters. This means "string" is a string literal, whereas
<>string</> is an HTML literal consisting solely of the string text (with no tags).
The advantage of this approach is that now you have a general-purpose gen_page function
that you can reuse throughout your program. Indeed, the ability to easily manipulate HTML and
write such general-purpose presentation functions is an important aspect of building
user interfaces in Opa. As you will learn in the next section, HTML manipulation encompasses not only content generation, but also interactive aspects of the UI. This means you can use similar techniques to write complete, interactive, reusable UI
components. But let’s not get ahead of ourselves.
Event Handlers
Now that you know how to write static HTML and how to generate it dynamically, you can change the generated page under certain conditions, such as the state of the database. In this section you will learn how to generate dynamic pages, or pages that are changing as a result of such things as user interaction or the passage of time (giving animations).
In HMTL, you can achieve this by means of event handlers. You can think of event handlers as a way to execute certain code in response to some event.
Note
An event handler is a function whose call is triggered by some activity
in the user interface. Typical event handlers react to a user clicking on some element within a page
(a click event), pressing the Enter key (a newline event),
moving the mouse (a mousemove event), or loading the page
(a ready event).
In Opa, an event handler always has the type Dom.event -> void.
You can find more information about event handlers in the online Opa API documentation by searching for the word “Dom.event”.
Let’s take a closer look at the following function:
functionpage(){<ponclick={clicked}>Click me!</p>}
The onclick attribute defines a handler for the click event.
This event is fired when the user clicks with the left mouse button on the
given element of the page. The value of this attribute is the {clicked} insert.
But the interesting part here is that this insert is a function that is called
when the event occurs. Such functions are of the following type:
functionvoid clicked(Dom.event event){...}
This function takes a single argument of type Dom.event, which carries
information about the particular event that triggered the handler. It does not
return a value.
Note
void is a nonvalue in that it indicates the absence of a value. It is mainly used as
a return type for functions that actually do not return anything.
void ensures that the handler has the correct type.
This information is not necessary, but every event handler needs to have this particular type; that is,
a single argument of type Dom.event and no return value.
If the handler does not need any information from the event argument and hence
does not use it (this happens very often with event handlers), the compiler generates a warning. This is beneficial, as not using one
of the function arguments is often an indication that something is wrong.
In order to avoid this warning, you can use an argument name that starts with an
underscore (_). So you could write the header of this function without including the
type information, like so:
functionclicked(_event){...}
Or more simply:
functionclicked(_){...}
Note
Variables/arguments with an underscore as their name are throwaway values; you do not need them. You will often see them in event handlers and in pattern matching, which we discuss in Pattern Matching.
Note that it is perfectly fine to use anonymous functions for event handlers.
If you decide to ignore the event argument, you can rewrite the page function
as:
functionpage(){<ponclick={function(_){...}}>Click me!</>}
Providing function bodies for event handlers usually involves some DOM manipulation, a topic we will tackle in the next section.
DOM Manipulation
The Document Object Model (DOM) is a tree-structure representation of an HTML document. Modifying the DOM is the standard way to manipulate page content.
Opa offers a comprehensive set of operations on the DOM. By far the most common operation is replacing the content of a given DOM element:
#id=content
In the preceding code, id is an identifier (with no quotes around it) and content is an XHTML
expression. The result of this command is to replace the DOM element with the given
ID, content.
There are two other variants:
#id+=content#id=+content
The first one prepends content to the id element (i.e., puts it before
the existing content) and the second one appends it (i.e., puts it after the
existing content).
A multitude of additional DOM manipulation functions are also available.[1] The following list describes the ones that are used most often.
-
Dom.fresh_id()produces a fresh DOM ID, unique in the (local) page; this is very useful when you dynamically generate some HTML, such as a table based on database content, and you need unique identifiers for generated elements. Note that thefresh_idfunction is not cryptographically secure. -
string Dom.get_content(dom)retrieves the content of a given DOM element, usually an input field. -
Similarly,
void Dom.set_content(string content, dom dom)sets the content of thedomelement tocontent. -
void Dom.give_focus(dom dom)gives focus to thedomelement. -
void Dom.show(dom dom)andvoid Dom.hide(dom dom)respectively show and hide adomelement from the page.
Example: A Guessing Game
To illustrate the use of event handlers and DOM manipulations, let’s modify the program from Writing and Running the Code to play the following simple game:
- The computer selects a number x between 1 and 10.
- The user tries to guess what that number is.
- The user clicks on the page to reveal the number.
The main function of this program could look as follows:
functionpage(){<h1>Guess what is the number between 1 and 10 I'm thinking of?</h1><divid=#responseonclick={show_number}>Click to find out!</div>}
The last line of this function constructs a paragraph that reacts to
clicks by invoking the following show_number function:
functionshow_number(_){#response=<>I was thinking of{1+Random.int(10)}</>}
Random.int(x) is a standard library function that generates a random number between
0 (inclusive) and x (exclusive). Hence, 1 + Random.int(10) produces the desired
random number between 1 and 10.
So when the user clicks on the text paragraph containing the instructions, he will see a random number that the computer has “selected.” Note that the computer chooses the number after the user comes up with his number, that is, the first and second steps of the game are reversed in this scenario. But since computers are not yet capable of reading people’s minds, this is an unlikely cause for cheating.
Now all you have to do is to start a server, using Server.start, and you’ll end up with
the following complete app. Compare it with your first program from Writing and Running the Code
and note how the page function is used instead of an anonymous function; now change the
layout to put that declaration on one line. Note that the syntax ~page is just a shortcut for page: page, a concept known as syntactic sugar.
functionshow_number(_){#response=<>I was thinking of{1+Random.int(10)}</>}functionpage(){<h1>Guess what is the number between 1 and 10 I'm thinking of?</h1><divid=#responseonclick={show_number}>Click to find out!</div>}Server.start(Server.http,{title:"Guess",~page})
Before we move on to discussing the wiki interface, let’s make this game a bit more fun to play. Let’s make it a multiple-choice game, and provide hints if we can’t find the right number. To do this, start by modifying the UI:
<h1>Guess what is the number I'm thinking of</><inputid=#guess/><spanonclick={show}>Check</><divid=#message/>
Rename #response to #message since several messages might be displayed, and add an input to allow the user to enter data.
In the previous example, a number was drawn just before it was displayed. You can’t do that here, as a number needs to be drawn each time the page is rendered. Hence, at the beginning of the function page, you need to create a new secret value:
secret=1+Random.int(10);
Then you have to modify the show function to compute the right message:
message=if(guess==secret){<spanclass="success">Congrats! </span> }else if (guess<secret){<>More than this</> }else{<>Less than this</>};
Note that instead of using the empty HTML tags, you can insert a special span element around the text that is displayed when the user wins, but you should keep the interface as simple as you can in other scenarios.
To pass the secret value to the show function you add it as the first argument:
functionshow(secret,_){...}functionpage(){...<spanonclick={show(secret,_)}>Check</>...}
Finally, you need to read the value from the input in the show function and display the result in the #message element. Let’s try to do that with the following code:
functionshow(secret,_){guess=Dom.get_value(#guess);message=...#message=message;}
This should result in a type error message. This occurs because the guess value read from input is a string whereas secret is an integer. You can resolve this problem by casting the value using:
guess=String.to_int(Dom.get_value(#guess));
Here’s the complete code example:
functionshow_number(_){#response=<>I was thinking of{1+Random.int(10)}</>}functionpage(){<h1>Guess what is the number between 1 and 10 I'm thinking of?</h1><divid=#responseonclick={show_number}>Click to find out!</div>}Server.start(Server.http,{title:"Guess",~page})
The Wiki Interface (HTML)
Now we are ready to write the user interface part of the wiki app.
In this section you will write a display function that takes a single argument, topic, and
constructs a page for it. We will assume that you have
at your disposal the following functions for data storage, which we discussed
in Chapter 4:
-
load(topic), which gives the Markdown source associated withtopic -
save(topic, source), which associatessourcewithtopic
The main idea is that the page can have two modes:
- Editing, where the user can edit the content of the page (using Markdown)
- Display mode, where the content is just displayed (with appropriate Markdown rendering)
In this example you will have elements for both modes always present on the page, but only one mode will be visible at a time and the other one will be hidden. Dynamically changing the content would also work, but since you did that already in Example: A Guessing Game, let’s try this approach now.
HTML Plumbing
This is how the display function, parameterized by wiki
page title, topic, will look:
functiondisplay(topic){content=render(load_data(topic));xhtml=<header><h3>OpaWiki</h3></header><article><h1>About{topic}</h1><divid=show_container><small><strong>Tip:</strong> Double-click on the content to startediting it.</small><sectionid=content_show ondblclick={function(_){edit(topic)}}>{content}</section></div><divid=edit_container hidden><small><strong>Tip:</strong> Click outside of the content box to save changes.</small><textareaid=content_edit rows=30onblur={function(_){save(topic)}}/></div></article>;Resource.page("About{topic}",xhtml);}
First, we retrieve the content page by loading its data, load_data(topic), and passing
it to the render function, which turns a Markdown string into its HTML representation.
Then the page’s main HTML is stored in the xhtml value. Here we have a <header> with the name of the
application, Opa-wiki. Following that is the wiki article, <article>, consisting of an <h1> heading with
a topic name and two <div>s for two application modes, both containing a paragraph
(p) with a short explanation. The first <div> contains a section, <section>, for display
mode, and the second one contains an editable text box, <textarea>, for editing mode. We assign
identifiers, ids, to both elements and to the <div>s, as we will need to refer to them later.
Both elements have event handlers attached.
The static text on the double mouse click (ondblclick)
will switch us to editing mode, and the editable text when losing focus (onblur)—which may occur, for example,
as a result of the user clicking outside the box—will switch us back to display mode.
Finally, the last line of this function turns this HTML into a resource, as we discussed in Web Resources.
Markdown
We need to write the render function that transforms the Markdown source into a
ready-to-display HTML fragment.
Note
Markdown is a lightweight markup language, which is perfect for obtaining richly formatted user input. You can learn more about its syntax on the original project page or by taking a look at a very nicely done online Markdown editor, http://dillinger.io.
As with many other useful projects, Opa has a readily available library for dealing with Markdown. All you have to do is to import it:
importstdlib.tools.markdown
You will learn more about imports and packaging in Opa in Packages. For now, all you need to
know is that this makes the Markdown module available to you and that with it you can create the
following function:
functionxhtml xhtml_of_string(Markdown.options options,string source)
This takes Markdown source and rendering options and produces an XHTML representation
of the source. There is also a Markdown.default_options value of type Markdown.options, so the render function simply becomes:
functionrender(markdown){Markdown.xhtml_of_string(Markdown.default_options,markdown);}
Dynamically Updating the Page
Now let’s take a look at the edit and save functions.
Calling the edit function results in a change from display mode to editing
mode:
functionedit(topic){Dom.set_value(#content_edit,load_data(topic));Dom.hide(#show_container);Dom.show(#edit_container);Dom.give_focus(#content_edit);}
In the first line of the preceding code, we set the content of the text editing box to the Markdown
source for the current topic, which we fetch with load_data. Then we hide
the presentation field, display the editing box, and finally, give it a focus.
Similarly, the save function switches from edition mode to display mode,
saving all the changes the user has made:
functionsave(topic){content=Dom.get_value(#content_edit);save_data(topic,content);#content_show=render(content);Dom.hide(#edit_container);Dom.show(#show_container);}
In the preceding code, first we bind content to the text the user has entered, and then we save it and
use its rendered version for display. Finally, we switch the visibility of
the display/editing elements.
Adding Style (CSS)
A close companion of HTML is CSS, which stands for Cascading Style Sheets. Whereas HTML is used to describe the content and structure of web pages, CSS takes care of presentation semantics (i.e., appearance and formatting). Knowledge of CSS will help you create more beautiful pages, although you will learn how to style pages without writing CSS yourself in Bootstrap: Nice, Out-of-the-Box Styling. Still, a basic working knowledge of CSS comes in handy in the web world, so we suggest that you learn the basics of CSS.
In Opa, you can work with CSS in three ways:
-
Via the usual
styleattribute - Using Opa’s data type and special syntax for CSS
- Using external stylesheets
In addition to discussing these three methods of working with CSS, in this section we will explain how to add some style to the wiki.
Explicit Style Attributes
The first way to use CSS in Opa is with the usual style attribute, as
follows:
functionpage(){<pstyle="color: white; background: blue; padding: 10px;">Click me</>}
Although this method is supported, its use is discouraged. First, the purpose of CSS is to separate the presentation from the content, and indeed, it is best to do this by writing CSS in an external file, separate from the HTML document. You will learn how to do that in External CSS.
Sometimes, however, the CSS needs to be manipulated dynamically depending on some application logic. Let’s take a look at a method that is appropriate in those circumstances.
Opa-Powered Style
Just as Opa offers a data type and special syntax for HTML, it also
does so for CSS. The syntax consists of the css keyword and the usual CSS syntax
within curly braces. For instance, the page function you just wrote
can be rewritten as:
functionpage(){style=css{color:white;background:blue;padding:10px;}<pstyle={style}>Click me</>}
Here it is without the intermediate binding:
functionpage(){<pstyle={css{color:yellow;background:blue;padding:10px;}}>Click me</>}
One of the advantages of this over using a string literal for style is that
the Opa compiler will check such definitions, ruling out syntactic and some
semantic mistakes; for instance, style={css {color: 10px}} will not
be accepted.
Warning
As of this writing, Opa only supports a subset of the CSS3 standard. If your declaration is rejected and you believe it to be correct, chances are it is not yet supported, in which case, you will need to use one of the other two methods for working with CSS in Opa.
There are other advantages of using the Opa compiler. One is that CSS is a data type, and it is possible to parameterize functions by styling information:
functionparagraph(style,content){<pstyle={style}>{content}</>}
What is the type of this function?
functionxhtml paragraph(css_properties style,xhtml content)
The type of a single CSS declaration is called css_properties.
Another interesting option is to alter the CSS depending on some application logic as, for instance, in the following function:
functionxhtml block(Css.size width,Css.size height,xhtml content){style=css{width:{width};height:{height}}<divstyle={style}>{content}</>}
In this declaration you can see the Css.size type that denotes the CSS size
declaration. There are several other types for CSS notations, including fonts,
colors, and background properties.
External CSS
In Chapter 3 you learned how to embed resources in the Opa server. Those resources can include regular external CSS files, and you can instruct Opa to use such CSS as follows:
Server.start(Server.http,[{resources:@static_resource_directory("resources")},{register:{css:["/resources/css/style.css"]}},...])
The css field of the register record contains a list of URLs
of CSS files to be used. These files will be used for all the pages
in the application. It is also possible to use stylesheets on a per-page basis if needed--for instance, with theResource.styled_page function that we discussed in Constructing (Dynamic) Resources:
functionpage_with_style(body){Resource.styled_page("This is a page with style",["resources/custom_style.css"],body)}
Wiki with Style
For the wiki application, you just need to add a simple CSS file, resources/style.css, to add a bit of presentation information and, more importantly, hide the editing mode container initially:
include:code/wiki/resources/style.css[]
Now all you are missing is the following server declaration:
Server.start(Server.http,[{resources:@static_include_directory("resources")},{register:[{doctype:{html5}},{css:["/resources/style.css"]}]},{dispatch:start}]);
At this point, you should have a complete and ready-to-run wiki. You compile it with:
opa wiki.opaAnd you run it with:
thistle $ ./wiki.js
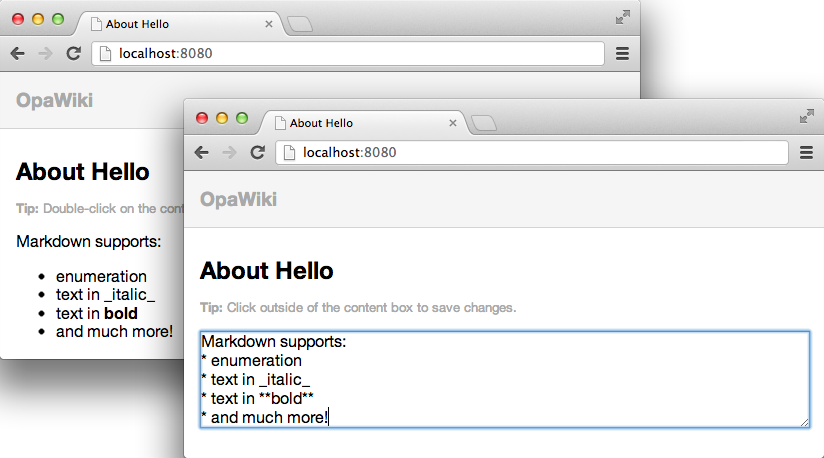
Http serving on http://thistle:8080Now the server is running. Pointing your browser to http://localhost:8080 should give a result similar to the screenshots shown in Figure 5-1, which show the app in both display mode and editing mode.
Bootstrap: Nice, Out-of-the-Box Styling
Typically, web applications are designed by professional web designers. However, in very basic projects, or at the early stages of major projects, a professional web designer may not be readily available. In such cases, you can use a frontend framework such as Bootstrap for the design task.
Note
Bootstrap is an open source project, developed at Twitter, that provides high-quality, responsive CSS, along with HTML conventions and JavaScript plug-ins for all the typical elements of websites. Using predefined classes and appropriate tagging combinations, developers can obtain a consistent and professional look for their sites for free. Describing Bootstrap itself is beyond the scope of this book, but the project website is well organized and self-explanatory.
The Opa authors have high regard for this project, and therefore made sure that using Bootstrap in Opa is as easy as it gets. To use Bootstrap in your Opa project, just type a single line:
importstdlib.themes.bootstrap
Note
This variant imports the latest Bootstrap version supported by Opa.[2] To request a specific version, you can write:
importstdlib.themes.bootstrap.v2.1.0
Now you can start using Bootstrap-compatible HTML markup and enjoy good-looking pages without any hassle!
In the following code, we will illustrate the power of Bootstrap on the wiki application. All you need
to do is replace the xhtml in the display function with the following one,
which is using Bootstrap conventions:
<divclass="navbar navbar-fixed-top"><divclass=navbar-inner><divclass=container><aclass=brand href="#">Opa Wiki</a></div></div></div><divclass=container><h1>About{topic}</><divid=show_container><spanclass="badge badge-info">Tip</span><small>Double-click on the content to start editing it.</small><divclass="well well-small"id=content_show ondblclick={function(_){edit(topic)}}>{content}</div></div><divid=edit_container hidden><spanclass="badge badge-info">Tip</span><small>Click outside of the content box to confirm the changes.</small><textareaid=content_edit rows=30onblur={function(_){save(topic)}}/></div></div>
Once you do that, you no longer need the full CSS we introduced before, and you can replace it with the following:
include:code/wiki/resources/style_additional.css[]
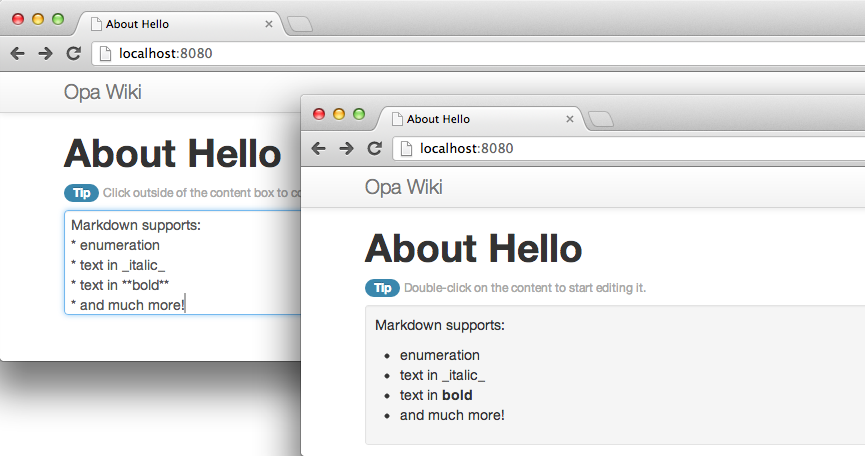
This code only hides the editing container, adds a little extra space between elements, and makes the editing text area the full width of your screen. This uses much simpler CSS yet produces a much more pleasant result, as you can see in Figure 5-2.
Bootstrap offers even more than this screenshot can capture, including responsive design; that is, web pages that display nicely on most devices and screen sizes. As mobile browsers become increasingly important, you will want to build responsive applications!
Working with Designers
We have been lucky to have a UX and UI designer in-house at MLstate. This section is a Q&A with Ida Swarczewskaja, who gives us her best tips on how to work with design and designers when coding with Opa.
How Should I Use the DOM Structure?
The DOM structure should remain light. Try to avoid using too many levels.
Can You Describe Your Development Environment?
Many great tools are available today. My favorite code editor is Sublime Text 2. For even more efficiency in building DOM structures I recommend using Emmet, previously known as ZenCoding, with Sublime Text 2.
How Should I Write CSS with Opa?
You can use CSS with Opa in three different ways, as described in Adding Style (CSS). The method you choose depends on your project. For prototyping or for a small project, you can use explicit style attributes or Opa-powered style. For bigger projects, the best way to start is to create a separate CSS file that is stored in the resources or assets directory, as described in External CSS. If you are not familiar with CSS and would like to get good UI results with your app, you should use Twitter Bootstrap, which you can easily import into your Opa file.
Which Tools Should I Use to Write CSS?
You can write CSS manually. However, like most designers currently do, I use CSS preprocessors that generate well-formatted CSS and allow better stylesheet file organization. I recommend the following:
- less, available at the less website.
- sass or scss, available at the sass website. These are dynamic stylesheet languages (extensions of CSS3) that enable you to use nested rules, variables, mixins, functions, and operations.
Note
Mixins allow you to reuse variables, properties, and selectors; they are great time-savers while declaring CSS3 properties.
How Do I Improve the CSS Workflow in Opa?
When launching the Opa application on a server, debug mode allows for real-time editing of CSS files. It is very convenient when working with designers as it allows a fully integrated workflow.
How Often Should Developers and Designers Interact?
Building a great UI and UX for your app requires interaction among developers and designers. Depending on the project, developers should discuss the DOM structure of the app, nesting rules, the elements’ class names, and other details with designers before they start coding, and they should check how everything interacts at each stage of the build process.
What Should Developers Know About CSS?
CSS3 replaces most of the images we were used to creating for UIs. CSS3 is commonly used to generate background gradients and tiles, drop shadow and embossing effects, text shadow effects, rounded corners, and transitions. Use @media queries for the web apps where responsive cross-platform design is required. Once again, Twitter Bootstrap provides an easy-to-use UI kit for styling responsive grids, navbars, forms, buttons, and other elements. All you have to do is stick to the default as much as possible if you do not want to dig into design.
What Should Designers Know About Opa?
Designers should know how to compile Opa apps, which is pretty easy to learn; edit HTML structures; and write CSS code or use CSS preprocessors to generate CSS code. Designers who write CSS are already syntax experts, so although they cannot usually write code, they are detail-oriented when it comes to syntax and should not break things.
Can You Provide Some Tips for Quickly Customizing Your App’s Bootstrap-Based UI?
Due to the popularity of Bootstrap, more and more applications are using it, and hence these applications look the same. I believe every product needs a custom design, though. So here are my tips for developers willing to customize their Bootstrap-based UI:
- The first thing to change is the font. Bootstrap uses Helvetica, which is a very basic font. I suggest changing the font to one that is fancier. For example, the Google Web Fonts Library has hundreds of free, open source fonts, optimized for use on the Web. If you like Helvetica, you might want to change the font only on the headings and branding elements.
- Another thing that helps to customize your Bootstrap-based UI is changing the default color scheme. You can find great color inspiration on websites like Colourlovers. Pick up some fresh colors and add them to your stylesheet! You can do this directly on the Bootstrap website. Alternatively, you can create an additional CSS file and overwrite the CSS properties of the Bootstrap components you are using. This stylesheet should be called after the Boostrap CSS.
- A third way you can quickly customize your app is by adding some texture. Bootstrap has a solid white background. A discrete texture might add some personality to your app, though. Why not choose a free background texture from, for example, the Subtle Patterns website. Retina-resolution images are also provided.
We will demonstrate these tips in action in our bigger application.
Summary
In this chapter you learned how to build user interfaces; in particular, how to:
- Build page content with HTML
- Add style to pages with CSS
- Use Bootstrap to generate nice-looking pages out-of-the-box
At this point, you have completed your simple wiki application and learned a lot along the way.
In Part II of this book you will develop a micro-blogging application, similar to Twitter, though without all the bells and whistles. This will be a great opportunity to learn more advanced topics. Ready? Let’s get started!