Table of Contents for
Opa: Up and Running
 Opa: Up and Running
Published by
O'Reilly Media, Inc., 2013
Opa: Up and Running
Published by
O'Reilly Media, Inc., 2013
- Cover
- Opa: Up and Running
- Opa: Up and Running
- Preface
- I. Coding a Mini Wikipedia
- 1. First Steps: Getting to Know Opa
- 2. Opa Fundamentals
- 3. Servers, Resources, and URLs
- 4. Data Storage
- 5. Building the UI in HTML and CSS
- II. Coding a Mini-Twitter
- 6. The Web Chat App
- 7. More Advanced Features of Opa
- 8. User Management
- 9. Building Reactive UIs: New Messages with a Real-Time Preview
- 10. Data Storage and Querying: Storing and Fetching Relevant Messages
- About the Authors
- Colophon
- Copyright
Chapter 6. The Web Chat App
The simplest example of a real-time web app is a web chat, similar to Facebook chat. As real-time is a feature of our micro-blogging app, we detail here what has become the de facto example of Opa programming.
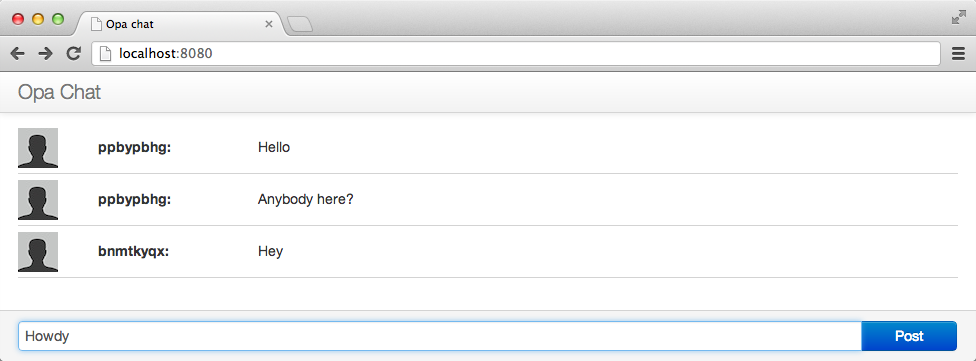
Our goal here is to build the application shown in Figure 6-1: a single chat room. Users connect to chat using regular web browsers, join the room immediately, and can start discussing in real time. For the sake of simplicity, we will choose names of users randomly. We will discuss in Chapter 8 how to add proper user management.
Note
In the web world, real time refers to the ability of a web page to update itself automatically when some data changes. Often in Web 2.0 apps, this is linked to displaying user interactions in real time; that is, updating the user interface of one user when another user does something.
Starting a New Project
To start the new chat application, simply write:
Tokyo:~ henri$ opa create chatThis will create a chat directory and generate a scaffolding for a new Opa app, with the following content:
+- chat
| +- Makefile
| +- Makefile.common
| +- opa.conf
| +- resources
| | +- css
| | | +- style.css
| +- src
| | +- model.opa
| | +- view.opa
| | +- controller.opa
The project includes:
- A Makefile file for the project (which can be customized)
- A generic Makefile.common file (which usually won’t be modified)
- A configuration file, opa.conf (which lists all the source files of the project and their dependencies; we’ll look at this file in more detail in Chapter 7)
- An example style file, style.css
- The source files, following the classic MVC pattern, divided into three sub-directories: model, view, and controller, for the standard three application layers
To compile and run the project, type:
Tokyo:~ henri$ cd chat; make runView: Building User Interface
Let’s start with the user interface; here we see the view part of the application, with which you should already be familiar:
moduleView{// View code goes herefunctionpage_template(content){<divclass="navbar navbar-inverse navbar-fixed-top"><divclass=navbar-inner><divclass=container><aclass=brand href="#">Opa Chat</a></div></div></div><divid=#main>{content}</div>}functiondefault_page(){content=<divclass="hero-unit">Page content goes here...</div>page_template("Default page",content)}}
The View module has two functions: page_template, which contains a generic
template for any page, and default_page, which uses page_template to build a page.
For the chat app, you need to modify the page_template and default_page functions
of the View module
to obtain the desired look and feel for the app. The template also automatically places
a CSS stylesheet in resources/css/style.css, which you may want to modify
as well.
Model: Application Logic
Now that you have the skeleton of the user interface in place, it’s time to bring it to life by adding application logic. This is the model part of the application, in which you define the application data, as well as its manipulation and storage, that you wrote in src/model.opa.
A chat app is about communicating messages between users. This means you need to decide what type of messages you wish to transmit.
In its minimal form, a message is a record that contains two fields: author
(which is a string, i.e., some text) and text (also a string):
typemessage={string author,string text}
Now that you know what a message is, you need to figure out how to pass it around to different clients. Opa provides three methods of communication between clients and the server:
- Session (for one-way, asynchronous communication)
- Cell (for two-way, synchronous communication)
- Network (for broadcasting messages to a number of observers)
For the chat application, you have a number of clients connected to the chat room, and they all need to be informed of every message posted; therefore, you will use a network:
privateNetwork.network(message)room=Network.cloud("room")
This extract creates a cloud network (ensuring that it will be shared among all running instances of the application) called “room.” The cloud name comes from the world of cloud computing and stresses that the networks can be easily distributed among several servers, although scaling Opa is not yet part of this book.
As is the case with everything in Opa, networks have a type. The type of this network is Network.network(message),
which means this is a network used to transmit data of type message.
By declaring this value as private, you ensure that it is not accessible
from outside the Model and that other functions need to be used to
manipulate it. This concept, known as encapsulation or information hiding,
is crucial for writing modular, well-designed programs. We will discuss this further in Packages.
You will need two such functions: one to broadcast a message to all clients and another one to register a callback, which will be invoked whenever a new message has been posted:
functionbroadcast(message){Network.broadcast(message,room);}functionregister_message_callback(callback){Network.add_callback(callback,room);}
Both functions simply invoke relevant features from the Network
module.
Finally, you need a function to assign usernames to newly connected users. As mentioned earlier, you will simplify the app by choosing those names at random:
functionnew_author(){Random.string(8);}
The complete source of the model follows:
typemessage={string author,string text}moduleModel{privateNetwork.network(message)room=Network.cloud("room")exposedfunctionbroadcast(message){Network.broadcast(message,room);}functionregister_message_callback(callback){Network.add_callback(callback,room);}functionnew_author(){Random.string(8);}}
Note
Notice that the broadcast function is exposed. exposed is an Opa keyword that precedes the function keyword. Exposing a function means that we specifically open an endpoint in the server so that clients can call the server-side function register.
If you omit exposed, Opa will have to perform more client/server calls.
Connecting the Model and the View
Now it is time to connect the model and the view.
Connecting the model and the view requires simply calling functions from Model in View.
Let’s start with a very simple call: author name generation.
In the View module, update the default_page function as follows:
functiondefault_page(){author=Model.new_author();page_template("Opa chat",(chat_html(author)))}
Next, you will learn how to do the following:
- Show new messages as they arrive
- Broadcast the current user’s message when it is entered
Showing New Messages
To show new messages, you write a user_update function that
takes a message as an argument and updates the user interface:
functionuser_update(message msg){line=<divclass="row-fluid line"><divclass="span1 userpic"><imgsrc="/resources/img/default-user.jpg"alt="User"/></div><divclass="span2 user">{msg.author}:</><divclass="span9 message">{msg.text}</></div>;#conversation=+line;Dom.scroll_to_bottom(#conversation);}
This code first constructs an HTML representation of the message (line)
and then prepends this HTML to the DOM element with the conversation
identifier, using the special syntax #conversation =+ line that we discussed in Chapter 5.
Finally, the last command of this function scrolls to the bottom
of the conversation element to ensure that the most recent messages are
visible.
Broadcasting the Current User’s Messages
When a user enters a new message, you need to send the message to other users. You can do this with the following function:
functionbroadcast(author){text=Dom.get_value(#entry);Model.broadcast(~{author,text});Dom.clear_value(#entry);}
Here, the code assigns the content of the user message to text by reading
the value of the DOM element with the entry ID using the Dom.get_value
function. The second line of this function calls the previously
written Model.broadcast function of the model to broadcast the message
to all chat users. The last line clears the content of
the input field, allowing the user to start composing a new chat message.
Connecting Everything
Now that you have all the pieces in place, it is time to connect them.
You need to do two things: make sure broadcast is invoked whenever
a user sends a new message; and make sure user_udpate is invoked whenever
a new message is sent to the chat room. You will use the
event handlers/listeners of the DOM to create connections.
Manipulating event handlers should not be difficult at this stage, as
you already learned about them in Event Handlers.
You will add all the wiring in the chat_html function. First you need
to add an argument to the function author, which is the name of
the current user. Then you need to add three event handlers:
-
Add the
onreadyevent to theconversationelement, which is invoked when the page loads and calls the model’sregister_message_callbackfunction, passinguser_updateas a callback that should be invoked for every new message received. -
Add the
onnewlineevent to theinputbox for the user’s message, which upon the user pressing the Enter key will call thebroadcastfunction to distribute it to other chat users. -
Add the
onclickevent to thePostbutton, which will enable users to send a message by clicking the Post button.
After you make those changes, the function should look like this:
functionchat_html(author){<divid=#conversationonready={function(_){Model.register_message_callback(user_update)}}/><divid=#footerclass="navbar navbar-fixed-bottom"><divclass=container><divclass=input-append><inputid=#entryclass=input-xxlarge type=textonnewline={function(_){broadcast(author)}}><buttonclass="btn btn-primary"type=buttononclick={function(_){broadcast(author)}}>Post</></div></div></div>}
You are now ready to compile and run the application. With the Makefile
generated by opa create, it is as simple as invoking:
Tokyo:~ henri$ make runThat’s it!
Understanding Networks
This advanced section explains the low-level mechanism of networks, which are also accessible in Opa. As we said earlier, networks are based on a lower-level object named sessions. A session in Opa is a unit of state and concurrency:
- Constructing a new session requires you to provide the session’s initial state and a message handler. As a result of constructing a session, a channel is created, which provides a means of communicating with the session. A session created on one machine will always remain there; however, its channels can be distributed and duplicated at will.
- When you have access to a session’s channel, you can send it a message. This message is passed and processed to the message handler. A message handler has access to the current state of the session and, as a result of processing the message, can modify that state.
Let’s detail a generic use of sessions, as represented in Figure 6-2.
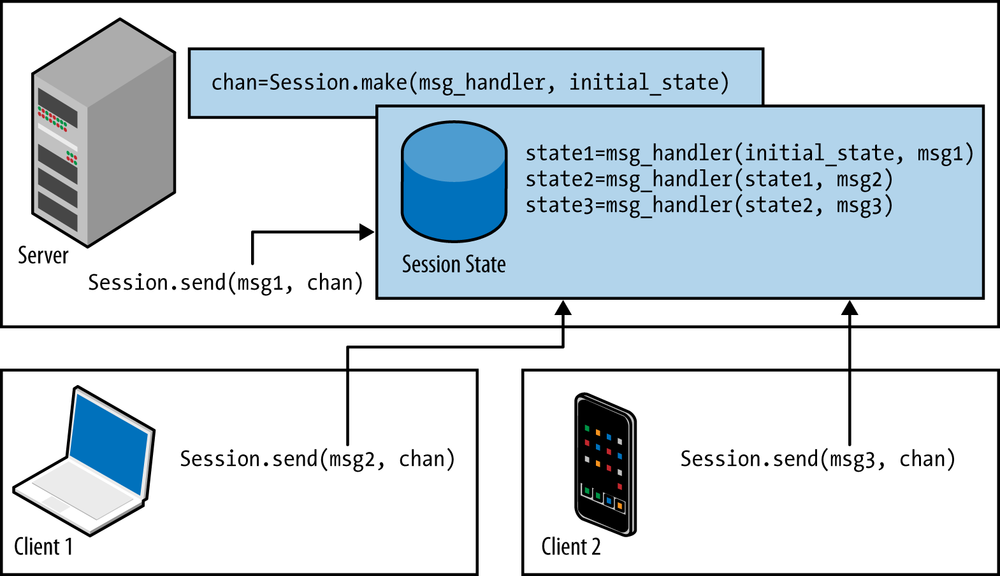
To create a new session, you write:
chan=Session.make(msg_handler,initial_state)
The resultant value, chan, is a channel that can be used to communicate with the session.
The parameters are initial_state, the value for the initial state of the session, and msg_handler, which is the handler used to process messages sent to this session.
Before we look in detail at what the handler is, note that when chan is created server-side, the session will stay server-side.
Reciprocally, if the session is created client-side, it will stay client-side.
The message handler is a function that takes two parameters:
- The current state of the session
- The message that was received
The message responds with a Session.instruction. This has the following type:
typeSession.instruction('state)={'stateset}or{unchanged}or{stop}
The preceding type is a variant of these three types:
-
{set: value}, which sets the new value to the state of the session -
{unchanged}, which leaves the state of the session unchanged -
{stop}, which terminates the session; future messages sent to it will be ignored
Let’s use this. On a server-side function, you can call:
Session.send(msg1,chan)
This causes asynchronous sending of
msg1 to the session identified with chan. Upon receipt of this
message, the session will invoke the message handler, in this case
resulting in a call to msg_handler(initial_state, msg1).
If the handler responds with {set: state1}, state1 will
become the new state of the session.
Later, when the application is executed, a client-side function may then send the following from Client 1:
Session.send(msg2,chan)
Then it may send the following from another client, Client 2:
Session.send(msg3,chan)
As a result, “Client 2” will reciprocally invoke msg_handler(state1, msg2) and msg_handler(state2, msg3).
Thanks to Opa’s transparent client/server communication, although chan resides server-side, it is OK to pass chan as an argument in the program flow to make it accessible client-side, for instance. It’s that simple.
In Opa, you can directly use high-level networks for real-time web applications, but the low-level sessions on which they are built can also be very useful in many more situations.
Exercises
Now it’s time to apply what you have learned! Here are a few exercises that will test your Opa skills.
Customizing the Display
Customize the chat app in the following ways:
- Make the text box appear at the top.
- Have each new message added at the top, rather than at the bottom.
You will need to use the += operator instead of =+.
Saying “Hello”
Customize the chat app so that, at startup, in the beginning of #conversation, it displays the following message to the current user: “Hello, you are user 8dh335.”
Customize the chat app so that, at startup, it displays the following message to all users: “User 8dh335 has joined the room.”
Combine both: customize the chat app so that one user sees something like “Hello, you are user 8dh335” and other users see “User 8dh335 has joined the room.”
Distinguishing Messages Between Users
Customize the chat app so that the user’s own messages are distinguished from messages sent by other users.
User Customization
Let users choose their own username, and let them choose their own icon. You can let them enter a URI, for instance.
Note
For security reasons, values with type xhtml cannot be transmitted from one client to another client.
So you will have to find another way to send one user’s icon to all other users.
And Beyond
And now, here’s an open exercise: invent and implement unique features to make your version of the chat app stand out! A starting point here can be a more complete, finished application such as this one.