Table of Contents for
JavaScript Web Applications
 JavaScript Web Applications
Published by
O'Reilly Media, Inc., 2011
JavaScript Web Applications
Published by
O'Reilly Media, Inc., 2011
- Cover
- JavaScript Web Applications
- JavaScript Web Applications
- Preface
- 1. MVC and Classes
- 2. Events and Observing
- 3. Models and Data
- 4. Controllers and State
- 5. Views and Templating
- 6. Dependency Management
- 7. Working with Files
- 8. The Real-Time Web
- 9. Testing and Debugging
- 10. Deploying
- 11. The Spine Library
- 12. The Backbone Library
- 13. EmberJS
- A. jQuery Primer
- B. CSS Extensions
- C. CSS3 Reference
- Index
- About the Author
- Colophon
- Copyright
Chapter 12. The Backbone Library
Backbone is an excellent library for building JavaScript applications. Its beauty is in its simplicity; the library is very lightweight, giving you a great deal of flexibility while covering all the basics. As with the rest of this book, MVC is the name of the game, and that pattern runs right through the core of Backbone. The library gives you models, controllers, and views—the building blocks for your application.
How is Backbone different from other frameworks, such as SproutCore or Cappuccino? Well, the main difference is Backbone’s lightweight nature. SproutCore and Cappuccino provide rich UI widgets and vast core libraries, and they determine the structure of your HTML for you. Both frameworks measure in the hundreds of kilobytes when packed and gzipped, as well as many megabytes of JavaScript, CSS, and images when loaded in the browser. By comparison, Backbone measures just 4 KB, providing purely the core concepts of models, events, collections, views, controllers, and persistence.
Backbone’s only hard dependency is underscore.js, a library full of useful utilities and general-purpose JavaScript functions. Underscore provides more than 60 functions that deal with—among other things—array manipulation, function binding, JavaScript templating, and deep-equality testing. It’s definitely worth checking out Underscore’s API, especially if you’re doing a lot of work with arrays. Other than Underscore, you can safely use jQuery or Zepto.js to help Backbone with view functionality.
Although it’s well documented, Backbone can be a little overwhelming when you first get into it. The aim of this chapter is to rectify that situation, giving you an in-depth and practical introduction to the library. The first few sections will be an overview of Backbone’s components, and then we’ll finish with a practical application. Feel free to skip straight to the end if you want to see Backbone in action.
Models
Let’s start with probably the most key component to MVC:
models. Models are where your application’s data is kept. Think of models
as a fancy abstraction upon the application’s raw data, adding utility
functions and events. You can create Backbone models by calling the
extend() function on Backbone.Model:
var User = Backbone.Model.extend({
  initialize: function() {
    // ...
  }
});
The first argument to extend()
takes an object that becomes the instance properties of the model. The
second argument is an optional class property hash. You can call extend() multiple times to generate subclasses
of models, which inherit all their parents’ class and instance
properties:
var User = Backbone.Model.extend({
  // Instance properties
  instanceProperty: "foo"
}, {
  // Class properties
  classProperty: "bar"
});

assertEqual( User.prototype.instanceProperty, "foo" );
assertEqual( User.classProperty, "bar" );
When a model is instantiated, the model’s initialize() instance function is called with any instantiation arguments. Behind the
scenes, Backbone models are constructor functions, so you can instantiate
a new instance by using the new
keyword:
var User = Backbone.Model.extend({
  initialize: function(name) {
    this.set({name: name});
  }
});

var user = new User("Leo McGarry");
assertEqual( user.get("name"), "Leo McGarry");
Models and Attributes
Use the set() and get() functions
for setting and retrieving an instances’
attributes:
var user = new User();
user.set({name: "Donna Moss"})

assertEqual( user.get("name"), "Donna Moss" );
assertEqual( user.attributes, {name: "Donna Moss"} );
set(attrs, [options]) takes a
hash of attributes to apply to the instance, and get(attr) takes a single string argument—the
name of the attribute—returning its
value. The instance keeps track of its current attributes with
a local hash called attributes. You
shouldn’t manipulate this directly; as with the get() and set() functions, make sure the appropriate
validation and events are invoked.
You can validate an instance’s attributes by using the validate()
function. By default, this is left undefined, but you can override
it to add any custom validation logic:
var User = Backbone.Model.extend({
  validate: function(atts){
    if (!atts.email || atts.email.length < 3) {
      return "email must be at least 3 chars";
    }
  }
});
If the model and attributes are valid, don’t return anything from
validate(); if the attributes are
invalid, you can either return a string describing the error or an
Error instance. If validation fails,
the set() and save() functions will not continue and an
error event will be triggered. You can bind to the
error event, ensuring that you’ll be notified when any validation
fails:
var user = new User;

user.bind("error", function(model, error) {
  // Handle error
});

user.set({email: "ga"});

// Or add an error handler onto the specific set
user.set({"email": "ga"}, {error: function(model, error){
  // ...
}});
Specify default attributes with a default hash. When creating an instance of the model, any unspecified
attributes will be set to their default value:
var Chat = Backbone.Model.extend({
  defaults: {
    from: "anonymous"
  }
});

assertEqual( (new Chat).get("from"), "anonymous" );
Collections
In Backbone, arrays of model instances are stored in
collections. It might not be immediately obvious why it’s useful to
separate collections from models, but it’s actually quite a common
scenario. If you were recreating Twitter, for example, you’d have two collections, Followers and Followees, both populated by User
instances. Although both collections are populated by the same model, each
contains an array of different User
instances; as a result, they are separate collections.
As with models, you can create a collection by extending Backbone.Collection:
var Users = Backbone.Collection.extend({
  model: User
});
In the example above, you can see we’re overriding the model property to specify which model we want associated with the
collection—in this case, the User
model. Although it’s not absolutely required, it’s useful to set this to
give the collection a default model to refer to if it’s ever required.
Normally, a collection will contain instances of only a single model type,
rather than a multitude of different ones.
When creating a collection, you can optionally pass an initial array
of models. Like with Backbone’s models, if you define an initialize instance function, it will be invoked on instantiation:
var users = new Users([{name: "Toby Ziegler"}, {name: "Josh Lyman"}]);Alternatively, you can add models to the collection using the
add() function:
var users = new Users;

// Add an individual model
users.add({name: "Donna Moss"});

// Or add an array of models
users.add([{name: "Josiah Bartlet"}, {name: "Charlie Young"}]);
When you add a model to the collection, the add event is fired:
users.bind("add", function(user) {
  alert("Ahoy " + user.get("name") + "!");
});
Similarly, you can remove a model from the collection using remove(), which triggers a remove event:
users.bind("remove", function(user) {
  alert("Adios " + user.get("name") + "!");
});

users.remove( users.models[0] );
Fetching a specific model is simple; if the model’s ID is present,
you can use the controller’s get()
function:
var user = users.get("some-guid");If you don’t have a model’s ID, you can fetch a model by cid—the client ID created automatically by Backbone whenever a new model is created:
var user = users.getByCid("c-some-cid");In addition to the add and remove events, whenever the model in a collection has been modified, a change event will be fired:
var user = new User({name: "Adam Buxton"});

var users = new Backbone.Collection;
users.bind("change", function(rec){
  // A record was changed!
});
users.add(user);

user.set({name: "Joe Cornish"});
Controlling a Collection’s Order
You can control a collection’s order by providing a comparator() function, returning a value against which you want the collection
sorted:
var Users = Backbone.Collection.extend({
  comparator: function(user){
    return user.get("name");
  }
});
You can return either a string or numeric value to sort against
(unlike JavaScript’s regular sort). In the example above, we’re making
sure the Users collection is sorted
alphabetically by name. Ordering will happen automatically behind the
scenes, but if you ever need to force a collection to re-sort itself,
you can call the sort()
function.
Views
Backbone views are not templates themselves, but are control classes that handle a model’s presentation. This can be confusing, because many MVC implementations refer to views as chunks of HTML or templates that deal with events and rendering in controllers. Regardless, in Backbone, it is a view “because it represents a logical chunk of UI, responsible for the contents of a single DOM.”
Like models and collections, views are created by extending one of
Backbone’s existing classes—in this case, Backbone.View:
var UserView = Backbone.View.extend({
  initialize: function(){ /* ... */ },
  render: function(){ /* ... */ }
});
Every view instance has the idea of a current DOM element, or
this.el, regardless of whether the view
has been inserted into the page. el is
created using the attributes from the view’s tagName, className, or id properties. If none of these is specified,
el is an empty div:
var UserView = Backbone.View.extend({
  tagName: "span",
  className: "users"
});

assertEqual( (new UserView).el.className, "users" );
If you want to bind the view onto an existing element in the page,
simply set el directly. Clearly, you
need to make sure this view is set up after the page has loaded;
otherwise, the element won’t yet exist:
var UserView = Backbone.View.extend({
  el: $(".users")
});
You can also pass el as an option
when instantiating a view, as with the tagName, className, and id properties:
new UserView({id: "followers"});Rendering Views
Every view also has a render() function, which by default is a no-op
(an empty function). Your view should call this function whenever the
view needs to be redrawn. You should override this function with
functionality specific to your view, dealing with rendering templates
and updating el with any new
HTML:
var TodoView = Backbone.View.extend({
  template: _.template($("#todo-template").html()),

  render: function() {
    $(this.el).html(this.template(this.model.toJSON()));
    return this;
  }
});
Backbone is pretty agnostic about how you render views. You can
generate the elements yourself or using a templating library. The latter
approach is advocated, though, because it’s generally the cleanest
method—keeping HTML out of your JavaScript programs. Since
Underscore.js, being a dependency of Backbone, is on the page, you can
use _.template()—a handy utility for
generating templates.
Above, you’ll notice that we’re using a local property called
this.model. This actually points to a
model’s instance and is passed through to the view upon instantiation.
The model’s toJSON() function essentially returns the model’s raw attributes, ready for
the template to use:
new TodoView({model: new Todo});Delegating Events
Through delegation, Backbone’s views provide an easy
shortcut for adding event handlers onto el. Here’s how you can set a hash of events and their corresponding callbacks on the view:
var TodoView = Backbone.View.extend({
  events: {
    "change input[type=checkbox]" : "toggleDone",
    "click .destroy"              : "clear",
  },

  toggleDone: function(e){ /* ... */},
  clear: function(e){ /* ... */}
});
The event hash is in the format {"eventType selector": "callback"}. The
selector is optional, and if it
isn’t provided, the event is bound straight to el. If the selector is provided, the event is
delegated, which
basically means it’s bound dynamically to any of el’s children that match the selector.
Delegation uses event bubbling, meaning that events will still fire
regardless of whether el’s contents
have changed.
The callback is a string, and it refers to the name of an instance
function on the current view. When
the view’s event callbacks are triggered, they’re invoked in the current
view’s context, rather than the current target or window’s context. This
is rather useful because you have direct access to this.el and this.model from any callbacks, such as in the
example toggleDone() and clear() functions above.
Binding and Context
So, how is the view’s render()
function actually invoked? Well, typically this is called by the
view’s model when it changes, using the change
event. This means your application’s views and HTML are kept in
sync (bound) with your model’s data:
var TodoView = Backbone.View.extend({
  initialize: function() {
    _.bindAll(this, 'render', 'close');
    this.model.bind('change', this.render);
  },

  close: function(){ /* ... */ }
});
One thing to watch out for is context changes in event callbacks. Underscore provides a useful function
to get around this: _.bindAll(context,
*functionNames). This function binds a context and function names (as
strings). _.bindAll() ensures that
all the functions you indicate are always invoked in the specified
context. This is especially useful for event callbacks, as their context
is always changing. In the example above, the render() and close() functions will always execute in the
TodoView’s instance context.
Catering to model destruction works similarly. Your views just
need to bind to the model’s delete event, removing
el when it’s triggered:
var TodoView = Backbone.View.extend({
  initialize: function() {
    _.bindAll(this, 'render', 'remove');
    this.model.bind('change',  this.render);
    this.model.bind('delete', this.remove);
  },

  remove: function(){
    $(this.el).remove();
  }
});
Note that you can render Backbone’s views without using models or
event callbacks. You could easily call the render() function from initialize(), rendering the view when it’s first instantiated. However,
I’ve been covering model and view integration because it’s the typical
use case for views—the binding capabilities are one of Backbone’s most
useful and powerful features.
Controllers
Backbone controllers connect the application’s state to the URL’s hash fragment, providing shareable, bookmarkable URLs. Essentially, controllers consist of a bunch of routes and the functions that will be invoked when those routes are navigated to.
Routes are a hash—the key consisting of paths, parameters, and splats—and the value is set to the function associated with the route:
routes: {                            // Matches:
  "help":                 "help",    //  #help
  "search/:query":        "search",  //  #search/kiwis
  "search/:query/p:page": "search",   //  #search/kiwis/p7
  "file/*path":           "file"     //  #file/any/path.txt
}
You can see in the example above that parameters start with a
: and then the name of the parameter.
Any parameters in a route will be passed to its action when the route is
invoked. Splats, specified by a *, are
basically a wildcard, matching anything. As with parameters, splats will be
passed matched values onto their route’s action.
Routes are parsed in the reverse order they’re specified in the
hash. In other words, your most general “catch all” routes should be
located at the beginning of the routes
hash.
Per usual, controllers are created by extending Backbone.Controllers, passing in an object
containing instance properties:
var PageController = Backbone.Controller.extend({
  routes: {
    "":                     "index",
    "help":                 "help",    // #help
    "search/:query":        "search",  // #search/kiwis
    "search/:query/p:page": "search"   // #search/kiwis/p7
  },

  index: function(){ /* ... */ },

  help: function() {
    // ...
  },

  search: function(query, page) {
    // ...
  }
});
In the example above, when the user navigates to
http://example.com#search/coconut, whether manually
or by pushing the back button, the search() function will be invoked with the query variable pointing to "coconut".
If you want to make your application compliant with the Ajax Crawling
specification and indexable by search engines (as discussed in
Chapter 4), you need to prefix all your routes
with !/, as in the following
example:
var PageController = Backbone.Controller.extend({
  routes: {
    "!/page/:title": "page", // #!/page/foo-title
  }
  // ...
}):
You’ll also need to make changes server side, as described by the specification.
If you need more route functionality, such as making sure certain
parameters are integers, you can pass a regex directly to route():
var PageController = Backbone.Controller.extend({
  initialize: function(){
    this.route(/pages\/(\d+)/, 'id', function(pageId){
      // ...
    });
  }
}):
So, routes tie up changes to the URL’s fragment with controllers,
but how about setting the fragment in the first place? Rather than setting
window.location.hash manually, Backbone
provides a shortcut—saveLocation(fragment):
Backbone.history.saveLocation("/page/" + this.model.id);When saveLocation() is called and the URL’s fragment is updated, none of the
controller’s routes will be invoked. This means you can safely call
saveLocation() in a view’s initialize() function, for example, without any
controller intervention.
Internally, Backbone will listen to the onhashchange event in browsers that support it, or implement a workaround using iframes and timers. However, you’ll need to initiate Backbone’s history support by calling the following:
Backbone.history.start();
You should only start Backbone’s history once the page has loaded
and all of your views, models, and collections are available. As it
stands, Backbone doesn’t support the new HTML5 pushState() and replaceState() history API. This is because pushState() and replaceState() currently need special handling
on the server side and aren’t yet supported by Internet Explorer. Backbone
may add support once those issues have been addressed. For now, all
routing is done by the URL’s hash fragment.
Syncing with the Server
By default, whenever you save a model, Backbone will notify
your server with an Ajax request, using either the jQuery or Zepto.js
library. Backbone achieves this by calling Backbone.sync() before a model is created, updated, or deleted. Backbone
will then send off a RESTful JSON request to your server which, if
successful, will update the model client side.
To take advantage of this, you need to define a url instance property on your model and have a RESTfully compliant server.
Backbone will take care of the rest:
var User = Backbone.Model.extend({
  url: '/users'
});
The url property can either be a
string or a function that returns a string. The path can be relative or
absolute, but it must return the model’s endpoint.
Backbone maps create, read, update, and delete (CRUD) actions into the following methods:
create → POST   /collection
read   → GET    /collection[/id]
update → PUT    /collection/id
delete → DELETE /collection/id
For example, if you were creating a User instance, Backbone would send off a POST
request to /users. Similarly, updating
a User instance would send off a PUT
request to the endpoint /users/id,
where id is the model’s identifier.
Backbone expects you to return a JSON hash of the instance’s attributes in
response to POST, PUT, and GET requests, which will be used to update the
instance.
To save a model to the server, call the model’s save([attrs], [options]) function, optionally
passing in a hash of attributes and request options. If the model has an
id, it is assumed to exist on the
server side, and save() sends will be a
PUT (update) request. Otherwise, save()
will send a POST (create) request:
var user = new User();
user.set({name: "Bernard"});

user.save(null, {success: function(){
  // user saved successfully
}});
All calls to save() are asynchronous, but you can listen to the Ajax request
callbacks by passing the success and
failure options. In fact, if Backbone
is using jQuery, any options passed to save() will also be passed to $.ajax(). In other words, you can use any of
jQuery’s Ajax
options, such as timeout, when
saving models.
If the server returns an error and the save fails, an error event will be triggered on the model. If it succeeds, the model will be updated with the server’s response:
var user = new User();

user.bind("error", function(e){
  // The server returns an error!
});

user.save({email: "Invalid email"});
You can refresh a model by using the fetch() function, which will request the model’s attributes from the server
(via a GET request). A change event will trigger if the remote representation of the model
differs from its current attributes:
var user = Users.get(1);
user.fetch();
Populating Collections
So, we’ve covered creating and updating models, but what
about fetching them from the server in the first place? This is where
Backbone collections come in, requesting remote models and storing them
locally. Like models, you should add a url property to the collection to specify its
endpoint. If a url isn’t provided,
Backbone will fall back to the associated model’s url:
var Followers = Backbone.Collection.extend({
  model: User,
  url: "/followers"
});

Followers.fetch();
The collection’s fetch()
function will send off a GET request to the server—in this case, to
/followers—retrieving the remote
models. When the model data returns from the server, the collection will
refresh, triggering a refresh event.
You can refresh collections manually with the refresh() function, passing in an array of model objects. This comes in
really handy when you’re first setting up the page. Rather than firing
off another GET request on page load, you can prepopulate collection
data by passing in a JSON object inline via refresh(). For example, here’s how it would
look using Rails:
<script type="text/javascript">
  Followers.refresh(<%= @users.to_json %>);
</script>
On the Server Side
As mentioned previously, your server needs to implement a number of RESTful endpoints in order to integrate seamlessly with Backbone:
create → POST   /collection
read   → GET    /collection
read   → GET    /collection/id
update → PUT    /collection/id
delete → DELETE /collection/id
Backbone will serialize models into JSON before sending them. Our
User model would look like
this:
{"name": "Yasmine"}Notice that the data isn’t prefixed by the current model, something that can especially trip up Rails developers. I’m going to go through some of the specifics of integrating Rails with Backbone, so if you’re not using the framework, feel free to skip to the next section.
Inside your CRUD methods, you should be using the plain,
unprefixed parameters. For example, here’s how our Rails controller’s
update method could work:
def update
  user = User.find(params[:id])
  user.update_attributes!(params)
  render :json => user
end
Obviously, you should be securing your model from
malicious input by whitelisting
attributes
using the attr_accessible method, but that’s beyond the scope
of this book. Every controller method, except for destroy, should return a JSON representation
of the record.
Serializing attributes to JSON is also an issue because, by default, Rails prefixes any record data with the model, like this:
{"user": {"name": "Daniela"}}Unfortunately, Backbone won’t be able to parse that object correctly. You need to ensure Rails doesn’t include the model name inside JSON serializations of records by creating an initializer file:
# config/initializers/json.rb
ActiveRecord::Base.include_root_in_json = false
Custom Behavior
Backbone.sync() is the function Backbone calls every time it attempts to
read or save a model to the server. You can override its default
behavior (sending an Ajax request) in order to use a different
persistence strategy, such as WebSockets, XML transport, or Local
Storage. For example, let’s replace Backbone.sync() with a no-op function that
just logs the arguments with which its called:
Backbone.sync = function(method, model, options) {
  console.log(method, model, options);
  options.success(model);
};
As you can see, Backbone.sync()
gets passed a method, model, and options, which have the following
properties:
methodThe CRUD method (
create,read,update, ordelete)modelThe model to be saved (or collection to be read)
optionsThe request options, including success and failure callbacks
The only thing Backbone expects you to do is invoke either the options.success() or options.error()
callback.
It’s also possible to override the sync function per model or collection, rather than globally:
Todo.prototype.sync = function(method, model, options){ /* ... */ };A good example of a custom Backbone.sync() function is in the local storage
adapter. Including the adapter and setting the localStorage option on the relevant models or
collections enables Backbone to use
HTML5 localStorage, rather
than a backend server. As you can see in the example below, Backbone.sync() CRUDs the store object, depending on the method, and
finally calls options.success() with
the appropriate model:
// Save all of the todo items under the "todos" localStorage namespace.
Todos.prototype.localStorage = new Store("todos");

// Override Backbone.sync() to use a delegate to the model or collection's
// localStorage property, which should be an instance of Store.
Backbone.sync = function(method, model, options) {

  var resp;
  var store = model.localStorage || model.collection.localStorage;

  switch (method) {
    case "read":    resp = model.id ? store.find(model) : store.findAll(); break;
    case "create":  resp = store.create(model);                            break;
    case "update":  resp = store.update(model);                            break;
    case "delete":  resp = store.destroy(model);                           break;
  }

  if (resp) {
    options.success(resp);
  } else {
    options.error("Record not found");
  }
};
Building a To-Do List
Let’s put what we’ve learned about Backbone into practice with a simple to-do list application. We want the user to be able to CRUD to-dos, and we want items to be persisted between page refreshes. You can build the application using the examples below, or see the finished application in assets/ch12/todos.
The initial page structure looks like the following; we’re loading in CSS, JavaScript libraries, and our Backbone application contained in todos.js:
<html>
<head>
  <link href="todos.css" media="all" rel="stylesheet" type="text/css"/>
  <script src="lib/json2.js"></script>
  <script src="lib/jquery.js"></script>
  <script src="lib/jquery.tmpl.js"></script>
  <script src="lib/underscore.js"></script>
  <script src="lib/backbone.js"></script>
  <script src="lib/backbone.localstorage.js"></script>
  <script src="todos.js"></script>
</head>

<body>
  <div id="todoapp">
    <div class="title">
      <h1>Todos</h1>
    </div>

    <div class="content">
      <div id="create-todo">
        <input id="new-todo" placeholder="What needs to be done?" type="text" />
      </div>

      <div id="todos">
        <ul id="todo-list"></ul>
      </div>
    </div>
  </div>
</body>
</html>
The page structure is very straightforward; it just contains a text
input for creating new to-dos (#new-todo) and a list showing existing to-dos
(#todo-list).
Now let’s move on to the todos.js
script, where the core of our Backbone application is located. We’re going
to wrap everything we put in this class with jQuery(), ensuring that it will be run only
after the page has loaded:
// todos.js
jQuery(function($){
  // Application goes here...
})
Let’s create a basic Todo model
that has content and done attributes. We’re providing a toggle() helper for easily inverting the model’s
done attribute:
window.Todo = Backbone.Model.extend({
  defaults: {
    done: false
  },

  toggle: function() {
    this.save({done: !this.get("done")});
  }
});
We’re setting the Todo model on
the window object to ensure that it’s
accessible globally. Also, by using this pattern, it’s easy to see which
global variables a script is declaring—just look through the script for
window references.
The next step is to set up a TodoList collection, where the array of Todo models will be stored:
window.TodoList = Backbone.Collection.extend({
  model: Todo,

  // Save all of the to-do items under the "todos" namespace.
  localStorage: new Store("todos"),

  // Filter down the list of all to-do items that are finished.
  done: function() {
    return this.filter(function(todo){ return todo.get('done'); });
  },

  remaining: function() {
    return this.without.apply(this, this.done());
  }
});

// Create our global collection of Todos.
window.Todos = new TodoList;
We’re using the Backbone local storage provider
(backbone.localstorage.js), which requires us to set
a localStorage attribute on any
collections or models wanting to store data. The other two functions in
TodoList, done(), and remaining() deal with filtering the collection,
returning to-do models that have or have not been completed. Because there
will only ever be one TodoList, we’re
instantiating a globally available instance of it: window.Todos.
And now for the view that will show individual to-dos, TodoView. This will bind to the
change event on Todo models, rerendering the view when it’s
triggered:
window.TodoView = Backbone.View.extend({

  // View is a list tag.
  tagName:  "li",

  // Cache the template function for a single item.
  template: $("#item-template").template(),

  // Delegate events to view functions
  events: {
    "change   .check"        : "toggleDone",
    "dblclick .todo-content" : "edit",
    "click    .todo-destroy" : "destroy",
    "keypress .todo-input"   : "updateOnEnter",
    "blur     .todo-input"   : "close"
  },

  initialize: function() {
    // Make sure functions are called in the right scope
    _.bindAll(this, 'render', 'close', 'remove');

    // Listen to model changes
    this.model.bind('change', this.render);
    this.model.bind('destroy', this.remove);
  },

  render: function() {
    // Update el with stored template
    var element = jQuery.tmpl(this.template, this.model.toJSON());
    $(this.el).html(element);
    return this;
  },

  // Toggle model's done status when the checkbox is checked
  toggleDone: function() {
    this.model.toggle();
  },

  // Switch this view into `"editing"` mode, displaying the input field.
  edit: function() {
    $(this.el).addClass("editing");
    this.input.focus();
  },

  // Close the `"editing"` mode, saving changes to the to-do.
  close: function(e) {
    this.model.save({content: this.input.val()});
    $(this.el).removeClass("editing");
  },

  // If you hit `enter`, we're through editing the item.
  // Fire the blur event on the input, triggering close()
  updateOnEnter: function(e) {
    if (e.keyCode == 13) e.target.blur();
  },

  // Remove element when model is destroyed
  remove: function() {
    $(this.el).remove();
  },

  // Destroy model when '.todo-destroy' is clicked
  destroy: function() {
    this.model.destroy();
  }
});
You can see we’re delegating a bunch of events to the view that
manage updating, completing, and deleting the to-do. For example, whenever
the checkbox is changed, toggleDone()
gets called, toggling the model’s done
attribute. That in turn triggers the model’s change
event, which causes the view to rerender.
We’re using jQuery.tmpl for the HTML templating, replacing the contents of el with a regenerated template whenever the view
renders. The template refers to an element with an ID of #item-template, which we haven’t yet defined.
Let’s do that now, placing the template inside our
index.html body tags:
<script type="text/template" id="item-template">
  <div class="todo {{if done}}done{{/if}}">
    <div class="display" title="Double click to edit...">
      <input class="check" type="checkbox" {{if done}}checked="checked"{{/if}} />
      <div class="todo-content">${content}</div>
      <span class="todo-destroy"></span>
    </div>
    <div class="edit">
      <input class="todo-input" type="text" value="${content}" />
    </div>
  </div>
</script>
That templating syntax should look fairly familiar to you if you’ve
read Chapter 5, where jQuery.tmpl is covered in
some depth. Essentially, we’re interoperating the to-do’s contents inside
the #todo-content and #todo-input elements. Additionally, we’re making
sure the checkbox has the correct “checked” state.
TodoView is pretty
self-contained—we just need to give it a model on instantiation and append
its el attribute to the to-do list.
This is basically the job of AppView,
which ensures that our initial to-do list is populated by instantiating
TodoView instances. The other role
AppView performs is creating new
Todo records when a user hits Return on
the #new-todo text input:
// Our overall AppView is the top-level piece of UI.
window.AppView = Backbone.View.extend({

  // Instead of generating a new element, bind to the existing skeleton of
  // the App already present in the HTML.
  el: $("#todoapp"),

  events: {
    "keypress #new-todo":  "createOnEnter",
    "click .todo-clear a": "clearCompleted"
  },

  // At initialization, we bind to the relevant events on the `Todos`
  // collection, when items are added or changed. Kick things off by
  // loading any preexisting to-dos that might be saved in *localStorage*.
  initialize: function() {
    _.bindAll(this, 'addOne', 'addAll', 'render');

    this.input = this.$("#new-todo");

    Todos.bind('add',     this.addOne);
    Todos.bind('refresh', this.addAll);

    Todos.fetch();
  },

  // Add a single to-do item to the list by creating a view for it and
  // appending its element to the `<ul>`.
  addOne: function(todo) {
    var view = new TodoView({model: todo});
    this.$("#todo-list").append(view.render().el);
  },

  // Add all items in the Todos collection at once.
  addAll: function() {
    Todos.each(this.addOne);
  },

  // If you hit return in the main input field, create new Todo model
  createOnEnter: function(e) {
    if (e.keyCode != 13) return;

    var value = this.input.val();
    if ( !value ) return;

    Todos.create({content: value});
    this.input.val('');
  },

  clearCompleted: function() {
    _.each(Todos.done(), function(todo){ todo.destroy(); });
    return false;
  }
});

// Finally, we kick things off by creating the App.
window.App = new AppView;
When the page initially loads, the Todos collection will be populated and the
refresh event called. This invokes addAll(), which fetches all the Todo models, generates TodoView views, and appends them to #todo-list. Additionally, when new Todo models are added to Todos, the Todos add event is
triggered, invoking addOne() and
appending a new TodoView to the list.
In other words, the initial population and Todo creation is being handled by AppView, while the individual TodoView views handle updating and destroying
themselves.
Now let’s refresh the page and see the result of our handiwork. Notwithstanding any bugs and typos, you should see something like Figure 12-1.
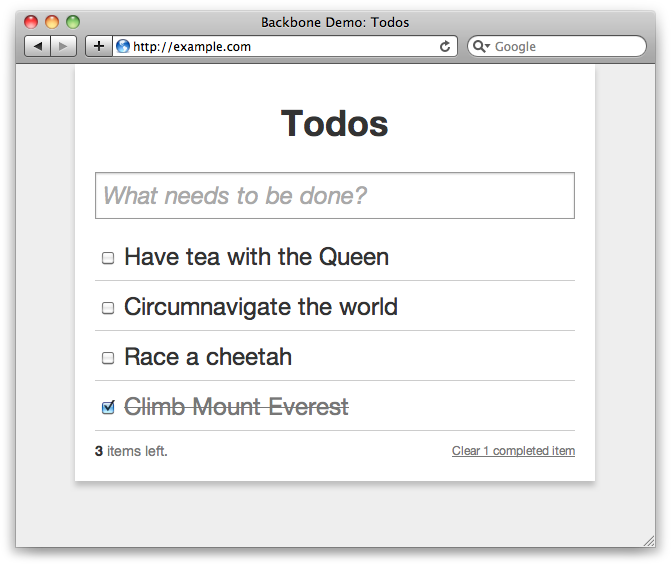
We have functionality for adding, checking, updating, and removing to-dos, all with a relatively small amount of code. Because we’re using the local storage Backbone adapter, to-dos are persisted between page reloads. This example should give you a good idea of how useful Backbone is, as well as how to go about creating your own applications.
You can find the full application inside this book’s accompanying files, in assets/ch12/todos.