Table of Contents for
JavaScript Web Applications
 JavaScript Web Applications
Published by
O'Reilly Media, Inc., 2011
JavaScript Web Applications
Published by
O'Reilly Media, Inc., 2011
- Cover
- JavaScript Web Applications
- JavaScript Web Applications
- Preface
- 1. MVC and Classes
- 2. Events and Observing
- 3. Models and Data
- 4. Controllers and State
- 5. Views and Templating
- 6. Dependency Management
- 7. Working with Files
- 8. The Real-Time Web
- 9. Testing and Debugging
- 10. Deploying
- 11. The Spine Library
- 12. The Backbone Library
- 13. EmberJS
- A. jQuery Primer
- B. CSS Extensions
- C. CSS3 Reference
- Index
- About the Author
- Colophon
- Copyright
Appendix A. jQuery Primer
A lot of libraries have been developed to make the DOM easier to work with, but few have the popularity and praise of jQuery. And for good reason: jQuery’s API is excellent and the library is lightweight and namespaced, so it shouldn’t conflict with anything else you’re using. What’s more, jQuery is easily extendable; a whole host of plug-ins have been developed, from JavaScript validation to progress bars.
jQuery is namespaced behind the jQuery variable, which is aliased with a dollar
sign ($). Unlike libraries such as Prototype, jQuery doesn’t extend any
native JavaScript objects, largely to avoid conflicts with other
libraries.
The other important thing to understand about jQuery is selectors. If you’re familiar with CSS, selectors will be second nature to you. All of jQuery’s instance methods are performed on selectors, so rather than iterating over elements, you can just use a selector to collect them. Any functions called on the jQuery selector will be executed on every element selected.
To demonstrate this, let me show you an example of adding a class name
selected to all the elements with the
class foo. The first example will be in
pure JavaScript, and the second will use jQuery:
// Pure JavaScript example
var elements = document.getElementsByClassName("foo");
for (var i=0; i < elements.length; i++) {
  elements[i].className += " selected";
}

// jQuery example
$(".foo").addClass("selected");
So, you can see how jQuery’s selectors API greatly reduces the code required. Let’s take a closer look at
those selectors. Just as you’d use a hash (#) in CSS to select elements by ID, you can do the
same with jQuery:
// Select an element by ID (wem)
var element = document.getElementById("wem");
var element = $("#wem");

// Select all elements by class (bar)
var elements = document.getElementsByClassName("bar");
var elements = $(".bar");

// Select all elements by tag (p)
var elements = document.getElementsByTagName("p");
var elements = $("p");
As with CSS, you can combine selectors to make them more specific:
// Select the children of 'bar' with a class of 'foo'
var foo = $(".bar .foo");
You can even select by an elements attribute:
var username = $("input[name='username']");Or, you can select the first matched element:
var example = $(".wem:first");Whenever we call a function on the selector, all elements selected are affected:
// Add a class to all elements with class 'foo'
$(".foo").addClass("bar");
As I mentioned, all of jQuery’s functions are namespaced, so if you call a function directly on a DOM element, it will fail:
// This will fail!
var element = document.getElementById("wem");
element.addClass("bar");
Instead, if you want to use jQuery’s API, you’ll have to wrap up the element into a jQuery instance:
var element = document.getElementById("wem");
$(element).addClass("bar");
DOM Traversal
Once you’ve selected some elements, jQuery gives you a number of ways of finding other elements relative to elements in the selector:
var wem = $("#wem");

// Find scoped children
wem.find(".test");

// Select the direct parent
wem.parent();

// Or get an array of parents, scoped by an optional selector
wem.parents(".optionalSelector");

// Select the direct descendants (of the first element)
wem.children();
Or, you can traverse elements inside the selector:
var wem = $("#wem");

// Returns the element at the specified index (0)
wem.eq( 0 );

// Returns the first element (equivalent to $.fn.eq(0))
wem.first();

// Reduce elements to those that match a selector (".foo")
wem.filter(".foo");

// Reduce elements to those that pass the test function
wem.filter(function(){
  // this, is the current element
  return $(this).hasClass(".foo");
});

// Reduce elements to those that have descendants that match a selector (".selected")
wem.has(".selected");
jQuery has some iterators, map()
and each(), that accept a
callback:
var wem = $("#wem");

// Pass each element selected into a function,
// constructing a new array based on the return values
wem.map(function(element, index){
  assertEqual(this, element);

  return this.id;
});

// Iterate a callback over selected elements, equivalent to a `for` loop.
wem.each(function(index, element){
  assertEqual(this, element);

  /* ... */
});
It’s also possible to add elements to a selector manually:
// Add all p elements to the selector
var wem = $("#wem");
wem.add( $("p") );
DOM Manipulation
jQuery isn’t all about selectors, though; it has a powerful API for manipulating and interfacing with the DOM. In addition to selectors, jQuery’s constructor takes HTML tags, which you can use to generate new elements:
var element = $("<p>");
element.addClass("bar")
element.text("Some content");
Appending the new element to the DOM is easy—just use jQuery’s
append() or prepend()
functions. For performance reasons, you ideally want to do any
manipulation on generated elements before you attach them to the
DOM:
// Append an element
var newDiv = $("<div />");
$("body").append(newDiv);

// Add an element as the first child
$(".container").prepend($("<hr />"));
Or, you can insert an element before/after another:
// Insert an element after another
$(".container").after( $("<p />") );

// Insert an element before another
$(".container").before( $("<p />") );
Removing elements is also simple:
// Removing elements
$("wem").remove();
What about changing an element’s attributes? jQuery has support for
that, too. For example, you can add class names using the addClass() function:
$("#foo").addClass("bar");

// Remove a class
$("#foo").removeClass("bar");

// Does an element have this class?
var hasBar = $("#foo").hasClass("bar");
Setting and fetching CSS styles is simple enough, too. The css() function acts as both a getter and setter, depending on the type of
arguments passed to it:
var getColor = $(".foo").css("color");

// Set the color style
$(".foo").css("color", "#000");

// Or, pass a hash to set multiple styles
$(".foo").css({color: "#000", backgroundColor: "#FFF"});
jQuery has a number of shortcuts for the most common style changes:
// Set display to none, hiding elements
$(".bar").hide();

// Set display to block, showing elements
$(".bar").show();
Or, if you want the opacity to change slowly:
$(".foo").fadeOut();
$(".foo").fadeIn();
jQuery’s getter and setter functions aren’t limited to CSS. For example, you can set the contents
of elements using the html()
function:
// Retrieving the HTML of the first element in the selector
var getHTML = $("#bar").html();

// Setting the HTML of selected elements
$("#bar").html("<p>Hi</p>");
The same goes for the text()
function, although the arguments are escaped:
var getText = $("#bar").text();

$("#bar").text("Plain text contents");
And, finally, to remove all of an element’s children, use the
empty() function:
$("#bar").empty();Events
Event handling in browsers has had a turbulent history, which has resulted in inconsistent APIs. jQuery resolves that problem for you, ironing out all the differences among browsers and providing a great API. Here’s a brief overview of jQuery’s event handling, but for more information, see Chapter 2, as well as the official docs.
To add an event handler, use the bind() function, passing the event type and callback:
$(".clicky").bind("click", function(event){
  // Executed on click
});
jQuery provides shortcuts for the more common events, so rather than calling bind, you can do something like this:
$(".clicky").click(function(){ /* ... */ });One event you’re very likely to use is
document.ready. This is fired during the page load, when the DOM is ready
but before elements such as images are loaded. jQuery provides a neat
shortcut for the event—just pass a function straight to the jQuery object:
jQuery(function($){
  // Executed on document.ready
});
What often confuses jQuery newcomers is the context change inside
callbacks. For instance, in the example above, the context of the callback
is changed to reference the element, in this case $(".clicky"):
$(".clicky").click(function(){
  // 'this' equals the event target
  assert( $(this).hasClass(".clicky") );
});
The context change becomes a problem if you’re using this in the callback. A common idiom is to store
the context in a local variable, often called self:
var self = this;
$(".clicky").click(function(){
  self.clickedClick();
});
An alternative is to wrap the callback in a proxy function using
jQuery.proxy(), like so:
$(".clicky").click($.proxy(function(){
  // Context isn't changed
}, this));
For a further explanation of event delegation and context, see Chapter 2.
Ajax
Ajax, or XMLHttpRequest,
is another feature that has wildly different implementations across
browsers. Again, jQuery abstracts them, ironing out any differences,
giving you a nice
API. We covered jQuery’s Ajax API in greater detail in Chapter 3, but here’s a brief overview.
jQuery has one low-level function, ajax(), and several higher-level abstractions of it. The ajax() function takes a hash of options, such as
the endpoint url, the type of request, and success callbacks:
$.ajax({
  url: "http://example.com",
  type: "GET",
  success: function(){ /* ... */ }
});
However, jQuery’s shortcuts make the API even more succinct:
$.get("http://example.com", function(){ /* on success */ })
$.post("http://example.com", {some: "data"});
jQuery’s dataType option
tells jQuery how to deal with Ajax responses. If you don’t
provide it, jQuery will make an intelligent guess based on the response’s
header data type. If you know what the response is, it’s better to set it
explicitly:
// Request JSON
$.ajax({
  url: "http://example.com/endpoint.json",
  type: "GET",
  dataType: "json",
  success: function(json){ /* ... */ }
});
jQuery also provides shortcuts for common datatypes, like getJSON(), which is equivalent to the ajax() function above:
$.getJSON("http://example.com/endpoint.json", function(json){ /* .. */ });For a more in-depth analysis of the options in jQuery’s Ajax API, check out Chapter 3, as well as the official documentation.
Being a Good Citizen
jQuery prides itself on being a good web citizen; as such,
it is completely namespaced and doesn’t pollute global scope. However, the
object jQuery is aliased to the
$, which is often used by other
libraries, such as Prototype. Therefore, to stop
the libraries from conflicting, you need to use jQuery’s noConflict mode to change the alias and free up
$:
var $J = jQuery.noConflict();

assertEqual( $, undefined );
When you’re writing jQuery extensions, you need to assume that jQuery’s no conflict mode has been
switched on and that $ doesn’t
reference jQuery. In practice, though, $ is a useful shortcut, so just make sure it’s a
local variable:
(function($){

  // $ is a local variable
  $(".foo").addClass("wem");

})(jQuery);
To simplify things, jQuery will also pass a reference to itself with the document.ready event:
jQuery(function($){
  // Runs when the page loads
  assertEqual( $, jQuery );
});
Extensions
Extending jQuery couldn’t be easier. If you want to add
class functions, just create the function straight on the jQuery object:
jQuery.myExt = function(arg1){ /*...*/ };

// Then, to use
$.myExt("anyArgs");
If you want to add instance functions that will be available on the
element selector, just set the function on the jQuery.fn object, which is an alias for jQuery.prototype. It’s good practice to return the context (i.e., this) at the end of the extension, which enables
chaining:
jQuery.fn.wemExt = function(arg1){
  $(this).html("Bar");
  return this;
};

$("#element").wemExt(1).addClass("foo");
It’s also good practice to encapsulate your extension in the module pattern,which prevents any scope leaks and variable conflicts. Wrap your extension in an anonymous function, keeping all the variables local:
(function($){
  // Local context in here
  var replaceLinks = function(){
    var re = /((http|https|ftp):\/\/[\w?=&.\/-;#~%-]+(?![\w\s?&.\/;#~%"=-]*>))/g;
    $(this).html(
     $(this).html().replace(re, '<a target="_blank" href="$1">$1</a> ')
    );
  };

  $.fn.autolink = function() {
    return this.each(replaceLinks);
  };
})(jQuery);
Creating a Growl jQuery Plug-in
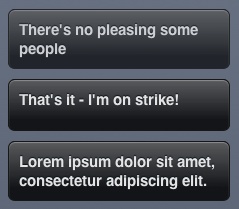
Let’s put our knowledge of jQuery into practice and create a Growl library. For those of you unfamiliar with Growl, it’s a notification library for Mac OS X that applications can use to show messages unobtrusively on the desktop. We’re going to emulate the OS X library somewhat and display messages from JavaScript in the page, as demonstrated in Figure A-1.
The first step is to create a #container div from which all our message
elements will descend. As you can see, we’re including both jQuery and
jQuery UI libraries—we’ll use the latter later to add a few effects. When
the page loads, we’ll append the container div:
//= require <jquery>
//= require <jquery.ui>

(function($){
  var container = $("<div />");
  container.attr({id: "growl"});

  $(function(){
    // On page load, append the div
    $("body").append(container);
  });

  /* ... */
})(jQuery);
Now for the plug-in’s logic. Whenever we have a new message, we
append a div to the container element.
We’re adding a drop effect to the
message and then, after a period of time, fading and removing it—just like
Growl’s behavior on OS X:
$.growl = function(body){
  // Create the Growl div
  var msg = $("<div />").addClass("msg");
  msg.html(body);

  // Append it to the list
  container.append(msg);

  // Add a drop effect, and then remove
  msg.show("drop", {
    direction: "down",
    distance: 50
  }, 300).
    delay(2000).
    fadeOut(300, function(){
      $(this).remove();
    });

  return msg;
};
That’s all the JavaScript required. It’s looking rather ugly at the
moment, so we can spice it up with a bit of CSS3. We want the #container div to be positioned absolutely, at
the bottom right of the page:
#growl {
  position: absolute;
  bottom: 10px;
  right: 20px;
  overflow: hidden;
}
Now let’s style the message elements. I quite like the HUD Growl
theme, so let’s try to emulate that. We’ll make the background slightly
transparent using rgba and then add an
inset box-shadow, giving the element
the appearance of a light source:
#growl .msg {
  width: 200px;
  min-height: 30px;
  padding: 10px;
  margin-bottom: 10px;

  border: 1px solid #171717;
  color: #E4E4E4;
  text-shadow: 0 -1px 1px #0A131A;
  font-weight: bold;
  font-size: 15px;

  background: #141517;
  background: -webkit-gradient(
    linear, left top, left bottom,
    from(rgba(255, 255, 255, 0.3)),
    color-stop(0.8, rgba(255, 255, 255, 0))),
    rgba(0, 0, 0, 0.8);

  -webkit-box-shadow: inset 0 1px 1px #8E8E8E;
  -moz-box-shadow: inset 0 1px 1px #8E8E8E;
  box-shadow: inset 0 1px 1px #8E8E8E;

  -webkit-border-radius: 7px;
  -moz-border-radius: 7px;
  border-radius: 7px;
}
That’s all there is to it. You see how trivially easy it is to create jQuery plug-ins. As with the other examples, you can see the full source in assets/appA/growl.html.