Table of Contents for
JavaScript Web Applications
 JavaScript Web Applications
Published by
O'Reilly Media, Inc., 2011
JavaScript Web Applications
Published by
O'Reilly Media, Inc., 2011
- Cover
- JavaScript Web Applications
- JavaScript Web Applications
- Preface
- 1. MVC and Classes
- 2. Events and Observing
- 3. Models and Data
- 4. Controllers and State
- 5. Views and Templating
- 6. Dependency Management
- 7. Working with Files
- 8. The Real-Time Web
- 9. Testing and Debugging
- 10. Deploying
- 11. The Spine Library
- 12. The Backbone Library
- 13. EmberJS
- A. jQuery Primer
- B. CSS Extensions
- C. CSS3 Reference
- Index
- About the Author
- Colophon
- Copyright
Chapter 7. Working with Files
Traditionally, file access and manipulation was within the realm of desktop apps, with the Web limited to functionality provided by plug-in technologies like Adobe Flash. However, all of that is changing with HTML5, which gives developers a lot more scope for dealing with files, further blurring the boundaries between desktop and the Web. With modern browsers, users can drag and drop files onto the page, paste structured data, and see real-time progress bars as files upload in the background.
Browser Support
Support for the new HTML5 file APIs is not universal, but certainly enough browsers have implementations that it’s worth your while to integrate them.
Firefox >= 3.6
Safari >= 6.0
Chrome >= 7.0
IE: no support
Opera >= 11.1
As there’s no IE support yet, you’ll have to use progressive enhancement. Give users the option of a traditional file input for uploading, as well as allowing the more advanced drag/dropping of files. Detecting support is simple—just check whether the relevant objects are present:
if (window.File && window.FileReader && window.FileList) {
  // API supported
}
Getting Information About Files
The main security consideration behind HTML5’s file handling is that only files selected by the user can be accessed. This can be done by dragging the file onto the browser, selecting it in a file input, or pasting it into a web application. Although there has been some work to expose a filesystem to JavaScript, access has always been sandboxed. Obviously, it would be a tremendous security flaw if JavaScript could read and write arbitrary files on your system.
Files are represented in HTML5 by File objects, which have three
attributes:
-
name The file’s name as a read-only string
-
size The file’s size as a read-only integer
-
type The file’s MIME type as a read-only string, or an empty string (“”) if the type couldn’t be determined
For security reasons, a file’s path information is never exposed.
Multiple files are exposed as FileList objects, which you can essentially
treat as an array of File
objects.
File Inputs
File inputs, which have been around since the dawn of the
Web, are the traditional way of letting users upload files. HTML5 improves
on them, reducing some of their drawbacks. One of the long-standing
bugbears for developers was allowing multiple file uploads. In the past,
developers had to resort to a mass of file inputs or rely on a plug-in
like Adobe Flash. HTML5 addresses this with the multiple attribute. By specifying multiple
on a file input, you’re indicating to the browser that users should be
allowed to select multiple files. Older browsers that don’t support HTML5
will simply ignore the attribute:
<input type="file" multiple>
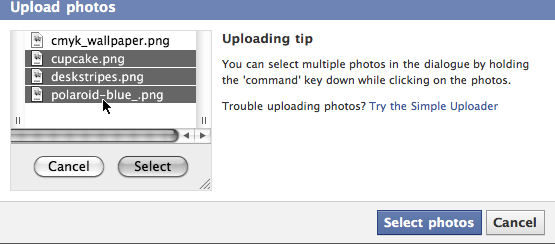
The UI isn’t perfect, though; to select multiple files, users need to hold down the Shift key. You may want to show users a message to this effect. For example, Facebook found that 85% of users who uploaded a photo would upload only one photo. By adding a tip that explains how to select multiple photos to the uploading process, as shown in Figure 7-1, the metrics dropped from 85% to 40%.
Another problem for developers was not having any information about
which files had been selected. Often, it’s useful to validate the selected
files, making sure they’re a certain type or not above a certain size.
HTML5 makes this possible now by giving you access to the input’s selected
files, using the files
attribute.
The read-only files attribute
returns a FileList, which you can
iterate through, performing your validation, and then informing the user
of the result:
var input = $("input[type=file]");

input.change(function(){
  var files = this.files;

  for (var i=0; i < files.length; i++)
    assert( files[i].type.match(/image.*/) )
});
Having access to the selected files doesn’t limit you to validation, though. For example, you could read the file’s contents, displaying an upload preview. Or, rather than having the UI block as the files are uploaded, you could upload them in the background using Ajax, displaying a live progress bar. All this and more is covered in the subsequent sections.
Drag and Drop
Drag and drop support was originally “designed” and implemented by Microsoft back in 1999 for Internet Explorer 5.0, and IE has supported it ever since. The HTML5 specification has just documented what was already there, and now Safari, Firefox, and Chrome have added support, emulating Microsoft’s implementation. However, to put it kindly, the specification is rather a mess, and it requires a fair bit of hoop-jumping to satisfy its often pointless requirements.
There are no less than seven events associated with drag and drop: dragstart, drag, dragover, dragenter, dragleave, drop, and dragend. I’ll elaborate on each in the sections below.
Even if your browser doesn’t support the HTML5 file APIs, it’s likely that you can still use the drag and drop APIs. Currently, the browser requirements are:
Firefox >= 3.5
Safari >= 3.2
Chrome >= 7.0
IE >= 6.0
Opera: no support
Dragging
Dragging is fairly straightforward. To make an element draggable,
set its draggable attribute to true.
<div id="dragme" draggable="true">Drag me!</div>
Now we have to associate that draggable element with some data. We
can do this by listening to the dragstart event
and calling the event’s setData() function:
var element = $("#dragme");

element.bind("dragstart", function(event){
  // We don't want to use jQuery's abstraction
  event = event.originalEvent;

  event.dataTransfer.effectAllowed = "move";
  event.dataTransfer.setData("text/plain", $(this).text());
  event.dataTransfer.setData("text/html", $(this).html());
  event.dataTransfer.setDragImage("/images/drag.png", -10, -10);
});
jQuery provides an abstraction of the event, which doesn’t contain
the dataTransfer object we need.
Conveniently, the abstracted event has an originalEvent attribute, which we can use to access the drag/drop APIs.
As demonstrated above, the event has a dataTransfer object, which has the various drag and drop functions we need.
The setData() function takes a
mimetype and string data. In this case, we’re setting some text and text/html data on the
drag event. When the element is dropped, and a
drop event is triggered, we can read this data.
Likewise, if the element is dragged outside the browser, other
applications can handle the dropped data according to which file types
they support.
When dragging text, use the text/plain type. It’s recommended to always
set this as a fallback for applications or drop targets that don’t
support any of the other formats. Dragged links should have two formats:
text/plain and text/uri-list. To drag multiple links, join
each link with a new line:
// Dragging links
event.dataTransfer.setData("text/uri-list", "http://example.com");
event.dataTransfer.setData("text/plain", "http://example.com");

// Multiple links are separated by a new line
event.dataTransfer.setData("text/uri-list", "http://example.com\nhttp://google.com");
event.dataTransfer.setData("text/plain", "http://example.com\nhttp://google.com");
The optional setDragImage()
function controls what is displayed under the cursor during drag operations. It takes an image
source and x/y coordinates, the position of the image relative to the
cursor. If it’s not supplied, you just get a ghostly clone of the
dragged element. An alternative to setDragImage() is addElement(element, x, y), which uses the
given element to update the drag feedback. In other words, you can
provide a custom element to be displayed during drag operations.
You can also allow users to drag files out of the browser by
setting the DownloadURL
type. You can specify a URL to the file’s location, which the
browser will subsequently download. Gmail uses this to great effect by
allowing users to drag and drop email attachments straight out of the
browser onto the desktop.
The bad news is that this is currently only supported by Chrome,
and it is rather undocumented. It can’t hurt to use it, though, and
hopefully other browsers will add support in the future. The DownloadURL format’s value is a colon
(:)-separated list of file
information: the mime, name, and location.
$("#preview").bind("dragstart", function(e){
  e.originalEvent.dataTransfer.setData("DownloadURL", [
    "application/octet-stream",    // MIME type
    "File.exe",                    // File name
    "http://example.com/file.png"  // File location
  ].join(":"));
});
You can see the full example of HTML5’s drag/drop API in this book’s accompanying assets, in assets/ch07/drag.html.
Dropping
The drag/drop API lets you listen to drop events, which can respond to dropped files and other elements. This is where we start to see some of the drag/drop API craziness; for the drop event to fire at all, you have to cancel the defaults of both the dragover and the dragenter events! For example, here’s how to cancel the two events:
var element = $("#dropzone");

element.bind("dragenter", function(e){
  // Cancel event
  e.stopPropagation();
  e.preventDefault();
});

element.bind("dragover", function(e){
  // Set the cursor
  e.originalEvent.dataTransfer.dropEffect = "copy";

  // Cancel event
  e.stopPropagation();
  e.preventDefault();
});
You can also set a dropEffect—i.e., the cursor appearance—in the
dragover event, as demonstrated above. By listening
to the dragenter and dragleave
events and toggling classes for the targeted element, you can give a
visual indication to users that a certain area accepts dropped
files.
Only once we’ve canceled dragenter and
dragover’s events can we start listening to
drop events. The drop event
will trigger when a dragged element or file is dropped over the target
element. The drop event’s dataTransfer object has a files attribute, which returns a FileList of all dropped files:
element.bind("drop", function(event){
  // Cancel redirection
  event.stopPropagation();
  event.preventDefault();

  event = event.originalEvent;

  // Access dragged files
  var files = event.dataTransfer.files;

  for (var i=0; i < files.length; i++)
    alert("Dropped " + files[i].name);
});
You can access data other than files using the dataTransfer.getData() function, passing the format you support. If that format isn’t
available, the function will just return undefined.
var text = event.dataTransfer.getData("Text");The dataTransfer object
has a read-only types
attribute, which returns a DOMStringList (essentially an array) of the
mime formats that were set on the dragstart event.
Additionally, if any files are being dragged, one of the types will be
the string "Files".
var dt = event.dataTransfer
for (var i=0; i < dt.types.length; i++)
  console.log( dt.types[i], dt.getData(dt.types[i]) );
See the full drop example in assets/ch07/drop.html.
Cancel Default Drag/Drop
By default, dragging a file onto a web page makes the browser
navigate to that file. We want to prevent that behavior because we don’t
want users navigating away from our web application if they miss the
drop area. This is easily accomplished—just cancel the body’s dragover
event.
$("body").bind("dragover", function(e){
  e.stopPropagation();
  e.preventDefault();
  return false;
});
Copy and Paste
In addition to drag-and-drop desktop integration, some browsers have support for copying and pasting. The API hasn’t been standardized, and it isn’t part of the HTML5 spec, so you’ll need to determine how to cater to the various browsers.
Again, funnily enough, IE is the pioneer here, with support dating
back to IE 5.0. WebKit has taken Microsoft’s API and improved it somewhat, bringing
it inline with the drag-and-drop API. Both are virtually identical, except
for the different objects: clipboardData rather than dataTransfer.
Firefox has no support yet, and although it has a proprietary API for accessing the clipboard, it’s unwieldy to say the least. WebKit (Safari/Chrome) has good support, and I imagine the W3C will eventually standardize its take on clipboard APIs. Browser support is as follows:
Safari >= 6.0
Chrome (only pasting)
Firefox: no support
IE >= 5.0 (different API)
Copying
There are two events associated with copying, and two events with cutting:
beforecopy
copy
beforecut
cut
As the name suggests, beforecopy and beforecut are triggered before any clipboard operations, allowing
you to cancel them if necessary. When the user copies some selected
text, the copy event fires, giving you a clipboardData object that can be used to set custom clipboard data. Like the
dataTransfer object, clipboardData has a setData() function, which takes a mime format
and string value. If you’re planning on calling this function, you should cancel the
original copy event, preventing the default
action.
Rather than on the event, IE sets the clipboardData object on window. You’ll need to check to see whether
the object is present on the event, and if not, whether it’s present on
the window.
Firefox will actually fire the copy event,
but it won’t give you access to the clipboardData object. Chrome will give you the
object, but it will ignore any data you set on it.
$("textarea").bind("copy", function(event){
  event.stopPropagation();
  event.preventDefault();

  var cd = event.originalEvent.clipboardData;

  // For IE
  if ( !cd ) cd = window.clipboardData;

  // For Firefox
  if ( !cd ) return;

  cd.setData("text/plain", $(this).text());
});
At the rate browsers are innovating, it’s quite likely support will be standardized soon. If you want to add copy/paste support to your application, you should take a look at the current situation yourself.
Pasting
There are two events associated with pasting, beforepaste and paste. The paste event is triggered when the user initiates a paste, but before any data has been pasted. Again, different browsers have different implementations. Chrome triggers the event, even if no element has focus. Both IE and Safari require an actively focused element.
The API is very similar to the drop event
API. The event has a clipboardData
property, which gives you access to the pasted data using the
getData() function, passing in a mime format. Unfortunately, from my tests,
the types property is always null, so you can’t see which mime types are
available on the clipboard data. Unless you cancel the event, the paste
process will carry on as normal, and the data will be pasted into the
focused element:
$("textarea").bind("paste", function(event){
  event.stopPropagation();
  event.preventDefault();

  event = event.originalEvent;

  var cd = event.clipboardData;

  // For IE
  if ( !cd ) cd = window.clipboardData;

  // For Firefox
  if ( !cd ) return;

  $("#result").text(cd.getData("text/plain"));

  // Safari event support file pasting
  var files = cd.files;
});
The nightly versions of
WebKit give you access to a files property on clipboardData, allowing you to support file
pasting into your application. I expect other browsers will follow suit
once the specification is standardized.
So, is there any possibility of getting this to work cross-browser? Well, yes, there are actually a few workarounds. Cappuccino, for example, bypasses the oncopy family of events completely, and simply captures key inputs. When the key combination Command/Ctrl + v is detected, it then focuses a hidden input field, which gets filled with the pasted data. This works in every browser, but obviously for pastes initiated by the keyboard only—not the menu.
Reading Files
Once you’ve obtained a File reference, you can instantiate a FileReader object to read its contents into memory. Files are read
asynchronously—you provide a callback to the FileReader instance, which will be invoked when
the file is ready.
FileReader gives you four
functions to read file data. Which you use depends on which data format
you want returned.
-
readAsBinaryString(Blob|File) Returns the file/blob’s data as a binary string. Every byte is represented by an integer in the range 0 to 255.
-
readAsDataURL(Blob|File) Returns the file/blob’s data encoded as a data URL. For example, this can be used as the
srcattribute value for an image.-
readAsText(Blob|File,
        encoding='UTF-8')
Returns the file/blob’s data as a text string. By default, the string is decoded as UTF-8.
-
readAsArrayBuffer(Blob|File) Returns the file/blob’s data as an
ArrayBufferobject. This is unimplemented in most browsers.
FileReader instances have a
number of events that are triggered when one of the above read functions
is called. The main ones with which you need to be concerned are:
- onerror
Called when an error occurs
- onprogress
Called periodically while the data is being read
- onload
Called when the data is available
To use FileReader, just
instantiate an instance, add the events, and use one of the read
functions. The onload event contains a result attribute, specifying read data in the
appropriate format:
var reader = new FileReader();
reader.onload = function(e) {
  var data = e.target.result;
};
reader.readAsDataURL(file);
For example, we can use the data
variable above as an image source, displaying a thumbnail of the specified
file:
var preview = $("img#preview")

// Check to see whether file is an image type, and isn't
// so big a preview that it would cause the browser problems
if (file.type.match(/image.*/) &&
      file.size < 50000000) {

  var reader = new FileReader();
  reader.onload = function(e) {
    var data    = e.target.result;
    preview.attr("src", data);
  };
  reader.readAsDataURL(file);
}
Blobs and Slices
Sometimes it’s preferable to read a slice of the file into
memory, rather than the entire thing. The HTML5 file APIs conveniently
support a slice() function. This takes a starting byte as the first argument, and a
byte offset (or slice length) as its second. It returns a Blob object, which we can interchange with
methods that support the File object,
such as FileReader. For example, we
could buffer the file reading like this:
var bufferSize = 1024;
var pos = 0;

var onload = function(e){
  console.log("Read: ", e.target.result);
};

var onerror = function(e){
  console.log("Error!", e);
};

while (pos < file.size) {
  var blob = file.slice(pos, bufferSize);

  var reader = new FileReader();
  reader.onload  = onload;
  reader.onerror = onerror;
  reader.readAsText(blob);

  pos += bufferSize;
}
As you can see above, you can use a FileReader instance only once; after that,
you’ll need to instantiate a new one.
You can check out the full example in assets/ch07/slices.html. One thing to watch out for is that the file can’t be read if the sandbox is local. In other words, if slices.html is being read from the disk, rather than hosted, the read will fail and the onerror event will be triggered.
Custom Browse Buttons
Opening a file-browsing dialog programmatically is a common use case. In other words, a styled Browse or Attachment button immediately brings up a browse dialog when clicked, without the user having to interact with a traditional file input. However, for security reasons, this is trickier than it sounds. File inputs have no browse function, and, with the exception of Firefox, you can’t just trigger a custom click event on a file input.
The current solution may sound like a hack, but it works rather well. When a user mouses over a browse button, overlay a transparent file input that has the same position and dimensions as the button. The transparent file input will catch any click events, opening a browse dialog.
Inside this book’s assets/ch07 folder, you’ll
find jquery.browse.js, a jQuery plug-in that does just that. To create a custom
browse button, just call the browseElement() function on a jQuery instance.
The function will return a file input that you can add a
change event listener to, detecting when the user has
selected some files.
var input = $("#attach").browseElement();

input.change(function(){
  var files = $(this).attr("files");
});
It’s got full cross-browser support, and it couldn’t be easier!
Uploading Files
Part of the XMLHttpRequest Level 2 specification was the ability to upload files. File uploads have long been a painful experience for users. Once they’ve browsed and selected a file, the page reloads and they have to wait for ages while it uploads, with no indication of progress or feedback—quite the usability nightmare. Luckily for us, XHR 2 solves this problem. It allows us to upload files in the background, and it even gives us progress events so that we can provide the user with a real-time progress bar. It’s generally well supported by the major browsers:
Safari >= 5.0
Firefox >= 4.0
Chrome >= 7.0
IE: no support
Opera: no support
File uploads can be done via the existing XMLHttpRequest
API, using the send()
function, or alternatively by using a FormData instance. A FormData instance just
represents the contents of a form in an easy-to-manipulate interface. You
can build a FormData object from
scratch, or by passing in an existing form element when instantiating the
object:
var formData = new FormData($("form")[0]);

// You can add form data as strings
formData.append("stringKey", "stringData");

// And even add File objects
formData.append("fileKey", file);
Once you’ve finished with the
FormData, you can POST it to your server using
XMLHttpRequest. If you’re using jQuery
for Ajax requests, you’ll need to set the processData option to false so that jQuery
doesn’t try to serialize the supplied data. Don’t set the Content-Type header because the browser will set
it automatically to multipart/form-data, along with a multipart
boundary:
jQuery.ajax({
  data: formData,
  processData: false,
  url: "http://example.com",
  type: "POST"
})
The alternative to using FormData
is to pass the file directly to the XHR object’s send() function:
var req = new XMLHttpRequest();
req.open("POST", "http://example.com", true);
req.send(file);
Or, with jQuery’s Ajax API, you can upload files like this:
$.ajax({
  url: "http://example.com",
  type: "POST",
  success: function(){ /* ... */ },
  processData: false,
  data: file
});
It’s worth noting that this upload is a bit different from the
traditional multipart/form-data one.
Usually, information about the file, such as the name, would be included
in the upload. Not so in this case—the upload is pure file data. To pass
information about the file, we can set custom headers, such as X-File-Name. Our servers can read these headers
and process the file properly:
$.ajax({
  url: "http://example.com",
  type: "POST",
  success: function(){ /* ... */ },
  processData: false,
  contentType: "multipart/form-data",

  beforeSend: function(xhr, settings){
    xhr.setRequestHeader("Cache-Control", "no-cache");
    xhr.setRequestHeader("X-File-Name", file.fileName);
    xhr.setRequestHeader("X-File-Size", file.fileSize);
  },

  data: file
});
Unfortunately, many servers will have trouble receiving the upload
because pure data is a more unfamiliar format than multipart or
URL-encoded form parameters. Using this method, you may have to parse the
request manually. For this reason, I advocate using FormData objects, and sending the upload
serialized as a multipart/form-data
request. In the assets/ch07 folder, you’ll find
jquery.upload.js, a jQuery plug-in that abstracts file uploading into a
simple $.upload(url, file)
interface.
Ajax Progress
The XHR Level 2 specification adds support for progress events, both for download and upload requests. This allows for a real-time file upload progress bar, giving users an estimated duration before the upload is complete.
To listen to the progress event on the download request, add it directly on the XHR instance:
var req = new XMLHttpRequest();

req.addEventListener("progress", updateProgress, false);
req.addEventListener("load", transferComplete, false);
req.open();
For the upload progress event, add it to the upload attribute of the XHR instance:
var req = new XMLHttpRequest();

req.upload.addEventListener("progress", updateProgress, false);
req.upload.addEventListener("load", transferComplete, false);
req.open();
The load event will fire once the upload request has completed, but
before the server has issued a response. We can add it to jQuery because
the XHR object and settings are passed to the
beforeSend callback. The full example, including
custom headers, looks like this:
$.ajax({
  url: "http://example.com",
  type: "POST",
  success: function(){ /* ... */ },
  processData: false,
  dataType: "multipart/form-data",

  beforeSend: function(xhr, settings){
    var upload = xhr.upload;

    if (settings.progress)
      upload.addEventListener("progress", settings.progress, false);

    if (settings.load)
      upload.addEventListener("load", settings.load, false);

    var fd = new FormData;

    for (var key in settings.data)
      fd.append(key, settings.data[key]);

    settings.data = fd;
  },

  data: file
});
The progress event contains the position
of the upload (that is, how many bytes have uploaded) and the total (the size of the upload request in
bytes). You can use these two properties to calculate a progress
percentage:
var progress = function(event){
  var percentage = Math.round((event.position / event.total) * 100);
  // Set progress bar
}
In fact, the event has a timestamp, so if you record the time you started the upload, you can create a rudimentary estimated time of completion (ETA):
var startStamp = new Date();
var progress = function(e){
  var lapsed = startStamp - e.timeStamp;
  var eta    = lapsed * e.total / e.position - lapsed;
};
However, this estimation is unlikely to be accurate with smaller (and therefore quicker) uploads. In my opinion, it’s only worth showing an ETA if the upload will take longer than four minutes or so. A percentage bar is usually sufficient, as it gives users a clear and visual indication of how much longer an upload will take.
jQuery Drag and Drop Uploader
So, let’s put all that knowledge into practice by building a
drag-and-drop file uploader. We’re going to need several libraries:
jquery.js for the backbone,
jquery.ui.js for the progress bar,
jquery.drop.js to abstract the drag-and-drop APIs,
and jquery.upload.js for the Ajax upload. All our
logic will go inside jQuery.ready(), so
it will be run when the DOM is ready:
//= require <jquery>
//= require <jquery.ui>
//= require <jquery.drop>
//= require <jquery.upload>

jQuery.ready(function($){
  /* ... */
});
Creating a Drop Area
We want users to be able to drag and drop files onto the
#drop element, so let’s turn it into
a drop area. We need to bind to the drop
event, canceling it and retrieving any dropped files, which are
then passed to the uploadFile()
function:
var view = $("#drop");
view.dropArea();

view.bind("drop", function(e){
  e.stopPropagation();
  e.preventDefault();

  var files = e.originalEvent.dataTransfer.files;
  for ( var i = 0; i < files.length; i++)
    uploadFile(files[i]);

  return false;
});
Uploading the File
And now for the uploadFile()
function—where the magic happens. We’re going use the $.upload() function in jquery.upload.js to
send an Ajax upload request to the server. We’ll listen to progress
events on the request and update a jQuery UI progress bar. Once the
upload is complete, we’ll notify the user and remove the element:
var uploadFile = function(file){
  var element = $("<div />");
  element.text(file.fileName);

  var bar = $("<div />");
  element.append(bar);
  $("#progress").append(element);

  var onProgress = function(e){
    var per = Math.round((e.position / e.total) * 100);
    bar.progressbar({value: per});
  };

  var onSuccess = function(){
    element.text("Complete");
    element.delay(1000).fade();
  };

  $.upload("/uploads", file, {upload: {progress: onProgress}, success: onSuccess});
};
That’s pretty straightforward! To see the full example, check out assets/ch07/dragdropupload.html.