Table of Contents for
JavaScript Web Applications
 JavaScript Web Applications
Published by
O'Reilly Media, Inc., 2011
JavaScript Web Applications
Published by
O'Reilly Media, Inc., 2011
- Cover
- JavaScript Web Applications
- JavaScript Web Applications
- Preface
- 1. MVC and Classes
- 2. Events and Observing
- 3. Models and Data
- 4. Controllers and State
- 5. Views and Templating
- 6. Dependency Management
- 7. Working with Files
- 8. The Real-Time Web
- 9. Testing and Debugging
- 10. Deploying
- 11. The Spine Library
- 12. The Backbone Library
- 13. EmberJS
- A. jQuery Primer
- B. CSS Extensions
- C. CSS3 Reference
- Index
- About the Author
- Colophon
- Copyright
Chapter 11. The Spine Library
Spine is a lightweight library for JavaScript application development that uses many of the concepts we’ve covered in this book, such as MVC, events, and classes. When I say lightweight, I mean lightweight—the library comes in at around 500 lines of JavaScript, which is about 2K minified and compressed. Don’t get the wrong impression, though; Spine will let you build fully featured JavaScript applications while ensuring your code remains clean and decoupled.
I created Spine while writing this book because I couldn’t find a client-side MVC framework that quite suited my needs. The library attempts to enshrine many of the best practices proposed in this book, and indeed the book’s example application, Holla, is built using Spine.
Unlike widget-based libraries such as Cappuccino and SproutCore, Spine doesn’t make any decisions about how you display data to users. The emphasis is on flexibility and simplicity. Spine gives you the bare bones and gets out of your way so you get on with the fun stuff—developing awesome applications.
Spine includes a class library with inheritance support, Spine.Class; an events module, Spine.Events; an ORM, Spine.Model; and a controller class, Spine.Controller. Anything else you’ll need, like
templating support or a DOM library, is up to you, so use what you’re most
familiar with. Having said that, Spine includes specific support for jQuery
and Zepto.js libraries, which complement it excellently.
Spine’s weakness at the moment is its lack of documentation. But since it’s still the early days of this library, the documentation situation is sure to improve. For now, this chapter should give you a pretty good introduction, and the sample applications will provide further explanation.
Setup
Simply download Spine from the project’s repository and include it in your page; Spine has no dependencies:
<script src="spine.js" type="text/javascript" charset="utf-8"></script>
Spine is completely namespaced behind the Spine variable, so it shouldn’t conflict with
any other variables. You can safely include libraries like jQuery, Zepto,
or Prototype without any complications.
Classes
Pretty much every object in Spine is encapsulated in a
class. However, Spine’s classes are constructed using Object.create() and pure prototypal inheritance, as covered in Chapter 3, which is different from how most class
abstractions are constructed.
To create a new class, call Spine.Class.create([instanceProperties,
classProperties]), passing an optional set of instance and class
properties:
var User = Spine.Class.create({
  name: "Caroline"
});
In the example above, instances of User now have a default name property. Behind
the scenes, create() is creating a new
object whose prototype is set to Spine.Class —i.e., it’s inheriting from it. If you want to create
subsequent subclasses, simply call create() on their parent class:
var Friend = User.create();
Friend is now a subclass of
User and will inherit all of its
properties:
assertEqual( Friend.prototype.name, "Caroline" );
Instantiation
You can instantiate classes using the new
keyword, for example:
var user = new User;
assertEqual( user.name,  "Caroline" );

user.name = "Trish";
assertEqual( user.name, "Trish" );
Any arguments passed to the construction
function will be sent to the instances initializer function,
init():
var User = Spine.Class.create({
  init: function(name){
    this.name = name;
  }
});

var user = new User("Martina");
assertEqual( user.name, "Martina" );
Extending Classes
As well as setting class and
instance properties during creation, you can use include () and extend(), passing in an object literal:
User.include({
  // Instance properties
});

User.extend({
  // Class properties
});
include() and extend() pave the way for modules, which are
reusable pieces of code that you can include multiple times:
var ORM = {
  extended: function(){
    // invoked when extended
    //   this === User
  },
  find:  function(){ /* ... */ },
  first: function(){ /* ... */ }
};

User.extend( ORM );
You can receive a callback when a module is included or extended. In the example
above, the extended function will be
invoked when User.extend() is called with a context of User. Likewise, if a module has an included property, it will be invoked when the
module is included inside a class.
Because we’re using prototypal-based inheritance, any properties we add onto classes will be reflected dynamically across subclasses at runtime:
var Friend = User.create();

User.include({
  email: "info@eribium.org"
});

assertEqual( (new Friend).email, "info@eribium.org" );
Properties in subclasses can be overridden without affecting the parent class. However, modifications to objects in subclasses, such as arrays, will be reflected across the whole inheritance tree. If you want an object to be specific to a class or instance, you’ll need to create it when the class or instance is first initialized.
Context
Context changes are rife within JavaScript programs, so
Spine.Class includes some utility
methods for controlling scope. To demonstrate the problem, take this
example:
var Controller = Spine.Class.create({
  init: function(){
    // Add event listener
    $("#destroy").click(this.destroy);
  },

  destroy: function(){
    // This destroy function is called with the wrong context,
    // so any references to `this` will cause problems
    // The following assertion will fail:
    assertEqual( this, Controller.fn );
  }
});
In the example above, when the event is invoked, the destroy() function will be called with the context of the element #destroy, rather than the Controller. To deal
with this, you can proxy the context, forcing it to be a particular one
you specify. Spine gives you the proxy() function to do that:
var Controller = Spine.Class.create({
  init: function(){
    $("#destroy").click(this.proxy(this.destroy));
  },

  destroy: function(){ }
});
Events
Events are key to Spine, and they are frequently used
internally. Spine’s event functionality is contained inside the module
Spine.Events, which can be included
wherever it’s needed. For example, let’s add some event support to a Spine
class:
var User = Spine.Class.create();
User.extend(Spine.Events);
Spine.Events gives you three
functions for handling events:
bind(eventName,
        callback)
trigger(eventName, [*data])unbind(eventName, [callback])
If you’ve used jQuery’s event API, this will look very familiar to
you. For example, let’s bind and trigger an event on our User class:
User.bind("create", function(){ /* ... */ });
User.trigger("create");
To bind multiple events with a single callback, just separate them with spaces:
User.bind("create update", function(){ /* ... */ });trigger() takes an event name and
passes optional arguments along to the event’s callbacks:
User.bind("countChange", function(count){
  // `count` is passed by trigger
  assertEqual(count, 5);
});

User.trigger("countChange", 5);
You will most commonly use Spine’s events with data binding, hooking up your application’s models with its views. We’ll cover that in detail later in the section Building a Contacts Manager.
Models
If you take a peek at Spine’s source code, you’ll see that the vast majority of it deals with models, and rightly so—models are the central part of any MVC application. Models deal with storing and manipulating your application’s data, and Spine simplifies this by providing a full ORM.
Rather than use the create()
function to make a new model, which is already reserved, use Spine.Model.setup(name, attrs), passing in the
model name and an array of attribute names:
// Create the Task model.
var Task = Spine.Model.setup("Task", ["name", "done"]);
Use include() and extend() to add instance and class properties:
Task.extend({
  // Return all done tasks.
  done: function(){ /* ... */ }
});

Task.include({
  // Default name
  name: "Empty...",
  done: false,

  toggle: function(){
    this.done = !this.done;
  }
});
When instantiating a record, you can pass an optional object containing the record’s initial properties:
var task = new Task({name: "Walk the dog"});
assertEqual( task.name, "Walk the dog" );
Setting and retrieving attributes is the same as setting and getting
properties on a normal object. In addition, the attributes() function returns an object literal
containing all the record’s attributes:
var task = new Task;
task.name = "Read the paper";
assertEqual( task.attributes(), {name: "Read the paper"} );
Saving new or existing records is as simple as calling the save() function. When saving a record, an ID will be generated if it doesn’t
already exist; then, the record will be persisted locally in
memory:
var task = new Task({name: "Finish book"});
task.save();

task.id //=> "44E1DB33-2455-4728-AEA2-ECBD724B5E7B"
Records can be retrieved using the model’s find() function, passing in the record’s ID:
var task = Task.find("44E1DB33-2455-4728-AEA2-ECBD724B5E7B");
assertEqual( task.name, "Finish book" );
If no record exists for the given ID, an exception will be raised.
You can check whether a record exists without fear of an exception using
the exists() function:
var taskExists = Task.exists("44E1DB33-2455-4728-AEA2-ECBD724B5E7B");
assert( taskExists );
You can remove a record from the local cache by using the destroy() function:
var task = Task.create({name: "Thanks for all the fish"});

assert( task.exists() );
task.destroy();
assertEqual( task.exists(), false );
Fetching Records
Retrieving records by ID is only one way of fetching them.
Typically, it’s useful to iterate through all the records or to return a
filtered subset. Spine lets you do this using all(), select(), and each():
// Return all tasks
Task.all(); //=> [Object]

// Return all tasks with a false done attribute
var pending = Task.select(function(task){ return !task.done });

// Invoke a callback for each task
Task.each(function(task){ /* ... */ });
In addition, Spine provides a few helpers for finding records by attribute:
// Finds first task with the specified attribute value
Task.findByAttribute(name, value);    //=> Object

// Finds all tasks with the specified attribute value
Task.findAllByAttribute(name, value); //=> [Object]
Model Events
You can bind to model events to get callbacks when records change:
Task.bind("save", function(record){
  console.log(record.name, "was saved!");
});
If a record is involved, it will be passed to the event callback. You can bind a listener to the model to receive global callbacks for every record, or you can bind a listener to a specific record:
Task.first().bind("save", function(){
  console.log(this.name, "was saved!")
});

Task.first().updateAttributes({name: "Tea with the Queen"});
Although you can obviously create custom events using trigger(), the following are available:
- save
Record was saved (either created/updated)
- update
Record was updated
- create
Record was created
- destroy
Record was destroyed
- change
Any of the above; record was created/updated/destroyed
- refresh
All records invalidated and replaced
- error
Validation failed
You’ll find that model events are crucial when creating your application, especially when it comes to binding models up to the view.
Validation
Validation is achieved in the simplest possible way, by
overriding the model instance’s validate() function. validate() is called whenever the record is
saved. If validate() returns
anything, the validation fails. Otherwise, the save continues
unhindered, persisting the record to local memory:
Task.include({
  validate: function(){
    if ( !this.name ) return "Name required";
  }
});
If validation fails, you should return a string from validate() with an explanation. Use this
message to notify the user of what went wrong and how to correct
it:
Task.bind("error", function(record, msg){
  // Very basic error notification
  alert("Task didn't save: " + msg);
});
The model’s error event will be invoked whenever validation fails. Callbacks will be passed the invalid record and error message.
Persistence
Spine’s records are always persisted in memory, but you have a choice of storage backends, such as HTML5’s Local Storage or Ajax.
Using Local Storage is trivial. Just include the
spine.model.local.js JavaScript file, and extend
your model with Spine.Model.Local:
// Save with local storage
Task.extend(Spine.Model.Local);
Task.fetch();
The records won’t be retrieved automatically from the browser’s
local storage, so you’ll need to call fetch() to populate your model with
preexisting data. This is typically done after everything else in your
application has been initialized. Once the model has been populated with
new data, the refresh event will be
triggered:
Task.bind("refresh", function(){
  // New tasks!
  renderTemplate(Task.all());
});
Using Ajax persistence is similar; just include the
spine.model.ajax.js script and extend your model
with Spine.Model.Ajax:
// Save to server
Task.extend(Spine.Model.Ajax);
By default, Spine detects the model name and uses some basic
pluralization to generate a URL. So, for the example above, the Task model’s URL would be /tasks. You can override this default behavior
by providing your own URL property on the class:
// Add a custom URL
Task.extend({
  url: "/tasks"
});

// Fetch new tasks from the server
Task.fetch();
As soon as Task.fetch() is called, Spine will make an Ajax GET request to
/tasks, expecting a JSON response
containing an array of tasks. If the server returns a successful
response, the records will be loaded and the
refresh event triggered.
Spine will send Ajax requests to the server whenever you create, update, or destroy a record, keeping the two in sync. The library expects your server to be structured in a RESTful way so it works seamlessly, although you can obviously override this to suit a custom setup. Spine expects these endpoints to exist:
read    → GET    /collection
create  → POST   /collection
update  → PUT    /collection/id
destroy → DELETE /collection/id
After a record has been created client side, Spine will send off
an HTTP POST to your server, including a JSON representation of the
record. Let’s create a Task with a
name of "Buy eggs"; this is the
request that would be sent to the server:
POST /tasks HTTP/1.0
Host: localhost:3000
Origin: http://localhost:3000
Content-Length: 66
Content-Type: application/json

{"id": "44E1DB33-2455-4728-AEA2-ECBD724B5E7B", "name": "Buy eggs"}
Likewise, destroying a record will trigger a DELETE request to the server, and updating a record will trigger a PUT request. For PUT and DELETE requests, the record’s ID is referenced inside the URL:
PUT /tasks/44E1DB33-2455-4728-AEA2-ECBD724B5E7B HTTP/1.0
Host: localhost:3000
Origin: http://localhost:3000
Content-Length: 71
Content-Type: application/json

{"id": "44E1DB33-2455-4728-AEA2-ECBD724B5E7B", "name": "Buy more eggs"}
Spine has a different take on Ajax syncing than most other libraries. It sends a request to the server after the record has been saved client side, so the client is never waiting for a response. This means your client is totally decoupled from your server— i.e., it doesn’t need a server to be present in order to function.
Having a decoupled server offers three major advantages. First, your interface is fast and nonblocking, so users are never waiting to interact with your application. The second is that it simplifies your code—you don’t need to plan for a record that may be displayed in the user interface but isn’t editable due to a pending server response. Third, it makes it much easier to add offline support, if that’s ever required.
What about server-side validation? Spine assumes you’ll do all necessary validation client side. The only time a server should respond with an error is if there’s been an exception (a problem with your code), which should only happen in exceptional circumstances.
When the server returns an unsuccessful response, an
ajaxError event will be fired on the model, including the record, an
XMLHttpRequest object, Ajax settings,
and the thrown error:
Task.bind("ajaxError", function(record, xhr, settings, error){
  // Invalid response
});
Controllers
Controllers are the last component to Spine, and they
provide the glue that will tie the rest of your application together.
Controllers generally add event handlers to DOM elements and models,
render templates, and keep the view and models in sync. To create a Spine
controller, you need to subclass Spine.Controller by calling create():
jQuery(function(){
  window.Tasks = Spine.Controller.create({
    // Controller properties
  });
});
It’s recommended to load controllers only after the rest of the page
has loaded, so you don’t have to deal with different page states. In all
the Spine examples, you’ll notice each controller is contained inside a
call to jQuery(). This ensures that the
controller will be created only when the document’s ready.
In Spine, the convention is to give controllers camel-cased plural
names—usually, the plural of the model with which they’re associated. Most
controllers just have instance properties, as they’re used after
instantiation only. Instantiating controllers is the same as instantiating
any other class, by using the new
keyword:
var tasks = new Tasks;
Controllers always have a DOM element associated with them, which can be accessed through the
el property. You can optionally pass this through on instantiation;
otherwise, the controller will generate a default div element:
var tasks = new Tasks({el: $("#tasks")});
assertEqual( tasks.el.attr("id"), "tasks" );
This element can be used internally to append templates and render views:
window.Tasks = Spine.Controller.create({
  init: function(){
    this.el.html("Some rendered text");
  }
});

var tasks = new Tasks();
$("body").append(tasks.el);
In fact, any arguments you pass when instantiating the controller will be set as properties on the controller. For example:
var tasks = new Tasks({item: Task.first()});
assertEqual( Task.first(), tasks.item );
Elements
It’s often useful to access elements inside your
controller as local properties. Spine provides a shortcut for this:
elements. Just add the elements property on your controller,
containing an object of selectors to names. In the example below,
this.input refers to the element selected by form input[type=text]. All selections are done
in the context of the controller’s element (el), not the whole page:
// The `input` instance variable
var Tasks = Spine.Controller.create({
  elements: {
    "form input[type=text]": "input"
  },

  init: function(){
    // this.input refers to the form's input
    console.log( this.input.val() );
  }
});
Keep in mind, though, that if you replace the HTML of the
controller’s element (el), you’ll
need to call refreshElements() to refresh all the element’s references.
Delegating Events
Spine’s events
property gives you an easy way to add event listeners in bulk.
Behind the scenes, Spine takes advantage of event bubbling, so only one event listener is added onto the controller’s
element (el). Like the events property, all event delegation is
scoped by el.
Events take the form of {"eventName
selector": "callback"}. The selector is optional and, if it
isn’t provided, the event will be placed straight on el. Otherwise, the event will be delegated, and it will be
triggered if the event type is fired on a child matching the selector.
This happens dynamically, so it doesn’t matter whether the contents of
el change:
var Tasks = Spine.Controller.create({
  events: {
    "keydown form input[type=text]": "keydown"
  },

  keydown: function(e){ /* ... */ }
});
In the example above, whenever the input matching the selector
receives a keydown event, the controller’s keydown callback is executed. Spine makes sure
that it’s executed with the correct context, so you don’t need to worry
about proxying event callbacks in this case.
The event object is passed along to the callback, which is useful in this
example because we can tell which key was pressed. Additionally, the
element in question can be retrieved from the event’s target property.
Controller Events
As well as event delegation, Spine’s controllers support
custom events. By default, controllers are extending with Spine.Events, meaning they have all the event functionality that
entails, like bind() and trigger(). You can use this to ensure that
your controllers are decoupled from each other, or as part of the
controller’s internal structure:
var Sidebar = Spine.Controller.create({
  events: {
    "click [data-name]": this.click
  },

  init: function(){
    this.bind("change", this.change);
  },

  change: function(name){ /* ... */ },

  click: function(e){
    this.trigger("change", $(e.target).attr("data-name"));
  }

  // ...
});

var sidebar = new Sidebar({el: $("#sidebar")});
sidebar.bind("change", function(name){
  console.log("Sidebar changed:", name);
})
In the example above, other controllers can bind to Sidebar’s change event or
even trigger it. As we explored in Chapter 2,
custom events can be a great way of structuring applications internally,
even if they’re never used externally.
Global Events
Spine lets you bind to and trigger events on a global
basis. This is a form of PubSub, and it lets controllers communicate without even knowing
about one another, ensuring they’re properly decoupled. This is achieved
by having a global object, Spine,
which anything can bind to or trigger events on:
var Sidebar = Spine.Controller.create({

  init: function(){
    Spine.bind("change", this.proxy(this.change));
  },

  change: function(name){ /* ... */ }
});
You can see in the example above that the Sidebar controller is binding to the global
event change. Other controllers or scripts can then
trigger this event, passing any required data:
Spine.trigger("change", "messages");The Render Pattern
Now that we’ve covered all the main options available in controllers, let’s look at some typical use cases.
The render pattern is a
really useful way of binding models and views. When the controller is
instantiated, it adds an event listener to the relevant model, invoking
a callback when the model is refreshed or changed. The callback will
update el, usually by replacing its
contents with a rendered template:
var Tasks = Spine.Controller.create({
  init: function(){
    Task.bind("refresh change", this.proxy(this.render));
  },

  template: function(items){
    return($("#tasksTemplate").tmpl(items));
  },

  render: function(){
    this.el.html(this.template(Task.all()));
  }
});
This simple but blunt method for data binding updates every element whenever a single record is changed. This is fine for uncomplicated and small lists, but you may find you need more control over individual elements, such as adding event handlers to items. This is where the element pattern comes in.
The Element Pattern
The element pattern essentially gives you the same functionality as the render pattern, but with a lot more control. It consists of two controllers: one that controls a collection of items, and one that deals with each individual item. Let’s dive right into the code to give you a good indication of how it works:
var TasksItem = Spine.Controller.create({
  // Delegate the click event to a local handler
  events: {
    "click": "click"
  },

  // Bind events to the record
  init: function(){
    this.item.bind("update", this.proxy(this.render));
    this.item.bind("destroy", this.proxy(this.remove));
  },

  // Render an element
  render: function(item){
    if (item) this.item = item;

    this.el.html(this.template(this.item));
    return this;
  },

  // Use a template, in this case via jQuery.tmpl.js
  template: function(items){
    return($("#tasksTemplate").tmpl(items));
  },

  // Called after an element is destroyed
  remove: function(){
    this.el.remove();
  },

  // We have fine control over events, and
  // easy access to the record too
  click: function(){ /* ... */ }
});

var Tasks = Spine.Controller.create({
  init: function(){
    Task.bind("refresh", this.proxy(this.addAll));
    Task.bind("create",  this.proxy(this.addOne));
  },

  addOne: function(item){
    var task = new TasksItem({item: item});
    this.el.append(task.render().el);
  },

  addAll: function(){
    Task.each(this.addOne);
  }
});
In the example above, Tasks has
responsibility for adding records when they’re initially created, and
TasksItem takes responsibility for
the record’s update and destroy events, rerendering the record when
necessary. Although it’s more complicated, this gives us some advantages
over the previous render pattern.
For one thing, it’s more efficient—the list doesn’t need to be
redrawn whenever a single element changes. Furthermore, we now have a
lot more control over individual items. We can place event handlers, as
demonstrated with the click callback,
and manage rendering on an item-by-item basis.
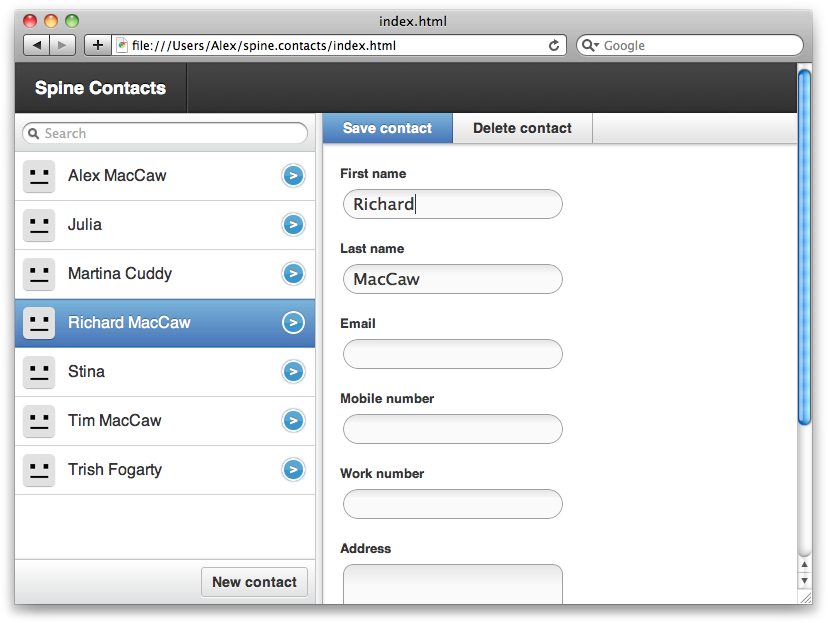
Building a Contacts Manager
So, let’s take our knowledge of Spine’s API and apply it to something practical, like a contacts manager. We want to give users a way of reading, creating, updating, and deleting contacts, as well as searching them.
Figure 11-1 shows the finished result so you can have an idea of what we’re creating.
The contact manager is one of a set of open source Spine examples. You can follow along with the tutorial below, or download the full code from the project’s repository.
As you can see in Figure 11-1, the contact manager
has two main sections, the sidebar and the contacts view. These two will
make up our respective controllers, Sidebar and Contacts. As for models, the manager only has
one: the Contact model. Before we
expand on each individual component, let’s take a look at the initial page
structure:
<div id="sidebar">
  <ul class="items">
  </ul>

  <footer>
    <button>New contact</button>
  </footer>
</div>

<div class="vdivide"></div>

<div id="contacts">
  <div class="show">
    <ul class="options">
      <li class="optEdit">Edit contact</li>
      <li class="optEmail">Email contact</li>
    </ul>
    <div class="content"></div>
  </div>

  <div class="edit">
    <ul class="options">
      <li class="optSave default">Save contact</li>
      <li class="optDestroy">Delete contact</li>
    </ul>
    <div class="content"></div>
  </div>
</div>
We have a #sidebar div and a
#contacts div for our respective
sections. Our application is going to fill the .items list with contact names and have a
currently selected contact showing in #contacts. We’ll listen to clicks on .optEmail and .optSave, toggling between the show and edit states as
required. Finally, we’ll listen for click events on .optDestroy, which destroys the current contact
and selects another.
Contact Model
With just a half-dozen lines of code, the contact model is
exceedingly straightforward. Contact
has three attributes: first_name,
last_name, and email. We’ll also provide a helper function
that will give a full name, which will be useful in templates:
// Create the model
var Contact = Spine.Model.setup("Contact", ["first_name", "last_name", "email"]);

// Persist model between page reloads
Contact.extend(Spine.Model.Local);

// Add some instance functions
Contact.include({
  fullName: function(){
    if ( !this.first_name && !this.last_name ) return;
    return(this.first_name + " " + this.last_name);
  }
});
Notice that Spine.Model.Local
is extending the model. This will ensure that records are saved to the
browser’s local storage, making them available the next time the page
loads.
Sidebar Controller
Now let’s take a look at the Sidebar controller, which has the
responsibility of listing contacts and keeping track of the currently
selected one. Whenever contacts change, the Sidebar controller must update itself to
reflect those changes. In addition, the sidebar has a “New contact”
button that it will listen to, creating new blank contacts when it’s
clicked.
Here’s the full controller in all its glory. This might be an overwhelming piece of code at first—especially if you’re not familiar with Spine—but it’s heavily commented, so it should be understandable under closer examination:
jQuery(function($){

  window.Sidebar = Spine.Controller.create({
    // Create instance variables:
    //  this.items //=> <ul></ul>
    elements: {
      ".items": "items"
    },

    // Attach event delegation
    events: {
      "click button": "create"
    },

    // Render template
    template: function(items){
      return($("#contactsTemplate").tmpl(items));
    },

    init: function(){
      this.list = new Spine.List({
        el: this.items,
        template: this.template
      });

      // When the list's current item changes, show the contact
      this.list.bind("change", this.proxy(function(item){
        Spine.trigger("show:contact", item);
      }));

      // When the current contact changes, i.e., when a new contact is created,
      // change the list's currently selected item
      Spine.bind("show:contact edit:contact", this.list.change);

      // Rerender whenever contacts are populated or changed
      Contact.bind("refresh change", this.proxy(this.render));
    },

    render: function(){
      var items = Contact.all();
      this.list.render(items);
    },

    // Called when 'Create' button is clicked
    create: function(){
      var item = Contact.create();
      Spine.trigger("edit:contact", item);
    }
  });

});
You’ll notice that the controller’s init() function is using a class called
Spine.List, something we haven’t yet covered. Spine.List is a utility controller that’s
great for generating lists of records. What’s more, Spine.List will keep track of a currently
selected item, and then notify listeners with a
change event when the user selects a different item.
The list is completely rerendered whenever contacts are changed or refreshed. This keeps the example nice and simple, but it may be something we want to change in the future if performance issues arise.
The #contactsTemplate
referenced in template() is a script
element that contains our contact’s template for individual list
items:
<script type="text/x-jquery-tmpl" id="contactsTemplate">
  <li class="item">
    {{if fullName()}}
      <span>${fullName()}</span>
    {{else}}
      <span>No Name</span>
    {{/if}}
  </li>
</script>
We are using jQuery.tmpl for the
templating, which should be familiar to you if you’ve read Chapter 5. Spine.List will use this template to render
each item, and it will set a class of current on the <li> if it’s associated with the
currently selected item.
Contacts Controller
Our Sidebar controller
is now displaying a list of contacts, allowing users to select
individual ones. But how about showing the currently selected contact?
This is where the Contacts controller
comes in:
jQuery(function($){

  window.Contacts = Spine.Controller.create({
    // Populate internal element properties
    elements: {
      ".show": "showEl",
      ".show .content": "showContent",
      ".edit": "editEl"
    },

    init: function(){
      // Initial view shows contact
      this.show();

      // Rerender the view when the contact is changed
      Contact.bind("change", this.proxy(this.render));

      // Bind to global events
      Spine.bind("show:contact", this.proxy(this.show));
    },

    change: function(item){
      this.current = item;
      this.render();
    },

    render: function(){
      this.showContent.html($("#contactTemplate").tmpl(this.current));
    },

    show: function(item){
      if (item && item.model) this.change(item);

      this.showEl.show();
      this.editEl.hide();
    }
  });
Whenever a new contact is selected in the sidebar, the global
show:contact event will be triggered. We’re binding to this event in Contacts, executing the show() function, which gets passed the newly
selected contact. We’re then rerendering the showContent div, replacing it with the
currently selected record.
You can see we’ve referenced a #contactTemplate template, which will display
Contacts' current contact to our
users. Let’s go ahead and add that template to the page:
<script type="text/x-jquery-tmpl" id="contactTemplate">
  <label>
    <span>Name</span>
    ${first_name} ${last_name}
  </label>

  <label>
    <span>Email</span>
    {{if email}}
      ${email}
    {{else}}
      <div class="empty">Blank</div>
    {{/if}}
  </label>
</script>
We’ve now got functionality to show contacts, but how about
editing and destroying them? Let’s rewrite the Contacts controller to do that. The main
difference is that we’re going to
toggle between two application states, showing and editing when the
.optEdit and
.optSave elements are clicked. We’re
also going to add a new template into the fray: #editContactTemplate. When saving records,
we’ll read the edit form’s inputs and update the record’s
attributes:
jQuery(function($){

  window.Contacts = Spine.Controller.create({
    // Populate internal element properties
    elements: {
      ".show": "showEl",
      ".edit": "editEl",
      ".show .content": "showContent",
      ".edit .content": "editContent"
    },

    // Delegate events
    events: {
      "click .optEdit": "edit",
      "click .optDestroy": "destroy",
      "click .optSave": "save"
    },

    init: function(){
      this.show();
      Contact.bind("change",        this.proxy(this.render));
      Spine.bind("show:contact", this.proxy(this.show));
      Spine.bind("edit:contact", this.proxy(this.edit));
    },

    change: function(item){
      this.current = item;
      this.render();
    },

    render: function(){
      this.showContent.html($("#contactTemplate").tmpl(this.current));
      this.editContent.html($("#editContactTemplate").tmpl(this.current));
    },

    show: function(item){
      if (item && item.model) this.change(item);

      this.showEl.show();
      this.editEl.hide();
    },

    // Called when the 'edit' button is clicked
    edit: function(item){
      if (item && item.model) this.change(item);

      this.showEl.hide();
      this.editEl.show();
    },

    // Called when the 'delete' button is clicked
    destroy: function(){
      this.current.destroy();
    },

    // Called when the 'save' button is clicked
    save: function(){
      var atts = this.editEl.serializeForm();
      this.current.updateAttributes(atts);
      this.show();
    }
  });

});
As mentioned previously, we’re using a new template called
#editContactTemplate. We need to add this to the page so it can
be referenced successfully. Essentially, #editContactTemplate is very similar to
#contactTemplate, except that it’s
using input elements to display the record’s data:
<script type="text/x-jquery-tmpl" id="editContactTemplate">
  <label>
    <span>First name</span>
    <input type="text" name="first_name" value="${first_name}" autofocus>
  </label>

  <label>
    <span>Last name</span>
    <input type="text" name="last_name" value="${last_name}">
  </label>

  <label>
    <span>Email</span>
    <input type="text" name="email" value="${email}">
  </label>
</script>
App Controller
So, we’ve got two controllers—Sidebar and Contacts—that deal with selecting, displaying,
and editing Contact records. Now all
that’s needed is an App controller
that instantiates every other controller, passing them the page elements
they require:
jQuery(function($){
  window.App = new Spine.Controller.create({
    el: $("body"),

    elements: {
      "#sidebar": "sidebarEl",
      "#contacts": "contactsEl"
    },

    init: function(){
      this.sidebar = new Sidebar({el: this.sidebarEl});
      this.contact = new Contacts({el: this.contactsEl});

      // Fetch contacts from local storage
      Contact.fetch();
    }
  })
});
Notice we’re instantiating the class with new immediately after creating the App controller. We’re also calling fetch() on the Contact model, retrieving all the contacts
from local storage.
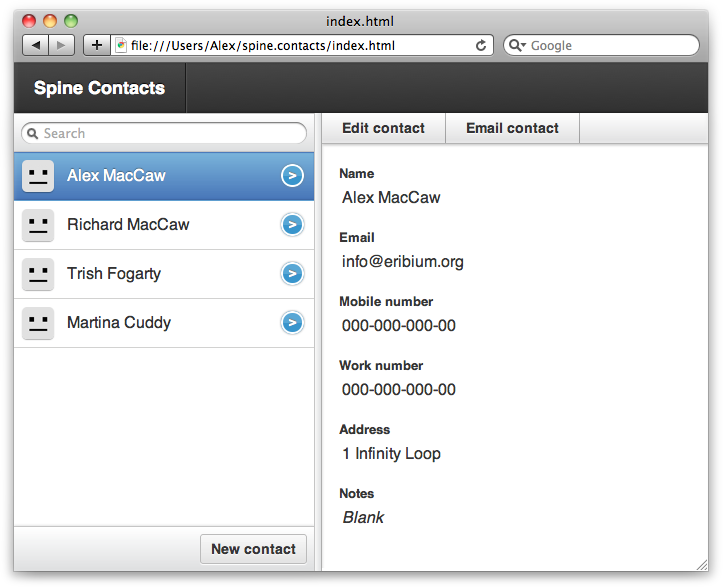
So, that’s all there is to it! Two main controllers (Sidebar and Contacts), one model (Contact), and a couple of views. To see the
finished product, check out the source repository
and see Figure 11-2.