Table of Contents for
Linux Bible, 9th Edition
 Linux Bible, 9th Edition
Published by
John Wiley & Sons, 2015
Linux Bible, 9th Edition
Published by
John Wiley & Sons, 2015
- Cover Page
- Title Page
- Copyright
- Dedication
- About the Author
- About the Technical Editor
- Credits
- Acknowledgments
- Contents at a Glance
- Contents
- Introduction
- Part I: Getting Started
- Chapter 1: Starting with Linux
- Chapter 2: Creating the Perfect Linux Desktop
- Part II: Becoming a Linux Power User
- Chapter 3: Using the Shell
- Chapter 4: Moving around the Filesystem
- Chapter 5: Working with Text Files
- Chapter 6: Managing Running Processes
- Chapter 7: Writing Simple Shell Scripts
- Part III: Becoming a Linux System Administrator
- Chapter 8: Learning System Administration
- Chapter 9: Installing Linux
- Chapter 10: Getting and Managing Software
- Chapter 11: Managing User Accounts
- Chapter 12: Managing Disks and Filesystems
- Part IV: Becoming a Linux Server Administrator
- Chapter 13: Understanding Server Administration
- Chapter 14: Administering Networking
- Chapter 15: Starting and Stopping Services
- Chapter 16: Configuring a Print Server
- Chapter 17: Configuring a Web Server
- Chapter 18: Configuring an FTP Server
- Chapter 19: Configuring a Windows File Sharing (Samba) Server
- Chapter 20: Configuring an NFS File Server
- Chapter 21: Troubleshooting Linux
- Part V: Learning Linux Security Techniques
- Chapter 22: Understanding Basic Linux Security
- Chapter 23: Understanding Advanced Linux Security
- Chapter 24: Enhancing Linux Security with SELinux
- Chapter 25: Securing Linux on a Network
- Part VI: Extending Linux into the Cloud
- Chapter 26: Using Linux for Cloud Computing
- Chapter 27: Deploying Linux to the Cloud
- Part VII: Appendixes
- Appendix A: Media
- Appendix B: Exercise Answers
- Index
- Linux® Bible, Ninth Edition

Using Linux for
Cloud Computing
IN THIS CHAPTER
How Linux is used in clouds
Trying basic cloud technology
To cloud users, cloud computing means being able to request some computing service from their local computer to some server on a network, without necessarily knowing how the request is fulfilled. What makes it a cloud is how those delivering the services set up their computer infrastructures to fulfill the requests.
Cloud technology today makes it possible to view datacenters as large, fluid pools of host computers (hypervisors), controllers, storage nodes, network configurations, and many other components. You may wonder what Linux has to do with cloud computing. Well, Linux just happens to be at the heart of many of today's public and private cloud technologies.
This chapter introduces you to concepts of cloud computing, in general, and cloud technologies associated with Linux, in particular. After introducing cloud concepts, this chapter has you set up some of the basic building blocks of cloud technology: hypervisors, virtual machines, and shared storage.
After you have tried some of those basic cloud technologies, the chapter describes how enterprise-quality clouds extend those basic concepts so they can scale up to meet the needs of modern datacenters.
Overview of Linux and Cloud Computing
Cloud moves us into an arena where everything you learned in this book is being abstracted and automated. For cloud, when you install a system, you are probably not booting from a physical DVD, erasing the local hard drive, and installing Linux directly on a computer sitting in front of you. You are not logging in using an entry in the /etc/passwd file or drawing on the processing power of a single machine.
Instead, you are installing to a virtual machine or container that is running on some host system in the cloud. The network interfaces you see may not be represented by a physical switch, but may be virtual networks that exist on a single computer or span multiple hypervisors.
Today, every software aspect of cloud computing can be fulfilled using open source technology running on Linux systems. My goal here is not to describe how to use every aspect of a Linux-based cloud environment. Instead, I want to tell you how emerging technologies are expanding everything we have covered in this book to work efficiently in a cloud environment. Then I give you a chance to configure some basic cloud technologies to get a feel for how it all works.
Cloud hypervisors (a.k.a. compute nodes)
In cloud computing, the operating systems serving cloud users are not running directly on computer hardware. Instead, hypervisors are configured to run many operating systems as what are referred to as virtual machines.
Depending on your cloud environment, you may hear a hypervisor referred to as a compute node or simply as a host. Because hypervisors tend to be commodity items (dozens or hundreds of hypervisors may be set up for a location), Linux is the logical choice as the operating system running as hypervisors directly on hardware.
Kernel-based Virtual Machine (KVM) is the basic virtualization technology implemented to make a Linux system into a hypervisor. KVM is supported on Ubuntu, Red Hat Enterprise Linux, Fedora, and many other Linux systems.
The other major technology that can be used instead of KVM to make a Linux system into a hypervisor is Xen (www.xenproject.org). Xen has been around longer than KVM and is supported in products from Citrix Systems and Oracle.
Later in this chapter, I describe how to check to see if a computer has the hardware features to be used as a hypervisor and how to configure it to be used with KVM.
Cloud controllers
Because a cloud configuration can include multiple hypervisors, pools of storage, multiple virtual networks, and many virtual machines, you need centralized tools to manage and monitor those features. You can use both graphical and command-based tools for controlling cloud environments.
Although not considered a full cloud controller, the Virtual Machine Manager (virt-manager) GUI and virsh command can be used to manage a small cloud-like environment. Using virt-manager, you can get a feel for managing multiple virtual machines across several hypervisors, and you can learn how to deal with virtual networks and shared storage pools.
Full-blown cloud platforms have their own controllers for offering much more complex interactions between cloud components. For the OpenStack cloud platform, the OpenStack Dashboard (Horizon project) provides a web-based interface to OpenStack components. For Red Hat Enterprise Virtualization (RHEV), the RHEV Manager provides the same features.
Later in this chapter, I describe how to use virt-manager to manage your first mini-cloud-like environment.
Cloud storage
New demands on data storage arise when you move your operating systems and applications into a cloud environment. For a virtual machine to be able to move to run on another hypervisor, its storage must be available from that new hypervisor. Storage needs for clouds include needing places to store the back-end storage for your VMs, images for launching VMs, and databases for storing information about the cloud itself.
Shared storage between hypervisors can be done as simply as creating an NFS share (see Chapter 20) and mounting it on the same mount point between multiple hypervisors. NFS is one of the easiest ways to implement shared storage.
More robust shared storage that can handle disk failures and provide better performance works better for clouds providing critical services. Shared block storage, where you mount a whole disk or disk partition, can be accomplished using technologies such as iSCSI or Fibre Channel.
Ceph (http://ceph.com) is an open source project for managing both block and object storage that is popular for managing storage in cloud environments. GlusterFS (www.gluster.org) is a scale-out filesystem that is often used in cloud environments.
For the simple mini-cloud example in this chapter, I use NFS to provide shared storage between the hypervisors.
Cloud authentication
To be able to limit how much cloud resources a user can consume, and possibly track and change for that use, you need authentication mechanisms. Authentication is necessary for those who are using cloud features as well as for those who are allowed to administer cloud features.
Cloud platform projects sometimes let you connect centralized authentication mechanisms to validate and authorize cloud users. These can include Kerberos, Microsoft Active Directory, and others. In Linux, Identity, Policy, and Audit (IPA) software (see www.freeipa.org) offers a full set of authentication features that can be used across an enterprise cloud platform.
Cloud deployment and configuration
If you are managing a large cloud infrastructure, you don't want to have to walk over to each machine and click through a graphical installation every time you want to add a hypervisor or other node on your network. Today, many tools can deploy and configure Linux systems as simply as rebooting the computer and having it boot up to a preconfigured installer.
In Chapter 9, I talk about how to use a PXE server (to automatically boot a Linux installer over the network from your network interface card) and kickstart files (to identify all the answers you need to complete an installation). With that setup in place, you can simply boot a computer from a network interface and come back a short time later to find a fully installed Linux system.
After a computer is deployed, systems can be configured and possibly monitored and updated, using tools such as Puppet (http://puppetlabs.com) and Chef (www.chef.io). Whole work environments can be deployed in virtual machines using Vagrant (www.vagrantup.com). Ansible (www.ansible.com) is another tool for automating IT infrastructures and the applications that run on it.
Cloud platforms
If you want to implement your own, private cloud within your organization, the open source OpenStack project is probably the most popular choice. It offers a huge amount of flexibility and power in how you configure and use it.
Red Hat Enterprise Virtualization (RHEV) is another popular cloud platform. RHEV makes it easy to start with a simple RHEV Manager and one or two hypervisors and grow by adding more hypervisors, storage pools, and other features.
If you want to use public clouds that are based on open source technology to run the operating systems you need, you can use any of several different cloud providers. Public cloud providers that you can use to run Linux VMs include Amazon Web Services (www.amazon.com/aws), Google Cloud Platform (https://cloud.google.com), and Rackspace (www.rackspace.com). Chapter 27 covers how to deploy Linux to some of these cloud providers.
Now that you have heard about many of the technologies that make up Linux cloud computing, you can get your first small taste of some of the foundational technologies of Linux clouds by setting up your own mini-cloud in the next section.
Trying Basic Cloud Technology
To help you understand cloud technology from the ground up, this section illustrates some of the basic building blocks of a modern cloud infrastructure. Using three computers, I'll help you create a setup that includes:
- Hypervisors—A hypervisor is a computer system that allows you run other computer systems on it. Those other systems are referred to as virtual machines. A cloud infrastructure may have dozens or hundreds of hypervisors running, possibly running thousands of virtual machines.
- Virtual machines—The virtual machines you run on a Linux hypervisor can be the same type of Linux system, a different Linux system, a Windows system, or any other type of system that is compatible with the hardware on which the hypervisor runs. So the virtual machines that run on the hypervisors we build here could include Fedora, Ubuntu, RHEL, CentOS, Microsoft Windows, and others.
- Shared storage—To offer the greatest flexibility, the storage that hypervisors make available to virtual machines is often shared among a pool of hypervisors. This allows a set of hypervisors to share a set of images they use to install or start virtual machines. It also lets the same set of virtual machines run on any hypervisor in that group and even move to a different hypervisor without shutting down the VM. Moving running VMs can be useful if a hypervisor becomes overloaded or needs to shut down for maintenance.
The setup we build during this procedure allows you to work with virtual machines in the following ways:
- Install a new virtual machine on a hypervisor
- Set features on your virtual machines
- Log in to and use a virtual machine running on a hypervisor
- Migrate a running virtual machine to another hypervisor
The technologies we explore here include:
- Kernel Virtualization Module (KVM)—KVM is the basic kernel technology that allows virtual machines to interact with the Linux Kernel.
- QEMU Processor Emulator—One qemu process runs for each active virtual machine on the system. QEMU provides features that make it appear to each virtual machine as though it is running on physical hardware.
- Libvirt Service Daemon (libvirtd)—A single libvirtd service runs on each hypervisor. The libvirtd daemon listens for requests to start, stop, pause, and otherwise manage virtual machines on a hypervisor. Those requests can come from an application designed to manage virtual machines (such as virt-manager or OpenStack Dashboard) or from an application you create to talk directly to the libvirt application programming interface.
- Virtual Machine Manager—The Virtual Machine Manager (virt-manager command) is a GUI tool for managing virtual machines. Besides letting you request to start and stop virtual machines, virt-manager lets you install, configure, and manage VMs in different ways. You can use the virsh command to pass options to the command line to work with virtual machines, instead of clicking in a GUI window.
- Virtualization Viewer—The virt-viewer command launches a virtual machine console window on your desktop. The window that appears allows you to work from a console window to a Desktop or command line interface to the selected virtual machine (depending on what that VM has to offer).
After this small cloud-like infrastructure is built, you have the basis for what is sometimes referred to as a Platform-as-a-Service (or PaaS) cloud. This means that someone consuming your PaaS could bundle together their own operating system, application, configuration files, and data and deploy them. They would rely on your PaaS to provide the compute power, storage, memory, network interfaces, and management features needed to run the virtual machines containing their applications.
Examples of a PaaS include OpenStack and Red Hat Enterprise Virtualization (RHEV). Those projects provide a much more refined way of accessing PaaS resources. Our mini-PaaS, however, gets similar results.
Setting Up a Small Cloud
With three physical machines connected together on a network, you can illustrate some of the basic concepts you need to understand to build your own cloud. The three computers running Fedora 21 and the network connecting them are configured as follows:
- Networking—A high-speed, wired network was set up to connect the three computers. Fast network connections are critical to successful VM migration. In this example, each hypervisor also has a network bridge configured so each virtual machine can pick up an IP address directly from a DHCP service on the network.
- Hypervisors—Two of the computers are configured as hypervisors. A hypervisor (sometimes referred to as a host or a computer node) allows you to run virtual machines. In Fedora 21, the basic hypervisor technology is called Kernel-based Virtual Machine (KVM) while the actual virtual machines are managed by the libvirtd service.
- Storage—One computer is configured to offer shared storage between the two hypervisors. For simplicity, NFS is used to create the shared storage, although in a production environment, iSCSI or Fibre Channel would be better solutions.
NOTE
For test purposes, you could use one of the two hypervisors to provide the shared storage. However, one of the main purposes of configuring two hypervisors and separate shared storage is that you want to be able to shut down any hypervisor and still have all your virtual machines operate normally. If you have shared storage available from one of the hypervisors, you could never bring that hypervisor down without shutting down all the VMs using that storage.
Configuring hypervisors
In this procedure, I installed Fedora 21 on two physical computers and configured them as KVM hosts running the libvirtd service. Follow these steps to accomplish this for yourself.
Step 1: Get Linux software
Go to the Get Fedora page (https://getfedora.org) and download Fedora 21. I chose to download the Fedora 21 64-bit Workstation edition DVD ISO. If a later version of Fedora is available, you could likely use that instead.
Use any available DVD burning application to burn the image to DVD or otherwise make the image available to install (such as by PXE booting).
Step 2: Check your computers
The computers you use as hypervisors in Fedora 21 need to meet a few requirements. You should check these things on your computer before you start installing:
- Support virtualization—You can check for virtualization support by looking at the flags set in the CPU.
- Memory—The computer must have enough RAM not only to run the host operating system, but for each virtual machine that you expect to run on the system.
- Processing power—Keep in mind that each virtual machine consumes processing power for itself and any application running inside the virtual machine.
Storage is another consideration. But because we intend to configure storage from a separate node on the network, we address that issue later.
To check that the available features of your computers meet the requirements, boot a Linux live CD or DVD, open a Terminal window, and type the following commands:
# cat /proc/cpuinfo | grep --color -E "vmx|svm|lm"
flags  : fpu vme de pse tsc msr pae mce cx8 apic sep mtrr pge mca
   cmov pat pse36 clflush dts acpi mmx fxsr sse sse2 ss ht tm pbe
   syscall nx pdpe1gb rdtscp lm constant_tsc arch_perfmon pebs bts
   rep_good xtopology nonstop_tsc aperfmperf pni pclmulqdq dtes64
   monitor ds_cpl vmx smx es...
...
The previous command shows that this computer is a 64-bit computer (lm) and that an Intel chip supports virtualization features (vmx). If the CPU were an AMD chip, instead of vmx, you would see svm highlighted (if the AMD chip supported virtualization). Those settings show that this computer can be used as a hypervisor.
When you start running VMs on a host, memory is often the bottleneck. For memory requirements, you must add what is needed by the host to whatever you need for each VM.
You can lower memory requirements by not having Desktop software installed, as most hypervisors do. In this case, however, I did a Fedora Workstation install, which comes with a Desktop. To check the memory and swap on the computer, I typed the following:
# free -m
         total   used    free   shared  buff/cache   available
Mem:      7867   3433    2835      298        1598        3860
Swap:    12287      0   12287
This system has about 8GB of RAM and 12GB of swap. I estimate that 4GB is good for a desktop system. If I allow 1GB or 2GB for each VM, this system should be able to run two to four VMs along with the desktop. Check the memory requirements for the operating systems and applications you plan to run to better determine your memory needs.
To check the number and types of processors on your computer, type the following:
# grep processor /proc/cpuinfo
processor : 0
...
processor : 6
processor : 7
# head /proc/cpuinfo
processor  : 0
vendor_id  : GenuineIntel
cpu family : 6
model      : 60
model name : Intel(R) Core(TM) i7-4800MQ CPU @ 2.70GHz
stepping   : 3
cpu MHz    : 2701.000
cache size : 6144 KB
...
The first command in the preceding code shows that there are eight (0 through 7) processors on the computer. With the second command, for the first processor, you can see that it is GenuineIntel, the model, model name, the CPU speed, and other information.
To do live VM migration between the two hypervisors, the CPUs must be in the same family. If they don't have compatible CPUs, you could migrate a VM by shutting it down on one hypervisor and starting it up from shared storage on the other.
After you have sized up the two hypervisor computers, start installing Fedora on them.
Step 3: Install Linux on hypervisors
Using the Fedora 21 Workstation installation media, begin installing the two hypervisors. Follow descriptions in Chapter 9 for installing Fedora. You should know these things that are specific to the installation for this procedure:
- Name the hypervisors—I set the hostnames on the hypervisors to host1.example.com and host2.example.com.
- Partitioning—When partitioning, I erased the entire hard disk. Then I created a 500MB /boot partition and a 12GB swap partition, and I assigned the rest of the disk space to the root partition (/). The /var/lib/libvirt/images directory holds most of the data on this system, but that is a shared directory, available from another system on the network and shared between the two hypervisors. (More on that later.)
- Networking—If given the option, turn on wired network interfaces for each hypervisor. The hypervisors and storage should all be on the same local network, because the speed of your network connection between those machines is critical to getting good performance.
- Software packages—During installation, I install only the default Fedora Workstation packages. After installation is complete and the system is rebooted, I install more of the software that's needed for each hypervisor.
Reboot the computer when installation is finished (ejecting the DVD and starting up on the hard disk). After the system is rebooted, update the Fedora software, add new packages, and reboot the system again, as follows:
# yum update -y
# yum install virt-manager libvirt-daemon-config-network
# reboot
The virt-manager package contains the GUI tool for managing your virtual machines. The libvirt-daemon-config-network package creates the default network interface that lets the virtual machines access external networks (through the host) using Network Address Translation (NAT). The default address range assigned to the virtual machines is 192.168.122.2 through 192.168.122.254.
Other packages you need should already be included with the Fedora Workstation install. If you did a different install type, make sure you have the following packages also added: libvirt-client (for the virsh command) and libvirt-daemon (to get the libvirtd service).
Step 4: Start services on the hypervisors
You need to make sure that the libvirtd service is running on both hypervisors. Start the sshd service as well. They may already be running, but just to make sure do the following as root on both hypervisors:
# systemctl start sshd.service
# systemctl enable sshd.service
# systemctl start libvirtd.service
# systemctl enable libvirtd.service
The sshd service allows you to log into the hypervisors over the network, if necessary. The libvirtd service is the one you might not be as familiar with. It is listening for requests to manage your virtual machines on each host.
Step 5: Edit /etc/hosts or set up DNS
To make it convenient to communicate between the hypervisors and storage system, you should assign host names to each system and map those names to IP addresses. Setting up a DNS server that all the systems point to is probably the best way to do that. However, for our simple example, you can just edit the /etc/hosts file on each system and add entries for each host.
Here is an example of what additional entries to your /etc/hosts file might look like for the three systems used in this procedure:
192.168.0.138 host1.example.com host1
192.168.0.139 host2.example.com host2
192.168.0.1   storage.example.com storage
Next you need to configure the storage.
Configuring storage
You can provide networked storage to the hypervisors for this procedure in many ways. I chose to set up a separate Fedora system on the same local network as the hypervisors and use NFS to attach the shared storage to both hypervisors.
NFS is not the most efficient method of sharing storage among hypervisors, but it is one of the easiest and most common to set up. In this procedure, I use the Virtualization Manager window (virt-manager) to configure the NFS storage pool.
For consistency's sake, the NFS share set up from the storage system is the /var/lib/libvirt/images directory. It is mounted in the same place on each of the hypervisors. (For testing, if you only have two machines available, you can configure storage from one of the hypervisors. Keep in mind, however, that this means you can't turn off that hypervisor without shutting down all your VMs.)
Step 1: Install Linux software
To set up your storage on an NFS server, you can use pretty much any Linux system that has an NFS service available. Consider these things when you install Linux:
- Disk space—Make sure you have enough storage space available on the partition that contains the shared directory. For this example, /var/lib/libvirt/images is the shared directory.
- Performance—For best performance, you want to have a disk that has fast access times and data transfer rates.
For Fedora and RHEL, NFS server software is available from the nfs-utils package. For Ubuntu, you need the nfs-kernel-server package.
After initial installation is finished, check that the NFS server software is installed. If it isn't, you can install it on Fedora or RHEL with this command:
# yum install nfs-utils
For Ubuntu and similar systems, type this:
# apt-get install nfs-kernel-server
Step 2: Configure NFS share
To create an NFS share, you need to identify the directory to share and add information about it to the /etc/exports file. Follow these steps:
- Create a directory. You can share any directory containing the space you want to share. Consider making a new directory and mounting a whole disk or partition on it. For this example, I create a directory named /var/storage:
# mkdir -p /var/storage - Allow exporting. On your storage system, create an entry in the /etc/exports file to share the directory with selected systems (by name or IP address). For this example, I allowed read-write access (rw) to all systems on the 192.168.0 subnetwork:
/var/storage 192.168.0.*(no_root_squash,rw,sync)
Step 3: Start the NFS service
Start the NFS service and open the firewall on the storage system to allow access to that service. Here's how:
- Start and enable NFS. On the latest Fedora and RHEL systems, type the following to start the NFS server:
# systemctl start nfs-server.service
# systemctl enable nfs-server.service
On RHEL 6, older Fedora and some Ubuntu systems, use these commands to start and enable the NFS service:
# service nfs start
# chkconfig nfs on
- Open the firewall. To open the firewall ports so those outside the local system can use your NFS share, do the following on Fedora 21:
# firewall-cmd --permanent --add-service=rpc-bind
# firewall-cmd --permanent --add-service=nfs
# systemctl restart firewalld
For systems using iptables directly, see Chapter 20 for information on how to open your firewall for the NFS service.
Step 4: Mount the NFS share on the hypervisors
Log in to each hypervisor and follow these steps to make the share available locally. Note that the location of the mount point directory on each hypervisor must be the same. Here's how:
- Check the NFS share availability. From each of the two hypervisors, make sure that you can see the available share by typing the following:
# showmount -e storage.example.com Export list for storage.example.com: /var/storage 192.168.0.* - Mount the NFS share. Add information about the share to the /etc/fstab file. For our example, to allow the directory from the 192.168.0.1 system to be mounted on the same directory locally each time the system boots, the entry in the /etc/fstab file could look like this:
storage.example.com:/storage /var/lib/libvirt/images nfs defaults 0 0
- Test the NFS mount. To check that you got the mount entry correct, run the following command to mount all entries in the /etc/fstab file that have not already been mounted and check that the NFS share was mounted:
# mount -a
# mount | grep libvirt
storage.example.com:/var/storage on /var/lib/libvirt/images type
nfs4
(rw,relatime,vers=4.0,rsize=1048576,wsize=1048576,namlen=255,hard,
proto=tcp,port=0,timeo=600,retrans=2,sec=sys,
clientaddr=192.168.0.1,local_lock=none,addr=192.168.0.138)
With your hypervisors and storage now in place, you can now begin creating your virtual machines.
Creating virtual machines
The Virtual Machine Manager (virt-manager) is a good tool to use to create your first virtual machines. It steps you through the installation and setup of virtual machines and provides a way to view and change the status of your existing virtual machines.
Later, when you understand the kinds of features that go into creating virtual machines, you can use the virt-install command to create virtual machines instead. The advantage of virt-install is that you can script or easily copy and paste a command line to create a virtual machine, instead of having to click through a GUI window.
You downloaded the Fedora 21 Workstation ISO image earlier in this chapter, so I'll use that in the example for creating a virtual machine. However, if you prefer, you can install many different versions of Linux or Windows as your virtual machine.
Step 1: Get images to make virtual machines
You can create a virtual machine in many ways. In general, you start with either a pre-built image (basically a copy of a working virtual machine) or just install from an installation ISO image into a fresh storage area. Here, we are going to do the latter and create a VM from the Fedora 21 Workstation installation ISO image.
Assuming you are logged in to one of the hypervisors as root and the ISO image is in the current directory, copy the ISO to the default directory used by virt-manager for storage (/var/lib/libvirt/images):
# cp Fedora-Live-Workstation-x86_64-21-5.iso /var/lib/libvirt/images/
Because that directory is shared by both hypervisors, you can go to either hypervisor to use that image.
Step 2: Check the network bridge
On each hypervisor, there should be a default network bridge name virbr0. All hypervisors will be added to this network interface and automatically assigned an IP address. By default, the hypervisor uses the address range of 192.168.122.2 through 192.168.122.254 to assign to the virtual machines. Using Network Address Translation (NAT), the host can route packets from the virtual machines using these private addresses to external network interfaces.
Do the following on each hypervisor to check the bridge for each:
# brctl show virbr0
bridge name  bridge id            STP enabled  interfaces
virbr0      8000.001aa0d7483e    yes           vnet0
# ip addr show virbr0
5: virbr0: <BROADCAST,MULTICAST,UP,LOWER_UP> mtu 1500 qdisc noqueue
        state UP group default
   link/ether fe:54:00:57:71:67 brd ff:ff:ff:ff:ff:ff
   inet 192.168.122.1 brd 192.168.122.255 scope global dynamic virbr0
Step 3: Start Virtual Machine Manager (virt-manager)
From the desktop on either hypervisor, do the following to open Virtual Machine Manager and connect it to the hypervisor:
- Start virt-manager. Go to the Activities screen, type Virtual Machine Manager into the search box and press Enter, or type virt-manager from the shell. Type the root password when prompted. You should see the Virtual Machine Manager window.
- Check the connection to the hypervisor. From the Add Connection pop-up, the hypervisor (QEMU/KVM) should already be set and the Autoconnect check box should be checked. Click Connect to connect to the local hypervisor if it has not already been done.
Step 4: Check connection details
After connecting to the hypervisor, set up some connection details. To do that from the Virtual Machine Manager window, do the following:
- View the connection details. Select Edit
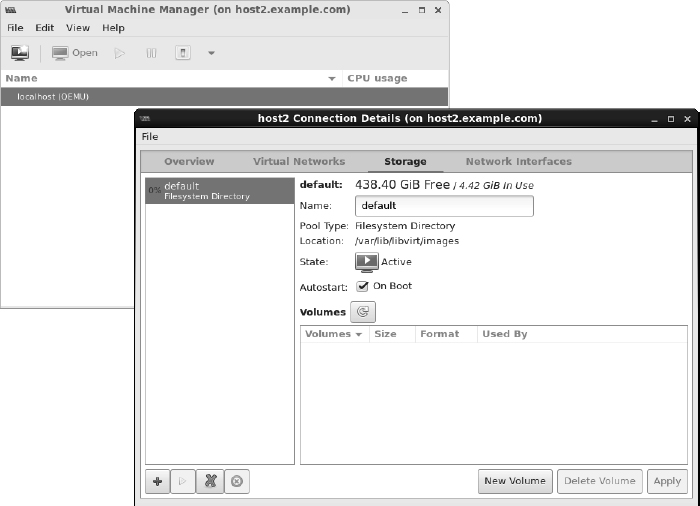
 Connection Details to see the Connection Details window. Select the Overview, Virtual Networks, Storage, and Network Interfaces tabs to familiarize yourself with the connection information for your hypervisor. For example, the Storage tab appears in Figure 26.1, showing that there are 438.40GB of free space in the location used by default for storage by this hypervisor (/var/lib/libvirt/images directory).
FIGURE 26.1
Start Virtual Machine Manager and check connection details.
- Check that the network bridge is available. Select the Network Interfaces tab and make sure the bridge we just created (bridge0) is in the list of available network interfaces.
Step 5: Create a new virtual machine
To create a new virtual machine from the Virtual Machine Manager window, do the following:
- Start the wizard. To start the Create a New Virtual Machine wizard, select File New Virtual Machine. The Create a New Virtual Machine window appears.
- Choose the installation method. Four ways of creating the virtual machine are presented. The first three are ways to identify the location of installation media. The fourth lets you import an existing disk image. For our example, choose the first selection (Local install media) and click Forward.
- Choose the ISO. Select the Use ISO Image button and choose Browse. In the window that appears, select or browse to the Fedora 21 Workstation ISO, select Choose Volume, and click Forward to continue.
- Choose the memory and CPU. Choose the amount of RAM and number of processors available to the VM, and click Forward. I suggest at least 1024MB of RAM and at least one processor. Using 2048MB of RAM, if it is available, is better.
- Enable storage. Choose the amount of disk space you want the VM to consume. I suggest at least 10GB for a Fedora Workstation, but you could probably get by with less. The qcow2 image that is created grows to the size you actually consume (up to the amount allocated), so overallocating space causes no problem until you actually try to use that space. Click Forward.
- Review the settings before the installation starts. Choose the name for the virtual machine, and review the other setting for your installation. Click Advanced Options, and make sure the “bridge0” entry is selected. Select Customize Configuration Before Install to further review settings. Leave other settings at the default for now, and click Finish.
- Review the hardware settings. If you selected “Customize” on the previous screen, you can review the settings in more detail. When you are satisfied, select Begin Installation.
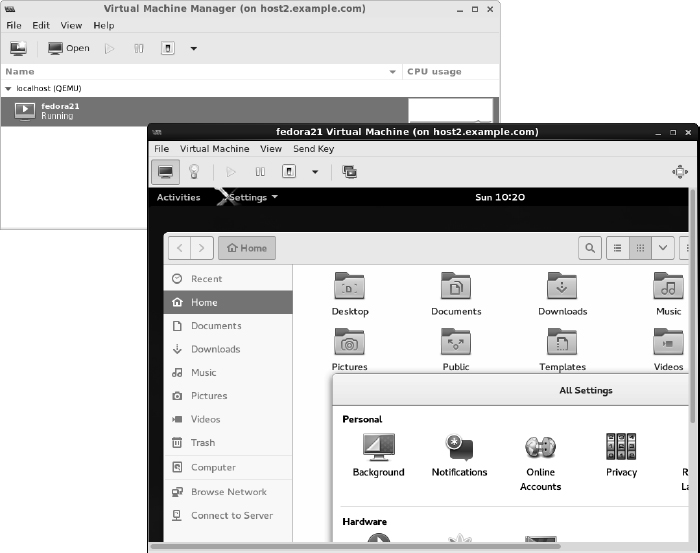
- Install the virtual machine. You are prompted to install the system just as you would be if you were installing directly to hardware. Complete the installation, and reboot the virtual machine. If the VM window isn't open, double-click the VM entry (in this case, fedora21) in the virt-manager window and log in. Figure 26.2 shows an example of the virt-manager window with the Fedora 21 Workstation virtual machine displayed.
Open the virtual machine and begin using it.
Managing virtual machines
After you have one or more virtual machines installed on a hypervisor, you can manage each VM in much the same ways you manage a computer system installed directly on hardware. You can do these things:
- View the system from a console. Double-click a running VM in the virt-manager window. A console window opens to the VM, allowing you to use the VM just as you would from a physical console to access an operating system installed directly on the hardware.
- Shut down the VM. Right-click the VM entry, and select Shut down. Then select either Shut down (to shut down properly) or Force off (effectively pulling the plug). Or you can select Reboot.
- Start the VM. If the VM is currently shut down, right-click the entry and select Run to start the VM running.
- Delete the VM. If you are totally finished using the VM, select Delete. You are asked if you want to delete the storage as well. Uncheck the box if you want to keep the storage associated with the VM.
Now that you are comfortable using your virtual machines, you can try migrating a VM to another hypervisor.
Migrating virtual machines
Being able to migrate your virtual machines between different hypervisors gives you tremendous flexibility in managing your computer workloads. Here are some of the advantages:
- Improve performance by moving VMs from hypervisors that are overloaded to ones that have more available memory and CPU capacity.
- Do routine maintenance on a hypervisor while keeping your VMs running.
- Move VMs off underutilized hypervisors so you can shut them off to save energy until they are needed again.
- Move VMs off site if you are expecting to shut down a datacenter or expecting a hurricane or other catastrophe to hit your datacenter.
Live migration, in particular, is valuable if you need work to continue on the VMs without interruption. The key to getting live VM migration to work is setting up your environment properly. Make sure the following are in place:
- Shared networked storage among the hypervisors
- The same network interfaces configured on each hypervisor
- Compatible CPUs between hypervisors (Often, a set of hypervisors have the exact same hardware.)
- A fast network connection between the hypervisors and storage
- The same or similar versions of virtualization software on the hypervisors (In our case, we used Fedora 21 on both and installed them similarly.)
With all that in place, live migration requires only a few steps to get going.
Step 1: Identify other hypervisors
Assuming that the Virtual Machine Manager window is still up and running on one of your hypervisors, go to that window and do the following to connect to the other hypervisor:
- Connect to the hypervisor. Select File Add Connection. The Add Connection window should appear.
- Add the connection. Select the Connect to Remote Host check box, choose SSH as the Method, use the user name root, and type the hostname of the other hypervisor (for example, host1.example.com). When you click Connect, you may be prompted to enter a password for the remote hypervisor's root user and enter other information.
An entry for the new hypervisor should appear on the Virtual Machine Manager window.
Step 2: Migrate running VM to another hypervisor
Right-click any VM that is currently running, and select Migrate. The Migrate the Virtual Machine window appears, as shown in Figure 26.3.
FIGURE 26.3
Choose which hypervisor to migrate the VM to.
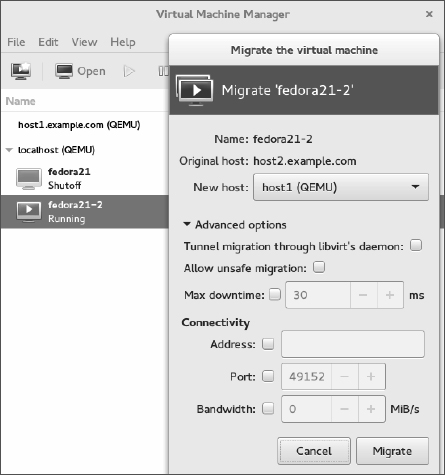
Select the new host. In my example, the VM is currently running on host2, so I want to select host1 as the new host. After a bit of time for the memory image of the VM to copy over to the other host, the VM should appear as running on that host.
If, for some reason, your migration fails (incompatible CPUs or other problems), you can always shut down the VM on one host and start it again on the other host. Doing that only requires that your shared storage is in place. On the second host, simply run the Create a new virtual machine wizard, but select to run an existing image instead of an installation ISO.
The hypervisor configuration I just showed you might suit you well for your home workstation or even a small business. Although it is beyond the scope of this book to help you develop an entire cloud computing platform, it is within our charter to help you use different cloud platforms to run your Linux systems. The next chapter helps you do that.
Summary
Linux is in the foundation on which most of today's emerging cloud technologies are being built. This chapter describes many of the basic components that go into building a cloud based on Linux and other open source technology. It then helps you learn about some of those basic technologies by setting up a couple of hypervisors and launching virtual machines.
Exercises
The exercises in this section describe tasks related to setting up a hypervisor (KVM host computer) and using it to run virtual machines. If you are stuck, solutions to the tasks are shown in Appendix B. Keep in mind that the solutions shown in Appendix B are usually just one of multiple ways to complete a task.
Although the example shown in this chapter for setting up hypervisors uses three physical machines, these exercises can be done on a single physical machine.
- Check your computer to see if it can support KVM virtualization.
- Install a Linux system along with the packages needed to use it as a KVM host and to run the Virtual Machine Manager application.
- Make sure that the sshd and libvirtd services are running on the system.
- Get a Linux installation ISO image that is compatible with your hypervisor, and copy it to the default directory used by Virtual Machine Manager to store images.
- Check that the default network bridge (virbr0) is currently active.
- Install a virtual machine using the ISO image you copied earlier.
- Make sure you can log into and use the virtual machine.
- Check that your virtual machine can connect to the Internet or other network outside the hypervisor.
- Stop the virtual machine so it is no longer running.
- Start the virtual machine again so it is running and available.