Table of Contents for
Linux Bible, 9th Edition
 Linux Bible, 9th Edition
Published by
John Wiley & Sons, 2015
Linux Bible, 9th Edition
Published by
John Wiley & Sons, 2015
- Cover Page
- Title Page
- Copyright
- Dedication
- About the Author
- About the Technical Editor
- Credits
- Acknowledgments
- Contents at a Glance
- Contents
- Introduction
- Part I: Getting Started
- Chapter 1: Starting with Linux
- Chapter 2: Creating the Perfect Linux Desktop
- Part II: Becoming a Linux Power User
- Chapter 3: Using the Shell
- Chapter 4: Moving around the Filesystem
- Chapter 5: Working with Text Files
- Chapter 6: Managing Running Processes
- Chapter 7: Writing Simple Shell Scripts
- Part III: Becoming a Linux System Administrator
- Chapter 8: Learning System Administration
- Chapter 9: Installing Linux
- Chapter 10: Getting and Managing Software
- Chapter 11: Managing User Accounts
- Chapter 12: Managing Disks and Filesystems
- Part IV: Becoming a Linux Server Administrator
- Chapter 13: Understanding Server Administration
- Chapter 14: Administering Networking
- Chapter 15: Starting and Stopping Services
- Chapter 16: Configuring a Print Server
- Chapter 17: Configuring a Web Server
- Chapter 18: Configuring an FTP Server
- Chapter 19: Configuring a Windows File Sharing (Samba) Server
- Chapter 20: Configuring an NFS File Server
- Chapter 21: Troubleshooting Linux
- Part V: Learning Linux Security Techniques
- Chapter 22: Understanding Basic Linux Security
- Chapter 23: Understanding Advanced Linux Security
- Chapter 24: Enhancing Linux Security with SELinux
- Chapter 25: Securing Linux on a Network
- Part VI: Extending Linux into the Cloud
- Chapter 26: Using Linux for Cloud Computing
- Chapter 27: Deploying Linux to the Cloud
- Part VII: Appendixes
- Appendix A: Media
- Appendix B: Exercise Answers
- Index
- Linux® Bible, Ninth Edition

Managing Disks and Filesystems
IN THIS CHAPTER
Creating disk partitions
Creating logical volumes with LVM
Adding filesystems
Mounting filesystems
Unmounting filesystems
Your operating system, applications, and data all need to be kept on some kind of permanent storage so that when you turn off your computer, it is all still there when the computer is turned on again. Traditionally, that storage has been provided by a hard disk in your computer. To organize the information on that disk, the disk is usually divided into partitions, with most partitions given a structure referred to as a filesystem.
This chapter describes how to work with hard disks. Hard disk tasks include partitioning, adding filesystems, and managing those filesystems in various ways. Storage devices that are attached to the systems from removable devices and network devices can be partitioned and managed in the same ways.
After covering basic partitions, I describe how logical volume management (LVM) can be used to make it easier to grow, shrink, and otherwise manage filesystems more efficiently.
Understanding Disk Storage
The basics of how data storage works are the same in most modern operating systems. When you install the operating system, the disk is divided into one or more partitions. Each partition is formatted with a filesystem. In the case of Linux, some of the partitions may be specially formatted for elements such as a swap area or LVM physical volumes. Disks are used for permanent storage; random access memory (RAM) and swap are used for temporary storage. For example, when you run a command, that command is copied from the hard disk into RAM so that your computer processor (CPU) can access it more quickly.
Your CPU can access data much faster from RAM than it can from hard disk. However, a disk is usually much larger than RAM, RAM is much more expensive, and RAM is erased when the computer reboots. Think of your office as a metaphor for RAM and disk. A disk is like a file cabinet where you store folders of information you need. RAM is like the top of your desk, where you put the folder of papers while you are using it, but you put it back in the file cabinet when you are not.
If RAM fills up, by running too many processes or a process with a memory leak, new processes fail if your system doesn't have a way to extend system memory. That's where a swap area comes in. A swap space is a hard disk swap partition or a swap file where your computer can “swap out” data from RAM that isn't being used at the moment and then “swap in” the data back to RAM when it is again needed. Although it is better to never exceed your RAM (performance takes a hit when you swap), swapping out is better than having processes just fail.
Another special partition is a logical volume management (LVM) physical volume. LVM physical volumes enable you to create pools of storage space called volume groups. From those volume groups, you have much more flexibility for growing and shrinking logical volumes than you have resizing disk partitions directly.
For Linux, at least one disk partition is required, assigned to the root (/) of the entire Linux filesystem. However, it is more common to have separate partitions that are assigned to particular directories, such as /home, /var, and/or /tmp. Each of the partitions is connected to the larger Linux filesystem by mounting it to a point in the filesystem where you want that partition to be used. Any file added to the mount point directory of a partition, or a subdirectory, is stored on that partition.
NOTE
The word mount refers to the action of connecting a filesystem from a hard disk, USB drive, or network storage device to a particular point in the filesystem. This action is done using the mount command, along with options to tell the command where the storage device is and what directory in the filesystem to connect it to.
The business of connecting disk partitions to the Linux filesystem is done automatically and invisibly to the end user. How does this happen? Each regular disk partition created when you install Linux is associated with a device name. An entry in the /etc/fstab file tells Linux each partition's device name and where to mount it (as well as other bits of information). The mounting is done when the system boots.
Most of this chapter focuses on understanding how your computer's disk is partitioned and connected to form your Linux filesystem, as well as how to partition disks, format filesystems and swap space, and have those items used when the system boots. The chapter then covers how to do partitioning and filesystem creation manually.
Filesystems are organized differently in Linux than they are in Microsoft Windows operating systems. Instead of drive letters (for example, A:, B:, C:) for each local disk, network filesystem, CD-ROM, or other type of storage medium, everything fits neatly into the Linux directory structure.
Some drives are connected (mounted) automatically into the filesystem when you insert removable media. For example, a CD might be mounted on /media/cdrom. If the drive isn't mounted automatically, it is up to an administrator to create a mount point in the filesystem and then connect the disk to that point.
Linux can understand VFAT filesystems, which are often the default format when you buy a USB flash drive. A VFAT USB flash drive provides a good way to share data between Linux and Windows systems. Linux kernel support is available for NTFS filesystems, which are usually used with Windows these days. However, NTFS often requires that you install additional kernel drivers in Linux.
VFAT file systems are often used when files need to be exchanged between different types of operating systems. Because VFAT was used in MS-DOS and early Windows operating systems, it offers a good lowest common denominator for sharing files with many types of systems (including Linux). NTFS is the file system type most commonly used with modern Microsoft Windows systems.
Partitioning Hard Disks
Linux provides several tools for managing your hard disk partitions. You need to know how to partition your disk if you want to add a disk to your system or change your existing disk configuration.
This section demonstrates disk partitioning using an 8GB removable USB flash drive and a fixed hard disk. To be safe, I use a USB flash drive that doesn't contain any data I want to keep to practice partitioning.
Changing partitioning can make a system unbootable!
I don't recommend using your system's primary hard disk to practice changing partitioning because a mistake can make your system unbootable. Even if you use a separate USB flash drive to practice, a bad entry in /etc/fstab can hang your system on reboot. If after changing partitions your system fails to boot, refer to Chapter 21, “Troubleshooting Linux,” for information on how to fix the problem.
Understanding partition tables
PC architecture computers have traditionally used Master Boot Record (MBR) partition tables to store information about the sizes and layouts of the hard disk partitions. There are many tools for managing MBR partitions that are quite stable and well known. In the past few years, however, a new standard called Global Unique Identifiers (GUID) partition tables began being used on systems as part of the UEFI computer architecture to replace the older BIOS method of booting the system.
Some Linux partitioning tools have been updated to handle GUID partition tables. Other tools for handling GUID partition tables have been added. If you happen to have a system that uses GUID partition tables, you can use a tool called gdisk instead of the fdisk command described in this chapter.
Limitations imposed by the MBR specification brought about the need for GUID partitions. In particular, MBR partitions are limited to 2TB in size. GUID partitions can create partitions up to 9.4ZB (zettabytes). While the gdisk command lets you manage partitions that are potentially much larger the subcommands for creating, deleting, and changing disk partitions are essentially the same as those available with fdisk.
Viewing disk partitions
To view disk partitions, use the fdisk command with the -l option. The following is an example of partitioning on a 160GB fixed hard drive on a Red Hat Enterprise Linux 7 system:
# fdisk -l /dev/sda
Disk /dev/sda: 160.0 GB, 160000000000 bytes, 312500000 sectors
Units = sectors of 1 * 512 = 512 bytes
Sector size (logical/physical): 512 bytes / 512 bytes
I/O size (minimum/optimal): 512 bytes / 512 bytes
Disk label type: dos
Disk identifier: 0x0008870c
   Device Boot      Start         End     Blocks Id System
/dev/sda1   *        2048     1026047     512000 83 Linux
/dev/sda2         1026048   304281599  151627776 8e Linux LVM
When a USB flash drive is inserted, it is assigned to the next available sd device. The following shows the partitioning on a USB drive from a RHEL system, where /dev/sdc is assigned as the device name (the third disk on the system). Use the -c option with fdisk to turn off DOS compatibility mode and -u to show the size in sectors instead of cylinders, because partitions may not fall on cylinder boundaries (default options changed recently, so the -c and -u options are no longer needed in the latest RHEL or Fedora releases):
# fdisk -cul /dev/sdc
Disk /dev/sdc: 8059 MB, 8059355136 bytes
248 heads, 62 sectors/track, 1023 cylinders, total 15740928 sectors
Units = sectors of 1 * 512 = 512 bytes
Sector size (logical/physical): 512 bytes / 512 bytes
I/O size (minimum/optimal): 512 bytes / 512 bytes
Disk identifier: 0x0007a9f4
   Device Boot   Start      End  Blocks Id System
/dev/sdc1   *     2048   194559   96256 83 Linux
/dev/sdc2       194560  2148351  976896 82 Linux swap / Solaris
/dev/sdc3      2150398 15738879 6794241  5 Extended
/dev/sdc5      2150400 15738879 6794240 83 Linux
The example just shown is for a USB drive that had a bootable Linux system installed on it. The first partition (/dev/sdc1) is a small /boot partition. The second (/dev/sdc2) is assigned as a swap area. The rest of the disk is assigned as an extended partition (/dev/sdc3), which allows any further partitions to take space from that partition. The final partition (/dev/sdc5) is assigned to the root filesystem (/) and consumes all the remaining disk space.
Your drive might be assigned to a different device name. Here are some things to look for:
- A SCSI or USB storage device, represented by an sd? device (such as sda, sdb, sdc, and so on), can have up to 16 minor devices (such as the main /dev/sdc device and /dev/sdc1 through /dev/sdc15). So there can be 15 partitions total.
- For x86 computers, disks can have up to four primary partitions. So, to have more than four total partitions, at least one must be an extended partition. Notice that /dev/sdc3 is an extended partition that consumes all remaining disk space not used by the first two partitions. Any partitions beyond the four primary partitions are logical partitions that use space from the extended partition.
- The id field indicates the type of partition. Notice that there is a mixture of Linux and swap partitions in both examples and Linux LVM partitions in the first example.
Your first primary hard disk usually appears as /dev/sda. With RHEL and Fedora installations, there is usually at least one LVM partition created by the installer, out of which other partitions can be assigned. So the output of fdisk might be as simple as the following:
# fdisk -cul /dev/sda
Disk /dev/sda: 500.1 GB, 500107862016 bytes
255 heads, 63 sectors/track, 60801 cylinders, total 976773168 sectors
Units = sectors of 1 * 512 = 512 bytes
Sector size (logical/physical): 512 bytes / 512 bytes
I/O size (minimum/optimal): 512 bytes / 512 bytes
Disk identifier: 0x000ebb20
   Device Boot  Start       End    Blocks Id System
/dev/sda1   *    2048    411647    204800 83 Linux
/dev/sda2      411648 976773119 488180736 8e Linux LVM
The first partition is roughly 200MB and is mounted on the /boot directory. The asterisk (*) under the Boot column indicates that the partition is bootable (that's where the kernel and other components needed to boot the system are stored). The rest of the disk is consumed by the LVM partition, which is ultimately used to create logical volumes. You can find out more on LVM in the section “Using Logical Volume Management Partitions” later in this chapter.
For the moment, I recommend you leave the hard disk alone and find a USB flash drive that you do not mind erasing. You can try the commands I demonstrate on that drive.
Creating a single-partition disk
To add a new storage medium (hard disk, USB flash drive, or similar device) to your computer so that it can be used by Linux, you need to first connect the disk device to your computer and then partition the disk. Here's the general procedure:
- Install the new hard drive or insert the new USB flash drive.
- Partition the new disk.
- Create the filesystems on the new disk.
- Mount the filesystems.
The easiest way to add a disk or flash drive to Linux is to have the entire disk devoted to a single Linux partition. You can have multiple partitions, however, and assign them each to different types of filesystems and different mount points, if you like.
The following process takes you through partitioning a USB flash drive to be used for Linux that has only one partition. If you have a USB flash drive (any size) that you don't mind erasing, you can work through this procedure as you read. The section following this describes how to partition a disk with multiple partitions.
WARNING
If you make a mistake partitioning your disk with fdisk, just type q to exit without saving your changes. If you are stuck in the middle of an operation, such as adding a partition, just complete that operation, and then type q after you see the command prompt.
- For a USB flash drive, just plug it into an available USB port. Going forward, I use an 8GB USB flash drive, but you can get a USB flash drive of any size.
- Determine the device name for the USB drive. As root user from a shell, type the following tail command, and then insert the USB flash drive. Messages appear, indicating the device name of the drive you just plugged in (press Ctrl+C to exit the tail command when you are finished):
# tail -f /var/log/messages
kernel: usb 3-2: new high speed USB device number 69 using xhci_hcd
kernel: usb 3-2: New USB device found, idVendor=0930,
idProduct=6545
kernel: usb 3-2: New USB device strings:
     Mfr=1, Product=2, SerialNumber=3
kernel: usb 3-2: Product: USB Flash Memory
kernel: usb 3-2: Manufacturer:
kernel: usb 3-2: SerialNumber: 001D92AD6ADAB98043230329
kernel: usb 3-2: configuration #1 chosen from 1 choice
kernel: scsi8 : SCSI emulation for USB Mass Storage devices
kernel: sd 8:0:0:0: Attached scsi generic sg2 type 0
kernel: sd 8:0:0:0: [sdc] 15740928 512-byte
     logical blocks: (8.05 GB/7.50 GiB)
kernel: sd 8:0:0:0: [sdc] Write Protect is off
kernel: sd 8:0:0:0: [sdc] Assuming drive cache: write through
kernel: sd 8:0:0:0: [sdc] Assuming drive cache: write through
kernel: sdc: sdc1 sdc2 sdc3 < sdc5 >
- From the output, you can see that the USB flash drive was found and assigned to /dev/sdc. (Your device name may be different!) It also contains multiple partitions: sdc1, sdc2, sdc3, and sdc5. Be sure you identify the correct disk, or you could lose all data from disks you may want to keep!
- If the USB flash drive mounts automatically, unmount it. From a GNOME 2 desktop, right-click the 8.0GB Filesystem icon that appears and select Unmount. From a GNOME 3 desktop, move your mouse to select the bottom tray, click the removable storage icon, and click the eject button. Or, in this case, as root you could instead type umount /dev/sdcl.
- Use the fdisk command to create partitions on the USB drive. For example, if you are formatting the third USB, SATA, or SCSI disk (sdc), you can type the following:
#  fdisk /dev/sdc
Command (m for help):
Now you are in fdisk command mode, where you can use the fdisk single-letter command set to work with your partitions. (For RHEL 6, adding the -c and -u options enables you to select the size of each partition based on sectors instead of cylinders. Those options are not needed for RHEL 7.)
- If you start with a new USB flash drive, it may have one partition that is entirely devoted to a Windows-compatible filesystem (such as VFAT). Use p to view all partitions and d to delete the partition. Here's what it looked like when I did that:
Command (m for help): p
...
   Device Boot Start      End  Blocks Id System
/dev/sdc1       2048 15667199 7832576  c W95 FAT32 (LBA)
Command (m for help): d
Selected partition 1
- To create a new partition, type the letter n. You are prompted for the type of partition.
- Choose an extended (e) or primary partition (p). Type the letter p to choose primary.
- Type the partition number. If you are creating the first partition (or for only one partition), type the number 1. You are prompted for the first sector to start the partition.
- Select the first available sector number (you can just press Enter to choose it). You are prompted for the last sector.
- Enter the size of the partition. Because you are just creating one partition to consume the whole disk, choose the last available sector. To do that you can just press Enter to accept the default.
- Double-check that the drive is partitioned the way you want by pressing p. (Your output will differ, depending on the size of your drive.)
Command (m for help): p ... Device Boot Start End Blocks Id System /dev/sdc1 2048 15667199 7832576 83 Linux - To make changes to the partition table permanent, type w. This writes the changes, tries to sync those changes with the Linux kernel, and quits fdisk. If you see a message like the following, don't worry; you can fix that in the next step:
WARNING: Re-reading the partition table failed with error 16:
Device or resource busy.
- If fdisk cannot sync the partition table on the disk with the kernel, the most likely reason is that a partition from the disk is still mounted. Unmount the partition, and try running the following command to sync the disk partition table with the kernel:
# partprobe /dev/sdcIf partprobe does not work, rebooting the computer will make sure the disk and kernel are in sync.
- Although the partitioning is done, the new partition is not yet ready to use. For that, you have to create a filesystem on the new partition. To create a filesystem on the new disk partition, use the mkfs command. By default, this command creates an ext2 filesystem, which is usable by Linux. However, in most cases you want to use a journaling filesystem (such as ext3 or ext4). To create an ext4 filesystem on the first partition of the third hard disk, type the following:
# mkfs -t ext4 /dev/sdc1You can use other commands, or options to this command, to create other filesystem types. For example, use mkfs. vfat to create a VFAT filesystem, mkfs.msdos for DOS, or mkfs.reiserfs for the Reiser filesystem type. You may want a VFAT filesystem if you want to share files among Linux, Windows, and Mac systems.
- To be able to use the new filesystem, you need to create a mount point and mount it to the partition. Here is an example of how to do that. You then check to make sure that the mount succeeded.
# mkdir /mnt/test
# mount /dev/sdc1 /mnt/test
# df -h /mnt/test
Filesystem            Size Used Avail Use% Mounted on
/dev/sdc1             7.4G  17M  7.0G   1% /mnt/test
# mount | grep sdc1
/dev/sdc1 on /mnt/test type ext4 (rw)
The df command shows that /dev/sdc1 is mounted on /mnt/test and that it offers about 7.4GB of disk space. The mount command shows all mounted filesystems, but here I used grep to show that sdc1 is mounted and is an ext4 filesystem type.
Any files or directories you create later in the /mnt/test directory and any of its subdirectories are stored on the /dev/sdc1 device.
- When you are finished using the drive, you can unmount it with the umount command, after which you can safely remove the drive (see the description of the umount command later if this command fails):
# umount /dev/sdc1 - You don't usually set up a USB flash drive to mount automatically every time the system boots because it mounts automatically when you plug it in. But if you decide you want to do that, edit /etc/fstab and add a line describing what and where to mount. Here is an example of a line you might add:
/dev/sdc1 /mnt/test ext4 defaults 0 1
In this example, the partition (/dev/sdc1) is mounted on the /mnt/test directory as an ext4 filesystem. The defaults keyword causes the partition to be mounted at boot time. The number 0 tells the system not to back up files from this filesystem with the dump command (dump is rarely used any more, but the field is here). The 1 in the last column tells the system to check the partition for errors after a certain number of mounts.
At this point, you have a working, permanently mounted disk partition. The next section describes how to partition a disk that has multiple partitions.
Creating a multiple-partition disk
Now that you understand the basic process of partitioning a disk, adding a filesystem, and making that filesystem available (temporarily and permanently), it is time to try a more complex example. Taking that same 8GB USB flash drive, I ran the procedure described later in this section to create multiple partitions on one disk.
In this procedure, I create a partition of 500MB (sdc1 and sdc2), 300MB (sdc3), 350MB (sdc5), and 400MB (sdc6). The sdc4 device is an extended partition, which consumes all remaining disk space. Space from the sdc5 and sdc6 partitions is taken from the extended partition.
As before, insert the USB flash drive and determine the device name (in my case, /dev/sdc). Also, be sure to unmount any partitions that mount automatically when you insert the USB flash drive.
TIP
When you indicate the size of each partition, type the plus sign and the number of megabytes or gigabytes you want to assign to the partition. For example, +1024M to create a 1024 megabyte partition or +10G for a 10 gigabyte partition. Be sure to remember the plus sign (+) and the M or G! If you forget the M or G, fdisk thinks you mean sectors and you get unexpected results.
- To start, open the /dev/sdc device with fdisk, delete the first (only) partition, and then add six new partitions.
# fdisk /dev/sdc
Command (m for help): d
Selected partition 1
Command (m for help): n
Command action
   e   extended
   p   primary partition (1-4)
p
Partition number (1-4): 1
First sector (2048-15667199, default 2048):
<Enter>
Using default value 2048
Last sector,+sectors or +size{K,M,G}(...default 15667199):+500M
Command (m for help): n
Command action
   e   extended
   p   primary partition (1-4)
p
Partition number (1-4): 2
First sector (1026048-15667199, default 1026048):
<Enter>
Using default value 1026048
Last sector, +sectorsor +size
{K,M,G}(default 15667199):+500M
Command (m for help): n
Command action
   e   extended
   p   primary partition (1-4)
p
Partition number (1-4): 3
First sector (2050048-15667199, default 2050048):
 <Enter>
Using default value 2050048
Last sector, +sectorsor +size {K,M,G} (...default 15667199):+300M
Command (m for help): n
Command action
   e   extended
   p   primary partition (1-4)
e
Selected partition 4
First sector (2664448-15667199, default 2664448):
<Enter>
Using default value 2664448
Last sector,+sectors or + size{K,M,G}(... default 15667199):
<Enter>
Using default value 15667199
Command (m for help): n
First sector (2666496-15667199, default 2666496):
<Enter>
Using default value 2666496
Last sector, +sectors or +size{K,M,G} (...default 15667199): +350M
Command (m for help): n
First sector (...default 3385344):
<Enter>
Using default value 3385344
Last sector, +sectors or +size {K,M,G} (...default 15667199): +400M
- Check the partitioning before saving by typing p. Notice that there are five usable partitions (sdc1, sdc2, sdc3, sdc5, and sdc6) and that the sectors between the Start and End for sdc 4 are being consumed by sdc5 and sdc6.
Command (m for help): p ... Device Boot Start End Blocks Id System /dev/sdc1 2048 1026047 512000 83 Linux /dev/sdc2 1026048 2050047 512000 83 Linux /dev/sdc3 2050048 2664447 307200 83 Linux /dev/sdc4 2664448 15667199 6501376 5 Extended /dev/sdc5 2666496 3383295 358400 83 Linux /dev/sdc6 3385344 4204543 409600 83 Linux - The default partition type is Linux. I decided I want to use some of the partitions for swap space (type 82), FAT32 (type x), and Linux LVM (type 8e). To do that, I type t and indicate which partition type to use. Type L to see a list of partition types.
Command (m for help): t
Partition number (1-6): 2
Hex code (type L to list codes): 82
Changed system type of partition 2 to 82 (Linux swap / Solaris)
Command (m for help): t
Partition number (1-6): 5
Hex code (type L to list codes): c
Changed system type of partition 5 to c (W95 FAT32 (LBA))
Command (m for help): t
Partition number (1-6): 6
Hex code (type L to list codes): 8e
Changed system type of partition 6 to 8e (Linux LVM)
- I check that the partition table is the way I want it and then write the changes:
Command (m for help): p
...
   Device Boot Start      End  Blocks Id System
/dev/sdc1       2048  1026047  512000 83 Linux
/dev/sdc2    1026048  2050047  512000 82 Linux swap /
Solaris
/dev/sdc3    2050048  2664447  307200 83 Linux
/dev/sdc4    2664448 15667199 6501376  5 Extended
/dev/sdc5    2666496  3383295  358400  c W95 FAT32 (LBA)
/dev/sdc6    3385344  4204543  409600 8e Linux LVM
Command (m for help): w
The partition table has been altered!
Calling ioctl() to re-read partition table.
...
- After the write is completed, check that the kernel knows about the changes to the partition table. To do that, search the /proc/partitions for sdc. If the new devices are not there, run the partprobe /dev/sdc command on the drive or reboot your computer.
# grep sdc /proc/partitions 8 32 7833600 sdc 8 33 512000 sdc1 8 34 512000 sdc2 8 35 307200 sdc3 8 36 1 sdc4 8 37 358400 sdc5 8 38 409600 sdc6 - While the partitions are now set for different types of content, other commands are needed to structure the partitions into filesystems or swap areas. Here's how to do that for the partitions just created:
- sdcl—To make this into a regular Linux ext4 filesystem, type the following:
# mkfs -t ext4 /dev/sdc1 - sdc2—To format this as a swap area, type the following:
# mkswap /dev/sdc2 - sdc3—To make this into an ext2 filesystem (the default) type the following:
# mkfs /dev/sdc3 - sdc5—To make this into a VFAT filesystem (the default) type the following:
# mkfs -t vfat /dev/sdc5 - sdc6—To make this into a LVM physical volume type the following:
# pvcreate /dev/sdc6
- sdcl—To make this into a regular Linux ext4 filesystem, type the following:
These partitions are now ready to be mounted, used as a swap area, or added to an LVM volume group. See the next section, “Using Logical Volume Management Partitions,” to see how LVM physical volumes are used to ultimately create LVM logical volumes from volume groups. See the section “Mounting Filesystems” for descriptions of how to mount filesystems and enable swap areas.
Using Logical Volume Management Partitions
Basic disk partitioning in Linux has its shortcomings. What happens if you run out of disk space? In the old days, a common solution was to copy data to a bigger disk, restart the system with the new disk, and hope that you didn't run out of space again any time soon. This process meant downtime and inefficiency.
Logical volume management (LVM) offers lots of flexibility and efficiency in dealing with constantly changing storage needs. With LVM, physical disk partitions are added to pools of space called volume groups. Logical volumes are assigned space from volume groups as needed. This gives you these abilities:
- Add more space to a logical volume from the volume group while the volume is still in use.
- Add more physical volumes to a volume group if the volume group begins to run out of space. The physical volumes can be from disks.
- Move data from one physical volume to another, so you can remove smaller disks and replace them with larger ones while the filesystems are still in use—again, without downtime.
With LVM it is also easier to shrink filesystems to reclaim disk space, although shrinking does require that you unmount the logical volume (but no reboot is needed). LVM also supports advanced features, such as mirroring and working in clusters.
Checking an existing LVM
Let's start by looking at an existing LVM example on a Red Hat Enterprise Linux system. The following command displays the partitions on my first hard disk:
# fdisk -l /dev/sda | grep /dev/sda
Disk /dev/sda: 160.0 GB, 160000000000 bytes
/dev/sda1   *        2048     1026047      512000 83 Linux
/dev/sda2   *     1026048   312498175   155736064 8e Linux LVM
On this RHEL system, the 160GB hard drive is divided into one 500MB Linux partition (sda1) and a second (Linux LVM) partition that consumes the rest of the disk (sda2). Next, I use the pvdisplay command to see if that partition is being used in an LVM group:
# pvdisplay /dev/sda2
  --- Physical volume ---
  PV Name               /dev/sda2
  VG Name               vg_abc
  PV Size               148.52 GiB / not usable 2.00 MiB
  Allocatable           yes (but full)
  PE Size               4.00 MiB
  Total PE              38021
  Free PE               0
  Allocated PE          38021
  PV UUID               wlvuIv-UiI2-pNND-f39j-oH0X-9too-AOII7R
You can see that the LVM physical volume represented by /dev/sda2 has 148.52GiB of space, all of which has been totally allocated to a volume group named vg_abc. The smallest unit of storage that can be used from this physical volume is 4.0MiB, which is referred to as a Physical Extent (PE).
NOTE
Notice that LVM tools show disk space in MiB and GiB. One MB is 1,000,000 bytes (10^6), while a MiB is 1,048,576 bytes (2^20). A MiB is a more accurate way to reflect how data are stored on a computer. But marketing people tend to use MB because it makes the hard disks, CDs, and DVDs they sell look like they have more capacity than they do. Keep in mind that most tools in Linux display storage data in MiB and GiB, although some can display MB and GB as well.
Next, you want to see information about the volume group:
# vgdisplay vg_abc
  --- Volume group ---
  VG Name              vg_abc
  System ID
Format               lvm2
  Metadata Areas       1
  Metadata Sequence No 4
  VG Access            read/write
  VG Status            resizable
  MAX LV               0
  Cur LV               3
  Open LV              3
  Max PV               0
  Cur PV               1
  Act PV               1
  VG Size              148.52 GiB
  PE Size              4.00 MiB
  Total PE             38021
  Alloc PE / Size      38021 / 148.52 GiB
  Free PE / Size       0 / 0
  VG UUID              c2SGHM-KU9H-wbXM-sgca-EtBr-UXAq-UnnSTh
You can see that all of the 38,021 PEs have been allocated. Using lvdisplay as follows, you can see where they have been allocated (I have snipped some of the output):
# lvdisplay vg_abc
  --- Logical volume ---
  LV Name                /dev/vg_abc/lv_root
  VG Name                vg_abc
  LV UUID                33VeDc-jd0l-hlCc-RMuB-tkcw-QvFi-cKCZqa
  LV Write Access        read/write
  LV Status              available
  # open                 1
  LV Size                50.00 GiB
  Current LE             12800
  Segments               1
  Allocation             inherit
  Read ahead sectors     auto
  - currently set to     256
  Block device           253:0
  --- Logical volume ---
  LV Name                /dev/vg_abc/lv_home
  VG Name                vg_abc
  ...
  LV Size                92.64 GiB
  --- Logical volume ---
  LV Name                /dev/vg_abc/lv_swap
  VG Name                vg_abc
  ...
  LV Size                5.88 GiB
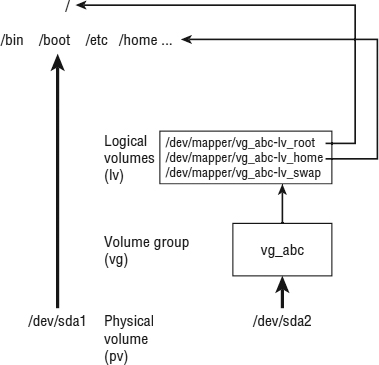
There are three logical volumes drawing space from vg_abc. Each logical volume is associated with a device name that includes the volume group name and the logical volume name: /dev/vg_abc/lv_root (50GB), /dev/vg_abc/lv_home (92.64GB), and /dev/vg_abc/lv_swap (5.88GB). Other devices linked to these names are located in the /dev/mapper directory: vg_abc-lv_home, vg_abc-lv_root, and vg_abc-lv_swap. Either set of names can be used to refer to these logical volumes.
The root and home logical volumes are formatted as ext4 filesystems, whereas the swap logical volume is formatted as swap space. Let's look in the /etc/fstab file to see how these logical volumes are used:
# grep vg_ /etc/fstab
/dev/mapper/vg_abc-lv_root /       ext4  defaults 1 1
/dev/mapper/vg_abc-lv_home /home   ext4  defaults 1 2
/dev/mapper/vg_abc-lv_swap swap    swap  defaults 0 0
Figure 12.1 illustrates how the different partitions, volume groups, and logical volumes relate to the complete Linux filesystem. The sda1 device is formatted as a filesystem and mounted on the /boot directory. The sda2 device provides space for the vg_abc volume group. Then logical volumes lv-home and lv-root are mounted on the /home and / directories, respectively.
FIGURE 12.1
LVM logical volumes can be mounted like regular partitions on a Linux filesystem.
If you run out of space on any of the logical volumes, you can assign more space from the volume group. If the volume group is out of space, you can add another hard drive or network storage drive and add space from that drive to the volume group, so more is available.
Now that you know how LVM works, the next section shows you how to create LVM logical volumes from scratch.
Creating LVM logical volumes
LVM logical volumes are used from the top down, but they are created from the bottom up. As illustrated in Figure 12.1, first you create one or more physical volumes (pv), use the physical volumes to create volume groups (vg), and then create logical volumes from the volume groups (lv).
Commands for working with each LVM component begin with the letters pv, vg, and lv. For example, pvdisplay shows physical volumes, vgdisplay shows volume groups, and lvdisplay shows logical volumes.
The following procedure takes you through the steps of creating LVM volumes from scratch. To do this procedure, you could use the USB flash drive and partitions I described earlier in this chapter. Use these steps:
- Obtain a disk with some spare space on it and create a disk partition on it of the LVM type (8e). Then use the pvcreate command to identify this partition as an LVM physical volume. The process of doing this is described in the section “Creating a multiple-partition disk” using the /dev/sdc6 device in that example.
- To add that physical volume to a new volume group, use the vgcreate command. The following command shows you how to create a volume group called myvg0 using the /dev/sdc6 device:
# vgcreate myvg0 /dev/sdc6 Volume group "myvg0" successfully created - To see the new volume group, type the following:
# vgdisplay myvg0 --- Volume group --- VG Name myvg0 ... VG Size 396.00 MiB PE Size 4.00 MiB Total PE 99 Alloc PE / Size 0 / 0 Free PE / Size 99 / 396.00 MiB - Of the 400MiB partition, 396MiB of space can be used in blocks of 4MiB. Here's how to create a logical volume from some of the space in that volume group and then check that the device for that logical volume exists:
#  lvcreate -n music -L 100M myvg0
   Logical volume "music" created
#  ls /dev/mapper/myvg0*
 /dev/mapper/myvg0-music
- The procedure created a device named /dev/mapper/myvg0-music. That device can now be used to put a filesystem on and mount, just as you did with regular partitions in the first part of this chapter. For example:
# mkfs -t ext4 /dev/mapper/myvg0-music
# mkdir /mnt/mymusic
# mount /dev/mapper/myvg0-music /mnt/mymusic
# df -h /mnt/mymusic
Filesystem              Size Used Avail Use% Mounted on
/dev/mapper/myvg0-music 97M  5.6M   87M   7% /mnt/mymusic
- As with regular partitions, logical volumes can be mounted permanently by adding an entry to the /etc/fstab file, such as:
/dev/mapper/myvg0-music /mnt/mymusic ext4 defaults 1 2
The next time you reboot, the logical volume is automatically mounted on /mnt/mymusic. (Be sure to unmount the logical volume and remove this line if you want to remove the USB flash drive from your computer.)
Growing LVM logical volumes
If you run out of space on a logical volume, you can add space to it without even unmounting it. To do that, you must have space available in the volume group, grow the logical volume, and grow the filesystem to fill it. Building on the procedure in the previous section, here's how to grow a logical volume:
- Note how much space is currently on the logical volume, and then check that space is available in the logical volume's volume group:
# vgdisplay myvg0
...
VG Size                396.00 MiB
PE Size                4.00 MiB
Total PE               99
Alloc PE / Size        25 / 100.00 MiB
Free PE / Size         74 / 296.00 MiB
# df -h /mnt/mymusic/
Filesystem                Size Used Avail Use% Mounted on
/dev/mapper/myvg0-music    97M 5.6M 87M 7% /mnt/mymusic
- Expand the logical volume using the lvextend command:
# lvextend -L +100M /dev/mapper/myvg0-music Extending logical volume music to 200.00 MiB Logical volume music successfully resized - Resize the filesystem to fit the new logical volume size:
# resize2fs -p /dev/mapper/myvg0-music - Check to see that the filesystem is now resized to include the additional disk space.
You can see that the filesystem is now about 100MB larger.
Mounting Filesystems
Now that you have had a chance to play with disk partitioning and filesystems, I'm going to step back and talk about how filesystems are set up to connect permanently to your Linux system.
Most of the hard disk partitions created when you install Linux are mounted automatically for you when the system boots. When you install Fedora, Ubuntu, Red Hat Enterprise Linux, and other Linux systems, you have the option to let the installer automatically configure your hard disk or create partitions yourself and indicate the mount points for those partitions.
When you boot Linux, usually all the Linux partitions on your hard disk are listed in your /etc/fstab file and are mounted. For that reason, this section describes what you might expect to find in that file. It also describes how you can mount other partitions so that they become part of your Linux filesystem.
The mount command is used not only to mount local storage devices, but also to mount other kinds of filesystems on your Linux system. For example, mount can be used to mount directories (folders) over the network from NFS or Samba servers. It can be used to mount filesystems from a new hard drive or USB flash drive that is not configured to automount. It can also mount filesystem image files using loop devices.
NOTE
With the addition of automatic mounting features and changes in how removable media are identified with the Linux 2.6 kernel (using features such as Udev and Hardware Abstraction Layer), you no longer need to manually mount removable media for many Linux desktop systems. Understanding how to manually mount and unmount filesystems on a Linux server, however, can be a very useful skill if you want to mount remote filesystems or temporarily mount partitions in particular locations.
Supported filesystems
To see filesystem types that are loaded in your kernel, type cat /proc/filesystems. The list that follows shows a sample of filesystem types that are currently supported in Linux, although they may not be in use at the moment or even available on the Linux distribution you are using.
- befs—Filesystem used by the BeOS operating system.
- btrfs—A copy-on-write filesystem that implements advanced filesystem features. It offers fault tolerance and easy administration. The btrfs file system has recently grown in popularity for enterprise applications.
- cifs—Common Internet Filesystem (CIFS), the virtual filesystem used to access servers that comply with the SNIA CIFS specification. CIFS is an attempt to refine and standardize the SMB protocol used by Samba and Windows file sharing.
- ext4—Successor to the popular ext3 filesystem. It includes many improvements over ext3, such as support for volumes up to 1 exbibyte and file sizes up to 16 tebibytes. (This replaced ext3 as the default filesystem used in Fedora and RHEL. It has since been supplanted by xfs as the default for RHEL.)
- ext3—Ext filesystems are the most common in most Linux systems. The ext3 filesystem, also called the third extended filesystem, includes journaling features that, compared to ext2, improve a filesystem's capability to recover from crashes.
- ext2—The default filesystem type for earlier Linux systems. Features are the same as ext3, except that ext2 doesn't include journaling features.
- ext—This is the first version of ext3. It is not used very often anymore.
- iso9660—Evolved from the High Sierra filesystem (the original standard for CD-ROMs). Extensions to the High Sierra standard (called Rock Ridge extensions) allow iso9660 filesystems to support long filenames and UNIX-style information (such as file permissions, ownership, and links). Data CD-ROMs typically use this filesystem type.
- kafs—AFS client filesystem. Used in distributed computing environments to share files with Linux, Windows, and Macintosh clients.
- minix—Minix filesystem type, used originally with the Minix version of UNIX. It supports filenames of up to only 30 characters.
- msdos—An MS-DOS filesystem. You can use this type to mount floppy disks that come from Microsoft operating systems.
- vfat—Microsoft extended FAT (VFAT) filesystem.
- umsdos—An MS-DOS filesystem with extensions to allow features that are similar to UNIX (including long filenames).
- proc—Not a real filesystem, but rather a filesystem interface to the Linux kernel. You probably won't do anything special to set up a proc filesystem. However, the /proc mount point should be a proc filesystem. Many utilities rely on /proc to gain access to Linux kernel information.
- reiserfs—ReiserFS journaled filesystem. ReiserFS was once a common default filesystem type for several Linux distributions. However, ext and xfs filesystems are by far more common filesystem types used with Linux today.
- swap—Used for swap partitions. Swap areas are used to hold data temporarily when RAM is used up. Data is swapped to the swap area and then returned to RAM when it is needed again.
- squashfs—Compressed, read-only filesystem type. Squashfs is popular on live CDs, where there is limited space and a read-only medium (such as a CD or DVD).
- nfs—Network Filesystem (NFS) type of filesystem. NFS is used to mount filesystems on other Linux or UNIX computers.
- hpfs—Filesystem is used to do read-only mounts of an OS/2 HPFS filesystem.
- ncpfs—A filesystem used with Novell NetWare. NetWare filesystems can be mounted over a network.
- ntfs—Windows NT filesystem. Depending upon the distribution you have, it may be supported as a read-only filesystem (so that you can mount and copy files from it).
- affs—Filesystem used with Amiga computers.
- ufs—Filesystem popular on Sun Microsystems' operating systems (that is, Solaris and SunOS).
- jfs—A 64-bit journaling filesystem by IBM that is relatively lightweight for the many features it has.
- xfs—A high performance filesystem originally developed by Silicon Graphics that works extremely well with large files. This filesystem is the default type for RHEL 7.
- gfs2—A shared disk filesystem that allows multiple machines to all use the same shared disk without going through a network filesystem layer such as CIFS, NFS, and so on.
To see the list of filesystems that come with the kernel you are currently using, type ls /lib/modules/kernelversion/kernel/fs/. The actual modules are stored in subdirectories of that directory. Mounting a filesystem of a supported type causes the filesystem module to be loaded, if it is not already loaded.
Type man fs to see descriptions of Linux filesystems.
Enabling swap areas
A swap area is an area of the disk that is made available to Linux if the system runs out of memory (RAM). If your RAM is full and you try to start another application without a swap area, that application will fail.
With a swap area, Linux can temporarily swap out data from RAM to the swap area and then get it back when needed. You take a performance hit, but it is better than having processes fail.
To create a swap area from a partition or a file, use the mkswap command. To temporarily enable that swap area, you can use the swapon command. For example, here's how to check your available swap space, create a swap file, enable the swap file, and then check that the space is available on your system:
# free -m
         total    used free shared buffers cached
Mem:      1955    663  1291      0      42    283
-/+ buffers/cache:      337   1617
Swap:      819      0   819
# dd if=/dev/zero of=/var/tmp/myswap bs=1M count=1024
# mkswap /var/opt/myswap
# swapon /var/opt/myswap
# free -m
         total    used free shared buffers cached
Mem:      1955    1720  235      0      42   1310
-/+ buffers/cache:      367   1588
Swap:    1843        0 1843
The free command shows the amount of swap before and after creating, making, and enabling the swap area with the swapon command. That amount of swap is available immediately and temporarily to your system. To make that swap area permanent, you need to add it to your /etc/fstab file. Here is an example:
/var/opt/myswap swap swap defaults 0 0
This entry indicates that the swap file named /var/opt/myswap should be enabled at boot time. Because there is no mount point for a swap area, the second field is just set to swap, as is the partition type. To test that the swap file works before rebooting, you can enable it immediately (swapon -a) and check that the additional swap area appears:
# swapon -a
Disabling a swap area
If at any point you want to disable a swap area, you can do so using the swapoff command. You might do this, in particular, if the swap area is no longer needed and you want to reclaim the space being consumed by a swap file or remove a USB drive that is providing a swap partition.
First, make sure that no space is being used on the swap device (using the free command), and then use swapoff to turn off the swap area so you can reuse the space. Here is an example:
# free -m
         total    used free shared buffers cached
Mem:      1955    1720  235      0      42   1310
-/+ buffers/cache: 367 1588
Swap:    1843        0 1843
# swapoff /var/opt/myswap
# free -m
Mem:    1955      1720  235      0      42   1310
-/+ buffers/cache: 367 1588
Swap:     819        0  819
Using the fstab file to define mountable file systems
The hard disk partitions on your local computer and the remote filesystems you use every day are probably set up to automatically mount when you boot Linux. The /etc/fstab file contains definitions for each partition, along with options describing how the partition is mounted. Here's an example of an /etc/fstab file:
# /etc/fstab
/dev/mapper/vg_abc-lv_root     /        ext4    defaults       1 1
UUID=78bdae46-9389-438d-bfee-06dd934fae28 /boot ext4   defaults  1 2
/dev/mapper/vg_abc-lv_home    /home     ext4    defaults       1 2
/dev/mapper/vg_abc-lv_swap    swap      swap    defaults       0 0
# Mount entries added later
/dev/sdb1                     /win      vfat    ro             1 2
192.168.0.27:/nfsstuff        /remote   nfs     users,_netdev  0 0
//192.168.0.28/myshare        /share    cifs    guest,_netdev  0 0
# special Linux filesystems
tmpfs                         /dev/shm  tmpfs   defaults       0 0
devpts                        /dev/pts  devpts  gid=5,mode=620 0 0
sysfs                         /sys      sysfs   defaults       0 0
proc                          /proc     proc    defaults       0 0
The /etc/fstab file just shown is from a default Red Hat Enterprise Linux 6 server install, with a few lines added.
For now, you can ignore the tmpfs, devpts, sysfs, and proc entries. Those are special devices associated with shared memory, terminal windows, device information, and kernel parameters, respectively.
In general, the first column of /etc/fstab shows the device or share (what is mounted), while the second column shows the mount point (where it is mounted). That is followed by the type of filesystem, any mount options (or defaults), and two numbers (used to tell commands such as dump and fsck what to do with the filesystem).
The first three entries represent the disk partitions assigned to the root of the filesystem ( /), the /boot directory, and the /home directory. All three are ext4 filesystems. The fourth line is a swap device (used to store data when RAM overflows). Notice that the device names for /, /home, and swap all start with /dev/mapper. That's because they are LVM logical volumes that are assigned space from a pool of space called an LVM volume group (more on LVM in the section “Using Logical Volume Management Partitions” later in this chapter).
The /boot partition is on its own physical partition, /dev/sda1. Instead of /dev/sda1, however, a unique identifier (UUID) identifies the device. Why use a UUID instead of /dev/sda1 to identify the device? Suppose you plugged another disk into your computer and booted up. It probably won't happen, but it is possible that the new disk might be identified as /dev/sda, causing the system to look for the contents of /boot on the first partition of that disk.
To see all the UUIDs assigned to storage devices on your system, type the blkid command, as follows:
# blkid
/dev/sda1:
  UUID="78bdae46-9389-438d-bfee-06dd934fae28" TYPE="ext4"
/dev/sda2:
  UUID="wlvuIv-UiI2-pNND-f39j-oH0X-9too-AOII7R" TYPE="LVM2_member"
/dev/mapper/vg_abc-lv_root:
  UUID="3e6f49a6-8fec-45e1-90a9-38431284b689" TYPE="ext4"
/dev/mapper/vg_abc-lv_swap:
  UUID="77662950-2cc2-4bd9-a860-34669535619d" TYPE="swap"
/dev/mapper/vg_abc-lv_home:
  UUID="7ffbcff3-36b9-4cbb-871d-091efb179790" TYPE="ext4"
/dev/sdb1:
  SEC_TYPE="msdos" UUID="75E0-96AA" TYPE="vfat"
Any of the device names can be replaced by the UUID designation in the left column of an /etc/fstab entry.
I added the next three entries in /etc/fstab to illustrate some different kinds of entries. I connected a hard drive from an old Microsoft Windows system, and I had it mounted on the /win directory. I added the ro option so it would mount read-only.
The next two entries represent remote filesystems. On the /remote directory, the /nfsstuff directory is mounted read/write (rw) from the host at address 192.168.0.27 as an NFS share. On the /share directory, the Windows share named myshare is mounted from the host at 192.168.0.28. In both cases, I added the _netdev option, which tells Linux to wait for the network to come up before trying to mount the shares. (For more information on mounting CIFS and NFS shares, refer to Chapters 19, “Configuring a Windows File Sharing (Samba) Server,” and 20, “Configuring an NFS File Server,” respectively.)
Coming from Windows
The section “Using the fstab file to define mountable file systems” shows mounting a hard disk partition from an old VFAT filesystem being used in Windows. Most Windows systems today use the NTFS filesystem. Support for this system, however, is not delivered with every Linux system. NTFS is available from Fedora in the ntfs-3g package.
To help you understand the contents of the /etc/fstab file, here is what is in each field of that file:
- Field 1—The name of the device representing the filesystem. This field can include the LABEL or UUID option, with which you can indicate a volume label or universally unique identifier ( UUID) instead of a device name. The advantage to this approach is that because the partition is identified by volume name, you can move a volume to a different device name and not have to change the fstab file. (See the description of the mkfs command in the section “Using the mkfs Command to Create a Filesystem” for information on creating and using labels.)
- Field 2—The mount point in the filesystem. The filesystem contains all data from the mount point down the directory tree structure unless another filesystem is mounted at some point beneath it.
- Field 3—The filesystem type. Valid filesystem types are described in the section “Supported filesystems” earlier in this chapter (although you can only use filesystem types for which drivers are included for your kernel).
- Field 4—Use defaults or a comma-separated list of options (no spaces) you want to use when the entry is mounted. See the mount command manual page (under the -o option) for information on other supported options.
TIP
Typically, only the root user is allowed to mount a filesystem using the mount command. However, to allow any user to mount a filesystem (such as a filesystem on a CD), you could add the user option to Field 4 of /etc/fstab.
- Field 5—The number in this field indicates whether the filesystem needs to be dumped (that is, have its data backed up). A 1 means that the filesystem needs to be dumped, and a 0 means that it doesn't. (This field is no longer particularly useful because most Linux administrators use more sophisticated backup options than the dump command. Most often, a 0 is used.)
- Field 6—The number in this field indicates whether the indicated filesystem should be checked with fsck when the time comes for it to be checked: 1 means it needs to be checked first, 2 means to check after all those indicated by 1 have already been checked, and 0 means don't check it.
If you want to find out more about mount options as well as other features of the /etc/fstab file, there are several man pages you can refer to, including man 5 nfs and man 8 mount.
Using the mount command to mount file systems
Linux systems automatically run mount -a (mount all filesystems from the /etc/fstab file) each time you boot. For that reason, you generally use the mount command only for special situations. In particular, the average user or administrator uses mount in two ways:
- To display the disks, partitions, and remote filesystems currently mounted
- To temporarily mount a filesystem
Any user can type mount (with no options) to see what filesystems are currently mounted on the local Linux system. The following is an example of the mount command. It shows a single hard disk partition (/dev/sda1) containing the root ( /) filesystem, and proc and devpts filesystem types mounted on /proc and /dev, respectively.
$ mount
/dev/sda3 on / type ext4 (rw)
/dev/sda2 on /boot type ext4 (rw)
/dev/sda1 on /mnt/win type vfat (rw)
/dev/proc on /proc type proc (rw)
/dev/sys on /sys type sysfs (rw)
/dev/devpts on /dev/pts type devpts (rw,gid=5,mode=620)
/dev/shm on /dev/shm type tmpfs (rw)
none on /proc/sys/fs/binfmt_misc type binfmt_misc (rw)
/dev/cdrom on /media/MyOwnDVD type iso9660 (ro,nosuid,nodev)
Traditionally, the most common devices to mount by hand are removable media, such as DVDs or CDs. However, depending on the type of desktop you are using, CDs and DVDs may be mounted for you automatically when you insert them. (In some cases, applications are launched as well when media is inserted. For example, a CD music player or photo editor may be launched when your inserted medium has music or digital images on it.)
Occasionally, however, you may find it useful to mount a filesystem manually. For example, you want to look at the contents of an old hard disk, so you install it as a second disk on your computer. If the partitions on the disk did not automount, you could mount partitions from that disk manually. For example, to mount read-only a disk partition sdb1 that has an older ext3 filesystem, you could type this:
# mkdir /mnt/temp
# mount -t ext3 -o ro /dev/sdb1 /mnt/tmp
Another reason to use the mount command is to remount a partition to change its mount options. Suppose you want to remount /dev/sdb1 as read/write, but you do not want to unmount it (maybe someone is using it). You could use the remount option as follows:
# mount -t ext3 -o remount,rw /dev/sdb1
Mounting a disk image in loopback
Another valuable way to use the mount command has to do with disk images. If you download a CD or floppy disk image from the Internet and you want to see what it contains, you can do so without burning it to CD or floppy. With the image on your hard disk, create a mount point and use the -o loop option to mount it locally. Here's an example:
# mkdir /mnt/mycdimage
# mount -o loop whatever-i686-disc1.iso /mnt/mycdimage
In this example, the /mnt/mycdimage directory is created, and then the disk image file (whatever-i686-disc1.iso) residing in the current directory is mounted on it. You can now cd to that directory, view the contents of it, and copy or use any of its contents. This is useful for downloaded CD images from which you want to install software without having to burn the image to CD. You could also share that mount point over NFS, so you could install the software from another computer. When you are finished, just type umount /mnt /mycdimage to unmount it.
Other options to mount are available only for specific filesystem types. See the mount manual page for those and other useful options.
Using the umount command
When you are finished using a temporary filesystem, or you want to unmount a permanent filesystem temporarily, use the umount command. This command detaches the filesystem from its mount point in your Linux filesystem. To use umount, you can give it either a directory name or a device name. For example:
# umount /mnt/test
This unmounts the device from the mount point /mnt/test. You can also unmount using this form:
# umount /dev/sdb1
In general, it's better to use the directory name (/mnt/test) because the umount command will fail if the device is mounted in more than one location. (Device names all begin with /dev.)
If you get the message device is busy, the umount request has failed because either an application has a file open on the device or you have a shell open with a directory on the device as a current directory. Stop the processes or change to a directory outside the device you are trying to unmount for the umount request to succeed.
An alternative for unmounting a busy device is the -l option. With umount -l (a lazy unmount), the unmount happens as soon as the device is no longer busy. To unmount a remote NFS filesystem that's no longer available (for example, the server went down), you can use the umount - f option to forcibly unmount the NFS filesystem.
A useful tool for discovering what's holding open a device you want to unmount is the lsof command. Type lsof with the name of the partition you want to unmount (such as lsof /mnt/test). The output shows you what commands are holding files open on that partition. The fuser-v /mnt/test command can be used in the same way.
Using the mkfs Command to Create a Filesystem
You can create a filesystem for any supported filesystem type on a disk or partition that you choose. You do so with the mkfs command. Although this is most useful for creating filesystems on hard-disk partitions, you can create filesystems on USB flash drives, floppy disks, or rewritable CDs as well.
Before you create a new filesystem, make sure of the following:
- You have partitioned the disk as you want (using the fdisk command).
- You get the device name correct, or you may end up overwriting your hard disk by mistake. For example, the first partition on the second SCSI or USB flash drive on your system is /dev/sdb1 and the third disk is /dev/sdc1.
- To unmount the partition if it's mounted before creating the filesystem.
The following are two examples of using mkfs to create a filesystems on two partitions on a USB flash drive located as the first and second partitions on the third SCSI disk (/dev/sdc1 and /dev/sdc2). The first creates an xfs partition, while the second creates an ext4 partition.
# mkfs -t ext4 /dev/sdc1
meta-data=/dev/sda3      isize=256  agcount=4, agsize=256825 blks
         =               sectsz=512 attr=2, projid32bit=1
         =               crc=0
data     =               bsize=4096 blocks=1027300, imaxpct=25
         =               sunit=0    swidth=0 blks
naming   =version 2      bsize=4096 ascii-ci=0 ftype=0
log      =internal log   bsize=4096 blocks=2560, version=2
         =               sectsz=512 sunit=0 blks, lazy-count=1
realtime =none           extsz=4096 blocks=0, rtextents=0
# mkfs -t ext4 /dev/sdc2
mke2fs 1.42.9 (28-Dec-2013)
Filesystem label=
OS type: Linux
Block size=4096 (log=2)
Fragment size=4096 (log=2)
Stride=0 blocks, Stripe width=0 blocks
257024 inodes, 1027300 blocks
51365 blocks (5.00%) reserved for the super user
First data block=0
Maximum filesystem blocks=1052770304
32 block groups
32768 blocks per group, 32768 fragments per group
8032 inodes per group
Superblock backups stored on blocks:
       32768, 98304, 163840, 229376, 294912, 819200, 884736
Allocating group tables: done
Writing inode tables: done
Creating journal (16384 blocks): done
Writing superblocks and filesystem accounting information: done
You can see the statistics that are output with the formatting done by the mkfs command. The number of inodes and blocks created are output, as are the number of blocks per group and fragments per group. An inode, which holds metadata such as ownership and timestamps for each file, is consumed for every file and directory in the filesystem. So the number of inodes shown here limits the total number of files you can create in that filesystem.
Now mount this filesystem (mkdir /mnt/myusb ; mount /dev/sdc1 /mnt/myusb), change to /mnt/myusb as your current directory (cd /mnt/myusb), and create files on it as you please.
Summary
Managing filesystems is a critical part of administering a Linux system. Using commands such as fdisk, you can view and change disk partitions. Filesystems can be added to partitions using the mkfs command. Once created, filesystems can be mounted and unmounted using the mount and umount commands, respectively.
Logical Volume Management (LVM) offers a more powerful and flexible way of managing disk partitions. With LVM, you create pools of storage, called volumes, that can allow you to grow and shrink logical volumes, as well as extend the size of your volume groups by adding more physical volumes.
With most of the basics needed to become a system administrator covered at this point in the book, Chapter 13 introduces concepts for extending those skills to manage network servers. Topics in that chapter include information on how to install, manage, and secure servers.
Exercises
Use these exercises to test your knowledge of creating disk partitions, logical volume management, and working with filesystems. You need a USB flash drive that is at least 1GB that you can erase for these exercises.
These tasks assume you are running a Fedora or Red Hat Enterprise Linux system (although some tasks work on other Linux systems as well). If you are stuck, solutions to the tasks are shown in Appendix B (although in Linux, there are often multiple ways to complete a task).
- Run a command as root to watch the /var/log/messages file and insert your USB flash drive. Determine the device name of the USB flash drive.
- Run a command to list the partition table for the USB flash drive.
- Delete all the partitions on your USB flash drive, save the changes, and make sure the changes were made both on the disk's partition table and in the Linux kernel.
- Add three partitions to the USB flash drive: 100MB Linux partition, 200MB swap partition, and 500MB LVM partition. Save the changes.
- Put an ext3 filesystem on the Linux partition.
- Create a mount point called /mnt/mypart, and mount the Linux partition on it.
- Enable the swap partition, and turn it on so additional swap space is immediately available.
- Create a volume group called abc from the LVM partition, create a 200MB logical volume from that group called data, add a VFAT partition, and then temporarily mount the logical volume on a new directory named /mnt/test. Check that it was successfully mounted.
- Grow the logical volume from 200MB to 300MB.
- Do what you need to do to safely remove the USB flash drive from the computer: unmount the Linux partition, turn off the swap partition, unmount the logical volume, and delete the volume group from the USB flash drive.