Table of Contents for
Linux Bible, 9th Edition
 Linux Bible, 9th Edition
Published by
John Wiley & Sons, 2015
Linux Bible, 9th Edition
Published by
John Wiley & Sons, 2015
- Cover Page
- Title Page
- Copyright
- Dedication
- About the Author
- About the Technical Editor
- Credits
- Acknowledgments
- Contents at a Glance
- Contents
- Introduction
- Part I: Getting Started
- Chapter 1: Starting with Linux
- Chapter 2: Creating the Perfect Linux Desktop
- Part II: Becoming a Linux Power User
- Chapter 3: Using the Shell
- Chapter 4: Moving around the Filesystem
- Chapter 5: Working with Text Files
- Chapter 6: Managing Running Processes
- Chapter 7: Writing Simple Shell Scripts
- Part III: Becoming a Linux System Administrator
- Chapter 8: Learning System Administration
- Chapter 9: Installing Linux
- Chapter 10: Getting and Managing Software
- Chapter 11: Managing User Accounts
- Chapter 12: Managing Disks and Filesystems
- Part IV: Becoming a Linux Server Administrator
- Chapter 13: Understanding Server Administration
- Chapter 14: Administering Networking
- Chapter 15: Starting and Stopping Services
- Chapter 16: Configuring a Print Server
- Chapter 17: Configuring a Web Server
- Chapter 18: Configuring an FTP Server
- Chapter 19: Configuring a Windows File Sharing (Samba) Server
- Chapter 20: Configuring an NFS File Server
- Chapter 21: Troubleshooting Linux
- Part V: Learning Linux Security Techniques
- Chapter 22: Understanding Basic Linux Security
- Chapter 23: Understanding Advanced Linux Security
- Chapter 24: Enhancing Linux Security with SELinux
- Chapter 25: Securing Linux on a Network
- Part VI: Extending Linux into the Cloud
- Chapter 26: Using Linux for Cloud Computing
- Chapter 27: Deploying Linux to the Cloud
- Part VII: Appendixes
- Appendix A: Media
- Appendix B: Exercise Answers
- Index
- Linux® Bible, Ninth Edition

Understanding Basic Linux Security
IN THIS CHAPTER
Implementing basic security
Monitoring security
Auditing and reviewing security
Understanding security is a crucial part of Linux system administration. No longer are a username and simple password sufficient for protecting your server. The number and variety of computer attacks escalate every day, and the need to improve computer security continues to grow with them.
Your first step is to gather knowledge of basic security procedures and principles. With this information, you can begin the process of locking down and securing your Linux servers. Also, you can learn how to stay informed of daily new threats and the new ways to continue protecting your organization's valuable information assets.
Understanding Security Basics
Securing your Linux systems must be done in several layers. It begins by physically securing the computers Linux runs on and proceeds through using good basic techniques for properly defining and securing user accounts. These and other techniques are the first lines of defense in securing your Linux systems.
Implementing physical security
A lock on the computer server room door is a first line of defense. Although a very simple concept, it is often ignored. Access to the physical server means access to all the data it contains. No security software can fully protect your systems if someone with malicious intent has physical access to the Linux server.
Basic server room physical security includes items such as these:
- A lock or security alarm on the server room door
- Access controls that allow only authorized access and identify who accessed the room and when the access occurred, such as a card key entry system
- A sign stating “no unauthorized access allowed” on the door
- Policies on who can access the room and when access may occur, for groups such as the cleaning crew, server administrators, and others
Physical security includes environmental controls. Appropriate fire suppression systems and proper ventilation for your server room must be implemented.
In addition to basic physical security of a server room, attention should be given to what is physically at each worker's desk. Desktops and laptops may need to be locked. Fingerprints are often left on computer tablets, which can reveal PINs and passwords. Therefore, a tablet screen wiping policy may need to be implemented.
A Clean Desk Policy (CDP) mandates either that only the papers being currently worked on are on a desk or that all papers must be locked away at the end of the day. A CDP protects classified information from being gleaned by nosy and unauthorized personnel. And, finally, a “no written passwords” policy is mandatory.
Implementing disaster recovery
Disasters do happen, and they can expose your organization's data to insecure situations. Therefore, part of computer security includes preparing for a disaster. Disaster recovery includes creating disaster recovery plans, testing the plans, and conducting plan reviews. Plans must be tested and updated to maintain their reliability in true disaster situations.
Disaster recovery plans should include these things:
- What data is to be included in backups
- Where backups are to be stored
- How long backups are maintained
- How backup media is rotated through storage
Backup data, media, and software should be included in your Access Control Matrix checklist.
CAUTION
It is important to determine how many backup copies of each object should be maintained. Whereas you may need only three backup copies of one particular object, another may have enough importance for you to maintain more copies.
Backup utilities on a Linux system include the following:
- amanda (Advanced Maryland Automatic Network Disk Archiver)
- cpio
- dump/restore
- tar
The cpio, dump/restore, and tar utilities are typically pre-installed on a Linux distribution. Only amanda is not installed by default. However, amanda is extremely popular because it comes with a great deal of flexibility and can even back up a Windows system. If you need more information on the amanda backup utility, see www.amanda.org. The utility you ultimately pick should meet your organization's particular security needs for backup.
With luck, disasters occur only rarely. However, every day, users log in to your Linux system. User accounts and passwords have basic security settings that should be reviewed and implemented as needed.
Securing user accounts
User accounts are part of the authentication process allowing users into the Linux system. Proper user account management enhances a system's security. Setting up user accounts was covered in Chapter 11. However, a few additional rules are necessary to increase security through user account management:
- One user per user account.
- Limit access to the root user account.
- Set expiration dates on temporary accounts.
- Remove unused user accounts.
One user per user account
Accounts should enforce accountability. Thus, multiple people should not be logging in to one account. When multiple people share an account, there is no way to prove a particular individual completed a particular action. Their actions are deniable, which is called repudiation in the security world. Accounts should be set up for nonrepudiation. In other words, there should be one person per user account, so actions cannot be denied.
TIP
You always want to set up your computer security for nonrepudiation. But that term can be confusing. To help you remember the terms, think of them this way:
repudiation–The user can deny actions or refuse accountability.
nonrepudiation–The user cannot deny actions or refuse accountability.
Limit access to the root user account
If multiple people can log in to the root account, you have another repudiation situation. You cannot track individual use of the root account. To allow tracking of root account use by individuals, a policy for using sudo (see Chapter 8) instead of logging into root should be instituted.
Instead of giving multiple people root permission on a Linux system, you can grant root access on a per-command basis with the sudo command. Using sudo provides the following security benefits:
- The root password does not have to be given out.
- You can fine-tune command access.
- All sudo use (who, what, when) is recorded in /var/log/secure.
All failed sudo access attempts are logged.
After you grant someone sudo permission, you can try to restrict root access to certain commands in the /etc/sudoers file (with the visudo command). However, after you grant root permission to a user, even in a limited way, it is difficult to be sure that a determined user can't find ways to gain full root access to your system and do what he or she wants to it.
One way to keep a misbehaving administrator in check is to have security messages intended for the /var/log/secure file sent to a remote log server that none of the local administrators have access to. In that way, any misuse of root privilege is attached to a particular user and is logged in a way that the user can't cover his or her tracks.
Setting expiration dates on temporary accounts
If you have consultants, interns, or temporary employees who need access to your Linux systems, it is important to set up their user accounts with expiration dates. The expiration date is a safeguard, in case you forget to remove their accounts when they no longer need access to your organization's systems.
To set a user account with an expiration date, use the usermod command. The format is usermod -e yyyy-mm-dd user_name. In the following code, the account tim has been set to expire on January 1, 2017.
# usermod -e 2017-01-01 tim
To verify that the account has been properly set to expire, double-check yourself by using the chage command. The chage command is primarily used to view and change a user account's password aging information. However, it also contains account expiration information. The -l option allows you to list the various information chage has access to. To keep it simple, pipe the output from the chage command into grep and search for the word “Account.” This produces only the user account's expiration date.
# chage -l tim | grep Account
Account expires                     :  Jan 01, 2017
The account expiration date was successfully changed for tim to January 1, 2017.
If you do not use the /etc/shadow file for storing your account passwords, the chage utility doesn't work. In most cases, this is not a problem because the /etc/shadow file is configured to store password information by default on most Linux systems..
Set account expiration dates for all transitory employees. In addition, consider reviewing all user account expiration dates as part of your security monitoring activities. These activities help to eliminate any potential backdoors to your Linux system.
Removing unused user accounts
Keeping old expired accounts around is asking for trouble. After a user has left an organization, it is best to perform a series of steps to remove his or her account along with data:
- Find files on the system owned by the account, using the following command: find/ -user username
- Expire or disable the account.
- Back up the files.
- Remove the files or reassign them to a new owner.
- Delete the account from the system.
Problems occur when Step 5 is forgotten, and expired or disabled accounts are still on the system. A malicious user gaining access to your system could renew the account and then masquerade as a legitimate user.
To find these accounts, search through the /etc/shadow file. The account's expiration date is in the eighth field of each record. It would be convenient if a date format were used. Instead, this field shows the account's expiration date as the number of days since January 1, 1970.
You can use a two-step process to find expired accounts in the /etc/shadow file automatically. First, set up a shell variable (see Chapter 7) with today's date in “days since January 1, 1970” format. Then, using the gawk command, you can obtain and format the information needed from the /etc/shadow file.
Setting up a shell variable with the current date converted to the number of days since January 1, 1970 is not particularly difficult. The date command can produce the number of seconds since January 1, 1970. To get what you need, divide the result from the date command by the number of seconds in a day: 86,400. The following demonstrates how to set up the shell variable TODAY.
# TODAY=$(echo $(($(date --utc --date "$1" +%s)/86400)))
# echo $TODAY
16373
Next, the accounts and their expiration dates are pulled from the /etc/shadow file using gawk. The gawk command is the GNU version of the awk program used in UNIX. The command's output is shown in the code that follows. As you would expect, many of the accounts do not have an expiration date. However, two accounts, Consultant and Intern, show an expiration date in the “days since January 1, 1970” format. Note that you can skip this step. It is just for demonstration purposes.
# gawk -F: '{print $1,$8}' /etc/shadow
...
chrony
tcpdump
johndoe
Consultant 13819
Intern 13911
The $1 and $8 in the gawk command represent the username and expiration date fields in the /etc/shadow file records. To check those accounts' expiration dates and see if they are expired, a more refined version of the gawk command is needed.
# gawk -F: '{if (($8 > 0) && ($TODAY > $8)) print $1}' /etc/shadow
Consultant
Intern
Only accounts with an expiration date are collected by the ($8 > 0) portion of the gawk command. To make sure these expiration dates are past the current date, the TODAY variable is compared with the expiration date field, $8. If TODAY is greater than the account's expiration date, the account is listed. As you can see in the preceding example, two expired accounts still exist on the system and need to be removed.
That is all you need to do. Set up your TODAY variable, and execute the gawk command. All the expired accounts in the /etc/shadow file are listed for you. To remove these accounts, use the userdel command.
User accounts are only a portion of the authentication process, allowing users into the Linux system. User account passwords also play an important role in the process.
Securing passwords
Passwords are the most basic security tool of any modern operating system and, consequently, the most commonly attacked security feature. It is natural for users to want to choose a password that is easy to remember, but often this means they choose a password that is also easy to guess.
Brute force methods are commonly employed to gain access to a computer system. Trying the popular passwords often yields results. Some of the most common passwords are:
Just use your favorite Internet search engine and look for “common passwords.” If you can find these lists, then malicious attackers can, too. Obviously, choosing good passwords is critical to having a secure system.
Choosing good passwords
In general, a password must not be easy to guess, be common or popular, or be linked to you in any way. Here are some rules to follow when choosing a password:
- Do not use any variation of your login name or your full name.
- Do not use a dictionary word.
- Do not use proper names of any kind.
- Do not use your phone number, address, family, or pet names.
- Do not use website names.
- Do not use any contiguous line of letters or numbers on the keyboard (such as “qwerty” or “asdfg”).
- Do not use any of the above with added numbers or punctuation to the front or end, or typed backward.
So now that you know what not to do, look at the two primary items that make a strong password:
- A password should be at least 15 to 25 characters in length.
- A password should contain all of the following:
- Lowercase letters
- Uppercase letters
- Numbers
- Special characters, such as : ! $ % * ( ) - + = , < > : : “ '
Twenty-five characters is a long password. However, the longer the password, the more secure it is. What your organization chooses as the minimum password length is dependent upon its security needs.
TIP
Gibson Research Center has some excellent material on strong passwords, including an article called “How big is your haystack...and how well hidden is your needle?” at www.grc.com/haystack.htm.
Choosing a good password can be difficult. It has to be hard enough not to be guessed and easy enough for you to remember. A good way to choose a strong password is to take the first letter from each word of an easily remembered sentence. Be sure to add numbers, special characters, and varied case. The sentence you choose should have meaning only to you, and should not be publicly available. Table 22.1 lists examples of strong passwords and the tricks used to remember them.
TABLE 22.1 Ideas for Good Passwords
| Password | How to Remember It |
| Mrci7yo! | My rusty car is 7 years old! |
| 2emBp1ib | 2 elephants make BAD pets, 1 is better |
| ItMc?Gib | Is that MY coat? Give it back |
The passwords look like nonsense but are rather easy to remember. Of course, be sure not to use the passwords listed here. Now that they are public, they will be added to malicious attackers' dictionaries.
Setting and changing passwords
You set your own password using the passwd command. Type the passwd command, and it enables you to change your password. First, it prompts you to enter your old password. To protect against someone shoulder surfing and learning your password, the password is not displayed as you type.
Assuming you type your old password correctly, the passwd command prompts you for the new password. When you type your new password, it is checked using a utility called cracklib to determine whether it is a good or bad password. Nonroot users are required to try a different password if the one they have chosen is not a good password.
The root user is the only user who is permitted to assign bad passwords. After the password has been accepted by cracklib, the passwd command asks you to enter the new password a second time to make sure there are no typos (which are hard to detect when you can't see what you are typing).
When running as root, changing a user's password is possible by supplying that user's login name as a parameter to the passwd command. For example:
# passwd joe
Changing password for user joe.
New UNIX password: ********
Retype new UNIX password: ********
passwd: all authentication tokens updated successfully.
Here, the passwd command prompts you twice to enter a new password for joe. It does not prompt for his old password in this case.
Enforcing best password practices
Now, you know what a good password looks like and how to change a password, but how do you enforce it on your Linux system? To get a good start on enforcing best password practices, educate system users. Educated users are better users. Here are some ideas for education:
- Add an article on best password practices to your organization's monthly newsletter.
- Post tip sheets in the break rooms, such as “The Top Ten Worst Passwords.”
- Send out regular employee computer security e-mails containing password tips.
- Provide new employees training on passwords.
Employees who understand password security often strive to create good passwords at work as well as at home. One of the “hooks” to gain user attention is to let employees know that these passwords work well also when creating personal passwords, such as for their online banking accounts.
Still, you always have a few users who refuse to implement good password practices. Plus, company security policies often require that a password be changed every so many days. It can become tiresome to come up with new, strong passwords every 30 days! That is why some enforcing techniques are often necessary.
TIP
If users are having a difficult time creating secure and unique passwords, consider installing the pwgen utility on your Linux system. This open source password generating utility creates passwords that are made to be pronounceable and memorable. You can use these generated words as a starting point for creating account passwords.
Default values in the /etc/login.defs file for new accounts were covered in Chapter 11. Within the login.defs file are some settings affecting password aging and length:
PASS_MAX_DAYS        30
PASS_MIN_DAYS        5
PASS_MIN_LEN         16
PASS_WARN_AGE        7
In this example, the maximum number of days, PASS_MAX_DAYS, until the password must be changed is 30. The number you set here is dependent upon your particular account setup. For organizations that practice one person to one account, this number can be much larger than 30. If you have shared accounts or multiple people know the root password, it is imperative that you change the password often. This practice effectively refreshes the list of those who know the password.
To keep users from changing their password to a new password and then immediately changing it back, you need to set the PASS_MIN_DAYS to a number larger than 0. In the preceding example, the soonest a user could change his password again is 5 days.
The PASS_WARN_AGE setting is the number of days a user is warned before being forced to change his password. People tend to need lots of warnings and prodding, so the preceding example sets the warning time to 7 days.
Earlier in the chapter, I mentioned that a strong password is between 15 and 25 characters long. With the PASS_MIN_LEN setting, you can force users to use a certain minimum number of characters in their passwords. The setting you choose should be based upon your organization's security life cycle plans.
NOTE
Ubuntu does not have the PASS_MIN_LEN setting in its login.defs file. Instead, this setting is handled by the PAM utility. PAM is covered in Chapter 23.
For accounts that have already been created, you need to control password aging via the chage command. The options needed to control password aging with chage are listed in Table 22.2. Notice that there is not a password length setting in the chage utility.
| Option | Description |
| -M | Sets the maximum number of days before a password needs to be changed. Equivalent to PASS_MAX_DAYS in /etc/login.defs |
| -m | Sets the minimum number of days before a password can be changed again. Equivalent to PASS_MIN_DAYS in /etc/login.defs |
| -W | Sets the number of days a user is warned before being forced to change the account password. Equivalent to PASS_WARN_AGE in /etc/login.defs |
The example that follows uses the chage command to set password aging parameters for the tim account. All three options are used at once.
# chage -l tim | grep days
Minimum number of days between password change          : 0
Maximum number of days between password change          : 99999
Number of days of warning before password expires       : 7
# chage -M 30 -m 5 -W 7 tim
# chage -l tim | grep days
Minimum number of days between password change          : 5
Maximum number of days between password change          : 30
Number of days of warning before password expires       : 7
You can also use the chage command as another method of account expiration, which is based upon the account's password expiring. Earlier, the usermod utility was used for account expiration. Use the chage command with the -M and the -I options to lock the account. In the code that follows, the tim account is viewed using chage -l. Only the information for tim's account passwords is extracted.
# chage -l tim | grep Password
Password expires                 : never
Password inactive                : never
You can see that there are no settings for password expiration (Password expires) or password inactivity (Password inactive). In the following code, the account is set to be locked 5 days after tim's password expires, by using only the -I option.
# chage -I 5 tim
# chage -l tim | grep Password
Password expires                 : never
Password inactive                : never
Notice that no settings changed! Without a password expiration set, the -I option has no effect. Thus, using the -M option, the maximum number of days is set before the password expires and the setting for the password inactivity time should take hold.
# chage -M 30 -I 5 tim
# chage -l tim | grep Password
Password expires                 : Mar 03, 2017
Password inactive                : Mar 08, 2017
Now, tim's account will be locked 5 days after his password expires. This is helpful in situations where an employee has left the company, but his user account has not yet been removed. Depending upon your organization's security needs, consider setting all accounts to lock a certain number of days after passwords have expired.
Understanding the password files and password hashes
Early Linux systems stored their passwords in the /etc/passwd file. The passwords were hashed. A hashed password is created using a one-way mathematical process. After you create the hash, you cannot re-create the original characters from the hash. Here's how it works.
When a user enters the account password, the Linux system rehashes the password and then compares the hash result to the original hash in /etc/passwd. If they match, the user is authenticated and allowed into the system.
The problem with storing these password hashes in the /etc/passwd file has to do with the filesystem security settings (see Chapter 4). The filesystem security settings for the /etc/passwd file are listed here:
# ls -l /etc/passwd
-rw-r--r--. 1 root root 1644 Feb  2 02:30 /etc/passwd
As you can see, everyone can read the password file. You might think that this is not a problem because the passwords are all hashed. However, individuals with malicious intent have created files called rainbow tables. A rainbow table is simply a dictionary of potential passwords that have been hashed. For instance, the rainbow table would contain the hash for the popular password “Password,” which is:
$6$dhN5ZMUj$CNghjYIteau5xl8yX.f6PTOpendJwTOcXjlTDQUQZhhy
V8hKzQ6Hxx6Egj8P3VsHJ8Qrkv.VSR5dxcK3QhyMc.
Because of the ease of access to the password hashes in the /etc/passwd file, it is only a matter of time before a hashed password is matched in a rainbow table and the plaintext password uncovered.
NOTE
Security experts will tell you that the passwords are not just hashed, but they are also salted. Salting a hash means that a randomly generated value is added to the original password before it is hashed. This makes it even more difficult for the hashed password to be matched to its original password. However, in Linux, the hash salt is also stored with the hashed passwords. Thus, read access to the /etc/passwd file means you have the hash value and its salt.
Thus, the hashed passwords were moved to a new configuration file, /etc/shadow, many years ago. This file has the following security settings:
# ls -l /etc/shadow
----------. 1 root root 1049 Feb  2 09:45 /etc/shadow
Despite having no permissions open, root, but no other user, can view this file. Thus, the hashed passwords are protected. Here is the tail end of a /etc/shadow file. You can see that there are long, nonsensical character strings in each user's record. Those are the hashed passwords.
# tail -2 /etc/shadow
johndoe:$6$jJjdRN9/qELmb8xWM1LgOYGhEIxc/:15364:0:99999:7:::
Tim:$6$z760AJ42$QXdhFyndpbVPVM5oVtNHs4B/:15372:5:30:7:16436::
CAUTION
You may inherit a Linux system that still uses the old method of keeping the hashed passwords in the /etc/passwd file. It is easy to fix. Just use the pwconv command, and the /etc/shadow file is created and hashed passwords moved to it.
The following are also stored in the /etc/shadow file, in addition to the account name and hashed password:
- Number of days (since January 1, 1970) since the password was changed
- Number of days before password can be changed
- Number of days before a password must be changed
- Number of days to warn a user before a password must be changed
- Number of days after password expires that an account is disabled
- Number of days (since January 1, 1970) that an account has been disabled
These should sound familiar because they are the settings for password aging covered earlier in the chapter. Remember that the chage command does not work if you do not have a /etc/shadow file set up, nor is the /etc/login.defs file available.
Obviously, filesystem security settings are very important for keeping your Linux system secure. This is especially true with all Linux systems' configuration files and others.
Securing the filesystem
Another important part of securing your Linux system is setting proper filesystem security. The basics for security settings were covered in Chapter 4 and Access Control Lists (ACL) in Chapter 11. However, there are a few additional points that need to be added to your knowledge base.
Managing dangerous filesystem permissions
If you gave full rwxrwxrwx (777) access to every file on the Linux system, you can imagine the chaos that would follow. In many ways, similar chaos can occur by not closely managing the SetUID (SUID) and the SetGID (SGID) permissions (see Chapters 4 and 11).
Files with the SUID permission in the Owner category and execute permission in the Other category allow anyone to temporarily become the file's owner while the file is being executed in memory. The riskiest case is if the file's owner is root.
Similarly, files with the SGID permission in the Owner category and execute permission in the Other category allow anyone to temporarily become a group member of the file's group while the file is being executed in memory. SGID can also be set on directories. This sets the group ID of any files created in the directory to the group ID of the directory.
Executable files with SUID or SGID are favorites of malicious users. Thus, it is best to use them sparingly. However, some files do need to keep these settings. Two examples are the passwd and the sudo commands, which follow. Each of these files should maintain their SUID permissions.
$ ls -l /usr/bin/passwd
-rwsr-xr-x. 1 root root 28804 Aug 17 20:50 /usr/bin/passwd
$ ls -l /usr/bin/sudo
---s--x--x. 2 root root 77364 Nov 3 08:10 /usr/bin/sudo
Commands such as passwd and sudo are designed to be used as SUID programs. Even though those commands run as root user, as a regular user you can only change your own password with passwd and can only escalate to root permission with sudo if you were given permission in the /etc/sudoers file. A more dangerous situation would be if a hacker created a SUID bash command; anyone running that command could effectively change everything on the system that had root access.
Using the find command, you can search your system to see if there are any hidden or otherwise inappropriate SUID and SGID commands on your system. Here is an example:
# find / -perm /6000 -ls
4597316 52 -rwxr-sr-x 1 root games 51952 Dec 21 2013 /usr/bin/atc
4589119 20 -rwxr-sr-x 1 root tty   19552 Nov 18 2013 /usr/bin/write
4587931 60 -rwsr-xr-x 1 root root  57888 Aug  2 2013 /usr/bin/at
4588045 60 -rwsr-xr-x 1 root root  57536 Sep 25 2013 /usr/bin/crontab
4588961 32 -rwsr-xr-x 1 root root  32024 Nov 18 2013 /usr/bin/su
...
5767487 85 -rwsrwsr-x 1 root  root 68928 Sep 13 11:52 /var/.bin/myvi
...
Notice that find uncovers SetUID and SetGID commands that regular users can run to escalate their permission for particular reasons. In this example, there is also a file that a user tried to hide (myvi). This is a copy of the vi command that, because of permission and ownership, can change files owned by root. This is obviously a user doing something he should not be doing.
Securing the password files
The /etc/passwd file is the file the Linux system uses to check user account information and was covered earlier in the chapter. The /etc/passwd file should have the following permission settings:
- Owner: root
- Group: root
- Permissions: (644) Owner: rw- Group: r-- Other: r--
The example that follows shows that the /etc/passwd file has the appropriate settings.
# ls -l /etc/passwd
-rw-r--r--. 1 root root 1644 Feb  2 02:30 /etc/passwd
These settings are needed so users can log in to the system and see usernames associated with user ID and group ID numbers. However, users should not be able to modify the /etc/passwd directly. For example, a malicious user could add a new account to the file if write access were granted to Other.
The next file is the /etc/shadow file. Of course, it is closely related to the /etc/passwd file because it is also used during the login authentication process. This /etc/shadow file should have the following permissions settings:
- Owner: root
- Group: root
- Permissions: (000) Owner: --- Group: --- Other: ---
The code that follows shows that the /etc/shadow file has the appropriate settings.
# ls -l /etc/shadow
----------. 1 root root 1049 Feb  2 09:45 /etc/shadow
The /etc/passwd file has read access for the owner, group, and other. Notice how much more the /etc/shadow file is restricted than the /etc/passwd file. For the /etc/shadow file, there is no access permission on, although the root user can still access the file. So if only root can view this file, how can a user change his or her password because it is stored in /etc/shadow? The passwd utility, /usr/bin/passwd, uses the special permission SUID. This permission setting is shown here:
# ls -l /usr/bin/passwd
-rwsr-xr-x. 1 root root 28804 Aug 17 20:50 /usr/bin/passwd
Thus, the user running the passwd command temporarily becomes root while the command is executing in memory and can then write to the /etc/shadow file, but only to change the user's own password-related information.
NOTE
root does not have write access to the /etc/shadow permissions, so how does root write to the /etc/shadow file? The root user is all-powerful and has complete access to all files, whether the permissions are listed or not.
The /etc/group file (see Chapter 11) contains all the groups on the Linux system. Its file permissions should be set exactly as the /etc/passwd file:
- Owner: root
- Group: root
- Permissions: (644) Owner: rw- Group: r-- Other: r--
Also, the group password file, /etc/gshadow, needs to be properly secured. As you would expect, the file permission should be set exactly as the /etc/shadow file:
- Owner: root
- Group: root
- Permissions: (000) Owner: --- Group: --- Other: ---
Locking down the filesystem
The filesystem table (see Chapter 12), /etc/fstab, needs some special attention, too. The /etc/fstab file is used at boot time to mount storage devices on filesystems. It is also used by the mount command, the dump command, and the fsck command. The /etc/fstab file should have the following permission settings:
- Owner: root
- Group: root
- Permissions: (664) Owner: rw- Group: rw- Other: r--
Within the filesystem table, there are some important security settings that need to be reviewed. Besides your root, boot, and swap partitions, filesystem options are fairly secure by default. However, you may want to also consider the following:
- Typically, you put the /home subdirectory, where user directories are located, on its own partition and when you add mount options, you can do the following:
- You can set the nosuid option to prevent SUID and SGID permission-enabled executable programs running from there. Programs that need SUID and SGID permissions should not be stored in /home and are most likely malicious.
- You can set the nodev option so no device file located there will be recognized. Device files should be stored in /dev and not in /home.
- You can set the noexec option so no executable programs, which are stored in /home, can be run.
- You can put the /tmp subdirectory, where temporary files are located, on its own partition and use the same options settings as for /home:
- nosuid
- nodev
- noexec
- You can put the /usr subdirectory, where user programs and data are located, on its own partition and set the nodev option so no device file located there is recognized. After software is installed, the /usr directory often has little or no change (sometimes, it is even mounted read-only for security reasons).
- If the system is configured as a server, you probably want to put the /var subdirectory on its own partition. The /var directory is meant to grow, as log messages and content for web, FTP, and other servers are added. You can use the same mount options with the /var partition as you do for /home:
- nosuid
- nodev
- noexec
Putting the preceding into your /etc/fstab would look similar to the following:
/dev/sdb1     /home   ext4    nodev,noexec,nosuid     1 2
/dev/sdc1     /tmp    ext4    nodev,noexec,nosuid     1 1
/dev/sdb2     /usr    ext4    nodev                   1 2
/dev/sdb3     /var    ext4    nodev,noexec,nosuid     1 2
These mount options will help to further lock down your filesystem and add another layer of protection from those with malicious intent.
Again, managing the various file permissions and fstab options should be part of your security policy. The items you choose to implement must be determined by your organization's security needs.
Managing software and services
Often, the administrator's focus is on making sure the needed software and services are on a Linux system. From a security standpoint, you need to take the opposite viewpoint and make sure the unneeded software and services are not on a Linux system.
Updating software packages
In addition to removing unnecessary services and software, keeping current software up to date is critical for security. The latest bug fixes and security patches are obtained via software updates. Software package updates were covered in Chapters 9 and 10.
Software updates need to be done on a regular basis. How often and when you do it, of course, depends upon your organization's security needs.
You can easily automate software updates, but like removing services and software, it would be wise to test the updates in a test environment first. When updated software shows no problems, you can then update the software on your production Linux systems.
Keeping up with security advisories
As security flaws are found in Linux software, the Common Vulnerabilities and Exposures (CVE) project tracks them and helps to quickly get fixes for those flaws worked on by the Linux community. Companies such as Red Hat provide updated packages to fix the security flaws and deliver them in what is referred to as errata. Errata may consist of a single updated package or multiple updated packages. If you are running Red Hat Enterprise Linux, you search for, identify, and install the packages associated with a particular CVE and delivered in errata.
For more on how security updates are handled in Red Hat Enterprise Linux, refer to the Security Updates page on the Red Hat customer portal (https://access.redhat.com/security/updates/). The site contains a wealth of knowledge related to security vulnerabilities and how they are being dealt with. Being able to get timely security updates is one of the primary reasons companies subscribe critical systems to Red Hat Enterprise Linux.
Advanced implementation
You should be aware of several other important security topics as you are planning your deployments. They include cryptography, Pluggable Authentication Modules (PAM), and SELinux. These advanced and detailed topics are in separate chapters, Chapter 23 and Chapter 24.
Monitoring Your Systems
If you do a good job of planning and implementing your system's security, most malicious attacks will be stopped. However, if an attack should occur, you need to be able to recognize it. Monitoring must go on continuously.
Monitoring your system includes watching over log files, user accounts, and the filesystem itself. In addition, you need some tools to help you detect intrusions and other types of malware.
Monitoring log files
Understanding how message logging is done is critical to maintaining and troubleshooting a Linux system. Before the systemd facility was used to gather messages in what is referred to as the systemd journal, messages generated by the kernel and system services were directed to file in the /var/log directory. While that is still true to a great extent with systemd, you can now also view log messages directly from the systemd journal using the journalctl command.
The log files for your Linux system are primarily located in the /var/log directory. Most of the files in the /var/log directory are directed there from the systemd journal through the rsyslogd service (see Chapter 13). Table 22.3 contains a list of /var/log files and a brief description of each.
TABLE 22.3 Log Files in the /var/log Directory
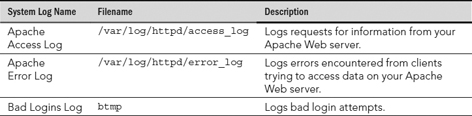
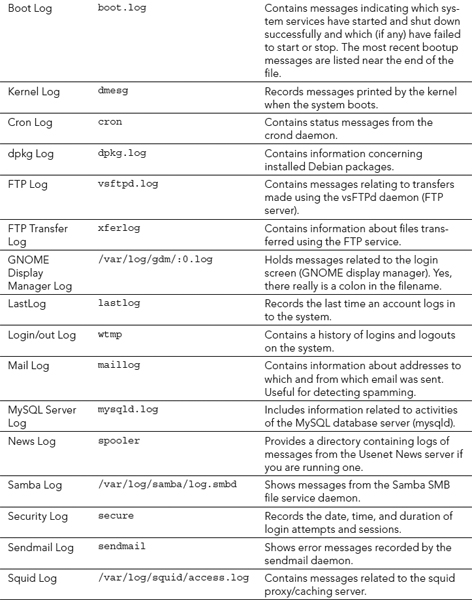
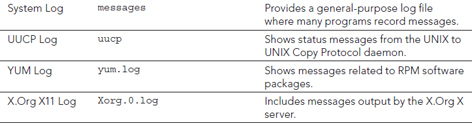
The log files that are in your system's /var/log directory depend upon what services you are running. Also, some log files are distribution-dependent. For example, if you use Fedora Linux, you would not have the dpkg log file.
Most of the log files are displayed using the commands cat, head, tail, more, or less. However, a few of them have special commands for viewing (see Table 22.4).
TABLE 22.4 Viewing Log Files That Need Special Commands
| Filename | View Command |
| btmp | dump-utmp btmp |
| dmesg | dmesg |
| lastlog | lastlog |
| wtmp | dump-utmp wtmp |
With the change in Fedora, RHEL, Ubuntu, and other Linux distributions to systemd (which manages the boot process and services), as noted earlier, the mechanism for gathering and displaying log messages associated with the kernel and system services has changed as well. Those messages are directed to the systemd journal and can be displayed with the journalctl command.
You can view journal messages directly from the systemd journal instead of simply listing the contents of /var/log files. In fact, the /var/log/messages file, which many services direct log messages to by default, does not even exist in the latest Fedora release. Instead, you can use the journalctl command to display log messages in various ways.
To page through kernel messages, type the following command:
# journalctl -k
-- Logs begin at Sun 2014-08-17 15:33:30 EDT,
    end at Sat 2014-09-13 22:29:00 EDT. --
Aug 29 23:14:38 fedora20 kernel: Initializing cgroup subsys cpuset
Aug 29 23:14:38 fedora20 kernel: Initializing cgroup subsys cpu
Aug 29 23:14:38 fedora20 kernel: Initializing cgroup subsys cpuacct
Aug 29 23:14:38 fedora20 kernel: Linux version
 3.11.10-301.fc20.x86_64 (mockbuild@bkernel01.fedoraproject.org)
    (gcc version 4.8.2 201
Aug 29 23:14:38 fedora20.example.com kernel: Command line:
    BOOT_IMAGE=/vmlinuz-3.11.10-3 01.fc20.x86_64
     root=/dev/mapper/fedora_fedora20-root ro rd.lvm
Aug 29 23:14:38 fedora20.example.com kernel: e820:
    BIOS-provided physical RAM map:

...
To view messages associated with a particular service, use the -u option followed by the service name. For example:
# journalctl -u NetworkManager.service
# journalctl -u httpd.service
# journalctl -u avahi-daemon.service
If you think a security breach is in progress, you can watch all or selected messages as they come in by following messages. For example, to follow kernel messages or httpd messages as they come in, add the -f option (press Ctrl+C when you are finished):
# journalctl -k -f
# journalctl -f -u NetworkManager.service
To check only boot messages, you can list the boot IDs for all system boots and then boot the particular boot instance that interests you. The following examples display boot IDs and then show boot messages for a selected boot ID:
# journalctl --list-boots
-2 eb3d5cbdda8f4f8da7bdbc71fb94e61e
    Sun 2014-08-17 15:33:30 EDT–Wed 2014-08-20 06:43:29 EDT
-1 534713a5a65c41c1b5b3d056487a16db
    Wed 2014-08-20 06:45:15 EDT–Fri 2014-08-29 12:01:01 EDT
 0 64147da7154b4499a312a88a696c19bd
    Fri 2014-08-29 23:14:38 EDT–Sun 2014-09-14 07:15:26 EDT
# journalctl -b 534713a5a65c41c1b5b3d056487a16dbb
-- Logs begin at Sun 2014-08-17 15:33:30 EDT, end at
    Sun 2014-09-14 07:23:09 EDT. --
Aug 20 06:45:15 fedora20.example.com systemd-journal[81]:
    Runtime journal is using 8.0M (m
...
Many other options are available with the journalctl command. For information on those options, see the journalctl man page (man journalctl). For more information about the systemd journal itself, type man systemd-journald.service.
Monitoring user accounts
User accounts are often used in malicious attacks on a system by gaining unauthorized access to a current account, creating new bogus accounts, or leaving an account behind to access later. To avoid such security issues, watching over user accounts is an important activity.
Detecting counterfeit new accounts and privileges
Accounts created without going through the appropriate authorization should be considered counterfeit. Also, modifying an account in any way that gives it a different unauthorized User Identification (UID) number or adds unauthorized group memberships is a form of rights escalation. Keeping an eye on the /etc/passwd and /etc/group files will monitor these potential breaches.
To help you monitor the /etc/passwd and /etc/group files, you can use the audit daemon. The audit daemon is an extremely powerful auditing tool that allows you to select system events to track and record them, and provides reporting capabilities.
To begin auditing the /etc/passwd and /etc/group files, you need to use the auditctl command. Two options at a minimum are required to start this process:
- -w filename—Place a watch on filename. The audit daemon tracks the file by its inode number. An inode number is a data structure that contains information concerning a file, including its location.
- -p trigger (s)—If one of these access types occurs (r=read, w=write, x=execute, a=attribute change) to filename, then trigger an audit record.
In the following example, a watch has been placed on the /etc/passwd file using the auditctl command. The audit daemon will monitor access, which consists of any reads, writes, or file attribute changes:
# auditctl -w /etc/passwd -p rwa
NOTE
After you have started a file audit, you may want to turn it off at some point. To turn off an audit, use the command
auditctl -W filename -p trigger(s).
To see a list of current audited files and their watch settings, type auditctl -l at the command line.
To review the audit logs, use the audit daemon's ausearch command. The only option needed here is the -f option, which specifies which records you want to view from the audit log. The following is an example of the /etc/passwd audit information:
# ausearch -f /etc/passwd
time->Fri Feb  7 04:27:01 2014
type=PATH msg=audit(1328261221.365:572):
item=0 name="/etc/passwd" inode=170549
dev=fd:01 mode=0100644 ouid=0 ogid=0
rdev=00:00 obj=system_u:object_r:etc_t:s0
type=CWD msg=audit(1328261221.365:572):  cwd="/"
...
time->Fri Feb  7 04:27:14 2014
type=PATH msg=audit(1328261234.558:574):
item=0 name="/etc/passwd" inode=170549
dev=fd:01 mode=0100644 ouid=0 ogid=0
rdev=00:00 obj=system_u:object_r:etc_t:s0
type=CWD msg=audit(1328261234.558:574):
cwd="/home/johndoe"
type=SYSCALL msg=audit(1328261234.558:574):
arch=40000003 syscall=5 success=yes exit=3
a0=3b22d9 a1=80000 a2=1b6 a3=0 items=1 ppid=3891
pid=21696 auid=1000 uid=1000 gid=1000 euid=1000
suid=1000 fsuid=1000 egid=1000 sgid=1000 fsgid=1000
tty=pts1 ses=2 comm="vi" exe="/bin/vi"
 subj=unconfined_u:unconfined_r:unconfined_t:s0-s0:c0.c1023"
----
This is lots of information to review. A few items will help you see what audit event happened to trigger the bottom record.
- time—The time stamp of the activity
- name—The filename, /etc/passwd, being watched
- inode—The /etc/passwd's inode number on this filesystem
- uid—The user ID, 1000, of the user running the program
- exe—The program, /bin/vi, used on the /etc/passwd file
To determine what user account is assigned the UID of 1000, look at the /etc/password file. In this case, the UID of 1000 belongs to the user johndoe. Thus, from the audit event record displayed above, you can determine that account johndoe has attempted to use the vi editor on the /etc/passwd file. It is doubtful that this was an innocent action and it requires more investigation.
NOTE
The ausearch command returns nothing if no watch events on a file have been triggered.
The audit daemon and its associated tools are extremely rich. To learn more about it, look at the man pages for the following audit daemon utilities and configuration files:
- auditd—The audit daemon
- auditd.conf—The audit daemon configuration file
- autditctl—Controls the auditing system
- audit.rules—Configuration rules loaded at boot
- ausearch—Searches the audit logs for specified items
- aureport—Report creator for the audit logs
- audispd—Sends audit information to other programs
The audit daemon is one way to keep an eye on important files. You should review your account and group files on a regular basis also with a “human eye” to see if anything looks irregular.
Important files, such as /etc/passwd, do need to be monitored for unauthorized account creation. However, just as bad as a new unauthorized user account is an authorized user account with a bad password.
Detecting bad account passwords
Even with all your good efforts, bad passwords will slip in. Therefore, you do need to monitor user account passwords to ensure they are strong enough to withstand an attack.
One password strength monitoring tool you can use is the same one malicious users use to crack accounts, John the Ripper. John the Ripper is a free and open source tool that you can use at the Linux command line. It's not installed by default. For a Fedora distribution, you need to issue the command yum install john to install it.
TIP
To install John the Ripper on Ubuntu, use the command sudo apt-get install john.
In order to use John the Ripper to test user passwords, you must first extract account names and passwords using the unshadow command. This information needs to be redirected into a file for use by john, as shown here:
# unshadow /etc/passwd /etc/shadow > password.file
Now, edit the password.file using your favorite text editor to remove any accounts without passwords. Because it is wise to limit John the Ripper to testing a few accounts at a time, remove any account names you do not wish to test presently.
CAUTION
The john utilities are extremely CPU-intensive. It does set its nice value to 19 in order to lower its priority. However, it would be wise to run it on a nonproduction system or during off-peak hours and for only a few accounts at a time.
Now, use the john command to attempt password cracks. To run john against the created password file, issue the command john filename. In the following code snippet, you can see the output from running john against the sample password.file. For demonstration purposes, only one account was left in the sample file. And the account, Samantha, was given the bad password of password. You can see how little time it took for John the Ripper to crack the password.
# john password.file
Loaded 1 password hash (generic crypt(3) [?/32])
password         (Samantha)
guesses: 1  time: 0:00:00:44 100% (2)  c/s: 20.87
 trying: 12345 - missy
Use the "--show" option to display all of the
 cracked passwords reliably
To demonstrate how strong passwords are vital, consider what happens when the Samantha account's password is changed from password to Password1234. Even though Password1234 is still a weak password, it takes longer than 7 days of CPU time to crack it. In the code that follows, john was finally aborted to end the cracking attempt.
# passwd Samantha
Changing password for user Samantha.
...
# john password.file
Loaded 1 password hash (generic crypt(3) [?/32])
...
time: 0:07:21:55 (3)  c/s: 119  trying: tth675 - tth787
Session aborted
As soon as password cracking attempts have been completed, the password.file should be removed from the system. To learn more about John the Ripper, visit www.openwall.com/john.
Monitoring the filesystem
Malicious programs often modify files. They also can try to cover their tracks by posing as ordinary files and programs. However, there are ways to uncover them through various monitoring tactics covered in this section.
Verifying software packages
Typically, if you install a software package from a standard repository or download a reputable site's package, you won't have any problems. But it is always good to double-check your installed software packages to see if they have been compromised. The command to accomplish this is rpm -V package_name.
When you verify the software, information from the installed package files is compared against the package metadata (see Chapter 10) in the rpm database. If no problems are found, the rpm -V command returns nothing. However, if there are discrepancies, you get a coded listing. Table 22.5 shows the codes used and a description of the discrepancy.
TABLE 22.5 Package Verification Discrepancies
| Code | Discrepancy |
| S | File size |
| M | File permissions and type |
| 5 | MD5 check sum |
| D | Device file's major and minor numbers |
| L | Symbolic links |
| U | User ownership |
| G | Group ownership |
| T | File modified times (mtime) |
| P | Other installed packages this package is dependent upon (aka capabilities) |
In the partial list that follows, all the installed packages are given a verification check. You can see that the codes 5, S, and T were returned, indicating some potential problems.
# rpm -qaV
5S.T.....  c /etc/hba.conf
...
...T.....    /lib/modules/3.2.1-3.fc16.i686/modules.devname
...T.....    /lib/modules/3.2.1-3.fc16.i686/modules.softdep
You do not have to verify all your packages at once. You can verify just one package at a time. For example, if you want to verify your nmap package, you simply enter rpm -V nmap.
NOTE
To verify packages on Ubuntu, you need the debsums utility. It is not installed by default. To install debsums, use the command sudo apt-get install debsums. To check all installed packages, use the debsums -a command. To check one package, type debsums packagename.
Scanning the filesystem
Unless you have recently updated your system, binary files should not have been modified for any reason. To check for binary file modification, you can use the files' modify time, or mtime. The file mtime is the time when the contents of a file were last modified. Also, you can monitor the file's create/change time or ctime.
If you suspect malicious activity, you can quickly scan your filesystem to see if any binaries were modified or changed today (or yesterday, depending upon when you think the intrusion took place). To do this scan, use the find command.
In the example that follows, a scan is made of the /sbin directory. To see if any binary files were modified less than 24 hours ago, the command find /sbin -mtime -1 is used. In the example, several files display, showing they were modified recently. This indicates that malicious activity is taking place on the system. To investigate further, review each individual file's times, using the stat filename command, as shown here:
# find /sbin -mtime -1
/sbin
/sbin/init
/sbin/reboot
/sbin/halt
# stat /sbin/init
  File: '/sbin/init' -> '../bin/systemd'
  Size: 14    Blocks: 0      IO Block: 4096   symbolic link
Device: fd01h/64769d    Inode: 9551        Links: 1
Access: (0777/lrwxrwxrwx)
Uid: (    0/    root)   Gid: (    0/    root)
Context: system_u:object_r:bin_t:s0
Access: 2016-02-03 03:34:57.276589176 -0500
Modify: 2016-02-02 23:40:39.139872288 -0500
Change: 2016-02-02 23:40:39.140872415 -0500
 Birth: -
You could create a database of all the binary's original mtimes and ctimes and then run a script to find current mtimes and ctimes, compare them against the database, and note any discrepancies. However, this type of program has already been created and works well. It's called an Intrusion Detection System and is covered later in this chapter.
You need to perform several other filesystem scans on a regular basis. Favorite files or file settings of malicious attackers are listed in Table 22.6. The table also lists the commands to perform the scans and why the file or file setting is potentially problematic.
TABLE 22.6 Additional Filesystem Scans
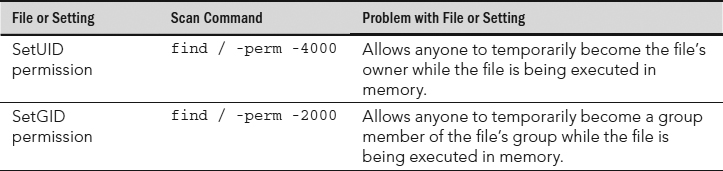

These filesystem scans help monitor what is going on in your system and help detect malicious attacks. However, other types of attacks can occur to your files, including viruses and rootkits.
Detecting viruses and rootkits
Two popular malicious attack tools are viruses and rootkits because they stay hidden while performing their malicious activities. Linux systems need to be monitored for both such tools.
Monitoring for viruses
A computer virus is malicious software that can attach itself to already installed system software and has the ability to spread through media or networks. It is a misconception that there are no Linux viruses. The malicious creators of viruses do often focus on the more popular desktop operating systems, such as Windows. However, that does not mean viruses are not created for the Linux systems.
Even more important, Linux systems are often used to handle services, such as mail servers, for Windows desktop systems. Therefore, Linux systems used for such purposes need to be scanned for Windows viruses as well.
Antivirus software scans files using virus signatures. A virus signature is a hash created from a virus's binary code. The hash will positively identify that virus. Antivirus programs have a virus signature database that is used to compare against files to see if there is a signature match. Depending upon the number of new threats, a virus signature database can be updated often to provide protection from these new threats.
A good antivirus software for your Linux system, which is open source and free, is ClamAV. To install ClamAV on a Fedora or RHEL system, type the command yum install clamav. You can find out more about ClamAV at http://www.clamav.net/index.html, where there is documentation on how to set up and run the antivirus software.
TIP
You can review the packages available for Ubuntu installation by entering the command apt-cache search clamav. A couple of different packages are available for Ubuntu, so review the ClamAV website information before you choose a package.
Monitoring for rootkits
A rootkit is a little more insidious than a virus. A rootkit is a malicious program that:
- Hides itself, often by replacing system commands or programs
- Maintains high-level access to a system
- Can circumvent software created to locate it
The purpose of a rootkit is to get and maintain root-level access to a system. The term was created by putting together “root,” which means that it has to have administrator access, and “kit,” which means it is usually several programs that operate in concert.
A rootkit detector that can be used on a Linux system is chkrootkit. To install chkrootkit on a Fedora or RHEL system, issue the command yum install chkrootkit. To install chkrookit on an Ubuntu system, use the command sudo apt-get install chkrootkit.
TIP
It is best to use a Live CD or flash drive to run chkrootkit so the results are not circumvented by a rootkit. The Fedora Security Spin has chkrootkit on its Live CD. You can get this distribution at http://spins.fedoraproject.org/security.
Finding a rootkit with chkrootkit is simple. After installing the package or booting up the Live CD, type in chkrootkit at the command line. It searches the entire file structure, denoting any infected files.
The code that follows shows a run of chkrootkit on an infected system. The grep command was used to search for the key word INFECTED. Notice that many of the files listed as “infected” are bash shell command files. This is typical of a rootkit.
# chkrootkit | grep INFECTED
Checking 'du'... INFECTED
Checking 'find'... INFECTED
Checking 'ls'... INFECTED
Checking 'lsof'... INFECTED
Checking 'pstree'... INFECTED
Searching for Suckit rootkit... Warning: /sbin/init INFECTED
In the last line of the preceding chkrootkit code is an indication that the system has been infected with the Suckit rootkit. It actually is not infected with this rootkit. When running utilities, such as antivirus and rootkit-detecting software, you often get a number of false positives. A false positive is an indication of a virus, rootkit, or other malicious activity that does not really exist. In this particular case, this false positive is caused by a known bug.
The chkrootkit utility should have regularly scheduled runs and, of course, should be run whenever a rootkit infection is suspected. To find more information on chkrootkit, go to http://chkrootkit.org.
Detecting an intrusion
Intrusion Detection System (IDS) software—a software package that monitors a system's activities (or its network) for potential malicious activities and reports these activities—can help you monitor your system for potential intrusions. Closely related to Intrusion Detection System software is a software package that prevents an intrusion, called Intrusion Prevention software. Some of these packages are bundled together to provide Intrusion Detection and Prevention.
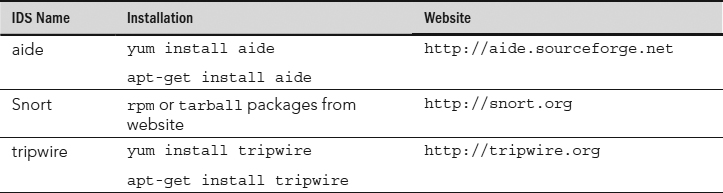
Several Intrusion Detection System software packages are available for a Linux system. A few of the more popular utilities are listed in Table 22.7. You should know that tripwire is no longer open source. However, the original tripwire code is still available. See the tripwire website listed in Table 22.8 for more details.
TABLE 22.7 Popular Linux Intrusion Detection Systems
The Advanced Intrusion Detection Environment (aide) IDS uses a method of comparison to detect intrusions. When you were a child, you may have played the game of comparing two pictures and finding what was different between them. The aide utility uses a similar method. A “first picture” database is created. At some time later, another database “second picture” is created, and aide compares the two databases and reports what is different.
To begin, you need to take that “first picture.” The best time to create this picture is when the system has been freshly installed. The command to create the initial database is aide -i and takes a long time to run. Some of its output follows. Notice that aide tells you where it is creating its initial “first picture” database.
# aide -i
AIDE, version 0.15.1

### AIDE database at /var/lib/aide/aide.db.new.gz initialized.
The next step is to move the initial “first picture” database to a new location. This protects the original database from being overwritten. Plus, the comparison does not work unless the database is moved. The command to move the database to its new location and give it a new name is as follows:
# cp /var/lib/aide/aide.db.new.gz /var/lib/aide/aide.db.gz
When you are ready to check whether your files have been tampered with, you need to create a new database, the “second picture,” and compare it to the original database, the “first picture.” The check option on the aide command, -c, creates a new database and runs a comparison against the old database. The output shown next illustrates this comparison being done and the aide command reporting on some problems.
# aide -C
...
----------------------------------------------------
Detailed information about changes:
----------------------------------------------------
File: /bin/find
Size : 189736 , 4620
Ctime : 2015-02-10 13:00:44 , 2015-02-11 03:05:52
MD5 : <NONE> , rUJj8NtNa1v4nmV5zfoOjg==
RMD160 : <NONE> , 0CwkiYhqNnfwPUPM12HdKuUSFUE=
SHA256 : <NONE> , jg60Soawj4S/UZXm5h4aEGJ+xZgGwCmN

File: /bin/ls
Size : 112704 , 6122
Ctime : 2015-02-10 13:04:57 , 2015-02-11 03:05:52
MD5 : POeOop46MvRx9qfEoYTXOQ== , IShMBpbSOY8axhw1Kj8Wdw==
RMD160 : N3V3Joe5Vo+cOSSnedf9PCDXYkI= ,
 e0ZneB7CrWHV42hAEgT2⊥wrVfP4=
SHA256 : vuOFe6FUgoAyNgIxYghOo6+SxR/zxS1s ,
 Z6nEMMBQyYm8486yFSIbKBuMUi/+jrUi

...

File: /bin/ps
Size : 76684 , 4828
Ctime : 2015-02-10 13:05:45 , 2015-02-11 03:05:52
MD5 : 1pCVAWbpeXINiBQWSUEJfQ== , 4ElJhyWkyMtm24vNLya6CA==
RMD160 : xwICWNtQH242jHsH2E8rV5kgSkU= ,
 AZlI2QNlKrWH45i3/V54H+1QQZk=
SHA256 : ffUDesbfxx3YsLDhD0bLTW0c6nykc3m0 ,
 w1qXvGWPFzFir5yxN+n6t3eOWw1TtNC/
...
File: /usr/bin/du
Size : 104224 , 4619
Ctime : 2015-02-10 13:04:58 , 2015-02-11 03:05:53
MD5 : 5DUMKWj6LodWj4C0xfPBIw== , nzn7vrwfBawAeL8nkayICg==
RMD160 : Zlbm0f/bUWRLgi1B5nVjhanuX9Q= ,
 2e5S00lBWqLq4Tnac4b6QIXRCwY=
SHA256 : P/jVAKr/SO0epBBxvGP900nLXrRY9tnw ,
 HhTqWgDyIkUDxA1X232ijmQ/OMA/kRgl

File: /usr/bin/pstree
Size : 20296 , 7030
Ctime : 2015-02-10 13:02:18 , 2015-02-11 03:05:53
MD5 : <NONE> , ry/MUZ7XvU4L2QfWJ4GXxg==
RMD160 : <NONE> , tFZer6As9EoOi58K7/LgmeiExjU=
SHA256 : <NONE> , iAsMkqNShagD4qe7dL/EwcgKTRzvKRSe
...
The files listed by the aide check in this example are infected. However, aide can also display many false positives.
Where aide databases are created, what comparisons are made, and several other configuration settings are handled in the /etc/aide.conf file. The following is a partial display of the file. You can see the names of the database file and the log file directories set here:
# cat /etc/aide.conf
# Example configuration file for AIDE.

@@define DBDIR /var/lib/aide
@@define LOGDIR /var/log/aide

# The location of the database to be read.
database=file:@@{DBDIR}/aide.db.gz

# The location of the database to be written.
#database_out=sql:host:port:database:login_name:passwd:table
#database_out=file:aide.db.new
database_out=file:@@{DBDIR}/aide.db.new.gz
...
An Intrusion Detection System can be a big help in monitoring the system. When potential intrusions are detected, comparing the output to information from other commands (such as rpm -V) and log files can help you better understand and correct any attacks on your system.
Auditing and Reviewing Linux
You must understand two important terms when you are auditing the health of your Linux system. A compliance review is an audit of the overall computer system environment to ensure that policies and procedures you have set for the system are being carried out correctly. A security review is an audit of current policies and procedures to ensure that they follow accepted best security practices.
Conducting compliance reviews
Similar to audits in other fields, such as accounting, audits can be conducted internally or by external personnel. These reviews can be as simple as someone sitting down and comparing implemented security to your company's stated policies. However, a more popular method is conducting audits using penetration testing.
Penetration testing is an evaluation method used to test a computer system's security by simulating malicious attacks. It is also called pen testing and ethical hacking. No longer do you have to gather tools and the local neighborhood hacker to help you conduct these tests. The following are Linux distributions you can use to conduct very thorough penetration tests:
- BackTrack(www.backtrack-linux.org)
- Linux distribution created specifically for penetration testing
- Can be used from a live DVD or a flash drive
- Training on use of BackTrack offered by www.offensive-security.com
- Fedora Security Spin (http://spins.fedoraproject.org/security)
- Also called Fedora Security Lab
- Spin of the Fedora Linux distribution
- Provides a test environment to work on security auditing
- Can be used from a flash drive
While penetration testing is lots of fun, for a thorough compliance review, a little more is needed. You should also use checklists from industry security sites.
Conducting security reviews
Conducting a security review requires that you know current best security practices. There are several ways to stay informed about best security practices. The following is a brief list of organizations that can help you.
- United States Computer Emergency Readiness Team (CERT)
- URL: www.us-cert.gov
- Offers the National Cyber Alert System
- Offers RSS feeds on the latest security threats
- The SANS Institute
- URL: www.sans.org/security-resources
- Offers Computer Security Research newsletters
- Offers RSS feeds on the latest security threats
- Gibson Research Corporation
- URL: www.grc.com
- Offers the Security Now! security netcast
Information from these sites will assist you in creating stronger policies and procedures. Given how fast the best security practices change, it would be wise to conduct security reviews often, depending upon your organization's security needs.
Now you understand a lot more about basic Linux security. The hard part is actually putting all these concepts into practice.
Summary
Basic Linux security practices such as managing user accounts, securing passwords, and managing software and services form the foundation for all other security on your Linux system. With that foundation in place, ongoing monitoring of your system includes watching over system log files, checking for malicious intrusions, and monitoring the filesystem.
Reviews of your security policies are also important to keep up on a regular basis. Audits assist in ensuring that your Linux system is secured and the proper security policies and practices are in place.
You have completed your first step of gathering basic security procedures and principles knowledge. It is not enough to just know the basics. You need to add advanced Linux security tools to your security toolbox. In the next chapter, advanced security topics of cryptography and authentication modules are covered.
Exercises
Refer to the material in this chapter to complete the tasks that follow. If you are stuck, solutions to the tasks are shown in Appendix B (although in Linux, there are often multiple ways to complete a task). Try each of the exercises before referring to the answers. These tasks assume you are running a Fedora or Red Hat Enterprise Linux system (although some tasks will work on other Linux systems as well).
- Check log messages from the systemd journal for the following services: NetworkManager.service, sshd.service, and auditd.service.
- List the permissions of the file containing your system's user passwords, and determine if they are appropriate.
- Determine your account's password aging and if it will expire using a single command.
- Start auditing writes to the /etc/shadow with the auditd daemon, and then check your audit settings.
- Create a report from the auditd daemon on the /etc/shadow file, and then turn off auditing on that file.
- Install the lemon package, damage the /usr/bin/lemon file (perhaps copy /etc/services there), verify that the file has been tampered with, and remove the lemon package.
- You suspect you have had a malicious attack on your system today and important binary files have been modified. What command should you use to find these modified files?
- Install and run chkrootkit to see if the malicious attack from Exercise 7 installed a rootkit.
- Find files with the SetUID or SetGID permission set.
- Install the aide package, run the aide command to initialize the aide database, copy the database to the correct location, and run the aide command to check if any important files on your system have been modified.