Table of Contents for
Linux Bible, 9th Edition
 Linux Bible, 9th Edition
Published by
John Wiley & Sons, 2015
Linux Bible, 9th Edition
Published by
John Wiley & Sons, 2015
- Cover Page
- Title Page
- Copyright
- Dedication
- About the Author
- About the Technical Editor
- Credits
- Acknowledgments
- Contents at a Glance
- Contents
- Introduction
- Part I: Getting Started
- Chapter 1: Starting with Linux
- Chapter 2: Creating the Perfect Linux Desktop
- Part II: Becoming a Linux Power User
- Chapter 3: Using the Shell
- Chapter 4: Moving around the Filesystem
- Chapter 5: Working with Text Files
- Chapter 6: Managing Running Processes
- Chapter 7: Writing Simple Shell Scripts
- Part III: Becoming a Linux System Administrator
- Chapter 8: Learning System Administration
- Chapter 9: Installing Linux
- Chapter 10: Getting and Managing Software
- Chapter 11: Managing User Accounts
- Chapter 12: Managing Disks and Filesystems
- Part IV: Becoming a Linux Server Administrator
- Chapter 13: Understanding Server Administration
- Chapter 14: Administering Networking
- Chapter 15: Starting and Stopping Services
- Chapter 16: Configuring a Print Server
- Chapter 17: Configuring a Web Server
- Chapter 18: Configuring an FTP Server
- Chapter 19: Configuring a Windows File Sharing (Samba) Server
- Chapter 20: Configuring an NFS File Server
- Chapter 21: Troubleshooting Linux
- Part V: Learning Linux Security Techniques
- Chapter 22: Understanding Basic Linux Security
- Chapter 23: Understanding Advanced Linux Security
- Chapter 24: Enhancing Linux Security with SELinux
- Chapter 25: Securing Linux on a Network
- Part VI: Extending Linux into the Cloud
- Chapter 26: Using Linux for Cloud Computing
- Chapter 27: Deploying Linux to the Cloud
- Part VII: Appendixes
- Appendix A: Media
- Appendix B: Exercise Answers
- Index
- Linux® Bible, Ninth Edition

Managing User Accounts
IN THIS CHAPTER
Working with user accounts
Working with group accounts
Configuring centralized user accounts
Adding and managing users are common tasks for Linux systems administrators. User accounts keep boundaries between the people who use your systems and between the processes that run on your systems. Groups are a way of assigning rights to your system that can be assigned to multiple users at once.
This chapter describes not only how to create a new user, but also how to create predefined settings and files to configure the user's environment. Using tools such as the useradd and usermod commands, you can assign settings such as the location of a home directory, a default shell, a default group, and specific user ID and group ID values.
Creating User Accounts
Every person who uses your Linux system should have a separate user account. Having a user account provides you with an area in which to securely store files, as well as a means of tailoring your user interface (GUI, path, environment variables, and so on) to suit the way that you use the computer.
You can add user accounts to most Linux systems in several ways. Fedora and Red Hat Enterprise Linux systems have a Users window available from the Settings Window. In GNOME 3, go the the Activities screen, type Users, and press Enter. In GNOME 2, from the Applications menu, select System Tools  Settings. Then select the Users icon. Select the Unlock button, and enter the root password. Then select the plus (+) to open a window for adding a user account, as shown in Figure 11.1.
You are now ready to begin adding a new user account to your Linux system. Here are the fields you need to fill in:
- Account Type—Choose Standard (to create a regular user account) or Administrator (to create an account that has root permission).
Add user accounts from the User window.
- Full Name—Use the user's real name, typically used with uppercase and lowercase letters as the user would write it in real life. Technically, this information is stored in the comment field of the passwd file but, by convention, most Linux and UNIX systems expect this field to hold each user's full name.
- Username—This is the name used to log in as this user. When you choose a username, don't begin with a number (for example, 26jsmith). Also, it's best to use all lowercase letters, no control characters or spaces, and a maximum of eight characters. The useradd command allows up to 32 characters, but some applications can't deal with usernames that long. Tools such as ps display user IDs (UIDs) instead of names if names are too long. Having users named Jsmith and jsmith can cause confusion with programs (such as sendmail) that don't distinguish case.
- Password, Verify—Select the “Set a password now” button. Then enter the password you want the user to have in the Password and Verify fields. The password should be at least eight characters and contain a mixture of uppercase and lowercase letters, numbers, and punctuation. It should not contain real words, repeated letters, or letters in a row on the keyboard. Through this interface, you must set a password that meets the above criteria. (If you want to add a password that doesn't meet these criteria, you can use the useradd command, described later in this chapter.)
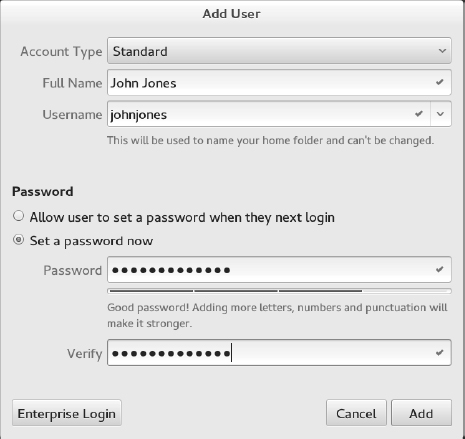
Select Add to add the user to the system. An entry for the new user account is added to the /etc/passwd file and the new group account to the /etc/group file. I describe those later in this chapter.
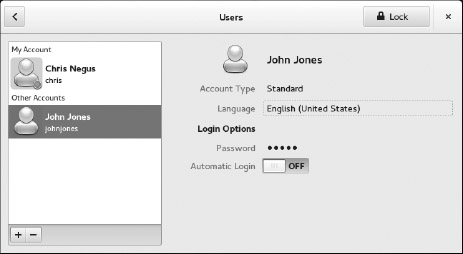
The Software window lets you modify a small set of information about a regular user after it has been created. To modify user information later, select the user account you want to change, click the Unlock button, and enter the root password. At this point, you can change the account type (Standard or Administrator), change the user's password, or allow the user account to log in automatically (without a password). This screen is shown in Figure 11.2.
FIGURE 11.2
Modify existing user accounts from the Users window.
The Users window was designed to simplify the process of creating and modifying user accounts. More features associated with user accounts can be added or modified from the command line. The next part of this chapter describes how to add user accounts from the command line with useradd or change them with the usermod command.
Adding users with useradd
Sometimes, a Linux system doesn't have a desktop available to use the User Manager window. Other times, you might find it more convenient to add lots of users at once with a shell script or change user account features that are not available from the Users window. For those cases, commands are available to enable you to add and modify user accounts from the command line.
The most straightforward method for creating a new user from the shell is the useradd command. After opening a Terminal window with root permission, you simply invoke useradd at the command prompt, with details of the new account as parameters.
The only required parameter is the login name of the user, but you probably want to include some additional information ahead of it. Each item of account information is preceded by a single-letter option code with a dash in front of it. The options available with useradd include the following:
- -c “comment here”—Provide a description of the new user account. Typically, this is the person's full name. Replace comment with the name of the user account (-c Jake). Use quotes to enter multiple words (for example, -c “Jake Jackson”).
- -d home_dir—Set the home directory to use for the account. The default is to name it the same as the login name and to place it in /home. Replace home_dir with the directory name to use (for example, -d /mnt/homes/jake).
- -D—Rather than create a new account, save the supplied information as the new default settings for any new accounts that are created.
- -e expire_date—Assign the expiration date for the account in YYYY-MM-DD format. Replace expire_date with a date you want to use. (For example, to expire an account on May 5, 2017, use -e 2017-05-05.)
- -f -1—Set the number of days after a password expires until the account is permanently disabled. The default, -1, disables the option. Setting this to 0 disables the account immediately after the password has expired. Replace -1 (that's minus one) with the number to use.
- -g group—Set the primary group (it must already exist in the /etc/group file) the new user will be in. Replace group with the group name (for example, -g wheel). Without this option, a new group is created that is the same as the user name and is used as that user's primary group.
- -G grouplist—Add the new user to the supplied comma-separated list of supplementary groups (for example, -G wheel,sales,tech,lunch). (If you use -G later with usermod, be sure to use -aG and not just -G. If you don't, existing supplementary groups are removed and the groups you provide here are the only ones assigned.)
- -k skel_dir—Set the skeleton directory containing initial configuration files and login scripts that should be copied to a new user's home directory. This parameter can be used only in conjunction with the -m option. Replace skel_dir with the directory name to use. (Without this option, the /etc/skel directory is used.)
- -m—Automatically create the user's home directory and copy the files in the skeleton directory (/etc/skel) to it. (This is the default action for Fedora and RHEL, so it's not required. It is not the default for Ubuntu.)
- -M—Do not create the new user's home directory, even if the default behavior is set to create it.
- -n—Turn off the default behavior of creating a new group that matches the name and user ID of the new user. This option is available with Fedora and RHEL systems. Other Linux systems often assign a new user to the group named users instead.
- -o—Use with -u uid to create a user account that has the same UID as another username. (This effectively lets you have two different usernames with authority over the same set of files and directories.)
- -p passwd—Enter a password for the account you are adding. This must be an encrypted password. Instead of adding an encrypted password here, you can simply use the passwd user command later to add a password for user. (To generate an encrypted MD5 password, type openssl passwd.)
- -s shell—Specify the command shell to use for this account. Replace shell with the command shell (for example, -s /bin/csh).
- -u user_id—Specify the user ID number for the account (for example, -u 793). Without the -u option, the default behavior is to automatically assign the next available number. Replace user_id with the ID number.
Let's create an account for a new user. The user's full name is Sara Green, and her login name is sara. To begin, become root user and type the following command:
# useradd -c "Sara Green" sara
Next, set the initial password for sara using the passwd command. You're prompted to type the password twice:
# passwd sara
Changing password for user sara.
New password: **********
Retype new password: **********
NOTE
Asterisks in this example represent the password you type. Nothing is actually displayed when you type the password. Also keep in mind that running passwd as root user lets you add short or blank passwords that regular users cannot add themselves.
In creating the account for Sara, the useradd command performs several actions:
- Reads the /etc/login.defs and /etc/default/useradd files to get default values to use when creating accounts.
- Checks command-line parameters to find out which default values to override.
- Creates a new user entry in the /etc/passwd and /etc/shadow files based on the default values and command-line parameters.
- Creates any new group entries in the /etc/group file. (Fedora creates a group using the new user's name.)
- Creates a home directory, based on the user's name, in the /home directory.
- Copies any files located within the /etc/skel directory to the new home directory. This usually includes login and application startup scripts.
The preceding example uses only a few of the available useradd options. Most account settings are assigned using default values. You can set more values explicitly, if you want to. Here's an example that uses a few more options to do so:
# useradd -g users -G wheel,apache -s /bin/tcsh -c "Sara Green" sara
In this case, useradd is told to make users the primary group sara belongs to (-g), add her to the wheel and apache groups, and assign tcsh as her primary command shell (-s). A home directory in /home under the user's name (/home/sara) is created by default. This command line results in a line similar to the following being added to the /etc/passwd file:
sara:x:1002:1007:Sara Green:/home/sara:/bin/tcsh
Each line in the /etc/passwd file represents a single user account record. Each field is separated from the next by a colon (:) character. The field's position in the sequence determines what it is. The login name is first. The password field contains an x because, in this example, the shadow password file is used to store encrypted password data (in /etc/shadow).
The user ID selected by useradd is 1002. The primary group ID is 1007, which corresponds to a private sara group in the /etc/group file. The comment field was correctly set to Sara Green, the home directory was automatically assigned as /home/sara, and the command shell was assigned as /bin/tcsh, exactly as specified with the useradd options.
By leaving out many of the options (as I did in the first useradd example), defaults are assigned in most cases. For example, by not using -g sales or -G wheel,apache, the group name mary was assigned to the new user. Some Linux systems (other than Fedora and RHEL) assign users as the group name by default. Likewise, excluding -s /bin/tcsh causes /bin/bash to be assigned as the default shell.
The /etc/group file holds information about the different groups on your Linux system and the users who belong to them. Groups are useful for enabling multiple users to share access to the same files while denying access to others. Here is the /etc/group entry created for sara:
sara:x:1007:
Each line in the group file contains the name of a group, a group password (usually filled with an x), the group ID number associated with it, and a list of users in that group. By default, each user is added to his or her own group, beginning with the next available GID, starting with 1000.
Setting user defaults
The useradd command determines the default values for new accounts by reading the /etc/login.defs and /etc/default/useradd files. You can modify those defaults by editing the files manually with a standard text editor. Although login.defs is different on different Linux systems, the following is an example containing many of the settings you might find in a login.defs file:
PASS_MAX_DAYS   99999
PASS_MIN_DAYS   0
PASS_MIN_LEN    5
PASS_WARN_AGE   7
UID_MIN                1000
UID_MAX               60000
GID_MIN                1000
GID_MAX               60000
CREATE_HOME yes
All uncommented lines contain keyword/value pairs. For example, the keyword PASS_MIN_LEN is followed by some white space and the value 5. This tells useradd that the user password must be at least five characters. Other lines enable you to customize the valid range of automatically assigned user ID numbers or group ID numbers. (Fedora starts at UID 1000; earlier systems started with UID 100.) A comment section that explains that keyword's purpose precedes each keyword (which I edited out here to save space). Altering a default value is as simple as editing the value associated with a keyword and saving the file before running the useradd command.
If you want to view other default settings, refer to the /etc/default/useradd file. You can also see default settings by typing the useradd command with the -D option, as follows:
# useradd -D
GROUP=100
HOME=/home
INACTIVE=-1
EXPIRE=
SHELL=/bin/bash
SKEL=/etc/skel
CREATE_MAIL_SPOOL=yes
You can also use the -D option to change defaults. When run with this flag, useradd refrains from actually creating a new user account; instead, it saves any additionally supplied options as the new default values in /etc/default/useradd. Not all useradd options can be used in conjunction with the -D option. You can use only the five options listed here.
- -b default_home—Set the default directory in which user home directories are created. Replace default_home with the directory name to use (for example, -b/garage). Usually, this is /home.
- -e default_expire_date—Set the default expiration date on which the user account is disabled. The default_expire_date value should be replaced with a date in the form YYYY-MM-DD (for example, -e 2011-10-17).
- -f default_inactive—Set the number of days after a password has expired before the account is disabled. Replace default_inactive with a number representing the number of days (for example, -f 7).
- -g default_group—Set the default group that new users will be placed in. Normally, useradd creates a new group with the same name and ID number as the user. Replace default_group with the group name to use (for example, -g bears).
- -s default_shell—Set the default shell for new users. Typically, this is /bin/bash. Replace default_shell with the full path to the shell that you want as the default for new users (for example, -s /usr/bin/ksh.
To set any of the defaults, give the -D option first and add the defaults you want to set. For example, to set the default home directory location to /home/everyone and the default shell to /bin/tcsh, type the following:
# useradd -D -b /home/everyone -s /bin/tcsh
In addition to setting up user defaults, an administrator can create default files that are copied to each user's home directory for use. These files can include login scripts and shell configuration files (such as .bashrc).
Other commands that are useful for working with user accounts include usermod (to modify settings for an existing account) and userdel (to delete an existing user account).
Modifying users with usermod
The usermod command provides a simple and straightforward method for changing account parameters. Many of the options available with it mirror those found in useradd. The options that can be used with this command include the following:
- -c username—Change the description associated with the user account. Replace username with the name of the user account (-c jake). Use quotes to enter multiple words (for example, -c “Jake Jackson”).
- -d home_dir—Change the home directory to use for the account. The default is to name it the same as the login name and to place it in /home. Replace home_dir with the directory name to use (for example, -d /mnt/homes/jake).
- -e expire_date—Assign a new expiration date for the account in YYYY-MM-DD format. Replace expire_date with a date you want to use. (For October 15, 2017, use -e 2017-10-15.)
- -f -1—Change the number of days after a password expires until the account is permanently disabled. The default, -1, disables the option. Setting this to 0 disables the account immediately after the password has expired. Replace -1 with the number to use.
- -g group—Change the primary group (as listed in the /etc/group file) the user will be in. Replace group with the group name (for example, -g wheel).
- -G grouplist—Set the user's secondary groups to the supplied comma-separated list of groups. If the user is already in at least one group besides the user's private group, you must add the -a option as well (-Ga). If not, the user belongs to only the new set of groups and loses membership to any previous groups.
- -l login_name—Change the login name of the account.
- -L—Lock the account by putting an exclamation point at the beginning of the encrypted password in /etc/shadow. This locks the account, while still allowing you to leave the password intact (the -U option unlocks it).
- -m—Available only when -d is used, this causes the contents of the user's home directory to be copied to the new directory.
- -o—Use only with -u uid to remove the restriction that UIDs must be unique.
- -s shell—Specify a different command shell to use for this account. Replace shell with the command shell (for example, -s bash).
- -u user_id—Change the user ID number for the account. Replace user_id with the ID number (for example, -u 1474).
- -U—Unlocks the user account (by removing the exclamation mark at the beginning of the encrypted password).
The following are examples of the usermod command:
# usermod -s /bin/csh chris
# usermod -Ga sales,marketing, chris
The first example changes the shell to the csh shell for the user named chris. In the second example, supplementary groups are added for the user chris. The -a option (-Ga) makes sure that the supplementary groups are added to any existing groups for the user chris. If the -a is not used, existing supplementary groups for chris are erased and the new list of groups includes the only supplementary groups assigned to that user.
Deleting users with userdel
Just as usermod is used to modify user settings and useradd is used to create users, userdel is used to remove users. The following command removes the user chris:
# userdel -r chris
Here, the user chris is removed from the /etc/password file. The -r option removes the user's home directory as well. If you choose not to use -r, as follows, the home directory for chris is not removed:
# userdel chris
Keep in mind that simply removing the user account does not change anything about the files that user leaves around the system (except those that are deleted when you use -r). However, ownership of files left behind appears as belonging to the previous owner's user ID number when you run ls -l on the files.
Before you delete the user, you may want to run a find command to find all files that would be left behind by the user. After you delete the user, you could search on user ID to find files left behind. Here are two find commands to do those things:
# find / -user chris -ls
# find / -uid 504 -ls
Because files that are not assigned to any username are considered to be a security risk, it is a good idea to find those files and assign them to a real user account. Here's an example of a find command that finds all files in the filesystem that are not associated with any user (the files are listed by UID):
# find / -nouser -ls
Understanding Group Accounts
Group accounts are useful if you want to share a set of files with multiple users. You can create a group and change the set of files to be associated with that group. The root user can assign users to that group so they can have access to files based on that group's permission. Consider the following file and directory:
$ ls -ld /var/salesdocs /var/salesdocs/file.txt
drwxrwxr-x. 2 root sales 4096 Jan 14 09:32 /var/salesstuff/
-rw-rw-r--. 1 root sales 0    Jan 14 09:32 /var/salesstuff/file.txt
Looking at permissions on the directory /var/salesdocs (rwxrwxr-x), you see that the second set of rwx shows that any member of the group (sales) has permission to read files in that directory (r is read), create and delete files from that directory (w is write), and change to that directory (x is execute). The file named file.txt can be read and changed by members of the sales group (based on the second rw-).
Using group accounts
Every user is assigned to a primary group. In Fedora and RHEL, by default, that group is a new group with the same name as the user. So if the user were named sara, the group assigned to her would also be sara. The primary group is indicated by the number in the third field of each entry in the /etc/passwd file, for example, the group ID 1007 here:
sara:x:1002:1007:Sara Green:/home/sara:/bin/tcsh
That entry points to an entry in the /etc/group file:
sara:x:1007:
Let's turn to the sara user and group accounts for examples. Here are a few facts about using groups:
- When sara creates a file or directory, by default, that file or directory is assigned to sara's primary group (also called sara).
- The user sara can belong to zero or more supplementary groups. If sara were a member of groups named sales and marketing, those entries could look like the following in the /etc/group file:
sales:x:1302:joe,bill,sally,sara
marketing:x:1303:mike,terry,sara
- The user sara can't add herself to a supplementary group. She can't even add another user to her sara group. Only someone with root privilege can assign users to groups.
- Any file assigned to the sales or marketing group is accessible to sara with group and other permissions (whichever provides the most access). If sara wants to create a file with the sales or marketing groups assigned to it, she could use the newgrp command. In this example, sara uses the newgrp command to have sales become her primary group temporarily and creates a file:
[sara]$ touch file1
[sara]$ newgrp sales
[sara]$ touch file2
[sara]$ ls -l file*
-rw-rw-r--. 1 sara sara  0 Jan 18 22:22 file1
-rw-rw-r--. 1 sara sales 0 Jan 18 22:23 file2
[sara]$ exit
It is also possible to allow users to temporarily become a member of a group with the newgrp command without actually being a member of that group. To do that, someone with root permission can use gpasswd to set a group password (such as gpasswd sales). After that, any user can type newgrp sales into a shell and temporarily use sales as their primary group by simply entering the group password when prompted.
Creating group accounts
As the root user, you can create new groups from the User Manager window or from the command line with the groupadd command. Also, as noted earlier, groups are created automatically when a user account is created.
Group ID numbers from 0 through 999 are assigned to special administrative groups. For example, the root group is associated with GID 0. Regular groups begin at 1000 for Red Hat Enterprise Linux and Fedora. On the first UNIX systems, GIDs went from 0 to 99. Other Linux systems reserve GIDs between 0 to 500 for administrative groups.
Here are some examples of creating a group account with the groupadd command:
# groupadd kings
# groupadd -g 1325 jokers
In the examples just shown, the group named kings is created with the next available group ID. After that, the group jokers is created using the 1325 group ID. Some administrators like using an undefined group number under 1000 so the group they create doesn't intrude on the group designations above 1000 (so UID and GID numbers can go along in parallel).
To change a group later, use the groupmod command. For example:
# groupmod -g 330 jokers
# groupmod -n jacks jokers
In the first example, the group ID for jokers is changed to 330. In the second, the name jokers is changed to jacks. If you wanted to then assign any of the groups as supplementary groups to a user, you can use the usermod command (as described earlier in this chapter).
Managing Users in the Enterprise
The basic Linux method of handling user and group accounts has not changed since the first UNIX systems were developed decades ago. However, as Linux systems have become used in more complex ways, features for managing users, groups, and the permissions associated with them have been added on to the basic user/group model so that it could be:
- More flexible—In the basic model, only one user and one group can be assigned to each file. Also, regular users have no ability to assign specific permissions to different users or groups and very little flexibility setting up collaborative files/directories. Enhancements to this model allow regular users to set up special collaborative directories (using features such as sticky bit and set GID bit directories). Using Access Control Lists (ACLs), any user can also assign specific permissions to files and directories to any users and groups they like.
- More centralized—When you have only one computer, storing user information for all users in the /etc/password file is probably not a hardship. However, if you need to authenticate the same set of users across thousands of Linux systems, centralizing that information can save lots of time and heartache. Red Hat Enterprise Linux includes features that enable you to authenticate users from LDAP servers or Microsoft Active Directories servers.
The following sections describe how to use features such as Access Control Lists (ACLs) and shared directories (sticky bit and set GID bit directories) to provide powerful ways to selectively share files and directories. Next, I describe how to manage user accounts from centralized authentication servers using the Authentication Configuration window.
Setting permissions with Access Control Lists
The Access Control List (ACL) feature was created so regular users could share their files and directories selectively with other users and groups. With ACLs, a user can allow others to read, write, and execute files and directories without leaving those filesystem elements wide open or requiring the root user to change the user or group assigned to them.
Here are a few things to know about ACLs:
- For ACLs to be used, they must be enabled on a filesystem when that filesystem is mounted.
- In Fedora and Red Hat Enterprise Linux, ACLs are automatically enabled on any filesystem created when the system is installed.
- If you create a filesystem after installation (such as when you add a hard disk), you need to make sure that the acl mount option is used when the filesystem is mounted (more on that later).
- To add ACLs to a file, you use the setfacl command; to view ACLs set on a file, you use the getfacl command.
- To set ACLs on any file or directory, you must be the actual owner (user) assigned to it. In other words, being assigned user or group permissions with setfacl does not give you permission to change ACLs on those files yourself.
- Because multiple users and groups can be assigned to a file/directory, the actual permission a user has is based on a union of all user/group designations to which they belong. For example, if a file had read-only permission (r--) for the sales group and read/write/execute (rwx) for the market group, and mary belonged to both, mary would have rwx permission.
NOTE
If ACLs are not enabled on the filesystem you are trying to use with setfacl, see the “Enabling ACLs” section later in this chapter for information on how to mount a filesystem with ACLs enabled.
Setting ACLs with setfacl
Using the setfacl command, you can modify permissions (-m) or remove ACL permissions (-x). The following is an example of the syntax of the setfacl command:
setfacl -m u:username:rwx filename
In the example just shown, the modify option (-m) is followed by the letter u, indicating that you are setting ACL permissions for a user. After a colon (:), you indicate the username, followed by another colon and the permissions you want to assign. As with the chmod command, you can assign read (r), write (w), and/or execute (x) permissions to the user or group (in the example, full rwx permission is given). The last argument is replaced by the actual filename you are modifying.
The following are some examples of the user mary using the setfacl command to add permission for other users and groups on a file:
[mary]$ touch /tmp/memo.txt
[mary]$ ls -l /tmp/memo.txt
-rw-rw-r--. 1 mary mary 0 Jan 21 09:27 /tmp/memo.txt
[mary]$ setfacl -m u:bill:rw /tmp/memo.txt
[mary]$ setfacl -m g:sales:rw /tmp/memo.txt
In the preceding example, mary created a file named /tmp/memo.txt. Using the setfacl command, she modified (-m) permissions for the user named bill so he now has read/write (rw) permissions to that file. Then she modified permissions for the group sales so anyone belonging to that group would also have read/write permissions. Look at ls -l and getfacl output on that file now:
[mary]$ ls -l /tmp/memo.txt
-rw-rw-r--+ 1 mary mary 0 Jan 21 09:27 /tmp/memo.txt
[mary]$ getfacl /tmp/memo.txt
# file: tmp/memo.txt
# owner: mary
# group: mary
user::rw-
user:bill:rw-
group::rw-
group:sales:rw-
mask::rw-
other::r--
From the ls -l output, notice the plus sign (+) in the rw-rw-r--+ output. The plus sign indicates that ACLs are set on the file, so you know to run the getfacl command to see how ACLs are set. The output shows mary as owner and group (same as what you see with ls -l), the regular user permissions (rw-), and permissions for ACL user bill (rw-). The same is true for group permissions and permissions for the group sales. Other permissions are r--.
The mask line (near the end of the previous getfacl example) requires some special discussion. As soon as you set ACLs on a file, the regular group permission on the file sets a mask of the maximum permission an ACL user or group can have on a file. So, even if you provide an individual with more ACL permissions than the group permissions allow, the individual's effective permissions do not exceed the group permissions. For example:
[mary]$ chmod 644 /tmp/memo.txt
[mary]$ getfacl /tmp/memo.txt
# file: tmp/memo.txt
# owner: mary
# group: mary
user::rw-
user:bill:rw-   #effective:r--
group::rw-      #effective:r--
group:sales:rw- #effective:r--
mask::r--
other::r--
Notice in the preceding example that even though the user bill and group sales have rw- permissions, their effective permissions are r--. So, bill or anyone in sales would not be able to change the file unless mary were to open permissions again (for example, by typing chmod 664 /tmp/memo.txt).
Setting default ACLs
Setting default ACLs on a directory enables your ACLs to be inherited. That means that when new files and directories are created in that directory, they are assigned the same ACLs. To set a user or group ACL permission as the default, you add a d: to the user or group designation. Consider the following example:
[mary]$ mkdir /tmp/mary
[mary]$ setfacl -m d:g:market:rwx /tmp/mary/
[mary]$ getfacl /tmp/mary/
# file: tmp/mary/
# owner: mary
# group: mary
user::rwx
group::rwx
other::r-x
default:user::rwx
default:group::rwx
default:group:sales:rwx
default:group:market:rwx
default:mask::rwx
default:other::r-x
To make sure the default ACL worked, create a subdirectory. Then run getfacl again. You will see that default lines are added for user, group, mask, and other, which are inherited from the directory's ACLs.
[mary]$ mkdir /tmp/mary/test
[mary]$ getfacl /tmp/mary/test
# file: tmp/mary/test
# owner: mary
# group: mary
user::rwx
group::rwx
group:sales:rwx
group:market:rwx
mask::rwx
other::r-x
default:user::rwx
default:group::rwx
default:group:sales:rwx
default:group:market:rwx
default:mask::rwx
default:other::r-x
Notice that when you create a file in that directory, the inherited permissions are different. Because a regular file is created without execute permission, the effective permission is reduced to rw-:
[mary@cnegus ~]$ touch /tmp/mary/file.txt
[mary@cnegus ~]$ getfacl /tmp/mary/file.txt
# file: tmp/mary/file.txt
# owner: mary
# group: mary
user::rw-
group::rwx         #effective:rw-
group:sales:rwx    #effective:rw-
group:market:rwx   #effective:rw-
mask::rw-
other::r--
Enabling ACLs
Basic Linux filesystems that you create after installation have only one user and one group assigned to each file and directory and do not include ACL support by default. Linux ext filesystem types (ext2, ext3, and ext4) can add ACL support through a mount option. To add ACL support, you must add the acl mount option when you mount it. You can do that in several ways:
- Add the acl option to the fifth field in the line in the /etc/fstab file that automatically mounts the filesystem when the system boots up.
- Implant the acl line in the Default mount options field in the filesystem's super block, so the acl option is used whether the filesystem is mounted automatically or manually.
- Add the acl option to the mount command line when you mount the filesystem manually with the mount command.
Keep in mind that in Fedora and Red Hat Enterprise Linux systems, you only have to add the acl mount option to those filesystems you create after Linux is installed. The anaconda installer automatically adds ACL support to every filesystem it creates during install time. To check that the acl option has been added to a filesystem, determine the device name associated with the filesystem, and run the tune2fs -l command to view the implanted mount options. For example:
# mount | grep home
/dev/mapper/mybox-home on /home type ext4 (rw)
# tune2fs -l /dev/mapper/mybox-home | grep "mount options"
Default mount options:    user_xattr acl
First, I typed the mount command to see a list of all filesystems that are currently mounted, limiting the output by grepping for the word home (because I was looking for the filesystem mounted on /home). After I saw the filesystem's device name, I used it as an option to tune2fs -l to find the default mount options line. There, I could see that mount options user_xattr (for extended attributes such as SELinux) and acl were both implanted in the filesystem super block so they would be used when the filesystem was mounted.
If the Default mount options field is blank (such as when you have just created a new filesystem), you can add the acl mount option using the tune2fs -o command. For example, I created a filesystem on a removable USB drive that was assigned as the /dev/sdc1 device. To implant the acl mount option and check that it is there, I ran the following commands:
# tune2fs -o acl /dev/sdc1
# tune2fs -l /dev/sdc1 | grep "mount options"
Default mount options:    acl
You can test that this worked by remounting the filesystem and trying to use the setfacl command on a file in that filesystem.
A second way to add acl support to a filesystem is to add the acl option to the line in the /etc/fstab file that automatically mounts the filesystem at boot time. The following is an example of what a line would look like that mounts the ext4 filesystem located on the /dev/sdc1 device to the /var/stuff directory:
/dev/sdc1 /var/stuff ext4 acl 1 2
Instead of the defaults entry in the fourth field, I added acl. If there were already options set in that field, add a comma after the last option and add acl. The next time the filesystem is mounted, ACLs are enabled. If the filesystem were already mounted, I could type the following mount command as root to remount the filesystem, using acl or any other values added to the /etc/fstab file:
# mount -o remount /dev/sdc1
A third way you can add ACL support to a filesystem is to mount the filesystem by hand and specifically request the acl mount option. So, if there is no entry for the filesystem in the /etc/fstab file, after creating the mount point (/var/stuff), type the following command to mount the filesystem and include ACL support:
# mount -o acl /dev/sdc1 /var/stuff
Keep in mind that the mount command only mounts the filesystem temporarily. When the system reboots, the filesystem is not mounted again, unless you add an entry to the /etc/fstab file.
Adding directories for users to collaborate
A special set of three permission bits are typically ignored when you use the chmod command to change permissions on the filesystem. These bits can set special permissions on commands and directories. The focus of this section is setting the bits that help you create directories to use for collaboration.
As with read, write, and execute bits for user, group, and other, these special file permission bits can be set with the chmod command. If, for example, you run chmod 775 /mnt/xyz, the implied permission is actually 0775. To change permissions, you can replace the number 0 with any combination of those three bits (4, 2, and 1), or you can use letter values instead. (Refer to Chapter 4, “Moving around the Filesystem,” if you need to be reminded about how permissions work.) The letters and numbers are shown in Table 11.1.
TABLE 11.1 Commands to Create and Use Files

The bits you are interested in for creating collaborative directories are the set group ID bit (2) and sticky bit (1). If you are interested in other uses of the set user ID and set group ID bits, refer to the sidebar “Using Set UID and Set GID Bit Commands.”
Creating group collaboration directories (set GID bit)
By creating a set GID directory, any files created in that directory are assigned to the group assigned to the directory itself. The idea is to have a directory where all members of a group can share files but still protect them from other users. Here's a set of steps for creating a collaborative directory for all users in the group I created called sales:
- Create a group to use for collaboration:
# groupadd -g 301 sales - Add some users to the group that you want to be able to share files (I used mary):
# usermod -aG sales mary - Create the collaborative directory:
# mkdir /mnt/salestoolsUsing Set UID and Set GID Bit Commands
The set UID and set GID bits are used on special executable files that allow commands set to be run differently from most. Normally, when a user runs a command, that command runs with that user's permissions. In other words, if I run the vi command as chris, that instance of the vi command would have the permissions to read and write files that the user chris could read and write.
Commands with the set UID or set GID bits set are different. It is the owner and group assigned to the command, respectively, that determines the permissions the command has to access resources on the computer. So a set UID command owned by root would run with root permissions; a set GID command owned by apache would have apache group permissions.
Examples of applications that have set UID bits turned on are the su and newgrp commands. In both of those cases, the commands must be able to act as the root user to do their jobs. However, to actually get root permissions, a user must provide a password. You can tell su is a set UID bit command because of the s where the first execute bit (x) usually goes:
$ ls /bin/su -rwsr-xr-x. 1 root root 30092 Jan 30 07:11 su - Assign the group sales to the directory:
# chgrp sales /mnt/salestools - Change the directory permission to 2775. This turns on the set group ID bit (2), full rwx for the user (7), rwx for group (7), and r-x (5) for other:
# chmod 2775 /mnt/salestools - Become mary (run su - mary). As mary, create a file in the shared directory and look at the permissions. When you list permissions, you can see that the directory is a set GID directory because a lowercase s appears where the group execute permission should be (rwxrwsr-x):
# su - mary
[mary]$ touch /mnt/salestools/test.txt
[mary]$ ls -ld /mnt/salestools/ /mnt/salestools/test.txt
drwxrwsr-x. 2 root sales 4096 Jan 22 14:32 /mnt/salestools/
-rw-rw-r--. 1 mary sales    0 Jan 22 14:32 /mnt/salestools/test.txt
Typically, a file created by mary would have the group mary assigned to it. But because test.txt was created in a set group ID bit directory, the file is assigned to the sales group. Now, anyone who belongs to the sales group can read or write that file, based on group permissions.
Creating restricted deletion directories (sticky bit)
A restricted deletion directory is created by turning on a directory's sticky bit. What makes a restricted deletion directory different than other directories? Normally, if write permission is open to a user on a file or directory, that user can delete that file or directory. However, in a restricted deletion directory, unless you are the root user or the owner of the directory, you can never delete another user's files.
Typically, a restricted deletion directory is used as a place where lots of different users can create files. For example, the /tmp directory is a restricted deletion directory:
$ ls -ld /tmp
drwxrwxrwt. 116 root root 36864 Jan 22 14:18 /tmp
You can see the permissions are wide open, but instead of an x for the execute bit for other, the t indicates that the sticky bit is set. The following is an example of creating a restricted deletion directory with a file that is wide open for writing by anyone:
[mary]$ mkdir /tmp/mystuff
[mary]$ chmod 1777 /tmp/mystuff
[mary]$ cp /etc/services /tmp/mystuff/
[mary]$ chmod 666 /tmp/mystuff/services
[mary]$ ls -ld /tmp/mystuff /tmp/mystuff/services
drwxrwxrwt. 2 mary mary   4096 Jan 22 15:28 /tmp/mystuff/
-rw-rw-rw-. 1 mary mary 640999 Jan 22 15:28 /tmp/mystuff/services
With permissions set to 1777 on the /tmp/mystuff directory, you can see that all permissions are wide open, but a t appears instead of the last execute bit. With the /tmp/mystuff/services file open for writing, any user could open it and change its contents. However, because the file is in a sticky bit directory, only root and mary can delete that file.
Centralizing User Accounts
Although the default way of authenticating users in Linux is to check user information against the /etc/passwd file and passwords from the /etc/shadow file, you can authenticate in other ways as well. In most large enterprises, user account information is stored in a centralized authentication server, so each time you install a new Linux system, instead of adding user accounts to that system, you have the Linux system query the authentication server when someone tries to log in.
As with local passwd/shadow authentication, configuring centralized authentication requires that you provide two types of information: account information (username, user/group IDs, home directory, default shell, and so on) and authentication method (different types of encrypted passwords, smart cards, retinal scans, and so on). Linux provides ways of configuring those types of information.
Because I hope you will someday use your Linux skills to work in a large Linux installation, I want to introduce the concept of centralized authentication. For now, I just discuss how to connect to existing authentication servers (rather than set up those servers themselves) and have users of a Linux system you configure authenticate against those types of servers.
Using the Users window
If you add a new user to your system with the Users window (described earlier in this chapter), you have the option of selecting the Enterprise Login button instead of adding a password for that user. On that window, you can identify the location (Domain) of a central authentication server. When the user you add tries to log into your Linux system, the authentication Domain, and not the local /etc/passwd file, is queried to authenticate the user account.
For more complex authentication configurations than are available through the Users window, you should investigate the authconfig command. With authconfig, you can enable different types of authentication mechanisms (such as Smart Card, fingerprint readers, and Kerberos authentication).
Authentication domains that are supported via the Users window include LDAP, NIS, and Windows Active Directory. The next section describes these authentication domains.
Using the Authentication Configuration window
Earlier versions of Fedora and Red Hat Enterprise Linux use a graphical window, called the Authentication Configuration window, for configuring centralized authentication. Through that window, you can configure where your system gets account information and what type of authentication method is used to verify users. Supported centralized database types include these:
- LDAP—The Lightweight Directory Access Protocol is a popular protocol for providing directory services (such as phone books, addresses, and user accounts). It is an open standard that is configured in many types of computing environments.
- NIS—The Network Information Service was originally created by Sun Microsystems to propagate information such as user accounts, host configuration, and other types of system information across many UNIX systems. Because NIS passes information in clear text, most enterprises now use the more secure LDAP or Winbind protocols for centralized authentication.
- Winbind—Selecting Winbind from the Authentication Configuration window enables you to authenticate your users against a Microsoft Active Directory (AD) server. Many large companies extend their desktop authentication setup to do server configuration as well as using an AD server.
For this introduction to configuring centralized authentication servers, you will configure a Linux system to authenticate against an LDAP server, using the Authentication Configuration window in Red Hat Enterprise Linux.
To begin, you need to gather information about the LDAP service at your location. That includes information about the account database and the authentication method:
- LDAP Search Base DN—This is the distinguished name of the LDAP database used to identify the location of the user account records. Often, the name is constructed from the company's DNS domain name. For example, dc=example,dc=com.
- LDAP server—This is the host name of the LDAP server—for example, ldap://ldap.example.com.
- Use TLS to encrypt connections—With this selected, you must also select to identify the location of a certificate authority (CA) certificate that will be downloaded to the local system to use to validate and encrypt communications with the LDAP server. Transport Layer Security (TLS) certificates for an organization are obtained from certificate authorities such as Verisign. Or you could create self-signed certificates.
- Authentication method—Instead of using regular MD5 passwords, pick either LDAP password or Kerberos as the authentication method with LDAP. For Kerberos, you must also provide information about the Kerberos server, which includes the Kerberos Realm, KDCs, and Admin Servers. All this information should be provided by the administrators who manage your company's Kerberos servers.
To start the Authentication Configuration window from a Red Hat Enterprise Linux 6 desktop, select System Administration Authentication. For a default system that only does local (passwd/shadow) authentication, the window appears.
To add LDAP authentication, select the User Account Database box and select LDAP. Then fill in the information described in the preceding bullet points.
If the new authentication method is configured properly, you should be able to go to a shell and validate that. If you know of a user account available from the LDAP server, use the following getent command to check that the account is available:
# getent passwd jsmith
jsmith:x:13599:13600:John Smith:/home/jsmith:/bin/bash
If you see the account information, you know your system was able to retrieve it from the LDAP server. The next thing to check is that the authentication method is working as well. For that, you could try to log in as the user from the console or by using the ssh command. For example:
$ ssh jsmith@localhost
When prompted, enter the username and password. If it succeeds, you know that both the account and authentication information you entered for your LDAP server were correct.
With your authentication centralized, consider centralizing your users' home directories as well. Using the Linux automounter (autofs service), you could set up home directories that are automatically mounted when each user logs in, regardless of which machine they are logging into. (See Chapter 20, “Configuring an NFS File Server,” for information on setting up an NFS server and configuring clients to automount from that server.)
Summary
Having separate user accounts is the primary method of setting secure boundaries between the people who use your Linux system. Regular users typically can control the files and directories within their own home directories, but very little outside those directories.
In this chapter, you learned how to add user and group accounts, how to modify them, and even how to extend user and group accounts beyond the boundaries of the local /etc/password file. You also learned that authentication can be done by accessing centralized LDAP servers.
The next chapter introduces another basic topic needed by Linux system administrators: how to manage disks. In that chapter, you learn how to partition disks, add filesystems, and mount them, so the contents of the disk partitions are accessible to those using your system.
Exercises
Use these exercises to test your knowledge of adding and managing user and group accounts in Linux. These tasks assume you are running a Fedora or Red Hat Enterprise Linux system (although some tasks work on other Linux systems as well). If you are stuck, solutions to the tasks are shown in Appendix B (although in Linux, you often have multiple ways to complete a task).
- Add a local user account to your Linux system that has a username of jbaxter and a full name of John Baxter, and uses /bin/sh as its default shell. Let the UID be assigned by default. Set the password for jbaxter to: My1N1te0ut!
- Create a group account named testing that uses group ID 315.
- Add jbaxter to the testing group and the bin group.
- Open a shell as jbaxter (either a new login session or using a current shell) and temporarily have the testing group be your default group so that when you type touch /home/jbaxter/file.txt, the testing group is assigned as the file's group.
- Note what user ID has been assigned to jbaxter, and delete the user account without deleting the home directory assigned to jbaxter.
- Find any files in the /home directory (and any subdirectories) that are assigned to the user ID that recently belonged to the user named jbaxter.
- Copy the /etc/services file to the default skeleton directory so it shows up in the home directory of any new user. Then add a new user to the system named mjones, with a full name of Mary Jones and a home directory of /home/maryjones.
- Find all files under the /home directory that belong to mjones. Are there any files owned by mjones that you didn't expect to see?
- Log in as mjones, and create a file called /tmp/maryfile.txt. Using ACLs, assign the bin user read/write permission to that file. Then assign the lp group read/write permission to that file.
- Still as mjones, create a directory named /tmp/mydir. Using ACLs, assign default permissions to that directory so the adm user has read/write/execute permission to that directory and any files or directories created in it. Create the /tmp/mydir/testing/ directory and /tmp/mydir/newfile.txt file, and make sure the adm user was also assigned full read/write/execute permissions. (Note that despite assigning rwx permission to the adm user, the effective permission on newfile.txt is only rw. What could you do to make sure adm gets execute permission as well?)