
Beijing • Cambridge • Farnham • Köln • Sebastopol • Tokyo
All programmers are optimists—these words of wisdom were written down almost thirty years ago by Frederick P. Brooks, Jr.[1] The Postfix mail system is a fine example of this. Postfix started as a half-year project while I was visiting the network and security department at IBM Research in New York state. Although half a year was enough time to replace the mail system on my own workstation, it was not nearly enough to build a complete mail system for general use. Throughout the next year, a lot of code was added while the software was tested by a closed group of experts. And in the five years that followed the public release, Postfix more than doubled in size and in the number of features. Meanwhile, active development continues.
One of the main goals of Postfix is wide adoption. Building Postfix was only the first challenge on the way to that goal. The second challenge was to make the software accessible. While expert users are happy to Read The Friendly Manual that accompanies Postfix, most people need a more gentle approach. Truth be told, I would not expect to see wide adoption of Postfix without a book to introduce the concepts behind the system, and which gives examples of how to get common tasks done. I was happy to leave the writing of this book to Kyle Dent.
Just like Postfix, I see this book as a work in progress. In the time that the first edition of the book was written, Postfix went through several major revisions. Some changes were the result of discussions with Kyle in order to make Postfix easier to understand, some changes added functionality that was missing from earlier versions, and some changes were forced upon Postfix by the big bad ugly world of junk email and computer viruses. Besides the changes that introduced new or extended features, many less-visible changes were made behind the scenes as part of ongoing maintenance and improvement.
This book describes Postfix Version 2.1, and covers some of the differences with older Postfix versions that were widely used at the time of publication. As Postfix continues to evolve, it will slowly diverge from this book, and eventually this book will have to be updated. While it is a pleasure for me to welcome you to this first edition, I already look forward to an opportunity to meet again in the near future.
| —Wietse Venema |
| Hawthorne, New York |
| September 19, 2003 |
[1] Frederick P. Brooks, Jr.: The Mythical Man-Month: Essays on Software Engineering, Addison Wesley, 1975.
I’m always astounded when I think about the early designers of Internet technologies. They were (and many still are) an amazing group of people who developed software and technologies for a network that was minuscule, by comparison with today’s Internet. Yet their work scaled and has continued to function in not only a much larger but in a very different environment. The expansion hasn’t been completely without growing pains, but that doesn’t diminish this amazing feat. Sendmail is an example of one of the early technologies that was written for a different universe, yet is still relevant and handles a large portion of email today.
Postfix has an advantage in that it was built with an awareness of the scope and hostile environment it would have to face. In fact, its creation was motivated by the need to overcome some of the problems of software written in a more innocent age. What a difference a little hindsight can make.
I first started using Postfix when I was working with systems in a security-sensitive environment. The promise of more flexibility and better security caught my interest as soon as I heard about it. I was not disappointed. It didn’t take long before I was hooked, and preferred using Postfix everywhere. This book is my attempt to create a reference and a guide to understanding how Postfix works. Its main goal is to explain the details and concepts behind Postfix. It also offers instructions for accomplishing many specific tasks.
Documenting a piece of software that is still under active development is a bit like trying to stop running water. Sadly, this book will be incomplete even before it is out. I’ve tried to structure the information in the book in such a way as to exclude things that might become irrelevant or quickly out-of-date, so that what you find in the book will be good information for a long time to come. However, you may have to supplement this book with online documentation, web sites, and the Postfix mailing list for coverage of the latest features.
Postfix is a network application written for Unix. The more you know about networking and Unix, the better equipped you will be to manage a Postfix server. This book tries to explain things in such a way as to be understandable to users new to Unix, but it is unrealistic to think that you could learn to administer a Postfix server without having (or at least acquiring) some Unix knowledge. The book focuses on Postfix itself. Other concepts are explained as needed to understand the functions and configuration of Postfix. If you’re new to Unix, you should certainly consult other texts for general Unix information. Unix System Administration Handbook by Evi Nemeth, et al. (Prentice-Hall) is an excellent choice, and includes a helpful section on email. The relevant RFCs mentioned in this book can also be very helpful for understanding the details of a subject.
Chapter 1 through Chapter 3 provide background information on Postfix and email, Chapter 4 through Chapter 7 discuss general aspects of running a Postfix server, and Chapter 8 through Chapter 15 each present a specific topic that you may or may not need, depending on how you use Postfix:
Introduces Postfix and some general email concepts. Also discusses some of the design decisions that went into Postfix.
Covers required topics for understanding other concepts in the book. Anyone with a basic understanding of Unix and email can safely skip this chapter.
Explains the pieces of the modular architecture of Postfix and how Postfix handles email messages.
Covers a wide range of topics for configuring and managing a Postfix server.
Explains how the Postfix queue manager works, and presents the tools used to work with the queue.
Discusses how DNS is used for email routing. Presents considerations for configuring DNS to work with Postfix.
Covers how Postfix makes local deliveries and how it operates in conjunction with POP and IMAP servers.
Discusses using Postfix to receive email for virtual domains.
Discusses operating Postfix as a mail relay or gateway system.
Discusses setting up mailing lists in Postfix, and using Postfix with mailing-list managers. Provides examples with Majordomo and Mailman.
Discusses Postfix controls for blocking unwanted mail messages.
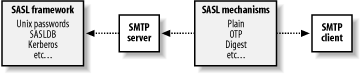
Covers using SASL libraries to provide SMTP authentication for clients to relay messages through your Postfix server.
Covers using the TLS patch to provide encrypted communications between clients and your Postfix server.
Discusses setting up external content filters with Postfix.
Covers using external data sources for Postfix lookup tables.
Presents an alphabetical listing of Postfix configuration parameters.
Presents a list, with brief explanations, of the command-line utilities that come with Postfix.
Discusses compiling and installing Postfix from source files.
Presents a list of frequently asked questions about Postfix.
Items appearing in this book are sometimes given a special appearance to set them apart from the regular text. Here’s how they look:
Used for commands, email addresses, URIs, filenames, emphasized text, first references to terms, and citations of books and articles.
Constant widthUsed for literals, constant values, code listings, and XML markup.
Constant width italicUsed for replaceable parameter and variable names.
Constant width
boldUsed to highlight the portion of a code listing being discussed.
Please address comments and questions concerning this book to the publisher:
| O’Reilly & Associates, Inc. |
| 1005 Gravenstein Highway North |
| Sebastopol, CA 95472 |
| (800) 998-9938 (in the United States or Canada) |
| (707) 829-0515 (international or local) |
| (707) 829-0104 (fax) |
O’Reilly maintains a web page for this book, that lists errata, examples, and any additional information. You can access this page at:
| http://www.oreilly.com/catalog/postfix/ |
To comment or ask technical questions about this book, send email to:
| bookquestions@oreilly.com |
For more information about O’Reilly books, conferences, Resource Centers, and the O’Reilly Network, see O’Reilly’s web site at:
| http://www.oreilly.com/ |
I would first like to thank Wietse Venema for Postfix, of course, but also for his many contributions to the Internet community. Having had the honor to work with him on this book, it is apparent to me that he brings the same level of intelligence and attention to detail to all of his endeavors. This book has benefited greatly from his considerable input.
I have always admired O’Reilly & Associates as a company. After having had the experience of working with them, my admiration has not diminished in the least. My editor, Andy Oram, excellently personifies the goals of the company. I’ve enjoyed discussions with him, and his comments were always very helpful. I appreciate his enormous patience. Lenny Muellner helped me get going with text-processing tools and I’d like to thank David Chu for his timely assistance when needed. I would also like to thank Robert Romano for turning my crude diagrams into the professional figures you find in the book, and Reg Aubry for guiding the book through the production process.
Several technical reviewers assisted me not only in staying honest and correct in the details, but they also often offered useful stylistic suggestions. Thanks to Rob Dinoff, Viktor Dukhovni (a.k.a. Victor Duchovni), Lutz Jänicke, and Alan Schwartz. I wish I had such a team looking over my shoulder for everything I do.
I would also like to acknowledge the many members of the postfix-users@postfix.org list. It is an active list with a low noise-to-signal ratio, populated by a group of remarkably capable and helpful people. Its members not only help the user community, but have contributed through their comments and discussions to the evolution of Postfix itself.
Finally, I owe a large debt of gratitude to my wife and first editor, Jackie. She subjected my initial drafts to scrupulous tests for lucidity and sanity (shocking how often they failed). This book is much improved from her patient and valuable input. She is an all-around good egg who remained cheerful even when faced with reading and rereading several rewrites.
Internet email history goes back as far as the early 1970s, when the first messages were sent across the Arpanet, the predecessor of today’s Internet. Since that time, email has been, and continues to be, the most widely used application on the Internet. In the olden days, email delivery was relatively simple, and generally consisted of moving mail files from one large host to another large host that served many users. As the Internet evolved and the network itself became more complex, more flexible tools were needed to move mail between different networks and different types of networks. The Sendmail package, released in the early 1980s, was designed to deal with the many variations among mail systems. It quickly assumed a dominant role for mail delivery on the Internet.
Today, most Internet sites use the SMTP mail protocol to deliver and receive mail messages. Sendmail is still one of the most widely deployed SMTP servers, but there have been problems with it. Sendmail’s monolithic architecture has been the primary cause of numerous security issues, and it can be difficult to configure and maintain.
Postfix was originally conceived as a replacement for the pervasive Sendmail. Its design eliminates many opportunities for security problems. Postfix also eliminates much of the complexity that comes with managing a Sendmail installation. Postfix administration is managed with two straightforward configuration files, and Postfix has been designed from the beginning to handle unexpected hardware or software problems gracefully.
Postfix was written by Wietse Venema, who is widely known for his security tools and papers. It was made available as open source software in December 1998. IBM Research sponsored the initial release and has continued to support its ongoing development. (IBM calls the package Secure Mailer.) There were certain goals from the beginning that drove the design and development of Postfix:
Postfix shows its real value when operating under stressful conditions. Even within simple environments, software can encounter unexpected conditions. For example, many software systems behave unpredictably when they run out of memory or disk space. Postfix detects such conditions, and rather than make the problem worse, gives the system a chance to recover. Regardless of hazards thrown its way, Postfix takes every precaution to function in a stable and reliable way.
Postfix assumes it is running in a hostile environment. It employs multiple layers of defense to protect against attackers. The security concept of least privilege is employed throughout the Postfix system, so that each process, which can be run within an isolated compartment, runs with the lowest set of privileges it needs. Processes running with higher privileges never trust the unprivileged processes. Likewise, unneeded modules can be disabled, enhancing security and simplifying an installation.
Postfix was written with performance in mind and, in fact, takes steps to ensure that its speed doesn’t overwhelm other systems. It uses techniques to limit both the number of new processes that have to be created and the number of filesystem accesses required in processing messages.
The Postfix system is actually made up of several different programs and subsystems. This approach allows for great flexibility. All of the pieces are easily tunable through straightforward configuration files.
Postfix is one of the easier email packages to set up and administer, as it uses straightforward configuration files and simple lookup tables for address translations and forwarding. The idea behind Postfix’s configuration is the notion of least surprise, which means that, to the extent it’s possible, Postfix behaves the way most people expect. When faced with design choices, Dr. Venema has opted for the decision that seems most reasonable to most humans.
With Sendmail compatibility, Postfix can easily replace Sendmail on a system without forcing any changes on users or breaking any of the applications that depend on it. Postfix supports Sendmail conventions like /etc/aliases and .forward files. The Sendmail executable program, sendmail, is replaced with a Postfix version that supports nearly all of the same command-line arguments but runs in conjunction with the Postfix system. While your Sendmail-dependent programs continue to work, Postfix has been evolving independently of Sendmail, and doesn’t necessarily implement all email features in the same way.
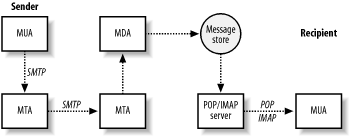
Unlike most proprietary email solutions, where a single software package does everything, Internet email is built from several standards and protocols that define how messages are composed and transferred from a sender to a recipient. There are many different pieces of software involved, each one handling a different step in message delivery. Postfix handles only a portion of the whole process. Most email users are only familiar with the software they use for reading and composing messages, known as a mail user agent (MUA). Examples of some common MUAs include mutt, elm, Pine, Netscape Communicator, and Outlook Express. MUAs are good for reading and composing email messages, but they don’t do much for mail delivery. That’s where Postfix fits in.
When you tell your MUA to send a message, it simply hands off the message to a mail server running a mail transfer agent (MTA). Figure 1-1 shows the components involved in a simple email transmission from sender to recipient. MTAs (like Postfix) do the bulk of the work in getting a message delivered from one system to another. When it receives a request to accept an email message, the MTA determines if it should take the message or not. An MTA generally accepts messages for its own local users; for other systems it knows how to forward to; or for messages from users, systems, or networks that are allowed to relay mail to other destinations. Once the MTA accepts a message, it has to decide what to do with it next. It might deliver the message to a user on its system, or it might have to pass the message along to another MTA. Messages bound for other networks will likely pass through many systems. If the MTA cannot deliver the message or pass it along, it bounces the message back to the original sender or notifies a system administrator. MTA servers are usually managed by Internet Service Providers (ISPs) for individuals or by corporate Information Systems departments for company employees.
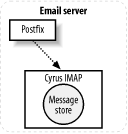
Ultimately, a message arrives at the MTA that is the final destination. If the message is destined for a user on the system, the MTA passes it to a message delivery agent (MDA) for the final delivery. The MDA might store the message as a plain file or pass it along to a specialized database for email. The term message store applies to persistent message storage regardless of how or where it is kept.
Once the message has been placed in the message store, it stays there until the intended recipient is ready to pick it up. The recipient uses an MUA to retrieve the message and read it. The MUA contacts the server that provides access to the message store. This server is separate from the MTA that delivered the message and is designed specifically to provide access for retrieving messages. After the server successfully authenticates the requester, it can transfer that user’s messages to her MUA.
Because Internet email standards are open, there are many different software packages available to handle Internet email. Different packages that implement the same protocols can interoperate regardless of who wrote them or the type of system they are running on. If you are putting together a complete email system, most likely the software that handles SMTP will be a different package than the software that handles POP/IMAP, and there are many different software choices for each aspect of your complete email system.
The communications that occur between each of these email system components are defined by standards and protocols. The standards documents are maintained by the Internet Engineering Task Force (IETF) and are published as Request For Comments (RFC) documents, which are numbered documents that explain a particular technology or protocol.
The Simple Mail Transport Protocol (SMTP) is used for sending messages, and either the Post Office Protocol ( POP) or Internet Mail Application Protocol ( IMAP) is used for retrieving messages. SMTP, defined in RFC 2821, describes the conversation that takes place between two hosts across a network to exchange email messages. The IMAP (RFC 2060) and POP (RFC 1939) protocols describe how to retrieve messages from a message store. The IMAP protocol was developed after POP and offers additional features. In both protocols, email messages are kept on a central server for message recipients who generally retrieve them across a network.
Note that the MUA does not necessarily use the same system for POP/IMAP as it does for SMTP, which is why email clients have to be configured separately for POP/IMAP and SMTP. An ISP might provide separate servers for each function to their customers, and corporate users who are away from the office often retrieve their messages from the company POP/IMAP server, but use the SMTP server of a dial-up ISP to send messages. MTA software running on SMTP servers constantly listens for requests to accept messages for delivery. Requests might come from MUAs or other MTA servers.
SMTP is commonly used for email submission and for transmissions of email messages between MTAs. When an MUA contacts an MTA to have a message delivered, it uses SMTP. SMTP is also used when one MTA contacts another MTA to relay or deliver a message. Originally, SMTP had no means to authenticate users, but extensions to the protocol provide the capability, if required. See Chapter 7 for more information on authenticating SMTP users.
When users want to retrieve their messages, they use their MUA to connect to a POP or IMAP server to retrieve them. POP users generally take all their messages from the server and manage their mail locally. IMAP provides features that make it easier to manage mail on the server itself. (See Chapter 12 for more information on using Postfix with POP and IMAP servers.) Many servers now offer both protocols, so I will refer to them as POP/IMAP servers. POP and IMAP have nothing to do with sending email. These protocols deal only with how users retrieve previously delivered and stored messages.
Not all users need POP/IMAP access to the message store. Users with shell access on a Unix machine, for example, might have their MUA configured to read their email messages directly from the mail file that resides on the same machine.
Postfix is an MTA and handles the delivery of messages between servers and locally within a system. It does not handle any POP or IMAP communications.
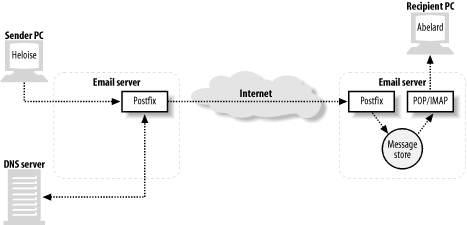
Figure 1-2 illustrates a simple example of message transmission where Postfix handles the responsibilities of the MTA and local delivery. As the MTA, Postfix receives and delivers email messages over the network via the SMTP protocol. For local delivery, the Postfix local delivery agent can deposit messages directly to a message store or hand off a message to a specialized mail delivery agent.
This example shows Postfix as the SMTP server at both ends of the email transaction; however, since Postfix is based on Internet standards, the other email server in this example could easily be any other standards-compliant server. Postfix can communicate with any other server that speaks SMTP (and even some that are not quite fluent). In our example, Heloise wants to send a message to Abelard from her address (heloise@oreilly.com) to his address ( abelard@postfix.org.) Heloise uses her email client to compose her message, which passes it to her MTA (using SMTP). As it happens, her MTA is a Postfix server that allows her to relay messages. After accepting the message from Heloise’s email client, the Postfix server determines where Heloise’s message needs to go, based on Abelard’s email address. Using DNS (see Chapter 6 for more information on DNS and email) it figures out which SMTP server should accept messages for Abelard’s domain (postfix.org) and contacts that server (using SMTP). Abelard’s Postfix server accepts the message and stores it until Abelard is ready to pick it up. At this point Postfix’s job is done. When Abelard is ready to retrieve his messages, his email client, using POP or IMAP, picks up Heloise’s message.
This example leaves out the details of the complicated tasks involved when Postfix delivers mail. In the case of messages with multiple recipients, Postfix has to figure out where to deliver copies for each recipient. In case one or more recipients cannot receive mail due to a networking or systems problem, Postfix has to queue the message and retry delivery periodically. From a user’s point of view, the Postfix piece of the operation is nearly invisible. From the Internet mail system’s point of view, Postfix handles most aspects of email message delivery.
Email systems are necessarily exposed to possible attacks because their function requires that they accept data from untrusted systems. The challenge is to build systems that are resistant to attack, and any good security strategy includes multiple layers of protection. This is particularly true for public systems in a potentially hostile environment. Postfix takes a proactive and multilayered approach to security. The Postfix architecture limits the severity of vulnerabilities, even if there are design or coding errors that might otherwise create major vulnerabilities in a monolithic privileged program.
The modular architecture of Postfix forms the basis for much of its security. Each Postfix process runs with the least amount of privilege necessary to get its particular job done. Many of Sendmail’s security problems were exacerbated because Sendmail ran as a privileged process most of the time. Postfix operates with the minimum privilege necessary to accomplish a particular task. Postfix processes that are not needed on a system can be turned off, making it impossible to exploit them. For example, a network firewall system that only relays mail and does not need local delivery can have all the Postfix components for local delivery turned off. Postfix processes are insulated from each other and depend very little on any interprocess communication. Each process determines for itself what it needs to know.
In most cases, the delivery of mail does not require a Unix shell process, but when a configuration does make use of one, Postfix sanitizes information before placing it into environment variables. Postfix tries to eliminate any harmful characters that might have special meaning to a shell before making any data available to the shell.
Most Postfix processes are executed by a trusted master daemon. They do not run as user child processes, so they are immune to any of the security problems that rely on parent-child inheritance and communications. These attacks that use signals, shared memory, open files, and other types of interprocess communication are essentially useless against Postfix.
A buffer overflow is another common type of attack against applications. In this type of attack, crackers cause a program to write to memory where it is not supposed to. Doing so might allow them to change the path of execution in order to take control of the process. I’ve already mentioned that Postfix processes run with as little privilege as possible, so such an attack would not get very far; moreover, Postfix avoids using fixed-size buffers for dynamic data, making a successful buffer overflow attack highly unlikely.
An important security protection available on Unix systems is
the ability to chroot applications. A chroot establishes a new root directory
for a running application such as /var/spool/postfix. When that program runs,
its view of the filesystem is limited to the subtree below /var/spool/postfix, and it cannot see
anything else above that point. Your critical system directories and
any other programs that might be exploited during an attack are not
accessible. Postfix makes it very simple to cause its processes to run
within a chroot (see more about chrooting in Chapter 4). By doing so, you cause
Postfix to run in its own separate compartment. Even if Postfix is
somehow subverted, it will not provide access to many of the methods
an attacker typically employs to compromise a system.
Because Postfix is designed to run even under stressful conditions, denial-of-service (DOS) attacks are much less effective. If a system runs out of disk space or memory due to a DOS attack or another type of problem, Postfix is careful not to make the situation worse. It backs off from what it is trying to do to allow the system to recover. Postfix processes are configured to use a limited amount of memory, so they do not grow uncontrollably from an onslaught of messages.
The difficulty in planning for security is that you don’t know what the next attack will be or how it will be carried out. Postfix is designed to deal with adverse conditions no matter what their cause. Its built-in robustness is a major factor in the degree of security that Postfix provides. Indeed, Dr. Venema has said that he is not so much interested in security as he is in creating software that works as intended, regardless of the circumstances. Security is just a beneficial side effect.
You can get more information about Postfix at the official web site: The Postfix Home Page (http://www.postfix.org/). The site contains the source code, documentation, links to add-on software, articles, and additional information about Postfix. There is also information about joining an active mailing list that discusses all aspects of Postfix.
If you don’t have a copy of Postfix already, you can obtain the source code from the Postfix web site. It is, however, quite possible that there is a precompiled package for your platform that may be more convenient for you. If that is the case, you can obtain the Postfix package for your operating system and use your system’s normal tools for software installation and configuration. You should check the normal repositories you use to get software for your system.
There are many good reasons to build Postfix for yourself: there may not be a pre-packaged bundle for your platform, you might not trust the packager of the bundle to have done everything correctly for your environment, you might need support for add-ons that are not built into a package, you might need a more current version than is available in packages, or you might just enjoy the task. If you have any experience compiling software, you’ll have no trouble building Postfix. It’s one of the easier open source packages to compile.
The Postfix web site has a download link that displays a list of mirrors from which you can get the software. You should select the mirror that is closest to you. Postfix is available as either an Official Release package or as an Experimental Release package. Even though it’s called experimental, you should consider the code to be very stable. Experimental releases contain new features that might still change before they become official. Some new features are available only in an experimental release, but you should feel comfortable using them. Just be aware that they may evolve slightly in later releases until their feature sets are considered stable enough for the official release. No Postfix software is released that hasn’t gone through extensive testing and review. Read through the RELEASE_NOTES file that comes with the package to learn what the differences are between the current official and experimental releases.
This chapter presents some basic Unix and email concepts that you need in order to follow explanations and examples presented later in the book. If you are already familiar with email administration, you can safely skip the material here and move on to the next chapter. This chapter does not give a systematic or comprehensive overview of either email or Unix administration. There is already an enormous amount of information available on both topics. This chapter simply presents an assortment of items that are referred to later in the book, with the expectation that readers already understand them.
There’s no question that the more familiar you are with Unix, the better a Postfix administrator you’ll be. Postfix is very much a Unix program working in conjunction with the underlying operating system for many of its functions. If you’re new to Unix, you should study an introductory text. In the meantime, this section presents some fundamental concepts that you will need to understand to follow explanations in the book.
The list of recognized users on a system is stored in the /etc/passwd file. Every user should have a unique login name and user ID number (commonly written as uid or UID). The UID, not the user’s login name, is the important attribute for identity and ownership checks. The login name is a convenience for humans, and the system uses it primarily to determine what the UID is. Some Postfix configuration parameters require UIDs rather than login names when referring to user accounts. Postfix sometimes takes on the identify of different users. A process is said to be using the rights or privileges of that account when assuming its identity.
A pseudo-account is a normal Unix system account except that it does not permit logins. These accounts are used to perform administrative functions or to run programs under specific user privileges. Your system most likely came installed with several pseudo-accounts. Account names such as bin and daemon are common ones. Generally, these accounts prevent logins by using an invalid password and nonexistent home directories and login shells. For Postfix administration, you need at least one pseudo-account for Postfix processes to run under. You may need additional ones for other functions, such as mailing-list programs and filters.
Nearly all processes on a Unix system have a standard input stream
and a standard output stream when they start. They read data on their
standard input and write data on their standard output. Normally,
standard input is the keyboard and standard output is the monitor,
which is how users interact with running programs. Standard input and
output can be redirected so that programs can get input from, and send
output to, a file or another program. This is often how batch mode
programs operate. For the purpose of email, you should be aware of
standard input and output because your mail system may have to
interact with other programs over their standard inputs and outputs. A
mail filter program, for example, might accept the contents of an
email message on its standard input and send the revised contents to
its standard output. Programs usually also have a standard error
stream that, like standard output, is normally a user’s monitor, but
it can also be redirected. Standard input/output/error are often
written as stdin, stdout, and stderr. For more information, consult an
introductory book on Unix.
The administrative login on Unix systems is the root account. It is also referred to as the superuser account, and you should treat it carefully. You should log in as the root user only when its privileges are required to accomplish a particular task. Administering Postfix sometimes requires root privileges. If you do not have superuser access on your system, you cannot administer Postfix.
When working with an interactive shell, you are normally
greeted with a command prompt that indicates the system is ready for
you to enter a command. By convention, user command prompts are shown
as either the $ character or the
% character, while the
root prompt is presented as the # character. You should use the
root account only when it is necessary. In
examples in this book, a normal user prompt is shown as $, and that for root is
shown as #. If the example shows
the prompt as #, you know that you
must execute the command as root.
It is common usage in Unix to break long commands into
multiple lines with a backslash (\)
at the end of the line, which indicates that two or more lines
continue as if they were a single line. The continuation backslash can
be used at a command prompt and in shell scripts, and it is commonly
used in configuration files (but not in Postfix configuration
files—see Chapter 4). In this
book, lines that don’t fit on the page are continued with backslashes.
If you follow the examples, you can type lines exactly as shown with
the backslashes, or simply combine the continued lines into a single
one.
Documentation for Unix systems is kept in an online manual known as
manpages. You can read the
documentation for a particular item by issuing the man command with the item as its argument.
For example, to read about the mailq command, simply type:
$ man mailqA description of the command is presented on your screen, one page at a time. Press the spacebar to continue scrolling through the information.
Manpages have a standard organization showing the syntax of the command, all options, and descriptions of behavior and other context. Some users find manpages daunting, but you’ll do yourself a great service by getting comfortable with manpages. All Unix and Postfix commands as well as many other features are documented in manpages. See an introductory Unix text or your system documentation to learn more about manpages.
Internet email is a complex subject with many aspects. There are important principles that apply when administering an email system regardless of the MTA you are working with. This section presents a few concepts that will help in understanding later explanations in the book, but you are urged to learn as much about Internet email as possible from the many resources available in books and online.
RFCs, or Request for Comments documents, define the standards for the Internet. There are several RFCs relating to Internet email, all of which are relevant to you if you are administering an email system on the Internet. The two most commonly referenced RFCs for email are RFC 821 and RFC 822, which deal with how email messages are transferred between systems, and how email messages should appear. These documents were put into effect more than 20 years ago. They were updated in April 2001 with the proposed standards RFC 2821 and RFC 2822, although you will still see many references to the original documents. RFC documents are maintained by the Internet Engineering Task Force, whose site is available at http://www.ietf.org/.
Chapter 1 introduced several of the email agents involved in message composition to final delivery. For convenience, Table 2-1 contains a summary of these agents.
Agent | Name | Purpose |
MUA | Email client software used to compose, send, and retrieve email messages. Sends messages through an MTA. Retrieves messages from a mail store either directly or through a POP/IMAP server. | |
MTA | Server that receives and delivers email. Determines message routing and possible address rewriting. Locally delivered messages are handed off to an MDA for final delivery. | |
MDA | Program that handles final delivery of messages for a system’s local recipients. MDAs can often filter or categorize messages upon delivery. An MDA might also determine that a message must be forwarded to another email address. |
An email administrator is commonly referred to as a postmaster . An individual with postmaster responsibilities makes
sure that the mail system is working correctly, makes configuration
changes, and adds/removes email accounts, among other things. You must
have a postmaster alias at all domains for which
you handle email that directs messages to the correct person or
persons. RFC 2142 specifies that a postmaster
address is required.
If a receiving MTA determines during the SMTP
conversation (see Section
2.2.8 later in the chapter) that it will not accept the
message, it rejects the message. At
that point the sending system should generate an error report to
deliver to the original sender. Sometimes the MTA accepts a message
and later discovers that it cannot be delivered—perhaps the intended
recipient doesn’t exist or there is a problem in the final delivery.
In this case, the MTA that has accepted the message bounces it back to the original sender by
sending an error report, usually including the reason the original
message could not be delivered.
The MTA that accepts a message takes responsibility for the message until it is delivered or handed off to another MTA. When a system is responsible for a message and cannot deliver or relay it, the responsible system informs the sender that the mail is undeliverable.
A common source of confusion for email users is the fact that the
To: address in email message headers has nothing to do with
where a message is actually delivered. The envelope address controls
message delivery. In practice, when you compose a message and provide
your MUA with a To:
address, your MUA uses that same address as the envelope destination
address, but this is not required nor is it always the case. From the
MTA’s point of view, message headers are part of the
content of an email message. The delivery of a message is determined
by the addresses specified during the SMTP conversation. These addresses are the envelope addresses , and they are the only thing that determine where
messages go. See Section
2.2.8 later in the chapter for an explanation of the SMTP
protocol.
Mailing lists and spam are common examples of when the envelope
destination address differs from the To: address of the message headers. For more
information, see RFC 2821 and RFC 2822. Also see Section 2.2.7 later in the
chapter for more information about the format of email messages. If
you follow the SMTP session in Example 2-2, try substituting any
address you want in the To: field
of the message contents to see that it has no effect on where the
message is delivered.
RFC 2822 describes the format of email addresses in great detail.
It specifies how things such as quoting and comments should work in
email addresses. If we ignore the more obscure details, a simple email
address is generally composed of three parts: the local part (which is usually a username), the
@ separator, and the domain name . The local part might also be an alias to another address or to a mailing list. The local
part is sometimes referred to as the lefthand side (LHS), and the domain is sometimes called
the righthand side (RHS). For more information, see RFC
2822.
Since RFC 822 was the document that originally described how Internet email messages should be formatted, messages are commonly referred to as “in the RFC 822 format” or as an “RFC 822 message.” You should understand the basics of the format since it is referred to in this book and you will likely see it elsewhere. I’ll use the newer proposed standard and refer to “RFC 2822 messages.”
RFC 2822 specifies the format of both email messages and
email addresses as they appear in message headers (but not envelope
addresses). The specification describes the format for transmission,
but many implementations use the same or a similar format to store
messages. A message is comprised of two parts: the header and the body. The
header contains specific fields with names such as To, From, or
Subject followed by a colon (:). After the colon comes the contents
of the field. One message header field can span multiple lines.
Lines that continue a field start with whitespace
characters (space or tab characters) to show that they are
continuations of the previous line.
The standard document provides a lot of detail about the
header fields and what they should be used for. There are rules
about how fields relate to each other and when one or another must
be used, but in the simplest case, the only required fields are the
Date: and the From: fields. The standard also provides
for customized fields that a particular email implementation might
want to create for its own use.
The header fields are separated from the message body by an empty line. The body of a message contains the contents of the message itself. The body is purposely free-form, but should contain only ASCII characters. Some defined headers have a prescribed structure that is more restricted than the body. Binary files, such as images or executables, must be converted in some way to ASCII characters, so they can be sent in compliance with the standard. Other standards such as MIME encoding or traditional uuencoding deal with converting such files for mailing. Example 2-1 shows a typical message with headers and body.
Return-Path: <info@oreilly.com>
Delivered-To: kdent@mail.example.com
Received: from mail.oreilly.com (mail.oreilly.com [192.168.145.34])
by mail.example.com (Postfix) with SMTP id 5FA26B3DFE
for <kdent@example.com>;
Mon, 8 Apr 2003 16:40:29 -0400 (EDT)
Date: Mon, 8 Apr 2003 15:38:21 -0500
From: Customer Service <info@oreilly.com>
To: <kdent@example.com>
Reply-To: <info@oreilly.com>
Message-ID: <01a4e2238200842@mail.oreilly.com>
Subject: Have you read RFC 2822?
This is the start of the body of the message. It could continue
for many lines, but it doesn't.The fields in the example are mostly self-explanatory. The
Received: header is not required by RFC 2822, but every MTA
that handles a message normally prepends a Received: header to the message, as
discussed in RFC 2821, which is described in the following
section.
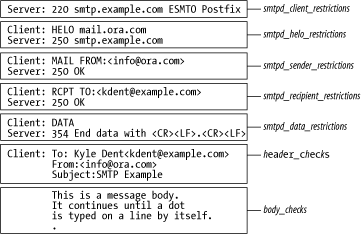
The SMTP protocol is defined in RFC 2821. The protocol is actually quite simple to follow, and was designed to be easily comprehensible both to humans and computers. A client connects to an SMTP server, whereupon the server begins the SMTP conversation, which consists of a series of simple commands and replies, including the transmission of the email message. The best way to understand the protocol is to see it in action. You can easily try it yourself once you have your mail server set up. Using a Telnet client, you can pose as a delivering MTA. Example 2-2 shows the steps and the basic commands to deliver a message.
$telnet mail.example.com 25Trying 10.232.45.151 Connected to mail.example.com. Escape character is '^]'. 220 mail.example.com ESMTP PostfixHELO mail.oreilly.com250 mail.oreilly.comMAIL FROM:<info@oreilly.com>250 OkRCPT TO:<kdent@example.com>250 OkDATA354 End data with <CR><LF>.<CR><LF>Date: Mon, 8 Apr 2003 15:38:21 -0500From: Customer Service <info@oreilly.com>To: <kdent@example.com>Reply-To: <service@oreilly.com>Message-ID: <01a4e2238200842@mail.oreilly.com>Subject: Have you read RFC 2822?This is the start of the body of the message. It could continuefor many lines, but it doesn't..250 Ok: queued as 5FA26B3DFEquit221 Bye Connection closed by foreign host. $
The SMTP session depicted in Example 2-2 is actually the delivery that produced the sample message in Example 2-1. To follow the example yourself, start by using a Telnet client to connect to the mail server on port 25 at mail.example.com. You should connect to your own Postfix server and type in your own email addresses for the envelope addresses. Port 25 is the well-known port for SMTP servers. After the Telnet messages:
Trying 10.232.45.151 Connected to localhost. Escape character is '^]'.
the server greets you with its banner:
220 mail.example.com ESMTP Postfix
SMTP server replies, such as the greeting message, always start with a three-digit response code, usually followed by a short message for human consumption. Table 2-2 provides the reply code levels and their meanings. The first digit of the response code is enough to know the status of the requested command. In documentation the response codes are often written as 2xx to indicate a level 200 reply.
Code level | Status |
2xx | The requested action was successful. The client may continue to the next step. |
3xx | Command was accepted, but the server expects additional information. The client should send another command with the additional information. |
4xx | The command was not successful, but the problem is temporary. The client should retry the action at a later time. |
5xx | The command was not successful, and the problem is considered permanent. The client should not retry the action. |
After receiving the welcome banner, introduce yourself with the
HELO command. The hostname after the HELO command should be the name of the
system you’re connecting from:
HELO mail.oreilly.com
The server replies with a success. So you may continue:
250 mail.oreilly.com
Indicate who the message is from with the MAIL FROM command:
MAIL FROM:<info@oreilly.com>
The server accepts the sending address:
250 Ok
Indicate who the message is to with the RCPT TO command:
RCPT TO:<kdent@example.com>
The server accepts the recipient address:
250 Ok
Now you are ready to send the content of the message. The
DATA command tells the server that you have an RFC 2822
message ready to transfer:
DATA
The server replies that it accepts the command and is expecting you to begin sending data:
354 End data with <CR><LF>.<CR><LF>
At this point, you can transfer the entire contents of your message. The contents of messages start with the message headers. When the message itself is finished, indicate the end by sending a single period on a line by itself.
The server acknowledges the end of your message and replies that the transfer was successfully completed:
250 Ok: queued as 5FA26B3DFE
At this point the server has taken responsibility for the
message. If you wanted to continue with more commands, you could do so
now. Since you have no other messages to deliver to this server, you
can start to disconnect with the quit command:
quit
The server replies with a success and disconnects:
221 Bye
Finally, the Telnet client tells you that the connection has ended returns to the command prompt:
Connection closed by foreign host. $
This was, of course, the simplest example of an SMTP
transaction. The basic protocol provides additional commands and has
been extended to allow for many enhancements. RFC 1869 provides a
framework for adding additional features to the basic SMTP protocol.
The enhanced protocol is referred to as ESMTP. A client
indicates its willingness to use the enhanced protocol by beginning
with the EHLO command instead of HELO. If the server also supports
enhancements, it replies with a list of the features it
provides.
Many enhancements have been specified in various RFCs. You can learn about them by searching for SMTP information on the IETF web site (http://www.ietf.org/). There are many other resources available on the Web regarding the SMTP and ESMTP protocols .
You can easily manage and operate Postfix without understanding everything about how it works. If you’re ready to dive right in, you can skip this section and start at the beginning of the next chapter. It might be difficult to digest all of the material here if you don’t have much experience with Postfix yet, but this chapter will give you an overview of the various pieces, which might come in handy as you start to work with Postfix. Later, after you have more experience with Postfix, you might want to return to this chapter to try to absorb more of the details.
The architecture of Postfix is quite different from that
of a monolithic system such as Sendmail, which traditionally uses a
single large program for its handling of email messages. Postfix breaks
down tasks into separate functions using individual programs that each
perform one specific task. Most of these programs are daemons, which are processes that run in the background on
your system. The master daemon is started first, and it invokes most other
processes, as needed. Postfix daemons that are invoked by the master daemon process their assigned tasks and
terminate. They might also terminate after a configured amount of time
or after handling a maximum number of requests. The master daemon is
resident at all times, and gets its configuration information at startup from both main.cf and master.cf. See Chapter 4 for more information on Postfix
configuration files.
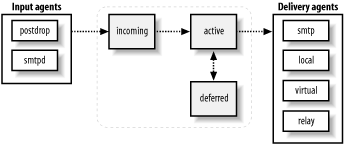
Figure 3-1 depicts a high-level picture of the Postfix architecture. Broadly speaking, Postfix receives messages, queues them, and finally delivers them. Each stage of processing is handled by a distinct set of Postfix components. After a message is received and placed into the queue, the queue manager invokes the appropriate delivery agent for the final disposition of the message. The next few sections in this chapter discuss the details of each of the stages.
Messages come into Postfix in one of four ways:
A message can be accepted into Postfix locally (sent from a user on the same machine).
A message can be accepted into Postfix over the network.
A message that was already accepted into Postfix through one of the other methods is resubmitted for forwarding to another address.
Postfix generates messages itself when it has to send notifications of undeliverable or deferred delivery attempts.
There is always the possibility that a message is rejected before it enters the Postfix system, or that some messages are deferred for later delivery.
The various Postfix components work together by writing messages to and reading messages from the queue. The queue manager has the responsibility of managing messages in the queue and alerting the correct component when it has a job to do.
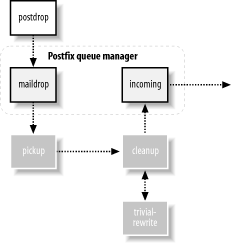
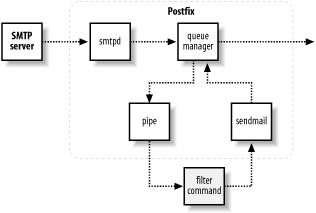
Figure 3-2
illustrates the flow when a local email message enters the Postfix
system. Local messages are deposited into the maildrop directory of the Postfix queue by the postdrop command, usually through the sendmail compatibility program. The pickup daemon reads the message from the queue and feeds it to
the cleanup daemon. Some messages
arrive without all of the required information for a valid email
message. So in addition to sanity checks on the message, the cleanup daemon, in conjunction with the
trivial-rewrite daemon inserts missing message headers, converts addresses to the
user@domain.tld format expected by other Postfix programs, and
possibly translates addresses based on the canonical or virtual lookup
tables (see Chapter 4 for more
information on lookup tables).
The cleanup daemon processes
all inbound mail and notifies the queue manager after it has placed the cleaned-up message
into the incoming queue. The queue manager then invokes the
appropriate delivery agent to send the message to its next hop or
ultimate destination.
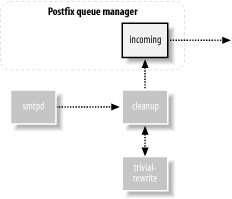
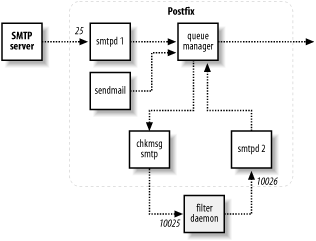
Figure 3-3 illustrates the flow when a network email message enters the Postfix system.
Messages received over the network are accepted by the Postfix
smtpd daemon. This daemon performs sanity checking and can be
configured to allow clients to relay mail on the system or deny them
from doing so. The smtpd daemon
passes the message to the cleanup
daemon, which performs its own checks then deposits the
message into the incoming queue. The queue manager then invokes the appropriate delivery
agent to send the message to its next hop or ultimate
destination.
When a user message is deferred or can’t be delivered, Postfix
uses the defer or bounce daemons to
create a new error message. The error message is handed off to the
cleanup daemon. It performs its normal checks before depositing
the error message into the incoming queue, where it is picked up by
the queue manager.
Sometimes, after processing an email message, Postfix determines that the destination address actually points to another address on another system. It could, at that point, simply hand off the message to the SMTP client for immediate delivery, but to make sure that every recipient is processed and logged correctly, Postfix resubmits it as a new message where it is handled like any other locally submitted message.
The Postfix queue manager does the bulk of the work in
processing email. Postfix components that accept mail have the ultimate
goal of getting the email message to the queue manager. This is done
through the cleanup daemon, which notifies the queue manager when it has
placed a new message into the incoming mail queue. Once the queue
manager has a new message, it uses trivial-rewrite to determine the routing information: the transport method to use, the next
host for delivery, and the recipient’s address.
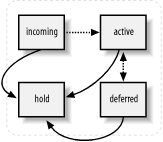
The queue manager maintains four different queues: incoming, active, deferred, and corrupt. After the initial cleanup steps, the incoming queue is the first stop for new messages. Assuming system resources are available, the queue manager then moves the message into the active queue, and calls on one of the delivery agents to deliver it. Messages that cannot be delivered are moved into the deferred queue.
The queue manager also has the responsibility of working with the
bounce and defer daemons to generate delivery status
reports for problem messages to be sent back to the sender, or possibly
the system administrator, or both. In addition to the message queue
directories, the Postfix spool directory contains bounce and defer directories. These directories contain
status information about why a particular message is delayed or undeliverable. The bounce and defer daemons use the information stored in
these directories to generate their notifications. See Chapter 5 for more detailed information
on how the queue manager works.
Postfix uses the concept of address classes when determining
which destinations to accept for delivery and how the delivery takes
place. The main address classes are local , virtual alias,
virtual mailbox, and relay. Destination addresses that do not fall
into one of these classes are delivered over the network by the SMTP
client (assuming it was received by an authorized client). Depending on
the address class, the queue manager calls the appropriate delivery
agent to handle the message.
The local delivery agent
handles mail for users with a shell account on the system where
Postfix is running. Domain names for local delivery are listed in the
mydestination parameter. Messages sent to a user at any of the
mydestination domains are delivered
to the individual shell account for the user. In the simple case, the
local delivery agent deposits an email message into the local message
store. It also checks aliases and users’ .forward
files to see if local messages should be delivered elsewhere. See
Chapter 7 for more information on
local delivery.
When a message is to be forwarded elsewhere, it is resubmitted to Postfix for delivery to the new address. If there are temporary problems delivering the message, the delivery agent notifies the queue manager to mark the message for a future delivery attempt and store it in the deferred queue. Permanent problems cause the queue manager to bounce the message back to the original sender.
Virtual alias addresses are all forwarded to other addresses. Domain names for virtual aliasing are listed in the
virtual_alias_domains parameter.
Every domain has its own set of users that do not have to be unique
across domains. Users and their real addresses are listed in
lookup tables specified in the virtual_alias_maps parameter. Messages received for virtual alias
addresses are resubmitted for delivery to the real address. See Chapter 8 for more information on
virtual aliases.
The virtual delivery
agent handles mail for virtual mailbox addresses. These mailboxes are
not associated with particular shell accounts on the system.
Domain names for virtual mailboxes are listed in the
virtual_mailbox_domains parameter. Every domain has its own set of users that
do not have to be unique across domains. Users and their mailbox files
are listed in lookup tables specified in the virtual_mailbox_maps parameter. See Chapter
8 for more information on virtual mailboxes.
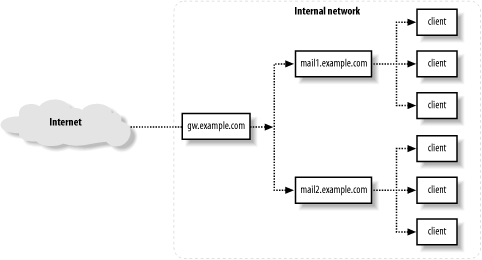
The smtp delivery
agent handles mail for relay domains. Email addresses in relay domains are hosted on
other systems, but Postfix accepts messages for the domains and relays
them to the correct system. Relay configurations are common when
Postfix accepts mail over the Internet and passes it to systems on an
internal network. Domain names for relay domains are listed in the
relay_domains parameter. See Chapter
9 for more information on relaying.
Messages that do not fit into one of the address classes
are generally destined for other domains hosted elsewhere on the
network. Postfix accepts such messages only from authorized clients,
such as systems that run on the same local network. When a message has
to be delivered across the network, the queue manager calls the
smtp delivery agent. The smtp agent determines which host or hosts
can receive the message and makes a connection to each in turn until
it finds one to accept it. If there are temporary problems delivering
the message, the smtp delivery
agent notifies the queue manager to mark the message for a future
delivery attempt and store it in the deferred queue. Permanent
problems cause the queue manager to bounce the message back to the
original sender.
When a destination system that has been unavailable comes back online, Postfix is careful not to overwhelm it with all its pending messages. Whether delivering previously deferred messages or new messages, Postfix, at first, makes only a limited (configurable) number of connections to a receiving system. After Postfix has detected successful deliveries to a particular site, it slowly increases (up to a configurable limit) simultaneous connections to it. If Postfix detects any trouble from the receiving site, it starts to back off deliveries immediately.
There are other Postfix delivery agents that can be
configured to handle messages for a particular class or destination.
Other delivery agents must be configured in the master.cf file. They are invoked either
through the class _transport parameter
or through an entry in a transport table, listed in the transport_maps parameter. Two common
alternate delivery agents are the lmtp and pipe agents.
The LMTP protocol is similar to SMTP, but it is used
for deliveries between mail systems on the same network. (See Chapter
7 for more information on LMTP.) For example, if a message
has to be delivered to a different software package, which might be
running on the same machine or another system on the local area
network, the queue manager calls the lmtp delivery agent. The most common
example for using LMTP is when a POP/IMAP server stores messages in a proprietary
format. (Recall that POP and IMAP are protocols for users to
retrieve their messages.) The POP/IMAP server, in this case, has its
own proprietary format for storing messages, so Postfix uses the
LMTP standard to hand off the message to the POP/IMAP server. If
there are any problems delivering the message, the lmtp delivery agent notifies the queue
manager to mark the message for a future delivery attempt and store
it in the deferred queue.
Postfix offers the option of delivering messages to
another program through the pipe
daemon. The pipe daemon delivers
messages to external commands. A common use for the pipe daemon is to have email delivered to
an external content filter or another communications medium, such as
a FAX machine. If there are any problems delivering the message, the
pipe daemon notifies the queue
manager to mark the message for a future delivery attempt and store
it in the deferred queue.
Let’s follow a typical message through the Postfix system.
Figure 3-4, Figure 3-5, and Figure 3-6 illustrate the process
as the message goes from the originating system to a destination MTA,
which, in turn, forwards it to the final MTA, where it is held until the
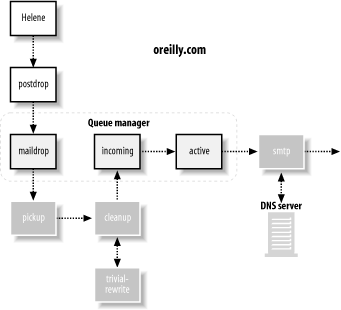
user is ready to read it. In Figure
3-4, Helene (helene@oreilly.com) wants to
send a message to Frank (frank@postfix.org). Helene
has an account on a system that runs Postfix. Her email client lets her
compose the message, and then it calls the Postfix sendmail command to send it. The Postfix
sendmail command receives the message from Helene’s email software
and deposits it into the maildrop
directory. The pickup
daemon then retrieves the message, performs its sanity
checks, and feeds the message to the cleanup daemon, which performs the final processing on the new
message. If Helene’s email client did not include a From: address, or did not use a
fully-qualified hostname in the address, cleanup makes the necessary fixes to the
message.
Once finished, cleanup places
the message into the incoming queue
and notifies the queue manager that a new message is ready to be
delivered. If the queue manager is ready to process new messages, it
moves the message into the active queue. Because this message is
destined for a user on an outside system, the queue manager has to alert
the smtp agent to handle the delivery of the message.
The smtp agent uses DNS (see
Chapter 6) to get a list of email
systems that can accept mail for the domain http://postfix.org. The smtp delivery agent selects the most preferred
MX host from the list and contacts it to deliver Helene’s
message.
Figure 3-5 shows
Frank’s email server at http://postfix.org also running Postfix, although the
system could be using any other standards-compliant MTA. The Postfix
smtpd on Frank’s server takes the
message from Helene’s smtp delivery
agent. After the smtpd daemon verifies that it should, in fact, accept this
message, it passes the message through to the cleanup daemon, which performs its checks
before depositing the message into the incoming queue.
The queue manager moves the message to the active queue, performs its processing, and determines that
it should call on the local
agent to make the final delivery of the message. The
local delivery agent finds that frank is an alias
and resubmits the message through the cleanup daemon for delivery to the new
address.
Both cleanup and the queue
manager call upon the trivial-rewrite
daemon when processing messages. trivial-rewrite helps with converting email
addresses to a standard format and determining the transport type and
next hop for delivery.
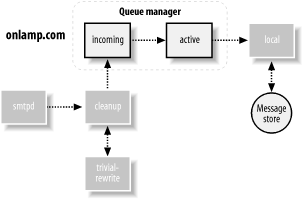
When a new message has to be delivered to another network, the
queue manager calls on smtp, which
checks the DNS for mail servers that can accept mail for the domain
http://onlamp.com. In Figure 3-6, the MTA at the
http://onlamp.com system
(once again by a happy coincidence, it’s a Postfix system) eventually
hands the message to the local
delivery agent, which deposits it into the message store
on that system. At this point Postfix has finished its job. Frank can
now read the message using his own email client, which might pull it
directly from the local message store or might use another protocol,
such as POP or IMAP, to get the message for him to read.
There are several variations that might have occurred in our
simple example. Perhaps the message could not be delivered at any step
for some temporary reason, in which case the delivery agent alerts the
queue manager, which places the message into the deferred queue and
attempts another delivery at a later time. Another possibility is that
doel is not an actual account on the system but an
account in an IMAP email system. In this case, the queue manager might
deliver the message through the lmtp
agent or via a specialized command configured through the
pipe delivery agent.
There are many variations and potential complications for Postfix to deal with. Fortunately, the architecture is robust enough to deal with nearly all situations, and flexible enough to easily accommodate changes in the future.
One of the truly remarkable things about Postfix is that, in many cases, it works as soon as you install it, with little or no change to its configuration. In the first section of this chapter, we’ll walk through checking the configuration and starting Postfix for the first time. Later sections discuss Postfix configuration details.
By default, Postfix is configured as a traditional Unix mail server, sending and receiving messages for all the accounts on the system. Your users can send and receive messages using any email client software available on your system.
In most environments, Postfix works in conjunction with a variety of other software systems. You should build each piece of your email system and test each one as a separate module before trying to integrate them all together. As you add each module, test the system before moving on to the next piece.
At this point you should have Postfix installed on your system. You might install Postfix from a packaged bundle for your platform or compile it yourself. See Appendix C for help with compiling Postfix, if you’re building it yourself. Check your normal software sources for any Postfix packages that might be available. If you haven’t yet installed Postfix, either get a package for your system or follow the instructions in Appendix C to build it. When you have finished with the installation, come back to this chapter for the final configuration.
I will assume, in examples throughout the book, that your installation of Postfix uses the default directories:
I will also assume that you or your installer created a postfix user and postdrop group.
This user and group should not be used for any other purpose on your
system. If you have changed any of the defaults, or if your Postfix
package did, keep that in mind when you read the examples presented in the
book.
There are two important issues to deal with before
starting Postfix for the first time. The first is how your system
identifies itself. Postfix uses a configuration parameter called
myhostname , which must be set to the fully qualified hostname of the
system Postfix is running on. Once Postfix knows the fully qualified
hostname, it can use that hostname to set default values for other
important parameters, such as mydomain. If the parameter myhostname is not set, Postfix defaults to the
hostname reported by the system itself. There is a complete discussion
of myhostname later in the chapter.
You can see what name your system reports with the Unix hostname
command:
$ hostname
mail.example.comA fully qualified hostname is comprised of both the individual hostname and the domain in which it resides. Some systems are configured with their simple hostname, rather than its fully qualified version:
$ hostname
mailIf your system is configured with just its simple hostname,
Postfix cannot determine what the fully qualified name is. You must
therefore explicitly set the myhostname parameter. You can do this quite
easily with the postconf Postfix command. The postconf command is a Postfix utility that
provides an easy way to get a variety of information about your Postfix
system. One of its functions is to display or change a specific
configuration parameter. You can use it to set the myhostname parameter:
# postconf -e myhostname=mail.example.comThe -e option tells postconf to edit the configuration with the
parameters and values specified. If your system is configured with its
fully qualified hostname, you don’t have to do anything to the Postfix
configuration.
The second important issue before starting Postfix for the first time is to make sure that your system’s aliases database is in the correct format. There are certain required aliases that you should configure when operating your mail server in a production environment. We’ll discuss the aliases file later in this chapter. For now, be aware that it is a text file that must be mapped into an indexed, binary format. Your existing aliases binary format might be different from what Postfix uses by default on your system. You can rebuild the indexed file with the newaliases command:
# newaliasesThis command doesn’t require any arguments, and it simply recreates your alias database without making any changes to your actual alias file.
Having accomplished these two critical items, you are now ready to start Postfix. Execute the following command:
# postfix startIf Postfix encounters any problems at start up, it reports them to your terminal. After some initial setup, Postfix detaches from the terminal and can no longer report problems to the screen. It will, however, continue to send a lot of information to your system log. Whenever you start or reload Postfix, be sure to check your system’s log to make sure that there are no reported errors or warnings. See Section 4.4.1 later in this chapter for information on Postfix logging and how to find the log file it uses.
Under most circumstances, Postfix will start without any problems, and you should now be the proud administrator of a currently running, fully functional Postfix system. See Chapter 7 for information about configuring Postfix to work with a POP/IMAP server, so that your users do not need shell access to your mail system. You should also review Chapter 6 for important information on DNS and email.
To read about stopping and restarting Postfix, see Section 4.4.2 later in this chapter. The rest of this chapter discusses Postfix configuration and administration.
The directory /etc/postfix contains Postfix configuration
files. The two most important files used in the configuration of Postfix
are master.cf and main.cf. These
files should be owned by, and only writable by, the root user. They should be readable by
everyone. Whenever you make changes to these files, you have to reload
Postfix for your changes to go into effect:[1]
# postfix reloadThe master daemon is the overall process that controls other Postfix daemons for mail handling. The master daemon uses the master.cf file for its configuration information. The master.cf file contains a line for each Postfix service or transport. Each line has columns that specify how each program should run as part of the overall Postfix system. See Chapter 3 for information on Postfix’s architecture and how various components interact with each other. In many installations, you will never have to change the default master.cf file. See Section 4.5 later in the chapter for information on when and how to make changes to master.cf.
The main.cf file is the core of your Postfix configuration. Nearly
all configuration changes occur in this file. The default main.cf file lists only a portion of the
nearly 300 Postfix parameters. Most Postfix parameters do not need to be changed, but the
flexibility is there when it’s required. All Postfix parameters are
listed and described in the various sample configuration files. The sample files are located
in the directory specified by the sample_directory parameter, which is usually
the same directory as your main.cf file. Both the main.cf file and the sample files that come
with the Postfix distribution contain comments that explain each of
the parameters.
Throughout this book, when the text says to modify a parameter, it always refers to a parameter in your main.cf unless a different file is indicated.
You can edit main.cf
with the postconf
command, as you saw earlier in the chapter, or you can change the file
directly with any text editor[2] (such as vi or
emacs). The file contains blank
lines, comment lines, and lines that assign values to parameters.
Comment lines start with the # character and continue to the end of the
line. Blank and comment lines are ignored by Postfix. Parameters can
appear in any order within the file, and are written as you would
expect:
parameter=value
A parameter definition must start in the first column of the line. The spaces around the equals sign are optional.
Here is an example parameter assignment with a comment:
# The myhostname value must be a fully qualified hostname. myhostname = mail.example.com # The rest of the file continues below...
You cannot have a comment on the same line as a parameter. The following example is incorrect and, with some parameters, could cause unexpected behavior that might be difficult to track down:
# # This is a bad parameter assignment. Never do this. # myhostname = mail.example.com # must be fully qualified hostname
Do not use quotation marks around values. They have no significance in the Postfix configuration, so they would be considered part of the value, which is probably not what you want.
A line that starts with whitespace (tabs or spaces) is considered a continuation of the previous line. This allows you to continue long parameter values onto multiple lines. The parameter assignment:
mydestination = example.com oreilly.com ora.com postfix.org
is the same as:
mydestination = example.com oreilly.com ora.com postfix.org
You can refer to the value of a defined parameter by
putting a $ in front of the parameter name:
mydomain = example.com myorigin = $mydomain
This causes the value of myorigin to be “example.com.”
You can reference a value in the file even before it has been set. The following example works as well as the previous one:
myorigin = $mydomain mydomain = example.com
Many parameters can have more than one value. Multiple values can be separated by commas, spaces, tabs, or new lines. Remember that when you separate values with new lines there must be spaces or tabs in front of the values to indicate a continuation of the previous line:
mydestination = $mydomain, example.com, oreilly.com
mydestination = $mydomain example.com oreilly.com
mydestination = $mydomain
example.com
oreilly.comThese three assignments to mydestination are effectively the
same.
Certain parameters allow you to place multiple values
in a text file and then point the parameter to that file in
main.cf . A value that starts with a forward slash is assumed
to be a pointer to a file. If your system receives mail locally for
many destinations, you may want to keep the list of destinations in
a separate file. Then point the mydestination parameter to that
file:
mydestination = /etc/postfix/destinations
The parameters that can use external files to store values are
those that accept lists where the order of the listed items is not
significant, such as mynetworks,
mydestination, and relay_domains. Check the documentation for
a particular parameter to see if it supports this feature.
If you have thousands of items in a list, it can be more efficient to keep them in a lookup table instead. Lookup tables are described in the next section.
Whenever you make a change to main.cf , you must reload Postfix for your changes to go into effect:
# postfix reloadSee Section 4.4.2 later in the chapter for more information about stopping and starting Postfix.
Rather than using complicated rewriting or pattern
transformation rules as Sendmail does, Postfix makes use of simple,
yet flexible, lookup tables. Many parameters point to lookup tables to
obtain important configuration information. One such parameter is
canonical_maps . It’s used to rewrite email addresses in messages.
Consider a site that uses account names internally for email
addresses, but wants any publicly visible addresses to have the form
firstname.lastname@example.com.
For example, the address
kdent@example.com should appear as
kyle.dent@example.com. A canonical_maps lookup table provides the
mapping from a key (kdent@example.com) to a value
(kyle.dent@example.com).
There are many parameters that use lookup maps, but they all work on the same principle. An email message (or client) provides some kind of key used to look up a value. Based on the value, Postfix takes some action or makes some change.
Postfix lookup tables are usually Unix database files, which are specially indexed files that provide faster access to the stored items. Lookup tables start as simple text files, with each key and value on the same line separated by spaces or tabs:
# # canonical mappings # kdent@example.com kyle.dent@example.com
Each entry has a unique key. The keys are often referred to as the LHS, or lefthand side of an entry, and the values are referred to as the RHS, or righthand side of an entry. Keys in lookup tables are not case-sensitive. The files can contain comment and blank lines just like main.cf, and line continuation works by putting whitespace at the beginning of carry-over lines. Lookup tables also do not treat quotation marks with any special significance.
Once you have created a text file with all of your mappings, you have to execute the postmap command against it to create the actual indexed version of the file:
# postmap /etc/postfix/canonicalWhenever you change your text file you must execute postmap against it.
The postmap command can also be used to query lookup tables. Use
the -q option to query a
value:
# postmap -q kdent@example.com /etc/postfix/canonical
kyle.dent@example.com Different types of Unix database files have different
internal formats. The format you use depends on the database
libraries available on your system. Normally Postfix supports one or
more of three types: btree
, dbm, and hash. Depending on your system libraries,
you may have fewer or more than these three types available. It’s
important to know which map type you use. The postconf command with the -m option lists all of the map types
supported by your installation of Postfix:
$ postconf -m
static
pcre
nis
regexp
environ
proxy
btree
unix
hashThe output of this command lists all map types, some of which
are used for access to other kinds of storage. But you should find
at least one of the three database types (btree, dbm, and hash).
The default_database_type
parameter tells you which database type Postfix uses
by default:
$ postconf default_database_type
default_database_type = hashAll of the examples in this book use the hash type, but if your installation is
using something different, be aware of that as you follow the
examples.
If you don’t specify a database type with postmap, it automatically uses your default type. In general, you can just use the default type configured on your system, but you must know what it is when assigning lookup tables to mapping parameters.
When you assign a lookup table to a parameter, you must specify both the map type and the path to the lookup table. The format of lookup maps is:
parameter=type:name
where type is the storage access
method and name is the resource
containing keys and values. With indexed datafile lookups,
name is the filename. The canonical
example is assigned as follows:
canonical_maps = hash:/etc/postfix/canonical
You can assign multiple lookup tables to a parameter. Postfix
searches the tables in the order listed, stopping as soon as it
finds a match. Some table lookups are recursive, depending on the
parameter. The canonical_maps
parameter in these examples is one such parameter. With recursive lookups, once a value is found, Postfix
tries to match it against all of the keys again until a key matches
itself or is not found.
You may have noticed that when postmap indexes files, it creates additional files. postmap creates either one additional file with the extension .db, or two additional files with the extensions .dir and .pag, depending on your database format. When you assign the lookup table to its parameter, specify the path and filename without any extensions.
Since keys are often email addresses, Postfix
automatically parses addresses, breaking them up into their parts.
You can have keys that match a full address, just the domain
portion, or just the local part. The way Postfix searches for
addresses or portions of addresses depends on the type of mapping
parameter. Certain maps might sensibly include the simple local part of an address, such as canonical_maps. Others would not expect a
local part key, such as transport_maps. The order in which Postfix
searches for a match differs slightly, depending on which type of
parameter it’s working with. Check the lookup table’s manpage to see
which search order it follows.
The search order where local parts are expected, such as with
canonical_maps , relocated_maps
, and virtual_alias_maps, is as follows:
The complete address. Example: kdent@example.com
The local part alone. Example: kdent
The domain portion only, specified with the @ character. Example: @example.com
For lookup tables where it doesn’t make sense to have a local
part, such as with transport_maps
, Postfix searches for matches in the following
order:
The complete address. Example: kdent@example.com
The domain by itself. Example: example.com
The domain specified with an initial period, which matches any subdomain. Example: .example.com
If you always want domains to match themselves plus any subdomain, you
can simplify your lookup tables somewhat by setting the parent_domain_matches_subdomains
parameter. The parameter, by default, contains many
lists. To add transport_maps to
the list, append it as follows:
parent_domain_matches_subdomains = debug_peer_list fast_flush_domains mynetworks permit_mx_backup_networks qmqpd_authorized_clients relay_domains smtpd_access_maps transport_maps transport_maps = hash:/etc/postfix/transport
Now, a domain entry in the /etc/postfix/transport matches itself and all of its subdomains automatically. You no longer need any entries such as the third item, .example.com, from the preceding list.
Some parameters that normally take a simple list, such
as mydestination, can also be
specified with a lookup table. The LHS keys are the items in the
list. You still have to provide a RHS value for each key, but the
value is simply ignored. You can specify any text you want. It’s a
good place to provide yourself a comment. Using a lookup table for a
straight list is useful when you have thousands of items; otherwise,
a simple text file is more than adequate and probably has better
performance. If you use a lookup table for lists of network IP addresses, you cannot use the
network/netmask notation to specify an entire subnet. You must list
each address individually. Check the documentation to see if a list
parameter supports the lookup table feature.
Postfix provides a special lookup table type using regular expressions that offers even more flexibility for matching keys in lookup tables. Regular expressions are used in many Unix utilities. They provide a powerful tool for specifying matching patterns. There are two types of regular expression libraries that you might use with Postfix, depending on which libraries are available on your system.
By default, Postfix uses POSIX extended regular expressions, which I’ll refer
to as regexp. POSIX, which stands for
Portable Operating System Interface, is a standard
that encourages portability across different operating systems. It
includes specifications for regular expressions. Postfix also
supports Perl-compatible regular expressions, which I’ll refer
to as pcre. If you’re used to regular
expressions in Perl, you’ll find that regexp patterns are a bit
different. If you want pcre support, be sure you have a pcre library
to link with when building Postfix. With the pcre format, some
features differ from regexp, and the performance is usually better.
It’s possible that your Postfix distribution already includes pcre
support. You can check by executing the postconf command with the -m option, as you did earlier in the
chapter.
If pcre is listed among your map types, then you can use Perl-style regular expressions for your regular expression lookup tables. But don’t rush to add pcre support if you don’t have it; the default regexp is quite powerful and usually adequate for administrators who need regular expressions. Install pcre only if you know of particular Perl-style regular expression features you need.
Both Perl-style and POSIX regular expressions are very
well-documented in many places. Any book on Perl should include
information on its regular expressions, and if you have Perl
installed on your system, you should find a manpage called perlre(1). Documentation for regexp
usually appears in a manpage called re_format(7). If your system does not
include the manpage, you should be able to find it on the Web.
sed & awk by Dale Dougherty and Arnold
Robbins (O’Reilly) contains information on POSIX regular
expressions.
To use regular expression tables, specify either
regexp or pcre as the map type when assigning tables
to map parameters:
body_checks = regexp:/etc/postfix/re_body_checks
Entries in re_body_checks are
conventionally specified—with the regular expression pattern between
two forward slashes—as the key, followed by whitespace, followed by
the mapped value:
/pattern/value
The most common use of regular expression tables is with the
header_checks and body_checks
parameters for blocking spam. See Chapter 11 for more
information.
Postfix can make use of other backend systems for its
lookup tables. (Later chapters discuss using MySQL and LDAP lookup tables.) When you make use of
these external sources for lookup values, you should start
with one of the simple database formats, such as dbm or hash. Make sure your configuration works as
expected. After setting up your external data source, verify that it
returns the same results as your simple tables.
The postmap with the -q option
is an important tool for testing any kind of lookup table. For
example, the following two commands should return the same values when
you test your MySQL database:
$postmap -q hash:/etc/postfix/transport$postmap -q mysql:/etc/postfix/transport.cf
See Chapter 15 for more information on using Postfix with external data sources.
Alias files are a special case of Postfix lookup tables because they use a Sendmail-compatible format. The file has traditionally been called aliases, and its location depends on your platform, but it is normally within the /etc directory or a subdirectory below it. By default, Postfix is configured to point to your original aliases file, so if you are migrating from Sendmail, your existing aliases continue to work.
Historically, email systems used a single alias
database. Postfix lets you have as many as you want. Multiple alias
files can help in organizing your configuration information.
Typically, administrators configure multiple alias files for
convenience when configuring separate mailing lists. The alias_maps parameter points to your alias files.
If your system supports NIS, which is a network database of users (including
their aliases), then by default Postfix includes NIS among your
alias maps. A typical default alias_maps looks like the
following:
alias_maps = hash:/etc/aliases, nis:mail.aliases
If your system includes support for NIS, but you’re not using it, you should change the parameter so that it points to your aliases file only:
alias_maps = hash:/etc/aliases
You may want to locate your aliases file in your Postfix
configuration directory for consistency. Some administrators prefer
to have all of the email configuration files located together.
Simply reassign alias_maps to
point to the new location:
alias_maps = hash:/etc/postfix/aliases
You should also reassign alias_database so that your newaliases command continues to work
correctly (see the next section):
alias_database = hash:/etc/postfix/aliases
Since the format of alias maps differs from that of Postfix lookup tables, you cannot use postmap to build the alias database from your text file. Instead, Postfix provides the postalias command. Its command-line syntax is the same as that of postmap, allowing you to create or query alias maps. To build an alias database from your aliases file, execute the following:
# postalias /etc/aliasesAnother Sendmail compatibility command related to alias files
is the newaliases command. It provides a convenient way to rebuild your
alias databases. The Postfix installation includes a replacement
version of the command that follows the same syntax as the original.
It’s normally executed with no arguments and determines which alias
files to rebuild from the alias_database parameter. The alias_database parameter differs from
alias_maps in that it includes
only standard Unix database-mapped files (those that should be
indexed by newaliases), whereas
alias_maps might also contain
other map types such as nis.
newaliases uses the default_database_type parameter discussed earlier to determine which
database format to use.
The text file for alias databases is much like Postfix
lookup tables, except for the alias definition itself. Alias files can have blank and
comment lines that are ignored. Comments are marked by a # at the beginning of the line and cannot
be on the same line as an alias definition. A single alias
definition can be broken onto multiple lines by starting
continuation lines with whitespace.
The form of an alias definition consists of the name being
aliased, followed by a colon, followed by one or more targets for
the aliased name. Aliases can be directed to different types of
targets (discussed below). Multiple targets are
separated by commas. Both aliases and targets should be quoted if they
contain whitespace or any special characters such as a #, :, and @:
alias:target1,target2,...
The LHS aliases are always local addresses, so you cannot specify a domain name with an alias key. The target is often one or more addresses, but can be any of the following:
Any RFC 2822 address is allowed, meaning target addresses can be local or forwarded to another site for delivery. For example:
kyle.dent: kdent, kdent@oreilly.com
Specify the full path to a file. New messages are appended to the file specified. Delivery occurs to the file as it would to any local mailbox. See Chapter 7 for information on local delivery to mailboxes and on specifying different mailbox formats. For example:
info: /usr/local/mail/info_box
Specify a pipe character and a command. See Chapter 14 for more information on delivery to commands. For example:
info: "|/usr/local/bin/autoreply"
include:An included file contains a list of additional alias targets. The targets in the file can be any valid target type as described here, but by default filenames and commands are not allowed. The next section discusses configuration parameters to override these default restrictions. For example:
info: :include:/usr/local/mail/info_list
Normally, when Postfix makes a local delivery it assumes the
identity of the recipient of the message. With aliases, Postfix uses
the identity of the owner of the alias file, except when the file is
owned by root. When a
delivery would occur as root,
Postfix uses the identity of the account configured with the
default_privs parameter instead.
You can control which kinds of targets are allowed in
your alias files with the parameters allow_mail_to_commands and allow_mail_to_files. Each of these
parameters takes a list of the aliasing mechanism that permits its
action. Aliasing mechanisms are “alias,” the alias file we’ve
been discussing; “include,” the include target, and “forward,” which
is the .forward file discussed
in Chapter 7.
The default setting for the two parameters is to allow delivery to commands and files from both alias and .forward files, but not from include files, for security considerations. If you want to disallow delivery to commands and files from your aliases database entirely, set the parameters to blank:
allow_mail_to_commands = allow_mail_to_files =
If you would like to make delivery to commands and files available in all the alias mechanisms, set the parameters as follows:
allow_mail_to_commands = alias, forward, include allow_mail_to_files = alias, forward, include
This setting is equivalent to the default behavior for Sendmail. However, it could expose access to possibly vulnerable mailing-list managers that might be coerced into adding a filename or command as a destination address. If you don’t need the additional include option for files and commands, it’s best to accept the Postfix default.
There are several common aliases that are configured
by default. By convention, these system aliases point to the root account. You want to make sure that
root’s mail is read regularly.
This is normally accomplished by creating an alias for root to the normal login account of the
person or persons responsible for system administration.
RFC 2142 defines several mailbox names that all
domains should have, depending on which services they run on the
Internet. At a minimum, you should have a postmaster alias, and you should review
the RFC to see if there are other aliases you want to create.
[1] If you change the inet_interfaces parameter, you must stop
and start Postfix.
[2] Postfix expects configuration files to contain normal Unix-style line endings. If you edit your configuration files from another platform, such as Windows or Mac, make sure that your editor uses the correct line endings for Unix.
We saw at the beginning of this chapter how Postfix requires only minimal configuration changes to work. Depending on how you plan to use your Postfix system, you may want to consider some of the more common options. This section discusses how your system identifies itself, and then covers the very important topic of relay control.
There are four parameters dealing with your system’s
hostname and domain that you want to consider, no matter
how you use Postfix: myhostname,
mydomain, myorigin, and mydestination.
We discussed the purpose and importance of the
myhostname parameter earlier in this chapter. If myhostname is not specified, Postfix uses
the function gethostname
to determine what your system’s hostname is. If your
system correctly reports the fully qualified hostname, you can leave myhostname unspecified in the
configuration file. Some systems may not be configured correctly or
may not report the fully qualified version of the hostname. In these
cases, you can set either myhostname to the fully qualified hostname
or mydomain to your system’s domain. If mydomain is explicitly set, Postfix
automatically sets myhostname to
the domain name specified and the local hostname reported by
gethostname to create the fully
qualified hostname.
If you set myhostname to
the system’s fully qualified hostname but omit mydomain, Postfix uses the value of
myhostname, minus the first
component of the fully qualified hostname, to automatically set
mydomain. A value of
mail.example.com for myhostname causes mydomain to be
example.com unless you explicitly set it to
something else. Similarly, a hostname of
mail.ny.example.com causes the value to be
ny.example.com. If your system does not report
its fully qualified name, and you have not set either the mydomain or myhostname parameters, Postfix reports the
problem in your log file. See Section 4.4.1 later in this
chapter.
When your users send or receive mail through the
Postfix system with no domain name specified in the envelope or
header addresses, the parameter myorigin determines what domain name
should be appended. The default is to use the value of myhostname. If Postfix is running on a
system whose hostname is mail.example.com,
messages from the user kdent have
a From: address of
kdent@mail.example.com. However, frequently
users want their mail to be sent from the domain name without any
extra host information (kdent@example.com
instead of kdent@mail.example.com). If that is
the case, set myorigin to
$mydomain:
myorigin = $mydomain
The mydestination
parameter lists all the domains your Postfix system should accept
mail for and deliver to local users. By default Postfix accepts mail
destined for $myhostname and
localhost.$mydomain. If you want
your system to accept mail for your entire domain and not just the
single host it is running on, add $mydomain to the list:
mydestination = $myhostname, localhost.$mydomain, $mydomain
Now your mail server can act as a gateway receiving all mail for the domain.
In addition to accepting mail and delivering messages to your local users, Postfix also relays messages to other systems. It’s very important to restrict who is allowed to relay messages through your system. Systems on your own network may require the ability to send messages anywhere, but you do not want to provide the rest of the world with the same service. Relay control is an important topic in email administration because of the prevalence of Unsolicited Bulk Email (UBE), or spam. (See Chapter 11for more information on UBE.) A common practice among spammers is to find a well-connected system that allows them to relay their mail. You want to prevent anyone who is not authorized from using your system to relay mail. If you leave yourself configured as an open relay, not only will you be contributing to the spam problem, but your own machine may become unusable as it is abused by spammers. Furthermore, you may find that other systems start refusing mail from you as they discover that your system is the source of spam. They’ll refuse the spam as well as any legitimate messages your own systems send. Mail servers that permit anyone to relay mail are called open relays .
By default Postfix is not an open relay. The
parameters mynetworks_style
and mynetworks
determine what other systems can use your mail server to send
messages. The default configuration allows relaying only from other
machines that are connected to the same IP subnet as your server.
You can limit or broaden the range of addresses that should be
allowed to relay by setting the parameter mynetworks_style. If you prefer to limit
relaying to the local machine only, set mynetworks_style to “host”. You can also
set mynetworks_style to “class”
to allow relaying by any host within the same class A, B, or C
network as your server. For many networks a class setting opens
relaying to too many systems. If you aren’t familiar with IP address
classes, stick to the default “subnet” or more restrictive “host”
settings.
Alternatively, you can explicitly indicate the hosts that
should be allowed to relay mail by setting mynetworks. If you set mynetworks, the mynetworks_style parameter is ignored. You
can list individual IP addresses or specify subnets using the network/netmask notation—for example,
192.168.100.0/28. This parameter is handy if you need to provide
mail relay to hosts outside of your network because you can list
specific IP addresses regardless of their relationship to your
own subnet. If, for example, you want to provide relaying to remote
users, you simply add an IP address to your list. In this case, your
remote users need a static IP address, or at least an address
assigned from a limited range of addresses. If your remote users do
not have static IP addresses, then you have to configure some kind
of SMTP authentication.
All of the techniques for SMTP authentication introduce their own complexities. You would be wise to consider simpler options before selecting an authentication technique. Is it possible to get static IP addresses for your remote users? Can your remote users avail themselves of another SMTP server? Perhaps your users’ remote access provider offers an SMTP server as well.
Your first inclination may be to use UBE controls to permit mail relaying when a message’s envelope sender address is from the local domain. Don’t do this. Envelope addresses are trivial to fake, and spammers know to use local addresses for this purpose. Configuring your mail server in this way makes you an open relay.
Chapter 12 discusses using SASL for SMTP authentication. SASL is a general protocol that defines how a server and client can exchange authentication credentials. It requires that additional libraries be linked to your SMTP server. There are three alternatives to SASL that all work similarly: pop-before-smtp , DRAC (Dynamic Relay Authorization Control), and WHOSON. Each of these methods is designed to work with clients that have dynamically assigned IP addresses. They require that a user first log in to a POP/IMAP server, thereby supplying the client’s currently assigned IP address to your system or network. The client IP address is fed to the SMTP server, which then permits mail relaying by the client system for some configurable time limit. This technique is mostly transparent to end users, but it does require that they first check for new messages (logging into the POP/IMAP server) before trying to send out any messages.
Both pop-before-smtp and DRAC work with Postfix by dynamically updating a Postfix lookup table, adding new addresses as users authenticate, and deleting others when the time period expires. Postfix doesn’t require any special libraries or configuration. You simply configure it to check the lookup table that is updated when users log in via your POP/IMAP server. Your POP/IMAP server, on the other hand, may require changes and recompiling to work. DRAC differs from pop-before-smtp in that it can work over a network, while pop-before-smtp requires that the POP/IMAP server be installed on the same system as the SMTP server.
WHOSON is actually a protocol that provides an interface to both the POP/IMAP and SMTP servers. You have to run a WHOSON server on your network, and you must obtain a patch that adds a new lookup type to Postfix. After building Postfix with the patch, it can communicate with the WHOSON server to determine if a particular client IP address should be allowed to relay mail.
Another option to consider is client-side certificate authentication. (See Chapter 13 for a full discussion of Transport Layer Security and certificates.) We normally think of certificates as a means to encrypt communications, but they can also be used as a strong method of authentication. However, they do require management of certificates and support for the TLS protocol.
None of these add-ons is an ideal solution. They require additional code compiled into your existing daemons that may then require special write access to system files. They also require additional work for busy system administrators. If you cannot use any of the nonauthenticating alternatives mentioned earlier, or your business requirements demand that all of your users’ mail pass through your system no matter where they are on the Internet, SASL is probably the solution that offers the most reliable and scalable method to authenticate users.
Running a mail server is an ongoing task. You cannot start it and forget about it. There are periodic administrative tasks, and you should regularly check for any problems your system might have. This section discusses many of those tasks and how to accomplish them with Postfix.
Postfix provides a utility through the postfix command to validate many aspects of your installation. The command checks for configuration problems, looks at directory and file ownership, and creates any missing directories. Executing:
# postfix checkshould report no messages on a correctly installed system. If there are any problems, the command reports them to you both on the screen and in your log file.
Since Postfix is a long-running program, you should regularly check your system’s log file for warnings or messages. Things can change on your system that might impact Postfix. Almost all Postfix activity, successful or not, is logged. Whenever you start or reload Postfix, it is a good idea to check your log file for messages.
Postfix logging is accomplished by using your system’s syslog daemon. System log files are an aspect of system administration that vary across versions of Unix, so you may have to consult your own system documentation to fully understand Postfix logging.
In general, the syslog daemon (syslogd) receives messages from various
system processes and writes them to their final destination (often a
file). syslogd organizes messages
according to their importance and the application or facility that
generated the message. The file /etc/syslog.conf tells syslogd where to write each type of message.
The logging facility used by Postfix is mail . If you don’t know where to find messages logged by
Postfix, the file /etc/syslog.conf should point you in the
right direction. Some operating systems, by convention, log nearly
everything to a single file, such as /var/log/syslog, while others prefer to
separate messages by applications or services, so that Postfix
messages go to a file like /var/log/maillog. For the latter type of
systems, you might find an entry like the following in /etc/syslog.conf:
mail.* -/var/log/maillog
Once you locate your mail log file, check it regularly. You’ll probably want to check it at least daily, but decide for yourself, depending on the volume of mail your server handles and your existing log rotation scheme. You can use the following command to find Postfix messages that might be of interest:
$ egrep '(reject|warning|error|fatal|panic):' /var/log/maillogassuming that your log file is /var/log/maillog. If not, substitute the name of your own mail log file.
You saw earlier in the chapter how to use the postfix command to start Postfix:
# postfix startOnce Postfix is running, if you make any changes to main.cf or master.cf, have Postfix reread its configuration by executing postfix with the reload argument:
# postfix reloadPostfix gracefully terminates running processes after they have finished any tasks they are working on, rereads its configuration files, and continues to receive mail without interruption.
The most important thing when starting or reloading Postfix is to check your system log to see if Postfix reports any errors or warnings.
You can stop Postfix with the stop argument. Running processes will still finish any tasks they’re working on and then terminate:
# postfix stopYou should not stop and start Postfix when a reload will suffice. Also, do not stop, restart, or reload frequently, since any of these actions can impact performance.
Most systems automatically start Postfix when they boot up because of Postfix’s built-in Sendmail compatibility. Sendmail is typically launched at startup with a command like:
sendmail -bd -q15m
The Postfix sendmail
command understands nearly all of the same options as
Sendmail, so if your server already has scripts that start Sendmail,
those same scripts will start Postfix. One common Sendmail option
ignored by Postfix is -q , which is used by Sendmail to specify the time between
queue scans. The time between queue scans for Postfix is set in the
main.cf file with the queue_run_delay parameter, which defaults to 1000 seconds.
Your system may have a configuration option to turn on automatic startup of Sendmail. After you install Postfix, turning on this option should be sufficient to cause Postfix to start at system initialization. Different versions of Unix have different idioms for configuring a server to start a process at system initialization. If your system’s Sendmail start script doesn’t work, or you prefer to use a Postfix-specific script, you can easily create a start script.
The requirements and conventions for initialization scripts vary among the different versions of Unix, so you should consult your system’s documentation to see where and how to add startup options. On System V-type systems, you can install a script like the one shown in Example 4-1.
#!/sbin/sh
#
# Set the path to your own logger and postfix commands.
#
LOGGER="/usr/bin/logger"
POSTFIX="/usr/sbin/postfix"
rc=0
if [ ! -f $POSTFIX ] ; then
$LOGGER -t $0 -s -p mail.err "Unable to locate Postfix"
exit(1)
fi
if [ ! -f /etc/postfix/main.cf ] ; then
$LOGGER -t $0 -s -p mail.err "Unable to locate Postfix configuration"
exit(1)
fi
case "$1" in
start)
echo -n "Starting Postfix"
$POSTFIX start
rc=$?
echo "."
;;
stop)
echo -n "Stopping Postfix"
$POSTFIX stop
rc=$?
echo "."
;;
restart)
echo -n "Restarting Postfix"
$POSTFIX reload
rc=$?
echo "."
;;
*)
echo "Usage: $0 {start|stop|restart}"
rc=1
esac
exit $rcDepending on your environment, you may also want to add additional pre- and post-checks to this example. You should install your script in the correct directory for your system, commonly /etc/init.d, although HP-UX, for example, uses /sbin/init.d. Once the script is in place, you also have to create a symlink to it in the appropriate run level directory for your server (often /etc/rc2.d). For example, if you named the above script postfix, create a symlink such as the following:
# ln -s /etc/init.d/postfix /etc/init.d/rc2.d/S95postfixYou should consult your system documentation for the details on your platform.
The Postfix queue is also an important part of email administration. See Chapter 5 for information on the Postfix queue manager.
The Postfix master daemon launches all of the other Postfix services as they are needed. The various services, and how they are run, are specified in the master.cf file.
The master configuration file works like other Postfix
configuration files. A comment is marked by a # character at the beginning of a line.
Comments and blank lines are ignored. Long lines can continue onto
subsequent lines by starting the carry-over lines with
whitespace.
Example 4-2 shows a sample file. Each column contains a specific configuration option. A dash in a column indicates the default setting for that column. Some default values come from parameters in the main.cf file.
#= = = = = = = = = = = = = = = = = = = = = = = = = = = = = =
# service type private unpriv chroot wakeup maxproc command + args
# name (yes) (yes) (yes) (never) (100)
#= = = = = = = = = = = = = = = = = = = = = = = = = = = = = =
smtp inet n - y - - smtpd
pickup fifo n - n 60 1 pickup
cleanup unix n - n - 0 cleanup
qmgr fifo n - n 300 1 qmgr
rewrite unix - - n - - trivial-rewrite
bounce unix - - n - 0 bounce
defer unix - - n - 0 bounce
flush unix n - n 1000? 0 flush
proxymap unix - - n - - proxymap
smtp unix - - y - - smtp
relay unix - - y - - smtp
-o smtp_helo_timeout=5 -o smtp_connect_timeout=5
showq unix n - n - - showq
error unix - - n - - error
local unix - n n - - local
virtual unix - n n - - virtual
lmtp unix - - n - - lmtp
maildrop unix - n n - - pipe
flags=DRhu user=vmail argv=/usr/local/bin/maildrop -d ${recipient}
cyrus unix - n n - - pipe
user=cyrus argv=/cyrus/bin/deliver -e -r ${sender}
-m ${extension} ${user}
uucp unix - n n - - pipe
flags=Fqhu user=uucp argv=uux -r -n -z -a$sender -
$nexthop!rmail ($recipient)The following list describes each column in the file, including its default setting:
The inet type refers to
network sockets. A network socket component can
communicate with other processes on the same machine or other machines
on the network. Network sockets use a combination of a system’s IP
address and the port used for connecting. They are commonly written in
combination as the host or IP address and the port, separated by a
colon. The name of an inet
transport in master.cf is a socket
specified as the host and port. The name can be written as just the port
if it’s on the local system. You can use a hostname or an IP address for
the host, and the port can be the actual port number, or its symbolic name. (Symbolic names for ports come from the
/etc/services file. See your system
documentation.)
The unix type refers to Unix
domain sockets, and fifo refers to
named pipes. Both are used for communication between
processes on the same machine. Both Unix domain sockets and FIFOs use
special files for their communications. The names for unix and
fifo components follow the same
naming rules as for valid Unix filenames without directories. Postfix
creates special communications files using the service name. Unix domain
sockets and named pipes are standard Unix interprocess communications
tools. If you would like more information about them, refer to a text on
Unix programming.
Table 4-1 shows examples of valid service names for the various transport types.
Service name | Transport type | Description |
smtp | | Name for the smtpd daemon. The name is the symbolic name for the SMTP port. |
127.0.0.1:10025 | | A component that listens on the loopback interface on port 10025. |
465 | | A component that listens on the local host on port 465. |
maildrop | | A component that is invoked through Postfix’s pipe daemon. |
pickup | | A Postfix FIFO component. |
privateAccess to some components is restricted to the Postfix
system itself. This column is marked with a y for private access (the default) or an
n for public access. inet components must be marked n for public access, since network
sockets are necessarily available to other processes.
unpriv Postfix components run with the least amount of
privilege required to accomplish their tasks. They set their
identity to that of the unprivileged account specified by the
mail_owner parameter. The default installation uses postfix. The default value of y for this column indicates that the
service runs under the normal unprivileged account. Services that
require root privileges
are marked with n.
chroot Many components can be chrooted for additional
security. The chroot location is specified in the queue_directory parameter in main.cf. The default is for a service
to run in a chroot environment; however, the normal installation
marks all components with an n
so they are not chrooted when they run. Chrooting a service adds a
level of complexity that you should thoroughly understand before
taking advantage of the added security. See Section 4.8 later in the
chapter for more information on running Postfix services in a
chroot environment.
wakeup Some components require a wake-up timer to kick them
into action at the specified interval. The pickup daemon is one example. At its default setting of 60
seconds, the master daemon
wakes it up every minute to see if any new messages have arrived
in the maildrop queue. The other services that require a wake-up
are the qmgr and flush
daemons. A question mark character (?) can be added at the end
of the time to indicate that a wake-up event should be sent only
if the component is being used. A 0 for the time interval
indicates that no wake-up is required. The default is 0, since
only the three components mentioned require a wake-up. The values
as they are set in the Postfix distribution should work for almost
all situations. Other services should not have wakeup enabled.
maxproc Limits the number of processes that can be invoked
simultaneously. If unspecified here, the value comes from the
parameter default_process_limit in main.cf, which is set to 100 by
default. A setting of 0 means no process limit. You may want to
adjust maxproc settings if you
run Postfix on a system with limited resources or you want to
optimize different aspects of the system.
command The actual command used to execute a service is
listed in the final column. The command is specified with no path
information, because it is expected to be in the Postfix
daemon directory specified by the daemon_directory parameter in main.cf. By default the directory is
/usr/libexec/postfix. All of
the Postfix commands can be specified with one or more -v options to turn on increasingly more
verbose logging information, which can be helpful if
you must troubleshoot a problem. You can also enable information
for a debugging program with the -D option. See the DEBUG_README file that comes with the
Postfix distribution for more information on debugging if
necessary.
Each of the Postfix daemons has its own set of options that can be specified after the command itself. (See the manpages for the individual daemons to learn about the available options.) You can specify only Postfix commands in the command column. If you want to execute your own commands, use the Postfix pipe daemon. See the Postfix pipe manpage for more information.
If main.cf offers
configuration information for a component, you can override that
information in master.cf by providing an alternative in an -o option. To create a specialized smtp client service, for example, add another entry to
master.cf such as the
following:
smtp-quick unix - - n - - smtp -o smtp_connect_timeout=5s
There can be no spaces between the parameter and the equals sign
and the assigned value. As configured in the example, smtp-quick is a specialized smtp service that doesn’t wait as long for a
server to respond when it tries to connect. This SMTP client follows the
configuration in main.cf, but uses
a different value for the smtp_connect_timeout parameter. You’ll see more examples later in this chapter
and elsewhere in the book.
The smtpd daemon can enforce a number of limits on incoming mail. The limits are configurable through several parameters in the main.cf file. You can limit the size of messages, the number of recipients for a single delivery, and the length of lines in a message. You can also limit the number of errors to allow from a single client before breaking off communications.
To limit the number of recipients for a single message, use the smtpd_recipient_limit parameter. The default
is 1,000 recipients, and it should be adequate for normal
operation.
The message_size_limit
parameter limits the size of any message your system will
accept. The default is 10 MB. If you have limited disk space or memory,
you might want to lower the value. On the other hand, if your users
commonly receive large attachments, you may have to increase it.
Increasingly frequent errors from the same client might indicate a problem or an attack. Postfix
keeps a counter of errors, and handles potential problem clients by
introducing delays with each error. The delays can help protect your
system from misconfigured or malignant clients. As the number of errors
increases so does the length of each delay. The length of the initial
delay is specified by smtpd_error_sleep_time with a default of one second. After the number of errors
exceeds the value set for smtpd_soft_error_limit , Postfix increases the delay by one second for every
error, so that with each error, there is a slightly longer delay.
Finally, when the error count hits the value set in smtpd_hard_error_limit , Postfix gives up on the client and disconnects.
If a malicious program connects to your mail server and sends garbage commands, attempting to crash your server, the bogus commands appear to Postfix as errors from a misbehaving client. Assume the following values for the delay parameters:
smtpd_error_sleep_time = 1s smtpd_soft_error_limit = 10 smtpd_hard_error_limit = 20
With these settings, Postfix initially waits one second (smtpd_error_sleep_time) after each error
before responding to the client. After 10 (smtpd_soft_error_limit) such probes, Postfix
starts increasing the length of each delay. After 11 errors, Postfix
waits 11 seconds. After 12 errors, Postfix waits 12 seconds, and so on.
Once the number of errors hits 20 (smtpd_hard_error_limit), Postfix disconnects,
cutting off the malicious program. If the program connects again, it
simply gets the same treatment each time it starts creating
problems.
Postfix tries to make sense of addresses in email and writes them using the standard RFC 2822 format. Certain address rewriting occurs automatically.
You saw earlier in the chapter how Postfix appends myorigin to a local name that has no domain part. Postfix also
appends the value of mydomain to
addresses that include only the host portion without the domain name.
This fixes addresses that look like kdent@host so
they become kdent@host.example.com.
Postfix provides another type of address rewriting that
lets you map disparate addresses into a standard format for your
entire site. The canonical_maps
parameter points to a lookup table of address mappings.
(While the word canonical has many
meanings, among computer professionals it means “the usual, standard,
or normal.”) If different mail systems on your network create
addresses in different ways, you can relay them all through your
Postfix gateway and have it fix up the addresses into your standard
format. Canonical maps are often used to change addresses from an
internal format to a public one. Include entries like the following in
your canonical table:
# # /etc/postfix/canonical # pabelard@example.com peter.abelard@example.com hfulbert@example.com heloise.fulbert@example.com
They can also rewrite addresses completely.
# # /etc/postfix/canonical # pabelard@example.com abelard@oreilly.com hfulbert@example.com heloise@oreilly.com
In main.cf, point the
canonical_maps parameter to the
canonical file:
canonical_maps = hash:/etc/postfix/canonical
Be sure to execute postmap against your canonical file and reload Postfix so that it recognizes your changes to main.cf:
#postmap /etc/postfix/canonical#postfix reload
The canonical_maps parameter
affects all of the addresses, including envelope and message headers.
If Postfix finds a match, it makes the change. If you want your
changes to affect only sender or recipient addresses, Postfix provides
the additional parameters sender_canonical_maps and recipient_canonical_maps. They both work the
same as canonical_maps, but only on
their respective classes of addresses. If you use either of these two
parameters in addition to canonical_maps, Postfix first fixes the
addresses according to sender_canonical_maps and recipient_canonical_maps, and then canonical_maps.
Address masquerading refers to the idea that you can
hide the names of internal hosts, and make all addresses
appear as if they originated from the gateway system itself. You may
have internal systems that use your Postfix server as a gateway. When
mail is sent from these systems and the sender addresses include the
fully qualified hostname, you may want addresses to appear with the
domain name only. The masquerade_domains parameter strips hostnames down to their simpler domain
names.
The parameter takes a list of domains. Any address whose fully qualified hostname matches the domain portion is stripped down to just the domain name:
masquerade_domains = example.com
Addresses that look like heloise@server1.example.com and frank@server2.example.com are converted to heloise@example.com and frank@example.com.
You can list multiple domains and subdomains. Postfix processes addresses against
masquerade domain names in the order you list them. Consider a network
that includes the two subdomains,
acct.example.com and
hr.example.com. You want addresses from these
domains to show the subdomain, but you want addresses from any other
domain or host in the network to show the parent domain. Set masquerade_domains as follows:
masquerade_domains = acct.example.com hr.example.com example.com
With this setting, the address heloise@sys3.acct.example.com matches acct.example.com, so that it becomes heloise@acct.example.com. The address frank@db.hr.example.com matches hr.example.com, and becomes frank@hr.example.com. Finally, helene@server1.example.com matches the last value, example.com, to become helene@example.com.
If you want to preserve a domain name that would otherwise be stripped down, you can preface the domain with an exclamation point:
masquerade_domains = !it.example.com, example.com
In this case, the domain it.example.com will not be rewritten, so the address kdent@it.example.com stays as it is.
You can exclude specific account names from masquerading. For example, if you
want an address like root@db.example.com to stay
intact, add the account to the masquerade_exceptions parameter:
masquerade_exceptions = admin, root
When you use masquerading, it is normally applied to all
envelope and header addresses but not envelope recipient addresses. This allows mail addressed
to a specific host to be delivered from the mail gateway to that
particular system, while still rewriting addresses for messages sent
from the host. If you prefer to have all addresses masqueraded, set
the masquerade_classes parameter to include the complete list of address
classes recognized by Postfix:
masquerade_classes = envelope_recipient, envelope_sender,
header_sender, header_recipientBe aware that if you set masquerade_classes this way, a gateway mail
system may no longer know where to deliver a message that was
originally addressed to kdent@server1.example.com
once it has been rewritten as
kdent@example.com.
The relocated_maps
parameter points to a lookup table where you can store
a list of addresses or domains that have moved to another
location:
relocated_maps = hash:/etc/postfix/relocated
The lookup table uses the old address as the key and its new location as the value. When a message is delivered to a relocated address, Postfix rejects the delivery attempt with a message that includes the user’s new address as specified in the lookup table. You can also list just a domain name to have all recipients at that domain rejected with your specified message.
The file /etc/postfix/relocated contains entries like:
kdent@ora.com kdent@oreilly.com heloise@ora.com hfulbert@oreilly.com @example.com oreilly.com
Messages sent to either kdent@ora.com or heloise@ora.com are rejected with an error message that gives their respective new addresses. Any messages sent to example.com are rejected regardless of what the local part is. The message reports that the address has moved to oreilly.com.
A local address that is not listed in relocated or other
maps, and is not an account on the system is an unknown user. Normally, when Postfix
receives mail for an unknown user, it rejects it. If you prefer to
capture all of the messages sent to nonexistent accounts, you can use
the luser_relay parameter. Set it to any email address to have messages
destined for unknown users sent to the address you provide. You must
also set local_recipient_maps
to blank to prevent Postfix from rejecting mail for
unknown users:
luser_relay = catchall local_recipient_maps =
Assuming catchall is
a legitimate address (alias or user account) on your system, it will
receive all messages sent to nonexistent users. Be careful when using
luser_relay, since spammers often
launch dictionary attacks, where they try enormous lists of
addresses hoping to find a legitimate one at your site. If luser_relay is configured, it will catch all
of the spam.
Postfix provides multiple layers of security. One such layer is the option to permit most Postfix services to run within a chroot environment. The Unix chroot function allows a process to change its view of, and access to, its filesystem by changing its root directory to a new path other than the normal /.
The chroot feature is particularly beneficial for processes that must communicate with external, potentially hostile clients. If an attacker somehow manages to subvert the smtpd daemon, for example, the attacker gains only very limited access to the filesystem. Configuring for a chroot environment is an advanced Postfix feature that adds a layer of complexity that you or your administrators may not want to deal with. Generally, chroot is not needed, except for sites that use Postfix in a highly secure environment or on particularly exposed servers, such as dedicated firewall systems and bastion hosts.
All of the Postfix processes that use chroot change their root
directory to the directory specified in the queue_directory parameter, which is normally /var/spool/postfix. When a process runs
chrooted, the directory /var/spool/postfix/pid, for example, becomes
/pid to that process, and the
process cannot access any files other than those below its new
root.
To chroot individual components, edit your master.cf file. Change the fifth column to y. The chroot option is possible with all
components except the pipe, virtual, local, and proxymap services. In Example 4-1, chroot is enabled for
the SMTP clients and server.
Since chroot changes the environment of the process, all of the resources the chrooted daemon needs must be available below the new root directory. Unfortunately, the specific resources Postfix daemons might need depend on your platform. In general, Postfix might require resources that provide user information (/etc/passwd), name resolution configuration (nsswitch.conf or resolv.conf), timezone information, or shared libraries. Some platforms also require certain device files. There are platform-specific scripts that come with the Postfix distribution. They’re available in the examples/chroot-setup/ subdirectory below the main distribution directory.
Executing the correct script should be sufficient to set up the chroot environment on your system. If there is not a script for your platform, you may have to experiment a little to find everything you need. Consider all of the resources mentioned above and review the example scripts for other platforms. Watch your logs for error messages after you chroot a process. An entry like the following:
postfix/smtp[1575]: fatal: unknown service: smtp/tcp
shows that Postfix cannot determine what port the smtp service uses. This problem is fixed by
placing the /etc/services file into
the chroot, by copying it to /var/spool/postfix/etc/services. Other
symptoms show up in the log complaining of similar types of
problems.
If the normal Postfix log doesn’t give enough information, you may have to run a trace to see where the program fails. Look for tools such as truss , strace, and tusc on your system. These tools can be used to see where a service fails when it tries to run in a chroot. If you discover the failure is due to a missing component, copy the component into the chrooted environment. See the DEBUG_README file that comes with Postfix for instructions on attaching tracing tools to Postfix.
Once you have Postfix running in a chroot, you need to make sure you keep your chroot resources in sync with the normal system files. If your chroot requires /etc/passwd, for example, whenever the system /etc/passwd changes, the chroot version must be updated, too. Creating link files doesn’t work because symlinks cannot cross the chroot boundary, and hard links do not work across filesystems.
The Postfix distribution ships with a lot of documentation. Depending on your installation package, you
may or may not have all of the documents. You should have at least the
manpages and sample configuration files. The sample files are located in the
directory specified by the sample_directory parameter, which is usually the same directory in which
your main.cf file resides. All of
the Postfix parameters are documented in one or more of the sample
files.
When Postfix was installed, the manpages should have been installed in a sensible place on your system. If they are in a directory where your system expects to find them, you only have to type, for example:
$ man postfixto have the manpage displayed on your screen. If your system replies with an error message such as:
$ man postfix
No manual entry found for postfix.then either the pages are not installed or they are not in a
location your system expects to find them. Read the documentation for
your system to find out about setting your MANPATH variable or moving the manpages to a more standard
location for your platform.
There are many manpages for various Postfix commands, daemons, and lookup tables. All of the documentation is also available as HTML files. If the HTML files are not installed on your system, you can find them on the Postfix web site at http://www.postfix.org/. The online documentation always refers to the current release of Postfix.
The queue manager daemon qmgr is in many ways the heart of your Postfix system.[1] All messages, both outbound and inbound, must pass through the queue. It’s a good idea to understand the queue and how Postfix uses it in case you have to troubleshoot a problem.
The queue manager maintains five different queues: incoming, active, deferred, hold, and corrupt.
Postfix uses a separate directory for each queue below the path specified
in the queue_directory parameter. By default the path is /var/spool/postfix, which gives you a directory
structure like the following:
/var/spool/postfix/active /var/spool/postfix/bounce /var/spool/postfix/corrupt /var/spool/postfix/deferred /var/spool/postfix/hold
The qmgr daemon running in the background handles most of the queue management tasks automatically. The commands postsuper and postqueue are used by administrators for manual queue management tasks. This chapter looks at how qmgr and the command-line tools work, as well as Postfix parameters that affect the queue.
[1] You may see references to nqmgr in older configuration files and documentation. Earlier Postfix versions shipped with two queue manager daemons, qmgr and nqmgr. The original qmgr was replaced by the current one, which has a better scheduling algorithm. nqmgr was the name of the current queue manager daemon while it coexisted with the original. Once it was ready for promotion as sole queue manager for Postfix, it was renamed qmgr.
Figure 5-1 illustrates how messages move through the queue. The
incoming queue is where messages first enter Postfix. The queue manager
provides protection for the queue filesystem through the queue_minfree parameter. The default value is 0. You can make sure the
disk that stores your queue doesn’t run out of space by setting a
limit.
From the incoming queue, the queue manager moves messages to the active queue and invokes the appropriate delivery agent to handle them. For the most part, if there are no problems with delivery, movement through the queue is so fast that you won’t see messages in the queue. If Postfix is trying to deliver to a slow or unavailable SMTP server, you may see messages in the active queue. Postfix waits 30 seconds to decide if a remote system is unreachable.
A message that cannot be delivered is placed in the deferred queue. Messages are deferred only when they encounter a temporary problem in delivery, such as a temporary DNS problem or when a destination mail server reports a temporary problem. Messages that are rejected, or encounter a permanent error, are immediately bounced back to the sender in an error report and don’t stay in the queue.
Messages in the deferred queue stay there until they are
either delivered successfully or expire and are bounced back to the
sender. The bounce_size_limit
parameter determines how much of a message that could
not be delivered is bounced back to the sender in the error report.
The default is 50,000 bytes.
Once a message has failed delivery, Postfix marks it with a timestamp to indicate when the next delivery attempt should occur. Postfix keeps a short-term list of systems that are down to avoid unnecessary delivery attempts. If there are deferred messages scheduled for a redelivery attempt, and there is space available in the active queue, the queue manager alternates between taking messages from the deferred and incoming queues, so that new messages are not forced to wait behind a large backlog of deferred ones.
Postfix periodically scans the queue to see if there are
deferred messages whose timestamps indicate they are ready for another
delivery attempt. Subsequent failed attempts at delivery cause
scheduled delays to double, so Postfix waits longer each time
before it attempts to deliver a message. You can configure the maximum
delay with the maximal_queue_lifetime parameter. When the time has expired, Postfix gives up
trying to deliver the message and bounces it back to the sender. By
default the period is five days (5d). You can set it to any length of
time, or to 0 to have undeliverable mail returned immediately.
Queue scans occur at an interval specified by the queue_run_delay parameter. By default the parameter is set to 1,000
seconds (1000s). With this setting, every 1,000 seconds, Postfix
checks the deferred queue to see if there are any messages due for
another delivery attempt.
The parameters minimal_backoff_time and maximal_backoff_time set minimum and maximum
time limits on how often Postfix attempts to redeliver deferred
messages. Each time a message is deferred, the queue manager increases
the amount of time it waits to attempt to deliver that message again.
The calculated increase of time is never allowed to exceed maximal_backoff_time (default 4,000 seconds)
and is never less than minimal_backoff_time (default 1,000
seconds). If you find that you have a large backlog of deferred
messages, you may want to increase the maximal_backoff_time so that Postfix doesn’t
expend system resources in trying to deliver messages to unavailable
servers.
The queue manager arranges for the delivery of messages by invoking the appropriate delivery agent. Postfix is careful not to overwhelm destination systems and provides several parameters to control resources for outgoing messages. For most situations the default settings are correct, but if you are experiencing resource problems or you are trying to optimize deliveries, you may want to experiment with the queue manager configuration.
Outgoing messages might be delivered over any of the transports
available in the master.cf
file. Each transport can have a limit on its total
number of processes, specified in the maxproc column (see Section 4.5). If a value is not
specified there, Postfix uses default_process_limit for its limit.
The initial_destination_concurrency parameter limits the number of messages initially sent
(default is five). You can increase the value, but it can’t go higher
than the maxproc value or default_process_limit for the transport
used. After the initial delivery of messages, if there are more
messages in the queue for a particular destination, Postfix increases
the number of concurrent delivery attempts, as long as it doesn’t
detect any problem from the destination system at the current load.
Postfix continues to increase the number of simultaneous deliveries up
to the number specified in the default_destination_concurrency_limit
parameter, which is 20 by default. In general, you
don’t want to increase the concurrency limit, or you risk overwhelming
the receiving system.
You can override the default_destination_concurrency_limit value
for any transport by setting a parameter of the form
transport _destination_concurrency_limit. For example,
you can limit concurrent connections to external systems with the
parameter smtp_destination_concurrency_limit
, or limit local deliveries with local_destination_concurrency_limit
.
There are also parameters of the form
transport _destination_recipient_limit that control
how many recipients Postfix specifies for a single copy of an email
message. If a transport-specific parameter is not configured, it takes
its default value from default_destination_recipient_limit
. If the number of recipients for a message exceeds the
limit, Postfix breaks up the list of recipients into smaller groups of
addresses and sends separate copies of the message to each group of
addresses.
The corrupt queue is simply used to store damaged or otherwise unreadable messages. If a message is too damaged to do anything with it, Postfix places it here. If you want to investigate an issue, the problem message is available in this queue where you can view it manually, if necessary. Corrupt messages are very rare. If you have them, they may be a symptom of an underlying operating system or hardware problem.
Postfix can report certain errors by sending error messages to an administrator.
Postfix classifies errors for notification, as shown in Table 5-1. The notify_classes parameter in main.cf contains the list of error
classes that should generate error notices. By default
the parameter includes " resource” and “software” errors.
Each class of error can be configured to send the
notification to a particular email address, using parameters of the
form class _notice_recipient.
By default they all go to postmaster . Table 5-1
provides a list of possible error classes, along with the parameters
that indicate who should receive the error notices.
Error class | Description | Notice recipient parameter |
bounce | Send headers for all bounced messages. | |
2bounce | Send undeliverable bounced messages. | |
delay | Send headers of delayed messages. | |
policy | Send the transcript of any SMTP transaction when a message is rejected due to anti-spam restrictions. | |
protocol | Send the transcript of any SMTP transaction that had errors. | |
resource | Send notice that a message could not be delivered because of system resource problems. | |
software | Send notice that a message could not be delivered because of software problems. | |
If you would like to receive all problem notices, set the parameter as follows:
notify_classes = bounce, 2bounce, delay, policy, protocol, resource, software
Postfix provides command-line tools for displaying and managing the messages in your queue. The primary commands are postsuper and postqueue. You can perform the following tasks on messages in the queue:
Listing messages
Deleting messages
Holding messages
Requeuing messages
Displaying messages
Flushing messages
Each of the tasks, and the commands to accomplish them, are explained in the sections that follow.
The queue display contains an entry for each message that shows the message ID, size, arrival time, sender, and recipient addresses. Deferred messages also include the reason they could not be delivered. Messages in the active queue are marked with an asterisk after the Queue ID. Messages in the hold queue are marked with an exclamation point. Deferred messages have no mark.
You can list all the messages in your queue with the postqueue -p command. Postfix also provides the mailq command for compatibility with Sendmail. The Postfix replacement for mailq produces the same output as postqueue -p.
A typical queue entry looks like the following:
$ postqueue -p
-Queue ID- --Size-- ----Arrival Time---- -Sender/Recipient-------
DBA3F1A9 553 Mon May 5 14:42:15 kdent@example.com
(connect to mail.ora.com[192.168.155.63]: Connection refused)
kdent@ora.comSince this entry is not marked with either an asterisk or an exclamation point, it is in the deferred queue.
The postsuper command
allows you to remove messages from the queue. To remove the message in
the sample entry displayed above, execute postsuper with the -d
option:
# postsuper -d DBA3F1A9
postsuper: DBA3F1A9: removed
postsuper: Deleted: 1 messageIf you have a lot of messages to remove, you can clear out your
entire queue with the ALL
argument:
# postsuper -d ALL
postsuper: Deleted: 23 messagesThe ALL argument must be
capitalized. Be very careful when using the command, since it will
delete all queued messages without asking any questions.
Rather than deleting all of the queued messages or just one at a time, frequently you want to delete messages with a specific email address. Example 5-1 is a Perl script that provides a convenient way to specify an email address to delete particular messages from the queue.
#!/usr/bin/perl -w
#
# pfdel - deletes message containing specified address from
# Postfix queue. Matches either sender or recipient address.
#
# Usage: pfdel <email_address>
#
use strict;
# Change these paths if necessary.
my $LISTQ = "/usr/sbin/postqueue -p";
my $POSTSUPER = "/usr/sbin/postsuper";
my $email_addr = "";
my $qid = "";
my $euid = $>;
if ( @ARGV != 1 ) {
die "Usage: pfdel <email_address>\n";
} else {
$email_addr = $ARGV[0];
}
if ( $euid != 0 ) {
die "You must be root to delete queue files.\n";
}
open(QUEUE, "$LISTQ |") ||
die "Can't get pipe to $LISTQ: $!\n";
my $entry = <QUEUE>; # skip single header line
$/ = ""; # Rest of queue entries print on
# multiple lines.
while ( $entry = <QUEUE> ) {
if ( $entry =~ / $email_addr$/m ) {
($qid) = split(/\s+/, $entry, 2);
$qid =~ s/[\*\!]//;
next unless ($qid);
#
# Execute postsuper -d with the queue id.
# postsuper provides feedback when it deletes
# messages. Let its output go through.
#
if ( system($POSTSUPER, "-d", $qid) != 0 ) {
# If postsuper has a problem, bail.
die "Error executing $POSTSUPER: error " .
"code " . ($?/256) . "\n";
}
}
}
close(QUEUE);
if (! $qid ) {
die "No messages with the address <$email_addr> " .
"found in queue.\n";
}
exit 0; The hold queue is available for messages you would like
to keep in your queue indefinitely. Figure 5-2 shows the hold queue and how you can move messages into the hold
queue where they will not be delivered until you specifically remove
them or move them back for normal queue processing. To place the
example message into the hold queue, use the postsuper command with the -h
option:
# postsuper -h DBA3F1A9The queue entry now contains an exclamation point to show that the message is on hold:
-Queue ID- --Size-- ----Arrival Time---- -Sender/Recipient-------
DBA3F1A9 ! 553 Mon May 5 14:42:15 kdent@example.com
(connect to mail.ora.com[192.168.155.63]: Connection refused)
kdent@ora.comTo move the message back into the normal queue for
regular processing, execute the command with a capital -H option instead:
# postsuper -H DBA3F1A9After the message is moved back, the queue manager marks it for redelivery according to its normal scheduling, or you can flush the message to have it sent out immediately (see Section 5.2.6).
If you have messages that were deferred because of a
configuration problem that has been corrected, you may have to requeue
the messages to have them delivered successfully. If the
misconfiguration caused Postfix to store incorrect information about
the next hop or transport method, or to rewrite the address
incorrectly, requeuing causes Postfix to update the incorrect
information based on your new configuration. The postsuper command uses the -r
option to requeue messages. You can specify a queue ID for a single
message, or the word ALL in capital
letters to requeue everything:
# postsuper -r ALLRequeued messages get a new queue ID and an additional Received: header.
The postcat command displays the contents of a queue file:
# postcat -q DBA3F1A9Earlier versions of postcat
did not support the -q option but
required the full path to the queue file. Since a message can be in
any of the queue compartments (maildrop, incoming, active, deferred,
hold), and each of these has multiple subdirectories, the path to a
particular queue file is not immediately apparent. If you are using an
earlier version of postcat, which
doesn’t support the -q option, you
can create a shell script like the one in Example 5-2 as a convenient way to
view a queue file by specifying only the queue ID. The script accepts one queue ID as an
argument, checks all of the queue directories to locate the queue
file, and executes postcat with the
full path as its argument. The contents are then displayed. This
simple script displays only one queue file at a time.
#!/bin/sh
PATH=/usr/bin:/usr/sbin
QS="deferred active incoming maildrop hold"
QPATH=`postconf -h queue_directory`
if [ $# -ne 1 ]; then
echo "Usage: pfcat <queue id>"
exit 1
fi
if [ `whoami` != "root" ]; then
echo "You must be root to view queue files."
exit 1
fi
if [ ! -d $QPATH ]; then
echo "Cannot locate queue directory $QPATH."
exit 1
fi
for q in $QS
do
FILE=`find $QPATH/$q -type f -name $1`
if [ -n "$FILE" ]; then
postcat $FILE
exit 0
fi
done
if [ -z $FILE ]; then
echo "No such queue file $1"
exit 1
fiFlushing the queue causes Postfix to attempt to deliver messages in the queue immediately. You can flush queue messages with the postqueue -f command. However, unless you have a reason to expect successful deliveries, it’s best to leave redelivery attempts to the Postfix queue manager. Repeated attempts to flush the queue can have a severe performance impact on your mail server.
You can flush messages destined for a particular site with the
-s option. The site must be eligible for fast
flush in order for this to work. To be eligible, the site
must be listed in the fast_flush_domains parameter. By default, fast_flush_domains includes all of the hosts
listed in relay_domains , but you can add additional sites if you want to flush
them before the normally scheduled redelivery attempt.
fast_flush_domains = $relay_domains example.com
If you know that a previously unavailable, eligible site is
ready to accept mail, execute postqueue with the -s option and name the site:
# postqueue -s example.comSee Chapter 9 for more information about fast flush and the SMTP command ETRN.
The Domain Name System (DNS) is a vast distributed database whose main job is to map hostnames to IP addresses. It also has an important role in email routing. In this chapter we’ll look at how MTAs in general use DNS and some of the DNS issues that relate to Postfix and its configuration. Keep in mind that there are two important aspects to your mail servers and DNS:
For sending mail, the system running your Postfix mail server must have access to a reliable DNS server to resolve hostnames and email-routing information.
For receiving mail, your domains must be configured correctly to route messages to your mail server.
Misconfiguration of DNS servers is a common source of problems in setting up email servers.
At one time, hostname to IP address mapping was handled by one large, centrally managed text file that contained an entry for every host accessible on the Internet. Each site downloaded a copy of the file periodically to get the latest hostname information. That scheme quickly became unwieldy, and the DNS service was conceived. It was defined in RFC 882 in 1983, and introduced two key ideas: the data is distributed and the naming of hosts is hierarchical. Making the data distributed means that every site updates its own information, and the updates become available almost immediately. Hierarchical naming prevents hostname conflicts and gives us the current domain-naming system that we are all very familiar with today. Each site obtains at least one domain name, and all of the hosts at that site are named by prefixing the simple hostname to the site’s domain name. For example, a site that controls the domain name example.com might have any number of hosts with names like server1.example.com, hp4100.example.com, or www.example.com.
Each domain has at least two domain nameservers that are considered authoritative for the domain. Authoritative nameservers should have direct access to the database that contains all the information about a domain.
The data is comprised of different types of records called resource records . Different resource records provide different kinds of information, such as IP addresses, nameservers, hostname aliases, and mail routing. The resource records you need to know about for this discussion are the following:
The mapping of names to IP addresses is handled by A records. These records contain a hostname and its IP address. The names that people use to refer to hosts have to be converted to IP addresses used for Internet routing. A records provide this name-to-address translation.
Some hostnames are aliases that point to other hostnames, rather than to IP addresses. This can be useful for directing requests to services (such as HTTP or POP) that might reside on systems generally known by a different name. The CNAME record provides the “real,” or canonical, name that an alias hostname points to. For example, an administrator might publicize the hostname http://www.example.com, which is really a CNAME record pointing to server1.example.com most of the time. But during periods of maintenance on server1.example.com, for example, http://www.example.com could temporarily point to server2.example.com.
MX records provide mail-routing information. They specify mail exchangers for domains—that is, the names of the mail hubs that handle all the mail for a domain name. The MX records tell MTAs where to send messages. Since a domain can have multiple mail exchangers, MX records include a preference value to designate the order of priority when selecting a mail exchanger to deliver messages to.
PTR records provide a reverse lookup of IP addresses to hostnames. These records normally match up with A records, so that forward lookups of hostnames return an IP address whose reverse lookup returns the hostname. However, many hostnames can point to the same IP address, so PTR records should map back to the canonical name associated with the IP address. Some applications use PTR records as a form of authentication to make sure that a connecting client’s IP address maps to the expected hostname.
Let’s consider for a moment one way that email routing
might work. A user horatio in the domain
example.com has a workstation named denmark. He could receive mail by using the
email address horatio@denmark.example.com. An
MTA with a message to deliver would simply look up the IP
address for denmark.example.com and deliver it to
that system for the user horatio. This scenario
requires that Horatio’s workstation is always turned on, that it has a
functional MTA running at all times to receive messages, and that it is
accessible by unknown MTAs from anywhere on the Internet. Rather than
manage hundreds or thousands of MTAs on workstations and expose them to
the Internet, nearly all sites make use of mail hubs that receive all
the mail for a domain. MTAs such as Postfix need a way to determine
which host or hosts are the mail hubs for a domain. DNS MX records provide this information.
A mail exchanger either delivers mail it receives or forwards it to another mail system. A domain may have multiple mail systems for reliability, and therefore multiple MX records. Generally, one host is the primary mail server and the others serve as backup or secondary mail servers. Each MX record in DNS contains a preference value that orders mail systems from most preferred to least preferred.
BIND is one of the most common DNS server applications. (O’Reilly’s DNS and BIND by Paul Albitz and Cricket Liu fully explains the DNS system and documents the BIND software.) A simple BIND configuration file for the domain http://example.com looks like the following:
example.com. IN SOA ns.example.com. kdent.example.com. (
1049310513
10800
3600
604800
900 )
;
; Nameservers
;
example.com. IN NS ns.example.com.
;
; Host Addresses
;
example.com. IN A 192.168.100.50
server1.example.com. IN A 192.168.100.220
ns.example.com. IN A 192.168.100.5
mail1.example.com. IN A 192.168.100.50
mail2.example.com. IN A 192.168.100.54
mail3.example.com. IN A 192.168.100.123
;
; Mail Exchangers
;
example.com. IN MX 10 mail1.example.com.
example.com. IN MX 20 mail2.example.com.
example.com. IN MX 30 mail3.example.com.
;
; CNAME Records
;
pop.example.com. IN CNAME mail1.example.com.
www.example.com. IN CNAME server1.example.com.For this discussion, we’re primarily interested in the mail exchanger records:
example.com. IN MX 10 mail1.example.com. example.com. IN MX 20 mail2.example.com. example.com. IN MX 30 mail3.example.com.
The domain name is in the first column. The second column indicates that the entries are Internet class records, and the third indicates that they are mail exchanger resource records. The last column shows the mail exchanger host, and the second-to-last column shows its preference value. Preference values can be any number between 0 and 65,536, and a lower value indicates a more preferred host. The numbers are meaningful only in relation to each other and can be anything within the allowed range. By convention, most administrators create priority values in multiples of 10, which allows some flexibility for inserting or temporarily rearranging preferences.
In our simple example above, mail1.example.com receives all the mail for the domain http://example.com. In this case, all mail must eventually arrive at mail1.example.com. When an MTA has to deliver a message to a user at the domain example.com, it retrieves all of the MX records and sorts them in order of priority. It first attempts delivery to mail1.example.com. If mail1.example.com is available and accepts the message, the delivery is finished; however, if for some reason mail1.example.com is not available to accept the message, the MTA continues down the list until it finds a mail exchanger able to accept the message. If a secondary mail exchanger accepts a message, it takes the responsibility of delivering it to a more preferred mail server (possibly the primary) when the unavailable server comes back online.
If no MX records are found for a domain, an MTA checks to see if there is an A record associated with the domain name itself. If there is an A record, the MTA attempts delivery to the system at that IP address.
This mail-routing scheme seems simple enough, but it does get
slightly more complicated. Consider an example where the MTA on
mail2.example.com receives a message for
ophelia@example.com. Presumably,
mail1.example.com is offline, since mail2 received the message. The MTA running on
mail2.example.com gets the list of mail exchangers
for example.com, determines that the message should
go to mail1.example.com, and discovers that
mail1 is not available. The next mail
exchanger on the list is itself. Delivery to itself doesn’t really make
sense. So, the next mail exchanger in line is
mail3.example.com. The MTA could deliver the
message there, but mail3 will go
through the same process and immediately try to hand the message back to
mail2, creating a mail loop. (MTAs
actually resolve hostnames to IP addresses for comparisons, since MX
hosts might have multiple A records. Postfix compares the IP address to
its list of addresses in inet_interfaces and proxy_interfaces.)
The solution is that when an MTA gets the list of mail exchangers
and discovers itself among them, it discards its own record plus all
other mail exchangers with an equal or less preferred priority (higher
number). For our example, the host mail2 eliminates itself and mail3, thus reducing the list of mail
exchangers to only mail1. Since
mail1 is not available and mail2 has no other options for delivery, it
queues the message and makes the delivery when mail1 comes back online.
In order for mail routing to work successfully, you should be very careful when setting up MX records. In particular, you should observe the following rules for MX records in your DNS configuration:
The mail exchanger pointed to by the MX record must be a hostname with a valid A record. Once an MTA has determined which host should receive the mail, it has to be able to find that host.
The host pointed to by an MX record should not be an alias (CNAME record). Under normal circumstances, an MTA knows itself by its canonical name and looks for that name when checking the list of mail exchangers to prevent mail loops. The server must be able to find itself, so make sure that you list the canonical name in the MX record, or you risk creating a mail loop. Even if an MTA accommodates CNAME records (by looking up and using the canonical name), using them causes inefficiencies in mail delivery.
List a hostname rather than an IP address for mail exchangers. While you may get by with a bare IP address, RFC 974 states that you must use a name of a host. Future changes (IPv6, for example) might cause bare IP addresses to break mail routing.
Leaving out the preference value for MX records may have different effects, depending on your DNS server and MTA. At best, the problem creates ambiguity; at worst, it can prevent mail delivery.
When sending mail, Postfix uses system resolvers, which are programs or libraries that make requests for DNS information. To receive mail, the DNS for your domain must be configured to route messages to your Postfix server. This section looks at DNS issues both for sending and receiving mail.
The Postfix SMTP delivery agent must be able to obtain IP address and MX records for mail-routing information. Postfix must make at least two DNS lookups: one to get the MX hostname and one to get the IP address for that hostname. Since Postfix uses the normal operating system resolver libraries for its DNS queries, the system that runs Postfix must have access to a DNS server. The DNS server does not have to be on the same system, although for most circumstances it should be.
If your system does not seem to be resolving domain names correctly, there are three common command-line tools that you can use to troubleshoot the problem: nslookup , dig, and host. You should check your system documentation to see which of these tools is available on your server and how to use them. You can use these tools to query all types of resource records for a domain, including the MX record that Postfix needs in order to successfully deliver mail to a domain.
DNS problems might stem from your own system’s configuration or a problem with the DNS server configuration for the domain Postfix is trying to send mail to. When you are troubleshooting a problem, it is very important to remember that Postfix first looks for MX records and not A records. Even if you can resolve a domain to an IP address, Postfix may not be able to deliver mail for that domain if there is a problem in retrieving MX information.
When delivering mail, Postfix performs a DNS lookup to retrieve all of the MX records for the destination domain. It sorts them in order of preference and tries each one in priority order. Once Postfix has established a connection with an SMTP server, the server replies to Postfix requests with a status code. Codes within the 2xx range indicate that everything is okay. Error codes in the 4xx range indicate a temporary problem, and those in the 5xx range indicate a permanent problem. See Chapter 2 for more information on SMTP reply codes.
To provide compatibility with Sendmail, Postfix, by default,
treats SMTP servers that respond with 4xx or 5xx reply codes as if
the servers had not responded at all. If you prefer that Postfix
react to the error codes returned by the MX server rather than
ignore them, set the smtp_skip_5xx_greeting and smtp_skip_4xx_greeting parameters:
smtp_skip_4xx_greeting = no smtp_skip_5xx_greeting = no
If smtp_skip_4xx_greeting
is set to no, and Postfix
attempts delivery to a mail exchanger that responds with a 4xx code,
it does not try any more mail exchangers for the destination domain.
It queues the message and attempts delivery later.
If smtp_skip_5xx_greeting
is set to no, and Postfix
attempts delivery to a mail exchanger that responds with a 5xx code,
it does not try any more mail exchangers for the destination domain.
It bounces the message back to the sender.
Some domains have MX records set to equal preference
values. By default, the Postfix SMTP client randomly shuffles MX
addresses of equal preference. You can change the default behavior
by setting the smtp_randomize_addresses parameter:
smtp_randomize_addresses = no
Setting this parameter causes Postfix to attempt delivery to the MX servers in the same order it retrieved them.
Due to the prevalence of spam, many sites now require that connecting clients have valid PTR records associated with their IP addresses. Your Postfix system’s IP address should have a reverse PTR mapping to a hostname that returns the same IP address to ensure that you can deliver to all mail servers.
For Postfix to accept email for a particular domain, the system must be specified as an MX host in the domain’s DNS setup, and Postfix must be configured to accept mail for the domain. Postfix accepts mail for domains that are either local to the system, relay domains, or virtual domains. Virtual domains might use virtual aliases or virtual mailboxes (see Chapter 8). Each type of domain must be listed in a different Postfix parameter, as shown in Table 6-1.
Domain type | Parameter |
Local | |
Relay | |
Virtual mailboxes | |
Virtual aliases | |
Do not list a domain in more than one of the parameters. Postfix issues a warning if it detects a domain listed in two of the parameters. The error message “mail for example.com loops back to myself” occurs when the DNS configuration points to your mail server, but Postfix has not been configured to accept mail for the domain.
If your Postfix server accepts mail for the two local domains
example.com and
porcupine.org, then the mydestination parameter should look like the
following in your main.cf
file:
mydestination = example.com, porcupine.org
Chapter 9 explains configuration of relay domains. Chapter 8 covers virtual mailbox and virtual alias domains.
The following error messages in the mail log files indicate host lookup problems:
domain loops back to
myselfThis is one of the most common errors related to DNS. It
happens when you have configured your Postfix server as an MX host in your DNS server, but
you have not told your Postfix server that it is the final
destination for the domain. Add the domain in question to the
mydestination parameter, or
configure it as a virtual domain or a relay domain. If your
Postfix server is behind a proxy or NAT device, it may not realize
that it is an MX host for the domain. In that case, add the proxy
device’s IP address to proxy_interfaces. Log entries for this
error resemble the following:
postfix/qmgr[3981]: 2CC3B229: from=<heloise@ora.com>, \
size=306, nrcpt=1 (queue active)
postfix/smtp[3983]: warning: mailer loop: best MX host for \
example.com is local
postfix/smtp[3983]: 2CC3B229: to=<abelard@example.com>, \
relay=none, delay=0, status=bounced (mail for example.com \
loops back to myself)The domain’s DNS configuration has no MX records and there is no A record for the domain itself. You will have to contact an administrator of the domain to fix the problem. For your own domains, be sure they all include MX records pointing to your mail server. Log entries for this error resemble the following:
postfix/qmgr[3818]: D31CD20F: from=<heloise@ora.com>, \
size=312, nrcpt=1 (queue active)
postfix/smtp[3824]: D31CD20F: to=<abelard@example.com>, \
relay=none, delay=1, status=bounced (Name service \
error forname=example.com type=A: Host found but \
no data record of requested type)domain has a valid A
recordThe domain’s DNS configuration has MX records, but lookups for the IP addresses fail. You will have to contact an administrator of the domain to fix the problem. For your own domains, be sure that any hosts you specify as MX hosts are valid and have correct A records. Log entries for this error resemble the following:
postfix/qmgr[3818]: 068DB20F: from=<heloise@ora.com> \
size=306, nrcpt=1 (queue active)
postfix/smtp[3846]: warning: no MX host for example.com has
a valid A record
postfix/smtp[3846]: 068DB20F: to=<abelard@example.com> \
relay=none, delay=1, status=deferred (Name service \
error for name=mail.seaglass.com type=A: Host not found)The DNS query produced no answer. Either the DNS server is not reachable, or it is broken. Assuming the DNS server for this domain is up and working correctly, this error message could be due to a networking problem, or perhaps your system’s resolver is misconfigured. Check over the documentation for the nsswitch.conf and resolv.conf files on your platform. Be sure that your system is resolving DNS queries correctly, using one of the tools mentioned earlier in the chapter, before trying to troubleshoot the problem with Postfix. Log entries for this error resemble the following:
postfix/qmgr[3818]: CCBED1E8: from=<heloise@ora.com> \
size=306, nrcpt=1 (queue active)
postfix/smtp[3937]: CCBED1E8: to=<abelard@example.com> \
relay=none, delay=1, status=deferred (Name service error \
for name=example.com type=MX: Host not found, try again)If you are running Postfix in a chrooted environment, there are several configuration files related to DNS that must be within the chrooted compartment. See Chapter 4 for more information on running Postfix within a chroot.
Chapter 1 explained that POP and IMAP are protocols that deal with how users retrieve their email messages from message stores. Postfix is a mail transfer agent and does not implement POP or IMAP. This chapter looks at how Postfix delivers messages and how they are read by POP/IMAP servers. There are many POP/IMAP servers available, and the information presented here should be applicable to any standards-conforming server. The last part of this chapter deals with configuring Postfix to work with the Cyrus IMAP server. Before we look at local delivery, we’ll first discuss more broadly the different delivery transports Postfix uses. Transports other than local are discussed in subsequent chapters.
Postfix offers delivery for four different classes of recipient addresses: local, relay, virtual alias, and virtual mailbox. How you configure the domains you accept mail for determines the delivery method used by Postfix. The following are the delivery transports used by Postfix:
Delivers mail on the local system. Each address has an account on the
system or comes from the local aliases file (historically
/etc/aliases). Delivered
messages go to the system’s mail spool or mail files in individual
home directories. Deliveries are handled by the local delivery
agent or passed to a custom delivery program. Lists local domains
in the mydestination
parameter.
Delivers mail to other systems, usually on the same
network. Relay domains are generally configured on gateway systems
when Postfix accepts mail for an entire network. The gateway
system relays messages to the correct internal mail system.
Deliveries are handled by the relay transport, which is simply a
clone of the smtp agent, but it
is optimized for making deliveries to internal systems on a local
network. Lists relay domains in the relay_domains parameter. Mail relaying
is discussed in Chapter
9.
Delivers mail for virtual mailbox domains. Virtual mailbox domains are
used for hosting multiple domains using a separate mail spool that
contains mailboxes for many separate domains. Email users
typically do not have system accounts on the mail server. Lists
virtual mailbox domains in the virtual_mailbox_domains parameter.
Virtual hosting is discussed in Chapter 8.
Deliveries to nonlocal domains are handled by the smtp transport. It determines where to deliver messages for any nonlocal domain through DNS lookups. Virtual alias addresses are resubmitted to Postfix for delivery to the new address, at which point they’ll be handled by one of the above transports.
The rest of the chapter discusses the details of local delivery.
When Postfix makes local deliveries it transfers the contents of messages to the local message store. The most common types of message stores are the traditional mbox format and the newer maildir style. Both use regular files to store messages, but they are structured in different ways. In Postfix, you specify maildir style by including a trailing slash when you configure any mail file or directory parameters (see configuration information later in this chapter).
Historically, Unix systems have used a single file to
store each user’s email messages. This type of message store format is
commonly referred to as mbox. Each message
within the file starts with a line that begins with the word From. It is important that the string start
on the first character of the line, and that there is a space after
the end of the word. The From line is commonly referred to as From_ with an underscore character to
indicate the space following the word. Don’t confuse the From_ line used for separating messages
within an mbox file with the From:
line included in email message headers. The last line of a message is
always a blank line.
A complete From_ line looks
like the following:
From jmbrown@example.com Sun Feb 3 16:54:01 2002
As described, the line starts with the word From followed by a space. Following the
space is an email address that is usually the envelope address of the
message. Following the envelope address is the date of delivery in the
common Unix date format occupying 24 characters. The mbox format
allows for an optional comment string following the date, but it is
generally not used.
When Postfix delivers a message to an mbox file, it first
creates the From_ line using the
envelope sender and the current date. Postfix then copies the contents
of the delivered message into the mbox file. If Postfix encounters any
lines that begin with From followed
by a space, it has to quote them by adding a > to the beginning of the line, so that
they won’t be confused with the start of the next message.
When a POP/IMAP server reads messages from the mbox file, it
scans the file, looking for From_
lines, which mark the beginning of each message. It can read to the
next From_ line (or the end of the
file) to know when a message is finished. The POP/IMAP server may
unquote any of the “>From” quoted lines, or they may remain in the
quoted form.
Since both Postfix and the POP/IMAP servers access the mailbox file, they must use file locking. Postfix must obtain an exclusive lock on the file when it is delivering a message, so that it can write the message to the file. Postfix offers a variety of locking mechanisms, depending on the platform. You can use the postconf -l command to see which mechanisms Postfix can use on your system:
$ postconf -l
flock
fcntl
dotlockIf you want more information about the locking types listed by Postfix on your system, check your system’s man pages for the specific lock name:
$ man flockThe dotlock type, which should be available on all systems, is
probably not documented on your system, because it is not a function
of the operating system or supporting libraries as flock and fcntl are. The
dotlock is simply a file. The lock
file name is made up of the name of the file to be locked with a
.lock extension appended to it. If
such a lock file exists, then Postfix knows that another process is
using the mail file. If the file does not exist, Postfix creates it to
signal other processes that it is using the file. When Postfix is
finished, it removes the lock file, making the mail file available
again. The drawback of dotlock
locking is that it is susceptible to stale locks, and it is not very
efficient.
For the most part, you do not need to worry about locking, and the lock types available, because Postfix does a good job of figuring out the best option.
The maildir mailbox format differs from mbox in that it uses a structure of directories to store email messages. It was designed to solve some of the reliability and locking problems of the mbox format. For example, if a system crashes at the instant an email message is being delivered to an mbox file, it is possible that the message will be truncated at the point where the delivery was interrupted. When the system comes back online, the mail transport agent will attempt to deliver the message again. The partially written message at the bottom of the mbox file may cause problems when the next message is appended to the file.
Other problems can occur if a POP/IMAP server tries to access the mbox file at the same time as the SMTP server. If the programs do not use the same locking mechanism, the mail file will most likely be corrupted. There are several possible mail file locking mechanisms (see above), which are not necessarily used by all mail programs. With the maildir format, no locks are necessary because each message gets its own file. Different mail processes do not need access to the same files at the same time.
A maildir-style directory has three subdirectories, which must all be on the same filesystem: tmp, new, and cur. These subdirectories are usually below a mail directory in a user’s home directory:
$ ll /home/kdent/maildir
total 12
drwxr-x--- 2 kdent kdent 4096 Mar 13 12:24 cur
drwxr-x--- 2 kdent kdent 4096 Mar 13 12:24 new
drwxr-x--- 2 kdent kdent 4096 Mar 13 12:24 tmpFiles in the new directory are messages that have been delivered but
have not yet been read. The modification time of the file is the
delivery date of the message. The file usually contains the message in
RFC 2822 format, and no From_ line
is needed.
Once a message has been viewed, it is moved to the cur directory. The tmp directory is used during message delivery to store the contents of a file before it can be confirmed to have been written to the new directory.
There is no simple answer to help you decide which type of mailbox format is best for you. The mbox format has the advantage of being almost universally supported, but has the file-locking problems that prompted the development of the maildir format. On the other hand, there are concerns about the ability of the maildir format to scale to handle large numbers of messages on some filesystems. There are performance arguments to support both formats: locating and accessing or deleting a particular message is probably quicker with maildir, but delivery by simply appending the text of a message to the end of a single file is probably quicker in the mbox format. Your choice will most likely be driven by your selection of a POP/IMAP server. If you settle on a POP/IMAP server that requires the maildir format, the choice is made for you. Postfix easily supports either format, so you can safely allow other considerations to drive your decision. If you think it will be significant in your environment, you should run tests of both formats, simulating your own mail tasks as closely as possible.
All destination domains that should be handled by the
local transport should be listed in the mydestination parameter. You can list as many domains as you like, but
individual local users receive mail at all of the domains listed. For
example, if both ora.com and
oreilly.com are listed in mydestination, then messages to either
kdent@ora.com or
kdent@oreilly.com go to the same local
mailbox.
All local recipients should be listed in tables configured in
the local_recipient_maps parameter to avoid accepting messages for unknown users.
By default, local_recipient_maps is
set to the system password file and alias maps, so you normally don’t
have to make any changes. Once Postfix has determined that it is the
final destination for a message, and that the message should be
delivered locally, it has to decide what to do with the message.
Before looking for a user account that matches the local part of the email address, Postfix consults its alias maps (see Chapter 4). If there is a forwarding alias that matches the recipient address, Postfix resubmits the message as a new delivery, based on the forwarding information from the alias lookup. Otherwise, it tries to deliver the message to a user on the system. Postfix first checks for the existence of a .forward file for the local user, and may resubmit the message based on information there. If no .forward exists for the user, Postfix delivers the message to the user’s mailbox.
.forward files allow local users to set up their own aliases. The contents of the .forward file are the same as the righthand side of an alias entry. When an alias entry has multiple values on the righthand side, they are separated by commas; while .forward files use the same convention, they also allow multiple entries to be entered on multiple lines.
.forward files must be owned by the recipient, and are normally
found in users’ home directories. You can specify different locations
with the forward_path parameter. When specifying a path for the parameter, there are eight variables whose
values are expanded at delivery time:
$userRecipient username as specified in /etc/passwd
$homeRecipient home directory as specified in /etc/passwd
$shellRecipient shell as specified in /etc/passwd
$recipientThe complete recipient email address
$extensionAn optional extension of a local part of the recipient
address, separated by a delimiter such as the + character
$domainDomain from the recipient email address
$localComplete local part of recipient email address (includes extensions if any)
$recipient_delimiterDelimiter character from the recipient email address, if there is an extension
If you want to add support for a nonstandard .forward file, you could configure forward_path as follows:
forward_path = /home/$user/.forward /home/$user/other_forward
See the Postfix local manpage for more information on specifying paths with variable expansion.
When Postfix delivers to a command or file specified in alias files, it makes the delivery or
executes the command as the user who owns the alias file. The
exception is when the file is owned by root, in which case Postfix uses the account
specified in the default_privs
parameter. By default it is set to the account nobody . Aliases are discussed in Chapter 4.
When Postfix delivers a message to a local user, it
writes the message to the system’s message store. By default Postfix
uses the mbox format for deliveries. When you install Postfix, it
can normally figure out the default location of the mail spool
directory depending on the type of Unix system you have. The mail_spool_directory parameter can be used to specify a directory other than
the default. To change the directory to something other than the
default for your system, edit the main.cf file, and add or modify the
mail_spool_directory
parameter:
mail_spool_directory = /var/spool/mail
To cause Postfix to use the maildir format for delivery, append the directory with a trailing slash:
mail_spool_directory = /var/spool/mail/
Postfix can also be configured to deliver messages to mailboxes
within users’ home directories. Assign a relative path to the home_mailbox parameter to indicate which file should be used for
mailboxes:
home_mailbox = mbox
Append the path with a trailing slash to indicate that Postfix should use the maildir-style delivery:
home_mailbox = maildir/
This causes Postfix to deliver messages into a directory called maildir, below users’ home directories.
After Postfix has delivered a message, users need a way to read it. Many sites provide a POP/IMAP server for users to retrieve their email messages over the network. In most cases Postfix works seamlessly with POP/IMAP servers, so that no special configuration is required on either side.
The POP protocol works best when you have limited, or less than full-time, network access because it allows you to connect to your mail server, fetch all of your messages, and disconnect from the network. You now have local copies that you can read offline. Most POP clients have a configuration option to delete your messages from the server when you retrieve them, since you then have the local copies. If you don’t delete them at some time, the messages accumulate, taking up more and more space on your mail server. POP was designed to be easy to implement, but the major problem with the POP protocol is that if you ever work from more than one computer, your messages may not be where you need them. It also does not handle multiple mailboxes very well, and it forces you to download complete messages. There is no option to retrieve just the subject, for example, to decide if you want the complete message.
The IMAP protocol was designed to overcome some of POP’s shortcomings. It keeps all messages on the server. You have to be connected while working with your email messages, but you can manage them as if they were local. Since everything happens on the server, it doesn’t matter if you work from your desktop computer at home, another machine at work, and even on a laptop while traveling. IMAP still allows for saving messages locally, if necessary, and it also provides much more flexibility than POP. You can download just the headers from your messages and then decide to retrieve the rest of a message if you want to read it. You don’t have to be stuck downloading a huge message or attachment that you might not be interested in. You can maintain multiple mailboxes and folders on the IMAP server.
The cooperation between Postfix and POP/IMAP servers is
simple. When Postfix accepts delivery of an email message, it places
it in the message store. The POP/IMAP server simply retrieves messages
from the same store when a user requests them. Figure 7-1 shows how simple the
cooperation is between Postfix and POP/IMAP servers. Postfix and the POP/IMAP server must agree on the type
of mailbox format and the style of locking. Postfix should work with
any standards-compliant POP/IMAP server that uses one of the
traditional message stores. You may have to adjust the mail_spool_directory parameter, as described
earlier in the chapter, but for most POP/IMAP servers, you can simply
follow the standard installation instructions and start the server.
For POP/IMAP servers that don’t use a traditional message store,
Postfix can still deliver messages using the Local Mail Transfer
Protocol, which is discussed in the next section.
Some POP/IMAP servers use nonstandard message stores. Since it would be unreasonable to expect MTAs such as Postfix to understand many different proprietary formats, the Local Mail Transfer Protocol (LMTP) provides a way to pass email messages from one local mail service to another without depending on a common message store. LMTP is based on, and is a simplified version of, SMTP. With LMTP, the server can either accept an email message immediately or it cannot accept it at all. There is no attempt by the LMTP server to queue or redeliver a message that cannot be delivered immediately.
When an MTA makes a delivery to an SMTP server, where the message is destined for multiple recipients, and one or more recipients cannot accept the message for some reason, the SMTP server takes the responsibility of queuing the message to deliver it later, and reports an overall successful delivery to the MTA. LMTP servers do not queue messages, so they must return an individual status reply for every recipient of a particular email message. For those recipients that could not be delivered, the MTA, and not the LMTP server, takes the responsibility of queuing the message and attempting redelivery.
LMTP conversations can occur between mail subsystems on the same machine or on different machines on a local area network. It is not recommended for wide area networks, since the protocol depends on a quick response to indicate whether the message was delivered. With SMTP there is a recognized synchronization problem between sending and receiving mail systems that sometimes causes duplicate messages to be delivered. It is believed that LMTP over wide area networks would make the problem worse.
Apart from delivery to nonstandard message stores, a real benefit of the LMTP protocol is that it allows for a highly scalable and reliable mail system. One or more Postfix servers can receive mail from the public Internet and make deliveries to multiple LMTP backend systems. As the load increases, it is a simple matter to add more boxes to the front- or backend systems.
The most common implementation of LMTP delivery is the Cyrus IMAP server from Carnegie Mellon University. It is available from the Project Cyrus web page at http://asg.web.cmu.edu/cyrus/. Cyrus IMAP uses its own message store, as shown in Figure 7-2. This section looks at how Postfix can use the LMTP protocol to hand off messages to Cyrus IMAP. For more information about configuring Cyrus IMAP, see Managing IMAP by Dianna Mullet and Kevin Mullet (O’Reilly).
Cyrus IMAP is intended to run on servers that provide POP/IMAP access only, where users do not need a shell account. If you are creating a mail server for existing users on a system, you will probably want to use another simpler POP/IMAP solution, such as Qualcomm’s Qpopper (POP access only) or the University of Washington’s IMAP Toolkit, which doesn’t require any special configuration to work with Postfix. This section deals with configuration issues for getting Postfix to work together with Cyrus IMAP.
Cyrus IMAP can listen for LMTP deliveries using either Unix-domain sockets or TCP sockets. You must know which method you are using so that you can configure Postfix appropriately. If you want to use Unix-domain sockets, both Postfix and the Cyrus IMAP server must be on the same machine. If you use TCP sockets, the Cyrus IMAP server could be on the same system or any other system on your network. LMTP delivery is configured in your main.cf file or in a transport map.
For Postfix to accept messages to be delivered locally to Cyrus
IMAP, the destination domain name of the email address must be listed
in the mydestination parameter.
(You may also want to configure Cyrus deliveries via the virtual transport. See Chapter 8.) Then you must configure
Postfix to pass messages to Cyrus IMAP. Use the mailbox_transport, local_transport, or fallback_transport parameter to tell Postfix
how much local processing to do before handing off messages to Cyrus.
If you are using local_transport or
fallback_transport, make sure that
Postfix knows about all of the Cyrus users, by including the usernames
in a lookup table listed with the local_recipient_maps parameter.
mailbox_transportThe mail message is given to the local delivery agent first. The local delivery agent checks for and expands any aliases or entries in .forward files. After expansion of the original address, the message is delegated to the Postfix LMTP client, which delivers it to the LMTP server.
local_transportWhen you specify that the local transport should be LMTP, Postfix transfers the message directly to the Postfix LMTP client. The normal local delivery agent does not process the message at all, so there is no expansion of aliases or .forward files.
fallback_transportWhen the fallback transport is LMTP, Postfix gives the
message to its local delivery agent first. The normal aliases
and .forward files are
expanded, and if the recipient has a normal account on the
system, delivery is made to the appropriate mail store on the
system. If no such account exists, delivery is delegated to the
Postfix LMTP client for delivery to the LMTP server. If you have
actual accounts on the system that should receive email messages
in the conventional message store, and the rest of your email
users do not have system accounts but do receive mail through
the Cyrus IMAP server, you should configure the fallback_transport to use LMTP
delivery.
Specify your chosen transport type using the following format:
xxx_transport =service:socket_type[:/path/to/socket]
For LMTP delivery, service
must be lmtp, which refers to the
lmtp service in the /etc/postfix/master.cf file. The socket_type is either unix or
inet for Unix domain, or TCP sockets, respectively. The
default is inet, which means that
if your LMTP server uses an inet
socket, you can simply specify the service as:
local_transport = lmtp
A typical LMTP transport configuration in /etc/postfix/main.cf using local_transport and a Unix domain socket looks like the
following:
local_transport = lmtp:unix:/var/imap/socket/lmtp
To build Cyrus IMAP, you need the Cyrus SASL library, which is used to authenticate users for the IMAP server.[1] You must first build and install the Cyrus SASL library, and then you can build the Cyrus IMAP server. The Cyrus software requires at least Version 3 of Berkeley DB. If you were using a version of Berkeley DB prior to Version 3, you may need to update your entire system. Having different versions of Berkeley DB intermixed on your system will likely lead to problems that can be difficult to track down. If you have to upgrade your libraries, consider rebuilding other packages that use Berkeley DB (such as Perl and Postfix), so that everything on your system uses the same version of the library.
Follow the instructions in the Cyrus SASL and IMAP distributions to compile and install them correctly on your system. There might be binary distributions available for your platform. Check your normal software sources to see if you can save yourself the trouble of building the Cyrus software.
For this example, assume that you have a Postfix server
receiving mail for the domain example.com. All of
the email accounts are set up within the Cyrus IMAP server running on
the same system, so there are very few actual login accounts on the
system. However, you want mail destined for the root account or postmaster alias to be sent
to the correct person, which means that you need to expand local
aliases before handing off messages to the Cyrus IMAP server. To
achieve this, set the mailbox_transport parameter to point to the
lmtp delivery agent, which will be
configured to deliver mail to the Cyrus IMAP server:
Complete the installation and configuration of Cyrus IMAP on your system. Check the Cyrus configuration file (normally /etc/cyrus.conf) to make sure that it is configured to use Unix-domain sockets, and note the location of the socket file. You should see an entry that resembles the following:
SERVICES {
# add or remove based on preferences
imap cmd="imapd" listen="imap" prefork=0
pop3 cmd="pop3d" listen="pop3" prefork=0
# LMTP is required for delivery
lmtpunix cmd="lmtpd" listen="/var/imap/socket/lmtp" prefork=0
}The lmtpunix entry shows
the correct path to the socket file.
Follow the documentation that came with your package to add users to your Cyrus IMAP server.
Check the /etc/postfix/master.cf to make sure
that the lmtp service is set up
correctly. The line should look like the following:
lmtp unix - - n - - lmtp
If you have a default Postfix installation, the lmtp line will already be in the file,
as shown in the example. The fifth column indicates whether the
LMTP delivery agent should run within a chrooted environment. In
this example, the Postfix LMTP delivery agent must read the socket
file created by the Cyrus IMAP server, so leave this column with
the value n.[2]
Check the main.cf file
to make sure that the domain you are receiving mail for is listed
in the mydestination parameter.
It might be listed explicitly:
mydestination = $myhostname, localhost.$mydomain, $mydomain, example.com
or it might come from the $mydomain variable:
mydomain = example.com mydestination = $myhostname, localhost.$mydomain, $mydomain
Specify that the mailbox_transport parameter should use
the lmtp service from the
master.cf file, and point to
the Cyrus IMAP socket file whose path you determined from the
Cyrus configuration file (see item 1):
mailbox_transport = lmtp:unix:/var/imap/socket/lmtp
# postfix reload[1] It is the same library that is used to add authentication support for Postfix. See Chapter 12 for more information on adding SMTP authentication support to Postfix.
[2] It is possible to set up your system in such a way that allows the LMTP delivery agent to read the socket file even from within the Postfix chroot environment, but it is probably not necessary.
It is very common these days for a single system to host
many domains. For instance, http://oreillynet.com and http://onlamp.com might run on a single host, but act as
if they were two totally different hosts. A system usually has a canonical domain, which is considered its usual or common domain
name. Additional domains are configured as virtual domains. Each virtual domain can host services such as web
sites and email as if it were the only domain on a server. This chapter
explains several different mechanisms for hosting multiple domains. The
techniques are explained separately, but it is possible to mix techniques
if you must handle different domains in different ways.
To determine which technique or techniques you need, you must decide how Postfix should deliver messages for virtual domains. There are two important considerations that influence how you should configure Postfix for hosting multiple domains:
Should your domains have separate namespaces? For example, should mail for the two addresses info@ora.com and info@oreilly.com go to the same mailbox or separate ones? We’ll refer to the same mailbox scenario as shared domains, and the other as separate domains.
Does every user require a system account? We’ll make the distinction between system accounts that are real Unix accounts on your system and virtual accounts. With virtual accounts, users can have mailboxes on your server, but don’t otherwise log in to the system and don’t require an entry in /etc/passwd.
We’ll consider four different ways Postfix can handle mail for virtual domains:
Shared domains with system accounts
Separate domains with system accounts
Separate domains with virtual accounts
Virtual domains with a proprietary message store not managed by Postfix
Your POP/IMAP server will be a major factor in deciding which technique you need. If your POP/IMAP server does not understand virtual domains, then it will most likely require that you have system accounts for all addresses. Some POP/IMAP servers inherently support multiple domains, and deliver messages into a particular directory structure on the local filesystem. Other POP/IMAP servers use their own proprietary message store. Postfix can hand off messages to them using LMTP.
Regardless of the technique you use, all of your virtual domains must be configured correctly in DNS. You should configure DNS for virtual domains the same way you do for your system’s canonical domain. See Chapter 6 for information on Postfix and DNS.
Accepting mail for multiple domains where every user can receive mail for
every domain is the simplest configuration of virtual domains. Simply
add your virtual domains to the mydestination parameter. Create user accounts as you normally would,
and they can start receiving mail addressed to any of the domains. This
technique uses the local delivery agent, providing all of the same
features as your normal canonical domain hosting. Users can create their
own .forward files, and local
aliases are available. On a system whose canonical name is http://oreillynet.com, hosting two
virtual domains, http://ora.com and http://oreilly.com, the mydomain parameter is set as if http://oreillynet.com were the only
domain, and mydestination is set as
follows:
mydomain = oreillynet.com mydestination = $myhostname, $mydomain, ora.com, oreilly.com
Make sure you reload Postfix after making changes. Users can now
receive mail at any of the domains you listed in mydestination:
# postfix reloadMessages addressed to either info@ora.com or info@oreilly.com all go to the same local user account.
If you require separate namespaces for each of your virtual domains, the
configuration is only slightly more complicated. With separate domains, mail to
info@ora.com should go to a different mailbox than
mail to info@oreilly.com. In this case, do not list
the additional domains in the mydestination parameter. Instead, use virtual_alias_domains :
virtual_alias_domains = ora.com, oreilly.com
You must create a user account for every email address that will receive messages on your system. Your system accounts do not have to match the email addresses in any way, since you will be mapping the addresses to the accounts separately, but each account must be unique. If your platform supports long usernames, a good way to create unique account names, and to avoid confusion about which accounts are meant to receive mail at which domains, is to use the domain name itself as part of the account name. One possible naming convention is to create accounts such as info.ora.com and info.oreilly.com.
Once Postfix knows which domains to accept mail for, and you have
accounts for each address, use virtual_alias_maps to map the email addresses to the accounts you create. In
main.cf, point the virtual_alias_maps parameter to the virtual alias lookup file. In this example, the file
/etc/postfix/virtual_alias is
used:
virtual_alias_maps = hash:/etc/postfix/virtual_alias
The /etc/postfix/virtual_alias file contains entries with the email addresses pointing to the system accounts you created, plus any non-local forwarding you need:
info@ora.com helene@localhost info@oreilly.com frank@localhost kdent@oreilly.com kyle.dent@onlamp.com
Whenever you create or update a virtual aliases file, don’t forget to execute the postmap command on the file:
# postmap virtual_aliasIf helene and frank plan
to send messages from the system, you may also want to set up canonical
maps so that their outbound messages show the correct sending addresses.
Assign a lookup table like the following to canonical_maps :
helene info@ora.com frank info@oreilly.com
And remember to execute postmap against the file:
# postmap canonicalThe drawback for the techniques so far is that you must maintain system accounts for all email addresses on your server. As the number of domains you host increases, so does the effort to maintain all the accounts. In particular, if users only receive email at your server, and don’t otherwise log in, you probably don’t want to have to create system accounts for each one. Instead, configure Postfix to deliver to a local message store where each virtual email address can have its own mailbox file. Your users then retrieve their messages through a POP/IMAP server.
The local message store works much like normal local delivery, but
it doesn’t require a one-to-one correspondence between each mail file
and a local user account. For this configuration, list each virtual
domain in the virtual_mailbox_domains
parameter:
virtual_mailbox_domains = ora.com, oreilly.com
If you have many domains, you can list them in a file and point
virtual_mailbox_domains to the
file:
virtual_mailbox_domains = /etc/postfix/virtual_domains
The file /etc/postfix/virtual_domains then contains a line for each domain:
# # /etc/postfix/virtual_domains # ora.com oreilly.com
Virtual domains listed in virtual_mailbox_domains are delivered by the
virtual delivery agent, which is actually a streamlined
version of the local delivery agent. It makes deliveries in a highly
secure and efficient manner, but local aliases, .forward files, and mailing list programs are
not available. You can make use of the virtual_alias_maps parameter that you saw
earlier in the chapter to accomplish aliasing, and we’ll look at a
technique to accomplish delivery to programs later in this
chapter.
When setting up the virtual mailboxes, you should structure the directories to accommodate the expectations of your POP/IMAP server. Let’s assume for this explanation that the virtual mailboxes are all located below the base directory /usr/local/vmail. Each virtual domain has its own subdirectory below that, so that you have directories like the following:
/usr/local/vmail/ora.com /usr/local/vmail/oreilly.com
This is a common configuration for POP/IMAP servers that support
virtual hosting. Below each domain subdirectory are the mail files for
each user. Indicate to Postfix the base directory of the mail store with
the virtual_mailbox_base parameter:
virtual_mailbox_base = /usr/local/vmail
You must create a lookup file that maps email addresses to their
mailbox files. Specify the lookup table with the virtual_mailbox_maps parameter:
virtual_mailbox_maps = hash:/etc/postfix/virtual
Every user receiving mail to a virtual mailbox file must have an
entry in a Postfix lookup table. The mailbox file is specified relative
to virtual_mailbox_base . Mail files can use either mbox or maildir format (see Chapter 7). To use maildir format,
include a slash at the end of the filename. A virtual mailbox map file
looks like the following:
info@ora.com ora.com/info info@oreilly.com oreilly.com/info
The email address info@ora.com goes to a different mailbox from the address info@oreilly.com.
The virtual mailbox files must be owned by a user account and associated with a group on your system. How your users retrieve their messages determines what the ownership of mailbox files should be. Often, your POP/IMAP server executes under its own account and expects all of the mailbox files to be owned by this user, but if necessary, Postfix lets you configure ownership for mailbox files in any way you need. Each can be owned by a separate user, or one user can own all of the mailboxes for one domain, while a different user owns the mailboxes of another.
The virtual_uid_maps
and virtual_gid_maps
parameters determine the owner and group Postfix uses when making deliveries to virtual
mailbox files. You can specify that all of the virtual mailboxes
should be owned by the same user account with the static map type. Assume, for this example,
that you have created an account called vmail
that has a UID of 1003, and a group called vmail
that has a GID of 1005. You want all of the virtual mailbox files to
be owned by this user and group.
Set the virtual_uid_maps and
virtual_gid_maps parameters in
main.cf:
virtual_uid_maps = static:1003 virtual_gid_maps = static:1005
If you want to use different UIDs for different mailbox files, you must create a lookup file that maps the addresses to the UIDs. Then point the mapping parameter to your lookup file:
virtual_uid_maps = hash:/etc/postfix/virtual_uids
If most of your virtual mailboxes should have the same fixed ownership but some require different UIDs, you can combine static and table lookups:
virtual_uid_maps = hash:/etc/postfix/virtual_uids static:1003
If you also need separate group mappings, they work exactly the same way.
The file /etc/postfix/virtual_uids contains entries like the following, with each address mapped to the correct UID. In this case, the mailboxes for http://ora.com use one ID and those for http://oreilly.com use another:
# # /etc/postfix/virtual_uids # info@ora.com 1004 kdent@ora.com 1004 info@oreilly.com 1007 service@oreilly.com 1007
It is possible for a virtually hosted domain to have
some addresses that are delivered to the local message store and some
that are forwarded. Since all recipient addresses are checked for
virtual aliasing regardless of their class, simply place the forwarded
addresses in the virtual_alias_maps
file instead of the virtual_mailbox_maps file. Make sure the
virtual_alias_maps parameter points to a virtual alias lookup
table:
virtual_alias_maps = hash:/etc/postfix/virtual_alias
The /etc/postfix/virtual_alias file contains entries for addresses that should be forwarded elsewhere:
kdent@oreilly.com kyle.dent@onlamp.com
Do not list a domain in both virtual_mailbox_domains and virtual_alias_domains . Use virtual_mailbox_domains for domains that
have a mix of aliases and mailboxes and virtual_alias_domains only when all of the
addresses are aliases.
For either virtual mailboxes or virtual aliases, your lookup table can have a key value of the domain without a local part to catch any message destined for the domain addressed to a nonexistent address. Catchall addresses should be used advisedly, since they tend to receive a lot of spam. Spammers often send messages to nonexistent accounts at a domain, which are received by catchall addresses.
The first step is to identify a mailbox to receive
messages sent to nonexistent addresses. You can use an existing
mailbox or create a new one. Add a new virtual_mailbox_maps entry like the
following to deliver any message with an unknown destination address
to the service mailbox:
@ora.com ora.com/service
Catchall addresses with virtual aliases work similarly
to virtual mailboxes, but you should set up a catchall alias address
only if all addresses in a domain are configured as aliases and not
mailboxes. Since virtual aliases are checked before virtual
mailboxes, a catchall alias intercepts all messages, including those
otherwise destined for virtual mailbox addresses. Once you’ve
identified the address that should receive messages sent to
nonexistent addresses, add a new virtual_alias_maps entry like the
following:
@ora.com customer.service@onlamp.com
It’s possible to have a virtual alias catchall address in conjunction with virtual mailbox addresses by creating entries for all of your virtual mailbox addresses in your virtual alias lookup maps. Assuming you have virtual mailboxes configured like the following:
info@ora.com ora.com/info info@oreilly.com oreilly.com/info
your virtual alias lookup table that includes a catchall alias must also contain the mailbox entries:
@ora.com customer.service@onlamp.com kdent@oreilly.com kyle.dent@onlamp.com info@ora.com info@ora.com info@oreilly.com info@oreilly.com
In this way, a message addressed to info@ora.com won’t be intercepted by the @ora.com catchall alias.
The last configuration we’ll consider is hosting virtual domains with a system using a proprietary message store. To work with these systems, Postfix hands off messages using a protocol like LMTP, letting the proprietary system handle delivery to the correct mail box.
Since Postfix must receive messages before handing them off to the
LMTP server, it has to know that it should accept mail for each of the
virtual domains. List them in virtual_mailbox_domains :
virtual_mailbox_domains = ora.com, oreilly.com
You also have to list each email address, so Postfix can accept
messages for valid addresses and reject unknown users. Use the virtual_mailbox_maps parameter to point to a lookup file with valid
addresses:
virtual_mailbox_maps = hash:/etc/postfix/virtual
In the /etc/postfix/virtual file, the righthand value isn’t used because all messages are passed along to the POP/IMAP server. You must still include a righthand value because lookup tables must have a key and a value, but the value you use doesn’t matter:
info@ora.com General Information Address info@oreilly.com General Information Address
In order to have Postfix pass mail for virtual domains through to
your POP/IMAP server, specify the correct transport in the virtual_transport parameter in main.cf. You have to know how your LMTP
server socket is set up. Assuming it’s on the same host as
Postfix and uses a socket file located at /var/imap/socket/lmtp, the transport lookup
table for the example domains looks like the following:
virtual_transport = lmtp:unix:/var/imap/socket/lmtp
This causes all of your virtual_mailbox_domains to be delivered to
your POP/IMAP server over LMTP.
As mentioned earlier in the chapter, you can’t use local
aliases, .forward files, and
mailing-list programs with virtual domains delivered by the virtual
delivery agent. You’ve seen that you can easily set up aliases through
the virtual_alias_maps parameter, but
you cannot deliver messages to a command. In this last section, we’ll
look at working around that issue by demonstrating how to deliver
virtual addresses to external programs. The first example sets up
delivery to an autoreply program, and the second to a mailing-list
manager.
Auto-responders are scripts or programs that process incoming messages and return a reply to the sender of the message without any human intervention. The autoreply program used in this example, inforeply.pl, is listed in Example 8-1. This program is meant to handle mail for a dedicated information email address. Users or customers can send a message to the address to request special information. Note that this simple example is inadequate as a general autoreply program, such as the Unix vacation command. It does not cache addresses it has already replied to, and it does not do full checking for addresses that should not receive automatic replies (see the sidebar). You might also like to enhance the program to return different types of information, based on the subject or a keyword in the body of the request messages.
#!/usr/bin/perl -w
#
# inforeply.pl - Automatic email reply.
#
# All messages are logged to your mail log. Check the
# log after executing the script to see the results.
#
# Set $UID to the uid of the process that runs the script.
# Check the entry in master.cf that calls this script. Use
# the uid of the account you assign to the user= attribute.
# If you want to test the script from the command line,
# set $UID to your own uid.
#
# Set $ENV_FROM to the envelope FROM address you want on
# outgoing replies. By default it's blank, which will
# use the NULL sender address <>. You can set it to an
# address to receive bounces, but make sure you don't set
# it to the same address that invokes the program, or
# you'll create a mail loop.
#
# Point $INFOFILE to a text file that contains the text of
# the outgoing reply. Include any headers you want in the
# message such as Subject: and From:. The To: header is
# set automatically based on the sender's address. Make
# sure you have an empty line between your headers and the
# body of the message.
#
# If necessary, change the path to sendmail in $MAILBIN.
#
# @MAILOPTS contains options to sendmail. Make changes if
# necessary. The default options should work in most
# situations.
#
# The calls to syslog require that your Perl installation
# converted the necessary header files. See h2ph in your
# Perl distribution.
#
require 5.004; # for setlogsock in Sys::Syslog module
use strict;
use Sys::Syslog qw(:DEFAULT setlogsock);
#
# Config options. Set these according to your needs.
#
my $UID = 500;
my $ENV_FROM = "";
my $INFOFILE = "/home/autoresp/inforeply.txt";
my $MAILBIN = "/usr/sbin/sendmail";
my @MAILOPTS = ("-oi", "-tr", "$ENV_FROM");
my $SELF = "inforeply.pl";
#
# end of config options
my $EX_TEMPFAIL = 75;
my $EX_UNAVAILABLE = 69;
my $EX_OK = 0;
my $sender;
my $euid = $>;
$SIG{PIPE} = \&PipeHandler;
$ENV{PATH} = "/bin:/usr/bin:/sbin:/usr/sbin";
setlogsock('unix');
openlog($SELF, 'ndelay,pid', 'user');
#
# Check our environment.
#
if ( $euid != $UID ) {
syslog('mail|err',"error: invalid uid: $> (expecting: $UID)");
exit($EX_TEMPFAIL);
}
if ( @ARGV != 1 ) {
syslog('mail|err',"error: invalid invocation (expecting 1 argument)");
exit($EX_TEMPFAIL);
} else {
$sender = $ARGV[0];
if ( $sender =~ /([\w\-.%]+\@[\w.-]+)/ ) { # scrub address
$sender = $1;
} else {
syslog('mail|err',"error: Illegal sender address");
exit($EX_UNAVAILABLE);
}
}
if (! -x $MAILBIN ) {
syslog('mail|err', "error: $MAILBIN not found or not executable");
exit($EX_TEMPFAIL);
}
if (! -f $INFOFILE ) {
syslog('mail|err', "error: $INFOFILE not found");
exit($EX_TEMPFAIL);
}
#
# Check sender exceptions.
#
if ($sender eq ""
|| $sender =~ /^owner-|-(request|owner)\@|^(mailer-daemon|postmaster)\@/i) {
exit($EX_OK);
}
#
# Check message contents for Precedence header.
#
while ( <STDIN> ) {
last if (/^$/);
exit($EX_OK) if (/^precedence:\s+(bulk|list|junk)/i);
}
#
# Open info file.
#
if (! open(INFO, "<$INFOFILE") ) {
syslog('mail|err',"error: can't open $INFOFILE: %m");
exit($EX_TEMPFAIL);
}
#
# Open pipe to mailer.
#
my $pid = open(MAIL, "|-") || exec("$MAILBIN", @MAILOPTS);
#
# Send reply.
#
print MAIL "To: $sender\n";
print MAIL while (<INFO>);
if (! close(MAIL) ) {
syslog('mail|err',"error: failure invoking $MAILBIN: %m");
exit($EX_UNAVAILABLE);
}
close(INFO);
syslog('mail|info',"sent reply to $sender");
exit($EX_OK);
sub PipeHandler {
syslog('mail|err',"error: broken pipe to mailer");
}To configure an auto-responder to work with virtual domains, you must create a special transport type in master.cf for delivery to the specific command. In order to have messages delivered to your new component, you have to map an address to the transport you created using transport maps.
Many auto-responders can handle only a single message at a time
with only one recipient. You can limit the number of recipients to any
transport type by setting a parameter of the form
transport _destination_recipient_limit, where the
string transport is the name of the
transport type. If a transport called inforeply should be limited to only one
recipient at a time, set the following parameter:
inforeply_destination_recipient_limit = 1
The following steps walk through setting up the email address info@ora.com to use inforeply.pl. The domain http://ora.com is configured as a virtual domain. The local domain on the host is http://example.com:
Create a local account under whose privileges the inforeply.pl program should execute. In this example, an account called autoresp is used. You should create a new pseudo-account for this purpose. Use the normal administrative tools on your system to make the account.
Create a transport type called inforeply by adding an entry to your
master.cf file. The entry
should look something like the following:
inforeply unix - n n - - pipe
flags= user=autoresp argv=/usr/local/bin/inforeply.pl ${sender}The pipe daemon is
used to deliver messages to external commands. You can specify
flags if your program requires
any special options. (See the pipe(8) man page for information on
the available options.) The user attribute is required for any
pipe components in master.cf. The argv attribute must be specified last,
and should start with the path to the autoreply command. There are
several values that you can pass to your command when Postfix
executes it. The values are supplied through special macros. In
this example, the envelope sender address (${sender}) is passed. For the simple
inforeply.pl responder, you
need only the sender address, but you will often want the
recipient (${recipient})
address, too, for auto-responders that can handle multiple
recipient addresses. See the pipe(8) manpage for the list of
available macros.
If you haven’t already set up any transports on your system,
set the transport_maps
parameter in main.cf to point to the transport
table:
transport_maps = hash:/etc/postfix/transport
Add an entry in your transport table that contains the
address to direct messages to the inforeply transport. In this case, we’ll
use the address autoresp@ora.com:
autoresp@ora.com inforeply
Now, all messages sent to autoresp@ora.com are delivered to the auto-responder.
Execute postmap against the transport lookup table:
# postmap /etc/postfix/transportPoint virtual_alias_maps
to your virtual alias lookup table:
virtual_alias_maps = hash:/etc/postfix/virtual_alias
Add an entry to the virtual_alias lookup table to map info@ora.com to both the new autoreply address and the actual recipient address that can receive the messages:
info@ora.com autoresp@ora.com, service@oreilly.com
Execute postmap against the virtual alias lookup table:
# postmap /etc/postfix/virtual_aliasNow messages sent to info@ora.com will be delivered to autoresp@ora.com and service@oreilly.com.
Reload Postfix so that it recognizes the changes to its main.cf and master.cf files:
# postfix reloadWhen a message is sent to info@ora.com,
Postfix first finds the destination address in the virtual_alias
lookup table. The address points both to
autoresp@ora.com and
service@oreilly.com. Postfix finds
autoresp@ora.com in the transport lookup
table, which points to the inforeply transport in the master.cf file. The entry in master.cf pipes the message to the
inforeply.pl program, which
sends the reply to the original sender. Finally, the message is
also resubmitted for delivery to
service@oreilly.com.
In the next example, you’ll set up a mailing list for a virtual domain. Mailing-list managers are discussed in Chapter 10. You may want to review that chapter before setting up your virtual mailing lists. This example creates a mailing list for Majordomo. You should first install and configure Majordomo according to the directions in Chapter 10.
Virtual mailing lists work by creating a parallel version of the list under a local domain. The local version is only used internally on your system. External users can use the virtual addresses and never know that the local version exists. When naming the local version, you may want to include the virtual domain name in some way to distinguish the list from lists for other virtual domains hosted on your system. The following procedure creates a mailing list at the virtual address astronomy@ora.com that is handled by the local version astronomy-ora@example.com:
Set up the local version of the mailing list just as you would a normal mailing list, as described in Chapter 10, by adding the following entries to /usr/local/majordomo/aliases:
# astronomy@ora.com list
astronomy-ora: :include:/usr/local/majordomo/lists/astronomy
owner-astronomy-ora: kdent@ora.com
astronomy-ora-request: "|/usr/local/majordomo/wrapper request-answer \
astronomy-ora"
astronomy-ora-approval: kdent@ora.comRebuild the Majordomo aliases table:
# postaliases /usr/local/majordomo/aliasesCreate the file to hold the email addresses for list subscribers, and set its ownership to the majordom account:
#touch /usr/local/majordomo/lists/astronomy#chown majordom /usr/local/majordomo/lists/astronomy
If desired, create an info file for the list at /usr/local/majordomo/lists/astronomy-ora.info.
Create the necessary addresses for the list at the virtual domain. Add the following entries to the virtual alias map file virtual_alias:
# astronomy@ora.com list astronomy@ora.com astronomy-ora@localhost owner-astronomy@ora.com owner-astronomy-ora@localhost astronomy-request@ora.com astronomy-ora-request@localhost astronomy-approval@ora.com astronomy-ora-approval@localhost
Rebuild the virtual alias map file:
# postmap virtual_aliasAdd addresses to the /usr/local/majordomo/lists/astronomy list file.
You should now be able to send messages to astronomy@ora.com for distribution to all of the addresses in your list file.
Up until now, we’ve mostly considered Postfix in its role as the end node for email messages. That is, messages that arrive at the Postfix system are, for the most part, delivered to the local system. But it’s also common to find Postfix serving as an intermediate node on the path a message follows to its ultimate destination. In this chapter we’ll look at some of the configuration options for Postfix as a client in MTA-to-MTA communications.
In DNS, MX records refer to mail exchangers (see Chapter 6). MX records contain both host and priority (or preference) information for sending mail to a domain. A backup MX server is one that receives mail for a particular domain, but is not the preferred server to receive the mail. If the preferred server or servers are down, the backup MX server receives the mail and queues it until one of the more preferred servers comes back online. Figure 9-1 illustrates delivery to a backup host when the primary host is not available. The backup queues messages until the primary is back online, whereupon the backup can deliver messages to it.
When your system is configured in DNS as a backup MX host, you
don’t have to configure any special transport from your system to the
primary system. Postfix uses the DNS records to determine how to route
mail to the primary MX host. The only configuration required in Postfix
is to indicate that it should receive mail for the domain by adding the
domain name to the relay_domains
parameter. When a sending MTA discovers that the primary
mail system for a domain is down, it tries the next preferred one until
it finds one that accepts delivery. If your system is a backup MX host,
and the destination domain is listed in your relay_domains parameter, Postfix accepts the
mail and queues it. Postfix periodically scans its queue and checks for
a more preferred system to see if any are able to accept the message.
Once a higher priority mail exchanger is back online, Postfix can
deliver the message to it.
Postfix continues trying to deliver queued messages for the amount
of time specified in the maximal_queue_lifetime parameter, which determines how long deferred messages
stay in the queue before they are bounced back to the sender. The
default value is five days. If you provide secondary mail service for
primary servers that you know will be down longer than the default, you
can extend the time.
It is highly recommended that you maintain a list of valid recipients for domains you provide backup MX services to. You should develop a regular process for obtaining an updated user list from your primary MX servers. If your system does not know all of the available mailboxes on the primary mail server, it must accept all messages. It’s only when your backup MX server tries to deliver them to the primary server that it discovers that a message cannot be delivered. At that point, your server must bounce the message back to the original sender.
Since spammers often send messages to made-up addresses, if your
server does not know all the valid email addresses on the primary
server, your server will unnecessarily accept a lot of mail that must
be bounced. The bounce problem is exacerbated by the spammer tactic of
forging sender addresses by using the real email addresses of innocent
bystanders. The forged addresses receive all of the error notices for
messages they never sent (see Chapter
11). The relay_recipient_maps parameter specifies lookup tables that should contain
all of the addresses for domains listed in your relay_domains parameter:
relay_recipient_maps = hash:/etc/postfix/relay_recipients
The relay_recipients file should contain entries with the recipient address on the lefthand side. The righthand side is not used by Postfix, but you must specify a value:
# # relay_recipients # user1@example.com any_value user2@example.com any_value user3@example.com any_value
If your system is on the same network as the primary, and the user accounts are stored in some kind of database, you may be able to perform real-time lookups using MySQL or LDAP (see Chapter 15).
A potential problem is that once you set relay_recipient_maps, you must include email
addresses for all domains you provide backup service to. If not,
Postfix will reject messages that don’t appear in the lookup table. If
you don’t know the valid addresses for some domains, you can specify a
wildcard entry for that domain:
# # relay_recipients # user1@example.com any_value user2@example.com any_value user3@example.com any_value @oreillynet.com any_value
The final entry is a wildcard entry that allows messages for any address at the domain. Obviously, it’s better to obtain the list of valid addresses for the reasons mentioned earlier.
Networks that receive mail for many sites, such as ISP networks, typically have some customers whose systems aren’t always connected to the network. When the customer network is offline, the ISP queues its messages. When the site comes online, it can request immediate delivery of all its queued mail with the ETRN SMTP command:
220 mail.ora.com ESMTP PostfixEHLO mail.example.com250-auger.seaglass.com 250-PIPELINING 250-SIZE 10240000 250-VRFY 250-ETRN 250-STARTTLS 250 8BITMIMEETRN example.com250 Queuing started
If there are a lot of messages queued when a domain is ready to accept mail, searching every queue file would be time-consuming. Postfix provides a capability called fast flush to speed up queue processing for a particular domain. Fast flush is handled by the flush daemon, which maintains lists of messages that are queued for specific domains so that Postfix knows which messages to deliver when it receives an ETRN command.
By default, all of the sites listed in relay_domains are eligible for the fast
flush service. You can include domains in addition to your relay
domains by adding them to the fast_flush_domains parameter. Add a domain name as follows:
fast_flush_domains = $relay_domains, example.com
In this case http://example.com is a domain not already listed in
relay_domains.
You can manually notify Postfix that a fast flush domain is ready to accept messages by issuing the postqueue -s command (or its equivalent, sendmail -qR) with the site name:
$ postqueue -s example.com Postfix can be configured to relay to any other host,
regardless of how DNS MX records are set up. This section discusses the
transport_maps parameter in general.
Later sections and other chapters in the book present specific
configurations that use it.
Conceptually, transport maps override default transport types for
delivery of messages. The transport_maps parameter points to one or more
transport lookup tables. The following entry sets up /etc/postfix/transport as a transport map
lookup table:
transport_maps = hash:/etc/postfix/transport
The keys in a transport lookup table are either complete email addresses or domains and subdomains. (Email addresses as lookup keys for transport maps require Postfix 2.0 or later.) When a destination address or domain matches a lefthand key it uses the righthand value to determine the delivery method and destination. Example 9-1 lists some possible transport map entries.
example.com smtp:[192.168.23.56]:20025 oreilly.com relay:[gateway.oreilly.com] oreillynet.com smtp ora.com maildrop kdent@ora.com error:no mail accepted for kdent
The format of righthand values can differ depending on the
transport type, but generally has the form
transport:nexthop,
where nexthop often indicates a host and port
for delivery. Each of the possible portions of the righthand value are
described here:
transportRefers to an entry from master.cf. If you are adding a new transport type, first create an entry for it in master.cf.
hostThe destination host for delivery of messages. The
host is used only with inet transports such as SMTP and LMTP.
Postfix treats the hostname like any destination domain. It
performs an MX lookup to determine where to deliver messages. If
there are no MX records, Postfix delivers to the A record IP
address. If you know that Postfix should deliver directly to the
IP in the A record for the specified host, you can have Postfix
skip the check for MX records by enclosing the name in brackets.
If you use an IP address, the brackets are required.
portThe destination port for message delivery. The
port is used only with inet transports such as SMTP and LMTP.
The port can be specified using the actual number or its symbolic
name from the /etc/services
file.
Each of the sample entries from Example 9-1 uses a different format in their righthand values, which are explained below:
All messages destined for http://example.com are relayed using the smtp transport to the host at IP address
192.168.23.56. Messages are delivered over port 20025 instead of
the default SMTP port 25. Notice that the IP address is in
brackets, as required for IP addresses.
All messages destined for http://oreilly.com are relayed using the relay transport to the host
gateway.oreilly.com. Since no port is
specified, Postfix uses the default port 25. The hostname is in
brackets to prevent Postfix from looking up MX records. Instead,
it looks up the A record and delivers to the IP address that the
hostname resolves to.
The relay transport was
introduced in Version 2 of Postfix to fix a potential performance
bottleneck with queue scheduling. You should direct inbound messages
relayed to internal systems over the relay transport, so that they don’t compete
with messages destined for many different systems on the
Internet.
All messages destined for http://oreillynet.com are relayed using the
smtp transport. Since both the
next hop and port are left off, Postfix uses the default port 25
and determines the next hop based on the destination address. Most
often, the next hop is determined by performing a DNS lookup,
which determines the MX host for the domain. This example is a bit
contrived, since simply listing http://oreillynet.com with relay_hosts achieves the same thing in
this case.
All messages destined for http://ora.com are delivered to the maildrop service. maildrop must be an entry in master.cf. Since delivery occurs over a
pipe rather than an inet
socket, no host and port are specified.
The special error
transport causes all mail to be rejected. After the colon, specify
a message to report when email is rejected.
Transport maps can also be used for special handling of certain messages on the local system. (Chapter 14 discusses content filters, which provide a good example of configuring special local transports.) Another local use of transport maps is to temporarily defer all of a domain’s messages. To demonstrate a simple use of transport maps, the next section describes a procedure to defer all of the messages for a domain.
Under some circumstances you want Postfix to postpone
delivery of messages until it has received an explicit command to
deliver them. Deferred messages are delivered when you issue the
postqueue -f
domain command or Postfix receives an ETRN
SMTP command from a fastflush-eligible domain.
A common scenario for deferring messages is when an ISP receives mail for a customer network that is not always online. The ISP must queue messages until the network is online and can receive them. Similarly, users on the customer network should send messages through a local gateway that queues them until they can be delivered once the network is online. This section presents configurations for both situations.
This procedure sets up a new transport type called “ondemand,” and configures a transport map to defer all messages for the http://example.com domain:
Create a new transport in your master.cf file called ondemand. It should be identical to
your smtp transport except
for the name:
ondemand unix - - n - - smtp
Tell Postfix that delivery of all messages over your new
transport should be deferred automatically. Edit the defer_transports parameter in
main.cf to include your
ondemand transport:
defer_transports = ondemand
Make sure that the transport_maps parameter points to
your transport lookup table:
transport_maps = hash:/etc/postfix/transport
Add an entry to your transport file for http://example.com that points
it to the ondemand
transport:
example.com ondemand
Execute postmap on the file.
# postmap /etc/postfix/transportReload Postfix so that it recognizes the changes in its configuration files:
# postfix reloadNow any message destined for http://example.com is deferred until there is an explicit command to deliver it.
When you are ready to release the deferred messages, issue the postqueue -f command:
$ postqueue -f example.comA home network or small office network that wants to trigger delivery manually should defer all SMTP deliveries, so that delivery attempts only occur when a connection to the Internet has been established:
Once a connection is established, all of the messages can be delivered using postqueue -f.
The rest of this chapter describes various scenarios where Postfix must relay mail to other systems. In many cases, transport maps are necessary for configuring the next-hop delivery details.
A mail gateway is an email system that accepts messages and relays them to another system. Gateways might provide a path from one network to another, or from one protocol to another. A common use of a mail gateway is a server that accepts all the mail for a network from the Internet and relays it to internal mail systems. Mail gateways are commonly set up in conjunction with firewall systems to limit the number of servers that need direct access to the Internet.
Imagine a company network such as the one depicted in Figure 9-2. There are sub-domains for different workgroups at the company, and each workgroup has its own internal mail server. The gateway system gw.example.com receives all the mail for the network. The human resources department gets email addressed as user@hr.example.com, and their mail should go to the server mail1.example.com. The sales department uses user@sales.example.com, and their mail should go to mail2.example.com. The client hosts in each subnet retrieve mail from their respective mail servers. Transport maps are required to set up the mail gateway gw.example.com to relay messages to the correct internal mail servers.
The following procedure demonstrates how to configure gw.example.com to relay messages to the correct internal systems:
Make sure that the DNS has been configured correctly with MX records for hr.example.com and sales.example.com pointing to the gateway gw.example.com.
In your main.cf file, set
relay_domains to include the two internal domains:
relay_domains = hr.example.com, sales.example.com
Make sure that the transport_maps parameter points to your transport lookup
table:
transport_maps = hash:/etc/postfix/transport
Add entries to your transport file for each domain pointing to the correct internal mail systems:
# # transport maps # hr.example.com relay:[mail1.example.com] sales.example.com relay:[mail2.example.com]
We’ve used brackets around the internal mail system host names to disable MX lookups for those systems.
Reload Postfix so that it recognizes the changes in its configuration files:
# postfix reloadIt is highly recommended that you maintain a list of valid
recipients for all of your internal users with the relay_recipient_maps parameter. See Section 9.1.1 earlier in the
chapter.
When a mail system does not have adequate connectivity or all of the information it needs to relay messages, it can forward them to another system that is in a better position for relaying. Consider the network in Figure 9-2 again. If the internal mail systems don’t have direct access to the Internet, they can’t deliver messages sent by the users in their subnets. They can, however, pass along all messages to the gateway mail system, which can make the deliveries for them. The following procedure demonstrates setting up Postfix on mail1.example.com to relay all messages it receives to gw.example.com, which can then make the outbound deliveries.
Before configuring the internal mail systems, make sure that the
mail gateway is set up to permit relaying from the internal mail
systems. The mynetworks parameter (see Chapter
4) should encompass the IP addresses of the internal mail
systems, and if you use SMTP UBE restrictions (see Chapter 11), be sure to include permit_mynetworks among the rules to allow
relaying:
Check the mynetworks (or
mynetworks_style) parameter to
make sure it includes the client systems.
Have the users in the workgroup configure their various mail clients to use mail1.example.com as their SMTP server.
In main.cf, set the
parameter relayhost to point to the gateway system:
relayhost = [gw.example.com]
Reload Postfix so that it recognizes the changes in its configuration file:
# postfix reloadNow all messages delivered to mail1.example.com are relayed through gw.example.com.
The Postfix online documentation describes configuring Postfix for delivery to a FAX system and setting up a gateway for UUCP. These provide good examples for configuring Postfix to work with all kinds of special devices. If you need to create a gateway between different types of systems or different networks, transport maps provide the mechanism for directing mail to the other systems or devices.
Mailing lists provide a convenient way to send a single email message to many recipients. They allow a nearly unlimited number of correspondents to carry on conversations through email. A server-based, centrally managed mailing list has many advantages over other mechanisms to send messages to multiple recipients. If you regularly send email to the same group of people, typing in lists of recipients is too tedious and prone to error to be practical. MUAs usually have a facility that lets you create personal aliases that associate an easily remembered name with a list of email addresses. Personal aliases are fine for an individual, but as soon as the list has to be shared with others, it is no longer a practical solution. Major advantages of centrally managed mailing lists are that changes are made in a single place, and the new information is immediately available to anyone sending messages to the list. Other advantages become evident when you use Mailing List Managers (MLMs) to administer the list, relieving administrators from manually updating addresses.
In this chapter we look at creating simple mailing lists within Postfix itself, and then configuring Postfix to deliver messages to MLMs for more sophisticated list management. In deciding whether or not to create your mailing list within Postfix or to use an MLM, consider how often the list has to be changed, who will make the changes, and whether you need some of the other features of an MLM, such as moderated lists and digest versions. MLMs allow users to subscribe and unsubscribe themselves and to make changes to their addresses, if necessary. If you have relatively static lists or users who come to you for subscribing and unsubscribing anyway, you probably don’t need the overhead of an MLM. You can always run both flavors of lists, if that fits your environment.
There are many aspects and nuances to managing a mailing list. If you will be taking on the task, you should consult a text that deals specifically with mailing-list management such as Managing Mailing Lists by Alan Schwartz (O’Reilly).
Postfix provides the means to create simple mailing lists
through the normal alias facility (see Chapter 4). Because aliases can point to
lists of addresses or files that contain lists of addresses, it is easy
to create an alias that points to multiple names. You can create list
aliases in the system aliases file,
or in any other file that you specify in the alias_maps parameter. See more about the alias_maps parameter later in the chapter. The
default alias file when you install Postfix is /etc/aliases.
Let’s suppose that you administer mail for the domain http://example.com, and you want to create a new mailing list for people to discuss needlepoint. You decide to create a mailing list alias needlepoint@example.com to be used for online discussions. Edit your alias file, and add the following line with the email addresses of people who want to subscribe to the list:
needlepoint: rgrier@oreilly.com, gmhopper@onlamp.com, grayburn@oreilly.com
After making changes to the file, rebuild the alias lookup table by executing:
# postalias /etc/aliasesNow any messages sent to needlepoint@example.com will be forwarded to each of the email addresses listed in the example.
If any messages cannot be delivered to one of the
addresses listed, the original sender of the message receives an error
message explaining that there was a delivery problem. For small or
internal lists this may be perfectly acceptable; however, if you are
creating a large list, or the members of the list do not necessarily
know each other, it is probably more appropriate to have error
messages sent to the administrator of the list. The convention is to
create an additional alias for lists using a format like
owner-<list_alias>@example.com, where
owner- is prepended to the name of
the list alias. For the previous example, we would create the alias
owner-needlepoint.[1] This owner- alias
should point to an administrator, who is generally in a better
position than the original sender to deal with bounced
messages:
owner-needlepoint: kdent@example.com
Sending error notifications to the owner- alias is achieved by setting the envelope sender to the
owner-needlepoint@example.com alias instead of
the original sender’s email address. Example 10-1 shows typical
headers from a mailing-list message.
Return-Path: <owner-needlepoint@example.com>
Delivered-To: rgrier@oreilly.com
Received: from cowrie.example.com (cowrie.example.com[192.168.100.7])
by mail.oreilly.com (Postfix) with ESMTP id B712120DD5B
for <needlepoint@example.com> Mon, 13 May 2002 11:55:40 -0400 (EDT)
Date: Mon, 13 May 2002 12:00:43 -0400 (EDT)
From: G.M. Hopper <gmhopper@onlamp.com>
X-Sender: gmhopper@cowrie
To: needlepoint@example.com
Subject: Just finished latest project
Message-ID: <Pine.GSO.4.10.10205131200230.692-100000@cowrie>When the owner- alias exists,
Postfix automatically uses it as the envelope sender address when
sending out messages to list members. If, for some reason, you don’t
want Postfix to use the owner-
alias but rather to keep the originator’s address, you can set the
parameter owner_request_special
to no:
owner_request_special = no
You can also cause Postfix to use the actual administrator’s
email address instead of the owner-
alias by setting expand_owner_alias
to yes:
expand_owner_alias = yes
If this parameter is set, the address kdent@example.com is used instead of owner-needlepoint@example.com.
Although users do not generally need to send mail directly to the list owner, you should create owner aliases even for simple lists so other postmasters can contact the correct person in case they run into any problems with your list.
Another list convention is to provide a
request alias for your lists. Request aliases
use the format
<list_alias>-request@example.com. The
request alias for the needlepoint
alias looks like needlepoint-request@example.com.
Request aliases are used for requests to subscribe and unsubscribe
from lists or to get nontechnical information about a list.
If you have more than just a few names on a list, it is more convenient to create a text file that lists all of the email addresses for the list. The format of the alias entry that points to a file is as follows:
email_alias: :include:/path/to/file.
Let’s take the needlepoint
alias from earlier in the chapter and move the list addresses into a
separate file. Your alias entry should be revised to point to the text
file that contains the list of addresses:
needlepoint: :include:/etc/postfix/needlepoint
The file /etc/postfix/needlepoint contains the email address of each member of the group. Put one address on each line. When you need to make changes to the list, simply edit the file:
rgrier@oreilly.com gmhopper@onlamp.com grayburn@oreilly.com bogus@example.com
I’m adding an invalid address, bogus@example.com, for testing later in the chapter.
Recall from Chapter 4 that
the alias_maps parameter allows you to specify any number of alias
files to use with Postfix. For example, you might want to use a
separate alias file to store your mailing lists. Simply include the
separate alias filename along with the system alias to set the
alias_maps parameter. You should
also set the alias_database
parameter, so that you can run the command newaliases to update all of your
alias-mapping files:
alias_maps = hash:/etc/postfix/aliases, hash:/etc/postfix/mail_lists alias_database = hash:/etc/postfix/aliases, hash:/etc/postfix/mail_lists
It may be more convenient to assign all of your alias files to
alias_database and then assign
alias_database to alias_maps. If you use other map types for
aliases, simply assign them to alias_maps as well:
alias_database = hash:/etc/postfix/aliases, hash:/etc/postfix/mail_lists alias_maps = $alias_database, nis:mail.aliases
Remember to reload Postfix when you make changes to main.cf.
Let’s review everything discussed so far and consider
all the pieces of our needlepoint
mailing list. The alias file contains the following lines:
needlepoint: :include:/etc/postfix/needlepoint owner-needlepoint: kdent@example.com needlepoint-request: kdent@example.com
The first line in the example causes messages sent to needlepoint@example.com to be delivered to every address listed in the /etc/postfix/needlepoint file. This file should contain a list of email addresses of all members of the list. Bounce messages and requests are forwarded to the real address kdent@example.com. If necessary, users or other postmasters can send messages to the list owner, and users can send messages to the request alias for subscription or other information.
When a message is sent to the list, the To: header contains just the address of the
mail list alias and not an expansion of all the names on the list
(which could be hundreds or even thousands of names). Each member of
the list receives a copy of the message with headers that resemble
those shown in Example
10-1. In this example, gmhopper@onlamp.com
has sent a message to the list. Notice that the Return-Path: contains the owner alias rather
than the actual originator of the message
(gmhopper@onlamp.com).
You can test your list by sending a message to the alias you created for it. In this example, we’ll use the list alias needlepoint@example.com. Example 10-2 shows the log entries for a sample test message. Imagine that the address bogus@example.com is invalid.
postfix/local[7411]: 6C2CE20DD5B: to=<needlepoint@example.com>, relay=local, delay=1, status=sent (forwarded as ACDC120DD70) postfix/qmgr[8163]: ACDC120DD70: from=<owner-needlepoint@example.com>, size=1121, nrcpt=8 (queue active) postfix/local[0835]: ACDC120DD70: to=<bogus@example.com> relay=local, delay=1, status=bounced (unknown user: "bogus") postfix/smtp[6556]: ACDC120DD70: to=<grayburn@oreilly.com> relay=mail.oreilly.com[10.82.6.11], delay=1, status=sent (250 Mail accepted) postfix/smtp[6556]: ACDC120DD70: to=<rgrier@oreilly.com> relay=mail.oreilly.com[10.82.6.11], delay=1, status=sent (250 Mail accepted) postfix/smtp[5954]: ACDC120DD70: to=<gmhopper@onlamp.com> relay=mail.onlamp.com[10.171.8.111], delay=1, status=sent (250 Message received: GZCLUC00.E8F)
Some of the information, such as the timestamp and hostname, has
been removed for clarity. Notice that at the end of the first line
there is a comment saying (forwarded as
ACDC120DD70) and the rest of the log entries use the new
queue ID. Also notice in the first line of the example that the
message enters the system addressed to
needlepoint@example.com. The second line shows
that Postfix uses the owner alias as the envelop sender address
(from=<owner-needlepoint@example.com>)
while delivering the message to all members of the list. The bogus address shows a status of “bounced.” The
address kdent@example.com pointed to by the owner
alias receives the bounce notification, which looks like Example 10-3. Notice in the example that the bounce notification message is delivered to
owner-needlepoint@example.com. The sender of the
message does not receive a notification.
From MAILER-DAEMON@mail.example.com Tue Jul 16 12:03:49 2002 Date: Tue, 16 Jul 2002 11:25:27 -0400 (EDT) From: Mail Delivery System <MAILER-DAEMON@mail.example.com> To: owner-needlepoint@example.com Subject: Undelivered Mail Returned to Sender ... <bogus@example.com>: unknown user: "bogus" ...
[1] Some MLM systems have adopted the convention of placing
-owner after the alias instead
of before.
Running mailing lists within Postfix is fine for static lists. But lists that change frequently are better handled by a mailing-list manager (MLM). With an MLM, the administrator of the list doesn’t have to manually edit the list file to add, delete, or change addresses because list members can subscribe and unsubscribe themselves. MLMs also support other features such as archiving of messages, digests of discussions, and the ability to moderate a list by allowing an administrator to review messages before they are posted to all members.
MLMs work by pointing normal Postfix aliases to commands that handle the distribution of messages and management of lists. MLMs use administrative aliases that point to programs to handle list functions such as subscribing and unsubscribing members from the list, handling bounced messages, and possibly filtering messages sent to the list. The lists themselves actually work the same way as the simple aliases from the last section. Each list has its own file to store list members, but rather than editing the file yourself, you can have the MLM automatically add and remove addresses.
The next two sections look at two popular MLMs: Majordomo and Mailman.
Majordomo is one of the more popular MLMs and has been available since the early 1990’s. It offers a complete set of MLM features, and nearly all administration takes place by sending commands through email messages. Little to no intervention is required by a postmaster once a list has been created. There are also web-based administration packages available to work with Majordomo, allowing much of the list administration to take place from a web site.
Majordomo is available at the Majordomo home page (http://www.greatcircle.com/majordomo/.) It requires Perl and works with Perl4 Version 4.036 or Perl5 Version 5.002 or better. Future releases will probably require Perl5. Majordomo also makes use of a small wrapper program written in C. If you are planning to build the package from scratch, you must have an ANSI C compiler.
If you configure Majordomo for moderated lists, where a
list administrator approves posts using the Majordomo-supplied
approve, you have to make an
adjustment for Postfix and Majordomo to work together correctly.
Postfix prepends a Delivered-To: header to messages it handles. It then uses the header
to detect mailer loops. When a Majordomo message is delivered to a
moderator for approval who then pipes the message through the approve command, it is sent back to the list with all of its
original headers intact. When Postfix receives the message again, it
recognizes that it has already seen the message and reports a mail
delivery loop.
The easiest way to fix this issue is to make a small
change to the Majordomo approve
script (which is written in Perl). You’ll have to edit the file,
normally located in the /bin
directory located below the main Majordomo installation directory. If
you follow the steps in the procedure below, your file will be located
at /usr/local/majordomo/bin/approve. Edit the
file and find the subroutine called process_bounce. Within that routine, there
is a while loop, as shown below.
Insert the emphasized line as shown, save the file, and you’re
done:
while (<$FILE>) {
if (/^>?From / && ! defined($from_skipped)) {
# Skip any initial "From " or ">From " line
$from_skipped = 1;
next;
}
next if ( /^delivered-to:/i ); # Added for Postfix
s/^~/~~/;
print MAIL $_;
} The following steps walk you through setting up the
astronomy list alias using
Majordomo and Postfix. These instructions assume that you will
create a user called majordom and install the
package at /usr/local/majordomo. If you create a
different username or install to a different location, keep that in
mind as you read through this example.
Make sure that you have Perl installed on your system and that it is at least Version 5.002 or better. You can check your Perl installation by typing perl -v at a command prompt. This will display license and other information about your installation of Perl, including the version number:
$ perl -v
This is perl, version 5.005_03 built for i386-freebsd
Copyright 1987-1999, Larry Wall
...Obtain a copy of Majordomo either in source form from the Majordomo home page or find a prepackaged version from your normal software sources. Follow the instructions that come with your bundle to install Majordomo on your system. If you are installing from source, you will need an ANSI C compiler to build it.
If you build Majordomo yourself, when you modify the
Makefile and majordomo.cf file, you should be able to follow the
instructions as if you were installing Majordomo to work with
Sendmail as the MTA. If the location for $sendmail_command in majordomo.cf is correct, the rest of
the mailer variables with the default options will be
correct.
Create and edit a file called /usr/local/majordomo/aliases to store the Majordomo aliases. Add the aliases for the Majordomo commands as specified in the Majordomo instructions. Then add the aliases for your list. The file should look like the following:
majordomo: "| /usr/local/majordomo/wrapper majordomo" owner-majordomo: kdent@example.com majordomo-owner: kdent@example.com # astronomy list astronomy: :include:/usr/local/majordomo/lists/astronomy owner-astronomy: csagan@example.com astronomy-request: "|/usr/local/majordomo/wrapper request-answer astronomy" astronomy-approval: csagan@example.com
Edit /etc/postfix/main.cf to add the
Majordomo alias file to the alias_maps parameter:
alias_maps = hash:/etc/aliases, hash:/usr/local/majordomo/aliases
You can also add the new alias file to the alias_database parameter to automatically rebuild the datafile
when you run the newaliases
command:
alias_database = hash:/etc/aliases, hash:/usr/local/majordomo/aliases
Reload Postfix so that it recognizes the changes in its main.cf configuration file:
# postfix reloadCreate the file to hold the email addresses for the
astronomy list. Set its
ownership to the majordom
account:
#touch /usr/local/majordomo/lists/astronomy#chown majordom /usr/local/majordomo/lists/astronomy
Create the info
file that contains the message sent to new members of the list
and anyone who sends the info
command. Create the file as /usr/local/majordomo/lists/astronomy.info
and include any text that is appropriate for your list:
Welcome to the astronomy discussion list at example.com. The purpose of this list is to discuss new astronomical phenomena. To send a message to all the members of the list, address your email to <astronomy@example.com>. The basic rules and etiquette for the list are as follows: 1. ...
Make sure that the info file is accessible by the majordom account:
# chown majordom /usr/local/majordomo/lists/astronomy.info# postalias /usr/local/majordomo/aliasesOr, if you added the Majordomo alias file to alias_database, just type newaliases.
You can test your Majordomo installation by running the following command:
$ echo 'lists' | mail majordomoExecuting the above sends an email message to Majordomo containing the command ‘lists', telling Majordomo to send you information about all of the lists it maintains. On our example system, the reply from Majordomo looks like the following:
Date: Tue, 16 Jul 2002 18:14:59 -0400 (EDT) From: Majordomo@example.com To: kdent@example.com Subject: Majordomo results -- >>>> lists Majordomo@example.com serves the following lists: astronomy Use the 'info <list>' command to get more information about a specific list. >>>> >>>>
You or your users can now send Majordomo commands at
the address majordomo@example.com to get help
and be added to lists. To add yourself to the new mailing list, send
a message to majordomo with the
subscribe command in the body of
the message:
To: majordomo@example.com From: tbrahe@porcupine.org Subject: subscribe astronomy
If you send a subscription request, you should receive a confirmation message from Majordomo. You must reply to the message with the authentication code provided to complete your subscription to the list (see the Majordomo documentation).
If you had no problems during the Majordomo installation, everything should work as expected. The main issue that you may run into has to do with file permissions. If you send a message to the list and receive a bounce notification like the following, then you know you have a permissions problem:
...
The Postfix program
<astronomy@example.com>: cannot open include file
/usr/local/majordomo/lists/astronomy: Permission denied
...Majordomo needs read access to the list file (/usr/local/majordomo/astronomy) and the
list configuration file (/usr/local/majordomo/astronomy.config)
when Postfix invokes it for deliveries to the list. Postfix delivers
the message to Majordomo running with the privileges of the user
that owns the alias map file containing the majordomo alias, /usr/local/majordomo/aliases.db. The
normal mechanism used to ensure that Majordomo has access to the
necessary files is to set the Majordomo wrapper program to set user
ID (suid) with root as the owner.
This means that regardless of the user executing the command, the
process runs with root privileges. The
Majordomo installation takes care of setting the permissions
properly, but if for some reason they are not correct, you will see
an error message like the one described above. You can correct the
problem by setting the permissions yourself:
# chmod 4755 /usr/local/majordomo/wrapperA better solution than setting the wrapper program suid is to make sure that the alias file and all of the list files are owned by the majordom user.
Mailman is another full-featured MLM. It is available at the Mailman home page at http://www.gnu.org/software/mailman/. It includes web-based administration and creates a home page for each list where list administrators and members can perform administrative functions. It also accepts administrative commands via email much like Majordomo does.
Mailman requires at least Version 1.5.2 of Python. It includes some security wrapper programs that are written in C, so you must have an ANSI C compiler if you are planning to build the package from scratch.
There is one slightly tricky aspect to get Postfix and Mailman
working together correctly. Mailman expects to be invoked by a process running with
a particular group ID (GID). The GID it expects is specified at the
time the Mailman package is built. If you are building the package
yourself, make sure that you first create an account and a group
called mailman . You should be able to use the normal administrative
tools on your system to create both the account and the group. When
you are finished, you should have an entry in /etc/passwd that resembles the
following:
mailman:*:26413:60003:Mailman List Manager:/home/mailman:/bin/sh
and an entry in /etc/group like the following:
mailman:*:60003:
Make sure that the account mailman has the group mailman as its primary group. In the
examples above, 60003 specifies the
mailman group and the mailman account has that as its primary
group.
When you run configure for Mailman, be sure that you
include the option --with-mail-gid=
xxx, where xxx
is the actual GID for the mailman
group that you created. According to the examples above, you should
execute configure using 60003 for
the GID option:
$ ./configure --with-mail-gid=60003You may have additional options for configure according to your environment. Be sure to read the Mailman documentation for building the package. If you have already built your Mailman package and you did not specify the group, build it again. If you didn’t build your Mailman package, see the sidebar below.
The following steps walk you through setting up the
astronomy list alias using
Mailman and Postfix. They assume that you create an account and a
group called mailman and install
the package in /home/mailman.
Make sure that you have Python installed on your system and that you have at least Version 1.5.2. Test this by executing the python command, which will display version information and a Python prompt. You can exit the Python shell by typing Ctrl-D:
$pythonPython 1.5.2 (#1, Jul 5 2001, 03:02:19) [GCC... Copyright 1991-1995 Stichting Mathematisch Centrum, Amsterdam >>>^D$
If the version number following “Python” on the first line of output is not at least 1.5.2, you will have to upgrade your copy of Python.
Obtain a copy of Mailman either in source form from the Mailman home page or find a prepackaged version from your normal software sources. Follow the instructions that come with your bundle to install Mailman on your system. If you are installing from source, you will need an ANSI C compiler to build it. Be sure to specify the correct GID when you build Mailman. (See the discussion earlier in this chapter.)
You should create a separate alias file to store all of your Mailman aliases and set the owner and group correctly. Become the mailman user and execute the following commands. This example assumes that you want the alias file in the mailman home directory located at /home/mailman:
$cd /home/mailman$touch aliases$postalias aliases
These commands create both the alias file and the necessary map files that Postfix uses for lookups. Since you perform these steps as the mailman user, the group and ownership of the files will automatically be correct, assuming your account is set up as it should be.
Edit /etc/postfix/main.cf to add the new
alias file for storing Mailman mailing lists. Simply add the
Mailman alias file to the existing list of files for the
alias_maps parameter:
alias_maps = hash:/etc/aliases, hash:/home/mailman/aliases
You can also add the new alias file to the alias_database parameter to automatically rebuild the datafile
when you run the newaliases
command:
alias_database = hash:/etc/aliases, hash:/home/mailman/aliases
Reload Postfix so that it recognizes the changes in its
main.cf configuration
file:
# postfix reloadExecute the Mailman command newlist to initialize your new mailing list. The output of newlist includes lines of text that must be inserted into the /home/mailman/aliases file. Copy the lines from the newlist output into /home/mailman/aliases. Save and exit the file. The emphasized lines in Example 10-4 are the lines that must be added to /home/mailman/aliases.
Build the new alias datafile:
# postalias /home/mailman/aliasesOr, if you added the Mailman alias file to alias_database, just run the newaliases command.
#bin/newlistEnter the name of the list:astronomyEnter the email of the person running the list:kdent@example.comInitial astronomy password: Entry for aliases file: ## astronomy mailing list ## created: 08-Mar-2002 root astronomy: "|/home/mailman/mail/wrapper post astronomy" astronomy-admin: "|/home/mailman/mail/wrapper mailowner astronomy" astronomy-request: "|/home/mailman/mail/wrapper mailcmd astronomy" astronomy-owner: astronomy-admin Hit enter to continue with astronomy owner notification...
You or your users can now send requests to astronomy-request@example.com to get help and be added to the list. You can now use Mailman’s web- or email-based command interface to specify options for your new list. See the Mailman documentation to learn its options and other ways to work with the package.
Unsolicited Bulk Email (UBE), also referred to as Unsolicited Commercial Email (UCE), is commonly called spam. Spamming is the practice of sending mass mailings to large numbers of people who have had no prior relationship with the sender and who didn’t ask to receive such mail. Spam exists because it’s so cheap to send. The incremental cost of adding even hundreds of thousands of recipients to a mailing is relatively small, so spammers target as many email addresses as they possibly can. This chapter looks at the problem of spam and the tools Postfix provides to help limit the consequences.
There is a decidedly dishonest component to most spam. Spammers make no effort to match message content with a recipient’s interests, and their messages frequently lie, claiming that the recipient has an association with the company or its partners or in some way requested information. Messages are sometimes designed to look like an actual exchange between two people that was mistakenly misdelivered in the hopes of sparking interest in some product or service.
Spam frequently offers instructions to opt out from receiving more messages; however, in many cases this is simply a subterfuge on the part of the spammer to confirm that your email address is good. By replying to such messages, you confirm that your address is a legitimate one. Following the directions provided will more than likely cause your address to be added to more spammer lists.
Spammers often try to hide their trail so their messages cannot be traced back to them. They purposely use false return addresses and forge header information. They seek out misconfigured systems that allow them to relay anonymously. More recently spammers have broken into systems and installed their own secret relay servers. Spammers commonly encode their messages or insert random letters to circumvent spam filters.
Some of the techniques employed by spammers have sideeffects that make the problem much worse than the act of spamming itself. In their scatter-shot approach, spammers send messages to email addresses they think are likely to exist whether they actually do or not. Some launch dictionary assaults on mail servers where they run through preassembled lists of names hoping to find a match with a user on the mail server.
While spam may seem like a minor issue on a small scale, it is a significant problem on the Internet. A system hosting hundreds or thousands of users each receiving dozens or hundreds of unwanted messages every day can have substantial difficulties dealing with the onslaught. There is a real cost to the victims of spam. It unfairly uses the bandwidth and disk space of its recipients and their providers.
Other costs brought on by spam include technical support personnel time, when technicians or administrators must help users clean up flooded mailboxes. Sometimes the volume of spam can even make a system unusable for its intended purpose (clogging bandwidth or filling disk space). In such a case the effects of spam are no different from those of a denial-of-service attack. Even in less drastic circumstances, spam interferes with legitimate uses of email. Important messages can easily be overlooked in a flood of spam or mistakenly deleted when littered mailboxes are cleaned up.
A significant issue with spam is dealing with messages addressed to nonexistent users. Some mail systems recognize that a destination address is bogus and can reject mail before it is accepted; other systems must receive the mail first and then bounce it as undeliverable. The volume of bounces can easily clog a queue and interfere with the delivery of legitimate messages. Since the return addresses often don’t really exist, the bounces cannot be delivered and sit in the queue undergoing many redelivery attempts until they expire.
Another spamming trick is to use a legitimate return address that belongs to an innocent third party. The target or relay systems that receive the spam send bounce messages to the supposed sender, helpfully letting that person know that the recipient does not exist. In this case, thousands or millions of bounce messages will be delivered to the unfortunate victim in a phenomenon referred to as backscatter . This victim isn’t involved in any way in the original delivery of the spam. In most cases, the only solution for these completely innocent bystanders is to abandon the victimized address and start using a new one.
If you operate an email server on the Internet, you have a responsibility to make sure that you do not create an open relay that spammers can use as a launching point for their activities. An open relay is a mail system that permits outside systems to send mail to other outside systems, passing the messages along so that the originating system does not have to deliver directly to its target. Spammers constantly scan for misconfigured systems that permit them to relay mail. Before spam became such a problem on the Internet, mail administrators often operated open relays because it made their systems convenient for their users. Now nearly all SMTP software systems are configured by default not to be open relays. Postfix is no exception.
If your system is abused as an open relay, it will most likely be so bogged down with sending spam that its performance will be hindered for your legitimate users. If you choose to accept spam into your own system that is, of course, up to you, but you must take steps to ensure that your system is not used to abuse other systems. There is a good possibility that if spammers use your system to relay mail, your network will end up on a blacklist. Once your site is blacklisted, many sites will reject all messages from your network, both relayed spam and legitimate messages from your users. Chapter 4 discusses safely configuring Postfix to prevent your system from being abused.
As long as you’re not operating an open relay, you can be confident that your systems are not being used to harm other systems. Your next consideration is to protect yourself and your users by limiting the spam your network receives. Ideally, your mail server could simply reject any message that looks like spam. Unfortunately, whereas humans can look at a message and know instantly that it’s spam, computers have a tougher time detecting it without making mistakes. The ugly truth is that once you start to reject spam, there is always a risk that you will block legitimate correspondence.
Misidentifying a legitimate message as spam is referred to as a false-positive identification. Your anti-spam efforts are an attempt to detect as much spam as you can with the fewest possible false-positives. You have to weigh the size of your spam problem against the possibility of rejecting real email when deciding how aggressive to be in implementing your anti-spam measures. The extremes range from permitting all spam to accepting mail only from preapproved individuals. Preapproval may seem severe, but the problem is getting bad enough for some people that whitelist applications, where any correspondent you receive mail from must be identified ahead of time, are becoming more common.
There are two primary ways of detecting spam: identifying a known spamming client and inspecting the contents of a message for tell-tale phrases or other clues that reveal the true nature of a spam message. Despite the difficulties, postmasters can achieve some success with minimal false-positives by implementing various spam-detection measures.
Client-blocking techniques use I P addresses, hostnames, or email addresses supplied by clients when they connect to deliver a message. Each piece of information supplied can be compared to lists of items from known spamming systems. Spamming systems might be owned by actual spammers, but they might also be unintentionally open relays managed by hapless, (almost) innocent mail administrators. In either case, if a system is regularly sending you spam, you will probably decide to block messages from it. One problem with identifying spam by IP address, hostname, or email address is that these items are easily forged. While the IP address of the connecting system requires some sophistication to spoof, envelope email addresses are trivial to fake.
In a grass-roots effort to stem the tide of spam on the Internet, various anti-spam services, generally called DNS-based Blacklists (DNSBL) or Realtime Blacklists, have developed. These services maintain large databases of systems that are known to be open relays or that have been used for spam. A newer, increasingly more common problem is with systems that have been hijacked by spammers who install their own proxy software that allows them to relay messages. These hijacked systems can also be used in distributed denial-of-service attacks. There are DNSBL lists that are dedicated to listing these unwitting spam relays. The idea is that by pooling the information from hundreds or thousands of postmasters, legitimate sites can try to stay ahead of spammers.
Usually, these systems work by adding a DNS entry to their
domain space for each of the IP addresses in their database that
have been identified as spam-friendly open relays. For example, if
the host at IP address 192.168.254.31 has been identified as an
open relay, the (fictitious) DNSBL service No Spam Unlimited using a
domain name of nospam.example.com creates a DNS
entry like 31.254.168.192.nospam.example.com.
When a client connects to your Postfix system, Postfix can check the
No Spam DNS server to see if there is an entry for the client’s IP
address. If the IP address has been identified as an open relay
system, Postfix can reject the message.
Consider very carefully before you decide to make use of a DNSBL service. Many open relays used to forward spam also operate mail services for nonspamming users. You are very likely to block legitimate mail in addition to the spam. Also keep in mind that you are offloading to a third party the responsibility of making important decisions about who can and cannot send mail to your users. On the other hand, if you’re buried in spam, DNSBL services can definitely help. If you decide to use one, review their service options and policies very carefully. Again, you have to balance your aggressiveness and the likelihood of losing legitimate mail against the magnitude of your spam problem.
In addition to identifying clients, you can often recognize spam by its contents. Certain strings within email messages mark them as likely to be spam (“Our Rates Have Never Been Lower!!”). But trying to distinguish spam by the contents of the message can be problematic. Imagine that you receive lots of spam offering new house mortgages. You figure you can eliminate most of it by blocking messages that contain words like “really low interest rate on a new mortgage.” This may indeed block many spam messages, but you might also block a message from your friend (or one of your user’s friends) who just got a great deal on a new house and wrote to tell you about it.
The problem with both client- and content-based techniques to identify spam is that spammers are constantly finding ways to get around them. There is a sort of arms race going on between legitimate users of email and spammers. You can compile lists of open relays, but spammers expend a great deal of effort seeking out new open relays or proxy servers to abuse (and there always seem to be more of them).
You may discover that you receive a lot of spam with the same return address. You can block messages that use that return address, but spammers use hit-and-run tactics. They obtain an email address from one of the free email sites and use that address to send thousands or millions of spam messages, and then discard it for another. Within a couple of days, you’ll never see the address you listed again.
Even content filters have to adjust for spammers escalating tactics. Some spammers embed HTML codes within the words of their messages to break up phrases you might filter against. Or they encode the entire message so that when Postfix scans it for recognized spam phrases, there are no intelligible phrases. Most email clients oblige users by automatically rendering such messages—decoding or ignoring extraneous HTML codes. Recipients often don’t even notice that the message had originally been encoded.
Broadly speaking you have a few choices once you have detected spam:
Reject spam immediately during the SMTP conversation. Rejecting spam outright is an attractive idea because you never have to store a copy of the message and worry about what to do with it. The sender of the message is responsible for handling the error. If your site has a low tolerance for rejecting legitimate messages, you might prefer to accept suspect messages and develop a process to review them periodically to make sure that there are no good messages in with the bad.
Save spam into a suspected spam repository. If you save the suspect messages and review them periodically, you can be sure that you don’t miss any legitimate mail. The task is cumbersome and usually requires frequent reviews, so you may not gain much over allowing suspect messages into users’ mail boxes.
Label spam and deliver it with some kind of spam tag. This option provides users with flexibility in determining their own tolerance for spam versus their sensitivity to missing real messages. Postfix doesn’t currently have a built-in mechanism for labeling spam. You can easily have Postfix work with an external content filter to handle the labeling (see Chapter 14). If the content filter delivers tagged messages to individual users, they can configure their email software to deal with it according to their own preferences.
When using an MTA for spam detection, the rejection option is usually best. If you want more flexibility, consider using options that filter spam at the MDA or MUA level. A combination of spam filtering is also a good alternative. You can configure Postfix to reject the obvious spam, allowing suspicious messages through to the next level where another agent can perform the most appropriate action.
Postfix really excels in its tools to help you identify spam clients and reject them. Rejecting messages with Postfix requires fewer system resources than invoking external filters after the message has been accepted. If you are concerned about losing legitimate mail, there are still a couple of safety measures available that we’ll look at when configuring Postfix.
The rest of this chapter discusses the various types of UBE checks Postfix provides. It considers four different categories of spam detection which are listed below.
Four parameter rules that work with pieces of the client identity. Each rule is assigned a list of one or more restrictions that can explicitly reject or accept a message or take no position one way or the other (commonly indicated as DUNNO). For example, you can configure a rule that includes a restriction to reject a particular client IP address.
Parameters that check for strict adherence to the standards. Since spammers often don’t follow the published standards, you can reject messages that come from misconfigured or poorly implemented systems. Some of the client restrictions also fall under this category.
You can check the headers and the body of each message for tell-tale regular expressions that indicate probable spam.
You can define complex client-detection rules with restriction classes. These allow you to combine restrictions into groups to form new restrictions.
When configuring Postfix to detect spam, you also specify what to do with messages identified as spam. In general, Postfix can reject them outright, separate them into a different queue, or pass them along to an external filter.
Postfix provides the following rules that are assigned restrictions based on client information:
Each one corresponds to a step of the SMTP transaction. At each step, the client provides a
piece of information. Using the client-supplied information, Postfix
considers one or more restrictions that you assign to each rule. Figure 11-1 shows an SMTP
conversation along with the client rule applied at each step. The
header_checks and body_checks are discussed later in the
chapter.
Let’s review the SMTP conversation to see where each of the parameters fits in.
The SMTP conversation in Figure 11-1 should be familiar to you from Chapter 2. Example 11-1 shows the log entries for the transaction. First, an SMTP client connects to Postfix over a socket. Because of the way sockets function, Postfix learns the IP address of the client when it establishes the connection. You don’t see the client IP address in the figure, but it is logged by Postfix. You can accept or reject a message based on the client hostname or IP address, thus blocking specific hostnames or IP and network addresses.
1. postfix/smtpd[866062]: connect from mail.ora.com[10.143.23.45] 2. postfix/smtpd[866062]: D694B20DD5B: client=[10.143.23.45] 3. postfix/cleanup[864868]: D694B20DD5B: \ message-id=<20030106185403.D694B20DD5B@smtp.example.com> 4. postfix/qmgr[861396]: D694B20DD5B: from=<info@ora.com>, \ size=486, nrcpt=1 (queue active) 5. postfix/local[864857]: D694B20DD5B: to=<kdent@smtp.example.com>, \ relay=local, delay=98, status=sent (mailbox) 6. postfix/smtpd[866062]: disconnect from mail.ora.com[10.143.23.45]
Once connected, the client sends a HELO command with an identifying hostname. The hostname
provided can be used to accept or reject a message using smtpd_helo_restrictions .
In the next step, the client issues a MAIL FROM command to indicate the sender’s email address,
followed by a RCPT TO command to indicate the recipient’s email
address.
If everything is acceptable up to the point of the DATA command, the
client is permitted to send the contents of the message, which consist
of message headers followed by the message body. Postfix provides
another opportunity to reject the message based on its contents (see
Section 11.9 later in
this chapter). If the final header and body checks are acceptable, the message is
delivered.
Postfix indicates to the client that it has rejected a message by sending reply codes. Standard reply codes are described in Chapter 2. In this chapter, we consider codes in the 4xx and 5xx range. More information appears in a sidebar later in this chapter.
When you assign restrictions to Postfix UBE rules, it is not necessary to use all of the rules. You can define restrictions for the ones you need and leave out the others. The default setting if no rules are set in main.cf looks like the following:
smtpd_client_restrictions =
smtpd_helo_restrictions =
smtpd_sender_restrictions =
smtpd_recipient_restrictions =
permit_mynetworks, reject_unauth_destinationThis prevents your system from being an open relay by allowing any computer on your network to relay while rejecting all others unless they are sending messages destined for one of your users.
There are many restrictions available. Table 11-1 lists each one
along with the client information it operates on. One important
concept that confuses many people at first is that any of these
restrictions can be used in any rule. While it may seem logical that
check_helo_access should be
assigned to smtpd_helo_restrictions, it could equally be
assigned to smptd_sender_restrictions or any of the
others. This gives you a lot of flexibility in ordering your
restrictions when deciding what to accept and what to block.
Restrictions | Client-supplied information |
check_client_access
| Client IP address or hostname |
reject_rbl_client | |
reject_rhsbl_client | |
reject_unknown_client | |
check_helo_access
| |
permit_naked_ip_address | |
reject_invalid_hostname | |
reject_non_fqdn_hostname | |
reject_unknown_hostname | |
check_sender_access
| |
reject_non_fqdn_sender | |
reject_rhsbl_sender | |
reject_unknown_sender_domain | |
check_recipient_access
| |
permit_auth_destination | |
permit_mx_backup | |
reject_non_fqdn_recipient | |
reject_unauth_destination | |
reject_unknown_recipient_domain | |
reject_unauth_pipelining | |
You’ll notice from Table
11-1 that some rules take an argument of the form
maptype:mapname.
The mapname refers to a normal Postfix
lookup table whose lefthand key is matched against the piece of client
information, and the righthand value is the action to perform. Access
maps are discussed in Restriction Definitions following.
Each of the nonaccess map restrictions
evaluates to or returns one of three possible
values that determine what action Postfix takes with the message: OK, REJECT, and DUNNO. (Access maps can also
return the same values, but they allow additional actions as well.)
The restrictions are evaluated in the order you list them. During
processing, if a rule returns an explicit REJECT, the message is
immediately rejected. If a rule returns an explicit OK, the
processing stops for that
parameter but continues on to the next until all of the
assigned rules have been evaluated or Postfix encounters a
rejection. It’s important to note that a rule might explicitly
accept a message, but it can still be rejected by another rule’s
restrictions. If the set of rules comes to no definite conclusion
(all DUNNOs), the default action is to accept the message. Any
single parameter can reject a message, but all of them must accept
it in order for it not to be rejected. There are generic
restrictions such as permit
and reject that
return explicit OK or REJECT values without considering any of the
client information.
When a rule evaluates to REJECT, by default Postfix
does not actually reject the message until after the client has sent
the RCPT TO command. Even though it may know at the HELO command that it’s going to reject
this client, it waits until after it receives the RCPT TO command before returning the
reject code. The reason for this default is that some SMTP clients
do not check that they have been rejected during the transaction and
continue trying to deliver the message. In such a case, you end up
with connections that last longer than they should and several
warning messages in your log file. Another advantage to the default
is that you get more complete information in your log. If you want
to change the default to have a rejection take effect as soon as
possible, set the parameter smtpd_delay_reject in main.cf:
smtpd_delay_reject = no
You might want to do this in a controlled environment where you know all of the connecting SMTP clients are well-behaved; otherwise, the default makes sense for most situations.
A useful parameter for testing new restrictions is
soft_bounce :
soft_bounce = yes
When it is set, hard reject responses (5xx) are
converted to soft reject responses (4xx). When you add a new
restriction that you’re not sure about, you might want to turn
soft_bounce on and then watch
your logs for what’s rejected so that you can fine-tune your
settings by the time another delivery attempt is made.
Another useful option for testing restrictions is the warn_if_reject qualifier. Simply precede any restriction with it to
have that restriction log a warning instead of rejecting a message.
If you’re not sure what effect a new restriction will have in your
environment, you can try it out with warn_if_reject, and then implement it
completely only if it works as you expect:
smtpd_recipient_restrictions =
permit_mynetworks
reject_unauth_destination
warn_if_reject reject_invalid_hostname
reject_unknown_recipient_domain
reject_non_fqdn_recipientIn this example, if a client uses an invalid HELO hostname when delivering a message,
Postfix logs a warning but still delivers the message (assuming it’s
not blocked for other reasons).
Before moving on to the restriction definitions, let’s consider a simple example:
smtpd_recipient_restrictions =
permit_mynetworks
reject_unauth_destination
reject_invalid_hostname
reject_unknown_sender_domainThis example expands on the default configuration with two
additional restrictions. When a client connects, if it’s from your
own network, permit_mynetworks
returns OK, so it is allowed to send mail. The other
restrictions are not checked. If the client is from outside your
network, permit_mynetworks does
not return OK and does not return REJECT, so it returns DUNNO.
Postfix then checks reject_unauth_destination .
If the message is not addressed to somebody at one of your
destination domains, it returns REJECT; otherwise, it returns DUNNO.
Assuming it returns DUNNO, Postfix then checks reject_invalid_hostname , which says to return REJECT if the hostname supplied
with the HELO command is not
valid. Otherwise, it returns DUNNO. Finally, Postfix checks reject_unknown_sender_domain , which returns REJECT if the domain name of the
address supplied with the MAIL
FROM command does not have a valid DNS entry. If none of
the restrictions has rejected the message, Postfix accepts it for
delivery.
There are six types of restrictions introduced below. Each of the restrictions are defined in the sections that follow.
Restrictions of the form check_*_access point to lookup tables
that might list IP addresses, hostnames, or email addresses
(depending on the parameter) that should be accepted or rejected
by Postfix.
Other client restrictions compare the client
information to general configuration information instead of
access tables. An example is permit_mynetworks, which you saw
earlier.
Some restrictions tell Postfix to enforce SMTP standards very strictly. Since spammers often misconfigure or use poorly implemented software, you can stop a lot of spam by making sure that connecting clients follow the rules.
DNS-checking rules ensure that DNS information is correct. Spammers often work from networks that do not configure DNS correctly. Unfortunately, rules of this type are appropriate only for a very aggressive anti-spam stance because of the number of legitimate sites that also do not configure their DNS correctly.
Real-time blacklists are services listing suspected spamming clients. Postfix can check with real-time blacklist services and reject clients based on their listing.
Generic rules explicitly reject or accept a message. They usually specify your default stance if a message isn’t explicitly accepted or rejected elsewhere. Since these rules will always accept or reject a message, they should come last in your list of rules.
Restrictions in the client-checking category all point to access map files. Access maps are simply a type of Postfix lookup table (see Chapter 4 for more information about lookup tables). In the lookup table, you specify the client information as a key and the action to take (accept or reject) as the value:
check_client_access
maptype:mapnameThe check_client_access restriction points to an access table
containing entries with IP addresses, network addresses,
hostnames, and parent domains to match against the client IP
address. (Postfix performs a reverse lookup on the IP address
to obtain a hostname to compare host and parent domain name
information.) Each entry includes an action to take when the
IP address matches a key.
check_helo_access
maptype:mapnameThe check_helo_access
restriction points to an access table
containing hostnames and parent domains to match against the
host information supplied with the HELO command. Each entry includes an
action to take when the supplied host information matches a
key.
check_recipient_access
maptype:mapnameThe check_recipient_access restriction points to an access table
containing entries with email addresses, domains, and local
parts to match against the address specified with the RCPT TO command. Each entry includes an action to take
when the supplied address matches a key.
check_sender_access
maptype:mapnameThe check_sender_access restriction points to an access table
containing entries with email addresses, domains, and local
parts to match against the address specified with the MAIL FROM command. Each entry includes an action to take
when the supplied address matches a key.
The restrictions check_sender_access and check_recipient_access both check a
supplied email address. For them, the key in your index file
can be an email address (user@example.com) to
match a specific address, a domain name (http://example.com) to match the domain name
portion or subdomains of the address, or the local part of an email
address (user@) to match all addresses using
the specified local part.
The rules check_client_access and check_helo_access compare the key to a
supplied hostname or IP address. The index file pattern can be
a hostname, an IP address (192.168.143.23), or a network address
specified by the initial octets of the address (10 or 10.12 or 10.12.154).
Actions can be indicated as follows:
Accept the item. Processing for the current rule stops. Postfix moves on to the next restriction rule.
Reject the item. You can optionally specify a
short string of text to be used in the reply and with logging
for this message; otherwise, Postfix uses the general reply
code and text configured for the restriction. The parameter
access_map_reject_code
contains the default reply code for the check_*_access rules and maps_rbl_reject_code contains the
default reply code for reject_maps_rbl. If you don’t
specify a value, they both default to 554.
Stop checking entries for the lookup table. Postfix moves on to the next restriction for the current rule.
Redirect the message to a content filter. You must specify a transport and next hop as you would in a transport table.
Place the message in the hold queue. You can optionally specify a short string of text to be logged; otherwise, Postfix logs a generic message.
Report a successful delivery to the client, but drop the message. You can optionally specify a short string of text to be logged; otherwise, Postfix logs a generic message. Don’t use this action unless you have carefully considered the ramifications. Silently dropping messages runs counter to the expected behavior of email systems. When dealing with spam, dropping messages might be the best course of action, but discarding any legitimate mail can affect the overall perceived reliability of Internet email.
message textReject the message. The response sent to the client is the numerical code you specify. A response in the 4xx range tells the client there is a temporary problem; queue the message and try delivery later. (See sidebar.)
message textReject the message. The response sent to the client is the numerical code you specify. A response in the 5xx range tells the client there is a permanent problem; send a bounce notification to the original sender. (See sidebar.)
You can also set up regular expression tables for access maps. In most cases, it probably doesn’t make sense to use a regular expression table for your access lists. Postfix already breaks up email addresses, domains, and IP addresses into the individual pieces to make its comparisons, so you really don’t gain much through regular expressions here. On the other hand, regular expression tables work very well for header and body checks, which are discussed later in this chapter.
Let’s expand the configuration example with some access maps:
smtpd_client_restrictions =
check_client_access hash:/etc/postfix/client_access
smtpd_sender_restrictions =
check_sender_access hash:/etc/postfix/sender_access
smtpd_recipient_restrictions =
permit_mynetworks
reject_unauth_destination
reject_invalid_hostname
reject_unknown_senderWe’ve now added restrictions to consult the lookup tables client_access and sender_access.
The client_access file can have entries like the following:
10.157 REJECT 192.168.76.23 REJECT currentmail.com REJECT
and the sender_access file can have entries like the following:
hardsell@example.com REJECT marketing@ REJECT specials.digital-letter.com REJECT
The following client restrictions make their decisions by comparing client-supplied information to the local Postfix configuration. The default rules fall under this category.
permit_auth_destinationPermits a request if the resolved destination address
matches a hostname or subdomain where the Postfix system is
the final destination for the message or a relay for the final
destination. Final destinations are listed in mydestination, inet_interfaces, virtual_alias_maps, or virtual_mailbox_maps, and relays are
listed in relay_domains.
Furthermore, the address must not contain any sender-specified
routing (e.g., user@example.com@example.net).
If permit_auth_destination
does not find a match, it returns DUNNO rather than REJECT.
Postfix continues to check all subsequent restriction
rules.
permit_mynetworksAllows a request if the client IP address matches any of
the addresses listed in the mynetworks parameter. You normally
use this restriction to exclude local clients from other UBE
restrictions and to allow them to relay through your SMTP
server.
reject_unauth_destinationRejects a request if the Postfix system is not the final
resolved destination email address or a relay for the final
destination. Final destinations are listed in mydestination, inet_interfaces, virtual_alias_maps, or virtual_mailbox_maps, and relays are
listed in relay_domains.
Addresses must not contain any sender-specified routing (e.g.,
user@example.com@example.net). The relay_domains_reject_code parameter
specifies the response code for rejected requests. The default
is 554.
Restrictions in the strict syntax category check for misconfigured clients and reject mail when they don’t comply with the standards. These rules can detect a lot of spam, but they might also reject legitimate clients. You should study the nature of your spam and real messages to see which rules will benefit you most without rejecting real messages. You can use access maps with OK actions to whitelist known senders that would otherwise be rejected.
reject_invalid_hostnameRejects a request if the hostname supplied with
the HELO command is not a
valid hostname. The invalid_hostname_reject_code
parameter specifies the response code for rejected requests.
The default is 501. Most legitimate senders use valid
hostnames.
reject_non_fqdn_hostname Rejects a request if the hostname supplied with
the HELO command is not in
the fully qualified form, as required by the RFC. The non_fqdn_reject_code parameter specifies the response code for
rejected requests. The default is 504.
reject_non_fqdn_recipientRejects a request if the address supplied with
the RCPT TO command is not
in the fully qualified form, as required by the RFC. The
non_fqdn_reject_code
parameter specifies the response code for rejected requests. The default
is 504. Most legitimate senders use fully qualified domain
names.
reject_non_fqdn_senderRejects a request if the address supplied with
the MAIL FROM command is
not in the fully qualified form, as required by the RFC. The
non_fqdn_reject_code
parameter specifies the response code for rejected requests.
The default is 504.
reject_unauth_pipelining Pipelining is a technique supported by Postfix
to speed up bulk mail deliveries by sending multiple SMTP
commands at once. The protocol requires that clients first
check that the server supports pipelining. Some clients
incorrectly begin pipelining before they confirm that Postfix
actually supports it. The rule reject_unauth_pipelining immediately
rejects such requests. There is no more processing, and the
message is rejected.
The DNS checking rules make sure that clients and email envelope addresses are sent from domains that have valid DNS information. It would be a great improvement to email in general if postmasters could always require valid DNS information because it would be harder for spammers to hide. Unfortunately, there are too many legitimate domains that do not configure their DNS correctly for such strictness to be practical. You should study the nature of your spam and real messages to see which will benefit you most without rejecting false-positives. You can use access maps with OK actions to whitelist known senders that would otherwise be rejected.
reject_unknown_clientRejects a request if the client IP address has no DNS
PTR record or if a follow-up lookup on the
hostname listed in the PTR record does not match the
connecting IP address. The unknown_client_reject_code
parameter specifies the response code for
rejected requests. The default is 450. If you change the
default, the reply code you specify is returned except when
there is a temporary DNS error. In this case, your change is
overridden and Postfix returns 450. This rule tends to find
many false-positives for spam because it seems to be very
common to have PTR records misconfigured or not configured at
all.
reject_unknown_hostnameRejects a request if the hostname supplied with the
HELO command doesn’t have
either a DNS A or MX record. The unknown_hostname_reject_code
parameter specifies the response code for
rejected requests. The default is 450. If you change the
default, the reply code you specify is returned except when
there is a temporary DNS error. In this case, your change is
overridden and Postfix returns 450. Many clients do not use a
fully qualified hostname and would be rejected by this
restriction.
reject_unknown_recipient_domainRejects a request if the domain name of the address
supplied with the RCPT TO
command doesn’t have either a DNS A or an MX record. The
unknown_address_reject_code
parameter specifies the response code for
rejected requests. The default is 450. If you change the
default, the reply code you specify is returned except when
there is a temporary DNS error. In this case, your change is
overridden and Postfix returns 450.
reject_unknown_sender_domainRejects a request if the domain name of the address
supplied with the MAIL FROM
command has neither an A nor an MX record in DNS. The unknown_address_reject_code
parameter specifies the response code for
rejected requests. The default is 450. If you change the
default, the reply code you specify is returned except when
there is a temporary DNS error. In this case, your change is
overridden and Postfix returns 450.
Since the MAIL FROM
address is the address that bounce notifications must
be sent to, it makes sense to require a known domain name. It is
highly recommended that you include this rule in your
restrictions.
Restrictions for real-time blacklists cause Postfix to perform DNS lookups using client information with domains you specify to determine if a client is listed with one of the DNSBL services:
reject_rbl_client domain
nameRejects a request if a DNS lookup of a hostname composed of the octets of the client IP address in reverse in the specified domain lists an A record.
reject_rhsbl_client domain
nameRejects a request if the client hostname has an A record under the specified domain.
reject_rhsbl_sender domain
nameRejects a request if the domain of the sender address has an A record under the specified domain.
With what we know so far, let’s trace what happens with
some simple HELO restrictions.
Consider that smtpd_helo_restrictions is assigned the following rules:
smtpd_helo_restrictions =
check_helo_access hash:/etc/postfix/helo_access
reject_invalid_hostnameand helo_access contains the following entries:
greatdeals.example.com REJECT oreillynet.com OK
Let’s follow four different scenarios when clients connect with
different HELO commands:
HELO examplePostfix first encounters the check_helo_access rule pointing to the
helo_access lookup table.
In checking the lookup table, it does not find the specified
hostname example, so it moves on to the
reject_invalid_hostname
rule. Since example is not a
complete hostname as required by the standard, Postfix rejects
the message.
HELO
greatdeals.example.comPostfix first encounters the check_helo_access rule pointing to the
helo_access lookup table.
In checking the lookup table, it finds an entry for
greatdeals.example.com with an action of
REJECT. Postfix, therefore, rejects the message.
HELO
oreillynet.comPostfix first encounters the check_helo_access rule pointing to the
helo_access lookup table.
In checking the lookup table, it finds an entry for http://oreillynet.com with an
action of OK. Postfix stops processing for the smtpd_helo_restrictions parameter
without considering any of the other restrictions and moves on
to smtpd_sender_restrictions
if specified.
HELO mail.ora.comPostfix first encounters the check_helo_access rule pointing to the
helo_access lookup table.
In checking the lookup table, it does not find the specified
host mail.ora.com, so it moves on to the
reject_invalid_hostname
rule. Since mail.ora.com
conforms to the format required by the standard, Postfix
continues to the smtpd_sender_restrictions if
specified.
There are two parameters configured in main.cf that require strict adherence to Internet email
standards. Enable the smtpd_helo_required parameter to require that SMTP clients start the conversation with the HELO/EHLO verb, as described in the SMTP RFC. By
default Postfix is rather lenient with clients that do not follow the
protocol exactly. If you specify smtpd_helo_required = yes, and a client skips
this step, Postfix rejects the message. The RFC also specifies exactly
how envelope addresses should be formatted. Normally, Postfix
accepts nearly any envelope address that it can make sense of, but if
you specify strict_rfc821_envelopes =
yes , Postfix rejects messages from clients that do not send
correctly formatted addresses.
In actual practice, it’s probably a good idea to require HELO because most clients at least follow the
basic steps of the protocol. On the other hand, there are a number of
clients that don’t get address formatting correct. Being too strict here
might lose legitimate messages.
The last chance you have to reject a message from Postfix directly is by checking the contents of the message itself. Postfix offers simple content checking through the parameters:
These checks are an all-or-nothing feature with Postfix. There is no way to bypass checks for certain senders or recipients. For more sophisticated analysis, you should use a separate content filter specifically designed to detect spam. See Chapter 14 for more information on using filters with Postfix.
Each parameter points to a lookup table containing regular expression patterns and actions. The patterns are compared to strings within email messages. If Postfix finds a match, the specified action is executed. By default regular expression checking is not case-sensitive. See Chapter 4 for information on using regular expressions with Postfix lookup tables.
By default mime_header_checks and nested_header_checks use the same lookup
tables as header_checks. If you want to distinguish checks for each one, you can
configure them separately; otherwise, configuring header_checks causes mime_header_checks and nested_header_checks to use the same
patterns as header_checks. When you
assign the checking parameters, indicate both the lookup table and which type of regular expression you
are using (see Chapter 4):
header_checks = regexp:/etc/postfix/header_checks body_checks = regexp:/etc/postfix/body_checks
In a pattern-checking lookup table, the lefthand key is a regular expression enclosed by two delimiters (usually forward slashes):
/match string/ REJECT
A typical header_checks file contains lines like the following:
/free mortgage quote/ REJECT /repair your credit/ REJECT /take advantage now/ REJECT
If any of the strings shown appear in any of the headers of a message (these would most likely show up in the Subject: header), the message is rejected. Postfix logs the rejection along with the offending line, and if you specified a message, it is also logged and sent to the client.
The right hand action can be one of the following values. The values that allow an optional text message are indicated. The specified message is sent to the client and logged with the rejection. If you don’t supply a message, Postfix uses the default.
Rejects the message when a line from the message matches the regular expression.
Logs a rejection without actually rejecting the message. This action is useful for testing a regular expression to see what happens in the log before using a REJECT to actually reject the message.
Provides a way to delete headers or lines from the body of a message. If the regular expression matches, the line is dropped from the message. This can be useful to strip out internal network information before sending a message outside your network. Be careful about what you delete since most headers are required by the standards and can be very useful in tracking down email problems.
Causes the message to be placed in the HOLD queue. See Chapter 5 for information about the HOLD queue.
Causes Postfix to claim successful delivery and silently discard the message. Sometimes spammer software won’t take no for an answer. Even if you reject the message with a 5xx error, the client continues to try to deliver it. DISCARD makes it look as if the message was delivered even though it was simply thrown away. DISCARD can also be useful to minimize the backscatter problem mentioned earlier in the chapter. If an innocent user’s email address is used as the sender address, you can claim successful delivery, so that the innocent user does not receive bounce messages.
After queuing the message, Postfix sends it through a separate content filter. See Chapter 14 for more information about setting up separate content filters.
Actions cannot include specific error reply codes or customized restrictions as with access maps.
Header checks compare each header against every pattern in the listed lookup files. Multiline headers are combined into a single line before making comparisons. Each pattern is checked in the order you list them, and checking stops as soon as Postfix finds a match, at which point the message is handled according to the action you specified.
The patterns indicated by the body_checks parameter are checked against each line of the body of
the message. Lines are compared one at a time, and each one is checked
against every pattern in the order you list them. Checking stops as
soon as Postfix finds a match, at which point the message is handled
according to the action you specified.
Very long body lines are compared in chunks that are at most as
long as the value of the parameter line_length_limit . The default is 2048. Also, by default, Postfix checks
the contents of the body only up to the value of body_checks_size_limit . The default is 50 KB. Message headers are compared in
chunks that are limited by header_size_limit. These limits are useful
in preventing Postfix from scanning the entire file when messages
contain large attachments.
Some administrators use header checks for simple virus scanning. You can reject all messages that include attachments with file extensions that might be dangerous to your users:
/name ?="?.*\.(bat|com|dll|exe|hta|pif|vbs)"?/ REJECT
You should include any other extensions that you know might pose a problem for your users. Be aware, however, that this pattern is not really sufficient for true virus scanning since you are certain to miss some extensions, and many PC clients may execute files regardless of their extension.
A typical body_checks file contains lines like the following:
/increase your sales by/ REJECT /lowest rates.*\!/ REJECT /in compliance (with|of) strict/ REJECT /[:alpha:]<!--.*-->[:alpha:]/ REJECT Suspicious embedded HTML comments
The second line matches any string that starts with “lowest rates” followed by any text leading to an exclamation point (“We have our lowest rates in 40 years!”). The fourth line checks for HTML comments that are embedded in the middle of words. Remember that this is a common spammer trick to defeat your content filters, but it’s also a dead giveaway that the message contains spam.
You can test your regular expressions with the postmap command. Place the contents of a message into a file, then redirect the file to postmap:
$ postmap -q - regexp:/etc/postfix/body_checks < msg.txt
opportunity. increase your sales by 500%. Consider REJECTpostmap prints any lines that match any of the regular expressions along with the action specified.
Study the spam you receive to refine and add to your patterns. However, be aware of potential performance problems with poorly written regular expressions. Another potential issue with content checking is that there is no way to whitelist individual messages that you might want to receive despite their containing phrases that trigger a rejection. In particular, if a message is whitelisted during the restriction parameter checking (described earlier in this chapter), it might still be rejected by header and body checks.
As you create rules for detecting spam, keep in mind that your users may differ in what balance they’ll accept between some spam and the possibility of blocking some real messages. If you must create different rules for different users, it’s probably best not to try to accomplish this with an MTA. Instead consider a specialized delivery agent such as procmail, maildrop, or sieve to set up per-user UBE rules. You can use Postfix to set up broad per-user class restrictions, as you’ll see in the next section.
Restriction classes provide the last wrinkle in the Postfix anti-spam parameters. They allow you to define a set of restrictions that you can assign to the righthand side of an access table. They cannot be used in header and body checks—only in access tables. Restriction classes let you set up different restrictions for different clients, senders, and recipients. Restriction classes are a powerful tool that can provide great flexibility in Postfix UBE restrictions. If you require any sort of complicated rules to block spam, it is well worth your while to invest the time to understand restriction classes.
Restriction classes are particularly useful when you need to create exceptions to your normal restrictions. To illustrate with an example, let’s create two classes of users. One group wants to receive all messages addressed to them whether or not the messages are spam. The other group prefers particularly stringent checks against spam even at the risk of losing some legitimate mail.
We’ll call the two classes “spamlover” and “spamhater.”
You must list all of the restriction classes you plan to define in the
smtpd_restriction_classes
parameter:
smtpd_restriction_classes = spamlover, spamhater
We’ve invented the names of the classes, but once listed with
smtpd_restriction_classes, they can
be treated like any other restriction rule. You can assign a list of
restrictions to be considered for the class. Once defined, the
restriction class can be used as an action in an access table. When
Postfix encounters the class, it steps through the assigned
restrictions.
We’ll define “spamhater” with several restrictions:
spamhater =
reject_invalid_hostname
reject_non_fqdn_hostname
reject_unknown_sender_domain
reject_rbl_client nospam.example.comand “spamlover” with a simple “permit”:
spamlover = permit
You could, of course, refine these with restrictions that make sense for your own configuration.
Now that the restriction classes have been declared and defined, you can put them to use by assigning the appropriate class to each of our recipients in a lookup table. We’ll call the table per_user_ube.
# # per_user_ube # abelard@example.com spamhater heloise@example.com spamlover
Next, tell Postfix that it should check your recipient lookup table when checking restrictions:
smtpd_recipient_restrictions =
permit_mynetworks
reject_unauth_destination
check_recipient_access hash:/etc/postfix/per_user_ubeWhen a message comes in addressed to
abelard@example.com, Postfix goes through the
normal default restrictions and then encounters check_recipient_access pointing to the
recipient lookup table. Postfix finds the recipient address in the
file, reads the action spamhater,
and then invokes the restrictions defined for spamhater. If any of the “spamhater”
restrictions returns REJECT, Postfix rejects the message; otherwise,
it is delivered. Messages for heloise@example.com
go through the same process, but when Postfix checks the “spamlover”
restrictions, it finds permit and
immediately accepts the message.
Now that we’ve covered the many aspects of Postfix’s anti-spam arsenal, we’ll finish with an example configuration. Requirements vary considerably from site to site, so it’s impossible to make actual recommendations apart from the considerations that have been discussed in this chapter. Example 11-2 can provide a starting point, but you must decide for yourself which restrictions fit your own circumstances.
smtpd_restriction_classes =
spamlover
spamhater
spamhater =
reject_invalid_hostname
reject_non_fqdn_hostname
reject_unknown_sender_domain
reject_rbl_client nospam.example.com
spamlover = permit
smtpd_helo_required = yes
smtpd_client_restrictions =
check_client_access hash:/etc/postfix/client_access
smtpd_helo_restrictions =
reject_invalid_hostname
check_helo_access hash:/etc/postfix/helo_access
smtpd_sender_restrictions =
reject_non_fqdn_sender
reject_unknown_sender_domain
check_sender_access hash:/etc/postfix/sender_access
smtpd_recipient_restrictions =
permit_mynetworks
reject_unauth_destination
reject_non_fqdn_recipient
reject_unknown_recipient_domain
smtpd_data_restrictions =
reject_unauth_pipelining
header_checks = /etc/postfix/header_checks
body_checks = /etc/postfix/body_checksYou should enter IP and email addresses into the access tables
from messages you receive that you have identified as spam. It’s very
difficult to block a lot of spam with the check_helo_access and check_sender_access restrictions because it’s
so easy for spammers to fake that information. There is effectively an
unlimited number of addresses and hostnames spammers might use. This
makes it nearly impossible to keep up with them. Since it’s so easy to
fake this information, you might be blocking legitimate hosts and
addresses that just have the bad luck of having their information used
by spammers.
But these checks can be useful against messages that repeatedly
use the same forged information and spammers that don’t attempt to cover
their tracks. Some online marketing services use their real information
when sending spam. These sites might even honor removal requests, but if
you object to having to request a removal from companies you’ve never
heard of, you can block them based on the HELO or MAIL
FROM information.
You can also block sites that you don’t want to hear from whether they’re real or fake. Mail from a site you consider objectionable is one example. Also, if you believe it’s impossible that you would be receiving messages from the Republic of Maldives, you could block addresses and hostnames using the Republic of Maldive’s top-level domain. Keep in mind, however, if you run a mail system for many users, you probably shouldn’t force your own moral attitude on everyone, or assume your users don’t have Maldivian relatives or a special interest in the cuisine.
The basic SMTP protocol does not provide a mechanism to authenticate users. Since email envelope addresses are so easy to fake, you can’t know who is sending mail to your server unless you have a reliable means to authenticate clients. To allow mail relay privileges on your server, you need assurance that senders are who they claim to be, and you cannot rely on the senders’ email addresses as identification. In this chapter, we look at using the Simple Authentication and Security Layer (SASL) as a means to control mail relaying and generally to identify who is using your mail server.
You might want to provide access to individuals using your mail server as their SMTP server, or to other MTAs that relay through your system. We’ll also look at configuring Postfix to provide its own credentials to other MTAs that may require authentication before permitting email delivery or relaying. Chapter 4 discusses the mail relay problem in general, and some other solutions to consider.
Because you lock down your mail servers to prevent unauthorized relaying, some of your users might have trouble sending email when they are not on your network. If you have users that travel with laptops, for example, they will likely connect through a nearby ISP and get an IP address from its dial-up pool. Or perhaps you have users that work from home. In any case, whenever you don’t know what users’ IP addresses will be, SASL can provide the means to reliably identify them.
RFC 2554, “SMTP Service Extension for Authentication,” provides an extension to the basic SMTP protocol that allows clients to authenticate to an SMTP server using the SASL protocol. We’ll show how to use the Cyrus SASL libraries from Carnegie Mellon to add SASL to Postfix. You may optionally also want to add support for TLS (see Chapter 13). TLS (formerly SSL) is most commonly used to encrypt conversations between web browsers and servers, but works equally well for mail servers and clients. Since some of the SASL password mechanisms transmit passwords as plaintext, you can use TLS to make sure your passwords are not sent in the clear.
Adding SASL to Postfix requires that you have the Cyrus libraries on your system and that your Postfix system be compiled with them. Remote users must configure their email clients to send a login and password when they want to relay mail through your system. Most modern email clients make this a fairly easy configuration option.
SASL is a general method to add or enhance authentication in client/server protocols. Its primary purpose is to authenticate clients to servers. When you configure SASL, you must decide on both an authentication mechanism , for the exchange of authentication information (commonly referred to as user credentials), and an authentication framework for how user information is stored. The SASL authentication mechanism governs the challenges and responses between the client and server and how they should be encoded for transmission. The authentication framework refers to how the server itself stores and verifies password information. Figure 12-1 illustrates these two processes. Once an authentication is successful, the server knows the user’s identity and can determine which privileges the identified user should have. In the case of Postfix, it is the privilege to relay mail. You can also optionally limit identified users to using a particular sender address when they relay mail.
The client and server must agree on the authentication mechanism they’ll use. (See the Cyrus documentation for currently supported mechanisms.) Some of the more common mechanisms are listed below:
The PLAIN mechanism is the simplest to use, but it does not include any encryption of authentication credentials. You may want to use TLS (see TLS information in Chapter 13) in conjunction with the PLAIN mechanism. The login and password are passed to the mail server as a base64 encoded string.
The LOGIN mechanism is not an officially registered or supported mechanism. Certain older email clients were developed using LOGIN as their authentication mechanism. The SASL libraries support it in case you have to support such clients. If you need it, you must specify support for it when you compile the libraries and Postfix. See Appendix C if you are building your own Postfix. If you are using a packaged distribution and you need LOGIN support, check the documentation with your distribution to make sure it includes it. If it is used, the authentication exchange works the same as the PLAIN mechanism.
OTP is an authentication mechanism using one-time passwords (formerly S/Key). The mechanism does not provide for any encryption, but that may not be necessary since any captured password is good for only a single session. SMTP clients must be able to generate OTP authentication credentials.
With the DIGEST-MD5 mechanism, both the client and server share a secret password, but it’s never sent over the network. The authentication exchange starts with a challenge from the server. The client uses the challenge and the secret password to generate a unique response that could be created only by somebody who has the secret password. The server uses the same two pieces, the challenge and secret password, to generate its own copy, and compares the two. Since the actual secret password is never sent across the network, it’s not vulnerable to network eavesdropping.
Kerberos is a network-wide authentication protocol. Unless you are already using Kerberos on your network, you probably don’t need to support the KERBEROS mechanism. If you are using Kerberos, using SASL is a nice way to fit SMTP authentication into your existing infrastructure.
SASL includes an ANONYMOUS mechanism, which might make sense for some protocols, but has no benefit for SMTP. An open relay is essentially using an anonymous mechanism, and the purpose of SMTP authentication is to eliminate open relays.
When a client connects to a mail server, the server typically lists all of the password mechanisms it supports, in order of preference. The client tries the first one it supports. If that fails, it may be configured to try additional mechanisms until it can authenticate successfully. If the client and server cannot successfully negotiate over a common mechanism, authentication fails.
Once the server and client agree on a mechanism, they begin the authentication process, consisting of one or more challenges and responses that are governed by the agreed-upon mechanism. The protocol also specifies how these exchanges should be encoded.[1]
The SASL authentication framework can use your existing Unix system passwords (for example, passwd, shadow, or PAM) or a separate password file just for authenticating SMTP users. Other options include Kerberos or even a new scheme of your own.
Ultimately, your choice comes down to where and how you want to store your authentication information. Consider your network and how your users currently authenticate to decide which framework works best for you. If your mail users already authenticate on your network through PAM, for example, then you probably want to configure SASL to use your existing system. If, on the other hand, most of your SMTP users are virtual accounts (without system logins), you should opt for a separate password database for SMTP users. Often your POP/IMAP server can share the same user database, making this a convenient option for virtual mail accounts.
[1] Note: that’s encoded, not encrypted. A particular mechanism may or may not include encryption of the client’s credentials.
Before getting started with SASL, you should decide which framework and mechanism you will use because it affects your installation and configuration. In order to enable SASL authentication in Postfix, you must have the Cyrus SASL library and a copy of Postfix with SASL support compiled in. Some platforms have precompiled packages available with support for SASL. If you want to use a precompiled Postfix package make sure that it specifically includes support for SASL and has the necessary SASL libraries. Furthermore, make sure that the SASL libraries were compiled with the options you need for your situation. The relevant options are described throughout the rest of this section.
Cyrus SASL library development is currently following two tracks: SASL and SASLv2. The SASL track is being phased out in favor of SASLv2. In the future, you can expect Postfix to include support for SASLv2 only. This chapter discusses SASLv2. You must have the correct combination of versions of both Postfix and the SASL libraries.
You should be able to use the latest stable version of the SASLv2 track of the Cyrus libraries. Postfix support for SASLv2 first appeared in the experimental release Version 1.1.7-20020331 and was included in the official release 2.0. It is very important that you use a version of Postfix that supports SASLv2 to follow the directions in this chapter. When the text mentions SASL, it refers to Version 2 of the library.
Before you get started, decide on the authentication mechanisms you plan to support and the authentication framework you want SASL to use with Postfix.
The SASL library uses a separate configuration file for each application it works with. Postfix uses a file named smtpd.conf for SASL purposes. This file is usually located at /usr/local/lib/sasl2/smtpd.conf. At a minimum, smtpd.conf contains a line indicating the framework to use. We are going to look at specifying either Unix passwords or separate SASL passwords for Postfix authentication. See the Cyrus documentation to see other options you might include in smtpd.conf.
Often, it’s most convenient for SASL to use the existing system database to authenticate users. Historically, this meant using the /etc/passwd file. Today, it’s more likely that you use /etc/shadow, PAM, or some related authentication database. Since these passwords are not available to unprivileged processes, and Postfix purposely runs with limited privileges, it cannot normally authenticate users.
The Cyrus libraries deal with the problem by providing a special authentication server called saslauthd . It handles requests on behalf of Postfix. The saslauthd daemon requires superuser privileges; however, since it runs as a process distinct from Postfix and does not have to communicate outside of your network, the security impact is minimized. If you are going to use Unix passwords with SASL, you must run the saslauthd daemon that ships with the Cyrus distribution. Note that using Unix passwords with saslauthd limits you to plaintext passwords because the daemon needs the actual passwords to verify them. See Chapter 13 for using encryption between Postfix and email clients.
To specify that you want Postfix to use the saslauthd daemon for authentication, create the smtpd.conf with a line like the following:
pwcheck_method: saslauthd
saslauthd comes with the
Cyrus SASL distribution and should be installed in a convenient
location. The daemon must be running in the background for Postfix
to use it to authenticate clients. When you start saslauthd , you tell it what type of password system you are
using with the -a option. The
most common options are pam,
shadow, or getpwent (for the conventional /etc/passwd). For example, to start the
daemon on a system that uses PAM for authentication, type the command:
# saslauthd -a pamConsult the Cyrus documentation for other options when using saslauthd . Also, you probably want this daemon to start automatically at system initialization so that it is always available for your Postfix server. You can add saslauthd to your system’s startup processes in the same way you add other daemons such as Postfix.
If you don’t want your mail server to use existing system accounts, you can create a separate database of users and passwords that is independent of the system password mechanism. You can create accounts for email users who have mail access only and will not be able to log into the host itself. Include the following line in your smtpd.conf file:
pwcheck_method: auxprop
The term auxprop comes from
the Cyrus notion of auxiliary property plug-ins. Plug-ins allow you to insert external
programs for authentication. The Cyrus SASL distribution ships with
sasldb as the default auxiliary property plug-in and that
should be all you need to work with Postfix. The keyword auxprop simply says to use an external
SASL password file.
You do not have to run the saslauthd daemon when using SASL
passwords, but you must create the external password file containing
credentials for all of your email accounts. By default, the SASL
username/password file is kept at /etc/sasldb2. The Postfix SMTP server
needs at least read access to the file, and if you use the auto_transition feature of Cyrus SASL (see the Cyrus documentation),
Postfix will also require write access to the file. If you don’t
need the auto_transition feature,
it’s best not to give Postfix write access to the password
file.
If you have other processes that also need access to the file
(such as a POP/IMAP server), you may have to adjust the ownership
and permissions so all the processes that need it can access it. For
example, you might want to create an sasl group
on your system. Make sure that the postfix user
and other accounts that need access to the file are all in that
group. If any of the other processes need to update the file, then
read-only is too restrictive and you’ll have to provide write access
for the processes that need it. To set the permissions to 440, so that it is read-only and not
generally readable by users on the system, type the following
commands:
#chown postfix:sasl /etc/sasldb2#chmod 440 /etc/sasldb2
To create accounts for your SMTP server, use the
saslpasswd2 command included with the Cyrus SASL distribution. It
stores accounts in /etc/sasldb2. You must specify both a
username and an SASL domain. For Postfix the domain should be the value
specified in the myhostname
parameter. If you use the command postconf
-h myhostname to determine your hostname, you can be sure you have
the correct one. The following command creates an account for the
user kdent:
# saslpasswd2 -c -u `postconf -h myhostname` kdent
Password:
Again (for verification):Enter the password twice, as prompted. The -c option tells saslpasswd2 to create the user account,
and -u is used to specify the
domain for this account, which you take directly from the Postfix
configuration.
All of the relevant Postfix parameters for SASL password
authentication start with smtpd_sasl* for the SMTP server or smtp_sasl* for the SMTP client. For server
configuration you need at a minimum the smtpd_sasl_auth_enable parameter and the permit_sasl_authenticated restriction, which
must be assigned to one of the smtpd restriction parameters. See Chapter 11 for more information on UBE
restrictions.
In order to turn on authentication in the Postfix SMTP server, add the enable parameter to your main.cf file:
smtpd_sasl_auth_enable = yes
In addition, some older email clients[2] don’t follow the SMTP authentication protocol
correctly. The specification calls for the server to list its
supported mechanisms after the keyword AUTH followed by a space. These clients
expect to receive AUTH followed
by an equals sign. Postfix allows you to accommodate them by setting
the following parameter:
broken_sasl_auth_clients = yes
By setting this parameter, you tell Postfix to advertise its SMTP authentication support in the nonstandard way as well as the standard way. This option is perfectly safe to use since it doesn’t interfere with other mail clients, and the nonstandard ones will now work as well.
To make sure that clients use correct sender addresses when relaying, Postfix allows you to map sender addresses to SASL logins. For example, if you have an address kdent@example.com that should be used only by the SASL user kdent, you can create a file requiring the correct user for that address:
kdent@example.com kdent
The file is a normal Postfix lookup table and allows regular expressions as well as
local parts and domains (see Chapter
4 for information on Postfix lookup tables). Use the
parameter smtpd_sender_login_maps
in main.cf to
indicate the table you create:
smtpd_sender_login_maps = hash:/etc/postfix/sasl_senders
You can list as many addresses as you need in the table. To
reject messages from users attempting to use incorrect sender
addresses or users who are not authenticated at all who attempt to
use a specified address, include the restriction reject_sender_login_mismatch with your
restriction parameters (see Chapter
11 for information on UBE restrictions).
If you are already using the smtpd_recipient_restrictions parameter as part of your UBE blocking, you have to
tell Postfix to allow authenticated users to relay by adding
permit_sasl_authenticated
to the list of restrictions. If you were previously
using the default and didn’t need a smtpd_recipient_restrictions parameter,
just add the following line:
smtpd_recipient_restrictions = permit_mynetworks,
permit_sasl_authenticated, reject_unauth_destinationIf you are already using the smtpd_recipient_restrictions parameter,
just add permit_sasl_authenticated to the list of
restrictions. Be sure to include some kind of rejection restriction
in your list (see Chapter
11).
The smtpd_sasl_security_options parameter lets you control which password mechanisms
are listed when clients connect to your SMTP server. The complete
list of available mechanisms depends on your system and the
mechanisms that were available when your SASL libraries were built.
If you don’t specify any options, the default is to accept all
available mechanisms including plaintext passwords, but not
anonymous logins. If you are using the saslauthd daemon, you must accept plaintext passwords, so the
default configuration probably makes the most sense. If you specify
any of the options, you override the default, so make sure that you
include noanonymous among your
options. If you set this parameter, you can specify any combination
of the following values. For example:
smtpd_sasl_security_options = noanonymous, noplaintext
Common mechanisms include:
noplaintextIf your security policy does not permit passwords to be
sent as plaintext, specify noplaintext . This causes SASL to use one of the
challenge/response techniques that authenticate without
transmitting actual passwords.
noactiveIn active attacks, attackers manage to insert themselves
between the client and server. Some types of active attacks
are commonly referred to as man-in-the-middle attacks. Attackers may be able
to read or alter data as it is transmitted or pretend to be
the client or server. Specify noactive to limit supported password
mechanisms to those that are not known to be vulnerable to
active attacks.
nodictionaryIn dictionary attacks, attackers run through a preassembled
database of possible passwords trying each one in turn to see
if it allows access. Databases are typically made up of lists
of cities, teams, proper names, and all dictionary words plus
obvious variations on the words. Specify nodictionary to limit supported
password mechanisms to those that are not known to be
vulnerable to dictionary attacks.
noanonymousAnonymous logins have no useful purpose for SMTP
servers. By default Postfix does not allow anonymous logins. If you specify any other
options, be sure to also specify noanonymous since you will be
overriding the default.
mutual_authYou can require mechanisms that provide mutual
authentication where both the client and server provide
credentials proving their identities. Specify mutual_auth to limit advertised
mechanisms to those that provide for mutual
authentication.
Following are step-by-step instructions summarizing the configuration described in this chapter. This is a broad overview of what’s required to set up your Postfix system with SASL:
Determine the authentication mechanisms and framework you plan to support.
Install the SASL libraries and recompile Postfix with SASL support. Or obtain a Postfix distribution with SASL, including support for the authentication mechanisms and SASL options you need.
Reinstall Postfix.
Create the file /usr/local/lib/sasl2/smtpd.conf. Enter
either saslauthd or auxprop for pwcheck_method.
If you are using Unix passwords for authentication, start the saslauthd daemon, specifying the type of authentication in use on your system. Otherwise, use the saslpasswd2 command to create email accounts on your system.
Edit main.cf to turn on authentication. This requires that you enable SASL and that you specify that authenticated clients should be allowed to relay mail. A basic setup requires at least the following parameters:
smtpd_sasl_auth_enable = yes
smtpd_recipient_restrictions = permit_mynetworks,
permit_sasl_authenticated, reject_unauth_destinationReload Postfix so that it recognizes the changes in its main.cf configuration file:
# postfix reload[2] Reportedly, Microsoft Outlook and Outlook Express before Version 5, but you may have to experiment to determine if your clients are culprits.
It’s probably best to try authenticating to your SMTP server manually before having your users attempt it with their email clients. By connecting to your SMTP server and manually authenticating, you can see exactly what response you get, and you can immediately check your log file for any other important information.
The easiest way to connect to your SMTP server is to use a Telnet client and then start speaking SMTP to your server. (Chapter 2 shows a sample SMTP session.) The PLAIN mechanism is the easiest to test, so if you have disabled it, you may want to enable it just to confirm that authentication works. You can disable it after you are finished testing.
To authenticate using the PLAIN mechanism, you must send the command AUTH followed by your
credentials encoded using base64. Your credentials are a
combination of the authorization identity (identity to login as), followed by
a null character, followed by the authentication identity (identity whose password will be
used), followed by a null character, followed by the password. Usually,
the authorization identity is the same as the authentication identity,
and we’ll assume as much here. Using the credentials for the user
kdent, you need to encode the string 'kdent\0kdent\0Rumpelstiltskin‘.
The tricky part is to encode your credentials in base64 without including a carriage return character. If your system has the mmencode and printf commands, it should be simple. The printf command prints formatted strings, and does not automatically include a linefeed like the more common echo command. The mmencode command simply converts strings into various MIME formats and uses base64 by default, which is exactly what we need.
You can get the encoded string you need by executing the following:
$ printf 'kdent\0kdent\0Rumpelstiltskin' | mmencode
a2RlbnQAa2RlbnQAcnVtcGxlc3RpbHRza2luOn some platforms printf might not handle the null characters embedded in the middle of the string correctly. You’ll know that you have this problem if the encoded string is shorter than your original string. You can try using the echo command with the -n switch instead of printf if it’s available on your system. The -n tells echo not to include a trailing newline character. If you cannot get echo or printf to cooperate, or if you do not have the mmencode command, you can find a simple Perl solution in the sidebar in this chapter to get the string you need.
Once you have the string you need, cut and paste it into your Telnet session. In the example below, you type the telnet command to get things started, and then all of the bold lines. Here you are testing authentication on the host mail.example.com. You should specify your own system’s name:
$telnet mail.example.com 25Trying 192.168.100.5... Connected to mail.example.com. Escape character is '^]'. Server: 220 mail.example.com ESMTP PostfixEHLO test.ora.com250-mail.example.com 250-PIPELINING 250-SIZE 10240000 250-VRFY 250-ETRN 250-AUTH LOGIN PLAIN DIGEST-MD5 CRAM-MD5 250-XVERP 250 8BITMIMEAUTH PLAIN a2RlbnQAa2RlbnQAcnVtcGxlc3RpbHRza2luServer: 235 Authentication successfulquitServer: 221 Bye Connection closed by foreign host.
If you do not see a message that the authentication was successful, check your mail log to see what Postfix has reported. Problems can be tricky to track down because there are many pieces involved.
When you test authentication using Telnet, if you don’t see the line:
250-AUTH LOGIN PLAIN DIGEST-MD5 CRAM-MD5
listed among the server’s extensions, make sure that you didn’t
forget smtpd_sasl_auth_enable
in your main.cf
file. If the parameter is there (without typos), then you’d better look
at how you compiled Postfix and make sure that it was built with support
for SASL.
If the log tells you that it cannot open the db file, make sure that the password file
exists in the /etc directory and
that the permissions are set so the postfix account
has access to it. The Cyrus distribution comes with some utilities that
might help you diagnose problems. Check the documentation for the
sasldblistusers2 and the saslpasswd2 commands.
You may want your Postfix server to relay through other servers that require SMTP authentication. In addition to requiring passwords on your own server, you can configure Postfix to provide login names and passwords when relaying mail through other SMTP servers.
You have to provide Postfix with a password file that contains the
credentials it should use when authenticating to other servers. Entries
in the password file contain a domain or hostname, username, and
password in the form: domain
username:password. For the domain or hostname, Postfix
first checks for the destination domain from the recipient address. If
it doesn’t find the domain, it then checks for the hostname it is
connecting to. This allows Postfix to work easily with sites that have
multiple MX hosts that share the same user database. Use smtp_sasl_password_maps parameter to specify where your password file is.
The client smtp_sasl_security_options parameter works just like server smtpd_sasl_security_options (discussed earlier
in the chapter) for the SMTP servers. If you don’t specify any options,
the default allows all available mechanisms including plaintext but not
anonymous logins.
Use the following steps to configure Postfix to provide a login and password when relaying mail. In this example, you’ll set up two different passwords for Postfix to authenticate when relaying through any server for the domain ora.com and through a host called mail.postfix.org:
Create a file called /etc/postfix/sasl_passwd with entries for each host, login, and password combination you need. Your file should resemble the following:
ora.com kdent:Rumpelstiltskin mail.postfix.org kyle:quixote
Execute postmap on the file:
# postmap /etc/postfix/sasl_passwdEdit main.cf to turn on
client authentication. Notice that you are now setting smtp_sasl_auth_enable instead of smtpd_sasl_auth_enable as you did to
turn on authentication at the server. You must also set smtp_sasl_password_maps to point to the password file you created:
smtp_sasl_auth_enable = yes smtp_sasl_password_maps = hash:/etc/postfix/sasl_passwd
Reload Postfix so that it recognizes the changes in its main.cf configuration file:
# postfix reloadNow, when the Postfix SMTP client attempts to relay messages
through any of the domains or hosts listed in /etc/postfix/sasl_passwd, it will offer the
corresponding authentication credentials. For example, if your Postfix
smtp client connects to the server
mail.ora.com, it authenticates with the username
kdent and the password Rumpelstiltskin.
Transport Layer Security, or TLS (formerly known as SSL), enhances TCP communications by adding encryption for privacy and message integrity. RFC 3207 defines an extension to SMTP known as STARTTLS. Its primary purpose is to provide privacy in peer-to-peer communications. It can also give you assurances that your mail is not being delivered to a rogue system posing as the server you think you’re sending mail to. Another useful application is in combination with SASL, to protect plaintext passwords that would otherwise be sent in the clear.
One nice benefit of TLS is that you can obtain the privacy and assurances of reliable server identification without a previous arrangement between systems. Strong authentication is also possible if your users’ email clients support it. By using client certificates, which are cryptographically signed identifiers (see sidebar), your mail server can be sure that connecting clients are indeed who they claim to be. You can use client certificates in place of or in conjunction with SASL authentication discussed in Chapter 12. There is administrative overhead in managing client certificates and assisting users in configuring their email clients to use them, while using TLS just to encrypt authentication credentials is fairly easy to set up.
It is important to note, however, that TLS is not meant to protect the contents of email messages. When you encrypt the transmission between a client and server, everything (including the message) is encrypted. However, TLS protects only the transmission between the two systems. After the server receives a message, it is probably stored as plaintext. You can’t be sure if the message will be encrypted or not when the server forwards it to the next destination, or when the final recipient downloads the message to read it. Unless you can control and encrypt the path all the way from the originating client to the ultimate recipient of the message, it will most likely pass in the clear at some point on its way to delivery. To achieve end-to-end privacy you need a client solution such as PGP or S/MIME.
Support for TLS in Postfix is provided by a set of patches written by Lutz Jänicke. You can follow the link for Add-on Software from the Postfix home page to download the patches. (See Appendix C for information on building Postfix with the TLS patches.) If you are using a prebuilt Postfix package for your platform, make sure that it has the TLS patches built in.
In addition to compiling Postfix to support TLS, you must also create and configure TLS certificates. You need both a private key and a public key. The public key is a signed certificate identifying your server. It is validated and digitally signed by a certificate authority (CA), which attests that your certificate does, in fact, identify your system (see sidebar in TLS Certificates Brief Overview). In addition to your own certificates, you must also have the public key of the CA that signed your certificate.
You can register with any of the many CAs to obtain a signed certificate, or you can act as your own CA. The clients connecting to your TLS-enabled server must recognize and acknowledge the CA you use and agree to accept it as an authority to attest to your identity. Generally, it is a fairly simple configuration option in email clients to accept a certificate and have the CA public key added to its list of trusted authorities if it isn’t listed already.
The TLS patches for Postfix were written using the OpenSSL libraries. The libraries come with command-line tools for managing certificates, which you will need to generate certificates. For Postfix purposes, all of your certificates must be in the PEM format, which is base64 encoded data with some additional header lines. The default output for the OpenSSL tools is PEM, so you won’t have to convert any certificates you generate to use with Postfix. By default, the OpenSSL tools are installed below /usr/local/ssl. The openssl command is the utility you’ll use most often in managing your certificates.
Your server certificates have to be signed by a CA. You can easily set yourself up as a CA to sign your own certificates. The OpenSSL distribution includes a script to configure yourself as a CA. From the SSL home directory, type the following:
# misc/CA.pl -newcaAnswer all of the prompts as requested. This sets up all of the necessary CA files below ./demoCA. Later, when you issue the command to sign a certificate, the openssl command will refer to these root certificates.
You can use the openssl command to generate the public and private keys for your server. From the public key, you create a certificate signing request (CSR) to send to a CA for validation. Once signed, your public certificate can be widely distributed, but your private keys must be carefully guarded. In fact, many applications store encrypted private keys and require a pass phrase to access them. You cannot use encrypted keys with Postfix, however, because different components need read access to the keys as they are started by the master daemon.
The OpenSSL distribution includes scripts to help you generate keys and certificate-signing requests, but the scripts encrypt the keys by default. Since you want to leave the keys unencrypted, it’s just as easy to use the openssl command directly. Execute the following command to create a public and private key to be used with Postfix:
$openssl req -new -nodes -keyout mailkey.pem \-out mailreq.pem -days 365
The openssl command with the
-new option creates both a private
key and a CSR. The -nodes option
tells openssl not to encrypt the
key. -keyout and -out indicate the names of the files where
the private key and the CSR should be created. Finally, -days 365 says to make the certificate valid
for one year.
If you are using a third-party CA, follow its directions for getting your certificate request signed. You will be sending in the mailreq.pem file created above. If you are acting as your own CA, you can sign the file yourself with the following command:
# openssl ca -out mail_signed_cert.pem -infiles mailreq.pemThis produces the file mail_signed_cert.pem, which will serve as your signed certificate.
You probably want to copy all of your Postfix/TLS-related certificate files to a convenient location. If you used all of the defaults, execute the following commands to move the certificate files into the Postfix configuration directory:
#cp /usr/local/ssl/mailkey.pem /etc/postfix#cp /usr/local/ssl/mail_signed_cert.pem /etc/postfix
These files represent your server private key and public certificate. Because you created the private key without encrypting it, you must protect it by using permissions that are as restrictive as possible. Use the following commands to make sure it is owned and readable only by the root account.
#chown root /etc/postfix/mailkey.pem#chmod 400 /etc/postfix/mailkey.pem
Your Postfix/TLS server must have access to the public certificate of the CA that signed your server certificate and any CAs that signed certificates for your users. If a single CA signed both, you need only one CA certificate. If you are acting as your own CA, copy the cacert.pem file that was created after you ran the CA.pl script:
# cp /usr/local/ssl/demoCA/cacert.pem /etc/postfixIf you used a third-party CA to sign your public certificate, place that organization’s PEM-format public certificate in the file /etc/postfix/cacert.pem. You will also need public certificates from any CA that signed client certificates you intend to trust.
There are two different ways to add CA certificates to
Postfix/TLS. The first keeps all of the certificates together in a
single file defined by the smtpd_tls_CAfile parameter. You simply
append new certificates to the existing file. If, for example, your CA
certificates are stored in /etc/postfix/cacert.pem, and you have a new
certificate stored in a file called newCA.pem, use the following commands to
add your new CA certificate:
#cp /etc/postfix/cacert.pem /etc/postfix/cacert.pem.old#cat newCA.pem >> /etc/postfix/cacert.pem
(Be sure to type two angle
brackets so that you don’t overwrite the file.)
The other option is to keep all of your CA certificates in
separate files. This option makes maintenance of CA certificates a
little easier, but the certificates will not be automatically
available to a chrooted Postfix. Most likely you would choose this
option if you have a lot of CA certificates to deal with. The
parameter smtpd_tls_CApath points
to a directory where the CA certificates are stored. To add additional
certificates, simply copy a new certificate file into the directory
and execute the c_rehash utility
that comes with OpenSSL. For example, if you have a new certificate
stored in a file called newCA.pem
and you store all of your certificate files in /etc/postfix/certs, use the following
commands to add it to your Postfix installation:
#cp newCA.pem /etc/postfix/certs#c_rehash /etc/postfix/certs
The TLS patches for Postfix introduce additional parameters for dealing with TLS within the SMTP server. Following are some of the critical TLS parameters that you’ll need for the basic configuration. See the sample configuration file that comes with the patch distribution for additional TLS parameters.
smtpd_use_tlsTurns on server TLS support. Otherwise, Postfix operates
as it would without the TLS patch. For example: smtp_use_tls = yes
smtpd_tls_key_filePoints to the file containing your server’s private key.
For example: smtpd_tls_key_file =
/etc/postfix/mailkey.pem
smtpd_tls_cert_filePoints to the file containing your server’s signed
certificate. For example: smtpd_tls_cert_file =
/etc/postfix/mail_signed_cert.pem
smtpd_tls_CAfilePoints to the file containing the public certificates
identifying Certificate Authorities you trust. For example:
smtpd_tls_CAfile =
/etc/postfix/cacert.pem
smtpd_tls_CApathPoints to a directory of files each containing a public
certificate for a Certificate Authority you trust. For example:
smtpd_tls_CApath =
/etc/postfix/certs
Once you set these parameters in your main.cf file and reload Postfix, your server will be ready to handle encrypted connections.
Following is a summary of the steps to follow in order to set up Postfix to use TLS:
If it’s not already installed on your system, install the OpenSSL distribution that you’ll need to generate TLS certificates.
Recompile and reinstall Postfix with the TLS patch (see Appendix C) or obtain a Postfix distribution that includes the TLS code.
Generate server certificates including a certificate-signing request. You can validate the signing request yourself if you’re acting as your own CA or send it to a third-party CA for validation.
Install your certificates (server secret key, signed public certificate, and your CA’s public certificate) into the Postfix directory.
Edit main.cf and set the following parameters for TLS:
smtpd_use_tls = yes smtpd_tls_key_file = /etc/postfix/mailkey.pem smtpd_tls_cert_file = /etc/postfix/mail_signed_cert.pem smtpd_tls_CAfile = /etc/postfix/cacert.pem
If there are other TLS parameters that you want to set, do so here (see the TLS patches documentation).
Reload Postfix so that it recognizes the changes in its main.cf configuration file:
# postfix reloadNow, when a client requests an encrypted session, your server should be able to respond appropriately.
You may want to use client-side certificates instead of, or in addition to, other SMTP authentication techniques. Client-side certificates provide an excellent method of authentication that can be very difficult to fake.
Client-side certificates must be signed by a CA. If you plan to have your users’ certificates signed by a third-party CA, you should follow the directions from your CA for creating client-side certificates. You can also create client certificates and sign them yourself using tools from the OpenSSL package.
Creating client certificates is just like creating the server certificate we saw earlier in the chapter with the added step of converting the signed certificate into a format that email clients can import. Most popular mail clients expect certificates in the PKCS12 format, which packages together the signed certificate and private key and protects them with a password. If you use a third-party CA, the company will most likely provide you or your users with the correct format needed for your particular email client. If you are signing certificates yourself, you have to create a PKCS12-formatted file to give to your users. The file is created with the user’s signed certificate, the private key corresponding to that certificate, and your own CA public certificate.
You have to create a separate certificate/key pair for each user you plan to authenticate with certificates. You should decide on a policy for choosing a distinguished name. Generally, you would use the individual’s email address or the client machine’s hostname when generating the certificates. The steps below walk through creating a certificate for a user with the email address kdent@ora.com:
Using the openssl command, generate a private and public key for your user. Remember that your public key also has to be signed by a CA (possibly yourself):
$openssl req -new -nodes -keyout kdentkey.pem \-out kdentreq.pem -days 365
This command creates both a private key and a CSR, as
specified by the -new option.
The -nodes option tells
openssl not to encrypt the
key (see Section
13.2.2). -keyout and
-out indicate the names of
the files where the private key and the CSR should be created.
Finally, -days 365 says to
make the certificate valid for one year.
If you are using a third-party CA, follow their directions for getting your certificate request signed. You will be sending them the kdentreq.pem file you created above. If you are acting as your own CA, you can sign the file yourself with the following command:
# openssl ca -out kdent_signed_cert.pem -infiles kdentreq.pemOnce you have the signed certificate, convert it to a format that can be used by your users’ email clients:
#openssl pkcs12 -in kdent_signed_cert.pem -inkey \kdentkey.pem -certfile /etc/postfix/cacert.pem -out kdent.p12 \-export -name "kdent@ora.com"
You will be prompted to provide a password for the file
the command creates. You will have to provide your user with the
password you select. The -certfile option points to your own CA
certificate file. In this example, you’re using the file as
created by the CA.pl script.
Once finished, you can provide your user with the kdent.p12 file and the password you
used when creating it.
Your user should now be able to import the file into a mail client that supports the PKCS12 format.
Postfix/TLS uses certificate fingerprints to identify acceptable certificates. A fingerprint is a cryptographic hash calculated from a signed certificate. Fingerprints for each certificate are stored in a standard Postfix lookup table (see Chapter 4). When a client presents a certificate, Postfix/TLS calculates the fingerprint from the certificate and compares it to those listed in its lookup table. If it finds a match, it permits the client to relay.
You need to calculate a fingerprint for each client certificate that you will accept. Many email clients can produce a fingerprint for you, or if you created the certificate, you can easily calculate a fingerprint with the openssl x509 command:
$openssl x509 -fingerprint -noout -in kdent_signed_cert.pem \| cut -d= -f257:8E:95:63:67:CD:2B:96:7C:0A:3A:61:46:A5:95:EA
To continue the calculation:
Obtain a list of fingerprints for each of your users’ client certificates. You can generate them as described above or obtain them from your users if they can get them from their email clients.
Create a file to store all of the client certificate fingerprints. For this example, you’ll create a file called /etc/postfix/clientcerts
Edit the clientcerts file to add each fingerprint. Since this is a standard Postfix lookup table, you must also add a righthand value for each fingerprint, even though that value is not used. Use a value that will help you to identify the fingerprint in the future. Your resultant file should contain entries like the following for each of your users:
57:8E:95:63:67:CD:2B:96:7C:0A:3A:61:46:A5:95:EA kdent@ora.com
Execute postmap against the clientcerts file:
# postmap /etc/postfix/clientcertsEdit main.cf to add the following parameters:
relay_clientcerts = hash:/etc/postfix/clientcerts
smtpd_tls_ask_ccert = yes
smtpd_recipient_restrictions =
permit_mynetworks
permit_tls_clientcerts
reject_unauth_destinationNote that smtpd_tls_ask_ccert has two c’s for “client certificate.” If you have
already defined the smtpd_recipient_restrictions
parameter, add permit_tls_clientcerts to the list of restriction rules.
Reload Postfix so that it recognizes the changes in its main.cf configuration file:
# postfix reloadSince you may have configurations where other email servers require your server to authenticate when relaying mail, Postfix/TLS can also present a certificate when acting as an SMTP client. Note that you are limited to only one certificate for your SMTP client unless you set up additional SMTP transports in master.cf and configure them to use different client keys and certificates.
If you are using a self-signed server certificate, you can use
the same certificate and its accompanying secret key as your client
certificate. If a third-party CA signed your server certificate, it’s
possible that it can be used only for the SMTP server. In which case,
you can generate a separate client certificate and have that signed
too. Your client certificate’s common name should match the hostname of your system, as
specified in the myhostname
parameter. Follow the same procedure that you used to create the
server certificates. If you are using the same certificates, you don’t
have to do anything; simply configure the TLS client parameters to
point to the same files as the server parameters.
The TLS patches for Postfix introduce the following parameters for dealing with TLS within the SMTP client. See the sample configuration file that comes with the TLS distribution for additional TLS parameters:
smtp_use_tlsTurns on client TLS support. Otherwise, Postfix operates
as it would without the TLS patch. Example: smtp_use_tls = yes
smtp_tls_key_filePoints to the file containing the private key used in
conjunction with your client-signed certificate. Example:
smtp_tls_key_file =
/etc/postfix/mailkey.pem
smtp_tls_cert_filePoints to the file containing your client-signed
certificate. Example: smtp_tls_cert_file =
/etc/postfix/mail_signed_cert.pem
smtp_tls_CAfilePoints to the file containing the public certificates
identifying the CAs that signed your client certificate.
Example: smtp_tls_CAfile =
/etc/postfix/CAcert.pem
Assuming that you are using the same certificates that you used for your server, the procedure to enable TLS in the SMTP client is quite simple:
Edit main.cf and set the following parameters:
smtp_use_tls = yes smtp_tls_key_file = /etc/postfix/mailkey.pem smtp_tls_cert_file = /etc/postfix/mail_signed_cert.pem smtp_tls_CAfile = /etc/postfix/cacert.pem
If there are other TLS parameters that you want to set, do so here (see the TLS patches documentation).
Reload Postfix so that it recognizes the changes in its main.cf configuration file:
# postfix reloadNow, when Postfix connects to an SMTP server that requests a client certificate, it will provide the necessary information.
A content filter is a utility that scans the headers and body of an email message, and usually takes some action based on what it finds. The most common examples are anti-virus and anti-spam programs. Viruses are commonly spread within the contents of email messages, and if you cannot detect spam based on the connecting client or envelope information, you might have better luck by inspecting the actual contents of a message. Filters might change messages, redirect them, respond to them, or tag them for later processing by another tool.
In this chapter we’ll look at content filtering at your mail server, although that may not always be your best option for filtering. MTA filtering is appropriate for filtering that should occur with all or nearly all messages. If you need filtering that is configurable by user, the MTA is not the best choice for it. Other types of filtering to consider are:
Configurable MDAs such as procmail or sieve allow users to manage their own delivery configuration files. Generally, MDAs expect your users to edit their own configuration files on the mail server system. If they don’t have system accounts, you must provide another means for them to configure their filtering, such as through a web-based application.
You might also consider allowing your users to take advantage of filtering capabilities within their email clients. If their client packages support filtering, this is an excellent way to provide per-user filtering for virtual users that don’t have system accounts on your mail server. It has the added advantage of moving processor- and memory-intensive scanning from the server out to multiple clients.
Postfix body and header checks can provide limited filtering. They cannot be configured by the user, but they are probably the simplest to implement. See Chapter 11 for information about setting them up.
A combination of MTA and MUA filters might make a nice compromise. The MTA filter can tag messages with a value to be read by users’ MUA filters. Users can then configure their own filters to accept, reject, or categorize messages based on the tagged value.
An anti-virus filter is an excellent choice for MTA filtering. You can maintain it centrally and block viruses before they even enter your network. Actions that should occur for every message that enters your system are best handled by the MTA.
Postfix body and header checks, while powerful, can consider only one line of a message at a time, and they’re always applied to all messages. They don’t offer a convenient way to set up complex options for rejecting or redirecting messages. Anything more than simple filtering should probably not be handled within a general MTA like Postfix.
Postfix provides two approaches for configuring external filters: commands that accept the contents of email messages on their standard input or daemons that accept message contents via SMTP or LMTP. With commands, a new process is started for every message, which can be resource-intensive, particularly if the command has a high start-up cost. Daemon filters stay resident and have the potential for better performance using fewer system resources. The daemon method is somewhat more complicated to configure but provides a more robust solution.
The simplest way to set up content filtering is to use a program that runs as a command and accepts the contents of a message on its standard input. Postfix delivers messages to your filter command via the pipe mailer. Your filter command performs its checking and then gives the filtered message back to Postfix using the Postfix sendmail command.
For this discussion, we’ll assume that the filter command operates on mail that comes in through the SMTP daemon but not on mail that is delivered locally (using the sendmail command), so that your filter can use sendmail to give the message back to Postfix without looping. Figure 14-1 illustrates the path messages follow once you put your filter in place. Rather than passing the message to a delivery agent, the queue manager invokes the filter.
Your filter program must be able to accept the message on its standard input and then deliver it to the Postfix sendmail command. If you have a filtering program that doesn’t handle input and output in this way it should be easy enough to create a shell script wrapper to deal with those details. In the Postfix distribution, the FILTER_README file contains an example of such a script.
When you configure Postfix to use your filter program, you must specify a user that the program runs as. You should create a pseudoaccount whose sole purpose is to run the filter.
Let’s set up an example configuration and assume that you have a filter program named simple_filt stored at /usr/local/bin and that you have created a pseudouser called filter to run it. Edit your master.cf file to add an entry for your filter:
filter unix - n n - - pipe
flags=Rq user=filter argv=/usr/local/bin/simple_filt
-f ${sender} -- ${recipient}The first line contains all of the standard settings for a
Postfix component entry with the last column indicating that the
message should be handled by the Postfix pipe daemon. The second and third lines are
a continuation of the first because of the whitespace at the
beginning. They contain options the pipe service will use when executing the
command. The options R and q, specified as flags, tell the pipe service to prepend a Return-Path: header and to quote whitespace
and special characters in the ${sender} and ${recipient} addresses that are passed to
the command. See the pipe(8) man
page for other possible options.
The user= option is the
filter pseudouser that you set up for running
your filter command. The argv
option specifies the actual command along with its arguments to
execute. The argument list specified here (-f
${sender} -- ${recipient}) can be used exactly as is by the
script when it invokes the sendmail
command to deliver the message back to Postfix. Your own filter may
require different arguments, but make sure you include the items you
need to send the message back to Postfix through the sendmail command. The ${recipient} variable is expanded by the pipe daemon into multiple recipients up to the limit
specified in the filter _destination_recipient_limit parameter when
a message has more than one recipient.
In addition to the new component entry, you must also make a change to the smtpd entry in master.cf to turn on filtering for all messages that are delivered to the SMTP daemon:
smtp inet n - n - - smtpd -o content_filter=filter:
Simply add the second line in the preceding example to your
existing smtpd line. Don’t forget
the initial whitespace to indicate that it is a continuation of the
previous line. The content_filter
parameter is set equal to the entry you just created in
master.cf for your filter
program. Set this option here rather than in main.cf because it should apply to the
smtpd daemon only and not for every
message that enters the Postfix system. After you reload Postfix, all
messages coming in over SMTP will now be handled by your filter
program.
A filter of this sort, although easy to configure, is not the most efficient method of filtering. It requires that Postfix invoke a shell or interpreter and that the filter invoke sendmail to resubmit the filtered message. If your program runs into problems—disk space or memory—for example, there isn’t a reliable way for it to report the exact problem back to Postfix. Daemon-based filtering described in the next section offers a more robust solution with better performance.[1]
Daemon-based filtering offers a more advanced architecture over the command-based method with lower cost in I/O and CPU usage. It can provide better error handling than is possible with the command method. If implemented as a resident process, the startup overhead per message is eliminated. A daemon-based content filter can pass email messages back and forth with Postfix using the standard SMTP or LMTP protocol. Such a filter can run as a standalone daemon or it can be started by Postfix if configured to do so in master.cf.
In this configuration, we want the content filter to handle all
messages, whether delivered locally (via sendmail) or to the smtpd daemon. You have to configure Postfix in
master.cf to use a special smtp client component to deliver the messages
to your filter and an additional smtpd daemon to receive messages back from
your filter. Figure 14-2
illustrates how a filtered message travels through Postfix to your
content filter and back into Postfix for delivery. In this diagram, the
filter receives mail via localhost port 10025 from the additional
smtp client and submits it back to
Postfix via localhost port 10026 to the additional smtpd server component.
If the filter wants to reject a message, it should reply with an SMTP code of 550 along with the reason for the rejection. Otherwise, it should accept the message and perform its operations before passing it back to Postfix. If your filter rejects a message, Postfix bounces it back to the sender address with the message your filter provides.
For the purposes of this discussion, I’ll assume that you are running a standalone content filter daemon that listens for incoming messages using SMTP. After processing, it sends the message back to Postfix using SMTP. The basic steps to configure this setup are:
Create a pseudoaccount for your filter.
Install and configure your content filter.
Edit master.cf to add two additional Postfix components.
Edit main.cf to add the
content_filter
parameter.
Restart Postfix so that it recognizes the changes to its configuration files.
When setting up a daemon-based content filter, make sure it does
not use the same hostname that Postfix has set in its myhostname parameter, or the Postfix SMTP client will consider it
an error and not deliver the message to your filter. The rest of this
section walks you through the details of setting up a daemon-based
content filter.
As with the simple filtering solution described earlier, you should create a pseudoaccount for your filter. The account shouldn’t have access to other resources on your system. If your filter needs to write files, you should create a directory for that purpose. Your filter should be started as the designated user or configured to become that user after starting. Check your filter’s configuration options. For this example, I’ll assume that you’ve created a user called filter.
Your content filter package should provide you with instructions for installation and configuration. In this example, assume that the filter listens on the loopback interface on port 10025. After processing messages, the filter should pass them back to Postfix on port 10026. You should be able to configure your filter accordingly, or if your filter listens and reinjects on a different port, keep that in mind as you follow the example. If possible, test your filter first to make sure that it operates correctly before trying to connect it to Postfix.
You may encounter "mail loops back to myself” problems when creating
additional SMTP components. One solution is to give the additional
component a different value for myhostname.
Edit master.cf to add the
new components you need. A second smtp component will be used to send
messages to your content filter. (See Section 4.5 in Chapter 4 for more information on
editing master.cf.) We’ll call
this additional smtp entry
chkmsg:
chkmsg unix - - n - 10 smtp
-o myhostname=localhostLater, when you turn on content filtering in main.cf, you’ll tell Postfix to send the message to your filter on port 10025 using this component.
In addition to the extra smtp client, you also need a second
smtpd service to receive messages
back from the content filter program. The second smtpd instance is configured slightly
differently from the normal one because you want Postfix to handle
traffic from your filter differently from messages coming from
outside. Set options with an entry like the following:
localhost:10026 inet n - n - 10 smtpd
-o content_filter=
-o local_recipient_maps=
-o mynetworks=127.0.0.0/8
-o smtpd_helo_restrictions=
-o smtpd_client_restrictions=
-o smtpd_sender_restrictions=
-o smtpd_recipient_restrictions=permit_mynetworks,rejectThis instance of smtpd is
configured to listen on the loopback interface on port 10026. You
configure your filter to send the processed messages to this
service. There are several options in this example. These override
the settings in the main.cf file
and are explained below:
content_filterThe default smtpd
instance has content filtering turned on in main.cf. This instance of smtpd should not have the content
filter process messages again.
local_recipient_mapsSome lookup maps convert an address when it is received
by the external smtpd. When
your filter tries to reinject it, Postfix may not recognize
the recipient and reject the message. Set this option to blank
to make sure the filtered messages are always accepted from
your filter.
mynetworksSince your filter runs on the same system as Postfix,
the filter and Postfix can communicate over the local loopback
interface, a pseudonetwork device not associated with any real
hardware interface. The loopback interface always uses an
address of 127.0.0.1. Since 127 is the first byte of its
address, it’s a class A network that you identify with a
/8 network prefix. By
setting mynetworks to the
loopback network and smtpd_recipient_restrictions
to permit only this network, this instance of
smtpd accepts connections
from your filter only and isn’t exposed to any (potentially
hostile) traffic from the network.
smtpd_helo_restrictions, smtpd_client_restrictions, smtpd_sender_restrictionsYou can turn off any restrictions that were already
checked by the original smtpd instance. If you’re not
already using these restrictions in main.cf, you don’t need to turn
them off here.
smtpd_recipient_restrictionsFinally, tell smtpd
to accept connections on the loopback interface and reject
everything else.
After you have made the necessary changes to master.cf, you have to configure Postfix to pass all messages it receives to your content filter. Edit the main.cf file to add a line like the following:
content_filter = chkmsg:[127.0.0.1]:10025
This parameter tells Postfix to pass messages to the content
filter via the chkmsg service
that you created in master.cf.
You also tell it to send the messages to port 10025, which should
match what you have configured your content filter program to use.
Be sure to reload Postfix to recognize the changes in its
configuration files. Once Postfix is reloaded, it will start passing
all messages through your content filter for processing.
To demonstrate setting up a daemon-based content filter, this section walks through installing Vexira AntiVirus from Central Command. Vexira is a commercial anti-virus product available on the Central Command web page, http://www.centralcommand.com/. Its Vexira AntiVirus for Mail servers product is written to work with Postfix among other MTAs. It is available for Linux, FreeBSD, and OpenBSD platforms. If you are using a different daemon-based anti-virus solution, the configuration should be similar to the procedure presented here:
Install Vexira according to the documentation from Command Central. The rest of this procedure assumes that your configuration files are in /etc per the installation instructions.
Configure Vexira to listen on the local loopback interface
on port 10024. Edit /etc/vamailarmor.conf and set the
parameter ListenAddress as
follows:
ListenAddress localhost port 10024
Also set the ForwardTo
parameter to pass messages back to Postfix over the loopback
interface on port 10025:
ForwardTo SMTP: localhost port 10025
Restart Vexira using the method or scripts installed on your system. See your Vexira documentation.
Edit the Postfix main.cf file to have all messages sent
to the Vexira daemon for virus scanning. Edit the content_filter parameter as
follows:
content_filter = smtp:[127.0.0.1]:10024
Edit the Postfix master.cf file to add another SMTP daemon to accept messages back from Vexira after virus scanning:
localhost:10025 inet n - n - 10 smtpd
-o content_filter=
-o local_recipient_maps=
-o mynetworks=127.0.0.0/8
-o smtpd_helo_restrictions=
-o smtpd_client_restrictions=
-o smtpd_sender_restrictions=
-o smtpd_recipient_restrictions=permit_mynetworks,rejectReload Postfix so that it recognizes the changes in its configuration files:
# postfix reloadYou can run multiple content filters, if necessary, by chaining them. If, for example, you have both an anti-virus and an anti-spam content filter, simply configure the first one to deliver to the next one rather than immediately back to Postfix. The Postfix configuration doesn’t have to change from what’s presented here. Only the final filter delivers the message back to Postfix.
Be aware of any email address rewriting that occurs before your filter receives a message. When the filter resubmits a message, if the rewritten address isn’t in one of the recipient maps, Postfix will reject it. You may have to turn off address rewriting in your normal SMTP server and configure it instead in your SMTP server that accepts messages back from your filter.
Some filters recommend that you configure them to accept mail in front of your normal MTA, and then they pass the messages on to your MTA after processing. You probably do not want to do this. Postfix is specifically designed to accept messages over an unfriendly network. A content filter is specifically designed to deal with processing the contents of messages and probably isn’t optimized for dealing with the load and potential hazards of accepting connections from the outside. Likewise some filters want to handle the final delivery of messages without re-injecting them into Postfix. Again, Postfix offers a lot of flexibility and security in dealing with the final disposition of messages that you might lose by delegating the delivery to another package.
Postfix map files provide an easy and efficient mechanism for the many lookup operations needed when handling email. In some situations, however, it can be more convenient to have the information in a database separate from Postfix. A database can provide a central repository available to many system or network services that need similar information, such as account names and passwords. A database can be useful when redundant systems running Postfix need to share the same configuration information. A central database might also be more convenient when you have multiple people who need access to edit information.
Databases can also slow Postfix performance compared to normal index files. In general, if you don’t have a definite need for a database, you’re better off with the standard Postfix maps. In many cases you can get the best of both options by storing information in a database and running regular scripts that update your Postfix files from the central data repository. But if your environment requires instant access to revised data, an external database configuration may be your only option.
In this chapter, we’ll look at configuring Postfix to work with
MySQL and LDAP. (Postfix also has support for PostgreSQL as of Version
2.1.) In either case, Postfix must be compiled with additional libraries
to support the mysql and ldap map types. If you are using a prebuilt
package, make sure that it has support for the type of database you plan
to use. If you built your own Postfix, see Chapter 15 for information on compiling
with the additional libraries.
You can easily check if your Postfix installation contains support for LDAP and MySQL with the postconf -m command:
$ postconf -m
static
pcre
regexp
mysql
environ
proxy
ldap
btree
unix
hashYou should see either ldap or
mysql or both listed among the map
types.
While the databases you use with Postfix may contain a variety of information, conceptually they work the same as Postfix maps. You have a key such as the recipient email address, and you expect to get back a value associated with the key such as a forwarding address. How to perform this with each type of database, MySQL and LDAP, is explained in the next sections.
It is a good practice to make sure your lookups work correctly with normal Postfix lookup tables. Then duplicate your configuration with MySQL or LDAP lookups. Make sure that you get the same results from both. In most cases, Postfix expects a lookup to return only one result. Make sure that your database queries do not return multiple result values.
MySQL is an open source relational database system that uses Structured Query Language (SQL) for querying and managing its data. You don’t have to know SQL to use Postfix with MySQL, but it will help to understand how they interact. Normally, you would use MySQL because you already have a database of information about each user such as a full name, account name, phone numbers, etc. You have to make sure your database includes the information you need to accomplish a particular task with Postfix. A common use is to map an email alias to the local account name. For this to work there must be one database column containing email aliases and another with local account names. Postfix can query your database with the recipient address of an email message as the key to look up the value of the local account for delivery. Any of the Postfix lookup table parameters can work with MySQL queries. You just have to figure out which columns contain the information you need.
MySQL maps are specified like any other map in Postfix. You specify the map type and the file containing the mappings. In the case of MySQL, however, the file you specify is not the lookup map itself, but rather a file that contains configuration information that specifies how to get the desired value from your database:
alias_maps = mysql:/etc/postfix/mysql-aliases.cf
The file mysql-aliases.cf contains configuration information that specifies how to get the information from MySQL. The parameters for this file are explained below.
MySQL parameters provide the information necessary for
Postfix to connect to your database server and construct an SQL
statement to look up the data it needs. These parameters are placed
in a MySQL map configuration file that functions like a Postfix
configuration file with blanks and comments ignored. Comments are
marked by a # as the first
character of a line. You can have as many MySQL configuration files
as needed in place of normal Postfix lookup files. All of the MySQL
parameters presented here are required except for additional_conditions.
Figure 15-1 shows an SQL statement that Postfix creates using the parameters described.
hostsList of hostnames or IP addresses where a MySQL server
is running. You can also indicate a Unix domain socket by
preceding a path to a socket with unix:. You should list more than one
host or socket only if you have multiple redundant database
servers. Each host is tried in the order listed until a
successful query can be made. For example:
hosts = unix:/tmp/mysql.sock, db.example.com, 192.168.150.15
userAccount name to use when logging into the MySQL server.
passwordPassword to use when logging into the MySQL server.
dbnameThe name of the database to use for the query.
tableThe name of the table to use for the query.
select_fieldThe name of the column that contains the lookup value.
where_fieldThe name of the column that contains the key value.
additional_conditionsAdditional comparisons for the WHERE clause of the SQL statement built by Postfix. You must understand SQL to use this attribute. Set this parameter as if you are continuing the SQL statement. For example:
additional_conditions = and mail_type = 'local'
Let’s go through an example illustrating a MySQL and
Postfix configuration. The http://example.com site uses a MySQL database to
manage all of the users on its network. There is a database that
contains a variety of information about users on the network,
including names, phone numbers, etc. Among the tables in the database
is one called email_address, which
contains the pertinent information for configuring Postfix. The
database structure looks like the following:
+-----------------+-------------+------+-----+---------+-------+ | Field | Type | Null | Key | Default | Extra | +-----------------+-------------+------+-----+---------+-------+ | localpart | varchar(15) | | PRI | | | | type | varchar(15) | YES | | NULL | | | to_address | varchar(65) | YES | | NULL | | | password | varchar(65) | YES | | NULL | | | last_changed_by | varchar(15) | YES | | NULL | | +-----------------+-------------+------+-----+---------+-------+
This table contains all of the email addresses that Postfix
should accept mail for with the localpart column providing the local part of
the addresses. Some of the users maintain their primary email accounts
on other systems, so their http://example.com addresses are aliases that forward
messages to their primary email addresses elsewhere. The type column indicates whether an address is
delivered locally or forwarded to another address. The value forward indicates that this address is an
alias. If an address is forwarded, the to_address column contains the address to
forward messages to.
Table 15-1 contains the access information needed to configure Postfix in this scenario. You should collect the same information about your own database before starting to configure Postfix.
Access information: | Values |
Host | mysql.example.com |
Database name: | user_accounts |
Database table: | email_address |
Database user: | kdent |
Database password: | Rumpelstiltskin |
In addition to the general database information in Table 15-1, you will have to
determine the columns you need for the particular Postfix maps you are
replacing with your MySQL table. Example 15-1 shows a sample
record from the database with the relevant columns for this
configuration. In this example, you’ll be configuring the Postfix
parameters local_recipient_maps and
alias_maps.
+------------+----------+-------------------+ | localpart | type | to_address | +------------+----------+-------------------+ | kdent | forward | kyle.dent@ora.com | +------------+----------+-------------------+
The local_recipient_maps
parameter points to lists of local users that should
receive email at this system. By default it points to the user
accounts and aliases on the system, so that mail sent to a
nonexistent user is rejected by the SMTP server. This lookup map is
a bit different from others in that it doesn’t require a return
value to map to. It matters only that the recipient is in the lookup
table or not. In this example, the MySQL database contains the list
of all email accounts that should receive mail on the system. You
can point the local_recipient_maps parameter to a MySQL
configuration that extracts the list of email users. You’ll use a
file called mysql-local.cf for
the query configuration. First, set local_recipient_maps to point to the query
configuration file, indicating that the lookup type is mysql:
local_recipient_maps = mysql:/etc/postfix/mysql-local.cf
The file mysql-local.cf
contains parameters for each of the items listed in
Table 15-1, plus the
select_field and where_field
for this specific query:
# # mysql-local.cf - local recipients for mail server. # hosts = mysql.example.com user = kdent password = Rumpelstiltskin dbname = user_accounts table = email_address select_field = localpart where_field = localpart
The select_field and
where_field both point to the
localpart column. The select_field in this case is not
particularly important since you don’t need a value back from the
map. You don’t need the additional_conditions parameter because you want every record that appears
in the table. After reloading, Postfix uses the MySQL configuration
to determine local users and reject mail for recipients not listed
in the MySQL table.
You can easily check your MySQL configuration file with the postmap command:
$ postmap -q 'kdent' mysql:/etc/postfix/mysql-local.cf
kdentThe -q option tells
postmap to query the map using
the specified key. If your query has any problems, postmap reports them to your
terminal.
Some users do not receive their mail on this system, but
rather have it forwarded to another account. By pointing alias_maps to another MySQL configuration, you can obtain the
list of users that have aliases and determine what the forwarding
address is. You’ll use a file called mysql-alias.cf for this query
configuration. First, set the alias_maps parameter to point to the query
configuration file:
alias_maps = mysql:/etc/postfix/mysql-alias.cf
The mysql-alias.cf file contains the following parameters:
# # mysql-alias.cf - forwarding aliases # hosts = mysql.example.com user = kdent password = Rumpelstiltskin dbname = user_accounts table = email_address select_field = to_address where_field = localpart additional_conditions = and type = 'forward'
In this case, you set the select_field to to_address
since that’s the value needed by alias_maps to forward messages. You also
specified additional_conditions
because you want only the addresses that have
aliases. After reloading Postfix, it uses this MySQL configuration
to determine addresses with aliases and where messages should be
forwarded.
MySQL databases are often used by sites that host many virtual domains. This last MySQL example walks through configuring virtual mailbox domains. Be sure to read Chapter 8 for information about virtual hosting in general, as this section discusses only the MySQL configuration.
In this example, you’ll use a table called email_address from a database called
customer. The table contains a
record for every virtual address at all the domains the system
accepts mail for. It includes the following fields that are of
interest:
domainThe virtual domain name for this record.
mail_addressThe public email address that messages can be sent to. Messages are delivered to the local virtual mail store.
mailboxContains the filename for delivery into the local mail
store. The name should be relative to the path set in virtual_mailbox_base. You can append
the name with a slash for maildir-style delivery.
Example 15-2 shows a sample record from the database with the relevant columns.
+------------+---------------+---------------+ | domain | mail_address | mailbox | +------------+---------------+---------------+ | ora.com | kdent@ora.com | ora.com/kdent | +------------+---------------+---------------+
In this example, all virtual deliveries occur under the same
user and group, vmail:vmail. If
you require different user and group privileges for the different
users or domains, you should have additional columns for uid and gid in your table and then create mysql maps for them as well.
You are using a static uid
and gid for deliveries and your
message store is simply a directory on the local filesystem:
virtual_mailbox_base = /usr/local/vmail virtual_uid_maps = static:1003 virtual_gid_maps = static:1003
The list of virtual domains and mailbox maps comes from two MySQL configuration files:
virtual_mailbox_domains = mysql:/etc/postfix/virtual_domains.cf virtual_mailbox_maps = mysql:/etc/postfix/virtual_mailboxes.cf
The virtual_mailboxes.cf configuration maps email addresses to the mail store file where messages should be delivered:
hosts = mysql.example.com user = kdent password = Rumpelstiltskin dbname = customer table = email_address select_field = mailbox where_field = mail_address
LDAP is a protocol that provides access to directories of information. LDAP directories are composed of entries that are organized into hierarchies. You have to understand how LDAP works and how your own directory is organized to use it with Postfix. Many networks are starting to make use of LDAP for user information, which makes it a nice way for Postfix to determine what users and addresses it should accept mail for. If your organization uses an LDAP directory, you can query your existing information for your Postfix configuration.
LDAP maps are specified with the ldap map type and can be listed along with
any other maps for a given parameter. Unlike MySQL, LDAP parameters are all listed in main.cf. You have to invent a name for the
particular LDAP configuration you are creating and specify it with the
ldap map type. If you call your
LDAP configuration ldapaliases, for
example, set your alias maps like this:
alias_maps = ldap:ldapaliases
The LDAP parameters for this configuration all start with the
name you invented followed by the name of the parameter. Thus, the
LDAP server is identified by the parameter
name _server_host, so for the example above, the
parameter is called ldapaliases_server_host:
ldapaliases_server_host = ldap.example.com
The important LDAP parameters are defined below. The complete list is available in the LDAP_README file that comes with the Postfix distribution:
name _search_baseThe base DN from which to start the search. You have to
know the naming context for your directory so that you can
specify the common container for your entries. Often it is the
root of the directory. Example: ldapaliases_search_base = dc=example, dc=com
name _scopeThe scope of the search. There are three possible options
for the scope: sub, base, and one. Your directory hierarchy
determines which value you need. The base option is rarely useful. With
sub the entire tree under the
base is searched, and with one only direct child nodes are
searched. The _scope
parameter defaults to sub if
you don’t specify another value. Example: ldapaliases_scope = one
name _query_filterThe attributes and values that should form your search
filter. The variable %s can
be used as a placeholder for the current recipient email
address. Example: ldapaliases_query_filter =
(mailType=forward)
name _result_attributeThe attribute containing the value you want returned for
this lookup. You can list multiple attributes in order of
preference. Example: ldapaliases_result_attribute = email,
rfc822Mailbox.
A common use of LDAP with Postfix is to protect an
internal mail server on a network that uses an LDAP directory of user
accounts. Postfix resides on a gateway system accepting messages from
the Internet, and relays them to the internal mail server. You want
Postfix to reject messages for unknown users on the network so that
they are never accepted on your network. By setting the local_recipient_maps parameter to query the LDAP directory, you can
configure Postfix so that it knows about all of the user accounts and
can reject mail for nonexistent accounts. On a large network there may
be different mail systems serving different groups of users. You can
also set up Postfix to forward messages to the correct mail server for
a particular user by setting transport_maps to point email addresses to
the correct internal mail servers.
The LDAP directory includes attributes for mail and mailHost, where mail contains the public email address for a
user and mailHost is the internal
server to which messages should be forwarded. A sample item in the
directory looks like the following:
dn: uid=kdent,ou=people,dc=example,dc=com
uid: kdent
cn: Kyle D. Dent
mail: kyle.dent@example.com
uidNumber: 1001
gidNumber: 1001
mailHost: mail1.example.com
homeDirectory: /home/kdent
mailType: forward
objectClass: people
userPassword: {crypt}hidden
accountStatus: activeTable 15-1 contains the LDAP directory information you need to configure Postfix in this scenario. You should collect the hostname and base DN for your own directory before starting to configure Postfix.
Directory information | Values |
Host | ldap.example.com |
Base DN: | dc=example,dc=com |
For the local_recipient_maps
lookup, you only have to know that an address exists in the mail attribute. For forwarding messages to
the correct internal mail server, you need the value from the mailHost attribute.
The local_recipient_maps
parameter points to lists of local users that should
receive email at this system. By default it points to the user
accounts and aliases that exist on the system, so that mail sent to
a nonexistent user is rejected by Postfix. In this example, the LDAP
directory contains the list of all email accounts that should
receive mail on the system. You can set up an ldap lookup map for local_recipient_maps. In the case of
local_recipient_maps, the value
returned is not used for anything because you only need to know if
the email address exists or not. Use an LDAP configuration called
“ldaplocal.” First, set local_recipient_maps to use this
configuration:
local_recipient_maps = ldap:ldaplocal
The rest of the LDAP parameters for this configuration are set as follows:
ldaplocal_server_host = ldap.example.com ldaplocal_search_base = dc=example, dc=com ldaplocal_query_filter = (&(mail=%s)(accountStatus=active)) ldaplocal_result_attribute = uid
The ldaplocal_query_filter
parameter compares the recipient email address to the mail attribute in the directory. It also
checks to make sure that the accountStatus attribute is set to active.
The result attribute is set to uid. For this lookup, you only need to
know that the item exists, but Postfix does require a non-blank
result for the lookup.
After reloading Postfix, it uses the LDAP configuration to determine local users and reject mail for recipients not listed in the LDAP directory.
You can easily check your LDAP configuration file with the postmap command:
$ postmap -q 'kdent' ldap:ldaplocal
kdentThe -q option tells
postmap to query the map using
the specified key. If your query has any problems, postmap reports them to your
terminal.
When messages received by Postfix have to be relayed to the
correct internal mail server, use transport_maps . Set transport_maps to use a new LDAP
configuration called “ldaptransport”:
transport_maps = ldap:ldaptransport
Because the LDAP directory returns just the name of the host,
and you need a transport value (transport:nexthop), you can use the
_result_filter parameter to
specify a template for the results:
ldaptransport_result_filter = relay:%s
Also, configure the following parameters:
ldaptransport_server_host = ldap.example.com ldaptransport_search_base = dc=example, dc=com ldaptransport_query_filter = (&(mail=%s)(accountStatus=active)) ldaptransport_result_attribute = mailHost
Again, the ldaplocal_query_filter parameter compares
the recipient email address to the mail attribute in the directory and checks
to make sure that the accountStatus attribute is set to active.
The result attribute is the value for the mailHost attribute, which is the email
server that should receive messages for the specified user. The
result is expanded in the template specified in ldaptransport_result_filter.
Be sure to reload Postfix for the new ldap transport map to go into effect.
This appendix contains an alphabetical listing of parameters normally configured in the Postfix main.cf file. The brief descriptions are only meant to give you an idea of the purpose of the parameter. All of the parameters are fully documented in the sample configuration files and manpages that come with the Postfix distribution. This quick reference can point you in the right direction, but you will have to consult the body of this book or the online documentation to understand how each parameter works.
All of the parameters are listed with a type of value that should be assigned to it. Most of the value types are obvious. Those that require some explanation are described here:
The parameter requires one or more items from a specific list of possible values. See the online documentation for a particular parameter to see what the possible values are.
When a parameter points to lookup tables, the tables are specified with their map type and the table name separated by a colon:
transport_map = hash:/etc/postfix/transport
The complete path to a file.
Some parameter values are specified as strings that contain macros:
smtpd_banner = $myhostname ESMTP $mail_name
The macros are expanded into their values at the time the parameter is used. See the online documentation to find out what macros are allowed for a particular template parameter.
Many parameters are specified as an amount of time:
queue_run_delay = 1000s
They are assigned a value and a time unit abbreviation. Time unit abbreviations are listed in Table A-1. If you leave off the time unit, each time parameter has a default unit that it assumes for the value specified. You can check the online documentation to see what the default unit is for a particular parameter.
All of the parameters have a default value (although for some the default is blank). Only parameters that differ from their default values have to be specified in main.cf. The parameters are listed here with their default values, but they sometimes change with Postfix releases. You can check the default value for a parameter with the postconf command and its -d option:
$ postconf -d alias_maps
alias_maps = hash:/etc/aliases, nis:mail.aliasesauthorized_verp_clients
$mynetworks
VERP is a technique used with mailing lists to handle bounced
messages. It combines the list owner address and original recipient
address with a special delimiter character. authorized_verp_clients contains a list of
host and domain names and IP addresses of clients that are allowed
to use the feature.
debug_peer_list
(null)
For help with troubleshooting, Postfix can increase logging
for particular hosts that you might be having problems with.
debug_peer_list specifies a list of one or more hosts, domains, or
regular expression patterns whose logging should be increased by the
degree specified in debug_peer_level.
default_destination_concurrency_limit
20
Postfix allows you to set a limit on the number of
simultaneous deliveries to any transport in master.cf. If you don’t set an explicit
limit for a transport, the value in default_destination_concurrency_limit
is used. Note that concurrency limits are per
destination as opposed to process limits, which are per
transport.
default_verp_delimiters
disable_dns_lookups
double_bounce_sender
double-bounce
A double bounce is produced when the original sender of a
message cannot be notified that the message was not delivered. The
double_bounce_sender parameter
specifies the sender address Postfix uses for mail that should be
discarded if it cannot be delivered. The specified address should
not be used for anything else since all messages addressed to it are
silently discarded.
fast_flush_domains
fast_flush_refresh_time
forward_expansion_filter
(see example)
When assigning path names to the forward_path parameter, you can use macros
such as $user that are expanded
by Postfix to determine the path for the current message. The
forward_expansion_filter
parameter specifies a list of characters that should
be allowed when expanding macros. Characters that are not permitted
are replaced by underscores.
maximal_backoff_time
4000s
Maximum time limit for Postfix to attempt redelivery of
deferred messages. Each time a message is deferred, the queue
manager increases the amount of time it waits to attempt delivery of
that message again. The calculated increase of time is never allowed
to exceed maximal_backoff_time
.
minimal_backoff_time
proxy_interfaces
(null)
When a Postfix server is running on an internal network behind
a proxy or NAT device, and it serves as the backup MX host for a
domain, it’s possible to get mail delivery loops when the primary MX
host is down. The proxy_interfaces specifies a list of network interface addresses that
receive mail via a proxy device. Postfix avoids mail loops with
listed interfaces.
smtp_pix_workaround_delay_time
10s
Certain older Cisco PIX firewalls contain a bug that
causes them to interfere with SMTP delivery when the final period
and CR/LF indicating the end of message content arrive in separate
packets. Postfix can automatically detect the problem and adjust for
it by waiting before sending the final period and CR/LF to give the
socket send buffer a chance to empty out. The smtp_pix_workaround_delay_time parameter
specifies how long Postfix waits for the socket send buffer to
empty.
smtp_skip_5xx_greeting
yes
When an SMTP server responds with 5xx reply code, Postfix can
either bounce the message or move on to any additional mail
exchangers for the destination domain to see if they are able to
accept the message. The parameter smtp_skip_5xx_greeting specifies whether or not Postfix should react to the
reply code or move on. A value of no causes Postfix to try additional mail
exchangers.
soft_bounce
verp_delimiter_filter
Postfix command-line tools are listed below. Each one is fully documented in a manpage that comes with the Postfix distribution. This appendix is meant to give you an idea of what each command is used for. You should refer to the manpages for complete information about each of the commands:
postalias Creates or queries alias databases.
postcatPrints the contents of queue files, allowing administrators to display the text of a message in the queue.
postconf Displays or changes Postfix parameters. Can display one parameter at a time, or the entire list of parameters.
postdrop Injects a message into the maildrop directory for delivery by Postfix.
postfix Starts and stops the Postfix system. Can also be used for other Postfix maintenance, such as checking the configuration and flushing the queue.
postkickSends a request to a particular Postfix service. Meant to provide a way for shell scripts to communicate with Postfix services.
postlock Locks a specified file for exclusive access. Provides a means for shell scripts to use Postfix-compatible locking.
postlog Logs specified information to the system-logging facility. Provides a means for shell scripts to log information easily in a style similar to Postfix.
postmap Creates or queries lookup maps. Much of the Postfix configuration information is kept in lookup tables that are created by the postmap command.
postqueue Provides user-level access to the Postfix queue. Changes to the queue requiring super-user privileges are managed by the postsuper command.
postsuper Provides super-user access to the Postfix queue. Allows an administrator to delete messages, place them on hold and release them from hold, and repair the queue structure, if necessary.
The general steps to build Postfix from the source files are to
obtain the software bundle, uncompress it, compile it, and install it. The
tools you need are common on nearly all distributions of Unix: gzip, tar,
make, and a C compiler. Postfix
generally expects the GNU gcc compiler,
but you can also build it with your platform’s native compiler, as long as
it supports ANSI C.
The official Postfix web site (http://www.postfix.org/) has a download link that displays a list of mirrors from which you can get the software. You should select the mirror that is closest to you. Get the package you want by selecting the “Source code” link under either the Official or Experimental release (see Chapter 1). The examples here assume that you have downloaded a file called postfix-2.0.10.tar.gz. If the file you download is different, change the filename accordingly in the commands in the examples.
Before we move on to the specifics of building Postfix, let’s take a look at some of the basics when compiling C code.
The options for a particular build are usually contained within a description file normally called Makefile. The make utility uses the Makefile to determine prerequisites, dependencies, and options to use when building a package. Using this information, make calls a compiler to create object files, and then a linker (usually called ld) to link them together into executables.
Since the Postfix distribution creates its own Makefile, you don’t have to worry about
editing that (and you shouldn’t edit it, since any changes you make
would likely get overwritten later). Options that Postfix needs in its
Makefile are defined in environment
variables such as CCARGS. The
INSTALL file that comes with the
Postfix distribution discusses all of the available options. We’ll look
at some of the more common ones here.
The following environment variables are available to set compile-time options. You should use quotes around the values to retain spaces or other shell metacharacters:
AUXLIBSTells the linker where to look for additional libraries that are not in the standard locations. For example, if you build support for an add-on package, you may have to indicate where the libraries are for that package.
CCSpecifies a particular compiler to use. If you want to use a compiler other than the one Postfix selects, set this variable to your compiler. Postfix normally uses gcc except on platforms where the native compiler is known to work better. You can check the makedefs file to see which compiler Postfix uses by default on your system.
CCARGSProvides additional arguments to the compiler. If your compiler allows special options or your supporting files are not located in default directories, indicate those options with this variable.
DEBUGThe DEBUG parameter
specifies debugging levels for the compiler to use when building
the Postfix binaries. Turning on debugging produces extra
information that a debugger can use. You can also turn off
debugging features completely to build Postfix for a production
system.
OPTThe OPT parameter
specifies optimization levels for the compiler to use when
building Postfix binaries. Additional optimization may increase
performance but at the cost of longer compilation and more memory.
You can probably accept the defaults that Postfix selects for your
platform.
Compiler options are set in the CCARGS variable. C source code files require
header files that define certain functions and variables. The standard
location for header files is the /usr/include directory. If your header
files are located somewhere else, you have to tell the compiler where
to look for them. The -I compiler
option is used to specify additional directories where the compiler
might find header files. If you are linking with libraries from
external packages, the header files might be located where the package
is installed rather than in the standard location. A common convention
for external packages is to install header files in /usr/local/include. If you want to tell the
compiler to look in that directory as well as the standard location
when building Postfix, specify the options and directory with CCARGS:
CCARGS='-I/usr/local/include/'
Use additional -I options for
each additional directory the compiler should search.
Postfix uses conditional compilation during its build, depending
on which libraries or other resources are available on your system. It
defines certain macros based on what it discovers about your system or
based on options you have selected. The -D option provides a way to define macros at
the time you compile Postfix. Add-on packages for Postfix require that
you define a particular macro to tell Postfix to include it when
building. For example, if you want to include support for MySQL, you
define the HAS_MYSQL macro:
CCARGS='-DHAS_MYSQL'
Linker options are set in the AUXLIBS variable. After Postfix has compiled
the object files, it links them together with required libraries into
executable files. The standard location for system libraries is
/usr/lib. To tell the linker to
search additional directories for libraries, use the -L option:
AUXLIBS='-L/usr/local/lib'
You must also tell the linker which specific libraries to link
in. The -l option is used to name
specific libraries. The library files must be in a standard location
or a directory indicated with the -L option. Library archive files are named
starting with lib, followed by
their name, followed by the extension, which is normally .a for static libraries and .so or .sl for shared objects or shared libraries.
When you use the -l option, you
leave off the initial lib and the
extension of the library file. To link with the MySQL client library
for example, where the library file is called libmysqlclient.a, the -l option is specified as follows:
AUXLIBS='-L/usr/local/lib -lmysqlclient'
Most linkers choose runtime or dynamic libraries over the static versions. Runtime libraries are linked when a program is running rather than during compilation. At compile time, the linker adds information so the program can find the libraries when it is executed. If you always install all of your dynamic libraries in a standard location such as /usr/lib, your system won’t have any trouble finding the libraries at runtime. However, some external packages install libraries in nonstandard directories such that they cannot be found at runtime. Different systems use different conventions for locating dynamic libraries using fixed path information and environment variables. Be sure to configure your system to be able to find your dynamic libraries or make sure that the libraries are installed in your system’s standard directories. Another option is to provide the actual path to specific libraries when you build your programs.
The linker uses an argument to include directories in a runtime
search path for dynamic libraries. The argument differs depending on
your linker and platform. The GNU linker (Linux, FreeBSD) uses
-rpath, as does IRIX. Solaris, on
the other hand uses -R, and HP-UX
uses +b. Consult the manpage for
your linker, ld(1), to see which
argument you should use to set the runtime library search path.
Using the SSL library as an example, if your libssl.so file is located in /usr/local/lib and you are building Postfix
on FreeBSD or another system that uses rpath, define AUXLIBS as follows:
AUXLIBS='-L/usr/local/lib -rpath/usr/local/lib -lssl'
When linking Postfix with external libraries, if you have multiple versions of the libraries installed, it is very important to make sure that you link Postfix with the version you need. Also, make sure that the library version you link to corresponds to the correct version of the header files you include. Version mismatch problems are often the source of compiler errors. Sometimes the compiler does not complain, in which case your build may succeed, but you’re likely to find unusual errors from Postfix at runtime that can be tricky to track down.
The source file that you download is in a compressed, tar archive and must be uncompressed using the gzip command. In the same directory as the downloaded bundle, type the following:
$ gzip -d postfix-2.0.10.tar.gzThis uncompresses the file and produces a tar file without the .gz extension. Next, untar the file:
$ tar -xf postfix-2.0.10.tarThis creates a directory called postfix-2.0.10 below the current directory. Set that directory as your current directory for the rest of the compilation:
$ cd postfix-2.0.10If you accept all of the default parameters for building Postfix, compiling is as simple as executing make in the top-level directory of the distribution:
$ makeExecuting make creates a Makefile for your particular platform, which is in turn used to compile Postfix for your system. If you don’t need any changes to the default build, you can skip ahead to the Section C.4 section.
The file makedefs contains platform-specific information that Postfix uses when configuring the package for your system. If you are curious, you can look at the file to see which parameters Postfix uses for your platform. It identifies your environment and creates the macros and definitions that are used in the Makefile for building Postfix on your system. The resultant Makefile is invoked by the make command which in turn calls your compiler and linker to build the Postfix system. When you type make as above, all of this happens automatically, so you don’t normally need to worry about this file.
If you want to change any of the parameters for your environment, you can execute the build in two steps. The command make makefiles creates a new Makefile based on parameters that you specify on the command line. To set specific parameters, simply define variables on the command line. For example, you can use a different compiler from the default that Postfix chooses for your environment. The following example works on an HP-UX system to be sure that make finds the correct compiler:
$ make makefiles CC="/opt/ansic/bin/cc -Ae"You would, of course, specify the path to your own compiler plus
any necessary options. If you need to specify an additional directory
for header files on your system, define CCARGS to include your directory:
$ make makefiles CCARGS="-I /usr/local/include/"And, of course, you can combine options:
$ make makefiles CC="/opt/ansic/bin/cc -Ae" CCARGS="-I /usr/local/include"Postfix provides a lot of flexibility through its
configuration files. Nearly all of Postfix’s runtime parameters,
including the various directories it uses, can be set in its
configuration file except, of course, the location of the
configuration file itself. You can change the location by defining
DEF_CONFIG_DIR within the CCARGS variable:
$ make makefiles CCARGS='-DDEF_CONFIG_DIR=\"/usr/local/etc/postfix\"'The single and double quotation marks and backslashes are
important since the value for DEF_CONFIG_DIR should itself be quoted.
After compilation, Postfix looks for its main.cf configuration file in the directory
/usr/local/etc/postfix instead of
the default directory, /etc/postfix.
You can use combinations of all the examples above to configure the environment you need. If your command line starts to get complicated, you might want to create a simple shell script to execute it for you. See Section C.7 later in this appendix.
Once you have used make makefiles with your specific options to create your Makefile, execute make to build Postfix:
$ makeAfter you have successfully compiled Postfix, you are ready to install it. You will have to be the root user in order to perform the installation steps.
You need to create a dedicated account that will own the Postfix queue and most of its processes. The account should not permit logins and does not need a shell or a home directory. Use your normal administrative tools to create an account. You can set the password to * and its home directory and shell to invalid paths (something like /bin/false or /dev/null). By convention the username should be postfix. The entry in /etc/passwd should resemble the following:
postfix:*:1001:1001:postfix:/no/where:/bin/false
You must also create a dedicated group that is not used by any user account, including the postfix account you just created. By convention the group name is postdrop. On most systems you create groups be editing the /etc/group. Add a line like the following:
postdrop:*:1007:
Remember that Postfix is a replacement for Sendmail, and in order to maintain compatibility it installs its own sendmail binary in place of your existing one. You may want to rename the existing one to save it from being overwritten. Depending on your platform your existing sendmail is commonly in /usr/sbin/sendmail or /usr/lib/sendmail. You should be able to determine the exact location of your sendmail by executing:
# whereis sendmailThis may list a number of files. You are looking for the binary that has no extension. Once you have found it, rename it to move it out of the way:
# mv /usr/sbin/sendmail /usr/sbin/sendmail.origYou will also want to rename two other files that will be replaced by Postfix: mailq and newaliases. These are commonly found in the /usr/bin directory, but you can use the whereis command to locate them if necessary. These commands might be symbolic links on your systems:
#mv /usr/bin/mailq /usr/bin/mailq.orig#mv /usr/bin/newaliases /usr/bin/newaliases.orig
Now you are ready to run the installation script.
Make sure you are still the root user and still in the Postfix distribution directory. Execute the installation script:
# make installAfter checking that everything is built, the installation script asks you a few questions about setting up Postfix on your system:
install_root: [/]
The install_root directory is the root directory of your system. The only time you would want to change this is if you are creating an installable package. Package builders often want to keep all of the files together in a separate subdirectory in order to bundle them up when creating an installable distribution:
tempdir: [/home/kdent/postfix-2.0.10]
The tempdir directory is a place where the installation script can write temporary files. It defaults to your current directory and cleans up after itself. If for some reason you want the installation script to use another directory, specify it here:
config_directory: [/etc/postfix] daemon_directory: [/usr/libexec/postfix] command_directory: [/usr/sbin] queue_directory: [/var/spool/postfix] sendmail_path: [/usr/lib/sendmail] newaliases_path: [/usr/bin/newaliases] mailq_path: [/usr/bin/mailq]
You should probably accept the defaults for the questions that involve the location of the various Postfix files. Just be sure that the default values presented by the installation script match the directories you found with the whereis command for your original copies of sendmail, newaliases, and mailq. If they don’t, you should type in the correct path when the installation script prompts you for it.
mail_owner: [postfix]
The mail_owner defaults to
postfix, and assuming that you followed the
instructions earlier, you can accept that value. If you created an
account with a different username, enter that here.
setgid_group: [postdrop]
The setgid property defaults to
postdrop, and assuming you followed the
instructions earlier, you can accept that value. If you created a group
with a different name, enter that here.
manpage_directory: [/usr/local/man]
For installation of the Postfix man pages, you can accept the default or type in a more appropriate place on your system.
sample_directory: [/etc/postfix]
The sample configuration files contain explanations for Postfix parameters and should be included in your installation. If you prefer not to have them in your configuration directory, you can specify a different location here.
readme_directory: [no]
The Postfix distribution includes several README files with additional information about particular features and add-on packages. These are less critical for the regular maintenance of your Postfix server than the sample configuration files, but if you would like to include them on your system, specify a path where they should be installed. If you don’t install them, they are still available in the distribution directory.
The installation script then installs all of the necessary files.
If Postfix is already installed on your system, you can upgrade it when you have a new compilation or version to install. It’s usually best to stop Postfix before performing the upgrade. The upgrade process is not interactive but requires that the main.cf file exist on your system already:
#postfix stop#make upgrade#postfix start
Postfix checks for changed files and replaces them with newer versions from your new compilation. Be sure to check the log file after restarting Postfix.
This section walks through building Postfix with various add-on packages that are mentioned in the book. Before recompiling Postfix with any additional packages, it is important to first clean up from any previous builds. Execute the following:
$ make tidyNow you’ll be starting with a clean source tree for your new builds. Each of the examples below takes you through creating a new Makefile. Once you’ve accomplished that, simply type:
$ maketo rebuild Postfix. If your new build is successful, you can upgrade your currently installed Postfix:
# make upgradeIf you hadn’t previously installed Postfix, use make install instead.
See Chapter 12 for information on Cyrus SASL and Postfix. You can download the source for the Cyrus SASL libraries from the Carnegie Mellon web site at http://asg.web.cmu.edu/sasl/sasl-library.html. Note that this book assumes that you are working with SASL Version 2.x libraries. Follow the instructions for building the Cyrus SASL2 libraries. There is also a SASL_README file that comes with the Postfix distribution.
One issue when compiling Cyrus SASL that affects Postfix is
whether or not to include support for certain Microsoft clients that
authenticate using a nonstandard mechanism. The standard plain-text
authentication mechanism is identified as PLAIN, but these clients use LOGIN. If you need to support such clients,
be sure that the libraries are built with the workaround enabled using
the --enable-login option when you
run configure.
When you install the libraries, be sure to note their location. This example assumes that they are installed in /usr/local/lib and that the header files are located below /usr/local/include. If you are using different locations, adjust the examples accordingly.
To build Postfix with SASL support, you must define the USE_SASL_AUTH macro and specify the
directories for the libraries and header files. You must also link
against the libsasl2.so library
file. Run make tidy if necessary.
Build your Makefile with the
following options:
$make makefiles CCARGS='-DUSE_SASL_AUTH -I/usr/local/include/sasl' \AUXLIBS='-L/usr/local/lib -lsasl2'
Remember that if you must provide the path to your libraries to the runtime linker, include the correct runtime search path argument:
$make makefiles CCARGS='-DUSE_SASL_AUTH -I/usr/local/include/sasl' \AUXLIBS='-L/usr/local/lib -lsasl2 -rpath /usr/local/lib'
If your linker uses an argument other than rpath, be sure to specify the correct
one.
See Chapter 13 for information on the TLS patches and Postfix. You can find the web site for the TLS patches from the “Add-on Software” page of the Postfix web site. Since this add-on modifies the Postfix source, make sure you get the correct download for your version of Postfix. For this example, assume the downloaded file is called pfixtls-0.8.13-2.0.10-0.9.7b.tar.gz. If the file you download is different, adjust the examples accordingly.
This add-on depends on the OpenSSL library, which you must install first if it’s not already on your system. Check the documentation that comes with the TLS distribution to make sure you have the correct version of OpenSSL. For this example, assume that your OpenSSL libraries are installed in /usr/local/ssl/lib and the header files are in /usr/local/ssl/include. If your installation differs, adjust the example accordingly.
The TLS modifications to the Postfix source are all contained in the file pfixtls.diff, and you use the patch command to apply the differences to your Postfix source. You should uncompress and untar the TLS patch in a subdirectory that is at the same level as your Postfix directory such that if your current directory is the one above the Postfix source, you can see both the Postfix directory and the TLS patch directory:
$pwd/home/kdent $ls -ld pfixtls-0.8.13-2.0.10-0.9.7b postfix-2.0.10drwxr-xr-x 5 kdent kdent 512 May 14 2002 pfixtls-0.8.13-2.0.10-0.9.7b drwxr-xr-x 15 kdent kdent 1024 May 31 17:31 postfix-2.0.10
From that directory apply the patch as follows:
$ patch -p0 < pfixtls-0.8.13-2.0.10-0.9.7b/pfixtls.diffpatch reports the changes as it makes them until it finishes and displays “done” on your terminal.
Go back to the Postfix distribution directory to build Postfix
with TLS support. You must define the HAS_SSL macro and specify the directories
for the SSL libraries and header files. You must also link against the
libssl.so (or libssl.a) and libcrypto.so (or libcrypto.a) library files. Run make tidy if necessary. Build your Makefile with the following options:
$make makefiles CCARGS='-DHAS_SSL -I/usr/local/ssl/include' \AUXLIBS='-L/usr/local/ssl/lib -lcrypto -lssl'
Remember that if you must provide the path to your libraries to the runtime linker, include the correct runtime search path argument:
$make makefiles CCARGS='-DHAS_SSL -I/usr/local/ssl/include' \AUXLIBS='-L/usr/local/ssl/lib -lcrypto -lssl -rpath /usr/local/ssl/lib'
If your linker uses an argument other than rpath, be sure to specify the correct
one.
See Chapter 15 for information on MySQL and Postfix. This add-on depends on the MySQL client library and the zlib compression library, which you must install first if they’re not already on your system. This example assumes that your MySQL library is installed in /usr/local/lib/mysql with its header files in /usr/local/include/mysql and that the zlib library is in /usr/lib. If your installation differs, adjust the example accordingly. There is a MYSQL_README file that comes with the Postfix distribution with information about building Postfix with support for MySQL.
To build Postfix with MySQL support, you must define the
HAS_MYSQL macro and specify the
directories for the MySQL library and header files. You must link
against the libmysqlclient.so and
the libz.so library files. You
must also link against the libm.so math library file, which is
standard on Unix systems. Run make
tidy if necessary. Build your Makefile with the following options:
$make makefiles 'CCARGS=-DHAS_MYSQL -I/usr/local/include/mysql' \'AUXLIBS=-L/usr/local/lib/mysql -lmysqlclient -lz -lm'
Remember that if you must provide the path to your libraries to the runtime linker, include the correct runtime search path argument:
$make makefiles 'CCARGS=-DHAS_MYSQL -I/usr/local/include/mysql' \'AUXLIBS=-L/usr/local/lib/mysql -lmysqlclient -lz -lm \-rpath /usr/local/lib/mysql'
If your linker uses an argument other than rpath, be sure to specify the correct
one.
See Chapter 15 for information on LDAP and Postfix. This add-on depends on LDAP libraries, which you must install first if they’re not already on your system. There are commercial libraries available as well as an open source package from http://www.openldap.org/. This example assumes that you have LDAP libraries installed in /usr/local/lib/ and LDAP header files in /usr/local/include. If your installation differs, adjust the example accordingly. There is an LDAP_README file that comes with the Postfix distribution with information about building Postfix with support for LDAP.
To build Postfix with LDAP support, you must define the HAS_LDAP macro and specify the directories
for the LDAP libraries and header files. You must link against the
libldap.so library file and also
the liblber.so library file,
which defines encoding routines for the LDAP protocol. Run make tidy if necessary. Build your Makefile with the following options:
$make makefiles CCARGS='-I/usr/local/include -DHAS_LDAP' \AUXLIBS='-L/usr/local/lib -lldap -L/usr/local/lib -llber'
Remember that if you must provide the path to your libraries to the runtime linker, include the correct runtime search path argument:
$make makefiles CCARGS='-I/usr/local/include -DHAS_LDAP' \AUXLIBS='-L/usr/local/lib -lldap -L/usr/local/lib -llber \-rpath /usr/local/lib'
If your linker uses an argument other than rpath, be sure to specify the correct
one.
If you run into problems, check the various README files for information about your build. Frequently, they contain information about problems you might run into. Certainly, if there is a README file specific to your platform, be sure to read it. Some possible problems are mentioned below. Exact messages vary depending on your platform and compiler, so the following are general errors similar to what you might see when building Postfix.
Make sure that the path to your compiler is correct. If
you specified a compiler by setting CC when building your Makefile (for example, make makefiles CC="/path“),
double-check the path you typed. If the path to your compiler
came from the Postfix makedefs file, you might need to
override it with:
$ make makefiles CC="/path/to/your/compiler"Another possibility is to have Postfix call your compiler without a path, assuming its directory is in your environment path:
$ make makefiles CC="cc"Make sure that the path to your include files is correct.
The include files are normally stored in /usr/include. If your system uses a
different path for some reason, you will have to specify it with
the -I option set in CCARGS:
$ make makefiles CCARGS="-I/path/to/include"If you already specified a path with -I double-check your typing.
Make sure that the library paths you specified with the
-L option are correct and
that you have specified the libraries themselves correctly with
the -l option.
If you see errors associated with a header file like
mail_conf.h, you may not be
using an ANSI C compiler. Nearly all platforms ship with a
compiler that is used to reconfigure the kernel, but they do not
all include an ANSI C compiler that you can use for development.
You may have to contact your vendor to get an ANSI C compiler if
you want to build Postfix. Also, the GNU gcc compiler works on nearly all
platforms and is available as open source software. If you are
using the compiler for HP-UX, you must use the -Ae flag to compile in ANSI mode.
Include it in your CCARGS
variable:
$ make makefiles CCARGS="-Ae"You have probably lost your Makefile or never had one. You can easily create your Makefile by executing the command:
$ make -f Makefile.init makefilesAfter that completes, try your build again.
You can mix and match any of the options or add on libraries described in this appendix to build Postfix for your environment. If your command line for building the Postfix Makefile is getting a little complicated, you should probably create a simple shell script that invokes the options and additional libraries you need. Creating a build script has the added advantage of documenting the options you used when you last built Postfix. Feel free to include plenty of comments to yourself to explain the reasons you are including an option or not, and how you came to that decision. The following is an example of a shell script you might use, although you will certainly need to customize it for your own environment. This example includes all of the add-on libraries we’ve discussed. You should exclude the ones you don’t need:
# # Simple script to create a Makefile to build Postfix. # # # Remember to start by cleaning up or uncomment this line # to have this script do it every time. # #make tidy # # Specify all of our options and supporting libraries # make makefiles \ CCARGS='-DUSE_SASL_AUTH -DHAS_SSL -DHAS_MYSQL -DHAS_LDAP \ -I/usr/local/include/sasl -I/usr/local/ssl/include \ -I/usr/local/include/mysql -I/usr/local/include' \ AUXLIBS='-L/usr/local/lib -L/usr/local/ssl/lib \ -L/usr/local/lib/mysql -L/usr/local/lib \ -lsasl2 -lcrypto -lssl -lmysqlclient -lz -lm -lldap -llber \ -rpath /usr/local/lib/mysql -rpath /usr/local/lib \ -rpath /usr/local/ssl/lib'
To build Postfix, type:
$sh build.sh$make
The first command creates your Makefile with the options you need. The second executes the build.
Postfix reports this error when a DNS reply points to your
mail server, but Postfix has not been configured to accept mail for
the domain. Postfix accepts mail for domains listed in mydestination, relay_domains, virtual_mailbox_domains, virtual_alias_domains, and domains that
resolve to IP addresses listed in inet_interfaces and proxy_interfaces. Your domain must be
listed in one of these parameters.
It depends on the type of file you are changing. Changes in files that Postfix reads into memory at startup require a reload. Examples of such files are main.cf, master.cf, and any lookup table using regular expressions. DB or DBM files are not read into memory and don’t require reloading Postfix when they are changed.
No. Most administrators with complex configurations create a Makefile that will cat the necessary files together. If you have other regular administrative tasks, add them to your Makefile too. Your Makefile should have an entry that looks something like this:
main.cf: file1 file2 file3
cat file1 file2 file3 > main.cf.new
mv main.cf.new main.cfThen type make main.cf to rebuild your configuration file.
This is not currently available in Postfix.
By design this is not implemented in Postfix directly. It’s not the job of an MTA, and it’s not as simple a problem as it seems because of MIME and digital signatures. MIME messages have a structure that can be very complex. Digital signatures attest to the fact that a signed message has not been modified. Adding a footer to the bottom of a message breaks both of these. Some people add short text to the headers of email messages, but the text is not likely to be seen by most users. The real solution is to configure your clients to add whatever text is required.
Having said that, it is possible to configure a content filter that appends the text for you. Follow the directions for configuring Postfix to work with a content filter. Your filter should be MIME-aware, and you should be aware that digital signatures will no longer work.
Specify an address in the always_bcc parameter. It will receive
copies of all messages.
This is not really a function of Postfix, although you may
achieve what you’re looking for with the mailbox_size_limit. Be aware that if you
use maildir-style mailboxes, this parameter limits only the size of
individual mail files and not the size of the entire mailbox.
Mailbox quotas are best enforced by the mail store itself, which
might be done through normal operating system accounting or your
POP/IMAP server configuration.
The idea behind this message is that users should contact their own postmasters for assistance, since the local postmaster is quite possibly the one who has to deal with the problem. If you definitely want to make the change, you have to modify the source code.
If you are using an external program for delivery, it might
not handle more than one address at a time. Such is the case with
maildrop, for example. To make
sure that Postfix passes messages for delivery one at a time, set
the transport _destination_recipient_limit parameter in
main.cf to 1.
transport is the name of the transport
method making the deliveries. If you are using maildrop, the parameter looks like the
following:
maildrop_destination_recipient_limit = 1
Specify the IP address of the interface you want Postfix to
use in the inet_interfaces
parameter.
This is controlled by the delay_warning_time parameter. By default
it’s set to 0 for “never”.
Postfix does not support EXPN. Because of Postfix’s architecture and concern for security, the unprivileged SMTP server doesn’t know anything about local aliases. It’s the privileged local delivery agent that actually expands aliases at the point of delivery. If you use a mailing-list manager, it most likely has a command to tell you who is on the list, or you may have to check the aliases file on the mail server system.
mailbox_transport and mailbox_command?The mailbox_transport
parameter is set to a service from master.cf, while mailbox_command refers to an actual
command on the mail server filesystem. There are a few parameters
that can affect mailbox delivery. The parameters in order of
preference are mailbox_transport,
mailbox_command_maps, mailbox_command, and home_mailbox.
Add header checks that match the header lines showing your internal systems and specify the IGNORE action for them.
You can specify an address in the luser_relay parameter and disable local_recipient_maps:
luser_relay = info local_recipient_maps =
Be careful if you do this. With the prevalence of spam, the address you specify is liable to catch a large amount of junk mail.
You probably have soft_bounce turned on.
# postsuper -d ALLNote that the word ALL must
be all capital letters, and that executing this command deletes
all of the mail in your
queue.
Postfix logs messages to your system’s syslogd daemon. Check your system documentation to find the actual log file.
It’s normal if you have:
disable_dns_lookups = yes
specified in main.cf. You might also have a transport map specified in brackets, in which case Postfix delivers directly to the system:
example.com smtp:[mail.example.com]
You don’t want to block messages based on the fact that they have a null return path. Accepting null envelope addresses is required by the standards. The technique is used to prevent looping of error notifications. You’ll have to identify the spam by some other means.
header_checks and
body_checks to block spam, but some
legitimate email is blocked by my checks. Is there any way to
whitelist some mail so that the header and body checks are not
applied?No. Header and body checks are applied to every message and should be used for simple checks that can easily be applied to all mail. If you need anything more sophisticated, you should set up a content filter that has the smarts you need.
A link in an index entry is displayed as the section title in which that entry appears. Because some sections have multiple index markers, it is not unusual for an entry to have several links to the same section. Clicking on any link will take you directly to the place in the text in which the marker appears.
Kyle D. Dent works as an independent consultant and software developer in the New York metropolitan area. He has designed and implemented various security, network, and web-based applications for technology and financial firms. He has been working with Postfix in various settings since it was released by IBM in 1998. Kyle grew up with computers in an IBM family, but originally started working in publishing and as a teacher of English as a Second Language. He is an avid supporter of public libraries serving as a trustee at his local library and on his regional library system board. He has recently started to learn the classical guitar.
Our look is the result of reader comments, our own experimentation, and feedback from distribution channels. Distinctive covers complement our distinctive approach to technical topics, breathing personality and life into potentially dry subjects.
The animal on the cover of Postfix: The Definitive Guide is a dove. Doves belong to the class Aves (birds) and the order Columbiformes (doves and pigeons), to which the now-extinct dodo bird (Raphus cucullatus) also belonged. Their family, Columbidae, includes over 300 species of pigeons and doves, including the common rock dove or feral pigeon (Columba livia).
In 1679, the French astronomer Augustin Royer discovered the dove-shaped constellation Columba. A constellation in the southern hemisphere, located near Puppis and Caelum, Columba’s stars were originally part of the constellation Canis Major.
Reg Aubry was the production editor and copyeditor, and Matt Hutchinson was the proofreader for Postfix: The Definitive Guide . Colleen Gorman and Claire Cloutier provided quality control. Mary Agner provided production assistance. Ellen Troutman-Zaig wrote the index.
Ellie Volckhausen designed the cover of this book, based on a series design by Edie Freedman. The cover image is an original illustration created by Susan Hart. Emma Colby produced the cover layout with QuarkXPress 4.1 using Adobe’s ITC Garamond font.
David Futato designed the interior layout. This book was converted by Joe Wizda to FrameMaker 5.5.6 with a format conversion tool created by Erik Ray, Jason McIntosh, Neil Walls, and Mike Sierra that uses Perl and XML technologies. The text font is Linotype Birka; the heading font is Adobe Myriad Condensed; and the code font is LucasFont’s TheSans Mono Condensed. The illustrations that appear in the book were produced by Robert Romano and Jessamyn Read, using Macromedia FreeHand 9 and Adobe Photoshop 6. The tip and warning icons were drawn by Christopher Bing. This colophon was written by Leanne Soylemez and Reg Aubry.
The online edition of this book was created by the Safari production group (John Chodacki, Becki Maisch, and Ellie Cutler) using a set of Frame-to-XML conversion and cleanup tools written and maintained by Erik Ray, Benn Salter, John Chodacki, and Jeff Liggett.
Copyright © 2009 O’Reilly Media, Inc.
1005 Gravenstein Highway North
Sebastopol, CA 95472
Beijing • Cambridge • Farnham • Köln • Sebastopol • Tokyo
All programmers are optimists—these words of wisdom were written down almost thirty years ago by Frederick P. Brooks, Jr.[1] The Postfix mail system is a fine example of this. Postfix started as a half-year project while I was visiting the network and security department at IBM Research in New York state. Although half a year was enough time to replace the mail system on my own workstation, it was not nearly enough to build a complete mail system for general use. Throughout the next year, a lot of code was added while the software was tested by a closed group of experts. And in the five years that followed the public release, Postfix more than doubled in size and in the number of features. Meanwhile, active development continues.
One of the main goals of Postfix is wide adoption. Building Postfix was only the first challenge on the way to that goal. The second challenge was to make the software accessible. While expert users are happy to Read The Friendly Manual that accompanies Postfix, most people need a more gentle approach. Truth be told, I would not expect to see wide adoption of Postfix without a book to introduce the concepts behind the system, and which gives examples of how to get common tasks done. I was happy to leave the writing of this book to Kyle Dent.
Just like Postfix, I see this book as a work in progress. In the time that the first edition of the book was written, Postfix went through several major revisions. Some changes were the result of discussions with Kyle in order to make Postfix easier to understand, some changes added functionality that was missing from earlier versions, and some changes were forced upon Postfix by the big bad ugly world of junk email and computer viruses. Besides the changes that introduced new or extended features, many less-visible changes were made behind the scenes as part of ongoing maintenance and improvement.
This book describes Postfix Version 2.1, and covers some of the differences with older Postfix versions that were widely used at the time of publication. As Postfix continues to evolve, it will slowly diverge from this book, and eventually this book will have to be updated. While it is a pleasure for me to welcome you to this first edition, I already look forward to an opportunity to meet again in the near future.
| —Wietse Venema |
| Hawthorne, New York |
| September 19, 2003 |
[1] Frederick P. Brooks, Jr.: The Mythical Man-Month: Essays on Software Engineering, Addison Wesley, 1975.
I’m always astounded when I think about the early designers of Internet technologies. They were (and many still are) an amazing group of people who developed software and technologies for a network that was minuscule, by comparison with today’s Internet. Yet their work scaled and has continued to function in not only a much larger but in a very different environment. The expansion hasn’t been completely without growing pains, but that doesn’t diminish this amazing feat. Sendmail is an example of one of the early technologies that was written for a different universe, yet is still relevant and handles a large portion of email today.
Postfix has an advantage in that it was built with an awareness of the scope and hostile environment it would have to face. In fact, its creation was motivated by the need to overcome some of the problems of software written in a more innocent age. What a difference a little hindsight can make.
I first started using Postfix when I was working with systems in a security-sensitive environment. The promise of more flexibility and better security caught my interest as soon as I heard about it. I was not disappointed. It didn’t take long before I was hooked, and preferred using Postfix everywhere. This book is my attempt to create a reference and a guide to understanding how Postfix works. Its main goal is to explain the details and concepts behind Postfix. It also offers instructions for accomplishing many specific tasks.
Documenting a piece of software that is still under active development is a bit like trying to stop running water. Sadly, this book will be incomplete even before it is out. I’ve tried to structure the information in the book in such a way as to exclude things that might become irrelevant or quickly out-of-date, so that what you find in the book will be good information for a long time to come. However, you may have to supplement this book with online documentation, web sites, and the Postfix mailing list for coverage of the latest features.
Postfix is a network application written for Unix. The more you know about networking and Unix, the better equipped you will be to manage a Postfix server. This book tries to explain things in such a way as to be understandable to users new to Unix, but it is unrealistic to think that you could learn to administer a Postfix server without having (or at least acquiring) some Unix knowledge. The book focuses on Postfix itself. Other concepts are explained as needed to understand the functions and configuration of Postfix. If you’re new to Unix, you should certainly consult other texts for general Unix information. Unix System Administration Handbook by Evi Nemeth, et al. (Prentice-Hall) is an excellent choice, and includes a helpful section on email. The relevant RFCs mentioned in this book can also be very helpful for understanding the details of a subject.
Chapter 1 through Chapter 3 provide background information on Postfix and email, Chapter 4 through Chapter 7 discuss general aspects of running a Postfix server, and Chapter 8 through Chapter 15 each present a specific topic that you may or may not need, depending on how you use Postfix:
Introduces Postfix and some general email concepts. Also discusses some of the design decisions that went into Postfix.
Covers required topics for understanding other concepts in the book. Anyone with a basic understanding of Unix and email can safely skip this chapter.
Explains the pieces of the modular architecture of Postfix and how Postfix handles email messages.
Covers a wide range of topics for configuring and managing a Postfix server.
Explains how the Postfix queue manager works, and presents the tools used to work with the queue.
Discusses how DNS is used for email routing. Presents considerations for configuring DNS to work with Postfix.
Covers how Postfix makes local deliveries and how it operates in conjunction with POP and IMAP servers.
Discusses using Postfix to receive email for virtual domains.
Discusses operating Postfix as a mail relay or gateway system.
Discusses setting up mailing lists in Postfix, and using Postfix with mailing-list managers. Provides examples with Majordomo and Mailman.
Discusses Postfix controls for blocking unwanted mail messages.
Covers using SASL libraries to provide SMTP authentication for clients to relay messages through your Postfix server.
Covers using the TLS patch to provide encrypted communications between clients and your Postfix server.
Discusses setting up external content filters with Postfix.
Covers using external data sources for Postfix lookup tables.
Presents an alphabetical listing of Postfix configuration parameters.
Presents a list, with brief explanations, of the command-line utilities that come with Postfix.
Discusses compiling and installing Postfix from source files.
Presents a list of frequently asked questions about Postfix.
Items appearing in this book are sometimes given a special appearance to set them apart from the regular text. Here’s how they look:
Used for commands, email addresses, URIs, filenames, emphasized text, first references to terms, and citations of books and articles.
Constant widthUsed for literals, constant values, code listings, and XML markup.
Constant width italicUsed for replaceable parameter and variable names.
Constant width
boldUsed to highlight the portion of a code listing being discussed.
Please address comments and questions concerning this book to the publisher:
| O’Reilly & Associates, Inc. |
| 1005 Gravenstein Highway North |
| Sebastopol, CA 95472 |
| (800) 998-9938 (in the United States or Canada) |
| (707) 829-0515 (international or local) |
| (707) 829-0104 (fax) |
O’Reilly maintains a web page for this book, that lists errata, examples, and any additional information. You can access this page at:
| http://www.oreilly.com/catalog/postfix/ |
To comment or ask technical questions about this book, send email to:
| bookquestions@oreilly.com |
For more information about O’Reilly books, conferences, Resource Centers, and the O’Reilly Network, see O’Reilly’s web site at:
| http://www.oreilly.com/ |
I would first like to thank Wietse Venema for Postfix, of course, but also for his many contributions to the Internet community. Having had the honor to work with him on this book, it is apparent to me that he brings the same level of intelligence and attention to detail to all of his endeavors. This book has benefited greatly from his considerable input.
I have always admired O’Reilly & Associates as a company. After having had the experience of working with them, my admiration has not diminished in the least. My editor, Andy Oram, excellently personifies the goals of the company. I’ve enjoyed discussions with him, and his comments were always very helpful. I appreciate his enormous patience. Lenny Muellner helped me get going with text-processing tools and I’d like to thank David Chu for his timely assistance when needed. I would also like to thank Robert Romano for turning my crude diagrams into the professional figures you find in the book, and Reg Aubry for guiding the book through the production process.
Several technical reviewers assisted me not only in staying honest and correct in the details, but they also often offered useful stylistic suggestions. Thanks to Rob Dinoff, Viktor Dukhovni (a.k.a. Victor Duchovni), Lutz Jänicke, and Alan Schwartz. I wish I had such a team looking over my shoulder for everything I do.
I would also like to acknowledge the many members of the postfix-users@postfix.org list. It is an active list with a low noise-to-signal ratio, populated by a group of remarkably capable and helpful people. Its members not only help the user community, but have contributed through their comments and discussions to the evolution of Postfix itself.
Finally, I owe a large debt of gratitude to my wife and first editor, Jackie. She subjected my initial drafts to scrupulous tests for lucidity and sanity (shocking how often they failed). This book is much improved from her patient and valuable input. She is an all-around good egg who remained cheerful even when faced with reading and rereading several rewrites.
Internet email history goes back as far as the early 1970s, when the first messages were sent across the Arpanet, the predecessor of today’s Internet. Since that time, email has been, and continues to be, the most widely used application on the Internet. In the olden days, email delivery was relatively simple, and generally consisted of moving mail files from one large host to another large host that served many users. As the Internet evolved and the network itself became more complex, more flexible tools were needed to move mail between different networks and different types of networks. The Sendmail package, released in the early 1980s, was designed to deal with the many variations among mail systems. It quickly assumed a dominant role for mail delivery on the Internet.
Today, most Internet sites use the SMTP mail protocol to deliver and receive mail messages. Sendmail is still one of the most widely deployed SMTP servers, but there have been problems with it. Sendmail’s monolithic architecture has been the primary cause of numerous security issues, and it can be difficult to configure and maintain.
Postfix was originally conceived as a replacement for the pervasive Sendmail. Its design eliminates many opportunities for security problems. Postfix also eliminates much of the complexity that comes with managing a Sendmail installation. Postfix administration is managed with two straightforward configuration files, and Postfix has been designed from the beginning to handle unexpected hardware or software problems gracefully.
Postfix was written by Wietse Venema, who is widely known for his security tools and papers. It was made available as open source software in December 1998. IBM Research sponsored the initial release and has continued to support its ongoing development. (IBM calls the package Secure Mailer.) There were certain goals from the beginning that drove the design and development of Postfix:
Postfix shows its real value when operating under stressful conditions. Even within simple environments, software can encounter unexpected conditions. For example, many software systems behave unpredictably when they run out of memory or disk space. Postfix detects such conditions, and rather than make the problem worse, gives the system a chance to recover. Regardless of hazards thrown its way, Postfix takes every precaution to function in a stable and reliable way.
Postfix assumes it is running in a hostile environment. It employs multiple layers of defense to protect against attackers. The security concept of least privilege is employed throughout the Postfix system, so that each process, which can be run within an isolated compartment, runs with the lowest set of privileges it needs. Processes running with higher privileges never trust the unprivileged processes. Likewise, unneeded modules can be disabled, enhancing security and simplifying an installation.
Postfix was written with performance in mind and, in fact, takes steps to ensure that its speed doesn’t overwhelm other systems. It uses techniques to limit both the number of new processes that have to be created and the number of filesystem accesses required in processing messages.
The Postfix system is actually made up of several different programs and subsystems. This approach allows for great flexibility. All of the pieces are easily tunable through straightforward configuration files.
Postfix is one of the easier email packages to set up and administer, as it uses straightforward configuration files and simple lookup tables for address translations and forwarding. The idea behind Postfix’s configuration is the notion of least surprise, which means that, to the extent it’s possible, Postfix behaves the way most people expect. When faced with design choices, Dr. Venema has opted for the decision that seems most reasonable to most humans.
With Sendmail compatibility, Postfix can easily replace Sendmail on a system without forcing any changes on users or breaking any of the applications that depend on it. Postfix supports Sendmail conventions like /etc/aliases and .forward files. The Sendmail executable program, sendmail, is replaced with a Postfix version that supports nearly all of the same command-line arguments but runs in conjunction with the Postfix system. While your Sendmail-dependent programs continue to work, Postfix has been evolving independently of Sendmail, and doesn’t necessarily implement all email features in the same way.
Unlike most proprietary email solutions, where a single software package does everything, Internet email is built from several standards and protocols that define how messages are composed and transferred from a sender to a recipient. There are many different pieces of software involved, each one handling a different step in message delivery. Postfix handles only a portion of the whole process. Most email users are only familiar with the software they use for reading and composing messages, known as a mail user agent (MUA). Examples of some common MUAs include mutt, elm, Pine, Netscape Communicator, and Outlook Express. MUAs are good for reading and composing email messages, but they don’t do much for mail delivery. That’s where Postfix fits in.
When you tell your MUA to send a message, it simply hands off the message to a mail server running a mail transfer agent (MTA). Figure 1-1 shows the components involved in a simple email transmission from sender to recipient. MTAs (like Postfix) do the bulk of the work in getting a message delivered from one system to another. When it receives a request to accept an email message, the MTA determines if it should take the message or not. An MTA generally accepts messages for its own local users; for other systems it knows how to forward to; or for messages from users, systems, or networks that are allowed to relay mail to other destinations. Once the MTA accepts a message, it has to decide what to do with it next. It might deliver the message to a user on its system, or it might have to pass the message along to another MTA. Messages bound for other networks will likely pass through many systems. If the MTA cannot deliver the message or pass it along, it bounces the message back to the original sender or notifies a system administrator. MTA servers are usually managed by Internet Service Providers (ISPs) for individuals or by corporate Information Systems departments for company employees.
Ultimately, a message arrives at the MTA that is the final destination. If the message is destined for a user on the system, the MTA passes it to a message delivery agent (MDA) for the final delivery. The MDA might store the message as a plain file or pass it along to a specialized database for email. The term message store applies to persistent message storage regardless of how or where it is kept.
Once the message has been placed in the message store, it stays there until the intended recipient is ready to pick it up. The recipient uses an MUA to retrieve the message and read it. The MUA contacts the server that provides access to the message store. This server is separate from the MTA that delivered the message and is designed specifically to provide access for retrieving messages. After the server successfully authenticates the requester, it can transfer that user’s messages to her MUA.
Because Internet email standards are open, there are many different software packages available to handle Internet email. Different packages that implement the same protocols can interoperate regardless of who wrote them or the type of system they are running on. If you are putting together a complete email system, most likely the software that handles SMTP will be a different package than the software that handles POP/IMAP, and there are many different software choices for each aspect of your complete email system.
The communications that occur between each of these email system components are defined by standards and protocols. The standards documents are maintained by the Internet Engineering Task Force (IETF) and are published as Request For Comments (RFC) documents, which are numbered documents that explain a particular technology or protocol.
The Simple Mail Transport Protocol (SMTP) is used for sending messages, and either the Post Office Protocol ( POP) or Internet Mail Application Protocol ( IMAP) is used for retrieving messages. SMTP, defined in RFC 2821, describes the conversation that takes place between two hosts across a network to exchange email messages. The IMAP (RFC 2060) and POP (RFC 1939) protocols describe how to retrieve messages from a message store. The IMAP protocol was developed after POP and offers additional features. In both protocols, email messages are kept on a central server for message recipients who generally retrieve them across a network.
Note that the MUA does not necessarily use the same system for POP/IMAP as it does for SMTP, which is why email clients have to be configured separately for POP/IMAP and SMTP. An ISP might provide separate servers for each function to their customers, and corporate users who are away from the office often retrieve their messages from the company POP/IMAP server, but use the SMTP server of a dial-up ISP to send messages. MTA software running on SMTP servers constantly listens for requests to accept messages for delivery. Requests might come from MUAs or other MTA servers.
SMTP is commonly used for email submission and for transmissions of email messages between MTAs. When an MUA contacts an MTA to have a message delivered, it uses SMTP. SMTP is also used when one MTA contacts another MTA to relay or deliver a message. Originally, SMTP had no means to authenticate users, but extensions to the protocol provide the capability, if required. See Chapter 7 for more information on authenticating SMTP users.
When users want to retrieve their messages, they use their MUA to connect to a POP or IMAP server to retrieve them. POP users generally take all their messages from the server and manage their mail locally. IMAP provides features that make it easier to manage mail on the server itself. (See Chapter 12 for more information on using Postfix with POP and IMAP servers.) Many servers now offer both protocols, so I will refer to them as POP/IMAP servers. POP and IMAP have nothing to do with sending email. These protocols deal only with how users retrieve previously delivered and stored messages.
Not all users need POP/IMAP access to the message store. Users with shell access on a Unix machine, for example, might have their MUA configured to read their email messages directly from the mail file that resides on the same machine.
Postfix is an MTA and handles the delivery of messages between servers and locally within a system. It does not handle any POP or IMAP communications.
Figure 1-2 illustrates a simple example of message transmission where Postfix handles the responsibilities of the MTA and local delivery. As the MTA, Postfix receives and delivers email messages over the network via the SMTP protocol. For local delivery, the Postfix local delivery agent can deposit messages directly to a message store or hand off a message to a specialized mail delivery agent.
This example shows Postfix as the SMTP server at both ends of the email transaction; however, since Postfix is based on Internet standards, the other email server in this example could easily be any other standards-compliant server. Postfix can communicate with any other server that speaks SMTP (and even some that are not quite fluent). In our example, Heloise wants to send a message to Abelard from her address (heloise@oreilly.com) to his address ( abelard@postfix.org.) Heloise uses her email client to compose her message, which passes it to her MTA (using SMTP). As it happens, her MTA is a Postfix server that allows her to relay messages. After accepting the message from Heloise’s email client, the Postfix server determines where Heloise’s message needs to go, based on Abelard’s email address. Using DNS (see Chapter 6 for more information on DNS and email) it figures out which SMTP server should accept messages for Abelard’s domain (postfix.org) and contacts that server (using SMTP). Abelard’s Postfix server accepts the message and stores it until Abelard is ready to pick it up. At this point Postfix’s job is done. When Abelard is ready to retrieve his messages, his email client, using POP or IMAP, picks up Heloise’s message.
This example leaves out the details of the complicated tasks involved when Postfix delivers mail. In the case of messages with multiple recipients, Postfix has to figure out where to deliver copies for each recipient. In case one or more recipients cannot receive mail due to a networking or systems problem, Postfix has to queue the message and retry delivery periodically. From a user’s point of view, the Postfix piece of the operation is nearly invisible. From the Internet mail system’s point of view, Postfix handles most aspects of email message delivery.
Email systems are necessarily exposed to possible attacks because their function requires that they accept data from untrusted systems. The challenge is to build systems that are resistant to attack, and any good security strategy includes multiple layers of protection. This is particularly true for public systems in a potentially hostile environment. Postfix takes a proactive and multilayered approach to security. The Postfix architecture limits the severity of vulnerabilities, even if there are design or coding errors that might otherwise create major vulnerabilities in a monolithic privileged program.
The modular architecture of Postfix forms the basis for much of its security. Each Postfix process runs with the least amount of privilege necessary to get its particular job done. Many of Sendmail’s security problems were exacerbated because Sendmail ran as a privileged process most of the time. Postfix operates with the minimum privilege necessary to accomplish a particular task. Postfix processes that are not needed on a system can be turned off, making it impossible to exploit them. For example, a network firewall system that only relays mail and does not need local delivery can have all the Postfix components for local delivery turned off. Postfix processes are insulated from each other and depend very little on any interprocess communication. Each process determines for itself what it needs to know.
In most cases, the delivery of mail does not require a Unix shell process, but when a configuration does make use of one, Postfix sanitizes information before placing it into environment variables. Postfix tries to eliminate any harmful characters that might have special meaning to a shell before making any data available to the shell.
Most Postfix processes are executed by a trusted master daemon. They do not run as user child processes, so they are immune to any of the security problems that rely on parent-child inheritance and communications. These attacks that use signals, shared memory, open files, and other types of interprocess communication are essentially useless against Postfix.
A buffer overflow is another common type of attack against applications. In this type of attack, crackers cause a program to write to memory where it is not supposed to. Doing so might allow them to change the path of execution in order to take control of the process. I’ve already mentioned that Postfix processes run with as little privilege as possible, so such an attack would not get very far; moreover, Postfix avoids using fixed-size buffers for dynamic data, making a successful buffer overflow attack highly unlikely.
An important security protection available on Unix systems is
the ability to chroot applications. A chroot establishes a new root directory
for a running application such as /var/spool/postfix. When that program runs,
its view of the filesystem is limited to the subtree below /var/spool/postfix, and it cannot see
anything else above that point. Your critical system directories and
any other programs that might be exploited during an attack are not
accessible. Postfix makes it very simple to cause its processes to run
within a chroot (see more about chrooting in Chapter 4). By doing so, you cause
Postfix to run in its own separate compartment. Even if Postfix is
somehow subverted, it will not provide access to many of the methods
an attacker typically employs to compromise a system.
Because Postfix is designed to run even under stressful conditions, denial-of-service (DOS) attacks are much less effective. If a system runs out of disk space or memory due to a DOS attack or another type of problem, Postfix is careful not to make the situation worse. It backs off from what it is trying to do to allow the system to recover. Postfix processes are configured to use a limited amount of memory, so they do not grow uncontrollably from an onslaught of messages.
The difficulty in planning for security is that you don’t know what the next attack will be or how it will be carried out. Postfix is designed to deal with adverse conditions no matter what their cause. Its built-in robustness is a major factor in the degree of security that Postfix provides. Indeed, Dr. Venema has said that he is not so much interested in security as he is in creating software that works as intended, regardless of the circumstances. Security is just a beneficial side effect.
You can get more information about Postfix at the official web site: The Postfix Home Page (http://www.postfix.org/). The site contains the source code, documentation, links to add-on software, articles, and additional information about Postfix. There is also information about joining an active mailing list that discusses all aspects of Postfix.
If you don’t have a copy of Postfix already, you can obtain the source code from the Postfix web site. It is, however, quite possible that there is a precompiled package for your platform that may be more convenient for you. If that is the case, you can obtain the Postfix package for your operating system and use your system’s normal tools for software installation and configuration. You should check the normal repositories you use to get software for your system.
There are many good reasons to build Postfix for yourself: there may not be a pre-packaged bundle for your platform, you might not trust the packager of the bundle to have done everything correctly for your environment, you might need support for add-ons that are not built into a package, you might need a more current version than is available in packages, or you might just enjoy the task. If you have any experience compiling software, you’ll have no trouble building Postfix. It’s one of the easier open source packages to compile.
The Postfix web site has a download link that displays a list of mirrors from which you can get the software. You should select the mirror that is closest to you. Postfix is available as either an Official Release package or as an Experimental Release package. Even though it’s called experimental, you should consider the code to be very stable. Experimental releases contain new features that might still change before they become official. Some new features are available only in an experimental release, but you should feel comfortable using them. Just be aware that they may evolve slightly in later releases until their feature sets are considered stable enough for the official release. No Postfix software is released that hasn’t gone through extensive testing and review. Read through the RELEASE_NOTES file that comes with the package to learn what the differences are between the current official and experimental releases.
This chapter presents some basic Unix and email concepts that you need in order to follow explanations and examples presented later in the book. If you are already familiar with email administration, you can safely skip the material here and move on to the next chapter. This chapter does not give a systematic or comprehensive overview of either email or Unix administration. There is already an enormous amount of information available on both topics. This chapter simply presents an assortment of items that are referred to later in the book, with the expectation that readers already understand them.
There’s no question that the more familiar you are with Unix, the better a Postfix administrator you’ll be. Postfix is very much a Unix program working in conjunction with the underlying operating system for many of its functions. If you’re new to Unix, you should study an introductory text. In the meantime, this section presents some fundamental concepts that you will need to understand to follow explanations in the book.
The list of recognized users on a system is stored in the /etc/passwd file. Every user should have a unique login name and user ID number (commonly written as uid or UID). The UID, not the user’s login name, is the important attribute for identity and ownership checks. The login name is a convenience for humans, and the system uses it primarily to determine what the UID is. Some Postfix configuration parameters require UIDs rather than login names when referring to user accounts. Postfix sometimes takes on the identify of different users. A process is said to be using the rights or privileges of that account when assuming its identity.
A pseudo-account is a normal Unix system account except that it does not permit logins. These accounts are used to perform administrative functions or to run programs under specific user privileges. Your system most likely came installed with several pseudo-accounts. Account names such as bin and daemon are common ones. Generally, these accounts prevent logins by using an invalid password and nonexistent home directories and login shells. For Postfix administration, you need at least one pseudo-account for Postfix processes to run under. You may need additional ones for other functions, such as mailing-list programs and filters.
Nearly all processes on a Unix system have a standard input stream
and a standard output stream when they start. They read data on their
standard input and write data on their standard output. Normally,
standard input is the keyboard and standard output is the monitor,
which is how users interact with running programs. Standard input and
output can be redirected so that programs can get input from, and send
output to, a file or another program. This is often how batch mode
programs operate. For the purpose of email, you should be aware of
standard input and output because your mail system may have to
interact with other programs over their standard inputs and outputs. A
mail filter program, for example, might accept the contents of an
email message on its standard input and send the revised contents to
its standard output. Programs usually also have a standard error
stream that, like standard output, is normally a user’s monitor, but
it can also be redirected. Standard input/output/error are often
written as stdin, stdout, and stderr. For more information, consult an
introductory book on Unix.
The administrative login on Unix systems is the root account. It is also referred to as the superuser account, and you should treat it carefully. You should log in as the root user only when its privileges are required to accomplish a particular task. Administering Postfix sometimes requires root privileges. If you do not have superuser access on your system, you cannot administer Postfix.
When working with an interactive shell, you are normally
greeted with a command prompt that indicates the system is ready for
you to enter a command. By convention, user command prompts are shown
as either the $ character or the
% character, while the
root prompt is presented as the # character. You should use the
root account only when it is necessary. In
examples in this book, a normal user prompt is shown as $, and that for root is
shown as #. If the example shows
the prompt as #, you know that you
must execute the command as root.
It is common usage in Unix to break long commands into
multiple lines with a backslash (\)
at the end of the line, which indicates that two or more lines
continue as if they were a single line. The continuation backslash can
be used at a command prompt and in shell scripts, and it is commonly
used in configuration files (but not in Postfix configuration
files—see Chapter 4). In this
book, lines that don’t fit on the page are continued with backslashes.
If you follow the examples, you can type lines exactly as shown with
the backslashes, or simply combine the continued lines into a single
one.
Documentation for Unix systems is kept in an online manual known as
manpages. You can read the
documentation for a particular item by issuing the man command with the item as its argument.
For example, to read about the mailq command, simply type:
$ man mailqA description of the command is presented on your screen, one page at a time. Press the spacebar to continue scrolling through the information.
Manpages have a standard organization showing the syntax of the command, all options, and descriptions of behavior and other context. Some users find manpages daunting, but you’ll do yourself a great service by getting comfortable with manpages. All Unix and Postfix commands as well as many other features are documented in manpages. See an introductory Unix text or your system documentation to learn more about manpages.
Internet email is a complex subject with many aspects. There are important principles that apply when administering an email system regardless of the MTA you are working with. This section presents a few concepts that will help in understanding later explanations in the book, but you are urged to learn as much about Internet email as possible from the many resources available in books and online.
RFCs, or Request for Comments documents, define the standards for the Internet. There are several RFCs relating to Internet email, all of which are relevant to you if you are administering an email system on the Internet. The two most commonly referenced RFCs for email are RFC 821 and RFC 822, which deal with how email messages are transferred between systems, and how email messages should appear. These documents were put into effect more than 20 years ago. They were updated in April 2001 with the proposed standards RFC 2821 and RFC 2822, although you will still see many references to the original documents. RFC documents are maintained by the Internet Engineering Task Force, whose site is available at http://www.ietf.org/.
Chapter 1 introduced several of the email agents involved in message composition to final delivery. For convenience, Table 2-1 contains a summary of these agents.
Agent | Name | Purpose |
MUA | Email client software used to compose, send, and retrieve email messages. Sends messages through an MTA. Retrieves messages from a mail store either directly or through a POP/IMAP server. | |
MTA | Server that receives and delivers email. Determines message routing and possible address rewriting. Locally delivered messages are handed off to an MDA for final delivery. | |
MDA | Program that handles final delivery of messages for a system’s local recipients. MDAs can often filter or categorize messages upon delivery. An MDA might also determine that a message must be forwarded to another email address. |
An email administrator is commonly referred to as a postmaster . An individual with postmaster responsibilities makes
sure that the mail system is working correctly, makes configuration
changes, and adds/removes email accounts, among other things. You must
have a postmaster alias at all domains for which
you handle email that directs messages to the correct person or
persons. RFC 2142 specifies that a postmaster
address is required.
If a receiving MTA determines during the SMTP
conversation (see Section
2.2.8 later in the chapter) that it will not accept the
message, it rejects the message. At
that point the sending system should generate an error report to
deliver to the original sender. Sometimes the MTA accepts a message
and later discovers that it cannot be delivered—perhaps the intended
recipient doesn’t exist or there is a problem in the final delivery.
In this case, the MTA that has accepted the message bounces it back to the original sender by
sending an error report, usually including the reason the original
message could not be delivered.
The MTA that accepts a message takes responsibility for the message until it is delivered or handed off to another MTA. When a system is responsible for a message and cannot deliver or relay it, the responsible system informs the sender that the mail is undeliverable.
A common source of confusion for email users is the fact that the
To: address in email message headers has nothing to do with
where a message is actually delivered. The envelope address controls
message delivery. In practice, when you compose a message and provide
your MUA with a To:
address, your MUA uses that same address as the envelope destination
address, but this is not required nor is it always the case. From the
MTA’s point of view, message headers are part of the
content of an email message. The delivery of a message is determined
by the addresses specified during the SMTP conversation. These addresses are the envelope addresses , and they are the only thing that determine where
messages go. See Section
2.2.8 later in the chapter for an explanation of the SMTP
protocol.
Mailing lists and spam are common examples of when the envelope
destination address differs from the To: address of the message headers. For more
information, see RFC 2821 and RFC 2822. Also see Section 2.2.7 later in the
chapter for more information about the format of email messages. If
you follow the SMTP session in Example 2-2, try substituting any
address you want in the To: field
of the message contents to see that it has no effect on where the
message is delivered.
RFC 2822 describes the format of email addresses in great detail.
It specifies how things such as quoting and comments should work in
email addresses. If we ignore the more obscure details, a simple email
address is generally composed of three parts: the local part (which is usually a username), the
@ separator, and the domain name . The local part might also be an alias to another address or to a mailing list. The local
part is sometimes referred to as the lefthand side (LHS), and the domain is sometimes called
the righthand side (RHS). For more information, see RFC
2822.
Since RFC 822 was the document that originally described how Internet email messages should be formatted, messages are commonly referred to as “in the RFC 822 format” or as an “RFC 822 message.” You should understand the basics of the format since it is referred to in this book and you will likely see it elsewhere. I’ll use the newer proposed standard and refer to “RFC 2822 messages.”
RFC 2822 specifies the format of both email messages and
email addresses as they appear in message headers (but not envelope
addresses). The specification describes the format for transmission,
but many implementations use the same or a similar format to store
messages. A message is comprised of two parts: the header and the body. The
header contains specific fields with names such as To, From, or
Subject followed by a colon (:). After the colon comes the contents
of the field. One message header field can span multiple lines.
Lines that continue a field start with whitespace
characters (space or tab characters) to show that they are
continuations of the previous line.
The standard document provides a lot of detail about the
header fields and what they should be used for. There are rules
about how fields relate to each other and when one or another must
be used, but in the simplest case, the only required fields are the
Date: and the From: fields. The standard also provides
for customized fields that a particular email implementation might
want to create for its own use.
The header fields are separated from the message body by an empty line. The body of a message contains the contents of the message itself. The body is purposely free-form, but should contain only ASCII characters. Some defined headers have a prescribed structure that is more restricted than the body. Binary files, such as images or executables, must be converted in some way to ASCII characters, so they can be sent in compliance with the standard. Other standards such as MIME encoding or traditional uuencoding deal with converting such files for mailing. Example 2-1 shows a typical message with headers and body.
Return-Path: <info@oreilly.com>
Delivered-To: kdent@mail.example.com
Received: from mail.oreilly.com (mail.oreilly.com [192.168.145.34])
by mail.example.com (Postfix) with SMTP id 5FA26B3DFE
for <kdent@example.com>;
Mon, 8 Apr 2003 16:40:29 -0400 (EDT)
Date: Mon, 8 Apr 2003 15:38:21 -0500
From: Customer Service <info@oreilly.com>
To: <kdent@example.com>
Reply-To: <info@oreilly.com>
Message-ID: <01a4e2238200842@mail.oreilly.com>
Subject: Have you read RFC 2822?
This is the start of the body of the message. It could continue
for many lines, but it doesn't.The fields in the example are mostly self-explanatory. The
Received: header is not required by RFC 2822, but every MTA
that handles a message normally prepends a Received: header to the message, as
discussed in RFC 2821, which is described in the following
section.
The SMTP protocol is defined in RFC 2821. The protocol is actually quite simple to follow, and was designed to be easily comprehensible both to humans and computers. A client connects to an SMTP server, whereupon the server begins the SMTP conversation, which consists of a series of simple commands and replies, including the transmission of the email message. The best way to understand the protocol is to see it in action. You can easily try it yourself once you have your mail server set up. Using a Telnet client, you can pose as a delivering MTA. Example 2-2 shows the steps and the basic commands to deliver a message.
$telnet mail.example.com 25Trying 10.232.45.151 Connected to mail.example.com. Escape character is '^]'. 220 mail.example.com ESMTP PostfixHELO mail.oreilly.com250 mail.oreilly.comMAIL FROM:<info@oreilly.com>250 OkRCPT TO:<kdent@example.com>250 OkDATA354 End data with <CR><LF>.<CR><LF>Date: Mon, 8 Apr 2003 15:38:21 -0500From: Customer Service <info@oreilly.com>To: <kdent@example.com>Reply-To: <service@oreilly.com>Message-ID: <01a4e2238200842@mail.oreilly.com>Subject: Have you read RFC 2822?This is the start of the body of the message. It could continuefor many lines, but it doesn't..250 Ok: queued as 5FA26B3DFEquit221 Bye Connection closed by foreign host. $
The SMTP session depicted in Example 2-2 is actually the delivery that produced the sample message in Example 2-1. To follow the example yourself, start by using a Telnet client to connect to the mail server on port 25 at mail.example.com. You should connect to your own Postfix server and type in your own email addresses for the envelope addresses. Port 25 is the well-known port for SMTP servers. After the Telnet messages:
Trying 10.232.45.151 Connected to localhost. Escape character is '^]'.
the server greets you with its banner:
220 mail.example.com ESMTP Postfix
SMTP server replies, such as the greeting message, always start with a three-digit response code, usually followed by a short message for human consumption. Table 2-2 provides the reply code levels and their meanings. The first digit of the response code is enough to know the status of the requested command. In documentation the response codes are often written as 2xx to indicate a level 200 reply.
Code level | Status |
2xx | The requested action was successful. The client may continue to the next step. |
3xx | Command was accepted, but the server expects additional information. The client should send another command with the additional information. |
4xx | The command was not successful, but the problem is temporary. The client should retry the action at a later time. |
5xx | The command was not successful, and the problem is considered permanent. The client should not retry the action. |
After receiving the welcome banner, introduce yourself with the
HELO command. The hostname after the HELO command should be the name of the
system you’re connecting from:
HELO mail.oreilly.com
The server replies with a success. So you may continue:
250 mail.oreilly.com
Indicate who the message is from with the MAIL FROM command:
MAIL FROM:<info@oreilly.com>
The server accepts the sending address:
250 Ok
Indicate who the message is to with the RCPT TO command:
RCPT TO:<kdent@example.com>
The server accepts the recipient address:
250 Ok
Now you are ready to send the content of the message. The
DATA command tells the server that you have an RFC 2822
message ready to transfer:
DATA
The server replies that it accepts the command and is expecting you to begin sending data:
354 End data with <CR><LF>.<CR><LF>
At this point, you can transfer the entire contents of your message. The contents of messages start with the message headers. When the message itself is finished, indicate the end by sending a single period on a line by itself.
The server acknowledges the end of your message and replies that the transfer was successfully completed:
250 Ok: queued as 5FA26B3DFE
At this point the server has taken responsibility for the
message. If you wanted to continue with more commands, you could do so
now. Since you have no other messages to deliver to this server, you
can start to disconnect with the quit command:
quit
The server replies with a success and disconnects:
221 Bye
Finally, the Telnet client tells you that the connection has ended returns to the command prompt:
Connection closed by foreign host. $
This was, of course, the simplest example of an SMTP
transaction. The basic protocol provides additional commands and has
been extended to allow for many enhancements. RFC 1869 provides a
framework for adding additional features to the basic SMTP protocol.
The enhanced protocol is referred to as ESMTP. A client
indicates its willingness to use the enhanced protocol by beginning
with the EHLO command instead of HELO. If the server also supports
enhancements, it replies with a list of the features it
provides.
Many enhancements have been specified in various RFCs. You can learn about them by searching for SMTP information on the IETF web site (http://www.ietf.org/). There are many other resources available on the Web regarding the SMTP and ESMTP protocols .
You can easily manage and operate Postfix without understanding everything about how it works. If you’re ready to dive right in, you can skip this section and start at the beginning of the next chapter. It might be difficult to digest all of the material here if you don’t have much experience with Postfix yet, but this chapter will give you an overview of the various pieces, which might come in handy as you start to work with Postfix. Later, after you have more experience with Postfix, you might want to return to this chapter to try to absorb more of the details.
The architecture of Postfix is quite different from that
of a monolithic system such as Sendmail, which traditionally uses a
single large program for its handling of email messages. Postfix breaks
down tasks into separate functions using individual programs that each
perform one specific task. Most of these programs are daemons, which are processes that run in the background on
your system. The master daemon is started first, and it invokes most other
processes, as needed. Postfix daemons that are invoked by the master daemon process their assigned tasks and
terminate. They might also terminate after a configured amount of time
or after handling a maximum number of requests. The master daemon is
resident at all times, and gets its configuration information at startup from both main.cf and master.cf. See Chapter 4 for more information on Postfix
configuration files.
Figure 3-1 depicts a high-level picture of the Postfix architecture. Broadly speaking, Postfix receives messages, queues them, and finally delivers them. Each stage of processing is handled by a distinct set of Postfix components. After a message is received and placed into the queue, the queue manager invokes the appropriate delivery agent for the final disposition of the message. The next few sections in this chapter discuss the details of each of the stages.
Messages come into Postfix in one of four ways:
A message can be accepted into Postfix locally (sent from a user on the same machine).
A message can be accepted into Postfix over the network.
A message that was already accepted into Postfix through one of the other methods is resubmitted for forwarding to another address.
Postfix generates messages itself when it has to send notifications of undeliverable or deferred delivery attempts.
There is always the possibility that a message is rejected before it enters the Postfix system, or that some messages are deferred for later delivery.
The various Postfix components work together by writing messages to and reading messages from the queue. The queue manager has the responsibility of managing messages in the queue and alerting the correct component when it has a job to do.
Figure 3-2
illustrates the flow when a local email message enters the Postfix
system. Local messages are deposited into the maildrop directory of the Postfix queue by the postdrop command, usually through the sendmail compatibility program. The pickup daemon reads the message from the queue and feeds it to
the cleanup daemon. Some messages
arrive without all of the required information for a valid email
message. So in addition to sanity checks on the message, the cleanup daemon, in conjunction with the
trivial-rewrite daemon inserts missing message headers, converts addresses to the
user@domain.tld format expected by other Postfix programs, and
possibly translates addresses based on the canonical or virtual lookup
tables (see Chapter 4 for more
information on lookup tables).
The cleanup daemon processes
all inbound mail and notifies the queue manager after it has placed the cleaned-up message
into the incoming queue. The queue manager then invokes the
appropriate delivery agent to send the message to its next hop or
ultimate destination.
Figure 3-3 illustrates the flow when a network email message enters the Postfix system.
Messages received over the network are accepted by the Postfix
smtpd daemon. This daemon performs sanity checking and can be
configured to allow clients to relay mail on the system or deny them
from doing so. The smtpd daemon
passes the message to the cleanup
daemon, which performs its own checks then deposits the
message into the incoming queue. The queue manager then invokes the appropriate delivery
agent to send the message to its next hop or ultimate
destination.
When a user message is deferred or can’t be delivered, Postfix
uses the defer or bounce daemons to
create a new error message. The error message is handed off to the
cleanup daemon. It performs its normal checks before depositing
the error message into the incoming queue, where it is picked up by
the queue manager.
Sometimes, after processing an email message, Postfix determines that the destination address actually points to another address on another system. It could, at that point, simply hand off the message to the SMTP client for immediate delivery, but to make sure that every recipient is processed and logged correctly, Postfix resubmits it as a new message where it is handled like any other locally submitted message.
The Postfix queue manager does the bulk of the work in
processing email. Postfix components that accept mail have the ultimate
goal of getting the email message to the queue manager. This is done
through the cleanup daemon, which notifies the queue manager when it has
placed a new message into the incoming mail queue. Once the queue
manager has a new message, it uses trivial-rewrite to determine the routing information: the transport method to use, the next
host for delivery, and the recipient’s address.
The queue manager maintains four different queues: incoming, active, deferred, and corrupt. After the initial cleanup steps, the incoming queue is the first stop for new messages. Assuming system resources are available, the queue manager then moves the message into the active queue, and calls on one of the delivery agents to deliver it. Messages that cannot be delivered are moved into the deferred queue.
The queue manager also has the responsibility of working with the
bounce and defer daemons to generate delivery status
reports for problem messages to be sent back to the sender, or possibly
the system administrator, or both. In addition to the message queue
directories, the Postfix spool directory contains bounce and defer directories. These directories contain
status information about why a particular message is delayed or undeliverable. The bounce and defer daemons use the information stored in
these directories to generate their notifications. See Chapter 5 for more detailed information
on how the queue manager works.
Postfix uses the concept of address classes when determining
which destinations to accept for delivery and how the delivery takes
place. The main address classes are local , virtual alias,
virtual mailbox, and relay. Destination addresses that do not fall
into one of these classes are delivered over the network by the SMTP
client (assuming it was received by an authorized client). Depending on
the address class, the queue manager calls the appropriate delivery
agent to handle the message.
The local delivery agent
handles mail for users with a shell account on the system where
Postfix is running. Domain names for local delivery are listed in the
mydestination parameter. Messages sent to a user at any of the
mydestination domains are delivered
to the individual shell account for the user. In the simple case, the
local delivery agent deposits an email message into the local message
store. It also checks aliases and users’ .forward
files to see if local messages should be delivered elsewhere. See
Chapter 7 for more information on
local delivery.
When a message is to be forwarded elsewhere, it is resubmitted to Postfix for delivery to the new address. If there are temporary problems delivering the message, the delivery agent notifies the queue manager to mark the message for a future delivery attempt and store it in the deferred queue. Permanent problems cause the queue manager to bounce the message back to the original sender.
Virtual alias addresses are all forwarded to other addresses. Domain names for virtual aliasing are listed in the
virtual_alias_domains parameter.
Every domain has its own set of users that do not have to be unique
across domains. Users and their real addresses are listed in
lookup tables specified in the virtual_alias_maps parameter. Messages received for virtual alias
addresses are resubmitted for delivery to the real address. See Chapter 8 for more information on
virtual aliases.
The virtual delivery
agent handles mail for virtual mailbox addresses. These mailboxes are
not associated with particular shell accounts on the system.
Domain names for virtual mailboxes are listed in the
virtual_mailbox_domains parameter. Every domain has its own set of users that
do not have to be unique across domains. Users and their mailbox files
are listed in lookup tables specified in the virtual_mailbox_maps parameter. See Chapter
8 for more information on virtual mailboxes.
The smtp delivery
agent handles mail for relay domains. Email addresses in relay domains are hosted on
other systems, but Postfix accepts messages for the domains and relays
them to the correct system. Relay configurations are common when
Postfix accepts mail over the Internet and passes it to systems on an
internal network. Domain names for relay domains are listed in the
relay_domains parameter. See Chapter
9 for more information on relaying.
Messages that do not fit into one of the address classes
are generally destined for other domains hosted elsewhere on the
network. Postfix accepts such messages only from authorized clients,
such as systems that run on the same local network. When a message has
to be delivered across the network, the queue manager calls the
smtp delivery agent. The smtp agent determines which host or hosts
can receive the message and makes a connection to each in turn until
it finds one to accept it. If there are temporary problems delivering
the message, the smtp delivery
agent notifies the queue manager to mark the message for a future
delivery attempt and store it in the deferred queue. Permanent
problems cause the queue manager to bounce the message back to the
original sender.
When a destination system that has been unavailable comes back online, Postfix is careful not to overwhelm it with all its pending messages. Whether delivering previously deferred messages or new messages, Postfix, at first, makes only a limited (configurable) number of connections to a receiving system. After Postfix has detected successful deliveries to a particular site, it slowly increases (up to a configurable limit) simultaneous connections to it. If Postfix detects any trouble from the receiving site, it starts to back off deliveries immediately.
There are other Postfix delivery agents that can be
configured to handle messages for a particular class or destination.
Other delivery agents must be configured in the master.cf file. They are invoked either
through the class _transport parameter
or through an entry in a transport table, listed in the transport_maps parameter. Two common
alternate delivery agents are the lmtp and pipe agents.
The LMTP protocol is similar to SMTP, but it is used
for deliveries between mail systems on the same network. (See Chapter
7 for more information on LMTP.) For example, if a message
has to be delivered to a different software package, which might be
running on the same machine or another system on the local area
network, the queue manager calls the lmtp delivery agent. The most common
example for using LMTP is when a POP/IMAP server stores messages in a proprietary
format. (Recall that POP and IMAP are protocols for users to
retrieve their messages.) The POP/IMAP server, in this case, has its
own proprietary format for storing messages, so Postfix uses the
LMTP standard to hand off the message to the POP/IMAP server. If
there are any problems delivering the message, the lmtp delivery agent notifies the queue
manager to mark the message for a future delivery attempt and store
it in the deferred queue.
Postfix offers the option of delivering messages to
another program through the pipe
daemon. The pipe daemon delivers
messages to external commands. A common use for the pipe daemon is to have email delivered to
an external content filter or another communications medium, such as
a FAX machine. If there are any problems delivering the message, the
pipe daemon notifies the queue
manager to mark the message for a future delivery attempt and store
it in the deferred queue.
Let’s follow a typical message through the Postfix system.
Figure 3-4, Figure 3-5, and Figure 3-6 illustrate the process
as the message goes from the originating system to a destination MTA,
which, in turn, forwards it to the final MTA, where it is held until the
user is ready to read it. In Figure
3-4, Helene (helene@oreilly.com) wants to
send a message to Frank (frank@postfix.org). Helene
has an account on a system that runs Postfix. Her email client lets her
compose the message, and then it calls the Postfix sendmail command to send it. The Postfix
sendmail command receives the message from Helene’s email software
and deposits it into the maildrop
directory. The pickup
daemon then retrieves the message, performs its sanity
checks, and feeds the message to the cleanup daemon, which performs the final processing on the new
message. If Helene’s email client did not include a From: address, or did not use a
fully-qualified hostname in the address, cleanup makes the necessary fixes to the
message.
Once finished, cleanup places
the message into the incoming queue
and notifies the queue manager that a new message is ready to be
delivered. If the queue manager is ready to process new messages, it
moves the message into the active queue. Because this message is
destined for a user on an outside system, the queue manager has to alert
the smtp agent to handle the delivery of the message.
The smtp agent uses DNS (see
Chapter 6) to get a list of email
systems that can accept mail for the domain http://postfix.org. The smtp delivery agent selects the most preferred
MX host from the list and contacts it to deliver Helene’s
message.
Figure 3-5 shows
Frank’s email server at http://postfix.org also running Postfix, although the
system could be using any other standards-compliant MTA. The Postfix
smtpd on Frank’s server takes the
message from Helene’s smtp delivery
agent. After the smtpd daemon verifies that it should, in fact, accept this
message, it passes the message through to the cleanup daemon, which performs its checks
before depositing the message into the incoming queue.
The queue manager moves the message to the active queue, performs its processing, and determines that
it should call on the local
agent to make the final delivery of the message. The
local delivery agent finds that frank is an alias
and resubmits the message through the cleanup daemon for delivery to the new
address.
Both cleanup and the queue
manager call upon the trivial-rewrite
daemon when processing messages. trivial-rewrite helps with converting email
addresses to a standard format and determining the transport type and
next hop for delivery.
When a new message has to be delivered to another network, the
queue manager calls on smtp, which
checks the DNS for mail servers that can accept mail for the domain
http://onlamp.com. In Figure 3-6, the MTA at the
http://onlamp.com system
(once again by a happy coincidence, it’s a Postfix system) eventually
hands the message to the local
delivery agent, which deposits it into the message store
on that system. At this point Postfix has finished its job. Frank can
now read the message using his own email client, which might pull it
directly from the local message store or might use another protocol,
such as POP or IMAP, to get the message for him to read.
There are several variations that might have occurred in our
simple example. Perhaps the message could not be delivered at any step
for some temporary reason, in which case the delivery agent alerts the
queue manager, which places the message into the deferred queue and
attempts another delivery at a later time. Another possibility is that
doel is not an actual account on the system but an
account in an IMAP email system. In this case, the queue manager might
deliver the message through the lmtp
agent or via a specialized command configured through the
pipe delivery agent.
There are many variations and potential complications for Postfix to deal with. Fortunately, the architecture is robust enough to deal with nearly all situations, and flexible enough to easily accommodate changes in the future.
One of the truly remarkable things about Postfix is that, in many cases, it works as soon as you install it, with little or no change to its configuration. In the first section of this chapter, we’ll walk through checking the configuration and starting Postfix for the first time. Later sections discuss Postfix configuration details.
By default, Postfix is configured as a traditional Unix mail server, sending and receiving messages for all the accounts on the system. Your users can send and receive messages using any email client software available on your system.
In most environments, Postfix works in conjunction with a variety of other software systems. You should build each piece of your email system and test each one as a separate module before trying to integrate them all together. As you add each module, test the system before moving on to the next piece.
At this point you should have Postfix installed on your system. You might install Postfix from a packaged bundle for your platform or compile it yourself. See Appendix C for help with compiling Postfix, if you’re building it yourself. Check your normal software sources for any Postfix packages that might be available. If you haven’t yet installed Postfix, either get a package for your system or follow the instructions in Appendix C to build it. When you have finished with the installation, come back to this chapter for the final configuration.
I will assume, in examples throughout the book, that your installation of Postfix uses the default directories:
I will also assume that you or your installer created a postfix user and postdrop group.
This user and group should not be used for any other purpose on your
system. If you have changed any of the defaults, or if your Postfix
package did, keep that in mind when you read the examples presented in the
book.
There are two important issues to deal with before
starting Postfix for the first time. The first is how your system
identifies itself. Postfix uses a configuration parameter called
myhostname , which must be set to the fully qualified hostname of the
system Postfix is running on. Once Postfix knows the fully qualified
hostname, it can use that hostname to set default values for other
important parameters, such as mydomain. If the parameter myhostname is not set, Postfix defaults to the
hostname reported by the system itself. There is a complete discussion
of myhostname later in the chapter.
You can see what name your system reports with the Unix hostname
command:
$ hostname
mail.example.comA fully qualified hostname is comprised of both the individual hostname and the domain in which it resides. Some systems are configured with their simple hostname, rather than its fully qualified version:
$ hostname
mailIf your system is configured with just its simple hostname,
Postfix cannot determine what the fully qualified name is. You must
therefore explicitly set the myhostname parameter. You can do this quite
easily with the postconf Postfix command. The postconf command is a Postfix utility that
provides an easy way to get a variety of information about your Postfix
system. One of its functions is to display or change a specific
configuration parameter. You can use it to set the myhostname parameter:
# postconf -e myhostname=mail.example.comThe -e option tells postconf to edit the configuration with the
parameters and values specified. If your system is configured with its
fully qualified hostname, you don’t have to do anything to the Postfix
configuration.
The second important issue before starting Postfix for the first time is to make sure that your system’s aliases database is in the correct format. There are certain required aliases that you should configure when operating your mail server in a production environment. We’ll discuss the aliases file later in this chapter. For now, be aware that it is a text file that must be mapped into an indexed, binary format. Your existing aliases binary format might be different from what Postfix uses by default on your system. You can rebuild the indexed file with the newaliases command:
# newaliasesThis command doesn’t require any arguments, and it simply recreates your alias database without making any changes to your actual alias file.
Having accomplished these two critical items, you are now ready to start Postfix. Execute the following command:
# postfix startIf Postfix encounters any problems at start up, it reports them to your terminal. After some initial setup, Postfix detaches from the terminal and can no longer report problems to the screen. It will, however, continue to send a lot of information to your system log. Whenever you start or reload Postfix, be sure to check your system’s log to make sure that there are no reported errors or warnings. See Section 4.4.1 later in this chapter for information on Postfix logging and how to find the log file it uses.
Under most circumstances, Postfix will start without any problems, and you should now be the proud administrator of a currently running, fully functional Postfix system. See Chapter 7 for information about configuring Postfix to work with a POP/IMAP server, so that your users do not need shell access to your mail system. You should also review Chapter 6 for important information on DNS and email.
To read about stopping and restarting Postfix, see Section 4.4.2 later in this chapter. The rest of this chapter discusses Postfix configuration and administration.
The directory /etc/postfix contains Postfix configuration
files. The two most important files used in the configuration of Postfix
are master.cf and main.cf. These
files should be owned by, and only writable by, the root user. They should be readable by
everyone. Whenever you make changes to these files, you have to reload
Postfix for your changes to go into effect:[1]
# postfix reloadThe master daemon is the overall process that controls other Postfix daemons for mail handling. The master daemon uses the master.cf file for its configuration information. The master.cf file contains a line for each Postfix service or transport. Each line has columns that specify how each program should run as part of the overall Postfix system. See Chapter 3 for information on Postfix’s architecture and how various components interact with each other. In many installations, you will never have to change the default master.cf file. See Section 4.5 later in the chapter for information on when and how to make changes to master.cf.
The main.cf file is the core of your Postfix configuration. Nearly
all configuration changes occur in this file. The default main.cf file lists only a portion of the
nearly 300 Postfix parameters. Most Postfix parameters do not need to be changed, but the
flexibility is there when it’s required. All Postfix parameters are
listed and described in the various sample configuration files. The sample files are located
in the directory specified by the sample_directory parameter, which is usually
the same directory as your main.cf file. Both the main.cf file and the sample files that come
with the Postfix distribution contain comments that explain each of
the parameters.
Throughout this book, when the text says to modify a parameter, it always refers to a parameter in your main.cf unless a different file is indicated.
You can edit main.cf
with the postconf
command, as you saw earlier in the chapter, or you can change the file
directly with any text editor[2] (such as vi or
emacs). The file contains blank
lines, comment lines, and lines that assign values to parameters.
Comment lines start with the # character and continue to the end of the
line. Blank and comment lines are ignored by Postfix. Parameters can
appear in any order within the file, and are written as you would
expect:
parameter=value
A parameter definition must start in the first column of the line. The spaces around the equals sign are optional.
Here is an example parameter assignment with a comment:
# The myhostname value must be a fully qualified hostname. myhostname = mail.example.com # The rest of the file continues below...
You cannot have a comment on the same line as a parameter. The following example is incorrect and, with some parameters, could cause unexpected behavior that might be difficult to track down:
# # This is a bad parameter assignment. Never do this. # myhostname = mail.example.com # must be fully qualified hostname
Do not use quotation marks around values. They have no significance in the Postfix configuration, so they would be considered part of the value, which is probably not what you want.
A line that starts with whitespace (tabs or spaces) is considered a continuation of the previous line. This allows you to continue long parameter values onto multiple lines. The parameter assignment:
mydestination = example.com oreilly.com ora.com postfix.org
is the same as:
mydestination = example.com oreilly.com ora.com postfix.org
You can refer to the value of a defined parameter by
putting a $ in front of the parameter name:
mydomain = example.com myorigin = $mydomain
This causes the value of myorigin to be “example.com.”
You can reference a value in the file even before it has been set. The following example works as well as the previous one:
myorigin = $mydomain mydomain = example.com
Many parameters can have more than one value. Multiple values can be separated by commas, spaces, tabs, or new lines. Remember that when you separate values with new lines there must be spaces or tabs in front of the values to indicate a continuation of the previous line:
mydestination = $mydomain, example.com, oreilly.com
mydestination = $mydomain example.com oreilly.com
mydestination = $mydomain
example.com
oreilly.comThese three assignments to mydestination are effectively the
same.
Certain parameters allow you to place multiple values
in a text file and then point the parameter to that file in
main.cf . A value that starts with a forward slash is assumed
to be a pointer to a file. If your system receives mail locally for
many destinations, you may want to keep the list of destinations in
a separate file. Then point the mydestination parameter to that
file:
mydestination = /etc/postfix/destinations
The parameters that can use external files to store values are
those that accept lists where the order of the listed items is not
significant, such as mynetworks,
mydestination, and relay_domains. Check the documentation for
a particular parameter to see if it supports this feature.
If you have thousands of items in a list, it can be more efficient to keep them in a lookup table instead. Lookup tables are described in the next section.
Whenever you make a change to main.cf , you must reload Postfix for your changes to go into effect:
# postfix reloadSee Section 4.4.2 later in the chapter for more information about stopping and starting Postfix.
Rather than using complicated rewriting or pattern
transformation rules as Sendmail does, Postfix makes use of simple,
yet flexible, lookup tables. Many parameters point to lookup tables to
obtain important configuration information. One such parameter is
canonical_maps . It’s used to rewrite email addresses in messages.
Consider a site that uses account names internally for email
addresses, but wants any publicly visible addresses to have the form
firstname.lastname@example.com.
For example, the address
kdent@example.com should appear as
kyle.dent@example.com. A canonical_maps lookup table provides the
mapping from a key (kdent@example.com) to a value
(kyle.dent@example.com).
There are many parameters that use lookup maps, but they all work on the same principle. An email message (or client) provides some kind of key used to look up a value. Based on the value, Postfix takes some action or makes some change.
Postfix lookup tables are usually Unix database files, which are specially indexed files that provide faster access to the stored items. Lookup tables start as simple text files, with each key and value on the same line separated by spaces or tabs:
# # canonical mappings # kdent@example.com kyle.dent@example.com
Each entry has a unique key. The keys are often referred to as the LHS, or lefthand side of an entry, and the values are referred to as the RHS, or righthand side of an entry. Keys in lookup tables are not case-sensitive. The files can contain comment and blank lines just like main.cf, and line continuation works by putting whitespace at the beginning of carry-over lines. Lookup tables also do not treat quotation marks with any special significance.
Once you have created a text file with all of your mappings, you have to execute the postmap command against it to create the actual indexed version of the file:
# postmap /etc/postfix/canonicalWhenever you change your text file you must execute postmap against it.
The postmap command can also be used to query lookup tables. Use
the -q option to query a
value:
# postmap -q kdent@example.com /etc/postfix/canonical
kyle.dent@example.com Different types of Unix database files have different
internal formats. The format you use depends on the database
libraries available on your system. Normally Postfix supports one or
more of three types: btree
, dbm, and hash. Depending on your system libraries,
you may have fewer or more than these three types available. It’s
important to know which map type you use. The postconf command with the -m option lists all of the map types
supported by your installation of Postfix:
$ postconf -m
static
pcre
nis
regexp
environ
proxy
btree
unix
hashThe output of this command lists all map types, some of which
are used for access to other kinds of storage. But you should find
at least one of the three database types (btree, dbm, and hash).
The default_database_type
parameter tells you which database type Postfix uses
by default:
$ postconf default_database_type
default_database_type = hashAll of the examples in this book use the hash type, but if your installation is
using something different, be aware of that as you follow the
examples.
If you don’t specify a database type with postmap, it automatically uses your default type. In general, you can just use the default type configured on your system, but you must know what it is when assigning lookup tables to mapping parameters.
When you assign a lookup table to a parameter, you must specify both the map type and the path to the lookup table. The format of lookup maps is:
parameter=type:name
where type is the storage access
method and name is the resource
containing keys and values. With indexed datafile lookups,
name is the filename. The canonical
example is assigned as follows:
canonical_maps = hash:/etc/postfix/canonical
You can assign multiple lookup tables to a parameter. Postfix
searches the tables in the order listed, stopping as soon as it
finds a match. Some table lookups are recursive, depending on the
parameter. The canonical_maps
parameter in these examples is one such parameter. With recursive lookups, once a value is found, Postfix
tries to match it against all of the keys again until a key matches
itself or is not found.
You may have noticed that when postmap indexes files, it creates additional files. postmap creates either one additional file with the extension .db, or two additional files with the extensions .dir and .pag, depending on your database format. When you assign the lookup table to its parameter, specify the path and filename without any extensions.
Since keys are often email addresses, Postfix
automatically parses addresses, breaking them up into their parts.
You can have keys that match a full address, just the domain
portion, or just the local part. The way Postfix searches for
addresses or portions of addresses depends on the type of mapping
parameter. Certain maps might sensibly include the simple local part of an address, such as canonical_maps. Others would not expect a
local part key, such as transport_maps. The order in which Postfix
searches for a match differs slightly, depending on which type of
parameter it’s working with. Check the lookup table’s manpage to see
which search order it follows.
The search order where local parts are expected, such as with
canonical_maps , relocated_maps
, and virtual_alias_maps, is as follows:
The complete address. Example: kdent@example.com
The local part alone. Example: kdent
The domain portion only, specified with the @ character. Example: @example.com
For lookup tables where it doesn’t make sense to have a local
part, such as with transport_maps
, Postfix searches for matches in the following
order:
The complete address. Example: kdent@example.com
The domain by itself. Example: example.com
The domain specified with an initial period, which matches any subdomain. Example: .example.com
If you always want domains to match themselves plus any subdomain, you
can simplify your lookup tables somewhat by setting the parent_domain_matches_subdomains
parameter. The parameter, by default, contains many
lists. To add transport_maps to
the list, append it as follows:
parent_domain_matches_subdomains = debug_peer_list fast_flush_domains mynetworks permit_mx_backup_networks qmqpd_authorized_clients relay_domains smtpd_access_maps transport_maps transport_maps = hash:/etc/postfix/transport
Now, a domain entry in the /etc/postfix/transport matches itself and all of its subdomains automatically. You no longer need any entries such as the third item, .example.com, from the preceding list.
Some parameters that normally take a simple list, such
as mydestination, can also be
specified with a lookup table. The LHS keys are the items in the
list. You still have to provide a RHS value for each key, but the
value is simply ignored. You can specify any text you want. It’s a
good place to provide yourself a comment. Using a lookup table for a
straight list is useful when you have thousands of items; otherwise,
a simple text file is more than adequate and probably has better
performance. If you use a lookup table for lists of network IP addresses, you cannot use the
network/netmask notation to specify an entire subnet. You must list
each address individually. Check the documentation to see if a list
parameter supports the lookup table feature.
Postfix provides a special lookup table type using regular expressions that offers even more flexibility for matching keys in lookup tables. Regular expressions are used in many Unix utilities. They provide a powerful tool for specifying matching patterns. There are two types of regular expression libraries that you might use with Postfix, depending on which libraries are available on your system.
By default, Postfix uses POSIX extended regular expressions, which I’ll refer
to as regexp. POSIX, which stands for
Portable Operating System Interface, is a standard
that encourages portability across different operating systems. It
includes specifications for regular expressions. Postfix also
supports Perl-compatible regular expressions, which I’ll refer
to as pcre. If you’re used to regular
expressions in Perl, you’ll find that regexp patterns are a bit
different. If you want pcre support, be sure you have a pcre library
to link with when building Postfix. With the pcre format, some
features differ from regexp, and the performance is usually better.
It’s possible that your Postfix distribution already includes pcre
support. You can check by executing the postconf command with the -m option, as you did earlier in the
chapter.
If pcre is listed among your map types, then you can use Perl-style regular expressions for your regular expression lookup tables. But don’t rush to add pcre support if you don’t have it; the default regexp is quite powerful and usually adequate for administrators who need regular expressions. Install pcre only if you know of particular Perl-style regular expression features you need.
Both Perl-style and POSIX regular expressions are very
well-documented in many places. Any book on Perl should include
information on its regular expressions, and if you have Perl
installed on your system, you should find a manpage called perlre(1). Documentation for regexp
usually appears in a manpage called re_format(7). If your system does not
include the manpage, you should be able to find it on the Web.
sed & awk by Dale Dougherty and Arnold
Robbins (O’Reilly) contains information on POSIX regular
expressions.
To use regular expression tables, specify either
regexp or pcre as the map type when assigning tables
to map parameters:
body_checks = regexp:/etc/postfix/re_body_checks
Entries in re_body_checks are
conventionally specified—with the regular expression pattern between
two forward slashes—as the key, followed by whitespace, followed by
the mapped value:
/pattern/value
The most common use of regular expression tables is with the
header_checks and body_checks
parameters for blocking spam. See Chapter 11 for more
information.
Postfix can make use of other backend systems for its
lookup tables. (Later chapters discuss using MySQL and LDAP lookup tables.) When you make use of
these external sources for lookup values, you should start
with one of the simple database formats, such as dbm or hash. Make sure your configuration works as
expected. After setting up your external data source, verify that it
returns the same results as your simple tables.
The postmap with the -q option
is an important tool for testing any kind of lookup table. For
example, the following two commands should return the same values when
you test your MySQL database:
$postmap -q hash:/etc/postfix/transport$postmap -q mysql:/etc/postfix/transport.cf
See Chapter 15 for more information on using Postfix with external data sources.
Alias files are a special case of Postfix lookup tables because they use a Sendmail-compatible format. The file has traditionally been called aliases, and its location depends on your platform, but it is normally within the /etc directory or a subdirectory below it. By default, Postfix is configured to point to your original aliases file, so if you are migrating from Sendmail, your existing aliases continue to work.
Historically, email systems used a single alias
database. Postfix lets you have as many as you want. Multiple alias
files can help in organizing your configuration information.
Typically, administrators configure multiple alias files for
convenience when configuring separate mailing lists. The alias_maps parameter points to your alias files.
If your system supports NIS, which is a network database of users (including
their aliases), then by default Postfix includes NIS among your
alias maps. A typical default alias_maps looks like the
following:
alias_maps = hash:/etc/aliases, nis:mail.aliases
If your system includes support for NIS, but you’re not using it, you should change the parameter so that it points to your aliases file only:
alias_maps = hash:/etc/aliases
You may want to locate your aliases file in your Postfix
configuration directory for consistency. Some administrators prefer
to have all of the email configuration files located together.
Simply reassign alias_maps to
point to the new location:
alias_maps = hash:/etc/postfix/aliases
You should also reassign alias_database so that your newaliases command continues to work
correctly (see the next section):
alias_database = hash:/etc/postfix/aliases
Since the format of alias maps differs from that of Postfix lookup tables, you cannot use postmap to build the alias database from your text file. Instead, Postfix provides the postalias command. Its command-line syntax is the same as that of postmap, allowing you to create or query alias maps. To build an alias database from your aliases file, execute the following:
# postalias /etc/aliasesAnother Sendmail compatibility command related to alias files
is the newaliases command. It provides a convenient way to rebuild your
alias databases. The Postfix installation includes a replacement
version of the command that follows the same syntax as the original.
It’s normally executed with no arguments and determines which alias
files to rebuild from the alias_database parameter. The alias_database parameter differs from
alias_maps in that it includes
only standard Unix database-mapped files (those that should be
indexed by newaliases), whereas
alias_maps might also contain
other map types such as nis.
newaliases uses the default_database_type parameter discussed earlier to determine which
database format to use.
The text file for alias databases is much like Postfix
lookup tables, except for the alias definition itself. Alias files can have blank and
comment lines that are ignored. Comments are marked by a # at the beginning of the line and cannot
be on the same line as an alias definition. A single alias
definition can be broken onto multiple lines by starting
continuation lines with whitespace.
The form of an alias definition consists of the name being
aliased, followed by a colon, followed by one or more targets for
the aliased name. Aliases can be directed to different types of
targets (discussed below). Multiple targets are
separated by commas. Both aliases and targets should be quoted if they
contain whitespace or any special characters such as a #, :, and @:
alias:target1,target2,...
The LHS aliases are always local addresses, so you cannot specify a domain name with an alias key. The target is often one or more addresses, but can be any of the following:
Any RFC 2822 address is allowed, meaning target addresses can be local or forwarded to another site for delivery. For example:
kyle.dent: kdent, kdent@oreilly.com
Specify the full path to a file. New messages are appended to the file specified. Delivery occurs to the file as it would to any local mailbox. See Chapter 7 for information on local delivery to mailboxes and on specifying different mailbox formats. For example:
info: /usr/local/mail/info_box
Specify a pipe character and a command. See Chapter 14 for more information on delivery to commands. For example:
info: "|/usr/local/bin/autoreply"
include:An included file contains a list of additional alias targets. The targets in the file can be any valid target type as described here, but by default filenames and commands are not allowed. The next section discusses configuration parameters to override these default restrictions. For example:
info: :include:/usr/local/mail/info_list
Normally, when Postfix makes a local delivery it assumes the
identity of the recipient of the message. With aliases, Postfix uses
the identity of the owner of the alias file, except when the file is
owned by root. When a
delivery would occur as root,
Postfix uses the identity of the account configured with the
default_privs parameter instead.
You can control which kinds of targets are allowed in
your alias files with the parameters allow_mail_to_commands and allow_mail_to_files. Each of these
parameters takes a list of the aliasing mechanism that permits its
action. Aliasing mechanisms are “alias,” the alias file we’ve
been discussing; “include,” the include target, and “forward,” which
is the .forward file discussed
in Chapter 7.
The default setting for the two parameters is to allow delivery to commands and files from both alias and .forward files, but not from include files, for security considerations. If you want to disallow delivery to commands and files from your aliases database entirely, set the parameters to blank:
allow_mail_to_commands = allow_mail_to_files =
If you would like to make delivery to commands and files available in all the alias mechanisms, set the parameters as follows:
allow_mail_to_commands = alias, forward, include allow_mail_to_files = alias, forward, include
This setting is equivalent to the default behavior for Sendmail. However, it could expose access to possibly vulnerable mailing-list managers that might be coerced into adding a filename or command as a destination address. If you don’t need the additional include option for files and commands, it’s best to accept the Postfix default.
There are several common aliases that are configured
by default. By convention, these system aliases point to the root account. You want to make sure that
root’s mail is read regularly.
This is normally accomplished by creating an alias for root to the normal login account of the
person or persons responsible for system administration.
RFC 2142 defines several mailbox names that all
domains should have, depending on which services they run on the
Internet. At a minimum, you should have a postmaster alias, and you should review
the RFC to see if there are other aliases you want to create.
[1] If you change the inet_interfaces parameter, you must stop
and start Postfix.
[2] Postfix expects configuration files to contain normal Unix-style line endings. If you edit your configuration files from another platform, such as Windows or Mac, make sure that your editor uses the correct line endings for Unix.
We saw at the beginning of this chapter how Postfix requires only minimal configuration changes to work. Depending on how you plan to use your Postfix system, you may want to consider some of the more common options. This section discusses how your system identifies itself, and then covers the very important topic of relay control.
There are four parameters dealing with your system’s
hostname and domain that you want to consider, no matter
how you use Postfix: myhostname,
mydomain, myorigin, and mydestination.
We discussed the purpose and importance of the
myhostname parameter earlier in this chapter. If myhostname is not specified, Postfix uses
the function gethostname
to determine what your system’s hostname is. If your
system correctly reports the fully qualified hostname, you can leave myhostname unspecified in the
configuration file. Some systems may not be configured correctly or
may not report the fully qualified version of the hostname. In these
cases, you can set either myhostname to the fully qualified hostname
or mydomain to your system’s domain. If mydomain is explicitly set, Postfix
automatically sets myhostname to
the domain name specified and the local hostname reported by
gethostname to create the fully
qualified hostname.
If you set myhostname to
the system’s fully qualified hostname but omit mydomain, Postfix uses the value of
myhostname, minus the first
component of the fully qualified hostname, to automatically set
mydomain. A value of
mail.example.com for myhostname causes mydomain to be
example.com unless you explicitly set it to
something else. Similarly, a hostname of
mail.ny.example.com causes the value to be
ny.example.com. If your system does not report
its fully qualified name, and you have not set either the mydomain or myhostname parameters, Postfix reports the
problem in your log file. See Section 4.4.1 later in this
chapter.
When your users send or receive mail through the
Postfix system with no domain name specified in the envelope or
header addresses, the parameter myorigin determines what domain name
should be appended. The default is to use the value of myhostname. If Postfix is running on a
system whose hostname is mail.example.com,
messages from the user kdent have
a From: address of
kdent@mail.example.com. However, frequently
users want their mail to be sent from the domain name without any
extra host information (kdent@example.com
instead of kdent@mail.example.com). If that is
the case, set myorigin to
$mydomain:
myorigin = $mydomain
The mydestination
parameter lists all the domains your Postfix system should accept
mail for and deliver to local users. By default Postfix accepts mail
destined for $myhostname and
localhost.$mydomain. If you want
your system to accept mail for your entire domain and not just the
single host it is running on, add $mydomain to the list:
mydestination = $myhostname, localhost.$mydomain, $mydomain
Now your mail server can act as a gateway receiving all mail for the domain.
In addition to accepting mail and delivering messages to your local users, Postfix also relays messages to other systems. It’s very important to restrict who is allowed to relay messages through your system. Systems on your own network may require the ability to send messages anywhere, but you do not want to provide the rest of the world with the same service. Relay control is an important topic in email administration because of the prevalence of Unsolicited Bulk Email (UBE), or spam. (See Chapter 11for more information on UBE.) A common practice among spammers is to find a well-connected system that allows them to relay their mail. You want to prevent anyone who is not authorized from using your system to relay mail. If you leave yourself configured as an open relay, not only will you be contributing to the spam problem, but your own machine may become unusable as it is abused by spammers. Furthermore, you may find that other systems start refusing mail from you as they discover that your system is the source of spam. They’ll refuse the spam as well as any legitimate messages your own systems send. Mail servers that permit anyone to relay mail are called open relays .
By default Postfix is not an open relay. The
parameters mynetworks_style
and mynetworks
determine what other systems can use your mail server to send
messages. The default configuration allows relaying only from other
machines that are connected to the same IP subnet as your server.
You can limit or broaden the range of addresses that should be
allowed to relay by setting the parameter mynetworks_style. If you prefer to limit
relaying to the local machine only, set mynetworks_style to “host”. You can also
set mynetworks_style to “class”
to allow relaying by any host within the same class A, B, or C
network as your server. For many networks a class setting opens
relaying to too many systems. If you aren’t familiar with IP address
classes, stick to the default “subnet” or more restrictive “host”
settings.
Alternatively, you can explicitly indicate the hosts that
should be allowed to relay mail by setting mynetworks. If you set mynetworks, the mynetworks_style parameter is ignored. You
can list individual IP addresses or specify subnets using the network/netmask notation—for example,
192.168.100.0/28. This parameter is handy if you need to provide
mail relay to hosts outside of your network because you can list
specific IP addresses regardless of their relationship to your
own subnet. If, for example, you want to provide relaying to remote
users, you simply add an IP address to your list. In this case, your
remote users need a static IP address, or at least an address
assigned from a limited range of addresses. If your remote users do
not have static IP addresses, then you have to configure some kind
of SMTP authentication.
All of the techniques for SMTP authentication introduce their own complexities. You would be wise to consider simpler options before selecting an authentication technique. Is it possible to get static IP addresses for your remote users? Can your remote users avail themselves of another SMTP server? Perhaps your users’ remote access provider offers an SMTP server as well.
Your first inclination may be to use UBE controls to permit mail relaying when a message’s envelope sender address is from the local domain. Don’t do this. Envelope addresses are trivial to fake, and spammers know to use local addresses for this purpose. Configuring your mail server in this way makes you an open relay.
Chapter 12 discusses using SASL for SMTP authentication. SASL is a general protocol that defines how a server and client can exchange authentication credentials. It requires that additional libraries be linked to your SMTP server. There are three alternatives to SASL that all work similarly: pop-before-smtp , DRAC (Dynamic Relay Authorization Control), and WHOSON. Each of these methods is designed to work with clients that have dynamically assigned IP addresses. They require that a user first log in to a POP/IMAP server, thereby supplying the client’s currently assigned IP address to your system or network. The client IP address is fed to the SMTP server, which then permits mail relaying by the client system for some configurable time limit. This technique is mostly transparent to end users, but it does require that they first check for new messages (logging into the POP/IMAP server) before trying to send out any messages.
Both pop-before-smtp and DRAC work with Postfix by dynamically updating a Postfix lookup table, adding new addresses as users authenticate, and deleting others when the time period expires. Postfix doesn’t require any special libraries or configuration. You simply configure it to check the lookup table that is updated when users log in via your POP/IMAP server. Your POP/IMAP server, on the other hand, may require changes and recompiling to work. DRAC differs from pop-before-smtp in that it can work over a network, while pop-before-smtp requires that the POP/IMAP server be installed on the same system as the SMTP server.
WHOSON is actually a protocol that provides an interface to both the POP/IMAP and SMTP servers. You have to run a WHOSON server on your network, and you must obtain a patch that adds a new lookup type to Postfix. After building Postfix with the patch, it can communicate with the WHOSON server to determine if a particular client IP address should be allowed to relay mail.
Another option to consider is client-side certificate authentication. (See Chapter 13 for a full discussion of Transport Layer Security and certificates.) We normally think of certificates as a means to encrypt communications, but they can also be used as a strong method of authentication. However, they do require management of certificates and support for the TLS protocol.
None of these add-ons is an ideal solution. They require additional code compiled into your existing daemons that may then require special write access to system files. They also require additional work for busy system administrators. If you cannot use any of the nonauthenticating alternatives mentioned earlier, or your business requirements demand that all of your users’ mail pass through your system no matter where they are on the Internet, SASL is probably the solution that offers the most reliable and scalable method to authenticate users.
Running a mail server is an ongoing task. You cannot start it and forget about it. There are periodic administrative tasks, and you should regularly check for any problems your system might have. This section discusses many of those tasks and how to accomplish them with Postfix.
Postfix provides a utility through the postfix command to validate many aspects of your installation. The command checks for configuration problems, looks at directory and file ownership, and creates any missing directories. Executing:
# postfix checkshould report no messages on a correctly installed system. If there are any problems, the command reports them to you both on the screen and in your log file.
Since Postfix is a long-running program, you should regularly check your system’s log file for warnings or messages. Things can change on your system that might impact Postfix. Almost all Postfix activity, successful or not, is logged. Whenever you start or reload Postfix, it is a good idea to check your log file for messages.
Postfix logging is accomplished by using your system’s syslog daemon. System log files are an aspect of system administration that vary across versions of Unix, so you may have to consult your own system documentation to fully understand Postfix logging.
In general, the syslog daemon (syslogd) receives messages from various
system processes and writes them to their final destination (often a
file). syslogd organizes messages
according to their importance and the application or facility that
generated the message. The file /etc/syslog.conf tells syslogd where to write each type of message.
The logging facility used by Postfix is mail . If you don’t know where to find messages logged by
Postfix, the file /etc/syslog.conf should point you in the
right direction. Some operating systems, by convention, log nearly
everything to a single file, such as /var/log/syslog, while others prefer to
separate messages by applications or services, so that Postfix
messages go to a file like /var/log/maillog. For the latter type of
systems, you might find an entry like the following in /etc/syslog.conf:
mail.* -/var/log/maillog
Once you locate your mail log file, check it regularly. You’ll probably want to check it at least daily, but decide for yourself, depending on the volume of mail your server handles and your existing log rotation scheme. You can use the following command to find Postfix messages that might be of interest:
$ egrep '(reject|warning|error|fatal|panic):' /var/log/maillogassuming that your log file is /var/log/maillog. If not, substitute the name of your own mail log file.
You saw earlier in the chapter how to use the postfix command to start Postfix:
# postfix startOnce Postfix is running, if you make any changes to main.cf or master.cf, have Postfix reread its configuration by executing postfix with the reload argument:
# postfix reloadPostfix gracefully terminates running processes after they have finished any tasks they are working on, rereads its configuration files, and continues to receive mail without interruption.
The most important thing when starting or reloading Postfix is to check your system log to see if Postfix reports any errors or warnings.
You can stop Postfix with the stop argument. Running processes will still finish any tasks they’re working on and then terminate:
# postfix stopYou should not stop and start Postfix when a reload will suffice. Also, do not stop, restart, or reload frequently, since any of these actions can impact performance.
Most systems automatically start Postfix when they boot up because of Postfix’s built-in Sendmail compatibility. Sendmail is typically launched at startup with a command like:
sendmail -bd -q15m
The Postfix sendmail
command understands nearly all of the same options as
Sendmail, so if your server already has scripts that start Sendmail,
those same scripts will start Postfix. One common Sendmail option
ignored by Postfix is -q , which is used by Sendmail to specify the time between
queue scans. The time between queue scans for Postfix is set in the
main.cf file with the queue_run_delay parameter, which defaults to 1000 seconds.
Your system may have a configuration option to turn on automatic startup of Sendmail. After you install Postfix, turning on this option should be sufficient to cause Postfix to start at system initialization. Different versions of Unix have different idioms for configuring a server to start a process at system initialization. If your system’s Sendmail start script doesn’t work, or you prefer to use a Postfix-specific script, you can easily create a start script.
The requirements and conventions for initialization scripts vary among the different versions of Unix, so you should consult your system’s documentation to see where and how to add startup options. On System V-type systems, you can install a script like the one shown in Example 4-1.
#!/sbin/sh
#
# Set the path to your own logger and postfix commands.
#
LOGGER="/usr/bin/logger"
POSTFIX="/usr/sbin/postfix"
rc=0
if [ ! -f $POSTFIX ] ; then
$LOGGER -t $0 -s -p mail.err "Unable to locate Postfix"
exit(1)
fi
if [ ! -f /etc/postfix/main.cf ] ; then
$LOGGER -t $0 -s -p mail.err "Unable to locate Postfix configuration"
exit(1)
fi
case "$1" in
start)
echo -n "Starting Postfix"
$POSTFIX start
rc=$?
echo "."
;;
stop)
echo -n "Stopping Postfix"
$POSTFIX stop
rc=$?
echo "."
;;
restart)
echo -n "Restarting Postfix"
$POSTFIX reload
rc=$?
echo "."
;;
*)
echo "Usage: $0 {start|stop|restart}"
rc=1
esac
exit $rcDepending on your environment, you may also want to add additional pre- and post-checks to this example. You should install your script in the correct directory for your system, commonly /etc/init.d, although HP-UX, for example, uses /sbin/init.d. Once the script is in place, you also have to create a symlink to it in the appropriate run level directory for your server (often /etc/rc2.d). For example, if you named the above script postfix, create a symlink such as the following:
# ln -s /etc/init.d/postfix /etc/init.d/rc2.d/S95postfixYou should consult your system documentation for the details on your platform.
The Postfix queue is also an important part of email administration. See Chapter 5 for information on the Postfix queue manager.
The Postfix master daemon launches all of the other Postfix services as they are needed. The various services, and how they are run, are specified in the master.cf file.
The master configuration file works like other Postfix
configuration files. A comment is marked by a # character at the beginning of a line.
Comments and blank lines are ignored. Long lines can continue onto
subsequent lines by starting the carry-over lines with
whitespace.
Example 4-2 shows a sample file. Each column contains a specific configuration option. A dash in a column indicates the default setting for that column. Some default values come from parameters in the main.cf file.
#= = = = = = = = = = = = = = = = = = = = = = = = = = = = = =
# service type private unpriv chroot wakeup maxproc command + args
# name (yes) (yes) (yes) (never) (100)
#= = = = = = = = = = = = = = = = = = = = = = = = = = = = = =
smtp inet n - y - - smtpd
pickup fifo n - n 60 1 pickup
cleanup unix n - n - 0 cleanup
qmgr fifo n - n 300 1 qmgr
rewrite unix - - n - - trivial-rewrite
bounce unix - - n - 0 bounce
defer unix - - n - 0 bounce
flush unix n - n 1000? 0 flush
proxymap unix - - n - - proxymap
smtp unix - - y - - smtp
relay unix - - y - - smtp
-o smtp_helo_timeout=5 -o smtp_connect_timeout=5
showq unix n - n - - showq
error unix - - n - - error
local unix - n n - - local
virtual unix - n n - - virtual
lmtp unix - - n - - lmtp
maildrop unix - n n - - pipe
flags=DRhu user=vmail argv=/usr/local/bin/maildrop -d ${recipient}
cyrus unix - n n - - pipe
user=cyrus argv=/cyrus/bin/deliver -e -r ${sender}
-m ${extension} ${user}
uucp unix - n n - - pipe
flags=Fqhu user=uucp argv=uux -r -n -z -a$sender -
$nexthop!rmail ($recipient)The following list describes each column in the file, including its default setting:
The inet type refers to
network sockets. A network socket component can
communicate with other processes on the same machine or other machines
on the network. Network sockets use a combination of a system’s IP
address and the port used for connecting. They are commonly written in
combination as the host or IP address and the port, separated by a
colon. The name of an inet
transport in master.cf is a socket
specified as the host and port. The name can be written as just the port
if it’s on the local system. You can use a hostname or an IP address for
the host, and the port can be the actual port number, or its symbolic name. (Symbolic names for ports come from the
/etc/services file. See your system
documentation.)
The unix type refers to Unix
domain sockets, and fifo refers to
named pipes. Both are used for communication between
processes on the same machine. Both Unix domain sockets and FIFOs use
special files for their communications. The names for unix and
fifo components follow the same
naming rules as for valid Unix filenames without directories. Postfix
creates special communications files using the service name. Unix domain
sockets and named pipes are standard Unix interprocess communications
tools. If you would like more information about them, refer to a text on
Unix programming.
Table 4-1 shows examples of valid service names for the various transport types.
Service name | Transport type | Description |
smtp | | Name for the smtpd daemon. The name is the symbolic name for the SMTP port. |
127.0.0.1:10025 | | A component that listens on the loopback interface on port 10025. |
465 | | A component that listens on the local host on port 465. |
maildrop | | A component that is invoked through Postfix’s pipe daemon. |
pickup | | A Postfix FIFO component. |
privateAccess to some components is restricted to the Postfix
system itself. This column is marked with a y for private access (the default) or an
n for public access. inet components must be marked n for public access, since network
sockets are necessarily available to other processes.
unpriv Postfix components run with the least amount of
privilege required to accomplish their tasks. They set their
identity to that of the unprivileged account specified by the
mail_owner parameter. The default installation uses postfix. The default value of y for this column indicates that the
service runs under the normal unprivileged account. Services that
require root privileges
are marked with n.
chroot Many components can be chrooted for additional
security. The chroot location is specified in the queue_directory parameter in main.cf. The default is for a service
to run in a chroot environment; however, the normal installation
marks all components with an n
so they are not chrooted when they run. Chrooting a service adds a
level of complexity that you should thoroughly understand before
taking advantage of the added security. See Section 4.8 later in the
chapter for more information on running Postfix services in a
chroot environment.
wakeup Some components require a wake-up timer to kick them
into action at the specified interval. The pickup daemon is one example. At its default setting of 60
seconds, the master daemon
wakes it up every minute to see if any new messages have arrived
in the maildrop queue. The other services that require a wake-up
are the qmgr and flush
daemons. A question mark character (?) can be added at the end
of the time to indicate that a wake-up event should be sent only
if the component is being used. A 0 for the time interval
indicates that no wake-up is required. The default is 0, since
only the three components mentioned require a wake-up. The values
as they are set in the Postfix distribution should work for almost
all situations. Other services should not have wakeup enabled.
maxproc Limits the number of processes that can be invoked
simultaneously. If unspecified here, the value comes from the
parameter default_process_limit in main.cf, which is set to 100 by
default. A setting of 0 means no process limit. You may want to
adjust maxproc settings if you
run Postfix on a system with limited resources or you want to
optimize different aspects of the system.
command The actual command used to execute a service is
listed in the final column. The command is specified with no path
information, because it is expected to be in the Postfix
daemon directory specified by the daemon_directory parameter in main.cf. By default the directory is
/usr/libexec/postfix. All of
the Postfix commands can be specified with one or more -v options to turn on increasingly more
verbose logging information, which can be helpful if
you must troubleshoot a problem. You can also enable information
for a debugging program with the -D option. See the DEBUG_README file that comes with the
Postfix distribution for more information on debugging if
necessary.
Each of the Postfix daemons has its own set of options that can be specified after the command itself. (See the manpages for the individual daemons to learn about the available options.) You can specify only Postfix commands in the command column. If you want to execute your own commands, use the Postfix pipe daemon. See the Postfix pipe manpage for more information.
If main.cf offers
configuration information for a component, you can override that
information in master.cf by providing an alternative in an -o option. To create a specialized smtp client service, for example, add another entry to
master.cf such as the
following:
smtp-quick unix - - n - - smtp -o smtp_connect_timeout=5s
There can be no spaces between the parameter and the equals sign
and the assigned value. As configured in the example, smtp-quick is a specialized smtp service that doesn’t wait as long for a
server to respond when it tries to connect. This SMTP client follows the
configuration in main.cf, but uses
a different value for the smtp_connect_timeout parameter. You’ll see more examples later in this chapter
and elsewhere in the book.
The smtpd daemon can enforce a number of limits on incoming mail. The limits are configurable through several parameters in the main.cf file. You can limit the size of messages, the number of recipients for a single delivery, and the length of lines in a message. You can also limit the number of errors to allow from a single client before breaking off communications.
To limit the number of recipients for a single message, use the smtpd_recipient_limit parameter. The default
is 1,000 recipients, and it should be adequate for normal
operation.
The message_size_limit
parameter limits the size of any message your system will
accept. The default is 10 MB. If you have limited disk space or memory,
you might want to lower the value. On the other hand, if your users
commonly receive large attachments, you may have to increase it.
Increasingly frequent errors from the same client might indicate a problem or an attack. Postfix
keeps a counter of errors, and handles potential problem clients by
introducing delays with each error. The delays can help protect your
system from misconfigured or malignant clients. As the number of errors
increases so does the length of each delay. The length of the initial
delay is specified by smtpd_error_sleep_time with a default of one second. After the number of errors
exceeds the value set for smtpd_soft_error_limit , Postfix increases the delay by one second for every
error, so that with each error, there is a slightly longer delay.
Finally, when the error count hits the value set in smtpd_hard_error_limit , Postfix gives up on the client and disconnects.
If a malicious program connects to your mail server and sends garbage commands, attempting to crash your server, the bogus commands appear to Postfix as errors from a misbehaving client. Assume the following values for the delay parameters:
smtpd_error_sleep_time = 1s smtpd_soft_error_limit = 10 smtpd_hard_error_limit = 20
With these settings, Postfix initially waits one second (smtpd_error_sleep_time) after each error
before responding to the client. After 10 (smtpd_soft_error_limit) such probes, Postfix
starts increasing the length of each delay. After 11 errors, Postfix
waits 11 seconds. After 12 errors, Postfix waits 12 seconds, and so on.
Once the number of errors hits 20 (smtpd_hard_error_limit), Postfix disconnects,
cutting off the malicious program. If the program connects again, it
simply gets the same treatment each time it starts creating
problems.
Postfix tries to make sense of addresses in email and writes them using the standard RFC 2822 format. Certain address rewriting occurs automatically.
You saw earlier in the chapter how Postfix appends myorigin to a local name that has no domain part. Postfix also
appends the value of mydomain to
addresses that include only the host portion without the domain name.
This fixes addresses that look like kdent@host so
they become kdent@host.example.com.
Postfix provides another type of address rewriting that
lets you map disparate addresses into a standard format for your
entire site. The canonical_maps
parameter points to a lookup table of address mappings.
(While the word canonical has many
meanings, among computer professionals it means “the usual, standard,
or normal.”) If different mail systems on your network create
addresses in different ways, you can relay them all through your
Postfix gateway and have it fix up the addresses into your standard
format. Canonical maps are often used to change addresses from an
internal format to a public one. Include entries like the following in
your canonical table:
# # /etc/postfix/canonical # pabelard@example.com peter.abelard@example.com hfulbert@example.com heloise.fulbert@example.com
They can also rewrite addresses completely.
# # /etc/postfix/canonical # pabelard@example.com abelard@oreilly.com hfulbert@example.com heloise@oreilly.com
In main.cf, point the
canonical_maps parameter to the
canonical file:
canonical_maps = hash:/etc/postfix/canonical
Be sure to execute postmap against your canonical file and reload Postfix so that it recognizes your changes to main.cf:
#postmap /etc/postfix/canonical#postfix reload
The canonical_maps parameter
affects all of the addresses, including envelope and message headers.
If Postfix finds a match, it makes the change. If you want your
changes to affect only sender or recipient addresses, Postfix provides
the additional parameters sender_canonical_maps and recipient_canonical_maps. They both work the
same as canonical_maps, but only on
their respective classes of addresses. If you use either of these two
parameters in addition to canonical_maps, Postfix first fixes the
addresses according to sender_canonical_maps and recipient_canonical_maps, and then canonical_maps.
Address masquerading refers to the idea that you can
hide the names of internal hosts, and make all addresses
appear as if they originated from the gateway system itself. You may
have internal systems that use your Postfix server as a gateway. When
mail is sent from these systems and the sender addresses include the
fully qualified hostname, you may want addresses to appear with the
domain name only. The masquerade_domains parameter strips hostnames down to their simpler domain
names.
The parameter takes a list of domains. Any address whose fully qualified hostname matches the domain portion is stripped down to just the domain name:
masquerade_domains = example.com
Addresses that look like heloise@server1.example.com and frank@server2.example.com are converted to heloise@example.com and frank@example.com.
You can list multiple domains and subdomains. Postfix processes addresses against
masquerade domain names in the order you list them. Consider a network
that includes the two subdomains,
acct.example.com and
hr.example.com. You want addresses from these
domains to show the subdomain, but you want addresses from any other
domain or host in the network to show the parent domain. Set masquerade_domains as follows:
masquerade_domains = acct.example.com hr.example.com example.com
With this setting, the address heloise@sys3.acct.example.com matches acct.example.com, so that it becomes heloise@acct.example.com. The address frank@db.hr.example.com matches hr.example.com, and becomes frank@hr.example.com. Finally, helene@server1.example.com matches the last value, example.com, to become helene@example.com.
If you want to preserve a domain name that would otherwise be stripped down, you can preface the domain with an exclamation point:
masquerade_domains = !it.example.com, example.com
In this case, the domain it.example.com will not be rewritten, so the address kdent@it.example.com stays as it is.
You can exclude specific account names from masquerading. For example, if you
want an address like root@db.example.com to stay
intact, add the account to the masquerade_exceptions parameter:
masquerade_exceptions = admin, root
When you use masquerading, it is normally applied to all
envelope and header addresses but not envelope recipient addresses. This allows mail addressed
to a specific host to be delivered from the mail gateway to that
particular system, while still rewriting addresses for messages sent
from the host. If you prefer to have all addresses masqueraded, set
the masquerade_classes parameter to include the complete list of address
classes recognized by Postfix:
masquerade_classes = envelope_recipient, envelope_sender,
header_sender, header_recipientBe aware that if you set masquerade_classes this way, a gateway mail
system may no longer know where to deliver a message that was
originally addressed to kdent@server1.example.com
once it has been rewritten as
kdent@example.com.
The relocated_maps
parameter points to a lookup table where you can store
a list of addresses or domains that have moved to another
location:
relocated_maps = hash:/etc/postfix/relocated
The lookup table uses the old address as the key and its new location as the value. When a message is delivered to a relocated address, Postfix rejects the delivery attempt with a message that includes the user’s new address as specified in the lookup table. You can also list just a domain name to have all recipients at that domain rejected with your specified message.
The file /etc/postfix/relocated contains entries like:
kdent@ora.com kdent@oreilly.com heloise@ora.com hfulbert@oreilly.com @example.com oreilly.com
Messages sent to either kdent@ora.com or heloise@ora.com are rejected with an error message that gives their respective new addresses. Any messages sent to example.com are rejected regardless of what the local part is. The message reports that the address has moved to oreilly.com.
A local address that is not listed in relocated or other
maps, and is not an account on the system is an unknown user. Normally, when Postfix
receives mail for an unknown user, it rejects it. If you prefer to
capture all of the messages sent to nonexistent accounts, you can use
the luser_relay parameter. Set it to any email address to have messages
destined for unknown users sent to the address you provide. You must
also set local_recipient_maps
to blank to prevent Postfix from rejecting mail for
unknown users:
luser_relay = catchall local_recipient_maps =
Assuming catchall is
a legitimate address (alias or user account) on your system, it will
receive all messages sent to nonexistent users. Be careful when using
luser_relay, since spammers often
launch dictionary attacks, where they try enormous lists of
addresses hoping to find a legitimate one at your site. If luser_relay is configured, it will catch all
of the spam.
Postfix provides multiple layers of security. One such layer is the option to permit most Postfix services to run within a chroot environment. The Unix chroot function allows a process to change its view of, and access to, its filesystem by changing its root directory to a new path other than the normal /.
The chroot feature is particularly beneficial for processes that must communicate with external, potentially hostile clients. If an attacker somehow manages to subvert the smtpd daemon, for example, the attacker gains only very limited access to the filesystem. Configuring for a chroot environment is an advanced Postfix feature that adds a layer of complexity that you or your administrators may not want to deal with. Generally, chroot is not needed, except for sites that use Postfix in a highly secure environment or on particularly exposed servers, such as dedicated firewall systems and bastion hosts.
All of the Postfix processes that use chroot change their root
directory to the directory specified in the queue_directory parameter, which is normally /var/spool/postfix. When a process runs
chrooted, the directory /var/spool/postfix/pid, for example, becomes
/pid to that process, and the
process cannot access any files other than those below its new
root.
To chroot individual components, edit your master.cf file. Change the fifth column to y. The chroot option is possible with all
components except the pipe, virtual, local, and proxymap services. In Example 4-1, chroot is enabled for
the SMTP clients and server.
Since chroot changes the environment of the process, all of the resources the chrooted daemon needs must be available below the new root directory. Unfortunately, the specific resources Postfix daemons might need depend on your platform. In general, Postfix might require resources that provide user information (/etc/passwd), name resolution configuration (nsswitch.conf or resolv.conf), timezone information, or shared libraries. Some platforms also require certain device files. There are platform-specific scripts that come with the Postfix distribution. They’re available in the examples/chroot-setup/ subdirectory below the main distribution directory.
Executing the correct script should be sufficient to set up the chroot environment on your system. If there is not a script for your platform, you may have to experiment a little to find everything you need. Consider all of the resources mentioned above and review the example scripts for other platforms. Watch your logs for error messages after you chroot a process. An entry like the following:
postfix/smtp[1575]: fatal: unknown service: smtp/tcp
shows that Postfix cannot determine what port the smtp service uses. This problem is fixed by
placing the /etc/services file into
the chroot, by copying it to /var/spool/postfix/etc/services. Other
symptoms show up in the log complaining of similar types of
problems.
If the normal Postfix log doesn’t give enough information, you may have to run a trace to see where the program fails. Look for tools such as truss , strace, and tusc on your system. These tools can be used to see where a service fails when it tries to run in a chroot. If you discover the failure is due to a missing component, copy the component into the chrooted environment. See the DEBUG_README file that comes with Postfix for instructions on attaching tracing tools to Postfix.
Once you have Postfix running in a chroot, you need to make sure you keep your chroot resources in sync with the normal system files. If your chroot requires /etc/passwd, for example, whenever the system /etc/passwd changes, the chroot version must be updated, too. Creating link files doesn’t work because symlinks cannot cross the chroot boundary, and hard links do not work across filesystems.
The Postfix distribution ships with a lot of documentation. Depending on your installation package, you
may or may not have all of the documents. You should have at least the
manpages and sample configuration files. The sample files are located in the
directory specified by the sample_directory parameter, which is usually the same directory in which
your main.cf file resides. All of
the Postfix parameters are documented in one or more of the sample
files.
When Postfix was installed, the manpages should have been installed in a sensible place on your system. If they are in a directory where your system expects to find them, you only have to type, for example:
$ man postfixto have the manpage displayed on your screen. If your system replies with an error message such as:
$ man postfix
No manual entry found for postfix.then either the pages are not installed or they are not in a
location your system expects to find them. Read the documentation for
your system to find out about setting your MANPATH variable or moving the manpages to a more standard
location for your platform.
There are many manpages for various Postfix commands, daemons, and lookup tables. All of the documentation is also available as HTML files. If the HTML files are not installed on your system, you can find them on the Postfix web site at http://www.postfix.org/. The online documentation always refers to the current release of Postfix.
The queue manager daemon qmgr is in many ways the heart of your Postfix system.[1] All messages, both outbound and inbound, must pass through the queue. It’s a good idea to understand the queue and how Postfix uses it in case you have to troubleshoot a problem.
The queue manager maintains five different queues: incoming, active, deferred, hold, and corrupt.
Postfix uses a separate directory for each queue below the path specified
in the queue_directory parameter. By default the path is /var/spool/postfix, which gives you a directory
structure like the following:
/var/spool/postfix/active /var/spool/postfix/bounce /var/spool/postfix/corrupt /var/spool/postfix/deferred /var/spool/postfix/hold
The qmgr daemon running in the background handles most of the queue management tasks automatically. The commands postsuper and postqueue are used by administrators for manual queue management tasks. This chapter looks at how qmgr and the command-line tools work, as well as Postfix parameters that affect the queue.
[1] You may see references to nqmgr in older configuration files and documentation. Earlier Postfix versions shipped with two queue manager daemons, qmgr and nqmgr. The original qmgr was replaced by the current one, which has a better scheduling algorithm. nqmgr was the name of the current queue manager daemon while it coexisted with the original. Once it was ready for promotion as sole queue manager for Postfix, it was renamed qmgr.
Figure 5-1 illustrates how messages move through the queue. The
incoming queue is where messages first enter Postfix. The queue manager
provides protection for the queue filesystem through the queue_minfree parameter. The default value is 0. You can make sure the
disk that stores your queue doesn’t run out of space by setting a
limit.
From the incoming queue, the queue manager moves messages to the active queue and invokes the appropriate delivery agent to handle them. For the most part, if there are no problems with delivery, movement through the queue is so fast that you won’t see messages in the queue. If Postfix is trying to deliver to a slow or unavailable SMTP server, you may see messages in the active queue. Postfix waits 30 seconds to decide if a remote system is unreachable.
A message that cannot be delivered is placed in the deferred queue. Messages are deferred only when they encounter a temporary problem in delivery, such as a temporary DNS problem or when a destination mail server reports a temporary problem. Messages that are rejected, or encounter a permanent error, are immediately bounced back to the sender in an error report and don’t stay in the queue.
Messages in the deferred queue stay there until they are
either delivered successfully or expire and are bounced back to the
sender. The bounce_size_limit
parameter determines how much of a message that could
not be delivered is bounced back to the sender in the error report.
The default is 50,000 bytes.
Once a message has failed delivery, Postfix marks it with a timestamp to indicate when the next delivery attempt should occur. Postfix keeps a short-term list of systems that are down to avoid unnecessary delivery attempts. If there are deferred messages scheduled for a redelivery attempt, and there is space available in the active queue, the queue manager alternates between taking messages from the deferred and incoming queues, so that new messages are not forced to wait behind a large backlog of deferred ones.
Postfix periodically scans the queue to see if there are
deferred messages whose timestamps indicate they are ready for another
delivery attempt. Subsequent failed attempts at delivery cause
scheduled delays to double, so Postfix waits longer each time
before it attempts to deliver a message. You can configure the maximum
delay with the maximal_queue_lifetime parameter. When the time has expired, Postfix gives up
trying to deliver the message and bounces it back to the sender. By
default the period is five days (5d). You can set it to any length of
time, or to 0 to have undeliverable mail returned immediately.
Queue scans occur at an interval specified by the queue_run_delay parameter. By default the parameter is set to 1,000
seconds (1000s). With this setting, every 1,000 seconds, Postfix
checks the deferred queue to see if there are any messages due for
another delivery attempt.
The parameters minimal_backoff_time and maximal_backoff_time set minimum and maximum
time limits on how often Postfix attempts to redeliver deferred
messages. Each time a message is deferred, the queue manager increases
the amount of time it waits to attempt to deliver that message again.
The calculated increase of time is never allowed to exceed maximal_backoff_time (default 4,000 seconds)
and is never less than minimal_backoff_time (default 1,000
seconds). If you find that you have a large backlog of deferred
messages, you may want to increase the maximal_backoff_time so that Postfix doesn’t
expend system resources in trying to deliver messages to unavailable
servers.
The queue manager arranges for the delivery of messages by invoking the appropriate delivery agent. Postfix is careful not to overwhelm destination systems and provides several parameters to control resources for outgoing messages. For most situations the default settings are correct, but if you are experiencing resource problems or you are trying to optimize deliveries, you may want to experiment with the queue manager configuration.
Outgoing messages might be delivered over any of the transports
available in the master.cf
file. Each transport can have a limit on its total
number of processes, specified in the maxproc column (see Section 4.5). If a value is not
specified there, Postfix uses default_process_limit for its limit.
The initial_destination_concurrency parameter limits the number of messages initially sent
(default is five). You can increase the value, but it can’t go higher
than the maxproc value or default_process_limit for the transport
used. After the initial delivery of messages, if there are more
messages in the queue for a particular destination, Postfix increases
the number of concurrent delivery attempts, as long as it doesn’t
detect any problem from the destination system at the current load.
Postfix continues to increase the number of simultaneous deliveries up
to the number specified in the default_destination_concurrency_limit
parameter, which is 20 by default. In general, you
don’t want to increase the concurrency limit, or you risk overwhelming
the receiving system.
You can override the default_destination_concurrency_limit value
for any transport by setting a parameter of the form
transport _destination_concurrency_limit. For example,
you can limit concurrent connections to external systems with the
parameter smtp_destination_concurrency_limit
, or limit local deliveries with local_destination_concurrency_limit
.
There are also parameters of the form
transport _destination_recipient_limit that control
how many recipients Postfix specifies for a single copy of an email
message. If a transport-specific parameter is not configured, it takes
its default value from default_destination_recipient_limit
. If the number of recipients for a message exceeds the
limit, Postfix breaks up the list of recipients into smaller groups of
addresses and sends separate copies of the message to each group of
addresses.
The corrupt queue is simply used to store damaged or otherwise unreadable messages. If a message is too damaged to do anything with it, Postfix places it here. If you want to investigate an issue, the problem message is available in this queue where you can view it manually, if necessary. Corrupt messages are very rare. If you have them, they may be a symptom of an underlying operating system or hardware problem.
Postfix can report certain errors by sending error messages to an administrator.
Postfix classifies errors for notification, as shown in Table 5-1. The notify_classes parameter in main.cf contains the list of error
classes that should generate error notices. By default
the parameter includes " resource” and “software” errors.
Each class of error can be configured to send the
notification to a particular email address, using parameters of the
form class _notice_recipient.
By default they all go to postmaster . Table 5-1
provides a list of possible error classes, along with the parameters
that indicate who should receive the error notices.
Error class | Description | Notice recipient parameter |
bounce | Send headers for all bounced messages. | |
2bounce | Send undeliverable bounced messages. | |
delay | Send headers of delayed messages. | |
policy | Send the transcript of any SMTP transaction when a message is rejected due to anti-spam restrictions. | |
protocol | Send the transcript of any SMTP transaction that had errors. | |
resource | Send notice that a message could not be delivered because of system resource problems. | |
software | Send notice that a message could not be delivered because of software problems. | |
If you would like to receive all problem notices, set the parameter as follows:
notify_classes = bounce, 2bounce, delay, policy, protocol, resource, software
Postfix provides command-line tools for displaying and managing the messages in your queue. The primary commands are postsuper and postqueue. You can perform the following tasks on messages in the queue:
Listing messages
Deleting messages
Holding messages
Requeuing messages
Displaying messages
Flushing messages
Each of the tasks, and the commands to accomplish them, are explained in the sections that follow.
The queue display contains an entry for each message that shows the message ID, size, arrival time, sender, and recipient addresses. Deferred messages also include the reason they could not be delivered. Messages in the active queue are marked with an asterisk after the Queue ID. Messages in the hold queue are marked with an exclamation point. Deferred messages have no mark.
You can list all the messages in your queue with the postqueue -p command. Postfix also provides the mailq command for compatibility with Sendmail. The Postfix replacement for mailq produces the same output as postqueue -p.
A typical queue entry looks like the following:
$ postqueue -p
-Queue ID- --Size-- ----Arrival Time---- -Sender/Recipient-------
DBA3F1A9 553 Mon May 5 14:42:15 kdent@example.com
(connect to mail.ora.com[192.168.155.63]: Connection refused)
kdent@ora.comSince this entry is not marked with either an asterisk or an exclamation point, it is in the deferred queue.
The postsuper command
allows you to remove messages from the queue. To remove the message in
the sample entry displayed above, execute postsuper with the -d
option:
# postsuper -d DBA3F1A9
postsuper: DBA3F1A9: removed
postsuper: Deleted: 1 messageIf you have a lot of messages to remove, you can clear out your
entire queue with the ALL
argument:
# postsuper -d ALL
postsuper: Deleted: 23 messagesThe ALL argument must be
capitalized. Be very careful when using the command, since it will
delete all queued messages without asking any questions.
Rather than deleting all of the queued messages or just one at a time, frequently you want to delete messages with a specific email address. Example 5-1 is a Perl script that provides a convenient way to specify an email address to delete particular messages from the queue.
#!/usr/bin/perl -w
#
# pfdel - deletes message containing specified address from
# Postfix queue. Matches either sender or recipient address.
#
# Usage: pfdel <email_address>
#
use strict;
# Change these paths if necessary.
my $LISTQ = "/usr/sbin/postqueue -p";
my $POSTSUPER = "/usr/sbin/postsuper";
my $email_addr = "";
my $qid = "";
my $euid = $>;
if ( @ARGV != 1 ) {
die "Usage: pfdel <email_address>\n";
} else {
$email_addr = $ARGV[0];
}
if ( $euid != 0 ) {
die "You must be root to delete queue files.\n";
}
open(QUEUE, "$LISTQ |") ||
die "Can't get pipe to $LISTQ: $!\n";
my $entry = <QUEUE>; # skip single header line
$/ = ""; # Rest of queue entries print on
# multiple lines.
while ( $entry = <QUEUE> ) {
if ( $entry =~ / $email_addr$/m ) {
($qid) = split(/\s+/, $entry, 2);
$qid =~ s/[\*\!]//;
next unless ($qid);
#
# Execute postsuper -d with the queue id.
# postsuper provides feedback when it deletes
# messages. Let its output go through.
#
if ( system($POSTSUPER, "-d", $qid) != 0 ) {
# If postsuper has a problem, bail.
die "Error executing $POSTSUPER: error " .
"code " . ($?/256) . "\n";
}
}
}
close(QUEUE);
if (! $qid ) {
die "No messages with the address <$email_addr> " .
"found in queue.\n";
}
exit 0; The hold queue is available for messages you would like
to keep in your queue indefinitely. Figure 5-2 shows the hold queue and how you can move messages into the hold
queue where they will not be delivered until you specifically remove
them or move them back for normal queue processing. To place the
example message into the hold queue, use the postsuper command with the -h
option:
# postsuper -h DBA3F1A9The queue entry now contains an exclamation point to show that the message is on hold:
-Queue ID- --Size-- ----Arrival Time---- -Sender/Recipient-------
DBA3F1A9 ! 553 Mon May 5 14:42:15 kdent@example.com
(connect to mail.ora.com[192.168.155.63]: Connection refused)
kdent@ora.comTo move the message back into the normal queue for
regular processing, execute the command with a capital -H option instead:
# postsuper -H DBA3F1A9After the message is moved back, the queue manager marks it for redelivery according to its normal scheduling, or you can flush the message to have it sent out immediately (see Section 5.2.6).
If you have messages that were deferred because of a
configuration problem that has been corrected, you may have to requeue
the messages to have them delivered successfully. If the
misconfiguration caused Postfix to store incorrect information about
the next hop or transport method, or to rewrite the address
incorrectly, requeuing causes Postfix to update the incorrect
information based on your new configuration. The postsuper command uses the -r
option to requeue messages. You can specify a queue ID for a single
message, or the word ALL in capital
letters to requeue everything:
# postsuper -r ALLRequeued messages get a new queue ID and an additional Received: header.
The postcat command displays the contents of a queue file:
# postcat -q DBA3F1A9Earlier versions of postcat
did not support the -q option but
required the full path to the queue file. Since a message can be in
any of the queue compartments (maildrop, incoming, active, deferred,
hold), and each of these has multiple subdirectories, the path to a
particular queue file is not immediately apparent. If you are using an
earlier version of postcat, which
doesn’t support the -q option, you
can create a shell script like the one in Example 5-2 as a convenient way to
view a queue file by specifying only the queue ID. The script accepts one queue ID as an
argument, checks all of the queue directories to locate the queue
file, and executes postcat with the
full path as its argument. The contents are then displayed. This
simple script displays only one queue file at a time.
#!/bin/sh
PATH=/usr/bin:/usr/sbin
QS="deferred active incoming maildrop hold"
QPATH=`postconf -h queue_directory`
if [ $# -ne 1 ]; then
echo "Usage: pfcat <queue id>"
exit 1
fi
if [ `whoami` != "root" ]; then
echo "You must be root to view queue files."
exit 1
fi
if [ ! -d $QPATH ]; then
echo "Cannot locate queue directory $QPATH."
exit 1
fi
for q in $QS
do
FILE=`find $QPATH/$q -type f -name $1`
if [ -n "$FILE" ]; then
postcat $FILE
exit 0
fi
done
if [ -z $FILE ]; then
echo "No such queue file $1"
exit 1
fiFlushing the queue causes Postfix to attempt to deliver messages in the queue immediately. You can flush queue messages with the postqueue -f command. However, unless you have a reason to expect successful deliveries, it’s best to leave redelivery attempts to the Postfix queue manager. Repeated attempts to flush the queue can have a severe performance impact on your mail server.
You can flush messages destined for a particular site with the
-s option. The site must be eligible for fast
flush in order for this to work. To be eligible, the site
must be listed in the fast_flush_domains parameter. By default, fast_flush_domains includes all of the hosts
listed in relay_domains , but you can add additional sites if you want to flush
them before the normally scheduled redelivery attempt.
fast_flush_domains = $relay_domains example.com
If you know that a previously unavailable, eligible site is
ready to accept mail, execute postqueue with the -s option and name the site:
# postqueue -s example.comSee Chapter 9 for more information about fast flush and the SMTP command ETRN.
The Domain Name System (DNS) is a vast distributed database whose main job is to map hostnames to IP addresses. It also has an important role in email routing. In this chapter we’ll look at how MTAs in general use DNS and some of the DNS issues that relate to Postfix and its configuration. Keep in mind that there are two important aspects to your mail servers and DNS:
For sending mail, the system running your Postfix mail server must have access to a reliable DNS server to resolve hostnames and email-routing information.
For receiving mail, your domains must be configured correctly to route messages to your mail server.
Misconfiguration of DNS servers is a common source of problems in setting up email servers.
At one time, hostname to IP address mapping was handled by one large, centrally managed text file that contained an entry for every host accessible on the Internet. Each site downloaded a copy of the file periodically to get the latest hostname information. That scheme quickly became unwieldy, and the DNS service was conceived. It was defined in RFC 882 in 1983, and introduced two key ideas: the data is distributed and the naming of hosts is hierarchical. Making the data distributed means that every site updates its own information, and the updates become available almost immediately. Hierarchical naming prevents hostname conflicts and gives us the current domain-naming system that we are all very familiar with today. Each site obtains at least one domain name, and all of the hosts at that site are named by prefixing the simple hostname to the site’s domain name. For example, a site that controls the domain name example.com might have any number of hosts with names like server1.example.com, hp4100.example.com, or www.example.com.
Each domain has at least two domain nameservers that are considered authoritative for the domain. Authoritative nameservers should have direct access to the database that contains all the information about a domain.
The data is comprised of different types of records called resource records . Different resource records provide different kinds of information, such as IP addresses, nameservers, hostname aliases, and mail routing. The resource records you need to know about for this discussion are the following:
The mapping of names to IP addresses is handled by A records. These records contain a hostname and its IP address. The names that people use to refer to hosts have to be converted to IP addresses used for Internet routing. A records provide this name-to-address translation.
Some hostnames are aliases that point to other hostnames, rather than to IP addresses. This can be useful for directing requests to services (such as HTTP or POP) that might reside on systems generally known by a different name. The CNAME record provides the “real,” or canonical, name that an alias hostname points to. For example, an administrator might publicize the hostname http://www.example.com, which is really a CNAME record pointing to server1.example.com most of the time. But during periods of maintenance on server1.example.com, for example, http://www.example.com could temporarily point to server2.example.com.
MX records provide mail-routing information. They specify mail exchangers for domains—that is, the names of the mail hubs that handle all the mail for a domain name. The MX records tell MTAs where to send messages. Since a domain can have multiple mail exchangers, MX records include a preference value to designate the order of priority when selecting a mail exchanger to deliver messages to.
PTR records provide a reverse lookup of IP addresses to hostnames. These records normally match up with A records, so that forward lookups of hostnames return an IP address whose reverse lookup returns the hostname. However, many hostnames can point to the same IP address, so PTR records should map back to the canonical name associated with the IP address. Some applications use PTR records as a form of authentication to make sure that a connecting client’s IP address maps to the expected hostname.
Let’s consider for a moment one way that email routing
might work. A user horatio in the domain
example.com has a workstation named denmark. He could receive mail by using the
email address horatio@denmark.example.com. An
MTA with a message to deliver would simply look up the IP
address for denmark.example.com and deliver it to
that system for the user horatio. This scenario
requires that Horatio’s workstation is always turned on, that it has a
functional MTA running at all times to receive messages, and that it is
accessible by unknown MTAs from anywhere on the Internet. Rather than
manage hundreds or thousands of MTAs on workstations and expose them to
the Internet, nearly all sites make use of mail hubs that receive all
the mail for a domain. MTAs such as Postfix need a way to determine
which host or hosts are the mail hubs for a domain. DNS MX records provide this information.
A mail exchanger either delivers mail it receives or forwards it to another mail system. A domain may have multiple mail systems for reliability, and therefore multiple MX records. Generally, one host is the primary mail server and the others serve as backup or secondary mail servers. Each MX record in DNS contains a preference value that orders mail systems from most preferred to least preferred.
BIND is one of the most common DNS server applications. (O’Reilly’s DNS and BIND by Paul Albitz and Cricket Liu fully explains the DNS system and documents the BIND software.) A simple BIND configuration file for the domain http://example.com looks like the following:
example.com. IN SOA ns.example.com. kdent.example.com. (
1049310513
10800
3600
604800
900 )
;
; Nameservers
;
example.com. IN NS ns.example.com.
;
; Host Addresses
;
example.com. IN A 192.168.100.50
server1.example.com. IN A 192.168.100.220
ns.example.com. IN A 192.168.100.5
mail1.example.com. IN A 192.168.100.50
mail2.example.com. IN A 192.168.100.54
mail3.example.com. IN A 192.168.100.123
;
; Mail Exchangers
;
example.com. IN MX 10 mail1.example.com.
example.com. IN MX 20 mail2.example.com.
example.com. IN MX 30 mail3.example.com.
;
; CNAME Records
;
pop.example.com. IN CNAME mail1.example.com.
www.example.com. IN CNAME server1.example.com.For this discussion, we’re primarily interested in the mail exchanger records:
example.com. IN MX 10 mail1.example.com. example.com. IN MX 20 mail2.example.com. example.com. IN MX 30 mail3.example.com.
The domain name is in the first column. The second column indicates that the entries are Internet class records, and the third indicates that they are mail exchanger resource records. The last column shows the mail exchanger host, and the second-to-last column shows its preference value. Preference values can be any number between 0 and 65,536, and a lower value indicates a more preferred host. The numbers are meaningful only in relation to each other and can be anything within the allowed range. By convention, most administrators create priority values in multiples of 10, which allows some flexibility for inserting or temporarily rearranging preferences.
In our simple example above, mail1.example.com receives all the mail for the domain http://example.com. In this case, all mail must eventually arrive at mail1.example.com. When an MTA has to deliver a message to a user at the domain example.com, it retrieves all of the MX records and sorts them in order of priority. It first attempts delivery to mail1.example.com. If mail1.example.com is available and accepts the message, the delivery is finished; however, if for some reason mail1.example.com is not available to accept the message, the MTA continues down the list until it finds a mail exchanger able to accept the message. If a secondary mail exchanger accepts a message, it takes the responsibility of delivering it to a more preferred mail server (possibly the primary) when the unavailable server comes back online.
If no MX records are found for a domain, an MTA checks to see if there is an A record associated with the domain name itself. If there is an A record, the MTA attempts delivery to the system at that IP address.
This mail-routing scheme seems simple enough, but it does get
slightly more complicated. Consider an example where the MTA on
mail2.example.com receives a message for
ophelia@example.com. Presumably,
mail1.example.com is offline, since mail2 received the message. The MTA running on
mail2.example.com gets the list of mail exchangers
for example.com, determines that the message should
go to mail1.example.com, and discovers that
mail1 is not available. The next mail
exchanger on the list is itself. Delivery to itself doesn’t really make
sense. So, the next mail exchanger in line is
mail3.example.com. The MTA could deliver the
message there, but mail3 will go
through the same process and immediately try to hand the message back to
mail2, creating a mail loop. (MTAs
actually resolve hostnames to IP addresses for comparisons, since MX
hosts might have multiple A records. Postfix compares the IP address to
its list of addresses in inet_interfaces and proxy_interfaces.)
The solution is that when an MTA gets the list of mail exchangers
and discovers itself among them, it discards its own record plus all
other mail exchangers with an equal or less preferred priority (higher
number). For our example, the host mail2 eliminates itself and mail3, thus reducing the list of mail
exchangers to only mail1. Since
mail1 is not available and mail2 has no other options for delivery, it
queues the message and makes the delivery when mail1 comes back online.
In order for mail routing to work successfully, you should be very careful when setting up MX records. In particular, you should observe the following rules for MX records in your DNS configuration:
The mail exchanger pointed to by the MX record must be a hostname with a valid A record. Once an MTA has determined which host should receive the mail, it has to be able to find that host.
The host pointed to by an MX record should not be an alias (CNAME record). Under normal circumstances, an MTA knows itself by its canonical name and looks for that name when checking the list of mail exchangers to prevent mail loops. The server must be able to find itself, so make sure that you list the canonical name in the MX record, or you risk creating a mail loop. Even if an MTA accommodates CNAME records (by looking up and using the canonical name), using them causes inefficiencies in mail delivery.
List a hostname rather than an IP address for mail exchangers. While you may get by with a bare IP address, RFC 974 states that you must use a name of a host. Future changes (IPv6, for example) might cause bare IP addresses to break mail routing.
Leaving out the preference value for MX records may have different effects, depending on your DNS server and MTA. At best, the problem creates ambiguity; at worst, it can prevent mail delivery.
When sending mail, Postfix uses system resolvers, which are programs or libraries that make requests for DNS information. To receive mail, the DNS for your domain must be configured to route messages to your Postfix server. This section looks at DNS issues both for sending and receiving mail.
The Postfix SMTP delivery agent must be able to obtain IP address and MX records for mail-routing information. Postfix must make at least two DNS lookups: one to get the MX hostname and one to get the IP address for that hostname. Since Postfix uses the normal operating system resolver libraries for its DNS queries, the system that runs Postfix must have access to a DNS server. The DNS server does not have to be on the same system, although for most circumstances it should be.
If your system does not seem to be resolving domain names correctly, there are three common command-line tools that you can use to troubleshoot the problem: nslookup , dig, and host. You should check your system documentation to see which of these tools is available on your server and how to use them. You can use these tools to query all types of resource records for a domain, including the MX record that Postfix needs in order to successfully deliver mail to a domain.
DNS problems might stem from your own system’s configuration or a problem with the DNS server configuration for the domain Postfix is trying to send mail to. When you are troubleshooting a problem, it is very important to remember that Postfix first looks for MX records and not A records. Even if you can resolve a domain to an IP address, Postfix may not be able to deliver mail for that domain if there is a problem in retrieving MX information.
When delivering mail, Postfix performs a DNS lookup to retrieve all of the MX records for the destination domain. It sorts them in order of preference and tries each one in priority order. Once Postfix has established a connection with an SMTP server, the server replies to Postfix requests with a status code. Codes within the 2xx range indicate that everything is okay. Error codes in the 4xx range indicate a temporary problem, and those in the 5xx range indicate a permanent problem. See Chapter 2 for more information on SMTP reply codes.
To provide compatibility with Sendmail, Postfix, by default,
treats SMTP servers that respond with 4xx or 5xx reply codes as if
the servers had not responded at all. If you prefer that Postfix
react to the error codes returned by the MX server rather than
ignore them, set the smtp_skip_5xx_greeting and smtp_skip_4xx_greeting parameters:
smtp_skip_4xx_greeting = no smtp_skip_5xx_greeting = no
If smtp_skip_4xx_greeting
is set to no, and Postfix
attempts delivery to a mail exchanger that responds with a 4xx code,
it does not try any more mail exchangers for the destination domain.
It queues the message and attempts delivery later.
If smtp_skip_5xx_greeting
is set to no, and Postfix
attempts delivery to a mail exchanger that responds with a 5xx code,
it does not try any more mail exchangers for the destination domain.
It bounces the message back to the sender.
Some domains have MX records set to equal preference
values. By default, the Postfix SMTP client randomly shuffles MX
addresses of equal preference. You can change the default behavior
by setting the smtp_randomize_addresses parameter:
smtp_randomize_addresses = no
Setting this parameter causes Postfix to attempt delivery to the MX servers in the same order it retrieved them.
Due to the prevalence of spam, many sites now require that connecting clients have valid PTR records associated with their IP addresses. Your Postfix system’s IP address should have a reverse PTR mapping to a hostname that returns the same IP address to ensure that you can deliver to all mail servers.
For Postfix to accept email for a particular domain, the system must be specified as an MX host in the domain’s DNS setup, and Postfix must be configured to accept mail for the domain. Postfix accepts mail for domains that are either local to the system, relay domains, or virtual domains. Virtual domains might use virtual aliases or virtual mailboxes (see Chapter 8). Each type of domain must be listed in a different Postfix parameter, as shown in Table 6-1.
Domain type | Parameter |
Local | |
Relay | |
Virtual mailboxes | |
Virtual aliases | |
Do not list a domain in more than one of the parameters. Postfix issues a warning if it detects a domain listed in two of the parameters. The error message “mail for example.com loops back to myself” occurs when the DNS configuration points to your mail server, but Postfix has not been configured to accept mail for the domain.
If your Postfix server accepts mail for the two local domains
example.com and
porcupine.org, then the mydestination parameter should look like the
following in your main.cf
file:
mydestination = example.com, porcupine.org
Chapter 9 explains configuration of relay domains. Chapter 8 covers virtual mailbox and virtual alias domains.
The following error messages in the mail log files indicate host lookup problems:
domain loops back to
myselfThis is one of the most common errors related to DNS. It
happens when you have configured your Postfix server as an MX host in your DNS server, but
you have not told your Postfix server that it is the final
destination for the domain. Add the domain in question to the
mydestination parameter, or
configure it as a virtual domain or a relay domain. If your
Postfix server is behind a proxy or NAT device, it may not realize
that it is an MX host for the domain. In that case, add the proxy
device’s IP address to proxy_interfaces. Log entries for this
error resemble the following:
postfix/qmgr[3981]: 2CC3B229: from=<heloise@ora.com>, \
size=306, nrcpt=1 (queue active)
postfix/smtp[3983]: warning: mailer loop: best MX host for \
example.com is local
postfix/smtp[3983]: 2CC3B229: to=<abelard@example.com>, \
relay=none, delay=0, status=bounced (mail for example.com \
loops back to myself)The domain’s DNS configuration has no MX records and there is no A record for the domain itself. You will have to contact an administrator of the domain to fix the problem. For your own domains, be sure they all include MX records pointing to your mail server. Log entries for this error resemble the following:
postfix/qmgr[3818]: D31CD20F: from=<heloise@ora.com>, \
size=312, nrcpt=1 (queue active)
postfix/smtp[3824]: D31CD20F: to=<abelard@example.com>, \
relay=none, delay=1, status=bounced (Name service \
error forname=example.com type=A: Host found but \
no data record of requested type)domain has a valid A
recordThe domain’s DNS configuration has MX records, but lookups for the IP addresses fail. You will have to contact an administrator of the domain to fix the problem. For your own domains, be sure that any hosts you specify as MX hosts are valid and have correct A records. Log entries for this error resemble the following:
postfix/qmgr[3818]: 068DB20F: from=<heloise@ora.com> \
size=306, nrcpt=1 (queue active)
postfix/smtp[3846]: warning: no MX host for example.com has
a valid A record
postfix/smtp[3846]: 068DB20F: to=<abelard@example.com> \
relay=none, delay=1, status=deferred (Name service \
error for name=mail.seaglass.com type=A: Host not found)The DNS query produced no answer. Either the DNS server is not reachable, or it is broken. Assuming the DNS server for this domain is up and working correctly, this error message could be due to a networking problem, or perhaps your system’s resolver is misconfigured. Check over the documentation for the nsswitch.conf and resolv.conf files on your platform. Be sure that your system is resolving DNS queries correctly, using one of the tools mentioned earlier in the chapter, before trying to troubleshoot the problem with Postfix. Log entries for this error resemble the following:
postfix/qmgr[3818]: CCBED1E8: from=<heloise@ora.com> \
size=306, nrcpt=1 (queue active)
postfix/smtp[3937]: CCBED1E8: to=<abelard@example.com> \
relay=none, delay=1, status=deferred (Name service error \
for name=example.com type=MX: Host not found, try again)If you are running Postfix in a chrooted environment, there are several configuration files related to DNS that must be within the chrooted compartment. See Chapter 4 for more information on running Postfix within a chroot.
Chapter 1 explained that POP and IMAP are protocols that deal with how users retrieve their email messages from message stores. Postfix is a mail transfer agent and does not implement POP or IMAP. This chapter looks at how Postfix delivers messages and how they are read by POP/IMAP servers. There are many POP/IMAP servers available, and the information presented here should be applicable to any standards-conforming server. The last part of this chapter deals with configuring Postfix to work with the Cyrus IMAP server. Before we look at local delivery, we’ll first discuss more broadly the different delivery transports Postfix uses. Transports other than local are discussed in subsequent chapters.
Postfix offers delivery for four different classes of recipient addresses: local, relay, virtual alias, and virtual mailbox. How you configure the domains you accept mail for determines the delivery method used by Postfix. The following are the delivery transports used by Postfix:
Delivers mail on the local system. Each address has an account on the
system or comes from the local aliases file (historically
/etc/aliases). Delivered
messages go to the system’s mail spool or mail files in individual
home directories. Deliveries are handled by the local delivery
agent or passed to a custom delivery program. Lists local domains
in the mydestination
parameter.
Delivers mail to other systems, usually on the same
network. Relay domains are generally configured on gateway systems
when Postfix accepts mail for an entire network. The gateway
system relays messages to the correct internal mail system.
Deliveries are handled by the relay transport, which is simply a
clone of the smtp agent, but it
is optimized for making deliveries to internal systems on a local
network. Lists relay domains in the relay_domains parameter. Mail relaying
is discussed in Chapter
9.
Delivers mail for virtual mailbox domains. Virtual mailbox domains are
used for hosting multiple domains using a separate mail spool that
contains mailboxes for many separate domains. Email users
typically do not have system accounts on the mail server. Lists
virtual mailbox domains in the virtual_mailbox_domains parameter.
Virtual hosting is discussed in Chapter 8.
Deliveries to nonlocal domains are handled by the smtp transport. It determines where to deliver messages for any nonlocal domain through DNS lookups. Virtual alias addresses are resubmitted to Postfix for delivery to the new address, at which point they’ll be handled by one of the above transports.
The rest of the chapter discusses the details of local delivery.
When Postfix makes local deliveries it transfers the contents of messages to the local message store. The most common types of message stores are the traditional mbox format and the newer maildir style. Both use regular files to store messages, but they are structured in different ways. In Postfix, you specify maildir style by including a trailing slash when you configure any mail file or directory parameters (see configuration information later in this chapter).
Historically, Unix systems have used a single file to
store each user’s email messages. This type of message store format is
commonly referred to as mbox. Each message
within the file starts with a line that begins with the word From. It is important that the string start
on the first character of the line, and that there is a space after
the end of the word. The From line is commonly referred to as From_ with an underscore character to
indicate the space following the word. Don’t confuse the From_ line used for separating messages
within an mbox file with the From:
line included in email message headers. The last line of a message is
always a blank line.
A complete From_ line looks
like the following:
From jmbrown@example.com Sun Feb 3 16:54:01 2002
As described, the line starts with the word From followed by a space. Following the
space is an email address that is usually the envelope address of the
message. Following the envelope address is the date of delivery in the
common Unix date format occupying 24 characters. The mbox format
allows for an optional comment string following the date, but it is
generally not used.
When Postfix delivers a message to an mbox file, it first
creates the From_ line using the
envelope sender and the current date. Postfix then copies the contents
of the delivered message into the mbox file. If Postfix encounters any
lines that begin with From followed
by a space, it has to quote them by adding a > to the beginning of the line, so that
they won’t be confused with the start of the next message.
When a POP/IMAP server reads messages from the mbox file, it
scans the file, looking for From_
lines, which mark the beginning of each message. It can read to the
next From_ line (or the end of the
file) to know when a message is finished. The POP/IMAP server may
unquote any of the “>From” quoted lines, or they may remain in the
quoted form.
Since both Postfix and the POP/IMAP servers access the mailbox file, they must use file locking. Postfix must obtain an exclusive lock on the file when it is delivering a message, so that it can write the message to the file. Postfix offers a variety of locking mechanisms, depending on the platform. You can use the postconf -l command to see which mechanisms Postfix can use on your system:
$ postconf -l
flock
fcntl
dotlockIf you want more information about the locking types listed by Postfix on your system, check your system’s man pages for the specific lock name:
$ man flockThe dotlock type, which should be available on all systems, is
probably not documented on your system, because it is not a function
of the operating system or supporting libraries as flock and fcntl are. The
dotlock is simply a file. The lock
file name is made up of the name of the file to be locked with a
.lock extension appended to it. If
such a lock file exists, then Postfix knows that another process is
using the mail file. If the file does not exist, Postfix creates it to
signal other processes that it is using the file. When Postfix is
finished, it removes the lock file, making the mail file available
again. The drawback of dotlock
locking is that it is susceptible to stale locks, and it is not very
efficient.
For the most part, you do not need to worry about locking, and the lock types available, because Postfix does a good job of figuring out the best option.
The maildir mailbox format differs from mbox in that it uses a structure of directories to store email messages. It was designed to solve some of the reliability and locking problems of the mbox format. For example, if a system crashes at the instant an email message is being delivered to an mbox file, it is possible that the message will be truncated at the point where the delivery was interrupted. When the system comes back online, the mail transport agent will attempt to deliver the message again. The partially written message at the bottom of the mbox file may cause problems when the next message is appended to the file.
Other problems can occur if a POP/IMAP server tries to access the mbox file at the same time as the SMTP server. If the programs do not use the same locking mechanism, the mail file will most likely be corrupted. There are several possible mail file locking mechanisms (see above), which are not necessarily used by all mail programs. With the maildir format, no locks are necessary because each message gets its own file. Different mail processes do not need access to the same files at the same time.
A maildir-style directory has three subdirectories, which must all be on the same filesystem: tmp, new, and cur. These subdirectories are usually below a mail directory in a user’s home directory:
$ ll /home/kdent/maildir
total 12
drwxr-x--- 2 kdent kdent 4096 Mar 13 12:24 cur
drwxr-x--- 2 kdent kdent 4096 Mar 13 12:24 new
drwxr-x--- 2 kdent kdent 4096 Mar 13 12:24 tmpFiles in the new directory are messages that have been delivered but
have not yet been read. The modification time of the file is the
delivery date of the message. The file usually contains the message in
RFC 2822 format, and no From_ line
is needed.
Once a message has been viewed, it is moved to the cur directory. The tmp directory is used during message delivery to store the contents of a file before it can be confirmed to have been written to the new directory.
There is no simple answer to help you decide which type of mailbox format is best for you. The mbox format has the advantage of being almost universally supported, but has the file-locking problems that prompted the development of the maildir format. On the other hand, there are concerns about the ability of the maildir format to scale to handle large numbers of messages on some filesystems. There are performance arguments to support both formats: locating and accessing or deleting a particular message is probably quicker with maildir, but delivery by simply appending the text of a message to the end of a single file is probably quicker in the mbox format. Your choice will most likely be driven by your selection of a POP/IMAP server. If you settle on a POP/IMAP server that requires the maildir format, the choice is made for you. Postfix easily supports either format, so you can safely allow other considerations to drive your decision. If you think it will be significant in your environment, you should run tests of both formats, simulating your own mail tasks as closely as possible.
All destination domains that should be handled by the
local transport should be listed in the mydestination parameter. You can list as many domains as you like, but
individual local users receive mail at all of the domains listed. For
example, if both ora.com and
oreilly.com are listed in mydestination, then messages to either
kdent@ora.com or
kdent@oreilly.com go to the same local
mailbox.
All local recipients should be listed in tables configured in
the local_recipient_maps parameter to avoid accepting messages for unknown users.
By default, local_recipient_maps is
set to the system password file and alias maps, so you normally don’t
have to make any changes. Once Postfix has determined that it is the
final destination for a message, and that the message should be
delivered locally, it has to decide what to do with the message.
Before looking for a user account that matches the local part of the email address, Postfix consults its alias maps (see Chapter 4). If there is a forwarding alias that matches the recipient address, Postfix resubmits the message as a new delivery, based on the forwarding information from the alias lookup. Otherwise, it tries to deliver the message to a user on the system. Postfix first checks for the existence of a .forward file for the local user, and may resubmit the message based on information there. If no .forward exists for the user, Postfix delivers the message to the user’s mailbox.
.forward files allow local users to set up their own aliases. The contents of the .forward file are the same as the righthand side of an alias entry. When an alias entry has multiple values on the righthand side, they are separated by commas; while .forward files use the same convention, they also allow multiple entries to be entered on multiple lines.
.forward files must be owned by the recipient, and are normally
found in users’ home directories. You can specify different locations
with the forward_path parameter. When specifying a path for the parameter, there are eight variables whose
values are expanded at delivery time:
$userRecipient username as specified in /etc/passwd
$homeRecipient home directory as specified in /etc/passwd
$shellRecipient shell as specified in /etc/passwd
$recipientThe complete recipient email address
$extensionAn optional extension of a local part of the recipient
address, separated by a delimiter such as the + character
$domainDomain from the recipient email address
$localComplete local part of recipient email address (includes extensions if any)
$recipient_delimiterDelimiter character from the recipient email address, if there is an extension
If you want to add support for a nonstandard .forward file, you could configure forward_path as follows:
forward_path = /home/$user/.forward /home/$user/other_forward
See the Postfix local manpage for more information on specifying paths with variable expansion.
When Postfix delivers to a command or file specified in alias files, it makes the delivery or
executes the command as the user who owns the alias file. The
exception is when the file is owned by root, in which case Postfix uses the account
specified in the default_privs
parameter. By default it is set to the account nobody . Aliases are discussed in Chapter 4.
When Postfix delivers a message to a local user, it
writes the message to the system’s message store. By default Postfix
uses the mbox format for deliveries. When you install Postfix, it
can normally figure out the default location of the mail spool
directory depending on the type of Unix system you have. The mail_spool_directory parameter can be used to specify a directory other than
the default. To change the directory to something other than the
default for your system, edit the main.cf file, and add or modify the
mail_spool_directory
parameter:
mail_spool_directory = /var/spool/mail
To cause Postfix to use the maildir format for delivery, append the directory with a trailing slash:
mail_spool_directory = /var/spool/mail/
Postfix can also be configured to deliver messages to mailboxes
within users’ home directories. Assign a relative path to the home_mailbox parameter to indicate which file should be used for
mailboxes:
home_mailbox = mbox
Append the path with a trailing slash to indicate that Postfix should use the maildir-style delivery:
home_mailbox = maildir/
This causes Postfix to deliver messages into a directory called maildir, below users’ home directories.
After Postfix has delivered a message, users need a way to read it. Many sites provide a POP/IMAP server for users to retrieve their email messages over the network. In most cases Postfix works seamlessly with POP/IMAP servers, so that no special configuration is required on either side.
The POP protocol works best when you have limited, or less than full-time, network access because it allows you to connect to your mail server, fetch all of your messages, and disconnect from the network. You now have local copies that you can read offline. Most POP clients have a configuration option to delete your messages from the server when you retrieve them, since you then have the local copies. If you don’t delete them at some time, the messages accumulate, taking up more and more space on your mail server. POP was designed to be easy to implement, but the major problem with the POP protocol is that if you ever work from more than one computer, your messages may not be where you need them. It also does not handle multiple mailboxes very well, and it forces you to download complete messages. There is no option to retrieve just the subject, for example, to decide if you want the complete message.
The IMAP protocol was designed to overcome some of POP’s shortcomings. It keeps all messages on the server. You have to be connected while working with your email messages, but you can manage them as if they were local. Since everything happens on the server, it doesn’t matter if you work from your desktop computer at home, another machine at work, and even on a laptop while traveling. IMAP still allows for saving messages locally, if necessary, and it also provides much more flexibility than POP. You can download just the headers from your messages and then decide to retrieve the rest of a message if you want to read it. You don’t have to be stuck downloading a huge message or attachment that you might not be interested in. You can maintain multiple mailboxes and folders on the IMAP server.
The cooperation between Postfix and POP/IMAP servers is
simple. When Postfix accepts delivery of an email message, it places
it in the message store. The POP/IMAP server simply retrieves messages
from the same store when a user requests them. Figure 7-1 shows how simple the
cooperation is between Postfix and POP/IMAP servers. Postfix and the POP/IMAP server must agree on the type
of mailbox format and the style of locking. Postfix should work with
any standards-compliant POP/IMAP server that uses one of the
traditional message stores. You may have to adjust the mail_spool_directory parameter, as described
earlier in the chapter, but for most POP/IMAP servers, you can simply
follow the standard installation instructions and start the server.
For POP/IMAP servers that don’t use a traditional message store,
Postfix can still deliver messages using the Local Mail Transfer
Protocol, which is discussed in the next section.
Some POP/IMAP servers use nonstandard message stores. Since it would be unreasonable to expect MTAs such as Postfix to understand many different proprietary formats, the Local Mail Transfer Protocol (LMTP) provides a way to pass email messages from one local mail service to another without depending on a common message store. LMTP is based on, and is a simplified version of, SMTP. With LMTP, the server can either accept an email message immediately or it cannot accept it at all. There is no attempt by the LMTP server to queue or redeliver a message that cannot be delivered immediately.
When an MTA makes a delivery to an SMTP server, where the message is destined for multiple recipients, and one or more recipients cannot accept the message for some reason, the SMTP server takes the responsibility of queuing the message to deliver it later, and reports an overall successful delivery to the MTA. LMTP servers do not queue messages, so they must return an individual status reply for every recipient of a particular email message. For those recipients that could not be delivered, the MTA, and not the LMTP server, takes the responsibility of queuing the message and attempting redelivery.
LMTP conversations can occur between mail subsystems on the same machine or on different machines on a local area network. It is not recommended for wide area networks, since the protocol depends on a quick response to indicate whether the message was delivered. With SMTP there is a recognized synchronization problem between sending and receiving mail systems that sometimes causes duplicate messages to be delivered. It is believed that LMTP over wide area networks would make the problem worse.
Apart from delivery to nonstandard message stores, a real benefit of the LMTP protocol is that it allows for a highly scalable and reliable mail system. One or more Postfix servers can receive mail from the public Internet and make deliveries to multiple LMTP backend systems. As the load increases, it is a simple matter to add more boxes to the front- or backend systems.
The most common implementation of LMTP delivery is the Cyrus IMAP server from Carnegie Mellon University. It is available from the Project Cyrus web page at http://asg.web.cmu.edu/cyrus/. Cyrus IMAP uses its own message store, as shown in Figure 7-2. This section looks at how Postfix can use the LMTP protocol to hand off messages to Cyrus IMAP. For more information about configuring Cyrus IMAP, see Managing IMAP by Dianna Mullet and Kevin Mullet (O’Reilly).
Cyrus IMAP is intended to run on servers that provide POP/IMAP access only, where users do not need a shell account. If you are creating a mail server for existing users on a system, you will probably want to use another simpler POP/IMAP solution, such as Qualcomm’s Qpopper (POP access only) or the University of Washington’s IMAP Toolkit, which doesn’t require any special configuration to work with Postfix. This section deals with configuration issues for getting Postfix to work together with Cyrus IMAP.
Cyrus IMAP can listen for LMTP deliveries using either Unix-domain sockets or TCP sockets. You must know which method you are using so that you can configure Postfix appropriately. If you want to use Unix-domain sockets, both Postfix and the Cyrus IMAP server must be on the same machine. If you use TCP sockets, the Cyrus IMAP server could be on the same system or any other system on your network. LMTP delivery is configured in your main.cf file or in a transport map.
For Postfix to accept messages to be delivered locally to Cyrus
IMAP, the destination domain name of the email address must be listed
in the mydestination parameter.
(You may also want to configure Cyrus deliveries via the virtual transport. See Chapter 8.) Then you must configure
Postfix to pass messages to Cyrus IMAP. Use the mailbox_transport, local_transport, or fallback_transport parameter to tell Postfix
how much local processing to do before handing off messages to Cyrus.
If you are using local_transport or
fallback_transport, make sure that
Postfix knows about all of the Cyrus users, by including the usernames
in a lookup table listed with the local_recipient_maps parameter.
mailbox_transportThe mail message is given to the local delivery agent first. The local delivery agent checks for and expands any aliases or entries in .forward files. After expansion of the original address, the message is delegated to the Postfix LMTP client, which delivers it to the LMTP server.
local_transportWhen you specify that the local transport should be LMTP, Postfix transfers the message directly to the Postfix LMTP client. The normal local delivery agent does not process the message at all, so there is no expansion of aliases or .forward files.
fallback_transportWhen the fallback transport is LMTP, Postfix gives the
message to its local delivery agent first. The normal aliases
and .forward files are
expanded, and if the recipient has a normal account on the
system, delivery is made to the appropriate mail store on the
system. If no such account exists, delivery is delegated to the
Postfix LMTP client for delivery to the LMTP server. If you have
actual accounts on the system that should receive email messages
in the conventional message store, and the rest of your email
users do not have system accounts but do receive mail through
the Cyrus IMAP server, you should configure the fallback_transport to use LMTP
delivery.
Specify your chosen transport type using the following format:
xxx_transport =service:socket_type[:/path/to/socket]
For LMTP delivery, service
must be lmtp, which refers to the
lmtp service in the /etc/postfix/master.cf file. The socket_type is either unix or
inet for Unix domain, or TCP sockets, respectively. The
default is inet, which means that
if your LMTP server uses an inet
socket, you can simply specify the service as:
local_transport = lmtp
A typical LMTP transport configuration in /etc/postfix/main.cf using local_transport and a Unix domain socket looks like the
following:
local_transport = lmtp:unix:/var/imap/socket/lmtp
To build Cyrus IMAP, you need the Cyrus SASL library, which is used to authenticate users for the IMAP server.[1] You must first build and install the Cyrus SASL library, and then you can build the Cyrus IMAP server. The Cyrus software requires at least Version 3 of Berkeley DB. If you were using a version of Berkeley DB prior to Version 3, you may need to update your entire system. Having different versions of Berkeley DB intermixed on your system will likely lead to problems that can be difficult to track down. If you have to upgrade your libraries, consider rebuilding other packages that use Berkeley DB (such as Perl and Postfix), so that everything on your system uses the same version of the library.
Follow the instructions in the Cyrus SASL and IMAP distributions to compile and install them correctly on your system. There might be binary distributions available for your platform. Check your normal software sources to see if you can save yourself the trouble of building the Cyrus software.
For this example, assume that you have a Postfix server
receiving mail for the domain example.com. All of
the email accounts are set up within the Cyrus IMAP server running on
the same system, so there are very few actual login accounts on the
system. However, you want mail destined for the root account or postmaster alias to be sent
to the correct person, which means that you need to expand local
aliases before handing off messages to the Cyrus IMAP server. To
achieve this, set the mailbox_transport parameter to point to the
lmtp delivery agent, which will be
configured to deliver mail to the Cyrus IMAP server:
Complete the installation and configuration of Cyrus IMAP on your system. Check the Cyrus configuration file (normally /etc/cyrus.conf) to make sure that it is configured to use Unix-domain sockets, and note the location of the socket file. You should see an entry that resembles the following:
SERVICES {
# add or remove based on preferences
imap cmd="imapd" listen="imap" prefork=0
pop3 cmd="pop3d" listen="pop3" prefork=0
# LMTP is required for delivery
lmtpunix cmd="lmtpd" listen="/var/imap/socket/lmtp" prefork=0
}The lmtpunix entry shows
the correct path to the socket file.
Follow the documentation that came with your package to add users to your Cyrus IMAP server.
Check the /etc/postfix/master.cf to make sure
that the lmtp service is set up
correctly. The line should look like the following:
lmtp unix - - n - - lmtp
If you have a default Postfix installation, the lmtp line will already be in the file,
as shown in the example. The fifth column indicates whether the
LMTP delivery agent should run within a chrooted environment. In
this example, the Postfix LMTP delivery agent must read the socket
file created by the Cyrus IMAP server, so leave this column with
the value n.[2]
Check the main.cf file
to make sure that the domain you are receiving mail for is listed
in the mydestination parameter.
It might be listed explicitly:
mydestination = $myhostname, localhost.$mydomain, $mydomain, example.com
or it might come from the $mydomain variable:
mydomain = example.com mydestination = $myhostname, localhost.$mydomain, $mydomain
Specify that the mailbox_transport parameter should use
the lmtp service from the
master.cf file, and point to
the Cyrus IMAP socket file whose path you determined from the
Cyrus configuration file (see item 1):
mailbox_transport = lmtp:unix:/var/imap/socket/lmtp
# postfix reload[1] It is the same library that is used to add authentication support for Postfix. See Chapter 12 for more information on adding SMTP authentication support to Postfix.
[2] It is possible to set up your system in such a way that allows the LMTP delivery agent to read the socket file even from within the Postfix chroot environment, but it is probably not necessary.
It is very common these days for a single system to host
many domains. For instance, http://oreillynet.com and http://onlamp.com might run on a single host, but act as
if they were two totally different hosts. A system usually has a canonical domain, which is considered its usual or common domain
name. Additional domains are configured as virtual domains. Each virtual domain can host services such as web
sites and email as if it were the only domain on a server. This chapter
explains several different mechanisms for hosting multiple domains. The
techniques are explained separately, but it is possible to mix techniques
if you must handle different domains in different ways.
To determine which technique or techniques you need, you must decide how Postfix should deliver messages for virtual domains. There are two important considerations that influence how you should configure Postfix for hosting multiple domains:
Should your domains have separate namespaces? For example, should mail for the two addresses info@ora.com and info@oreilly.com go to the same mailbox or separate ones? We’ll refer to the same mailbox scenario as shared domains, and the other as separate domains.
Does every user require a system account? We’ll make the distinction between system accounts that are real Unix accounts on your system and virtual accounts. With virtual accounts, users can have mailboxes on your server, but don’t otherwise log in to the system and don’t require an entry in /etc/passwd.
We’ll consider four different ways Postfix can handle mail for virtual domains:
Shared domains with system accounts
Separate domains with system accounts
Separate domains with virtual accounts
Virtual domains with a proprietary message store not managed by Postfix
Your POP/IMAP server will be a major factor in deciding which technique you need. If your POP/IMAP server does not understand virtual domains, then it will most likely require that you have system accounts for all addresses. Some POP/IMAP servers inherently support multiple domains, and deliver messages into a particular directory structure on the local filesystem. Other POP/IMAP servers use their own proprietary message store. Postfix can hand off messages to them using LMTP.
Regardless of the technique you use, all of your virtual domains must be configured correctly in DNS. You should configure DNS for virtual domains the same way you do for your system’s canonical domain. See Chapter 6 for information on Postfix and DNS.
Accepting mail for multiple domains where every user can receive mail for
every domain is the simplest configuration of virtual domains. Simply
add your virtual domains to the mydestination parameter. Create user accounts as you normally would,
and they can start receiving mail addressed to any of the domains. This
technique uses the local delivery agent, providing all of the same
features as your normal canonical domain hosting. Users can create their
own .forward files, and local
aliases are available. On a system whose canonical name is http://oreillynet.com, hosting two
virtual domains, http://ora.com and http://oreilly.com, the mydomain parameter is set as if http://oreillynet.com were the only
domain, and mydestination is set as
follows:
mydomain = oreillynet.com mydestination = $myhostname, $mydomain, ora.com, oreilly.com
Make sure you reload Postfix after making changes. Users can now
receive mail at any of the domains you listed in mydestination:
# postfix reloadMessages addressed to either info@ora.com or info@oreilly.com all go to the same local user account.
If you require separate namespaces for each of your virtual domains, the
configuration is only slightly more complicated. With separate domains, mail to
info@ora.com should go to a different mailbox than
mail to info@oreilly.com. In this case, do not list
the additional domains in the mydestination parameter. Instead, use virtual_alias_domains :
virtual_alias_domains = ora.com, oreilly.com
You must create a user account for every email address that will receive messages on your system. Your system accounts do not have to match the email addresses in any way, since you will be mapping the addresses to the accounts separately, but each account must be unique. If your platform supports long usernames, a good way to create unique account names, and to avoid confusion about which accounts are meant to receive mail at which domains, is to use the domain name itself as part of the account name. One possible naming convention is to create accounts such as info.ora.com and info.oreilly.com.
Once Postfix knows which domains to accept mail for, and you have
accounts for each address, use virtual_alias_maps to map the email addresses to the accounts you create. In
main.cf, point the virtual_alias_maps parameter to the virtual alias lookup file. In this example, the file
/etc/postfix/virtual_alias is
used:
virtual_alias_maps = hash:/etc/postfix/virtual_alias
The /etc/postfix/virtual_alias file contains entries with the email addresses pointing to the system accounts you created, plus any non-local forwarding you need:
info@ora.com helene@localhost info@oreilly.com frank@localhost kdent@oreilly.com kyle.dent@onlamp.com
Whenever you create or update a virtual aliases file, don’t forget to execute the postmap command on the file:
# postmap virtual_aliasIf helene and frank plan
to send messages from the system, you may also want to set up canonical
maps so that their outbound messages show the correct sending addresses.
Assign a lookup table like the following to canonical_maps :
helene info@ora.com frank info@oreilly.com
And remember to execute postmap against the file:
# postmap canonicalThe drawback for the techniques so far is that you must maintain system accounts for all email addresses on your server. As the number of domains you host increases, so does the effort to maintain all the accounts. In particular, if users only receive email at your server, and don’t otherwise log in, you probably don’t want to have to create system accounts for each one. Instead, configure Postfix to deliver to a local message store where each virtual email address can have its own mailbox file. Your users then retrieve their messages through a POP/IMAP server.
The local message store works much like normal local delivery, but
it doesn’t require a one-to-one correspondence between each mail file
and a local user account. For this configuration, list each virtual
domain in the virtual_mailbox_domains
parameter:
virtual_mailbox_domains = ora.com, oreilly.com
If you have many domains, you can list them in a file and point
virtual_mailbox_domains to the
file:
virtual_mailbox_domains = /etc/postfix/virtual_domains
The file /etc/postfix/virtual_domains then contains a line for each domain:
# # /etc/postfix/virtual_domains # ora.com oreilly.com
Virtual domains listed in virtual_mailbox_domains are delivered by the
virtual delivery agent, which is actually a streamlined
version of the local delivery agent. It makes deliveries in a highly
secure and efficient manner, but local aliases, .forward files, and mailing list programs are
not available. You can make use of the virtual_alias_maps parameter that you saw
earlier in the chapter to accomplish aliasing, and we’ll look at a
technique to accomplish delivery to programs later in this
chapter.
When setting up the virtual mailboxes, you should structure the directories to accommodate the expectations of your POP/IMAP server. Let’s assume for this explanation that the virtual mailboxes are all located below the base directory /usr/local/vmail. Each virtual domain has its own subdirectory below that, so that you have directories like the following:
/usr/local/vmail/ora.com /usr/local/vmail/oreilly.com
This is a common configuration for POP/IMAP servers that support
virtual hosting. Below each domain subdirectory are the mail files for
each user. Indicate to Postfix the base directory of the mail store with
the virtual_mailbox_base parameter:
virtual_mailbox_base = /usr/local/vmail
You must create a lookup file that maps email addresses to their
mailbox files. Specify the lookup table with the virtual_mailbox_maps parameter:
virtual_mailbox_maps = hash:/etc/postfix/virtual
Every user receiving mail to a virtual mailbox file must have an
entry in a Postfix lookup table. The mailbox file is specified relative
to virtual_mailbox_base . Mail files can use either mbox or maildir format (see Chapter 7). To use maildir format,
include a slash at the end of the filename. A virtual mailbox map file
looks like the following:
info@ora.com ora.com/info info@oreilly.com oreilly.com/info
The email address info@ora.com goes to a different mailbox from the address info@oreilly.com.
The virtual mailbox files must be owned by a user account and associated with a group on your system. How your users retrieve their messages determines what the ownership of mailbox files should be. Often, your POP/IMAP server executes under its own account and expects all of the mailbox files to be owned by this user, but if necessary, Postfix lets you configure ownership for mailbox files in any way you need. Each can be owned by a separate user, or one user can own all of the mailboxes for one domain, while a different user owns the mailboxes of another.
The virtual_uid_maps
and virtual_gid_maps
parameters determine the owner and group Postfix uses when making deliveries to virtual
mailbox files. You can specify that all of the virtual mailboxes
should be owned by the same user account with the static map type. Assume, for this example,
that you have created an account called vmail
that has a UID of 1003, and a group called vmail
that has a GID of 1005. You want all of the virtual mailbox files to
be owned by this user and group.
Set the virtual_uid_maps and
virtual_gid_maps parameters in
main.cf:
virtual_uid_maps = static:1003 virtual_gid_maps = static:1005
If you want to use different UIDs for different mailbox files, you must create a lookup file that maps the addresses to the UIDs. Then point the mapping parameter to your lookup file:
virtual_uid_maps = hash:/etc/postfix/virtual_uids
If most of your virtual mailboxes should have the same fixed ownership but some require different UIDs, you can combine static and table lookups:
virtual_uid_maps = hash:/etc/postfix/virtual_uids static:1003
If you also need separate group mappings, they work exactly the same way.
The file /etc/postfix/virtual_uids contains entries like the following, with each address mapped to the correct UID. In this case, the mailboxes for http://ora.com use one ID and those for http://oreilly.com use another:
# # /etc/postfix/virtual_uids # info@ora.com 1004 kdent@ora.com 1004 info@oreilly.com 1007 service@oreilly.com 1007
It is possible for a virtually hosted domain to have
some addresses that are delivered to the local message store and some
that are forwarded. Since all recipient addresses are checked for
virtual aliasing regardless of their class, simply place the forwarded
addresses in the virtual_alias_maps
file instead of the virtual_mailbox_maps file. Make sure the
virtual_alias_maps parameter points to a virtual alias lookup
table:
virtual_alias_maps = hash:/etc/postfix/virtual_alias
The /etc/postfix/virtual_alias file contains entries for addresses that should be forwarded elsewhere:
kdent@oreilly.com kyle.dent@onlamp.com
Do not list a domain in both virtual_mailbox_domains and virtual_alias_domains . Use virtual_mailbox_domains for domains that
have a mix of aliases and mailboxes and virtual_alias_domains only when all of the
addresses are aliases.
For either virtual mailboxes or virtual aliases, your lookup table can have a key value of the domain without a local part to catch any message destined for the domain addressed to a nonexistent address. Catchall addresses should be used advisedly, since they tend to receive a lot of spam. Spammers often send messages to nonexistent accounts at a domain, which are received by catchall addresses.
The first step is to identify a mailbox to receive
messages sent to nonexistent addresses. You can use an existing
mailbox or create a new one. Add a new virtual_mailbox_maps entry like the
following to deliver any message with an unknown destination address
to the service mailbox:
@ora.com ora.com/service
Catchall addresses with virtual aliases work similarly
to virtual mailboxes, but you should set up a catchall alias address
only if all addresses in a domain are configured as aliases and not
mailboxes. Since virtual aliases are checked before virtual
mailboxes, a catchall alias intercepts all messages, including those
otherwise destined for virtual mailbox addresses. Once you’ve
identified the address that should receive messages sent to
nonexistent addresses, add a new virtual_alias_maps entry like the
following:
@ora.com customer.service@onlamp.com
It’s possible to have a virtual alias catchall address in conjunction with virtual mailbox addresses by creating entries for all of your virtual mailbox addresses in your virtual alias lookup maps. Assuming you have virtual mailboxes configured like the following:
info@ora.com ora.com/info info@oreilly.com oreilly.com/info
your virtual alias lookup table that includes a catchall alias must also contain the mailbox entries:
@ora.com customer.service@onlamp.com kdent@oreilly.com kyle.dent@onlamp.com info@ora.com info@ora.com info@oreilly.com info@oreilly.com
In this way, a message addressed to info@ora.com won’t be intercepted by the @ora.com catchall alias.
The last configuration we’ll consider is hosting virtual domains with a system using a proprietary message store. To work with these systems, Postfix hands off messages using a protocol like LMTP, letting the proprietary system handle delivery to the correct mail box.
Since Postfix must receive messages before handing them off to the
LMTP server, it has to know that it should accept mail for each of the
virtual domains. List them in virtual_mailbox_domains :
virtual_mailbox_domains = ora.com, oreilly.com
You also have to list each email address, so Postfix can accept
messages for valid addresses and reject unknown users. Use the virtual_mailbox_maps parameter to point to a lookup file with valid
addresses:
virtual_mailbox_maps = hash:/etc/postfix/virtual
In the /etc/postfix/virtual file, the righthand value isn’t used because all messages are passed along to the POP/IMAP server. You must still include a righthand value because lookup tables must have a key and a value, but the value you use doesn’t matter:
info@ora.com General Information Address info@oreilly.com General Information Address
In order to have Postfix pass mail for virtual domains through to
your POP/IMAP server, specify the correct transport in the virtual_transport parameter in main.cf. You have to know how your LMTP
server socket is set up. Assuming it’s on the same host as
Postfix and uses a socket file located at /var/imap/socket/lmtp, the transport lookup
table for the example domains looks like the following:
virtual_transport = lmtp:unix:/var/imap/socket/lmtp
This causes all of your virtual_mailbox_domains to be delivered to
your POP/IMAP server over LMTP.
As mentioned earlier in the chapter, you can’t use local
aliases, .forward files, and
mailing-list programs with virtual domains delivered by the virtual
delivery agent. You’ve seen that you can easily set up aliases through
the virtual_alias_maps parameter, but
you cannot deliver messages to a command. In this last section, we’ll
look at working around that issue by demonstrating how to deliver
virtual addresses to external programs. The first example sets up
delivery to an autoreply program, and the second to a mailing-list
manager.
Auto-responders are scripts or programs that process incoming messages and return a reply to the sender of the message without any human intervention. The autoreply program used in this example, inforeply.pl, is listed in Example 8-1. This program is meant to handle mail for a dedicated information email address. Users or customers can send a message to the address to request special information. Note that this simple example is inadequate as a general autoreply program, such as the Unix vacation command. It does not cache addresses it has already replied to, and it does not do full checking for addresses that should not receive automatic replies (see the sidebar). You might also like to enhance the program to return different types of information, based on the subject or a keyword in the body of the request messages.
#!/usr/bin/perl -w
#
# inforeply.pl - Automatic email reply.
#
# All messages are logged to your mail log. Check the
# log after executing the script to see the results.
#
# Set $UID to the uid of the process that runs the script.
# Check the entry in master.cf that calls this script. Use
# the uid of the account you assign to the user= attribute.
# If you want to test the script from the command line,
# set $UID to your own uid.
#
# Set $ENV_FROM to the envelope FROM address you want on
# outgoing replies. By default it's blank, which will
# use the NULL sender address <>. You can set it to an
# address to receive bounces, but make sure you don't set
# it to the same address that invokes the program, or
# you'll create a mail loop.
#
# Point $INFOFILE to a text file that contains the text of
# the outgoing reply. Include any headers you want in the
# message such as Subject: and From:. The To: header is
# set automatically based on the sender's address. Make
# sure you have an empty line between your headers and the
# body of the message.
#
# If necessary, change the path to sendmail in $MAILBIN.
#
# @MAILOPTS contains options to sendmail. Make changes if
# necessary. The default options should work in most
# situations.
#
# The calls to syslog require that your Perl installation
# converted the necessary header files. See h2ph in your
# Perl distribution.
#
require 5.004; # for setlogsock in Sys::Syslog module
use strict;
use Sys::Syslog qw(:DEFAULT setlogsock);
#
# Config options. Set these according to your needs.
#
my $UID = 500;
my $ENV_FROM = "";
my $INFOFILE = "/home/autoresp/inforeply.txt";
my $MAILBIN = "/usr/sbin/sendmail";
my @MAILOPTS = ("-oi", "-tr", "$ENV_FROM");
my $SELF = "inforeply.pl";
#
# end of config options
my $EX_TEMPFAIL = 75;
my $EX_UNAVAILABLE = 69;
my $EX_OK = 0;
my $sender;
my $euid = $>;
$SIG{PIPE} = \&PipeHandler;
$ENV{PATH} = "/bin:/usr/bin:/sbin:/usr/sbin";
setlogsock('unix');
openlog($SELF, 'ndelay,pid', 'user');
#
# Check our environment.
#
if ( $euid != $UID ) {
syslog('mail|err',"error: invalid uid: $> (expecting: $UID)");
exit($EX_TEMPFAIL);
}
if ( @ARGV != 1 ) {
syslog('mail|err',"error: invalid invocation (expecting 1 argument)");
exit($EX_TEMPFAIL);
} else {
$sender = $ARGV[0];
if ( $sender =~ /([\w\-.%]+\@[\w.-]+)/ ) { # scrub address
$sender = $1;
} else {
syslog('mail|err',"error: Illegal sender address");
exit($EX_UNAVAILABLE);
}
}
if (! -x $MAILBIN ) {
syslog('mail|err', "error: $MAILBIN not found or not executable");
exit($EX_TEMPFAIL);
}
if (! -f $INFOFILE ) {
syslog('mail|err', "error: $INFOFILE not found");
exit($EX_TEMPFAIL);
}
#
# Check sender exceptions.
#
if ($sender eq ""
|| $sender =~ /^owner-|-(request|owner)\@|^(mailer-daemon|postmaster)\@/i) {
exit($EX_OK);
}
#
# Check message contents for Precedence header.
#
while ( <STDIN> ) {
last if (/^$/);
exit($EX_OK) if (/^precedence:\s+(bulk|list|junk)/i);
}
#
# Open info file.
#
if (! open(INFO, "<$INFOFILE") ) {
syslog('mail|err',"error: can't open $INFOFILE: %m");
exit($EX_TEMPFAIL);
}
#
# Open pipe to mailer.
#
my $pid = open(MAIL, "|-") || exec("$MAILBIN", @MAILOPTS);
#
# Send reply.
#
print MAIL "To: $sender\n";
print MAIL while (<INFO>);
if (! close(MAIL) ) {
syslog('mail|err',"error: failure invoking $MAILBIN: %m");
exit($EX_UNAVAILABLE);
}
close(INFO);
syslog('mail|info',"sent reply to $sender");
exit($EX_OK);
sub PipeHandler {
syslog('mail|err',"error: broken pipe to mailer");
}To configure an auto-responder to work with virtual domains, you must create a special transport type in master.cf for delivery to the specific command. In order to have messages delivered to your new component, you have to map an address to the transport you created using transport maps.
Many auto-responders can handle only a single message at a time
with only one recipient. You can limit the number of recipients to any
transport type by setting a parameter of the form
transport _destination_recipient_limit, where the
string transport is the name of the
transport type. If a transport called inforeply should be limited to only one
recipient at a time, set the following parameter:
inforeply_destination_recipient_limit = 1
The following steps walk through setting up the email address info@ora.com to use inforeply.pl. The domain http://ora.com is configured as a virtual domain. The local domain on the host is http://example.com:
Create a local account under whose privileges the inforeply.pl program should execute. In this example, an account called autoresp is used. You should create a new pseudo-account for this purpose. Use the normal administrative tools on your system to make the account.
Create a transport type called inforeply by adding an entry to your
master.cf file. The entry
should look something like the following:
inforeply unix - n n - - pipe
flags= user=autoresp argv=/usr/local/bin/inforeply.pl ${sender}The pipe daemon is
used to deliver messages to external commands. You can specify
flags if your program requires
any special options. (See the pipe(8) man page for information on
the available options.) The user attribute is required for any
pipe components in master.cf. The argv attribute must be specified last,
and should start with the path to the autoreply command. There are
several values that you can pass to your command when Postfix
executes it. The values are supplied through special macros. In
this example, the envelope sender address (${sender}) is passed. For the simple
inforeply.pl responder, you
need only the sender address, but you will often want the
recipient (${recipient})
address, too, for auto-responders that can handle multiple
recipient addresses. See the pipe(8) manpage for the list of
available macros.
If you haven’t already set up any transports on your system,
set the transport_maps
parameter in main.cf to point to the transport
table:
transport_maps = hash:/etc/postfix/transport
Add an entry in your transport table that contains the
address to direct messages to the inforeply transport. In this case, we’ll
use the address autoresp@ora.com:
autoresp@ora.com inforeply
Now, all messages sent to autoresp@ora.com are delivered to the auto-responder.
Execute postmap against the transport lookup table:
# postmap /etc/postfix/transportPoint virtual_alias_maps
to your virtual alias lookup table:
virtual_alias_maps = hash:/etc/postfix/virtual_alias
Add an entry to the virtual_alias lookup table to map info@ora.com to both the new autoreply address and the actual recipient address that can receive the messages:
info@ora.com autoresp@ora.com, service@oreilly.com
Execute postmap against the virtual alias lookup table:
# postmap /etc/postfix/virtual_aliasNow messages sent to info@ora.com will be delivered to autoresp@ora.com and service@oreilly.com.
Reload Postfix so that it recognizes the changes to its main.cf and master.cf files:
# postfix reloadWhen a message is sent to info@ora.com,
Postfix first finds the destination address in the virtual_alias
lookup table. The address points both to
autoresp@ora.com and
service@oreilly.com. Postfix finds
autoresp@ora.com in the transport lookup
table, which points to the inforeply transport in the master.cf file. The entry in master.cf pipes the message to the
inforeply.pl program, which
sends the reply to the original sender. Finally, the message is
also resubmitted for delivery to
service@oreilly.com.
In the next example, you’ll set up a mailing list for a virtual domain. Mailing-list managers are discussed in Chapter 10. You may want to review that chapter before setting up your virtual mailing lists. This example creates a mailing list for Majordomo. You should first install and configure Majordomo according to the directions in Chapter 10.
Virtual mailing lists work by creating a parallel version of the list under a local domain. The local version is only used internally on your system. External users can use the virtual addresses and never know that the local version exists. When naming the local version, you may want to include the virtual domain name in some way to distinguish the list from lists for other virtual domains hosted on your system. The following procedure creates a mailing list at the virtual address astronomy@ora.com that is handled by the local version astronomy-ora@example.com:
Set up the local version of the mailing list just as you would a normal mailing list, as described in Chapter 10, by adding the following entries to /usr/local/majordomo/aliases:
# astronomy@ora.com list
astronomy-ora: :include:/usr/local/majordomo/lists/astronomy
owner-astronomy-ora: kdent@ora.com
astronomy-ora-request: "|/usr/local/majordomo/wrapper request-answer \
astronomy-ora"
astronomy-ora-approval: kdent@ora.comRebuild the Majordomo aliases table:
# postaliases /usr/local/majordomo/aliasesCreate the file to hold the email addresses for list subscribers, and set its ownership to the majordom account:
#touch /usr/local/majordomo/lists/astronomy#chown majordom /usr/local/majordomo/lists/astronomy
If desired, create an info file for the list at /usr/local/majordomo/lists/astronomy-ora.info.
Create the necessary addresses for the list at the virtual domain. Add the following entries to the virtual alias map file virtual_alias:
# astronomy@ora.com list astronomy@ora.com astronomy-ora@localhost owner-astronomy@ora.com owner-astronomy-ora@localhost astronomy-request@ora.com astronomy-ora-request@localhost astronomy-approval@ora.com astronomy-ora-approval@localhost
Rebuild the virtual alias map file:
# postmap virtual_aliasAdd addresses to the /usr/local/majordomo/lists/astronomy list file.
You should now be able to send messages to astronomy@ora.com for distribution to all of the addresses in your list file.
Up until now, we’ve mostly considered Postfix in its role as the end node for email messages. That is, messages that arrive at the Postfix system are, for the most part, delivered to the local system. But it’s also common to find Postfix serving as an intermediate node on the path a message follows to its ultimate destination. In this chapter we’ll look at some of the configuration options for Postfix as a client in MTA-to-MTA communications.
In DNS, MX records refer to mail exchangers (see Chapter 6). MX records contain both host and priority (or preference) information for sending mail to a domain. A backup MX server is one that receives mail for a particular domain, but is not the preferred server to receive the mail. If the preferred server or servers are down, the backup MX server receives the mail and queues it until one of the more preferred servers comes back online. Figure 9-1 illustrates delivery to a backup host when the primary host is not available. The backup queues messages until the primary is back online, whereupon the backup can deliver messages to it.
When your system is configured in DNS as a backup MX host, you
don’t have to configure any special transport from your system to the
primary system. Postfix uses the DNS records to determine how to route
mail to the primary MX host. The only configuration required in Postfix
is to indicate that it should receive mail for the domain by adding the
domain name to the relay_domains
parameter. When a sending MTA discovers that the primary
mail system for a domain is down, it tries the next preferred one until
it finds one that accepts delivery. If your system is a backup MX host,
and the destination domain is listed in your relay_domains parameter, Postfix accepts the
mail and queues it. Postfix periodically scans its queue and checks for
a more preferred system to see if any are able to accept the message.
Once a higher priority mail exchanger is back online, Postfix can
deliver the message to it.
Postfix continues trying to deliver queued messages for the amount
of time specified in the maximal_queue_lifetime parameter, which determines how long deferred messages
stay in the queue before they are bounced back to the sender. The
default value is five days. If you provide secondary mail service for
primary servers that you know will be down longer than the default, you
can extend the time.
It is highly recommended that you maintain a list of valid recipients for domains you provide backup MX services to. You should develop a regular process for obtaining an updated user list from your primary MX servers. If your system does not know all of the available mailboxes on the primary mail server, it must accept all messages. It’s only when your backup MX server tries to deliver them to the primary server that it discovers that a message cannot be delivered. At that point, your server must bounce the message back to the original sender.
Since spammers often send messages to made-up addresses, if your
server does not know all the valid email addresses on the primary
server, your server will unnecessarily accept a lot of mail that must
be bounced. The bounce problem is exacerbated by the spammer tactic of
forging sender addresses by using the real email addresses of innocent
bystanders. The forged addresses receive all of the error notices for
messages they never sent (see Chapter
11). The relay_recipient_maps parameter specifies lookup tables that should contain
all of the addresses for domains listed in your relay_domains parameter:
relay_recipient_maps = hash:/etc/postfix/relay_recipients
The relay_recipients file should contain entries with the recipient address on the lefthand side. The righthand side is not used by Postfix, but you must specify a value:
# # relay_recipients # user1@example.com any_value user2@example.com any_value user3@example.com any_value
If your system is on the same network as the primary, and the user accounts are stored in some kind of database, you may be able to perform real-time lookups using MySQL or LDAP (see Chapter 15).
A potential problem is that once you set relay_recipient_maps, you must include email
addresses for all domains you provide backup service to. If not,
Postfix will reject messages that don’t appear in the lookup table. If
you don’t know the valid addresses for some domains, you can specify a
wildcard entry for that domain:
# # relay_recipients # user1@example.com any_value user2@example.com any_value user3@example.com any_value @oreillynet.com any_value
The final entry is a wildcard entry that allows messages for any address at the domain. Obviously, it’s better to obtain the list of valid addresses for the reasons mentioned earlier.
Networks that receive mail for many sites, such as ISP networks, typically have some customers whose systems aren’t always connected to the network. When the customer network is offline, the ISP queues its messages. When the site comes online, it can request immediate delivery of all its queued mail with the ETRN SMTP command:
220 mail.ora.com ESMTP PostfixEHLO mail.example.com250-auger.seaglass.com 250-PIPELINING 250-SIZE 10240000 250-VRFY 250-ETRN 250-STARTTLS 250 8BITMIMEETRN example.com250 Queuing started
If there are a lot of messages queued when a domain is ready to accept mail, searching every queue file would be time-consuming. Postfix provides a capability called fast flush to speed up queue processing for a particular domain. Fast flush is handled by the flush daemon, which maintains lists of messages that are queued for specific domains so that Postfix knows which messages to deliver when it receives an ETRN command.
By default, all of the sites listed in relay_domains are eligible for the fast
flush service. You can include domains in addition to your relay
domains by adding them to the fast_flush_domains parameter. Add a domain name as follows:
fast_flush_domains = $relay_domains, example.com
In this case http://example.com is a domain not already listed in
relay_domains.
You can manually notify Postfix that a fast flush domain is ready to accept messages by issuing the postqueue -s command (or its equivalent, sendmail -qR) with the site name:
$ postqueue -s example.com Postfix can be configured to relay to any other host,
regardless of how DNS MX records are set up. This section discusses the
transport_maps parameter in general.
Later sections and other chapters in the book present specific
configurations that use it.
Conceptually, transport maps override default transport types for
delivery of messages. The transport_maps parameter points to one or more
transport lookup tables. The following entry sets up /etc/postfix/transport as a transport map
lookup table:
transport_maps = hash:/etc/postfix/transport
The keys in a transport lookup table are either complete email addresses or domains and subdomains. (Email addresses as lookup keys for transport maps require Postfix 2.0 or later.) When a destination address or domain matches a lefthand key it uses the righthand value to determine the delivery method and destination. Example 9-1 lists some possible transport map entries.
example.com smtp:[192.168.23.56]:20025 oreilly.com relay:[gateway.oreilly.com] oreillynet.com smtp ora.com maildrop kdent@ora.com error:no mail accepted for kdent
The format of righthand values can differ depending on the
transport type, but generally has the form
transport:nexthop,
where nexthop often indicates a host and port
for delivery. Each of the possible portions of the righthand value are
described here:
transportRefers to an entry from master.cf. If you are adding a new transport type, first create an entry for it in master.cf.
hostThe destination host for delivery of messages. The
host is used only with inet transports such as SMTP and LMTP.
Postfix treats the hostname like any destination domain. It
performs an MX lookup to determine where to deliver messages. If
there are no MX records, Postfix delivers to the A record IP
address. If you know that Postfix should deliver directly to the
IP in the A record for the specified host, you can have Postfix
skip the check for MX records by enclosing the name in brackets.
If you use an IP address, the brackets are required.
portThe destination port for message delivery. The
port is used only with inet transports such as SMTP and LMTP.
The port can be specified using the actual number or its symbolic
name from the /etc/services
file.
Each of the sample entries from Example 9-1 uses a different format in their righthand values, which are explained below:
All messages destined for http://example.com are relayed using the smtp transport to the host at IP address
192.168.23.56. Messages are delivered over port 20025 instead of
the default SMTP port 25. Notice that the IP address is in
brackets, as required for IP addresses.
All messages destined for http://oreilly.com are relayed using the relay transport to the host
gateway.oreilly.com. Since no port is
specified, Postfix uses the default port 25. The hostname is in
brackets to prevent Postfix from looking up MX records. Instead,
it looks up the A record and delivers to the IP address that the
hostname resolves to.
The relay transport was
introduced in Version 2 of Postfix to fix a potential performance
bottleneck with queue scheduling. You should direct inbound messages
relayed to internal systems over the relay transport, so that they don’t compete
with messages destined for many different systems on the
Internet.
All messages destined for http://oreillynet.com are relayed using the
smtp transport. Since both the
next hop and port are left off, Postfix uses the default port 25
and determines the next hop based on the destination address. Most
often, the next hop is determined by performing a DNS lookup,
which determines the MX host for the domain. This example is a bit
contrived, since simply listing http://oreillynet.com with relay_hosts achieves the same thing in
this case.
All messages destined for http://ora.com are delivered to the maildrop service. maildrop must be an entry in master.cf. Since delivery occurs over a
pipe rather than an inet
socket, no host and port are specified.
The special error
transport causes all mail to be rejected. After the colon, specify
a message to report when email is rejected.
Transport maps can also be used for special handling of certain messages on the local system. (Chapter 14 discusses content filters, which provide a good example of configuring special local transports.) Another local use of transport maps is to temporarily defer all of a domain’s messages. To demonstrate a simple use of transport maps, the next section describes a procedure to defer all of the messages for a domain.
Under some circumstances you want Postfix to postpone
delivery of messages until it has received an explicit command to
deliver them. Deferred messages are delivered when you issue the
postqueue -f
domain command or Postfix receives an ETRN
SMTP command from a fastflush-eligible domain.
A common scenario for deferring messages is when an ISP receives mail for a customer network that is not always online. The ISP must queue messages until the network is online and can receive them. Similarly, users on the customer network should send messages through a local gateway that queues them until they can be delivered once the network is online. This section presents configurations for both situations.
This procedure sets up a new transport type called “ondemand,” and configures a transport map to defer all messages for the http://example.com domain:
Create a new transport in your master.cf file called ondemand. It should be identical to
your smtp transport except
for the name:
ondemand unix - - n - - smtp
Tell Postfix that delivery of all messages over your new
transport should be deferred automatically. Edit the defer_transports parameter in
main.cf to include your
ondemand transport:
defer_transports = ondemand
Make sure that the transport_maps parameter points to
your transport lookup table:
transport_maps = hash:/etc/postfix/transport
Add an entry to your transport file for http://example.com that points
it to the ondemand
transport:
example.com ondemand
Execute postmap on the file.
# postmap /etc/postfix/transportReload Postfix so that it recognizes the changes in its configuration files:
# postfix reloadNow any message destined for http://example.com is deferred until there is an explicit command to deliver it.
When you are ready to release the deferred messages, issue the postqueue -f command:
$ postqueue -f example.comA home network or small office network that wants to trigger delivery manually should defer all SMTP deliveries, so that delivery attempts only occur when a connection to the Internet has been established:
Once a connection is established, all of the messages can be delivered using postqueue -f.
The rest of this chapter describes various scenarios where Postfix must relay mail to other systems. In many cases, transport maps are necessary for configuring the next-hop delivery details.
A mail gateway is an email system that accepts messages and relays them to another system. Gateways might provide a path from one network to another, or from one protocol to another. A common use of a mail gateway is a server that accepts all the mail for a network from the Internet and relays it to internal mail systems. Mail gateways are commonly set up in conjunction with firewall systems to limit the number of servers that need direct access to the Internet.
Imagine a company network such as the one depicted in Figure 9-2. There are sub-domains for different workgroups at the company, and each workgroup has its own internal mail server. The gateway system gw.example.com receives all the mail for the network. The human resources department gets email addressed as user@hr.example.com, and their mail should go to the server mail1.example.com. The sales department uses user@sales.example.com, and their mail should go to mail2.example.com. The client hosts in each subnet retrieve mail from their respective mail servers. Transport maps are required to set up the mail gateway gw.example.com to relay messages to the correct internal mail servers.
The following procedure demonstrates how to configure gw.example.com to relay messages to the correct internal systems:
Make sure that the DNS has been configured correctly with MX records for hr.example.com and sales.example.com pointing to the gateway gw.example.com.
In your main.cf file, set
relay_domains to include the two internal domains:
relay_domains = hr.example.com, sales.example.com
Make sure that the transport_maps parameter points to your transport lookup
table:
transport_maps = hash:/etc/postfix/transport
Add entries to your transport file for each domain pointing to the correct internal mail systems:
# # transport maps # hr.example.com relay:[mail1.example.com] sales.example.com relay:[mail2.example.com]
We’ve used brackets around the internal mail system host names to disable MX lookups for those systems.
Reload Postfix so that it recognizes the changes in its configuration files:
# postfix reloadIt is highly recommended that you maintain a list of valid
recipients for all of your internal users with the relay_recipient_maps parameter. See Section 9.1.1 earlier in the
chapter.
When a mail system does not have adequate connectivity or all of the information it needs to relay messages, it can forward them to another system that is in a better position for relaying. Consider the network in Figure 9-2 again. If the internal mail systems don’t have direct access to the Internet, they can’t deliver messages sent by the users in their subnets. They can, however, pass along all messages to the gateway mail system, which can make the deliveries for them. The following procedure demonstrates setting up Postfix on mail1.example.com to relay all messages it receives to gw.example.com, which can then make the outbound deliveries.
Before configuring the internal mail systems, make sure that the
mail gateway is set up to permit relaying from the internal mail
systems. The mynetworks parameter (see Chapter
4) should encompass the IP addresses of the internal mail
systems, and if you use SMTP UBE restrictions (see Chapter 11), be sure to include permit_mynetworks among the rules to allow
relaying:
Check the mynetworks (or
mynetworks_style) parameter to
make sure it includes the client systems.
Have the users in the workgroup configure their various mail clients to use mail1.example.com as their SMTP server.
In main.cf, set the
parameter relayhost to point to the gateway system:
relayhost = [gw.example.com]
Reload Postfix so that it recognizes the changes in its configuration file:
# postfix reloadNow all messages delivered to mail1.example.com are relayed through gw.example.com.
The Postfix online documentation describes configuring Postfix for delivery to a FAX system and setting up a gateway for UUCP. These provide good examples for configuring Postfix to work with all kinds of special devices. If you need to create a gateway between different types of systems or different networks, transport maps provide the mechanism for directing mail to the other systems or devices.
Mailing lists provide a convenient way to send a single email message to many recipients. They allow a nearly unlimited number of correspondents to carry on conversations through email. A server-based, centrally managed mailing list has many advantages over other mechanisms to send messages to multiple recipients. If you regularly send email to the same group of people, typing in lists of recipients is too tedious and prone to error to be practical. MUAs usually have a facility that lets you create personal aliases that associate an easily remembered name with a list of email addresses. Personal aliases are fine for an individual, but as soon as the list has to be shared with others, it is no longer a practical solution. Major advantages of centrally managed mailing lists are that changes are made in a single place, and the new information is immediately available to anyone sending messages to the list. Other advantages become evident when you use Mailing List Managers (MLMs) to administer the list, relieving administrators from manually updating addresses.
In this chapter we look at creating simple mailing lists within Postfix itself, and then configuring Postfix to deliver messages to MLMs for more sophisticated list management. In deciding whether or not to create your mailing list within Postfix or to use an MLM, consider how often the list has to be changed, who will make the changes, and whether you need some of the other features of an MLM, such as moderated lists and digest versions. MLMs allow users to subscribe and unsubscribe themselves and to make changes to their addresses, if necessary. If you have relatively static lists or users who come to you for subscribing and unsubscribing anyway, you probably don’t need the overhead of an MLM. You can always run both flavors of lists, if that fits your environment.
There are many aspects and nuances to managing a mailing list. If you will be taking on the task, you should consult a text that deals specifically with mailing-list management such as Managing Mailing Lists by Alan Schwartz (O’Reilly).
Postfix provides the means to create simple mailing lists
through the normal alias facility (see Chapter 4). Because aliases can point to
lists of addresses or files that contain lists of addresses, it is easy
to create an alias that points to multiple names. You can create list
aliases in the system aliases file,
or in any other file that you specify in the alias_maps parameter. See more about the alias_maps parameter later in the chapter. The
default alias file when you install Postfix is /etc/aliases.
Let’s suppose that you administer mail for the domain http://example.com, and you want to create a new mailing list for people to discuss needlepoint. You decide to create a mailing list alias needlepoint@example.com to be used for online discussions. Edit your alias file, and add the following line with the email addresses of people who want to subscribe to the list:
needlepoint: rgrier@oreilly.com, gmhopper@onlamp.com, grayburn@oreilly.com
After making changes to the file, rebuild the alias lookup table by executing:
# postalias /etc/aliasesNow any messages sent to needlepoint@example.com will be forwarded to each of the email addresses listed in the example.
If any messages cannot be delivered to one of the
addresses listed, the original sender of the message receives an error
message explaining that there was a delivery problem. For small or
internal lists this may be perfectly acceptable; however, if you are
creating a large list, or the members of the list do not necessarily
know each other, it is probably more appropriate to have error
messages sent to the administrator of the list. The convention is to
create an additional alias for lists using a format like
owner-<list_alias>@example.com, where
owner- is prepended to the name of
the list alias. For the previous example, we would create the alias
owner-needlepoint.[1] This owner- alias
should point to an administrator, who is generally in a better
position than the original sender to deal with bounced
messages:
owner-needlepoint: kdent@example.com
Sending error notifications to the owner- alias is achieved by setting the envelope sender to the
owner-needlepoint@example.com alias instead of
the original sender’s email address. Example 10-1 shows typical
headers from a mailing-list message.
Return-Path: <owner-needlepoint@example.com>
Delivered-To: rgrier@oreilly.com
Received: from cowrie.example.com (cowrie.example.com[192.168.100.7])
by mail.oreilly.com (Postfix) with ESMTP id B712120DD5B
for <needlepoint@example.com> Mon, 13 May 2002 11:55:40 -0400 (EDT)
Date: Mon, 13 May 2002 12:00:43 -0400 (EDT)
From: G.M. Hopper <gmhopper@onlamp.com>
X-Sender: gmhopper@cowrie
To: needlepoint@example.com
Subject: Just finished latest project
Message-ID: <Pine.GSO.4.10.10205131200230.692-100000@cowrie>When the owner- alias exists,
Postfix automatically uses it as the envelope sender address when
sending out messages to list members. If, for some reason, you don’t
want Postfix to use the owner-
alias but rather to keep the originator’s address, you can set the
parameter owner_request_special
to no:
owner_request_special = no
You can also cause Postfix to use the actual administrator’s
email address instead of the owner-
alias by setting expand_owner_alias
to yes:
expand_owner_alias = yes
If this parameter is set, the address kdent@example.com is used instead of owner-needlepoint@example.com.
Although users do not generally need to send mail directly to the list owner, you should create owner aliases even for simple lists so other postmasters can contact the correct person in case they run into any problems with your list.
Another list convention is to provide a
request alias for your lists. Request aliases
use the format
<list_alias>-request@example.com. The
request alias for the needlepoint
alias looks like needlepoint-request@example.com.
Request aliases are used for requests to subscribe and unsubscribe
from lists or to get nontechnical information about a list.
If you have more than just a few names on a list, it is more convenient to create a text file that lists all of the email addresses for the list. The format of the alias entry that points to a file is as follows:
email_alias: :include:/path/to/file.
Let’s take the needlepoint
alias from earlier in the chapter and move the list addresses into a
separate file. Your alias entry should be revised to point to the text
file that contains the list of addresses:
needlepoint: :include:/etc/postfix/needlepoint
The file /etc/postfix/needlepoint contains the email address of each member of the group. Put one address on each line. When you need to make changes to the list, simply edit the file:
rgrier@oreilly.com gmhopper@onlamp.com grayburn@oreilly.com bogus@example.com
I’m adding an invalid address, bogus@example.com, for testing later in the chapter.
Recall from Chapter 4 that
the alias_maps parameter allows you to specify any number of alias
files to use with Postfix. For example, you might want to use a
separate alias file to store your mailing lists. Simply include the
separate alias filename along with the system alias to set the
alias_maps parameter. You should
also set the alias_database
parameter, so that you can run the command newaliases to update all of your
alias-mapping files:
alias_maps = hash:/etc/postfix/aliases, hash:/etc/postfix/mail_lists alias_database = hash:/etc/postfix/aliases, hash:/etc/postfix/mail_lists
It may be more convenient to assign all of your alias files to
alias_database and then assign
alias_database to alias_maps. If you use other map types for
aliases, simply assign them to alias_maps as well:
alias_database = hash:/etc/postfix/aliases, hash:/etc/postfix/mail_lists alias_maps = $alias_database, nis:mail.aliases
Remember to reload Postfix when you make changes to main.cf.
Let’s review everything discussed so far and consider
all the pieces of our needlepoint
mailing list. The alias file contains the following lines:
needlepoint: :include:/etc/postfix/needlepoint owner-needlepoint: kdent@example.com needlepoint-request: kdent@example.com
The first line in the example causes messages sent to needlepoint@example.com to be delivered to every address listed in the /etc/postfix/needlepoint file. This file should contain a list of email addresses of all members of the list. Bounce messages and requests are forwarded to the real address kdent@example.com. If necessary, users or other postmasters can send messages to the list owner, and users can send messages to the request alias for subscription or other information.
When a message is sent to the list, the To: header contains just the address of the
mail list alias and not an expansion of all the names on the list
(which could be hundreds or even thousands of names). Each member of
the list receives a copy of the message with headers that resemble
those shown in Example
10-1. In this example, gmhopper@onlamp.com
has sent a message to the list. Notice that the Return-Path: contains the owner alias rather
than the actual originator of the message
(gmhopper@onlamp.com).
You can test your list by sending a message to the alias you created for it. In this example, we’ll use the list alias needlepoint@example.com. Example 10-2 shows the log entries for a sample test message. Imagine that the address bogus@example.com is invalid.
postfix/local[7411]: 6C2CE20DD5B: to=<needlepoint@example.com>, relay=local, delay=1, status=sent (forwarded as ACDC120DD70) postfix/qmgr[8163]: ACDC120DD70: from=<owner-needlepoint@example.com>, size=1121, nrcpt=8 (queue active) postfix/local[0835]: ACDC120DD70: to=<bogus@example.com> relay=local, delay=1, status=bounced (unknown user: "bogus") postfix/smtp[6556]: ACDC120DD70: to=<grayburn@oreilly.com> relay=mail.oreilly.com[10.82.6.11], delay=1, status=sent (250 Mail accepted) postfix/smtp[6556]: ACDC120DD70: to=<rgrier@oreilly.com> relay=mail.oreilly.com[10.82.6.11], delay=1, status=sent (250 Mail accepted) postfix/smtp[5954]: ACDC120DD70: to=<gmhopper@onlamp.com> relay=mail.onlamp.com[10.171.8.111], delay=1, status=sent (250 Message received: GZCLUC00.E8F)
Some of the information, such as the timestamp and hostname, has
been removed for clarity. Notice that at the end of the first line
there is a comment saying (forwarded as
ACDC120DD70) and the rest of the log entries use the new
queue ID. Also notice in the first line of the example that the
message enters the system addressed to
needlepoint@example.com. The second line shows
that Postfix uses the owner alias as the envelop sender address
(from=<owner-needlepoint@example.com>)
while delivering the message to all members of the list. The bogus address shows a status of “bounced.” The
address kdent@example.com pointed to by the owner
alias receives the bounce notification, which looks like Example 10-3. Notice in the example that the bounce notification message is delivered to
owner-needlepoint@example.com. The sender of the
message does not receive a notification.
From MAILER-DAEMON@mail.example.com Tue Jul 16 12:03:49 2002 Date: Tue, 16 Jul 2002 11:25:27 -0400 (EDT) From: Mail Delivery System <MAILER-DAEMON@mail.example.com> To: owner-needlepoint@example.com Subject: Undelivered Mail Returned to Sender ... <bogus@example.com>: unknown user: "bogus" ...
[1] Some MLM systems have adopted the convention of placing
-owner after the alias instead
of before.
Running mailing lists within Postfix is fine for static lists. But lists that change frequently are better handled by a mailing-list manager (MLM). With an MLM, the administrator of the list doesn’t have to manually edit the list file to add, delete, or change addresses because list members can subscribe and unsubscribe themselves. MLMs also support other features such as archiving of messages, digests of discussions, and the ability to moderate a list by allowing an administrator to review messages before they are posted to all members.
MLMs work by pointing normal Postfix aliases to commands that handle the distribution of messages and management of lists. MLMs use administrative aliases that point to programs to handle list functions such as subscribing and unsubscribing members from the list, handling bounced messages, and possibly filtering messages sent to the list. The lists themselves actually work the same way as the simple aliases from the last section. Each list has its own file to store list members, but rather than editing the file yourself, you can have the MLM automatically add and remove addresses.
The next two sections look at two popular MLMs: Majordomo and Mailman.
Majordomo is one of the more popular MLMs and has been available since the early 1990’s. It offers a complete set of MLM features, and nearly all administration takes place by sending commands through email messages. Little to no intervention is required by a postmaster once a list has been created. There are also web-based administration packages available to work with Majordomo, allowing much of the list administration to take place from a web site.
Majordomo is available at the Majordomo home page (http://www.greatcircle.com/majordomo/.) It requires Perl and works with Perl4 Version 4.036 or Perl5 Version 5.002 or better. Future releases will probably require Perl5. Majordomo also makes use of a small wrapper program written in C. If you are planning to build the package from scratch, you must have an ANSI C compiler.
If you configure Majordomo for moderated lists, where a
list administrator approves posts using the Majordomo-supplied
approve, you have to make an
adjustment for Postfix and Majordomo to work together correctly.
Postfix prepends a Delivered-To: header to messages it handles. It then uses the header
to detect mailer loops. When a Majordomo message is delivered to a
moderator for approval who then pipes the message through the approve command, it is sent back to the list with all of its
original headers intact. When Postfix receives the message again, it
recognizes that it has already seen the message and reports a mail
delivery loop.
The easiest way to fix this issue is to make a small
change to the Majordomo approve
script (which is written in Perl). You’ll have to edit the file,
normally located in the /bin
directory located below the main Majordomo installation directory. If
you follow the steps in the procedure below, your file will be located
at /usr/local/majordomo/bin/approve. Edit the
file and find the subroutine called process_bounce. Within that routine, there
is a while loop, as shown below.
Insert the emphasized line as shown, save the file, and you’re
done:
while (<$FILE>) {
if (/^>?From / && ! defined($from_skipped)) {
# Skip any initial "From " or ">From " line
$from_skipped = 1;
next;
}
next if ( /^delivered-to:/i ); # Added for Postfix
s/^~/~~/;
print MAIL $_;
} The following steps walk you through setting up the
astronomy list alias using
Majordomo and Postfix. These instructions assume that you will
create a user called majordom and install the
package at /usr/local/majordomo. If you create a
different username or install to a different location, keep that in
mind as you read through this example.
Make sure that you have Perl installed on your system and that it is at least Version 5.002 or better. You can check your Perl installation by typing perl -v at a command prompt. This will display license and other information about your installation of Perl, including the version number:
$ perl -v
This is perl, version 5.005_03 built for i386-freebsd
Copyright 1987-1999, Larry Wall
...Obtain a copy of Majordomo either in source form from the Majordomo home page or find a prepackaged version from your normal software sources. Follow the instructions that come with your bundle to install Majordomo on your system. If you are installing from source, you will need an ANSI C compiler to build it.
If you build Majordomo yourself, when you modify the
Makefile and majordomo.cf file, you should be able to follow the
instructions as if you were installing Majordomo to work with
Sendmail as the MTA. If the location for $sendmail_command in majordomo.cf is correct, the rest of
the mailer variables with the default options will be
correct.
Create and edit a file called /usr/local/majordomo/aliases to store the Majordomo aliases. Add the aliases for the Majordomo commands as specified in the Majordomo instructions. Then add the aliases for your list. The file should look like the following:
majordomo: "| /usr/local/majordomo/wrapper majordomo" owner-majordomo: kdent@example.com majordomo-owner: kdent@example.com # astronomy list astronomy: :include:/usr/local/majordomo/lists/astronomy owner-astronomy: csagan@example.com astronomy-request: "|/usr/local/majordomo/wrapper request-answer astronomy" astronomy-approval: csagan@example.com
Edit /etc/postfix/main.cf to add the
Majordomo alias file to the alias_maps parameter:
alias_maps = hash:/etc/aliases, hash:/usr/local/majordomo/aliases
You can also add the new alias file to the alias_database parameter to automatically rebuild the datafile
when you run the newaliases
command:
alias_database = hash:/etc/aliases, hash:/usr/local/majordomo/aliases
Reload Postfix so that it recognizes the changes in its main.cf configuration file:
# postfix reloadCreate the file to hold the email addresses for the
astronomy list. Set its
ownership to the majordom
account:
#touch /usr/local/majordomo/lists/astronomy#chown majordom /usr/local/majordomo/lists/astronomy
Create the info
file that contains the message sent to new members of the list
and anyone who sends the info
command. Create the file as /usr/local/majordomo/lists/astronomy.info
and include any text that is appropriate for your list:
Welcome to the astronomy discussion list at example.com. The purpose of this list is to discuss new astronomical phenomena. To send a message to all the members of the list, address your email to <astronomy@example.com>. The basic rules and etiquette for the list are as follows: 1. ...
Make sure that the info file is accessible by the majordom account:
# chown majordom /usr/local/majordomo/lists/astronomy.info# postalias /usr/local/majordomo/aliasesOr, if you added the Majordomo alias file to alias_database, just type newaliases.
You can test your Majordomo installation by running the following command:
$ echo 'lists' | mail majordomoExecuting the above sends an email message to Majordomo containing the command ‘lists', telling Majordomo to send you information about all of the lists it maintains. On our example system, the reply from Majordomo looks like the following:
Date: Tue, 16 Jul 2002 18:14:59 -0400 (EDT) From: Majordomo@example.com To: kdent@example.com Subject: Majordomo results -- >>>> lists Majordomo@example.com serves the following lists: astronomy Use the 'info <list>' command to get more information about a specific list. >>>> >>>>
You or your users can now send Majordomo commands at
the address majordomo@example.com to get help
and be added to lists. To add yourself to the new mailing list, send
a message to majordomo with the
subscribe command in the body of
the message:
To: majordomo@example.com From: tbrahe@porcupine.org Subject: subscribe astronomy
If you send a subscription request, you should receive a confirmation message from Majordomo. You must reply to the message with the authentication code provided to complete your subscription to the list (see the Majordomo documentation).
If you had no problems during the Majordomo installation, everything should work as expected. The main issue that you may run into has to do with file permissions. If you send a message to the list and receive a bounce notification like the following, then you know you have a permissions problem:
...
The Postfix program
<astronomy@example.com>: cannot open include file
/usr/local/majordomo/lists/astronomy: Permission denied
...Majordomo needs read access to the list file (/usr/local/majordomo/astronomy) and the
list configuration file (/usr/local/majordomo/astronomy.config)
when Postfix invokes it for deliveries to the list. Postfix delivers
the message to Majordomo running with the privileges of the user
that owns the alias map file containing the majordomo alias, /usr/local/majordomo/aliases.db. The
normal mechanism used to ensure that Majordomo has access to the
necessary files is to set the Majordomo wrapper program to set user
ID (suid) with root as the owner.
This means that regardless of the user executing the command, the
process runs with root privileges. The
Majordomo installation takes care of setting the permissions
properly, but if for some reason they are not correct, you will see
an error message like the one described above. You can correct the
problem by setting the permissions yourself:
# chmod 4755 /usr/local/majordomo/wrapperA better solution than setting the wrapper program suid is to make sure that the alias file and all of the list files are owned by the majordom user.
Mailman is another full-featured MLM. It is available at the Mailman home page at http://www.gnu.org/software/mailman/. It includes web-based administration and creates a home page for each list where list administrators and members can perform administrative functions. It also accepts administrative commands via email much like Majordomo does.
Mailman requires at least Version 1.5.2 of Python. It includes some security wrapper programs that are written in C, so you must have an ANSI C compiler if you are planning to build the package from scratch.
There is one slightly tricky aspect to get Postfix and Mailman
working together correctly. Mailman expects to be invoked by a process running with
a particular group ID (GID). The GID it expects is specified at the
time the Mailman package is built. If you are building the package
yourself, make sure that you first create an account and a group
called mailman . You should be able to use the normal administrative
tools on your system to create both the account and the group. When
you are finished, you should have an entry in /etc/passwd that resembles the
following:
mailman:*:26413:60003:Mailman List Manager:/home/mailman:/bin/sh
and an entry in /etc/group like the following:
mailman:*:60003:
Make sure that the account mailman has the group mailman as its primary group. In the
examples above, 60003 specifies the
mailman group and the mailman account has that as its primary
group.
When you run configure for Mailman, be sure that you
include the option --with-mail-gid=
xxx, where xxx
is the actual GID for the mailman
group that you created. According to the examples above, you should
execute configure using 60003 for
the GID option:
$ ./configure --with-mail-gid=60003You may have additional options for configure according to your environment. Be sure to read the Mailman documentation for building the package. If you have already built your Mailman package and you did not specify the group, build it again. If you didn’t build your Mailman package, see the sidebar below.
The following steps walk you through setting up the
astronomy list alias using
Mailman and Postfix. They assume that you create an account and a
group called mailman and install
the package in /home/mailman.
Make sure that you have Python installed on your system and that you have at least Version 1.5.2. Test this by executing the python command, which will display version information and a Python prompt. You can exit the Python shell by typing Ctrl-D:
$pythonPython 1.5.2 (#1, Jul 5 2001, 03:02:19) [GCC... Copyright 1991-1995 Stichting Mathematisch Centrum, Amsterdam >>>^D$
If the version number following “Python” on the first line of output is not at least 1.5.2, you will have to upgrade your copy of Python.
Obtain a copy of Mailman either in source form from the Mailman home page or find a prepackaged version from your normal software sources. Follow the instructions that come with your bundle to install Mailman on your system. If you are installing from source, you will need an ANSI C compiler to build it. Be sure to specify the correct GID when you build Mailman. (See the discussion earlier in this chapter.)
You should create a separate alias file to store all of your Mailman aliases and set the owner and group correctly. Become the mailman user and execute the following commands. This example assumes that you want the alias file in the mailman home directory located at /home/mailman:
$cd /home/mailman$touch aliases$postalias aliases
These commands create both the alias file and the necessary map files that Postfix uses for lookups. Since you perform these steps as the mailman user, the group and ownership of the files will automatically be correct, assuming your account is set up as it should be.
Edit /etc/postfix/main.cf to add the new
alias file for storing Mailman mailing lists. Simply add the
Mailman alias file to the existing list of files for the
alias_maps parameter:
alias_maps = hash:/etc/aliases, hash:/home/mailman/aliases
You can also add the new alias file to the alias_database parameter to automatically rebuild the datafile
when you run the newaliases
command:
alias_database = hash:/etc/aliases, hash:/home/mailman/aliases
Reload Postfix so that it recognizes the changes in its
main.cf configuration
file:
# postfix reloadExecute the Mailman command newlist to initialize your new mailing list. The output of newlist includes lines of text that must be inserted into the /home/mailman/aliases file. Copy the lines from the newlist output into /home/mailman/aliases. Save and exit the file. The emphasized lines in Example 10-4 are the lines that must be added to /home/mailman/aliases.
Build the new alias datafile:
# postalias /home/mailman/aliasesOr, if you added the Mailman alias file to alias_database, just run the newaliases command.
#bin/newlistEnter the name of the list:astronomyEnter the email of the person running the list:kdent@example.comInitial astronomy password: Entry for aliases file: ## astronomy mailing list ## created: 08-Mar-2002 root astronomy: "|/home/mailman/mail/wrapper post astronomy" astronomy-admin: "|/home/mailman/mail/wrapper mailowner astronomy" astronomy-request: "|/home/mailman/mail/wrapper mailcmd astronomy" astronomy-owner: astronomy-admin Hit enter to continue with astronomy owner notification...
You or your users can now send requests to astronomy-request@example.com to get help and be added to the list. You can now use Mailman’s web- or email-based command interface to specify options for your new list. See the Mailman documentation to learn its options and other ways to work with the package.
Unsolicited Bulk Email (UBE), also referred to as Unsolicited Commercial Email (UCE), is commonly called spam. Spamming is the practice of sending mass mailings to large numbers of people who have had no prior relationship with the sender and who didn’t ask to receive such mail. Spam exists because it’s so cheap to send. The incremental cost of adding even hundreds of thousands of recipients to a mailing is relatively small, so spammers target as many email addresses as they possibly can. This chapter looks at the problem of spam and the tools Postfix provides to help limit the consequences.
There is a decidedly dishonest component to most spam. Spammers make no effort to match message content with a recipient’s interests, and their messages frequently lie, claiming that the recipient has an association with the company or its partners or in some way requested information. Messages are sometimes designed to look like an actual exchange between two people that was mistakenly misdelivered in the hopes of sparking interest in some product or service.
Spam frequently offers instructions to opt out from receiving more messages; however, in many cases this is simply a subterfuge on the part of the spammer to confirm that your email address is good. By replying to such messages, you confirm that your address is a legitimate one. Following the directions provided will more than likely cause your address to be added to more spammer lists.
Spammers often try to hide their trail so their messages cannot be traced back to them. They purposely use false return addresses and forge header information. They seek out misconfigured systems that allow them to relay anonymously. More recently spammers have broken into systems and installed their own secret relay servers. Spammers commonly encode their messages or insert random letters to circumvent spam filters.
Some of the techniques employed by spammers have sideeffects that make the problem much worse than the act of spamming itself. In their scatter-shot approach, spammers send messages to email addresses they think are likely to exist whether they actually do or not. Some launch dictionary assaults on mail servers where they run through preassembled lists of names hoping to find a match with a user on the mail server.
While spam may seem like a minor issue on a small scale, it is a significant problem on the Internet. A system hosting hundreds or thousands of users each receiving dozens or hundreds of unwanted messages every day can have substantial difficulties dealing with the onslaught. There is a real cost to the victims of spam. It unfairly uses the bandwidth and disk space of its recipients and their providers.
Other costs brought on by spam include technical support personnel time, when technicians or administrators must help users clean up flooded mailboxes. Sometimes the volume of spam can even make a system unusable for its intended purpose (clogging bandwidth or filling disk space). In such a case the effects of spam are no different from those of a denial-of-service attack. Even in less drastic circumstances, spam interferes with legitimate uses of email. Important messages can easily be overlooked in a flood of spam or mistakenly deleted when littered mailboxes are cleaned up.
A significant issue with spam is dealing with messages addressed to nonexistent users. Some mail systems recognize that a destination address is bogus and can reject mail before it is accepted; other systems must receive the mail first and then bounce it as undeliverable. The volume of bounces can easily clog a queue and interfere with the delivery of legitimate messages. Since the return addresses often don’t really exist, the bounces cannot be delivered and sit in the queue undergoing many redelivery attempts until they expire.
Another spamming trick is to use a legitimate return address that belongs to an innocent third party. The target or relay systems that receive the spam send bounce messages to the supposed sender, helpfully letting that person know that the recipient does not exist. In this case, thousands or millions of bounce messages will be delivered to the unfortunate victim in a phenomenon referred to as backscatter . This victim isn’t involved in any way in the original delivery of the spam. In most cases, the only solution for these completely innocent bystanders is to abandon the victimized address and start using a new one.
If you operate an email server on the Internet, you have a responsibility to make sure that you do not create an open relay that spammers can use as a launching point for their activities. An open relay is a mail system that permits outside systems to send mail to other outside systems, passing the messages along so that the originating system does not have to deliver directly to its target. Spammers constantly scan for misconfigured systems that permit them to relay mail. Before spam became such a problem on the Internet, mail administrators often operated open relays because it made their systems convenient for their users. Now nearly all SMTP software systems are configured by default not to be open relays. Postfix is no exception.
If your system is abused as an open relay, it will most likely be so bogged down with sending spam that its performance will be hindered for your legitimate users. If you choose to accept spam into your own system that is, of course, up to you, but you must take steps to ensure that your system is not used to abuse other systems. There is a good possibility that if spammers use your system to relay mail, your network will end up on a blacklist. Once your site is blacklisted, many sites will reject all messages from your network, both relayed spam and legitimate messages from your users. Chapter 4 discusses safely configuring Postfix to prevent your system from being abused.
As long as you’re not operating an open relay, you can be confident that your systems are not being used to harm other systems. Your next consideration is to protect yourself and your users by limiting the spam your network receives. Ideally, your mail server could simply reject any message that looks like spam. Unfortunately, whereas humans can look at a message and know instantly that it’s spam, computers have a tougher time detecting it without making mistakes. The ugly truth is that once you start to reject spam, there is always a risk that you will block legitimate correspondence.
Misidentifying a legitimate message as spam is referred to as a false-positive identification. Your anti-spam efforts are an attempt to detect as much spam as you can with the fewest possible false-positives. You have to weigh the size of your spam problem against the possibility of rejecting real email when deciding how aggressive to be in implementing your anti-spam measures. The extremes range from permitting all spam to accepting mail only from preapproved individuals. Preapproval may seem severe, but the problem is getting bad enough for some people that whitelist applications, where any correspondent you receive mail from must be identified ahead of time, are becoming more common.
There are two primary ways of detecting spam: identifying a known spamming client and inspecting the contents of a message for tell-tale phrases or other clues that reveal the true nature of a spam message. Despite the difficulties, postmasters can achieve some success with minimal false-positives by implementing various spam-detection measures.
Client-blocking techniques use I P addresses, hostnames, or email addresses supplied by clients when they connect to deliver a message. Each piece of information supplied can be compared to lists of items from known spamming systems. Spamming systems might be owned by actual spammers, but they might also be unintentionally open relays managed by hapless, (almost) innocent mail administrators. In either case, if a system is regularly sending you spam, you will probably decide to block messages from it. One problem with identifying spam by IP address, hostname, or email address is that these items are easily forged. While the IP address of the connecting system requires some sophistication to spoof, envelope email addresses are trivial to fake.
In a grass-roots effort to stem the tide of spam on the Internet, various anti-spam services, generally called DNS-based Blacklists (DNSBL) or Realtime Blacklists, have developed. These services maintain large databases of systems that are known to be open relays or that have been used for spam. A newer, increasingly more common problem is with systems that have been hijacked by spammers who install their own proxy software that allows them to relay messages. These hijacked systems can also be used in distributed denial-of-service attacks. There are DNSBL lists that are dedicated to listing these unwitting spam relays. The idea is that by pooling the information from hundreds or thousands of postmasters, legitimate sites can try to stay ahead of spammers.
Usually, these systems work by adding a DNS entry to their
domain space for each of the IP addresses in their database that
have been identified as spam-friendly open relays. For example, if
the host at IP address 192.168.254.31 has been identified as an
open relay, the (fictitious) DNSBL service No Spam Unlimited using a
domain name of nospam.example.com creates a DNS
entry like 31.254.168.192.nospam.example.com.
When a client connects to your Postfix system, Postfix can check the
No Spam DNS server to see if there is an entry for the client’s IP
address. If the IP address has been identified as an open relay
system, Postfix can reject the message.
Consider very carefully before you decide to make use of a DNSBL service. Many open relays used to forward spam also operate mail services for nonspamming users. You are very likely to block legitimate mail in addition to the spam. Also keep in mind that you are offloading to a third party the responsibility of making important decisions about who can and cannot send mail to your users. On the other hand, if you’re buried in spam, DNSBL services can definitely help. If you decide to use one, review their service options and policies very carefully. Again, you have to balance your aggressiveness and the likelihood of losing legitimate mail against the magnitude of your spam problem.
In addition to identifying clients, you can often recognize spam by its contents. Certain strings within email messages mark them as likely to be spam (“Our Rates Have Never Been Lower!!”). But trying to distinguish spam by the contents of the message can be problematic. Imagine that you receive lots of spam offering new house mortgages. You figure you can eliminate most of it by blocking messages that contain words like “really low interest rate on a new mortgage.” This may indeed block many spam messages, but you might also block a message from your friend (or one of your user’s friends) who just got a great deal on a new house and wrote to tell you about it.
The problem with both client- and content-based techniques to identify spam is that spammers are constantly finding ways to get around them. There is a sort of arms race going on between legitimate users of email and spammers. You can compile lists of open relays, but spammers expend a great deal of effort seeking out new open relays or proxy servers to abuse (and there always seem to be more of them).
You may discover that you receive a lot of spam with the same return address. You can block messages that use that return address, but spammers use hit-and-run tactics. They obtain an email address from one of the free email sites and use that address to send thousands or millions of spam messages, and then discard it for another. Within a couple of days, you’ll never see the address you listed again.
Even content filters have to adjust for spammers escalating tactics. Some spammers embed HTML codes within the words of their messages to break up phrases you might filter against. Or they encode the entire message so that when Postfix scans it for recognized spam phrases, there are no intelligible phrases. Most email clients oblige users by automatically rendering such messages—decoding or ignoring extraneous HTML codes. Recipients often don’t even notice that the message had originally been encoded.
Broadly speaking you have a few choices once you have detected spam:
Reject spam immediately during the SMTP conversation. Rejecting spam outright is an attractive idea because you never have to store a copy of the message and worry about what to do with it. The sender of the message is responsible for handling the error. If your site has a low tolerance for rejecting legitimate messages, you might prefer to accept suspect messages and develop a process to review them periodically to make sure that there are no good messages in with the bad.
Save spam into a suspected spam repository. If you save the suspect messages and review them periodically, you can be sure that you don’t miss any legitimate mail. The task is cumbersome and usually requires frequent reviews, so you may not gain much over allowing suspect messages into users’ mail boxes.
Label spam and deliver it with some kind of spam tag. This option provides users with flexibility in determining their own tolerance for spam versus their sensitivity to missing real messages. Postfix doesn’t currently have a built-in mechanism for labeling spam. You can easily have Postfix work with an external content filter to handle the labeling (see Chapter 14). If the content filter delivers tagged messages to individual users, they can configure their email software to deal with it according to their own preferences.
When using an MTA for spam detection, the rejection option is usually best. If you want more flexibility, consider using options that filter spam at the MDA or MUA level. A combination of spam filtering is also a good alternative. You can configure Postfix to reject the obvious spam, allowing suspicious messages through to the next level where another agent can perform the most appropriate action.
Postfix really excels in its tools to help you identify spam clients and reject them. Rejecting messages with Postfix requires fewer system resources than invoking external filters after the message has been accepted. If you are concerned about losing legitimate mail, there are still a couple of safety measures available that we’ll look at when configuring Postfix.
The rest of this chapter discusses the various types of UBE checks Postfix provides. It considers four different categories of spam detection which are listed below.
Four parameter rules that work with pieces of the client identity. Each rule is assigned a list of one or more restrictions that can explicitly reject or accept a message or take no position one way or the other (commonly indicated as DUNNO). For example, you can configure a rule that includes a restriction to reject a particular client IP address.
Parameters that check for strict adherence to the standards. Since spammers often don’t follow the published standards, you can reject messages that come from misconfigured or poorly implemented systems. Some of the client restrictions also fall under this category.
You can check the headers and the body of each message for tell-tale regular expressions that indicate probable spam.
You can define complex client-detection rules with restriction classes. These allow you to combine restrictions into groups to form new restrictions.
When configuring Postfix to detect spam, you also specify what to do with messages identified as spam. In general, Postfix can reject them outright, separate them into a different queue, or pass them along to an external filter.
Postfix provides the following rules that are assigned restrictions based on client information:
Each one corresponds to a step of the SMTP transaction. At each step, the client provides a
piece of information. Using the client-supplied information, Postfix
considers one or more restrictions that you assign to each rule. Figure 11-1 shows an SMTP
conversation along with the client rule applied at each step. The
header_checks and body_checks are discussed later in the
chapter.
Let’s review the SMTP conversation to see where each of the parameters fits in.
The SMTP conversation in Figure 11-1 should be familiar to you from Chapter 2. Example 11-1 shows the log entries for the transaction. First, an SMTP client connects to Postfix over a socket. Because of the way sockets function, Postfix learns the IP address of the client when it establishes the connection. You don’t see the client IP address in the figure, but it is logged by Postfix. You can accept or reject a message based on the client hostname or IP address, thus blocking specific hostnames or IP and network addresses.
1. postfix/smtpd[866062]: connect from mail.ora.com[10.143.23.45] 2. postfix/smtpd[866062]: D694B20DD5B: client=[10.143.23.45] 3. postfix/cleanup[864868]: D694B20DD5B: \ message-id=<20030106185403.D694B20DD5B@smtp.example.com> 4. postfix/qmgr[861396]: D694B20DD5B: from=<info@ora.com>, \ size=486, nrcpt=1 (queue active) 5. postfix/local[864857]: D694B20DD5B: to=<kdent@smtp.example.com>, \ relay=local, delay=98, status=sent (mailbox) 6. postfix/smtpd[866062]: disconnect from mail.ora.com[10.143.23.45]
Once connected, the client sends a HELO command with an identifying hostname. The hostname
provided can be used to accept or reject a message using smtpd_helo_restrictions .
In the next step, the client issues a MAIL FROM command to indicate the sender’s email address,
followed by a RCPT TO command to indicate the recipient’s email
address.
If everything is acceptable up to the point of the DATA command, the
client is permitted to send the contents of the message, which consist
of message headers followed by the message body. Postfix provides
another opportunity to reject the message based on its contents (see
Section 11.9 later in
this chapter). If the final header and body checks are acceptable, the message is
delivered.
Postfix indicates to the client that it has rejected a message by sending reply codes. Standard reply codes are described in Chapter 2. In this chapter, we consider codes in the 4xx and 5xx range. More information appears in a sidebar later in this chapter.
When you assign restrictions to Postfix UBE rules, it is not necessary to use all of the rules. You can define restrictions for the ones you need and leave out the others. The default setting if no rules are set in main.cf looks like the following:
smtpd_client_restrictions =
smtpd_helo_restrictions =
smtpd_sender_restrictions =
smtpd_recipient_restrictions =
permit_mynetworks, reject_unauth_destinationThis prevents your system from being an open relay by allowing any computer on your network to relay while rejecting all others unless they are sending messages destined for one of your users.
There are many restrictions available. Table 11-1 lists each one
along with the client information it operates on. One important
concept that confuses many people at first is that any of these
restrictions can be used in any rule. While it may seem logical that
check_helo_access should be
assigned to smtpd_helo_restrictions, it could equally be
assigned to smptd_sender_restrictions or any of the
others. This gives you a lot of flexibility in ordering your
restrictions when deciding what to accept and what to block.
Restrictions | Client-supplied information |
check_client_access
| Client IP address or hostname |
reject_rbl_client | |
reject_rhsbl_client | |
reject_unknown_client | |
check_helo_access
| |
permit_naked_ip_address | |
reject_invalid_hostname | |
reject_non_fqdn_hostname | |
reject_unknown_hostname | |
check_sender_access
| |
reject_non_fqdn_sender | |
reject_rhsbl_sender | |
reject_unknown_sender_domain | |
check_recipient_access
| |
permit_auth_destination | |
permit_mx_backup | |
reject_non_fqdn_recipient | |
reject_unauth_destination | |
reject_unknown_recipient_domain | |
reject_unauth_pipelining | |
You’ll notice from Table
11-1 that some rules take an argument of the form
maptype:mapname.
The mapname refers to a normal Postfix
lookup table whose lefthand key is matched against the piece of client
information, and the righthand value is the action to perform. Access
maps are discussed in Restriction Definitions following.
Each of the nonaccess map restrictions
evaluates to or returns one of three possible
values that determine what action Postfix takes with the message: OK, REJECT, and DUNNO. (Access maps can also
return the same values, but they allow additional actions as well.)
The restrictions are evaluated in the order you list them. During
processing, if a rule returns an explicit REJECT, the message is
immediately rejected. If a rule returns an explicit OK, the
processing stops for that
parameter but continues on to the next until all of the
assigned rules have been evaluated or Postfix encounters a
rejection. It’s important to note that a rule might explicitly
accept a message, but it can still be rejected by another rule’s
restrictions. If the set of rules comes to no definite conclusion
(all DUNNOs), the default action is to accept the message. Any
single parameter can reject a message, but all of them must accept
it in order for it not to be rejected. There are generic
restrictions such as permit
and reject that
return explicit OK or REJECT values without considering any of the
client information.
When a rule evaluates to REJECT, by default Postfix
does not actually reject the message until after the client has sent
the RCPT TO command. Even though it may know at the HELO command that it’s going to reject
this client, it waits until after it receives the RCPT TO command before returning the
reject code. The reason for this default is that some SMTP clients
do not check that they have been rejected during the transaction and
continue trying to deliver the message. In such a case, you end up
with connections that last longer than they should and several
warning messages in your log file. Another advantage to the default
is that you get more complete information in your log. If you want
to change the default to have a rejection take effect as soon as
possible, set the parameter smtpd_delay_reject in main.cf:
smtpd_delay_reject = no
You might want to do this in a controlled environment where you know all of the connecting SMTP clients are well-behaved; otherwise, the default makes sense for most situations.
A useful parameter for testing new restrictions is
soft_bounce :
soft_bounce = yes
When it is set, hard reject responses (5xx) are
converted to soft reject responses (4xx). When you add a new
restriction that you’re not sure about, you might want to turn
soft_bounce on and then watch
your logs for what’s rejected so that you can fine-tune your
settings by the time another delivery attempt is made.
Another useful option for testing restrictions is the warn_if_reject qualifier. Simply precede any restriction with it to
have that restriction log a warning instead of rejecting a message.
If you’re not sure what effect a new restriction will have in your
environment, you can try it out with warn_if_reject, and then implement it
completely only if it works as you expect:
smtpd_recipient_restrictions =
permit_mynetworks
reject_unauth_destination
warn_if_reject reject_invalid_hostname
reject_unknown_recipient_domain
reject_non_fqdn_recipientIn this example, if a client uses an invalid HELO hostname when delivering a message,
Postfix logs a warning but still delivers the message (assuming it’s
not blocked for other reasons).
Before moving on to the restriction definitions, let’s consider a simple example:
smtpd_recipient_restrictions =
permit_mynetworks
reject_unauth_destination
reject_invalid_hostname
reject_unknown_sender_domainThis example expands on the default configuration with two
additional restrictions. When a client connects, if it’s from your
own network, permit_mynetworks
returns OK, so it is allowed to send mail. The other
restrictions are not checked. If the client is from outside your
network, permit_mynetworks does
not return OK and does not return REJECT, so it returns DUNNO.
Postfix then checks reject_unauth_destination .
If the message is not addressed to somebody at one of your
destination domains, it returns REJECT; otherwise, it returns DUNNO.
Assuming it returns DUNNO, Postfix then checks reject_invalid_hostname , which says to return REJECT if the hostname supplied
with the HELO command is not
valid. Otherwise, it returns DUNNO. Finally, Postfix checks reject_unknown_sender_domain , which returns REJECT if the domain name of the
address supplied with the MAIL
FROM command does not have a valid DNS entry. If none of
the restrictions has rejected the message, Postfix accepts it for
delivery.
There are six types of restrictions introduced below. Each of the restrictions are defined in the sections that follow.
Restrictions of the form check_*_access point to lookup tables
that might list IP addresses, hostnames, or email addresses
(depending on the parameter) that should be accepted or rejected
by Postfix.
Other client restrictions compare the client
information to general configuration information instead of
access tables. An example is permit_mynetworks, which you saw
earlier.
Some restrictions tell Postfix to enforce SMTP standards very strictly. Since spammers often misconfigure or use poorly implemented software, you can stop a lot of spam by making sure that connecting clients follow the rules.
DNS-checking rules ensure that DNS information is correct. Spammers often work from networks that do not configure DNS correctly. Unfortunately, rules of this type are appropriate only for a very aggressive anti-spam stance because of the number of legitimate sites that also do not configure their DNS correctly.
Real-time blacklists are services listing suspected spamming clients. Postfix can check with real-time blacklist services and reject clients based on their listing.
Generic rules explicitly reject or accept a message. They usually specify your default stance if a message isn’t explicitly accepted or rejected elsewhere. Since these rules will always accept or reject a message, they should come last in your list of rules.
Restrictions in the client-checking category all point to access map files. Access maps are simply a type of Postfix lookup table (see Chapter 4 for more information about lookup tables). In the lookup table, you specify the client information as a key and the action to take (accept or reject) as the value:
check_client_access
maptype:mapnameThe check_client_access restriction points to an access table
containing entries with IP addresses, network addresses,
hostnames, and parent domains to match against the client IP
address. (Postfix performs a reverse lookup on the IP address
to obtain a hostname to compare host and parent domain name
information.) Each entry includes an action to take when the
IP address matches a key.
check_helo_access
maptype:mapnameThe check_helo_access
restriction points to an access table
containing hostnames and parent domains to match against the
host information supplied with the HELO command. Each entry includes an
action to take when the supplied host information matches a
key.
check_recipient_access
maptype:mapnameThe check_recipient_access restriction points to an access table
containing entries with email addresses, domains, and local
parts to match against the address specified with the RCPT TO command. Each entry includes an action to take
when the supplied address matches a key.
check_sender_access
maptype:mapnameThe check_sender_access restriction points to an access table
containing entries with email addresses, domains, and local
parts to match against the address specified with the MAIL FROM command. Each entry includes an action to take
when the supplied address matches a key.
The restrictions check_sender_access and check_recipient_access both check a
supplied email address. For them, the key in your index file
can be an email address (user@example.com) to
match a specific address, a domain name (http://example.com) to match the domain name
portion or subdomains of the address, or the local part of an email
address (user@) to match all addresses using
the specified local part.
The rules check_client_access and check_helo_access compare the key to a
supplied hostname or IP address. The index file pattern can be
a hostname, an IP address (192.168.143.23), or a network address
specified by the initial octets of the address (10 or 10.12 or 10.12.154).
Actions can be indicated as follows:
Accept the item. Processing for the current rule stops. Postfix moves on to the next restriction rule.
Reject the item. You can optionally specify a
short string of text to be used in the reply and with logging
for this message; otherwise, Postfix uses the general reply
code and text configured for the restriction. The parameter
access_map_reject_code
contains the default reply code for the check_*_access rules and maps_rbl_reject_code contains the
default reply code for reject_maps_rbl. If you don’t
specify a value, they both default to 554.
Stop checking entries for the lookup table. Postfix moves on to the next restriction for the current rule.
Redirect the message to a content filter. You must specify a transport and next hop as you would in a transport table.
Place the message in the hold queue. You can optionally specify a short string of text to be logged; otherwise, Postfix logs a generic message.
Report a successful delivery to the client, but drop the message. You can optionally specify a short string of text to be logged; otherwise, Postfix logs a generic message. Don’t use this action unless you have carefully considered the ramifications. Silently dropping messages runs counter to the expected behavior of email systems. When dealing with spam, dropping messages might be the best course of action, but discarding any legitimate mail can affect the overall perceived reliability of Internet email.
message textReject the message. The response sent to the client is the numerical code you specify. A response in the 4xx range tells the client there is a temporary problem; queue the message and try delivery later. (See sidebar.)
message textReject the message. The response sent to the client is the numerical code you specify. A response in the 5xx range tells the client there is a permanent problem; send a bounce notification to the original sender. (See sidebar.)
You can also set up regular expression tables for access maps. In most cases, it probably doesn’t make sense to use a regular expression table for your access lists. Postfix already breaks up email addresses, domains, and IP addresses into the individual pieces to make its comparisons, so you really don’t gain much through regular expressions here. On the other hand, regular expression tables work very well for header and body checks, which are discussed later in this chapter.
Let’s expand the configuration example with some access maps:
smtpd_client_restrictions =
check_client_access hash:/etc/postfix/client_access
smtpd_sender_restrictions =
check_sender_access hash:/etc/postfix/sender_access
smtpd_recipient_restrictions =
permit_mynetworks
reject_unauth_destination
reject_invalid_hostname
reject_unknown_senderWe’ve now added restrictions to consult the lookup tables client_access and sender_access.
The client_access file can have entries like the following:
10.157 REJECT 192.168.76.23 REJECT currentmail.com REJECT
and the sender_access file can have entries like the following:
hardsell@example.com REJECT marketing@ REJECT specials.digital-letter.com REJECT
The following client restrictions make their decisions by comparing client-supplied information to the local Postfix configuration. The default rules fall under this category.
permit_auth_destinationPermits a request if the resolved destination address
matches a hostname or subdomain where the Postfix system is
the final destination for the message or a relay for the final
destination. Final destinations are listed in mydestination, inet_interfaces, virtual_alias_maps, or virtual_mailbox_maps, and relays are
listed in relay_domains.
Furthermore, the address must not contain any sender-specified
routing (e.g., user@example.com@example.net).
If permit_auth_destination
does not find a match, it returns DUNNO rather than REJECT.
Postfix continues to check all subsequent restriction
rules.
permit_mynetworksAllows a request if the client IP address matches any of
the addresses listed in the mynetworks parameter. You normally
use this restriction to exclude local clients from other UBE
restrictions and to allow them to relay through your SMTP
server.
reject_unauth_destinationRejects a request if the Postfix system is not the final
resolved destination email address or a relay for the final
destination. Final destinations are listed in mydestination, inet_interfaces, virtual_alias_maps, or virtual_mailbox_maps, and relays are
listed in relay_domains.
Addresses must not contain any sender-specified routing (e.g.,
user@example.com@example.net). The relay_domains_reject_code parameter
specifies the response code for rejected requests. The default
is 554.
Restrictions in the strict syntax category check for misconfigured clients and reject mail when they don’t comply with the standards. These rules can detect a lot of spam, but they might also reject legitimate clients. You should study the nature of your spam and real messages to see which rules will benefit you most without rejecting real messages. You can use access maps with OK actions to whitelist known senders that would otherwise be rejected.
reject_invalid_hostnameRejects a request if the hostname supplied with
the HELO command is not a
valid hostname. The invalid_hostname_reject_code
parameter specifies the response code for rejected requests.
The default is 501. Most legitimate senders use valid
hostnames.
reject_non_fqdn_hostname Rejects a request if the hostname supplied with
the HELO command is not in
the fully qualified form, as required by the RFC. The non_fqdn_reject_code parameter specifies the response code for
rejected requests. The default is 504.
reject_non_fqdn_recipientRejects a request if the address supplied with
the RCPT TO command is not
in the fully qualified form, as required by the RFC. The
non_fqdn_reject_code
parameter specifies the response code for rejected requests. The default
is 504. Most legitimate senders use fully qualified domain
names.
reject_non_fqdn_senderRejects a request if the address supplied with
the MAIL FROM command is
not in the fully qualified form, as required by the RFC. The
non_fqdn_reject_code
parameter specifies the response code for rejected requests.
The default is 504.
reject_unauth_pipelining Pipelining is a technique supported by Postfix
to speed up bulk mail deliveries by sending multiple SMTP
commands at once. The protocol requires that clients first
check that the server supports pipelining. Some clients
incorrectly begin pipelining before they confirm that Postfix
actually supports it. The rule reject_unauth_pipelining immediately
rejects such requests. There is no more processing, and the
message is rejected.
The DNS checking rules make sure that clients and email envelope addresses are sent from domains that have valid DNS information. It would be a great improvement to email in general if postmasters could always require valid DNS information because it would be harder for spammers to hide. Unfortunately, there are too many legitimate domains that do not configure their DNS correctly for such strictness to be practical. You should study the nature of your spam and real messages to see which will benefit you most without rejecting false-positives. You can use access maps with OK actions to whitelist known senders that would otherwise be rejected.
reject_unknown_clientRejects a request if the client IP address has no DNS
PTR record or if a follow-up lookup on the
hostname listed in the PTR record does not match the
connecting IP address. The unknown_client_reject_code
parameter specifies the response code for
rejected requests. The default is 450. If you change the
default, the reply code you specify is returned except when
there is a temporary DNS error. In this case, your change is
overridden and Postfix returns 450. This rule tends to find
many false-positives for spam because it seems to be very
common to have PTR records misconfigured or not configured at
all.
reject_unknown_hostnameRejects a request if the hostname supplied with the
HELO command doesn’t have
either a DNS A or MX record. The unknown_hostname_reject_code
parameter specifies the response code for
rejected requests. The default is 450. If you change the
default, the reply code you specify is returned except when
there is a temporary DNS error. In this case, your change is
overridden and Postfix returns 450. Many clients do not use a
fully qualified hostname and would be rejected by this
restriction.
reject_unknown_recipient_domainRejects a request if the domain name of the address
supplied with the RCPT TO
command doesn’t have either a DNS A or an MX record. The
unknown_address_reject_code
parameter specifies the response code for
rejected requests. The default is 450. If you change the
default, the reply code you specify is returned except when
there is a temporary DNS error. In this case, your change is
overridden and Postfix returns 450.
reject_unknown_sender_domainRejects a request if the domain name of the address
supplied with the MAIL FROM
command has neither an A nor an MX record in DNS. The unknown_address_reject_code
parameter specifies the response code for
rejected requests. The default is 450. If you change the
default, the reply code you specify is returned except when
there is a temporary DNS error. In this case, your change is
overridden and Postfix returns 450.
Since the MAIL FROM
address is the address that bounce notifications must
be sent to, it makes sense to require a known domain name. It is
highly recommended that you include this rule in your
restrictions.
Restrictions for real-time blacklists cause Postfix to perform DNS lookups using client information with domains you specify to determine if a client is listed with one of the DNSBL services:
reject_rbl_client domain
nameRejects a request if a DNS lookup of a hostname composed of the octets of the client IP address in reverse in the specified domain lists an A record.
reject_rhsbl_client domain
nameRejects a request if the client hostname has an A record under the specified domain.
reject_rhsbl_sender domain
nameRejects a request if the domain of the sender address has an A record under the specified domain.
With what we know so far, let’s trace what happens with
some simple HELO restrictions.
Consider that smtpd_helo_restrictions is assigned the following rules:
smtpd_helo_restrictions =
check_helo_access hash:/etc/postfix/helo_access
reject_invalid_hostnameand helo_access contains the following entries:
greatdeals.example.com REJECT oreillynet.com OK
Let’s follow four different scenarios when clients connect with
different HELO commands:
HELO examplePostfix first encounters the check_helo_access rule pointing to the
helo_access lookup table.
In checking the lookup table, it does not find the specified
hostname example, so it moves on to the
reject_invalid_hostname
rule. Since example is not a
complete hostname as required by the standard, Postfix rejects
the message.
HELO
greatdeals.example.comPostfix first encounters the check_helo_access rule pointing to the
helo_access lookup table.
In checking the lookup table, it finds an entry for
greatdeals.example.com with an action of
REJECT. Postfix, therefore, rejects the message.
HELO
oreillynet.comPostfix first encounters the check_helo_access rule pointing to the
helo_access lookup table.
In checking the lookup table, it finds an entry for http://oreillynet.com with an
action of OK. Postfix stops processing for the smtpd_helo_restrictions parameter
without considering any of the other restrictions and moves on
to smtpd_sender_restrictions
if specified.
HELO mail.ora.comPostfix first encounters the check_helo_access rule pointing to the
helo_access lookup table.
In checking the lookup table, it does not find the specified
host mail.ora.com, so it moves on to the
reject_invalid_hostname
rule. Since mail.ora.com
conforms to the format required by the standard, Postfix
continues to the smtpd_sender_restrictions if
specified.
There are two parameters configured in main.cf that require strict adherence to Internet email
standards. Enable the smtpd_helo_required parameter to require that SMTP clients start the conversation with the HELO/EHLO verb, as described in the SMTP RFC. By
default Postfix is rather lenient with clients that do not follow the
protocol exactly. If you specify smtpd_helo_required = yes, and a client skips
this step, Postfix rejects the message. The RFC also specifies exactly
how envelope addresses should be formatted. Normally, Postfix
accepts nearly any envelope address that it can make sense of, but if
you specify strict_rfc821_envelopes =
yes , Postfix rejects messages from clients that do not send
correctly formatted addresses.
In actual practice, it’s probably a good idea to require HELO because most clients at least follow the
basic steps of the protocol. On the other hand, there are a number of
clients that don’t get address formatting correct. Being too strict here
might lose legitimate messages.
The last chance you have to reject a message from Postfix directly is by checking the contents of the message itself. Postfix offers simple content checking through the parameters:
These checks are an all-or-nothing feature with Postfix. There is no way to bypass checks for certain senders or recipients. For more sophisticated analysis, you should use a separate content filter specifically designed to detect spam. See Chapter 14 for more information on using filters with Postfix.
Each parameter points to a lookup table containing regular expression patterns and actions. The patterns are compared to strings within email messages. If Postfix finds a match, the specified action is executed. By default regular expression checking is not case-sensitive. See Chapter 4 for information on using regular expressions with Postfix lookup tables.
By default mime_header_checks and nested_header_checks use the same lookup
tables as header_checks. If you want to distinguish checks for each one, you can
configure them separately; otherwise, configuring header_checks causes mime_header_checks and nested_header_checks to use the same
patterns as header_checks. When you
assign the checking parameters, indicate both the lookup table and which type of regular expression you
are using (see Chapter 4):
header_checks = regexp:/etc/postfix/header_checks body_checks = regexp:/etc/postfix/body_checks
In a pattern-checking lookup table, the lefthand key is a regular expression enclosed by two delimiters (usually forward slashes):
/match string/ REJECT
A typical header_checks file contains lines like the following:
/free mortgage quote/ REJECT /repair your credit/ REJECT /take advantage now/ REJECT
If any of the strings shown appear in any of the headers of a message (these would most likely show up in the Subject: header), the message is rejected. Postfix logs the rejection along with the offending line, and if you specified a message, it is also logged and sent to the client.
The right hand action can be one of the following values. The values that allow an optional text message are indicated. The specified message is sent to the client and logged with the rejection. If you don’t supply a message, Postfix uses the default.
Rejects the message when a line from the message matches the regular expression.
Logs a rejection without actually rejecting the message. This action is useful for testing a regular expression to see what happens in the log before using a REJECT to actually reject the message.
Provides a way to delete headers or lines from the body of a message. If the regular expression matches, the line is dropped from the message. This can be useful to strip out internal network information before sending a message outside your network. Be careful about what you delete since most headers are required by the standards and can be very useful in tracking down email problems.
Causes the message to be placed in the HOLD queue. See Chapter 5 for information about the HOLD queue.
Causes Postfix to claim successful delivery and silently discard the message. Sometimes spammer software won’t take no for an answer. Even if you reject the message with a 5xx error, the client continues to try to deliver it. DISCARD makes it look as if the message was delivered even though it was simply thrown away. DISCARD can also be useful to minimize the backscatter problem mentioned earlier in the chapter. If an innocent user’s email address is used as the sender address, you can claim successful delivery, so that the innocent user does not receive bounce messages.
After queuing the message, Postfix sends it through a separate content filter. See Chapter 14 for more information about setting up separate content filters.
Actions cannot include specific error reply codes or customized restrictions as with access maps.
Header checks compare each header against every pattern in the listed lookup files. Multiline headers are combined into a single line before making comparisons. Each pattern is checked in the order you list them, and checking stops as soon as Postfix finds a match, at which point the message is handled according to the action you specified.
The patterns indicated by the body_checks parameter are checked against each line of the body of
the message. Lines are compared one at a time, and each one is checked
against every pattern in the order you list them. Checking stops as
soon as Postfix finds a match, at which point the message is handled
according to the action you specified.
Very long body lines are compared in chunks that are at most as
long as the value of the parameter line_length_limit . The default is 2048. Also, by default, Postfix checks
the contents of the body only up to the value of body_checks_size_limit . The default is 50 KB. Message headers are compared in
chunks that are limited by header_size_limit. These limits are useful
in preventing Postfix from scanning the entire file when messages
contain large attachments.
Some administrators use header checks for simple virus scanning. You can reject all messages that include attachments with file extensions that might be dangerous to your users:
/name ?="?.*\.(bat|com|dll|exe|hta|pif|vbs)"?/ REJECT
You should include any other extensions that you know might pose a problem for your users. Be aware, however, that this pattern is not really sufficient for true virus scanning since you are certain to miss some extensions, and many PC clients may execute files regardless of their extension.
A typical body_checks file contains lines like the following:
/increase your sales by/ REJECT /lowest rates.*\!/ REJECT /in compliance (with|of) strict/ REJECT /[:alpha:]<!--.*-->[:alpha:]/ REJECT Suspicious embedded HTML comments
The second line matches any string that starts with “lowest rates” followed by any text leading to an exclamation point (“We have our lowest rates in 40 years!”). The fourth line checks for HTML comments that are embedded in the middle of words. Remember that this is a common spammer trick to defeat your content filters, but it’s also a dead giveaway that the message contains spam.
You can test your regular expressions with the postmap command. Place the contents of a message into a file, then redirect the file to postmap:
$ postmap -q - regexp:/etc/postfix/body_checks < msg.txt
opportunity. increase your sales by 500%. Consider REJECTpostmap prints any lines that match any of the regular expressions along with the action specified.
Study the spam you receive to refine and add to your patterns. However, be aware of potential performance problems with poorly written regular expressions. Another potential issue with content checking is that there is no way to whitelist individual messages that you might want to receive despite their containing phrases that trigger a rejection. In particular, if a message is whitelisted during the restriction parameter checking (described earlier in this chapter), it might still be rejected by header and body checks.
As you create rules for detecting spam, keep in mind that your users may differ in what balance they’ll accept between some spam and the possibility of blocking some real messages. If you must create different rules for different users, it’s probably best not to try to accomplish this with an MTA. Instead consider a specialized delivery agent such as procmail, maildrop, or sieve to set up per-user UBE rules. You can use Postfix to set up broad per-user class restrictions, as you’ll see in the next section.
Restriction classes provide the last wrinkle in the Postfix anti-spam parameters. They allow you to define a set of restrictions that you can assign to the righthand side of an access table. They cannot be used in header and body checks—only in access tables. Restriction classes let you set up different restrictions for different clients, senders, and recipients. Restriction classes are a powerful tool that can provide great flexibility in Postfix UBE restrictions. If you require any sort of complicated rules to block spam, it is well worth your while to invest the time to understand restriction classes.
Restriction classes are particularly useful when you need to create exceptions to your normal restrictions. To illustrate with an example, let’s create two classes of users. One group wants to receive all messages addressed to them whether or not the messages are spam. The other group prefers particularly stringent checks against spam even at the risk of losing some legitimate mail.
We’ll call the two classes “spamlover” and “spamhater.”
You must list all of the restriction classes you plan to define in the
smtpd_restriction_classes
parameter:
smtpd_restriction_classes = spamlover, spamhater
We’ve invented the names of the classes, but once listed with
smtpd_restriction_classes, they can
be treated like any other restriction rule. You can assign a list of
restrictions to be considered for the class. Once defined, the
restriction class can be used as an action in an access table. When
Postfix encounters the class, it steps through the assigned
restrictions.
We’ll define “spamhater” with several restrictions:
spamhater =
reject_invalid_hostname
reject_non_fqdn_hostname
reject_unknown_sender_domain
reject_rbl_client nospam.example.comand “spamlover” with a simple “permit”:
spamlover = permit
You could, of course, refine these with restrictions that make sense for your own configuration.
Now that the restriction classes have been declared and defined, you can put them to use by assigning the appropriate class to each of our recipients in a lookup table. We’ll call the table per_user_ube.
# # per_user_ube # abelard@example.com spamhater heloise@example.com spamlover
Next, tell Postfix that it should check your recipient lookup table when checking restrictions:
smtpd_recipient_restrictions =
permit_mynetworks
reject_unauth_destination
check_recipient_access hash:/etc/postfix/per_user_ubeWhen a message comes in addressed to
abelard@example.com, Postfix goes through the
normal default restrictions and then encounters check_recipient_access pointing to the
recipient lookup table. Postfix finds the recipient address in the
file, reads the action spamhater,
and then invokes the restrictions defined for spamhater. If any of the “spamhater”
restrictions returns REJECT, Postfix rejects the message; otherwise,
it is delivered. Messages for heloise@example.com
go through the same process, but when Postfix checks the “spamlover”
restrictions, it finds permit and
immediately accepts the message.
Now that we’ve covered the many aspects of Postfix’s anti-spam arsenal, we’ll finish with an example configuration. Requirements vary considerably from site to site, so it’s impossible to make actual recommendations apart from the considerations that have been discussed in this chapter. Example 11-2 can provide a starting point, but you must decide for yourself which restrictions fit your own circumstances.
smtpd_restriction_classes =
spamlover
spamhater
spamhater =
reject_invalid_hostname
reject_non_fqdn_hostname
reject_unknown_sender_domain
reject_rbl_client nospam.example.com
spamlover = permit
smtpd_helo_required = yes
smtpd_client_restrictions =
check_client_access hash:/etc/postfix/client_access
smtpd_helo_restrictions =
reject_invalid_hostname
check_helo_access hash:/etc/postfix/helo_access
smtpd_sender_restrictions =
reject_non_fqdn_sender
reject_unknown_sender_domain
check_sender_access hash:/etc/postfix/sender_access
smtpd_recipient_restrictions =
permit_mynetworks
reject_unauth_destination
reject_non_fqdn_recipient
reject_unknown_recipient_domain
smtpd_data_restrictions =
reject_unauth_pipelining
header_checks = /etc/postfix/header_checks
body_checks = /etc/postfix/body_checksYou should enter IP and email addresses into the access tables
from messages you receive that you have identified as spam. It’s very
difficult to block a lot of spam with the check_helo_access and check_sender_access restrictions because it’s
so easy for spammers to fake that information. There is effectively an
unlimited number of addresses and hostnames spammers might use. This
makes it nearly impossible to keep up with them. Since it’s so easy to
fake this information, you might be blocking legitimate hosts and
addresses that just have the bad luck of having their information used
by spammers.
But these checks can be useful against messages that repeatedly
use the same forged information and spammers that don’t attempt to cover
their tracks. Some online marketing services use their real information
when sending spam. These sites might even honor removal requests, but if
you object to having to request a removal from companies you’ve never
heard of, you can block them based on the HELO or MAIL
FROM information.
You can also block sites that you don’t want to hear from whether they’re real or fake. Mail from a site you consider objectionable is one example. Also, if you believe it’s impossible that you would be receiving messages from the Republic of Maldives, you could block addresses and hostnames using the Republic of Maldive’s top-level domain. Keep in mind, however, if you run a mail system for many users, you probably shouldn’t force your own moral attitude on everyone, or assume your users don’t have Maldivian relatives or a special interest in the cuisine.
The basic SMTP protocol does not provide a mechanism to authenticate users. Since email envelope addresses are so easy to fake, you can’t know who is sending mail to your server unless you have a reliable means to authenticate clients. To allow mail relay privileges on your server, you need assurance that senders are who they claim to be, and you cannot rely on the senders’ email addresses as identification. In this chapter, we look at using the Simple Authentication and Security Layer (SASL) as a means to control mail relaying and generally to identify who is using your mail server.
You might want to provide access to individuals using your mail server as their SMTP server, or to other MTAs that relay through your system. We’ll also look at configuring Postfix to provide its own credentials to other MTAs that may require authentication before permitting email delivery or relaying. Chapter 4 discusses the mail relay problem in general, and some other solutions to consider.
Because you lock down your mail servers to prevent unauthorized relaying, some of your users might have trouble sending email when they are not on your network. If you have users that travel with laptops, for example, they will likely connect through a nearby ISP and get an IP address from its dial-up pool. Or perhaps you have users that work from home. In any case, whenever you don’t know what users’ IP addresses will be, SASL can provide the means to reliably identify them.
RFC 2554, “SMTP Service Extension for Authentication,” provides an extension to the basic SMTP protocol that allows clients to authenticate to an SMTP server using the SASL protocol. We’ll show how to use the Cyrus SASL libraries from Carnegie Mellon to add SASL to Postfix. You may optionally also want to add support for TLS (see Chapter 13). TLS (formerly SSL) is most commonly used to encrypt conversations between web browsers and servers, but works equally well for mail servers and clients. Since some of the SASL password mechanisms transmit passwords as plaintext, you can use TLS to make sure your passwords are not sent in the clear.
Adding SASL to Postfix requires that you have the Cyrus libraries on your system and that your Postfix system be compiled with them. Remote users must configure their email clients to send a login and password when they want to relay mail through your system. Most modern email clients make this a fairly easy configuration option.
SASL is a general method to add or enhance authentication in client/server protocols. Its primary purpose is to authenticate clients to servers. When you configure SASL, you must decide on both an authentication mechanism , for the exchange of authentication information (commonly referred to as user credentials), and an authentication framework for how user information is stored. The SASL authentication mechanism governs the challenges and responses between the client and server and how they should be encoded for transmission. The authentication framework refers to how the server itself stores and verifies password information. Figure 12-1 illustrates these two processes. Once an authentication is successful, the server knows the user’s identity and can determine which privileges the identified user should have. In the case of Postfix, it is the privilege to relay mail. You can also optionally limit identified users to using a particular sender address when they relay mail.
The client and server must agree on the authentication mechanism they’ll use. (See the Cyrus documentation for currently supported mechanisms.) Some of the more common mechanisms are listed below:
The PLAIN mechanism is the simplest to use, but it does not include any encryption of authentication credentials. You may want to use TLS (see TLS information in Chapter 13) in conjunction with the PLAIN mechanism. The login and password are passed to the mail server as a base64 encoded string.
The LOGIN mechanism is not an officially registered or supported mechanism. Certain older email clients were developed using LOGIN as their authentication mechanism. The SASL libraries support it in case you have to support such clients. If you need it, you must specify support for it when you compile the libraries and Postfix. See Appendix C if you are building your own Postfix. If you are using a packaged distribution and you need LOGIN support, check the documentation with your distribution to make sure it includes it. If it is used, the authentication exchange works the same as the PLAIN mechanism.
OTP is an authentication mechanism using one-time passwords (formerly S/Key). The mechanism does not provide for any encryption, but that may not be necessary since any captured password is good for only a single session. SMTP clients must be able to generate OTP authentication credentials.
With the DIGEST-MD5 mechanism, both the client and server share a secret password, but it’s never sent over the network. The authentication exchange starts with a challenge from the server. The client uses the challenge and the secret password to generate a unique response that could be created only by somebody who has the secret password. The server uses the same two pieces, the challenge and secret password, to generate its own copy, and compares the two. Since the actual secret password is never sent across the network, it’s not vulnerable to network eavesdropping.
Kerberos is a network-wide authentication protocol. Unless you are already using Kerberos on your network, you probably don’t need to support the KERBEROS mechanism. If you are using Kerberos, using SASL is a nice way to fit SMTP authentication into your existing infrastructure.
SASL includes an ANONYMOUS mechanism, which might make sense for some protocols, but has no benefit for SMTP. An open relay is essentially using an anonymous mechanism, and the purpose of SMTP authentication is to eliminate open relays.
When a client connects to a mail server, the server typically lists all of the password mechanisms it supports, in order of preference. The client tries the first one it supports. If that fails, it may be configured to try additional mechanisms until it can authenticate successfully. If the client and server cannot successfully negotiate over a common mechanism, authentication fails.
Once the server and client agree on a mechanism, they begin the authentication process, consisting of one or more challenges and responses that are governed by the agreed-upon mechanism. The protocol also specifies how these exchanges should be encoded.[1]
The SASL authentication framework can use your existing Unix system passwords (for example, passwd, shadow, or PAM) or a separate password file just for authenticating SMTP users. Other options include Kerberos or even a new scheme of your own.
Ultimately, your choice comes down to where and how you want to store your authentication information. Consider your network and how your users currently authenticate to decide which framework works best for you. If your mail users already authenticate on your network through PAM, for example, then you probably want to configure SASL to use your existing system. If, on the other hand, most of your SMTP users are virtual accounts (without system logins), you should opt for a separate password database for SMTP users. Often your POP/IMAP server can share the same user database, making this a convenient option for virtual mail accounts.
[1] Note: that’s encoded, not encrypted. A particular mechanism may or may not include encryption of the client’s credentials.
Before getting started with SASL, you should decide which framework and mechanism you will use because it affects your installation and configuration. In order to enable SASL authentication in Postfix, you must have the Cyrus SASL library and a copy of Postfix with SASL support compiled in. Some platforms have precompiled packages available with support for SASL. If you want to use a precompiled Postfix package make sure that it specifically includes support for SASL and has the necessary SASL libraries. Furthermore, make sure that the SASL libraries were compiled with the options you need for your situation. The relevant options are described throughout the rest of this section.
Cyrus SASL library development is currently following two tracks: SASL and SASLv2. The SASL track is being phased out in favor of SASLv2. In the future, you can expect Postfix to include support for SASLv2 only. This chapter discusses SASLv2. You must have the correct combination of versions of both Postfix and the SASL libraries.
You should be able to use the latest stable version of the SASLv2 track of the Cyrus libraries. Postfix support for SASLv2 first appeared in the experimental release Version 1.1.7-20020331 and was included in the official release 2.0. It is very important that you use a version of Postfix that supports SASLv2 to follow the directions in this chapter. When the text mentions SASL, it refers to Version 2 of the library.
Before you get started, decide on the authentication mechanisms you plan to support and the authentication framework you want SASL to use with Postfix.
The SASL library uses a separate configuration file for each application it works with. Postfix uses a file named smtpd.conf for SASL purposes. This file is usually located at /usr/local/lib/sasl2/smtpd.conf. At a minimum, smtpd.conf contains a line indicating the framework to use. We are going to look at specifying either Unix passwords or separate SASL passwords for Postfix authentication. See the Cyrus documentation to see other options you might include in smtpd.conf.
Often, it’s most convenient for SASL to use the existing system database to authenticate users. Historically, this meant using the /etc/passwd file. Today, it’s more likely that you use /etc/shadow, PAM, or some related authentication database. Since these passwords are not available to unprivileged processes, and Postfix purposely runs with limited privileges, it cannot normally authenticate users.
The Cyrus libraries deal with the problem by providing a special authentication server called saslauthd . It handles requests on behalf of Postfix. The saslauthd daemon requires superuser privileges; however, since it runs as a process distinct from Postfix and does not have to communicate outside of your network, the security impact is minimized. If you are going to use Unix passwords with SASL, you must run the saslauthd daemon that ships with the Cyrus distribution. Note that using Unix passwords with saslauthd limits you to plaintext passwords because the daemon needs the actual passwords to verify them. See Chapter 13 for using encryption between Postfix and email clients.
To specify that you want Postfix to use the saslauthd daemon for authentication, create the smtpd.conf with a line like the following:
pwcheck_method: saslauthd
saslauthd comes with the
Cyrus SASL distribution and should be installed in a convenient
location. The daemon must be running in the background for Postfix
to use it to authenticate clients. When you start saslauthd , you tell it what type of password system you are
using with the -a option. The
most common options are pam,
shadow, or getpwent (for the conventional /etc/passwd). For example, to start the
daemon on a system that uses PAM for authentication, type the command:
# saslauthd -a pamConsult the Cyrus documentation for other options when using saslauthd . Also, you probably want this daemon to start automatically at system initialization so that it is always available for your Postfix server. You can add saslauthd to your system’s startup processes in the same way you add other daemons such as Postfix.
If you don’t want your mail server to use existing system accounts, you can create a separate database of users and passwords that is independent of the system password mechanism. You can create accounts for email users who have mail access only and will not be able to log into the host itself. Include the following line in your smtpd.conf file:
pwcheck_method: auxprop
The term auxprop comes from
the Cyrus notion of auxiliary property plug-ins. Plug-ins allow you to insert external
programs for authentication. The Cyrus SASL distribution ships with
sasldb as the default auxiliary property plug-in and that
should be all you need to work with Postfix. The keyword auxprop simply says to use an external
SASL password file.
You do not have to run the saslauthd daemon when using SASL
passwords, but you must create the external password file containing
credentials for all of your email accounts. By default, the SASL
username/password file is kept at /etc/sasldb2. The Postfix SMTP server
needs at least read access to the file, and if you use the auto_transition feature of Cyrus SASL (see the Cyrus documentation),
Postfix will also require write access to the file. If you don’t
need the auto_transition feature,
it’s best not to give Postfix write access to the password
file.
If you have other processes that also need access to the file
(such as a POP/IMAP server), you may have to adjust the ownership
and permissions so all the processes that need it can access it. For
example, you might want to create an sasl group
on your system. Make sure that the postfix user
and other accounts that need access to the file are all in that
group. If any of the other processes need to update the file, then
read-only is too restrictive and you’ll have to provide write access
for the processes that need it. To set the permissions to 440, so that it is read-only and not
generally readable by users on the system, type the following
commands:
#chown postfix:sasl /etc/sasldb2#chmod 440 /etc/sasldb2
To create accounts for your SMTP server, use the
saslpasswd2 command included with the Cyrus SASL distribution. It
stores accounts in /etc/sasldb2. You must specify both a
username and an SASL domain. For Postfix the domain should be the value
specified in the myhostname
parameter. If you use the command postconf
-h myhostname to determine your hostname, you can be sure you have
the correct one. The following command creates an account for the
user kdent:
# saslpasswd2 -c -u `postconf -h myhostname` kdent
Password:
Again (for verification):Enter the password twice, as prompted. The -c option tells saslpasswd2 to create the user account,
and -u is used to specify the
domain for this account, which you take directly from the Postfix
configuration.
All of the relevant Postfix parameters for SASL password
authentication start with smtpd_sasl* for the SMTP server or smtp_sasl* for the SMTP client. For server
configuration you need at a minimum the smtpd_sasl_auth_enable parameter and the permit_sasl_authenticated restriction, which
must be assigned to one of the smtpd restriction parameters. See Chapter 11 for more information on UBE
restrictions.
In order to turn on authentication in the Postfix SMTP server, add the enable parameter to your main.cf file:
smtpd_sasl_auth_enable = yes
In addition, some older email clients[2] don’t follow the SMTP authentication protocol
correctly. The specification calls for the server to list its
supported mechanisms after the keyword AUTH followed by a space. These clients
expect to receive AUTH followed
by an equals sign. Postfix allows you to accommodate them by setting
the following parameter:
broken_sasl_auth_clients = yes
By setting this parameter, you tell Postfix to advertise its SMTP authentication support in the nonstandard way as well as the standard way. This option is perfectly safe to use since it doesn’t interfere with other mail clients, and the nonstandard ones will now work as well.
To make sure that clients use correct sender addresses when relaying, Postfix allows you to map sender addresses to SASL logins. For example, if you have an address kdent@example.com that should be used only by the SASL user kdent, you can create a file requiring the correct user for that address:
kdent@example.com kdent
The file is a normal Postfix lookup table and allows regular expressions as well as
local parts and domains (see Chapter
4 for information on Postfix lookup tables). Use the
parameter smtpd_sender_login_maps
in main.cf to
indicate the table you create:
smtpd_sender_login_maps = hash:/etc/postfix/sasl_senders
You can list as many addresses as you need in the table. To
reject messages from users attempting to use incorrect sender
addresses or users who are not authenticated at all who attempt to
use a specified address, include the restriction reject_sender_login_mismatch with your
restriction parameters (see Chapter
11 for information on UBE restrictions).
If you are already using the smtpd_recipient_restrictions parameter as part of your UBE blocking, you have to
tell Postfix to allow authenticated users to relay by adding
permit_sasl_authenticated
to the list of restrictions. If you were previously
using the default and didn’t need a smtpd_recipient_restrictions parameter,
just add the following line:
smtpd_recipient_restrictions = permit_mynetworks,
permit_sasl_authenticated, reject_unauth_destinationIf you are already using the smtpd_recipient_restrictions parameter,
just add permit_sasl_authenticated to the list of
restrictions. Be sure to include some kind of rejection restriction
in your list (see Chapter
11).
The smtpd_sasl_security_options parameter lets you control which password mechanisms
are listed when clients connect to your SMTP server. The complete
list of available mechanisms depends on your system and the
mechanisms that were available when your SASL libraries were built.
If you don’t specify any options, the default is to accept all
available mechanisms including plaintext passwords, but not
anonymous logins. If you are using the saslauthd daemon, you must accept plaintext passwords, so the
default configuration probably makes the most sense. If you specify
any of the options, you override the default, so make sure that you
include noanonymous among your
options. If you set this parameter, you can specify any combination
of the following values. For example:
smtpd_sasl_security_options = noanonymous, noplaintext
Common mechanisms include:
noplaintextIf your security policy does not permit passwords to be
sent as plaintext, specify noplaintext . This causes SASL to use one of the
challenge/response techniques that authenticate without
transmitting actual passwords.
noactiveIn active attacks, attackers manage to insert themselves
between the client and server. Some types of active attacks
are commonly referred to as man-in-the-middle attacks. Attackers may be able
to read or alter data as it is transmitted or pretend to be
the client or server. Specify noactive to limit supported password
mechanisms to those that are not known to be vulnerable to
active attacks.
nodictionaryIn dictionary attacks, attackers run through a preassembled
database of possible passwords trying each one in turn to see
if it allows access. Databases are typically made up of lists
of cities, teams, proper names, and all dictionary words plus
obvious variations on the words. Specify nodictionary to limit supported
password mechanisms to those that are not known to be
vulnerable to dictionary attacks.
noanonymousAnonymous logins have no useful purpose for SMTP
servers. By default Postfix does not allow anonymous logins. If you specify any other
options, be sure to also specify noanonymous since you will be
overriding the default.
mutual_authYou can require mechanisms that provide mutual
authentication where both the client and server provide
credentials proving their identities. Specify mutual_auth to limit advertised
mechanisms to those that provide for mutual
authentication.
Following are step-by-step instructions summarizing the configuration described in this chapter. This is a broad overview of what’s required to set up your Postfix system with SASL:
Determine the authentication mechanisms and framework you plan to support.
Install the SASL libraries and recompile Postfix with SASL support. Or obtain a Postfix distribution with SASL, including support for the authentication mechanisms and SASL options you need.
Reinstall Postfix.
Create the file /usr/local/lib/sasl2/smtpd.conf. Enter
either saslauthd or auxprop for pwcheck_method.
If you are using Unix passwords for authentication, start the saslauthd daemon, specifying the type of authentication in use on your system. Otherwise, use the saslpasswd2 command to create email accounts on your system.
Edit main.cf to turn on authentication. This requires that you enable SASL and that you specify that authenticated clients should be allowed to relay mail. A basic setup requires at least the following parameters:
smtpd_sasl_auth_enable = yes
smtpd_recipient_restrictions = permit_mynetworks,
permit_sasl_authenticated, reject_unauth_destinationReload Postfix so that it recognizes the changes in its main.cf configuration file:
# postfix reload[2] Reportedly, Microsoft Outlook and Outlook Express before Version 5, but you may have to experiment to determine if your clients are culprits.
It’s probably best to try authenticating to your SMTP server manually before having your users attempt it with their email clients. By connecting to your SMTP server and manually authenticating, you can see exactly what response you get, and you can immediately check your log file for any other important information.
The easiest way to connect to your SMTP server is to use a Telnet client and then start speaking SMTP to your server. (Chapter 2 shows a sample SMTP session.) The PLAIN mechanism is the easiest to test, so if you have disabled it, you may want to enable it just to confirm that authentication works. You can disable it after you are finished testing.
To authenticate using the PLAIN mechanism, you must send the command AUTH followed by your
credentials encoded using base64. Your credentials are a
combination of the authorization identity (identity to login as), followed by
a null character, followed by the authentication identity (identity whose password will be
used), followed by a null character, followed by the password. Usually,
the authorization identity is the same as the authentication identity,
and we’ll assume as much here. Using the credentials for the user
kdent, you need to encode the string 'kdent\0kdent\0Rumpelstiltskin‘.
The tricky part is to encode your credentials in base64 without including a carriage return character. If your system has the mmencode and printf commands, it should be simple. The printf command prints formatted strings, and does not automatically include a linefeed like the more common echo command. The mmencode command simply converts strings into various MIME formats and uses base64 by default, which is exactly what we need.
You can get the encoded string you need by executing the following:
$ printf 'kdent\0kdent\0Rumpelstiltskin' | mmencode
a2RlbnQAa2RlbnQAcnVtcGxlc3RpbHRza2luOn some platforms printf might not handle the null characters embedded in the middle of the string correctly. You’ll know that you have this problem if the encoded string is shorter than your original string. You can try using the echo command with the -n switch instead of printf if it’s available on your system. The -n tells echo not to include a trailing newline character. If you cannot get echo or printf to cooperate, or if you do not have the mmencode command, you can find a simple Perl solution in the sidebar in this chapter to get the string you need.
Once you have the string you need, cut and paste it into your Telnet session. In the example below, you type the telnet command to get things started, and then all of the bold lines. Here you are testing authentication on the host mail.example.com. You should specify your own system’s name:
$telnet mail.example.com 25Trying 192.168.100.5... Connected to mail.example.com. Escape character is '^]'. Server: 220 mail.example.com ESMTP PostfixEHLO test.ora.com250-mail.example.com 250-PIPELINING 250-SIZE 10240000 250-VRFY 250-ETRN 250-AUTH LOGIN PLAIN DIGEST-MD5 CRAM-MD5 250-XVERP 250 8BITMIMEAUTH PLAIN a2RlbnQAa2RlbnQAcnVtcGxlc3RpbHRza2luServer: 235 Authentication successfulquitServer: 221 Bye Connection closed by foreign host.
If you do not see a message that the authentication was successful, check your mail log to see what Postfix has reported. Problems can be tricky to track down because there are many pieces involved.
When you test authentication using Telnet, if you don’t see the line:
250-AUTH LOGIN PLAIN DIGEST-MD5 CRAM-MD5
listed among the server’s extensions, make sure that you didn’t
forget smtpd_sasl_auth_enable
in your main.cf
file. If the parameter is there (without typos), then you’d better look
at how you compiled Postfix and make sure that it was built with support
for SASL.
If the log tells you that it cannot open the db file, make sure that the password file
exists in the /etc directory and
that the permissions are set so the postfix account
has access to it. The Cyrus distribution comes with some utilities that
might help you diagnose problems. Check the documentation for the
sasldblistusers2 and the saslpasswd2 commands.
You may want your Postfix server to relay through other servers that require SMTP authentication. In addition to requiring passwords on your own server, you can configure Postfix to provide login names and passwords when relaying mail through other SMTP servers.
You have to provide Postfix with a password file that contains the
credentials it should use when authenticating to other servers. Entries
in the password file contain a domain or hostname, username, and
password in the form: domain
username:password. For the domain or hostname, Postfix
first checks for the destination domain from the recipient address. If
it doesn’t find the domain, it then checks for the hostname it is
connecting to. This allows Postfix to work easily with sites that have
multiple MX hosts that share the same user database. Use smtp_sasl_password_maps parameter to specify where your password file is.
The client smtp_sasl_security_options parameter works just like server smtpd_sasl_security_options (discussed earlier
in the chapter) for the SMTP servers. If you don’t specify any options,
the default allows all available mechanisms including plaintext but not
anonymous logins.
Use the following steps to configure Postfix to provide a login and password when relaying mail. In this example, you’ll set up two different passwords for Postfix to authenticate when relaying through any server for the domain ora.com and through a host called mail.postfix.org:
Create a file called /etc/postfix/sasl_passwd with entries for each host, login, and password combination you need. Your file should resemble the following:
ora.com kdent:Rumpelstiltskin mail.postfix.org kyle:quixote
Execute postmap on the file:
# postmap /etc/postfix/sasl_passwdEdit main.cf to turn on
client authentication. Notice that you are now setting smtp_sasl_auth_enable instead of smtpd_sasl_auth_enable as you did to
turn on authentication at the server. You must also set smtp_sasl_password_maps to point to the password file you created:
smtp_sasl_auth_enable = yes smtp_sasl_password_maps = hash:/etc/postfix/sasl_passwd
Reload Postfix so that it recognizes the changes in its main.cf configuration file:
# postfix reloadNow, when the Postfix SMTP client attempts to relay messages
through any of the domains or hosts listed in /etc/postfix/sasl_passwd, it will offer the
corresponding authentication credentials. For example, if your Postfix
smtp client connects to the server
mail.ora.com, it authenticates with the username
kdent and the password Rumpelstiltskin.
Transport Layer Security, or TLS (formerly known as SSL), enhances TCP communications by adding encryption for privacy and message integrity. RFC 3207 defines an extension to SMTP known as STARTTLS. Its primary purpose is to provide privacy in peer-to-peer communications. It can also give you assurances that your mail is not being delivered to a rogue system posing as the server you think you’re sending mail to. Another useful application is in combination with SASL, to protect plaintext passwords that would otherwise be sent in the clear.
One nice benefit of TLS is that you can obtain the privacy and assurances of reliable server identification without a previous arrangement between systems. Strong authentication is also possible if your users’ email clients support it. By using client certificates, which are cryptographically signed identifiers (see sidebar), your mail server can be sure that connecting clients are indeed who they claim to be. You can use client certificates in place of or in conjunction with SASL authentication discussed in Chapter 12. There is administrative overhead in managing client certificates and assisting users in configuring their email clients to use them, while using TLS just to encrypt authentication credentials is fairly easy to set up.
It is important to note, however, that TLS is not meant to protect the contents of email messages. When you encrypt the transmission between a client and server, everything (including the message) is encrypted. However, TLS protects only the transmission between the two systems. After the server receives a message, it is probably stored as plaintext. You can’t be sure if the message will be encrypted or not when the server forwards it to the next destination, or when the final recipient downloads the message to read it. Unless you can control and encrypt the path all the way from the originating client to the ultimate recipient of the message, it will most likely pass in the clear at some point on its way to delivery. To achieve end-to-end privacy you need a client solution such as PGP or S/MIME.
Support for TLS in Postfix is provided by a set of patches written by Lutz Jänicke. You can follow the link for Add-on Software from the Postfix home page to download the patches. (See Appendix C for information on building Postfix with the TLS patches.) If you are using a prebuilt Postfix package for your platform, make sure that it has the TLS patches built in.
In addition to compiling Postfix to support TLS, you must also create and configure TLS certificates. You need both a private key and a public key. The public key is a signed certificate identifying your server. It is validated and digitally signed by a certificate authority (CA), which attests that your certificate does, in fact, identify your system (see sidebar in TLS Certificates Brief Overview). In addition to your own certificates, you must also have the public key of the CA that signed your certificate.
You can register with any of the many CAs to obtain a signed certificate, or you can act as your own CA. The clients connecting to your TLS-enabled server must recognize and acknowledge the CA you use and agree to accept it as an authority to attest to your identity. Generally, it is a fairly simple configuration option in email clients to accept a certificate and have the CA public key added to its list of trusted authorities if it isn’t listed already.
The TLS patches for Postfix were written using the OpenSSL libraries. The libraries come with command-line tools for managing certificates, which you will need to generate certificates. For Postfix purposes, all of your certificates must be in the PEM format, which is base64 encoded data with some additional header lines. The default output for the OpenSSL tools is PEM, so you won’t have to convert any certificates you generate to use with Postfix. By default, the OpenSSL tools are installed below /usr/local/ssl. The openssl command is the utility you’ll use most often in managing your certificates.
Your server certificates have to be signed by a CA. You can easily set yourself up as a CA to sign your own certificates. The OpenSSL distribution includes a script to configure yourself as a CA. From the SSL home directory, type the following:
# misc/CA.pl -newcaAnswer all of the prompts as requested. This sets up all of the necessary CA files below ./demoCA. Later, when you issue the command to sign a certificate, the openssl command will refer to these root certificates.
You can use the openssl command to generate the public and private keys for your server. From the public key, you create a certificate signing request (CSR) to send to a CA for validation. Once signed, your public certificate can be widely distributed, but your private keys must be carefully guarded. In fact, many applications store encrypted private keys and require a pass phrase to access them. You cannot use encrypted keys with Postfix, however, because different components need read access to the keys as they are started by the master daemon.
The OpenSSL distribution includes scripts to help you generate keys and certificate-signing requests, but the scripts encrypt the keys by default. Since you want to leave the keys unencrypted, it’s just as easy to use the openssl command directly. Execute the following command to create a public and private key to be used with Postfix:
$openssl req -new -nodes -keyout mailkey.pem \-out mailreq.pem -days 365
The openssl command with the
-new option creates both a private
key and a CSR. The -nodes option
tells openssl not to encrypt the
key. -keyout and -out indicate the names of the files where
the private key and the CSR should be created. Finally, -days 365 says to make the certificate valid
for one year.
If you are using a third-party CA, follow its directions for getting your certificate request signed. You will be sending in the mailreq.pem file created above. If you are acting as your own CA, you can sign the file yourself with the following command:
# openssl ca -out mail_signed_cert.pem -infiles mailreq.pemThis produces the file mail_signed_cert.pem, which will serve as your signed certificate.
You probably want to copy all of your Postfix/TLS-related certificate files to a convenient location. If you used all of the defaults, execute the following commands to move the certificate files into the Postfix configuration directory:
#cp /usr/local/ssl/mailkey.pem /etc/postfix#cp /usr/local/ssl/mail_signed_cert.pem /etc/postfix
These files represent your server private key and public certificate. Because you created the private key without encrypting it, you must protect it by using permissions that are as restrictive as possible. Use the following commands to make sure it is owned and readable only by the root account.
#chown root /etc/postfix/mailkey.pem#chmod 400 /etc/postfix/mailkey.pem
Your Postfix/TLS server must have access to the public certificate of the CA that signed your server certificate and any CAs that signed certificates for your users. If a single CA signed both, you need only one CA certificate. If you are acting as your own CA, copy the cacert.pem file that was created after you ran the CA.pl script:
# cp /usr/local/ssl/demoCA/cacert.pem /etc/postfixIf you used a third-party CA to sign your public certificate, place that organization’s PEM-format public certificate in the file /etc/postfix/cacert.pem. You will also need public certificates from any CA that signed client certificates you intend to trust.
There are two different ways to add CA certificates to
Postfix/TLS. The first keeps all of the certificates together in a
single file defined by the smtpd_tls_CAfile parameter. You simply
append new certificates to the existing file. If, for example, your CA
certificates are stored in /etc/postfix/cacert.pem, and you have a new
certificate stored in a file called newCA.pem, use the following commands to
add your new CA certificate:
#cp /etc/postfix/cacert.pem /etc/postfix/cacert.pem.old#cat newCA.pem >> /etc/postfix/cacert.pem
(Be sure to type two angle
brackets so that you don’t overwrite the file.)
The other option is to keep all of your CA certificates in
separate files. This option makes maintenance of CA certificates a
little easier, but the certificates will not be automatically
available to a chrooted Postfix. Most likely you would choose this
option if you have a lot of CA certificates to deal with. The
parameter smtpd_tls_CApath points
to a directory where the CA certificates are stored. To add additional
certificates, simply copy a new certificate file into the directory
and execute the c_rehash utility
that comes with OpenSSL. For example, if you have a new certificate
stored in a file called newCA.pem
and you store all of your certificate files in /etc/postfix/certs, use the following
commands to add it to your Postfix installation:
#cp newCA.pem /etc/postfix/certs#c_rehash /etc/postfix/certs
The TLS patches for Postfix introduce additional parameters for dealing with TLS within the SMTP server. Following are some of the critical TLS parameters that you’ll need for the basic configuration. See the sample configuration file that comes with the patch distribution for additional TLS parameters.
smtpd_use_tlsTurns on server TLS support. Otherwise, Postfix operates
as it would without the TLS patch. For example: smtp_use_tls = yes
smtpd_tls_key_filePoints to the file containing your server’s private key.
For example: smtpd_tls_key_file =
/etc/postfix/mailkey.pem
smtpd_tls_cert_filePoints to the file containing your server’s signed
certificate. For example: smtpd_tls_cert_file =
/etc/postfix/mail_signed_cert.pem
smtpd_tls_CAfilePoints to the file containing the public certificates
identifying Certificate Authorities you trust. For example:
smtpd_tls_CAfile =
/etc/postfix/cacert.pem
smtpd_tls_CApathPoints to a directory of files each containing a public
certificate for a Certificate Authority you trust. For example:
smtpd_tls_CApath =
/etc/postfix/certs
Once you set these parameters in your main.cf file and reload Postfix, your server will be ready to handle encrypted connections.
Following is a summary of the steps to follow in order to set up Postfix to use TLS:
If it’s not already installed on your system, install the OpenSSL distribution that you’ll need to generate TLS certificates.
Recompile and reinstall Postfix with the TLS patch (see Appendix C) or obtain a Postfix distribution that includes the TLS code.
Generate server certificates including a certificate-signing request. You can validate the signing request yourself if you’re acting as your own CA or send it to a third-party CA for validation.
Install your certificates (server secret key, signed public certificate, and your CA’s public certificate) into the Postfix directory.
Edit main.cf and set the following parameters for TLS:
smtpd_use_tls = yes smtpd_tls_key_file = /etc/postfix/mailkey.pem smtpd_tls_cert_file = /etc/postfix/mail_signed_cert.pem smtpd_tls_CAfile = /etc/postfix/cacert.pem
If there are other TLS parameters that you want to set, do so here (see the TLS patches documentation).
Reload Postfix so that it recognizes the changes in its main.cf configuration file:
# postfix reloadNow, when a client requests an encrypted session, your server should be able to respond appropriately.
You may want to use client-side certificates instead of, or in addition to, other SMTP authentication techniques. Client-side certificates provide an excellent method of authentication that can be very difficult to fake.
Client-side certificates must be signed by a CA. If you plan to have your users’ certificates signed by a third-party CA, you should follow the directions from your CA for creating client-side certificates. You can also create client certificates and sign them yourself using tools from the OpenSSL package.
Creating client certificates is just like creating the server certificate we saw earlier in the chapter with the added step of converting the signed certificate into a format that email clients can import. Most popular mail clients expect certificates in the PKCS12 format, which packages together the signed certificate and private key and protects them with a password. If you use a third-party CA, the company will most likely provide you or your users with the correct format needed for your particular email client. If you are signing certificates yourself, you have to create a PKCS12-formatted file to give to your users. The file is created with the user’s signed certificate, the private key corresponding to that certificate, and your own CA public certificate.
You have to create a separate certificate/key pair for each user you plan to authenticate with certificates. You should decide on a policy for choosing a distinguished name. Generally, you would use the individual’s email address or the client machine’s hostname when generating the certificates. The steps below walk through creating a certificate for a user with the email address kdent@ora.com:
Using the openssl command, generate a private and public key for your user. Remember that your public key also has to be signed by a CA (possibly yourself):
$openssl req -new -nodes -keyout kdentkey.pem \-out kdentreq.pem -days 365
This command creates both a private key and a CSR, as
specified by the -new option.
The -nodes option tells
openssl not to encrypt the
key (see Section
13.2.2). -keyout and
-out indicate the names of
the files where the private key and the CSR should be created.
Finally, -days 365 says to
make the certificate valid for one year.
If you are using a third-party CA, follow their directions for getting your certificate request signed. You will be sending them the kdentreq.pem file you created above. If you are acting as your own CA, you can sign the file yourself with the following command:
# openssl ca -out kdent_signed_cert.pem -infiles kdentreq.pemOnce you have the signed certificate, convert it to a format that can be used by your users’ email clients:
#openssl pkcs12 -in kdent_signed_cert.pem -inkey \kdentkey.pem -certfile /etc/postfix/cacert.pem -out kdent.p12 \-export -name "kdent@ora.com"
You will be prompted to provide a password for the file
the command creates. You will have to provide your user with the
password you select. The -certfile option points to your own CA
certificate file. In this example, you’re using the file as
created by the CA.pl script.
Once finished, you can provide your user with the kdent.p12 file and the password you
used when creating it.
Your user should now be able to import the file into a mail client that supports the PKCS12 format.
Postfix/TLS uses certificate fingerprints to identify acceptable certificates. A fingerprint is a cryptographic hash calculated from a signed certificate. Fingerprints for each certificate are stored in a standard Postfix lookup table (see Chapter 4). When a client presents a certificate, Postfix/TLS calculates the fingerprint from the certificate and compares it to those listed in its lookup table. If it finds a match, it permits the client to relay.
You need to calculate a fingerprint for each client certificate that you will accept. Many email clients can produce a fingerprint for you, or if you created the certificate, you can easily calculate a fingerprint with the openssl x509 command:
$openssl x509 -fingerprint -noout -in kdent_signed_cert.pem \| cut -d= -f257:8E:95:63:67:CD:2B:96:7C:0A:3A:61:46:A5:95:EA
To continue the calculation:
Obtain a list of fingerprints for each of your users’ client certificates. You can generate them as described above or obtain them from your users if they can get them from their email clients.
Create a file to store all of the client certificate fingerprints. For this example, you’ll create a file called /etc/postfix/clientcerts
Edit the clientcerts file to add each fingerprint. Since this is a standard Postfix lookup table, you must also add a righthand value for each fingerprint, even though that value is not used. Use a value that will help you to identify the fingerprint in the future. Your resultant file should contain entries like the following for each of your users:
57:8E:95:63:67:CD:2B:96:7C:0A:3A:61:46:A5:95:EA kdent@ora.com
Execute postmap against the clientcerts file:
# postmap /etc/postfix/clientcertsEdit main.cf to add the following parameters:
relay_clientcerts = hash:/etc/postfix/clientcerts
smtpd_tls_ask_ccert = yes
smtpd_recipient_restrictions =
permit_mynetworks
permit_tls_clientcerts
reject_unauth_destinationNote that smtpd_tls_ask_ccert has two c’s for “client certificate.” If you have
already defined the smtpd_recipient_restrictions
parameter, add permit_tls_clientcerts to the list of restriction rules.
Reload Postfix so that it recognizes the changes in its main.cf configuration file:
# postfix reloadSince you may have configurations where other email servers require your server to authenticate when relaying mail, Postfix/TLS can also present a certificate when acting as an SMTP client. Note that you are limited to only one certificate for your SMTP client unless you set up additional SMTP transports in master.cf and configure them to use different client keys and certificates.
If you are using a self-signed server certificate, you can use
the same certificate and its accompanying secret key as your client
certificate. If a third-party CA signed your server certificate, it’s
possible that it can be used only for the SMTP server. In which case,
you can generate a separate client certificate and have that signed
too. Your client certificate’s common name should match the hostname of your system, as
specified in the myhostname
parameter. Follow the same procedure that you used to create the
server certificates. If you are using the same certificates, you don’t
have to do anything; simply configure the TLS client parameters to
point to the same files as the server parameters.
The TLS patches for Postfix introduce the following parameters for dealing with TLS within the SMTP client. See the sample configuration file that comes with the TLS distribution for additional TLS parameters:
smtp_use_tlsTurns on client TLS support. Otherwise, Postfix operates
as it would without the TLS patch. Example: smtp_use_tls = yes
smtp_tls_key_filePoints to the file containing the private key used in
conjunction with your client-signed certificate. Example:
smtp_tls_key_file =
/etc/postfix/mailkey.pem
smtp_tls_cert_filePoints to the file containing your client-signed
certificate. Example: smtp_tls_cert_file =
/etc/postfix/mail_signed_cert.pem
smtp_tls_CAfilePoints to the file containing the public certificates
identifying the CAs that signed your client certificate.
Example: smtp_tls_CAfile =
/etc/postfix/CAcert.pem
Assuming that you are using the same certificates that you used for your server, the procedure to enable TLS in the SMTP client is quite simple:
Edit main.cf and set the following parameters:
smtp_use_tls = yes smtp_tls_key_file = /etc/postfix/mailkey.pem smtp_tls_cert_file = /etc/postfix/mail_signed_cert.pem smtp_tls_CAfile = /etc/postfix/cacert.pem
If there are other TLS parameters that you want to set, do so here (see the TLS patches documentation).
Reload Postfix so that it recognizes the changes in its main.cf configuration file:
# postfix reloadNow, when Postfix connects to an SMTP server that requests a client certificate, it will provide the necessary information.
A content filter is a utility that scans the headers and body of an email message, and usually takes some action based on what it finds. The most common examples are anti-virus and anti-spam programs. Viruses are commonly spread within the contents of email messages, and if you cannot detect spam based on the connecting client or envelope information, you might have better luck by inspecting the actual contents of a message. Filters might change messages, redirect them, respond to them, or tag them for later processing by another tool.
In this chapter we’ll look at content filtering at your mail server, although that may not always be your best option for filtering. MTA filtering is appropriate for filtering that should occur with all or nearly all messages. If you need filtering that is configurable by user, the MTA is not the best choice for it. Other types of filtering to consider are:
Configurable MDAs such as procmail or sieve allow users to manage their own delivery configuration files. Generally, MDAs expect your users to edit their own configuration files on the mail server system. If they don’t have system accounts, you must provide another means for them to configure their filtering, such as through a web-based application.
You might also consider allowing your users to take advantage of filtering capabilities within their email clients. If their client packages support filtering, this is an excellent way to provide per-user filtering for virtual users that don’t have system accounts on your mail server. It has the added advantage of moving processor- and memory-intensive scanning from the server out to multiple clients.
Postfix body and header checks can provide limited filtering. They cannot be configured by the user, but they are probably the simplest to implement. See Chapter 11 for information about setting them up.
A combination of MTA and MUA filters might make a nice compromise. The MTA filter can tag messages with a value to be read by users’ MUA filters. Users can then configure their own filters to accept, reject, or categorize messages based on the tagged value.
An anti-virus filter is an excellent choice for MTA filtering. You can maintain it centrally and block viruses before they even enter your network. Actions that should occur for every message that enters your system are best handled by the MTA.
Postfix body and header checks, while powerful, can consider only one line of a message at a time, and they’re always applied to all messages. They don’t offer a convenient way to set up complex options for rejecting or redirecting messages. Anything more than simple filtering should probably not be handled within a general MTA like Postfix.
Postfix provides two approaches for configuring external filters: commands that accept the contents of email messages on their standard input or daemons that accept message contents via SMTP or LMTP. With commands, a new process is started for every message, which can be resource-intensive, particularly if the command has a high start-up cost. Daemon filters stay resident and have the potential for better performance using fewer system resources. The daemon method is somewhat more complicated to configure but provides a more robust solution.
The simplest way to set up content filtering is to use a program that runs as a command and accepts the contents of a message on its standard input. Postfix delivers messages to your filter command via the pipe mailer. Your filter command performs its checking and then gives the filtered message back to Postfix using the Postfix sendmail command.
For this discussion, we’ll assume that the filter command operates on mail that comes in through the SMTP daemon but not on mail that is delivered locally (using the sendmail command), so that your filter can use sendmail to give the message back to Postfix without looping. Figure 14-1 illustrates the path messages follow once you put your filter in place. Rather than passing the message to a delivery agent, the queue manager invokes the filter.
Your filter program must be able to accept the message on its standard input and then deliver it to the Postfix sendmail command. If you have a filtering program that doesn’t handle input and output in this way it should be easy enough to create a shell script wrapper to deal with those details. In the Postfix distribution, the FILTER_README file contains an example of such a script.
When you configure Postfix to use your filter program, you must specify a user that the program runs as. You should create a pseudoaccount whose sole purpose is to run the filter.
Let’s set up an example configuration and assume that you have a filter program named simple_filt stored at /usr/local/bin and that you have created a pseudouser called filter to run it. Edit your master.cf file to add an entry for your filter:
filter unix - n n - - pipe
flags=Rq user=filter argv=/usr/local/bin/simple_filt
-f ${sender} -- ${recipient}The first line contains all of the standard settings for a
Postfix component entry with the last column indicating that the
message should be handled by the Postfix pipe daemon. The second and third lines are
a continuation of the first because of the whitespace at the
beginning. They contain options the pipe service will use when executing the
command. The options R and q, specified as flags, tell the pipe service to prepend a Return-Path: header and to quote whitespace
and special characters in the ${sender} and ${recipient} addresses that are passed to
the command. See the pipe(8) man
page for other possible options.
The user= option is the
filter pseudouser that you set up for running
your filter command. The argv
option specifies the actual command along with its arguments to
execute. The argument list specified here (-f
${sender} -- ${recipient}) can be used exactly as is by the
script when it invokes the sendmail
command to deliver the message back to Postfix. Your own filter may
require different arguments, but make sure you include the items you
need to send the message back to Postfix through the sendmail command. The ${recipient} variable is expanded by the pipe daemon into multiple recipients up to the limit
specified in the filter _destination_recipient_limit parameter when
a message has more than one recipient.
In addition to the new component entry, you must also make a change to the smtpd entry in master.cf to turn on filtering for all messages that are delivered to the SMTP daemon:
smtp inet n - n - - smtpd -o content_filter=filter:
Simply add the second line in the preceding example to your
existing smtpd line. Don’t forget
the initial whitespace to indicate that it is a continuation of the
previous line. The content_filter
parameter is set equal to the entry you just created in
master.cf for your filter
program. Set this option here rather than in main.cf because it should apply to the
smtpd daemon only and not for every
message that enters the Postfix system. After you reload Postfix, all
messages coming in over SMTP will now be handled by your filter
program.
A filter of this sort, although easy to configure, is not the most efficient method of filtering. It requires that Postfix invoke a shell or interpreter and that the filter invoke sendmail to resubmit the filtered message. If your program runs into problems—disk space or memory—for example, there isn’t a reliable way for it to report the exact problem back to Postfix. Daemon-based filtering described in the next section offers a more robust solution with better performance.[1]
Daemon-based filtering offers a more advanced architecture over the command-based method with lower cost in I/O and CPU usage. It can provide better error handling than is possible with the command method. If implemented as a resident process, the startup overhead per message is eliminated. A daemon-based content filter can pass email messages back and forth with Postfix using the standard SMTP or LMTP protocol. Such a filter can run as a standalone daemon or it can be started by Postfix if configured to do so in master.cf.
In this configuration, we want the content filter to handle all
messages, whether delivered locally (via sendmail) or to the smtpd daemon. You have to configure Postfix in
master.cf to use a special smtp client component to deliver the messages
to your filter and an additional smtpd daemon to receive messages back from
your filter. Figure 14-2
illustrates how a filtered message travels through Postfix to your
content filter and back into Postfix for delivery. In this diagram, the
filter receives mail via localhost port 10025 from the additional
smtp client and submits it back to
Postfix via localhost port 10026 to the additional smtpd server component.
If the filter wants to reject a message, it should reply with an SMTP code of 550 along with the reason for the rejection. Otherwise, it should accept the message and perform its operations before passing it back to Postfix. If your filter rejects a message, Postfix bounces it back to the sender address with the message your filter provides.
For the purposes of this discussion, I’ll assume that you are running a standalone content filter daemon that listens for incoming messages using SMTP. After processing, it sends the message back to Postfix using SMTP. The basic steps to configure this setup are:
Create a pseudoaccount for your filter.
Install and configure your content filter.
Edit master.cf to add two additional Postfix components.
Edit main.cf to add the
content_filter
parameter.
Restart Postfix so that it recognizes the changes to its configuration files.
When setting up a daemon-based content filter, make sure it does
not use the same hostname that Postfix has set in its myhostname parameter, or the Postfix SMTP client will consider it
an error and not deliver the message to your filter. The rest of this
section walks you through the details of setting up a daemon-based
content filter.
As with the simple filtering solution described earlier, you should create a pseudoaccount for your filter. The account shouldn’t have access to other resources on your system. If your filter needs to write files, you should create a directory for that purpose. Your filter should be started as the designated user or configured to become that user after starting. Check your filter’s configuration options. For this example, I’ll assume that you’ve created a user called filter.
Your content filter package should provide you with instructions for installation and configuration. In this example, assume that the filter listens on the loopback interface on port 10025. After processing messages, the filter should pass them back to Postfix on port 10026. You should be able to configure your filter accordingly, or if your filter listens and reinjects on a different port, keep that in mind as you follow the example. If possible, test your filter first to make sure that it operates correctly before trying to connect it to Postfix.
You may encounter "mail loops back to myself” problems when creating
additional SMTP components. One solution is to give the additional
component a different value for myhostname.
Edit master.cf to add the
new components you need. A second smtp component will be used to send
messages to your content filter. (See Section 4.5 in Chapter 4 for more information on
editing master.cf.) We’ll call
this additional smtp entry
chkmsg:
chkmsg unix - - n - 10 smtp
-o myhostname=localhostLater, when you turn on content filtering in main.cf, you’ll tell Postfix to send the message to your filter on port 10025 using this component.
In addition to the extra smtp client, you also need a second
smtpd service to receive messages
back from the content filter program. The second smtpd instance is configured slightly
differently from the normal one because you want Postfix to handle
traffic from your filter differently from messages coming from
outside. Set options with an entry like the following:
localhost:10026 inet n - n - 10 smtpd
-o content_filter=
-o local_recipient_maps=
-o mynetworks=127.0.0.0/8
-o smtpd_helo_restrictions=
-o smtpd_client_restrictions=
-o smtpd_sender_restrictions=
-o smtpd_recipient_restrictions=permit_mynetworks,rejectThis instance of smtpd is
configured to listen on the loopback interface on port 10026. You
configure your filter to send the processed messages to this
service. There are several options in this example. These override
the settings in the main.cf file
and are explained below:
content_filterThe default smtpd
instance has content filtering turned on in main.cf. This instance of smtpd should not have the content
filter process messages again.
local_recipient_mapsSome lookup maps convert an address when it is received
by the external smtpd. When
your filter tries to reinject it, Postfix may not recognize
the recipient and reject the message. Set this option to blank
to make sure the filtered messages are always accepted from
your filter.
mynetworksSince your filter runs on the same system as Postfix,
the filter and Postfix can communicate over the local loopback
interface, a pseudonetwork device not associated with any real
hardware interface. The loopback interface always uses an
address of 127.0.0.1. Since 127 is the first byte of its
address, it’s a class A network that you identify with a
/8 network prefix. By
setting mynetworks to the
loopback network and smtpd_recipient_restrictions
to permit only this network, this instance of
smtpd accepts connections
from your filter only and isn’t exposed to any (potentially
hostile) traffic from the network.
smtpd_helo_restrictions, smtpd_client_restrictions, smtpd_sender_restrictionsYou can turn off any restrictions that were already
checked by the original smtpd instance. If you’re not
already using these restrictions in main.cf, you don’t need to turn
them off here.
smtpd_recipient_restrictionsFinally, tell smtpd
to accept connections on the loopback interface and reject
everything else.
After you have made the necessary changes to master.cf, you have to configure Postfix to pass all messages it receives to your content filter. Edit the main.cf file to add a line like the following:
content_filter = chkmsg:[127.0.0.1]:10025
This parameter tells Postfix to pass messages to the content
filter via the chkmsg service
that you created in master.cf.
You also tell it to send the messages to port 10025, which should
match what you have configured your content filter program to use.
Be sure to reload Postfix to recognize the changes in its
configuration files. Once Postfix is reloaded, it will start passing
all messages through your content filter for processing.
To demonstrate setting up a daemon-based content filter, this section walks through installing Vexira AntiVirus from Central Command. Vexira is a commercial anti-virus product available on the Central Command web page, http://www.centralcommand.com/. Its Vexira AntiVirus for Mail servers product is written to work with Postfix among other MTAs. It is available for Linux, FreeBSD, and OpenBSD platforms. If you are using a different daemon-based anti-virus solution, the configuration should be similar to the procedure presented here:
Install Vexira according to the documentation from Command Central. The rest of this procedure assumes that your configuration files are in /etc per the installation instructions.
Configure Vexira to listen on the local loopback interface
on port 10024. Edit /etc/vamailarmor.conf and set the
parameter ListenAddress as
follows:
ListenAddress localhost port 10024
Also set the ForwardTo
parameter to pass messages back to Postfix over the loopback
interface on port 10025:
ForwardTo SMTP: localhost port 10025
Restart Vexira using the method or scripts installed on your system. See your Vexira documentation.
Edit the Postfix main.cf file to have all messages sent
to the Vexira daemon for virus scanning. Edit the content_filter parameter as
follows:
content_filter = smtp:[127.0.0.1]:10024
Edit the Postfix master.cf file to add another SMTP daemon to accept messages back from Vexira after virus scanning:
localhost:10025 inet n - n - 10 smtpd
-o content_filter=
-o local_recipient_maps=
-o mynetworks=127.0.0.0/8
-o smtpd_helo_restrictions=
-o smtpd_client_restrictions=
-o smtpd_sender_restrictions=
-o smtpd_recipient_restrictions=permit_mynetworks,rejectReload Postfix so that it recognizes the changes in its configuration files:
# postfix reloadYou can run multiple content filters, if necessary, by chaining them. If, for example, you have both an anti-virus and an anti-spam content filter, simply configure the first one to deliver to the next one rather than immediately back to Postfix. The Postfix configuration doesn’t have to change from what’s presented here. Only the final filter delivers the message back to Postfix.
Be aware of any email address rewriting that occurs before your filter receives a message. When the filter resubmits a message, if the rewritten address isn’t in one of the recipient maps, Postfix will reject it. You may have to turn off address rewriting in your normal SMTP server and configure it instead in your SMTP server that accepts messages back from your filter.
Some filters recommend that you configure them to accept mail in front of your normal MTA, and then they pass the messages on to your MTA after processing. You probably do not want to do this. Postfix is specifically designed to accept messages over an unfriendly network. A content filter is specifically designed to deal with processing the contents of messages and probably isn’t optimized for dealing with the load and potential hazards of accepting connections from the outside. Likewise some filters want to handle the final delivery of messages without re-injecting them into Postfix. Again, Postfix offers a lot of flexibility and security in dealing with the final disposition of messages that you might lose by delegating the delivery to another package.
Postfix map files provide an easy and efficient mechanism for the many lookup operations needed when handling email. In some situations, however, it can be more convenient to have the information in a database separate from Postfix. A database can provide a central repository available to many system or network services that need similar information, such as account names and passwords. A database can be useful when redundant systems running Postfix need to share the same configuration information. A central database might also be more convenient when you have multiple people who need access to edit information.
Databases can also slow Postfix performance compared to normal index files. In general, if you don’t have a definite need for a database, you’re better off with the standard Postfix maps. In many cases you can get the best of both options by storing information in a database and running regular scripts that update your Postfix files from the central data repository. But if your environment requires instant access to revised data, an external database configuration may be your only option.
In this chapter, we’ll look at configuring Postfix to work with
MySQL and LDAP. (Postfix also has support for PostgreSQL as of Version
2.1.) In either case, Postfix must be compiled with additional libraries
to support the mysql and ldap map types. If you are using a prebuilt
package, make sure that it has support for the type of database you plan
to use. If you built your own Postfix, see Chapter 15 for information on compiling
with the additional libraries.
You can easily check if your Postfix installation contains support for LDAP and MySQL with the postconf -m command:
$ postconf -m
static
pcre
regexp
mysql
environ
proxy
ldap
btree
unix
hashYou should see either ldap or
mysql or both listed among the map
types.
While the databases you use with Postfix may contain a variety of information, conceptually they work the same as Postfix maps. You have a key such as the recipient email address, and you expect to get back a value associated with the key such as a forwarding address. How to perform this with each type of database, MySQL and LDAP, is explained in the next sections.
It is a good practice to make sure your lookups work correctly with normal Postfix lookup tables. Then duplicate your configuration with MySQL or LDAP lookups. Make sure that you get the same results from both. In most cases, Postfix expects a lookup to return only one result. Make sure that your database queries do not return multiple result values.
MySQL is an open source relational database system that uses Structured Query Language (SQL) for querying and managing its data. You don’t have to know SQL to use Postfix with MySQL, but it will help to understand how they interact. Normally, you would use MySQL because you already have a database of information about each user such as a full name, account name, phone numbers, etc. You have to make sure your database includes the information you need to accomplish a particular task with Postfix. A common use is to map an email alias to the local account name. For this to work there must be one database column containing email aliases and another with local account names. Postfix can query your database with the recipient address of an email message as the key to look up the value of the local account for delivery. Any of the Postfix lookup table parameters can work with MySQL queries. You just have to figure out which columns contain the information you need.
MySQL maps are specified like any other map in Postfix. You specify the map type and the file containing the mappings. In the case of MySQL, however, the file you specify is not the lookup map itself, but rather a file that contains configuration information that specifies how to get the desired value from your database:
alias_maps = mysql:/etc/postfix/mysql-aliases.cf
The file mysql-aliases.cf contains configuration information that specifies how to get the information from MySQL. The parameters for this file are explained below.
MySQL parameters provide the information necessary for
Postfix to connect to your database server and construct an SQL
statement to look up the data it needs. These parameters are placed
in a MySQL map configuration file that functions like a Postfix
configuration file with blanks and comments ignored. Comments are
marked by a # as the first
character of a line. You can have as many MySQL configuration files
as needed in place of normal Postfix lookup files. All of the MySQL
parameters presented here are required except for additional_conditions.
Figure 15-1 shows an SQL statement that Postfix creates using the parameters described.
hostsList of hostnames or IP addresses where a MySQL server
is running. You can also indicate a Unix domain socket by
preceding a path to a socket with unix:. You should list more than one
host or socket only if you have multiple redundant database
servers. Each host is tried in the order listed until a
successful query can be made. For example:
hosts = unix:/tmp/mysql.sock, db.example.com, 192.168.150.15
userAccount name to use when logging into the MySQL server.
passwordPassword to use when logging into the MySQL server.
dbnameThe name of the database to use for the query.
tableThe name of the table to use for the query.
select_fieldThe name of the column that contains the lookup value.
where_fieldThe name of the column that contains the key value.
additional_conditionsAdditional comparisons for the WHERE clause of the SQL statement built by Postfix. You must understand SQL to use this attribute. Set this parameter as if you are continuing the SQL statement. For example:
additional_conditions = and mail_type = 'local'
Let’s go through an example illustrating a MySQL and
Postfix configuration. The http://example.com site uses a MySQL database to
manage all of the users on its network. There is a database that
contains a variety of information about users on the network,
including names, phone numbers, etc. Among the tables in the database
is one called email_address, which
contains the pertinent information for configuring Postfix. The
database structure looks like the following:
+-----------------+-------------+------+-----+---------+-------+ | Field | Type | Null | Key | Default | Extra | +-----------------+-------------+------+-----+---------+-------+ | localpart | varchar(15) | | PRI | | | | type | varchar(15) | YES | | NULL | | | to_address | varchar(65) | YES | | NULL | | | password | varchar(65) | YES | | NULL | | | last_changed_by | varchar(15) | YES | | NULL | | +-----------------+-------------+------+-----+---------+-------+
This table contains all of the email addresses that Postfix
should accept mail for with the localpart column providing the local part of
the addresses. Some of the users maintain their primary email accounts
on other systems, so their http://example.com addresses are aliases that forward
messages to their primary email addresses elsewhere. The type column indicates whether an address is
delivered locally or forwarded to another address. The value forward indicates that this address is an
alias. If an address is forwarded, the to_address column contains the address to
forward messages to.
Table 15-1 contains the access information needed to configure Postfix in this scenario. You should collect the same information about your own database before starting to configure Postfix.
Access information: | Values |
Host | mysql.example.com |
Database name: | user_accounts |
Database table: | email_address |
Database user: | kdent |
Database password: | Rumpelstiltskin |
In addition to the general database information in Table 15-1, you will have to
determine the columns you need for the particular Postfix maps you are
replacing with your MySQL table. Example 15-1 shows a sample
record from the database with the relevant columns for this
configuration. In this example, you’ll be configuring the Postfix
parameters local_recipient_maps and
alias_maps.
+------------+----------+-------------------+ | localpart | type | to_address | +------------+----------+-------------------+ | kdent | forward | kyle.dent@ora.com | +------------+----------+-------------------+
The local_recipient_maps
parameter points to lists of local users that should
receive email at this system. By default it points to the user
accounts and aliases on the system, so that mail sent to a
nonexistent user is rejected by the SMTP server. This lookup map is
a bit different from others in that it doesn’t require a return
value to map to. It matters only that the recipient is in the lookup
table or not. In this example, the MySQL database contains the list
of all email accounts that should receive mail on the system. You
can point the local_recipient_maps parameter to a MySQL
configuration that extracts the list of email users. You’ll use a
file called mysql-local.cf for
the query configuration. First, set local_recipient_maps to point to the query
configuration file, indicating that the lookup type is mysql:
local_recipient_maps = mysql:/etc/postfix/mysql-local.cf
The file mysql-local.cf
contains parameters for each of the items listed in
Table 15-1, plus the
select_field and where_field
for this specific query:
# # mysql-local.cf - local recipients for mail server. # hosts = mysql.example.com user = kdent password = Rumpelstiltskin dbname = user_accounts table = email_address select_field = localpart where_field = localpart
The select_field and
where_field both point to the
localpart column. The select_field in this case is not
particularly important since you don’t need a value back from the
map. You don’t need the additional_conditions parameter because you want every record that appears
in the table. After reloading, Postfix uses the MySQL configuration
to determine local users and reject mail for recipients not listed
in the MySQL table.
You can easily check your MySQL configuration file with the postmap command:
$ postmap -q 'kdent' mysql:/etc/postfix/mysql-local.cf
kdentThe -q option tells
postmap to query the map using
the specified key. If your query has any problems, postmap reports them to your
terminal.
Some users do not receive their mail on this system, but
rather have it forwarded to another account. By pointing alias_maps to another MySQL configuration, you can obtain the
list of users that have aliases and determine what the forwarding
address is. You’ll use a file called mysql-alias.cf for this query
configuration. First, set the alias_maps parameter to point to the query
configuration file:
alias_maps = mysql:/etc/postfix/mysql-alias.cf
The mysql-alias.cf file contains the following parameters:
# # mysql-alias.cf - forwarding aliases # hosts = mysql.example.com user = kdent password = Rumpelstiltskin dbname = user_accounts table = email_address select_field = to_address where_field = localpart additional_conditions = and type = 'forward'
In this case, you set the select_field to to_address
since that’s the value needed by alias_maps to forward messages. You also
specified additional_conditions
because you want only the addresses that have
aliases. After reloading Postfix, it uses this MySQL configuration
to determine addresses with aliases and where messages should be
forwarded.
MySQL databases are often used by sites that host many virtual domains. This last MySQL example walks through configuring virtual mailbox domains. Be sure to read Chapter 8 for information about virtual hosting in general, as this section discusses only the MySQL configuration.
In this example, you’ll use a table called email_address from a database called
customer. The table contains a
record for every virtual address at all the domains the system
accepts mail for. It includes the following fields that are of
interest:
domainThe virtual domain name for this record.
mail_addressThe public email address that messages can be sent to. Messages are delivered to the local virtual mail store.
mailboxContains the filename for delivery into the local mail
store. The name should be relative to the path set in virtual_mailbox_base. You can append
the name with a slash for maildir-style delivery.
Example 15-2 shows a sample record from the database with the relevant columns.
+------------+---------------+---------------+ | domain | mail_address | mailbox | +------------+---------------+---------------+ | ora.com | kdent@ora.com | ora.com/kdent | +------------+---------------+---------------+
In this example, all virtual deliveries occur under the same
user and group, vmail:vmail. If
you require different user and group privileges for the different
users or domains, you should have additional columns for uid and gid in your table and then create mysql maps for them as well.
You are using a static uid
and gid for deliveries and your
message store is simply a directory on the local filesystem:
virtual_mailbox_base = /usr/local/vmail virtual_uid_maps = static:1003 virtual_gid_maps = static:1003
The list of virtual domains and mailbox maps comes from two MySQL configuration files:
virtual_mailbox_domains = mysql:/etc/postfix/virtual_domains.cf virtual_mailbox_maps = mysql:/etc/postfix/virtual_mailboxes.cf
The virtual_mailboxes.cf configuration maps email addresses to the mail store file where messages should be delivered:
hosts = mysql.example.com user = kdent password = Rumpelstiltskin dbname = customer table = email_address select_field = mailbox where_field = mail_address
LDAP is a protocol that provides access to directories of information. LDAP directories are composed of entries that are organized into hierarchies. You have to understand how LDAP works and how your own directory is organized to use it with Postfix. Many networks are starting to make use of LDAP for user information, which makes it a nice way for Postfix to determine what users and addresses it should accept mail for. If your organization uses an LDAP directory, you can query your existing information for your Postfix configuration.
LDAP maps are specified with the ldap map type and can be listed along with
any other maps for a given parameter. Unlike MySQL, LDAP parameters are all listed in main.cf. You have to invent a name for the
particular LDAP configuration you are creating and specify it with the
ldap map type. If you call your
LDAP configuration ldapaliases, for
example, set your alias maps like this:
alias_maps = ldap:ldapaliases
The LDAP parameters for this configuration all start with the
name you invented followed by the name of the parameter. Thus, the
LDAP server is identified by the parameter
name _server_host, so for the example above, the
parameter is called ldapaliases_server_host:
ldapaliases_server_host = ldap.example.com
The important LDAP parameters are defined below. The complete list is available in the LDAP_README file that comes with the Postfix distribution:
name _search_baseThe base DN from which to start the search. You have to
know the naming context for your directory so that you can
specify the common container for your entries. Often it is the
root of the directory. Example: ldapaliases_search_base = dc=example, dc=com
name _scopeThe scope of the search. There are three possible options
for the scope: sub, base, and one. Your directory hierarchy
determines which value you need. The base option is rarely useful. With
sub the entire tree under the
base is searched, and with one only direct child nodes are
searched. The _scope
parameter defaults to sub if
you don’t specify another value. Example: ldapaliases_scope = one
name _query_filterThe attributes and values that should form your search
filter. The variable %s can
be used as a placeholder for the current recipient email
address. Example: ldapaliases_query_filter =
(mailType=forward)
name _result_attributeThe attribute containing the value you want returned for
this lookup. You can list multiple attributes in order of
preference. Example: ldapaliases_result_attribute = email,
rfc822Mailbox.
A common use of LDAP with Postfix is to protect an
internal mail server on a network that uses an LDAP directory of user
accounts. Postfix resides on a gateway system accepting messages from
the Internet, and relays them to the internal mail server. You want
Postfix to reject messages for unknown users on the network so that
they are never accepted on your network. By setting the local_recipient_maps parameter to query the LDAP directory, you can
configure Postfix so that it knows about all of the user accounts and
can reject mail for nonexistent accounts. On a large network there may
be different mail systems serving different groups of users. You can
also set up Postfix to forward messages to the correct mail server for
a particular user by setting transport_maps to point email addresses to
the correct internal mail servers.
The LDAP directory includes attributes for mail and mailHost, where mail contains the public email address for a
user and mailHost is the internal
server to which messages should be forwarded. A sample item in the
directory looks like the following:
dn: uid=kdent,ou=people,dc=example,dc=com
uid: kdent
cn: Kyle D. Dent
mail: kyle.dent@example.com
uidNumber: 1001
gidNumber: 1001
mailHost: mail1.example.com
homeDirectory: /home/kdent
mailType: forward
objectClass: people
userPassword: {crypt}hidden
accountStatus: activeTable 15-1 contains the LDAP directory information you need to configure Postfix in this scenario. You should collect the hostname and base DN for your own directory before starting to configure Postfix.
Directory information | Values |
Host | ldap.example.com |
Base DN: | dc=example,dc=com |
For the local_recipient_maps
lookup, you only have to know that an address exists in the mail attribute. For forwarding messages to
the correct internal mail server, you need the value from the mailHost attribute.
The local_recipient_maps
parameter points to lists of local users that should
receive email at this system. By default it points to the user
accounts and aliases that exist on the system, so that mail sent to
a nonexistent user is rejected by Postfix. In this example, the LDAP
directory contains the list of all email accounts that should
receive mail on the system. You can set up an ldap lookup map for local_recipient_maps. In the case of
local_recipient_maps, the value
returned is not used for anything because you only need to know if
the email address exists or not. Use an LDAP configuration called
“ldaplocal.” First, set local_recipient_maps to use this
configuration:
local_recipient_maps = ldap:ldaplocal
The rest of the LDAP parameters for this configuration are set as follows:
ldaplocal_server_host = ldap.example.com ldaplocal_search_base = dc=example, dc=com ldaplocal_query_filter = (&(mail=%s)(accountStatus=active)) ldaplocal_result_attribute = uid
The ldaplocal_query_filter
parameter compares the recipient email address to the mail attribute in the directory. It also
checks to make sure that the accountStatus attribute is set to active.
The result attribute is set to uid. For this lookup, you only need to
know that the item exists, but Postfix does require a non-blank
result for the lookup.
After reloading Postfix, it uses the LDAP configuration to determine local users and reject mail for recipients not listed in the LDAP directory.
You can easily check your LDAP configuration file with the postmap command:
$ postmap -q 'kdent' ldap:ldaplocal
kdentThe -q option tells
postmap to query the map using
the specified key. If your query has any problems, postmap reports them to your
terminal.
When messages received by Postfix have to be relayed to the
correct internal mail server, use transport_maps . Set transport_maps to use a new LDAP
configuration called “ldaptransport”:
transport_maps = ldap:ldaptransport
Because the LDAP directory returns just the name of the host,
and you need a transport value (transport:nexthop), you can use the
_result_filter parameter to
specify a template for the results:
ldaptransport_result_filter = relay:%s
Also, configure the following parameters:
ldaptransport_server_host = ldap.example.com ldaptransport_search_base = dc=example, dc=com ldaptransport_query_filter = (&(mail=%s)(accountStatus=active)) ldaptransport_result_attribute = mailHost
Again, the ldaplocal_query_filter parameter compares
the recipient email address to the mail attribute in the directory and checks
to make sure that the accountStatus attribute is set to active.
The result attribute is the value for the mailHost attribute, which is the email
server that should receive messages for the specified user. The
result is expanded in the template specified in ldaptransport_result_filter.
Be sure to reload Postfix for the new ldap transport map to go into effect.
This appendix contains an alphabetical listing of parameters normally configured in the Postfix main.cf file. The brief descriptions are only meant to give you an idea of the purpose of the parameter. All of the parameters are fully documented in the sample configuration files and manpages that come with the Postfix distribution. This quick reference can point you in the right direction, but you will have to consult the body of this book or the online documentation to understand how each parameter works.
All of the parameters are listed with a type of value that should be assigned to it. Most of the value types are obvious. Those that require some explanation are described here:
The parameter requires one or more items from a specific list of possible values. See the online documentation for a particular parameter to see what the possible values are.
When a parameter points to lookup tables, the tables are specified with their map type and the table name separated by a colon:
transport_map = hash:/etc/postfix/transport
The complete path to a file.
Some parameter values are specified as strings that contain macros:
smtpd_banner = $myhostname ESMTP $mail_name
The macros are expanded into their values at the time the parameter is used. See the online documentation to find out what macros are allowed for a particular template parameter.
Many parameters are specified as an amount of time:
queue_run_delay = 1000s
They are assigned a value and a time unit abbreviation. Time unit abbreviations are listed in Table A-1. If you leave off the time unit, each time parameter has a default unit that it assumes for the value specified. You can check the online documentation to see what the default unit is for a particular parameter.
All of the parameters have a default value (although for some the default is blank). Only parameters that differ from their default values have to be specified in main.cf. The parameters are listed here with their default values, but they sometimes change with Postfix releases. You can check the default value for a parameter with the postconf command and its -d option:
$ postconf -d alias_maps
alias_maps = hash:/etc/aliases, nis:mail.aliasesauthorized_verp_clients
$mynetworks
VERP is a technique used with mailing lists to handle bounced
messages. It combines the list owner address and original recipient
address with a special delimiter character. authorized_verp_clients contains a list of
host and domain names and IP addresses of clients that are allowed
to use the feature.
debug_peer_list
(null)
For help with troubleshooting, Postfix can increase logging
for particular hosts that you might be having problems with.
debug_peer_list specifies a list of one or more hosts, domains, or
regular expression patterns whose logging should be increased by the
degree specified in debug_peer_level.
default_destination_concurrency_limit
20
Postfix allows you to set a limit on the number of
simultaneous deliveries to any transport in master.cf. If you don’t set an explicit
limit for a transport, the value in default_destination_concurrency_limit
is used. Note that concurrency limits are per
destination as opposed to process limits, which are per
transport.
default_verp_delimiters
disable_dns_lookups
double_bounce_sender
double-bounce
A double bounce is produced when the original sender of a
message cannot be notified that the message was not delivered. The
double_bounce_sender parameter
specifies the sender address Postfix uses for mail that should be
discarded if it cannot be delivered. The specified address should
not be used for anything else since all messages addressed to it are
silently discarded.
fast_flush_domains
fast_flush_refresh_time
forward_expansion_filter
(see example)
When assigning path names to the forward_path parameter, you can use macros
such as $user that are expanded
by Postfix to determine the path for the current message. The
forward_expansion_filter
parameter specifies a list of characters that should
be allowed when expanding macros. Characters that are not permitted
are replaced by underscores.
maximal_backoff_time
4000s
Maximum time limit for Postfix to attempt redelivery of
deferred messages. Each time a message is deferred, the queue
manager increases the amount of time it waits to attempt delivery of
that message again. The calculated increase of time is never allowed
to exceed maximal_backoff_time
.
minimal_backoff_time
proxy_interfaces
(null)
When a Postfix server is running on an internal network behind
a proxy or NAT device, and it serves as the backup MX host for a
domain, it’s possible to get mail delivery loops when the primary MX
host is down. The proxy_interfaces specifies a list of network interface addresses that
receive mail via a proxy device. Postfix avoids mail loops with
listed interfaces.
smtp_pix_workaround_delay_time
10s
Certain older Cisco PIX firewalls contain a bug that
causes them to interfere with SMTP delivery when the final period
and CR/LF indicating the end of message content arrive in separate
packets. Postfix can automatically detect the problem and adjust for
it by waiting before sending the final period and CR/LF to give the
socket send buffer a chance to empty out. The smtp_pix_workaround_delay_time parameter
specifies how long Postfix waits for the socket send buffer to
empty.
smtp_skip_5xx_greeting
yes
When an SMTP server responds with 5xx reply code, Postfix can
either bounce the message or move on to any additional mail
exchangers for the destination domain to see if they are able to
accept the message. The parameter smtp_skip_5xx_greeting specifies whether or not Postfix should react to the
reply code or move on. A value of no causes Postfix to try additional mail
exchangers.
soft_bounce
verp_delimiter_filter
Postfix command-line tools are listed below. Each one is fully documented in a manpage that comes with the Postfix distribution. This appendix is meant to give you an idea of what each command is used for. You should refer to the manpages for complete information about each of the commands:
postalias Creates or queries alias databases.
postcatPrints the contents of queue files, allowing administrators to display the text of a message in the queue.
postconf Displays or changes Postfix parameters. Can display one parameter at a time, or the entire list of parameters.
postdrop Injects a message into the maildrop directory for delivery by Postfix.
postfix Starts and stops the Postfix system. Can also be used for other Postfix maintenance, such as checking the configuration and flushing the queue.
postkickSends a request to a particular Postfix service. Meant to provide a way for shell scripts to communicate with Postfix services.
postlock Locks a specified file for exclusive access. Provides a means for shell scripts to use Postfix-compatible locking.
postlog Logs specified information to the system-logging facility. Provides a means for shell scripts to log information easily in a style similar to Postfix.
postmap Creates or queries lookup maps. Much of the Postfix configuration information is kept in lookup tables that are created by the postmap command.
postqueue Provides user-level access to the Postfix queue. Changes to the queue requiring super-user privileges are managed by the postsuper command.
postsuper Provides super-user access to the Postfix queue. Allows an administrator to delete messages, place them on hold and release them from hold, and repair the queue structure, if necessary.
The general steps to build Postfix from the source files are to
obtain the software bundle, uncompress it, compile it, and install it. The
tools you need are common on nearly all distributions of Unix: gzip, tar,
make, and a C compiler. Postfix
generally expects the GNU gcc compiler,
but you can also build it with your platform’s native compiler, as long as
it supports ANSI C.
The official Postfix web site (http://www.postfix.org/) has a download link that displays a list of mirrors from which you can get the software. You should select the mirror that is closest to you. Get the package you want by selecting the “Source code” link under either the Official or Experimental release (see Chapter 1). The examples here assume that you have downloaded a file called postfix-2.0.10.tar.gz. If the file you download is different, change the filename accordingly in the commands in the examples.
Before we move on to the specifics of building Postfix, let’s take a look at some of the basics when compiling C code.
The options for a particular build are usually contained within a description file normally called Makefile. The make utility uses the Makefile to determine prerequisites, dependencies, and options to use when building a package. Using this information, make calls a compiler to create object files, and then a linker (usually called ld) to link them together into executables.
Since the Postfix distribution creates its own Makefile, you don’t have to worry about
editing that (and you shouldn’t edit it, since any changes you make
would likely get overwritten later). Options that Postfix needs in its
Makefile are defined in environment
variables such as CCARGS. The
INSTALL file that comes with the
Postfix distribution discusses all of the available options. We’ll look
at some of the more common ones here.
The following environment variables are available to set compile-time options. You should use quotes around the values to retain spaces or other shell metacharacters:
AUXLIBSTells the linker where to look for additional libraries that are not in the standard locations. For example, if you build support for an add-on package, you may have to indicate where the libraries are for that package.
CCSpecifies a particular compiler to use. If you want to use a compiler other than the one Postfix selects, set this variable to your compiler. Postfix normally uses gcc except on platforms where the native compiler is known to work better. You can check the makedefs file to see which compiler Postfix uses by default on your system.
CCARGSProvides additional arguments to the compiler. If your compiler allows special options or your supporting files are not located in default directories, indicate those options with this variable.
DEBUGThe DEBUG parameter
specifies debugging levels for the compiler to use when building
the Postfix binaries. Turning on debugging produces extra
information that a debugger can use. You can also turn off
debugging features completely to build Postfix for a production
system.
OPTThe OPT parameter
specifies optimization levels for the compiler to use when
building Postfix binaries. Additional optimization may increase
performance but at the cost of longer compilation and more memory.
You can probably accept the defaults that Postfix selects for your
platform.
Compiler options are set in the CCARGS variable. C source code files require
header files that define certain functions and variables. The standard
location for header files is the /usr/include directory. If your header
files are located somewhere else, you have to tell the compiler where
to look for them. The -I compiler
option is used to specify additional directories where the compiler
might find header files. If you are linking with libraries from
external packages, the header files might be located where the package
is installed rather than in the standard location. A common convention
for external packages is to install header files in /usr/local/include. If you want to tell the
compiler to look in that directory as well as the standard location
when building Postfix, specify the options and directory with CCARGS:
CCARGS='-I/usr/local/include/'
Use additional -I options for
each additional directory the compiler should search.
Postfix uses conditional compilation during its build, depending
on which libraries or other resources are available on your system. It
defines certain macros based on what it discovers about your system or
based on options you have selected. The -D option provides a way to define macros at
the time you compile Postfix. Add-on packages for Postfix require that
you define a particular macro to tell Postfix to include it when
building. For example, if you want to include support for MySQL, you
define the HAS_MYSQL macro:
CCARGS='-DHAS_MYSQL'
Linker options are set in the AUXLIBS variable. After Postfix has compiled
the object files, it links them together with required libraries into
executable files. The standard location for system libraries is
/usr/lib. To tell the linker to
search additional directories for libraries, use the -L option:
AUXLIBS='-L/usr/local/lib'
You must also tell the linker which specific libraries to link
in. The -l option is used to name
specific libraries. The library files must be in a standard location
or a directory indicated with the -L option. Library archive files are named
starting with lib, followed by
their name, followed by the extension, which is normally .a for static libraries and .so or .sl for shared objects or shared libraries.
When you use the -l option, you
leave off the initial lib and the
extension of the library file. To link with the MySQL client library
for example, where the library file is called libmysqlclient.a, the -l option is specified as follows:
AUXLIBS='-L/usr/local/lib -lmysqlclient'
Most linkers choose runtime or dynamic libraries over the static versions. Runtime libraries are linked when a program is running rather than during compilation. At compile time, the linker adds information so the program can find the libraries when it is executed. If you always install all of your dynamic libraries in a standard location such as /usr/lib, your system won’t have any trouble finding the libraries at runtime. However, some external packages install libraries in nonstandard directories such that they cannot be found at runtime. Different systems use different conventions for locating dynamic libraries using fixed path information and environment variables. Be sure to configure your system to be able to find your dynamic libraries or make sure that the libraries are installed in your system’s standard directories. Another option is to provide the actual path to specific libraries when you build your programs.
The linker uses an argument to include directories in a runtime
search path for dynamic libraries. The argument differs depending on
your linker and platform. The GNU linker (Linux, FreeBSD) uses
-rpath, as does IRIX. Solaris, on
the other hand uses -R, and HP-UX
uses +b. Consult the manpage for
your linker, ld(1), to see which
argument you should use to set the runtime library search path.
Using the SSL library as an example, if your libssl.so file is located in /usr/local/lib and you are building Postfix
on FreeBSD or another system that uses rpath, define AUXLIBS as follows:
AUXLIBS='-L/usr/local/lib -rpath/usr/local/lib -lssl'
When linking Postfix with external libraries, if you have multiple versions of the libraries installed, it is very important to make sure that you link Postfix with the version you need. Also, make sure that the library version you link to corresponds to the correct version of the header files you include. Version mismatch problems are often the source of compiler errors. Sometimes the compiler does not complain, in which case your build may succeed, but you’re likely to find unusual errors from Postfix at runtime that can be tricky to track down.
The source file that you download is in a compressed, tar archive and must be uncompressed using the gzip command. In the same directory as the downloaded bundle, type the following:
$ gzip -d postfix-2.0.10.tar.gzThis uncompresses the file and produces a tar file without the .gz extension. Next, untar the file:
$ tar -xf postfix-2.0.10.tarThis creates a directory called postfix-2.0.10 below the current directory. Set that directory as your current directory for the rest of the compilation:
$ cd postfix-2.0.10If you accept all of the default parameters for building Postfix, compiling is as simple as executing make in the top-level directory of the distribution:
$ makeExecuting make creates a Makefile for your particular platform, which is in turn used to compile Postfix for your system. If you don’t need any changes to the default build, you can skip ahead to the Section C.4 section.
The file makedefs contains platform-specific information that Postfix uses when configuring the package for your system. If you are curious, you can look at the file to see which parameters Postfix uses for your platform. It identifies your environment and creates the macros and definitions that are used in the Makefile for building Postfix on your system. The resultant Makefile is invoked by the make command which in turn calls your compiler and linker to build the Postfix system. When you type make as above, all of this happens automatically, so you don’t normally need to worry about this file.
If you want to change any of the parameters for your environment, you can execute the build in two steps. The command make makefiles creates a new Makefile based on parameters that you specify on the command line. To set specific parameters, simply define variables on the command line. For example, you can use a different compiler from the default that Postfix chooses for your environment. The following example works on an HP-UX system to be sure that make finds the correct compiler:
$ make makefiles CC="/opt/ansic/bin/cc -Ae"You would, of course, specify the path to your own compiler plus
any necessary options. If you need to specify an additional directory
for header files on your system, define CCARGS to include your directory:
$ make makefiles CCARGS="-I /usr/local/include/"And, of course, you can combine options:
$ make makefiles CC="/opt/ansic/bin/cc -Ae" CCARGS="-I /usr/local/include"Postfix provides a lot of flexibility through its
configuration files. Nearly all of Postfix’s runtime parameters,
including the various directories it uses, can be set in its
configuration file except, of course, the location of the
configuration file itself. You can change the location by defining
DEF_CONFIG_DIR within the CCARGS variable:
$ make makefiles CCARGS='-DDEF_CONFIG_DIR=\"/usr/local/etc/postfix\"'The single and double quotation marks and backslashes are
important since the value for DEF_CONFIG_DIR should itself be quoted.
After compilation, Postfix looks for its main.cf configuration file in the directory
/usr/local/etc/postfix instead of
the default directory, /etc/postfix.
You can use combinations of all the examples above to configure the environment you need. If your command line starts to get complicated, you might want to create a simple shell script to execute it for you. See Section C.7 later in this appendix.
Once you have used make makefiles with your specific options to create your Makefile, execute make to build Postfix:
$ makeAfter you have successfully compiled Postfix, you are ready to install it. You will have to be the root user in order to perform the installation steps.
You need to create a dedicated account that will own the Postfix queue and most of its processes. The account should not permit logins and does not need a shell or a home directory. Use your normal administrative tools to create an account. You can set the password to * and its home directory and shell to invalid paths (something like /bin/false or /dev/null). By convention the username should be postfix. The entry in /etc/passwd should resemble the following:
postfix:*:1001:1001:postfix:/no/where:/bin/false
You must also create a dedicated group that is not used by any user account, including the postfix account you just created. By convention the group name is postdrop. On most systems you create groups be editing the /etc/group. Add a line like the following:
postdrop:*:1007:
Remember that Postfix is a replacement for Sendmail, and in order to maintain compatibility it installs its own sendmail binary in place of your existing one. You may want to rename the existing one to save it from being overwritten. Depending on your platform your existing sendmail is commonly in /usr/sbin/sendmail or /usr/lib/sendmail. You should be able to determine the exact location of your sendmail by executing:
# whereis sendmailThis may list a number of files. You are looking for the binary that has no extension. Once you have found it, rename it to move it out of the way:
# mv /usr/sbin/sendmail /usr/sbin/sendmail.origYou will also want to rename two other files that will be replaced by Postfix: mailq and newaliases. These are commonly found in the /usr/bin directory, but you can use the whereis command to locate them if necessary. These commands might be symbolic links on your systems:
#mv /usr/bin/mailq /usr/bin/mailq.orig#mv /usr/bin/newaliases /usr/bin/newaliases.orig
Now you are ready to run the installation script.
Make sure you are still the root user and still in the Postfix distribution directory. Execute the installation script:
# make installAfter checking that everything is built, the installation script asks you a few questions about setting up Postfix on your system:
install_root: [/]
The install_root directory is the root directory of your system. The only time you would want to change this is if you are creating an installable package. Package builders often want to keep all of the files together in a separate subdirectory in order to bundle them up when creating an installable distribution:
tempdir: [/home/kdent/postfix-2.0.10]
The tempdir directory is a place where the installation script can write temporary files. It defaults to your current directory and cleans up after itself. If for some reason you want the installation script to use another directory, specify it here:
config_directory: [/etc/postfix] daemon_directory: [/usr/libexec/postfix] command_directory: [/usr/sbin] queue_directory: [/var/spool/postfix] sendmail_path: [/usr/lib/sendmail] newaliases_path: [/usr/bin/newaliases] mailq_path: [/usr/bin/mailq]
You should probably accept the defaults for the questions that involve the location of the various Postfix files. Just be sure that the default values presented by the installation script match the directories you found with the whereis command for your original copies of sendmail, newaliases, and mailq. If they don’t, you should type in the correct path when the installation script prompts you for it.
mail_owner: [postfix]
The mail_owner defaults to
postfix, and assuming that you followed the
instructions earlier, you can accept that value. If you created an
account with a different username, enter that here.
setgid_group: [postdrop]
The setgid property defaults to
postdrop, and assuming you followed the
instructions earlier, you can accept that value. If you created a group
with a different name, enter that here.
manpage_directory: [/usr/local/man]
For installation of the Postfix man pages, you can accept the default or type in a more appropriate place on your system.
sample_directory: [/etc/postfix]
The sample configuration files contain explanations for Postfix parameters and should be included in your installation. If you prefer not to have them in your configuration directory, you can specify a different location here.
readme_directory: [no]
The Postfix distribution includes several README files with additional information about particular features and add-on packages. These are less critical for the regular maintenance of your Postfix server than the sample configuration files, but if you would like to include them on your system, specify a path where they should be installed. If you don’t install them, they are still available in the distribution directory.
The installation script then installs all of the necessary files.
If Postfix is already installed on your system, you can upgrade it when you have a new compilation or version to install. It’s usually best to stop Postfix before performing the upgrade. The upgrade process is not interactive but requires that the main.cf file exist on your system already:
#postfix stop#make upgrade#postfix start
Postfix checks for changed files and replaces them with newer versions from your new compilation. Be sure to check the log file after restarting Postfix.
This section walks through building Postfix with various add-on packages that are mentioned in the book. Before recompiling Postfix with any additional packages, it is important to first clean up from any previous builds. Execute the following:
$ make tidyNow you’ll be starting with a clean source tree for your new builds. Each of the examples below takes you through creating a new Makefile. Once you’ve accomplished that, simply type:
$ maketo rebuild Postfix. If your new build is successful, you can upgrade your currently installed Postfix:
# make upgradeIf you hadn’t previously installed Postfix, use make install instead.
See Chapter 12 for information on Cyrus SASL and Postfix. You can download the source for the Cyrus SASL libraries from the Carnegie Mellon web site at http://asg.web.cmu.edu/sasl/sasl-library.html. Note that this book assumes that you are working with SASL Version 2.x libraries. Follow the instructions for building the Cyrus SASL2 libraries. There is also a SASL_README file that comes with the Postfix distribution.
One issue when compiling Cyrus SASL that affects Postfix is
whether or not to include support for certain Microsoft clients that
authenticate using a nonstandard mechanism. The standard plain-text
authentication mechanism is identified as PLAIN, but these clients use LOGIN. If you need to support such clients,
be sure that the libraries are built with the workaround enabled using
the --enable-login option when you
run configure.
When you install the libraries, be sure to note their location. This example assumes that they are installed in /usr/local/lib and that the header files are located below /usr/local/include. If you are using different locations, adjust the examples accordingly.
To build Postfix with SASL support, you must define the USE_SASL_AUTH macro and specify the
directories for the libraries and header files. You must also link
against the libsasl2.so library
file. Run make tidy if necessary.
Build your Makefile with the
following options:
$make makefiles CCARGS='-DUSE_SASL_AUTH -I/usr/local/include/sasl' \AUXLIBS='-L/usr/local/lib -lsasl2'
Remember that if you must provide the path to your libraries to the runtime linker, include the correct runtime search path argument:
$make makefiles CCARGS='-DUSE_SASL_AUTH -I/usr/local/include/sasl' \AUXLIBS='-L/usr/local/lib -lsasl2 -rpath /usr/local/lib'
If your linker uses an argument other than rpath, be sure to specify the correct
one.
See Chapter 13 for information on the TLS patches and Postfix. You can find the web site for the TLS patches from the “Add-on Software” page of the Postfix web site. Since this add-on modifies the Postfix source, make sure you get the correct download for your version of Postfix. For this example, assume the downloaded file is called pfixtls-0.8.13-2.0.10-0.9.7b.tar.gz. If the file you download is different, adjust the examples accordingly.
This add-on depends on the OpenSSL library, which you must install first if it’s not already on your system. Check the documentation that comes with the TLS distribution to make sure you have the correct version of OpenSSL. For this example, assume that your OpenSSL libraries are installed in /usr/local/ssl/lib and the header files are in /usr/local/ssl/include. If your installation differs, adjust the example accordingly.
The TLS modifications to the Postfix source are all contained in the file pfixtls.diff, and you use the patch command to apply the differences to your Postfix source. You should uncompress and untar the TLS patch in a subdirectory that is at the same level as your Postfix directory such that if your current directory is the one above the Postfix source, you can see both the Postfix directory and the TLS patch directory:
$pwd/home/kdent $ls -ld pfixtls-0.8.13-2.0.10-0.9.7b postfix-2.0.10drwxr-xr-x 5 kdent kdent 512 May 14 2002 pfixtls-0.8.13-2.0.10-0.9.7b drwxr-xr-x 15 kdent kdent 1024 May 31 17:31 postfix-2.0.10
From that directory apply the patch as follows:
$ patch -p0 < pfixtls-0.8.13-2.0.10-0.9.7b/pfixtls.diffpatch reports the changes as it makes them until it finishes and displays “done” on your terminal.
Go back to the Postfix distribution directory to build Postfix
with TLS support. You must define the HAS_SSL macro and specify the directories
for the SSL libraries and header files. You must also link against the
libssl.so (or libssl.a) and libcrypto.so (or libcrypto.a) library files. Run make tidy if necessary. Build your Makefile with the following options:
$make makefiles CCARGS='-DHAS_SSL -I/usr/local/ssl/include' \AUXLIBS='-L/usr/local/ssl/lib -lcrypto -lssl'
Remember that if you must provide the path to your libraries to the runtime linker, include the correct runtime search path argument:
$make makefiles CCARGS='-DHAS_SSL -I/usr/local/ssl/include' \AUXLIBS='-L/usr/local/ssl/lib -lcrypto -lssl -rpath /usr/local/ssl/lib'
If your linker uses an argument other than rpath, be sure to specify the correct
one.
See Chapter 15 for information on MySQL and Postfix. This add-on depends on the MySQL client library and the zlib compression library, which you must install first if they’re not already on your system. This example assumes that your MySQL library is installed in /usr/local/lib/mysql with its header files in /usr/local/include/mysql and that the zlib library is in /usr/lib. If your installation differs, adjust the example accordingly. There is a MYSQL_README file that comes with the Postfix distribution with information about building Postfix with support for MySQL.
To build Postfix with MySQL support, you must define the
HAS_MYSQL macro and specify the
directories for the MySQL library and header files. You must link
against the libmysqlclient.so and
the libz.so library files. You
must also link against the libm.so math library file, which is
standard on Unix systems. Run make
tidy if necessary. Build your Makefile with the following options:
$make makefiles 'CCARGS=-DHAS_MYSQL -I/usr/local/include/mysql' \'AUXLIBS=-L/usr/local/lib/mysql -lmysqlclient -lz -lm'
Remember that if you must provide the path to your libraries to the runtime linker, include the correct runtime search path argument:
$make makefiles 'CCARGS=-DHAS_MYSQL -I/usr/local/include/mysql' \'AUXLIBS=-L/usr/local/lib/mysql -lmysqlclient -lz -lm \-rpath /usr/local/lib/mysql'
If your linker uses an argument other than rpath, be sure to specify the correct
one.
See Chapter 15 for information on LDAP and Postfix. This add-on depends on LDAP libraries, which you must install first if they’re not already on your system. There are commercial libraries available as well as an open source package from http://www.openldap.org/. This example assumes that you have LDAP libraries installed in /usr/local/lib/ and LDAP header files in /usr/local/include. If your installation differs, adjust the example accordingly. There is an LDAP_README file that comes with the Postfix distribution with information about building Postfix with support for LDAP.
To build Postfix with LDAP support, you must define the HAS_LDAP macro and specify the directories
for the LDAP libraries and header files. You must link against the
libldap.so library file and also
the liblber.so library file,
which defines encoding routines for the LDAP protocol. Run make tidy if necessary. Build your Makefile with the following options:
$make makefiles CCARGS='-I/usr/local/include -DHAS_LDAP' \AUXLIBS='-L/usr/local/lib -lldap -L/usr/local/lib -llber'
Remember that if you must provide the path to your libraries to the runtime linker, include the correct runtime search path argument:
$make makefiles CCARGS='-I/usr/local/include -DHAS_LDAP' \AUXLIBS='-L/usr/local/lib -lldap -L/usr/local/lib -llber \-rpath /usr/local/lib'
If your linker uses an argument other than rpath, be sure to specify the correct
one.
If you run into problems, check the various README files for information about your build. Frequently, they contain information about problems you might run into. Certainly, if there is a README file specific to your platform, be sure to read it. Some possible problems are mentioned below. Exact messages vary depending on your platform and compiler, so the following are general errors similar to what you might see when building Postfix.
Make sure that the path to your compiler is correct. If
you specified a compiler by setting CC when building your Makefile (for example, make makefiles CC="/path“),
double-check the path you typed. If the path to your compiler
came from the Postfix makedefs file, you might need to
override it with:
$ make makefiles CC="/path/to/your/compiler"Another possibility is to have Postfix call your compiler without a path, assuming its directory is in your environment path:
$ make makefiles CC="cc"Make sure that the path to your include files is correct.
The include files are normally stored in /usr/include. If your system uses a
different path for some reason, you will have to specify it with
the -I option set in CCARGS:
$ make makefiles CCARGS="-I/path/to/include"If you already specified a path with -I double-check your typing.
Make sure that the library paths you specified with the
-L option are correct and
that you have specified the libraries themselves correctly with
the -l option.
If you see errors associated with a header file like
mail_conf.h, you may not be
using an ANSI C compiler. Nearly all platforms ship with a
compiler that is used to reconfigure the kernel, but they do not
all include an ANSI C compiler that you can use for development.
You may have to contact your vendor to get an ANSI C compiler if
you want to build Postfix. Also, the GNU gcc compiler works on nearly all
platforms and is available as open source software. If you are
using the compiler for HP-UX, you must use the -Ae flag to compile in ANSI mode.
Include it in your CCARGS
variable:
$ make makefiles CCARGS="-Ae"You have probably lost your Makefile or never had one. You can easily create your Makefile by executing the command:
$ make -f Makefile.init makefilesAfter that completes, try your build again.
You can mix and match any of the options or add on libraries described in this appendix to build Postfix for your environment. If your command line for building the Postfix Makefile is getting a little complicated, you should probably create a simple shell script that invokes the options and additional libraries you need. Creating a build script has the added advantage of documenting the options you used when you last built Postfix. Feel free to include plenty of comments to yourself to explain the reasons you are including an option or not, and how you came to that decision. The following is an example of a shell script you might use, although you will certainly need to customize it for your own environment. This example includes all of the add-on libraries we’ve discussed. You should exclude the ones you don’t need:
# # Simple script to create a Makefile to build Postfix. # # # Remember to start by cleaning up or uncomment this line # to have this script do it every time. # #make tidy # # Specify all of our options and supporting libraries # make makefiles \ CCARGS='-DUSE_SASL_AUTH -DHAS_SSL -DHAS_MYSQL -DHAS_LDAP \ -I/usr/local/include/sasl -I/usr/local/ssl/include \ -I/usr/local/include/mysql -I/usr/local/include' \ AUXLIBS='-L/usr/local/lib -L/usr/local/ssl/lib \ -L/usr/local/lib/mysql -L/usr/local/lib \ -lsasl2 -lcrypto -lssl -lmysqlclient -lz -lm -lldap -llber \ -rpath /usr/local/lib/mysql -rpath /usr/local/lib \ -rpath /usr/local/ssl/lib'
To build Postfix, type:
$sh build.sh$make
The first command creates your Makefile with the options you need. The second executes the build.
Postfix reports this error when a DNS reply points to your
mail server, but Postfix has not been configured to accept mail for
the domain. Postfix accepts mail for domains listed in mydestination, relay_domains, virtual_mailbox_domains, virtual_alias_domains, and domains that
resolve to IP addresses listed in inet_interfaces and proxy_interfaces. Your domain must be
listed in one of these parameters.
It depends on the type of file you are changing. Changes in files that Postfix reads into memory at startup require a reload. Examples of such files are main.cf, master.cf, and any lookup table using regular expressions. DB or DBM files are not read into memory and don’t require reloading Postfix when they are changed.
No. Most administrators with complex configurations create a Makefile that will cat the necessary files together. If you have other regular administrative tasks, add them to your Makefile too. Your Makefile should have an entry that looks something like this:
main.cf: file1 file2 file3
cat file1 file2 file3 > main.cf.new
mv main.cf.new main.cfThen type make main.cf to rebuild your configuration file.
This is not currently available in Postfix.
By design this is not implemented in Postfix directly. It’s not the job of an MTA, and it’s not as simple a problem as it seems because of MIME and digital signatures. MIME messages have a structure that can be very complex. Digital signatures attest to the fact that a signed message has not been modified. Adding a footer to the bottom of a message breaks both of these. Some people add short text to the headers of email messages, but the text is not likely to be seen by most users. The real solution is to configure your clients to add whatever text is required.
Having said that, it is possible to configure a content filter that appends the text for you. Follow the directions for configuring Postfix to work with a content filter. Your filter should be MIME-aware, and you should be aware that digital signatures will no longer work.
Specify an address in the always_bcc parameter. It will receive
copies of all messages.
This is not really a function of Postfix, although you may
achieve what you’re looking for with the mailbox_size_limit. Be aware that if you
use maildir-style mailboxes, this parameter limits only the size of
individual mail files and not the size of the entire mailbox.
Mailbox quotas are best enforced by the mail store itself, which
might be done through normal operating system accounting or your
POP/IMAP server configuration.
The idea behind this message is that users should contact their own postmasters for assistance, since the local postmaster is quite possibly the one who has to deal with the problem. If you definitely want to make the change, you have to modify the source code.
If you are using an external program for delivery, it might
not handle more than one address at a time. Such is the case with
maildrop, for example. To make
sure that Postfix passes messages for delivery one at a time, set
the transport _destination_recipient_limit parameter in
main.cf to 1.
transport is the name of the transport
method making the deliveries. If you are using maildrop, the parameter looks like the
following:
maildrop_destination_recipient_limit = 1
Specify the IP address of the interface you want Postfix to
use in the inet_interfaces
parameter.
This is controlled by the delay_warning_time parameter. By default
it’s set to 0 for “never”.
Postfix does not support EXPN. Because of Postfix’s architecture and concern for security, the unprivileged SMTP server doesn’t know anything about local aliases. It’s the privileged local delivery agent that actually expands aliases at the point of delivery. If you use a mailing-list manager, it most likely has a command to tell you who is on the list, or you may have to check the aliases file on the mail server system.
mailbox_transport and mailbox_command?The mailbox_transport
parameter is set to a service from master.cf, while mailbox_command refers to an actual
command on the mail server filesystem. There are a few parameters
that can affect mailbox delivery. The parameters in order of
preference are mailbox_transport,
mailbox_command_maps, mailbox_command, and home_mailbox.
Add header checks that match the header lines showing your internal systems and specify the IGNORE action for them.
You can specify an address in the luser_relay parameter and disable local_recipient_maps:
luser_relay = info local_recipient_maps =
Be careful if you do this. With the prevalence of spam, the address you specify is liable to catch a large amount of junk mail.
You probably have soft_bounce turned on.
# postsuper -d ALLNote that the word ALL must
be all capital letters, and that executing this command deletes
all of the mail in your
queue.
Postfix logs messages to your system’s syslogd daemon. Check your system documentation to find the actual log file.
It’s normal if you have:
disable_dns_lookups = yes
specified in main.cf. You might also have a transport map specified in brackets, in which case Postfix delivers directly to the system:
example.com smtp:[mail.example.com]
You don’t want to block messages based on the fact that they have a null return path. Accepting null envelope addresses is required by the standards. The technique is used to prevent looping of error notifications. You’ll have to identify the spam by some other means.
header_checks and
body_checks to block spam, but some
legitimate email is blocked by my checks. Is there any way to
whitelist some mail so that the header and body checks are not
applied?No. Header and body checks are applied to every message and should be used for simple checks that can easily be applied to all mail. If you need anything more sophisticated, you should set up a content filter that has the smarts you need.
A link in an index entry is displayed as the section title in which that entry appears. Because some sections have multiple index markers, it is not unusual for an entry to have several links to the same section. Clicking on any link will take you directly to the place in the text in which the marker appears.
Kyle D. Dent works as an independent consultant and software developer in the New York metropolitan area. He has designed and implemented various security, network, and web-based applications for technology and financial firms. He has been working with Postfix in various settings since it was released by IBM in 1998. Kyle grew up with computers in an IBM family, but originally started working in publishing and as a teacher of English as a Second Language. He is an avid supporter of public libraries serving as a trustee at his local library and on his regional library system board. He has recently started to learn the classical guitar.
Our look is the result of reader comments, our own experimentation, and feedback from distribution channels. Distinctive covers complement our distinctive approach to technical topics, breathing personality and life into potentially dry subjects.
The animal on the cover of Postfix: The Definitive Guide is a dove. Doves belong to the class Aves (birds) and the order Columbiformes (doves and pigeons), to which the now-extinct dodo bird (Raphus cucullatus) also belonged. Their family, Columbidae, includes over 300 species of pigeons and doves, including the common rock dove or feral pigeon (Columba livia).
In 1679, the French astronomer Augustin Royer discovered the dove-shaped constellation Columba. A constellation in the southern hemisphere, located near Puppis and Caelum, Columba’s stars were originally part of the constellation Canis Major.
Reg Aubry was the production editor and copyeditor, and Matt Hutchinson was the proofreader for Postfix: The Definitive Guide . Colleen Gorman and Claire Cloutier provided quality control. Mary Agner provided production assistance. Ellen Troutman-Zaig wrote the index.
Ellie Volckhausen designed the cover of this book, based on a series design by Edie Freedman. The cover image is an original illustration created by Susan Hart. Emma Colby produced the cover layout with QuarkXPress 4.1 using Adobe’s ITC Garamond font.
David Futato designed the interior layout. This book was converted by Joe Wizda to FrameMaker 5.5.6 with a format conversion tool created by Erik Ray, Jason McIntosh, Neil Walls, and Mike Sierra that uses Perl and XML technologies. The text font is Linotype Birka; the heading font is Adobe Myriad Condensed; and the code font is LucasFont’s TheSans Mono Condensed. The illustrations that appear in the book were produced by Robert Romano and Jessamyn Read, using Macromedia FreeHand 9 and Adobe Photoshop 6. The tip and warning icons were drawn by Christopher Bing. This colophon was written by Leanne Soylemez and Reg Aubry.
The online edition of this book was created by the Safari production group (John Chodacki, Becki Maisch, and Ellie Cutler) using a set of Frame-to-XML conversion and cleanup tools written and maintained by Erik Ray, Benn Salter, John Chodacki, and Jeff Liggett.
Copyright © 2009 O’Reilly Media, Inc.
1005 Gravenstein Highway North
Sebastopol, CA 95472