Table of Contents for
Squid: The Definitive Guide
 Squid: The Definitive Guide
Published by
O'Reilly Media, Inc., 2004
Squid: The Definitive Guide
Published by
O'Reilly Media, Inc., 2004
- Cover
- Squid: The Definitive Guide
- Squid: The Definitive Guide
- Dedication
- Preface
- 1. Introduction
- 2. Getting Squid
- 3. Compiling and Installing
- 4. Configuration Guide for the Eager
- 5. Running Squid
- 6. All About Access Controls
- 7. Disk Cache Basics
- 8. Advanced Disk Cache Topics
- 9. Interception Caching
- 10. Talking to Other Squids
- 11. Redirectors
- 12. Authentication Helpers
- 13. Log Files
- 14. Monitoring Squid
- 15. Server Accelerator Mode
- 16. Debugging and Troubleshooting
- A. Config File Reference
- http_port
- https_port
- ssl_unclean_shutdown
- icp_port
- htcp_port
- mcast_groups
- udp_incoming_address
- udp_outgoing_address
- cache_peer
- cache_peer_domain
- neighbor_type_domain
- icp_query_timeout
- maximum_icp_query_timeout
- mcast_icp_query_timeout
- dead_peer_timeout
- hierarchy_stoplist
- no_cache
- cache_access_log
- cache_log
- cache_store_log
- cache_swap_log
- emulate_httpd_log
- log_ip_on_direct
- cache_dir
- cache_mem
- cache_swap_low
- cache_swap_high
- maximum_object_size
- minimum_object_size
- maximum_object_size_in_memory
- cache_replacement_policy
- memory_replacement_policy
- store_dir_select_algorithm
- mime_table
- ipcache_size
- ipcache_low
- ipcache_high
- fqdncache_size
- log_mime_hdrs
- useragent_log
- referer_log
- pid_filename
- debug_options
- log_fqdn
- client_netmask
- ftp_user
- ftp_list_width
- ftp_passive
- ftp_sanitycheck
- cache_dns_program
- dns_children
- dns_retransmit_interval
- dns_timeout
- dns_defnames
- dns_nameservers
- hosts_file
- diskd_program
- unlinkd_program
- pinger_program
- redirect_program
- redirect_children
- redirect_rewrites_host_header
- redirector_access
- redirector_bypass
- auth_param
- authenticate_ttl
- authenticate_cache_garbage_interval
- authenticate_ip_ttl
- external_acl_type
- wais_relay_host
- wais_relay_port
- request_header_max_size
- request_body_max_size
- refresh_pattern
- quick_abort_min
- quick_abort_max
- quick_abort_pct
- negative_ttl
- positive_dns_ttl
- negative_dns_ttl
- range_offset_limit
- connect_timeout
- peer_connect_timeout
- read_timeout
- request_timeout
- persistent_request_timeout
- client_lifetime
- half_closed_clients
- pconn_timeout
- ident_timeout
- shutdown_lifetime
- acl
- http_access
- http_reply_access
- icp_access
- miss_access
- cache_peer_access
- ident_lookup_access
- tcp_outgoing_tos
- tcp_outgoing_address
- reply_body_max_size
- cache_mgr
- cache_effective_user
- cache_effective_group
- visible_hostname
- unique_hostname
- hostname_aliases
- announce_period
- announce_host
- announce_file
- announce_port
- httpd_accel_host
- httpd_accel_port
- httpd_accel_single_host
- httpd_accel_with_proxy
- httpd_accel_uses_host_header
- dns_testnames
- logfile_rotate
- append_domain
- tcp_recv_bufsize
- err_html_text
- deny_info
- memory_pools
- memory_pools_limit
- forwarded_for
- log_icp_queries
- icp_hit_stale
- minimum_direct_hops
- minimum_direct_rtt
- cachemgr_passwd
- store_avg_object_size
- store_objects_per_bucket
- client_db
- netdb_low
- netdb_high
- netdb_ping_period
- query_icmp
- test_reachability
- buffered_logs
- reload_into_ims
- always_direct
- never_direct
- header_access
- header_replace
- icon_directory
- error_directory
- maximum_single_addr_tries
- snmp_port
- snmp_access
- snmp_incoming_address
- snmp_outgoing_address
- as_whois_server
- wccp_router
- wccp_version
- wccp_incoming_address
- wccp_outgoing_address
- delay_pools
- delay_class
- delay_access
- delay_parameters
- delay_initial_bucket_level
- incoming_icp_average
- incoming_http_average
- incoming_dns_average
- min_icp_poll_cnt
- min_dns_poll_cnt
- min_http_poll_cnt
- max_open_disk_fds
- offline_mode
- uri_whitespace
- broken_posts
- mcast_miss_addr
- mcast_miss_ttl
- mcast_miss_port
- mcast_miss_encode_key
- nonhierarchical_direct
- prefer_direct
- strip_query_terms
- coredump_dir
- ignore_unknown_nameservers
- digest_generation
- digest_bits_per_entry
- digest_rebuild_period
- digest_rewrite_period
- digest_swapout_chunk_size
- digest_rebuild_chunk_percentage
- chroot
- client_persistent_connections
- server_persistent_connections
- pipeline_prefetch
- extension_methods
- request_entities
- high_response_time_warning
- high_page_fault_warning
- high_memory_warning
- ie_refresh
- vary_ignore_expire
- sleep_after_fork
- B. The Memory Cache
- C. Delay Pools
- D. Filesystem Performance Benchmarks
- E. Squid on Windows
- F. Configuring Squid Clients
- About the Author
- Colophon
- Copyright
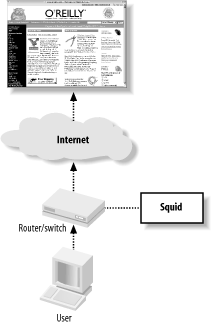
Chapter 9. Interception Caching
Interception caching is a popular technique for getting traffic to Squid without configuring any clients. Instead, you configure a router or switch to divert HTTP connections to the machine on which Squid is running. Squid’s operating system is configured to accept the foreign packets and deliver them to the Squid process. To make HTTP interception work, you need to configure three separate components: a network device, Squid’s operating system, and Squid itself.
This chapter begins with an overview of HTTP interception. I’ll explain how it all works and define some terms so that the remaining sections make sense. I also explain the tradeoffs involved with HTTP interception.
Following that, I’ll discuss your options for devices and configurations that can intercept client traffic. In particular, I cover Cisco policy routing, Cisco’s WCCP, layer four switches, and running Squid on a host that also functions as a router or bridge.
Next, I’ll show how to configure the operating system to handle the intercepted connections. This functionality is a feature of the IP packet filtering software, which varies from system to system. It is called iptables (Netfilter) on Linux; ipfw on FreeBSD; pf on OpenBSD; and IPFilter on NetBSD, Solaris, and other BSD variants.
Squid is the final component you need to configure. Fortunately, this is relatively straightforward because it doesn’t depend on your operating system or network device.
I finish the chapter with a little checklist that may help you debug HTTP interception problems.
How It Works
Interception caching involves some network trickery, so it is helpful for you to understand what happens between the client and Squid. I’ll use Figure 9-1 and the following sample tcpdump output to explain how the packets are intercepted as they flow through your network.
The user-agent wants to request a resource, say /index.html from an origin server, say www.oreilly.com. It needs the origin server’s IP address, so it makes a DNS request:
Packet 1
TIME:   19:54:41.317310
UDP:    206.168.0.3.2459 -> 206.168.0.2.53
DATA:   .d...........www.oreilly.com.....
---------------------------------------------------------------------------
Packet 2
TIME:   19:54:41.317707 (0.000397)
UDP:    206.168.0.2.53 -> 206.168.0.3.2459
DATA:   .d...........www.oreilly.com.............PR.....%........PR.
        ....$........PR...ns1.sonic.net.........PR...ns2.Q........PR
        ...ns...M...............h.............!.z.......b......
Now that it has the IP address, the user-agent initiates a TCP connection to the origin server on port 80:
Packet 3
TIME:   19:54:41.320652 (0.002945)
TCP:    206.168.0.3.3897 -> 208.201.239.37.80 Syn
DATA:   <No data>
The switch/router notices a TCP SYN packet with destination port 80. What happens next depends on the particular interception technology. In the case of layer four switches and policy routing, the device simply forwards the TCP packet to Squid’s datalink layer (Ethernet) address. This works only when Squid is directly attached to the network device. For WCCP, the router encapsulates the TCP packet into a GRE packet. Because the GRE packet has its own IP address, it can be routed through multiple subnets. In other words, WCCP doesn’t require Squid to be directly attached to the router.
The Squid host’s operating system receives the intercepted packet. For layer four switches, the TCP/IP packet is unchanged from the earlier explanation.
If the packet is encapsulated with GRE, the host removes the outer IP and GRE headers and places the original TCP/IP packet on the input queue.
Note that the Squid host receives an IP packet for a foreign address (the origin server’s). Normally this packet is dropped because its destination address doesn’t match any of the local interface addresses. To make the host accept the foreign packet, you must enable IP forwarding on most operating systems.
The client’s TCP/IP packet is processed by the packet filtering code. The packet matches a rule that instructs the kernel to forward or divert this packet to Squid. Without this rule, the kernel simply forwards this packet on its way to the origin server, which isn’t what you want.
Note that the SYN packet’s destination port is 80, but Squid may be listening on a different port, such as 3128. The packet filtering rules allow you to change the port number. You don’t need to make Squid listen on port 80. You can’t see this step with tcpdump because the diverted packet doesn’t flow through the network interface code again.
The packet filter’s redirection rule is still necessary even if you have Squid listen on port 80. Simply making the port numbers match doesn’t allow Squid to receive the intercepted packets. The redirection rule is the magic that delivers foreign packets to Squid.
Squid receives notification of the new connection, which it accepts. The kernel sends a SYN/ACK packet back to the client:
Packet 4
TIME:   19:54:41.320735 (0.000083)
TCP:    208.201.239.37.80 -> 206.168.0.3.3897 SynAck
DATA:   <No data>
As you can see, the source address is the origin server’s, even though this packet didn’t reach the origin. The operating system simply copies and swaps the source and destination IP addresses from the SYN packet into the reply.
The user-agent receives the SYN/ACK packet, fully establishing the TCP connection. The user-agent now believes it is connected to the origin server, so it writes the HTTP request:
Packet 5
TIME:   19:54:41.323080 (0.002345)
TCP:    206.168.0.3.3897 -> 208.201.239.37.80 Ack
DATA:   <No data>
---------------------------------------------------------------------------
Packet 6
TIME:   19:54:41.323482 (0.000402)
TCP:    206.168.0.3.3897 -> 208.201.239.37.80 AckPsh
DATA:   GET / HTTP/1.0
        User-Agent: Wget/1.8.2
        Host: www.oreilly.com
        Accept: */*
        Connection: Keep-Alive
Squid receives the HTTP request. It uses the HTTP
Hostheader to convert the partial URL into a full URL. In this case, you’ll see http://www.oreilly.com/ in the access.log file.From this point on, Squid treats the request normally. As usual, cache hits are returned immediately. Cache misses are forwarded to the origin server.
Lastly, here is the response that Squid receives from the origin server:
Packet 8
TIME:   19:54:41.448391 (0.030030)
TCP:    208.201.239.37.80 -> 206.168.0.3.3897 AckPsh
DATA:   HTTP/1.0 200 OK
        Date: Mon, 29 Sep 2003 01:54:41 GMT
        Server: Apache/1.3.26 (Unix) PHP/4.2.1 mod_gzip/1.3.19.1a mo
        d_perl/1.27
        P3P: policyref="http://www.oreillynet.com/w3c/p3p.xml",CP="C
        AO DSP COR CURa ADMa DEVa TAIa PSAa PSDa IVAa IVDa CONo OUR
        DELa PUBi OTRa IND PHY ONL UNI PUR COM NAV INT DEM CNT STA P
        RE"
        Last-Modified: Sun, 28 Sep 2003 23:54:44 GMT
        ETag: "1b76bf-b910-3ede86c4"
        Accept-Ranges: bytes
        Content-Length: 47376
        Content-Type: text/html
        X-Cache: MISS from www.oreilly.com
        X-Cache: MISS from 10.0.0.1
        Connection: keep-alive
You don’t want your switch/router to intercept the connections that Squid makes to origin servers. If that happens, Squid ends up talking to itself and can’t satisfy any cache misses. The best way to avoid forwarding loops like this is to make sure that your users and Squid connect to separate interfaces on the switch/router. Whenever feasible, you should apply the interception rules to specific interfaces. Obviously, you should not enable interception on the interface that Squid uses.
Why (Not) Intercept?
Many organizations find interception caching attractive because they can’t, or would rather not, configure all their user’s web browsers. It’s probably easier to perform a little network trickery on a single switch or router than it is to configure hundreds or thousands of workstations. As with many choices we face, interception caching is really a tradeoff. It brings both benefits and drawbacks. It may make your life easier, or more difficult.
The obvious benefit of interception caching is that all HTTP requests leaving your network automatically go through Squid. You don’t need to worry about configuring any browsers or that users might disable their proxy settings. Interception caching puts you, the network administrator, in control of the HTTP traffic. You can change, add, or remove Squid caches from service without significantly interrupting your users’ web surfing.
Most of the disadvantages surrounding HTTP interception are because this technique violates the TCP/IP standards. These protocols mandate that routers (and switches) forward TCP/IP packets to the host specified by the destination IP address. Diverting the packets to a caching proxy breaks the rules. The proxy accepts diverted connections under false pretense. User agents are tricked into believing they have established a TCP connection with the origin server.
This confusion causes a serious problem with older versions of
Microsoft’s Internet Explorer. The browser’s Reload button is the
easiest way to refresh an HTML page. When Explorer is configured to use
a caching proxy, a reload request includes a Cache-Control: no-cache header to force a cache miss (or
validation) and ensure that the response is up to date. Explorer omits
this header when not explicitly configured for proxying. With
interception caching, Explorer thinks it is connecting to the origin
server anyway, and there is no need to send this header. Squid can’t
tell that the user pressed the Reload button in this case and may not
validate the cached response. Squid’s ie_refresh
provides a partial workaround for this bug (see Appendix A). According to Microsoft, this
problem has been corrected in Explorer Version 5.5, Service Pack
1.[1]
For similar reasons, you can’t use HTTP proxy authentication in combination with
interception caching. Because the client is unaware of the proxy, it
doesn’t send the necessary Proxy-Authorization header. Additionally, the
407 (Proxy Authorization Required) response code is inappropriate
because the response should look like it came from the origin server,
which would never send such a reply.
You also can’t use RFC 1413 ident lookups (see Section 6.1.2.11) with
interception. Squid can’t bind a new TCP socket to the necessary IP
address. The operating system cheats when forwarding the intercepted
connection to Squid. However, it can’t cheat when Squid wants to bind a
new TCP socket to the foreign IP address. The address that it wants to
bind to isn’t really local, so the bind system call fails.
Interception caching is also incompatible with IP filtering designed to prevent address spoofing (See also RFC 2267: Network Ingress Filtering: Defeating Denial of Service Attacks Which Employ IP Source Address Spoofing). Consider the network shown in Figure 9-2. The router has two LAN interfaces: lan0 and lan1. The network administrator uses packet filters on the router to make sure that the internal hosts don’t transmit packets with spoofed source addresses. The router forwards only packets with source addresses corresponding to the connected networks. The packet filter rules might look something like this:
# lan0
allow ip from 172.16.1.0/24 to any via lan0
deny ip from any to any via lan0
# lan1
allow ip from 10.0.0.0/16 to any via lan1
deny ip from any to any via lan1
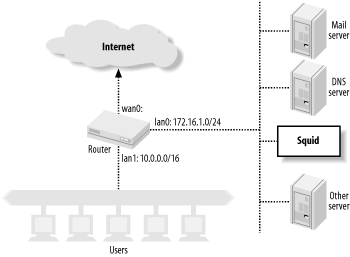
Now consider what happens when the router and Squid box on lan1 are configured to intercept HTTP connections coming from lan0. Squid pretends to be the origin server, which means that the TCP packets carrying response data from Squid back to the users have spoofed source addresses. These lan0 filter rules cause the router to deny these packets. To make interception caching work, the network administrator must remove the lan0 rules. This, in turn, leaves the network vulnerable to being the source of denial-of-service attacks.
As I explained in the previous section, clients must make DNS queries before opening a connection. This may be undesirable or difficult in certain firewall environments. A host whose HTTP traffic you want to intercept must be able to query the DNS. Clients that know they are using a proxy (due to manual configuration or proxy auto-configuration, for example) don’t usually try to resolve hostnames. Instead, they simply forward full URLs to Squid, and it becomes Squid’s job to look up origin server IP addresses.
Another little problem is that Squid accepts connections for any destination IP address. Consider, for example, a web site that still has a DNS entry even though the site and server have been taken down. Squid accepts the TCP connection for this bogus site. The client believes the site is up and running, because it’s connection is established. When Squid fails to connect to the origin server, it is forced to return an error message.
In case it’s not clear, HTTP interception can be tricky and difficult to get working the first time. A number of different components must all work together and be correctly configured. Furthermore, it can be difficult to recreate the entire configuration from memory. I strongly encourage you to set up a test environment before attempting this on a production system. Once you get it all working, be sure to document every little step.
The Network Device
Now that you know all the ins and outs of interception caching, let’s see how to actually make it work. We’ll start by configuring the network devices that will be intercepting your HTTP connections.
Inline Squid
In this configuration, you don’t need a switch or network router to intercept HTTP connections. Instead, Squid runs on a Unix system that is also your router (or perhaps bridge), as shown in Figure 9-3.
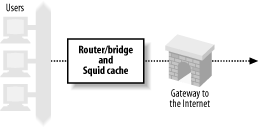
This configuration essentially skips the first three steps shown in Section 9.1. The Squid host already receives the HTTP connection packets because it is the router for your network. If you are taking this approach, feel free to skip ahead to Section 9.4.
Layer Four Switches
Many organizations use layer four switches specifically for their HTTP interception support. These products offer additional features as well, such as health checks and load balancing. I’ll only cover interception here. For information on health checks and load balancing, see O’Reilly’s Server Load Balancing and Load Balancing Servers, Firewalls, and Caches (John Wiley & Sons). The following subsections contain working-example configurations for a number of products and techniques.
Alteon/Nortel
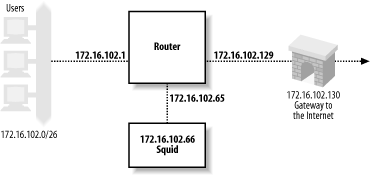
The following configuration is from an ACEswitch 180 and Alteon’s WebOS 8.0.21. The network setup is shown in Figure 9-4.

Clients are connected to port 1, the connection to the Internet is via port 2, and Squid is on port 3. The following lines are the relevant output of a /cfg/dump command on the switch. You don’t necessarily need to type all of these lines. Furthermore, some of the commands may have changed for newer versions of Alteon’s software. Note that Alteon calls this feature Web Cache Redirection (WCR). Here’s the process, step by step:
First, you must give the Alteon switch an IP address. This seems necessary so that the switch can perform health checks with Squid:
/cfg/ip/if 1
        ena
        addr 172.16.102.1
        mask 255.255.255.0
        broad 172.16.102.255
Alteon’s WCR is a feature of its Server Load Balancing (SLB) configuration. Thus, you need to enable SLB features on the switch with this command:
/cfg/slb
        on
Next, you define a real server with Squid’s IP address:
/cfg/slb/real 1
        ena
        rip 172.16.102.66
You must also define a group and make the real server a member:
/cfg/slb/group 1
        health tcp
        add 1
The next step is to define two filters. The first filter matches HTTP connections—TCP packets with destination port 80—and redirects them to a server in group 1. The second filter matches all other packets and forwards them normally:
/cfg/slb/filt 1
        ena
        action redir
        sip any
        smask 0.0.0.0
        dip any
        dmask 0.0.0.0
        proto tcp
        sport any
        dport http
        group 1
        rport 0
/cfg/slb/filt 224
        ena
        action allow
        sip any
        smask 0.0.0.0
        dip any
        dmask 0.0.0.0
        proto any
The final step is to configure specific switch ports for SLB. On port 1, you enable client processing (this is where the clients connect), and add the two filters. On the second port you need only configure it for servers (i.e., the upstream Internet connection):
/cfg/slb/port 1
        client ena
        filt ena
        add 1
        add 224
/cfg/slb/port 2
        server ena
To verify that HTTP interception is configured and working
correctly, you can use the commands under the /stats/slb and /info/slb menus. The /info/slb/dump command is a quick and easy
way to see the entire SLB configuration:
>> Main# /info/slb/dump
Real server state:
  1: 172.16.102.66, 00:c0:4f:23:d7:05, vlan 1, port 3, health 3, up

Virtual server state:

Redirect filter state:
  1: dport http, rport 0, group 1, health tcp, backup none
    real servers:
      1: 172.16.102.66, backup none, up

Port state:
  1: 0.0.0.0, client
     filt  enabled, filters: 1 224
  2: 0.0.0.0, server
     filt disabled, filters: empty
  3: 0.0.0.0
     filt disabled, filters: empty
In this output, notice that the switch says Squid is reachable
via port 3 and that the health checks show Squid is up. You can also see that filter 1 has
been applied to port 1, where the clients connect. In the Port state
section, port 1 is designated as a place where clients connect, and
port 2 is similarly marked as a server port.
The /stats/slb/real command
shows a handful of statistics for the real server (i.e.,
Squid):
>> Main# /stats/slb/real 1
------------------------------------------------------------------
Real server 1 stats:
Health check failures:                0
Current sessions:                    41
Total sessions:                     760
Highest sessions:                    55
Octets:                               0
Most of the statistics relate to the number of sessions (i.e., TCP connections). The Total sessions counter should increase if you execute the command again.
Lastly, the /stats/slb/group command shows almost the
same information:
>> Main# /stats/slb/group 1
------------------------------------------------------------------
Real server group 1 stats:
                      Current      Total  Highest
Real IP address      Sessions   Sessions Sessions           Octets
---- --------------- -------- ---------- --------  ---------------
   1 172.16.102.66         65       2004       90                0
---- --------------- -------- ---------- --------  ---------------
                           65       2004       90                0
This output would be more interesting if there was more than one real server in the group.
Foundry
The configuration in the following example comes from a ServerIron XL, running software version 07.0.07T12. As before, clients are on port 1, the Internet link is on port 2, and Squid is on port 3. However, that matters less for this particular configuration because you can enable HTTP interception globally. Foundry’s name for interception caching is Transparent Cache Switching (TCS). Refer back to Figure 9-4 for this example.
The first step is to give the switch an IP address so it can perform health checks:
ip address 172.16.102.1 255.255.255.0
Foundry allows you to enable or disable TCS on particular ports. However, for the sake of simplicity, let’s enable it globally:
ip policy 1 cache tcp http global
In this line, cache is a
keyword that corresponds to the TCS feature. The next line defines a
web cache. I’ve given it the name squid1 and
told the switch its IP address:
server cache-name squid1 172.16.102.66
The final step is to add the web cache to a cache group:
server cache-group 1
 cache-name squid1
If you’re having problems getting the Foundry switch to divert connections, have a look at the show cache-group output:
ServerIron#show cache-group

Cache-group 1 has 1 members Admin-status = Enabled Active = 0
Hash_info: Dest_mask = 255.255.255.0 Src_mask = 0.0.0.0

Cache Server Name                Admin-status Hash-distribution
squid1                           6            3

HTTP Traffic  From <-> to  Web-Caches

Name: squid1          IP: 172.16.102.66    State: 6   Groups =   1

                                   Host->Web-cache       Web-cache->Host
           State   CurConn TotConn Packets    Octets     Packets    Octets
Client     active  441     12390   188871     15976623   156962     154750098
Web-Server active  193     11664   150722     151828731  175796     15853612
Total              634     24054   339593     167805354  332758     170603710
Some of this output is cryptic, but you can tell interception is working by repeating the command and watching the counters increase.
The show server real command provides almost the same information:
ServerIron#show server real squid1
Real Servers Info

Name : squid1                                       Mac-addr: 00c0.4f23.d705
IP:172.16.102.66   Range:1    State:Active          Wt:1     Max-conn:1000000
Src-nat (cfg:op):(off:off)    Dest-nat (cfg:op):(off:off)
squid1 is a TRANSPARENT CACHE in groups   1
Remote server   : No          Dynamic : No      Server-resets:0
Mem:server: 02009eae Mem:mac: 045a3714

Port    State    Ms CurConn TotConn Rx-pkts  Tx-pkts  Rx-octet   Tx-octet   Reas
----    -----    -- ------- ------- -------  -------  --------   --------   ----
http    active   0  855     29557   379793   471713   373508204  39425322   0
default active   0  627     28335   425106   366016   38408994   368496301  0

Server  Total       1482    57892   804899   837729   411917198  407921623  0
Finally, you can use the show logging command to see if the switch believes Squid is up or down:
ServerIron#show logging
...
00d00h11m51s:N:L4 server 172.16.102.66 squid1 port 80 is up
00d00h11m49s:N:L4 server 172.16.102.66 squid1 port 80 is down
00d00h10m21s:N:L4 server 172.16.102.66 squid1 port 80 is up
00d00h10m21s:N:L4 server 172.16.102.66 squid1 is up
Note that the ServerIron thinks the server is running on port 80. As you’ll see later, my examples have Squid running on port 3128. The packet filtering rules actually change the packet’s destination port from 80 to 3128. This has some interesting consequences for health checks, which I address later in Section 9.3.2.5.
Extreme Networks
In this example, the hardware is a Summit1i, and the software is Version 6.1.3b11. Once again, the clients are on port 1, the Internet link is on port 2, and Squid is on port 3. The network configuration is shown in Figure 9-5.
The Extreme switch can intercept HTTP connections only for packets that it routes between subnets. In other words, if you use the Extreme switch in layer two mode (with a single VLAN), you can’t divert traffic to Squid. To make HTTP interception work, you must configure separate VLANs for users, Squid, and the Internet:
configure Default delete port 1-8

create vlan Users
configure Users ip 172.16.102.1 255.255.255.192
configure Users add port 1

create vlan Internet
configure Internet ip 172.16.102.129 255.255.255.192
configure Internet add port 2

create vlan Squid
configure Squid ip 172.16.102.65 255.255.255.192
configure Squid add port 3
The next step is to enable and configure routing in the switch:
enable ipforwarding
configure iproute add default 172.16.102.130
Lastly, you configure the switch to redirect HTTP connections to Squid:
create flow-redirect http tcp destination any ip-port 80 source any
configure http add next-hop 172.16.102.66
Cisco Arrowpoint
The following configuration is based on notes from an old test I ran. However, I don’t have access to an arrowpoint switch now and can’t verify that these lines are correct.
circuit VLAN1
  ip address 172.16.102.1 255.255.255.0

service pxy1
  type transparent-cache
  ip address 172.16.102.66
  port 80
  protocol tcp
  active

owner foo
  content bar
    add service pxy1
    protocol tcp
    port 80
    active
A comment on HTTP servers and health checks
I’ve set up these examples so that the router/switch forwards packets without changing the destination TCP port. The packet filtering rules that I’ll cover in Section 9.4 change the destination port. An interesting problem arises when you also run an HTTP server on the Squid box.
To run an HTTP server on port 80 while running Squid on port 3128, your packet filter configuration must have a special rule that accepts TCP connections for the HTTP server. Otherwise, the connection gets diverted to Squid. The special rule is simple to construct. If the destination port is 80, and the destination address is the server’s, accept the packet normally. All the intercepted packets have foreign destination addresses, so they won’t match the special rule.
However, when the router/switch makes an HTTP health check, it connects to the server’s IP address. Thus, the health-check packet matches the special rule and isn’t diverted to Squid. The router/switch is checking the health of the wrong server. If the HTTP server is down, but Squid is up (or vice versa), the health check will be wrong.
If you find yourself in this situation, you have a few options:
Don’t run an HTTP server on the Squid host.
Add a specific packet filtering rule that diverts TCP health check connections from the router/switch to Squid.
Configure your router/switch to change the destination port to 3128.
Disable layer four health checks.
Cisco Policy Routing
Policy routing isn’t that different from what I’ve talked about with layer four switches. It is implemented in routing products made by Cisco and others. The primary difference is that policy routing doesn’t include any health checking. Thus, if Squid becomes overloaded or fails entirely, the router continues to forward packets to Squid, rather than route them directly to origin servers. Policy routing requires that Squid be on one of the router’s directly connected subnets.
In this example, I’m using a Cisco 7204 router running IOS Version 12.0(5)T. The network configuration is the same as the previous example, shown in Figure 9-5.
The first configuration step is to define an access list that matches port 80 packets coming from clients. You must make sure that port 80 packets coming from Squid aren’t reintercepted. One way to do this is with a specific rule that denies packets coming from Squid, followed by a rule that allows all others:
access-list 110 deny tcp host 172.16.102.66 any eq www
access-list 110 permit tcp any any eq www
Alternatively, if Squid and your users are on different subnets, you can permit only those packets that originate from the client network:
access-list 110 permit tcp 10.102.0.0 0.0.255.255 any eq www
The next step is to define a route map. This is where you tell the router where to forward the intercepted packets:
route-map proxy-redirect permit 10
 match ip address 110
 set ip next-hop 172.16.102.66
Those commands say, “If the IP address matches access-list 110,
forward the packet to 172.16.102.66.” The 10 on the route-map line is a sequence number in case
you have multiple route maps. The final step is to apply the route map
to interfaces where your clients connect:
interface Ethernet0/0
 ip policy route-map proxy-redirect
IOS doesn’t provide much in the way of debugging for policy routing. However, the show route-map command may be sufficient:
router#show route-map proxy-redirect
route-map proxy-redirect, permit, sequence 10
  Match clauses:
    ip address (access-lists): 110
  Set clauses:
    ip next-hop 172.16.102.66
  Policy routing matches: 730 packets, 64649 bytes
Web Cache Coordination Protocol
Cisco’s answer to layer four switching technology (before they acquired Arrowpoint) is the Web Cache Coordination Protocol (WCCP).[2] WCCP is different from the typical layer four interception in a couple of ways.
First, intercepted packets are encapsulated with GRE (Generic Routing Encapsulation). This simply allows them to traverse subnets, which means Squid doesn’t need to be directly connected to the router. Because they are encapsulated, the Squid host must unencapsulate them. Not all Unix systems have the code for unwrapping GRE packets.
The second difference is in how the router decides to spread the load among multiple caches. In fact, the router doesn’t make this decision, the cache does. When a router has a group of WCCP-enabled caches, one nominates itself to be the leader. The leader decides how to spread the load and informs the router. This is an extra step that must occur before the router can redirect any connections.
Because WCCP uses GRE, the router may be forced to fragment large TCP packets from HTTP requests. Fortunately, this shouldn’t occur very often because most HTTP requests are smaller than the Ethernet MTU size (1500 octets). The default TCP and IP packet headers are 20 octets each, which means an Ethernet frame can carry 1460 octets of actual data. GRE encapsulation adds 20 octets for the GRE header, plus another 20 for the second IP header. Thus a normal 1500-octet TCP/IP packet from the client becomes 1540 octets after encapsulation. This is too large to transmit in a single Ethernet frame, so the router fragments the original packet into two packets.
WCCPv1
The configuration examples in this section were tested on a Cisco 7204 running IOS Version 12.0(5)T. The network configuration is the same as shown in Figure 9-5.
First, enter these two lines in the IOS configuration to enable WCCP for the router:
ip wccp version 1
ip wccp web-cache
Second, you must enable WCCP on individual router interfaces. You should do this only on interfaces where HTTP packets leave the router. In other words, select interfaces that connect to origin servers or your Internet gateway:
interface Ethernet0/1
 ip address 172.16.102.129 255.255.255.192
 ip wccp web-cache redirect out
Be sure to save your configuration changes.
You may need to use an access list to prevent interception for certain web sites. You can also use the access list to prevent forwarding loops. For example:
! don't re-intercept connections coming from Squid:
access-list 112 deny   tcp host 172.16.102.66 any eq www

! don't intercept this broken web site
access-list 112 deny   tcp any 192.16.8.7 255.255.255.255 eq www

! allow other HTTP traffic
access-list 110 permit tcp any any eq www

ip wccp web-cache redirect-list 112
The router doesn’t send any traffic to Squid until Squid announces itself to the router. I explain how to configure Squid for WCCP in Section 9.5.1.
WCCPv2
The standard Squid distribution currently only supports WCCPv1. However, you can find a patch for WCCPv2 on the http://devel.squid-cache.org/ site. This code is still experimental.
Note that the GRE packets sent from the router to Squid contain an additional four octets. WCCPv2 inserts a redirect header between the GRE header, and the encapsulated IP packet. You may need to modify your kernel code to account for this additional header.
Debugging
IOS provides a couple of commands to monitor and debug WCCP. The show ip wccp web-cache command provides some basic information:
router#show ip wccp web-cache
Global WCCP information:
    Router information:
        Router Identifier:                   172.16.102.129
        Protocol Version:                    1.0

    Service Identifier: web-cache
        Number of Cache Engines:             1
        Number of routers:                   1
        Total Packets Redirected:            1424
        Redirect access-list:                -none-
        Total Packets Denied Redirect:       0
        Total Packets Unassigned:            0
        Group access-list:                   -none-
        Total Messages Denied to Group:      0
        Total Authentication failures:       0
For a few more details, add the word detail to the end of the previous
command:
router#show ip wccp web-cache detail
WCCP Cache-Engine information:
        IP Address:            172.16.102.66
        Protocol Version:      0.4
        State:                 Usable
        Initial Hash Info:     00000000000000000000000000000000
                               00000000000000000000000000000000
        Assigned Hash Info:    FFFFFFFFFFFFFFFFFFFFFFFFFFFFFFFF
                               FFFFFFFFFFFFFFFFFFFFFFFFFFFFFFFF
        Hash Allotment:        256 (100.00%)
        Packets Redirected:    1424
        Connect Time:          00:17:40
Here you can see Squid’s IP address and state. If more than one cache speaks WCCP to the router, the hash assignment information should look different. Most likely, each cache receives an equal proportion of the hash buckets.
Note that the detailed output has a Protocol Version line with a different value than the first command. Unfortunately, the word “version” is overloaded. The show ip wccp web-cache command appears to report the WCCP protocol major version number (i.e., 1 or 2), while the detail version seems to be a different (perhaps internal, or minor version) number that matches the value of Squid’s wccp_version directive.
Operating System Tweaks
You must enable certain networking features in your operating system to make interception caching work. First, you need to enable IP packet forwarding. This allows the operating system to receive packets with foreign destination addresses. Second, you must enable and configure optional code in the kernel that redirects the foreign packets to Squid.
Linux
The instructions in this section should work for the 2.4 series of Linux kernels. I used RedHat Linux 7.2 (kernel 2.4.7-10). If you are using an older or newer version, these may not work. I recommend searching the Squid FAQ and other places for updated or historical information.
In my tests with iptables, it wasn’t necessary to enable IP forwarding. However, you may want to enable it initially and see if you can disable it after everything else is working. The best way to enable packet forwarding is to add this line to /etc/sysctl.conf:
net.ipv4.ip_forward = 1
Most likely you’ll need to make a new kernel before HTTP interception will work. See O’Reilly’s Running Linux by Matt Welsh, Matthias Kalle Dalheimer, and Lar Kaufman, if you don’t know how to configure and create a Linux kernel. When you configure the kernel, make sure these options are enabled:
o  General setup
     Networking support (CONFIG_NET=y)
     Sysctl support (CONFIG_SYSCTL=y)
o  Networking options
     Network packet filtering (CONFIG_NETFILTER=y)
     TCP/IP networking (CONFIG_INET=y)
     Netfilter Configuration
       Connection tracking (CONFIG_IP_NF_CONNTRACK=y)
       IP tables support (CONFIG_IP_NF_IPTABLES=y)
       Full NAT (CONFIG_IP_NF_NAT=y)
       REDIRECT target support (CONFIG_IP_NF_TARGET_REDIRECT=y)
o  File systems
     /proc filesystem support (CONFIG_PROC_FS=y)
Additionally, make sure this option isn’t enabled:
o Networking options
    Fast switching (CONFIG_NET_FASTROUTE=n)
The code that redirects foreign packets to Squid is part of the Netfilter software. Here is a rule that sends the intercepted HTTP connections to Squid:
iptables -t nat -A PREROUTING -i eth0 -p tcp --dport 80 -j REDIRECT --to-port 3128
The Linux kernel maintains a number of different
tables. The -t nat option
indicates that we are modifying the Network Address Translation (NAT)
table. In essence, we’re using iptables to translate origin server TCP/IP
addresses to Squid’s local TCP/IP address.
Each iptables table has a
number of chains. The -A
PREROUTING option indicates that we are appending a rule to
the built-in chain named PREROUTING. The PREROUTING chain applies only to packets
entering the system from the outside network.
The next three options determine which packets match this rule.
The -i eth0 option restricts the rule to packets
received on the eth0 interface. The
-p tcp option specifies TCP packets, and
—dport 80 specifies packets with destination port
equal to 80. If all three conditions are true, the packet matches the
rule.
The -j REDIRECT option indicates the target, or
action to take, for packets that match the rule. REDIRECT is a built-in target name that
causes iptables to change the
packet’s destination address to 127.0.0.1. The —to-port
3128 option instructs iptables also to change the destination TCP
port number to 3128.
If you are also running an HTTP server (such as Apache) on the
Squid host, you must add another iptables rule. The additional rule is
necessary to allow connections to your HTTP server. Otherwise, the
REDIRECT rule causes iptables to send those connections to Squid
on port 3128. You can use the -I option to insert a
new rule at the top of the list:
iptables -t nat -I PREROUTING -i eth0 -p tcp -d 172.16.102.66 --dport 80 -j ACCEPT
Once you have all your iptables rules working correctly, be sure to save them with this command:
/sbin/service iptables save
This saves the current rules to /etc/sysconfig/iptables so they get automatically loaded when you reboot.
Linux and WCCP
Version 2.4 of the Linux kernel comes with a GRE pseudo-interface. However, it doesn’t work for decoding GRE-encapsulated packets from a WCCP session. The problem seems to be that the router sets the Protocol Type field to 0x883E for WCCP/GRE packets. Linux’s GRE driver doesn’t know what to do with these packets because it doesn’t know about protocol type 0x883E.
You can try patching Linux’s GRE module so that it works with WCCP. The Squid FAQ contains a link to such a patch. However, you’ll probably find it easier to use the WCCP-specific module for Linux. You can find it at http://www.squid-cache.org/WCCP-support/Linux/ip_wccp.c.
You need to compile the ip_wccp.c file as a loadable kernel module. This can be a little tricky because the specific compiler options may change depending on your kernel version. One thing you can do is go to your kernel source directory, type make modules and watch the compiler commands scroll by. Then copy one of those commands and change the last argument to ip_wccp.c. Here are the commands that I used with the 2.4.7-10 Linux kernel:
% gcc -Wall -D_ _KERNEL_ _ -I/usr/src/linux-2.4.7-10/include  \
  -DMODULE -DMODVERSIONS -DEXPORT_SYMBAB \
  -include /usr/src/linux-2.4.7-10/include/linux/modversions.h \
  -O2 -c ip_wccp.c
The gcc command should leave you with an ip_wccp.o file in the current directory. The next step is to load that file into the kernel with the insmod command:
# insmod ip_wccp.o
Note that the ip_wccp module accepts GRE/WCCP packets from any source address. In other words, a malicious person might be able to send traffic to your Squid cache. If you use this module, you should also install an iptables rule to deny foreign GRE packets. For example:
# iptables -A INPUT -p gre -s 172.16.102.65 -j ACCEPT
# iptables -A INPUT -p gre -j DROP
Again, don’t forget to save your working rules with the /sbin/service iptables save command.
FreeBSD
The examples in this section are based on FreeBSD-4.8 and should work for any later version of FreeBSD-4 and FreeBSD-5.
To enable IP packet forwarding, add this line to /etc/sysctl.conf:
net.inet.ip.forwarding=1
You’ll need a kernel with two special options enabled. If you don’t know how to make a kernel, refer to Section 9 of the FreeBSD Handbook (http://www.freebsd.org/handbook/index.html). Edit your kernel config file and make sure these lines are present:
options          IPFIREWALL
options          IPFIREWALL_FORWARD
If the Squid box is in an unattended machine room, I also
recommend using the IPFIREWALL_DEFAULT_TO_ACCEPT option. In case
you mess up the firewall rules, you’ll still be able to log in.
These ipfw commands tell the kernel to redirect intercepted connections to Squid:
/sbin/ipfw add allow tcp from 172.16.102.66 to any out
/sbin/ipfw add allow tcp from any 80 to any out
/sbin/ipfw add fwd 127.0.0.1,3128 tcp from any to any 80 in
/sbin/ipfw add allow tcp from any 80 to 172.16.102.66 in
The first rule matches packets originating from the Squid host.
It ensures that outgoing TCP connections won’t be redirected back to
Squid.[3] The second rule matches TCP packets sent from Squid back
to the clients. I’ve added it here in case you have additional
ipfw rules later that would deny
these packets. The third rule is the one that actually redirects
incoming connections to Squid. The fourth rule matches packets coming
back from origin servers to Squid. Again, this is in case you have
subsequent deny rules.
If you’re also running an HTTP server on the Squid host, you
must add another rule that passes, rather than redirects, TCP packets
destined for the origin server. The following rule goes before the
fwd rule:
/sbin/ipfw add allow tcp from any to 172.16.102.66 80 in
FreeBSD typically stores ipfw
rules in /etc/rc.firewall. Once
you get your rule set working properly, be sure to save them. Add this
line to /etc/rc.conf to make
FreeBSD automatically run the /etc/rc.firewall script when it
boots:
firewall_enable="YES"
FreeBSD and WCCP
FreeBSD Version 4.8 and later have built-in support for GRE and WCCP. Earlier versions require patches, which you can still find at http://www.squid-cache.org/WCCP-support/FreeBSD/. The built-in implementation is much better, however, as it is written by real kernel gurus. You’ll probably need to make a new kernel that supports GRE. Add this line to your kernel configuration:
pseudo-device gre
For FreeBSD-5, use device
instead of pseudo-device. Of
course, you also need the FIREWALL options mentioned in the
preceding section.
After installing and booting from the new kernel, you must configure a GRE tunnel to accept GRE packets from the router. For example:
# ifconfig gre0 create
# ifconfig gre0 172.16.102.66 172.16.102.65 netmask 255.255.255.255 up
# ifconfig gre0 tunnel 172.16.102.66 172.16.102.65
# route delete 172.16.102.65
The ifconfig command adds a
routing table entry for the router (172.16.102.65) over the gre0 interface. I found it necessary to
delete that route so that Squid can talk to the router.
You may want or need to add an ipfw rule for the GRE packets coming from the router:
/sbin/ipfw add allow gre from 172.16.102.65 to 172.16.102.66
OpenBSD
The examples in this section are based on OpenBSD 3.3.
To enable packet forwarding, uncomment or add this line in /etc/sysctl.conf:
net.inet.ip.forwarding=1
Now, configure the packet filter rules for interception by adding lines like these to /etc/pf.conf:
rdr inet proto tcp from any to any port = www -> 127.0.0.1 port 3128
pass out proto tcp from 172.16.102.66 to any
pass out proto tcp from any port = 80 to any
pass in proto tcp from any port = 80 to 172.16.102.66
If you aren’t already using OpenBSD’s packet filter, you need to enable it with this line in /etc/rc.conf.local:
pf=YES
OpenBSD and WCCP
First, tell the system to accept and process GRE and WCCP packets by adding these lines to /etc/sysctl.conf:
net.inet.gre.allow=1
net.inet.gre.wccp=1
Then, configure a GRE interface with commands like these:
# ifconfig gre0 172.16.102.66 172.16.102.65 netmask 255.255.255.255 up
# ifconfig gre0 tunnel 172.16.102.66 172.16.102.65
# route delete 172.16.102.65
As with FreeBSD, I found it necessary to delete the route that is automatically added by ifconfig. Finally, depending on your packet filter configuration, you may need to add a rule that allows the GRE packets:
pass in proto gre from 172.16.102.65 to 172.16.102.66
IPFilter on NetBSD and Others
The examples in this section are based on NetBSD 1.6.1. They might also work on Solaris, HP-UX, IRIX, and Tru64 since IPFilter runs on those systems as well.
To enable packet forwarding (on NetBSD), add this line to /etc/sysctl.conf:
net.inet.ip.forwarding=1
Then, insert a line like this into the NAT (network address translation) configuration file, /etc/ipnat.conf:
rdr fxp0 0/0 port 80 -> 172.16.102.66 port 3128 tcp
Your interface name may be different from fxp0 in this example.
NetBSD and WCCP
I was not able to make WCCP work with NetBSD, even after patching the GRE code to
accept WCCP packets. The problem seems to arise because the IPFilter
rdr rule is bound to a specific
interface. Packets coming from the router go through NetBSD’s
gre0 interface (where they are
unencapsulated). However, packets going the other way, back to the
router, aren’t encapsulated and don’t go through the same network
interface. Therefore, the IPFilter code doesn’t translate Squid’s
local IP address back to the origin server’s address.
Configure Squid
If you are using Linux 2.4 and iptables, you should probably use the
—enable-linux-netfilter option when you run (or re-run) ./configure. It enables some Linux-specific
code so that Squid can find the IP address of the origin server from
where the request was originally sent. Squid normally gets the origin
server name (and/or address) from the Host header. The
—enable-linux-netfilter feature is necessary only for
requests that don’t have a Host
header. Statistics show that almost all requests have the Host header, so you may actually be able to
get by without the —enable-linux-netfilter
option.
If you are using the IPFilter package (with NetBSD, Solaris, and
others), you should use the —enable-ipf-transparent
option for the same reason. On OpenBSD, you should use the
—enable-pf-transparent option. Each time you run
./configure you must recompile Squid,
as described in Section
3.8.
After you get the ./configure options figured out, and Squid recompiled, you can edit squid.conf. As a starting point, make sure the following directives are defined with the given values:
httpd_accel_host virtual
httpd_accel_port 80
httpd_accel_uses_host_header on
httpd_accel_with_proxy on
httpd_accel_single_host off
The httpd_accel_host directive is the key. It
instructs Squid to accept HTTP requests with partial URIs. The
httpd_accel_uses_host_header directive is enabled
so that Squid uses the Host header to
reconstruct full URIs. The virtual
keyword instructs Squid to put the origin server’s IP address in the URL
when the Host header is
absent.
The httpd_accel_with_proxy directive controls whether or not Squid accepts both HTTP server (partial URI) requests, and proxy (full URI) requests. It should probably be enabled for interception caching. Squid may still work if httpd_accel_with_proxy is disabled as long as none of your clients are explicitly configured for Squid as a proxy.
The httpd_accel_single_host directive is normally disabled, but it was enabled by default in some earlier versions of Squid. I’ve listed it here to make sure that it is disabled for interception caching.
If you are intercepting more than just port 80, you may want to
set httpd_accel_port to 0. See Appendix
A for more information.
If you’re not using WCCP, you should be ready to start sending intercepted traffic to Squid. Give it a try by surfing the Web with your browser or by making some test requests with squidclient. If you are using WCCP, there is just one more step that you must complete.
Configuring WCCPv1
The router doesn’t send any traffic to Squid until Squid announces itself to the router. To make Squid do that, add these lines to your squid.conf:
wccp_router 172.16.102.65
wccp_version 4
Your router has many interfaces. Be sure to use the IP address of the interface closest to Squid. This is necessary because the WCCP messages coming from the router have the source IP address set to the address of the outgoing interface. Squid rejects WCCP messages if the source address doesn’t match the wccp_router value.
The WCCPv1 document specifies 4 as the protocol version number. However, some users report that Cisco IOS 11.2 supports only Version 3. If you are using this version of IOS, change the version in squid.conf:
wccp_version 3
Debugging Problems
HTTP interception is complicated because many different devices must all work correctly together. To help you track down problems, here’s a trouble-shooting check list:
- Are client packets going through the router/switch?
This should be obvious for simple networks. You can trace the cables and watch the activity lights blink. In a large, complex network, however, packets may be taking an alternate path. If your organization is large enough to have a network sniffer, you may want to observe the traffic on the link that should carry requests from web clients. A low-tech approach is to disconnect the link in question and see if it affects the client’s web browsing.
- Is the router/switch configured properly?
You may want to double-check your router/switch configuration. If you configured specific interfaces, did you get the right ones?
Is your new configuration actually running on the device? Perhaps the router/switch was rebooted before you could save the configuration. You may need to reboot before the changes take effect.
- Can the switch/router talk to the Squid host?
Can you ping Squid from the router/switch? Most layer four interception configurations require that the device and Squid be on the same subnet. Log into the router/switch, and make sure you can ping Squid’s IP address.
- Does the switch/router believe that Squid is up?
Many traffic interception devices don’t send traffic to Squid unless they know it’s healthy. Use the debugging commands to view Squid’s health status. You may find that a layer three health check (e.g., ICMP ping) is simpler than a layer four check (e.g., HTTP), and more likely to make the network device mark Squid as up.
- Is Squid actually running?
Double-check that Squid is really running, especially if the system has recently been rebooted.
- Are packets arriving at the Squid host?
You should be able to see intercepted TCP connections with tcpdump. Here’s an example:
# tcpdump -n -i eth0 port 80
If you use WCCP, check for GRE packets coming from the router:
# tcpdump -n -i eth0 ip proto gre
If you don’t see any output from tcpdump, the router/switch is probably not sending anything. In that case, return to the previous suggestions.
Note, if the device is using layer four health checks, you should see those in the tcpdump output. Health checks come from the router/switch IP address, so they should be easy to spot. If you see health checks, but no other traffic, it probably means the router/switch is interpreting Squid’s reply as unhealthy. For example, the device may want to see a 200 (OK) response, but Squid returns an error, such as 401 (Unauthorized) or 404 (Not Found). You may want to run tail -f on the access.log.
- Did you enable IP forwarding?
Double-check that Squid’s operating system is configured to forward IP packets. If not, the host may drop intercepted packets because the destination IP address isn’t local.
- Did you configure the packet filter?
Make sure that the packet filter (i.e., ipfw, iptables, pf, etc.) is configured correctly. When everything is working well, you should be able to run the command periodically that displays the filtering rules and see the counters increase. For example:
# ipfw show 300 ; sleep 3; ipfw show 300
00300  86216 8480458 fwd 127.0.0.1,3128 tcp from any to any 80 in
00300  86241 8482240 fwd 127.0.0.1,3128 tcp from any to any 80 in
Note that in this example on FreeBSD, the packet and byte counters (second and third columns) are being incremented.
- Is the loopback interface up and configured?
If you have a rule to forward/redirect packets to 127.0.0.1, make sure that the loopback (e.g., lo0, lo) interface is up and configured. If not, the kernel may simply skip the forward/redirect rule.
- Are WCCP/GRE packets being unencapsulated correctly?
If you use WCCP, make sure that the GRE packets are being unencapsulated. If, for some reason, your system doesn’t know what to do with GRE packets, it probably increments the “unknown/unsupported protocol” counter in netstat -s output:
# netstat -s | grep unknown
        46 packets for unknown/unsupported protocol
If your OS has a GRE interface, run netstat -i every so often and look for increasing packet counts:
# netstat -in | grep ^gre0
Name    Mtu Network       Address              Ipkts Ierrs    Opkts Oerrs  Coll
gre0   1476 <Link#4>
304452     0        0     4     0
Also, try running tcpdump on the GRE interface:
# tcpdump -n -i gre0
- Can Squid talk back to the clients?
You may have a situation in which the router/switch is able to send packets to Squid, but Squid can’t send packets back to the clients. This can happen if your firewall filter rules reject those outgoing packets or if Squid just doesn’t have a route to the client addresses. To check for this condition, run netstat -n and look for a lot of sockets in the
SYN_RCVDstate:% netstat -n Active Internet connections Proto Recv-Q Send-Q Local Address Foreign Address (state) tcp4 0 0 10.102.129.246.80 10.102.0.1.36260 SYN_RCVD tcp4 0 0 10.102.129.226.80 10.102.0.1.36259 SYN_RCVD tcp4 0 0 10.102.128.147.80 10.102.0.1.36258 SYN_RCVD tcp4 0 0 10.102.129.26.80 10.102.0.2.36257 SYN_RCVD tcp4 0 0 10.102.129.29.80 10.102.0.2.36255 SYN_RCVD tcp4 0 0 10.102.129.226.80 10.102.0.1.36254 SYN_RCVD tcp4 0 0 10.102.128.117.80 10.102.0.1.36253 SYN_RCVD tcp4 0 0 10.102.128.149.80 10.102.0.1.36252 SYN_RCVD
If you see this, use ping and traceroute to make sure that Squid has bidirectional communication with the clients.
- Can Squid talk to origin servers?
Intercepted HTTP connections get stuck if Squid can’t connect to origin servers. When this happens, netstat should show you a lot of connections in the
SYN_SENTstate:% netstat -n Active Internet connections Proto Recv-Q Send-Q Local Address Foreign Address (state) tcp4 0 0 172.16.102.66.5217 10.102.129.145.80 SYN_SENT tcp4 0 0 172.16.102.66.5216 10.102.129.224.80 SYN_SENT tcp4 0 0 172.16.102.66.5215 10.102.128.71.80 SYN_SENT tcp4 0 0 172.16.102.66.5214 10.102.129.209.80 SYN_SENT tcp4 0 0 172.16.102.66.5213 10.102.129.62.80 SYN_SENT tcp4 0 0 172.16.102.66.5212 10.102.129.160.80 SYN_SENT tcp4 0 0 172.16.102.66.5211 10.102.128.129.80 SYN_SENT tcp4 0 0 172.16.102.66.5210 10.102.129.44.80 SYN_SENT tcp4 0 0 172.16.102.66.5209 10.102.128.73.80 SYN_SENT tcp4 0 0 172.16.102.66.5208 10.102.128.43.80 SYN_SENT
Again, use ping and traceroute to make sure that Squid can talk to origin servers.
- Are outgoing connections being intercepted?
If Squid can ping origin servers, and you still see a lot of connections in the
SYN_SENTstate, the router/switch may be intercepting Squid’s outgoing TCP connections. In some cases, Squid can detect such forwarding loops, and it writes a warning message to cache.log. Such a forwarding loop can quickly exhaust all of Squid’s file descriptors, which also generates a warning in cache.log.
If you suspect this problem, use the squidclient program to make some simple HTTP requests. For example, this command makes an HTTP request directly to the origin server:
% /usr/local/squid/bin/squidclient -p 80 -h slashdot.org /
If this command succeeds, you should see a bunch of ugly HTML from the Slashdot site on your screen. You can then try the same request through Squid:
% /usr/local/squid/bin/squidclient -r -p 3128 -h 127.0.0.1 http://slashdot.org/
Again, you should see some HTML on your screen. If not check for error messages in cache.log. If you see forwarding loop errors, you need to reconfigure your router/switch so that it allows Squid’s outgoing connections to pass without being intercepted.
Exercises
Try running Squid with a bogus httpd_accel_host value. For example:
httpd_accel_host blah.blah.blah
Does it still work, or do you get error messages?
Disconnect Squid’s network connection while your router/switch is diverting traffic to it. Does the network device bypass Squid? How long does it take to notice the problem?
Repeat the same experiment, but this time kill the Squid process instead of unplugging the network cable.
Enable Squid’s user-agent log and see if you are intercepting any nonbrowser web traffic.
[1] See Microsoft support knowledge base article Q266121 for more (or less) information: http://support.microsoft.com/support/kb/articles/Q266/1/21.ASP.
[2] At various times it has also been called Web Cache Control Protocol.
[3] Although a misconfiguration on the switch/router may still reintercept these packets.