Table of Contents for
Docker: Up & Running, 2nd Edition
 Docker: Up & Running, 2nd Edition
Published by
O'Reilly Media, Inc., 2018
Docker: Up & Running, 2nd Edition
Published by
O'Reilly Media, Inc., 2018
- Cover
- nav
- Docker: Up & Running
- Docker: Up and Running
- Dedication
- Foreword
- Preface
- 1. Introduction
- 2. The Docker Landscape
- 3. Installing Docker
- 4. Working with Docker Images
- 5. Working with Docker Containers
- 6. Exploring Docker
- 7. Debugging Containers
- 8. Exploring Docker Compose
- 9. The Path to Production Containers
- 10. Docker at Scale
- 11. Advanced Topics
- 12. Container Platform Design
- 13. Conclusion
- Index
- About the Authors
- Colophon
Chapter 9. The Path to Production Containers
Now that we’ve explored tooling for bringing up a stack of containers on a single host, we need to look at how we’d do this in a large scale production environment. In this chapter, our goal is to show you how you might take containers to production based on our own experiences. There are a myriad of ways in which you will probably need to tailor this to your own applications and environments, but this all should provide you with a solid starting point to help you understand the Docker philosophy in practical terms.
Getting to Production
Getting an application from the point where it is built and configurable to the point where it is actually running on production systems is one of the most mine-ridden steps in going from zero to production. This has traditionally been complicated but is vastly simplified by the shipping container model. If you can imagine what it was like to load goods into a ship to take across the ocean before shipping containers existed, you have a sense of what most traditional deployment systems look like. In that old shipping model, randomly-sized boxes, crates, barrels, and all manner of other packaging were all loaded by hand onto ships. They then had to be manually unloaded by someone who could tell which pieces needed to be unloaded first so that the whole pile wouldn’t collapse like a Jenga puzzle.
Shipping containers changed all that: we have a standardized box with well-known dimensions. These containers can be packed and unloaded in a logical order and whole groups of items arrive together when expected. We’ve built machinery to make managing them extremely efficient. This is the Docker deployment model. All Docker containers support the same external interface, and the tooling just drops them on the servers they are supposed to be on without any concern for what’s inside.
In the new model, when we have a running build of our application, we don’t have to write much custom tooling to kick off deployment. If we only want to ship it to one server, the docker command-line tooling will handle most of that for us. If we want to send it to more servers, then we will have look at some of more advanced tooling from the broader container ecosystem.
There is a progression you will follow while getting your applications to production on Docker:
-
Locally build and test a Docker image on your development box.
-
Build your official image for testing and deployment, usually from a CI or build system.
-
Push the image to a registry.
-
Deploy your Docker image to your server, then configure and start the container.
As your workflow evolves, you will eventually collapse all of those steps into a single fluid workflow:
-
Orchestrate the deployment of images and creation of containers on production servers.
But there is a lot more to the story than that. At the most basic level, a production story must encompass three things:
-
It must be a repeatable process. Each time you invoke it, it needs to do the same thing.
-
It needs to handle configuration for you. You must be able to define your application’s configuration in a particular environment and then guarantee that it will ship that configuration on each deployment.
-
It must deliver an executable artifact that can be started.
To accomplish that, there are a number of things you need to think about. We’ll try to help with that by presenting a framework you can use to think about your application in its environment.
Docker’s Role in Production Environments
We’ve covered a lot of capabilities that Docker brings to the table, and talked about some general production strategies. Before we dive deeper into production containers, let’s look at how Docker fits into both a traditional and more modern production environment. If you are moving to Docker from a more traditional system, you can pick and choose which pieces you will delegate to Docker, to a deployment tool, or to a larger platform like Mesos or Kubernetes, or perhaps even leave on your more traditional infrastructure. We have successfully transitioned multiple systems from traditional deployments to containerized systems, and there is a wide spectrum of good solutions. But understanding the required components and what makes up the modern and traditional variants will put you on the right path to make good choices.
In Figure 9-1 we describe a number of concerns that need to be filled in a production system, the modern components that fill them, and the systems they might replace in a more traditional environment. We divide these up into concerns that are addressed by Docker itself, and those we ascribe to what we call the “platform.” The platform is a system that usually wraps around more than one instance of Docker and presents a common interface across Docker instances. This might be a single system like Mesos, Kubernetes, or Docker Swarm, or it may be a deployment system, a separate monitoring system, and a separate orchestration system. In transition from a more traditional system to a fully containerized system with a scheduler, the platform might be more than one thing at a time. So let’s take a look at each of these concerns and see how they fit together.
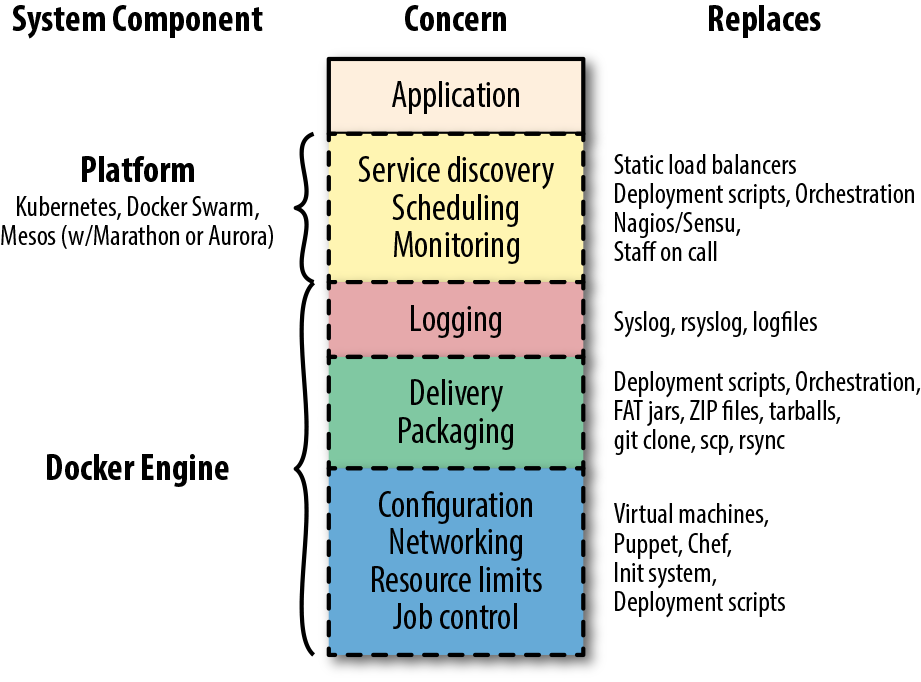
Figure 9-1. Docker’s role in a production system
In the diagram, you can see that the application is sitting on the top of the stack. It relies on all of the concerns below it in a production system. In some cases your environment may call these concerns out specifically, and in others they may be addressed by something you don’t necessarily think of as filling that concern. But your production applications will rely on most of these in one way or another, and they will need to be addressed in your production environment. If you want to transition from an existing environment to a Docker-based environment, you’ll want to think about how you are providing these today and how they might be addressed in the new system.
We’ll start with familiar territory, and then go from the bottom to the top. That familiar territory is your application. Your application is on top! Everything else is there to deliver functionality to your application. After all, it’s the application that delivers business value and everything else is there to make that possible, to facilitate doing it at scale and reliably, and to standardize how it works across applications. While the items are ordered underneath your application in an intentional way, it’s not the case that each layer provides functionality to the one above. They are all providing that functionality to the application itself.
Because Docker provides a lot of this stack, containerizing your system will make many of the choices easier. As we get closer to the platform part of the stack, we’ll have more to think about, but understanding everything that lies below there will make that much more manageable.
Let’s start with application job control.
Job Control
Job control really makes up just the table stakes for a modern deployment. This is part of the blue block in the drawing of concerns. You basically can’t have a system of any kind without job control. It’s something we’ve more traditionally left to the operating system, or the Linux init system (upstart, systemd, System V init, runit, etc.) more specifically. We tell the operating system about a process we want to have running and then we configure how the behavior should be around restarting it, reloading its configuration, and managing the lifecycle of the application. When we want to start or stop the application, we rely on these systems to handle that. We also rely on them in some cases to keep the application running in a more robust way by, for example, restarting it when it fails. Different applications require different job control. In a traditional Linux system you might use cron to start and stop jobs on a timed basis. How it does so is down to the specifics of that system, and there are many different systems to deal with.
But that’s not great. If we’re moving to the shipping container model, we want to be able to treat all jobs more or less the same way from the outside. We might need a little more metadata about them to get them to do the right thing, but we don’t want to look inside the container. The Docker engine provides a strong set of primitives around job control—for example, docker start, docker stop, docker run, and docker kill—which map to most of the critical steps in the lifecycle of an application. We’ve placed this at the bottom of the stack of concerns because it’s the lowest abstraction that Docker really provides for your application. Even if we didn’t use any other part of Docker, this would be a big win because it’s the same for all applications.
Resource Limits
Sitting above job control are resource limits. In Linux systems we can use cgroups directly if we want to, and production environments have sometimes done that before Docker popularized them. But more traditionally we relied on things like ulimit and the different settings of application runtime environments like the Java, Ruby, or Python virtual machines. In cloud systems, one of the early wins was that we could spin up individual virtual servers to limit the resources around a single business application. Compared to containers, of course, that is a pretty coarse-grained control.
With Docker you can easily apply a wide set of resource controls to your containers. It’s up to you to decide whether or not you’ll restrict your application’s access to things like memory, disk space, or I/O when running in production. However, we highly recommend that you take the time to do this once you’re comfortable with the needs of your application. As we’ve discussed, Docker gives this to you for free and it’s a core part of what makes a container valuable. You can review the specific arguments that Docker uses to manage these resources in Chapter 5.
Networking
There is a lot of detail about Docker networking in Chapter 11, so we won’t touch on it too heavily here, but your containerized system will need to somehow manage connecting your applications together on the network. Docker provides a rich set of configuration options for networking. You should really decide on one mechanism to use in your production environment and standardize that across containers. Trying to mix them is not an easy path to success.
Configuration
All applications need to somehow have access to their configuration. There are two levels of configuration for an application. The lowest level is how it expects the Linux environment around it to be configured. Containers handle this by providing a Dockerfile that we can use to build the same environment repeatably. In a more traditional system we might have used a configuration management system like Chef, Puppet, or Ansible to do this. You may still use those systems in a containerized world, but you are usually not using them to provide dependencies to applications. That job belongs to Docker and the Dockerfile. Even if the contents of the Dockerfile are different for different applications, the mechanism and tooling are all the same—and that’s a huge win.
The next level of configuration is the configuration directly applied to the application. We talked earlier about this in detail. Docker’s native mechanism is to use environment variables, and this works across all of the modern platforms. Some systems, notably, make it easier to rely on more traditional configuration files. We find that this can really impact the observability of the application and discourage you from relying on that crutch. There is more about the reasoning behind environment variables in Chapter 12.
Packaging and Delivery
We’ll lump packaging and delivery together in our discussion here. This is an area where a containerized system has major advantages over a traditional one. Here we don’t have to stretch our imaginations to see the parallels to the shipping container model: we have a consistent package, the container image, and a standardized way to get them places—Docker’s registry and pull and push facilities. In more traditional systems we would have built handcrafted deployment tooling, some of which we hopefully standardized across our applications. But if we needed to have a multilanguage environment, this would have been trouble. In your containerized environment, you’ll need to consider how you handle packaging your applications into images and how you store those images.
The easiest path for the latter is a paid subscription to a hosted, commercial registry. If that’s acceptable to your company, then you should consider that. Several cloud providers, including Amazon, have image-hosting services that you can deploy inside your own environment, which are another good option. You can, of course, also build and maintain your own registry as we talked about in “Running a Private Registry”.
Logging
Logging sits on the boundary of concerns that you can rely on Docker to provide in your containerized environment and concerns that the platform needs to manage. That’s because, as we detailed in Chapter 6, Docker can collect all the logs from your containers and ship them somewhere. But by default, that somewhere is not even off of the local system. That might be great for a limited-size environment, and you could stop considering it there if this sounds like it’s good enough for you. But your platform will be responsible for handling logs from lots of applications on lots of systems, so you’ll probably want more than this. When designing this, refer back to Chapter 6 for more details on logging.
Monitoring
The first part of the system not fully solved by Docker still relies on the standardization that Docker brings to the table. The ability to health-check applications in a standardized way, as discussed in Chapter 6, means that monitoring applications for health is vastly simplified. In many systems the platform itself handles monitoring, and the scheduler will dynamically shut down unhealthy containers and potentially move the workload to a different server or restart the workload on the same system. In older systems, containers are often monitored by existing systems like Nagios, Zabbix, or other traditional monitoring systems. As we showed in Chapter 6, there are also newer options, including systems like Prometheus.
In older systems, it is generally engineers who are paged, respond to issues, and make decisions about how to handle failed applications. In dynamic systems, this work generally moves into more automated processes that belong in the platform. In a transitional period, your system may have both while moving more and more to an automated system where engineers are paged only when the platform really can’t intervene.
Scheduling
How do you decide which services run on which servers? Containers are easy to move around because Docker provides such good mechanisms for doing so. And that opens up lots of possibilities for better resource usage, better reliability, self-healing services, and dynamic scaling. But something has to make those decisions.
In older systems this was often handled with dedicated servers per service. You often configured a list of servers into the deployment scripts and the same set of servers would receive the new application on each deployment. One-service-per-server models drove early virtualization in private data centers. Cloud systems encouraged the one-service-per-server model by making it easy to slice and dice servers into commodity virtual servers. Autoscaling in systems like AWS handled part of this dynamic behavior. But if you move to containers, where many services may be running on the same virtual server, then scaling and dynamic behavior at the server level doesn’t help you.
Distributed schedulers
Distributed schedulers leverage Docker to let you reason about your entire network of servers almost as if it were a single computer. The idea here is that you define some policies about how you want your application to run, and you let the system figure out where to run it and how many instances of it to run. If something goes wrong on a server or with the application, you let the scheduler start it up again on resources that are healthy. This fits more into Docker, Inc. founder Solomon Hykes’s original vision for Docker: a way to run your application anywhere without worrying about how it gets there. Generally, zero downtime deployment in this model is done in the blue-green style, where you launch the new generation of an application alongside the old generation, and then slowly migrate work from the old stack to the new one.
Using the metaphor now made famous by Kelsey Hightower, the scheduler is the system that plays Tetris for you, placing services on servers for best fit, on the fly.
Apache Mesos, which was originally written at the University of California, Berkeley, and most publicly adopted by Twitter and Airbnb, is the most mature option. Mesos is a resource pool abstraction that lets you run multiple frameworks on the same cluster of hosts. You can, for example, run Docker applications and Hadoop jobs on the same compute cluster. Mesos uses Zookeeper (or CoreOS’s zetcd) and has been around for much longer than most of the other options because it actually predates Docker. Despite being on the scene for a number of years before Docker arrived, Mesos has outstanding support for Docker. In Mesos systems the actual scheduling is handled by the framework you run on top (e.g., HubSpot’s Singularity, Mesosphere’s Marathon, Mesos’s Chronos, or Apache Aurora). All of these frameworks have full support for Docker—it’s almost expected at this point.
All of these Mesos frameworks take quite different approaches, and it’s worth evaluating at least the four main options to see which works best for you. Schedulers often can handle different kinds of workloads, including long-running services, one-off commands, and scheduled jobs.
Kubernetes is another popular scheduler and came out of Google in 2014. It inherits a lot of what they learned on their own internal Borg system. It was built on Docker from the beginning and not only supports Docker but also a few of the other runtimes, all of which run Docker containers. It’s a big system with a lot of moving pieces. There are now at least two dozen different commercial distributions of Kubernetes and at least a dozen cloud environments. The Kubernetes ecosystem has fragmented at a really high rate, with lots of vendors trying to stake out their own territory early on. This space continues to change rapidly and while Kubernetes is really powerful, it’s a moving target that’s hard to stay on top of. If you are building a brand new system from scratch, you will probably want to consider Kubernetes. We believe it’s a harder system to retrofit, and at the moment it is not clear which distributions will win out in the long run. Docker, Inc. is heavily integrating Kubernetes into their own tooling, so this might be a safer bet if you’re looking for a platform to carry forward.
Docker Swarm came out of Docker, Inc. in 2015 and is built as a Docker native system from the ground up. It’s an attractive option if you’re looking to stay completely on a Docker platform and get support from a single vendor. It has not had the adoption in the market that Kubernetes has recently seen, and since Docker is integrating Kubernetes so heavily into their own tooling, this is probably not as clear a path as it once was.
Orchestration
When we talk about schedulers, we often talk about not just their ability to match jobs to resources but their orchestration capabilities as well. By that, we mean the ability to command and organize applications and deployments across a whole system. Your scheduler might move jobs for you on the fly or allow you to run tasks on each server specifically. This was more commonly handled in older systems by specific orchestration tools. You might find that even with a scheduler in your system, you want a tool explicitly for orchestration. Or you might find that you can get away without a scheduler and simply deploy applications using orchestration tools. You and your team will then act as schedulers. This might not sound space age, but it’s a reasonable early approach for a small or transitional system. With these tools, you tell them what to do, and then they do it at scale while you wait, much like the deployment model of Capistrano or Fabric, for example. These tools generally provide the simplest way to get into production with Docker.
In this category are tools like:
Of all the features delivered by the platform, scheduling is undoubtedly the most powerful. It also has the most impact on applications when moving them into containers. Many applications are not designed to have service discovery and resource allocation change underneath them and require a significant number of changes to work well in a truly dynamic environment. For this reason, your move to a containerized system may not necessarily encompass moving to a scheduled platform initially. Often the best path to production containers lies in containerizing your applications while running inside the traditional system, and then moving on to a more dynamic, scheduled system.
Service Discovery
You can think of service discovery as the mechanism by which the application finds all the other services and resources it needs on the network. Rare is the application that has no dependency on anything else. Stateless, static websites are perhaps one of the only systems that may not need any service discovery. Nearly everything else needs to know something about the surrounding system and a way to find out that information. Most of the time this involves more than one system, but they are usually tightly coupled.
You might not think of them this way, but in traditional systems, load balancers were one of the primary means for service discovery. Load balancers are used for reliability and scaling, but they also keep track of all of the endpoints associated with a particular service. This is sometimes manually configured and sometimes more dynamic, but the way other systems find endpoints for a service is by using a known address or name for the load balancer. That’s a form of service discovery, and load balancers are a common way to do this in older systems. They often are in modern environments, too, even if they don’t look much like traditional load balancers. Other means for service discovery in older systems are static database configurations or application configuration files.
As you can see back in Figure 9-1, Docker does not itself address service discovery in your environment, except when using Docker Swarm mode. But for the vast majority of systems, service discovery is left to the platform. This means it’s one of the first things you’ll need to resolve in a more dynamic system. Containers are by nature easily moved, and that can break traditional systems easily if they were built around more statically deployed applications. Each platform handles this differently and you’ll want to understand what works best with your system.
Note
Docker Swarm and Docker Swarm mode are not exactly the same thing. We will discuss Docker Swarm mode in more detail in Chapter 10.
Some examples of service discovery mechanisms you might be familiar with include:
-
Load balancers with well-known addresses
-
Round-robin DNS
-
DNS SRV records
-
Dynamic DNS systems
-
Multicast DNS
-
Overlay networks with well-known addresses
-
Gossip protocols (e.g., in Cassandra, Seneca JS, or Sidecar from Nitro/New Relic)
-
Apple’s Bonjour protocol
That’s a big list and there are a lot more options than that. Some of these systems also do a lot more than just service discovery, which can confuse the issue. An example of service discovery that may be closer to hand while you’re trying to understand this concept is the linking mechanism used by Docker Compose in Chapter 8. This mechanism relies on a DNS system that the dockerd server supplies, which allows you to call out to known service names and find the right container at the resolved address.
Often you find that the interface to these systems basically relies on having well-known names and/or ports for a service. You might call out to http://service-a.example.com to reach service A on a well-known name. Or you might call out to http://services.example.com:service-a-port to reach the same service on a well-known name and port. Different modern environments handle this differently. Usually within the new system, this process will be managed and fairly seamless. And it’s frequently easy for new applications to call out of the platform to more traditional systems, but sometimes it’s not as easy going the other way. Often the best initial system (though not necessarily longer-term) is a system where you present dynamically configured load balancers that are easily reachable by systems in your older environment.
Examples of this include:
-
The Mesos backend for the Traefik load balancer
-
Nixy for
nginxand Mesos -
Kubernetes’s ingress controllers
-
Standalone Sidecar service discovery with Lyft’s Envoy proxy
-
Istio and Lyft’s Envoy
If you are running a blended modern and traditional system, getting traffic into the newer containerized system is generally the harder problem to solve and the one you should think through first.
Production Wrap-Up
Many people will start by using simple Docker orchestration tools. However, as the number of containers and frequency with which you deploy containers grow, the appeal of distributed schedulers will quickly become apparent. Tools like Mesos allow you to abstract individual servers and whole data centers into large pools of resources in which to run container-based tasks.
There are undoubtedly many other worthy projects out there in the deployment space. But these are the most commonly cited and have the most publicly available information at the time of this writing. It’s a fast-evolving space, so it’s worth taking a look around to see what new tools are being shipped.
In any case, you should start by getting a Docker infrastructure up and running and then look at outside tooling. Docker’s built-in tooling might be enough for you. We suggest using the lightest-weight tool for the job, but having flexibility is a great place to be, and Docker is increasingly supported by more and more powerful tooling.
Docker and the DevOps Pipeline
So if we wade through all of those waters, we can get our production environment into robust shape. But how do we know it works? One of the key promises of Docker is the ability to test your application and all of its dependencies in exactly the operating environment it would have in production. It can’t guarantee that you have properly tested external dependencies like databases, nor does it provide any magical test framework, but it can make sure that your libraries and other code dependencies are all tested together. Changing underlying dependencies is a critical place where things go wrong, even for organizations with strong testing discipline. With Docker, you can build your image, run it on your development box, and then test the exact same image with the same application version and dependencies before shipping it to production servers.
Testing your Dockerized application is not much more complicated than testing your application itself, but you need to make sure that your test environment has a Docker server you can run things on and that your application will allow you to use environment variables or command-line arguments to switch on the correct testing behavior. Next we’ll cover one example of how you might do this.
Quick Overview
Let’s draw up an example production environment for a fictional company. We’ll try to describe something that is similar to the environment at a lot of companies, with Docker thrown into the mix for illustration purposes.
Our fictional company’s environment has a pool of production servers that run Docker daemons, and an assortment of applications deployed there. There is a build server and test worker boxes that are tied to the test server. We’ll ignore deployment for now and talk about it once we have our fictional application tested and ready to ship.
Figure 9-2 shows what a common workflow looks like for testing Dockerized applications, including the following steps:
-
A build is triggered by some outside means.
-
The build server kicks off a Docker build.
-
The image is created on the local
docker. -
The image is tagged with a build number or commit hash.
-
A container is configured to run the test suite based on the newly built image.
-
The test suite is run against the container and the result is captured by the build server.
-
The build is marked as passing or failing.
-
Passed builds are shipped to an image store (e.g., registry).
You’ll notice that this isn’t too different from common patterns for testing applications. At a minimum you need to have a job that can kick off a test suite. The steps we’re adding here are just to create a Docker image first and invoke the test suite inside the container rather than on the raw system itself.
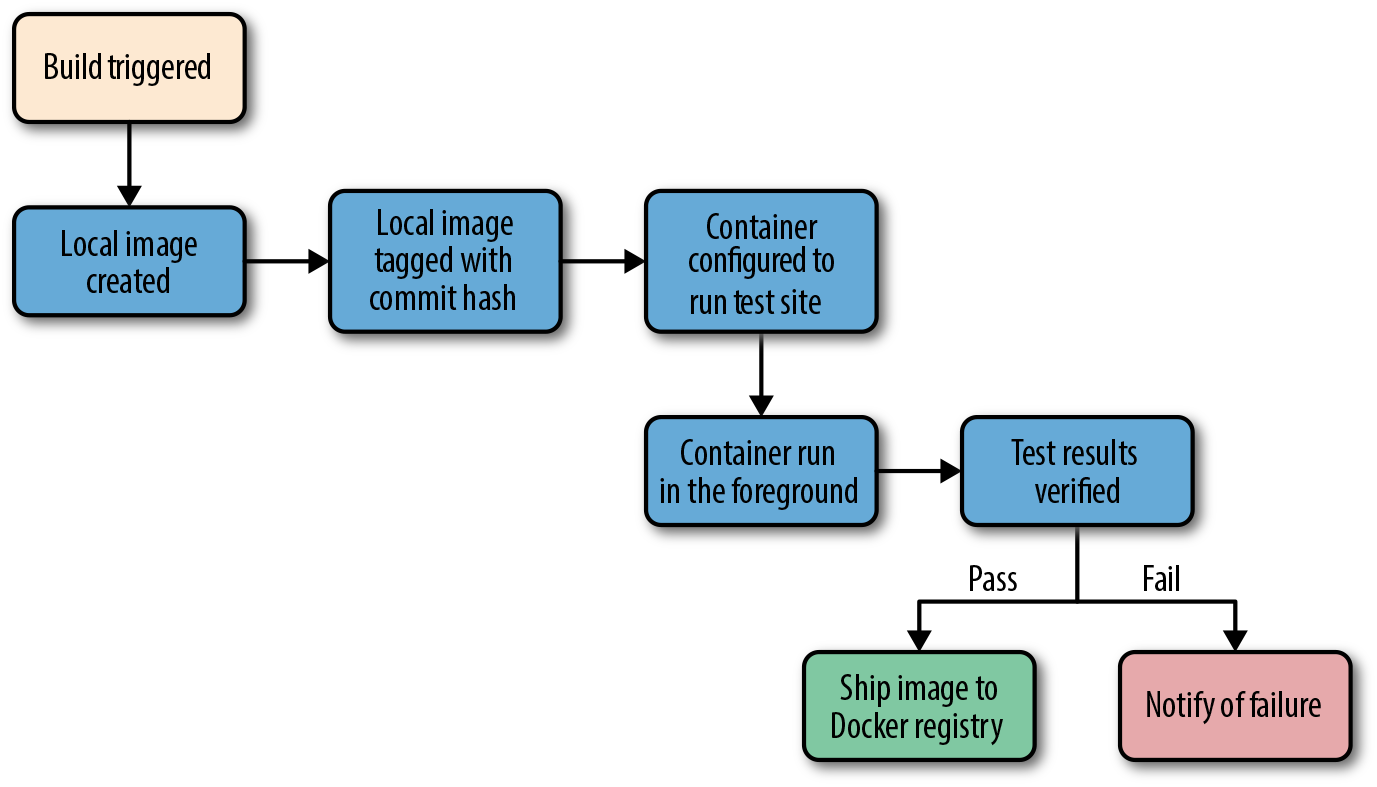
Figure 9-2. Docker testing workflow chart
Let’s look at how this works for the application we’re deploying at our fictional company. We just updated our application and pushed the latest code to our Git repository. We have a post-commit hook that triggers a build on each commit, so that job is kicked off on the build server. The job on the test server is set up to talk to a docker on a particular test worker server. Our test server doesn’t have docker running, but it has the docker command-line tool installed. So we run our docker build against that remote Docker server and it runs our Dockerfile, generating a new image on the remote Docker server. We could run docker on the test server itself if we had a smaller environment.
Note
You should build your container image exactly as you’ll ship it to production. If you need to make concessions for testing, they should be externally provided switches, either via environment variables or through command-line arguments. The whole idea is to test the exact build that you’ll ship, so this is a critical point.
Once the image has been built, our test job will create and run a new container based on our new production image. Our image is configured to run the application in production, but we need to run a different command for testing. That’s OK! Docker lets us do that simply by providing the command at the end of the docker run command. In production, we’d start supervisor and it would start up an nginx instance and some Ruby unicorn web server instances behind that. But for testing, we don’t need that nginx and we don’t need to run our web application. Instead, our build job invokes the container like this:
$ docker run -e ENVIRONMENT=testing -e API_KEY=12345 \
    -i -t awesome_app:version1 /opt/awesome_app/test.sh
We called docker run, but we did a couple of extra things here, too. We passed a couple of environment variables into the container: ENVIRONMENT and API_KEY. These can either be new or overrides for the ones Docker already exports for us. We also asked for a particular tag—in this case, version1. That will make sure we build on top of the correct image even if another build is running simultaneously. Then we override the command that our container was configured to start in the Dockerfile’s CMD line. Instead, we call our test script, /opt/awesome_app/test.sh. We don’t have to here, but you should note that in some cases you will actually need to override the Dockerfile’s ENTRYPOINT (--entrypoint) to run something other than the default command for that container. Using ENTRYPOINT to run the default command is a bad practice but, sadly, a common one.
Tip
Always pass the precise Docker tag (usually a version or commit hash) for your image into the test job. If you always use latest, then you won’t be able to guarantee that another job has not moved that tag just after your build was kicked off. If you use the precise tag, you can be sure you’re testing the right version of the application.
A critical point to make here is that docker run will exit with the exit status of the command that was invoked in the container. That means we could just look at the exit status to see if our tests were successful. If your test suite is properly designed, this is probably all you need. If you need to run multiple steps, or the exit code can’t be relied on, one way to handle this is to capture all of the output of the test run into a file and then sift through the output to look for status messages. Our fictional build system does just that. We write out the output from the test suite and our test.sh echoes either Result: SUCCESS! or Result: FAILURE! on the last line to signify if our tests passed. If you need to rely on this mechanism, be sure to look for some output string that won’t appear by happenstance in your normal test suite output. If we need to look for “success,” for example, we had best limit it to looking at the last line of the file, and maybe also anchored to the beginning of the line. In this case, we look at just the last line of the file and find our success string, so we mark the build as passed.
There is one more Docker-specific step. We want to take our passed build and push that image to our registry. The registry is the interchange point between builds and deployments. It also allows us to share the image with other builds that might be stacked on top of it. But for now, let’s just think of it as the place where we put and tag successful builds. Our build script will now do a docker tag to give the image the right build tag(s), including latest, and then a docker push to push the build to the registry.
That’s it! As you can see, there is not much to this compared with testing a normal application. We take advantage of the client/server model of Docker to invoke the test on a different server from the test master server, and we have to wrap up our test output in a shell script to generate our output status. But other than that, it’s a lot like a common build system anywhere.
But, critically, our fictional company’s system makes sure they only ship applications whose test suite has passed on the same Linux distribution, with the same libraries and the same exact build settings. That container might then also be tested against any outside dependencies like databases or caches without having to mock them. None of this guarantees success, but it gets them a lot closer to that guarantee than the dependency roulette often experienced by production deployment systems.
Note
If you use Jenkins for continuous integration or are looking for a good way to test scaling Docker, there are many plug-ins for Docker, Mesos, and Kubernetes that are worth investigating.
Outside Dependencies
But what about those external dependencies we glossed over? Things like the database, or Memcache or Redis instances that we need to run our tests against our container? If our fictional company’s application needs a database to run, or a Memcache or Redis instance, we need to solve that external dependency to have a clean test environment. It would be nice to use the container model to support that dependency. With some work, you can do this with tools like Docker Compose, which we described in detail in Chapter 8. In Docker Compose, our build job could express some dependencies between containers, and then Compose will connect them together seamlessly.
Being able to really test your application in an environment that looks like where it will live is a huge win. Compose makes this pretty easy to set up. You’ll still need to rely on your own language’s testing framework for the tests, but the environment is really easy to orchestrate.