Table of Contents for
Docker: Up & Running, 2nd Edition
 Docker: Up & Running, 2nd Edition
Published by
O'Reilly Media, Inc., 2018
Docker: Up & Running, 2nd Edition
Published by
O'Reilly Media, Inc., 2018
- Cover
- nav
- Docker: Up & Running
- Docker: Up and Running
- Dedication
- Foreword
- Preface
- 1. Introduction
- 2. The Docker Landscape
- 3. Installing Docker
- 4. Working with Docker Images
- 5. Working with Docker Containers
- 6. Exploring Docker
- 7. Debugging Containers
- 8. Exploring Docker Compose
- 9. The Path to Production Containers
- 10. Docker at Scale
- 11. Advanced Topics
- 12. Container Platform Design
- 13. Conclusion
- Index
- About the Authors
- Colophon
Chapter 8. Exploring Docker Compose
At this point you should have a good feel for the docker command and how to use it to build, launch, monitor, and debug your applications. Once you are comfortable working with individual containers it won’t be long before you’ll want to share your projects and start building more complex projects that require multiple containers to function properly. This is particularly the case in development environments, where having a whole stack of containers running can easily simulate many production environments on your local machine.
If you’re running a whole stack of containers, however, every container needs to be run with the proper setup to ensure that the underlying application is configured correctly and will run as expected. Getting these settings correct each and every time can be challenging, especially when you are not the person who originally wrote the application. To help with this during development, people often resort to writing shell scripts that can build and run their containers in a consistent manner. Although this works, it can become difficult to understand for a newcomer and hard to maintain as the project changes over time. It’s also not necessarily repeatable between projects.
To help address this problem, Docker, Inc. released a tool primarily aimed at developers called Docker Compose. This tool is included with Docker Community Edition, but you can also install it by following the online installation directions.
Docker Compose is an incredibly useful tool that can streamline all sorts of development tasks that have traditionally been very cumbersome and error-prone. It can easily be leveraged to help developers quickly spin up complicated application stacks, compile applications without the need for setting up complex local development environments, and much more.
In this chapter, we’ll do a run-through of how to use Compose to its best advantage. We’ll be using a GitHub repository in all of the following examples. If you want to run the examples as we go through them, you should run the following command to download the code, if you didn’t already do that in Chapter 6:
$ git clone https://github.com/spkane/rocketchat-hubot-demo.git \
    --config core.autocrlf=input
Note
In the example shell script and docker-compose.yaml files below, some lines have been truncated to fit in the margins. Make sure that you use the files from the preceding git repository, if you plan to try these examples yourselves.
This repository contains the configuration we’ll need to launch a complete web service that includes a MongoDB datastore, the open source RocketChat communications server, a Hubot chatops bot, and a zmachine-api instance for a little surprise entertainment value.
Configuring Docker Compose
Before we dive into using the docker-compose command, it is useful to see the kind of ad hoc tooling it replaces. So, let’s take a moment to look at a shell script that could be used to build and deploy a local copy of our service for development and local testing via Docker. This output is long and detailed, but it’s important in order to prove the point about why Docker Compose is a huge leap over shell scripting.
#!/bin/bashset-eset-uif[$#-ne0]&&[${1}=="down"];thendocker rm -f hubot||truedocker rm -f zmachine||truedocker rm -f rocketchat||truedocker rm -f mongo-init-replica||truedocker rm -f mongo||truedocker network rm botnet||trueecho"Environment torn down..."exit0fi# Global SettingsexportPORT="3000"exportROOT_URL="http://127.0.0.1:3000"exportMONGO_URL="mongodb://mongo:27017/rocketchat"exportMONGO_OPLOG_URL="mongodb://mongo:27017/local"exportMAIL_URL="smtp://smtp.email"exportRESPOND_TO_DM="true"exportHUBOT_ALIAS=". "exportLISTEN_ON_ALL_PUBLIC="true"exportROCKETCHAT_AUTH="password"exportROCKETCHAT_URL="rocketchat:3000"exportROCKETCHAT_ROOM=""exportROCKETCHAT_USER="hubot"exportROCKETCHAT_PASSWORD="HughTheBot"exportBOT_NAME="bot"exportEXTERNAL_SCRIPTS="hubot-help,hubot-diagnostics,hubot-zmachine"exportHUBOT_ZMACHINE_SERVER="http://zmachine:80"exportHUBOT_ZMACHINE_ROOMS="zmachine"exportHUBOT_ZMACHINE_OT_PREFIX="ot"docker build -t spkane/mongo:3.2 ./mongodb/docker docker push spkane/mongo:3.2 docker pull spkane/zmachine-api:latest docker pull rocketchat/rocket.chat:0.61.0 docker pull rocketchat/hubot-rocketchat:latest docker rm -f hubot||truedocker rm -f zmachine||truedocker rm -f rocketchat||truedocker rm -f mongo-init-replica||truedocker rm -f mongo||truedocker network rm botnet||truedocker network create -d bridge botnet docker run -d\--name=mongo\--network=botnet\--restart unless-stopped\-v$(pwd)/mongodb/data/db:/data/db\spkane/mongo:3.2\mongod --smallfiles --oplogSize128--replSet rs0 sleep 5 docker run -d\--name=mongo-init-replica\--network=botnet\spkane/mongo:3.2\'mongo mongo/rocketchat --eval "rs.initiate({ ..."'sleep 5 docker run -d\--name=rocketchat\--network=botnet\--restart unless-stopped\-v$(pwd)/rocketchat/data/uploads:/app/uploads\-p 3000:3000\-ePORT=${PORT}\-eROOT_URL=${ROOT_URL}\-eMONGO_URL=${MONGO_URL}\-eMONGO_OPLOG_URL=${MONGO_OPLOG_URL}\-eMAIL_URL=${MAIL_URL}\rocketchat/rocket.chat:0.61.0 docker run -d\--name=zmachine\--network=botnet\--restart unless-stopped\-v$(pwd)/zmachine/saves:/root/saves\-v$(pwd)/zmachine/zcode:/root/zcode\-p 3002:80\spkane/zmachine-api:latest docker run -d\--name=hubot\--network=botnet\--restart unless-stopped\-v$(pwd)/hubot/scripts:/home/hubot/scripts\-p 3001:8080\-eRESPOND_TO_DM="true"\-eHUBOT_ALIAS=". "\-eLISTEN_ON_ALL_PUBLIC="true"\-eROCKETCHAT_AUTH="password"\-eROCKETCHAT_URL="rocketchat:3000"\-eROCKETCHAT_ROOM=""\-eROCKETCHAT_USER="hubot"\-eROCKETCHAT_PASSWORD="HughTheBot"\-eBOT_NAME="bot"\-eEXTERNAL_SCRIPTS="hubot-help,hubot-diagnostics,hubot-zmachine"\-eHUBOT_ZMACHINE_SERVER="http://zmachine:80"\-eHUBOT_ZMACHINE_ROOMS="zmachine"\-eHUBOT_ZMACHINE_OT_PREFIX="ot"\rocketchat/hubot-rocketchat:latestecho"Environment setup..."exit0
At this point you can probably follow most of this script pretty easily. As you may already have noticed, this is a hassle to read, is not very flexible, will be a pain to edit, and might fail in several places in an unexpected way. If we were to follow shell script best practices and handle all the possible errors here in an effort to guarantee it was repeatable, it would also be two to three times as long as it already is. Without a lot of work extracting common functionality for the error handling, you’d also have to rewrite much of that logic every time you have a new project like this. It’s not a very good way to approach a process that you need to work every time. This is where good tooling comes in. You can accomplish exactly the same thing with Docker Compose, while also making it much more repeatable and easier to read, understand, and maintain.
In contrast to this messy shell script, which is very repetitive and prone to easily breaking, Docker Compose is typically configured with a single, declarative YAML file for each project, called docker-compose.yaml. This configuration file is very easy to read and will work in a very repeatable fashion, so that each user has the same experience when they run it. Here you can see an example docker-compose.yaml file that could be used to replace the preceding brittle shell script:
version:'2'services:mongo:build:context:../../mongodb/dockerimage:spkane/mongo:3.2restart:unless-stoppedcommand:mongod --smallfiles --oplogSize 128 --replSet rs0volumes:-"../../mongodb/data/db:/data/db"networks:-botnetmongo-init-replica:image:spkane/mongo:3.2command:'mongomongo/rocketchat--eval"rs.initiate({..."'depends_on:-mongonetworks:-botnetrocketchat:image:rocketchat/rocket.chat:0.61.0restart:unless-stoppedvolumes:-"../../rocketchat/data/uploads:/app/uploads"environment:PORT:3000ROOT_URL:"http://127.0.0.1:3000"MONGO_URL:"mongodb://mongo:27017/rocketchat"MONGO_OPLOG_URL:"mongodb://mongo:27017/local"MAIL_URL:"smtp://smtp.email"depends_on:-mongoports:-3000:3000networks:-botnetzmachine:image:spkane/zmachine-api:latestrestart:unless-stoppedvolumes:-"../../zmachine/saves:/root/saves"-"../../zmachine/zcode:/root/zcode"depends_on:-rocketchatexpose:-"80"networks:-botnethubot:image:rocketchat/hubot-rocketchat:latestrestart:unless-stoppedvolumes:-"../../hubot/scripts:/home/hubot/scripts"environment:RESPOND_TO_DM:"true"HUBOT_ALIAS:"."LISTEN_ON_ALL_PUBLIC:"true"ROCKETCHAT_AUTH:"password"ROCKETCHAT_URL:"rocketchat:3000"ROCKETCHAT_ROOM:""ROCKETCHAT_USER:"hubot"ROCKETCHAT_PASSWORD:"HughTheBot"BOT_NAME:"bot"EXTERNAL_SCRIPTS:"hubot-help,hubot-diagnostics,hubot-zmachine"HUBOT_ZMACHINE_SERVER:"http://zmachine:80"HUBOT_ZMACHINE_ROOMS:"zmachine"HUBOT_ZMACHINE_OT_PREFIX:"ot"depends_on:-zmachineports:-3001:8080networks:-botnetnetworks:botnet:driver:bridge
The docker-compose.yaml file makes it easy to describe all the important requirements for each of your services and how they need to communicate with each other. And we get a lot of validation and checking logic for free that we didn’t even have time to write into our shell script and which we’d probably get wrong on occasion, no matter how careful we were.
So, what did we tell Compose to do in that YAML file? The first line of our file simply tells Docker Compose what version of the Compose configuration language this file was designed for.
version:'2'
The rest of our document is divided into two sections: services and networks.
For starters, let’s take a quick look at the networks section. In this docker-compose.yaml file, we are defining a single named Docker network.
networks:botnet:driver:bridge
This is a very simple configuration that tells Docker Compose to create a single network, named botnet, using the (default) bridge driver, which will bridge the Docker network with the host’s networking stack.
The services section is the most important part of the configuration and tells Docker Compose what applications you want to launch. Here the services section defines five services: mongo, mongo-init-replica, rocketchat, zmachine, and hubot. Each named service then contains sections that tell Docker how to build, configure, and launch that service.
If you take a look at the mongo service, you will see that the first subsection is called build and contains a context key. This informs Docker Compose that it can build this image and that the files required for the build are located in the ../../mongodb/docker directory, which is two levels above the directory containing the docker-compose.yaml file.
build:context:../../mongodb/docker
The next setting, image, defines the image tag that you want either to apply to your build or to download (if you’re not building an image) and then run.
image:spkane/mongo:3.2
With the restart option, you tell Docker when you want it to restart your containers. In most cases, you’ll want Docker to restart your containers any time that you have not specifically stopped them.
restart:unless-stopped
The command option allows you to define the command that your container should run at startup. For this service, we’ll start MongoDB with a few command-line arguments.
command:mongod --smallfiles --oplogSize 128 --replSet rs0
A lot of services have at least some data that should be persisted during development, despite the ephemeral nature of containers. To accomplish this, it is easiest to mount a local directory into the containers. The volumes section allows you to list all the local directories that you would like to have mounted into a container, and define where they go.
volumes:-"../../mongodb/data/db:/data/db"
The final subsection for the mongo service, networks, tells Docker Compose which network this container should be attached to.
networks:-botnet
At this point, let’s jump down to the rocketchat service. This service does not have a build subsection. It only defines an image without a build line, which tells Docker Compose that it cannot build this image and must instead try to pull and launch a standard preexisting Docker image with the defined tag.
The first new subsection that you will notice in this service is called environment. This is where you can define any environment variables that you want to pass into your container.
Note that the value for the MONGO_URL does not use an IP address or fully qualified domain name. This is because all of these services are running on the same Docker network and Docker configures each container so that it can find the others via their service names. This means that we can easily configure URLs like this to simply point at the service name and internal port for the container we need to connect to. And, if we rearrange things later on, these names will continue to point to the right container in our stack. They are also nice because they make it quite explicit to the reader what the dependency is for this container.
environment:PORT:3000ROOT_URL:"http://127.0.0.1:3000"MONGO_URL:"mongodb://mongo:27017/rocketchat"MONGO_OPLOG_URL:"mongodb://mongo:27017/local"MAIL_URL:"smtp://smtp.email"
Tip
The docker-compose.yaml file can also refer to environment variables using the ${<VARIABLE_NAME>} format, which makes it possible to pull in secrets without actually storing them in this file. Newer versions of Docker Compose also support an .env file, which can be very useful for handling secrets and environment variables that change between developers, for example.
The depends_on section defines a container that must be running before this container can be started. Normally docker-compose ensures only that the container is running, not that it is actually healthy; however, you can use health-check functionality in both Docker and Docker Compose, if needed.
depends_on:-mongo
Note
We discuss Docker’s health-check functionality in more detail in “Container Health Checks”. You can also find more information in the documentation for Docker and Docker Compose.
The ports subsection allows you to define all the ports that you want mapped from the container to the host.
ports:-3000:3000
The zmachine service uses only one new subsection, called expose. This section allows us to tell Docker that we want to expose this port to the other containers on the Docker network, but not to the underlying host. This is why you do not provide a host port to map this port to.
expose:-"80"
You might notice at this point that, while we expose a port for zmachine, we didn’t expose a port in the mongo service. It wouldn’t have hurt anything to expose the mongo port, but we didn’t need to because it is already exposed by the upstream mongo Dockerfile. This is sometimes a little opaque. docker history on the built image can be helpful here.
Here we’ve used an example that is complex enough to expose you to some of the power of Docker Compose, but it is by no means exhaustive. There is a great deal else that you can configure in a docker-compose.yaml file, including security settings, resource quotas, and much more. You can find a lot of detailed information about configuration for Compose in the official Docker Compose documentation.
Launching Services
We configured a set of services for our application in the YAML file. That tells Compose what we’re going to launch and how to configure it. So, let’s get it up and running! To run our first Docker Compose command, we need to be sure that we are in the same directory as the docker-compose.yaml file that is appropriate for our operating system.
-
Unix/OS X users run:
$ cd rocketchat-hubot-demo/compose/unix
-
Windows users run:
PS C:\> cd rocketchat-hubot-demo\compose\windows
The only difference between these two docker-compose.yaml files is that the Windows version does not mount a volume for the MongoDB datastore. This is because MongoDB cannot use the Windows filesystem to store its data properly. The primary result of this is that when you delete the container using a command like docker-compose down, all of the data in the MongoDB instance will be lost.
Once you are in the appropriate directory, you can confirm that the configuration is correct by running:
$ docker-compose config
If everything is fine, the command will print out your configuration file. If there is a problem, the command will print an error with details about the problem, like so:
ERROR: The Compose file './docker-compose.yaml' is invalid because:
Unsupported config option for services.hubot: 'networkss'
You can build any containers that you need by using the build option. Any services that use images will be skipped.
$ docker-compose build
Building mongo
...
Successfully built a7b0d2b7b1b9
Successfully tagged spkane/mongo:3.2
mongo-init-replica uses an image, skipping
rocketchat uses an image, skipping
zmachine uses an image, skipping
hubot uses an image, skipping
You can start up your web service in the background by running the following command:
$ docker-compose up -d
Creating network "unix_botnet" with driver "bridge"
Creating unix_mongo-init-replica_1 ... done
Creating unix_rocketchat_1         ...
Creating unix_zmachine_1           ... done
Creating unix_zmachine_1           ...
Creating unix_hubot_1              ... done
Note
Docker Compose prefixes the network and container names with the name of the directory that contains your docker-compose.yaml file. So, on Windows you will see windows_botnet, windows_mongo-init-replica_1, and so on, in your output instead of what we show here.
Windows users: When you first bring up the services, Windows will most likely prompt you to authorize vpnkit, and Docker for Windows will prompt you to share your disk. You must click both the “Allow access” and the “Share it” buttons for the network and volume shares to work and everything to come up properly.
Once everything comes up, we can take a quick look at the logs for all of the services:
$ docker-compose logs
...
rocketchat_1          | → |             Platform: linux                  |
mongo_1               | 2018-02-05T01:05:40.200+0000 I REPL     [Repli ...
rocketchat_1          | → |         Process Port: 3000                   |
mongo_1               | 2018-02-05T01:05:40.200+0000 I REPL     [Repli ...
rocketchat_1          | → |             Site URL: http://127.0.0.1:3000  |
hubot_1               | npm info preuninstall hubot-diagnostics@0.0.2
mongo_1               | 2018-02-05T01:05:40.200+0000 I REPL     [Repli ...
rocketchat_1          | → |     ReplicaSet OpLog: Enabled                |
...
You can’t see it in print here, but if you’re following along note that all of the logs are color-coded by service and interlaced by the time Docker received the loglines. This makes it a lot easier to follow what’s happening, even though there are a number of services logging at once.
At this point, we have successfully launched a reasonably complex application that makes up a stack of containers. We’ll take a look at this simple application now so that you can see what we built and get a more complete understanding of the Compose tooling. While this next section does not strictly have anything to do with Docker itself, it is intended to show you how easy it is to use Docker Compose to set up complex and fully functioning web services.
Exploring RocketChat
Note
In this section we’re going to diverge from Docker for a moment and take a look at RocketChat. We’ll spend a few pages on it, so that you know enough about it that you can hopefully start to appreciate how much easier it is to set up a complex environment using Docker Compose. Feel free to skip down to “Exercising Docker Compose”, if you would like.
We’ll shortly dig further into what’s happening under the covers of our setup. But in order to do that effectively, we should now take a brief moment to explore the application stack we built. The application we launched with Docker Compose, RocketChat, is an open source chat client/server application. To see how it works, let’s launch a web browser and navigate to http://127.0.0.1:3000.
When you get there, you are prompted with a login screen for RocketChat (Figure 8-1).
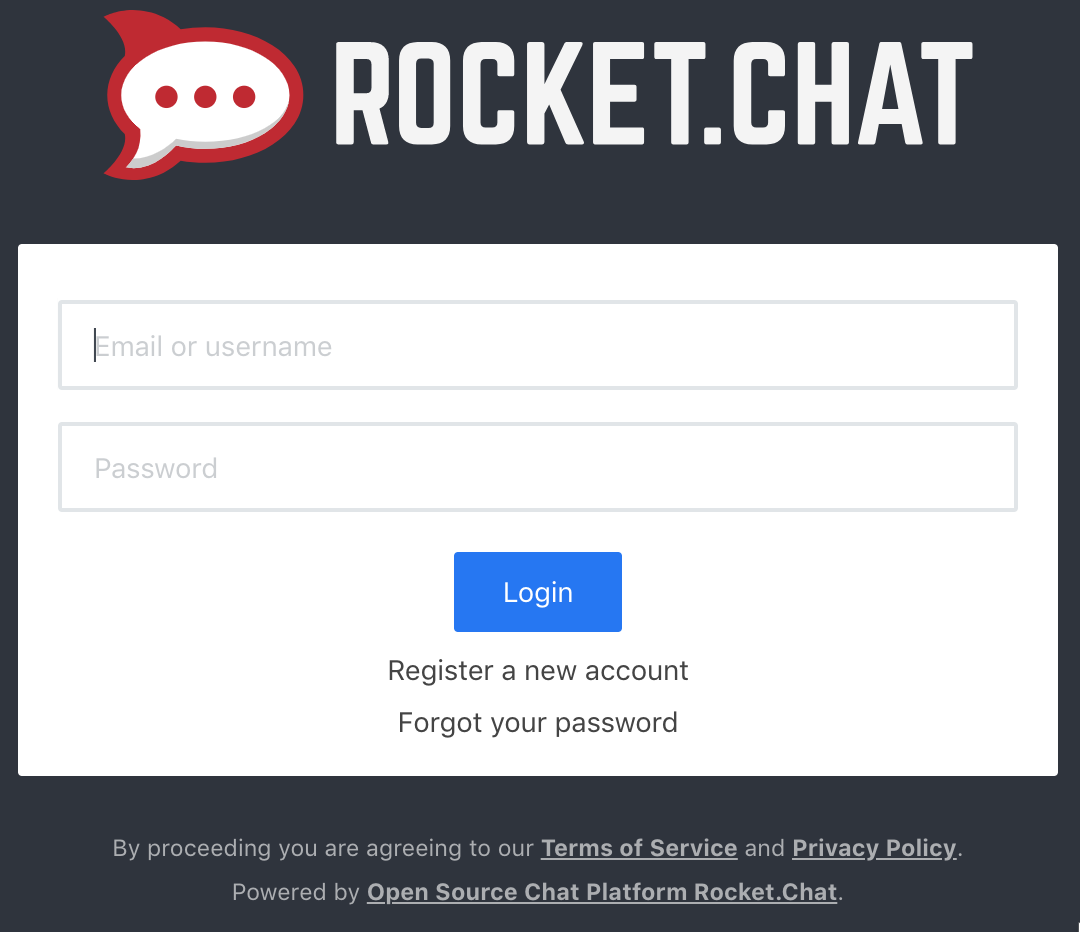
Figure 8-1. RocketChat login screen
Click the “Register a new account” link and fill out the following form:
Name: admin
Email: admin@example.com
Password: p2ssw0rd
Re-enter Password: p2ssw0rd
Then click the large blue button, labeled “Register a new account” (Figure 8-2).
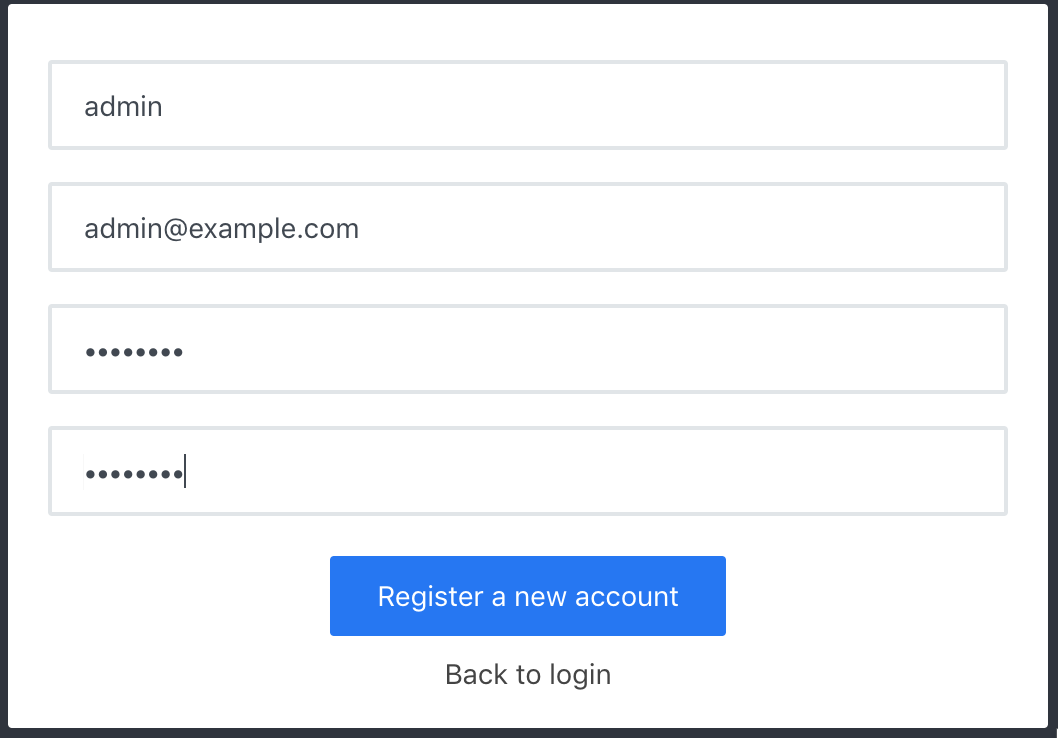
Figure 8-2. RocketChat registration screen
You now have to wait. The account setup will take at least a minute, while the server sets everything up for the first time. Try to resist clicking the blue button that now says “Please wait…”. It won’t really hurt anything, but it won’t help speed anything up either.
Once everything is set up, you will be prompted by a dialog window entitled “Register Username.” You can leave the username as is, unless you want to change it, and simply click the button labeled “Use This Username” (Figure 8-3).
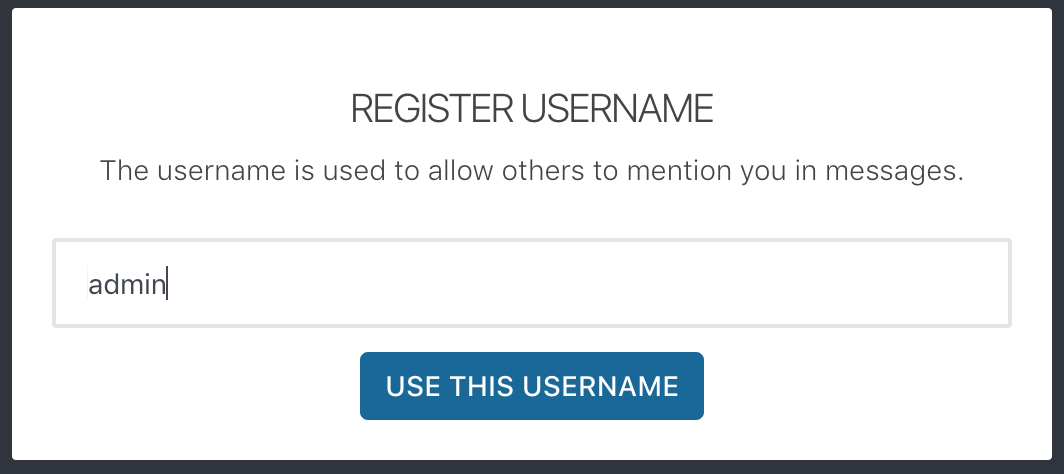
Figure 8-3. RocketChat username registration screen
Congratulations—you are now logged into a fully functional chat client, but you aren’t done yet. The Docker Compose configuration launched an instance of a hubot chat assistant and the mysterious zmachine, so let’s take a look at those.
Since the RocketChat server is brand new, it does not have a user yet that our bot can use. Let’s remedy that.
Start by clicking the top of the left sidebar, where you see your username and status displayed. This makes a menu pop up, within which you should be able to click “Administration” (Figure 8-4).
Warning
During testing, we noticed that some web browsers or operating systems did not always show the smaller icons in the RocketChat UI. They were clickable, but it was hard to tell that there was anything there. If you are seeing this, the buttons still work and moving your mouse around slowly should show some of the buttons’ tool tips.
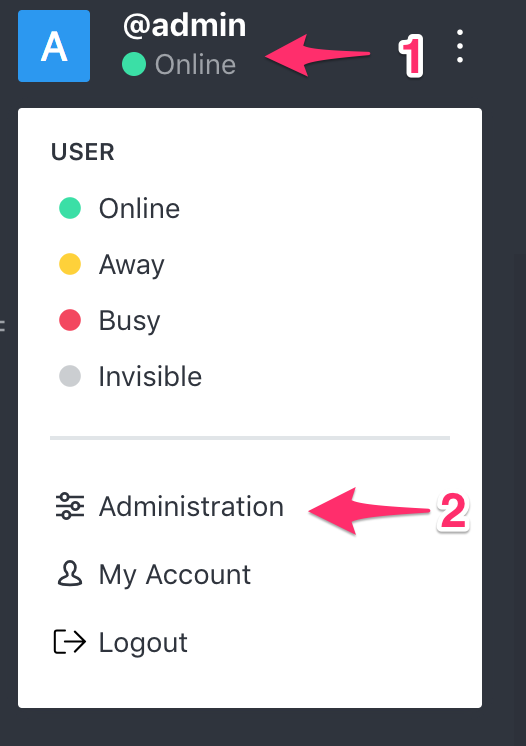
Figure 8-4. RocketChat administration sidebar
The left sidebar is now replaced by the Administration panel. In the Administration panel, click “Users” (Figure 8-5).
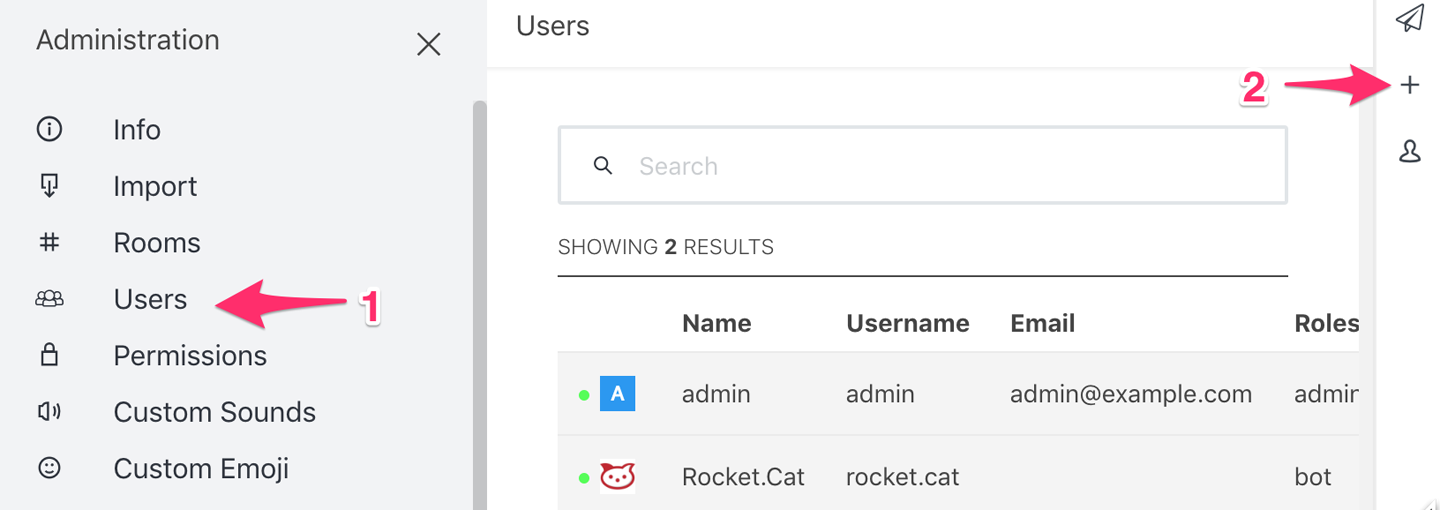
Figure 8-5. RocketChat Add User screen
On the far right side of the screen, click the + symbol to add a user, and then fill out the form as follows:
-
Name:
hubot -
Username:
hubot -
Email:
hubot@example.com -
Click:
Verified(Green) -
Password:
HughTheBot -
Click:
Require password change(Red) -
Selec a_role_:
bot -
Click:
Add Role -
Uncheck:
Send welcome email
Click “Save” at the bottom to create the user (Figure 8-6).
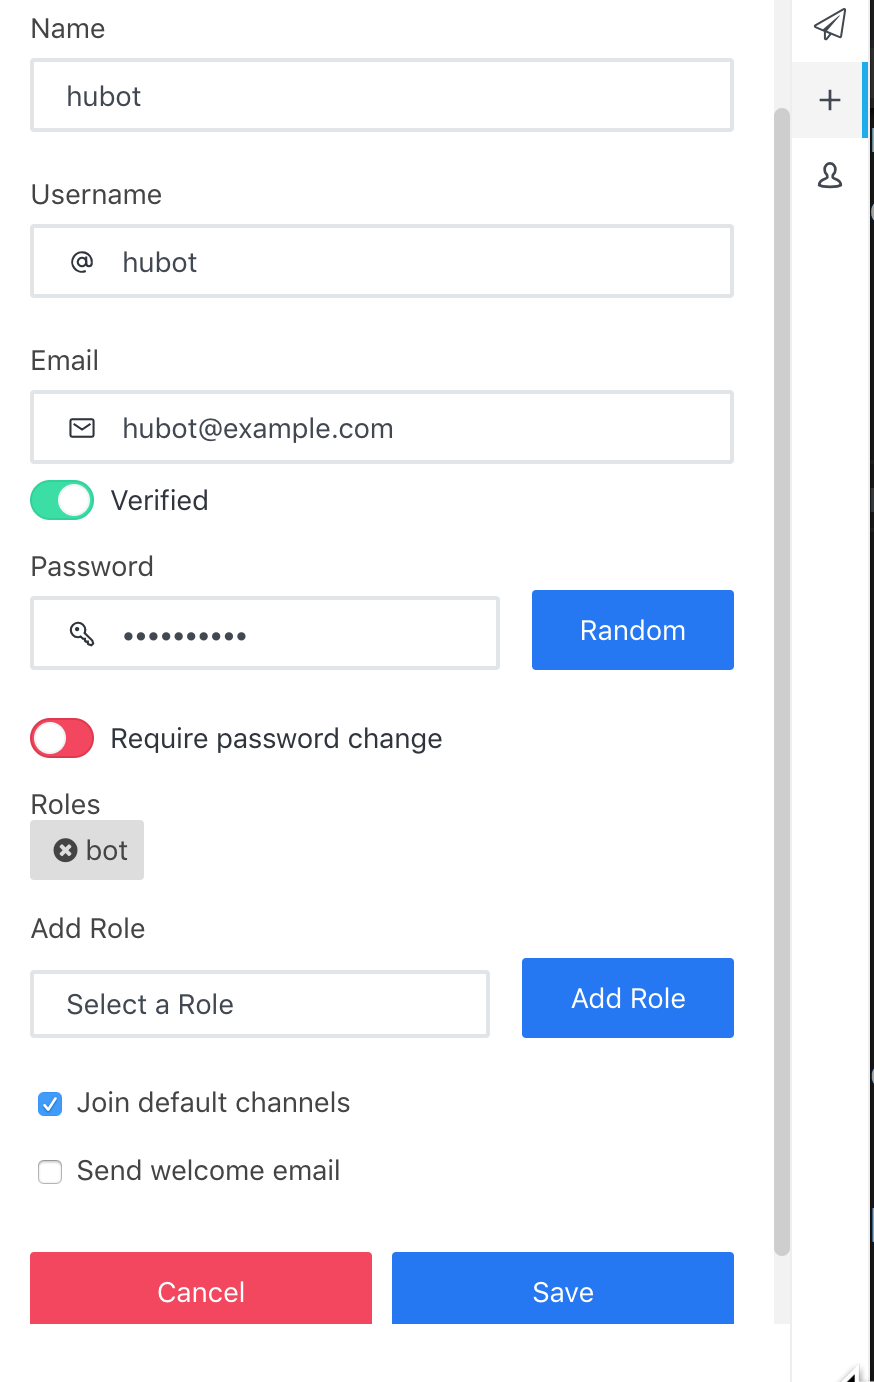
Figure 8-6. RocketChat Create Bot User screen
At the top of the left side Administration panel, click the X to close the panel (Figure 8-7).
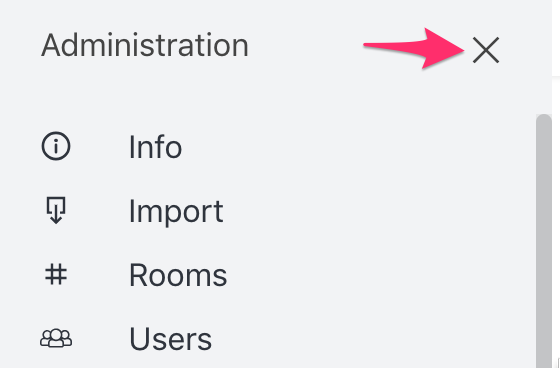
Figure 8-7. RocketChat Close Administration panel
In the left side panel under channels, click “general” (Figure 8-8).
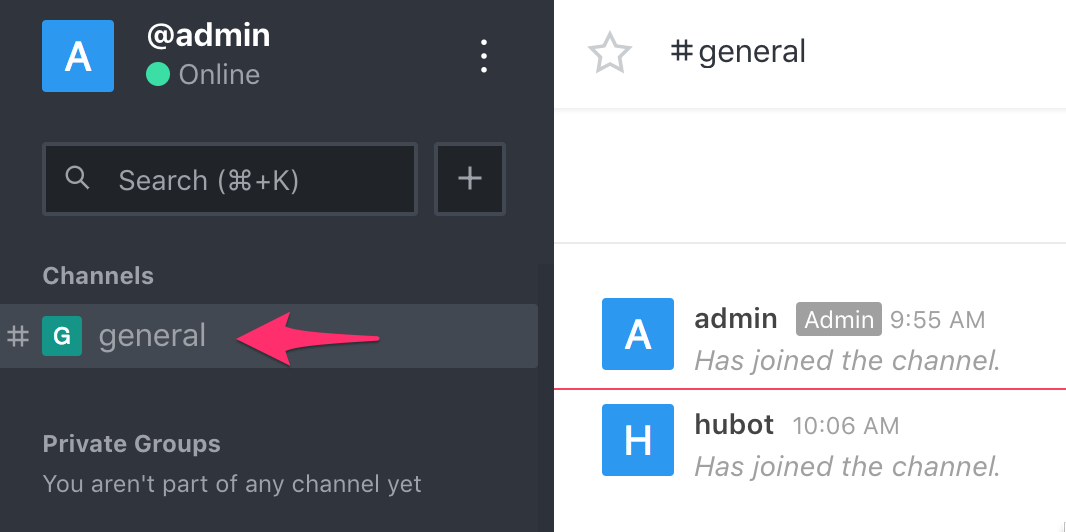
Figure 8-8. RocketChat General channel
And finally, let’s try to get hubot to connect to the chat server. The easiest way to accomplish this is to use a terminal and tell Docker Compose to restart the hubot container.
$ docker-compose restart hubot
Restarting unix_hubot_1 ... done
If everything went according to plan, you should now be able to navigate back to your web browser and send commands to your bot in the chat window.
In the message window at the bottom of the General chat screen, start by typing /invite @hubot to ensure that our bot is listening in the room (Figure 8-9).
Note
You may get a message from the internal admin rocket.cat that says @hubot is already in here. This is perfectly fine.
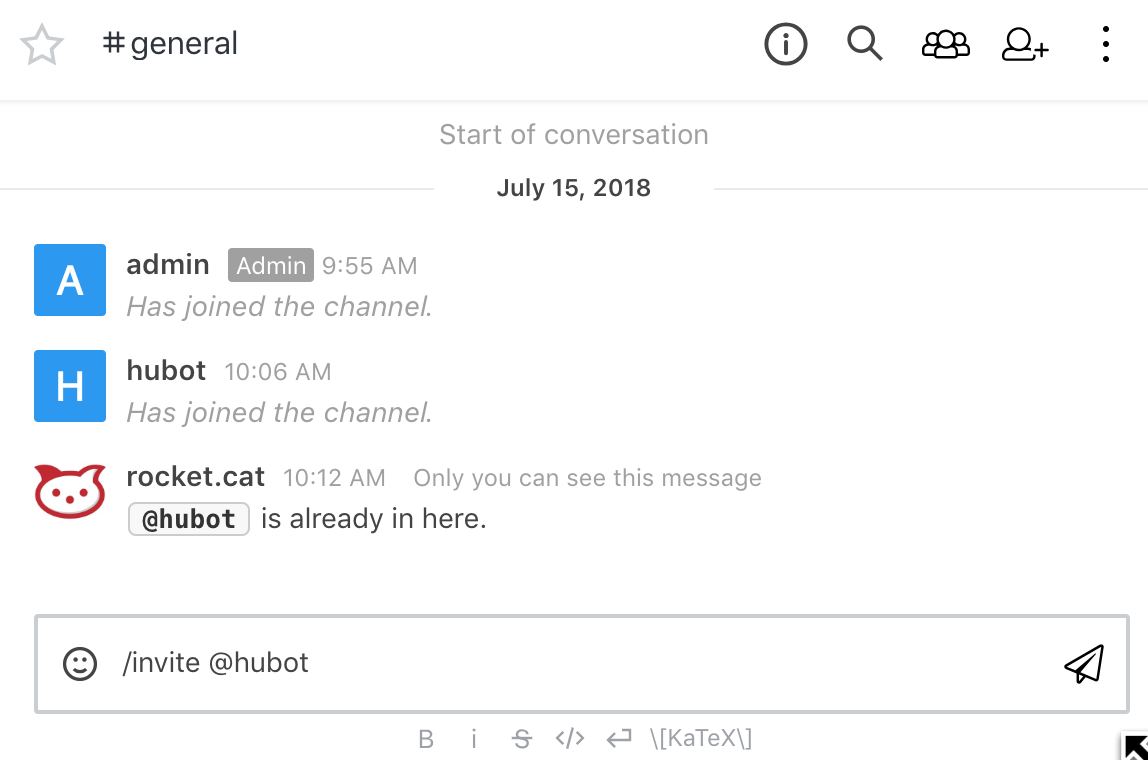
Figure 8-9. RocketChat Invite hubot screen
The environment variables used to configure hubot defined it’s alias as a period. So you can now try typing . help to test that the bot is responding. If everything is working you should get a list of commands that the bot understands and will respond to.
> . help
. adapter - Reply with the adapter
. echo <text> - Reply back with <text>
. help - Displays all of the help commands that this bot knows about.
. help <query> - Displays all help commands that match <query>.
...
. meme One does not simply <text> - Lord of the Rings Boromir
...
. ping - Reply with pong
. time - Reply with current time
. z <action> - Performs the action
...
. z stop - Ends the game for this channel
Finally, try typing:
. meme One does not simply launch a complex web service with docker-compose!
So, for one last diversion, try creating a new chat channel by typing /create zmachine in the chat window. You should now be able to click on the new zmachine channel in the left sidebar and invite hubot with the chat command /invite @hubot.
Note
When you do this, hubot might say:
There's no game for zmachine!
This is nothing to be concerned about.
Next try typing the following commands into the chat window to play a chat-based version of the famous game, Colossal Cave Adventure:
. z start adventure

more
look
go east
examine keys
get keys

. z save firstgame
. z stop
. z start adventure
. z restore firstgame

inventory
Warning
Interactive fiction can be addictive and a huge time sink. You have been warned… That being said, if you are aren’t already familiar with it and are interested in learning more, take a look at some of these resources.
You’ve now seen how easy it can be to configure, launch, and manage complex web services that require multiple components to accomplish their jobs using Docker Compose. In the next section, we will explore a few more of the features that Docker Compose includes.
Exercising Docker Compose
Now that you have that running and understand what the application is doing, we can dig in to get a little more insight into how the services are running. Some of the common Docker commands are also exposed as Compose commands, but for a specific stack rather than a single container or all of the containers on a host. You can run docker-compose top to see an overview of your containers and the processes that are running in them.
$ docker-compose top
unix_hubot_1
PID    USER   TIME                                  COMMAND
--------------------------------------------------------------------------...
1353   1001   0:00   /bin/sh -c node -e
                     "console.log(JSON.stringify('$EXTERNAL_SCRIPTS'.split...
                     external-scripts.json && npm install $(node -e
                     "console.log('$EXTERNAL_SCRIPTS'.split(',').join(' ')...
                     bin/hubot
                     -n $BOT_NAME -a rocketchat
1521   1001   0:02   node node_modules/.bin/coffee node_modules/.bin/hubot...
                     -n bot -a rocketchat

unix_mongo_1
 PID    USER   TIME                        COMMAND
-----------------------------------------------------------------------
23104   999    0:46   mongod --smallfiles --oplogSize 128 --replSet rs0

unix_rocketchat_1
 PID    USER    TIME     COMMAND
-----------------------------------
23399   99999   0:34   node main.js

unix_zmachine_1
 PID    USER   TIME                              COMMAND
--------------------------------------------------------------------------...
2808    0      0:00   /root/src/../frotz/dfrotz -S 0 /root/src/../zcode/ad...
23710   0      0:00   node /root/src/server.js
Similarly to how you would enter a running Docker container, you can run commands inside containers via the Docker Compose tooling using a docker-compose exec command:
$ docker-compose exec mongo bash
root@6f12015f1dfe:/# mongo
MongoDB shell version: 3.2.18
connecting to: test
Welcome to the MongoDB shell.
For interactive help, type "help".
For more comprehensive documentation, see
	http://docs.mongodb.org/
Questions? Try the support group
	http://groups.google.com/group/mongodb-user
rs0:PRIMARY> exit
bye
root@6f12015f1dfe:/# exit
Tip
docker-compose logs and docker-compose exec are probably the most useful commands for troubleshooting. If docker-compose cannot build your image or start your container at all, you will need to fall back to the standard docker commands to debug your image and container, like we discussed in “Troubleshooting Broken Builds” and “Getting Inside a Running Container”.
You can also use Docker Compose to start and stop and, in most environments, pause and unpause either a single container or all of your containers, depending on what you need.
$ docker-compose stop zmachine
Stopping unix_zmachine_1 ... done
$ docker-compose start zmachine
Starting zmachine ... done
$ docker-compose pause
Pausing unix_mongo_1      ... done
Pausing unix_rocketchat_1 ... done
Pausing unix_zmachine_1   ... done
Pausing unix_hubot_1      ... done
$ docker-compose unpause
Unpausing unix_hubot_1      ... done
Unpausing unix_zmachine_1   ... done
Unpausing unix_rocketchat_1 ... done
Unpausing unix_mongo_1      ... done
Finally, when you want to tear everything down and delete all the containers created by docker-compose, you can run the following command:
$ docker-compose down
Stopping unix_hubot_1      ... done
Stopping unix_zmachine_1   ... done
Stopping unix_rocketchat_1 ... done
Stopping unix_mongo_1      ... done
Removing unix_hubot_1              ... done
Removing unix_zmachine_1           ... done
Removing unix_rocketchat_1         ... done
Removing unix_mongo-init-replica_1 ... done
Removing unix_mongo_1              ... done
Removing network unix_botnet
Wrap-Up
You should now have a very good feel for the types of things you can accomplish with Docker Compose and how this tool can be used to decrease the toil and increase the repeatability of your development environments.
In the next chapter, we will explore some of the tools that are available to help you scale Docker inside your data center and in the cloud.