Table of Contents for
Docker: Up & Running, 2nd Edition
 Docker: Up & Running, 2nd Edition
Published by
O'Reilly Media, Inc., 2018
Docker: Up & Running, 2nd Edition
Published by
O'Reilly Media, Inc., 2018
- Cover
- nav
- Docker: Up & Running
- Docker: Up and Running
- Dedication
- Foreword
- Preface
- 1. Introduction
- 2. The Docker Landscape
- 3. Installing Docker
- 4. Working with Docker Images
- 5. Working with Docker Containers
- 6. Exploring Docker
- 7. Debugging Containers
- 8. Exploring Docker Compose
- 9. The Path to Production Containers
- 10. Docker at Scale
- 11. Advanced Topics
- 12. Container Platform Design
- 13. Conclusion
- Index
- About the Authors
- Colophon
Chapter 3. Installing Docker
We’re now at the point where you hopefully understand roughly what Docker is and what it isn’t, and it’s time for some hands-on work. Let’s get Docker installed so we can work with it. The steps required to install Docker vary depending on the platform you use for development and the Linux distribution you use to host your applications in production.
In this chapter, we discuss the steps required to get a fully working Docker development environment set up on most modern desktop operating systems. First we’ll install the Docker client on your native development platform, and then we’ll get a Docker server running on Linux. Finally, we’ll test out the installation to make sure it works as expected.
Although the Docker client can run on Windows and macOS to control a Docker server, Linux containers can be built and launched only on a Linux system.1 Therefore, non-Linux systems will require a virtual machine or remote server to host the Linux-based Docker server. Docker Community Edition, Docker Machine, and Vagrant, which are all discussed later in this chapter, provide some approaches to address this issue. It is also possible to run Windows containers natively on Windows systems, and we will specifically discuss this in “Windows Containers”, but most of the book’s focus will be on Linux containers.
Note
The Docker ecosystem is changing very rapidly as the technology evolves to become more robust and solve a broader range of problems. Some features discussed in this book and elsewhere may become deprecated. To see what has been tagged for deprecation and eventual removal, refer to the documentation.
Docker Client
The Docker client natively supports 64-bit versions of Linux, Windows, and macOS.
The majority of popular Linux distributions can trace their origins to either Debian or Red Hat. Debian systems utilize the deb package format and Advanced Package Tool (apt) to install most prepackaged software. On the other hand, Red Hat systems rely on rpm (Red Hat Package Manager) files and Yellowdog Updater, Modified (yum), or Dandified yum (dnf) to install similar software packages.
On macOS and Microsoft Windows, native GUI installers provide the easiest method to install and maintain prepackaged software. Homebrew for macOS and Chocolatey for Windows are also very popular options among technical users.
Warning
We will be discussing a few approaches to installing Docker in this section. Make sure that you pick the first one in this list that best matches your needs. Installing more than one may cause you problems if you are not well versed in how to switch between them properly.
Choose one of these: Docker Community Edition, docker-machine, OS package manager, or vagrant.
Linux
It is strongly recommended that you run Docker on a modern release of your preferred Linux distribution. It is possible to run Docker on some older releases, but stability may be a significant issue. Generally a 3.8 or later kernel is required, and we advise you to use the newest stable version of your chosen distribution. The following directions assume you are using a recent, stable release.
Ubuntu Linux 17.04 (64-bit)
Note
For other versions of Ubuntu, see the Docker Community Edition for Ubuntu.
Let’s take a look at the steps required to install Docker.
This first command will ensure that you aren’t running older versions of Docker. The package has been renamed a few times, so you’ll need to specify several possibilities here:
$ sudo apt-get remove docker docker-engine docker.io
Note
Docker ships in two flavors: Community Edition (CE) and Enterprise Edition (EE). Enterprise Edition is the commercially supported variant and has a slightly different set of features because they more carefully control the release schedule, much like Red Hat Enterprise and Fedora work in the Linux distribution arena. Here we’ll cover the Community Edition of Docker since that is largely what people will be using. Enterprise Edition users should find that almost all of what we’ll discuss in this book works fine for them as well, however, and should not be put off by the focus on Community Edition.
Next you will need to add the required software dependencies and apt respository for Docker Community Edition. This lets us fetch and install packages for Docker and validate that they are signed.
$ sudo apt-get update
$ sudo apt-get install \
    apt-transport-https \
    ca-certificates \
    curl \
    software-properties-common
$ curl -fsSL https://download.docker.com/linux/ubuntu/gpg |\
    sudo apt-key add -
$ sudo add-apt-repository \
    "deb [arch=amd64] https://download.docker.com/linux/ubuntu \
    $(lsb_release -cs) \
    stable"
Now that you have the repository set up, run the following commands to install Docker:
$ sudo apt-get update
$ sudo apt-get install docker-ce
Assuming you don’t get any error messages, you now have Docker installed!
Fedora Linux 26 (64-bit)
Note
For other versions of Fedora, see the Docker Community Edition for Fedora.
Let’s take a look at the steps needed in order to install the correct Docker packages on your system.
This first command will ensure that you aren’t running older versions of Docker. As on Ubuntu systems, the package has been renamed a few times, so you’ll need to specify several possibilities here:
$ sudo dnf remove docker \
    docker-common \
    docker-selinux \
    docker-engine-selinux \
    docker-engine
Next you will need to add the required software dependencies and dnf respository for Docker Community Edition.
$ sudo dnf -y install dnf-plugins-core
$ sudo dnf config-manager \
    --add-repo \
    https://download.docker.com/linux/fedora/docker-ce.repo
Now you can install the current version of Docker Community Edition.
$ sudo dnf install docker-ce
macOS, Mac OS X
To install Docker Community Edition on macOS, you should use the GUI installer provided by Docker.
GUI installer
Download the latest Docker Community Edition for Mac installer and then double-click on the downloaded program icon. Follow all of the installer prompts until the installation is finished.
Docker Community Edition for Mac relies on the xhyve project to provide a native lightweight virtualization layer for the Linux server component, which macOS requires to launch Linux virtual machines that can build Docker images and run containers.
Homebrew installation
You can also install the Docker CLI tools using the popular Homebrew package management system for macOS. If you take this approach, you should consider installing Docker Machine for creating and managing your Linux VM. We’ll discuss that shortly in “Non-Linux VM-Based Server”.
Microsoft Windows 10 Professional
Download the latest Docker Community Edition for Windows installer and then double-click on the downloaded program icon. Follow all of the installer prompts until the installation is finished.
Tip
If prompted, select support for “Linux Containers,” as almost all the examples in the book expect this, and Linux containers are still the most common type of Docker container. You can easily change this at any time if you want or need to switch over to Windows containers in the future.
Docker Community Edition for Windows relies on Hyper-V to provide a native virtualization layer for the Linux server component, which Windows requires to launch Linux virtual machines that can build Docker images and run containers.
Chocolatey installation
You can also install the Docker CLI tools using the popular Chocolatey package management system for Windows. If you take this approach, you should consider installing Docker Machine for creating and managing your Linux VM. We’ll discuss that shortly in “Non-Linux VM-Based Server”.
Note
Installation directions for additional operating systems can be found at store.docker.com.
Docker Server
The Docker server is a separate binary from the client and is used to manage most of the work that Docker is typically used for. Next we will explore the most common ways to manage the Docker server.
Note
Docker Community Edition already sets up the server for you, so if you took that route, you do not need to do anything else besides ensure that Docker Community Edition is running.
systemd-Based Linux
Current Fedora and Ubuntu releases use systemd to manage processes on the system. Because you have already installed Docker, you can ensure that the server starts every time you boot the system by typing:
$ sudo systemctl enable docker
This tells systemd to enable the docker service and start it when the system boots or switches into the default run level. To start the Docker server, type the following:
$ sudo systemctl start docker
Non-Linux VM-Based Server
If you are using Microsoft Windows or macOS in your Docker workflow, you will need a virtual machine so that you can set up a Docker server for testing. Docker Community Edition is convenient because it sets up this VM for you using the native virtualization technology on these platforms. If you are running an older version of Windows or cannot use Docker Community Edition for other reasons, you should investigate Docker Machine to help you create and manage your Docker server Linux VM.
In addition to Docker Machine, it is also possible to use other tools to set up the Docker server, depending on your preferences and needs:
-
Manually maintained virtual machines
Docker Machine
In early 2015, Docker announced the beta release of Docker Machine, a tool that makes it much easier to set up Docker hosts on bare-metal, cloud, and virtual machine platforms.
Warning
You only need to follow the Docker Machine directions if you are on a Mac or Windows system and decided not to install Docker Community Edition, since that already installs a virtual machine–based server for you.
The easiest way to install Docker Machine is to visit the GitHub releases page and download the correct binary for your operating system and architecture. Currently, there are variants for 64-bit versions of Linux, Windows, and macOS, among a few other options.
Note
Docker Machine is an advanced tool. Determining which hypervisor is appropriate for your system and how to install it is impossible to cover in adequate detail here.
For these demonstrations, you will need to have a recent release of a hypervisor, like VirtualBox, installed on your system. VirtualBox is freely downloadable and easily installed on most systems, so for this section, the examples will all use a Unix-based system with VirtualBox. The following example shows how to do the install on macOS.
First, you need to download and install the docker-machine executable. This example downloads v0.13.0, but you can determine the current release on GitHub.
$ mkdir ~/bin
$ curl -L https://github.com/docker/machine/releases/\
download/v0.13.0/docker-machine-`uname -s`-`uname -m` \
  > ~/bin/docker-machine
$ export PATH=${PATH}:~/bin
$ chmod u+rx ~/bin/docker-machine
Tip
We’ve had to line-wrap the URL to fit the format of this book. If you have trouble running that in your shell as is, try removing the backslashes and joining it into one line without any spaces in the URL.
Once you have the docker-machine executable in your path, you can start to use it to set up Docker hosts. Here we’ve just put it temporarily into your path. If you want to keep running it in the future, add it to your .profile or .bash_profile file. Now that you can run the tool, the next thing that you need to do is create a virtual machine to host your Docker server.
Tip
Under some circumstances, this command might exit early and then recommend that you run docker-machine regenerate-certs local. If it does, go ahead and run that command and then try again.
You can do this using the docker-machine create command:
$ docker-machine create --driver virtualbox local

Creating CA: /home/skane/.docker/machine/certs/ca.pem
Creating client certificate: /home/skane/.docker/machine/certs/cert.pem
Running pre-create checks...
(local) Image cache directory does not exist, creating it at ...
(local) No default Boot2Docker ISO found locally, downloading the latest...
(local) Latest release for github.com/boot2docker/boot2docker is v17.09.1-ce
(local) Downloading /home/skane/.docker/machine/cache/boot2docker.iso from ...
(local) 0%..10%..20%..30%..40%..50%..60%..70%..80%..90%..100%
Creating machine...
(local) Copying /home/me/.docker/machine/cache/boot2docker.iso to ...
(local) Creating VirtualBox VM...
(local) Creating SSH key...
(local) Starting the VM...
(local) Check network to re-create if needed...
(local) Found a new host-only adapter: "vboxnet0"
(local) Waiting for an IP...
Waiting for machine to be running, this may take a few minutes...
Detecting operating system of created instance...
Waiting for SSH to be available...
Detecting the provisioner...
Provisioning with boot2docker...
Copying certs to the local machine directory...
Copying certs to the remote machine...
Setting Docker configuration on the remote daemon...
Checking connection to Docker...
Docker is up and running!
To see how to connect your Docker Client to the Docker Engine running on this
  virtual machine, run: docker-machine env local
Note
If you already have a docker-machine VM created, you can simply start it with the command docker-machine start local.
This downloads a virtual machine image and then creates a VirtualBox VM that you can use as a Docker host. If you look at the output from the create command, you will see that it instructs you to run docker-machine env local.
This command will produce output that includes all of the environment variables that you must set in your shell to configure the Docker client to use your docker-machine virtual machine.
$ docker-machine env local
export DOCKER_TLS_VERIFY="1"
export DOCKER_HOST="tcp://172.17.42.10:2376"
export DOCKER_CERT_PATH="/Users/me/.docker/machine/machines/local"
export DOCKER_MACHINE_NAME="local"
# Run this command to configure your shell:
# eval $(docker-machine env local)
The last line in the preceding output includes a command that will automatically set up those environment variables in your current shell. This command is different across platforms, but on Unix-based systems it will look like this:
$ eval $(docker-machine env local)
Because we’re evaluating the output of the command with eval, this command produces no output. If you’re curious, feel free to run the part of the command in parentheses to see what is being evaluated. Generally speaking, you will want to also put this whole eval block in your .profile or .bash_profile file as well, since it makes working with your Docker VM much easier going forward.
Now that you have that all set up, you can use the following command to confirm what machines you have running:
$ docker-machine ls
NAME  ACTIVE DRIVER     STATE   URL                       SWARM DOCKER      ...
local -      virtualbox Running tcp://172.17.42.10:2376         v17.09.1-ce ...
This tells you that you have one machine, named local, that is active and running.
Now you can pass commands to the new Docker machine by leveraging the regular docker command, since you have set the proper environment variables.
If you did not want to set the Docker environment variables from docker-machine env local for some reason, you could also use the docker and docker-machine commands in conjunction with one another to configure the docker CLI at runtime, like so: docker $(docker-machine config local) ps.
This command embeds the output from docker-machine into the middle of the docker command. If you run the docker-machine config command on its own, you can see what it is adding to the docker command:
$ docker-machine config local
--tlsverify
--tlscacert="/home/skane/.docker/machine/machines/local/ca.pem"
--tlscert="/home/skane/.docker/machine/machines/local/cert.pem"
--tlskey="/home/skane/.docker/machine/machines/local/key.pem"
-H=tcp://172.17.42.10:2376
Although you can see the Docker host’s IP address in the output, you can ask for it explicitly with the following command:
$ docker-machine ip local
172.17.42.10
If you want to log in to the system, you can easily do this by running:
$ docker-machine ssh local
                        ##         .
                  ## ## ##        ==
               ## ## ## ## ##    ===
           /"""""""""""""""""\___/ ===
      ~~~ {~~ ~~~~ ~~~ ~~~~ ~~~ ~ /  ===- ~~~
           \______ o           __/
             \    \         __/
              \____\_______/
 _                 _   ____     _            _
| |__   ___   ___ | |_|___ \ __| | ___   ___| | _____ _ __
| '_ \ / _ \ / _ \| __| __) / _` |/ _ \ / __| |/ / _ \ '__|
| |_) | (_) | (_) | |_ / __/ (_| | (_) | (__|   <  __/ |
|_.__/ \___/ \___/ \__|_____\__,_|\___/ \___|_|\_\___|_|
Boot2Docker version 17.09.1-ce, build HEAD : e7de9ae - Fri Dec  8 19:41:36 ...
Docker version 17.09.1-ce, build 19e2cf6
docker@local:~$ exit
To stop your Docker machine, you can run:
$ docker-machine stop local
Stopping "local"...
Machine "local" was stopped.
And then you can run this to restart it (you need it to be running):
$ docker-machine start local
Once a machine is down, you can also remove it to clean up after yourself entirely:
$ docker-machine rm local
If you want to explore the other options that docker-machine provides, you can simply run docker-machine without any other options to see the command help.
Vagrant
If you need more flexibility with the way your Docker development environment is set up, you might want to consider using Vagrant instead of docker-machine. Like Docker Machine, Vagrant provides support for multiple hypervisors, but it is much more extensible, and can often be leveraged to mimic even the most complex environments.
A common use case for leveraging Vagrant during Docker development is to support testing on images that match your production environment. Vagrant supports everything from broad distributions like CentOS 7 and Ubuntu 16.04 to finely focused atomic host distributions like CoreOS and Project Atomic.
You can easily install Vagrant on most platforms by downloading a self-contained package from vagrantup.com. You will also need to have a hypervisor, like VirtualBox, installed on your system.
In the following example, you will create a CoreOS-based Docker host running the Docker daemon on the unencrypted port 2375. You could use your favorite distribution here instead, but CoreOS ships with working Docker out of the box and the image is quite small.
Note
In production, Docker should always be set up to use only encrypted remote connections. Although Docker Machine now uses encrypted communications by default, setting up Vagrant to do this in CoreOS is currently a bit too complicated for this installation example. You can find more information on how to set this up properly at coreos.com.
After Vagrant is installed, create a host directory with a name similar to docker-host and then move into that directory:
$ mkdir docker-host
$ cd docker-host
To install the coreos-vagrant files, you need the version control tool named Git. If you don’t already have Git, you can install it via your package manager of choice, or download and install it from git-scm.com. When Git is installed, you can grab the coreos-vagrant files and then change into the new directory with the following commands:
$ git clone https://github.com/coreos/coreos-vagrant.git
$ cd coreos-vagrant
Inside the coreos-vagrant directory, you’ll need to leverage the built-in ignition tool or the built-in cloud-init tool to add a systemd unit file that will enable the Docker daemon on TCP port 2375. The Vagrantfile will determine whether to use ignition or cloud-init based on your hypervisor, so it is easiest to simply set them both up.
Tip
You can read more about how ignition and cloud-init are used by coreos-vagrant in the README.
For ignition, create a file called config.ign that contains all of the following:
{"ignition":{"version":"2.0.0","config":{}},"storage":{},"systemd":{"units":[{"name":"docker-tcp.socket","enable":true,"contents":"[Unit]\nDescription=Docker Socket for the API\n..."}]},"networkd":{},"passwd":{}}
Note
The complete contents key and value pair should be a single line in the file. The above file will not work correctly, as printed, because the contents line has been truncated.
You can get a complete copy of the above JSON file by running:
git clone https://github.com/bluewhalebook/\
docker-up-and-running-2nd-edition.git
For cloud-init, create a file called user-data that contains all of the following, including the very first line:
#cloud-configcoreos:units:-name:docker-tcp.socketcommand:startenable:truecontent:|[Unit]Description=Docker Socket for the API[Socket]ListenStream=2375Service=docker.serviceBindIPv6Only=both[Install]WantedBy=sockets.target
When you have saved both of these files, you can start up the Vagrant-based virtual machine by running:
Warning
You will want to stop Docker Community Edition or any other Docker daemon you have running locally before running vagrant up, so that there are no potential port conflicts.
$ vagrant up
Bringing machine 'core-01' up with 'vmware_fusion' provider...
==> core-01: Cloning VMware VM: 'coreos-alpha'. This can take some time...
==> core-01: Checking if box 'coreos-alpha' is up to date...
==> core-01: Verifying vmnet devices are healthy...
==> core-01: Preparing network adapters...
==> core-01: Fixed port collision for 22 => 2222. Now on port 2202.
==> core-01: Starting the VMware VM...
==> core-01: Waiting for machine to boot. This may take a few minutes...
    core-01: SSH address: 172.17.42.10:22
    core-01: SSH username: core
    core-01: SSH auth method: private key
==> core-01: Machine booted and ready!
==> core-01: Forwarding ports...
    core-01: -- 22 => 2202
    core-01: SSH address: 172.17.42.10:22
    core-01: SSH username: core
    core-01: SSH auth method: private key
==> core-01: Setting hostname...
==> core-01: Configuring network adapters within the VM...
==> core-01: Running provisioner: file...
==> core-01: Running provisioner: shell...
    core-01: Running: inline script
==> core-01: Running provisioner: shell...
    core-01: Running: inline script
To set up your shell environment so that you can easily use your local Docker client to talk to the Docker daemon on your virtual machine, you can set the following variables:
$ unset DOCKER_TLS_VERIFY
$ unset DOCKER_CERT_PATH
$ export DOCKER_HOST=tcp://127.0.0.1:2375
Warning
Keep an eye out for a message like this when running vagrant up. If you see this, it means that Vagrant remapped the Docker port to a new port.
... Fixed port collision for 2375 ... Now on port 2202
This might happen if you have Docker Community Edition running, among other reasons. In the previous case, you can deal with this by changing the export command to this:
export DOCKER_HOST=tcp://127.0.0.1:2202
If everything is running properly, you should now be able to run the following to connect to the Docker daemon:
$ docker info
Containers: 0
 Running: 0
 Paused: 0
 Stopped: 0
Images: 0
Server Version: 17.11.0-ce
Storage Driver: overlay2
 Backing Filesystem: extfs
 Supports d_type: true
 Native Overlay Diff: true
Logging Driver: json-file
Cgroup Driver: cgroupfs
Plugins:
 Volume: local
 Network: bridge host macvlan null overlay
 Log: awslogs fluentd gcplogs gelf journald json-file logentries splunk syslog
Swarm: inactive
Runtimes: runc
Default Runtime: runc
Init Binary: docker-init
containerd version: 992280e8e265f491f7a624ab82f3e238be086e49
runc version: 0351df1c5a66838d0c392b4ac4cf9450de844e2d
init version: v0.13.2 (expected: 949e6facb77383876aeff8a6944dde66b3089574)
Security Options:
 seccomp
  Profile: default
 selinux
Kernel Version: 4.14.4-coreos
Operating System: Container Linux by CoreOS 1618.0.0 (Ladybug)
OSType: linux
Architecture: x86_64
CPUs: 1
Total Memory: 996.3MiB
Name: core-01
ID: MFKI:CLTN:3KDF:JXF4:FV74:GZAM:VJD7:35CW:TS3J:LTYE:QBLW:X26A
Docker Root Dir: /var/lib/docker
Debug Mode (client): false
Debug Mode (server): false
Registry: https://index.docker.io/v1/
Experimental: false
Insecure Registries:
 127.0.0.0/8
Live Restore Enabled: false
To connect to a shell on the Vagrant-based virtual machine, you can run:
$ vagrant ssh
Last login: Sun Dec 17 20:23:34 UTC 2017 from 192.168.180.1 on ssh
Container Linux by CoreOS alpha (1618.0.0)
core@core-01 ~ $ exit
You can stop your Vagrant-based VM by running:
$ vagrant halt
==> core-01: Attempting graceful shutdown of VM...
Note
If you shut down Docker Community Edition earlier to test Vagrant but do not plan on using Vagrant for your Docker environment, then now would be a good time to start Docker Community Edition back up and run unset DOCKER_HOST in your shell so that you are no longer pointing at the Vagrant host.
Testing the Setup
You are now ready to test that everything is working. You should be able to run any one of the following commands on your local system to tell the Docker daemon to download the latest official container for that distribution and then launch it with a running Unix shell process.
This step is important to ensure that all the pieces are properly installed and communicating with each other as expected. It also shows off one of the features of Docker: we can run containers based on any distribution we like. In the next few steps we’ll run Docker containers based on Ubuntu, Fedora, and Alpine Linux. You don’t need to run them all to prove that this works; running one of them will suffice.
Note
If you want to run these commands on the server, be sure that you prepend each docker command with sudo. Alternatively, since most Docker installs create a docker group that can be used to manage who has access to the dockerd Unix socket, you can simply add your user to that group as well.
Ubuntu
$ docker run --rm -ti ubuntu:latest /bin/bash
Fedora
$ docker run --rm -ti fedora:latest /bin/bash
Exploring the Docker Server
Although the Docker server is often installed, enabled, and run automatically, it’s useful to see that running the Docker daemon manually on a Linux system is as simple as typing something like this:
$ sudo dockerd -H unix:///var/run/docker.sock -H tcp://0.0.0.0:2375
Note
If you are using Docker Community Edition on a Windows or Mac, you won’t be able to easily interact with the dockerd executable, as it is intentionally hidden from the end user, but we’ll show you a trick in just a moment.
This command starts the Docker daemon, creates and listens to a Unix domain socket (-H unix:///var/run/docker.sock), and binds to all system IP addresses using the default unencrypted traffic port for docker (-H tcp://0.0.0.0:2375). You’re not likely to have to start the Docker server yourself, but that’s what going on behind the scenes. On non-Linux systems, you need a Linux-based virtual machine to host the Docker server. Docker Community Edition sets up this virtual machine for you in the background.
Note
If you already have Docker running, executing the daemon again will fail because it can’t use the same network port twice.
In most cases, it is very easy to SSH into your new Docker server and look around, but the seamless experience of Docker Community Edition on a non-Linux system means it is very hard to even notice that Docker is still leveraging a local virtual machine to run the Docker daemon on because the server appears to be running on the host system itself. You aren’t talking to the server over a TCP socket in that case, so you can’t just SSH to it.
If you are curious, or ever have a need to access the underlying VM, you can do it, but it requires a little advanced knowledge. We will talk about the command nsenter in much more detail in “nsenter”, but for now, if you would like to see the virtual machine (or underlying host) you can run these commands:
$ docker run -it --privileged --pid=host debian nsenter -t 1 -m -u -n -i sh

/ # cat /etc/os-release
PRETTY_NAME="Docker for Mac"

/ # ps | grep dockerd
 1096 root       0:16 /usr/local/bin/dockerd -H unix:///var/run/docker.sock
                          --config-file /run/config/docker/daemon.json
                          --swarm-default-advertise-addr=eth0
                          --userland-proxy-path /usr/bin/vpnkit-expose-port
                          --storage-driver overlay2

/ # exit
This command uses a privileged Debian container that contains the nsenter command to manipulate the Linux kernel namepsaces so that we can navigate the filesystem of the underlying virtual machine or host.
Warning
This container is privileged to allow us to navigate the underlying host, but you should not get into the habit of using privileged containers when adding individual capabilities or system call privileges will suffice. We discuss this more in “Security”.
The Docker daemon configuration is stored in /etc/docker/daemon.json. Docker uses sane defaults for all its settings, so this file may be very small or even completely absent. If you are using Docker Community Edition, you can edit this file by clicking on the Docker icon and selecting Preferences… → Daemon → Advanced, as shown in Figure 3-1.
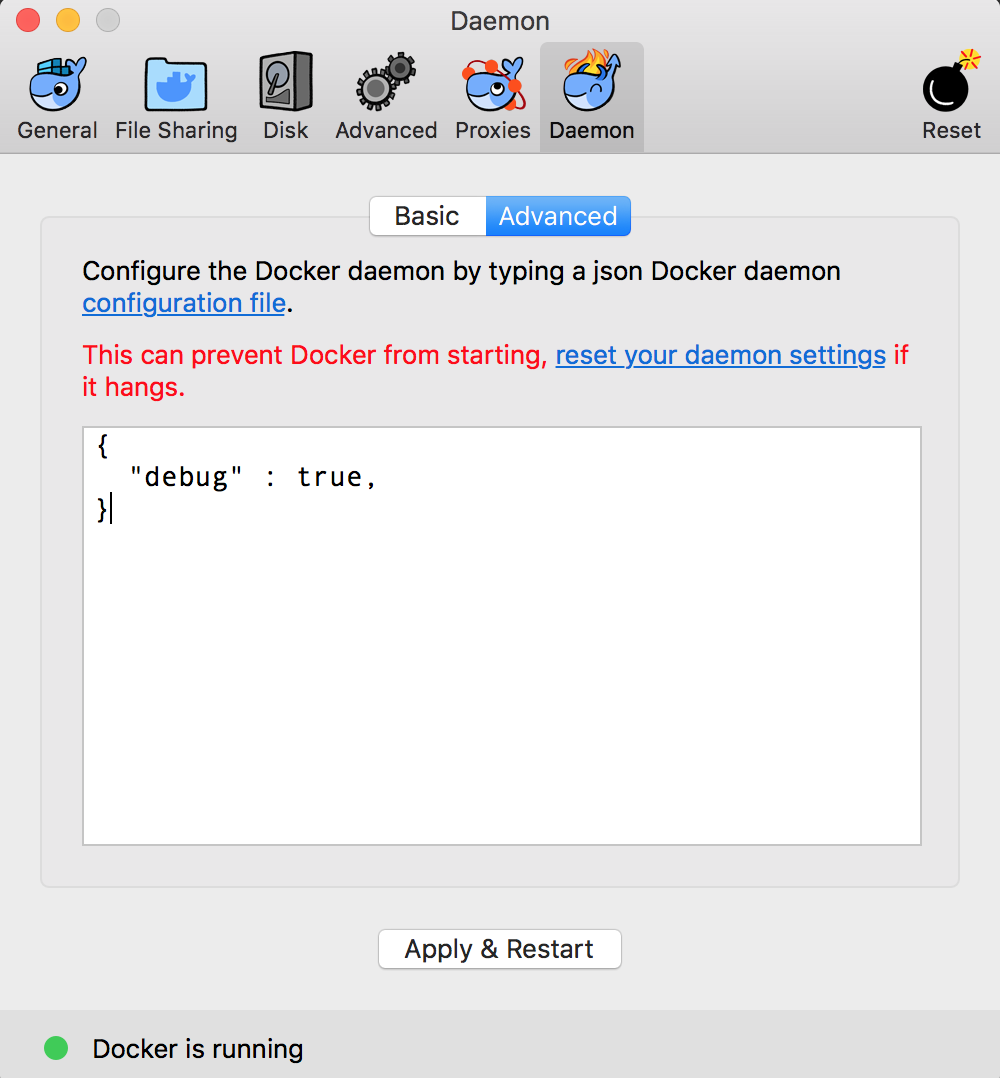
Figure 3-1. Community Edition server configuration
Wrap-Up
Now that you have a running Docker setup, you can start to look at more than the basic mechanics of getting it installed. In the next chapter, you’ll explore how to build and manage Docker images, which provide the basis for every container you will ever launch with Docker.
Tip
In the rest of the book, when you see docker on the command line, assume you will need to have the correct configuration in place either as environment variables or via the -H command-line flag to tell the docker client how to connect to the dockerd server process.