Table of Contents for
Learning Puppet 4
 Learning Puppet 4
Published by
O'Reilly Media, Inc., 2016
Learning Puppet 4
Published by
O'Reilly Media, Inc., 2016
- Cover
- nav
- Learning Puppet 4
- Learning Puppet 4
- Foreword
- Preface
- Introduction
- I. Controlling with Puppet Apply
- 1. Thinking Declarative
- 2. Creating a Learning Environment
- 3. Installing Puppet
- 4. Writing Manifests
- 5. Using the Puppet Configuration Language
- 6. Controlling Resource Processing
- 7. Expressing Relationships
- 8. Upgrading from Puppet 3
- 9. Wrap-Up of Puppet Basics
- II. Creating Puppet Modules
- 10. Creating a Test Environment
- 11. Separating Data from Code
- 12. Using Modules
- 13. Designing a Custom Module
- 14. Improving the Module
- 15. Extending Modules with Plugins
- 16. Documenting Modules
- 17. Testing Modules
- 18. Publishing Modules
- III. Using a Puppet Server
- 19. Preparing for a Puppet Server
- 20. Creating a Puppet Master
- 21. Creating a Puppet Server
- 22. Connecting a Node
- 23. Migrating an Existing Puppet Master
- 24. Utilizing Advantages of a Puppet Server
- 25. Managing TLS Certificates
- 26. Growing Your Puppet Deployment
- IV. Integrating Puppet
- 27. Tracking Puppet Status with Dashboards
- 28. Running the Puppet Agent on Windows
- 29. Customizing Environments
- 30. Controlling Puppet with MCollective
- 31. Managing Network Infrastructure with Puppet
- 32. Assimilating Puppet Best Practices
- 33. Finding Support Resources
- Afterword
- A. Installing Puppet on Other Platforms
- B. Configuring Firewalls on Other Platforms
- C. Installing Ruby
- Index
- About the Author
- Colophon
Chapter 31. Managing Network Infrastructure with Puppet
While DevOps teams have been building dynamic, push-button node and application deployments, the infrastructure in which they operate has not benefited from the same agility. In many organizations, the DevOps team has to toss a request over the wall to a slow, hand-built infrastructure team. Many other organizations avoid that discrepancy by placing all nodes on a flat network, forsaking the security benefits of functional isolation in order to retain the ability to repurpose nodes dynamically.
Speaking as someone who identified as a network engineer most of my early career, I believe network engineering would be vastly improved by declarative and idempotent implementation. There are hundreds of network planning and management tools—most of which end up being little more than frustrating and limited model makers—to create designs that end up being implemented by hand on the network devices. Infrastructure teams can be slow and inflexible for the same reasons outlined in “Is Puppet DevOps?”—a slower process is necessary to manage and track change, and work around the limitations of the tools available.
Few things are as exciting, and as valuable, as the cultural changes that are achievable when the network infrastructure and security teams can participate in a swift-moving, Agile-based workflow made possible by dynamically declared infrastructure.
Puppet’s ability to configure and audit network devices creates an exciting growth opportunity. Puppet has had limited, albeit powerful, support for configuring network devices for many years. In the last 12 months, we have witnessed many vendors releasing officially supported Puppet agents on a large number of network devices.
Tip
This chapter will review the options available today. As this specific area is experiencing significant growth right now, I expect this chapter will contain the largest amount of changes in the next revision.Managing Network Devices with Puppet Device
The first support for managing networking devices was provided by a Puppet agent acting as a proxy for the network device.
A node running puppet device would log in to the network device to gather facts, then connect to a Puppet server and request a catalog for the device. The device agent would then apply the catalog resources to the network device. This proxy implementation allows for management of network devices incapable of running a Puppet agent on their own.
This works surprisingly well, and provides power and flexibility to manage Cisco routers and switches without an embedded Puppet agent. Let’s configure one now.
Enabling SSH on the Switch
Let’s enable SSH on the switch or router, and configure a Puppet user with enough rights to configure the switch. This will be a short review, as all of these commands should be self-evident to an experienced network administrator.
Tip
You could also use telnet, but you’re smarter than that, aren’t you?Note that we are doing nothing more than configuring the exact minimum necessary to enable SSH and provide enough configuration (Base IP setup, DNS, and NTP) for Puppet to do all remaining configuration. Be certain to assign a unique hostname and the correct domain name to the unit. The hostname and domain name will be concatenated together by Puppet to create a certname for the unit:
Switch#conf t
Enter configuration commands, one per line.  End with CNTL/Z.
Switch(config)#hostname switch01
switch01(config)#ip domain-name example.com
switch01(config)#ip name-server 192.168.1.10
switch01(config)#ip name-server 192.168.1.11
switch01(config)#ntp server 192.168.1.10
switch01(config)#ntp server 192.168.1.11
switch01(config)#crypto key generate rsa general-keys modulus 2048
The name for the keys will be: switch01.example.com

% The key modulus size is 2048 bits
% Generating 2048 bit RSA keys ...[OK]

switch01(config)#
03:25:35: %SSH-5-ENABLED: SSH 1.99 has been enabled
switch01(config)#ip ssh version 2
switch01(config)#line vty 0 4
switch01(config-line)#transport input ssh
switch01(config-line)#line vty 5 15
switch01(config-line)#transport input ssh
switch01(config-line)#int vlan1
switch01(config-if)#ip address 192.168.1.253 255.255.255.0
switch01(config-if)#exit
Now you should create a privileged user account for the Puppet user. I recommend using an intuitive username like puppet, which would clearly identify the automated process in access logs. Do not share or reuse the login identity of a human.
If you have already customized authentication in your environment, use an authentication setup appropriate for your environment. If you do not have centralized authentication for your network devices, the following can provide a reasonable starting point. Choose appropriate passwords for the following secrets:
switch01(config)#enable secret enable-password
switch01(config)#aaa new-model
switch01(config)#aaa authentication login default local
switch01(config)#aaa authorization exec default local
switch01(config)#username admin priv 15 secret admin-password
switch01(config)#username puppet priv 15 secret puppet-password
switch01(config)#end
switch01#copy run start
Building configuration...
[OK]
The previous example was written using a Cisco 3560 switch. A few of these commands may require different options on newer or older OS versions, but this should provide you with enough information to work out the right commands for your specific unit.
Note
All standard practices for security hardening should be implemented as described in the vendor documentation, such as using an access control list to limit where SSH logins can originate from. Puppet requires only SSH access to the unit from the node runningpuppet device.Configuring the Puppet Proxy Agent
Select a node that can complete both of the following network connections:
- SSH to the Cisco switch or router (destination TCP port 22)
- Connect to the Puppet server (destination TCP port 8140)
On this node, create a non-privileged user account to use for device management. There is no reason to use the root account. You can use a single shared account for all devices, or a different user account for each device if you prefer. The process shown here will create a non-privileged user and an appropriate Puppet configuration file:
[vagrant@client~]$sudouseradd-U-m-c"Puppet Device Manager"devicemgr[vagrant@client~]$sudo-udevicemgr-i[devicemgr@client~]$mkdir-p.puppetlabs/etc/puppet[devicemgr@client~]$ln-s.puppetlabs/etc/puppet[devicemgr@client~]$$EDITOR.puppetlabs/etc/puppet/puppet.conf
Create ~/.puppetlabs/etc/puppet/puppet.conf with the following settings:
[agent]server=puppet.example.com
Create ~/.puppetlabs/etc/puppet/device.conf with a list of devices, their type, and a URL to access them. The URL must contain both the username and password to access the device, and the enable password if required:
[switch01.example.com]
type cisco
url ssh://puppet:password@switch01.example.com/?enable=admin
Secure the file containing passwords, for obvious reasons:
[devicemgr@client~]$chmod0600.puppetlabs/etc/puppet/device.conf
Now we will connect this network device to the Puppet server, using a process very similar to how new nodes are connected. Initialize the proxy agent for this device with the command puppet device followed by the node name:
$ puppet device switch01.example.com --verbose
applying configuration to switch01.example.com at ssh://switch01.example.com/
Info: Creating a new SSL key for switch01.example.com
Info: Caching certificate for ca
Info: Creating a new SSL certificate request for switch01.example.com
Info: Certificate Request fingerprint (SHA256): 65:FC:AA:E3:F5:E5:5D:05:D0:D9:…
Info: Caching certificate for ca
You may need to run puppet cert sign switch01.example.com on the Puppet server to authorize the network device, and then run the command again.
This process has created a new Puppet agent dedicated to managing this network device. All of the configuration files, TLS certificates, logs, and state files for this device can be found in the ~/.puppetlabs/ directory structure. They never mix or interfere with the Puppet agent running as root on this node.
This network device can now be configured through idempotent declarations in Puppet manifests. Let’s get started making changes.
Installing the Device_Hiera Module
One of the less-than-ideal circumstances around device configuration with Puppet was that each configuration entry on a device required a resource definition in the manifest. This often meant that Puppet device manifests were nearly as long as the device configurations that they generated.
The device_hiera module makes use of Hiera hierarchies and hash merging to utilize default port configurations, and enable DRY network configuration. Instead of specifying each interface specifically, we’ll make use of defaults and then add minimal overrides when necessary.
Let’s install this module on the Puppet server to make switch configuration easier, as shown here:
[vagrant@puppetserver~]$puppetmoduleinstalljorhett/device_hieraNotice:Preparingtoinstallinto/etc/puppetlabs/code/environments/production/modulesNotice:Downloadingfromhttps://forgeapi.puppetlabs.com...Info:Resolvingdependencies...Info:Preparingtoinstall...Notice:Installing--donotinterrupt.../etc/puppetlabs/code/environments/production/modules└─┬jorhett-device_hiera(v0.3.0)└──puppetlabs-stdlib(v4.9.0)
Defining Resource Defaults in Hiera
In your Hiera data, let’s assign the device_hiera class to this device. Do so by creating a file for this specific device in the Hiera data hierarchy, such as hostname/switch01.yaml:
# node-specific overrides for switch01classes:-device_hiera
Next, list the resource types to be configured on devices. As these types take no action without explicit configuration, we should add this definition to the global common.yaml file for a DRY implementation. In the example shown here, we’ve enabled configuration of VLANs and network interfaces:
# global lookup defaults in common.yamldevice_hiera::resources:-vlan-interfaces
For each device resource type, define the default parameters to be used. For a DRY implementation, place default values in the global common.yaml file. The following example configures interfaces in dynamic negotiation mode, with an access VLAN ID of 20, if a more specific configuration is not provided:
# global lookup defaults in common.yamldevice_hiera::defaults::vlan:ensure:presentdevice_hiera::defaults::interface:description:'Default interface configuration'mode:'dynamic auto'encapsulation:'negotiate'access_vlan:'20'
Warning
Observe that it defines the default for theinterface resource, even though we add interfaces in the resources list in the preceding example. I will explain that discrepancy soon.These definitions don’t do anything by themselves, but instead provide defaults for VLANs or interfaces declared for the device that do not have a custom definition. Keep in mind that these are Puppet resources, so you can use ordering metaparameters to ensure that things happen in a specific order:
# global defaults in common.yamldevice_hiera::defaults::interface:access_vlan:'20'require:'Vlan[20]'
In this case it won’t matter, as the VLAN will be created automatically because it was declared as the access VLAN to use by an automatic dependency. This can be useful in less obvious cases—for example, where a BGP peer resource depends on an access list used by the BGP peer configuration to be added first.
Take a moment to consider the power of this ability to declaratively map infrastructure dependencies using the ordering attributes you learned about in Chapter 7.
Centralizing VLAN Configuration
To configure VLANs on your switches, create a definition like the following example. As VLANs tend to be common across an entire site, you may want to place the VLAN configuration in the global common.yaml file. However, you can also place local VLAN definitions within a more specific file in your Hiera hierarchy, such as hostname/switch01.yaml:
# global lookup defaults in common.yamldevice_hiera::resources:-vlandevice_hiera::defaults::vlan:ensure:presentdevice_hiera::vlan:'20':description:'Servers''30':description:'Middleware'
This definition would create the common VLANs 20 and 30 on every switch.
Documentation for the vlan resource and parameters can be found at “Type Reference: vlan” on the Puppet docs site.
Applying Default Configs to Interfaces
Interfaces are special because there are so many of them, and you usually have to provide mostly redundant configuration details for each one. To make this easier to handle, the device_hiera module allows you to list slots in the chassis along with a range of ports that should be configured.
Define the device_hiera::interfaces::ports array. Each array value should be a hash with a single key and value pair. The key must be a quoted String value containing the slot name, and the value must also be a quoted String value containing a single range of ports, in the format: MIN-MAX. A slot can be listed multiple times to include multiple port ranges.
This example shows port definitions for a typical Cisco Catalyst 48-port switch with 10G uplinks:
device_hiera::interfaces::ports:-'GigabitEthernet1/0':'1-48'-'TenGigabitEthernet1/1':'1-2'
Place the list of slots and ports inside the Hiera data file for each individual device, such as hostname/switch01.yaml. Each of these interfaces will be configured with the default values provided in the device_hiera::defaults::interface configuration, unless the interface is specified in the device_hiera::interfaces::custom hash.
Note
If you have a dozen of these switches on site, the interface defaults plus this port array would configure 600 ports with just 8 lines of text.If you have many devices of the same type, take advantage of your Hiera hierarchy and put the slot and port ranges in a Hiera file shared by the same devices. Don’t repeat yourself.
Customizing Interface Configurations
It’s possible to customize the configuration of any interface on the device. Define a device_hiera::interfaces::custom hash inside the Hiera data file for the device, such as hostname/switch01.yaml.
Each entry should be a quoted String hash key of the entire interface name. The value should be a hash with the parameters for the interface resource. Anything not specified will use the default values provided in the device_hiera::defaults::interface hash. The value absent can be used to clear a default value. The interface names can overlap with, or be outside the slots and port ranges supplied in device_hiera::interfaces::ports.
The following example will configure two 10G ports as VLAN-trunking uplink ports:
device_hiera::interfaces::custom:'TenGigabitEthernet1/1/3':description:'Uplink to core 1'mode:'trunking'encapsulation:'dot1q''TenGigabitEthernet1/1/4':description:'Uplink to core 2'mode:'trunking'encapsulation:'dot1q'
One of the advantages of Hiera is that if every switch uses the same ports for uplink to the core, you could place this data in a shared Hiera file, and then override it just once in the definition of the core switch. Take advantage of Hiera’s hash merging to stay DRY.
Testing Out the Switch Configuration
Shown here is the output when I ran puppet device against the 48-port Cisco switch we created the puppet device proxy for, using the preceding example’s Hiera data:
$puppetdevice--verboseInfo:startingapplyingconfigurationtoswitch01.example.comInfo:RetrievingpluginfactsInfo:RetrievingpluginInfo:Cachingcatalogforswitch01.example.comInfo:Applyingconfigurationversion'1447670000'Notice:/Stage[main]/Device_hiera::Vlans/Vlan[20]/ensure:createdNotice:/Stage[main]/Device_hiera::Vlans/Vlan[30]/ensure:createdNotice:/Stage[main]/Device_hiera::Interfaces/Interface[GigabitEthernet1/0/1]/access_vlan:access_vlanchanged'1'to'20'Notice:/Stage[main]/Device_hiera::Interfaces/Interface[GigabitEthernet1/0/1]/description:defined'description'as'Default configuration'Notice:/Stage[main]/Device_hiera::Interfaces/Interface[GigabitEthernet1/0/2]/access_vlan:access_vlanchanged'1'to'20'Notice:/Stage[main]/Device_hiera::Interfaces/Interface[GigabitEthernet1/0/2]/description:defined'description'as'Default configuration'…repeatedforports3through48…Notice:/Stage[main]/Device_hiera::Interfaces/Interface[TenGigabitEthernet1/1/3]/description:defined'description'as'uplink to core 1'Notice:/Stage[main]/Device_hiera::Interfaces/Interface[TenGigabitEthernet1/1/3]/mode:modechanged'dynamic auto'to'trunk'Notice:/Stage[main]/Device_hiera::Interfaces/Interface[TenGigabitEthernet1/1/3]/encapsulation:encapsulationchanged'negotiate'to'dot1q'Notice:/Stage[main]/Device_hiera::Interfaces/Interface[TenGigabitEthernet1/1/4]/description:defined'description'as'uplink to core 2'Notice:/Stage[main]/Device_hiera::Interfaces/Interface[TenGigabitEthernet1/1/4]/mode:modechanged'dynamic auto'to'trunk'Notice:/Stage[main]/Device_hiera::Interfaces/Interface[TenGigabitEthernet1/1/4]/encapsulation:encapsulationchanged'negotiate'to'dot1q'Notice:Appliedcatalogin63.93seconds
As you can see, we have configured a VLAN and 50 interfaces on this switch in 63 seconds. That’s a lot faster than doing it by hand, isn’t it?
Adding Resource Types and Providers
Puppet only includes the two resources we’ve just shown for puppet device to use: interface and vlan.
There are modules in the Puppet Forge that provide additional resource types and providers, as well as support for other vendors’ devices. Resources designed for NetDev (described next) only work with an embedded Puppet agent on the device. The following modules from the Puppet Forge are designed to be used with puppet device:
puppetlabs/f5- Manages F5 BIG-IP Application Delivery Controllers
puppetlabs/netapp- Manages resources on NetApp Cluster Data ONTAP devices
puppetlabs/netscalar- Enables Puppet configuration of Citrix NetScaler devices through types and REST-based providers
mburger/networkdevice- Network Device Extensions for Cisco
Note that you will need to install these modules on both the Puppet server and your local Puppet environment, as the manifests are used when the server builds the catalog, but the device providers are used locally by the puppet device agent. So install the module in the device manager account:
[devicemgr@client~]$puppetmoduleinstallmburger/networkdevice
…and also on the Puppet server:
[vagrant@puppetserver~]$puppetmoduleinstallmburger/networkdevice
Merging Defaults with Other Resources
Any other resource type can also be created with parameters supplied in a hash under their title. They can likewise fall back to default values for the type. Values for the resource types and parameters should be taken from the module that provides the resource type in question.
For example, if you have installed the puppetlabs/ciscopuppet module, you could use the following for OSPF configuration:
device_hiera::resources:-cisco_interface_ospfdevice_hiera::defaults::cisco_interface_ospf:ensure:presentcost:200ospf:defaultdevice_hiera::cisco_interface_ospf:'Ethernet1/2 default':area:'172.16.0.0'
Tip
Wait, isn’t that type only used by the Puppet agent onboard a Cisco NX-OS device? Yep, thedevice_hiera module can be used with both proxy and embedded agents!There’s nothing in the device_hiera module that is specific or tied to puppet device. You can utilize this module just as easily with the embedded Puppet agents we’re going to talk about next.
Using the NetDev Standard Library
Puppet Labs has released a standard library of resources and providers that serves as a starting point for vendors looking to add a Puppet agent to their devices. Documentation on how to use this library and create vendor-specific providers is available at “Type definitions for Networking Device (NetDev) Standard Library” on the Puppet Forge.
The vast majority of vendors build Puppet providers to implement the standard NetDev types, before adding their own vendor-specific resources as appropriate for their product.
Finding NetDev Vendor Extensions
There are a growing number of devices with complete NetDev support, including the following:
juniper/netdev_stdlib_junos- Junos Provider code for Networking Device
puppetlabs/ciscopuppet- Cisco Puppet providers and types for NX-OS devices
aristanetworks/netdev_stdlib_eos- NetDev Providers for Arista EOS
mellanox/netdev_stdlib_mlnxos- Provider definition for implementing Networking Device (netdev) Library for Mellanox OS (mlnx-os)
In theory, you can utilize NetDev standard resources across any device. Obviously this works best with things like DNS and less well with custom vendor extensions. Most vendors add their own specific resources in the same or a different Puppet module.
For example, Arista Networks types and providers for configuring EOS devices are available at aristanetworks/eos on the Puppet Forge. Cumulus Linux and Mellanox also have networking components separated into different modules.
Creating a NetDev Device Object
Each device must declare a single netdev_device resource. The NetDev provider creates automatic dependencies between this resource and the other NetDev resources. If this resource fails to be applied, no other NetDev resource will be evaluated.
As this resource takes only a name, the device_hiera module implements the netdev_device type for a simple, one-shot definition. The following two lines of Hiera data will create a unique netdev_device resource for every NetDev vendor:
device_hiera::resources:-netdev_device
You can optionally override the name for a given node by defining device_hiera::netdev_device::node_name but this is not necessary. The value of the device’s unique certname is used to avoid duplication.
Warning
On some platforms, thenetdev_device resource will fail to apply if the puppet user doesn’t have permissions to configure the device, or if the configuration is locked by a different user.Reducing Duplication with Device_Hiera
The device_hiera module can also be used with any NetDev extensions module to minimize repetition. The following example creates NetDev resource defaults that can safely be placed in the global common.yaml file:
device_hiera::resources:-network_dns-network_interface-netdev_devicedevice_hiera::defaults::network_interface:duplex:'full'enable:'true'mtu:'1500'device_hiera::defaults::network_dns:ensure:presentdomain:'example.com'search:['example.com','example.net']servers:['192.168.51.10','192.168.51.11']
To utilize these defaults, assign the device_hiera class and override parameters as necessary within a specific host’s Hiera configuration data, such as hostname/switch01.yaml:
classes:-device_hieradevice_hiera::network_dns:settings:# this host is outside the firewall, use Google DNSservers:['8.8.8.8','8.8.4.4']device_hiera::network_interface:'Ethernet1':description:'Engineering'
Use this configuration style for DRY configuration of devices with NetDev provider modules.
Puppetizing Cisco Nexus Switches
Just before this book went to print, Puppet Labs and Cisco announced full support of Cisco Nexus switches provided by Puppet Labs. Nexus switches running NX-OS 7.0(3)12 and higher can install a Puppet 4 agent running on the device.
Install the Puppet Labs Supported module puppetlabs/ciscopuppet. This module provides the Puppet resource types and Cisco-specific providers to configure:
- Interfaces
- VLANs and VLAN Trunking Protocol (VTP)
- OSPF interfaces and virtual routers
- Cisco TACACS+ servers
- SNMP users and servers
- Any Cisco IOS command
The NX-OS devices are officially supported by Puppet Labs using this module with Puppet Server or Puppet Enterprise 2015. This module will not work with an older version of Puppet.
Configuring the Puppet Server
Before configuring the Cisco NX-OS device, install the puppetlabs/ciscopuppet module on a Puppet Server:
[vagrant@puppetserver~]$puppetmoduleinstallpuppetlabs/ciscopuppetNotice:Installinto/etc/puppetlabs/code/environments/production/modules...Notice:Downloadingfromhttps://forgeapi.puppetlabs.com...Notice:Installing--donotinterrupt.../etc/puppetlabs/code/environments/production/modules└──puppetlabs-ciscopuppet(v1.0.0)
Preparing the NX-OS Device
The Puppet agent runs best in the Guest Shell environment. By default, the Guest Shell doesn’t have enough resources. Therefore, preparation requires that we resize the Guest Shell on each switch:
n3k#guestshelldisablen3k#guestshellresizerootfs400Note:Pleasedisable/enableorreboottheGuestshellforrootfstoberesizedn3k#guestshellresizememory300Note:Pleasedisable/enableorreboottheGuestshellformemorytoberesizedn3k#guestshellenablen3k#showguestshelldetailVirtualserviceguestshell+detailState:ActivatedResourcereservationDisk:400MBMemory:300MB
The next step is to configure an IP address for the management interface, then the DNS resolver, and finally the NTP time service:
[root@guestshell]#config terminterfacemgmt0vrfmembermanagementipaddress192.168.1.21/24vrfcontextmanagementipdomain-nameexample.comipname-server192.168.1.10ipname-server192.168.1.11endntpserver192.168.1.10use-vrfmanagementend
The GuestShell environment is a secure Linux container running CentOS 7. This container has its own networking, which must be configured separately:
n3k#guestshell[root@guestshell]#sudo su -[root@guestshell]#chvrf management[root@guestshell]#hostname nxswitch01[root@guestshell]#echo 'nxswitch01' > /etc/hostname[root@guestshell]#echo 'domain example.com' > /etc/resolv.conf[root@guestshell]#echo 'search example.com' >> /etc/resolv.conf[root@guestshell]#echo 'nameserver 192.168.1.10' >> /etc/resolv.conf[root@guestshell]#echo 'nameserver 192.168.1.11' >> /etc/resolv.conf
Installing the NX-OS Puppet Agent
Install Puppet using a process eerily similar to what we’ve used throughout this book (that is correct—the Guest Shell uses the Enterprise Linux repository):
yum install http://yum.puppetlabs.com/puppetlabs-release-pc1-el-7.noarch.rpmyum install puppet-agent
After installing Puppet on the NX-OS device, you’ll need to install some Ruby gems:
[root@guestshell]#gem install cisco_node_utils[root@guestshell]#gem list | egrep 'cisco|net_http'cisco_node_utils(1.0.0)cisco_nxapi(1.0.0)net_http_unix(0.2.1)
If you are running on a Highly Available (HA) platform, exit the Guest Shell and sync these changes to the backup processor:
n3k#guestshellsync
Enabling the NX-OS Puppet Agent
At this point, you have a complete Puppet v4 client installed on the NX-OS device. You configure it and authorize it exactly like any other Puppet agent on CentOS 7, as follows:
- Run
export PATH=/opt/puppetlabs/puppet/bin:\ /opt/puppetlabs/puppet/lib:$PATH. - Configure /etc/puppetlabs/puppet/puppet.conf with the server name.
- Run
puppet agent --testto connect to the server. - Sign the certificate request on the Puppet server if not using
autosign. - Run the Puppet agent again to download and apply the catalog.
- Run
systemctl enable puppet.
It is necessary to edit the startup process prior to starting the agent. The following change ensures that Puppet runs in the NX-OS management namespace:
[root@guestshell]#sed -i.bak \-e's#^ExecStart=#ExecStart=/bin/nsenter --net=/var/run/netns/management #'\/usr/lib/systemd/system/puppet.service
Finally, you can start the Puppet agent service:
[root@guestshell]#systemctl start puppet
If you are running on a Highly Available (HA) platform, exit the guestshell and sync these changes to the backup processor:
n3k#guestshellsync
Managing Configuration
Documentation for the NX-OS resources can be found on the Puppet Forge at “Cisco Puppet NX-OS devices: Resource Reference”.
I highly recommend that you make use of the device_hiera module documented in “Managing Network Devices with Puppet Device”. This module works equally well with devices that have an embedded Puppet agent, and will allow the configuration to be DRY.
For example, you may want to configure all the default OSPF instance name and cost. In the global common.yaml file, define these defaults:
device_hiera::resources:-cisco_interface_ospfdevice_hiera::defaults::cisco_interface_ospf:ensure:presentcost:200ospf:default
Assign the device_hiera class and override these parameters as necessary within a specific device’s Hiera configuration data, such as hostname/switch01.yaml.
classes:-device_hieradevice_hiera::cisco_interface_ospf:'Ethernet1/2 default':area:'172.16.0.0'
Puppetizing Juniper Devices
Many recent Juniper devices including QFX, EX, and MX switches and routers can support a complete Puppet agent running on the device. This allows you to provision the device without using a proxy node.
The Juniper-provided juniper/netdev_stdlib_junos module contains the Junos-specific Puppet provider code that implements all standard NetDev resources. Support is provided by Juniper through the Juniper GitHub project.
This module provides Junos providers for all NetDev standard resources, and the following Junos features:
- Physical interfaces configuration
- Switch or router port network settings
- IP address assignment
- VLANs
- Link aggregation groups (port trunking)
- BGP Peering
- System services (ssh, netconf, telnet…)
- Syslog message facility and level assignments
- Event policies and scripts
There is a video demonstrating the module’s capabilities on the Juniper Learning Portal at Automating VLAN Provisioning on Multiple Junos Devices Using Puppet. The presenter configures two QFX5100 devices to communicate with each other on the same VLAN.
The video shows the older Puppet resource-style declarations. We’re going to show you how to configure Junos devices using the device_hiera module described earlier in this chapter.
Warning
At the time this book was written, the latest version of Puppet provided with a Junos device was version 3.61. This works with Puppet Server, but Puppet master is not backward compatible.We hope to see an upgraded jpuppet-4 package made available in the near future.
Supported Devices
Puppet is supported on modern EX, MX, and QFX switches and routers with Enterprise features enabled. The updated list of supported devices is documented on the Puppet Forge at juniper/netdev_stdlib_junos.
Warning
jpuppet-1.0 was based on Puppet 2.7.19, while jpuppet-3.6.1 is Puppet 3.6. I’d be very surprised if JPuppet v1 works with Puppet Server.The Juniper device runs the Puppet agent. The agent utilizes the netdev library to translate Puppet configuration into netconf instructions the device can understand (see Figure 31-1).
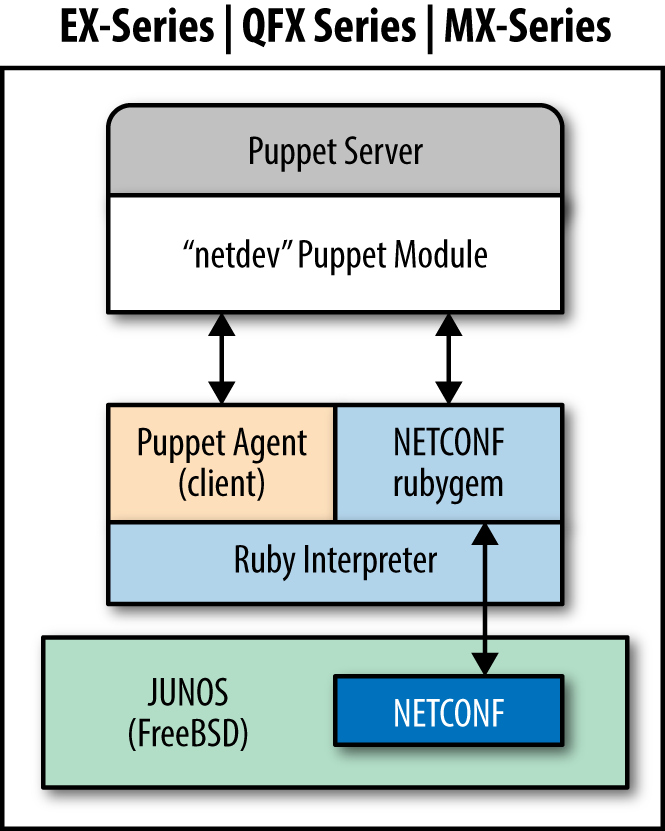
Figure 31-1. Junos SDK: JPuppet overview
It would appear from the documentation that you could download the virtualized MX Series Universal Edge Router (vMX) free trial to set up a virtualized test lab. Documentation for the vMX platform and installation images can be downloaded from “vMX - Download Software” on the Juniper Support site.
Installing Modules on the Puppet Server
On the Puppet server, you will need to install the netconf RubyGem:
[vagrant@puppetserver~]$sudopuppetservergeminstallnetconfFetching:nokogiri-1.6.6.2-java.gem(100%)Successfullyinstallednokogiri-1.6.6.2-javaFetching:net-ssh-2.9.2.gem(100%)Successfullyinstallednet-ssh-2.9.2Fetching:net-scp-1.2.1.gem(100%)Successfullyinstallednet-scp-1.2.1Fetching:netconf-0.3.1.gem(100%)Successfullyinstallednetconf-0.3.14gemsinstalled
Then install the Junos Puppet module:
[vagrant@puppetserver~]$sudopuppetmoduleinstalljuniper-netdev_stdlib_junosNotice:Preparingtoinstallintoenvironments/production/modules...Notice:Downloadingfromhttps://forgeapi.puppetlabs.com...Notice:Installing--donotinterrupt.../etc/puppetlabs/code/environments/production/modules└─┬juniper-netdev_stdlib_junos(v2.0.0)└──netdevops-netdev_stdlib(v1.0.0)
Preparing the Junos Device
Configure the management interface, DNS domain name, and NTP servers if that hasn’t been done already. All of these are necessary in order to communicate with Puppet Server:
root@junos> configure
[edit]
root@junos# set interfaces fxp0.0 family inet address 192.168.1.21/24
root@junos# set system host-name device-name
root@junos# set system domain-name example.com
root@junos# set system domain-search [ example.com example.net ]
root@junos# set system name-server 192.168.1.10
root@junos# set system name-server 192.168.1.11
root@junos# set system ntp time-zone America/Los_Angeles
root@junos# set system ntp server 192.168.1.10
root@junos# set system ntp server 192.168.1.11
root@junos# edit system extensions
[edit system extensions]
root@junos# set providers juniper license-type juniper deployment-scope commer
root@junos# commit and-quit
commit complete
root@junos>
This example is presented without explanation because we expect that you know the Junos configuration commands already.
Installing the Junos Puppet Agent
Download Puppet for Junos from https://downloads.puppetlabs.com/junos/. Select the version known to work with your platform, listed at juniper/netdev_stdlib_junos on the Puppet Forge. Copy this file to the /var/tmp directory on the device.
Note
Some devices running Junos with enhanced automation have the Puppet agent integrated into the software. If you see the word puppet in the output ofshow version, then you can skip this step.In this example, we’ll configure an EX4300 switch, which utilizes the PowerPC architecture. AFter downloading the appropriate Puppet version from the Juniper site, run this:
$ scp jpuppet-3.6.1_1.junos.powerpc.tgz junos-device:/var/tmp/
Log in to the device and install the software like any other Junos software package:
root@junos>requestsystemsoftwareadd/var/tmp/jpuppet-3.6.1_1.junos.powerpc.tgz
Creating the Puppet User
Create a puppet user on the device. This user account will be used by Puppet when configuring the device. Do not share this account with a real human being, or any other automation:
root@junos>configure[edit]root@junos#setsystemloginuserpuppetclasssuperuserroot@junos#setsystemloginuserpuppetauthenticationplain-text-password'Newpassword:typeasecurepasswordRetypenewpassword:retypethepasswordroot@junos#setsystemloginuserpuppetpasswordplain-text-passwordroot@junos#setsystemloginuserpuppetshellcshroot@junos#commitand-quitcommitcompleteroot@junos>
Now log in to the device as the puppet user and create the following files and directories:
$ ssh puppet@junos-device
Password: password

puppet@junos> start shell csh
puppet@junos% echo "setenv PATH ${PATH}:/opt/jet/juniper/bin" >> $HOME/.cshrc
puppet@junos% echo "limit data 128M" >> $HOME/.cshrc
puppet@junos% mkdir -p $HOME/.puppet/var/run
puppet@junos% mkdir -p $HOME/.puppet/var/log
puppet@junos% vi $HOME/.puppet/puppet.conf
Create a Puppet configuration file like so:
[main]pluginsync=truelibdir=$vardir/liblogdir=$vardir/log/puppetrundir=$vardir/run/puppetssldir=$vardir/ssl[agent]server=puppet.example.com
Save the file, then exit the shell and log out. Log in to the unit again in order to validate the environment:
puppet@junos% exit
puppet@junos> exit

$ ssh puppet@junos-device
Password: password
Start the shell and run the facter command to confirm that Puppet executables are in the PATH now:
puppet@junos>startshellcshpuppet@junos%facterarchitecture=>i386domain=>example.comfqdn=>junos-device.example.com...snip...
Now connect to the server, just like any other Puppet agent:
- Run
puppet agent --testto connect to the server. - Sign the certificate request on the Puppet server if not using
autosign. - Run the Puppet agent again to download and apply the catalog.
Adjusting Physical Interface Settings
The following example uses device_hiera with NetDev resources to configure physical interfaces on a Junos device.
The netdev_interface resource declares the attributes for a physical interface, such as speed, MTU, or duplex. As these tend to be consistent throughout a deployment, you may not need the custom configuration.
In the global common.yaml file, define defaults for physical interfaces:
device_hiera::resources:-netdev_device-netdev_interfacesdevice_hiera::defaults::netdev_interface:# many are resource defaults we could leave outensure:presentactive:'true'admin:'up'duplex:'auto'speed:'auto'mtu:'1500'
Assign the device_hiera class and override these parameters as necessary within a specific host’s Hiera configuration data, such as hostname/switch01.yaml:
classes:-device_hieradevice_hiera::netdev_interfaces::ports:-'ge-1/0/':'1-8'-'ge-2/1/':'1-48'device_hiera::netdev_interfaces::custom:'ge-1/0/13':description:'bad port'enable:'false''ge-4/0/1':description:'External firewall interface'speed:'100m'
This Hiera data will configure device_hiera to ensure that interface physical attributes are consistent on 56 ports, with a custom interface configuration on port ge-4/0/1. Port ge-1/0/13 is disabled with a comment explaining why.
Simplifying Layer-2 VLANs
The netdev_l2_interface resource declares the attributes for layer-2 switching services. It can reference VLANs created using netdev_vlan resources, or it can reference VLANs statically defined on the device.
In the global common.yaml file, define common defaults for VLANs, physical interfaces, and layer-2 interfaces. As VLANs are shared in this example deployment, we’ll place those in this common data:
device_hiera::resources:-netdev_device-netdev_l2_interfaces-netdev_vlandevice_hiera::defaults::netdev_vlan:active:'true'ensure:'present'device_hiera::defaults::netdev_l2_interface:ensure:presentactive:truevlan_tagging:'disable'untagged_vlan:'corporate'device_hiera::netdev_vlan:'corporate':vlan_id:'100'description:'Corporate Network''hardware':vlan_id:'101'description:'Hardware Development''testing':vlan_id:'102'description:'Test Network'
Assign the device_hiera class and override these parameters as necessary within a specific host’s Hiera configuration data, such as hostname/switch01.yaml:
classes:-device_hieradevice_hiera::netdev_l2_interfaces::ports:-'ge-1/0/':'1-8'-'ge-2/1/':'1-48'device_hiera::netdev_l2_interfaces::custom:'ge-4/0/2':description:'Uplink to core'vlan_tagging:'enable'untagged_vlan:'absent'tagged_vlans:['corporate','hardware','testing']
This Hiera data will configure device_hiera to ensure the following:
- Default access port configuration on 56 ports on the first two slots
- A custom layer-2 trunking configuration on port
ge-4/0/2
That’s 57 detailed port configurations in a dozen lines of text. It doesn’t get easier than this.
Enabling Link Aggregation
The netdev_lag resource declares the attributes for a link aggregation group (LAG), sometimes referred to as a port channel or bonded interface. The LAG can optionally enable the use of link aggregation control protocol (LACP) to maintain a peer relationship with the remote side.
In the global common.yaml file, define common defaults for VLANs, physical interfaces, and layer 2 interfaces. As VLANs are shared in this example deployment, we’ll place those in this common data:
device_hiera::resources:-netdev_device-netdev_lag-netdev_l2_interfacedevice_hiera::defaults::netdev_lag:lacp:'passive'
Assign the device_hiera class and override these parameters as necessary within a specific host’s Hiera configuration data, such as hostname/switch01.yaml:
classes:-device_hieradevice_hiera::netdev_lag:'ae0':links:['ge-4/0/1','ge-4/0/2','ge-5/0/1','ge-5/0/2']device_hiera::netdev_l2_interfaces::custom:'ae0:vlan_tagging : 'enable'tagged_vlans : ['corporate','hardware','testing']
This Hiera data will configure device_hiera to ensure the following:
- Bind four ports on two slots together as a bonded LACP port group.
- Configure three tagged VLANs on the newly created port group.
Short, simple, and easy to read.
Defining Ad Hoc Configuration Parameters
It is possible to apply Junos configuration statements for which there is no Puppet resource. For this purpose, you’ll need to create a Puppet module containing templates for the configuration:
[vagrant@puppetserver~]$puppetmodulegeneratemyorg/junos_config…snip…[vagrant@puppetserver~]$cdjunos_config/[vagrant@puppetserver~]$mkdirtemplates
Create ERB templates as documented in “Using Ruby ERB Templates”. These templates should resolve to a list of Junos configuration commands after parsing, like so:
setsystemdomain-nameexample.comsetsystemdomain-search[example.comexample.net]setsystemname-server192.168.1.10setsystemname-server192.168.1.11setsystemntptime-zoneAmerica/Los_Angelessetsystemntpserver192.168.1.10setsystemntpserver192.168.1.11
Finally, create a manifest that makes use of the template:
netdev_stdlib_junos::apply_group{'dns-ntp-servers':ensure=>present,active=>true,template_path=>'junos_config/dns-ntp-servers.erb',}
Obviously, it would be smarter to pass in Puppet variables and iterate over arrays for maximum flexibility. We’ll leave this as an exercise for the reader. Some useful examples of configuring BGP can be found at Puppet + ERB Templates + Junos = Increased automation agility and flexibility.
Tip
Thejuniper/netdev_stdlib_junos module contains a few templates built in, with examples of how to use them in a manifest on the Puppet Forge at juniper/netdev_stdlib_junos on the Puppet Forge.Here’s an example manifest that uses of one of these templates. This template looks for a variable named $service to be defined with an array of system services to enable:
# only enable SSH and NetConf configuration$services=[['netconf','ssh']]netdev_stdlib_junos::apply_group{"services_group":ensure=>present,active=>'true',template_path=>'netdev_stdlib_junos/services.set.erb',}
Distributing Junos Event Scripts
It is possible to copy Junos SLAX scripts to devices and assign them as event handlers:
[vagrant@puppetserverproduction]$cdmodules/junos_config[vagrant@puppetserverjunos_config]$mkdirfiles
Place the event script file in the files/ directory. Then declare a file resource to copy the file to the device:
file{'/var/db/scripts/event/checklogs.slax':ensure=>file,owner=>'puppet',group=>'wheel',mode=>'0644',source=>'puppet:///files/junos_config/checklogs.slax'}
After running Puppet, you should see the files installed on your Junos device, as shown here:
$ ssh puppet@junos-device
Password: password

puppet@junos> file list /var/db/scripts/event/
To make the Junos script run automatically based on event trigger, create a manifest that declares $policy and $event_script variables before making use of the event-options.xml.erb template:
# Files to copy$event_script=['checklogs.slax']# Configure event policy$policy={'check_logs'=>{'events'=>['sshd_login_failed'],'action'=>'then','event-script'=>'checklogs.slax',}}# Now apply the commands using the 'event-options' templatenetdev_stdlib_junos::apply_group{'event_options_group':ensure=>present,active=>true,template_path=>'netdev_stdlib_junos/event-options.xml.erb',}
You can declare multiple policies in the $policy hash, and multiple files in the $event_script array. You can find a list of events to match with set event-options policy check_logs events.
Documentation for event scripts can be found at Junos Event Automation: Event Scripts and Event Policy
Running Puppet Automatically
To enable Puppet to update the device automatically, enable a cron schedule for Puppet to run. Add the following cron resource to your Juniper configuration module:
cron{'puppet_agent':user=>'puppet',environment=>'PATH=/bin:/usr/bin:/sbin:/usr/sbin:/opt/sbin:\/opt/bin:/opt/jet/juniper/bin:/opt/sdk/juniper/bin'command=>'puppet agent --onetime --no-daemonize',minute=>'*/30',}
Troubleshooting
The Junos Puppet agent logs its actions extensively, making it easy to audit Puppet changes:
- The agent logs all commit operations with the provided Puppet catalog version.
- Puppet logs include a Junos source indicator.
- The Puppet agent makes configuration changes under exclusive lock, preventing multiple agents or users from overlapping commits.
These features enable report extraction and problem isolation in production environments.
On some platforms, the netdev_device resource (and all other Junos resources) will fail to apply if the Puppet user account doesn’t have permission to configure the device, or if another user is interactively working in configuration mode. When this occurs, you’ll see an error like this:
err: JUNOS: configuration database locked by: jorhett terminal p0(pid 6129)on since 2015-12-19 15:57:29 UTC exclusive{master:0}[edit]
To verify that the Puppet agent has downloaded and committed a specific catalog, use the show system commit operational mode command to view the commit history and catalog versions:
root@junos.example.com>showsystemcommit02015-12-1910:50:17PSTbypuppetvianetconfPuppetagentcatalog:135947460912015-12-1910:49:54PSTbyjorhettviacli22015-12-1910:48:00PSTbypuppetvianetconfPuppetagentcatalog:135947440832015-12-1906:47:37PSTbyrootviacli42015-12-1904:16:57PSTbypuppetvianetconfPuppetagentcatalog:1359474408
Best Practices for Network Devices
Let’s review some of the best practices for managing network devices with Puppet:
- Use SSH or NetConf rather than plain-text protocols like telnet.
- Passwords are stored in files, so use long and complex passwords.
- Use the
device_hieramodule and a DRY style to minimize cruft. - Run
puppet devicein a non-privileged user account to keep config and data separate.
Keep checking the Puppet Forge, as more NetDev-compatible vendor modules are added every month.
Reviewing Network Devices
Using Puppet to configure and audit network devices can be an exciting project. Puppet has powerful support for configuring network devices. The last year has seen the emergence of Puppet providers maintained and supported by a large number of network device vendors.
In this chapter, we have covered how to:
- Use
puppet deviceto manage network devices without embedded Puppet agents. - Install and configure a Puppet agent on Cisco NX-OS network switches.
- Install and enable Puppet agent on Junos devices.
- Use standardized NetDev resources to manage any vendor with NetDev support.
- Use
jorhett/device_hierafor DRY configuration, managing hundreds of ports with just a few lines of Hiera data.
Network device management with Puppet is a fast-growing part of the Puppet community. I expect this chapter will be updated and revised significantly over the next year.