Table of Contents for
Learning Puppet 4
 Learning Puppet 4
Published by
O'Reilly Media, Inc., 2016
Learning Puppet 4
Published by
O'Reilly Media, Inc., 2016
- Cover
- nav
- Learning Puppet 4
- Learning Puppet 4
- Foreword
- Preface
- Introduction
- I. Controlling with Puppet Apply
- 1. Thinking Declarative
- 2. Creating a Learning Environment
- 3. Installing Puppet
- 4. Writing Manifests
- 5. Using the Puppet Configuration Language
- 6. Controlling Resource Processing
- 7. Expressing Relationships
- 8. Upgrading from Puppet 3
- 9. Wrap-Up of Puppet Basics
- II. Creating Puppet Modules
- 10. Creating a Test Environment
- 11. Separating Data from Code
- 12. Using Modules
- 13. Designing a Custom Module
- 14. Improving the Module
- 15. Extending Modules with Plugins
- 16. Documenting Modules
- 17. Testing Modules
- 18. Publishing Modules
- III. Using a Puppet Server
- 19. Preparing for a Puppet Server
- 20. Creating a Puppet Master
- 21. Creating a Puppet Server
- 22. Connecting a Node
- 23. Migrating an Existing Puppet Master
- 24. Utilizing Advantages of a Puppet Server
- 25. Managing TLS Certificates
- 26. Growing Your Puppet Deployment
- IV. Integrating Puppet
- 27. Tracking Puppet Status with Dashboards
- 28. Running the Puppet Agent on Windows
- 29. Customizing Environments
- 30. Controlling Puppet with MCollective
- 31. Managing Network Infrastructure with Puppet
- 32. Assimilating Puppet Best Practices
- 33. Finding Support Resources
- Afterword
- A. Installing Puppet on Other Platforms
- B. Configuring Firewalls on Other Platforms
- C. Installing Ruby
- Index
- About the Author
- Colophon
Chapter 12. Using Modules
One of the most powerful benefits of using Puppet is having access to the shared community of module developers. While Puppet enables you to create modules to do nearly anything, it is quite possible that somebody has already written the module you need. You may be able to use it intact, or use it as a starting point for further development.
In this chapter, you’ll learn how to find, evaluate, install, and use modules provided by Puppet Labs and the global community.
Finding Modules
There are several places to find Puppet modules you can use. Let’s review each of them in turn.
Puppet Forge
The single largest repository of Puppet modules is the Puppet Forge.
The Puppet Forge provides an easy-to-use interface to search for and find Puppet modules provided by others. It is also the default repository used by the puppet module command. Let’s take a look at how to use it.
Start by opening a browser and going to https://forge.puppetlabs.com/. The very first thing you’ll see is the search interface, as shown in Figure 12-1.

Figure 12-1. Puppet Forge search
Enter the name of an application you wish to manage with Puppet into the search interface, and you’ll receive a list of modules that may do what you are looking for. For example, enter apache into the search query to see what modules exist to manage the Apache HTTPd server.
You can also search the Puppet Forge from the command line. For example, the following search will provide the same results:
$puppetmodulesearchapacheNotice:Searchinghttps://forgeapi.puppetlabs.com...NAMEDESCRIPTIONAUTHORpuppetlabs-apacheInstalls,configures,andmanages...@puppetlabsexample42-apachePuppetmoduleforapache@example42evenup-apacheManagesapacheincludingajpproxy...@evenuptheforeman-apacheApacheHTTPserverconfiguration@theforemansnipmanyotherresults
I have personally found the Puppet module command-line search useful when I am trying to remember the name of a module that I have already researched. However, the web interface provides a lot of useful information not available in the command-line output.
Public GitHub Repositories
Many people share their Puppet modules on GitHub. The following GitHub search will show you a significant number of modules that may not be found in the Puppet Forge: Search for “puppet” on GitHub.
A great many of the modules available on the Puppet Forge are also available on GitHub. If you click on the Project URL or Report Issues links in the Puppet Forge, the vast majority of the time you will find yourself on the GitHub repository for the module in question. If you need to report a problem or suggest an improvement to the module, you’ll find yourself using GitHub extensively.
There are a number of reasons why authors may not have published modules available on GitHub to the Puppet Forge:
- They haven’t prepared and documented the module appropriately for the Puppet Forge.
- They do not feel the module is appropriate or ready for general use.
- The module does not meet the licensing requirements for publication on the Puppet Forge. Be careful to read the license file provided by any module on GitHub!
Internal Repositories
If you work within a larger organization, you may also have an internal repository of modules. Depending on the software used to provide the forge, the web search interface will vary. However, you can use the stock puppet module command with any forge:
$puppetmodulesearch--module_repository=http://forge.example.org/apache
If you always or exclusively use the internal forge, you can add this parameter to your puppet.conf file to simplify command-line searches:
[main]module_repository=http://forge.example.org/
Evaluating Module Quality
While there are many high-quality modules on the Puppet Forge or GitHub, not all modules are created equal. It is best to examine the modules carefully before using them in your environment.
The Puppet Forge indicates some information about each entry on the right side of the page. It shows the results of both automated tests of the code base, and community feedback on the module (see Figure 12-2).
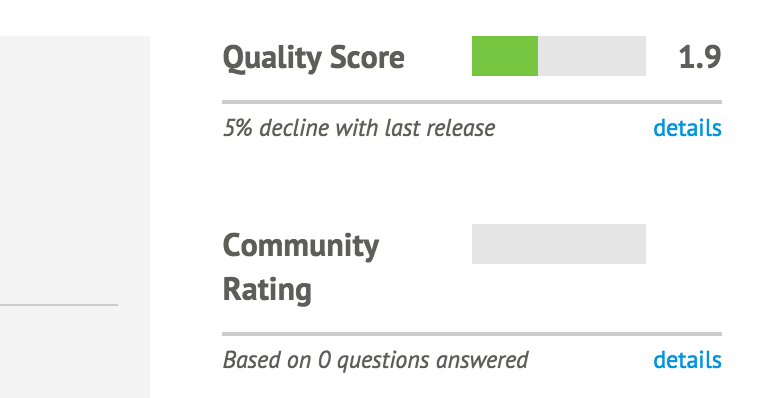
Figure 12-2. This module fails many automated tests, and nobody has commented on it
Let’s review some ways to identify high-quality modules.
Puppet Supported
Puppet Supported modules are written and officially supported by Puppet Labs (see Figure 12-3).
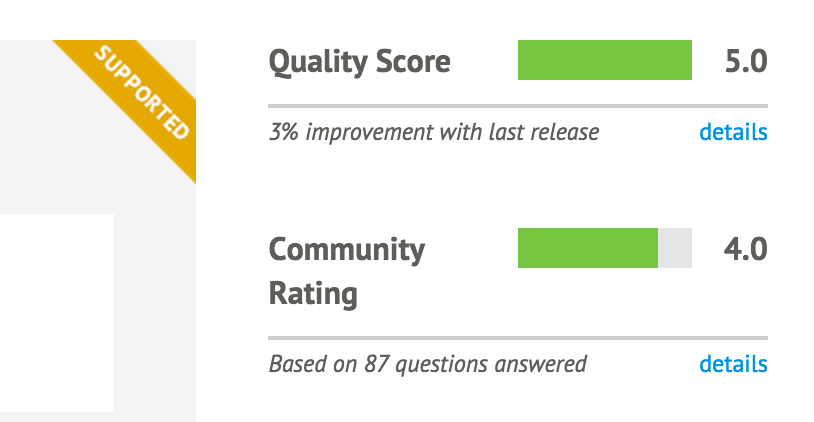
Figure 12-3. This module is fully supported by Puppet Labs
From “Puppet Supported Modules” at the Puppet Forge:
Puppet Labs guarantees that each supported module:
- has been tested with Puppet Enterprise
- is subject to official Puppet Labs Puppet Enterprise support
- will be maintained with bug or security patches as necessary
- is tested on and ensured compatible with multiple platforms
From personal experience, these modules work very well for base use cases. However, there are not very many Supported modules, and they tend not to handle highly customized situations.
Puppet Approved
Puppet Approved modules have been reviewed by Puppet Labs, and meet its standards for quality (see Figure 12-4).
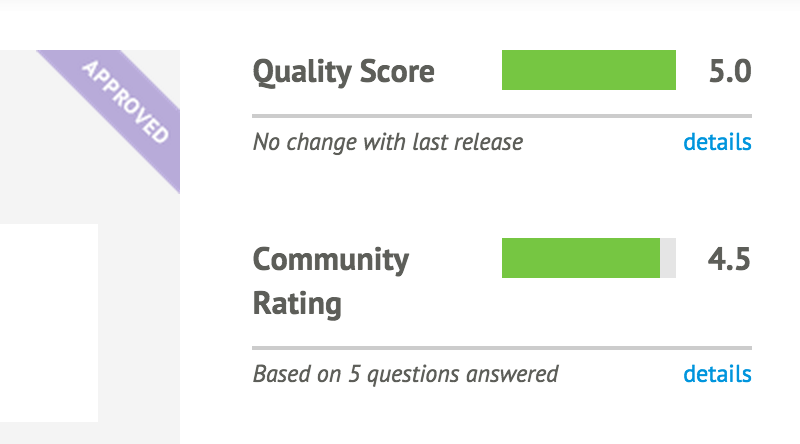
Figure 12-4. This module has been reviewed and approved by Puppet Labs
From “Puppet Approved Modules” at the Puppet Forge:
Puppet Labs ensures that Puppet Approved modules:
- Solve a discrete automation challenge
- Are developed in accordance with module best practices
- Adhere to Puppet Labs’ standards for style and design
- Have accurate and thorough documentation to help you get started quickly
- Are regularly maintained and versioned according to SemVer rules
- Provide metadata including license, issues URL, and where to find source code
- Do not deliberately inject malicious code or otherwise harm the system they’re used with
In my personal experience, all Puppet Approved modules have been high-quality modules. They have all been actively maintained, such that I have been consistently able to get minor problems fixed in a reasonable amount of time.
Quality Score
The quality score of a module, as shown in Figure 12-5, is the result of automated review and testing of the module.
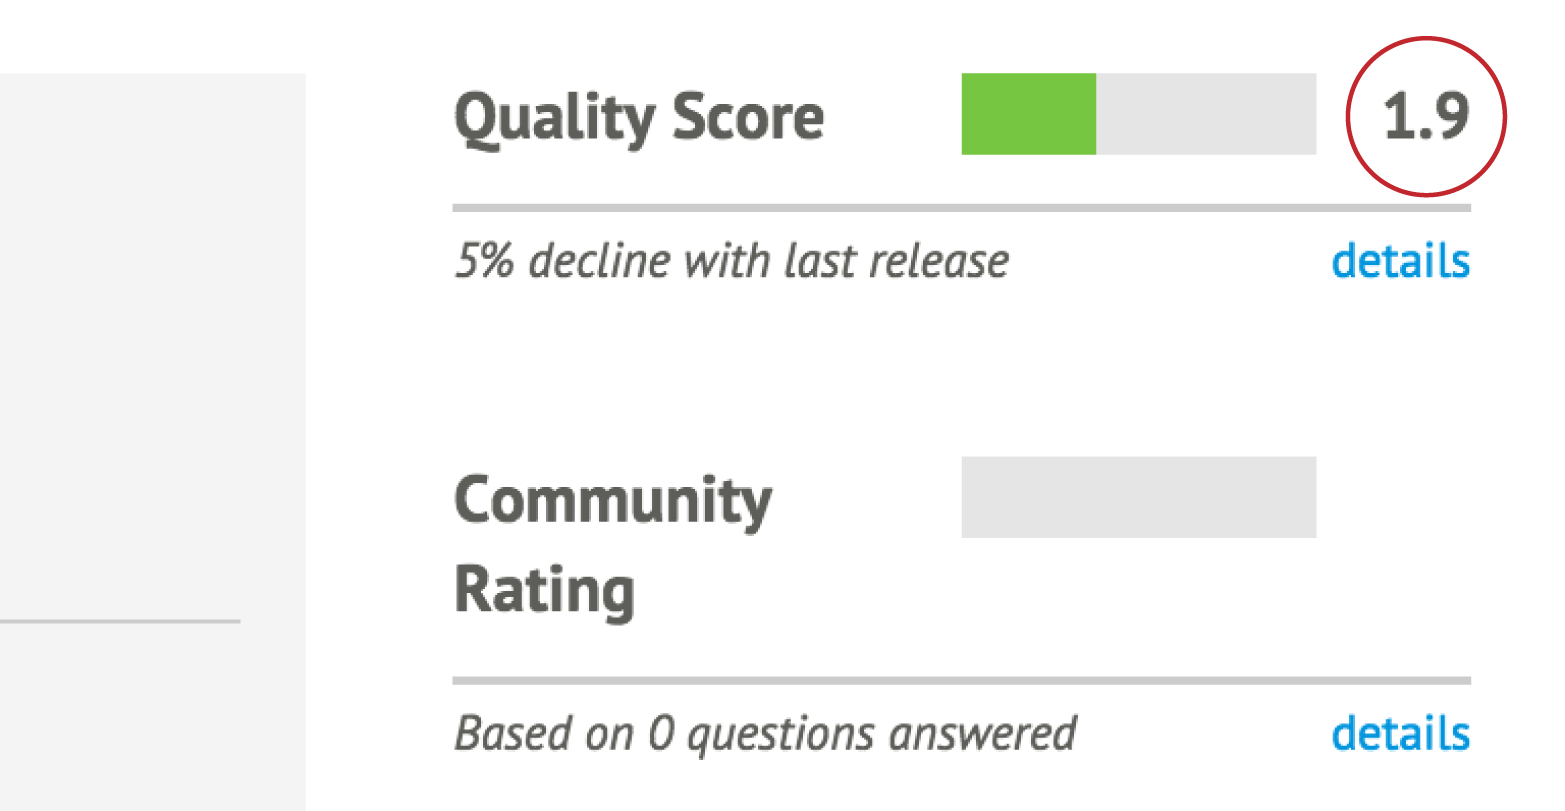
Figure 12-5. You might want to look carefully at a module with a score this low
You can see the test results by clicking on the “details” link, which is located underneath the rating (see Figure 12-6).
As you can see, the quality score is broken down into three tests:
- Code quality
- Puppet compatibility
- Metadata quality
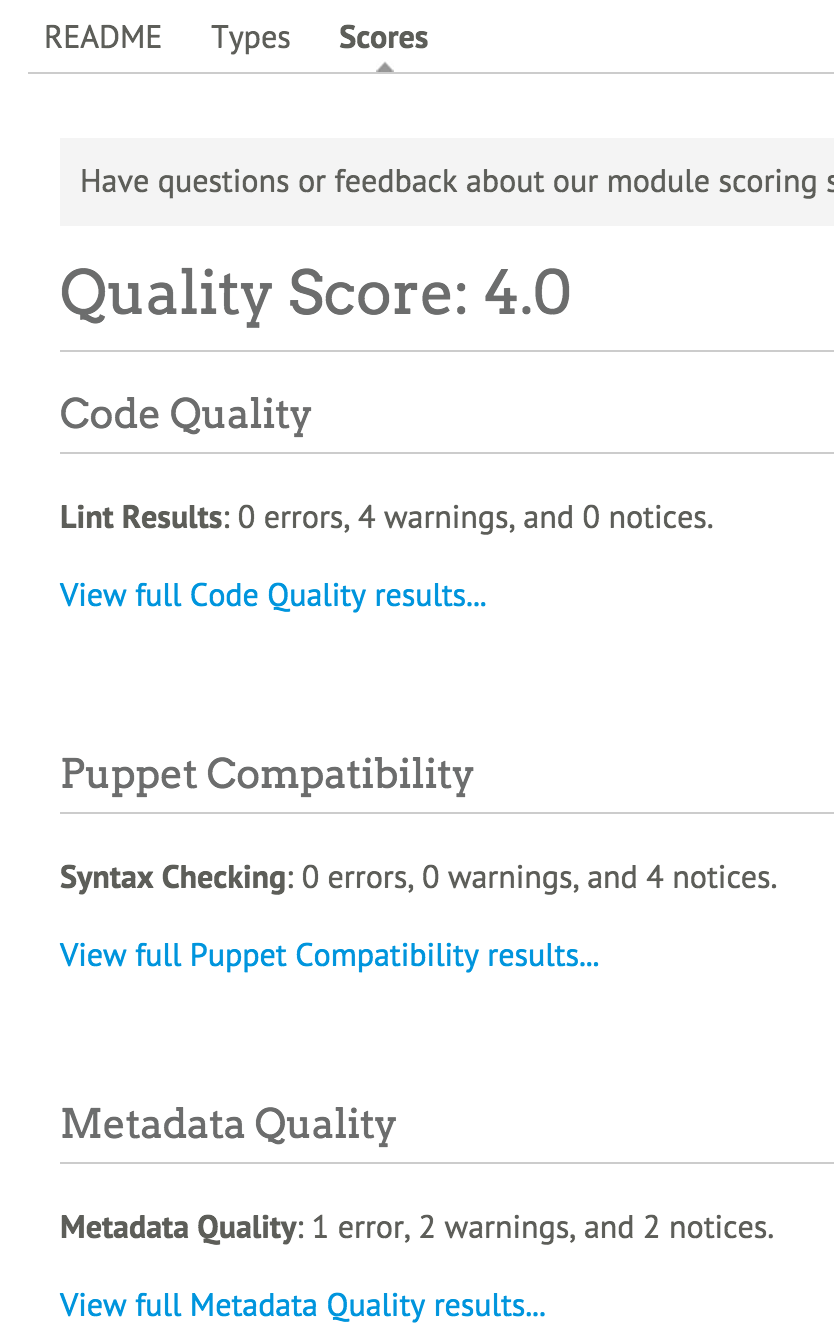
Figure 12-6. A breakdown of the quality test results
Tip
Clicking on the “details” link may not produce a visible effect on small screens. Scroll down the page to see Scores displayed farther down the page on a laptop or mobile device.The score breakdown provides you with a review of the issues found by each test, and a link to see detailed test results.
Community Rating
The final piece of data provided to you about a module is the community rating (see Figure 12-7). This provides feedback about what other users thought of the module.
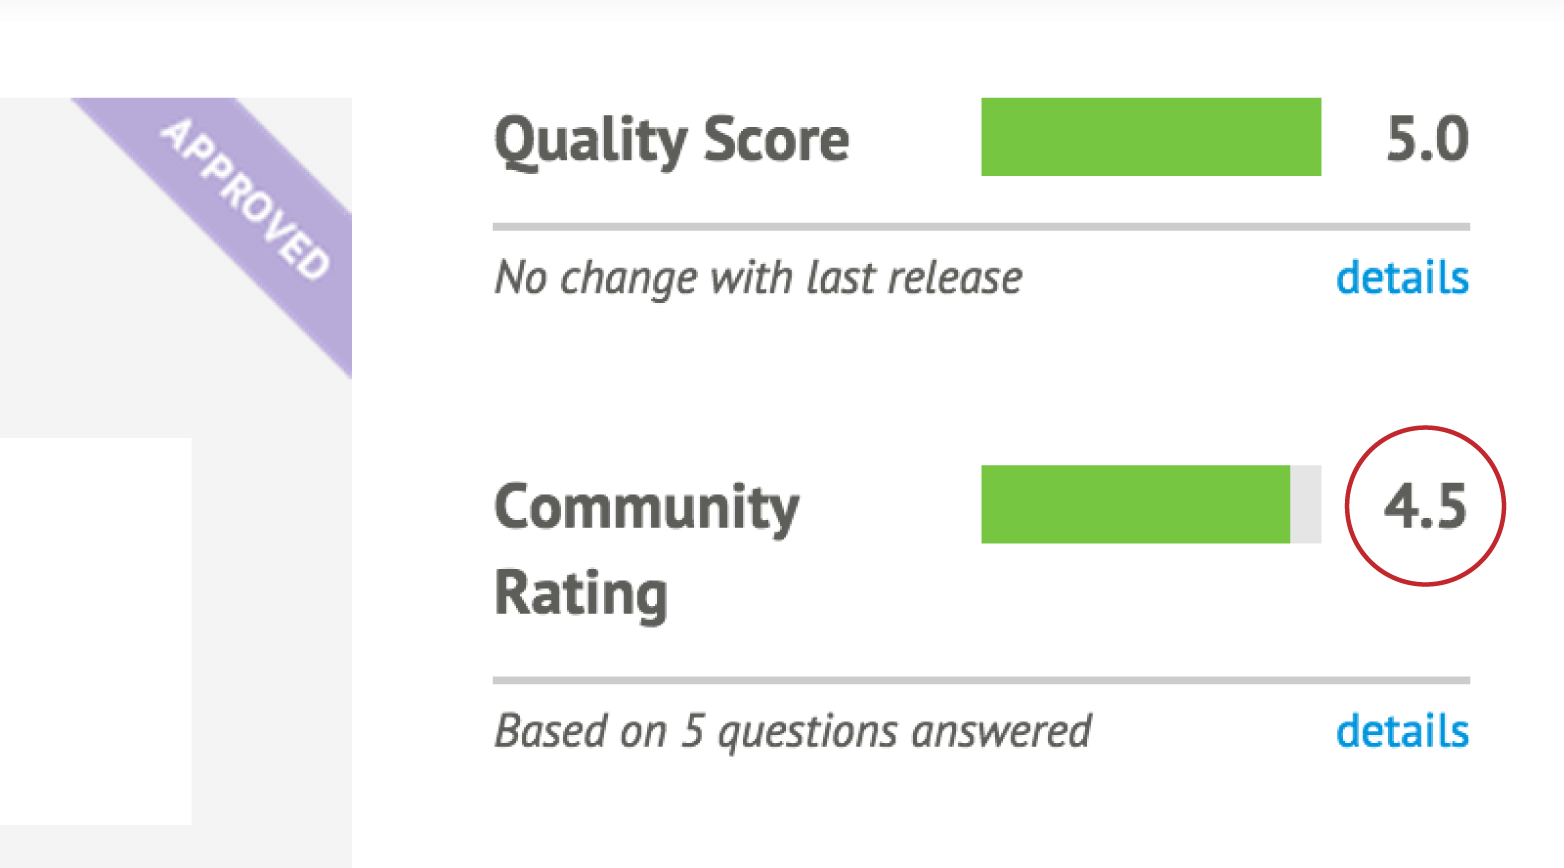
Figure 12-7. This module received a 4.5 out of 5 community rating
You can see details of the community rating by clicking on the “details” link. You can also scroll down and click Scores just below the module version. You’ll find the community rating at the bottom, below the quality score (see Figure 12-8).
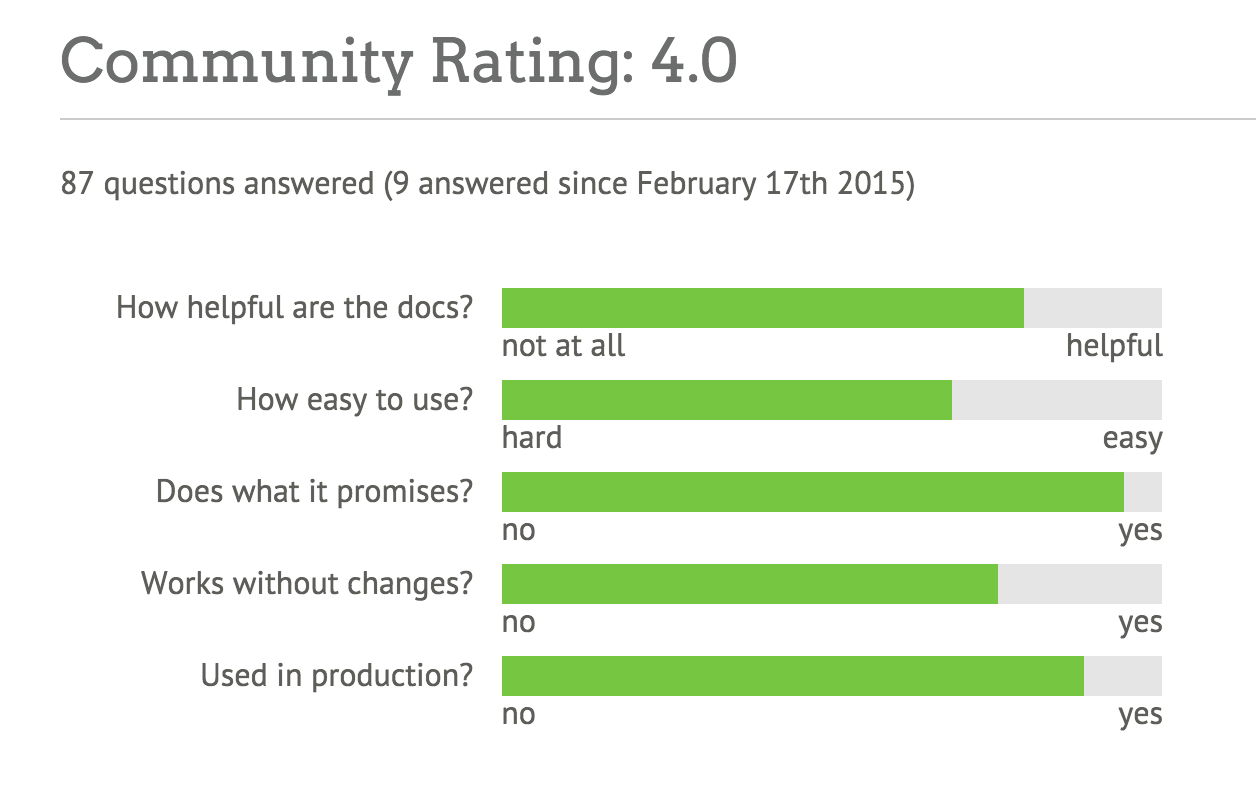
Figure 12-8. Breakdown of community rating
Tip
As with the quality score, clicking on the “details” link may not produce a visible change on a smaller display. Scroll down to see the changes.Installing Modules
You can install modules from the Puppet Forge, a private internal forge, or directly from the developer’s code repository.
Installing from a Puppet Forge
The process for installing a module from the Puppet Forge (or an internal forge of your choice) is very simple. Let’s go ahead and do this to install a very useful module that many other modules depend upon: the Puppet Supported stdlib module:
[vagrant@client~]$puppetmoduleinstallpuppetlabs-stdlibNotice:Preparingtoinstallinto/etc/puppetlabs/code/environments/production/modules...Notice:Downloadingfromhttps://forgeapi.puppetlabs.com...Notice:Installing--donotinterrupt.../etc/puppetlabs/code/environments/production/modules└──puppetlabs-stdlib(v4.8.0)
As you’ll note, this command installed the module into the production environment. When testing this out, you should install it in the test environment instead:
[vagrant@client~]$puppetmoduleinstallpuppetlabs-stdlib--environmenttestNotice:Preparingtoinstallinto/etc/puppetlabs/code/environments/test/modules...Notice:Downloadingfromhttps://forgeapi.puppetlabs.com...Notice:Installing--donotinterrupt.../etc/puppetlabs/code/environments/test/modules└──puppetlabs-stdlib(v4.8.0)
Note
If you didn’t set up the personal configuration file as discussed in “Running Puppet Without sudo”, then it will install the module in your personal ~/.puppetlabs/etc/code/modules directory. Add the--modulepath command-line option to place it in the system directory.The test environment is an excellent place for you to examine the module and determine if it meets your needs. You can run tests to see if the module meets your needs, yet avoid the consequences of breaking production systems.
Once you decide that a module will do what you need, you can install this module in another environment by rerunning the puppet module command with the new environment, or simply moving the directory to that environment:
$cd/etc/puppetlabs/code/environments$mvtest/modules/stdlibproduction/modules/
Installing from GitHub
Sometimes you will find a module you’d like to use on GitHub, or perhaps you need to test bleeding-edge changes to the module without waiting for the author to update the Puppet Forge. If that’s the case, then going straight to their source tree may be your best bet.
If you haven’t installed Git already, you should do that now:
[vagrant@client~]$sudoyuminstall-ygit...snip...Installed:git.x86_640:1.8.3.1-4.el7DependencyInstalled:libgnome-keyring.x86_640:3.8.0-3.el7perl-Error.noarch1:0.17020-2.el7perl-Git.noarch0:1.8.3.1-4.el7perl-TermReadKey.x86_640:2.30-20.el7rsync.x86_640:3.0.9-15.el7Complete!
This allows us to pull directly from any Puppet module available in a Git repository. For example, if you’d like to get the latest changes to my MCollective module, you can install it from GitHub like so:
$cd/etc/puppetlabs/code/environments/test/modules$gitclonehttps://github.com/jorhett/puppet-mcollectivemcollectiveInitializedemptyGitrepositoryin/etc/puppetlabs/code/environments/test/modules/mcollective/.git/remote:Countingobjects:183,done.Receivingobjects:100%(183/183),51.13KiB,done.remote:Total183(delta0),reused0(delta0),pack-reused183Resolvingdeltas:100%(98/98),done.
Do read the instructions that come with the module. Some modules published on GitHub require steps to be taken before the module can be used successfully, and this module is no exception. Better yet, set it aside for now, as all of Chapter 30 is devoted to this module.
Testing a Single Module
To test a module, you will need to follow the instructions on the page where you found the module. In most situations, you will need to:
- Declare the module’s classes in the node definition.
- Define Hiera data keys under the module’s name.
Let’s go through this process now. Start by installing and configuring the puppetlabs-ntp module. As this module will change system files, we’ll need to run this as root so we must install the module in the systemwide module path:
[vagrant@client~]$cd/etc/puppetlabs/code/environments/test/modules[vagrant@clientmodules]$puppetmoduleinstall--modulepath=.puppetlabs-ntpNotice:Preparingtoinstallinto/etc/puppetlabs/code/environments/test/modules...Notice:Downloadingfromhttps://forgeapi.puppetlabs.com...Notice:Installing--donotinterrupt.../etc/puppetlabs/code/environments/test/modules└─┬puppetlabs-ntp(v3.3.0)└──puppetlabs-stdlib(v4.5.1)
If you look in the /etc/puppetlabs/code/environments/test/modules directory now, you’ll find both ntp and stdlib modules installed. The puppet module install command automatically installs all dependencies listed in the module’s metadata.
Looking at the documentation at puppetlabs/ntp on the Puppet Forge, you’ll find that this module can operate without any input data. It will define the configuration using module defaults. Let’s try that out now:
$sudopuppetapply--environmenttest--execute'include ntp'Notice:Compiledcatalogforclient.example.cominenvironmenttestNotice:/Stage[main]/Ntp::Install/Package[ntp]/ensure:createdNotice:/Stage[main]/Ntp::Config/File[/etc/ntp.conf]/content:contentchanged'{md5}dc9e5754ad2bb6f6c32b954c04431d'to'{md5}ff26b20aa0c9fed35515afbcbf7190'Notice:/Stage[main]/Ntp::Service/Service[ntp]/ensure:ensurechanged'stopped'to'running'Notice:Appliedcatalogin11.77seconds
As you can see, the module has modified the NTP configuration and started the NTP service. The module works!
Defining Config with Hiera
Now, let’s say that you want to change the NTP configuration that the module generated. For instance, the NTP service was configured to only allow connections from localhost. Let’s say we want to expand that to allow connections from other systems on the same LAN.
At this point, you need to define some test data in Hiera. Let’s go ahead and open up the common.yaml file in the hieradata/ directory:
[vagrant@client~]$$EDITOR/etc/puppetlabs/code/hieradata/common.yaml
Looking at the documentation at puppetlabs/ntp on the Puppet Forge, you’ll find that this module’s security can be changed by the restrict and interface parameters.
To provide data for a module’s input, the data must be named modulename::paramname. So start by defining the restrict and interface options in the YAML file:
---ntp::interfaces:ntp::restrict:
The documentation says that both of these parameters expect array values. Based on what you learned in “Configuring Hiera”, use leading dashes to indicate array values. Use single quotes to surround unparsed strings. So the input data for the ntp module would look like this:
---# Data for the puppetlabs NTP module# which interfaces will accept connectionsntp::interfaces:-'127.0.0.1'# which nodes can connectntp::restrict:-'default kod nomodify notrap nopeer noquery'-'-6 default kod nomodify notrap nopeer noquery'-'127.0.0.1'-'-6 ::1'-'192.168.250.0/24'-'-6 fe80::'
Let’s make use of our host-level overrides and add some values specific to the client host. Add the following values to the /etc/puppetlabs/code/hieradata/hostname/client.yaml file:
---# Data for the puppetlabs NTP module# which interfaces will accept connectionsntp::interfaces:-'127.0.0.1'-'192.168.250.10'
Now that you’ve defined the input data, rerun Puppet to implement the changes:
$sudopuppetapply--environmenttest--execute'include ntp'Notice:Compiledcatalogforclient.example.cominenvironmenttestNotice:/Stage[main]/Ntp::Config/File[/etc/ntp.conf]/content:contentchanged'{md5}ff26b20aa0c9fed35515afbcbf7190'to'{md5}b751b9441d5057a503c13f5f5da3f1'Notice:/Stage[main]/Ntp::Service/Service[ntp]:Triggered'refresh'from1eventsNotice:Appliedcatalogin0.13seconds
As you can see, Puppet has updated the configuration file and restarted the service. You can validate the changes by examining the revised /etc/ntp.conf:
[vagrant@client~]$grep192.168.250/etc/ntp.confrestrict192.168.250.0/24interfacelisten192.168.250.10[vagrant@client~]$greplisten/etc/ntp.confinterfacelisten127.0.0.1interfacelisten192.168.250.10
As this outputs shows, the array values from the hostname-specific file were used instead of the values from the common file to produce the list of interfaces that would accept connections.
Assigning Modules to Nodes
The modern, best-practice way to assign module classes to a node’s run list is to define the classes within Hiera. This takes advantage of the Hiera hierarchy to customize the load list.
Using Hiera for Module Assignment
We should configure each environment to assign Puppet modules to your nodes from Hiera data.
To do this, we will create a simple manifest in each environment’s manifests/ directory. In older versions of Puppet, this file had to be named manifests/site.pp, but in Puppet 4 this can be any filename. I often name the file manifests/hieraclasses.pp, for example. We’ll use the most common name for the following examples:
[vagrant@client~]$cd/etc/puppetlabs/code/environments[vagrant@client~]$$EDITORtest/manifests/site.pp
Within this file, we are going to add a lookup of classes to be assigned to nodes:
notify{'UsingTest':message=>"Processing catalog from the Test environment.",}# Lookup all classes defined in Hiera and other data sourceslookup('classes',Array[String],'unique').include
This statement will do a lookup in Hiera for module classes to be assigned to the node. Let’s go ahead and add the same to the production environment:
[vagrant@client~]$cd/etc/puppetlabs/code/environments[vagrant@client~]$$EDITORproduction/manifests/site.pp
The entire contents of this file should be:
# Look up all classes defined in Hiera and other data sourceslookup('classes',Array[String],'unique').include
Now that we have done this, we can assign classes using Hiera data.
Assigning Classes to Every Node
To assign the ntp module to be applied by Puppet to every node, edit the common.yaml file in the hieradata/ directory:
[vagrant@clientmodules]$$EDITOR/etc/puppetlabs/code/hieradata/common.yaml
Within this file, create a top-level key named classes. The first entry in that array should be the name of the class we want the node to apply:
---classes:-'ntp'
Now that the ntp module is listed in the class list, you can test the module by applying a manifest that includes Hiera classes, such as the one we just created:
[vagrant@clientmodules]$sudopuppetapply--environmenttest../manifests/Notice:Compiledcatalogforclient.example.cominenvironmenttestNotice:Finishedcatalogrunin0.14seconds
Note
Wait, what happened? This time it didn’t do anything. That’s because the module is properly idempotent. The configuration hasn’t changed and the service is still running, so no changes were necessary.Let’s give the ntp module something to do by stopping the service:
[vagrant@clientmodules]$sudosystemctlstopntpd[vagrant@clientmodules]$sudopuppetapply--environmenttest../manifests/Notice:Compiledcatalogforclient.example.cominenvironmenttestNotice:/Stage[main]/Ntp::Service/Service[ntp]/ensure:ensurechanged'stopped'to'running'
Altering the Class List per Node
You may want to run Puppet agent on every node, but only run the Puppet server on the puppetserver node. For that you would define your Hiera data as follows.
Place the following classes in the /etc/puppetlabs/code/hieradata/common.yaml file:
---classes:-ntp-puppet::agent
Now, let’s set up an override for the puppetserver node. Create the file /etc/puppetlabs/code/hieradata/hostname/puppetserver.yaml with the following:
---classes:-puppet::server
Class assignment is always done as an array merge, so every value in the classes array will be merged together from each level of the hierarchy.
With this configuration, every node will apply the ntp and puppet::agent classes, while the puppetserver node will also apply the puppet::server class.
Avoiding Node Assignments in Manifests
If you used Puppet version 2 or older, you had no choice but to create explicit node assignments in the manifests/site.pp file. If you wanted to apply a list of classes to similar nodes, you were forced to create node assignments that inherited from other node assignments:
node'puppetserver'inheritsdefault{class{'puppet::server':}}node'webserver'inheritsdefault{class{'apache':}}nodedefault{class{'ntp':}class{'puppet::agent':}}
If you have managed a diverse group of nodes, you know exactly how convoluted and confusing those inherited relationships could easily become. These inheritances were linear top to bottom, which meant that duplicate data was required for any slight variance in configuration:
node'webserver'inherits'web-server'{class{'apache':'modules'=>'fail2ban'}}node'passenger-host'inherits'web-server'{class{'apache':'modules'=>'passenger'}}
With a single parameter difference, we have eight lines of code in node assignments. In large environments, this quickly devolved into a maintenance nightmare of node assignments and inheritance. When combined with altering the modules available in different environments, managing module assignment consistently went from impractical to implausible.
The ability to look up classes from data has completely solved that problem. You can now assign classes to nodes based on lookups of the class list from a flexible data hierarchy.
Classic node assignment and inheritance were still supported but deprecated with warnings in Puppet 3. Node assignment remains possible in Puppet 4, but node inheritance has been completely removed. There is simply no reason to use the preceding nightmare syntax when you can completely replace it with something as simple as a Hiera file loaded by all web servers:
classes:-apacheapache::modules:-passenger
Upgrading from Puppet 2 or 3
If you have one of these nightmare site.pp/ files, you may be wondering how to do the upgrade. There’s no simple conversation script, but I have some advice for how to do this.
Tip
If you don’t have older versions of Pupppet installed, you can skip this section and go straight to “Examining a Module”.Take apart each block of your node assignments and create a separate file for each one in the hieradata/ directory, using the following strategy:
- Place everything from the default node into common.yaml.
- Place everything that matched only a single host into a file named for that node, such as hostname/web01.yaml or fqdn/web01.example.com.yaml.
- Place everything that was applied to a group of nodes into a unique file for that role, such as role/frontend.yaml and role/passengerhost.yaml.
It is best to utilize node facts or configuration values that will properly identify a node. This will work the best and be the easiest to maintain. But if you have to do it based on node name, either of the following changes to your manifest will work.
If your nodes are named such that you can derive a role from their name, set a variable based on their name and use that to include the right file. For example, if servers are uniformly named by their role and a number (e.g., frontend01), the following regex can derive the role name for you:
# manifests/site.ppif($facts['hostname']=~/^/^([a-z]+)(\d+)/){/{$node_role=$1$node_number=$2}# Lookup all classes defined in Hiera and other data sourceslookup('classes',Array[String],'unique').include
Alter your Hiera hierarchy to load the appropriate files for each role, like so:
:hierarchy:-"hostname/%{facts.hostname}"-"role/%{::node_role}"-"os/%{facts.os.family}"-common
If the assignment isn’t so straightforward, you can set the role with if/else assignments, like so:
# manifests/site.ppif($facts['hostname']=~/^web/{$node_role='frontend'}elsif($facts['hostname']=~/^rails/{$node_role='passengerhost'}# Look up all classes defined in Hiera and other data sourceslookup('classes',Array[String],'unique').include
Warning
if/else is a hack. It’s a quick slash-burn to help you upgrade fast. Once you get past the initial need, develop more intelligent node classification using node facts.These examples will grant all the advantages of the Hiera hierarchy for parameters. This allows you to remove many lines of redundant parameter assignments.
As you learn more about module development, you’ll learn how to create and utilize facts based on node data. With good definitions of custom facts for your nodes, you can avoid this if/else nonsense entirely.
Examining a Module
Regardless of the quality score or community rating given to a module, it is always best to examine modules carefully to ensure they will work well in your environment. Badly written modules can create unintended chaos when put into use within your existing module space.
Here is a short list of items to check in the code base to determine if the module will work well for you:
- OS support
- May not support your operating system properly.
- Module namespace
- May require dependency modules named the same as modules you use.
- Environment assumptions
- May enforce local assumptions that won’t work in your environment.
- Sloppy code
- Could require or overwrite global variables.
- Resource namespace
- Could use simple resource titles that conflict with others used already.
- Greedy collectors
- Could utilize collectors that accidentally grab unrelated resources.
You should also utilize the preceding list when building your own modules.
Reviewing Modules
In this chapter, we have reviewed the installation, configuration, testing, and execution of a module from the Puppet Forge. You have now completed all of these steps:
- Set up the directory environments
testandproduction. - Installed the
puppetlabs-ntpmodule and its dependency into thetestenvironment. - Configured the
ntpmodule using Hiera configuration data based on instructions from the module. - Applied the module to configure and run the NTP service on our system.
In summary, you have done everything necessary to install, evaluate, and use a module from the Puppet Forge.