Table of Contents for
Learning Puppet 4
 Learning Puppet 4
Published by
O'Reilly Media, Inc., 2016
Learning Puppet 4
Published by
O'Reilly Media, Inc., 2016
- Cover
- nav
- Learning Puppet 4
- Learning Puppet 4
- Foreword
- Preface
- Introduction
- I. Controlling with Puppet Apply
- 1. Thinking Declarative
- 2. Creating a Learning Environment
- 3. Installing Puppet
- 4. Writing Manifests
- 5. Using the Puppet Configuration Language
- 6. Controlling Resource Processing
- 7. Expressing Relationships
- 8. Upgrading from Puppet 3
- 9. Wrap-Up of Puppet Basics
- II. Creating Puppet Modules
- 10. Creating a Test Environment
- 11. Separating Data from Code
- 12. Using Modules
- 13. Designing a Custom Module
- 14. Improving the Module
- 15. Extending Modules with Plugins
- 16. Documenting Modules
- 17. Testing Modules
- 18. Publishing Modules
- III. Using a Puppet Server
- 19. Preparing for a Puppet Server
- 20. Creating a Puppet Master
- 21. Creating a Puppet Server
- 22. Connecting a Node
- 23. Migrating an Existing Puppet Master
- 24. Utilizing Advantages of a Puppet Server
- 25. Managing TLS Certificates
- 26. Growing Your Puppet Deployment
- IV. Integrating Puppet
- 27. Tracking Puppet Status with Dashboards
- 28. Running the Puppet Agent on Windows
- 29. Customizing Environments
- 30. Controlling Puppet with MCollective
- 31. Managing Network Infrastructure with Puppet
- 32. Assimilating Puppet Best Practices
- 33. Finding Support Resources
- Afterword
- A. Installing Puppet on Other Platforms
- B. Configuring Firewalls on Other Platforms
- C. Installing Ruby
- Index
- About the Author
- Colophon
Chapter 25. Managing TLS Certificates
You’ve learned how to connect a Puppet agent to a Puppet server, and how to sign the client’s certificate using the puppet cert command. In this chapter, we’ll go into more detail on how the authentication works, and methods to automate the signing process. We’ll also cover how to utilize an external certificate authority for all certificate creation and authorization.
Reviewing Node Authentication
The topic of TLS authentication has been mentioned repeatedly, but you may be a bit confused by the details at this point. So let’s review how Puppet agents and servers use TLS public key authentication and encryption to communicate securely.
Bidirectional validation, where both the Puppet server and agent validate the other’s certificate as shown in Figure 25-1, prevents man-in-the-middle attacks. Once both sides have validated each other, they use the certificates (which are signed cryptographic keys) to negotiate an encrypted communication session secure from eavesdropping.
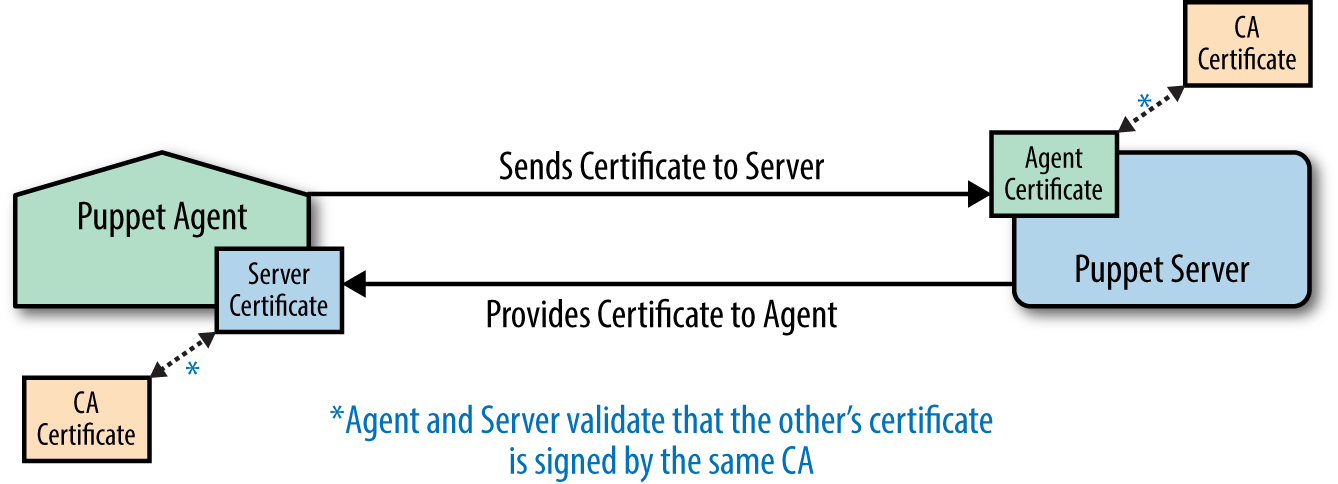
Figure 25-1. Bidirectional TLS validation
While this may sound complex, Puppet makes it trivially easy to implement and maintain. In fact, Puppet TLS keys are easier to create and utilize than any other private crypto system—so much so that Puppet certs are often used as the central authority for key management by other applications and security frameworks.
When Puppet provides the certificate authority (CA), the process for how this occurs is easy to understand:
- A CA server is configured to sign Puppet agent CSRs.
- Each Puppet server has a certificate signed by the Puppet CA.
- Each agent submits a CSR to the CA before attempting to contact a server.
- The CSR is signed manually via the
puppet certcommand, or by matching criteria for automatic signing. - The agent retrieves the signed certificate, and only then connects to the Puppet server.
- The Puppet server verifies the agent’s certificate was signed by the same CA.
- The agent verifies that the Puppet server’s certificate was signed by the same CA.
Autosigning Agent Certificates
As you can imagine, manual authorization and signing of each agent to be connected is not appropriate for every environment. It definitely provides a higher level of control and security, but may not be sustainable in highly volatile or dynamically scaled environments.
This section covers how to enable several different types of automatic certificate signing. Each of these techniques solves different problems, and each has certain security risks. We’ll discuss all of them in detail.
Name-Based Autosigning
Name-based autosigning is used to automatically sign certificates based on the name given by the requestor. To enable name-based autosigning, set the value of autosign in the [master] section of the Puppet configuration file to the name of a configuration file containing certificate names that should be signed automatically:
[master]autosign=$confdir/autosign.conf
The preceding is the default value. Name-based autosigning will be enabled if that file exists and is not executable by the Puppet user. The file should contain the full name or glob(*)-style wildcards that match the certificates to be signed.
In short, this means that the following would enable autosigning for any node in example.com:
$echo"*.example.com">/etc/puppetlabs/puppet/autosign.conf
The glob-style wildcard character * will only match a single name at the front of the certificate name. It will not match periods (.) in the name or work in a trailing position. A certificate request by web.server.example.com will match either of the following:
web.server.example.com*.server.example.com
…but will not match either of these:
*.example.comweb.server.*
Warning
Name-based autosigning does not provide security. Any user with or without root access can create a Puppet certificate request using any name. They only need to guess what names you have selected for autosigning.Name-based autosigning should be used only where access to the Puppet server is controlled by firewalls and other security mechanisms. In this mode, any Puppet agent that can connect to the server and guess the appropriate name (based on the hostnames around it) will have its certificate signed. It will then gain access to any information that the Puppet server provides.
Policy-Based Autosigning
Policy-based autosigning will automatically sign certificates based on the response provided by an external program. To enable policy-based autosigning, set the value of autosign in the [master] section of the Puppet configuration file to the name of an executable program:
[master]autosign=/path/to/decision-maker
The program can be written in any compiled or scripting language, so long as it is executable by the puppet user. It will receive the certname requested as the only command-line argument, and the contents of the certificate signing request (CSR) in PEM format on standard input (STDIN). The program needs to return an exit code of 0 for success, or nonzero to reject the certificate request.
If the program will make the decision based entirely on the name of the requestor, then it can ignore the CSR and evaluate the name. However, this provides no more security than name-based autosigning. The program should parse the PEM data for information to validate the nature of the request.
There are numerous data sources that could be queried to validate a request, including the following:
- Internal databases containing lists of provisioned nodes
- APIs used to provision virtual nodes, such as OpenStack, VMWare, or AWS
- Unique identifying information such as an encryption key added to the CSR
Tip
The security of policy-based signing will depend on the security of the data sources queried. If an attacker can easily acquire or manipulate data from this source, it will not improve security.Adding Custom Data to CSRs
To provide custom data in a CSR, you must perform the following steps on the node:
- Create a YAML format file containing the custom data.
- Specify the YAML file with the
csr_attributesPuppet configuration setting. - Generate a new certificate for the node.
The default location for the CSR attributes file is $confdir/csr_attributes.yaml. This file must contain two keys, the value of which should be a hash containing the attributes to be provided. Here is an example file:
---# Custom attributes will be discarded when the certificate is signedcustom_attributes:2.999.5.1.3:"Custom value 513 in the documentation OID"pp_uuid:"A unique instance identifier to be validated"# Extension requests will be added to the final certificate,# and available to the Puppet server during catalog buildextension_requests:pp_cost_center:"Custom value used in catalog build"
For convenience and readability, I recommend using the following short names for the Puppet-specific regular certificate extension OIDs as the keys in your hash:
pp_applicationpp_clusterpp_cost_centerpp_created_bypp_departmentpp_employeepp_environmentpp_image_namepp_instance_idpp_preshared_keypp_productpp_provisionerpp_rolepp_servicepp_software_versionpp_uuid
If you are experienced and comfortable with OIDs and want to build your own OID structure, you can use the Puppet Labs private certificate extension OID 1.3.6.1.4.1.34380.1.2 as documented at “SSL Configuration: CSR Attributes and Certificate Extensions” on the Puppet docs site.
Populate this file with data from whatever mechanism you use to configure new nodes, such as:
- Launch tools like Linux Kickstart, Solaris Jumpstart, or HashiCorp Terraform
- Virtualization platform config tools like AWS or OpenStack cloud-init
- Launch infrastructure like Terraform, Cobbler, or Foreman
- Manually creating the file by hand
Only after the csr_attributes.yaml file is populated should you attempt to connect to the Puppet server, which will create your certificate request. If you have mistakenly created a certificate request without the right attributes, you can purge the TLS keys and start over like so:
[vagrant@client~]$rm-rf/etc/puppetlabs/puppet/ssl[vagrant@client~]$puppetagent--test--server=puppet.example.com
Inspecting CSRs
The custom data provided in the CSR can be found in the Attributes or Requested Extensions block of the CSR. Your program will have to parse the PEM-format CSR data to retrieve these values. Libraries to parse PEM format files are available in every programming language. Refer to the documentation of the language used for your policy-based validator.
You can manually examine an unsigned certificate request using the standard openssl tool:
[vagrant@puppetserver ~]$ sudo bash
[root@puppetserver vagrant]# cd /var/opt/puppetlabs/puppetserver/ssl/ca/requests
[root@puppetserver requests]# openssl req -noout -text -in certname.pem
Certificate Request:
    Data:
        Version: 0 (0x0)
        Subject: CN=client.example.com
        Subject Public Key Info:
...base64-encoded bits...
        Attributes:
            1.3.6.1.4.1.34380.1.1.1  :
                A unique instance identifier to be validated
            2.999.5.1.3              :
                Custom value 513 in the documentation OID
        Requested Extensions:
            1.3.6.1.4.1.34380.1.1.5:
                ..Custom value used in catalog build
As you can tell, the openssl command does not know the short names for the Puppet-specific OIDs.
After the certificate has been signed, you can view the certificate with a much simpler puppet cert print command, which is aware of the Puppet-specific OIDs:
[vagrant@puppetserver ~]$ sudo puppet cert print client.example.com
Certificate:
    Data:
        Version: 3 (0x2)
        Serial Number: 2 (0x2)
        Signature Algorithm: sha256WithRSAEncryption
        Issuer: CN=Puppet CA: puppet.example.com
        Validity
            Not Before: Aug  6 06:33:41 2015 GMT
            Not After : Aug  5 06:33:41 2020 GMT
        Subject: CN=client.example.com
        Subject Public Key Info:
...base64-encoded bits...
         X509v3 extensions:
            Netscape Comment:
                .(Puppet Ruby/OpenSSL Internal Certificate
            Puppet Node Cost Center Name:
                ..Custom value used in catalog build
As previously discussed, the custom_attributes have been discarded and only the extension_requests are available in the final certificate.
More details about TLS certificate extensions can be found at “CSR Attributes and Certificate Extensions” on the Puppet docs site.
Using Extension Requests in Puppet
The data stored in the client’s certificate extension requests is available to the Puppet server when building the catalog, which makes it available for use in Puppet manifests. The data can be referenced by the extensions hash key of the trusted node facts:
notify{'cost-center':message=>"Cost center is ${trusted['extensions']['pp_cost_center']}",}
If you used site-specific private OID space, you’ll need to use the OID as a key, or create a YAML file mapping OIDs to names. I’m not going to cover OID mapping here, as people who enjoy playing with OIDs are rare creatures, and for them it is well documented at “Config Files: custom_trusted_oid_mapping.yaml” on the Puppet docs site.
Naive Autosigning
Naive autosigning is to believe or trust any agent that connects to the Puppet server. In this mode, every CSR is immediately signed, giving the agent instant access to data the Puppet server provides. Anyone who can open a connection to the server, directly or indirectly through a compromised access point, can retrieve any information the Puppet server is configured to provide.
If you want to provide your configuration data to anyone, set the value of autosign in the [master] section of the Puppet configuration file to true:
[master]autosign=true
Using an External Certificate Authority
As discussed in the previous chapters, by default the Puppet server will create its own TLS key and self-signed certificate when you install it. In doing so, it becomes its own certificate root authority. It will sign any agent’s automatic or manually approved CSR with its own certificate. In effect, it creates a new certification tree in which it is the root authority.
This works well for small environments, or situations where the Puppet certificates are used within their own framework only.
In large enterprises, it is often necessary or desirable to have all keys issued from a centralized certificate authority outside of Puppet. You can enable this by following the steps in this chapter.
Puppet servers support three configurations:
- A Puppet server is the sole certificate authority, and signs all certificates.
- A single external certificate authority signs certificates for both Puppet servers and Puppet agents.
- Two different external certificate authorities sign certificates, one for Puppet servers and another for Puppet agents.
Distributing Certificates Manually
Perhaps the biggest reason to avoid using an external certificate authority (CA) is that Puppet has no way to help you distribute those files. Puppet is a fantastic tool for distributing web server TLS certificates, Java keystores, and licenses. However, the Puppet agent must have a key signed by the CA in order to receive a catalog from a Puppet server, so you cannot use Puppet to distribute the necessary Puppet agent key and certificate to the node. It’s a classic catch-22 situation.
You’ll have to use some other mechanism, depending on your own CA solution and its resources, to create and distribute the private keys and signed certificates each Puppet agent requires. The following are some technology solutions that are good for bootstrapping nodes up to the point where Puppet can be run to finish configuration of the node:
- Node provisioning tools like HashiCorp Terraform, Cobbler, and Foreman
- Virtualization platform config tools like AWS or OpenStack cloud-init
- Key automation software like CertNanny
When you have the certificates available, install them in the configured locations on each node. You can verify those locations with this command:
$sudopuppetconfig--sectionagenthostcerthostprivkeylocalcacerthostcert=/etc/puppetlabs/puppet/ssl/certs/puppet.example.com.pemhostprivkey=/etc/puppetlabs/puppet/ssl/private_keys/puppet.example.com.pemlocalcacert=/etc/puppetlabs/puppet/ssl/certs/ca.pem
If the certificates are issued by an intermediate CA instead of a root CA, you’ll also need to set a configuration value for the location of the intermediate CA’s certificate in /etc/puppetlabs/puppet/puppet.conf:
[agent]ssl_client_ca_auth=/etc/puppetlabs/puppet/ssl/certs/intermediate.pem
Installing Certificates on the Server
When you use an external certificate authority, you are required to create a certificate request for the server and get it signed by the external authority on your own. There is no automation to do this for you.
When you have the certificates available, install them in the configured locations. You can query those locations with these commands:
$sudopuppetconfig--sectionmasterhostcerthostprivkeylocalcacerthostcert=/var/opt/puppetlabs/puppetserver/ssl/certs/puppet.example.com.pemhostprivkey=/var/opt/…/puppetserver/ssl/private_keys/puppet.example.com.pemlocalcacert=/var/opt/puppetlabs/puppetserver/ssl/certs/ca.pem
Copy the Puppet server’s key to the hostprivkey location, the certificate signed by the external CA to the host location, and a copy of the CA’s certificate to the localcacert location. If the Puppet server’s certificate was signed by an intermediate certificate authority, you’ll need to concatenate the root CA and the intermediate CA’s certificate in the localcacert file.
Disabling CA on a Puppet Server
To prevent Puppet Server from trying to sign certificates, as it doesn’t have the CA’s key to do this, comment out the following line in /etc/puppetlabs/puppetserver/bootstrap.cfg:
#puppetlabs.services.ca.certificate-authority-service/#certificate-authority-service
and uncomment or add the following line in its place:
puppetlabs.services.ca.certificate-authority-disabled-service/certificate-authority-disabled-service
Ensure that /etc/puppetlabs/puppetserver/conf.d/webserver.conf contains the following settings:
webserver:{ssl-key:/var/opt/…/puppetserver/ssl/private_keys/puppet.example.com.pemssl-cert:/var/opt/…/puppetserver/ssl/certs/puppet.example.com.pemssl-ca-cert:/var/opt/puppetlabs/puppetserver/ssl/ca/ca_crt.pemssl-cert-chain:/var/opt/puppetlabs/puppetserver/ssl/ca/ca_crt.pemssl-crl-path:/var/opt/puppetlabs/puppetserver/ssl/crl.pem}
Disabling CA on a Puppet Master
To prevent a Puppet master from trying to sign certificates, as it doesn’t have the CA’s key to do this, disable the ca configuration option in /etc/puppetlabs/puppet/puppet.conf:
[master]ca=false
Externally signed certificates can only be validated if you are using the Rack-enabled master running under Fusion Passenger, with all of the RequestHeader configuration lines from the example configuration file used by this book: /vagrant/etc-puppet/puppetmaster.conf. These configuration parameters tell Apache to validate the client certificate, and pass the validation data to the Puppet server in the named headers.
Warning
The test WEBrick instance cannot provide certificate validation.If the Puppet agent certificates are signed by an intermediate CA, you’ll need to modify the configuration to disable this line:
SSLVerifyDepth 1
…and enable the following lines with the name of the intermediate CA:
# Allow clients with a TLS certificate issued by the intermediate CA<Location/> SSLRequire %{SSL_CLIENT_I_DN_CN} eq "Intermediate CA Common Name" </Location>SSLVerifyDepth2
Place the full Common Name (CN) of the intermediate CA that will sign Puppet agent certificates in the quotes as shown.
Using Different CAs for Servers and Agents
It is possible to have the certificate authority tree set up such that two different intermediate certificate authorities are used. One will sign certificates issued to Puppet servers, while the other signs certificates issued to Puppet agents.
This is configured exactly as described on the previous pages, with two simple changes:
- Puppet servers
- The Puppet servers have the root CA certificate and the intermediate CA certificate that signs Puppet agent keys in the file referenced by
localcacert. This allows them to validate any agent certificate, but will fail to validate the certificate of another Puppet server. - Puppet agents
- Puppet agents will need the certificate of the intermediate CA that signs keys for Puppet servers installed in the location specified by the
ssl_client_ca_authsetting.
This provides enhanced security, as Puppet agent certificates successfully validate on other Puppet agents, nor will Puppet servers accept keys from other Puppet servers. The enhanced security provides a necessary wall that’s useful when different teams control different Puppet servers yet share the same root certificate authority.
Distributing the CA Revocation List
You can enable certificate revocation list (CRL) checking on both Puppet servers and Puppet agents. It must be distributed to the nodes through the same mechanism that was used to get the certs there. Install the CRL in the configured locations. You can query that location with these commands:
$sudopuppetconfig--sectionagenthostcrl/etc/puppetlabs/puppet/ssl/crl.pem
Tip
Puppet CAs provide a CRL to all agents. The agent retrieves it when acquiring its certificate back from the CA.If a revocation list is not provided by the external CA, you must disable CRL checking on the agent. Disable the following parameters in /etc/puppetlabs/puppet/puppet.conf:
[agent]certificate_revocation=false
If this parameter is not disabled, the agent will attempt to download the file from the Puppet server. As the Puppet server has its CA service disabled, the request will fail.
Learning More About TLS Authentication
The absolute best way to expand on what you have learned in this chapter is to try these processes out:
- Configure the server to autosign certificates for
*.example.com. - Run
vagrant up web2and install Puppet. - Start Puppet agent on the instance to connect to the server.
- Observe the Puppet agent immediately receive back a signed certificate.
- Observe the module convergence without having to run Puppet again.
- Review the node report stored in the $vardir/reports directory.
- Log out and run
vagrant destroy web2to recover the memory used.
For extra credit, implement an autosign program to validate certificate requests:
- Create a script to inspect CSR Attributes and exit with a nonzero exit code if a certain value isn’t in one.
- Specify this program as the value of the
autosignconfiguration variable on the Puppet server. - Run
vagrant up web3, and install Puppet. - Attempt to connect it to the Puppet server. Observe the rejection.
- Regenerate the CSR with the custom attribute you are looking for.
- Attempt to connect it to the Puppet server.