
Putting Data Bindings in Context
Question | Answer |
|---|---|
What are they? | Data bindings are expressions embedded into templates and are evaluated to produce dynamic content in the HTML document. |
Why are they useful? | Data bindings provide the link between the HTML elements in the HTML document and in template files with the data and code in the application. |
How are they used? | Data bindings are applied as attributes on HTML elements or as special sequences of characters in strings. |
Are there any pitfalls or limitations? | Data bindings contain simple JavaScript expressions that are evaluated to generate content. The main pitfall is including too much logic in a binding because such logic cannot be properly tested or used elsewhere in the application. Data binding expressions should be as simple as possible and rely on components (and other Angular features such pipes) to provide complex application logic. |
Are there any alternatives? | No. Data bindings are an essential part of Angular development. |
Chapter Summary
Problem | Solution | Listing |
|---|---|---|
Display data dynamically in the HTML document | Define a data binding | 1–4 |
Configure an HTML element | Use a standard property or attribute binding | 5, 8 |
Set the contents of an element | Use a string interpolation binding | 6, 7 |
Configure the classes to which an element is assigned | Use a class binding | 9–13 |
Configure the individual styles applied to an element | Use a style binding | 14–17 |
Manually trigger a data model update | Use the browser’s JavaScript console | 18, 19 |
Preparing the Example Project
For this chapter, I continue using the example project from Chapter 11. To prepare for this chapter, I added a method to the component class, as shown in Listing 12-1.
Tip
You can download the example project for this chapter—and for all the other chapters in this book—from https://github.com/Apress/pro-angular-6 .
Adding a Method in the component.ts File in the src/app Folder
Running the example application
Understanding One-Way Data Bindings
One-way data bindings are used to generate content for the user and are the basic building block for Angular templates. The term one-way refers to the fact that the data flows in one direction, which means that data flows from the component to the data binding so that it can be displayed in a template.
Tip
There are other types of Angular data binding, which I describe in later chapters. Event bindings flow in the other direction, from the elements in the template into the rest of the application, and allow user interaction. Two-way bindings allow data to flow in both directions and are most commonly used in forms. See Chapters 13 and 14 for details of other bindings.
The Contents of the template.html File in the src/app Folder
Using a one-way data binding
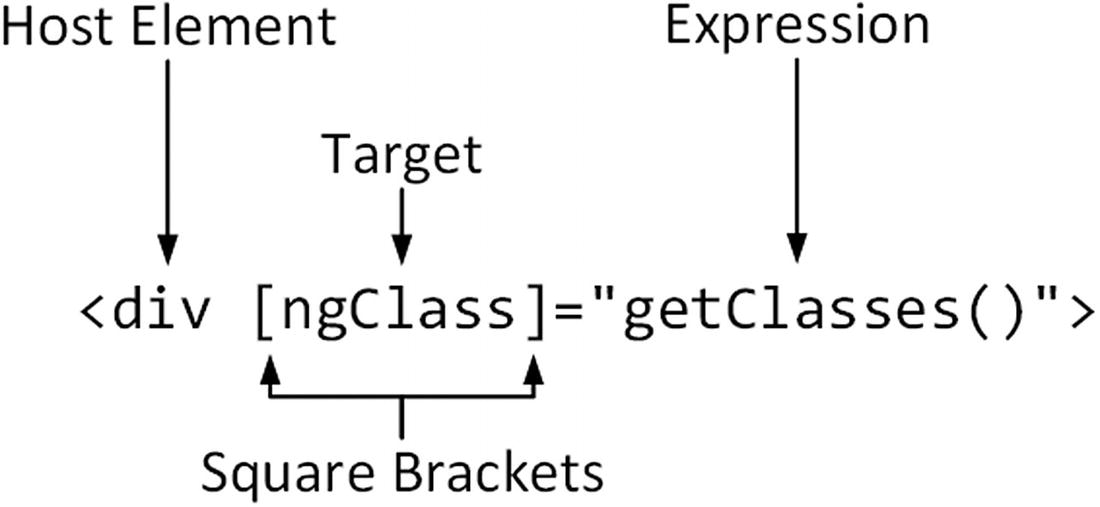
The anatomy of a data binding
The host element is the HTML element that the binding will affect, by changing its appearance, content, or behavior.
The square brackets tell Angular that this is a one-way data binding. When Angular sees square brackets in a data binding, it will evaluate the expression and pass the result to the binding’s target so that it can modify the host element.
The target specifies what the binding will do. There are two different types of target: a directive or a property binding.
The expression is a fragment of JavaScript that is evaluated using the template’s component to provide context, meaning that the component’s property and methods can be included in the expression, like the getClasses method in the example binding.
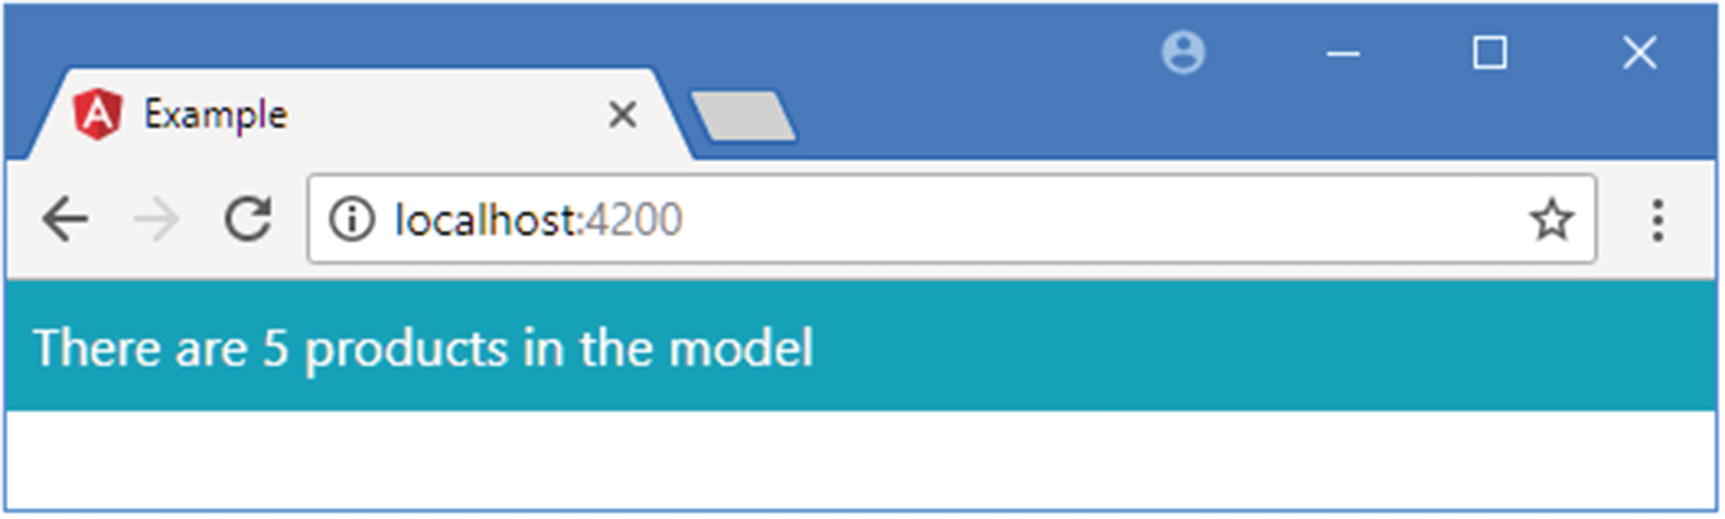
If there are five objects in the data model, then the method returns bg-success, which is a Bootstrap class that applies a green background. Otherwise, the method returns bg-warning, which is a Bootstrap class that applies an amber background.
The target for the data binding in Listing 12-2 is a directive, which is a class that is specifically written to support a data binding. Angular comes with some useful built-in directives, and you can create your own to provide custom functionality. The names of the built-in directives start with ng, which tells you that the ngClass target is one of the built-in directives. The target usually gives an indication of what the directive does, and, as its name suggests, the ngClass directive will add or remove the host element from the class or classes whose names are returned when the expression is evaluated.
Putting it all together, the data binding in Listing 12-2 will add the div element to the bg-success or bg-warning classes based on the number of items in the data model.
Since there are five objects in the model when the application starts (because the initial data is hard-coded into the SimpleDataSource class created in Chapter 12), the getClasses method returns bg-success and produces the result shown in Figure 12-3, adding a green background to the div element.
Understanding the Binding Target
The Basic Built-in Angular Directives
Name | Description |
|---|---|
ngClass | This directive is used to assign host elements to classes, as described in the “Setting Classes and Styles” section. |
ngStyle | This directive is used to set individual styles, as described in the “Setting Classes and Styles” section. |
ngIf | This directive is used to insert content in the HTML document when its expression evaluates as true, as described in Chapter 13. |
ngFor | This directive inserts the same content into the HTML document for each item in a data source, as described in Chapter 13. |
ngSwitchngSwitchCasengSwitchDefault | These directives are used to choose between blocks of content to insert into the HTML document based on the value of the expression, as described in Chapter 13. |
ngTemplateOutlet | This directive is used to repeat a block of content, as described in Chapter 13. |
Understanding Property Bindings
The Angular Property Bindings
Name | Description |
|---|---|
[property] | This is the standard property binding, which is used to set a property on the JavaScript object that represents the host element in the Document Object Model (DOM), as described in the “Using the Standard Property and Attribute Bindings” section. |
[attr.name] | This is the attribute binding, which is used to set the value of attributes on the host HTML element for which there are no DOM properties, as described in the “Using the Attribute Binding” section. |
[class.name] | This is the special class property binding, which is used to configure class membership of the host element, as described in the “Using the Class Bindings” section. |
[style.name] | This is the special style property binding, which is used to configure style settings of the host element, as described in the “Using the Style Bindings” section. |
Understanding the Expression
The expression in a data binding is a fragment of JavaScript code that is evaluated to provide a value for the target. The expression has access to the properties and methods defined by the component, which is how the binding in Listing 12-2 is able to invoke the getClasses method to provide the ngClass directive with the name of the class that the host element should be added to.
Performing an Operation in the template.html File in the src/app Folder
Combining classes in a JavaScript expression
It is easy to get carried away when writing expressions and include complex logic in the template. This can cause problems because the expressions are not checked by the TypeScript compiler nor can they be easily unit tested, which means that bugs are more likely to remain undetected until the application has been deployed. To avoid this issue, expressions should be as simple as possible and, ideally, used only to retrieve data from the component and format it for display. All the complex retrieval and processing logic should be defined in the component or the model, where it can be compiled and tested.
Understanding the Brackets
Omitting the Brackets in a Data Binding in the template.html File in the src/app Folder
The browser will try to process the classes to which the host element has been assigned, but the element’s appearance won’t be as expected since they don’t correspond to the class names used by Bootstrap. This is a common mistake to make, so it is the first thing to check if a binding doesn’t have the effect you expected.
The Angular Brackets
Name | Description |
|---|---|
[target]="expr" | The square brackets indicate a one-way data binding where data flows from the expression to the target. The different forms of this type of binding are the topic of this chapter. |
{{expression}} | This is the string interpolation binding, which is described in the “Using the String Interpolation Binding” section. |
(target) ="expr" | The round brackets indicate a one-way binding where the data flows from the target to the destination specified by the expression. This is the binding used to handle events, as described in Chapter 14. |
[(target)] ="expr" | This combination of brackets—known as the banana-in-a-box—indicates a two-way binding, where data flows in both directions between the target and the destination specified by the expression, as described in Chapter 14. |
Understanding the Host Element
The host element is the simplest part of a data binding. Data bindings can be applied to any HTML element in a template, and an element can have multiple bindings, each of which can manage a different aspect of the element’s appearance or behavior. You will see elements with multiple bindings in later examples.
Using the Standard Property and Attribute Bindings
If the target of a binding doesn’t match a directive, Angular will try to apply a property binding. The sections that follow describe the most common property bindings: the standard property binding and the attribute binding.
Using the Standard Property Binding
The browser uses the Document Object Model (DOM) to represent the HTML document. Each element in the HTML document, including the host element, is represented using a JavaScript object in the DOM. Like all JavaScript objects, the ones used to represent HTML elements have properties. These properties are used to manage the state of the element so that the value property, for example, is used to set the contents of an input element. When the browser parses an HTML document, it encounters each new HTML element, creates an object in the DOM to represent it, and uses the element’s attributes to set the initial values for the object’s properties.
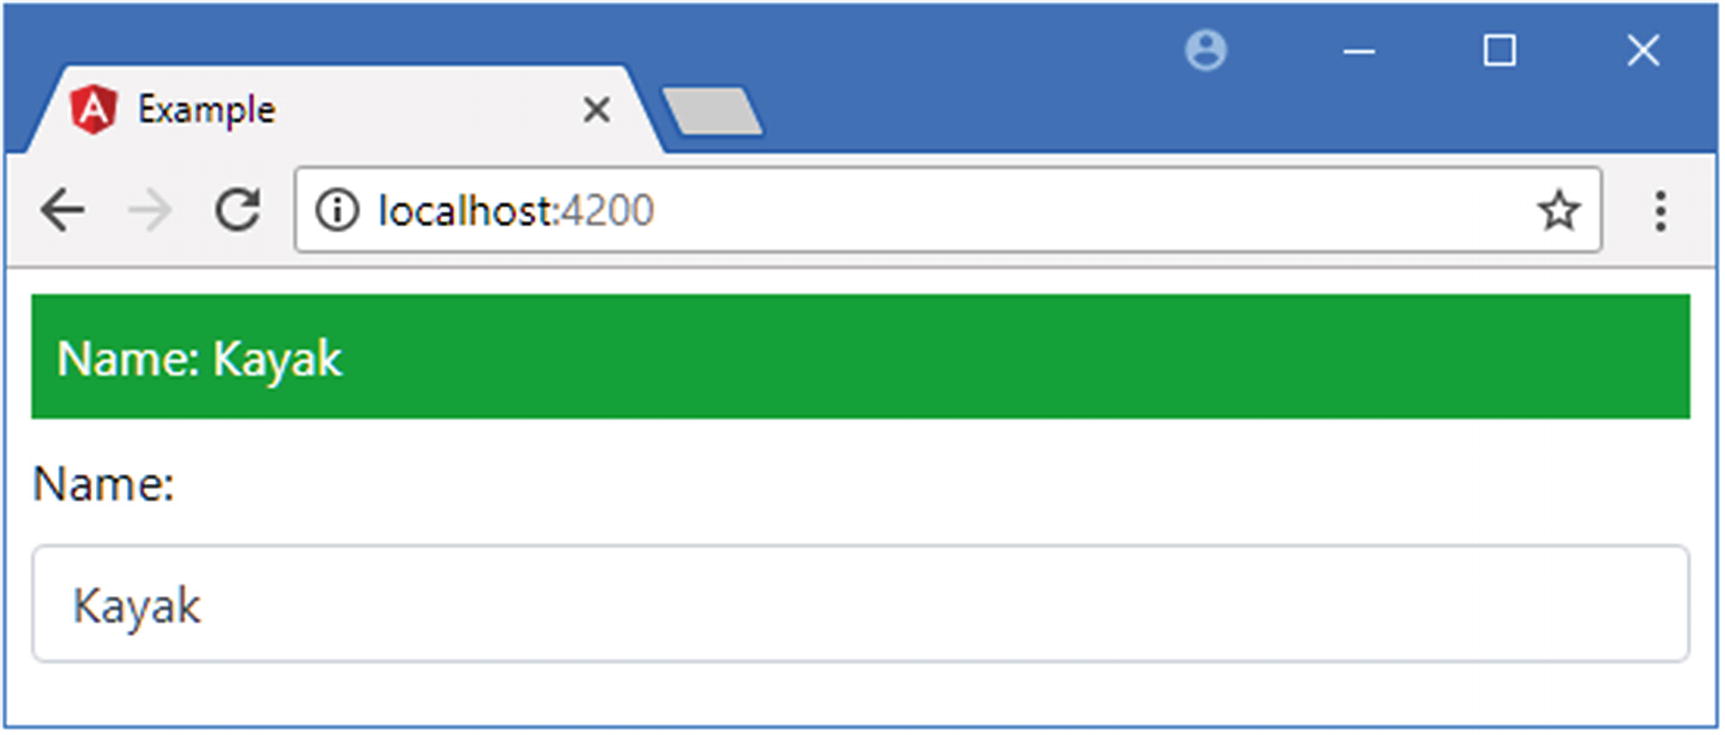
Using the Standard Property Binding in the template.html File in the src/app Folder
The new binding in this example specifies that the value property should be bound to the result of an expression that calls a method on the data model to retrieve a data object from the repository by specifying a key. It is possible that there is no data object with that key, in which case the repository method will return null.
If the result from the getProduct method isn’t null, then the expression will read the value of the name property and use it as the result. But if the result from the method is null, then the name property won’t be read, and the null coalescing operator (the || characters) will set the result to None instead.
Getting to Know the HTML Element Properties
Using property bindings can require some work figuring out which property you need to set. There is some inconsistency in the HTML specification. The name of most properties matches the name of the attribute that sets their initial value so that if you are used to setting the value attribute on an input element, for example, then you can achieve the same effect by setting the value property. Some property names don’t match their attribute names, and some properties are not configured by attributes at all.
The Mozilla Foundation provides a useful reference for all the objects that are used to represent HTML elements in the DOM at developer.mozilla.org/en-US/docs/Web/API. For each element, Mozilla provides a summary of the properties that are available and what each is used for. Start with HTMLElement (developer.mozilla.org/en-US/docs/Web/API/HTMLElement), which provides the functionality common to all elements. You can then branch out into the objects that are for specific elements, such as HTMLInputElement, which is used to represent input elements.

Using the standard property binding
Using the String Interpolation Binding
Angular provides a special version of the standard property binding, known as the string interpolation binding, that is used to include expression results in the text content of host elements. To understand why this special binding is useful, it helps to look at what binding is required when the standard property binding is used.
Setting an Element’s Content in the template.html File in the src/app Folder
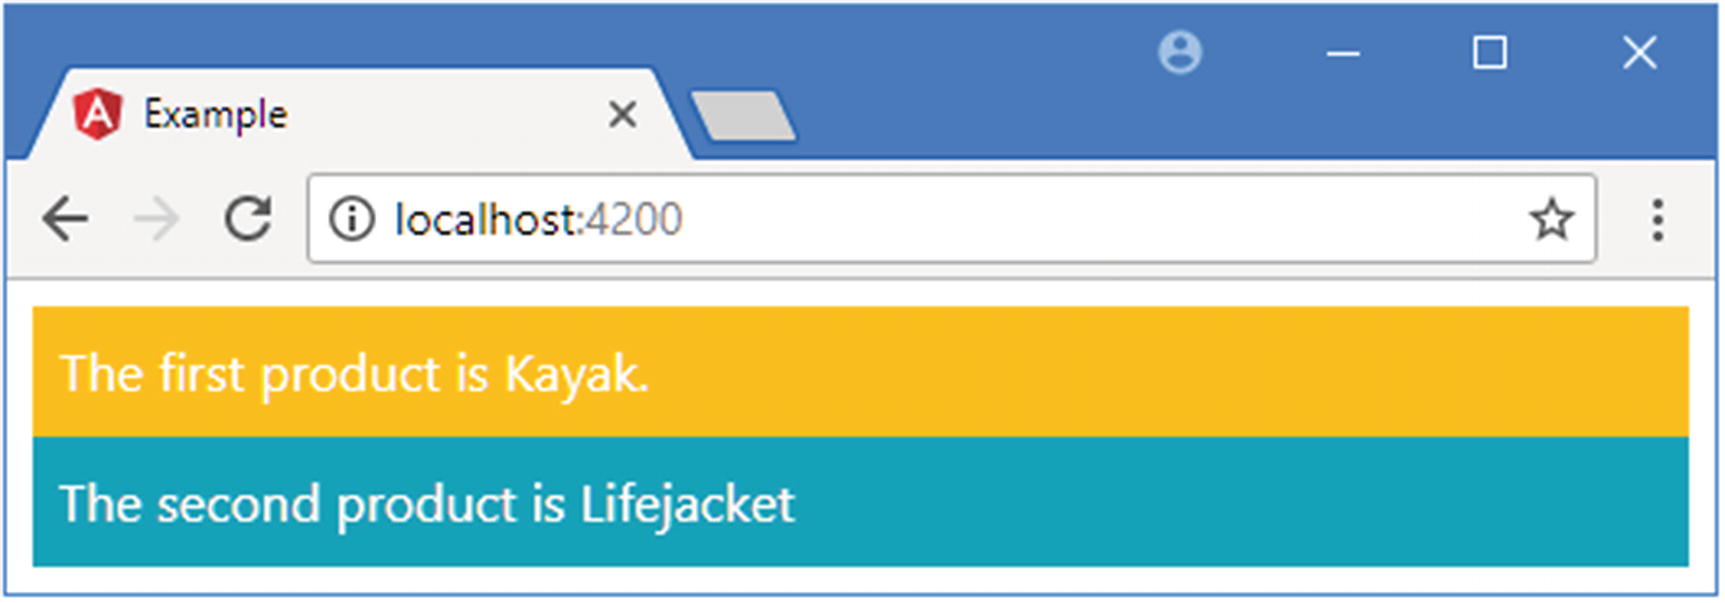
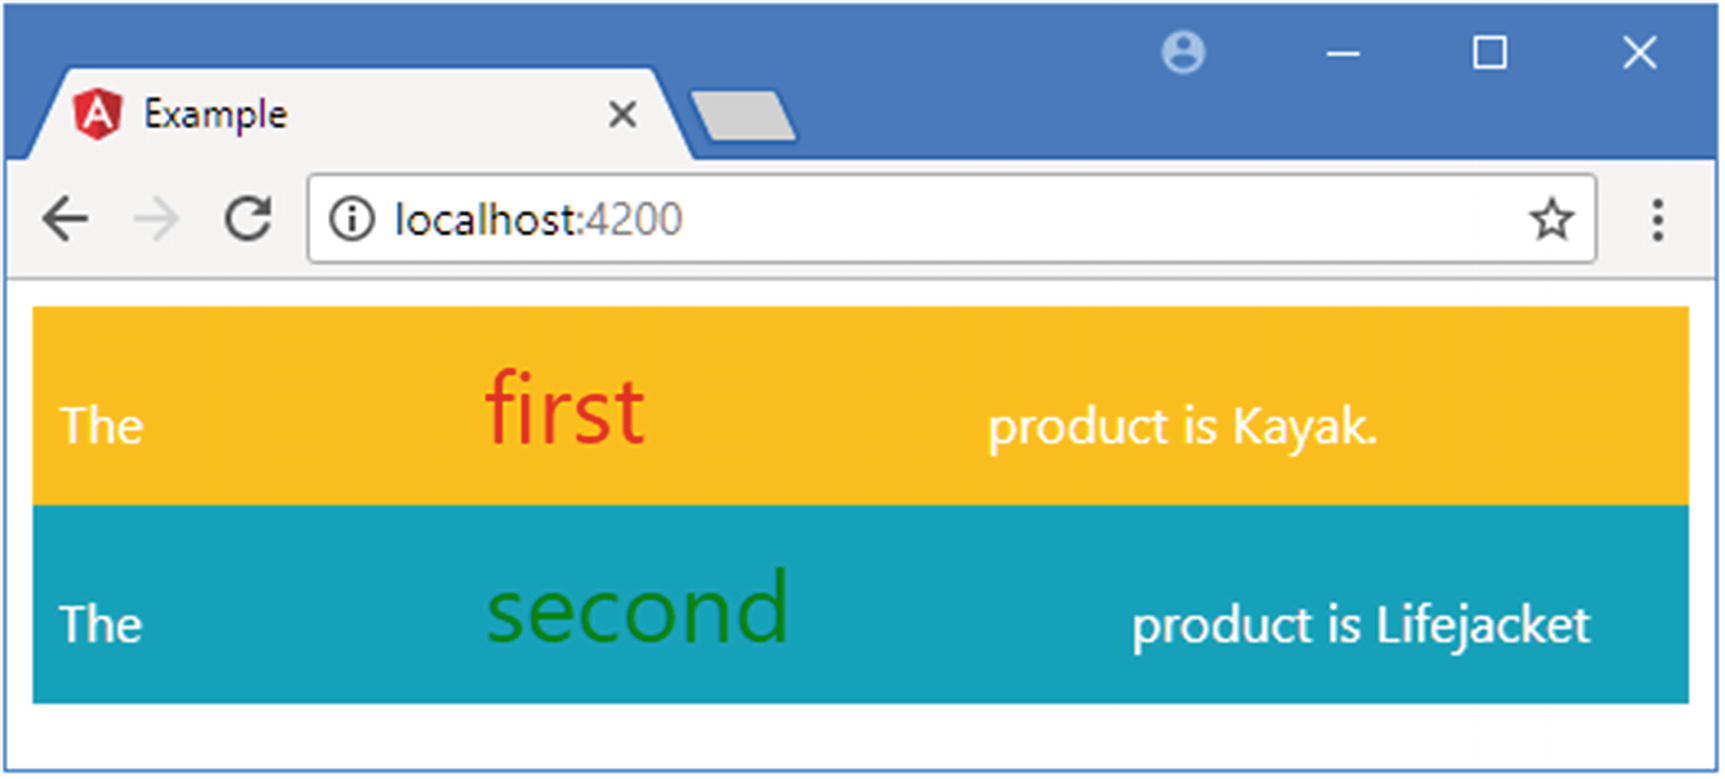
The expression in the new binding concatenates a literal string with the results of a method call in order to set the content of the div element.
The expression in this example is awkward to write, requiring careful attention to quotes, spaces, and brackets to ensure that the expected result is displayed in the output. The problem becomes worse for more complex bindings, where multiple dynamic values are interspersed among blocks of static content.
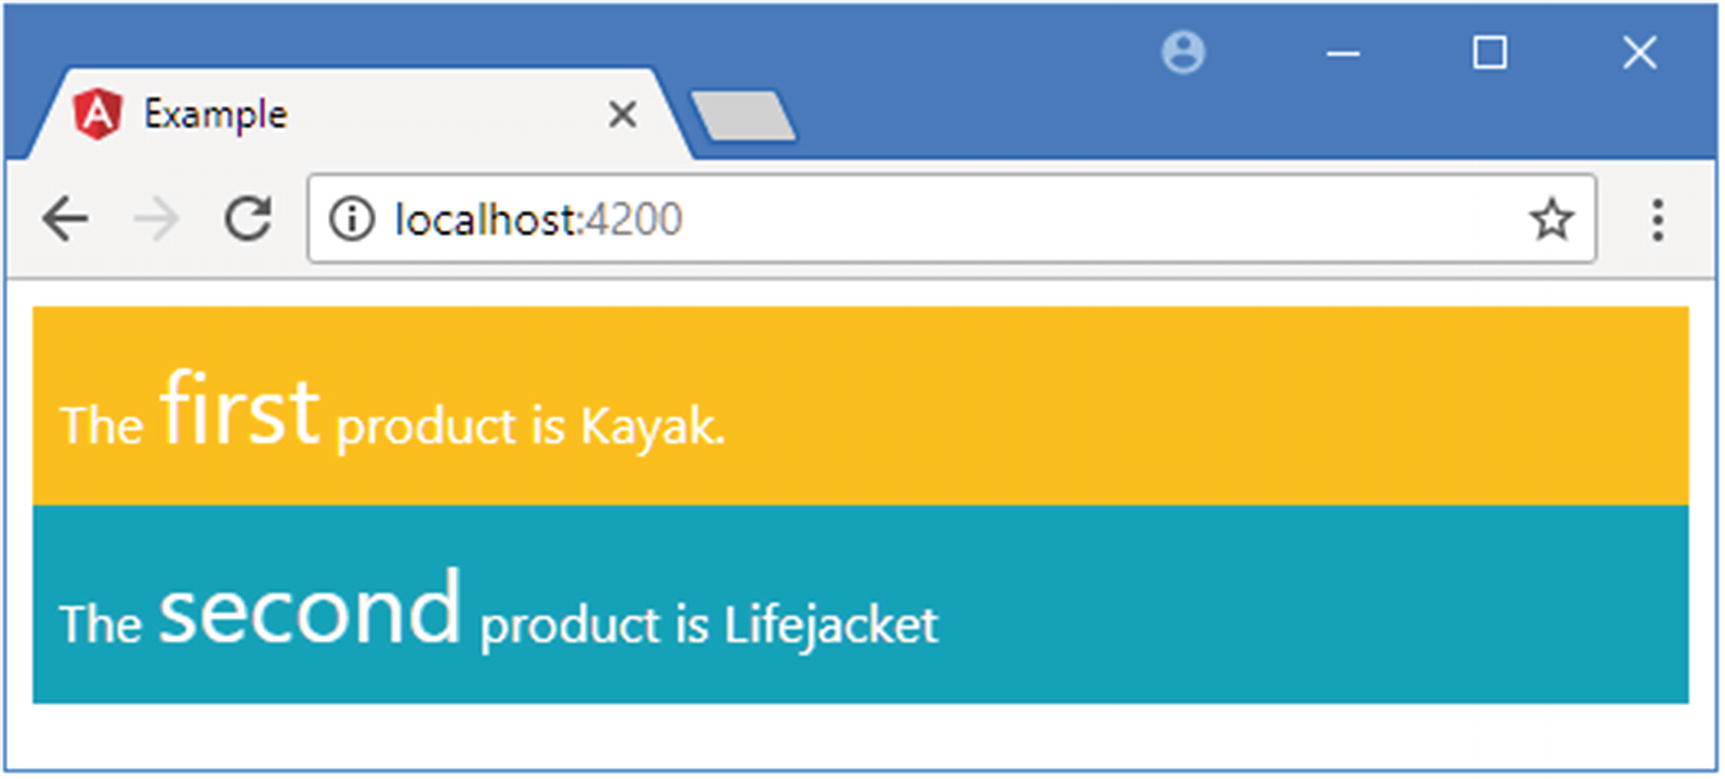
Using the String Interpolation Binding in the template.html File in the src/app Folder
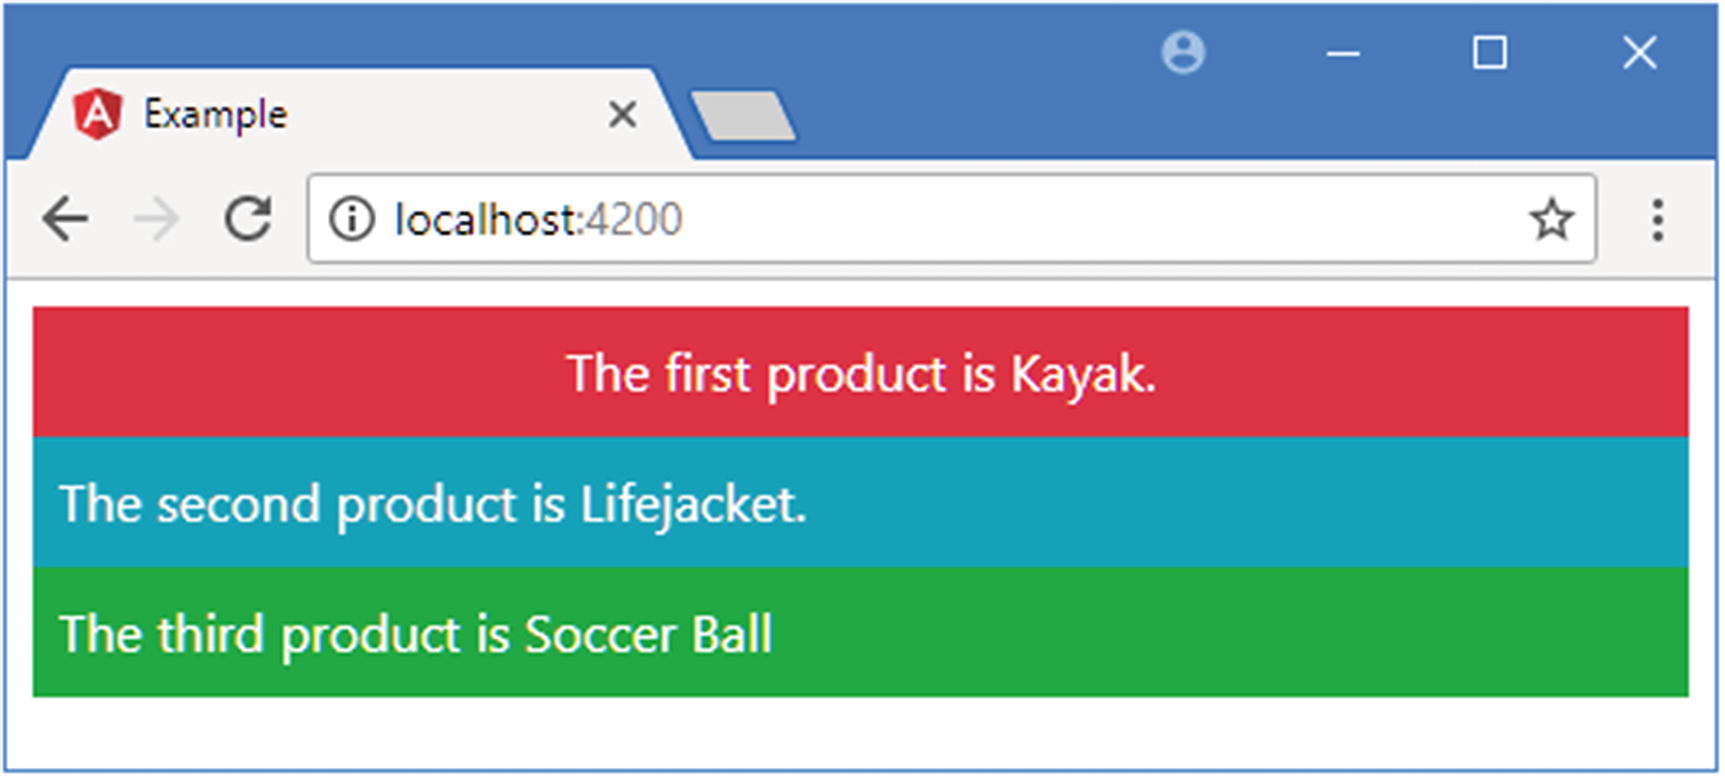
The string interpolation binding is denoted using pairs of curly brackets ({{ and }}). A single element can contain multiple string interpolation bindings.
Using the string interpolation binding
Using the Attribute Binding
There are some oddities in the HTML and DOM specifications that mean that not all HTML element attributes have equivalent properties in the DOM API. For these situations, Angular provides the attribute binding, which is used to set an attribute on the host element rather than setting the value of the JavaScript object that represents it in the DOM.
Using an Attribute Binding in the template.html File in the src/app Folder
Using an attribute binding
Setting Classes and Styles
Angular provides special support in property bindings for assigning the host element to classes and for configuring individual style properties. I describe these bindings in the sections that follow, along with details of the ngClass and ngStyle directives, which provide closely related features.
Using the Class Bindings
The Angular Class Bindings
Example | Description |
|---|---|
<div [class]="expr"></div> | This binding evaluates the expression and uses the result to replace any existing class memberships. |
<div [class.myClass]="expr"></div> | This binding evaluates the expression and uses the result to set the element’s membership of myClass. |
<div [ngClass]="map"></div> | This binding sets class membership of multiple classes using the data in a map object. |
Setting All of an Element’s Classes with the Standard Binding
Providing All Classes in a Single String in the component.ts File in the src/app Folder
The result from the getClasses method will include the p-2 class, which adds padding around the host element’s content, for all Product objects. If the value of the price property is less than 50, the bg-info class will be included in the result, and if the value is 50 or more, the bg-warning class will be included (these classes set different background colors).
Tip
You must ensure that the names of the classes are separated by spaces.
Setting Class Memberships in the template.html File in the src/app Folder
Setting class memberships
Setting Individual Classes Using the Special Class Binding
Using the Special Class Binding in the template.html File in the src/app Folder
The special class binding is specified with a target that combines the term class, followed by a period, followed by the name of the class whose membership is being managed. In the listing, there are two special class bindings, which manage the membership of the bg-success and bg-info classes.
The special class binding will add the host element to the specified class if the result of the expression is truthy (as described in the “Understanding Truthy and Falsy” sidebar). In this case, the host element will be a member of the bg-success class if the price property is less than 50 and a member of the bg-info class if the price property is 50 or more.
These bindings act independently from one another and do not interfere with any existing classes that an element belongs to, such as the p-2 class, which Bootstrap uses to add padding around an element’s content.
Understanding Truthy and Falsy
The false (boolean) value
The 0 (number) value
The empty string (“”)
null
undefined
NaN (a special number value)
All other values are truthy, which can be confusing. For example, "false" (a string whose content is the word false) is truthy. The best way to avoid confusion is to only use expressions that evaluate to the boolean values true and false.
Setting Classes Using the ngClass Directive
The Expression Result Types Supported by the ngClass Directive
Name | Description |
|---|---|
String | The host element is added to the classes specified by the string. Multiple classes are separated by spaces. |
Array | Each object in the array is the name of a class that the host element will be added to. |
Object | Each property on the object is the name of one or more classes, separated by spaces. The host element will be added to the class if the value of the property is truthy. |
Returning a Class Map Object in the component.ts File in the src/app Folder
The first property will assign the host element to the text-center class (which Bootstrap uses to center the text horizontally) and the bg-danger class (which sets the element’s background color). The second property evaluates to false, which means that the host element will not be added to the bg-info class. It may seem odd to specify a property that doesn’t result in an element being added to a class, but, as you will see shortly, the value of expressions is automatically updated to reflect changes in the application, and being able to define a map object that specifies memberships this way can be useful.
Using the ngClass Directive in the template.html File in the src/app Folder
Using the ngClass directive
Using the Style Bindings
The Angular Style Bindings
Example | Description |
|---|---|
<div [style.myStyle]="expr"></div> | This is the standard property binding, which is used to set a single style property to the result of the expression. |
<div [style.myStyle.units]="expr"></div> | This is the special style binding, which allows the units for the style value to be specified as part of the target. |
<div [ngStyle]="map"></div> | This binding sets multiple style properties using the data in a map object. |
Setting a Single Style Property
The standard property binding and the special style bindings are used to set the value of a single style property. The difference between these bindings is that the standard property binding must include the units required for the style, while the special binding allows for the units to be included in the binding target.
Adding Properties in the component.ts File in the src/app Folder
The fontSizeWithUnits property returns a value that includes a quantity and the units that quantity is expressed in: 30 pixels. The fontSizeWithoutUnits property returns just the quantity, without any unit information. Listing 12-15 shows how these properties can be used with the standard and special bindings.
Caution
Do not try to use the standard property binding to target the style property to set multiple style values. The object returned by the style property of the JavaScript object that represents the host element in the DOM is read-only. Some browsers will ignore this and allow changes to be made, but the results are unpredictable and cannot be relied on. If you want to set multiple style properties, then create a binding for each of them or use the ngStyle directive.
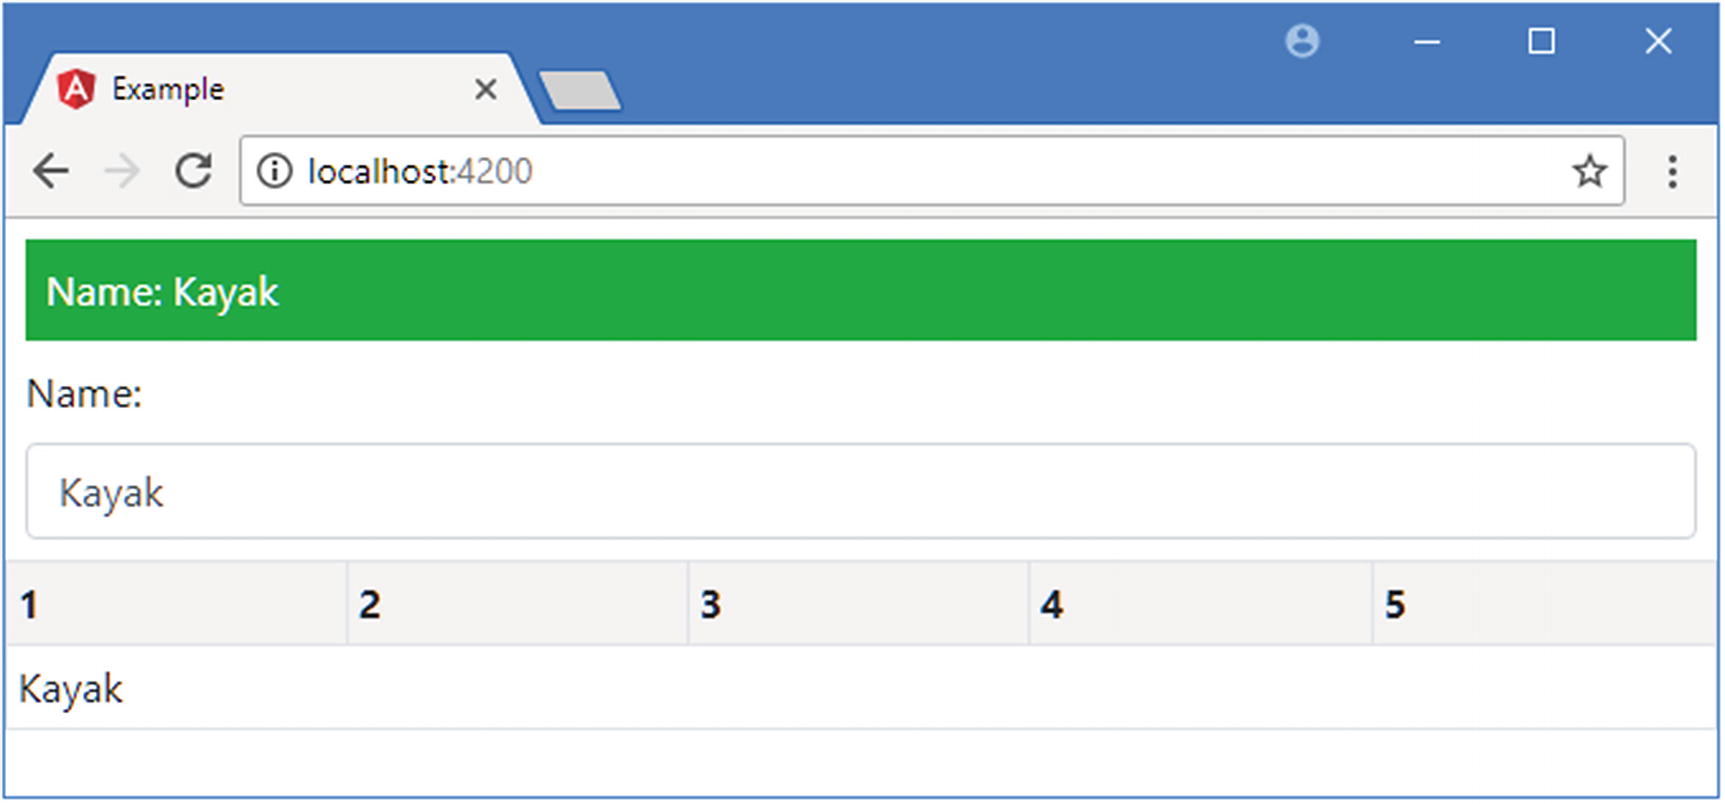
Using Style Bindings in the template.html File in the src/app Folder
The target for the binding is style.fontSize, which sets the size of the font used for the host element’s content. The expression for this binding uses the fontSizeWithUnits property, whose value includes the units, px for pixels, required to set the font size.
The target for the special binding is style.fontSize.px, which tells Angular that the value of the expression specifies the number in pixels. This allows the binding to use the component’s fontSizeWithoutUnits property, which doesn’t include units.
Tip
You can specify style properties using the JavaScript property name format ([style.fontSize]) or using the CSS property name format ([style.font-size]).
Setting individual style properties
Setting Styles Using the ngStyle Directive
Creating a Style Map Object in the component.ts File in the src/app Folder
Using the ngStyle Directive in the template.html File in the src/app Folder
Using the ngStyle directive
Updating the Data in the Application
When you start out with Angular, it can seem like a lot of effort to deal with the data bindings, remembering which binding is required in different situations. You might be wondering if it is worth the effort.
Bindings are worth understanding because their expressions are re-evaluated when the data they depend on changes. As an example, if you are using a string interpolation binding to display the value of a property, then the binding will automatically update when the value of the property is changed.
Preparing the Component in the component.ts File in the src/app Folder
I have imported the ApplicationRef type from the @angular/core module. When Angular performs the bootstrapping process, it creates an ApplicationRef object to represent the application. Listing 12-18 adds a constructor to the component that receives an ApplicationRef object as an argument, using the Angular dependency injection feature, which I describe in Chapter 19. Without going into detail now, declaring a constructor argument like this tells Angular that the component wants to receive the ApplicationRef object when a new instance is created.
These statements define variables in the global namespace and assign the ApplicationRef and Model objects to them. It is good practice to keep the global namespace as clear as possible, but exposing these objects allows them to be manipulated through the browser’s JavaScript console, which is important for this example.
The other methods added to the constructor allow a Product object to be retrieved from the repository based on its position, rather than by its key, and to generate a class map that differs based on the value of the price property.
Preparing for Changes in the template.html File in the src/app Folder
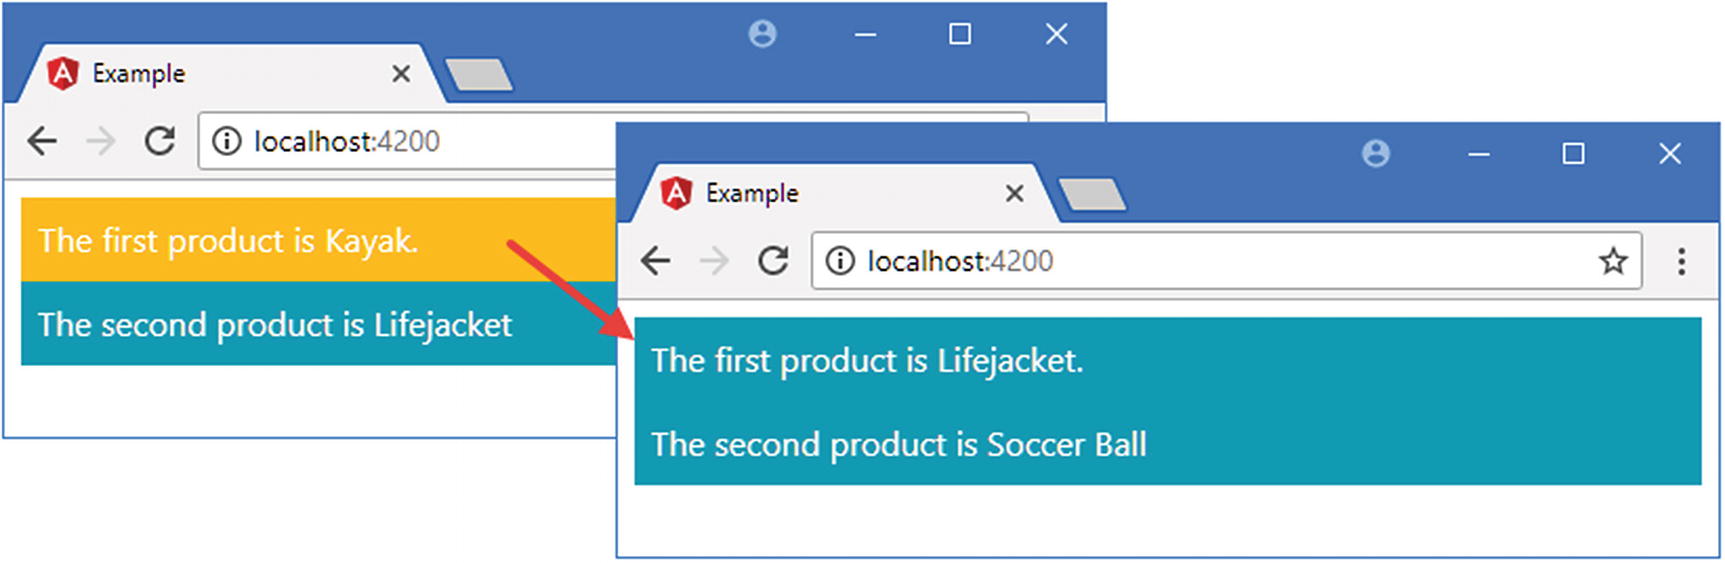
Manually updating the application model
It is worth taking a moment to think about what happened when the change detection process ran. Angular reevaluated the expressions on the bindings in the template and updated their values. In turn, the ngClass directive and the string interpolation binding reconfigured their host elements by changing their class memberships and displaying new content.
The happens because Angular data bindings are live, meaning that the relationship between the expression, the target, and the host element continues to exist after the initial content is displayed to the user and dynamically reflects changes to the application state. This effect is, I admit, much more impressive when you don’t have to make changes using the JavaScript console. I explain how Angular allows the user to trigger changes using events and forms in Chapter 14.
Summary
In this chapter, I described the structure of Angular data bindings and showed you how they are used to create relationships between the data in the application and the HTML elements that are displayed to the user. I introduced the property bindings and described how two of the built-in directives—ngClass and ngStyle—are used. In the next chapter, I explain how more of the built-in directives work.