Table of Contents for
Beginning Android Programming with Android Studio, Fourth Edition
 Beginning Android Programming with Android Studio, Fourth Edition
Published by
Wrox, 2016
Beginning Android Programming with Android Studio, Fourth Edition
Published by
Wrox, 2016
- Cover
- Contents
- Title Page
- Introduction
- Chapter 1: Getting Started with Android Programming
- Chapter 2: Using Android Studio for Android Development
- Chapter 3: Activities, Fragments, and Intents
- Chapter 4: Getting to Know the Android User Interface
- Chapter 5: Designing Your User Interface with Views
- Chapter 6: Displaying Pictures and Menus with Views
- Chapter 7: Data Persistence
- Chapter 8: Content Providers
- Chapter 9: Messaging
- Chapter 10: Location-Based Services
- Chapter 11: Networking
- Chapter 12: Developing Android Services
- Appendix: Answers to Exercises
- Copyright
- Dedication
- Credits
- About the Author
- About the Technical Editor
- Acknowledgments
- End User License Agreement
Chapter 10
Location-Based Services
You have seen the explosive growth of mobile apps in recent years. One category of apps that is very popular is Location-Based Services, commonly known as LBS. LBS apps track your location, and might offer additional services such as locating amenities nearby, offering suggestions for route planning, and so on. Of course, one of the key ingredients in an LBS app is maps, which present a visual representation of your location.
This chapter shows you how to make use of Google Maps in your Android application, as well as how to manipulate the map view programmatically. In addition, you find out how to obtain your geographical location using the LocationManager class available in the Android SDK. This chapter ends with a project to build a location tracker application that you can install on an Android device and use to track the location of friends and relatives using SMS messaging.
DISPLAYING MAPS
Google Maps is one of the many applications bundled with the Android platform. In addition to simply using the Maps application, you can also embed it into your own applications and make it do some very cool things. This section describes how to use Google Maps in your Android applications and programmatically perform the following:
- Change the views of Google Maps.
- Obtain the latitude and longitude of locations in Google Maps.
- Perform geocoding and reverse geocoding (translating an address to latitude and longitude and vice versa).
Creating the Project
To get started, you need to first create an Android project so that you can display Google Maps in your activity:
- Using Android Studio, create an Android project and name it LBS.
- From the Create New Project Wizard, select Google Maps Activity as shown in Figure 10.1.

Obtaining the Maps API Key
Beginning with the Android SDK release v1.0, you need to apply for a free Google Maps API key before you can integrate Google Maps into your Android application. When you apply for the key, you must also agree to Google's terms of use, so be sure to read them carefully.
To get a Google Maps key, open the google_maps_api.xml file that was created in your LBS project. Within this file is a link to create a new Google Maps key. Simply copy and paste the link into your browser and follow the instructions. Make note of the key that Google gives you because you need it later in this project.
Displaying the Map
You are now ready to display Google Maps in your Android application.
The following Try It Out shows you how.
Displaying the Zoom Control
The previous section showed how you can display Google Maps in your Android application. You can pan the map to any desired location and it updates on-the-fly. However, there is no way to use the emulator to zoom in or out from a particular location (on a real Android device you can pinch the map to zoom it). Thus, in this section, you find out how you can enable users to zoom in or out of the map using the built-in zoom controls.
Changing Views
By default, Google Maps is displayed in map view, which is basically drawings of streets and places of interest. You can also set Google Maps to display in satellite view using the setMapType() method of the GoogleMap class:
    public void onMapReady(GoogleMap googleMap) {
        mMap = googleMap;
        // Add a marker in Sydney and move the camera
        LatLng sydney = new LatLng(-34, 151);
        mMap.addMarker(new MarkerOptions().position(sydney).title(
"Marker in Sydney"));
        mMap.moveCamera(CameraUpdateFactory.newLatLng(sydney));
        mMap.setMapType(GoogleMap.MAP_TYPE_SATELLITE);
    }
Figure 10.4 shows Google Maps displayed in satellite view.
Navigating to a Specific Location
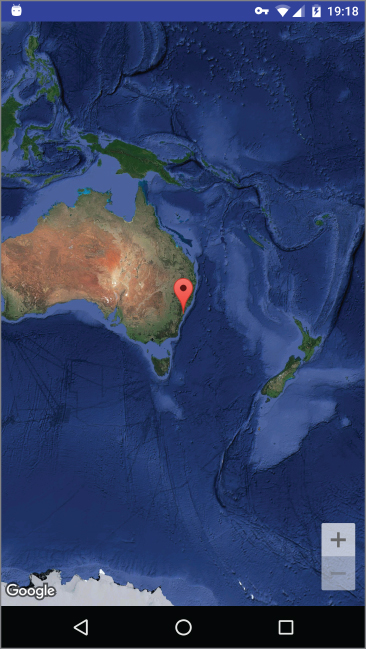
By default, Google Maps displays the map of Australia when it is first loaded. However, you can set Google Maps to display a particular location. To do so, you can use the moveCamera() method of the GoogleMap class.
The following Try It Out shows how you can programmatically animate Google Maps to a particular location.
Getting the Location That Was Touched
After using Google Maps for a while, you might want to know the latitude and longitude of a location corresponding to the position on the screen that was just touched. Knowing this information is very useful because you can determine a location's address—a process known as reverse geocoding (you find out how this is done in the next section).
To get the latitude and longitude of a point on the Google Map that was touched, you must set a onMapClickListener:
import android.support.v4.app.FragmentActivity;
import android.os.Bundle;
import android.util.Log;
import com.google.android.gms.maps.CameraUpdateFactory;
import com.google.android.gms.maps.GoogleMap;
import com.google.android.gms.maps.OnMapReadyCallback;
import com.google.android.gms.maps.SupportMapFragment;
import com.google.android.gms.maps.model.LatLng;
import com.google.android.gms.maps.model.MarkerOptions;
public class MapsActivity extends FragmentActivity implements OnMapReadyCallback {
    private GoogleMap mMap;
    @Override
    protected void onCreate(Bundle savedInstanceState) {
        super.onCreate(savedInstanceState);
        setContentView(R.layout.activity_maps);
        // Obtain the SupportMapFragment and get notified
        // when the map is ready to be used.
        SupportMapFragment mapFragment =
(SupportMapFragment) getSupportFragmentManager()
                .findFragmentById(R.id.map);
        mapFragment.getMapAsync(this);
    }
    @Override
    public void onMapReady(GoogleMap googleMap) {
        mMap = googleMap;
        LatLng boston = new LatLng(42.3601, -71.0589);
        mMap.addMarker(new MarkerOptions().position(boston).title("Boston, Mass"));
        mMap.moveCamera(CameraUpdateFactory.newLatLng(boston));
        mMap.setOnMapClickListener(new GoogleMap.OnMapClickListener() {
            @Override
            public void onMapClick(LatLng point) {
                Log.d("DEBUG","Map clicked [" + point.latitude +
 " / " + point.longitude + "]");
            }
        });
    }
}
You should see a logcat entry similar to this if you run the preceding code:
D/DEBUG: Map clicked [37.15198779979302 / -83.76536171883345]Geocoding and Reverse Geocoding
As mentioned in the preceding section, if you know the latitude and longitude of a location, you can find out its address using a process known as reverse geocoding. Google Maps in Android supports reverse geocoding via the Geocoder class. The following code snippet shows how you can retrieve the address of a location just touched using the getFromLocation() method:
import android.location.Address;
import android.location.Geocoder;
import android.support.v4.app.FragmentActivity;
import android.os.Bundle;
import android.widget.Toast;
import com.google.android.gms.maps.CameraUpdateFactory;
import com.google.android.gms.maps.GoogleMap;
import com.google.android.gms.maps.OnMapReadyCallback;
import com.google.android.gms.maps.SupportMapFragment;
import com.google.android.gms.maps.model.LatLng;
import com.google.android.gms.maps.model.MarkerOptions;
import java.io.IOException;
import java.util.List;
import java.util.Locale;
public class MapsActivity extends FragmentActivity implements OnMapReadyCallback {
private GoogleMap mMap;
@Override
protected void onCreate(Bundle savedInstanceState) {
super.onCreate(savedInstanceState);
setContentView(R.layout.activity_maps);
// Obtain the SupportMapFragment and get notified
// when the map is ready to be used.
SupportMapFragment mapFragment =
(SupportMapFragment) getSupportFragmentManager()
.findFragmentById(R.id.map);
mapFragment.getMapAsync(this);
}
@Override
public void onMapReady(GoogleMap googleMap) {
mMap = googleMap;
LatLng boston = new LatLng(42.3601, -71.0589);
mMap.addMarker(new MarkerOptions().position(boston).title("Boston, Mass"));
mMap.moveCamera(CameraUpdateFactory.newLatLng(boston));
mMap.setOnMapClickListener(new GoogleMap.OnMapClickListener() {
@Override
public void onMapClick(LatLng point) {
Geocoder geoCoder = new Geocoder(
getBaseContext(), Locale.getDefault());
try {
List<Address> addresses = geoCoder.getFromLocation(
point.latitude,point.longitude,1);
String add = "";
if (addresses.size() > 0)
{
for (int i=0; i<addresses.get(0).getMaxAddressLineIndex();
i++)
add += addresses.get(0).getAddressLine(i) + "\n";
}
Toast.makeText(getBaseContext()
, add, Toast.LENGTH_SHORT).show();
}
catch (IOException e) {
e.printStackTrace();
}
}
});
}
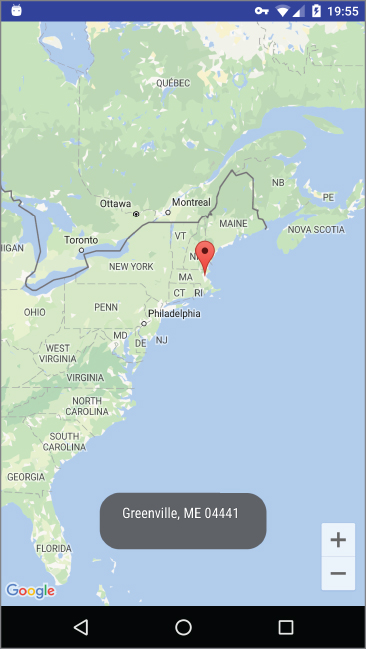
}The Geocoder object converts the latitude and longitude into an address using the getFromLocation() method. After the address is obtained, you display it using the Toast class. Keep in mind that pin will not move. In this example, we are only getting the address of a location that you touch. Figure 10.6 shows the application displaying the address of a location that was touched on the map.
If you know the address of a location but want to know its latitude and longitude, you can do so via geocoding. Again, you can use the Geocoder class for this purpose. The following code shows how you can find the exact location of the Empire State Building by using the getFromLocationName() method:
Geocoder geoCoder = new Geocoder(
                getBaseContext(), Locale.getDefault());
        try {
            List<Address> addresses = geoCoder.getFromLocationName(
                    "empire state building", 5);
            if (addresses.size() > 0) {
                LatLng p = new LatLng(
                        (int) (addresses.get(0).getLatitude()),
                        (int) (addresses.get(0).getLongitude()));
                mMap.moveCamera(CameraUpdateFactory.newLatLng(p));
            }
        } catch (IOException e) {
            e.printStackTrace();
        }
GETTING LOCATION DATA
Nowadays, mobile devices are commonly equipped with GPS receivers. Because of the many satellites orbiting the earth, you can use a GPS receiver to find your location easily. However, GPS requires a clear sky to work and hence does not always work indoors or where satellites can't penetrate (such as a tunnel through a mountain).
Another effective way to locate your position is through cell tower triangulation. When a mobile phone is switched on, it is constantly in contact with base stations surrounding it. By knowing the identity of cell towers, it is possible to translate this information into a physical location through the use of various databases containing the cell towers' identities and their exact geographical locations. The advantage of cell tower triangulation is that it works indoors, without the need to obtain information from satellites. However, it is not as precise as GPS because its accuracy depends on overlapping signal coverage, which varies quite a bit. Cell tower triangulation works best in densely populated areas where the cell towers are closely located.
A third method of locating your position is to rely on Wi-Fi triangulation. Rather than connect to cell towers, the device connects to a Wi-Fi network and checks the service provider against databases to determine the location serviced by the provider. Of the three methods described here, Wi-Fi triangulation is the least accurate.
On the Android platform, the SDK provides the LocationManager class to help your device determine the user's physical location. The following Try It Out shows how this is done in code.
You can combine both the GPS location provider with the network location provider within your application:
    @Override
    public void onResume() {
        super.onResume();
        //---request for location updates---
        lm.requestLocationUpdates(
                LocationManager.GPS_PROVIDER,
                0,
                0,
                locationListener);
        //---request for location updates---
        lm.requestLocationUpdates(
                LocationManager.NETWORK_PROVIDER,
                0,
                0,
                locationListener);
    }
However, be aware that doing so will cause your application to receive two different sets of coordinates, as both the GPS provider and the NETWORK provider will try to get your location using their own methods (GPS versus Wi-Fi and cell ID triangulation). Hence, it is important that you monitor the status of the two providers in your device and use the appropriate one. You can check the status of the two providers by implementing the following three methods (shown in bold) of the MyLocationListener class:
    private class MyLocationListener implements LocationListener
    {
        …
        //---called when the provider is disabled---
        public void onProviderDisabled(String provider) {
            Toast.makeText(getBaseContext(),
                    provider + " disabled",
                    Toast.LENGTH_SHORT).show();
        }
        //---called when the provider is enabled---
        public void onProviderEnabled(String provider) {
            Toast.makeText(getBaseContext(),
                    provider + " enabled",
                    Toast.LENGTH_SHORT).show();
        }
        //---called when there is a change in the provider status---
        public void onStatusChanged(String provider, int status,
            Bundle extras) {
            String statusString = "";
            switch (status) {
                case android.location.LocationProvider.AVAILABLE:
                    statusString = "available";
                case android.location.LocationProvider.OUT_OF_SERVICE:
                    statusString = "out of service";
                case android.location.LocationProvider.TEMPORARILY_UNAVAILABLE:
                    statusString = "temporarily unavailable";
            }
            Toast.makeText(getBaseContext(),
                    provider + " " + statusString,
                    Toast.LENGTH_SHORT).show();
        }
    }
MONITORING A LOCATION
One very cool feature of the LocationManager class is its ability to monitor a specific location. This is achieved using the addProximityAlert() method.
The following code snippet shows how to monitor a particular location such that if the user is within a five-meter radius from that location, your application will fire an intent to launch the web browser:
import android.app.PendingIntent;
import android.content.Intent;
import android.net.Uri;
        //---use the LocationManager class to obtain locations data---
        lm = (LocationManager)
            getSystemService(Context.LOCATION_SERVICE);
        //---PendingIntent to launch activity if the user is within
        // some locations---
        PendingIntent pendingIntent = PendingIntent.getActivity(
            this, 0, new
            Intent(android.content.Intent.ACTION_VIEW,
              Uri.parse("http://www.amazon.com")), 0);
        lm.addProximityAlert(37.422006, -122.084095, 5, -1, pendingIntent);
The addProximityAlert() method takes five arguments:
- Latitude
- Longitude
- Radius (in meters)
- Expiration (duration for which the proximity alert is valid, after which it is deleted; –1 for no expiration)
- Pending intent
Note that if the Android device's screen goes to sleep, the proximity is also checked once every four minutes in order to preserve the battery life of the device.
SUMMARY
This chapter took a whirlwind tour of the GoogleMap object, which displays Google Maps in your Android application. You have learned the various ways in which the map can be manipulated. You also have also seen how you can obtain geographical location data using the various network providers: GPS, cell ID, or Wi-Fi triangulation.
EXERCISES
- If you have embedded the Google Maps API into your Android application but it does not show the map when the application is loaded, what could be the likely reasons?
- What is the difference between geocoding and reverse geocoding?
- Name the two location providers that you can use to obtain your location data.
You can find answers to the exercises in the appendix.
WHAT YOU LEARNED IN THIS CHAPTER
| Topic | Key Concepts |
| Displaying the GoogleMap | <string name="google_maps_key" templateMergeStrategy="preserve" translatable="false">YOUR_KEY_HERE</string> |
| Displaying the zoom controls | map:uiZoomControls="true" |
| Programmatically zooming in or out of the map | mMap.animateCamera(CameraUpdateFactory.zoomTo(7)); |
| Changing views | mMap.setMapType(GoogleMap.MAP_TYPE_SATELLITE); |
| Animating to a particular location |
|
| Getting the location of the map touched |
|
| Geocoding and reverse geocoding | Use the Geocoder class |
| Setting a Proximity Alert |
|