I first started playing with the Android Software Development Kit (SDK) before it was officially released as version 0.8. Back then, the tools were unpolished, the application programming interfaces (APIs) in the SDK were unstable, and the documentation was sparse. Android is now one of the most popular mobile operating systems in the world.
Every day, more developers are trying Android development using Android Studio, either as a hobby or professionally. The current challenge for many beginning developers who want to move into the exciting world of android development is trying to determine where to start.
It was with this challenge in mind that I was motivated to write this book, one that could benefit beginning Android programmers and enable them to write progressively more sophisticated applications.
This book is written to help jump-start beginning Android developers, covering the necessary topics in a linear manner so that you can build on your knowledge without being overwhelmed by the details. I adopt the philosophy that the best way to learn is by doing. The numerous Try It Out sections in each chapter first show you how to build something. Then the follow-up How It Works sections explain how everything works. I have also taken this opportunity to further improve the previous edition of this book by addressing feedback from readers and adding additional topics that are important to beginning Android developers.
Although Android programming is a huge topic, my aim for this book is threefold: to get you started with the fundamentals, to help you understand the underlying architecture of the SDK, and to appreciate why things are done in certain ways. It is beyond the scope of any book to cover everything under the sun related to Android programming. However, I am confident that after reading this book (and doing the exercises), you will be well equipped to tackle your next Android programming challenge.
This book is targeted for the beginning Android developer who wants to start developing applications using Google's Android SDK. To truly benefit from this book, you should have some background in programming and at least be familiar with object-oriented programming (OOP) concepts. If you are totally new to Java—the language used for Android development—you might want to take a programming course in Java programming or grab one of many good books on Java programming. In my experience, if you already know C# or VB.NET, learning Java doesn't require too much effort. If you're already comfortable with C# or VB.NET, you should be comfortable just following along with the Try It Outs.
For those totally new to programming, I know the lure of developing mobile apps and making some money is tempting. However, before attempting to try out the examples in this book, I think a better starting point would be to first learn the basics of programming.
This book covers the fundamentals of Android programming using the Android SDK. It is divided into 12 chapters and one appendix.
This book breaks down the task of learning Android programming into several smaller chunks, enabling you to digest each topic before delving into a more advanced one.
If you are a total beginner to Android programming, start with Chapter 1. After you have familiarized yourself with the basics, head to Chapter 2 and get to know the Android Studio IDE. When you are ready, continue with Chapter 3 and gradually move into more advanced topics.
A feature of this book is that all the code samples in each chapter are independent of those discussed in previous chapters. This gives you the flexibility to dive into the topics that interest you and start working on the Try It Out projects.
All the examples in this book run on the Android emulator (which is included as part of the Android SDK and Android Studio). However, to get the most out of this book, it would be useful to have a real Android device (though it's not absolutely necessary).
To help you get the most from the text and keep track of what's happening, a number of conventions are used throughout the book.
As for other conventions in the text:
persistence.properties.We use a monofont type with no highlighting for most code examples.
We use bolding to emphasize code that is of particular importance in the
present context.As you work through the examples in this book, you may choose either to type in all the code manually or to use the source code files that accompany the book. All the source code used in this book is available for download at www.wrox.com. When at the site, simply locate the book's title (use the Search box or one of the title lists) and click the Download Code link on the book's detail page to obtain all the source code for the book.
You'll find the filename of the project you need at the end of the title of the Try it Out features:
We make every effort to ensure that there are no errors in the text or in the code. However, no one is perfect, and mistakes do occur. If you find an error in one of our books, such as a spelling mistake or faulty piece of code, we would be very grateful for your feedback. By sending in errata, you might save another reader hours of frustration and at the same time help us provide even higher-quality information.
To find the errata page for this book, go to www.wrox.com and locate the title using the Search box or one of the title lists. Then, on the book details page, click the Book Errata link. On this page, you can view all errata that has been submitted for this book and posted by Wrox editors.
If you don't spot “your” error on the Book Errata page, go to www.wrox.com/contact/techsupport.shtml and complete the form there to send us the error you have found. We'll check the information and, if appropriate, post a message to the book's errata page and fix the problem in subsequent editions of the book.
For author and peer discussion, join the P2P forums at p2p.wrox.com. The forums are a web-based system for you to post messages relating to Wrox books and related technologies. There, you also can interact with other readers and technology users. The forums offer a subscription feature that enables you to receive emails about topics of interest (of your choosing) when new posts are made to the forums. Wrox authors, editors, other industry experts, and your fellow readers are present on these forums.
At p2p.wrox.com, you will find a number of different forums that will help you not only as you read this book but also as you develop your own applications. To join the forums, follow these steps:
After you join, you can post new messages and respond to messages posted by other users. You can read messages at any time on the web. If you want to have new messages from a particular forum emailed to you, click the Subscribe to This Forum icon next to the forum name in the forum listing.
For more information about how to use the Wrox P2P, be sure to read the P2P FAQs for answers to questions about how the forum software works, as well as many common questions specific to P2P and Wrox books. To read the FAQs, click the FAQ link on any P2P page.
Welcome to the world of Android! This chapter explains what Android is and what makes it so compelling to both developers and device manufacturers. It also shows you how to obtain and set up all the necessary tools so that you can test your application on an Android emulator in Android Studio 2 and how to get started with developing your first Android application. By the end of this chapter, you will be equipped with the basic knowledge you need to explore more sophisticated techniques and tricks for developing your next killer Android application.
Android is a mobile operating system that is based on a modified version of Linux. It was originally developed by a startup of the same name, Android, Inc. In 2005, as part of its strategy to enter the mobile space, Google purchased Android, Inc. and took over its development work (as well as its development team).
Google wanted the Android OS to be open and free, so most of the Android code was released under the open source Apache License. That means anyone who wants to use Android can do so by downloading the full Android source code. Moreover, vendors (typically hardware manufacturers) can add their own proprietary extensions to Android and customize Android to differentiate their products from others. This development model makes Android very attractive to vendors, especially those companies affected by the phenomenon of Apple's iPhone, which was a hugely successful product that revolutionized the smartphone industry. When the iPhone was launched, many smartphone manufacturers had to scramble to find new ways of revitalizing their products. These manufacturers saw Android as a solution, meaning they will continue to design their own hardware and use Android as the operating system that powers it. Some companies that have taken advantage of Android's open source policy include Motorola and Sony Ericsson, which have been developing their own mobile operating systems for many years.
The main advantage to adopting Android is that it offers a unified approach to application development. Developers need only develop for Android in general, and their applications should be able to run on numerous different devices, as long as the devices are powered using Android. In the world of smartphones, applications are the most important part of the success chain.
Android has gone through quite a number of updates since its first release. Table 1.1 shows the various versions of Android and their codenames.
Table 1.1 A Brief History of Android Versions
| ANDROID VERSION | RELEASE DATE | CODENAME |
| 1.1 | February 9, 2009 | |
| 1.5 | April 30, 2009 | Cupcake |
| 1.6 | September 15, 2009 | Donut |
| 2.0/2.1 | October 26, 2009 | Éclair |
| 2.2 | May 20, 2010 | Froyo |
| 2.3 | December 6, 2010 | Gingerbread |
| 3.0/3.1/3.2 | February 22, 2011 | Honeycomb |
| 4.0 | October 18, 2011 | Ice Cream Sandwich |
| 4.1 | July 9, 2012 | Jelly Bean |
| 4.4 | October 31, 2013 | KitKat |
| 5.0 | November 12, 2014 | Lollipop |
| 6.0 | October 5, 2015 | Marshmallow |
| 7.0 | TBD | Nougat |
In 2016, Google released Android 7.0; the following are the key changes in Android 7.0:
One important thing to keep in mind as you are looking at Android versions is that each version has its own features and APIs (application programming interfaces). Therefore, if your application is written for the newest version of Android, and it uses an API that was not present in an older version of Android, then only devices running that newer version of Android will be able to use your application.
Because Android is open source and freely available to manufacturers for customization, there are no fixed hardware or software configurations. However, the base Android OS supports many features, including
Android's web browser is based on the open source WebKit and Chrome's V8 JavaScript engine.
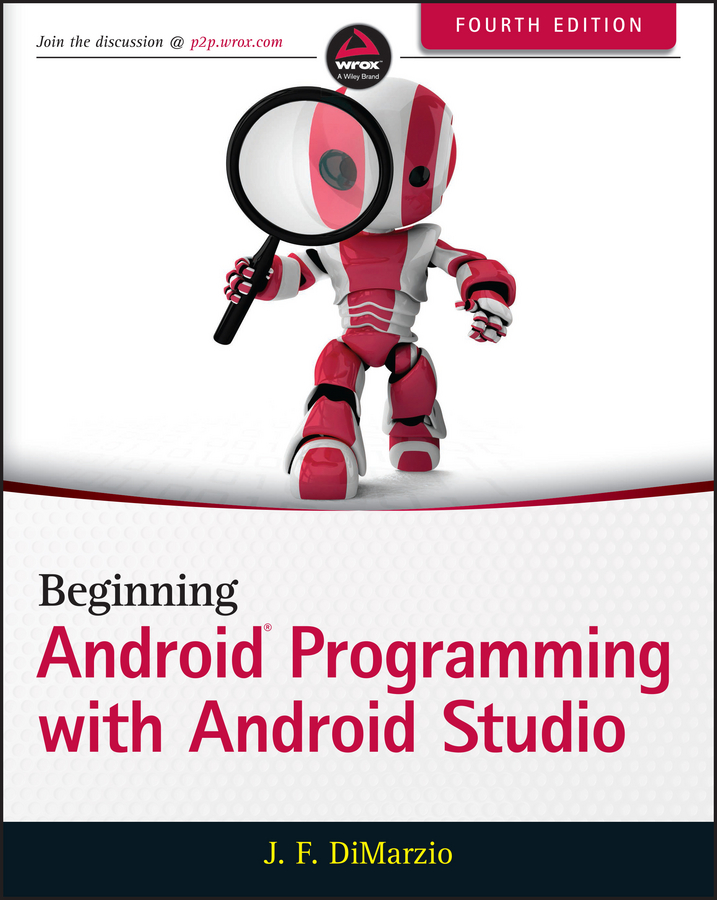
To understand how Android works, take a look at Figure 1.1, which shows the various layers that make up the Android operating system (OS).
The Android OS is roughly divided into five sections in four main layers:
Android devices come in all shapes and sizes including, but not limited to, the following types of devices:
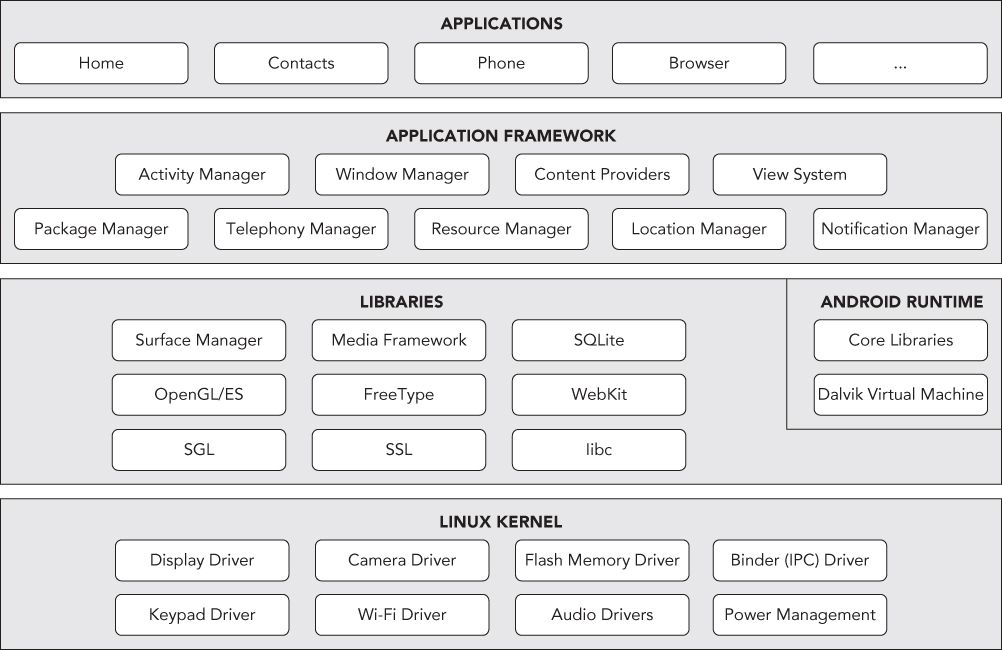
Chances are good that you own at least one of the preceding devices. Figure 1.2 shows the Samsung Galaxy Edge 7.
Another popular category of devices is the tablet. Tablets typically come in two sizes: 7″ and 10″, measured diagonally.
Besides smartphones and tablets, Android is used in dedicated devices, such as e-book readers. Figure 1.4 shows the Barnes and Noble's NOOK Color running the Android OS.
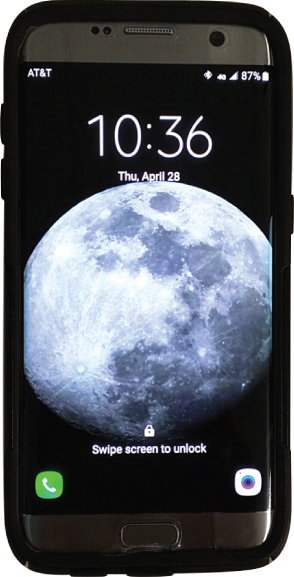
In addition to the popular mobile devices I've already mentioned, Android is finding its way onto your wrist. Smartwatches, and “wearables” in general, have become a major segment of the Android population. Figure 1.3 shows the Motorola Moto 360 Smartwatch, which runs Android Wear (a version of Android OS specifically designed for wearables).
At the time of writing, the Samsung Galaxy Nexus (see Figure 1.4) is the only device running a pure version of Android. Many manufacturers add their own modifications to the Android OS for use on their specific devices. Motorola devices have Motoblur, HTC devices have HTC Sense, and so on. However, the Nexus devices always run a clean version of Android with no modifications.
As mentioned earlier, one of the main factors determining the success of a smartphone platform is the applications that support it. It is clear from the success of the iPhone that applications play a very vital role in determining whether a new platform swims or sinks. Also, making these applications accessible to the general user is extremely important.
Users can simply use the Google Play application that is preinstalled on their Android devices to directly download third-party applications to their devices. Both paid and free applications are available in the Google Play Store, although paid applications are available only to users in certain countries because of legal issues.
Now that you know what Android is and what its feature set contains, you are probably anxious to get your hands dirty and start writing some applications! Before you write your first app, however, you need to download the required tools.
For Android development, you can use a Mac, a Windows PC, or a Linux machine. You can freely download all the necessary tools. Most of the examples provided in this book are written to work on Android Studio. For this book, I am using a Windows 10 computer to demonstrate all the code samples. If you are using a Mac or Linux computer, the screenshots should look similar. Some minor differences might be present, but you should be able to follow along without problems.
Let the fun begin!
The first and most important piece of software you need to download is Android Studio 2. After you have downloaded and installed Android Studio 2, you can use the SDK Manager to download and install multiple versions of the Android SDK. Having multiple versions of the SDK available enables you to write programs that target different devices. For example, you can write one version of an application that specifically targets Android Nougat, but because that flavor of Android is on less than 1% of devices, with multiple versions of the SDK you can also write a version of your app that uses older features and targets Marshmallow or Lollipop users. You can use the Android Device Manager to set up device emulators.
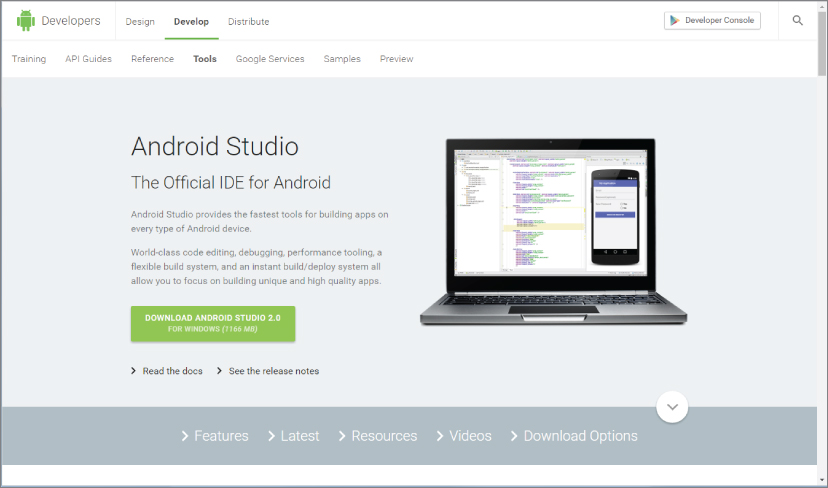
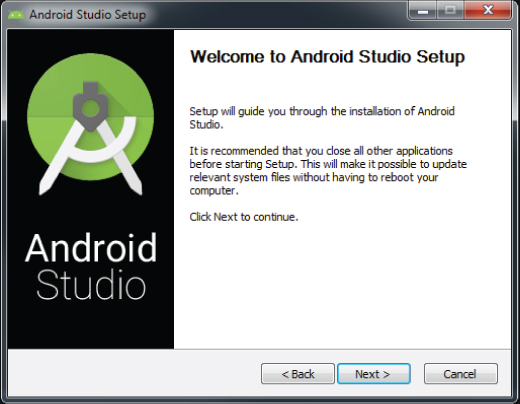
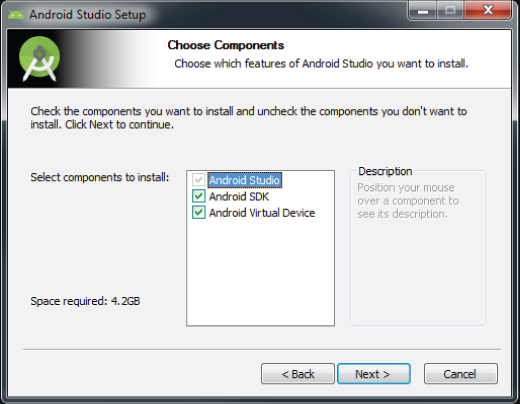
You can download Android Studio 2 from http://developer.android.com/sdk/index.html (see Figure 1.5).
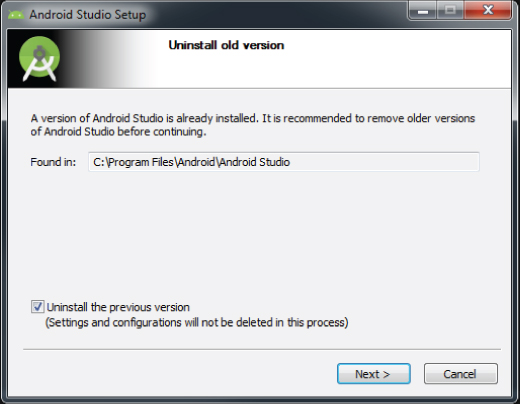
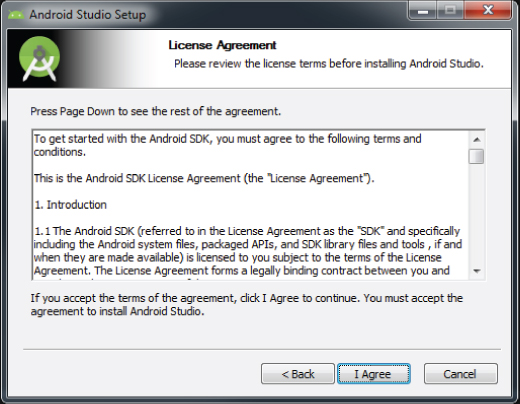
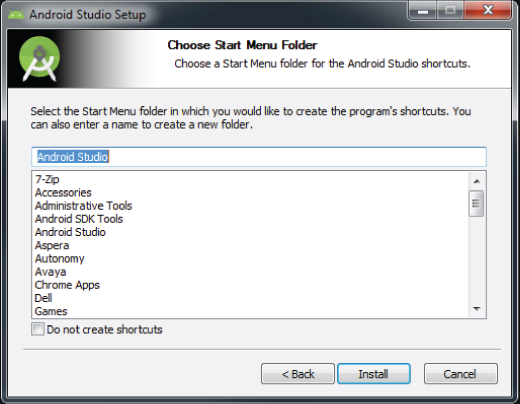
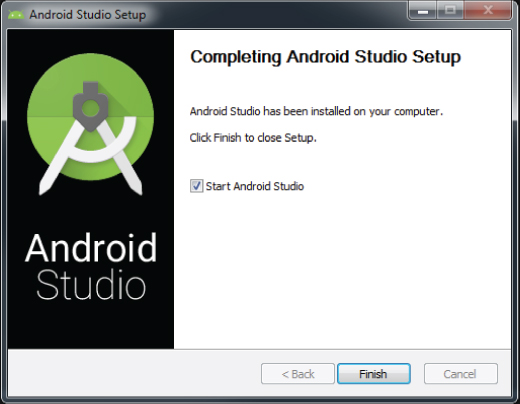
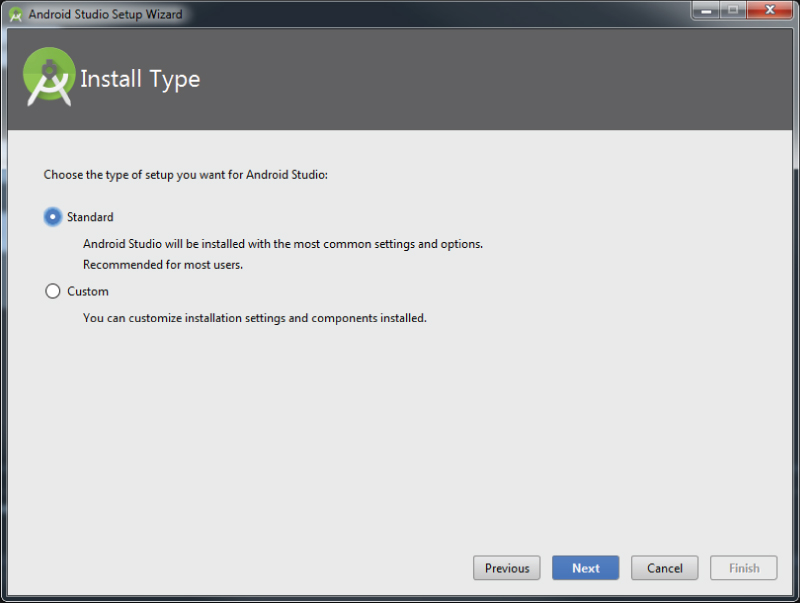
Android Studio 2 is packaged in an executable. Run the install process to set up Android Studio 2. After you've downloaded and run the setup executable, use the following steps to go through the installation process:
Now that Android Studio 2 is installed, you need to adjust the settings and options using the following steps:
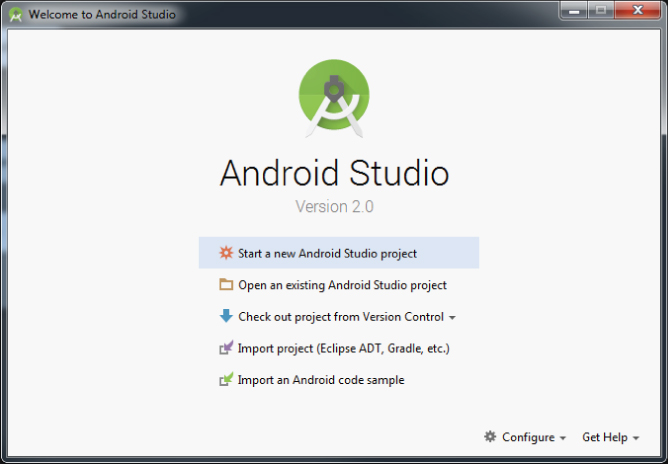
Now that Android Studio is set up, it's time to install the latest and greatest Android SDK.
The most important piece of software you need to download is, of course, the Android SDK. The Android SDK contains all of the packages and tools required to develop a functional Android application. The SDKs are named after the version of Android OS to which they correspond. By default, the Marshmallow SDK was installed with Android Studio 2, which means you can develop applications that will run seamlessly on devices with Android Marshmallow.
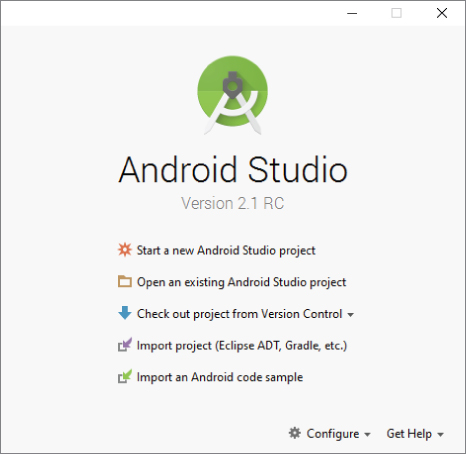
However, if you want to install a different Android SDK, you can do so using the SDK Manager from the Android Studio welcome screen (shown in Figure 1.15). From this screen, click the Configure drop-down menu in the lower-right corner. The Configure selection menu opens. Choose SDK Manager from this menu.
The SDK configuration screen, shown in Figure 1.16, shows that the Marshmallow SDK is already installed. Android N is available to be installed (as of the writing of this book Android Nougat was in a finalized beta, so it might be named differently now).
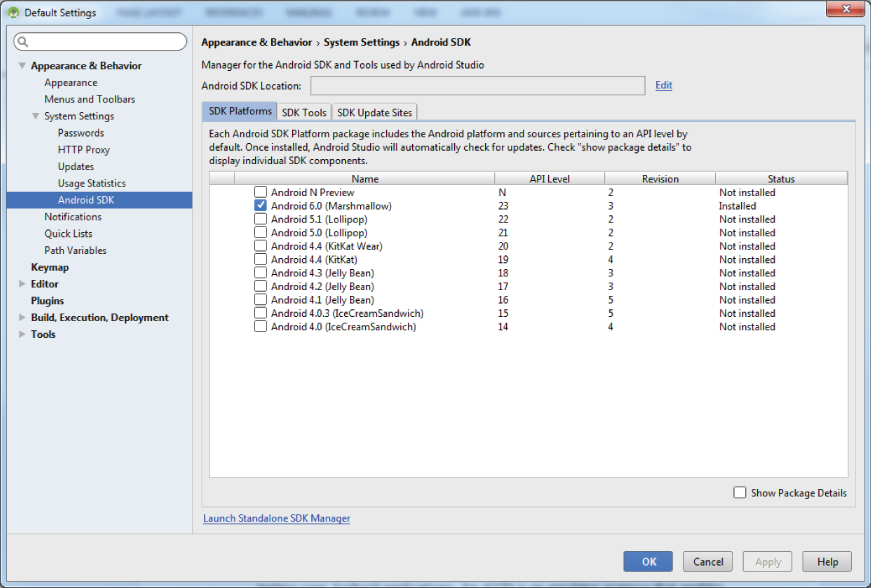
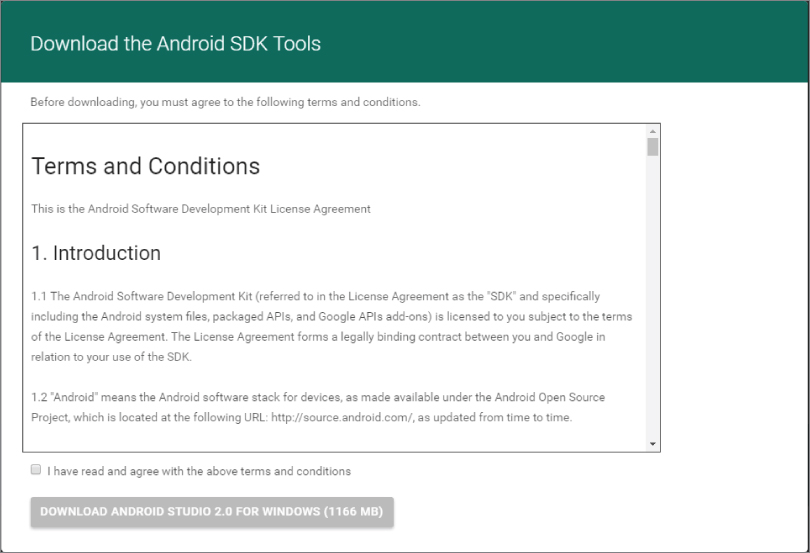
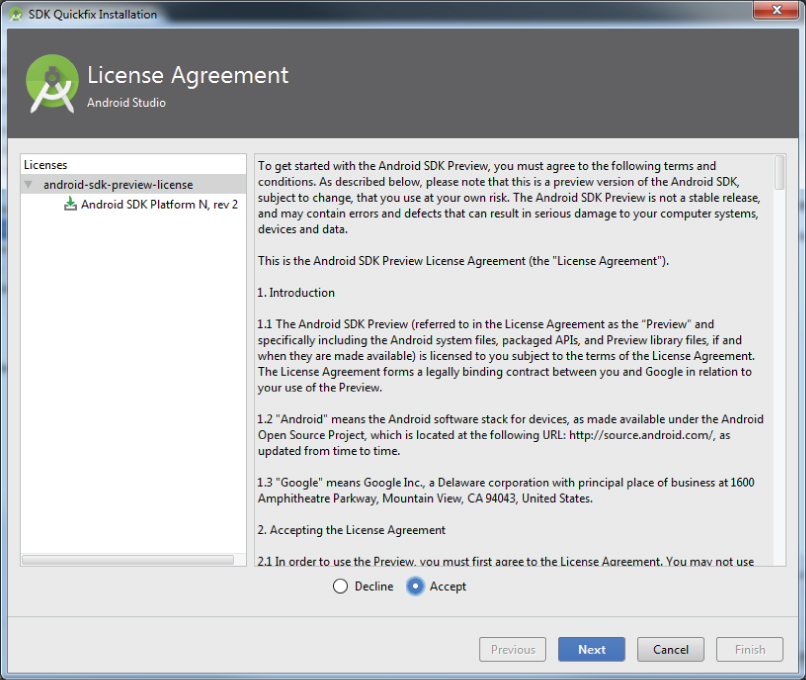
Select Android Nougat, click Apply, and then click OK. However, before the SDK is installed you must accept the licensing agreement as shown in Figure 1.17.
The setup process for Android Studio is now complete. The next section explains how to set up an Android Virtual Device that you can use to test your applications.
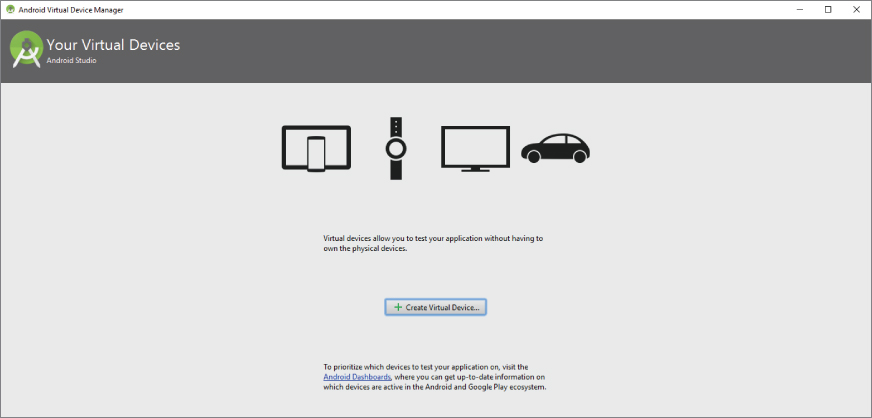
The next step is to create an Android Virtual Device (AVD) you can use for testing your Android applications. An AVD is an emulator instance that enables you to model an actual device. Each AVD consists of a hardware profile; a mapping to a system image; and emulated storage, such as a secure digital (SD) card. One important thing to remember about emulators is that they are not perfect. There are some applications, such as games (which are GPU heavy) or applications that use sensors such as the GPS or accelerometer. These types of applications cannot be simulated with the same speed or consistency within an emulator as they can when running on an actual device. However, the emulator is good for doing some generalized testing of your applications.
You can create as many AVDs as you want to test your applications with different configurations. This testing is important to confirm the behavior of your application when it is run on different devices with varying capabilities.
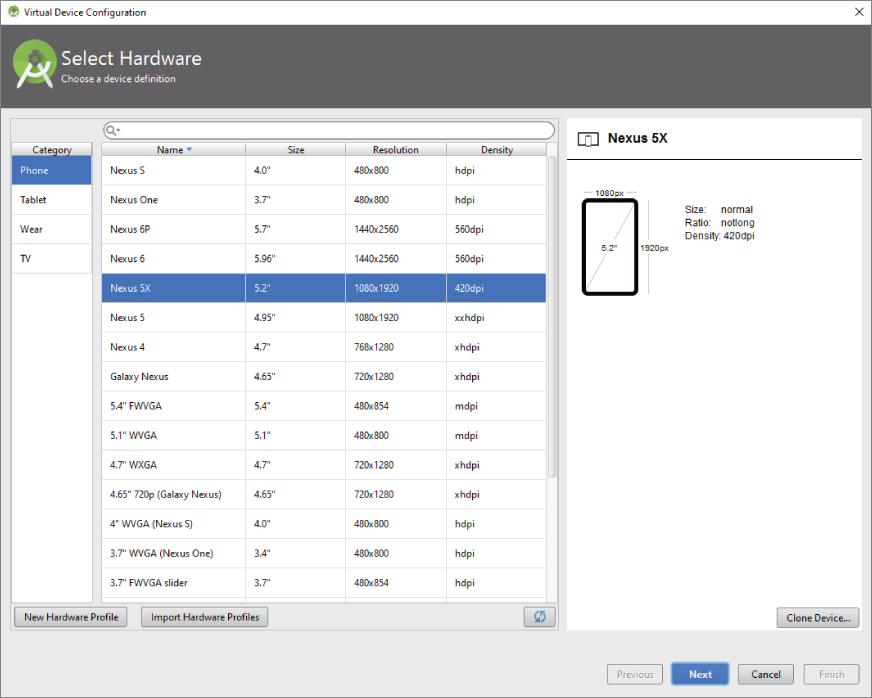
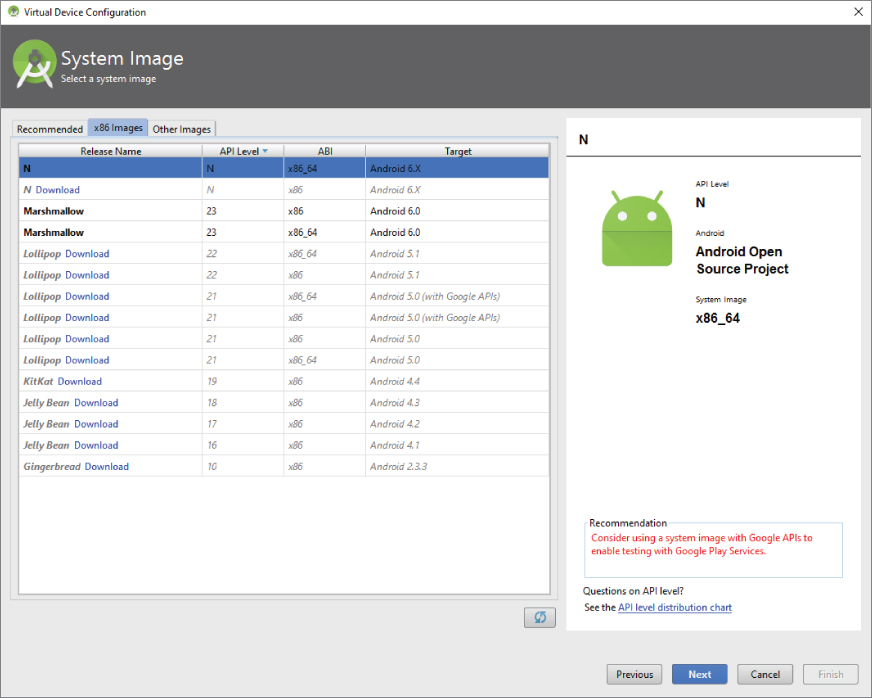
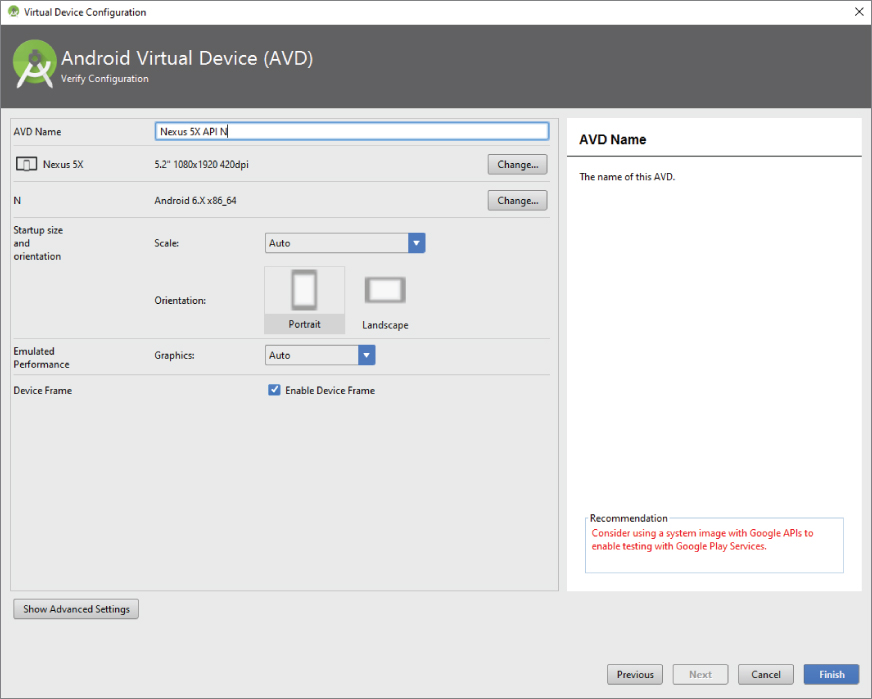
Use the following steps to create an AVD. This example demonstrates creating an AVD (put simply, an Android emulator) that emulates an Android device running Android N on the Nexus 5x hardware specs.
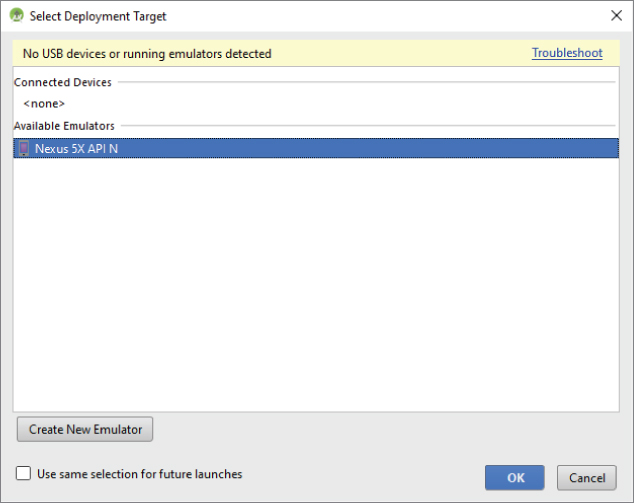
After you have created your ADV, it is time to test it. There is no better way to do this than to create and launch the ubiquitous Hello World application.
Now that Android is in its seventh version, there is a large developer community all over the world. It is easy to find solutions to problems and to find like-minded developers with whom to share app ideas and experiences.
The following are some developer communities and websites that you can turn to for help if you run into problems while working with Android:
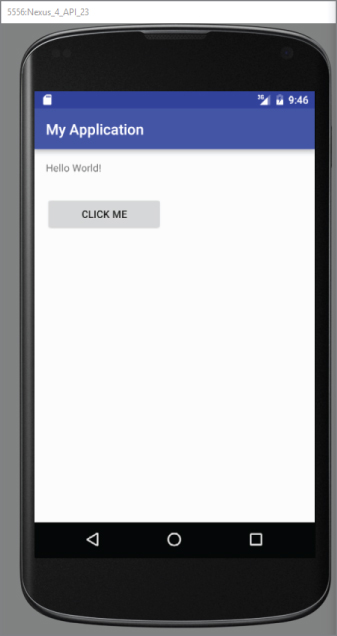
With all the tools and the SDK downloaded and installed, it is now time to start your engine. As in most programming books, the first example uses the ubiquitous Hello World application. This will give you a detailed look at the various components that make up an Android project. This is also the easiest Android project you will ever make.
Believe it or not, the Hello World application is already finished. By default, when you create a new application in Android Studio, it creates a Hello World application. Let's launch this application and, in the process, also launch the Android emulator to see how everything works.
With the emulator fully loaded and started, Android Studio can install your Hello World application. The application will display as shown in Figure 1.28.
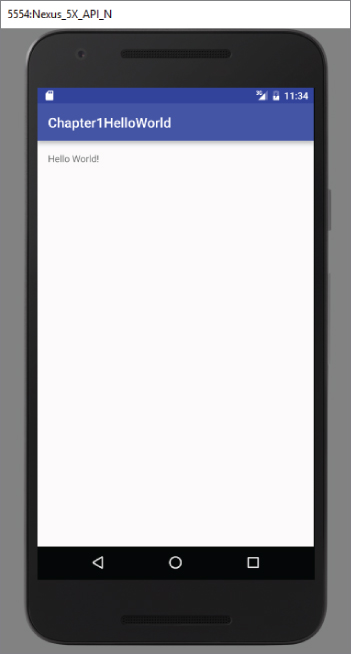
This was a very quick example of how to create and launch your first Android applications. However, what this example has really done for you is introduce you, on a general scale, to most of the major skills you will fine tune throughout this book.
This chapter provided a brief overview of Android and highlighted some of its capabilities. If you have followed the sections on downloading the tools and the Android SDK, you should now have a working system—one that is capable of developing Android applications that are more interesting than the Hello World application. In the next chapter, you find out about the inner workings of Android Studio before moving on to more complex Android application development concepts.
You can find answers to the exercises in the appendix.
| TOPIC | KEY CONCEPTS |
| Android OS | Android is an open source mobile operating system based on the Linux operating system. It is available to anyone who wants to adapt it to run on their own devices. |
| Languages used for Android application development | You use the Java programming language to develop Android applications. Written applications are compiled into Dalvik executables, which are then run on top of the Dalvik virtual machine. |
| Google Play | Google Play hosts all the various Android applications written by third-party developers. |
| Tools for Android application development | Android Studio, Android SDK, and virtual devices. |
Chapter 1 covers how to install and initially configure Android Studio for the purposes of developing Android applications. This chapter explains how to navigate the intricacies of Android Studio in a way that helps you develop applications more easily and with great efficiency.
Android Studio contains myriad features to help everyone from the greenest novices to the most senior superstar developers. By the time you finish this chapter, you will be able to navigate through the features of Android Studio with confidence, produce code that is easy to read and easy to reuse with the help of refactoring, save and share your code to GitHub, and use breakpoints to quickly find problems in your applications.
Let's begin by examining the features of Android Studio.
In this section you explore the Android Studio Integrated Development Environment, which is also known as the IDE. Basically, the IDE is the interface between you and Android Studio. The more you know about the tools, windows, and options that are available to you in Android Studio, the faster you will be able to produce code and the more confident you will be at creating applications.
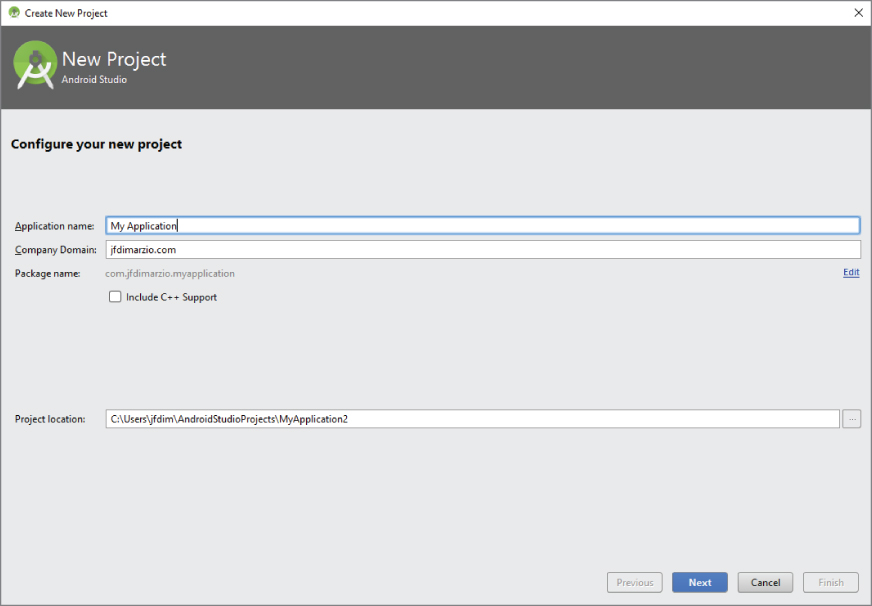
The first option you have is to name your project. Let's call this one IDEExplorer. The second option—the Company Domain—is very important because it is used to name the Java package to which your code will belong. You can type any name that you want into this field. There is no validation to check that you actually own the domain that you specify, but you should try to use a valid domain. I have used jfdimarzio.com. As you can see from the Package Name line, Android Studio automatically reverses your company domain to create the package name.
The final option on the Create New Project screen is the path to which Android Studio will save your new project. I typically accept the default here because it makes it easier for me to find projects in the future. However, feel free to specify any valid location that you want to use—it will not affect this tutorial. Click Next to continue.
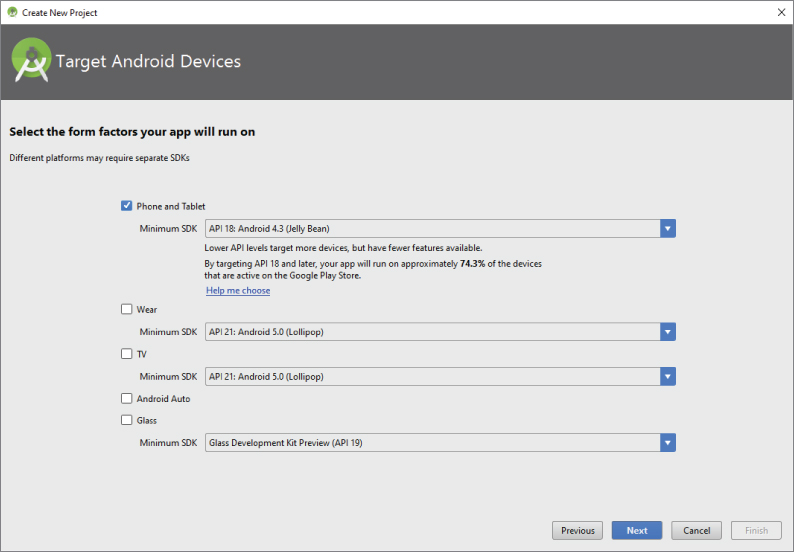
The next screen allows you to select the form factor on which your application will run (see Figure 2.3). For the purposes of this book, you exclusively use Phone and Tablet. The version of Android is Android N (or Nougat, depending on the version of the SDK you downloaded. As of the writing of this book, the name was officially announced as Nougat, but the SDK was still labeled N).
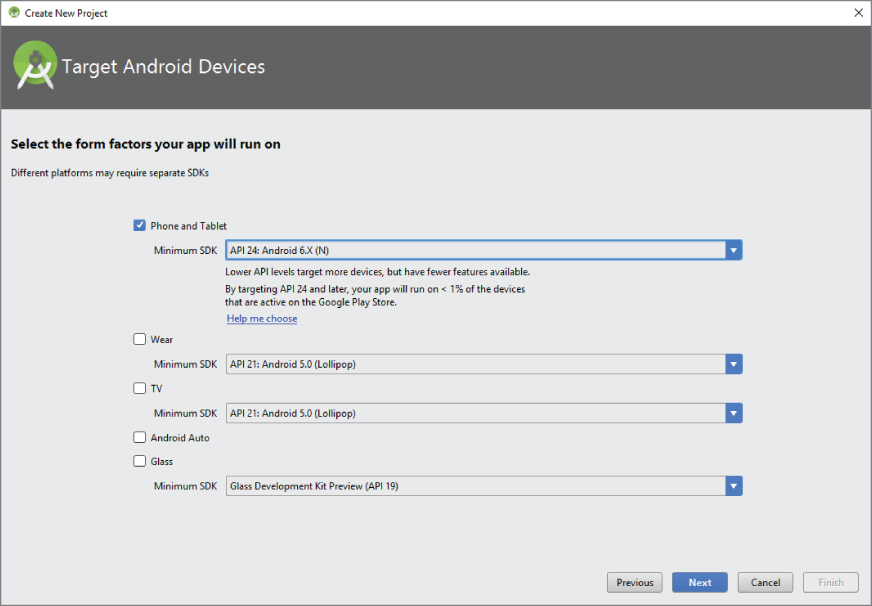
The other options on this screen allow you to create applications that run on Android Wear, Android Auto, and the elusive Google Glass. If you are feeling adventurous after reading this book, feel free to try some of these other application form factor options. For now, make sure to select Phone and Tablet and Android N and click Next to continue.
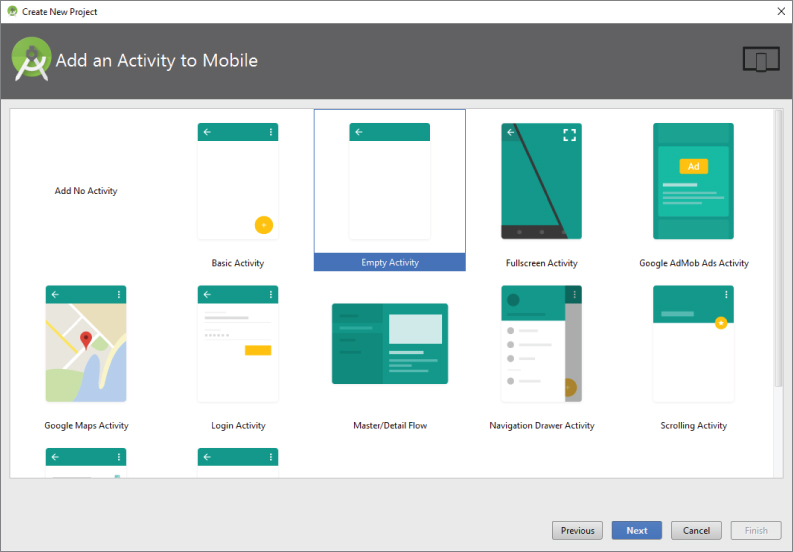
The next screen is the Add an Activity to Mobile screen, as shown in Figure 2.4. This screen is a helper that adds commonly used features to your project at the time the project is created. The options on this screen range from Add No Activity to Tabbed Activity. For example, if you were to select the Google Maps Activity option, Android Studio would create for you a project with a basic activity that contains a Google Map in it already. This can drastically cut down on the amount of time needed to create some types of applications.
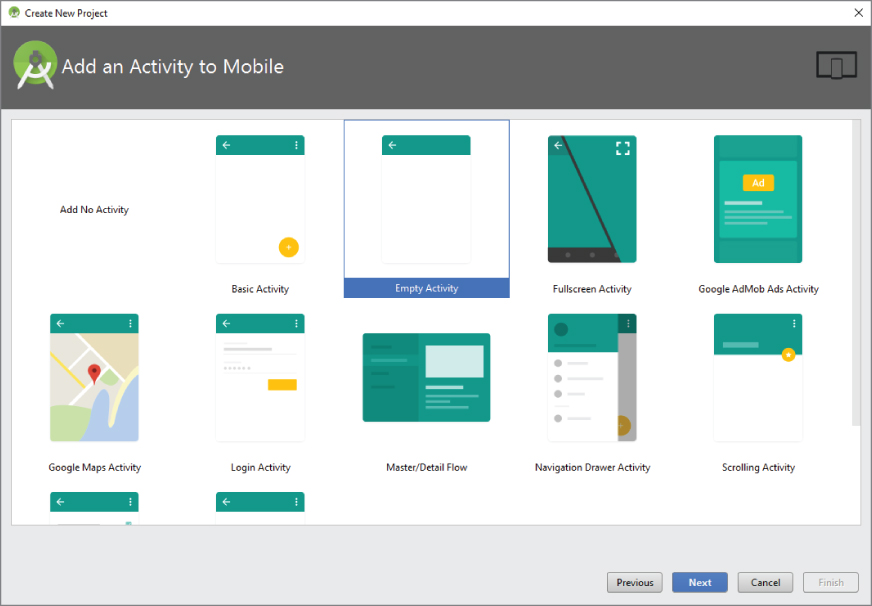
The default option is Empty Activity. This is the most useful for our examples because it creates a basic activity for you, with no code in it—thus allowing you to easily follow the examples in this book.
Click Next to go to the Customize the Activity screen, as shown in Figure 2.5.
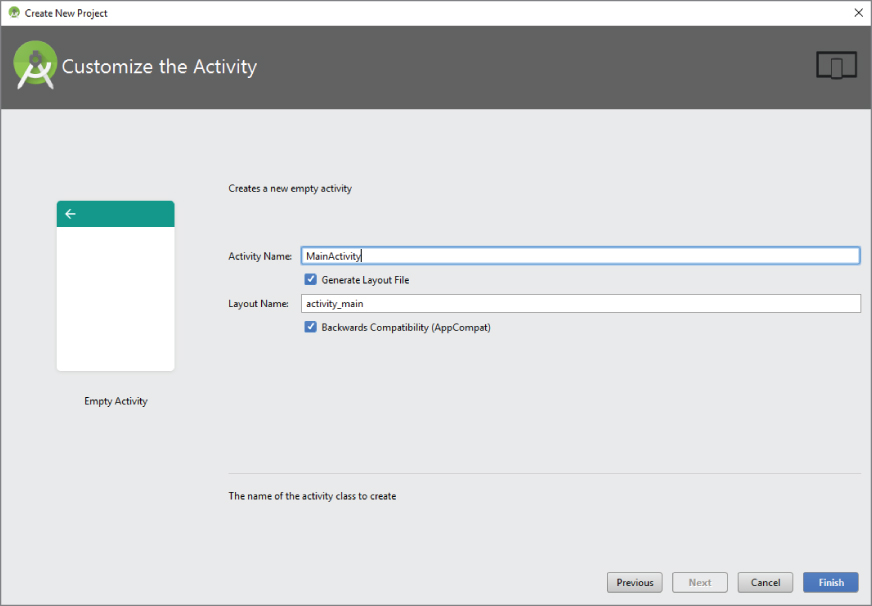
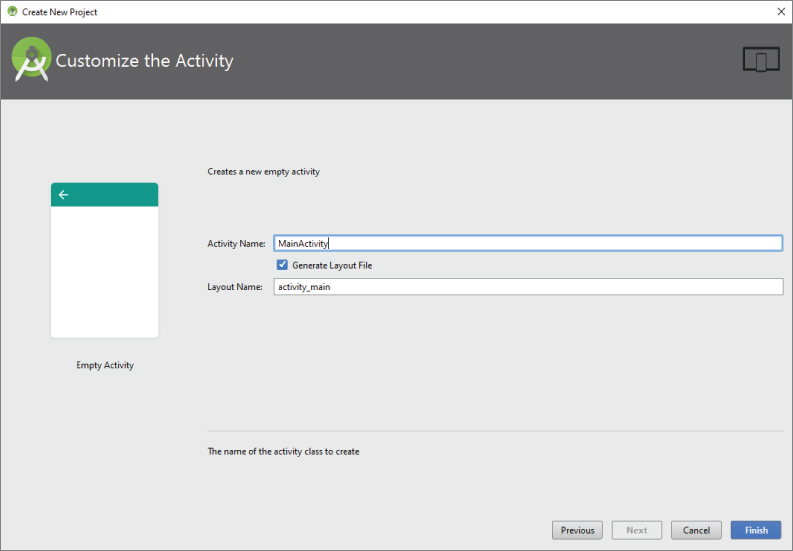
The Customize the Activity screen contains two options, one for naming your activity, and one for naming the main layout (presumably to be used by the main activity). Let's explore these two options.
MainActivity. The reason for this is to make it easier to locate the startup code for your application. If anyone else needs to look at or work with your application, they should know that the MainActivity is the starting point. All other activities can be named by their function, for example InputFormActivity or DeleteRecordActivity.activity_main layout. All other layouts should be named according to the activity that they support (activity_input, activity_delete).Click the Finish button to finish creating the project and jump into exploring the IDE.
The Android Studio IDE should now be visible to you as shown in Figure 2.6.
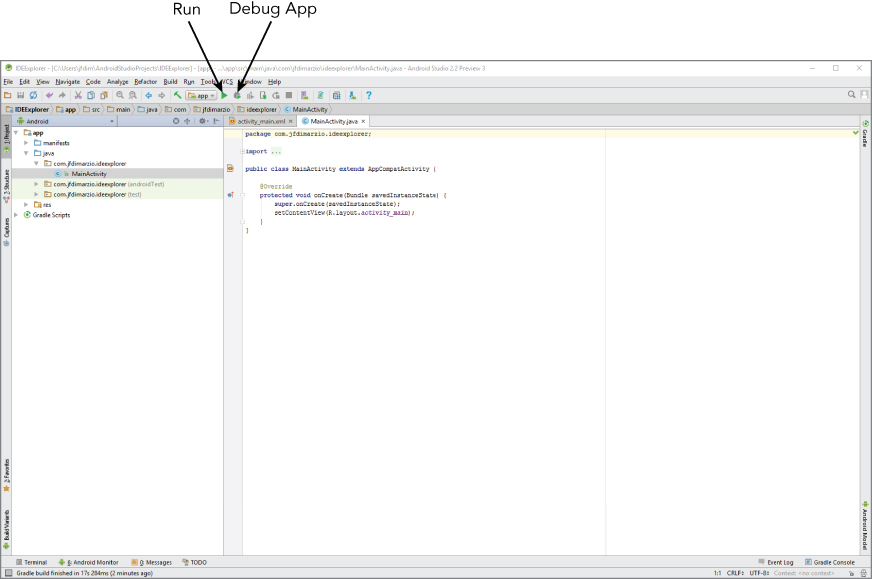
The upper portion of the IDE represents the menu bars or ribbons. Here, as with most applications that you have used in the past, you have all of your options for interacting directly with the IDE. The most important ones to note are the green arrow, which represents the Run app option, and the green arrow with a bug behind it, which is the Debug App option. The Debug App option is arguably the one that you use the most in this book.
By default, the left side of the IDE shows the Project window, as shown in Figure 2.7. The Project window enables you to quickly navigate the files within your project. By default, the Project window is set to the Android view (seen just above the Project window display). To change the view, click the word Android and use the drop-down list of options to make the change. I like to keep mine on Project view when I am working.

On the right side of the IDE (and taking up the largest area) are the Editor tabs (see Figure 2.8). The Editor tabs are where you write and work with your code files.
To work on a new file, simply locate the file in the Project window and double-click it to open a new Editor tab that contains that file's code. If you need to create a new file from scratch, right-click the directory into which you want to place your file, and select New ![]() <File Type> from the context menu.
<File Type> from the context menu.
Finally, at the bottom of the IDE, you should see a button labeled Android Monitor. Click this button to open the Android Monitor (see Figure 2.9).

The Android Monitor automatically displays when you debug an application. It contains a very useful tool called logcat. Logcat displays most of the helpful messages that are output by your application while you are trying to debug it. In future chapters, you will make use of logcat—including writing custom messages to it.
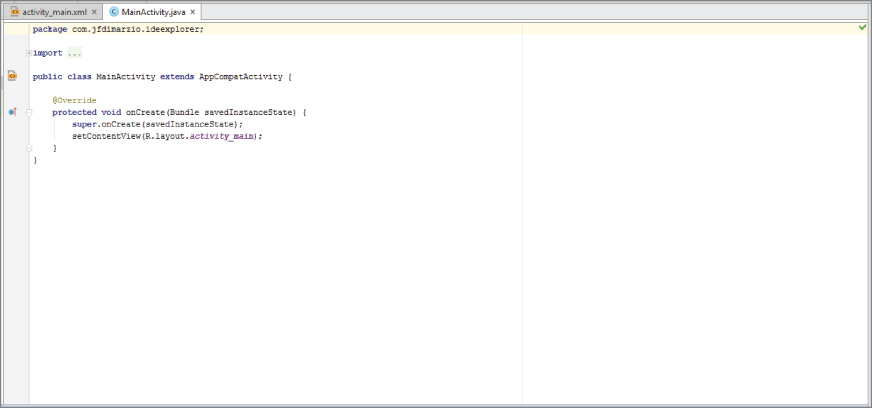
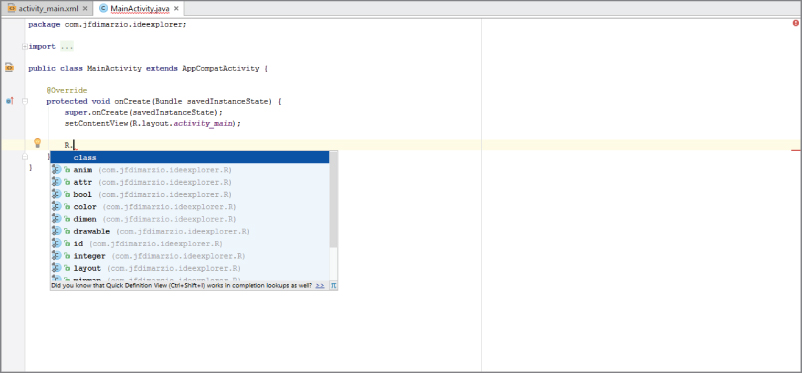
Code completion is an invaluable tool that shows you contextual options for completing the piece of code that you are trying to write. For example, in the editor tab for the MainActivity.js file, locate the line that reads
setContentView(R.layout.activity_main);Place your cursor after this line and press the Enter key. On the new line, type the letter R, and then type a period, as shown here:
R.Android Studio Code Completion should display a list of values that you could use to try to complete the code statement. Figure 2.10 shows what this list might look like. This is important if you are not entirely sure of the spelling of a method call or of how to identify the different method signatures.
You can also use code completion to insert code stubs into your classes. If you are inheriting from a class that has methods you must override, code completion notifies you that there are methods that need to be overridden. With a click, it inserts the stubs of those methods into your application.
Finally, the ability to import packages is one of the Android Studio features and its code completion implementation that you will use most often while navigating the examples in this book. For example, if you were to attempt to create a variable of a type that belongs to a package that you have not imported, Android Studio recognizes this and underlines the type with a red squiggle. Set the cursor to that line and press Alt+Enter to automatically import the package into a using statement at the top of your code file.
After you have built an application, you need to be able to debug it and see what is going on inside your code. One of the handiest ways to be able to see inside your code it through the use of breakpoints. Breakpoints allow you to pause the execution of your code at specific locations and see what is going on (or what is going wrong). Let's take a look at how to use breakpoints in Android Studio.
Breakpoints are a mechanism by which you can tell Android Studio to temporarily pause execution of your code, which allows you to examine the condition of your application. This means that you can check on the values of variables in your application while you are debugging it. Also, you can check whether certain lines of code are being executed as expected—or at all.
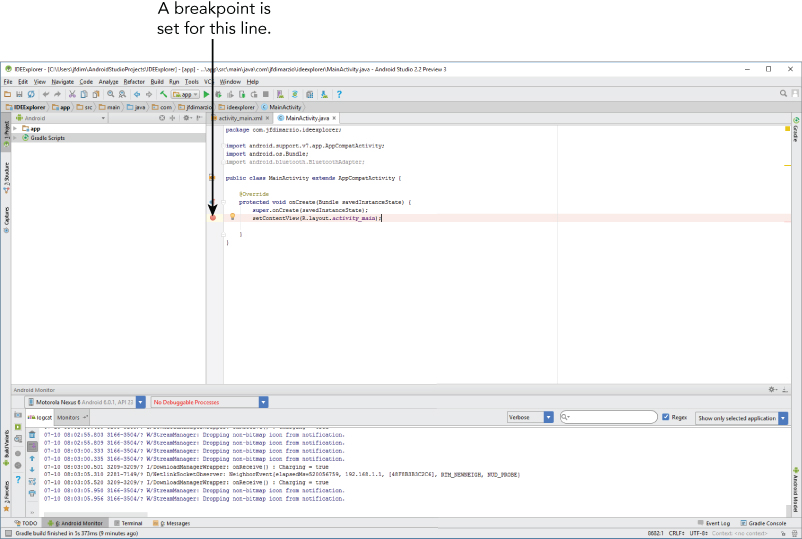
To tell Android Studio that you want to examine a specific line of code during debugging, you must set a breakpoint at that line. Click the margin of the editor tab next to line of code you want to break at, to set a breakpoint. A red circle is placed in the margin, and the corresponding line is highlighted in red, as shown in Figure 2.11.
You can also set a breakpoint by placing your cursor in the line of code where you want it to break and clicking Run ![]() Toggle Line Breakpoint. Notice that the term used is toggle, which means that any breakpoints you set can be turned off the same way you turn them on. Simply click an existing breakpoint to remove it from your code.
Toggle Line Breakpoint. Notice that the term used is toggle, which means that any breakpoints you set can be turned off the same way you turn them on. Simply click an existing breakpoint to remove it from your code.
Let's say that you do not know the exact line of code where you want the break to be. You might want to check on the condition of your code when a specific method is called. You can set a method breakpoint by selecting Run ![]() Toggle Method Breakpoint. A method breakpoint is represented by a red circle containing four dots placed at the method signature, as shown in Figure 2.12.
Toggle Method Breakpoint. A method breakpoint is represented by a red circle containing four dots placed at the method signature, as shown in Figure 2.12.
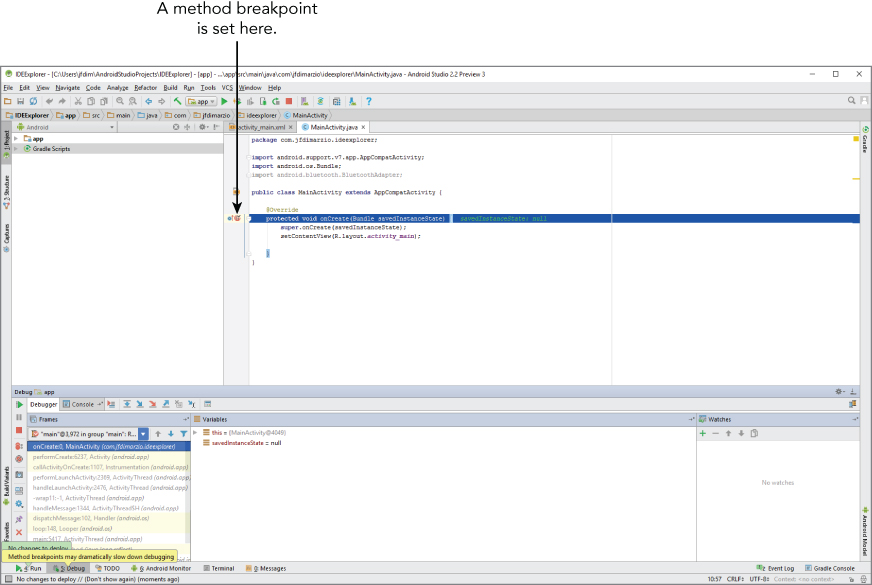
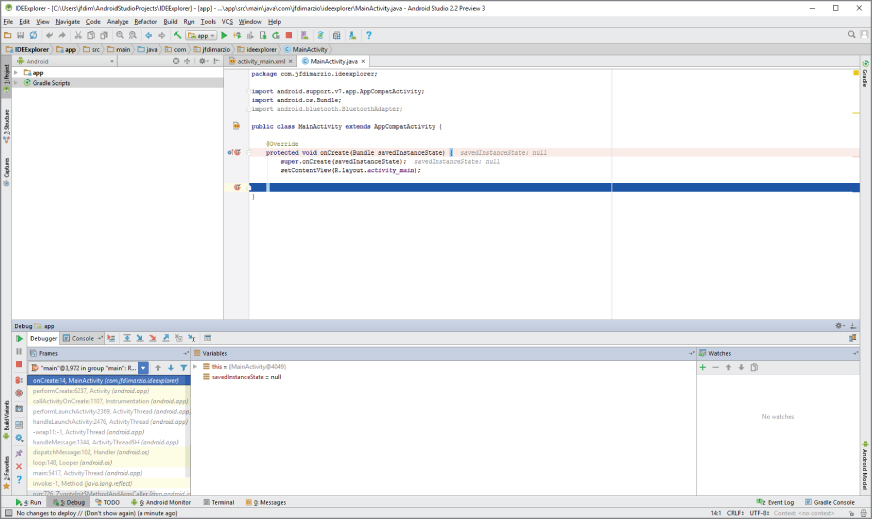
Notice in the lower left-hand area of Figure 2.12 that Android Studio has issued a warning that method breakpoints can dramatically slow down debugging. This is because method breakpoints do more than simple breakpoints in their default state. By default, method breakpoints are set apart from simple breakpoints. Android Studio pauses execution when the method is hit, and it also automatically sets a corresponding breakpoint and pauses at the end of the method (as shown in Figure 2.13).
Thus far, I've discussed simple and method breakpoints. However, there are two other types of breakpoints that you examine in this section: temporary breakpoints and conditional breakpoints.
A temporary breakpoint is useful when you are trying to debug a large loop, or you just want to make sure a line of code is being hit during execution. To set a temporary breakpoint, place your cursor at the location in the code where you want it to break and select Run ![]() Toggle Temporary Line Breakpoint. Notice that a red circle containing a 1 is now placed in the margin (once you set the conditions as shown in Figure 2.14).
Toggle Temporary Line Breakpoint. Notice that a red circle containing a 1 is now placed in the margin (once you set the conditions as shown in Figure 2.14).
The 1 in the red circle represents the fact that Android Studio only stops at this breakpoint the first time your code enters it. After that, the line is executed as though there is no breakpoint set. This can be very useful if you want to ensure a line within a loop is being hit, but you don't want to stop at the line every time it is executed.
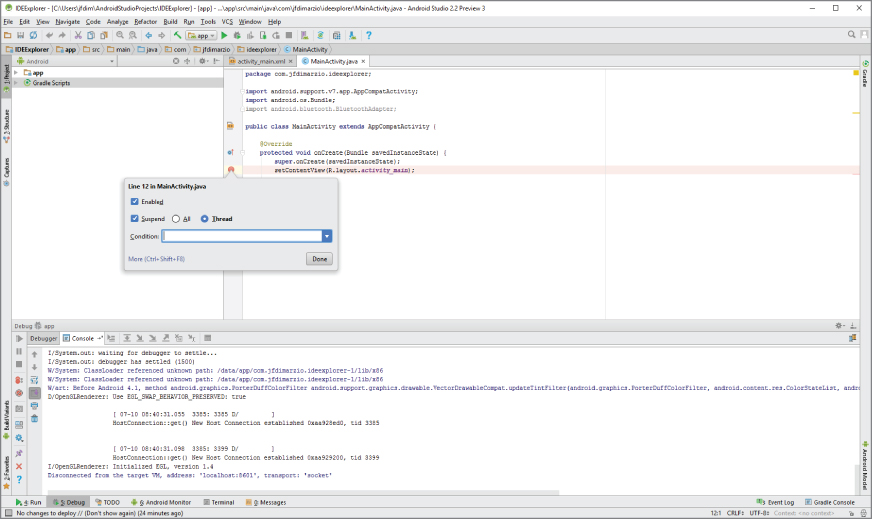
However, let's say that you want to ensure that a line within a loop is only being called when a specific variable is set to true (or something similarly complex). In such a case, you can use a conditional breakpoint.
A condition breakpoint is a breakpoint at which Android Studio only pauses when specific conditions are met. To set a conditional breakpoint, first set a simple breakpoint at the line of code you want to examine, then right-click the simple breakpoint to bring up the condition context menu (refer to Figure 2.14).
From here you can set conditions that tell Android Studio when to pause at a breakpoint. For example, you can tell Android Studio to only pause at a line of code when your variable named foo equals true. You would then set the condition in the breakpoint to
foo == trueConditional breakpoints are extremely useful in diagnosing intermittent issues in complex code blocks.
While in debug mode, Android Studio pauses at any breakpoint that you have set. That is, as long as a breakpoint has been set on a reachable line of code (a line of code that would be executed by system), Android Studio halts execution at that line until you tell it to continue.
When Android Studio hits, and pauses at, a breakpoint, the red circle in the margin next to the corresponding line of code changes to a circle with a check mark (see Figure 2.15).
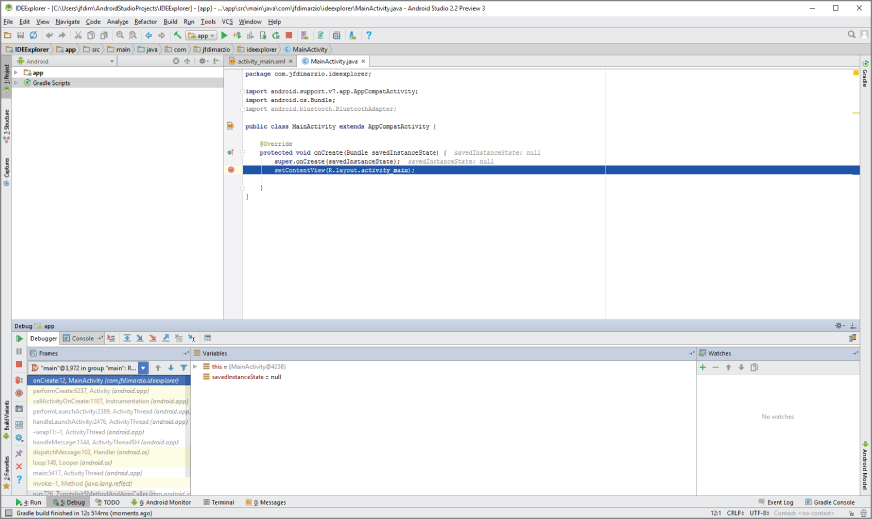
Once a breakpoint has been hit, the debug window opens at the bottom of Android Studio, as shown in Figure 2.16. The debug window contains many of the tools you use to navigate around your code.
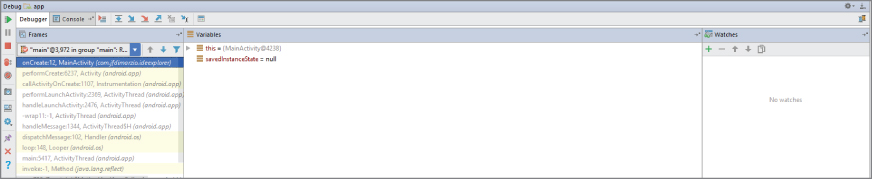
Notice the navigation buttons located in the menu bar of the debug window. The most commonly used are Step Over and Step Into. Step Over advances you to the line of code that immediately follows the one at which you are currently paused. This means that if you are paused at a method call, and you press Step Over, Android Studio executes the method call without pausing and then pauses again when execution reached the next line. However, what if an exception happens in that method call and execution never reaches the next line of code? For these situations use Step Into.
Step Into follows execution wherever it leads in the code. Therefore, if you are paused at a method call and click Step Into, Android Studio will shift the view to the method call and pause execution at the first line of code within that method. This allows you to then follow the execution of that method line-by-line before it returns to the calling block.
After you have created, and fully debugged, your application, you might want to deploy it to the Google Store for others to enjoy. The following sections outline the steps for publishing your applications.
To publish your finished application on the Google Play Store, you must generate a signed APK (the Android application package). The APK is the compiled, executable version of your application. Signing it is much like signing your name to a document. The signature identifies the app's developer to Google and the users who install your application. More importantly, unless your Android Studio is in developer mode, unsigned applications will not run. Use the following steps to generate a signed APK:
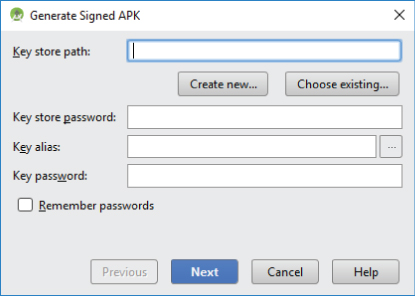
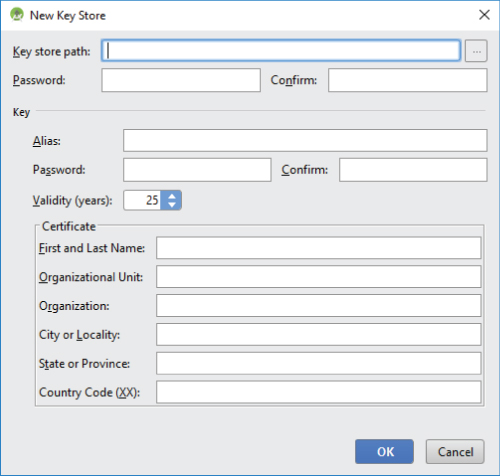
Notice that there are two places for a password. These are the passwords for your key store and your key, respectively. Because a key store can hold multiple keys, it requires a separate password than that of the key for a specific app.
Now that you have a signed APK, you can upload it to the Google Play Store using the developer console at https://play.google.com/apps/publish/.
Android Studio is a powerful IDE that contains many tools. In this chapter you learned how to navigate the different areas of the Android Studio IDE, such as the Project window and the Editor tabs. You also learned how to set breakpoints and navigate through paused code.
You can find answers to the exercises in the appendix.
| TOPIC | KEY POINTS |
| Android Studio IDE | Create a new project |
| Name the Java package | |
| Name the main entry point for your application | |
| Code Completion | Provides contextual information for completing your code |
| Breakpoints | Paused only while in debug mode |
| Simple | |
| Temporary | |
| Method | |
| Conditional |
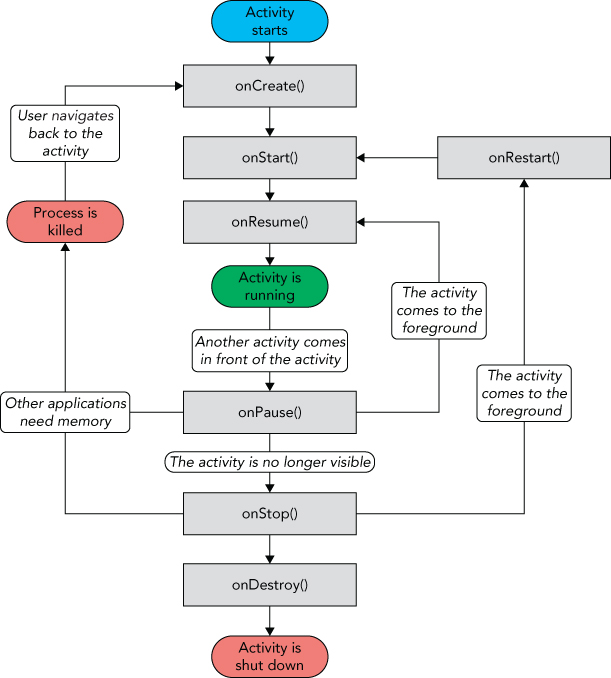
An Android application can have zero or more activities. Typically, applications have one or more activities. The main purpose of an activity is to interact with the user. From the moment an activity appears on the screen to the moment it is hidden, it goes through a number of stages. These stages are known as an activity's life cycle. Understanding the life cycle of an activity is vital to ensuring that your application works correctly. In addition to activities, Android N also supports fragments, a feature that was introduced for tablets in Android 3.0 and for phones in Android 4.0. Think of fragments as “miniature” activities that can be grouped to form an activity. In this chapter, you find out how activities and fragments work together.
Apart from activities, another unique concept in Android is that of an intent. An intent is basically the “glue” that enables activities from different applications to work together seamlessly, ensuring that tasks can be performed as though they all belong to one single application. Later in this chapter, you learn more about this very important concept and how you can use it to call built-in applications such as the Browser, Phone, Maps, and more.
This chapter begins by showing you how to create an activity. To create an activity, you create a Java class that extends the Activity base class:
package com.jfdimarzio.chapter1helloworld;
        import android.support.v7.app.AppCompatActivity;
        import android.os.Bundle;
public class MainActivity extends AppCompatActivity {
    @Override
    protected void onCreate(Bundle savedInstanceState) {
        super.onCreate(savedInstanceState);
        setContentView(R.layout.activity_main);
    }
}
Your activity class loads its user interface (UI) component using the XML file defined in your res/layout folder. In this example, you would load the UI from the main.xml file:
setContentView(R.layout.activity_main);Every activity you have in your application must be declared in your AndroidManifest.xml file, like this:
<?xml version="1.0" encoding="utf-8"?>
<manifest xmlns:android="http://schemas.android.com/apk/res/android
    package="com.jfdimarzio.chapter1helloworld">
    <application
        android:allowBackup="true"
        android:icon="@mipmap/ic_launcher"
        android:label="@string/app_name"
        android:supportsRtl="true"
        android:theme="@style/AppTheme">
        <activity android:name=".MainActivity">
            <intent-filter>
                <action android:name="android.intent.action.MAIN" />
                <category android:name="android.intent.category.LAUNCHER" />
            </intent-filter>
        </activity>
    </application>
</manifest>
The Activity base class defines a series of events that govern the life cycle of an activity. Figure 3.1 shows the lifecycle of an Activity.
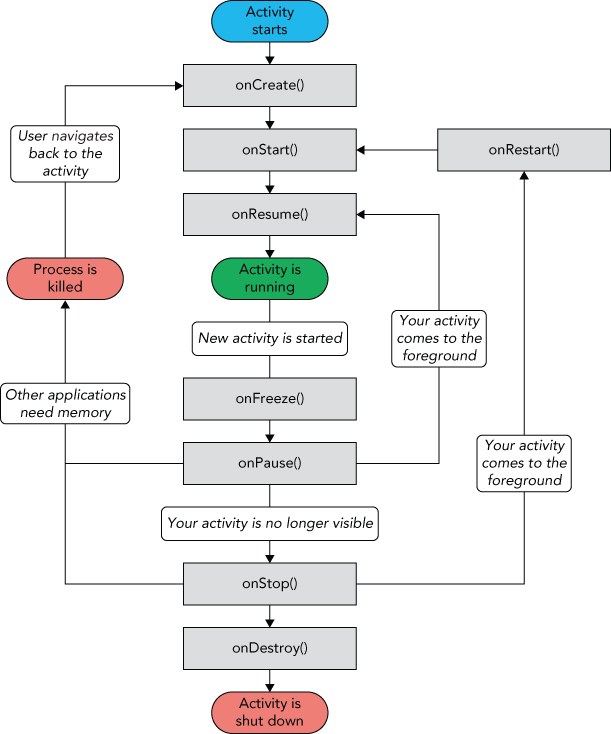
The Activity class defines the following events:
onCreate()—Called when the activity is first createdonStart()—Called when the activity becomes visible to the useronResume()—Called when the activity starts interacting with the useronPause()—Called when the current activity is being paused and the previous activity is being resumedonStop()—Called when the activity is no longer visible to the useronDestroy()—Called before the activity is destroyed by the system (either manually or by the system to conserve memory)onRestart()—Called when the activity has been stopped and is restarting againBy default, the activity created for you contains the onCreate() event. Within this event handler is the code that helps to display the UI elements of your screen.
Figure 3.2 shows the life cycle of an activity and the various stages it goes through—from when the activity is started until it ends.
The best way to understand the various stages of an activity is to create a new project, implement the various events, and then subject the activity to various user interactions.
By default, an activity is themed to the default Android theme. However, there has been a push in recent years to adopt a new theme known as Material. The Material theme has a much more modern and clean look to it.
There are two versions of the Material theme available to Android developers: Material Light and Material Dark. Either of these themes can be applied from the AndroidManifest.xml.
To apply one of the Material themes to an activity, simply modify the <Application> element in the AndroidManifest.xml file by changing the default android:theme attribute. (Please be sure to change all instances of "com.jfdimarzio" to whatever package name your project is using.)
<?xml version="1.0" encoding="utf-8"?>
<manifest xmlns:android="http://schemas.android.com/apk/res/android"
xmlns:tools="http://schemas.android.com/tools"
package="com.jfdimarzio.activity101">
<application
android:allowBackup="true"
android:icon="@mipmap/ic_launcher"
android:label="@string/app_name"
android:supportsRtl="true"
android:theme="@android:style/Theme.Material">
<activity android:name=".MainActivity">
<intent-filter>
<action android:name="android.intent.action.MAIN"/>
<category android:name="android.intent.category.LAUNCHER"/>
</intent-filter>
</activity>
</application>
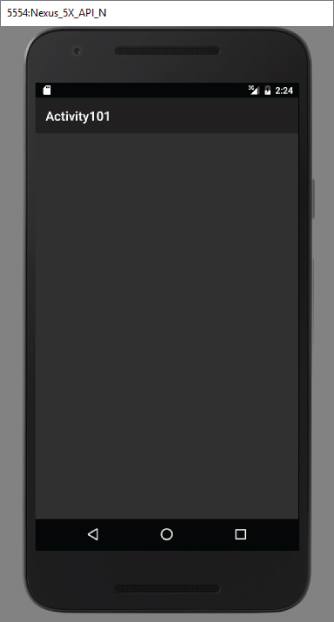
</manifest>Changing the default theme to @android:style/Theme.Material, as in the highlighted code in the preceding snippet, applies the Material Dark theme and gives your application a darker look as shown in Figure 3.4.
You can also hide the title of an activity if desired (such as when you just want to display a status update to the user). To do so, use the requestWindowFeature() method and pass it the Window.FEATURE_NO_TITLE constant, like this:
import android.support.v7.app.AppCompatActivity;
import android.os.Bundle;
import android.view.Window;
public class MainActivity extends AppCompatActivity {
    @Override
    protected void onCreate(Bundle savedInstanceState) {
        super.onCreate(savedInstanceState);
        setContentView(R.layout.activity_main);
        requestWindowFeature(Window.FEATURE_NO_TITLE);
    }
}
Now you need to change the theme in the AndroidManifest.xml to a theme that has no title bar. Be sure to change all instances of "com.jfdimarzio" to whatever package name your project is using.
package com.jfdimarzio.activity101;
<?xml version="1.0" encoding="utf-8"?>
<manifest xmlns:android="http://schemas.android.com/apk/res/android"
    xmlns:tools="http://schemas.android.com/tools"
    package="com.jfdimarzio.activity101">
    <application
        android:allowBackup="true"
        android:icon="@mipmap/ic_launcher"
        android:label="@string/app_name"
        android:supportsRtl="true"
        android:theme="@android:style/Theme.NoTitleBar">
        <activity android:name=".MainActivity">
            <intent-filter>
                <action android:name="android.intent.action.MAIN"/>
                <category android:name="android.intent.category.LAUNCHER"/>
            </intent-filter>
        </activity>
    </application>
</manifest>
This hides the title bar, as shown in Figure 3.5.
There are times when you need to display a dialog window to get a confirmation from the user. In this case, you can override the onCreateDialog() protected method defined in the Activity base class to display a dialog window. The following Try It Out shows you how.
One common UI feature in an Android device is the “Please wait” dialog that you typically see when an application is performing a long-running task. For example, the application might be logging in to a server before the user is allowed to use it, or it might be doing a calculation before displaying the result to the user. In such cases, it is helpful to display a dialog, known as a progress dialog, so that the user is kept in the loop.
Android provides a ProgressDialog class you can call when you want to display a running meter to the user. ProgressDialog is easy to call from an activity.
The following Try It Out demonstrates how to display such a dialog.
The next section explains using Intents, which help you navigate between multiple Activities.
An Android application can contain zero or more activities. When your application has more than one activity, you often need to navigate from one to another. In Android, you navigate between activities through what is known as an intent.
The best way to understand this very important but somewhat abstract concept is to experience it firsthand and see what it helps you achieve. The following Try It Out shows how to add another activity to an existing project and then navigate between the two activities.
The startActivity() method invokes another activity but does not return a result to the current activity. For example, you might have an activity that prompts the user for username and password. The information entered by the user in that activity needs to be passed back to the calling activity for further processing. If you need to pass data back from an activity, you should instead use the startActivityForResult() method. The following Try It Out demonstrates this.
Besides returning data from an activity, it is also common to pass data to an activity. For example, in the previous example, you might want to set some default text in the EditText view before the activity is displayed. In this case, you can use the Intent object to pass the data to the target activity.
The following Try It Out shows you the various ways in which you can pass data between activities.
In the previous section, you learned what an activity is and how to use it. In a small-screen device (such as a smartphone), an activity typically fills the entire screen, displaying the various views that make up the user interface of an application. The activity is essentially a container for views. However, when an activity is displayed in a large-screen device, such as on a tablet, it is somewhat out of place. Because the screen is much bigger, all the views in an activity must be arranged to make full use of the increased space, resulting in complex changes to the view hierarchy. A better approach is to have “mini-activities,” each containing its own set of views. During runtime, an activity can contain one or more of these mini-activities, depending on the screen orientation in which the device is held. In Android 3.0 and later, these mini-activities are known as fragments.
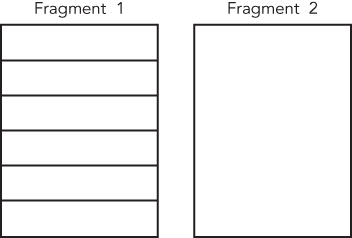
Think of a fragment as another form of activity. You create fragments to contain views, just like activities. Fragments are always embedded in an activity. For example, Figure 3.13 shows two fragments. Fragment 1 might contain a ListView showing a list of book titles. Fragment 2 might contain some TextViews and ImageViews showing some text and images.
Now imagine the application is running on an Android tablet (or on an Android smartphone) in portrait mode. In this case, Fragment 1 might be embedded in one activity, whereas Fragment 2 might be embedded in another activity (see Figure 3.14). When users select an item in the list in Fragment 1, Activity 2 is started.

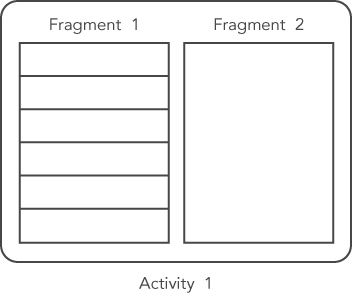
If the application is now displayed in a tablet in landscape mode, both fragments can be embedded within a single activity, as shown in Figure 3.15.
From this discussion, it becomes apparent that fragments present a versatile way in which you can create the user interface of an Android application. Fragments form the atomic unit of your user interface, and they can be dynamically added (or removed) to activities in order to create the best user experience possible for the target device.
The following Try It Out shows you the basics of working with fragments.
Although fragments enable you to compartmentalize your UI into various configurable parts, the real power of fragments is realized when you add them dynamically to activities during runtime. In the previous section, you saw how you can add fragments to an activity by modifying the XML file during design time. In reality, it is much more useful if you create fragments and add them to activities during runtime. This enables you to create a customizable user interface for your application. For example, if the application is running on a smartphone, you might fill an activity with a single fragment; if the application is running on a tablet, you might then fill the activity with two or more fragments, as the tablet has much more screen real estate compared to a smartphone.
The following Try It Out shows how you can programmatically add fragments to an activity during runtime.
Like activities, fragments have their own life cycle. Understanding the life cycle of a fragment enables you to properly save an instance of the fragment when it is destroyed, and restore it to its previous state when it is re-created.
The following Try It Out examines the various states experienced by a fragment.
Very often, an activity might contain one or more fragments working together to present a coherent UI to the user. In this case, it is important for fragments to communicate with one another and exchange data. For example, one fragment might contain a list of items (such as postings from an RSS feed). Also, when the user taps on an item in that fragment, details about the selected item might be displayed in another fragment.
The following Try It Out shows how one fragment can access the views contained within another fragment.
So far, you have seen the use of the Intent object to call other activities. This is a good time to recap and gain a more detailed understanding of how the Intent object performs its magic.
First, you learned that you can call another activity by passing its action to the constructor of an Intent object:
startActivity(new Intent("com.jfdimarzio.SecondActivity"));The action (in this example "com.jfdimarzio.SecondActivity") is also known as the component name. This is used to identify the target activity/application that you want to invoke. You can also rewrite the component name by specifying the class name of the activity if it resides in your project, like this:
startActivity(new Intent(this, SecondActivity.class));You can also create an Intent object by passing in an action constant and data, such as the following:
Intent i = new
Intent(android.content.Intent.ACTION_VIEW,
Uri.parse("http://www.amazon.com"));
startActivity(i);The action portion defines what you want to do, whereas the data portion contains the data for the target activity to act upon. You can also pass the data to the Intent object using the setData() method:
Intent i = new
Intent("android.intent.action.VIEW");
i.setData(Uri.parse("http://www.amazon.com")); In this example, you indicate that you want to view a web page with the specified URL. The Android OS will look for all activities that are able to satisfy your request. This process is known as intent resolution. The next section discusses in more detail how your activities can be the target of other activities.
For some intents, there is no need to specify the data. For example, to select a contact from the Contacts application, you specify the action and then indicate the MIME type using the setType() method:
Intent i = new
Intent(android.content.Intent.ACTION_PICK);
i.setType(ContactsContract.Contacts.CONTENT_TYPE);The setType() method explicitly specifies the MIME data type to indicate the type of data to return. The MIME type for ContactsContract.Contacts.CONTENT_TYPE is "vnd.android.cursor.dir/contact".
Besides specifying the action, the data, and the type, an Intent object can also specify a category. A category groups activities into logical units so that Android can use those activities for further filtering. The next section discusses categories in more detail.
To summarize, an Intent object can contain the following information:
Earlier, you saw how an activity can invoke another activity using the Intent object. In order for other activities to invoke your activity, you need to specify the action and category within the <intent-filter> element in the AndroidManifest.xml file, like this:
<intent-filter >
<action android:name="com.jfdimarzio.SecondActivity"/>
<category android:name="android.intent.category.DEFAULT"/>
</intent-filter>This is a very simple example in which one activity calls another using the "com.jfdimarzio.SecondActivity" action.
So far, you have been using the Toast class to display messages to the user. While the Toast class is a handy way to show users alerts, it is not persistent. It flashes on the screen for a few seconds and then disappears. If it contains important information, users may easily miss it if they are not looking at the screen.
For messages that are important, you should use a more persistent method. In this case, you should use the NotificationManager to display a persistent message at the top of the device, commonly known as the status bar (sometimes also referred to as the notification bar). The following Try It Out demonstrates how.
This chapter first provided a detailed look at how activities and fragments work and the various forms in which you can display them. You also learned how to display dialog windows using activities.
The second part of this chapter demonstrated a very important concept in Android—the intent. The intent is the “glue” that enables different activities to be connected, and it is a vital concept to understand when developing for the Android platform.
You can find answers to the exercises in the appendix.
| TOPIC | KEY CONCEPTS |
| Creating an activity | All activities must be declared in the AndroidManifest.xml file. |
| Key life cycle of an activity | When an activity is started, the onStart() and onResume() events are always called. |
When an activity is killed or sent to the background, the onPause() event is always called. |
|
| Displaying an activity as a dialog | Use the showDialog() method and implement the onCreateDialog() method. |
| Fragments | Fragments are “mini-activities” that you can add or remove from activities. |
| Manipulating fragments programmatically | You need to use the FragmentManager and FragmentTransaction classes when adding, removing, or replacing fragments during runtime. |
| Life cycle of a fragment | Similar to that of an activity—you save the state of a fragment in the onPause() event, and restore its state in one of the following events: onCreate(), onCreateView(), or onActivityCreated(). |
| Intent | The “glue” that connects different activities. |
| Calling an activity | Use the startActivity() or startActivityForResult() method. |
| Passing data to an activity | Use the Bundle object. |
Components in an Intent object |
An Intent object can contain the following: action, data, type, and category. |
| Displaying notifications | Use the NotificationManager class. |
Chapter 3 discusses activities and their life cycles. An activity is a means by which users interact with the application. However, an activity by itself does not have a presence on the screen. Instead, it has to draw the screen using views and ViewGroups. In this chapter, you find out how to create user interfaces (UIs) in Android and how users interact with the UIs. In addition, you discover how to handle changes in screen orientation on your Android devices.
As explained in Chapter 3, the basic unit of an Android application is an activity, which displays the UI of your application. The activity may contain widgets such as buttons, labels, textboxes, and so on. Typically, you define your UI using an XML file (for example, the activity_main.xml file located in the res/layout folder of your project), which looks similar to what is shown in here.
<?xml version="1.0" encoding="utf-8"?>
<android.support.design.widget.CoordinatorLayout
xmlns:android="http://schemas.android.com/apk/res/android"
xmlns:app="http://schemas.android.com/apk/res-auto"
xmlns:tools="http://schemas.android.com/tools"
android:layout_width="match_parent"
android:layout_height="match_parent"
android:fitsSystemWindows="true"
tools:context="com.jfdimarzio.helloworld.MainActivity">
<android.support.design.widget.AppBarLayout
android:layout_width="match_parent"
android:layout_height="wrap_content"
android:theme="@style/AppTheme.AppBarOverlay">
<android.support.v7.widget.Toolbar
android:id="@+id/toolbar"
android:layout_width="match_parent"
android:layout_height="?attr/actionBarSize"
android:background="?attr/colorPrimary"
app:popupTheme="@style/AppTheme.PopupOverlay"/>
</android.support.design.widget.AppBarLayout>
<include layout="@layout/content_main"/>
<android.support.design.widget.FloatingActionButton
android:id="@+id/fab"
android:layout_width="wrap_content"
android:layout_height="wrap_content"
android:layout_gravity="bottom|end"
android:layout_margin="@dimen/fab_margin"
android:src="@android:drawable/ic_dialog_email"/>
</android.support.design.widget.CoordinatorLayout>During runtime, you load the XML UI in the onCreate() method handler in your Activity class, using the setContentView() method of the Activity class:
@Override
public void onCreate(Bundle savedInstanceState) {
super.onCreate(savedInstanceState);
setContentView(R.layout.main);
}During compilation, each element in the XML file is compiled into its equivalent Android GUI (Graphical User Interface) class, with attributes represented by methods. The Android system then creates the activity's UI when the activity is loaded.
An activity contains views and ViewGroups. A view is a widget that has an appearance on screen. Examples of views are buttons, labels, and text boxes. A view derives from the base class android.view.View.
One or more views can be grouped into a ViewGroup. A ViewGroup (which is itself a special type of view) provides the layout in which you can order the appearance and sequence of views. Examples of ViewGroups include RadioGroup and ScrollView. A ViewGroup derives from the base class android.view.ViewGroup.
Another type of ViewGroup is a Layout. A Layout is another container that derives from android.view.ViewGroup and is used as a container for other views. However, whereas the purpose of a ViewGroup is to group views logically—such as a group of buttons with a similar purpose—a Layout is used to group and arrange views visually on the screen. The Layouts available to you in Android are as follows:
FrameLayoutLinearLayout(Horizontal)LinearLayout(Vertical)TableLayoutTableRowGridLayoutRelativeLayoutThe following sections describe each of these Layouts in more detail.
The FrameLayout is the most basic of the Android layouts. FrameLayouts are built to hold one view. As with all things related to development, there is no hard rule that FrameLayouts can't be used to hold multiple views. However, there is a reason why FrameLayouts were built the way they were.
Given that there are myriad screen sizes and resolutions, you have little control over the specifications of the devices that install your application. Therefore, when your application is resized and reformatted to fit any number of different devices you want to make sure it still looks as close to your initial design as possible.
The FrameLayout is used to help you control the stacking of single views as the screen is resized. In the following Try It Out, you add a TextView to a FrameLayout in your HelloWorld application.
The LinearLayout arranges views in a single column or a single row. Child views can be arranged either horizontally or vertically, which explains the need for two different layouts—one for horizontal rows of views and one for vertical columns of views.
To see how LinearLayout works, consider the following elements typically contained in the activity_main.xml file:
<?xml version="1.0" encoding="utf-8"?>
<LinearLayout xmlns:android="http://schemas.android.com/apk/res/android"
android:layout_width="fill_parent"
android:layout_height="fill_parent"
android:orientation="vertical" >
<TextView
android:layout_width="fill_parent"
android:layout_height="wrap_content"
android:text="@string/hello"/>
</LinearLayout>In the activity_main.xml file, observe that the root element is <LinearLayout> and it has a <TextView> element contained within it. The <LinearLayout> element controls the order in which the views contained within it appear.
Each view and ViewGroup has a set of common attributes, some of which are described in Table 4.1.
Table 4.1 Common Attributes Used in Views and ViewGroups
| Attribute | Description |
layout_width |
Specifies the width of the view or ViewGroup |
layout_height |
Specifies the height of the view or ViewGroup |
layout_marginTop |
Specifies extra space on the top side of the view or ViewGroup |
layout_marginBottom |
Specifies extra space on the bottom side of the view or ViewGroup |
layout_marginLeft |
Specifies extra space on the left side of the view or ViewGroup |
layout_marginRight |
Specifies extra space on the right side of the view or ViewGroup |
layout_gravity |
Specifies how child views are positioned |
layout_weight |
Specifies how much of the extra space in the layout should be allocated to the view |
layout_x |
Specifies the x-coordinate of the view or ViewGroup |
layout_y |
Specifies the y-coordinate of the view or ViewGroup |
For example, the width of the <TextView> element fills the entire width of its parent (which is the screen in this case) using the fill_parent constant. Its height is indicated by the wrap_content constant, which means that its height is the height of its content (in this case, the text contained within it). If you don't want the <TextView> view to occupy the entire row, you can set its layout_width attribute to wrap_content, like this:
<TextView
android:layout_width="wrap_content"
android:layout_height="wrap_content"
android:text="@string/hello"/> The preceding code sets the width of the view to be equal to the width of the text contained within it. Consider the layout in the next code snippet, which shows two views with their width explicitly stated as a measurement, and their heights set to the height of their contents.
<?xml version="1.0" encoding="utf-8"?>
<LinearLayout xmlns:android="http://schemas.android.com/apk/res/android"
android:layout_width="fill_parent"
android:layout_height="fill_parent"
android:orientation="vertical" >
<TextView
android:layout_width="100dp"
android:layout_height="wrap_content"
android:text="@string/hello"/>
<Button
android:layout_width="160dp"
android:layout_height="wrap_content"
android:text="Button"
android:onClick="onClick"/>
</LinearLayout>Here, you set the width of both the TextView and Button views to an absolute value. In this case, the width for the TextView is set to 100 density-independent pixels wide, and the Button to 160 density-independent pixels wide. Before you see how the views look on different screens with different pixel densities, it is important to understand how Android recognizes screens of varying sizes and densities.
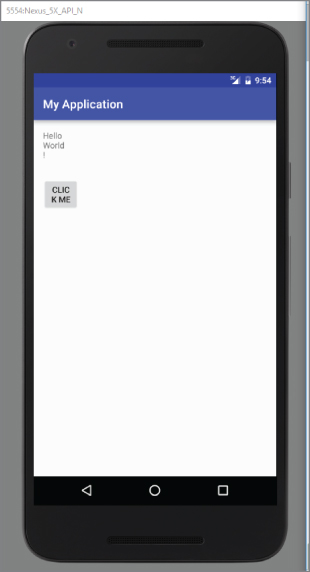
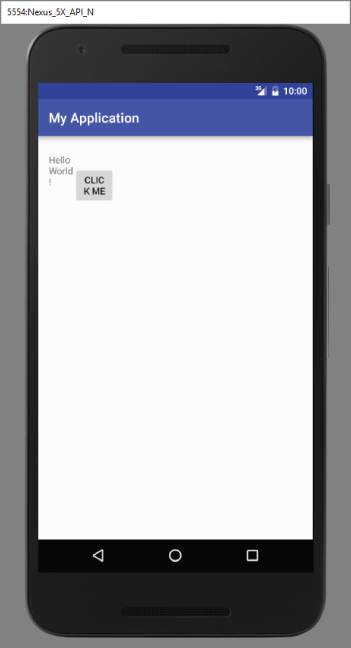
Figure 4.1 shows the screen of the Nexus 5 (from the emulator). It has a 5-inch screen (diagonally), with a screen width of 2.72 inches. Its resolution is 1080 (width) × 1920 (height) pixels. The pixel density of a screen varies according to screen size and resolution.
To test how the views defined in the XML file look when displayed on screens of different densities, create two Android Virtual Devices (AVDs) with different screen resolutions and abstracted LCD densities. Figure 4.2 shows an AVD with 1080 × 1920 resolution and LCD density of 480.

Figure 4.3 shows another AVD with 768 × 1280 resolution and LCD density of 320.
Using the dp unit ensures that your views are always displayed in the right proportion regardless of the screen density. Android automatically scales the size of the view depending on the density of the screen.
What if instead of using dp you now specify the size using pixels (px)?
<TextView
android:layout_width="100px"
android:layout_height="wrap_content"
android:text="@string/hello"/>
<Button
android:layout_width="160px"
android:layout_height="wrap_content"
android:text="Click Me"
android:onClick="onClick"/>Figure 4.4 shows how the Label and Button appear on a 480 dpi screen. Figure 4.5 shows the same views on a 320 dpi screen. In this case, Android does not perform any conversion because all the sizes are specified in pixels. If you use pixels for view sizes, the views appear smaller on a device with a high dpi screen than a screen with a lower dpi (assuming screen sizes are the same).
The preceding example also specifies that the orientation of the layout is vertical:
<LinearLayout xmlns:android="http://schemas.android.com/apk/res/android"
android:layout_width="fill_parent"
android:layout_height="fill_parent"
android:orientation="vertical" >The default orientation layout is horizontal, so if you omit the android:orientation attribute, the views appear as shown in Figure 4.6.
In LinearLayout, you can apply the layout_weight and layout_gravity attributes to views contained within it, as the modifications to activity_main.xml in the following code snippet show:
<?xml version="1.0" encoding="utf-8"?>
<LinearLayout xmlns:android="http://schemas.android.com/apk/res/android"
android:layout_width="fill_parent"
android:layout_height="fill_parent"
android:orientation="vertical" >
<Button
android:layout_width="160dp"
android:layout_height="0dp"
android:text="Button"
android:layout_gravity="left"
android:layout_weight="1"/>
<Button
android:layout_width="160dp"
android:layout_height="0dp"
android:text="Button"
android:layout_gravity="center"
android:layout_weight="2"/>
<Button
android:layout_width="160dp"
android:layout_height="0dp"
android:text="Button"
android:layout_gravity="right"
android:layout_weight="3"/>
</LinearLayout>Figure 4.7 shows the positioning of the views as well as their heights. The layout_gravity attribute indicates the positions the views should gravitate toward, whereas the layout_weight attribute specifies the distribution of available space. In the preceding example, the three buttons occupy about 16.6 percent (1/(1+2+3) * 100), 33.3 percent (2/(1+2+3) * 100), and 50 percent (3/(1+2+3) * 100) of the available height, respectively.
If you change the orientation of the LinearLayout to horizontal (as shown in the following code snippet), you need to change the width of each view to 0 dp. The views display as shown in Figure 4.8:
<LinearLayout xmlns:android="http://schemas.android.com/apk/res/android"
android:layout_width="fill_parent"
android:layout_height="fill_parent"
android:orientation="horizontal" >
<Button
android:layout_width="0dp"
android:layout_height="wrap_content"
android:text="Button"
android:layout_gravity="left"
android:layout_weight="1"/>
<Button
android:layout_width="0dp"
android:layout_height="wrap_content"
android:text="Button"
android:layout_gravity="center_horizontal"
android:layout_weight="2"/>
<Button
android:layout_width="0dp"
android:layout_height="wrap_content"
android:text="Button"
android:layout_gravity="right"
android:layout_weight="3"/>
</LinearLayout>In the following Try It Out, you combine multiple LinearLayouts to create an L-shaped configuration of views.
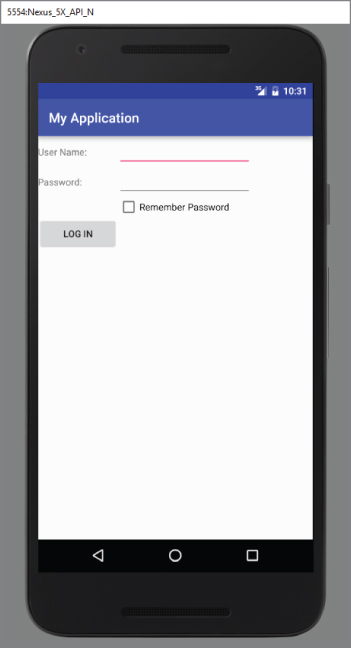
The TableLayout Layout groups views into rows and columns. You use the <TableRow> element to designate a row in the table. Each row can contain one or more views. Each view you place within a row forms a cell. The width of each column is determined by the largest width of each cell in that column.
Consider the content of activity_main.xml shown here:
<TableLayout
xmlns:android="http://schemas.android.com/apk/res/android"
android:layout_height="fill_parent"
android:layout_width="fill_parent" >
<TableRow>
<TextView
android:text="User Name:"
android:width ="120dp"
/>
<EditText
android:id="@+id/txtUserName"
android:width="200dp"/>
</TableRow>
<TableRow>
<TextView
android:text="Password:"
/>
<EditText
android:id="@+id/txtPassword"
android:inputType="textPassword"
/>
</TableRow>
<TableRow>
<TextView/>
<CheckBox android:id="@+id/chkRememberPassword"
android:layout_width="fill_parent"
android:layout_height="wrap_content"
android:text="Remember Password"
/>
</TableRow>
<TableRow>
<Button
android:id="@+id/buttonSignIn"
android:text="Log In"/>
</TableRow>
</TableLayout>Figure 4.10 shows how the preceding code appears when rendered on the Android emulator.
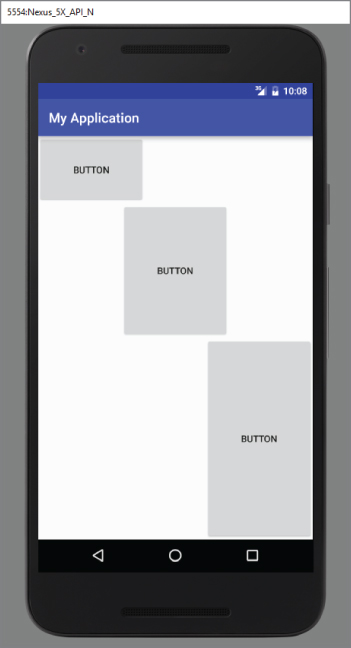
The RelativeLayout layout enables you to specify how child views are positioned relative to each other. Consider the following activity_main.xml file:
<?xml version="1.0" encoding="utf-8"?>
<RelativeLayout
android:id="@+id/RLayout"
android:layout_width="fill_parent"
android:layout_height="fill_parent"
xmlns:android="http://schemas.android.com/apk/res/android" >
<TextView
android:id="@+id/lblComments"
android:layout_width="wrap_content"
android:layout_height="wrap_content"
android:text="Comments"
android:layout_alignParentTop="true"
android:layout_alignParentStart="true"/>
<EditText
android:id="@+id/txtComments"
android:layout_width="fill_parent"
android:layout_height="170dp"
android:textSize="18sp"
android:layout_alignStart="@+id/lblComments"
android:layout_below="@+id/lblComments"
android:layout_centerHorizontal="true"/>
<Button
android:id="@+id/btnSave"
android:layout_width="125dp"
android:layout_height="wrap_content"
android:text="Save"
android:layout_below="@+id/txtComments"
android:layout_alignEnd="@+id/txtComments"/>
<Button
android:id="@+id/btnCancel"
android:layout_width="124dp"
android:layout_height="wrap_content"
android:text="Cancel"
android:layout_below="@+id/txtComments"
android:layout_alignStart="@+id/txtComments"/>
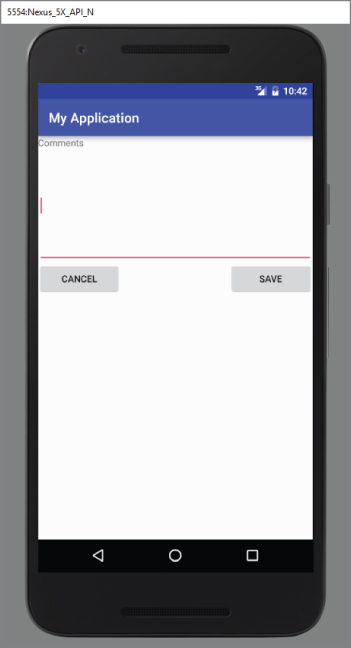
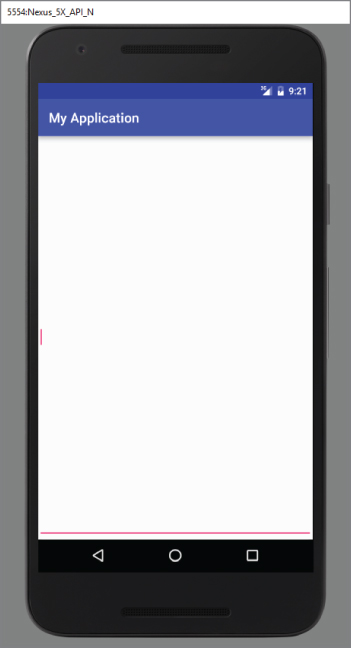
</RelativeLayout>Notice that each view embedded within the RelativeLayout has attributes that enable it to align with another view. These attributes are as follows:
layout_alignParentToplayout_alignParentStartlayout_alignStartlayout_alignEndlayout_belowlayout_centerHorizontalThe value for each of these attributes is the ID for the view that you are referencing. The preceding XML UI creates the screen shown in Figure 4.12.
The FrameLayout layout is a placeholder on screen that you can use to display a single view. Views that you add to a FrameLayout are always anchored to the top left of the layout. Consider the following content in main.xml:
<?xml version="1.0" encoding="utf-8"?>
<RelativeLayout
android:id="@+id/RLayout"
android:layout_width="fill_parent"
android:layout_height="fill_parent"
xmlns:android="http://schemas.android.com/apk/res/android" >
<TextView
android:id="@+id/lblComments"
android:layout_width="wrap_content"
android:layout_height="wrap_content"
android:text="Hello, Android!"
android:layout_alignParentTop="true"
android:layout_alignParentStart="true"/>
<FrameLayout
android:layout_width="wrap_content"
android:layout_height="wrap_content"
android:layout_alignStart="@+id/lblComments"
android:layout_below="@+id/lblComments"
android:layout_centerHorizontal="true" >
<ImageView
android:src="@mipmap/butterfly"
android:layout_width="wrap_content"
android:layout_height="wrap_content"/>
</FrameLayout>
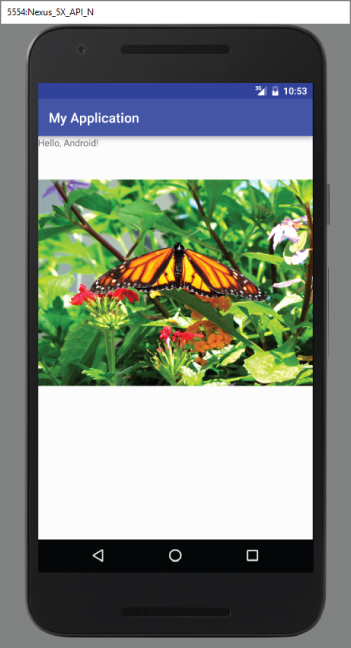
</RelativeLayout>Here, you have a FrameLayout within a RelativeLayout. Within the FrameLayout, you embed an ImageView. The UI is shown in Figure 4.13.
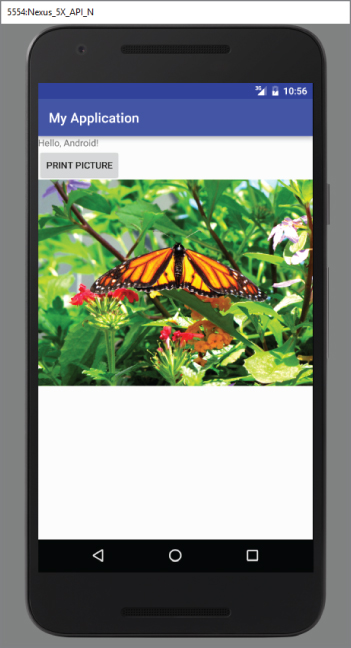
If you add another view (such as a Button view) within the FrameLayout, the view overlaps the previous view (see Figure 4.14):
<?xml version="1.0" encoding="utf-8"?>
<RelativeLayout
android:id="@+id/RLayout"
android:layout_width="fill_parent"
android:layout_height="fill_parent"
xmlns:android="http://schemas.android.com/apk/res/android" >
<TextView
android:id="@+id/lblComments"
android:layout_width="wrap_content"
android:layout_height="wrap_content"
android:text="Hello, Android!"
android:layout_alignParentTop="true"
android:layout_alignParentStart="true"/>
<FrameLayout
android:layout_width="wrap_content"
android:layout_height="wrap_content"
android:layout_alignStart="@+id/lblComments"
android:layout_below="@+id/lblComments"
android:layout_centerHorizontal="true" >
<ImageView
android:src="@mipmap/butterfly"
android:layout_width="wrap_content"
android:layout_height="wrap_content"/>
<Button
android:layout_width="124dp"
android:layout_height="wrap_content"
android:text="Print Picture"/>
</FrameLayout>A ScrollView is a special type of FrameLayout in that it enables users to scroll through a list of views that occupy more space than the physical display. The ScrollView can contain only one child view or ViewGroup, which normally is a LinearLayout.
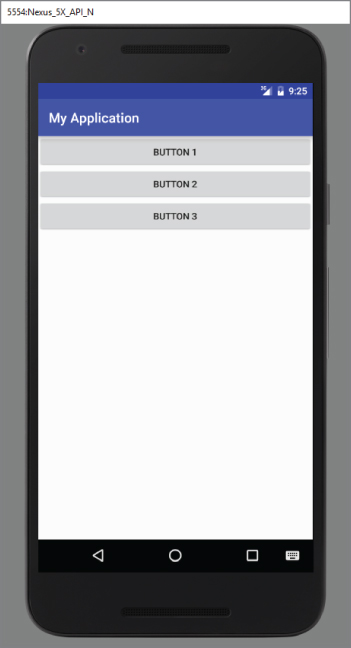
The following main.xml content shows a ScrollView containing a LinearLayout, which in turn contains some Button and EditText views:
<ScrollView
android:layout_width="fill_parent"
android:layout_height="fill_parent"
xmlns:android="http://schemas.android.com/apk/res/android" >
<LinearLayout
android:layout_width="fill_parent"
android:layout_height="wrap_content"
android:orientation="vertical" >
<Button
android:id="@+id/button1"
android:layout_width="fill_parent"
android:layout_height="wrap_content"
android:text="Button 1"/>
<Button
android:id="@+id/button2"
android:layout_width="fill_parent"
android:layout_height="wrap_content"
android:text="Button 2"/>
<Button
android:id="@+id/button3"
android:layout_width="fill_parent"
android:layout_height="wrap_content"
android:text="Button 3"/>
<EditText
android:id="@+id/txt"
android:layout_width="fill_parent"
android:layout_height="600dp"/>
<Button
android:id="@+id/button4"
android:layout_width="fill_parent"
android:layout_height="wrap_content"
android:text="Button 4"/>
<Button
android:id="@+id/button5"
android:layout_width="fill_parent"
android:layout_height="wrap_content"
android:text="Button 5"/>
</LinearLayout>
</ScrollView>If you load the preceding code on the Android emulator, you see something like what's shown in Figure 4.15.
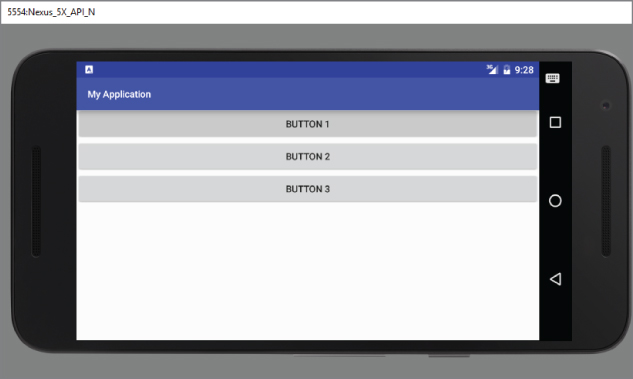
Because the EditText automatically gets the focus, it fills up the entire activity (as the height was set to 600dp). To prevent it from getting the focus, add the following two bolded attributes to the <LinearLayout> element:
<LinearLayout
android:layout_width="fill_parent"
android:layout_height="wrap_content"
android:orientation="vertical"
android:focusable="true"
android:focusableInTouchMode="true" >Now you are able to view the buttons and scroll through the list of views (see Figure 4.16).
Sometimes you might want EditText to automatically get the focus, but you do not want the soft input panel (keyboard) to appear automatically (which happens on a real device). To prevent the keyboard from appearing, add the following bolded attribute to the <activity> element in the AndroidManifest.xml file:
<activity
android:label="@string/app_name"
android:name=".LayoutsActivity"
android:windowSoftInputMode="stateHidden" >
<intent-filter >
<action android:name="android.intent.action.MAIN"/>
<category android:name="android.intent.category.LAUNCHER"/>
</intent-filter>
</activity>One of the key features of modern smartphones is their ability to switch screen orientation, and Android is no exception. Android supports two screen orientations: portrait and landscape. By default, when you change the display orientation of your Android device, the current activity automatically redraws its content in the new orientation. This is because the onCreate() method of the activity is fired whenever there is a change in display orientation.
However, when the views are redrawn, they may be drawn in their original locations (depending on the layout selected). Figure 4.17 shows the previous example displayed in landscape mode.
In general, you can employ two techniques to handle changes in screen orientation:
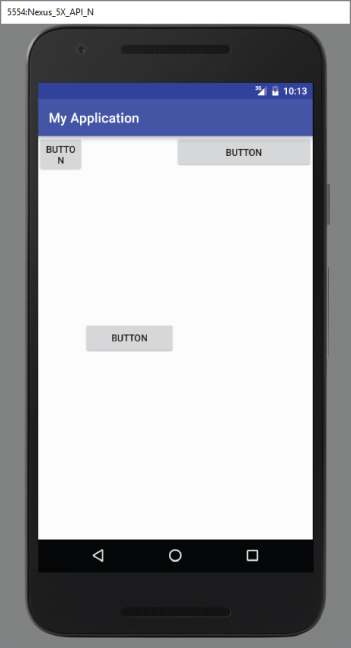
Anchoring can be easily achieved by using RelativeLayout. Consider the following main.xml file, which contains five Button views embedded within the <RelativeLayout> element:
<RelativeLayout
android:layout_width="fill_parent"
android:layout_height="fill_parent"
xmlns:android="http://schemas.android.com/apk/res/android">
<Button
android:id="@+id/button1"
android:layout_width="wrap_content"
android:layout_height="wrap_content"
android:text="Top Left"
android:layout_alignParentStart="true"
android:layout_alignParentTop="true"/>
<Button
android:id="@+id/button2"
android:layout_width="wrap_content"
android:layout_height="wrap_content"
android:text="Top Right"
android:layout_alignParentTop="true"
android:layout_alignParentEnd="true"/>
<Button
android:id="@+id/button3"
android:layout_width="wrap_content"
android:layout_height="wrap_content"
android:text="Bottom Left"
android:layout_alignParentStart="true"
android:layout_alignParentBottom="true"/>
<Button
android:id="@+id/button4"
android:layout_width="wrap_content"
android:layout_height="wrap_content"
android:text="Bottom Right"
android:layout_alignParentEnd="true"
android:layout_alignParentBottom="true"/>
<Button
android:id="@+id/button5"
android:layout_width="fill_parent"
android:layout_height="wrap_content"
android:text="Middle"
android:layout_centerVertical="true"
android:layout_centerHorizontal="true"/>
</RelativeLayout>Note the following attributes found in the various Button views:
layout_alignParentStart—Aligns the view to the left of the parent viewlayout_alignParentEnd—Aligns the view to the right of the parent viewlayout_alignParentTop—Aligns the view to the top of the parent viewlayout_alignParentBottom—Aligns the view to the bottom of the parent viewlayout_centerVertical—Centers the view vertically within its parent viewlayout_centerHorizontal—Centers the view horizontally within its parent viewFigure 4.18 shows the activity when viewed in portrait mode.
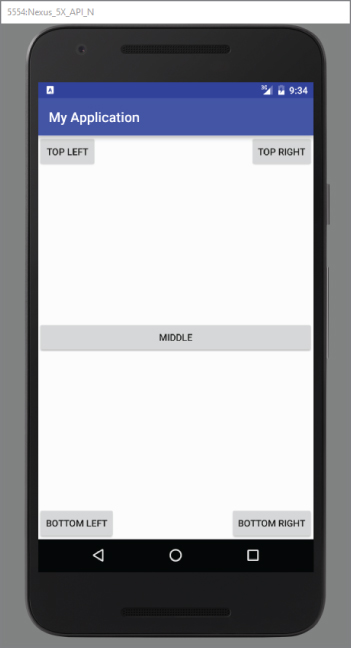
When the screen orientation changes to landscape mode, the four buttons are aligned to the four edges of the screen, and the center button is centered in the middle of the screen with its width fully stretched (see Figure 4.19).
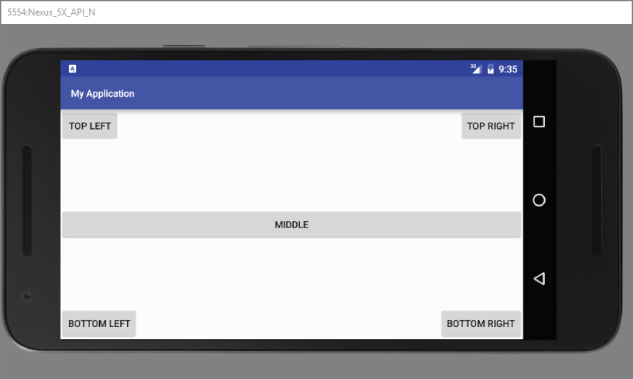
Now that you have looked at screen orientation changes, let's explore what happens to an activity's state when the device changes orientation.
The following Try It Out demonstrates the behavior of an activity when the device changes orientation.
So far, you have learned that changing screen orientation destroys an activity and re-creates it. Keep in mind that when an activity is re-created, its current state might be lost. When an activity is killed, it fires one or both of the following methods:
onPause()—This method is always fired whenever an activity is killed or pushed into the background.onSaveInstanceState()—This method is also fired whenever an activity is about to be killed or put into the background (just like the onPause() method). However, unlike the onPause() method, the onSaveInstanceState() method is not fired when an activity is being unloaded from the stack (such as when the user pressed the back button) because there is no need to restore its state later.In short, to preserve the state of an activity, you could always implement the onPause() method and then use your own ways to preserve the state of your activity, such as using a database, internal or external file storage, and so on.
If you simply want to preserve the state of an activity so that it can be restored later when the activity is re-created (such as when the device changes orientation), a much simpler way is to implement the onSaveInstanceState() method, as it provides a Bundle object as an argument so that you can use it to save your activity's state. The following code shows that you can save the string ID into the Bundle object during the onSaveInstanceState() method:
@Override
public void onSaveInstanceState(Bundle outState) {
//---save whatever you need to persist---
outState.putString("ID", "1234567890");
super.onSaveInstanceState(outState);
}When an activity is re-created, the onCreate() method is first fired, followed by the onRestoreInstanceState() method, which enables you to retrieve the state that you saved previously in the onSaveInstanceState() method through the Bundle object in its argument:
@Override
public void onRestoreInstanceState(Bundle savedInstanceState) {
super.onRestoreInstanceState(savedInstanceState);
//---retrieve the information persisted earlier---
String ID = savedInstanceState.getString("ID");
}
}Sometimes you need to know the device's current orientation during runtime. To determine that, you can use the getResources() method. The following code snippet demonstrates how you can programmatically detect the current orientation of your activity:
@Override
protected void onCreate(Bundle savedInstanceState) {
super.onCreate(savedInstanceState);
setContentView(R.layout.activity_main);
if(getResources().getConfiguration().orientation == Configuration.ORIENTATION_LANDSCAPE){
Log.d("StateInfo", "Landscape");
}else if(getResources().getConfiguration().orientation == Configuration.ORIENTATION_PORTRAIT){
Log.d("StateInfo", "Portrait");
}
}The getConfiguration() method contains an orientation object representing the screen of the device. You can then test this against the Configuration set of constants to determine the orientation.
Occasionally, you might want to ensure that your application is displayed in only a certain orientation. For example, you may be writing a game that should be viewed only in landscape mode. In this case, you can programmatically force a change in orientation using the setRequestOrientation() method of the Activity class:
import android.content.pm.ActivityInfo;
@Override
public void onCreate(Bundle savedInstanceState) {
super.onCreate(savedInstanceState);
setContentView(R.layout.main);
//---change to landscape mode---
setRequestedOrientation(ActivityInfo.SCREEN_ORIENTATION_LANDSCAPE);
}To change to portrait mode, use the ActivityInfo.SCREEN_ORIENTATION_PORTRAIT constant.
Besides using the setRequestOrientation() method, you can also use the android:screenOrientation attribute on the <activity> element in AndroidManifest.xml as follows to constrain the activity to a certain orientation:
<?xml version="1.0" encoding="utf-8"?>
<manifest xmlns:android="http://schemas.android.com/apk/res/android"
package="com.jfdimarzio.orientations">
<application
android:allowBackup="true"
android:icon="@mipmap/ic_launcher"
android:label="@string/app_name"
android:supportsRtl="true"
android:theme="@style/AppTheme">
<activity android:name=".MainActivity"
android:screenOrientation="landscape" >
<intent-filter>
<action android:name="android.intent.action.MAIN"/>
<category android:name="android.intent.category.LAUNCHER"/>
</intent-filter>
</activity>
</application>
</manifest>The preceding example constrains the activity to a certain orientation (landscape in this case) and prevents the activity from being destroyed; that is, the activity will not be destroyed and the onCreate() method will not be fired again when the orientation of the device changes.
Following are two other values that you can specify in the android:screenOrientation attribute:
portrait—Portrait modesensor—Based on the accelerometer (default)Besides fragments, another feature of Android is the Action Bar. In place of the traditional title bar located at the top of the device's screen, the Action Bar displays the application icon and the activity title. Optionally, on the right side of the Action Bar are action items. The next section discusses action items in more detail.
The following Try It Out shows how you can programmatically hide or display the Action Bar.
Besides displaying the application icon and the activity title on the left of the Action Bar, you can also display additional items on the Action Bar. These additional items are called action items. Action items are shortcuts to some of the commonly performed operations in your application. For example, you might be building an RSS reader application, in which case some of the action items might be Refresh Feed, Delete Feed, and Add New Feed.
The following Try It Out shows how you can add action items to the Action Bar.
So far, all the UIs you have seen in this chapter are created using XML. As mentioned earlier, besides using XML you can also create the UI using code. This approach is useful if your UI needs to be dynamically generated during runtime. For example, suppose you are building a cinema ticket reservation system and your application displays the seats of each cinema using buttons. In this case, you need to dynamically generate the UI based on the cinema selected by the user.
The following Try It Out demonstrates the code needed to dynamically build the UI in your activity.
Users interact with your UI at two levels: the activity level and the view level. At the activity level, the Activity class exposes methods that you can override. Some common methods that you can override in your activities include the following:
onKeyDown—Called when a key was pressed and not handled by any of the views contained within the activityonKeyUp—Called when a key was released and not handled by any of the views contained within the activityonMenuItemSelected—Called when a panel's menu item has been selected by the user (covered in Chapter 6)onMenuOpened—Called when a panel's menu is opened by the user (covered in Chapter 6)In this chapter, you have learned how user interfaces are created in Android. You have also learned about the different layouts that you can use to position the views in your Android UI. Because Android devices support more than one screen orientation, you need to take special care to ensure that your UI can adapt to changes in screen orientation.
dp unit and the px unit? Which one should you use to specify the dimension of a view?AbsoluteLayout not recommended for use?onPause()method and the onSaveInstanceState() method?You can find answers to the exercises in the appendix.
| Topic | Key Concepts |
LinearLayout |
Arranges views in a single column or single row. |
AbsoluteLayout |
Enables you to specify the exact location of its children. |
TableLayout |
Groups views into rows and columns. |
RelativeLayout |
Enables you to specify how child views are positioned relative to each other. |
FrameLayout |
A placeholder on screen that you can use to display a single view. |
ScrollView |
A special type of FrameLayout in that it enables users to scroll through a list of views that occupy more space than the physical display allows. |
| Unit of Measure | Use dp for specifying the dimension of views and sp for font size. |
| Two ways to adapt to changes in orientation | Anchoring, and resizing and repositioning. |
| Using different XML files for different orientations | Use the layout folder for portrait UI, and layout-land for landscape UI. |
| Three ways to persist activity state | Use the onPause() method.Use the onSaveInstanceState() method.Use the onRetainNonConfigurationInstance() method. |
| Getting the dimension of the current device | Use the WindowManager class's getDefaultDisplay() method. |
| Constraining the activity's orientation | Use the setRequestOrientation() method or the android:screenOrientation attribute in the AndroidManifest.xml file. |
| Action Bar | Replaces the traditional title bar for older versions of Android. |
| Action items | Action items are displayed on the right of the Action Bar. They are created just like options menus. |
| Application icon | Usually used to return to the “home” activity of an application. It is advisable to use the Intent object with the Intent.FLAG_ACTIVITY_CLEAR_TOP flag. |
In the previous chapter, you learned about the various layouts that you can use to position your views in an activity. You also learned about the techniques you can use to adapt to different screen resolutions and sizes. This chapter gives you a look at the various views that you can use to design the user interface (UI) for your applications.
In particular, the chapter covers the following ViewGroups:
TextView, EditText, and Button viewsTimePicker and DatePicker viewsListView and the SpinnerView viewsSubsequent chapters cover the other views not covered in this chapter, such as the analog and digital clock views and other views for displaying graphics, and so on.
To get started, this section explores some of the basic views that you can use to design the UI of your Android applications:
TextViewEditTextButtonImageButtonCheckBoxToggleButtonRadioButtonRadioGroupThese basic views enable you to display text information, as well as perform some basic selection. The following sections explore all these views in more detail.
When you create a new Android project, Android Studio always creates the activity_main.xml file (located in the res/layout folder), which contains a <TextView> element:
<?xml version="1.0" encoding="utf-8"?>
<LinearLayout xmlns:android="http://schemas.android.com/apk/res/android"
android:layout_width="fill_parent"
android:layout_height="fill_parent"
android:orientation="vertical" >
<TextView
android:layout_width="fill_parent"
android:layout_height="wrap_content"
android:text="@string/hello"/>
</LinearLayout>You use the TextView view to display text to the user. This is the most basic view and one that you will frequently use when you develop Android applications. If you need to allow users to edit the text displayed, you should use the subclass of TextView—EditText—which is discussed in the next section.
Besides the TextView view, which you will likely use the most often, there are some other basic views that you will find yourself frequently using:
Button—Represents a push-button widget.ImageButton—Similar to the Button view, except that it also displays an image.EditText—A subclass of the TextView view, which allows users to edit its text content.CheckBox—A special type of button that has two states: checked or unchecked.RadioGroup and RadioButton—The RadioButton has two states: either checked or unchecked. A RadioGroup is used to group one or more RadioButton views, thereby allowing only one RadioButton to be checked within the RadioGroup.ToggleButton—Displays checked/unchecked states using a light indicator.The following Try It Out provides details about how these views work.
Now that you have seen what the various views for an activity look like, the following Try It Out demonstrates how you can programmatically control them.
The ProgressBar view provides visual feedback about some ongoing tasks, such as when you are performing a task in the background. For example, you might be downloading some data from the web and need to update the user about the status of the download. In this case, the ProgressBar view is a good choice. The following activity demonstrates how to use the ProgressBar view.
The next Try It Out shows how you can change the look of the ProgressBar.
The AutoCompleteTextView is a view that is similar to EditText (in fact it is a subclass of EditText), except that it automatically shows a list of completion suggestions while the user is typing. The following Try It Out shows how to use the AutoCompleteTextView to automatically help users complete the text entry.
Selecting a date and time is one of the common tasks you need to perform in a mobile application. Android supports this functionality through the TimePicker and DatePicker views. The following sections demonstrate how to use these views in your activity.
The TimePicker view enables users to select a time of the day, in either 24-hour mode or AM/PM mode. The following Try It Out shows you how to use the TimePicker in the latest version of the Android SDK. When you are creating the project for this sample, be sure that you choose an SDK that is level 23 or greater.
Although you can display the TimePicker in an activity, it's better to display it in a dialog window because after the time is set, the window disappears and doesn't take up any space in an activity. The following Try It Out demonstrates how to do it.
Another view that is similar to the TimePicker is the DatePicker. Using the DatePicker, you can enable users to select a particular date on the activity. The following Try It Out shows you how to use the DatePicker.
List views are views that enable you to display a long list of items. In Android, there are two types of list views: ListView and SpinnerView. Both are useful for displaying long lists of items. The Try It Outs in this section show them in action.
The ListView displays a list of items in a vertically scrolling list. The following Try It Out demonstrates how to display a list of items using the ListView.
The ListView is a versatile view that you can further customize. The following Try It Out shows how to allow multiple items in the ListView to be selected and how to enable filtering support.
Although the previous example shows that the list of presidents' names is stored in an array, in a real-life application it is recommended that you either retrieve them from a database or at least store them in the strings.xml file. The following Try It Out shows you how.
This example demonstrated how to make items in a ListView selectable. At the end of the selection process, how do you know which item or items are selected? The following Try It Out shows you how.
The ListView displays a long list of items in an activity, but you might want the user interface to display other views, meaning you do not have the additional space for a full-screen view, such as the ListView. In such cases, you should use the SpinnerView. The SpinnerView displays one item at a time from a list and enables users to choose from them.
The following Try It Out shows how you can use the SpinnerView in your activity.
Chapter 3 discusses the fragment feature that was added in Android 3. Fragments allow you to customize the user interface of your Android application by dynamically rearranging fragments to fit within an activity. This enables you to build applications that run on devices with different screen sizes.
As you have learned, fragments are really “mini-activities” that have their own life cycles. To create a fragment, you need a class that extends the Fragment base class. In addition to the Fragment base class, you can also extend from some other subclasses of the Fragment base class to create more specialized fragments. The following sections discuss the three subclasses of Fragment:
ListFragmentDialogFragmentPreferenceFragmentA list fragment is a fragment that contains a ListView, which displays a list of items from a data source, such as an array or a Cursor. A list fragment is useful because it's common to have one fragment that contains a list of items (such as a list of RSS postings), and another fragment that displays details about the selected posting. To create a list fragment, you need to extend the ListFragment base class.
The following Try It Out shows you how to get started with a list fragment.
A dialog fragment floats on top of an activity and is displayed modally. Dialog fragments are useful when you need to obtain the user's response before continuing with execution. To create a dialog fragment, you must extend the DialogFragment base class.
The following Try It Out shows how to create a dialog fragment.
Typically, in your Android applications you provide preferences for users to personalize the application. For example, you might allow users to save the login credentials that they use to access their web resources. Also, you could save information, such as how often the feeds must be refreshed (for example, in an RSS reader application), and so on. In Android, you can use the PreferenceActivity base class to display an activity for the user to edit the preferences. In Android 3.0 and later, you can use the PreferenceFragment class to do the same thing.
The following Try It Out shows you how to create and use a preference fragment in Android 3 and 4.
This chapter provided a look at some of the commonly used views in an Android application. Although it is not possible to exhaustively examine each view in detail, the views you learned about here should provide a good foundation for designing your Android application's user interface, regardless of its requirements.
RadioButton is checked?strings.xml file?You can find answers to the exercises in the appendix.
| Topic | Key Concepts |
TextView |
|
Button |
|
ImageButton |
|
EditText |
|
CheckBox |
|
RadioGroup and RadioButton |
|
ToggleButton |
|
ProgressBar |
|
AutoCompleteTextBox |
|
TimePicker |
|
DatePicker |
|
Spinner |
|
| Specialized fragment types |
|
In the previous chapter, you learned about the various views that you can use to build the user interface of your Android application. This chapter continues your exploration of the other views that you can use to create robust and compelling applications.
In particular, you find out how to work with views that enable you to display images. Also, you see how to create option and context menus in your Android application. This chapter ends with a discussion of some helpful views that enable users to display the current time and web content.
So far, all the views you have seen are used to display text information. However, you can use the ImageView, ImageSwitcher, and GridView views for displaying images.
The following sections discuss each view in detail.
The ImageView is a view that shows images on the device screen. The following Try It Out shows you how to use the ImageView view to display an image.
The previous section demonstrated how to use the ImageView to display an image. However, sometimes you don't want an image to appear abruptly when the user opens the view. For example, you might want to apply some animation to an image when it transitions from one image to another. In this case, you need to use the ImageSwitcher. The following Try It Out shows you how.
The GridView shows items in a two-dimensional scrolling grid. You can use the GridView together with an ImageView to display a series of images. The following Try It Out demonstrates how.
Menus are useful for displaying additional options that are not directly visible on the main user interface (UI) of an application. There are two main types of menus in Android:
Before you go ahead and create your options and context menus, you need to create two helper methods. One creates a list of items to show inside a menu, whereas the other handles the event that is fired when the user selects an item inside the menu.
You are now ready to modify the application to display the options menu when the user presses the Menu key on the Android device.
The previous section showed how the options menu is displayed when the user presses the Menu button. In addition to the options menu, you can also display a context menu. A context menu is usually associated with a view on an activity. A context menu is displayed when the user taps and holds an item. For example, if the user taps a Button view and holds it for a few seconds, a context menu can be displayed.
If you want to associate a context menu with a view on an activity, you need to call the setOnCreateContextMenuListener() method of that particular view. The following Try It Out shows how you can associate a context menu with a Button view.
Aside from the standard views that you have seen up to this point, the Android SDK provides some additional views that make your applications much more interesting. This section explains more about the WebView.
The WebView enables you to embed a web browser in your activity. This is very useful if your application needs to embed some web content, such as maps from some other providers, and so on. The following Try It Out shows how you can programmatically load the content of a web page and display it in your activity.
In this chapter, you have taken a look at the various views that enable you to display images: Gallery, ImageView, ImageSwitcher, and GridView. Also, you learned about the difference between options menus and context menus, and how to display both in your application. Finally, you learned about the WebView, which displays the content of a web page.
ImageSwitcher?You can find answers to the exercises in the appendix.
| Topic | Key Concepts |
ImageView |
|
Using the ImageSwitcher view |
Performs animation when switching between images |
ImageSwitcher |
|
Using the GridView |
Shows items in a two-dimensional scrolling grid |
GridView |
|
WebView |
|
This chapter describes how to persist data in your Android applications. Persisting data is an important topic in application development because users typically expect to reuse data in the future. For Android, there are primarily three basic ways of persisting data:
The techniques discussed in this chapter enable applications to create and access their own private data. Chapter 8 shows you how to share data across applications.
Android provides the SharedPreferences object to help you save simple application data. For example, your application may have an option that enables users to specify the font size used in your application. In this case, your application needs to remember the size set by the user so that the size is set appropriately each time the app is opened. You have several options for saving this type of preference:
SharedPreferences object—The SharedPreferences object, however, saves data through the use of name/value pairs. For example, specify a name for the data you want to save, and then both it and its value will be saved automatically to an XML file.In the following Try It Out, you see how to use the SharedPreferences object to store application data. You also find out how the stored application data can be modified directly by the user through a special type of activity provided by the Android OS.
In the previous section, you saw how the PreferenceActivity class both enables developers to easily create preferences and enables users to modify them during runtime. To make use of these preferences in your application, you use the SharedPreferences class. The following Try It Out shows you how.
The SharedPreferences object enables you to store data that is best stored as name/value pairs—for example, user ID, birth date, gender, driver's license number, and so on. However, sometimes you might prefer to use the traditional file system to store your data. For example, you might want to store the text of poems you want to display in your applications. In Android, you can use the classes in the java.io package to do so.
The first way to save files in your Android application is to write to the device's internal storage. The following Try It Out demonstrates how to save a string entered by the user to the device's internal storage.
The previous section showed how you can save your files to the internal storage of your Android device. Sometimes, it would be useful to save them to external storage (such as an SD card) because of its larger capacity, as well as the capability to share the files easily with other users (by removing the SD card and passing it to somebody else). You can use the following steps to save files to external storage:
onClick() method of the Save button as shown in bold here:import java.io.File;
import java.io.FileInputStream;
import java.io.FileOutputStream;
import java.io.IOException;
import java.io.InputStreamReader;
import java.io.OutputStreamWriter;
import android.app.Activity;
import android.os.Bundle;
import android.os.Environment;
import android.view.View;
import android.widget.EditText;
import android.widget.Toast;
public void onClickSave(View view) {
String str = textBox.getText().toString();
try
{
//---SD Card Storage---
File sdCard = Environment.getExternalStorageDirectory();
File directory = new File (sdCard.getAbsolutePath() +
"/MyFiles");
directory.mkdirs();
File file = new File(directory, "textfile.txt");
FileOutputStream fOut = new FileOutputStream(file);
/*
FileOutputStream fOut =
openFileOutput("textfile.txt",
MODE_WORLD_READABLE);
*/
OutputStreamWriter osw = new
OutputStreamWriter(fOut);
//---write the string to the file---
osw.write(str);
osw.flush();
osw.close();
//---display file saved message---
Toast.makeText(getBaseContext(),
"File saved successfully!",
Toast.LENGTH_SHORT).show();
//---clears the EditText---
textBox.setText("");
}
catch (IOException ioe)
{
ioe.printStackTrace();
}
}getExternalStorageDirectory() method to return the full path to the external storage. Typically, it should return the “/sdcard” path for a real device, and “/mnt/sdcard” for an Android emulator. However, you should never try to hardcode the path to the SD card, as manufacturers may choose to assign a different path name to the SD card. Be sure to use the getExternalStorageDirectory() method to return the full path to the SD card.MyFiles in the SD card.onClickLoad() method for the Load button: public void onClickLoad(View view) {
try
{
//---SD Storage---
File sdCard = Environment.getExternalStorageDirectory();
File directory = new File (sdCard.getAbsolutePath() +
"/MyFiles");
File file = new File(directory, "textfile.txt");
FileInputStream fIn = new FileInputStream(file);
InputStreamReader isr = new InputStreamReader(fIn);
/*
FileInputStream fIn =
openFileInput("textfile.txt");
InputStreamReader isr = new
InputStreamReader(fIn);
*/
char[] inputBuffer = new char[READ_BLOCK_SIZE];
String s = "";
int charRead;
while ((charRead = isr.read(inputBuffer))>0)
{
//---convert the chars to a String---
String readString =
String.copyValueOf(inputBuffer, 0,
charRead);
s += readString;
inputBuffer = new char[READ_BLOCK_SIZE];
}
//---set the EditText to the text that has been
// read---
textBox.setText(s);
Toast.makeText(getBaseContext(),
"File loaded successfully!",
Toast.LENGTH_SHORT).show();
}
catch (IOException ioe) {
ioe.printStackTrace();
}
}WRITE_EXTERNAL_STORAGE permission in your AndroidManifest.xml file:
<?xml version="1.0" encoding="utf-8"?>
<manifest xmlns:android="http://schemas.android.com/apk/res/android"
package="com.jfdimarzio.Files"
android:versionCode="1"
android:versionName="1.0" >
<uses-sdk android:minSdkVersion="14"/>
<uses-permission android:name="android.permission.WRITE_EXTERNAL_STORAGE" />
<application
android:icon="@drawable/ic_launcher"
android:label="@string/app_name" >
<activity
android:label="@string/app_name"
android:name=".FilesActivity" >
<intent-filter >
<action android:name="android.intent.action.MAIN"/>
<category android:name="android.intent.category.LAUNCHER"/>
</intent-filter>
</activity>
</application>
</manifest>The previous sections described three main ways to save data in your Android applications: the SharedPreferences object, internal storage, and external storage. Which one should you use in your applications? Here are some guidelines:
SharedPreferences object. For example, if you want to store user preference data such as username, background color, date of birth, or last login date, then the SharedPreferences object is the ideal way to store this data. Moreover, you don't really have to do much to store data this way. Simply use the SharedPreferences object to store and retrieve it.So far, all the techniques you have seen are useful for saving simple sets of data. For saving relational data, using a database is much more efficient. For example, if you want to store the test results of all the students in a school, it is much more efficient to use a database to represent them because you can use database querying to retrieve the results of specific students. Moreover, using databases enables you to enforce data integrity by specifying the relationships between different sets of data.
Android uses the SQLite database system. The database that you create for an application is only accessible to itself; other applications will not be able to access it.
In this section, you find out how to programmatically create a SQLite database in your Android application. For Android, the SQLite database that you create programmatically in an application is always stored in the /data/data/<package_name>/databases folder.
A good practice for dealing with databases is to create a helper class to encapsulate all the complexities of accessing the data so that it is transparent to the calling code. For this section, you create a helper class called DBAdapter, which creates, opens, closes, and uses a SQLite database.
In this example, you are going to create a database named MyDB containing one table named contacts. This table has three columns: _id, name, and email.
With the DBAdapter helper class created, you are now ready to use the database. In the following sections, you will learn how to perform the regular CRUD (create, read, update and delete) operations commonly associated with databases.
The following Try It Out demonstrates how you can add a contact to the table.
To retrieve all the contacts in the contacts table, use the getAllContacts() method of the DBAdapter class, as the following Try It Out shows.
To retrieve a single contact using its ID, call the getContact() method of the DBAdapter class, as the following Try It Out shows.
To update a particular contact, call the updateContact() method in the DBAdapter class by passing the ID of the contact you want to update, as the following Try It Out shows.
To delete a contact, use the deleteContact() method in the DBAdapter class by passing the ID of the contact you want to update, as the following Try It Out shows.
Sometimes, after creating and using the database, you might need to add additional tables, change the schema of the database, or add columns to your tables. In this case, you need to migrate your existing data from the old database to a newer one.
To upgrade the database, change the DATABASE_VERSION constant to a value higher than the previous one. For example, if its previous value was 1, change it to 2:
public class DBAdapter {
static final String KEY_ROWID = "_id";
static final String KEY_NAME = "name";
static final String KEY_EMAIL = "email";
static final String TAG = "DBAdapter";
static final String DATABASE_NAME = "MyDB";
static final String DATABASE_TABLE = "contacts";
static final int DATABASE_VERSION = 2;When you run the application one more time, you see the following message in the logcat window of Android Studio:
DBAdapter(8705): Upgrading database from version 1 to 2, which
will destroy all old dataFor simplicity, simply drop the existing table and create a new one. In real life, you usually back up your existing table and then copy it over to the new table.
In this chapter, you were introduced to the different ways to save persistent data to your Android device. For simple unstructured data, using the SharedPreferences object is the ideal solution. If you need to store bulk data then consider using the traditional file system. Finally, for structured data, it is more efficient to store it in a relational database management system. For this, Android provides the SQLite database, which you can access easily using the APIs exposed.
Note that for the SharedPreferences object and the SQLite database, the data is accessible only by the application that creates it. In other words, it is not shareable. If you need to share data among different applications, you need to create a content provider. Content providers are discussed in more detail in Chapter 8.
You can find answers to the exercises in the appendix.
| Topic | Key Concepts |
| Saving simple user data | Use the SharedPreferences object. |
| Sharing data among activities in the same application | Use the getSharedPreferences() method. |
| Saving to a file | Use the FileOutputStream and OutputStreamReader classes. |
| Reading from a file | Use the FileInputStream and InputStreamReader classes. |
| Saving to external storage | Use the getExternalStorageDirectory() method to return the path to the external storage. |
Accessing files in the res/raw folder |
Use the openRawResource() method in the Resources object (obtained via the getResources() method). |
| Creating a database helper class | Extend the SQLiteOpenHelper class. |
The previous chapter explains the various ways to persist data—using shared preferences, files, as well as SQLite databases. Although using the database approach is the recommended way to save structured and complex data, sharing data is a challenge because the database is accessible to only the package that created it.
This chapter explains Android's way of sharing data through the use of content providers. You find out how to use the built-in content providers, as well as implement your own content providers to share data across packages.
In Android, using a content provider is the recommended way to share data across packages. Think of a content provider as a data store. How it stores its data is not relevant to the application using it. However, the way in which packages can access the data stored in it using a consistent programming interface is important. A content provider behaves very much like a database—you can query it, edit its content, and add or delete content. However, unlike a database, a content provider can use different ways to store its data. The data can be stored in a database, in files, or even over a network.
Android ships with many useful content providers, including the following:
Besides the many built-in content providers, you can also create your own content providers.
To query a content provider, you specify the query string in the form of a Uniform Resource Identifier (URI), with an optional specifier for a particular row. Here's the format of the query URI:
<standard_prefix>://<authority>/<data_path>/<id>The various parts of the URI are as follows:
The standard prefix for content providers is always content://.
The authority specifies the name of the content provider. An example would be contacts for the built-in Contacts content provider. For third-party content providers, this could be the fully qualified name, such as com.wrox.provider or com.jfdimarzio.provider.
data path specifies the kind of data requested. For example, if you are getting all the contacts from the Contacts content provider then the data path would be people, and the URI would look like this: content://contacts/people.id specifies the specific record requested. For example, if you are looking for contact number 2 in the Contacts content provider, the URI would look like this: content://contacts/people/2.Table 8.1 shows some examples of query strings.
Table 8.1 Example Query Strings
| QUERY STRING | DESCRIPTION |
content://media/internal/images |
Returns a list of the internal images on the device |
content://media/external/images |
Returns a list of the images stored on the external storage (for example, SD card) on the device |
content://call_log/calls |
Returns a list of calls registered in the Call Log |
content://browser/bookmarks |
Returns a list of bookmarks stored in the browser |
The best way to understand content providers is to actually use one. The following Try It Out shows how you can use a content provider from within your Android application.
Besides using the query URI, you can use a list of predefined query string constants in Android to specify the URI for the different data types. For example, besides using the query content://contacts/people, you can rewrite this statement:
Uri allContacts = Uri.parse("content://contacts/people");using one of the predefined constants in Android, as follows:
Uri allContacts = ContactsContract.Contacts.CONTENT_URI;The PrintContacts() method prints the following in the logcat window:
12-13 08:32:50.471: V/Content Providers(12346): 1, Wei-Meng Lee
12-13 08:32:50.471: V/Content Providers(12346): 2, Linda Chen
12-13 08:32:50.471: V/Content Providers(12346): 3, Joanna YipIt prints the ID and name of each contact stored in the Contacts application. In this case, you access the ContactsContract.Contacts._ID field to obtain the ID of a contact, and ContactsContract.Contacts.DISPLAY_NAME for the name of a contact. If you want to display the phone number of a contact, you need to query the content provider again, as the information is stored in another table:
private void PrintContacts(Cursor c)
{
if (c.moveToFirst()) {
do{
String contactID = c.getString(c.getColumnIndex(
ContactsContract.Contacts._ID));
String contactDisplayName =
c.getString(c.getColumnIndex(
ContactsContract.Contacts.DISPLAY_NAME));
Log.v("Content Providers", contactID + ", " +
contactDisplayName);
//---get phone number---
Cursor phoneCursor =
getContentResolver().query(
ContactsContract.CommonDataKinds.Phone.CONTENT_URI, null,
ContactsContract.CommonDataKinds.Phone.CONTACT_ID + " = " +
contactID, null, null);
while (phoneCursor.moveToNext()) {
Log.v("Content Providers",
phoneCursor.getString(
phoneCursor.getColumnIndex(
ContactsContract.CommonDataKinds.Phone.NUMBER)));
}
phoneCursor.close();
} while (c.moveToNext());
}
}In the preceding code snippet, you first check whether a contact has a phone number using the ContactsContract.Contacts.HAS_PHONE_NUMBER field. If the contact has at least a phone number, you then query the content provider again based on the ID of the contact. After the phone numbers are retrieved, you then iterate through them and print out the numbers. You should see something like this:
12-13 08:59:31.881: V/Content Providers(13351): 1, Wei-Meng Lee
12-13 08:59:32.311: V/Content Providers(13351): +651234567
12-13 08:59:32.321: V/Content Providers(13351): 2, Linda Chen
12-13 08:59:32.511: V/Content Providers(13351): +1 876-543-21
12-13 08:59:32.545: V/Content Providers(13351): 3, Joanna Yip
12-13 08:59:32.641: V/Content Providers(13351): +239 846 5522The third parameter for the CursorLoader class controls how many columns are returned by the query. This parameter is known as the projection. Earlier, you specified null:
Cursor c;
CursorLoader cursorLoader = new CursorLoader(
this,
allContacts,
null,
null,
null ,
null);
c = cursorLoader.loadInBackground(); You can specify the exact columns to return by creating an array containing the name of the column to return, like this:
String[] projection = new String[]
{ContactsContract.Contacts._ID,
ContactsContract.Contacts.DISPLAY_NAME,
ContactsContract.Contacts.HAS_PHONE_NUMBER};
Cursor c;
CursorLoader cursorLoader = new CursorLoader(
this,
allContacts,
projection,
null,
null ,
null);
c = cursorLoader.loadInBackground(); In the preceding example, the _ID, DISPLAY_NAME, and HAS_PHONE_NUMBER fields are retrieved.
The fourth and fifth parameters for the CursorLoader class enable you to specify a SQL WHERE clause to filter the result of the query. For example, the following statement retrieves only the people whose name ends with “Lee”:
Cursor c;
CursorLoader cursorLoader = new CursorLoader(
this,
allContacts,
projection,
ContactsContract.Contacts.DISPLAY_NAME + " LIKE '%Lee'",
null ,
null);
c = cursorLoader.loadInBackground(); Here, the fourth parameter for the CursorLoader constructor contains a SQL statement containing the name to search for (“Lee”). You can also put the search string into the next argument of the method/constructor, like this:
Cursor c;
//---Honeycomb and later---
CursorLoader cursorLoader = new CursorLoader(
this,
allContacts,
projection,
ContactsContract.Contacts.DISPLAY_NAME + " LIKE ?",
new String[] {"%Lee"},
null);
c = cursorLoader.loadInBackground(); The last parameter of the CursorLoader class enables you to specify a SQL ORDER BY clause to sort the result of the query. For example, the following statement sorts the contact names in ascending order:
Cursor c;
CursorLoader cursorLoader = new CursorLoader(
this,
allContacts,
projection,
ContactsContract.Contacts.DISPLAY_NAME + " LIKE ?",
new String[] {"%Lee"},
ContactsContract.Contacts.DISPLAY_NAME + " ASC");
c = cursorLoader.loadInBackground(); Creating your own content provider in Android is relatively simple. All you need to do is extend the abstract ContentProvider class and override the various methods defined within it.
This section explains how to create a simple content provider that stores a list of books.
Now that you have built your new content provider, you can test it from within your Android application. The following Try It Out demonstrates how to do that.
In this chapter, you learned what content providers are and how to use some of the built-in content providers in Android. In particular, you have seen how to use the Contacts content provider. Google's decision to provide content providers enables applications to share data through a standard set of programming interfaces. In addition to the built-in content providers, you can also create your own custom content provider to share data with other packages.
AndroidManifest.xml file?
You can find answers to the exercises in the appendix.
| TOPIC | KEY CONCEPTS |
| Retrieving a managed cursor | Use the CursorLoader class. |
| Two ways to specify a query for a content provider | Use either a query URI or a predefined query string constant. |
| Retrieving the value of a column in a content provider | Use the getColumnIndex() method. |
| Querying URI for accessing a contact's name | ContactsContract.Contacts.CONTENT_URI |
| Querying URI for accessing a contact's phone number | ContactsContract.CommonDataKinds.Phone.CONTENT_URI |
| Creating your own content provider | Create a class and extend the ContentProvider class. |
After you have your basic Android application up and running, the next interesting thing you can add to it is the capability to communicate with the outside world. You might want your application to send an SMS message to another phone when an event happens (such as when a particular geographical location is reached), or you might want to access a web service that provides certain services (such as currency exchange, weather, and so on).
This chapter demonstrates how to send and receive SMS messages programmatically from within your Android application. You also find out how to invoke the Mail application from within your Android application to send email messages to other users.
SMS messaging is one of the main functions on a mobile phone today—for some users, it's as necessary as the device itself. Today, any mobile phone you buy will have SMS messaging capabilities, and nearly all users of any age know how to send and receive such messages. Android comes with a built-in SMS application that enables you to send and receive SMS messages. However, in some cases, you might want to integrate SMS capabilities into your Android application. For example, you might want to write an application that automatically sends an SMS message at regular time intervals. For example, this would be useful if you wanted to track the location of your kids—simply give them an Android device that sends out an SMS message containing its geographical location every 30 minutes. Now you know if they really went to the library after school! (Of course, such a capability also means you would have to pay the fees incurred from sending all those SMS messages.)
This section describes how you can programmatically send and receive SMS messages in your Android applications. The good news for Android developers is that you don't need a real device to test SMS messaging: The free Android emulator provides that capability. In fact, when looking at your emulator window, the four-digit number that appears above your emulator is its “phone number.” The first emulator session that you open is typically 5554, with each subsequent session being incremented by 1.
The first example explains how to send SMS messages programmatically from within your application. Using this approach, your application can automatically send an SMS message to a recipient without user intervention. The following Try It Out shows you how.
Using the SmsManager class, you can send SMS messages from within your application without the need to involve the built-in Messaging application. However, sometimes it would be easier if you could simply invoke the built-in Messaging application and let it handle sending the message.
To activate the built-in Messaging application from within your application, you can use an Intent object with the MIME type "vnd.android-dir/mms-sms", as shown in the following code snippet:
Intent i = new
Intent(android.content.Intent.ACTION_VIEW);
i.putExtra("address", "5556; 5558; 5560");
i.putExtra("sms_body", "Hello my friends!");
i.setType("vnd.android-dir/mms-sms");
startActivity(i);This code invokes the Messaging application directly. Note that you can send your SMS to multiple recipients by separating each phone number with a semicolon (in the putExtra() method). The numbers are separated using commas in the Messaging application.
Besides sending SMS messages from your Android applications, you can also receive incoming SMS messages from within your applications by using a BroadcastReceiver object. This is useful when you want your application to perform an action when a certain SMS message is received. For example, you might want to track the location of your phone in case it is lost or stolen. In this case, you can write an application that automatically listens for SMS messages containing some secret code. When that message is received, you can then send an SMS message containing the location's coordinates back to the sender.
The following Try It Out shows how to programmatically listen for incoming SMS messages.
In the previous section, you might have noticed that every time you send an SMS message to the emulator (or device), both your application and the built-in application receive it. This is because when an SMS message is received, all applications (including the Messaging application) on the Android device take turns handling the incoming message. Sometimes, however, this is not the behavior you want. For example, you might want your application to receive the message and prevent it from being sent to other applications. This is very useful, especially if you are building some kind of tracking application.
The solution is very simple. To prevent an incoming message from being handled by the built-in Messaging application, your application needs to handle the message before the Messaging app has the chance to do it. To do this, add the android:priority attribute to the <intent-filter> element, like this:
<receiver android:name=".SMSReceiver">
<intent-filter android:priority="100">
<action android:name=
"android.provider.Telephony.SMS_RECEIVED"/>
</intent-filter>
</receiver> Set this attribute to a high number, such as 100. The higher the number, the earlier Android executes your application. When an incoming message is received, your application executes first, and you can decide what to do with the message. To prevent other applications from seeing the message, simply call the abortBroadcast() method in your BroadcastReceiver class:
@Override
public void onReceive(Context context, Intent intent)
{
//---get the SMS message passed in---
Bundle bundle = intent.getExtras();
SmsMessage[] msgs = null;
String str = "SMS from ";
if (bundle != null)
{
//---retrieve the SMS message received---
Object[] pdus = (Object[]) bundle.get("pdus");
msgs = new SmsMessage[pdus.length];
for (int i=0; i<msgs.length; i++){
msgs[i] = SmsMessage.createFromPdu((byte[])pdus[i]);
if (i==0) {
//---get the sender address/phone number---
str += msgs[i].getOriginatingAddress();
str += ": ";
}
//---get the message body---
str += msgs[i].getMessageBody().toString();
}
//---display the new SMS message---
Toast.makeText(context, str, Toast.LENGTH_SHORT).show();
Log.d("SMSReceiver", str);
//---stop the SMS message from being broadcasted---
this.abortBroadcast();
}
}After you do this, no other applications are able to receive your SMS messages.
The previous section demonstrates how you can use a BroadcastReceiver class to listen for incoming SMS messages and then use the Toast class to display the received SMS message. Often, you'll want to send the SMS message back to the main activity of your application. For example, you might want to display the message in a TextView. The following Try It Out demonstrates how you can do this.
The previous example shows how you can pass the SMS message received to be displayed in the activity. However, in many situations your activity might be in the background when the SMS message is received. In this case, it would be useful to be able to bring the activity to the foreground when a message is received. The following Try It Out shows you how.
Although the capability to send and receive SMS messages makes Android a very compelling platform for developing sophisticated applications, this flexibility comes with a price. A seemingly innocent application might send SMS messages behind the scene without the user knowing, as demonstrated by a recent case of an SMS-based Trojan Android application (see http://www.tripwire.com/state-of-security/security-data-protection/android-malware-sms/). The app claims to be a media player, but when it's installed it sends SMS messages to a premium-rate number, resulting in huge phone bills for the user.
The user needs to explicitly give permissions (such as accessing the Internet, sending and receiving SMS messages, and so on) to your application; however, the request for permissions is shown only at installation time. If the user clicks the Install button, he or she is considered to have granted the application permission to send and receive SMS messages. This is dangerous because after the application is installed it can send and receive SMS messages without ever prompting the user again.
In addition to this, the application also can “sniff” for incoming SMS messages. For example, based on the techniques you learned from the previous section, you can easily write an application that checks for certain keywords in the SMS message. When an SMS message contains the keyword you are looking for, you can then use the Location Manager (discussed in Chapter 8) to obtain your geographical location and then send the coordinates back to the sender of the SMS message. The sender could then easily track your location. All these tasks can be done easily without the user knowing it! That said, users should try to avoid installing Android applications that come from dubious sources, such as from unknown websites or strangers.
Like SMS messaging, Android also supports email. The Gmail/Email application on Android enables you to configure an email account using POP3 or IMAP. Besides sending and receiving emails using the Gmail/Email application, you can also send email messages programmatically from within your Android application. The following Try It Out shows you how.
For the following example to work properly, you must configure the Email app on your emulator. Simply click the Email app on the emulator and follow the on-screen prompts to set up the application. If you do not, you receive a message stating that no application is configured to handle the Email intent.
activity_main.xml file, replacing the TextView. Please be sure to replace all instances of com.jfdimarzio with the package used in your project:<?xml version="1.0" encoding="utf-8"?>
<android.support.constraint.ConstraintLayout xmlns:android=
"http://schemas.android.com/apk/res/android"
xmlns:app="http://schemas.android.com/apk/res-auto"
xmlns:tools="http://schemas.android.com/tools"
android:id="@+id/activity_main"
android:layout_width="match_parent"
android:layout_height="match_parent"
tools:context="com.jfdimarzio.emails.MainActivity">
<Button
android:text="Send Email"
android:layout_width="wrap_content"
android:layout_height="wrap_content"
android:id="@+id/btnSendEmail"
app:layout_constraintLeft_toLeftOf="@+id/activity_main"
app:layout_constraintTop_toTopOf="@+id/activity_main"
app:layout_constraintRight_toRightOf="@+id/activity_main"
app:layout_constraintBottom_toBottomOf="@+id/activity_main" />
</android.support.constraint.ConstraintLayout>MainActivity.java file:import android.content.Intent;
import android.net.Uri;
import android.support.v7.app.AppCompatActivity;
import android.os.Bundle;
import android.view.View;
public class MainActivity extends AppCompatActivity {
@Override
protected void onCreate(Bundle savedInstanceState) {
super.onCreate(savedInstanceState);
setContentView(R.layout.activity_main);
}
public void onClick(View v) {
//---replace the following email addresses with real ones---
String[] to =
{"someguy@example.com",
"anotherguy@example.com"};
String[] cc = {"busybody@example.com"};
sendEmail(to, cc, "Hello", "Hello my friends!");
}
private void sendEmail(String[] emailAddresses, String[] carbonCopies,
String subject, String message)
{
Intent emailIntent = new Intent(Intent.ACTION_SEND);
emailIntent.setData(Uri.parse("mailto:"));
String[] to = emailAddresses;
String[] cc = carbonCopies;
emailIntent.putExtra(Intent.EXTRA_EMAIL, to);
emailIntent.putExtra(Intent.EXTRA_CC, cc);
emailIntent.putExtra(Intent.EXTRA_SUBJECT, subject);
emailIntent.putExtra(Intent.EXTRA_TEXT, message);
emailIntent.setType("message/rfc822");
startActivity(Intent.createChooser(emailIntent, "Email"));
}
}
This chapter described the two key ways for your application to communicate with the outside world. You first learned how to send and receive SMS messages. Using SMS, you can build a variety of applications that rely on the service provided by your mobile operator. Chapter 8 shows you a good example of how to use SMS messaging to build a location tracker application.
You also learned how to send email messages from within your Android application. You do that by invoking the built-in Email application through the use of an Intent object.
AndroidManifest.xml file for sending and receiving SMS messages.BroadcastReceiver?
You can find answers to the exercises in the appendix.
| TOPIC | KEY CONCEPTS |
| Programmatically sending SMS messages | Use the SmsManager class. |
| Sending SMS messages using Intent | Set the intent type to vnd.android-dir/mms-sms. |
| Receiving SMS messages | Implement a BroadcastReceiver and set it in the AndroidManifest.xml file. |
| Sending email using Intent | Set the intent type to message/rfc822. |
You have seen the explosive growth of mobile apps in recent years. One category of apps that is very popular is Location-Based Services, commonly known as LBS. LBS apps track your location, and might offer additional services such as locating amenities nearby, offering suggestions for route planning, and so on. Of course, one of the key ingredients in an LBS app is maps, which present a visual representation of your location.
This chapter shows you how to make use of Google Maps in your Android application, as well as how to manipulate the map view programmatically. In addition, you find out how to obtain your geographical location using the LocationManager class available in the Android SDK. This chapter ends with a project to build a location tracker application that you can install on an Android device and use to track the location of friends and relatives using SMS messaging.
Google Maps is one of the many applications bundled with the Android platform. In addition to simply using the Maps application, you can also embed it into your own applications and make it do some very cool things. This section describes how to use Google Maps in your Android applications and programmatically perform the following:
To get started, you need to first create an Android project so that you can display Google Maps in your activity:

Beginning with the Android SDK release v1.0, you need to apply for a free Google Maps API key before you can integrate Google Maps into your Android application. When you apply for the key, you must also agree to Google's terms of use, so be sure to read them carefully.
To get a Google Maps key, open the google_maps_api.xml file that was created in your LBS project. Within this file is a link to create a new Google Maps key. Simply copy and paste the link into your browser and follow the instructions. Make note of the key that Google gives you because you need it later in this project.
You are now ready to display Google Maps in your Android application.
The following Try It Out shows you how.
The previous section showed how you can display Google Maps in your Android application. You can pan the map to any desired location and it updates on-the-fly. However, there is no way to use the emulator to zoom in or out from a particular location (on a real Android device you can pinch the map to zoom it). Thus, in this section, you find out how you can enable users to zoom in or out of the map using the built-in zoom controls.
By default, Google Maps is displayed in map view, which is basically drawings of streets and places of interest. You can also set Google Maps to display in satellite view using the setMapType() method of the GoogleMap class:
public void onMapReady(GoogleMap googleMap) {
mMap = googleMap;
// Add a marker in Sydney and move the camera
LatLng sydney = new LatLng(-34, 151);
mMap.addMarker(new MarkerOptions().position(sydney).title(
"Marker in Sydney"));
mMap.moveCamera(CameraUpdateFactory.newLatLng(sydney));
mMap.setMapType(GoogleMap.MAP_TYPE_SATELLITE);
}Figure 10.4 shows Google Maps displayed in satellite view.
By default, Google Maps displays the map of Australia when it is first loaded. However, you can set Google Maps to display a particular location. To do so, you can use the moveCamera() method of the GoogleMap class.
The following Try It Out shows how you can programmatically animate Google Maps to a particular location.
After using Google Maps for a while, you might want to know the latitude and longitude of a location corresponding to the position on the screen that was just touched. Knowing this information is very useful because you can determine a location's address—a process known as reverse geocoding (you find out how this is done in the next section).
To get the latitude and longitude of a point on the Google Map that was touched, you must set a onMapClickListener:
import android.support.v4.app.FragmentActivity;
import android.os.Bundle;
import android.util.Log;
import com.google.android.gms.maps.CameraUpdateFactory;
import com.google.android.gms.maps.GoogleMap;
import com.google.android.gms.maps.OnMapReadyCallback;
import com.google.android.gms.maps.SupportMapFragment;
import com.google.android.gms.maps.model.LatLng;
import com.google.android.gms.maps.model.MarkerOptions;
public class MapsActivity extends FragmentActivity implements OnMapReadyCallback {
private GoogleMap mMap;
@Override
protected void onCreate(Bundle savedInstanceState) {
super.onCreate(savedInstanceState);
setContentView(R.layout.activity_maps);
// Obtain the SupportMapFragment and get notified
// when the map is ready to be used.
SupportMapFragment mapFragment =
(SupportMapFragment) getSupportFragmentManager()
.findFragmentById(R.id.map);
mapFragment.getMapAsync(this);
}
@Override
public void onMapReady(GoogleMap googleMap) {
mMap = googleMap;
LatLng boston = new LatLng(42.3601, -71.0589);
mMap.addMarker(new MarkerOptions().position(boston).title("Boston, Mass"));
mMap.moveCamera(CameraUpdateFactory.newLatLng(boston));
mMap.setOnMapClickListener(new GoogleMap.OnMapClickListener() {
@Override
public void onMapClick(LatLng point) {
Log.d("DEBUG","Map clicked [" + point.latitude +
" / " + point.longitude + "]");
}
});
}
}You should see a logcat entry similar to this if you run the preceding code:
D/DEBUG: Map clicked [37.15198779979302 / -83.76536171883345]As mentioned in the preceding section, if you know the latitude and longitude of a location, you can find out its address using a process known as reverse geocoding. Google Maps in Android supports reverse geocoding via the Geocoder class. The following code snippet shows how you can retrieve the address of a location just touched using the getFromLocation() method:
import android.location.Address;
import android.location.Geocoder;
import android.support.v4.app.FragmentActivity;
import android.os.Bundle;
import android.widget.Toast;
import com.google.android.gms.maps.CameraUpdateFactory;
import com.google.android.gms.maps.GoogleMap;
import com.google.android.gms.maps.OnMapReadyCallback;
import com.google.android.gms.maps.SupportMapFragment;
import com.google.android.gms.maps.model.LatLng;
import com.google.android.gms.maps.model.MarkerOptions;
import java.io.IOException;
import java.util.List;
import java.util.Locale;
public class MapsActivity extends FragmentActivity implements OnMapReadyCallback {
private GoogleMap mMap;
@Override
protected void onCreate(Bundle savedInstanceState) {
super.onCreate(savedInstanceState);
setContentView(R.layout.activity_maps);
// Obtain the SupportMapFragment and get notified
// when the map is ready to be used.
SupportMapFragment mapFragment =
(SupportMapFragment) getSupportFragmentManager()
.findFragmentById(R.id.map);
mapFragment.getMapAsync(this);
}
@Override
public void onMapReady(GoogleMap googleMap) {
mMap = googleMap;
LatLng boston = new LatLng(42.3601, -71.0589);
mMap.addMarker(new MarkerOptions().position(boston).title("Boston, Mass"));
mMap.moveCamera(CameraUpdateFactory.newLatLng(boston));
mMap.setOnMapClickListener(new GoogleMap.OnMapClickListener() {
@Override
public void onMapClick(LatLng point) {
Geocoder geoCoder = new Geocoder(
getBaseContext(), Locale.getDefault());
try {
List<Address> addresses = geoCoder.getFromLocation(
point.latitude,point.longitude,1);
String add = "";
if (addresses.size() > 0)
{
for (int i=0; i<addresses.get(0).getMaxAddressLineIndex();
i++)
add += addresses.get(0).getAddressLine(i) + "\n";
}
Toast.makeText(getBaseContext()
, add, Toast.LENGTH_SHORT).show();
}
catch (IOException e) {
e.printStackTrace();
}
}
});
}
}The Geocoder object converts the latitude and longitude into an address using the getFromLocation() method. After the address is obtained, you display it using the Toast class. Keep in mind that pin will not move. In this example, we are only getting the address of a location that you touch. Figure 10.6 shows the application displaying the address of a location that was touched on the map.
If you know the address of a location but want to know its latitude and longitude, you can do so via geocoding. Again, you can use the Geocoder class for this purpose. The following code shows how you can find the exact location of the Empire State Building by using the getFromLocationName() method:
Geocoder geoCoder = new Geocoder(
getBaseContext(), Locale.getDefault());
try {
List<Address> addresses = geoCoder.getFromLocationName(
"empire state building", 5);
if (addresses.size() > 0) {
LatLng p = new LatLng(
(int) (addresses.get(0).getLatitude()),
(int) (addresses.get(0).getLongitude()));
mMap.moveCamera(CameraUpdateFactory.newLatLng(p));
}
} catch (IOException e) {
e.printStackTrace();
}Nowadays, mobile devices are commonly equipped with GPS receivers. Because of the many satellites orbiting the earth, you can use a GPS receiver to find your location easily. However, GPS requires a clear sky to work and hence does not always work indoors or where satellites can't penetrate (such as a tunnel through a mountain).
Another effective way to locate your position is through cell tower triangulation. When a mobile phone is switched on, it is constantly in contact with base stations surrounding it. By knowing the identity of cell towers, it is possible to translate this information into a physical location through the use of various databases containing the cell towers' identities and their exact geographical locations. The advantage of cell tower triangulation is that it works indoors, without the need to obtain information from satellites. However, it is not as precise as GPS because its accuracy depends on overlapping signal coverage, which varies quite a bit. Cell tower triangulation works best in densely populated areas where the cell towers are closely located.
A third method of locating your position is to rely on Wi-Fi triangulation. Rather than connect to cell towers, the device connects to a Wi-Fi network and checks the service provider against databases to determine the location serviced by the provider. Of the three methods described here, Wi-Fi triangulation is the least accurate.
On the Android platform, the SDK provides the LocationManager class to help your device determine the user's physical location. The following Try It Out shows how this is done in code.
You can combine both the GPS location provider with the network location provider within your application:
@Override
public void onResume() {
super.onResume();
//---request for location updates---
lm.requestLocationUpdates(
LocationManager.GPS_PROVIDER,
0,
0,
locationListener);
//---request for location updates---
lm.requestLocationUpdates(
LocationManager.NETWORK_PROVIDER,
0,
0,
locationListener);
}However, be aware that doing so will cause your application to receive two different sets of coordinates, as both the GPS provider and the NETWORK provider will try to get your location using their own methods (GPS versus Wi-Fi and cell ID triangulation). Hence, it is important that you monitor the status of the two providers in your device and use the appropriate one. You can check the status of the two providers by implementing the following three methods (shown in bold) of the MyLocationListener class:
private class MyLocationListener implements LocationListener
{
…
//---called when the provider is disabled---
public void onProviderDisabled(String provider) {
Toast.makeText(getBaseContext(),
provider + " disabled",
Toast.LENGTH_SHORT).show();
}
//---called when the provider is enabled---
public void onProviderEnabled(String provider) {
Toast.makeText(getBaseContext(),
provider + " enabled",
Toast.LENGTH_SHORT).show();
}
//---called when there is a change in the provider status---
public void onStatusChanged(String provider, int status,
Bundle extras) {
String statusString = "";
switch (status) {
case android.location.LocationProvider.AVAILABLE:
statusString = "available";
case android.location.LocationProvider.OUT_OF_SERVICE:
statusString = "out of service";
case android.location.LocationProvider.TEMPORARILY_UNAVAILABLE:
statusString = "temporarily unavailable";
}
Toast.makeText(getBaseContext(),
provider + " " + statusString,
Toast.LENGTH_SHORT).show();
}
}One very cool feature of the LocationManager class is its ability to monitor a specific location. This is achieved using the addProximityAlert() method.
The following code snippet shows how to monitor a particular location such that if the user is within a five-meter radius from that location, your application will fire an intent to launch the web browser:
import android.app.PendingIntent;
import android.content.Intent;
import android.net.Uri;
//---use the LocationManager class to obtain locations data---
lm = (LocationManager)
getSystemService(Context.LOCATION_SERVICE);
//---PendingIntent to launch activity if the user is within
// some locations---
PendingIntent pendingIntent = PendingIntent.getActivity(
this, 0, new
Intent(android.content.Intent.ACTION_VIEW,
Uri.parse("http://www.amazon.com")), 0);
lm.addProximityAlert(37.422006, -122.084095, 5, -1, pendingIntent);The addProximityAlert() method takes five arguments:
Note that if the Android device's screen goes to sleep, the proximity is also checked once every four minutes in order to preserve the battery life of the device.
This chapter took a whirlwind tour of the GoogleMap object, which displays Google Maps in your Android application. You have learned the various ways in which the map can be manipulated. You also have also seen how you can obtain geographical location data using the various network providers: GPS, cell ID, or Wi-Fi triangulation.
You can find answers to the exercises in the appendix.
| Topic | Key Concepts |
| Displaying the GoogleMap | <string name="google_maps_key" templateMergeStrategy="preserve" translatable="false">YOUR_KEY_HERE</string> |
| Displaying the zoom controls | map:uiZoomControls="true" |
| Programmatically zooming in or out of the map | mMap.animateCamera(CameraUpdateFactory.zoomTo(7)); |
| Changing views | mMap.setMapType(GoogleMap.MAP_TYPE_SATELLITE); |
| Animating to a particular location |
|
| Getting the location of the map touched |
|
| Geocoding and reverse geocoding | Use the Geocoder class |
| Setting a Proximity Alert |
|
Chapter 11 explains how your application can talk to the outside world through the use of SMS messaging and emails. Another way to communicate with the outside world is through the wireless network available on your Android device. In this chapter, you find out how to use the HTTP protocol to talk to web servers so that you can download text and binary data. Also, you see how to parse XML files to extract the relevant parts of an XML document—a technique that is useful if you are accessing web services. In addition to XML web services, this chapter also covers JSON (JavaScript Object Notation), which is a lightweight alternative to XML. You make use of the classes available in the Android SDK to manipulate JSON content.
Finally, this chapter also demonstrates how to write an Android application to connect to servers using TCP sockets. Using sockets programming, you can write sophisticated, interesting networked applications.
One common way to communicate with the outside world is through HTTP. HTTP is no stranger to most people; it is the protocol that drives much of the web's success. Using the HTTP protocol, you can perform a variety of tasks, such as downloading web pages from a web server, downloading binary data, and more.
The following Try It Out creates an Android project so you can use the HTTP protocol to connect to the web to download all sorts of content.
A common task you need to perform is downloading binary data from the web. For example, you might want to download an image from a server so that you can display it in your application. The following Try It Out shows how this is done.
Besides downloading binary data, you can also download plain-text content. For example, you might want to access a web service that returns a string of random quotes. The following Try It Out shows how you can download a string from a web service in your application.
So far, this chapter has showed you how to download images and text from the web. The previous section demonstrated how to download some plain text from a server. Very often, you need to download XML files and parse the contents (a good example of this is consuming web services). Therefore, in this section you learn how to connect to a web service using the HTTP GET method. After the web service returns a result in XML, you extract the relevant parts and display its content using the Toast class.
In this example, you use the web method from http://services.aonaware.com/DictService/DictService.asmx?op=Define. This web method is from a dictionary web service that returns the definition of a given word.
The web method takes a request in the following format:
GET /DictService/DictService.asmx/Define?word=string HTTP/1.1
Host: services.aonaware.com
HTTP/1.1 200 OK
Content-Type: text/xml; charset=utf-8
Content-Length: lengthIt returns a response in the following format:
<?xml version="1.0" encoding="utf-8"?>
<WordDefinition xmlns="http://services.aonaware.com/webservices/">
<Word>string</Word>
<Definitions>
<Definition>
<Word>string</Word>
<Dictionary>
<Id>string</Id>
<Name>string</Name>
</Dictionary>
<WordDefinition>string</WordDefinition>
</Definition>
<Definition>
<Word>string</Word>
<Dictionary>
<Id>string</Id>
<Name>string</Name>
</Dictionary>
<WordDefinition>string</WordDefinition>
</Definition>
</Definitions>
</WordDefinition>Hence, to obtain the definition of a word, you need to establish an HTTP connection to the web method and then parse the XML result that is returned. The following Try It Out shows you how.
In the previous section, you learned how to consume XML web services by using HTTP to connect to the web server and then obtain the results in XML. You also learned how to use DOM to parse the result of the XML document. However, manipulating XML documents is a computationally expensive operation for mobile devices, for the following reasons:
DocumentBuilderFactory, you must use DOM to traverse the tree in order to locate the information you want. In addition, DOM itself has to build the entire document in memory as a tree structure before you can traverse it. This is both memory and CPU intensive.A much more efficient way to represent information exists in the form of JSON (JavaScript Object Notation). JSON is a lightweight data-interchange format that is easy for humans to read and write. It is also easy for machines to parse and generate. The following lines of code show what a JSON message looks like:
[
{
"appeId":"1",
"survId":"1",
"location":"",
"surveyDate":"2008-03 14",
"surveyTime":"12:19:47",
"inputUserId":"1",
"inputTime":"2008-03-14 12:21:51",
"modifyTime":"0000-00-00 00:00:00"
},
{
"appeId":"2",
"survId":"32",
"location":"",
"surveyDate":"2008-03-14",
"surveyTime":"22:43:09",
"inputUserId":"32",
"inputTime":"2008-03-14 22:43:37",
"modifyTime":"0000-00-00 00:00:00"
},
{
"appeId":"3",
"survId":"32",
"location":"",
"surveyDate":"2008-03-15",
"surveyTime":"07:59:33",
"inputUserId":"32",
"inputTime":"2008-03-15 08:00:44",
"modifyTime":"0000-00-00 00:00:00"
},
{
"appeId":"4",
"survId":"1",
"location":"",
"surveyDate":"2008-03-15",
"surveyTime":"10:45:42",
"inputUserId":"1",
"inputTime":"2008-03-15 10:46:04",
"modifyTime":"0000-00-00 00:00:00"
},
{
"appeId":"5",
"survId":"32",
"location":"",
"surveyDate":"2008-03-16",
"surveyTime":"08:04:49",
"inputUserId":"32",
"inputTime":"2008-03-16 08:05:26",
"modifyTime":"0000-00-00 00:00:00"
},
{
"appeId":"6",
"survId":"32",
"location":"",
"surveyDate":"2008-03-20",
"surveyTime":"20:19:01",
"inputUserId":"32",
"inputTime":"2008-03-20 20:19:32",
"modifyTime":"0000-00-00 00:00:00"
}
]The preceding block of lines represents a set of data taken for a survey. Note that the information is represented as a collection of key/value pairs, and that each key/value pair is grouped into an ordered list of objects. Unlike XML, there are no lengthy tag names. Instead, there are only brackets and braces.
The following Try It Out demonstrates how to process JSON messages easily using the JSONArray and JSONObject classes available in the Android SDK.
In this chapter, you learned how your application can connect with the outside world through the use of the HTTP protocol. Using the HTTP protocol, you can download various types of data from web servers. One good application of this is to talk to web services, whereby you need to parse XML files. In addition to XML web services, you also saw how to consume JSON services, which are more lightweight than XML web services. Finally, you saw an alternative to HTTP: using sockets for communication. Sockets enable your application to remain connected to a server so that it can receive data as it becomes available. An important lesson in this chapter is that all synchronous operations must be encapsulated using the AsyncTask class. Otherwise, your application does not work on devices running Honeycomb or later.
AndroidManifest.xml file for an HTTP connection.You can find answers to the exercises in the appendix.
| Topic | Key Concepts |
| Establishing an HTTP connection | Use the HttpURLConnection class. |
| Accessing XML web services | Use the Document, DocumentBuilderFactory, and DocumentBuilder classes to parse the XML result returned by the web service. |
| Dealing with JSON messages | Use the JSONArray and JSONObject classes. |
| Sockets programming | Use the Socket class to establish a TCP connection. Use the InputStream and OutputStream objects for receiving and sending data, respectively. |
The three methods in an AsyncTask class |
The three methods are doInBackground(), onProgressUpdate(), and onPostExecute(). |
A service is an application in Android that runs in the background without needing to interact with the user. For example, while using an application, you might want to play some background music at the same time. In this case, the code that is playing the background music has no need to interact with the user; therefore, it can be run as a service. Also, services are ideal for situations in which there is no need to present a user interface (UI) to the user. A good example of this scenario is an application that continually logs the geographical coordinates of the device. In this case, you can write a service to do that in the background. In this chapter, you find out how to create your own services and use them to perform background tasks asynchronously.
The best way to understand how a service works is by creating one. The following Try It Out shows you the steps to create a simple service. Subsequent sections add more functionality to this service. For now, you see how to start and stop a service.
Because the service you created in the previous section does not do anything useful, in this section you modify it so that it performs a task. In the following Try It Out, you simulate the service of downloading a file from the Internet.
That means for a long-running service, it is important that you put all long-running code into a separate thread so that it does not tie up the application that calls it. The following Try It Out shows you how.
In addition to performing long-running tasks in a service, you might also perform some repeated tasks in a service. For example, you could write an alarm clock service that runs persistently in the background. In this case, your service might need to periodically execute some code to check whether a prescheduled time has been reached so that an alarm can be sounded. To execute a block of code to be executed at a regular time interval, you can use the Timer class within your service. The following Try It Out shows you how.
Earlier in this chapter, you learned how to start a service using the startService() method and stop a service using the stopService() method. You have also seen how you should execute long-running tasks on a separate thread—not the same thread as the calling activities. It is important to note that once your service has finished executing a task, it should be stopped as soon as possible so that it does not unnecessarily hold up valuable resources. That's why you use the stopSelf() method to stop the service when a task has been completed. Unfortunately, a lot of developers often forget to terminate a service when it is done performing its task. To easily create a service that runs a task asynchronously and terminates itself when it is done, you can use the IntentService class.
The IntentService class is a base class for Service that handles asynchronous requests on demand. It is started just like a normal service; and it executes its task within a worker thread and terminates itself when the task is completed. The following Try It Out demonstrates how to use the IntentService class.
Often a service simply executes in its own thread, independently of the activity that calls it. This doesn't pose a problem if you simply want the service to perform some tasks periodically and the activity does not need to be notified about the service's status. For example, you might have a service that periodically logs the geographical location of the device to a database. In this case, there is no need for your service to interact with any activities, because its main purpose is to save the coordinates into a database. However, suppose you want to monitor for a particular location. When the service logs an address that is near the location you are monitoring, it might need to communicate that information to the activity. If so, you need to devise a way for the service to interact with the activity.
The following Try It Out demonstrates how a service can communicate with an activity using a BroadcastReceiver.
So far, you have seen how services are created, how they are called, and how they are terminated when they are done with their task. All the services that you have seen are simple—either they start with a counter and increment at regular intervals or they download a fixed set of files from the Internet. However, real-world services are usually much more sophisticated, requiring the passing of data so that they can do the job correctly for you.
Using the service demonstrated earlier that downloads a set of files, suppose you now want to let the calling activity determine what files to download, instead of hardcoding them in the service. Here is what you need to do.
Intent object, specifying the service name: public void startService(View view) {
Intent intent = new Intent(getBaseContext(), MyService.class);
}URL objects and assign it to the Intent object through its putExtra() method.Intent object: public void startService(View view) {
Intent intent = new Intent(getBaseContext(), MyService.class);
try {
URL[] urls = new URL[] {
new URL("http://www.amazon.com/somefiles.pdf"),
new URL("http://www.wrox.com/somefiles.pdf"),
new URL("http://www.google.com/somefiles.pdf"),
new URL("http://www.learn2develop.net/somefiles.pdf")};
intent.putExtra("URLs", urls);
} catch (MalformedURLException e) {
e.printStackTrace();
}
startService(intent);
}URL array is assigned to the Intent object as an Object array.Intent object in the onStartCommand() method: @Override
public int onStartCommand(Intent intent, int flags, int startId) {
// We want this service to continue running until it is explicitly
// stopped, so return sticky.
Toast.makeText(this, "Service Started", Toast.LENGTH_LONG).show();
Object[] objUrls = (Object[]) intent.getExtras().get("URLs");
URL[] urls = new URL[objUrls.length];
for (int i=0; i<objUrls.length-1; i++) {
urls[i] = (URL) objUrls[i];
}
new DoBackgroundTask().execute(urls);
return START_STICKY;
}getExtras() method to return a Bundle object.get() method to extract the URL array as an Object array.execute() method.This is one way in which your activity can pass values to the service. As you can see, if you have relatively complex data to pass to the service, you must do some additional work to ensure that the data is passed correctly. A better way to pass data is to bind the activity directly to the service so that the activity can call any public members and methods on the service directly. The following Try It Out shows you how to bind an activity to a service.
So far, you have seen how services are created and why it is important to ensure that your long-running tasks are properly handled, especially when updating the UI thread. Earlier in this chapter (as well as in Chapter 9), you also saw how to use the AsyncTask class for executing long-running code in the background. This section briefly summarizes the various ways to handle long-running tasks correctly using a variety of methods available.
For this discussion, assume that you have an Android project named Threading. The main.xml file contains a Button and TextView:
<?xml version="1.0" encoding="utf-8"?>
<LinearLayout xmlns:android="http://schemas.android.com/apk/res/android"
android:layout_width="fill_parent"
android:layout_height="fill_parent"
android:orientation="vertical" >
<TextView
android:layout_width="fill_parent"
android:layout_height="wrap_content"
android:text="@string/hello"/>
<Button
android:id="@+id/btnStartCounter"
android:layout_width="match_parent"
android:layout_height="wrap_content"
android:text="Start"
android:onClick="startCounter"/>
<TextView
android:id="@+id/textView1"
android:layout_width="match_parent"
android:layout_height="wrap_content"
android:text="TextView"/>
</LinearLayout>Suppose you want to display a counter on the activity, from 0 to 1,000. In your ThreadingActivity class, you have the following code:
package net.learn2develop.Threading;
import android.app.Activity;
import android.os.Bundle;
import android.util.Log;
import android.view.View;
import android.widget.TextView;
public class ThreadingActivity extends Activity {
TextView txtView1;
/** Called when the activity is first created. */
@Override
public void onCreate(Bundle savedInstanceState) {
super.onCreate(savedInstanceState);
setContentView(R.layout.main);
txtView1 = (TextView) findViewById(R.id.textView1);
}
public void startCounter(View view) {
for (int i=0; i<=1000; i++) {
txtView1.setText(String.valueOf(i));
try {
Thread.sleep(1000);
} catch (InterruptedException e) {
Log.d("Threading", e.getLocalizedMessage());
}
}
}
}When you run the application and click the Start button, the application is briefly frozen.
The UI freezes because the application is continuously trying to display the value of the counter at the same time it is pausing for one second after it has been displayed. This ties up the UI, which is waiting for the display of the numbers to be completed. The result is a nonresponsive application that will frustrate your users.
To solve this problem, one option is to wrap the part of the code that contains the loop using a Thread and Runnable class, like this:
public void startCounter(View view) {
new Thread(new Runnable() {
public void run() {
for (int i=0; i<=1000; i++) {
txtView1.setText(String.valueOf(i));
try {
Thread.sleep(1000);
} catch (InterruptedException e) {
Log.d("Threading", e.getLocalizedMessage());
}
}
}
}).start();
}In the preceding code, you first create a class that implements the Runnable interface. Within this class, you put your long-running code within the run() method. The Runnable block is then started using the Thread class.
However, the preceding application will not work, and it will crash if you try to run it. This code that is placed inside the Runnable block is on a separate thread, and in the preceding example you are trying to update the UI from another thread, which is not a safe thing to do because Android UIs are not thread-safe. To resolve this, you need to use the post() method of a View to create another Runnable block to be added to the message queue. In short, the new Runnable block created will be executed in the UI thread, so it would now be safe to execute your application:
public void startCounter(View view) {
new Thread(new Runnable() {
@Override
public void run() {
for (int i=0; i<=1000; i++) {
final int valueOfi = i;
//---update UI---
txtView1.post(new Runnable() {
public void run() {
//---UI thread for updating---
txtView1.setText(String.valueOf(valueOfi));
}
});
//---insert a delay
try {
Thread.sleep(1000);
} catch (InterruptedException e) {
Log.d("Threading", e.getLocalizedMessage());
}
}
}
}).start();
}This application will now work correctly, but it is complicated and makes your code difficult to maintain.
A second option to update the UI from another thread is to use the Handler class. A Handler enables you to send and process messages, similar to using the post() method of a View. The following code snippet shows a Handler class called UIupdater that updates the UI using the message that it receives:
//---used for updating the UI on the main activity---
static Handler UIupdater = new Handler() {
@Override
public void handleMessage(Message msg) {
byte[] buffer = (byte[]) msg.obj;
//---convert the entire byte array to string---
String strReceived = new String(buffer);
//---display the text received on the TextView---
txtView1.setText(strReceived);
Log.d("Threading", "running");
}
};
public void startCounter(View view) {
new Thread(new Runnable() {
@Override
public void run() {
for (int i=0; i<=1000; i++) {
//---update the main activity UI---
ThreadingActivity.UIupdater.obtainMessage(
0, String.valueOf(i).getBytes() ).sendToTarget();
//---insert a delay
try {
Thread.sleep(1000);
} catch (InterruptedException e) {
Log.d("Threading", e.getLocalizedMessage());
}
}
}
}).start();
}
}A detailed discussion of the Handler class is beyond the scope of this book. For more details, check out the documentation at https://developer.android.com/reference/android/os/Handler.html.
So far, the two methods just described enable you to update the UI from a separate thread. In Android, you could use the simpler AsyncTask class to do this. Using the AsyncTask, you could rewrite the preceding code as follows:
private class DoCountingTask extends AsyncTask<Void, Integer, Void> {
protected Void doInBackground(Void… params) {
for (int i = 0; i < 1000; i++) {
//---report its progress---
publishProgress(i);
try {
Thread.sleep(1000);
} catch (InterruptedException e) {
Log.d("Threading", e.getLocalizedMessage());
}
}
return null;
}
protected void onProgressUpdate(Integer… progress) {
txtView1.setText(progress[0].toString());
Log.d("Threading", "updating…");
}
}
public void startCounter(View view) {
new DoCountingTask().execute();
}The preceding code will update the UI safely from another thread. What about stopping the task? If you run the preceding application and then click the Start button, the counter will start to display from zero. However, if you press the back button on the emulator/device, the task will continue to run even though the activity has been destroyed. You can verify this through the LogCat window. If you want to stop the task, use the following code snippets:
public class ThreadingActivity extends Activity {
static TextView txtView1;
DoCountingTask task;
/** Called when the activity is first created. */
@Override
public void onCreate(Bundle savedInstanceState) {
super.onCreate(savedInstanceState);
setContentView(R.layout.main);
txtView1 = (TextView) findViewById(R.id.textView1);
}
public void startCounter(View view) {
task = (DoCountingTask) new DoCountingTask().execute();
}
public void stopCounter(View view) {
task.cancel(true);
}
private class DoCountingTask extends AsyncTask<Void, Integer, Void> {
protected Void doInBackground(Void… params) {
for (int i = 0; i < 1000; i++) {
//---report its progress---
publishProgress(i);
try {
Thread.sleep(1000);
} catch (InterruptedException e) {
Log.d("Threading", e.getLocalizedMessage());
}
if (isCancelled()) break;
}
return null;
}
protected void onProgressUpdate(Integer… progress) {
txtView1.setText(progress[0].toString());
Log.d("Threading", "updating…");
}
}
@Override
protected void onPause() {
super.onPause();
stopCounter(txtView1);
}
}To stop the AsyncTask subclass, you need to get an instance of it first. To stop the task, call its cancel() method. Within the task, you call the isCancelled() method to check whether the task should be terminated.
In this chapter, you learned how to create a service in your Android project to execute long-running tasks. You have seen the many approaches you can use to ensure that the background task is executed in an asynchronous fashion, without tying up the main calling activity. You have also learned how an activity can pass data into a service, and how you can alternatively bind to an activity so that it can access a service more directly.
IntentService class?AsyncTask class.You can find answers to the exercises in the appendix.
| TOPIC | KEY CONCEPTS |
| Creating a service | Create a class and extend the Service class. |
| Implementing the methods in a service | Implement the following methods: onBind(), onStartCommand(), and onDestroy(). |
| Starting a service | Use the startService() method. |
| Stopping a service | Use the stopService() method. |
| Performing long-running tasks | Use the AsyncTask class and implement three methods: doInBackground(), onProgressUpdate(), and onPostExecute(). |
| Performing repeated tasks | Use the Timer class and call its scheduleAtFixedRate() method. |
| Executing tasks on a separate thread and auto-stopping a service | Use the IntentService class. |
| Enabling communication between an activity and a service | Use the Intent object to pass data into the service. For a service, broadcast an Intent to notify an activity. |
| Binding an activity to a service | Use the Binder class in your service and implement the ServiceConnection class in your calling activity. |
Updating the UI from a Runnable block |
Use the post() method of a view to update the UI. Alternatively, you can also use a Handler class. The recommended way is to use the AsyncTask class. |
This appendix includes the answers to the end-of-chapter exercises.
android:theme onCreateDialog()startActivityForResult()dp unit is density independent and 1dp is equivalent to one pixel on a 160-dpi screen. The px unit corresponds to an actual pixel on screen. You should always use the dp unit because it enables your activity to scale properly when run on devices of varying screen size.AbsoluteLayout makes it difficult for your application to have a consistent look and feel across devices.onPause() event is fired whenever an activity is killed or sent to the background. The onSaveInstanceState() event is similar to the onPause() event, except that it is not always called, such as when the user presses the Back button to kill the activity.onPause(), onSaveInstanceState(), and onRetainNonConfigurationInstance(). onPause() method to preserve the activity's state because the method is always called when the activity is about to be destroyed.onSaveInstanceState() method to save the state of the activity (such as the data entered by the user) using a Bundle object.onRetainNonConfigurationInstance() method is useful for momentarily saving data (such as images or files downloaded from a web service) that might be too large to fit into a Bundle object.onCreateOptionsMenu() and onOptionsItemSelected() events.isChecked() method of each RadioButton to determine whether it has been selected.getResources() method. //—-get the current date—-
Calendar today = Calendar.getInstance();
yr = today.get(Calendar.YEAR);
month = today.get(Calendar.MONTH);
day = today.get(Calendar.DAY_OF_MONTH);
showDialog(DATE_DIALOG_ID);ListFragment, DialogFragment, and PreferenceFragment. ListFragment is useful for displaying a list of items, such as an RSS listing of news items.DialogFragment allows you to display a dialog window modally and is useful when you want a response from the user before allowing him to continue with your application.PreferenceFragment displays a window containing your application's preferences and allows the user to edit them directly in your application.ImageSwitcher enables images to be displayed with animation. You can animate the image when it is being displayed, as well as when it is being replaced by another image.onCreateOptionsMenu() and onOptionsItemSelected().onCreateContextMenu() and onContextItemSelected().WebViewClient class and override the shouldOverrideUrlLoading() method.PreferenceActivity class.getExternalStorageDirectory().WRITE_EXTERNAL_STORAGE. Cursor c;
if (android.os.Build.VERSION.SDK_INT <11) {
//---before Honeycomb---
c = managedQuery(allContacts, projection,
ContactsContract.Contacts.DISPLAY_NAME + " LIKE ?",
new String[] {"%jack"},
ContactsContract.Contacts.DISPLAY_NAME + " ASC");
} else {
//---Honeycomb and later---
CursorLoader cursorLoader = new CursorLoader(
this,
allContacts,
projection,
ContactsContract.Contacts.DISPLAY_NAME + " LIKE ?",
new String[] {"%jack"},
ContactsContract.Contacts.DISPLAY_NAME + " ASC");
c = cursorLoader.loadInBackground();
}getType(), onCreate(), query(), insert(), delete(), and update(). <provider android:name="BooksProvider"
android:authorities="net.learn2develop.provider.Books"/>SEND_SMS and RECEIVE_SMS.onUpgrade()<uses-library> element in the AndroidManifest.xml fileINTERNET permission in the AndroidManifest.xml fileLocationManager.GPS_PROVIDERLocationManager.NETWORK_PROVIDERaddProximityAlert().INTERNET.JSONArray and JSONObject.AsyncTask.IntentService class is similar to the Service class except that it runs the tasks in a separate thread and automatically stops the service when the task has finished execution.doInBackground(), onProgressUpdate(), and onPostExecute().IntentFilter class.AsyncTask. This ensures that the UI is updated in a thread-safe manner.Beginning Android® Programming with Android Studio
Published by
John Wiley & Sons, Inc.
10475 Crosspoint Boulevard
Indianapolis, IN 46256
Copyright © 2017 by John Wiley & Sons, Inc., Indianapolis, Indiana
Published simultaneously in Canada
ISBN: 978-1-118-70559-9
ISBN: 978-1-118- 70742-5 (ebk)
ISBN: 978-1-119-19609-9 (ebk)
No part of this publication may be reproduced, stored in a retrieval system or transmitted in any form or by any means, electronic, mechanical, photocopying, recording, scanning or otherwise, except as permitted under Sections 107 or 108 of the 1976 United States Copyright Act, without either the prior written permission of the Publisher, or authorization through payment of the appropriate per-copy fee to the Copyright Clearance Center, 222 Rosewood Drive, Danvers, MA 01923, (978) 750-8400, fax (978) 646-8600. Requests to the Publisher for permission should be addressed to the Permissions Department, John Wiley & Sons, Inc., 111 River Street, Hoboken, NJ 07030, (201) 748-6011, fax (201) 748-6008, or online at http://www.wiley.com/go/permissions.
Limit of Liability/Disclaimer of Warranty: The publisher and the author make no representations or warranties with respect to the accuracy or completeness of the contents of this work and specifically disclaim all warranties, including without limitation warranties of fitness for a particular purpose. No warranty may be created or extended by sales or promotional materials. The advice and strategies contained herein may not be suitable for every situation. This work is sold with the understanding that the publisher is not engaged in rendering legal, accounting, or other professional services. If professional assistance is required, the services of a competent professional person should be sought. Neither the publisher nor the author shall be liable for damages arising herefrom. The fact that an organization or Web site is referred to in this work as a citation and/or a potential source of further information does not mean that the author or the publisher endorses the information the organization or Web site may provide or recommendations it may make. Further, readers should be aware that Internet Web sites listed in this work may have changed or disappeared between when this work was written and when it is read.
For general information on our other products and services please contact our Customer Care Department within the United States at (877) 762-2974, outside the United States at (317) 572-3993 or fax (317) 572-4002.
Wiley publishes in a variety of print and electronic formats and by print-on-demand. Some material included with standard print versions of this book may not be included in e-books or in print-on-demand. If this book refers to media such as a CD or DVD that is not included in the version you purchased, you may download this material at http://booksupport.wiley.com. For more information about Wiley products, visit www.wiley.com.
Library of Congress Control Number: 2016952673
Trademarks: Wiley, the Wiley logo, Wrox, the Wrox logo, Programmer to Programmer, and related trade dress are trademarks or registered trademarks of John Wiley & Sons, Inc. and/or its affiliates, in the United States and other countries, and may not be used without written permission. Android is a registered trademark of Google, Inc. All other trademarks are the property of their respective owners. John Wiley & Sons, Inc., is not associated with any product or vendor mentioned in this book.
To my children Christian, Sophia, and Giovanni;
Katie, Sarah, and Joe; and my love Jennifer.
J. F. DIMARZIO began developing computer programs—specifically games—in 1984 as a wide-eyed, curious child of the Atari age. Starting on the TRS-80 Color Computer II, in BASIC, he wrote several small text-based games and simple inventory applications. After leaving the Music program at the University of Massachusetts, J. F. moved into professional computer development; working for the United States Department of Defense, Walt Disney Imagineering, TechData, and The Walt Disney Company. In 2008, he started developing apps on the newly introduced Android platform (then on version 0.8). He has had 14 books published to date, 7 of which are on Android and Android game development.
CHÁD (SHOD) DARBY is an author, instructor, and speaker in the Java development world. As a recognized authority on Java applications and architectures, he has presented technical sessions at software development conferences worldwide (in the U.S., U.K., India, Italy, Russia, Netherlands, Singapore, Japan, and Australia). In his 20 years as a professional software architect, he's had the opportunity to work for Blue Cross/Blue Shield, Merck, Boeing, Red Hat, and a handful of startup companies.
Chád is a contributing author to several Java books, including Professional Java E-Commerce (Wrox Press), Beginning Java Networking (Wrox Press), and XML and Web Services Unleashed (Sams Publishing). Chád has Java certifications from Oracle and IBM. He holds a B.S. in Computer Science from Carnegie Mellon University.
J. F. DIMARZIO would like to thank Charlotte Kughen, Jim Minatel, Rick Kughen, and the team at John Wiley & Sons publishing; and Stacey Czarnowski, Katrina Bevan, and the team at Studio B.
Go to www.wiley.com/go/eula to access Wiley's ebook EULA.
I first started playing with the Android Software Development Kit (SDK) before it was officially released as version 0.8. Back then, the tools were unpolished, the application programming interfaces (APIs) in the SDK were unstable, and the documentation was sparse. Android is now one of the most popular mobile operating systems in the world.
Every day, more developers are trying Android development using Android Studio, either as a hobby or professionally. The current challenge for many beginning developers who want to move into the exciting world of android development is trying to determine where to start.
It was with this challenge in mind that I was motivated to write this book, one that could benefit beginning Android programmers and enable them to write progressively more sophisticated applications.
This book is written to help jump-start beginning Android developers, covering the necessary topics in a linear manner so that you can build on your knowledge without being overwhelmed by the details. I adopt the philosophy that the best way to learn is by doing. The numerous Try It Out sections in each chapter first show you how to build something. Then the follow-up How It Works sections explain how everything works. I have also taken this opportunity to further improve the previous edition of this book by addressing feedback from readers and adding additional topics that are important to beginning Android developers.
Although Android programming is a huge topic, my aim for this book is threefold: to get you started with the fundamentals, to help you understand the underlying architecture of the SDK, and to appreciate why things are done in certain ways. It is beyond the scope of any book to cover everything under the sun related to Android programming. However, I am confident that after reading this book (and doing the exercises), you will be well equipped to tackle your next Android programming challenge.
This book is targeted for the beginning Android developer who wants to start developing applications using Google's Android SDK. To truly benefit from this book, you should have some background in programming and at least be familiar with object-oriented programming (OOP) concepts. If you are totally new to Java—the language used for Android development—you might want to take a programming course in Java programming or grab one of many good books on Java programming. In my experience, if you already know C# or VB.NET, learning Java doesn't require too much effort. If you're already comfortable with C# or VB.NET, you should be comfortable just following along with the Try It Outs.
For those totally new to programming, I know the lure of developing mobile apps and making some money is tempting. However, before attempting to try out the examples in this book, I think a better starting point would be to first learn the basics of programming.
This book covers the fundamentals of Android programming using the Android SDK. It is divided into 12 chapters and one appendix.
This book breaks down the task of learning Android programming into several smaller chunks, enabling you to digest each topic before delving into a more advanced one.
If you are a total beginner to Android programming, start with Chapter 1. After you have familiarized yourself with the basics, head to Chapter 2 and get to know the Android Studio IDE. When you are ready, continue with Chapter 3 and gradually move into more advanced topics.
A feature of this book is that all the code samples in each chapter are independent of those discussed in previous chapters. This gives you the flexibility to dive into the topics that interest you and start working on the Try It Out projects.
All the examples in this book run on the Android emulator (which is included as part of the Android SDK and Android Studio). However, to get the most out of this book, it would be useful to have a real Android device (though it's not absolutely necessary).
To help you get the most from the text and keep track of what's happening, a number of conventions are used throughout the book.
As for other conventions in the text:
persistence.properties.We use a monofont type with no highlighting for most code examples.
We use bolding to emphasize code that is of particular importance in the
present context.As you work through the examples in this book, you may choose either to type in all the code manually or to use the source code files that accompany the book. All the source code used in this book is available for download at www.wrox.com. When at the site, simply locate the book's title (use the Search box or one of the title lists) and click the Download Code link on the book's detail page to obtain all the source code for the book.
You'll find the filename of the project you need at the end of the title of the Try it Out features:
We make every effort to ensure that there are no errors in the text or in the code. However, no one is perfect, and mistakes do occur. If you find an error in one of our books, such as a spelling mistake or faulty piece of code, we would be very grateful for your feedback. By sending in errata, you might save another reader hours of frustration and at the same time help us provide even higher-quality information.
To find the errata page for this book, go to www.wrox.com and locate the title using the Search box or one of the title lists. Then, on the book details page, click the Book Errata link. On this page, you can view all errata that has been submitted for this book and posted by Wrox editors.
If you don't spot “your” error on the Book Errata page, go to www.wrox.com/contact/techsupport.shtml and complete the form there to send us the error you have found. We'll check the information and, if appropriate, post a message to the book's errata page and fix the problem in subsequent editions of the book.
For author and peer discussion, join the P2P forums at p2p.wrox.com. The forums are a web-based system for you to post messages relating to Wrox books and related technologies. There, you also can interact with other readers and technology users. The forums offer a subscription feature that enables you to receive emails about topics of interest (of your choosing) when new posts are made to the forums. Wrox authors, editors, other industry experts, and your fellow readers are present on these forums.
At p2p.wrox.com, you will find a number of different forums that will help you not only as you read this book but also as you develop your own applications. To join the forums, follow these steps:
After you join, you can post new messages and respond to messages posted by other users. You can read messages at any time on the web. If you want to have new messages from a particular forum emailed to you, click the Subscribe to This Forum icon next to the forum name in the forum listing.
For more information about how to use the Wrox P2P, be sure to read the P2P FAQs for answers to questions about how the forum software works, as well as many common questions specific to P2P and Wrox books. To read the FAQs, click the FAQ link on any P2P page.
Welcome to the world of Android! This chapter explains what Android is and what makes it so compelling to both developers and device manufacturers. It also shows you how to obtain and set up all the necessary tools so that you can test your application on an Android emulator in Android Studio 2 and how to get started with developing your first Android application. By the end of this chapter, you will be equipped with the basic knowledge you need to explore more sophisticated techniques and tricks for developing your next killer Android application.
Android is a mobile operating system that is based on a modified version of Linux. It was originally developed by a startup of the same name, Android, Inc. In 2005, as part of its strategy to enter the mobile space, Google purchased Android, Inc. and took over its development work (as well as its development team).
Google wanted the Android OS to be open and free, so most of the Android code was released under the open source Apache License. That means anyone who wants to use Android can do so by downloading the full Android source code. Moreover, vendors (typically hardware manufacturers) can add their own proprietary extensions to Android and customize Android to differentiate their products from others. This development model makes Android very attractive to vendors, especially those companies affected by the phenomenon of Apple's iPhone, which was a hugely successful product that revolutionized the smartphone industry. When the iPhone was launched, many smartphone manufacturers had to scramble to find new ways of revitalizing their products. These manufacturers saw Android as a solution, meaning they will continue to design their own hardware and use Android as the operating system that powers it. Some companies that have taken advantage of Android's open source policy include Motorola and Sony Ericsson, which have been developing their own mobile operating systems for many years.
The main advantage to adopting Android is that it offers a unified approach to application development. Developers need only develop for Android in general, and their applications should be able to run on numerous different devices, as long as the devices are powered using Android. In the world of smartphones, applications are the most important part of the success chain.
Android has gone through quite a number of updates since its first release. Table 1.1 shows the various versions of Android and their codenames.
Table 1.1 A Brief History of Android Versions
| ANDROID VERSION | RELEASE DATE | CODENAME |
| 1.1 | February 9, 2009 | |
| 1.5 | April 30, 2009 | Cupcake |
| 1.6 | September 15, 2009 | Donut |
| 2.0/2.1 | October 26, 2009 | Éclair |
| 2.2 | May 20, 2010 | Froyo |
| 2.3 | December 6, 2010 | Gingerbread |
| 3.0/3.1/3.2 | February 22, 2011 | Honeycomb |
| 4.0 | October 18, 2011 | Ice Cream Sandwich |
| 4.1 | July 9, 2012 | Jelly Bean |
| 4.4 | October 31, 2013 | KitKat |
| 5.0 | November 12, 2014 | Lollipop |
| 6.0 | October 5, 2015 | Marshmallow |
| 7.0 | TBD | Nougat |
In 2016, Google released Android 7.0; the following are the key changes in Android 7.0:
One important thing to keep in mind as you are looking at Android versions is that each version has its own features and APIs (application programming interfaces). Therefore, if your application is written for the newest version of Android, and it uses an API that was not present in an older version of Android, then only devices running that newer version of Android will be able to use your application.
Because Android is open source and freely available to manufacturers for customization, there are no fixed hardware or software configurations. However, the base Android OS supports many features, including
Android's web browser is based on the open source WebKit and Chrome's V8 JavaScript engine.
To understand how Android works, take a look at Figure 1.1, which shows the various layers that make up the Android operating system (OS).
The Android OS is roughly divided into five sections in four main layers:
Android devices come in all shapes and sizes including, but not limited to, the following types of devices:
Chances are good that you own at least one of the preceding devices. Figure 1.2 shows the Samsung Galaxy Edge 7.
Another popular category of devices is the tablet. Tablets typically come in two sizes: 7″ and 10″, measured diagonally.
Besides smartphones and tablets, Android is used in dedicated devices, such as e-book readers. Figure 1.4 shows the Barnes and Noble's NOOK Color running the Android OS.
In addition to the popular mobile devices I've already mentioned, Android is finding its way onto your wrist. Smartwatches, and “wearables” in general, have become a major segment of the Android population. Figure 1.3 shows the Motorola Moto 360 Smartwatch, which runs Android Wear (a version of Android OS specifically designed for wearables).
At the time of writing, the Samsung Galaxy Nexus (see Figure 1.4) is the only device running a pure version of Android. Many manufacturers add their own modifications to the Android OS for use on their specific devices. Motorola devices have Motoblur, HTC devices have HTC Sense, and so on. However, the Nexus devices always run a clean version of Android with no modifications.
As mentioned earlier, one of the main factors determining the success of a smartphone platform is the applications that support it. It is clear from the success of the iPhone that applications play a very vital role in determining whether a new platform swims or sinks. Also, making these applications accessible to the general user is extremely important.
Users can simply use the Google Play application that is preinstalled on their Android devices to directly download third-party applications to their devices. Both paid and free applications are available in the Google Play Store, although paid applications are available only to users in certain countries because of legal issues.
Now that you know what Android is and what its feature set contains, you are probably anxious to get your hands dirty and start writing some applications! Before you write your first app, however, you need to download the required tools.
For Android development, you can use a Mac, a Windows PC, or a Linux machine. You can freely download all the necessary tools. Most of the examples provided in this book are written to work on Android Studio. For this book, I am using a Windows 10 computer to demonstrate all the code samples. If you are using a Mac or Linux computer, the screenshots should look similar. Some minor differences might be present, but you should be able to follow along without problems.
Let the fun begin!
The first and most important piece of software you need to download is Android Studio 2. After you have downloaded and installed Android Studio 2, you can use the SDK Manager to download and install multiple versions of the Android SDK. Having multiple versions of the SDK available enables you to write programs that target different devices. For example, you can write one version of an application that specifically targets Android Nougat, but because that flavor of Android is on less than 1% of devices, with multiple versions of the SDK you can also write a version of your app that uses older features and targets Marshmallow or Lollipop users. You can use the Android Device Manager to set up device emulators.
You can download Android Studio 2 from http://developer.android.com/sdk/index.html (see Figure 1.5).
Android Studio 2 is packaged in an executable. Run the install process to set up Android Studio 2. After you've downloaded and run the setup executable, use the following steps to go through the installation process:
Now that Android Studio 2 is installed, you need to adjust the settings and options using the following steps:
Now that Android Studio is set up, it's time to install the latest and greatest Android SDK.
The most important piece of software you need to download is, of course, the Android SDK. The Android SDK contains all of the packages and tools required to develop a functional Android application. The SDKs are named after the version of Android OS to which they correspond. By default, the Marshmallow SDK was installed with Android Studio 2, which means you can develop applications that will run seamlessly on devices with Android Marshmallow.
However, if you want to install a different Android SDK, you can do so using the SDK Manager from the Android Studio welcome screen (shown in Figure 1.15). From this screen, click the Configure drop-down menu in the lower-right corner. The Configure selection menu opens. Choose SDK Manager from this menu.
The SDK configuration screen, shown in Figure 1.16, shows that the Marshmallow SDK is already installed. Android N is available to be installed (as of the writing of this book Android Nougat was in a finalized beta, so it might be named differently now).
Select Android Nougat, click Apply, and then click OK. However, before the SDK is installed you must accept the licensing agreement as shown in Figure 1.17.
The setup process for Android Studio is now complete. The next section explains how to set up an Android Virtual Device that you can use to test your applications.
The next step is to create an Android Virtual Device (AVD) you can use for testing your Android applications. An AVD is an emulator instance that enables you to model an actual device. Each AVD consists of a hardware profile; a mapping to a system image; and emulated storage, such as a secure digital (SD) card. One important thing to remember about emulators is that they are not perfect. There are some applications, such as games (which are GPU heavy) or applications that use sensors such as the GPS or accelerometer. These types of applications cannot be simulated with the same speed or consistency within an emulator as they can when running on an actual device. However, the emulator is good for doing some generalized testing of your applications.
You can create as many AVDs as you want to test your applications with different configurations. This testing is important to confirm the behavior of your application when it is run on different devices with varying capabilities.
Use the following steps to create an AVD. This example demonstrates creating an AVD (put simply, an Android emulator) that emulates an Android device running Android N on the Nexus 5x hardware specs.
After you have created your ADV, it is time to test it. There is no better way to do this than to create and launch the ubiquitous Hello World application.
Now that Android is in its seventh version, there is a large developer community all over the world. It is easy to find solutions to problems and to find like-minded developers with whom to share app ideas and experiences.
The following are some developer communities and websites that you can turn to for help if you run into problems while working with Android:
With all the tools and the SDK downloaded and installed, it is now time to start your engine. As in most programming books, the first example uses the ubiquitous Hello World application. This will give you a detailed look at the various components that make up an Android project. This is also the easiest Android project you will ever make.
Believe it or not, the Hello World application is already finished. By default, when you create a new application in Android Studio, it creates a Hello World application. Let's launch this application and, in the process, also launch the Android emulator to see how everything works.
With the emulator fully loaded and started, Android Studio can install your Hello World application. The application will display as shown in Figure 1.28.
This was a very quick example of how to create and launch your first Android applications. However, what this example has really done for you is introduce you, on a general scale, to most of the major skills you will fine tune throughout this book.
This chapter provided a brief overview of Android and highlighted some of its capabilities. If you have followed the sections on downloading the tools and the Android SDK, you should now have a working system—one that is capable of developing Android applications that are more interesting than the Hello World application. In the next chapter, you find out about the inner workings of Android Studio before moving on to more complex Android application development concepts.
You can find answers to the exercises in the appendix.
| TOPIC | KEY CONCEPTS |
| Android OS | Android is an open source mobile operating system based on the Linux operating system. It is available to anyone who wants to adapt it to run on their own devices. |
| Languages used for Android application development | You use the Java programming language to develop Android applications. Written applications are compiled into Dalvik executables, which are then run on top of the Dalvik virtual machine. |
| Google Play | Google Play hosts all the various Android applications written by third-party developers. |
| Tools for Android application development | Android Studio, Android SDK, and virtual devices. |
Chapter 1 covers how to install and initially configure Android Studio for the purposes of developing Android applications. This chapter explains how to navigate the intricacies of Android Studio in a way that helps you develop applications more easily and with great efficiency.
Android Studio contains myriad features to help everyone from the greenest novices to the most senior superstar developers. By the time you finish this chapter, you will be able to navigate through the features of Android Studio with confidence, produce code that is easy to read and easy to reuse with the help of refactoring, save and share your code to GitHub, and use breakpoints to quickly find problems in your applications.
Let's begin by examining the features of Android Studio.
In this section you explore the Android Studio Integrated Development Environment, which is also known as the IDE. Basically, the IDE is the interface between you and Android Studio. The more you know about the tools, windows, and options that are available to you in Android Studio, the faster you will be able to produce code and the more confident you will be at creating applications.
The first option you have is to name your project. Let's call this one IDEExplorer. The second option—the Company Domain—is very important because it is used to name the Java package to which your code will belong. You can type any name that you want into this field. There is no validation to check that you actually own the domain that you specify, but you should try to use a valid domain. I have used jfdimarzio.com. As you can see from the Package Name line, Android Studio automatically reverses your company domain to create the package name.
The final option on the Create New Project screen is the path to which Android Studio will save your new project. I typically accept the default here because it makes it easier for me to find projects in the future. However, feel free to specify any valid location that you want to use—it will not affect this tutorial. Click Next to continue.
The next screen allows you to select the form factor on which your application will run (see Figure 2.3). For the purposes of this book, you exclusively use Phone and Tablet. The version of Android is Android N (or Nougat, depending on the version of the SDK you downloaded. As of the writing of this book, the name was officially announced as Nougat, but the SDK was still labeled N).
The other options on this screen allow you to create applications that run on Android Wear, Android Auto, and the elusive Google Glass. If you are feeling adventurous after reading this book, feel free to try some of these other application form factor options. For now, make sure to select Phone and Tablet and Android N and click Next to continue.
The next screen is the Add an Activity to Mobile screen, as shown in Figure 2.4. This screen is a helper that adds commonly used features to your project at the time the project is created. The options on this screen range from Add No Activity to Tabbed Activity. For example, if you were to select the Google Maps Activity option, Android Studio would create for you a project with a basic activity that contains a Google Map in it already. This can drastically cut down on the amount of time needed to create some types of applications.
The default option is Empty Activity. This is the most useful for our examples because it creates a basic activity for you, with no code in it—thus allowing you to easily follow the examples in this book.
Click Next to go to the Customize the Activity screen, as shown in Figure 2.5.
The Customize the Activity screen contains two options, one for naming your activity, and one for naming the main layout (presumably to be used by the main activity). Let's explore these two options.
MainActivity. The reason for this is to make it easier to locate the startup code for your application. If anyone else needs to look at or work with your application, they should know that the MainActivity is the starting point. All other activities can be named by their function, for example InputFormActivity or DeleteRecordActivity.activity_main layout. All other layouts should be named according to the activity that they support (activity_input, activity_delete).Click the Finish button to finish creating the project and jump into exploring the IDE.
The Android Studio IDE should now be visible to you as shown in Figure 2.6.
The upper portion of the IDE represents the menu bars or ribbons. Here, as with most applications that you have used in the past, you have all of your options for interacting directly with the IDE. The most important ones to note are the green arrow, which represents the Run app option, and the green arrow with a bug behind it, which is the Debug App option. The Debug App option is arguably the one that you use the most in this book.
By default, the left side of the IDE shows the Project window, as shown in Figure 2.7. The Project window enables you to quickly navigate the files within your project. By default, the Project window is set to the Android view (seen just above the Project window display). To change the view, click the word Android and use the drop-down list of options to make the change. I like to keep mine on Project view when I am working.
On the right side of the IDE (and taking up the largest area) are the Editor tabs (see Figure 2.8). The Editor tabs are where you write and work with your code files.
To work on a new file, simply locate the file in the Project window and double-click it to open a new Editor tab that contains that file's code. If you need to create a new file from scratch, right-click the directory into which you want to place your file, and select New ![]() <File Type> from the context menu.
<File Type> from the context menu.
Finally, at the bottom of the IDE, you should see a button labeled Android Monitor. Click this button to open the Android Monitor (see Figure 2.9).
The Android Monitor automatically displays when you debug an application. It contains a very useful tool called logcat. Logcat displays most of the helpful messages that are output by your application while you are trying to debug it. In future chapters, you will make use of logcat—including writing custom messages to it.
Code completion is an invaluable tool that shows you contextual options for completing the piece of code that you are trying to write. For example, in the editor tab for the MainActivity.js file, locate the line that reads
setContentView(R.layout.activity_main);Place your cursor after this line and press the Enter key. On the new line, type the letter R, and then type a period, as shown here:
R.Android Studio Code Completion should display a list of values that you could use to try to complete the code statement. Figure 2.10 shows what this list might look like. This is important if you are not entirely sure of the spelling of a method call or of how to identify the different method signatures.
You can also use code completion to insert code stubs into your classes. If you are inheriting from a class that has methods you must override, code completion notifies you that there are methods that need to be overridden. With a click, it inserts the stubs of those methods into your application.
Finally, the ability to import packages is one of the Android Studio features and its code completion implementation that you will use most often while navigating the examples in this book. For example, if you were to attempt to create a variable of a type that belongs to a package that you have not imported, Android Studio recognizes this and underlines the type with a red squiggle. Set the cursor to that line and press Alt+Enter to automatically import the package into a using statement at the top of your code file.
After you have built an application, you need to be able to debug it and see what is going on inside your code. One of the handiest ways to be able to see inside your code it through the use of breakpoints. Breakpoints allow you to pause the execution of your code at specific locations and see what is going on (or what is going wrong). Let's take a look at how to use breakpoints in Android Studio.
Breakpoints are a mechanism by which you can tell Android Studio to temporarily pause execution of your code, which allows you to examine the condition of your application. This means that you can check on the values of variables in your application while you are debugging it. Also, you can check whether certain lines of code are being executed as expected—or at all.
To tell Android Studio that you want to examine a specific line of code during debugging, you must set a breakpoint at that line. Click the margin of the editor tab next to line of code you want to break at, to set a breakpoint. A red circle is placed in the margin, and the corresponding line is highlighted in red, as shown in Figure 2.11.
You can also set a breakpoint by placing your cursor in the line of code where you want it to break and clicking Run ![]() Toggle Line Breakpoint. Notice that the term used is toggle, which means that any breakpoints you set can be turned off the same way you turn them on. Simply click an existing breakpoint to remove it from your code.
Toggle Line Breakpoint. Notice that the term used is toggle, which means that any breakpoints you set can be turned off the same way you turn them on. Simply click an existing breakpoint to remove it from your code.
Let's say that you do not know the exact line of code where you want the break to be. You might want to check on the condition of your code when a specific method is called. You can set a method breakpoint by selecting Run ![]() Toggle Method Breakpoint. A method breakpoint is represented by a red circle containing four dots placed at the method signature, as shown in Figure 2.12.
Toggle Method Breakpoint. A method breakpoint is represented by a red circle containing four dots placed at the method signature, as shown in Figure 2.12.
Notice in the lower left-hand area of Figure 2.12 that Android Studio has issued a warning that method breakpoints can dramatically slow down debugging. This is because method breakpoints do more than simple breakpoints in their default state. By default, method breakpoints are set apart from simple breakpoints. Android Studio pauses execution when the method is hit, and it also automatically sets a corresponding breakpoint and pauses at the end of the method (as shown in Figure 2.13).
Thus far, I've discussed simple and method breakpoints. However, there are two other types of breakpoints that you examine in this section: temporary breakpoints and conditional breakpoints.
A temporary breakpoint is useful when you are trying to debug a large loop, or you just want to make sure a line of code is being hit during execution. To set a temporary breakpoint, place your cursor at the location in the code where you want it to break and select Run ![]() Toggle Temporary Line Breakpoint. Notice that a red circle containing a 1 is now placed in the margin (once you set the conditions as shown in Figure 2.14).
Toggle Temporary Line Breakpoint. Notice that a red circle containing a 1 is now placed in the margin (once you set the conditions as shown in Figure 2.14).
The 1 in the red circle represents the fact that Android Studio only stops at this breakpoint the first time your code enters it. After that, the line is executed as though there is no breakpoint set. This can be very useful if you want to ensure a line within a loop is being hit, but you don't want to stop at the line every time it is executed.
However, let's say that you want to ensure that a line within a loop is only being called when a specific variable is set to true (or something similarly complex). In such a case, you can use a conditional breakpoint.
A condition breakpoint is a breakpoint at which Android Studio only pauses when specific conditions are met. To set a conditional breakpoint, first set a simple breakpoint at the line of code you want to examine, then right-click the simple breakpoint to bring up the condition context menu (refer to Figure 2.14).
From here you can set conditions that tell Android Studio when to pause at a breakpoint. For example, you can tell Android Studio to only pause at a line of code when your variable named foo equals true. You would then set the condition in the breakpoint to
foo == trueConditional breakpoints are extremely useful in diagnosing intermittent issues in complex code blocks.
While in debug mode, Android Studio pauses at any breakpoint that you have set. That is, as long as a breakpoint has been set on a reachable line of code (a line of code that would be executed by system), Android Studio halts execution at that line until you tell it to continue.
When Android Studio hits, and pauses at, a breakpoint, the red circle in the margin next to the corresponding line of code changes to a circle with a check mark (see Figure 2.15).
Once a breakpoint has been hit, the debug window opens at the bottom of Android Studio, as shown in Figure 2.16. The debug window contains many of the tools you use to navigate around your code.
Notice the navigation buttons located in the menu bar of the debug window. The most commonly used are Step Over and Step Into. Step Over advances you to the line of code that immediately follows the one at which you are currently paused. This means that if you are paused at a method call, and you press Step Over, Android Studio executes the method call without pausing and then pauses again when execution reached the next line. However, what if an exception happens in that method call and execution never reaches the next line of code? For these situations use Step Into.
Step Into follows execution wherever it leads in the code. Therefore, if you are paused at a method call and click Step Into, Android Studio will shift the view to the method call and pause execution at the first line of code within that method. This allows you to then follow the execution of that method line-by-line before it returns to the calling block.
After you have created, and fully debugged, your application, you might want to deploy it to the Google Store for others to enjoy. The following sections outline the steps for publishing your applications.
To publish your finished application on the Google Play Store, you must generate a signed APK (the Android application package). The APK is the compiled, executable version of your application. Signing it is much like signing your name to a document. The signature identifies the app's developer to Google and the users who install your application. More importantly, unless your Android Studio is in developer mode, unsigned applications will not run. Use the following steps to generate a signed APK:
Notice that there are two places for a password. These are the passwords for your key store and your key, respectively. Because a key store can hold multiple keys, it requires a separate password than that of the key for a specific app.
Now that you have a signed APK, you can upload it to the Google Play Store using the developer console at https://play.google.com/apps/publish/.
Android Studio is a powerful IDE that contains many tools. In this chapter you learned how to navigate the different areas of the Android Studio IDE, such as the Project window and the Editor tabs. You also learned how to set breakpoints and navigate through paused code.
You can find answers to the exercises in the appendix.
| TOPIC | KEY POINTS |
| Android Studio IDE | Create a new project |
| Name the Java package | |
| Name the main entry point for your application | |
| Code Completion | Provides contextual information for completing your code |
| Breakpoints | Paused only while in debug mode |
| Simple | |
| Temporary | |
| Method | |
| Conditional |
An Android application can have zero or more activities. Typically, applications have one or more activities. The main purpose of an activity is to interact with the user. From the moment an activity appears on the screen to the moment it is hidden, it goes through a number of stages. These stages are known as an activity's life cycle. Understanding the life cycle of an activity is vital to ensuring that your application works correctly. In addition to activities, Android N also supports fragments, a feature that was introduced for tablets in Android 3.0 and for phones in Android 4.0. Think of fragments as “miniature” activities that can be grouped to form an activity. In this chapter, you find out how activities and fragments work together.
Apart from activities, another unique concept in Android is that of an intent. An intent is basically the “glue” that enables activities from different applications to work together seamlessly, ensuring that tasks can be performed as though they all belong to one single application. Later in this chapter, you learn more about this very important concept and how you can use it to call built-in applications such as the Browser, Phone, Maps, and more.
This chapter begins by showing you how to create an activity. To create an activity, you create a Java class that extends the Activity base class:
package com.jfdimarzio.chapter1helloworld;
import android.support.v7.app.AppCompatActivity;
import android.os.Bundle;
public class MainActivity extends AppCompatActivity {
@Override
protected void onCreate(Bundle savedInstanceState) {
super.onCreate(savedInstanceState);
setContentView(R.layout.activity_main);
}
}Your activity class loads its user interface (UI) component using the XML file defined in your res/layout folder. In this example, you would load the UI from the main.xml file:
setContentView(R.layout.activity_main);Every activity you have in your application must be declared in your AndroidManifest.xml file, like this:
<?xml version="1.0" encoding="utf-8"?>
<manifest xmlns:android="http://schemas.android.com/apk/res/android
package="com.jfdimarzio.chapter1helloworld">
<application
android:allowBackup="true"
android:icon="@mipmap/ic_launcher"
android:label="@string/app_name"
android:supportsRtl="true"
android:theme="@style/AppTheme">
<activity android:name=".MainActivity">
<intent-filter>
<action android:name="android.intent.action.MAIN" />
<category android:name="android.intent.category.LAUNCHER" />
</intent-filter>
</activity>
</application>
</manifest>The Activity base class defines a series of events that govern the life cycle of an activity. Figure 3.1 shows the lifecycle of an Activity.
The Activity class defines the following events:
onCreate()—Called when the activity is first createdonStart()—Called when the activity becomes visible to the useronResume()—Called when the activity starts interacting with the useronPause()—Called when the current activity is being paused and the previous activity is being resumedonStop()—Called when the activity is no longer visible to the useronDestroy()—Called before the activity is destroyed by the system (either manually or by the system to conserve memory)onRestart()—Called when the activity has been stopped and is restarting againBy default, the activity created for you contains the onCreate() event. Within this event handler is the code that helps to display the UI elements of your screen.
Figure 3.2 shows the life cycle of an activity and the various stages it goes through—from when the activity is started until it ends.
The best way to understand the various stages of an activity is to create a new project, implement the various events, and then subject the activity to various user interactions.
By default, an activity is themed to the default Android theme. However, there has been a push in recent years to adopt a new theme known as Material. The Material theme has a much more modern and clean look to it.
There are two versions of the Material theme available to Android developers: Material Light and Material Dark. Either of these themes can be applied from the AndroidManifest.xml.
To apply one of the Material themes to an activity, simply modify the <Application> element in the AndroidManifest.xml file by changing the default android:theme attribute. (Please be sure to change all instances of "com.jfdimarzio" to whatever package name your project is using.)
<?xml version="1.0" encoding="utf-8"?>
<manifest xmlns:android="http://schemas.android.com/apk/res/android"
    xmlns:tools="http://schemas.android.com/tools"
    package="com.jfdimarzio.activity101">
    <application
        android:allowBackup="true"
        android:icon="@mipmap/ic_launcher"
        android:label="@string/app_name"
        android:supportsRtl="true"
        android:theme="@android:style/Theme.Material">
        <activity android:name=".MainActivity">
            <intent-filter>
                <action android:name="android.intent.action.MAIN"/>
                <category android:name="android.intent.category.LAUNCHER"/>
            </intent-filter>
        </activity>
    </application>
</manifest>Changing the default theme to @android:style/Theme.Material, as in the highlighted code in the preceding snippet, applies the Material Dark theme and gives your application a darker look as shown in Figure 3.4.
You can also hide the title of an activity if desired (such as when you just want to display a status update to the user). To do so, use the requestWindowFeature() method and pass it the Window.FEATURE_NO_TITLE constant, like this:
import android.support.v7.app.AppCompatActivity;
import android.os.Bundle;
import android.view.Window;
public class MainActivity extends AppCompatActivity {
@Override
protected void onCreate(Bundle savedInstanceState) {
super.onCreate(savedInstanceState);
setContentView(R.layout.activity_main);
requestWindowFeature(Window.FEATURE_NO_TITLE);
}
}Now you need to change the theme in the AndroidManifest.xml to a theme that has no title bar. Be sure to change all instances of "com.jfdimarzio" to whatever package name your project is using.
package com.jfdimarzio.activity101;
<?xml version="1.0" encoding="utf-8"?>
<manifest xmlns:android="http://schemas.android.com/apk/res/android"
xmlns:tools="http://schemas.android.com/tools"
package="com.jfdimarzio.activity101">
<application
android:allowBackup="true"
android:icon="@mipmap/ic_launcher"
android:label="@string/app_name"
android:supportsRtl="true"
android:theme="@android:style/Theme.NoTitleBar">
<activity android:name=".MainActivity">
<intent-filter>
<action android:name="android.intent.action.MAIN"/>
<category android:name="android.intent.category.LAUNCHER"/>
</intent-filter>
</activity>
</application>
</manifest>This hides the title bar, as shown in Figure 3.5.
There are times when you need to display a dialog window to get a confirmation from the user. In this case, you can override the onCreateDialog() protected method defined in the Activity base class to display a dialog window. The following Try It Out shows you how.
One common UI feature in an Android device is the “Please wait” dialog that you typically see when an application is performing a long-running task. For example, the application might be logging in to a server before the user is allowed to use it, or it might be doing a calculation before displaying the result to the user. In such cases, it is helpful to display a dialog, known as a progress dialog, so that the user is kept in the loop.
Android provides a ProgressDialog class you can call when you want to display a running meter to the user. ProgressDialog is easy to call from an activity.
The following Try It Out demonstrates how to display such a dialog.
The next section explains using Intents, which help you navigate between multiple Activities.
An Android application can contain zero or more activities. When your application has more than one activity, you often need to navigate from one to another. In Android, you navigate between activities through what is known as an intent.
The best way to understand this very important but somewhat abstract concept is to experience it firsthand and see what it helps you achieve. The following Try It Out shows how to add another activity to an existing project and then navigate between the two activities.
The startActivity() method invokes another activity but does not return a result to the current activity. For example, you might have an activity that prompts the user for username and password. The information entered by the user in that activity needs to be passed back to the calling activity for further processing. If you need to pass data back from an activity, you should instead use the startActivityForResult() method. The following Try It Out demonstrates this.
Besides returning data from an activity, it is also common to pass data to an activity. For example, in the previous example, you might want to set some default text in the EditText view before the activity is displayed. In this case, you can use the Intent object to pass the data to the target activity.
The following Try It Out shows you the various ways in which you can pass data between activities.
In the previous section, you learned what an activity is and how to use it. In a small-screen device (such as a smartphone), an activity typically fills the entire screen, displaying the various views that make up the user interface of an application. The activity is essentially a container for views. However, when an activity is displayed in a large-screen device, such as on a tablet, it is somewhat out of place. Because the screen is much bigger, all the views in an activity must be arranged to make full use of the increased space, resulting in complex changes to the view hierarchy. A better approach is to have “mini-activities,” each containing its own set of views. During runtime, an activity can contain one or more of these mini-activities, depending on the screen orientation in which the device is held. In Android 3.0 and later, these mini-activities are known as fragments.
Think of a fragment as another form of activity. You create fragments to contain views, just like activities. Fragments are always embedded in an activity. For example, Figure 3.13 shows two fragments. Fragment 1 might contain a ListView showing a list of book titles. Fragment 2 might contain some TextViews and ImageViews showing some text and images.
Now imagine the application is running on an Android tablet (or on an Android smartphone) in portrait mode. In this case, Fragment 1 might be embedded in one activity, whereas Fragment 2 might be embedded in another activity (see Figure 3.14). When users select an item in the list in Fragment 1, Activity 2 is started.
If the application is now displayed in a tablet in landscape mode, both fragments can be embedded within a single activity, as shown in Figure 3.15.
From this discussion, it becomes apparent that fragments present a versatile way in which you can create the user interface of an Android application. Fragments form the atomic unit of your user interface, and they can be dynamically added (or removed) to activities in order to create the best user experience possible for the target device.
The following Try It Out shows you the basics of working with fragments.
Although fragments enable you to compartmentalize your UI into various configurable parts, the real power of fragments is realized when you add them dynamically to activities during runtime. In the previous section, you saw how you can add fragments to an activity by modifying the XML file during design time. In reality, it is much more useful if you create fragments and add them to activities during runtime. This enables you to create a customizable user interface for your application. For example, if the application is running on a smartphone, you might fill an activity with a single fragment; if the application is running on a tablet, you might then fill the activity with two or more fragments, as the tablet has much more screen real estate compared to a smartphone.
The following Try It Out shows how you can programmatically add fragments to an activity during runtime.
Like activities, fragments have their own life cycle. Understanding the life cycle of a fragment enables you to properly save an instance of the fragment when it is destroyed, and restore it to its previous state when it is re-created.
The following Try It Out examines the various states experienced by a fragment.
Very often, an activity might contain one or more fragments working together to present a coherent UI to the user. In this case, it is important for fragments to communicate with one another and exchange data. For example, one fragment might contain a list of items (such as postings from an RSS feed). Also, when the user taps on an item in that fragment, details about the selected item might be displayed in another fragment.
The following Try It Out shows how one fragment can access the views contained within another fragment.
So far, you have seen the use of the Intent object to call other activities. This is a good time to recap and gain a more detailed understanding of how the Intent object performs its magic.
First, you learned that you can call another activity by passing its action to the constructor of an Intent object:
startActivity(new Intent("com.jfdimarzio.SecondActivity"));The action (in this example "com.jfdimarzio.SecondActivity") is also known as the component name. This is used to identify the target activity/application that you want to invoke. You can also rewrite the component name by specifying the class name of the activity if it resides in your project, like this:
startActivity(new Intent(this, SecondActivity.class));You can also create an Intent object by passing in an action constant and data, such as the following:
        Intent i = new
                Intent(android.content.Intent.ACTION_VIEW,
                        Uri.parse("http://www.amazon.com"));
        startActivity(i);
The action portion defines what you want to do, whereas the data portion contains the data for the target activity to act upon. You can also pass the data to the Intent object using the setData() method:
        Intent i = new
                Intent("android.intent.action.VIEW");
        i.setData(Uri.parse("http://www.amazon.com"));
In this example, you indicate that you want to view a web page with the specified URL. The Android OS will look for all activities that are able to satisfy your request. This process is known as intent resolution. The next section discusses in more detail how your activities can be the target of other activities.
For some intents, there is no need to specify the data. For example, to select a contact from the Contacts application, you specify the action and then indicate the MIME type using the setType() method:
                Intent i = new
                    Intent(android.content.Intent.ACTION_PICK);
i.setType(ContactsContract.Contacts.CONTENT_TYPE);The setType() method explicitly specifies the MIME data type to indicate the type of data to return. The MIME type for ContactsContract.Contacts.CONTENT_TYPE is "vnd.android.cursor.dir/contact".
Besides specifying the action, the data, and the type, an Intent object can also specify a category. A category groups activities into logical units so that Android can use those activities for further filtering. The next section discusses categories in more detail.
To summarize, an Intent object can contain the following information:
Earlier, you saw how an activity can invoke another activity using the Intent object. In order for other activities to invoke your activity, you need to specify the action and category within the <intent-filter> element in the AndroidManifest.xml file, like this:
   <intent-filter >
          <action android:name="com.jfdimarzio.SecondActivity"/>
          <category android:name="android.intent.category.DEFAULT"/>
   </intent-filter>
This is a very simple example in which one activity calls another using the "com.jfdimarzio.SecondActivity" action.
So far, you have been using the Toast class to display messages to the user. While the Toast class is a handy way to show users alerts, it is not persistent. It flashes on the screen for a few seconds and then disappears. If it contains important information, users may easily miss it if they are not looking at the screen.
For messages that are important, you should use a more persistent method. In this case, you should use the NotificationManager to display a persistent message at the top of the device, commonly known as the status bar (sometimes also referred to as the notification bar). The following Try It Out demonstrates how.
This chapter first provided a detailed look at how activities and fragments work and the various forms in which you can display them. You also learned how to display dialog windows using activities.
The second part of this chapter demonstrated a very important concept in Android—the intent. The intent is the “glue” that enables different activities to be connected, and it is a vital concept to understand when developing for the Android platform.
You can find answers to the exercises in the appendix.
| TOPIC | KEY CONCEPTS |
| Creating an activity | All activities must be declared in the AndroidManifest.xml file. |
| Key life cycle of an activity | When an activity is started, the onStart() and onResume() events are always called. |
When an activity is killed or sent to the background, the onPause() event is always called. |
|
| Displaying an activity as a dialog | Use the showDialog() method and implement the onCreateDialog() method. |
| Fragments | Fragments are “mini-activities” that you can add or remove from activities. |
| Manipulating fragments programmatically | You need to use the FragmentManager and FragmentTransaction classes when adding, removing, or replacing fragments during runtime. |
| Life cycle of a fragment | Similar to that of an activity—you save the state of a fragment in the onPause() event, and restore its state in one of the following events: onCreate(), onCreateView(), or onActivityCreated(). |
| Intent | The “glue” that connects different activities. |
| Calling an activity | Use the startActivity() or startActivityForResult() method. |
| Passing data to an activity | Use the Bundle object. |
Components in an Intent object |
An Intent object can contain the following: action, data, type, and category. |
| Displaying notifications | Use the NotificationManager class. |
Chapter 3 discusses activities and their life cycles. An activity is a means by which users interact with the application. However, an activity by itself does not have a presence on the screen. Instead, it has to draw the screen using views and ViewGroups. In this chapter, you find out how to create user interfaces (UIs) in Android and how users interact with the UIs. In addition, you discover how to handle changes in screen orientation on your Android devices.
As explained in Chapter 3, the basic unit of an Android application is an activity, which displays the UI of your application. The activity may contain widgets such as buttons, labels, textboxes, and so on. Typically, you define your UI using an XML file (for example, the activity_main.xml file located in the res/layout folder of your project), which looks similar to what is shown in here.
<?xml version="1.0" encoding="utf-8"?>
<android.support.design.widget.CoordinatorLayout
xmlns:android="http://schemas.android.com/apk/res/android"
    xmlns:app="http://schemas.android.com/apk/res-auto"
    xmlns:tools="http://schemas.android.com/tools"
    android:layout_width="match_parent"
    android:layout_height="match_parent"
    android:fitsSystemWindows="true"
    tools:context="com.jfdimarzio.helloworld.MainActivity">
    <android.support.design.widget.AppBarLayout
        android:layout_width="match_parent"
        android:layout_height="wrap_content"
        android:theme="@style/AppTheme.AppBarOverlay">
        <android.support.v7.widget.Toolbar
            android:id="@+id/toolbar"
            android:layout_width="match_parent"
            android:layout_height="?attr/actionBarSize"
            android:background="?attr/colorPrimary"
            app:popupTheme="@style/AppTheme.PopupOverlay"/>
    </android.support.design.widget.AppBarLayout>
    <include layout="@layout/content_main"/>
    <android.support.design.widget.FloatingActionButton
        android:id="@+id/fab"
        android:layout_width="wrap_content"
        android:layout_height="wrap_content"
        android:layout_gravity="bottom|end"
        android:layout_margin="@dimen/fab_margin"
        android:src="@android:drawable/ic_dialog_email"/>
</android.support.design.widget.CoordinatorLayout>
During runtime, you load the XML UI in the onCreate() method handler in your Activity class, using the setContentView() method of the Activity class:
    @Override
    public void onCreate(Bundle savedInstanceState) {
        super.onCreate(savedInstanceState);
        setContentView(R.layout.main);
    }
During compilation, each element in the XML file is compiled into its equivalent Android GUI (Graphical User Interface) class, with attributes represented by methods. The Android system then creates the activity's UI when the activity is loaded.
An activity contains views and ViewGroups. A view is a widget that has an appearance on screen. Examples of views are buttons, labels, and text boxes. A view derives from the base class android.view.View.
One or more views can be grouped into a ViewGroup. A ViewGroup (which is itself a special type of view) provides the layout in which you can order the appearance and sequence of views. Examples of ViewGroups include RadioGroup and ScrollView. A ViewGroup derives from the base class android.view.ViewGroup.
Another type of ViewGroup is a Layout. A Layout is another container that derives from android.view.ViewGroup and is used as a container for other views. However, whereas the purpose of a ViewGroup is to group views logically—such as a group of buttons with a similar purpose—a Layout is used to group and arrange views visually on the screen. The Layouts available to you in Android are as follows:
FrameLayoutLinearLayout(Horizontal)LinearLayout(Vertical)TableLayoutTableRowGridLayoutRelativeLayoutThe following sections describe each of these Layouts in more detail.
The FrameLayout is the most basic of the Android layouts. FrameLayouts are built to hold one view. As with all things related to development, there is no hard rule that FrameLayouts can't be used to hold multiple views. However, there is a reason why FrameLayouts were built the way they were.
Given that there are myriad screen sizes and resolutions, you have little control over the specifications of the devices that install your application. Therefore, when your application is resized and reformatted to fit any number of different devices you want to make sure it still looks as close to your initial design as possible.
The FrameLayout is used to help you control the stacking of single views as the screen is resized. In the following Try It Out, you add a TextView to a FrameLayout in your HelloWorld application.
The LinearLayout arranges views in a single column or a single row. Child views can be arranged either horizontally or vertically, which explains the need for two different layouts—one for horizontal rows of views and one for vertical columns of views.
To see how LinearLayout works, consider the following elements typically contained in the activity_main.xml file:
<?xml version="1.0" encoding="utf-8"?>
<LinearLayout xmlns:android="http://schemas.android.com/apk/res/android"
    android:layout_width="fill_parent"
    android:layout_height="fill_parent"
    android:orientation="vertical" >
    <TextView
        android:layout_width="fill_parent"
        android:layout_height="wrap_content"
        android:text="@string/hello"/>
</LinearLayout>
In the activity_main.xml file, observe that the root element is <LinearLayout> and it has a <TextView> element contained within it. The <LinearLayout> element controls the order in which the views contained within it appear.
Each view and ViewGroup has a set of common attributes, some of which are described in Table 4.1.
Table 4.1 Common Attributes Used in Views and ViewGroups
| Attribute | Description |
layout_width |
Specifies the width of the view or ViewGroup |
layout_height |
Specifies the height of the view or ViewGroup |
layout_marginTop |
Specifies extra space on the top side of the view or ViewGroup |
layout_marginBottom |
Specifies extra space on the bottom side of the view or ViewGroup |
layout_marginLeft |
Specifies extra space on the left side of the view or ViewGroup |
layout_marginRight |
Specifies extra space on the right side of the view or ViewGroup |
layout_gravity |
Specifies how child views are positioned |
layout_weight |
Specifies how much of the extra space in the layout should be allocated to the view |
layout_x |
Specifies the x-coordinate of the view or ViewGroup |
layout_y |
Specifies the y-coordinate of the view or ViewGroup |
For example, the width of the <TextView> element fills the entire width of its parent (which is the screen in this case) using the fill_parent constant. Its height is indicated by the wrap_content constant, which means that its height is the height of its content (in this case, the text contained within it). If you don't want the <TextView> view to occupy the entire row, you can set its layout_width attribute to wrap_content, like this:
<TextView
        android:layout_width="wrap_content"
        android:layout_height="wrap_content"
        android:text="@string/hello"/>
The preceding code sets the width of the view to be equal to the width of the text contained within it. Consider the layout in the next code snippet, which shows two views with their width explicitly stated as a measurement, and their heights set to the height of their contents.
<?xml version="1.0" encoding="utf-8"?>
<LinearLayout xmlns:android="http://schemas.android.com/apk/res/android"
    android:layout_width="fill_parent"
    android:layout_height="fill_parent"
    android:orientation="vertical" >
<TextView
    android:layout_width="100dp"
    android:layout_height="wrap_content"
    android:text="@string/hello"/>
<Button
    android:layout_width="160dp"
    android:layout_height="wrap_content"
    android:text="Button"
    android:onClick="onClick"/>
</LinearLayout>Here, you set the width of both the TextView and Button views to an absolute value. In this case, the width for the TextView is set to 100 density-independent pixels wide, and the Button to 160 density-independent pixels wide. Before you see how the views look on different screens with different pixel densities, it is important to understand how Android recognizes screens of varying sizes and densities.
Figure 4.1 shows the screen of the Nexus 5 (from the emulator). It has a 5-inch screen (diagonally), with a screen width of 2.72 inches. Its resolution is 1080 (width) × 1920 (height) pixels. The pixel density of a screen varies according to screen size and resolution.
To test how the views defined in the XML file look when displayed on screens of different densities, create two Android Virtual Devices (AVDs) with different screen resolutions and abstracted LCD densities. Figure 4.2 shows an AVD with 1080 × 1920 resolution and LCD density of 480.
Figure 4.3 shows another AVD with 768 × 1280 resolution and LCD density of 320.
Using the dp unit ensures that your views are always displayed in the right proportion regardless of the screen density. Android automatically scales the size of the view depending on the density of the screen.
What if instead of using dp you now specify the size using pixels (px)?
<TextView
    android:layout_width="100px"
    android:layout_height="wrap_content"
    android:text="@string/hello"/>
<Button
    android:layout_width="160px"
    android:layout_height="wrap_content"
    android:text="Click Me"
    android:onClick="onClick"/>
Figure 4.4 shows how the Label and Button appear on a 480 dpi screen. Figure 4.5 shows the same views on a 320 dpi screen. In this case, Android does not perform any conversion because all the sizes are specified in pixels. If you use pixels for view sizes, the views appear smaller on a device with a high dpi screen than a screen with a lower dpi (assuming screen sizes are the same).
The preceding example also specifies that the orientation of the layout is vertical:
<LinearLayout xmlns:android="http://schemas.android.com/apk/res/android"
    android:layout_width="fill_parent"
    android:layout_height="fill_parent"
    android:orientation="vertical" >
The default orientation layout is horizontal, so if you omit the android:orientation attribute, the views appear as shown in Figure 4.6.
In LinearLayout, you can apply the layout_weight and layout_gravity attributes to views contained within it, as the modifications to activity_main.xml in the following code snippet show:
<?xml version="1.0" encoding="utf-8"?>
<LinearLayout xmlns:android="http://schemas.android.com/apk/res/android"
    android:layout_width="fill_parent"
    android:layout_height="fill_parent"
    android:orientation="vertical" >
<Button
android:layout_width="160dp"
    android:layout_height="0dp"
    android:text="Button"
    android:layout_gravity="left"
    android:layout_weight="1"/>
<Button
android:layout_width="160dp"
    android:layout_height="0dp"
    android:text="Button"
    android:layout_gravity="center"
    android:layout_weight="2"/>
<Button
android:layout_width="160dp"
    android:layout_height="0dp"
    android:text="Button"
    android:layout_gravity="right"
    android:layout_weight="3"/>
    </LinearLayout>
Figure 4.7 shows the positioning of the views as well as their heights. The layout_gravity attribute indicates the positions the views should gravitate toward, whereas the layout_weight attribute specifies the distribution of available space. In the preceding example, the three buttons occupy about 16.6 percent (1/(1+2+3) * 100), 33.3 percent (2/(1+2+3) * 100), and 50 percent (3/(1+2+3) * 100) of the available height, respectively.
If you change the orientation of the LinearLayout to horizontal (as shown in the following code snippet), you need to change the width of each view to 0 dp. The views display as shown in Figure 4.8:
<LinearLayout xmlns:android="http://schemas.android.com/apk/res/android"
    android:layout_width="fill_parent"
    android:layout_height="fill_parent"
    android:orientation="horizontal" >
<Button
    android:layout_width="0dp"
    android:layout_height="wrap_content"
    android:text="Button"
    android:layout_gravity="left"
    android:layout_weight="1"/>
<Button
    android:layout_width="0dp"
    android:layout_height="wrap_content"
    android:text="Button"
    android:layout_gravity="center_horizontal"
    android:layout_weight="2"/>
<Button
    android:layout_width="0dp"
    android:layout_height="wrap_content"
    android:text="Button"
    android:layout_gravity="right"
    android:layout_weight="3"/>
</LinearLayout>
In the following Try It Out, you combine multiple LinearLayouts to create an L-shaped configuration of views.
The TableLayout Layout groups views into rows and columns. You use the <TableRow> element to designate a row in the table. Each row can contain one or more views. Each view you place within a row forms a cell. The width of each column is determined by the largest width of each cell in that column.
Consider the content of activity_main.xml shown here:
<TableLayout
    xmlns:android="http://schemas.android.com/apk/res/android"
    android:layout_height="fill_parent"
    android:layout_width="fill_parent" >
    <TableRow>
        <TextView
            android:text="User Name:"
            android:width ="120dp"
            />
        <EditText
            android:id="@+id/txtUserName"
            android:width="200dp"/>
    </TableRow>
    <TableRow>
        <TextView
            android:text="Password:"
            />
        <EditText
            android:id="@+id/txtPassword"
            android:inputType="textPassword"
            />
    </TableRow>
    <TableRow>
        <TextView/>
        <CheckBox android:id="@+id/chkRememberPassword"
            android:layout_width="fill_parent"
            android:layout_height="wrap_content"
            android:text="Remember Password"
            />
    </TableRow>
    <TableRow>
        <Button
            android:id="@+id/buttonSignIn"
            android:text="Log In"/>
    </TableRow>
</TableLayout>
Figure 4.10 shows how the preceding code appears when rendered on the Android emulator.
The RelativeLayout layout enables you to specify how child views are positioned relative to each other. Consider the following activity_main.xml file:
<?xml version="1.0" encoding="utf-8"?>
<RelativeLayout
    android:id="@+id/RLayout"
    android:layout_width="fill_parent"
    android:layout_height="fill_parent"
    xmlns:android="http://schemas.android.com/apk/res/android" >
    <TextView
        android:id="@+id/lblComments"
        android:layout_width="wrap_content"
        android:layout_height="wrap_content"
        android:text="Comments"
        android:layout_alignParentTop="true"
        android:layout_alignParentStart="true"/>
    <EditText
        android:id="@+id/txtComments"
        android:layout_width="fill_parent"
        android:layout_height="170dp"
        android:textSize="18sp"
        android:layout_alignStart="@+id/lblComments"
        android:layout_below="@+id/lblComments"
        android:layout_centerHorizontal="true"/>
    <Button
        android:id="@+id/btnSave"
        android:layout_width="125dp"
        android:layout_height="wrap_content"
        android:text="Save"
        android:layout_below="@+id/txtComments"
        android:layout_alignEnd="@+id/txtComments"/>
    <Button
        android:id="@+id/btnCancel"
        android:layout_width="124dp"
        android:layout_height="wrap_content"
        android:text="Cancel"
        android:layout_below="@+id/txtComments"
        android:layout_alignStart="@+id/txtComments"/>
</RelativeLayout>
Notice that each view embedded within the RelativeLayout has attributes that enable it to align with another view. These attributes are as follows:
layout_alignParentToplayout_alignParentStartlayout_alignStartlayout_alignEndlayout_belowlayout_centerHorizontalThe value for each of these attributes is the ID for the view that you are referencing. The preceding XML UI creates the screen shown in Figure 4.12.
The FrameLayout layout is a placeholder on screen that you can use to display a single view. Views that you add to a FrameLayout are always anchored to the top left of the layout. Consider the following content in main.xml:
<?xml version="1.0" encoding="utf-8"?>
<RelativeLayout
    android:id="@+id/RLayout"
    android:layout_width="fill_parent"
    android:layout_height="fill_parent"
    xmlns:android="http://schemas.android.com/apk/res/android" >
    <TextView
        android:id="@+id/lblComments"
        android:layout_width="wrap_content"
        android:layout_height="wrap_content"
        android:text="Hello, Android!"
        android:layout_alignParentTop="true"
        android:layout_alignParentStart="true"/>
    <FrameLayout
        android:layout_width="wrap_content"
        android:layout_height="wrap_content"
        android:layout_alignStart="@+id/lblComments"
        android:layout_below="@+id/lblComments"
        android:layout_centerHorizontal="true" >
        <ImageView
            android:src="@mipmap/butterfly"
        android:layout_width="wrap_content"
        android:layout_height="wrap_content"/>
    </FrameLayout>
</RelativeLayout>
Here, you have a FrameLayout within a RelativeLayout. Within the FrameLayout, you embed an ImageView. The UI is shown in Figure 4.13.
If you add another view (such as a Button view) within the FrameLayout, the view overlaps the previous view (see Figure 4.14):
<?xml version="1.0" encoding="utf-8"?>
<RelativeLayout
    android:id="@+id/RLayout"
    android:layout_width="fill_parent"
    android:layout_height="fill_parent"
    xmlns:android="http://schemas.android.com/apk/res/android" >
    <TextView
        android:id="@+id/lblComments"
        android:layout_width="wrap_content"
        android:layout_height="wrap_content"
        android:text="Hello, Android!"
        android:layout_alignParentTop="true"
        android:layout_alignParentStart="true"/>
    <FrameLayout
        android:layout_width="wrap_content"
        android:layout_height="wrap_content"
        android:layout_alignStart="@+id/lblComments"
        android:layout_below="@+id/lblComments"
        android:layout_centerHorizontal="true" >
        <ImageView
            android:src="@mipmap/butterfly"
        android:layout_width="wrap_content"
        android:layout_height="wrap_content"/>
        <Button
            android:layout_width="124dp"
            android:layout_height="wrap_content"
            android:text="Print Picture"/>
</FrameLayout>A ScrollView is a special type of FrameLayout in that it enables users to scroll through a list of views that occupy more space than the physical display. The ScrollView can contain only one child view or ViewGroup, which normally is a LinearLayout.
The following main.xml content shows a ScrollView containing a LinearLayout, which in turn contains some Button and EditText views:
<ScrollView
    android:layout_width="fill_parent"
    android:layout_height="fill_parent"
    xmlns:android="http://schemas.android.com/apk/res/android" >
    <LinearLayout
        android:layout_width="fill_parent"
        android:layout_height="wrap_content"
        android:orientation="vertical" >
        <Button
            android:id="@+id/button1"
            android:layout_width="fill_parent"
            android:layout_height="wrap_content"
            android:text="Button 1"/>
        <Button
            android:id="@+id/button2"
            android:layout_width="fill_parent"
            android:layout_height="wrap_content"
            android:text="Button 2"/>
        <Button
            android:id="@+id/button3"
            android:layout_width="fill_parent"
            android:layout_height="wrap_content"
            android:text="Button 3"/>
        <EditText
            android:id="@+id/txt"
            android:layout_width="fill_parent"
            android:layout_height="600dp"/>
        <Button
            android:id="@+id/button4"
            android:layout_width="fill_parent"
            android:layout_height="wrap_content"
            android:text="Button 4"/>
        <Button
            android:id="@+id/button5"
            android:layout_width="fill_parent"
            android:layout_height="wrap_content"
            android:text="Button 5"/>
    </LinearLayout>
</ScrollView>
If you load the preceding code on the Android emulator, you see something like what's shown in Figure 4.15.
Because the EditText automatically gets the focus, it fills up the entire activity (as the height was set to 600dp). To prevent it from getting the focus, add the following two bolded attributes to the <LinearLayout> element:
    <LinearLayout
        android:layout_width="fill_parent"
        android:layout_height="wrap_content"
        android:orientation="vertical"
        android:focusable="true"
        android:focusableInTouchMode="true" >
Now you are able to view the buttons and scroll through the list of views (see Figure 4.16).
Sometimes you might want EditText to automatically get the focus, but you do not want the soft input panel (keyboard) to appear automatically (which happens on a real device). To prevent the keyboard from appearing, add the following bolded attribute to the <activity> element in the AndroidManifest.xml file:
        <activity
            android:label="@string/app_name"
            android:name=".LayoutsActivity"
            android:windowSoftInputMode="stateHidden" >
            <intent-filter >
                <action android:name="android.intent.action.MAIN"/>
                <category android:name="android.intent.category.LAUNCHER"/>
            </intent-filter>
</activity>One of the key features of modern smartphones is their ability to switch screen orientation, and Android is no exception. Android supports two screen orientations: portrait and landscape. By default, when you change the display orientation of your Android device, the current activity automatically redraws its content in the new orientation. This is because the onCreate() method of the activity is fired whenever there is a change in display orientation.
However, when the views are redrawn, they may be drawn in their original locations (depending on the layout selected). Figure 4.17 shows the previous example displayed in landscape mode.
In general, you can employ two techniques to handle changes in screen orientation:
Anchoring can be easily achieved by using RelativeLayout. Consider the following main.xml file, which contains five Button views embedded within the <RelativeLayout> element:
<RelativeLayout
    android:layout_width="fill_parent"
    android:layout_height="fill_parent"
    xmlns:android="http://schemas.android.com/apk/res/android">
    <Button
        android:id="@+id/button1"
        android:layout_width="wrap_content"
        android:layout_height="wrap_content"
        android:text="Top Left"
        android:layout_alignParentStart="true"
        android:layout_alignParentTop="true"/>
    <Button
        android:id="@+id/button2"
        android:layout_width="wrap_content"
        android:layout_height="wrap_content"
        android:text="Top Right"
        android:layout_alignParentTop="true"
        android:layout_alignParentEnd="true"/>
    <Button
        android:id="@+id/button3"
        android:layout_width="wrap_content"
        android:layout_height="wrap_content"
        android:text="Bottom Left"
        android:layout_alignParentStart="true"
        android:layout_alignParentBottom="true"/>
    <Button
        android:id="@+id/button4"
        android:layout_width="wrap_content"
        android:layout_height="wrap_content"
        android:text="Bottom Right"
        android:layout_alignParentEnd="true"
        android:layout_alignParentBottom="true"/>
    <Button
        android:id="@+id/button5"
        android:layout_width="fill_parent"
        android:layout_height="wrap_content"
        android:text="Middle"
        android:layout_centerVertical="true"
        android:layout_centerHorizontal="true"/>
</RelativeLayout>
Note the following attributes found in the various Button views:
layout_alignParentStart—Aligns the view to the left of the parent viewlayout_alignParentEnd—Aligns the view to the right of the parent viewlayout_alignParentTop—Aligns the view to the top of the parent viewlayout_alignParentBottom—Aligns the view to the bottom of the parent viewlayout_centerVertical—Centers the view vertically within its parent viewlayout_centerHorizontal—Centers the view horizontally within its parent viewFigure 4.18 shows the activity when viewed in portrait mode.
When the screen orientation changes to landscape mode, the four buttons are aligned to the four edges of the screen, and the center button is centered in the middle of the screen with its width fully stretched (see Figure 4.19).
Now that you have looked at screen orientation changes, let's explore what happens to an activity's state when the device changes orientation.
The following Try It Out demonstrates the behavior of an activity when the device changes orientation.
So far, you have learned that changing screen orientation destroys an activity and re-creates it. Keep in mind that when an activity is re-created, its current state might be lost. When an activity is killed, it fires one or both of the following methods:
onPause()—This method is always fired whenever an activity is killed or pushed into the background.onSaveInstanceState()—This method is also fired whenever an activity is about to be killed or put into the background (just like the onPause() method). However, unlike the onPause() method, the onSaveInstanceState() method is not fired when an activity is being unloaded from the stack (such as when the user pressed the back button) because there is no need to restore its state later.In short, to preserve the state of an activity, you could always implement the onPause() method and then use your own ways to preserve the state of your activity, such as using a database, internal or external file storage, and so on.
If you simply want to preserve the state of an activity so that it can be restored later when the activity is re-created (such as when the device changes orientation), a much simpler way is to implement the onSaveInstanceState() method, as it provides a Bundle object as an argument so that you can use it to save your activity's state. The following code shows that you can save the string ID into the Bundle object during the onSaveInstanceState() method:
    @Override
    public void onSaveInstanceState(Bundle outState) {
        //---save whatever you need to persist---
        outState.putString("ID", "1234567890");
        super.onSaveInstanceState(outState);
    }
When an activity is re-created, the onCreate() method is first fired, followed by the onRestoreInstanceState() method, which enables you to retrieve the state that you saved previously in the onSaveInstanceState() method through the Bundle object in its argument:
    @Override
    public void onRestoreInstanceState(Bundle savedInstanceState) {
        super.onRestoreInstanceState(savedInstanceState);
        //---retrieve the information persisted earlier---
        String ID = savedInstanceState.getString("ID");
    }
}Sometimes you need to know the device's current orientation during runtime. To determine that, you can use the getResources() method. The following code snippet demonstrates how you can programmatically detect the current orientation of your activity:
    @Override
    protected void onCreate(Bundle savedInstanceState) {
        super.onCreate(savedInstanceState);
        setContentView(R.layout.activity_main);
        if(getResources().getConfiguration().orientation == Configuration.ORIENTATION_LANDSCAPE){
            Log.d("StateInfo", "Landscape");
        }else if(getResources().getConfiguration().orientation == Configuration.ORIENTATION_PORTRAIT){
            Log.d("StateInfo", "Portrait");
        }
    }
The getConfiguration() method contains an orientation object representing the screen of the device. You can then test this against the Configuration set of constants to determine the orientation.
Occasionally, you might want to ensure that your application is displayed in only a certain orientation. For example, you may be writing a game that should be viewed only in landscape mode. In this case, you can programmatically force a change in orientation using the setRequestOrientation() method of the Activity class:
import android.content.pm.ActivityInfo;
    @Override
    public void onCreate(Bundle savedInstanceState) {
        super.onCreate(savedInstanceState);
        setContentView(R.layout.main);
        //---change to landscape mode---
        setRequestedOrientation(ActivityInfo.SCREEN_ORIENTATION_LANDSCAPE);
    }
To change to portrait mode, use the ActivityInfo.SCREEN_ORIENTATION_PORTRAIT constant.
Besides using the setRequestOrientation() method, you can also use the android:screenOrientation attribute on the <activity> element in AndroidManifest.xml as follows to constrain the activity to a certain orientation:
<?xml version="1.0" encoding="utf-8"?>
<manifest xmlns:android="http://schemas.android.com/apk/res/android"
    package="com.jfdimarzio.orientations">
    <application
        android:allowBackup="true"
        android:icon="@mipmap/ic_launcher"
        android:label="@string/app_name"
        android:supportsRtl="true"
        android:theme="@style/AppTheme">
        <activity android:name=".MainActivity"
            android:screenOrientation="landscape" >
            <intent-filter>
                <action android:name="android.intent.action.MAIN"/>
                <category android:name="android.intent.category.LAUNCHER"/>
            </intent-filter>
        </activity>
    </application>
</manifest>
The preceding example constrains the activity to a certain orientation (landscape in this case) and prevents the activity from being destroyed; that is, the activity will not be destroyed and the onCreate() method will not be fired again when the orientation of the device changes.
Following are two other values that you can specify in the android:screenOrientation attribute:
portrait—Portrait modesensor—Based on the accelerometer (default)Besides fragments, another feature of Android is the Action Bar. In place of the traditional title bar located at the top of the device's screen, the Action Bar displays the application icon and the activity title. Optionally, on the right side of the Action Bar are action items. The next section discusses action items in more detail.
The following Try It Out shows how you can programmatically hide or display the Action Bar.
Besides displaying the application icon and the activity title on the left of the Action Bar, you can also display additional items on the Action Bar. These additional items are called action items. Action items are shortcuts to some of the commonly performed operations in your application. For example, you might be building an RSS reader application, in which case some of the action items might be Refresh Feed, Delete Feed, and Add New Feed.
The following Try It Out shows how you can add action items to the Action Bar.
So far, all the UIs you have seen in this chapter are created using XML. As mentioned earlier, besides using XML you can also create the UI using code. This approach is useful if your UI needs to be dynamically generated during runtime. For example, suppose you are building a cinema ticket reservation system and your application displays the seats of each cinema using buttons. In this case, you need to dynamically generate the UI based on the cinema selected by the user.
The following Try It Out demonstrates the code needed to dynamically build the UI in your activity.
Users interact with your UI at two levels: the activity level and the view level. At the activity level, the Activity class exposes methods that you can override. Some common methods that you can override in your activities include the following:
onKeyDown—Called when a key was pressed and not handled by any of the views contained within the activityonKeyUp—Called when a key was released and not handled by any of the views contained within the activityonMenuItemSelected—Called when a panel's menu item has been selected by the user (covered in Chapter 6)onMenuOpened—Called when a panel's menu is opened by the user (covered in Chapter 6)In this chapter, you have learned how user interfaces are created in Android. You have also learned about the different layouts that you can use to position the views in your Android UI. Because Android devices support more than one screen orientation, you need to take special care to ensure that your UI can adapt to changes in screen orientation.
dp unit and the px unit? Which one should you use to specify the dimension of a view?AbsoluteLayout not recommended for use?onPause()method and the onSaveInstanceState() method?You can find answers to the exercises in the appendix.
| Topic | Key Concepts |
LinearLayout |
Arranges views in a single column or single row. |
AbsoluteLayout |
Enables you to specify the exact location of its children. |
TableLayout |
Groups views into rows and columns. |
RelativeLayout |
Enables you to specify how child views are positioned relative to each other. |
FrameLayout |
A placeholder on screen that you can use to display a single view. |
ScrollView |
A special type of FrameLayout in that it enables users to scroll through a list of views that occupy more space than the physical display allows. |
| Unit of Measure | Use dp for specifying the dimension of views and sp for font size. |
| Two ways to adapt to changes in orientation | Anchoring, and resizing and repositioning. |
| Using different XML files for different orientations | Use the layout folder for portrait UI, and layout-land for landscape UI. |
| Three ways to persist activity state | Use the onPause() method.Use the onSaveInstanceState() method.Use the onRetainNonConfigurationInstance() method. |
| Getting the dimension of the current device | Use the WindowManager class's getDefaultDisplay() method. |
| Constraining the activity's orientation | Use the setRequestOrientation() method or the android:screenOrientation attribute in the AndroidManifest.xml file. |
| Action Bar | Replaces the traditional title bar for older versions of Android. |
| Action items | Action items are displayed on the right of the Action Bar. They are created just like options menus. |
| Application icon | Usually used to return to the “home” activity of an application. It is advisable to use the Intent object with the Intent.FLAG_ACTIVITY_CLEAR_TOP flag. |
In the previous chapter, you learned about the various layouts that you can use to position your views in an activity. You also learned about the techniques you can use to adapt to different screen resolutions and sizes. This chapter gives you a look at the various views that you can use to design the user interface (UI) for your applications.
In particular, the chapter covers the following ViewGroups:
TextView, EditText, and Button viewsTimePicker and DatePicker viewsListView and the SpinnerView viewsSubsequent chapters cover the other views not covered in this chapter, such as the analog and digital clock views and other views for displaying graphics, and so on.
To get started, this section explores some of the basic views that you can use to design the UI of your Android applications:
TextViewEditTextButtonImageButtonCheckBoxToggleButtonRadioButtonRadioGroupThese basic views enable you to display text information, as well as perform some basic selection. The following sections explore all these views in more detail.
When you create a new Android project, Android Studio always creates the activity_main.xml file (located in the res/layout folder), which contains a <TextView> element:
<?xml version="1.0" encoding="utf-8"?>
<LinearLayout xmlns:android="http://schemas.android.com/apk/res/android"
    android:layout_width="fill_parent"
    android:layout_height="fill_parent"
    android:orientation="vertical" >
    <TextView
        android:layout_width="fill_parent"
        android:layout_height="wrap_content"
        android:text="@string/hello"/>
</LinearLayout>
You use the TextView view to display text to the user. This is the most basic view and one that you will frequently use when you develop Android applications. If you need to allow users to edit the text displayed, you should use the subclass of TextView—EditText—which is discussed in the next section.
Besides the TextView view, which you will likely use the most often, there are some other basic views that you will find yourself frequently using:
Button—Represents a push-button widget.ImageButton—Similar to the Button view, except that it also displays an image.EditText—A subclass of the TextView view, which allows users to edit its text content.CheckBox—A special type of button that has two states: checked or unchecked.RadioGroup and RadioButton—The RadioButton has two states: either checked or unchecked. A RadioGroup is used to group one or more RadioButton views, thereby allowing only one RadioButton to be checked within the RadioGroup.ToggleButton—Displays checked/unchecked states using a light indicator.The following Try It Out provides details about how these views work.
Now that you have seen what the various views for an activity look like, the following Try It Out demonstrates how you can programmatically control them.
The ProgressBar view provides visual feedback about some ongoing tasks, such as when you are performing a task in the background. For example, you might be downloading some data from the web and need to update the user about the status of the download. In this case, the ProgressBar view is a good choice. The following activity demonstrates how to use the ProgressBar view.
The next Try It Out shows how you can change the look of the ProgressBar.
The AutoCompleteTextView is a view that is similar to EditText (in fact it is a subclass of EditText), except that it automatically shows a list of completion suggestions while the user is typing. The following Try It Out shows how to use the AutoCompleteTextView to automatically help users complete the text entry.
Selecting a date and time is one of the common tasks you need to perform in a mobile application. Android supports this functionality through the TimePicker and DatePicker views. The following sections demonstrate how to use these views in your activity.
The TimePicker view enables users to select a time of the day, in either 24-hour mode or AM/PM mode. The following Try It Out shows you how to use the TimePicker in the latest version of the Android SDK. When you are creating the project for this sample, be sure that you choose an SDK that is level 23 or greater.
Although you can display the TimePicker in an activity, it's better to display it in a dialog window because after the time is set, the window disappears and doesn't take up any space in an activity. The following Try It Out demonstrates how to do it.
Another view that is similar to the TimePicker is the DatePicker. Using the DatePicker, you can enable users to select a particular date on the activity. The following Try It Out shows you how to use the DatePicker.
List views are views that enable you to display a long list of items. In Android, there are two types of list views: ListView and SpinnerView. Both are useful for displaying long lists of items. The Try It Outs in this section show them in action.
The ListView displays a list of items in a vertically scrolling list. The following Try It Out demonstrates how to display a list of items using the ListView.
The ListView is a versatile view that you can further customize. The following Try It Out shows how to allow multiple items in the ListView to be selected and how to enable filtering support.
Although the previous example shows that the list of presidents' names is stored in an array, in a real-life application it is recommended that you either retrieve them from a database or at least store them in the strings.xml file. The following Try It Out shows you how.
This example demonstrated how to make items in a ListView selectable. At the end of the selection process, how do you know which item or items are selected? The following Try It Out shows you how.
The ListView displays a long list of items in an activity, but you might want the user interface to display other views, meaning you do not have the additional space for a full-screen view, such as the ListView. In such cases, you should use the SpinnerView. The SpinnerView displays one item at a time from a list and enables users to choose from them.
The following Try It Out shows how you can use the SpinnerView in your activity.
Chapter 3 discusses the fragment feature that was added in Android 3. Fragments allow you to customize the user interface of your Android application by dynamically rearranging fragments to fit within an activity. This enables you to build applications that run on devices with different screen sizes.
As you have learned, fragments are really “mini-activities” that have their own life cycles. To create a fragment, you need a class that extends the Fragment base class. In addition to the Fragment base class, you can also extend from some other subclasses of the Fragment base class to create more specialized fragments. The following sections discuss the three subclasses of Fragment:
ListFragmentDialogFragmentPreferenceFragmentA list fragment is a fragment that contains a ListView, which displays a list of items from a data source, such as an array or a Cursor. A list fragment is useful because it's common to have one fragment that contains a list of items (such as a list of RSS postings), and another fragment that displays details about the selected posting. To create a list fragment, you need to extend the ListFragment base class.
The following Try It Out shows you how to get started with a list fragment.
A dialog fragment floats on top of an activity and is displayed modally. Dialog fragments are useful when you need to obtain the user's response before continuing with execution. To create a dialog fragment, you must extend the DialogFragment base class.
The following Try It Out shows how to create a dialog fragment.
Typically, in your Android applications you provide preferences for users to personalize the application. For example, you might allow users to save the login credentials that they use to access their web resources. Also, you could save information, such as how often the feeds must be refreshed (for example, in an RSS reader application), and so on. In Android, you can use the PreferenceActivity base class to display an activity for the user to edit the preferences. In Android 3.0 and later, you can use the PreferenceFragment class to do the same thing.
The following Try It Out shows you how to create and use a preference fragment in Android 3 and 4.
This chapter provided a look at some of the commonly used views in an Android application. Although it is not possible to exhaustively examine each view in detail, the views you learned about here should provide a good foundation for designing your Android application's user interface, regardless of its requirements.
RadioButton is checked?strings.xml file?You can find answers to the exercises in the appendix.
| Topic | Key Concepts |
TextView |
|
Button |
|
ImageButton |
|
EditText |
|
CheckBox |
|
RadioGroup and RadioButton |
|
ToggleButton |
|
ProgressBar |
|
AutoCompleteTextBox |
|
TimePicker |
|
DatePicker |
|
Spinner |
|
| Specialized fragment types |
|
In the previous chapter, you learned about the various views that you can use to build the user interface of your Android application. This chapter continues your exploration of the other views that you can use to create robust and compelling applications.
In particular, you find out how to work with views that enable you to display images. Also, you see how to create option and context menus in your Android application. This chapter ends with a discussion of some helpful views that enable users to display the current time and web content.
So far, all the views you have seen are used to display text information. However, you can use the ImageView, ImageSwitcher, and GridView views for displaying images.
The following sections discuss each view in detail.
The ImageView is a view that shows images on the device screen. The following Try It Out shows you how to use the ImageView view to display an image.
The previous section demonstrated how to use the ImageView to display an image. However, sometimes you don't want an image to appear abruptly when the user opens the view. For example, you might want to apply some animation to an image when it transitions from one image to another. In this case, you need to use the ImageSwitcher. The following Try It Out shows you how.
The GridView shows items in a two-dimensional scrolling grid. You can use the GridView together with an ImageView to display a series of images. The following Try It Out demonstrates how.
Menus are useful for displaying additional options that are not directly visible on the main user interface (UI) of an application. There are two main types of menus in Android:
Before you go ahead and create your options and context menus, you need to create two helper methods. One creates a list of items to show inside a menu, whereas the other handles the event that is fired when the user selects an item inside the menu.
You are now ready to modify the application to display the options menu when the user presses the Menu key on the Android device.
The previous section showed how the options menu is displayed when the user presses the Menu button. In addition to the options menu, you can also display a context menu. A context menu is usually associated with a view on an activity. A context menu is displayed when the user taps and holds an item. For example, if the user taps a Button view and holds it for a few seconds, a context menu can be displayed.
If you want to associate a context menu with a view on an activity, you need to call the setOnCreateContextMenuListener() method of that particular view. The following Try It Out shows how you can associate a context menu with a Button view.
Aside from the standard views that you have seen up to this point, the Android SDK provides some additional views that make your applications much more interesting. This section explains more about the WebView.
The WebView enables you to embed a web browser in your activity. This is very useful if your application needs to embed some web content, such as maps from some other providers, and so on. The following Try It Out shows how you can programmatically load the content of a web page and display it in your activity.
In this chapter, you have taken a look at the various views that enable you to display images: Gallery, ImageView, ImageSwitcher, and GridView. Also, you learned about the difference between options menus and context menus, and how to display both in your application. Finally, you learned about the WebView, which displays the content of a web page.
ImageSwitcher?You can find answers to the exercises in the appendix.
| Topic | Key Concepts |
ImageView |
|
Using the ImageSwitcher view |
Performs animation when switching between images |
ImageSwitcher |
|
Using the GridView |
Shows items in a two-dimensional scrolling grid |
GridView |
|
WebView |
|
This chapter describes how to persist data in your Android applications. Persisting data is an important topic in application development because users typically expect to reuse data in the future. For Android, there are primarily three basic ways of persisting data:
The techniques discussed in this chapter enable applications to create and access their own private data. Chapter 8 shows you how to share data across applications.
Android provides the SharedPreferences object to help you save simple application data. For example, your application may have an option that enables users to specify the font size used in your application. In this case, your application needs to remember the size set by the user so that the size is set appropriately each time the app is opened. You have several options for saving this type of preference:
SharedPreferences object—The SharedPreferences object, however, saves data through the use of name/value pairs. For example, specify a name for the data you want to save, and then both it and its value will be saved automatically to an XML file.In the following Try It Out, you see how to use the SharedPreferences object to store application data. You also find out how the stored application data can be modified directly by the user through a special type of activity provided by the Android OS.
In the previous section, you saw how the PreferenceActivity class both enables developers to easily create preferences and enables users to modify them during runtime. To make use of these preferences in your application, you use the SharedPreferences class. The following Try It Out shows you how.
The SharedPreferences object enables you to store data that is best stored as name/value pairs—for example, user ID, birth date, gender, driver's license number, and so on. However, sometimes you might prefer to use the traditional file system to store your data. For example, you might want to store the text of poems you want to display in your applications. In Android, you can use the classes in the java.io package to do so.
The first way to save files in your Android application is to write to the device's internal storage. The following Try It Out demonstrates how to save a string entered by the user to the device's internal storage.
The previous section showed how you can save your files to the internal storage of your Android device. Sometimes, it would be useful to save them to external storage (such as an SD card) because of its larger capacity, as well as the capability to share the files easily with other users (by removing the SD card and passing it to somebody else). You can use the following steps to save files to external storage:
onClick() method of the Save button as shown in bold here:import java.io.File;
import java.io.FileInputStream;
import java.io.FileOutputStream;
import java.io.IOException;
import java.io.InputStreamReader;
import java.io.OutputStreamWriter;
import android.app.Activity;
import android.os.Bundle;
import android.os.Environment;
import android.view.View;
import android.widget.EditText;
import android.widget.Toast;
public void onClickSave(View view) {
String str = textBox.getText().toString();
try
{
//---SD Card Storage---
File sdCard = Environment.getExternalStorageDirectory();
File directory = new File (sdCard.getAbsolutePath() +
"/MyFiles");
directory.mkdirs();
File file = new File(directory, "textfile.txt");
FileOutputStream fOut = new FileOutputStream(file);
/*
FileOutputStream fOut =
openFileOutput("textfile.txt",
MODE_WORLD_READABLE);
*/
OutputStreamWriter osw = new
OutputStreamWriter(fOut);
//---write the string to the file---
osw.write(str);
osw.flush();
osw.close();
//---display file saved message---
Toast.makeText(getBaseContext(),
"File saved successfully!",
Toast.LENGTH_SHORT).show();
//---clears the EditText---
textBox.setText("");
}
catch (IOException ioe)
{
ioe.printStackTrace();
}
}getExternalStorageDirectory() method to return the full path to the external storage. Typically, it should return the “/sdcard” path for a real device, and “/mnt/sdcard” for an Android emulator. However, you should never try to hardcode the path to the SD card, as manufacturers may choose to assign a different path name to the SD card. Be sure to use the getExternalStorageDirectory() method to return the full path to the SD card.MyFiles in the SD card.onClickLoad() method for the Load button: public void onClickLoad(View view) {
try
{
//---SD Storage---
File sdCard = Environment.getExternalStorageDirectory();
File directory = new File (sdCard.getAbsolutePath() +
"/MyFiles");
File file = new File(directory, "textfile.txt");
FileInputStream fIn = new FileInputStream(file);
InputStreamReader isr = new InputStreamReader(fIn);
/*
FileInputStream fIn =
openFileInput("textfile.txt");
InputStreamReader isr = new
InputStreamReader(fIn);
*/
char[] inputBuffer = new char[READ_BLOCK_SIZE];
String s = "";
int charRead;
while ((charRead = isr.read(inputBuffer))>0)
{
//---convert the chars to a String---
String readString =
String.copyValueOf(inputBuffer, 0,
charRead);
s += readString;
inputBuffer = new char[READ_BLOCK_SIZE];
}
//---set the EditText to the text that has been
// read---
textBox.setText(s);
Toast.makeText(getBaseContext(),
"File loaded successfully!",
Toast.LENGTH_SHORT).show();
}
catch (IOException ioe) {
ioe.printStackTrace();
}
}WRITE_EXTERNAL_STORAGE permission in your AndroidManifest.xml file:
<?xml version="1.0" encoding="utf-8"?>
<manifest xmlns:android="http://schemas.android.com/apk/res/android"
package="com.jfdimarzio.Files"
android:versionCode="1"
android:versionName="1.0" >
<uses-sdk android:minSdkVersion="14"/>
<uses-permission android:name="android.permission.WRITE_EXTERNAL_STORAGE" />
<application
android:icon="@drawable/ic_launcher"
android:label="@string/app_name" >
<activity
android:label="@string/app_name"
android:name=".FilesActivity" >
<intent-filter >
<action android:name="android.intent.action.MAIN"/>
<category android:name="android.intent.category.LAUNCHER"/>
</intent-filter>
</activity>
</application>
</manifest>The previous sections described three main ways to save data in your Android applications: the SharedPreferences object, internal storage, and external storage. Which one should you use in your applications? Here are some guidelines:
SharedPreferences object. For example, if you want to store user preference data such as username, background color, date of birth, or last login date, then the SharedPreferences object is the ideal way to store this data. Moreover, you don't really have to do much to store data this way. Simply use the SharedPreferences object to store and retrieve it.So far, all the techniques you have seen are useful for saving simple sets of data. For saving relational data, using a database is much more efficient. For example, if you want to store the test results of all the students in a school, it is much more efficient to use a database to represent them because you can use database querying to retrieve the results of specific students. Moreover, using databases enables you to enforce data integrity by specifying the relationships between different sets of data.
Android uses the SQLite database system. The database that you create for an application is only accessible to itself; other applications will not be able to access it.
In this section, you find out how to programmatically create a SQLite database in your Android application. For Android, the SQLite database that you create programmatically in an application is always stored in the /data/data/<package_name>/databases folder.
A good practice for dealing with databases is to create a helper class to encapsulate all the complexities of accessing the data so that it is transparent to the calling code. For this section, you create a helper class called DBAdapter, which creates, opens, closes, and uses a SQLite database.
In this example, you are going to create a database named MyDB containing one table named contacts. This table has three columns: _id, name, and email.
With the DBAdapter helper class created, you are now ready to use the database. In the following sections, you will learn how to perform the regular CRUD (create, read, update and delete) operations commonly associated with databases.
The following Try It Out demonstrates how you can add a contact to the table.
To retrieve all the contacts in the contacts table, use the getAllContacts() method of the DBAdapter class, as the following Try It Out shows.
To retrieve a single contact using its ID, call the getContact() method of the DBAdapter class, as the following Try It Out shows.
To update a particular contact, call the updateContact() method in the DBAdapter class by passing the ID of the contact you want to update, as the following Try It Out shows.
To delete a contact, use the deleteContact() method in the DBAdapter class by passing the ID of the contact you want to update, as the following Try It Out shows.
Sometimes, after creating and using the database, you might need to add additional tables, change the schema of the database, or add columns to your tables. In this case, you need to migrate your existing data from the old database to a newer one.
To upgrade the database, change the DATABASE_VERSION constant to a value higher than the previous one. For example, if its previous value was 1, change it to 2:
public class DBAdapter {
static final String KEY_ROWID = "_id";
static final String KEY_NAME = "name";
static final String KEY_EMAIL = "email";
static final String TAG = "DBAdapter";
static final String DATABASE_NAME = "MyDB";
static final String DATABASE_TABLE = "contacts";
static final int DATABASE_VERSION = 2;When you run the application one more time, you see the following message in the logcat window of Android Studio:
DBAdapter(8705): Upgrading database from version 1 to 2, which
will destroy all old dataFor simplicity, simply drop the existing table and create a new one. In real life, you usually back up your existing table and then copy it over to the new table.
In this chapter, you were introduced to the different ways to save persistent data to your Android device. For simple unstructured data, using the SharedPreferences object is the ideal solution. If you need to store bulk data then consider using the traditional file system. Finally, for structured data, it is more efficient to store it in a relational database management system. For this, Android provides the SQLite database, which you can access easily using the APIs exposed.
Note that for the SharedPreferences object and the SQLite database, the data is accessible only by the application that creates it. In other words, it is not shareable. If you need to share data among different applications, you need to create a content provider. Content providers are discussed in more detail in Chapter 8.
You can find answers to the exercises in the appendix.
| Topic | Key Concepts |
| Saving simple user data | Use the SharedPreferences object. |
| Sharing data among activities in the same application | Use the getSharedPreferences() method. |
| Saving to a file | Use the FileOutputStream and OutputStreamReader classes. |
| Reading from a file | Use the FileInputStream and InputStreamReader classes. |
| Saving to external storage | Use the getExternalStorageDirectory() method to return the path to the external storage. |
Accessing files in the res/raw folder |
Use the openRawResource() method in the Resources object (obtained via the getResources() method). |
| Creating a database helper class | Extend the SQLiteOpenHelper class. |
The previous chapter explains the various ways to persist data—using shared preferences, files, as well as SQLite databases. Although using the database approach is the recommended way to save structured and complex data, sharing data is a challenge because the database is accessible to only the package that created it.
This chapter explains Android's way of sharing data through the use of content providers. You find out how to use the built-in content providers, as well as implement your own content providers to share data across packages.
In Android, using a content provider is the recommended way to share data across packages. Think of a content provider as a data store. How it stores its data is not relevant to the application using it. However, the way in which packages can access the data stored in it using a consistent programming interface is important. A content provider behaves very much like a database—you can query it, edit its content, and add or delete content. However, unlike a database, a content provider can use different ways to store its data. The data can be stored in a database, in files, or even over a network.
Android ships with many useful content providers, including the following:
Besides the many built-in content providers, you can also create your own content providers.
To query a content provider, you specify the query string in the form of a Uniform Resource Identifier (URI), with an optional specifier for a particular row. Here's the format of the query URI:
<standard_prefix>://<authority>/<data_path>/<id>The various parts of the URI are as follows:
The standard prefix for content providers is always content://.
The authority specifies the name of the content provider. An example would be contacts for the built-in Contacts content provider. For third-party content providers, this could be the fully qualified name, such as com.wrox.provider or com.jfdimarzio.provider.
data path specifies the kind of data requested. For example, if you are getting all the contacts from the Contacts content provider then the data path would be people, and the URI would look like this: content://contacts/people.id specifies the specific record requested. For example, if you are looking for contact number 2 in the Contacts content provider, the URI would look like this: content://contacts/people/2.Table 8.1 shows some examples of query strings.
Table 8.1 Example Query Strings
| QUERY STRING | DESCRIPTION |
content://media/internal/images |
Returns a list of the internal images on the device |
content://media/external/images |
Returns a list of the images stored on the external storage (for example, SD card) on the device |
content://call_log/calls |
Returns a list of calls registered in the Call Log |
content://browser/bookmarks |
Returns a list of bookmarks stored in the browser |
The best way to understand content providers is to actually use one. The following Try It Out shows how you can use a content provider from within your Android application.
Besides using the query URI, you can use a list of predefined query string constants in Android to specify the URI for the different data types. For example, besides using the query content://contacts/people, you can rewrite this statement:
Uri allContacts = Uri.parse("content://contacts/people");using one of the predefined constants in Android, as follows:
Uri allContacts = ContactsContract.Contacts.CONTENT_URI;The PrintContacts() method prints the following in the logcat window:
12-13 08:32:50.471: V/Content Providers(12346): 1, Wei-Meng Lee
12-13 08:32:50.471: V/Content Providers(12346): 2, Linda Chen
12-13 08:32:50.471: V/Content Providers(12346): 3, Joanna YipIt prints the ID and name of each contact stored in the Contacts application. In this case, you access the ContactsContract.Contacts._ID field to obtain the ID of a contact, and ContactsContract.Contacts.DISPLAY_NAME for the name of a contact. If you want to display the phone number of a contact, you need to query the content provider again, as the information is stored in another table:
private void PrintContacts(Cursor c)
{
if (c.moveToFirst()) {
do{
String contactID = c.getString(c.getColumnIndex(
ContactsContract.Contacts._ID));
String contactDisplayName =
c.getString(c.getColumnIndex(
ContactsContract.Contacts.DISPLAY_NAME));
Log.v("Content Providers", contactID + ", " +
contactDisplayName);
//---get phone number---
Cursor phoneCursor =
getContentResolver().query(
ContactsContract.CommonDataKinds.Phone.CONTENT_URI, null,
ContactsContract.CommonDataKinds.Phone.CONTACT_ID + " = " +
contactID, null, null);
while (phoneCursor.moveToNext()) {
Log.v("Content Providers",
phoneCursor.getString(
phoneCursor.getColumnIndex(
ContactsContract.CommonDataKinds.Phone.NUMBER)));
}
phoneCursor.close();
} while (c.moveToNext());
}
}In the preceding code snippet, you first check whether a contact has a phone number using the ContactsContract.Contacts.HAS_PHONE_NUMBER field. If the contact has at least a phone number, you then query the content provider again based on the ID of the contact. After the phone numbers are retrieved, you then iterate through them and print out the numbers. You should see something like this:
12-13 08:59:31.881: V/Content Providers(13351): 1, Wei-Meng Lee
12-13 08:59:32.311: V/Content Providers(13351): +651234567
12-13 08:59:32.321: V/Content Providers(13351): 2, Linda Chen
12-13 08:59:32.511: V/Content Providers(13351): +1 876-543-21
12-13 08:59:32.545: V/Content Providers(13351): 3, Joanna Yip
12-13 08:59:32.641: V/Content Providers(13351): +239 846 5522The third parameter for the CursorLoader class controls how many columns are returned by the query. This parameter is known as the projection. Earlier, you specified null:
Cursor c;
CursorLoader cursorLoader = new CursorLoader(
this,
allContacts,
null,
null,
null ,
null);
c = cursorLoader.loadInBackground(); You can specify the exact columns to return by creating an array containing the name of the column to return, like this:
String[] projection = new String[]
{ContactsContract.Contacts._ID,
ContactsContract.Contacts.DISPLAY_NAME,
ContactsContract.Contacts.HAS_PHONE_NUMBER};
Cursor c;
CursorLoader cursorLoader = new CursorLoader(
this,
allContacts,
projection,
null,
null ,
null);
c = cursorLoader.loadInBackground(); In the preceding example, the _ID, DISPLAY_NAME, and HAS_PHONE_NUMBER fields are retrieved.
The fourth and fifth parameters for the CursorLoader class enable you to specify a SQL WHERE clause to filter the result of the query. For example, the following statement retrieves only the people whose name ends with “Lee”:
Cursor c;
CursorLoader cursorLoader = new CursorLoader(
this,
allContacts,
projection,
ContactsContract.Contacts.DISPLAY_NAME + " LIKE '%Lee'",
null ,
null);
c = cursorLoader.loadInBackground(); Here, the fourth parameter for the CursorLoader constructor contains a SQL statement containing the name to search for (“Lee”). You can also put the search string into the next argument of the method/constructor, like this:
Cursor c;
//---Honeycomb and later---
CursorLoader cursorLoader = new CursorLoader(
this,
allContacts,
projection,
ContactsContract.Contacts.DISPLAY_NAME + " LIKE ?",
new String[] {"%Lee"},
null);
c = cursorLoader.loadInBackground(); The last parameter of the CursorLoader class enables you to specify a SQL ORDER BY clause to sort the result of the query. For example, the following statement sorts the contact names in ascending order:
Cursor c;
CursorLoader cursorLoader = new CursorLoader(
this,
allContacts,
projection,
ContactsContract.Contacts.DISPLAY_NAME + " LIKE ?",
new String[] {"%Lee"},
ContactsContract.Contacts.DISPLAY_NAME + " ASC");
c = cursorLoader.loadInBackground(); Creating your own content provider in Android is relatively simple. All you need to do is extend the abstract ContentProvider class and override the various methods defined within it.
This section explains how to create a simple content provider that stores a list of books.
Now that you have built your new content provider, you can test it from within your Android application. The following Try It Out demonstrates how to do that.
In this chapter, you learned what content providers are and how to use some of the built-in content providers in Android. In particular, you have seen how to use the Contacts content provider. Google's decision to provide content providers enables applications to share data through a standard set of programming interfaces. In addition to the built-in content providers, you can also create your own custom content provider to share data with other packages.
AndroidManifest.xml file?
You can find answers to the exercises in the appendix.
| TOPIC | KEY CONCEPTS |
| Retrieving a managed cursor | Use the CursorLoader class. |
| Two ways to specify a query for a content provider | Use either a query URI or a predefined query string constant. |
| Retrieving the value of a column in a content provider | Use the getColumnIndex() method. |
| Querying URI for accessing a contact's name | ContactsContract.Contacts.CONTENT_URI |
| Querying URI for accessing a contact's phone number | ContactsContract.CommonDataKinds.Phone.CONTENT_URI |
| Creating your own content provider | Create a class and extend the ContentProvider class. |
After you have your basic Android application up and running, the next interesting thing you can add to it is the capability to communicate with the outside world. You might want your application to send an SMS message to another phone when an event happens (such as when a particular geographical location is reached), or you might want to access a web service that provides certain services (such as currency exchange, weather, and so on).
This chapter demonstrates how to send and receive SMS messages programmatically from within your Android application. You also find out how to invoke the Mail application from within your Android application to send email messages to other users.
SMS messaging is one of the main functions on a mobile phone today—for some users, it's as necessary as the device itself. Today, any mobile phone you buy will have SMS messaging capabilities, and nearly all users of any age know how to send and receive such messages. Android comes with a built-in SMS application that enables you to send and receive SMS messages. However, in some cases, you might want to integrate SMS capabilities into your Android application. For example, you might want to write an application that automatically sends an SMS message at regular time intervals. For example, this would be useful if you wanted to track the location of your kids—simply give them an Android device that sends out an SMS message containing its geographical location every 30 minutes. Now you know if they really went to the library after school! (Of course, such a capability also means you would have to pay the fees incurred from sending all those SMS messages.)
This section describes how you can programmatically send and receive SMS messages in your Android applications. The good news for Android developers is that you don't need a real device to test SMS messaging: The free Android emulator provides that capability. In fact, when looking at your emulator window, the four-digit number that appears above your emulator is its “phone number.” The first emulator session that you open is typically 5554, with each subsequent session being incremented by 1.
The first example explains how to send SMS messages programmatically from within your application. Using this approach, your application can automatically send an SMS message to a recipient without user intervention. The following Try It Out shows you how.
Using the SmsManager class, you can send SMS messages from within your application without the need to involve the built-in Messaging application. However, sometimes it would be easier if you could simply invoke the built-in Messaging application and let it handle sending the message.
To activate the built-in Messaging application from within your application, you can use an Intent object with the MIME type "vnd.android-dir/mms-sms", as shown in the following code snippet:
Intent i = new
Intent(android.content.Intent.ACTION_VIEW);
i.putExtra("address", "5556; 5558; 5560");
i.putExtra("sms_body", "Hello my friends!");
i.setType("vnd.android-dir/mms-sms");
startActivity(i);This code invokes the Messaging application directly. Note that you can send your SMS to multiple recipients by separating each phone number with a semicolon (in the putExtra() method). The numbers are separated using commas in the Messaging application.
Besides sending SMS messages from your Android applications, you can also receive incoming SMS messages from within your applications by using a BroadcastReceiver object. This is useful when you want your application to perform an action when a certain SMS message is received. For example, you might want to track the location of your phone in case it is lost or stolen. In this case, you can write an application that automatically listens for SMS messages containing some secret code. When that message is received, you can then send an SMS message containing the location's coordinates back to the sender.
The following Try It Out shows how to programmatically listen for incoming SMS messages.
In the previous section, you might have noticed that every time you send an SMS message to the emulator (or device), both your application and the built-in application receive it. This is because when an SMS message is received, all applications (including the Messaging application) on the Android device take turns handling the incoming message. Sometimes, however, this is not the behavior you want. For example, you might want your application to receive the message and prevent it from being sent to other applications. This is very useful, especially if you are building some kind of tracking application.
The solution is very simple. To prevent an incoming message from being handled by the built-in Messaging application, your application needs to handle the message before the Messaging app has the chance to do it. To do this, add the android:priority attribute to the <intent-filter> element, like this:
<receiver android:name=".SMSReceiver">
<intent-filter android:priority="100">
<action android:name=
"android.provider.Telephony.SMS_RECEIVED"/>
</intent-filter>
</receiver> Set this attribute to a high number, such as 100. The higher the number, the earlier Android executes your application. When an incoming message is received, your application executes first, and you can decide what to do with the message. To prevent other applications from seeing the message, simply call the abortBroadcast() method in your BroadcastReceiver class:
@Override
public void onReceive(Context context, Intent intent)
{
//---get the SMS message passed in---
Bundle bundle = intent.getExtras();
SmsMessage[] msgs = null;
String str = "SMS from ";
if (bundle != null)
{
//---retrieve the SMS message received---
Object[] pdus = (Object[]) bundle.get("pdus");
msgs = new SmsMessage[pdus.length];
for (int i=0; i<msgs.length; i++){
msgs[i] = SmsMessage.createFromPdu((byte[])pdus[i]);
if (i==0) {
//---get the sender address/phone number---
str += msgs[i].getOriginatingAddress();
str += ": ";
}
//---get the message body---
str += msgs[i].getMessageBody().toString();
}
//---display the new SMS message---
Toast.makeText(context, str, Toast.LENGTH_SHORT).show();
Log.d("SMSReceiver", str);
//---stop the SMS message from being broadcasted---
this.abortBroadcast();
}
}After you do this, no other applications are able to receive your SMS messages.
The previous section demonstrates how you can use a BroadcastReceiver class to listen for incoming SMS messages and then use the Toast class to display the received SMS message. Often, you'll want to send the SMS message back to the main activity of your application. For example, you might want to display the message in a TextView. The following Try It Out demonstrates how you can do this.
The previous example shows how you can pass the SMS message received to be displayed in the activity. However, in many situations your activity might be in the background when the SMS message is received. In this case, it would be useful to be able to bring the activity to the foreground when a message is received. The following Try It Out shows you how.
Although the capability to send and receive SMS messages makes Android a very compelling platform for developing sophisticated applications, this flexibility comes with a price. A seemingly innocent application might send SMS messages behind the scene without the user knowing, as demonstrated by a recent case of an SMS-based Trojan Android application (see http://www.tripwire.com/state-of-security/security-data-protection/android-malware-sms/). The app claims to be a media player, but when it's installed it sends SMS messages to a premium-rate number, resulting in huge phone bills for the user.
The user needs to explicitly give permissions (such as accessing the Internet, sending and receiving SMS messages, and so on) to your application; however, the request for permissions is shown only at installation time. If the user clicks the Install button, he or she is considered to have granted the application permission to send and receive SMS messages. This is dangerous because after the application is installed it can send and receive SMS messages without ever prompting the user again.
In addition to this, the application also can “sniff” for incoming SMS messages. For example, based on the techniques you learned from the previous section, you can easily write an application that checks for certain keywords in the SMS message. When an SMS message contains the keyword you are looking for, you can then use the Location Manager (discussed in Chapter 8) to obtain your geographical location and then send the coordinates back to the sender of the SMS message. The sender could then easily track your location. All these tasks can be done easily without the user knowing it! That said, users should try to avoid installing Android applications that come from dubious sources, such as from unknown websites or strangers.
Like SMS messaging, Android also supports email. The Gmail/Email application on Android enables you to configure an email account using POP3 or IMAP. Besides sending and receiving emails using the Gmail/Email application, you can also send email messages programmatically from within your Android application. The following Try It Out shows you how.
For the following example to work properly, you must configure the Email app on your emulator. Simply click the Email app on the emulator and follow the on-screen prompts to set up the application. If you do not, you receive a message stating that no application is configured to handle the Email intent.
activity_main.xml file, replacing the TextView. Please be sure to replace all instances of com.jfdimarzio with the package used in your project:<?xml version="1.0" encoding="utf-8"?>
<android.support.constraint.ConstraintLayout xmlns:android=
"http://schemas.android.com/apk/res/android"
xmlns:app="http://schemas.android.com/apk/res-auto"
xmlns:tools="http://schemas.android.com/tools"
android:id="@+id/activity_main"
android:layout_width="match_parent"
android:layout_height="match_parent"
tools:context="com.jfdimarzio.emails.MainActivity">
<Button
android:text="Send Email"
android:layout_width="wrap_content"
android:layout_height="wrap_content"
android:id="@+id/btnSendEmail"
app:layout_constraintLeft_toLeftOf="@+id/activity_main"
app:layout_constraintTop_toTopOf="@+id/activity_main"
app:layout_constraintRight_toRightOf="@+id/activity_main"
app:layout_constraintBottom_toBottomOf="@+id/activity_main" />
</android.support.constraint.ConstraintLayout>MainActivity.java file:import android.content.Intent;
import android.net.Uri;
import android.support.v7.app.AppCompatActivity;
import android.os.Bundle;
import android.view.View;
public class MainActivity extends AppCompatActivity {
@Override
protected void onCreate(Bundle savedInstanceState) {
super.onCreate(savedInstanceState);
setContentView(R.layout.activity_main);
}
public void onClick(View v) {
//---replace the following email addresses with real ones---
String[] to =
{"someguy@example.com",
"anotherguy@example.com"};
String[] cc = {"busybody@example.com"};
sendEmail(to, cc, "Hello", "Hello my friends!");
}
private void sendEmail(String[] emailAddresses, String[] carbonCopies,
String subject, String message)
{
Intent emailIntent = new Intent(Intent.ACTION_SEND);
emailIntent.setData(Uri.parse("mailto:"));
String[] to = emailAddresses;
String[] cc = carbonCopies;
emailIntent.putExtra(Intent.EXTRA_EMAIL, to);
emailIntent.putExtra(Intent.EXTRA_CC, cc);
emailIntent.putExtra(Intent.EXTRA_SUBJECT, subject);
emailIntent.putExtra(Intent.EXTRA_TEXT, message);
emailIntent.setType("message/rfc822");
startActivity(Intent.createChooser(emailIntent, "Email"));
}
}This chapter described the two key ways for your application to communicate with the outside world. You first learned how to send and receive SMS messages. Using SMS, you can build a variety of applications that rely on the service provided by your mobile operator. Chapter 8 shows you a good example of how to use SMS messaging to build a location tracker application.
You also learned how to send email messages from within your Android application. You do that by invoking the built-in Email application through the use of an Intent object.
AndroidManifest.xml file for sending and receiving SMS messages.BroadcastReceiver?
You can find answers to the exercises in the appendix.
| TOPIC | KEY CONCEPTS |
| Programmatically sending SMS messages | Use the SmsManager class. |
| Sending SMS messages using Intent | Set the intent type to vnd.android-dir/mms-sms. |
| Receiving SMS messages | Implement a BroadcastReceiver and set it in the AndroidManifest.xml file. |
| Sending email using Intent | Set the intent type to message/rfc822. |
You have seen the explosive growth of mobile apps in recent years. One category of apps that is very popular is Location-Based Services, commonly known as LBS. LBS apps track your location, and might offer additional services such as locating amenities nearby, offering suggestions for route planning, and so on. Of course, one of the key ingredients in an LBS app is maps, which present a visual representation of your location.
This chapter shows you how to make use of Google Maps in your Android application, as well as how to manipulate the map view programmatically. In addition, you find out how to obtain your geographical location using the LocationManager class available in the Android SDK. This chapter ends with a project to build a location tracker application that you can install on an Android device and use to track the location of friends and relatives using SMS messaging.
Google Maps is one of the many applications bundled with the Android platform. In addition to simply using the Maps application, you can also embed it into your own applications and make it do some very cool things. This section describes how to use Google Maps in your Android applications and programmatically perform the following:
To get started, you need to first create an Android project so that you can display Google Maps in your activity:
Beginning with the Android SDK release v1.0, you need to apply for a free Google Maps API key before you can integrate Google Maps into your Android application. When you apply for the key, you must also agree to Google's terms of use, so be sure to read them carefully.
To get a Google Maps key, open the google_maps_api.xml file that was created in your LBS project. Within this file is a link to create a new Google Maps key. Simply copy and paste the link into your browser and follow the instructions. Make note of the key that Google gives you because you need it later in this project.
You are now ready to display Google Maps in your Android application.
The following Try It Out shows you how.
The previous section showed how you can display Google Maps in your Android application. You can pan the map to any desired location and it updates on-the-fly. However, there is no way to use the emulator to zoom in or out from a particular location (on a real Android device you can pinch the map to zoom it). Thus, in this section, you find out how you can enable users to zoom in or out of the map using the built-in zoom controls.
By default, Google Maps is displayed in map view, which is basically drawings of streets and places of interest. You can also set Google Maps to display in satellite view using the setMapType() method of the GoogleMap class:
public void onMapReady(GoogleMap googleMap) {
mMap = googleMap;
// Add a marker in Sydney and move the camera
LatLng sydney = new LatLng(-34, 151);
mMap.addMarker(new MarkerOptions().position(sydney).title(
"Marker in Sydney"));
mMap.moveCamera(CameraUpdateFactory.newLatLng(sydney));
mMap.setMapType(GoogleMap.MAP_TYPE_SATELLITE);
}Figure 10.4 shows Google Maps displayed in satellite view.
By default, Google Maps displays the map of Australia when it is first loaded. However, you can set Google Maps to display a particular location. To do so, you can use the moveCamera() method of the GoogleMap class.
The following Try It Out shows how you can programmatically animate Google Maps to a particular location.
After using Google Maps for a while, you might want to know the latitude and longitude of a location corresponding to the position on the screen that was just touched. Knowing this information is very useful because you can determine a location's address—a process known as reverse geocoding (you find out how this is done in the next section).
To get the latitude and longitude of a point on the Google Map that was touched, you must set a onMapClickListener:
import android.support.v4.app.FragmentActivity;
import android.os.Bundle;
import android.util.Log;
import com.google.android.gms.maps.CameraUpdateFactory;
import com.google.android.gms.maps.GoogleMap;
import com.google.android.gms.maps.OnMapReadyCallback;
import com.google.android.gms.maps.SupportMapFragment;
import com.google.android.gms.maps.model.LatLng;
import com.google.android.gms.maps.model.MarkerOptions;
public class MapsActivity extends FragmentActivity implements OnMapReadyCallback {
private GoogleMap mMap;
@Override
protected void onCreate(Bundle savedInstanceState) {
super.onCreate(savedInstanceState);
setContentView(R.layout.activity_maps);
// Obtain the SupportMapFragment and get notified
// when the map is ready to be used.
SupportMapFragment mapFragment =
(SupportMapFragment) getSupportFragmentManager()
.findFragmentById(R.id.map);
mapFragment.getMapAsync(this);
}
@Override
public void onMapReady(GoogleMap googleMap) {
mMap = googleMap;
LatLng boston = new LatLng(42.3601, -71.0589);
mMap.addMarker(new MarkerOptions().position(boston).title("Boston, Mass"));
mMap.moveCamera(CameraUpdateFactory.newLatLng(boston));
mMap.setOnMapClickListener(new GoogleMap.OnMapClickListener() {
@Override
public void onMapClick(LatLng point) {
Log.d("DEBUG","Map clicked [" + point.latitude +
" / " + point.longitude + "]");
}
});
}
}You should see a logcat entry similar to this if you run the preceding code:
D/DEBUG: Map clicked [37.15198779979302 / -83.76536171883345]As mentioned in the preceding section, if you know the latitude and longitude of a location, you can find out its address using a process known as reverse geocoding. Google Maps in Android supports reverse geocoding via the Geocoder class. The following code snippet shows how you can retrieve the address of a location just touched using the getFromLocation() method:
import android.location.Address;
import android.location.Geocoder;
import android.support.v4.app.FragmentActivity;
import android.os.Bundle;
import android.widget.Toast;
import com.google.android.gms.maps.CameraUpdateFactory;
import com.google.android.gms.maps.GoogleMap;
import com.google.android.gms.maps.OnMapReadyCallback;
import com.google.android.gms.maps.SupportMapFragment;
import com.google.android.gms.maps.model.LatLng;
import com.google.android.gms.maps.model.MarkerOptions;
import java.io.IOException;
import java.util.List;
import java.util.Locale;
public class MapsActivity extends FragmentActivity implements OnMapReadyCallback {
private GoogleMap mMap;
@Override
protected void onCreate(Bundle savedInstanceState) {
super.onCreate(savedInstanceState);
setContentView(R.layout.activity_maps);
// Obtain the SupportMapFragment and get notified
// when the map is ready to be used.
SupportMapFragment mapFragment =
(SupportMapFragment) getSupportFragmentManager()
.findFragmentById(R.id.map);
mapFragment.getMapAsync(this);
}
@Override
public void onMapReady(GoogleMap googleMap) {
mMap = googleMap;
LatLng boston = new LatLng(42.3601, -71.0589);
mMap.addMarker(new MarkerOptions().position(boston).title("Boston, Mass"));
mMap.moveCamera(CameraUpdateFactory.newLatLng(boston));
mMap.setOnMapClickListener(new GoogleMap.OnMapClickListener() {
@Override
public void onMapClick(LatLng point) {
Geocoder geoCoder = new Geocoder(
getBaseContext(), Locale.getDefault());
try {
List<Address> addresses = geoCoder.getFromLocation(
point.latitude,point.longitude,1);
String add = "";
if (addresses.size() > 0)
{
for (int i=0; i<addresses.get(0).getMaxAddressLineIndex();
i++)
add += addresses.get(0).getAddressLine(i) + "\n";
}
Toast.makeText(getBaseContext()
, add, Toast.LENGTH_SHORT).show();
}
catch (IOException e) {
e.printStackTrace();
}
}
});
}
}The Geocoder object converts the latitude and longitude into an address using the getFromLocation() method. After the address is obtained, you display it using the Toast class. Keep in mind that pin will not move. In this example, we are only getting the address of a location that you touch. Figure 10.6 shows the application displaying the address of a location that was touched on the map.
If you know the address of a location but want to know its latitude and longitude, you can do so via geocoding. Again, you can use the Geocoder class for this purpose. The following code shows how you can find the exact location of the Empire State Building by using the getFromLocationName() method:
Geocoder geoCoder = new Geocoder(
getBaseContext(), Locale.getDefault());
try {
List<Address> addresses = geoCoder.getFromLocationName(
"empire state building", 5);
if (addresses.size() > 0) {
LatLng p = new LatLng(
(int) (addresses.get(0).getLatitude()),
(int) (addresses.get(0).getLongitude()));
mMap.moveCamera(CameraUpdateFactory.newLatLng(p));
}
} catch (IOException e) {
e.printStackTrace();
}Nowadays, mobile devices are commonly equipped with GPS receivers. Because of the many satellites orbiting the earth, you can use a GPS receiver to find your location easily. However, GPS requires a clear sky to work and hence does not always work indoors or where satellites can't penetrate (such as a tunnel through a mountain).
Another effective way to locate your position is through cell tower triangulation. When a mobile phone is switched on, it is constantly in contact with base stations surrounding it. By knowing the identity of cell towers, it is possible to translate this information into a physical location through the use of various databases containing the cell towers' identities and their exact geographical locations. The advantage of cell tower triangulation is that it works indoors, without the need to obtain information from satellites. However, it is not as precise as GPS because its accuracy depends on overlapping signal coverage, which varies quite a bit. Cell tower triangulation works best in densely populated areas where the cell towers are closely located.
A third method of locating your position is to rely on Wi-Fi triangulation. Rather than connect to cell towers, the device connects to a Wi-Fi network and checks the service provider against databases to determine the location serviced by the provider. Of the three methods described here, Wi-Fi triangulation is the least accurate.
On the Android platform, the SDK provides the LocationManager class to help your device determine the user's physical location. The following Try It Out shows how this is done in code.
You can combine both the GPS location provider with the network location provider within your application:
@Override
public void onResume() {
super.onResume();
//---request for location updates---
lm.requestLocationUpdates(
LocationManager.GPS_PROVIDER,
0,
0,
locationListener);
//---request for location updates---
lm.requestLocationUpdates(
LocationManager.NETWORK_PROVIDER,
0,
0,
locationListener);
}However, be aware that doing so will cause your application to receive two different sets of coordinates, as both the GPS provider and the NETWORK provider will try to get your location using their own methods (GPS versus Wi-Fi and cell ID triangulation). Hence, it is important that you monitor the status of the two providers in your device and use the appropriate one. You can check the status of the two providers by implementing the following three methods (shown in bold) of the MyLocationListener class:
private class MyLocationListener implements LocationListener
{
…
//---called when the provider is disabled---
public void onProviderDisabled(String provider) {
Toast.makeText(getBaseContext(),
provider + " disabled",
Toast.LENGTH_SHORT).show();
}
//---called when the provider is enabled---
public void onProviderEnabled(String provider) {
Toast.makeText(getBaseContext(),
provider + " enabled",
Toast.LENGTH_SHORT).show();
}
//---called when there is a change in the provider status---
public void onStatusChanged(String provider, int status,
Bundle extras) {
String statusString = "";
switch (status) {
case android.location.LocationProvider.AVAILABLE:
statusString = "available";
case android.location.LocationProvider.OUT_OF_SERVICE:
statusString = "out of service";
case android.location.LocationProvider.TEMPORARILY_UNAVAILABLE:
statusString = "temporarily unavailable";
}
Toast.makeText(getBaseContext(),
provider + " " + statusString,
Toast.LENGTH_SHORT).show();
}
}One very cool feature of the LocationManager class is its ability to monitor a specific location. This is achieved using the addProximityAlert() method.
The following code snippet shows how to monitor a particular location such that if the user is within a five-meter radius from that location, your application will fire an intent to launch the web browser:
import android.app.PendingIntent;
import android.content.Intent;
import android.net.Uri;
//---use the LocationManager class to obtain locations data---
lm = (LocationManager)
getSystemService(Context.LOCATION_SERVICE);
//---PendingIntent to launch activity if the user is within
// some locations---
PendingIntent pendingIntent = PendingIntent.getActivity(
this, 0, new
Intent(android.content.Intent.ACTION_VIEW,
Uri.parse("http://www.amazon.com")), 0);
lm.addProximityAlert(37.422006, -122.084095, 5, -1, pendingIntent);The addProximityAlert() method takes five arguments:
Note that if the Android device's screen goes to sleep, the proximity is also checked once every four minutes in order to preserve the battery life of the device.
This chapter took a whirlwind tour of the GoogleMap object, which displays Google Maps in your Android application. You have learned the various ways in which the map can be manipulated. You also have also seen how you can obtain geographical location data using the various network providers: GPS, cell ID, or Wi-Fi triangulation.
You can find answers to the exercises in the appendix.
| Topic | Key Concepts |
| Displaying the GoogleMap | <string name="google_maps_key" templateMergeStrategy="preserve" translatable="false">YOUR_KEY_HERE</string> |
| Displaying the zoom controls | map:uiZoomControls="true" |
| Programmatically zooming in or out of the map | mMap.animateCamera(CameraUpdateFactory.zoomTo(7)); |
| Changing views | mMap.setMapType(GoogleMap.MAP_TYPE_SATELLITE); |
| Animating to a particular location |
|
| Getting the location of the map touched |
|
| Geocoding and reverse geocoding | Use the Geocoder class |
| Setting a Proximity Alert |
|
Chapter 11 explains how your application can talk to the outside world through the use of SMS messaging and emails. Another way to communicate with the outside world is through the wireless network available on your Android device. In this chapter, you find out how to use the HTTP protocol to talk to web servers so that you can download text and binary data. Also, you see how to parse XML files to extract the relevant parts of an XML document—a technique that is useful if you are accessing web services. In addition to XML web services, this chapter also covers JSON (JavaScript Object Notation), which is a lightweight alternative to XML. You make use of the classes available in the Android SDK to manipulate JSON content.
Finally, this chapter also demonstrates how to write an Android application to connect to servers using TCP sockets. Using sockets programming, you can write sophisticated, interesting networked applications.
One common way to communicate with the outside world is through HTTP. HTTP is no stranger to most people; it is the protocol that drives much of the web's success. Using the HTTP protocol, you can perform a variety of tasks, such as downloading web pages from a web server, downloading binary data, and more.
The following Try It Out creates an Android project so you can use the HTTP protocol to connect to the web to download all sorts of content.
A common task you need to perform is downloading binary data from the web. For example, you might want to download an image from a server so that you can display it in your application. The following Try It Out shows how this is done.
Besides downloading binary data, you can also download plain-text content. For example, you might want to access a web service that returns a string of random quotes. The following Try It Out shows how you can download a string from a web service in your application.
So far, this chapter has showed you how to download images and text from the web. The previous section demonstrated how to download some plain text from a server. Very often, you need to download XML files and parse the contents (a good example of this is consuming web services). Therefore, in this section you learn how to connect to a web service using the HTTP GET method. After the web service returns a result in XML, you extract the relevant parts and display its content using the Toast class.
In this example, you use the web method from http://services.aonaware.com/DictService/DictService.asmx?op=Define. This web method is from a dictionary web service that returns the definition of a given word.
The web method takes a request in the following format:
GET /DictService/DictService.asmx/Define?word=string HTTP/1.1
Host: services.aonaware.com
HTTP/1.1 200 OK
Content-Type: text/xml; charset=utf-8
Content-Length: lengthIt returns a response in the following format:
<?xml version="1.0" encoding="utf-8"?>
<WordDefinition xmlns="http://services.aonaware.com/webservices/">
<Word>string</Word>
<Definitions>
<Definition>
<Word>string</Word>
<Dictionary>
<Id>string</Id>
<Name>string</Name>
</Dictionary>
<WordDefinition>string</WordDefinition>
</Definition>
<Definition>
<Word>string</Word>
<Dictionary>
<Id>string</Id>
<Name>string</Name>
</Dictionary>
<WordDefinition>string</WordDefinition>
</Definition>
</Definitions>
</WordDefinition>Hence, to obtain the definition of a word, you need to establish an HTTP connection to the web method and then parse the XML result that is returned. The following Try It Out shows you how.
In the previous section, you learned how to consume XML web services by using HTTP to connect to the web server and then obtain the results in XML. You also learned how to use DOM to parse the result of the XML document. However, manipulating XML documents is a computationally expensive operation for mobile devices, for the following reasons:
DocumentBuilderFactory, you must use DOM to traverse the tree in order to locate the information you want. In addition, DOM itself has to build the entire document in memory as a tree structure before you can traverse it. This is both memory and CPU intensive.A much more efficient way to represent information exists in the form of JSON (JavaScript Object Notation). JSON is a lightweight data-interchange format that is easy for humans to read and write. It is also easy for machines to parse and generate. The following lines of code show what a JSON message looks like:
[
{
"appeId":"1",
"survId":"1",
"location":"",
"surveyDate":"2008-03 14",
"surveyTime":"12:19:47",
"inputUserId":"1",
"inputTime":"2008-03-14 12:21:51",
"modifyTime":"0000-00-00 00:00:00"
},
{
"appeId":"2",
"survId":"32",
"location":"",
"surveyDate":"2008-03-14",
"surveyTime":"22:43:09",
"inputUserId":"32",
"inputTime":"2008-03-14 22:43:37",
"modifyTime":"0000-00-00 00:00:00"
},
{
"appeId":"3",
"survId":"32",
"location":"",
"surveyDate":"2008-03-15",
"surveyTime":"07:59:33",
"inputUserId":"32",
"inputTime":"2008-03-15 08:00:44",
"modifyTime":"0000-00-00 00:00:00"
},
{
"appeId":"4",
"survId":"1",
"location":"",
"surveyDate":"2008-03-15",
"surveyTime":"10:45:42",
"inputUserId":"1",
"inputTime":"2008-03-15 10:46:04",
"modifyTime":"0000-00-00 00:00:00"
},
{
"appeId":"5",
"survId":"32",
"location":"",
"surveyDate":"2008-03-16",
"surveyTime":"08:04:49",
"inputUserId":"32",
"inputTime":"2008-03-16 08:05:26",
"modifyTime":"0000-00-00 00:00:00"
},
{
"appeId":"6",
"survId":"32",
"location":"",
"surveyDate":"2008-03-20",
"surveyTime":"20:19:01",
"inputUserId":"32",
"inputTime":"2008-03-20 20:19:32",
"modifyTime":"0000-00-00 00:00:00"
}
]The preceding block of lines represents a set of data taken for a survey. Note that the information is represented as a collection of key/value pairs, and that each key/value pair is grouped into an ordered list of objects. Unlike XML, there are no lengthy tag names. Instead, there are only brackets and braces.
The following Try It Out demonstrates how to process JSON messages easily using the JSONArray and JSONObject classes available in the Android SDK.
In this chapter, you learned how your application can connect with the outside world through the use of the HTTP protocol. Using the HTTP protocol, you can download various types of data from web servers. One good application of this is to talk to web services, whereby you need to parse XML files. In addition to XML web services, you also saw how to consume JSON services, which are more lightweight than XML web services. Finally, you saw an alternative to HTTP: using sockets for communication. Sockets enable your application to remain connected to a server so that it can receive data as it becomes available. An important lesson in this chapter is that all synchronous operations must be encapsulated using the AsyncTask class. Otherwise, your application does not work on devices running Honeycomb or later.
AndroidManifest.xml file for an HTTP connection.You can find answers to the exercises in the appendix.
| Topic | Key Concepts |
| Establishing an HTTP connection | Use the HttpURLConnection class. |
| Accessing XML web services | Use the Document, DocumentBuilderFactory, and DocumentBuilder classes to parse the XML result returned by the web service. |
| Dealing with JSON messages | Use the JSONArray and JSONObject classes. |
| Sockets programming | Use the Socket class to establish a TCP connection. Use the InputStream and OutputStream objects for receiving and sending data, respectively. |
The three methods in an AsyncTask class |
The three methods are doInBackground(), onProgressUpdate(), and onPostExecute(). |
A service is an application in Android that runs in the background without needing to interact with the user. For example, while using an application, you might want to play some background music at the same time. In this case, the code that is playing the background music has no need to interact with the user; therefore, it can be run as a service. Also, services are ideal for situations in which there is no need to present a user interface (UI) to the user. A good example of this scenario is an application that continually logs the geographical coordinates of the device. In this case, you can write a service to do that in the background. In this chapter, you find out how to create your own services and use them to perform background tasks asynchronously.
The best way to understand how a service works is by creating one. The following Try It Out shows you the steps to create a simple service. Subsequent sections add more functionality to this service. For now, you see how to start and stop a service.
Because the service you created in the previous section does not do anything useful, in this section you modify it so that it performs a task. In the following Try It Out, you simulate the service of downloading a file from the Internet.
That means for a long-running service, it is important that you put all long-running code into a separate thread so that it does not tie up the application that calls it. The following Try It Out shows you how.
In addition to performing long-running tasks in a service, you might also perform some repeated tasks in a service. For example, you could write an alarm clock service that runs persistently in the background. In this case, your service might need to periodically execute some code to check whether a prescheduled time has been reached so that an alarm can be sounded. To execute a block of code to be executed at a regular time interval, you can use the Timer class within your service. The following Try It Out shows you how.
Earlier in this chapter, you learned how to start a service using the startService() method and stop a service using the stopService() method. You have also seen how you should execute long-running tasks on a separate thread—not the same thread as the calling activities. It is important to note that once your service has finished executing a task, it should be stopped as soon as possible so that it does not unnecessarily hold up valuable resources. That's why you use the stopSelf() method to stop the service when a task has been completed. Unfortunately, a lot of developers often forget to terminate a service when it is done performing its task. To easily create a service that runs a task asynchronously and terminates itself when it is done, you can use the IntentService class.
The IntentService class is a base class for Service that handles asynchronous requests on demand. It is started just like a normal service; and it executes its task within a worker thread and terminates itself when the task is completed. The following Try It Out demonstrates how to use the IntentService class.
Often a service simply executes in its own thread, independently of the activity that calls it. This doesn't pose a problem if you simply want the service to perform some tasks periodically and the activity does not need to be notified about the service's status. For example, you might have a service that periodically logs the geographical location of the device to a database. In this case, there is no need for your service to interact with any activities, because its main purpose is to save the coordinates into a database. However, suppose you want to monitor for a particular location. When the service logs an address that is near the location you are monitoring, it might need to communicate that information to the activity. If so, you need to devise a way for the service to interact with the activity.
The following Try It Out demonstrates how a service can communicate with an activity using a BroadcastReceiver.
So far, you have seen how services are created, how they are called, and how they are terminated when they are done with their task. All the services that you have seen are simple—either they start with a counter and increment at regular intervals or they download a fixed set of files from the Internet. However, real-world services are usually much more sophisticated, requiring the passing of data so that they can do the job correctly for you.
Using the service demonstrated earlier that downloads a set of files, suppose you now want to let the calling activity determine what files to download, instead of hardcoding them in the service. Here is what you need to do.
Intent object, specifying the service name: public void startService(View view) {
Intent intent = new Intent(getBaseContext(), MyService.class);
}URL objects and assign it to the Intent object through its putExtra() method.Intent object: public void startService(View view) {
Intent intent = new Intent(getBaseContext(), MyService.class);
try {
URL[] urls = new URL[] {
new URL("http://www.amazon.com/somefiles.pdf"),
new URL("http://www.wrox.com/somefiles.pdf"),
new URL("http://www.google.com/somefiles.pdf"),
new URL("http://www.learn2develop.net/somefiles.pdf")};
intent.putExtra("URLs", urls);
} catch (MalformedURLException e) {
e.printStackTrace();
}
startService(intent);
}URL array is assigned to the Intent object as an Object array.Intent object in the onStartCommand() method: @Override
public int onStartCommand(Intent intent, int flags, int startId) {
// We want this service to continue running until it is explicitly
// stopped, so return sticky.
Toast.makeText(this, "Service Started", Toast.LENGTH_LONG).show();
Object[] objUrls = (Object[]) intent.getExtras().get("URLs");
URL[] urls = new URL[objUrls.length];
for (int i=0; i<objUrls.length-1; i++) {
urls[i] = (URL) objUrls[i];
}
new DoBackgroundTask().execute(urls);
return START_STICKY;
}getExtras() method to return a Bundle object.get() method to extract the URL array as an Object array.execute() method.This is one way in which your activity can pass values to the service. As you can see, if you have relatively complex data to pass to the service, you must do some additional work to ensure that the data is passed correctly. A better way to pass data is to bind the activity directly to the service so that the activity can call any public members and methods on the service directly. The following Try It Out shows you how to bind an activity to a service.
So far, you have seen how services are created and why it is important to ensure that your long-running tasks are properly handled, especially when updating the UI thread. Earlier in this chapter (as well as in Chapter 9), you also saw how to use the AsyncTask class for executing long-running code in the background. This section briefly summarizes the various ways to handle long-running tasks correctly using a variety of methods available.
For this discussion, assume that you have an Android project named Threading. The main.xml file contains a Button and TextView:
<?xml version="1.0" encoding="utf-8"?>
<LinearLayout xmlns:android="http://schemas.android.com/apk/res/android"
android:layout_width="fill_parent"
android:layout_height="fill_parent"
android:orientation="vertical" >
<TextView
android:layout_width="fill_parent"
android:layout_height="wrap_content"
android:text="@string/hello"/>
<Button
android:id="@+id/btnStartCounter"
android:layout_width="match_parent"
android:layout_height="wrap_content"
android:text="Start"
android:onClick="startCounter"/>
<TextView
android:id="@+id/textView1"
android:layout_width="match_parent"
android:layout_height="wrap_content"
android:text="TextView"/>
</LinearLayout>Suppose you want to display a counter on the activity, from 0 to 1,000. In your ThreadingActivity class, you have the following code:
package net.learn2develop.Threading;
import android.app.Activity;
import android.os.Bundle;
import android.util.Log;
import android.view.View;
import android.widget.TextView;
public class ThreadingActivity extends Activity {
TextView txtView1;
/** Called when the activity is first created. */
@Override
public void onCreate(Bundle savedInstanceState) {
super.onCreate(savedInstanceState);
setContentView(R.layout.main);
txtView1 = (TextView) findViewById(R.id.textView1);
}
public void startCounter(View view) {
for (int i=0; i<=1000; i++) {
txtView1.setText(String.valueOf(i));
try {
Thread.sleep(1000);
} catch (InterruptedException e) {
Log.d("Threading", e.getLocalizedMessage());
}
}
}
}When you run the application and click the Start button, the application is briefly frozen.
The UI freezes because the application is continuously trying to display the value of the counter at the same time it is pausing for one second after it has been displayed. This ties up the UI, which is waiting for the display of the numbers to be completed. The result is a nonresponsive application that will frustrate your users.
To solve this problem, one option is to wrap the part of the code that contains the loop using a Thread and Runnable class, like this:
public void startCounter(View view) {
new Thread(new Runnable() {
public void run() {
for (int i=0; i<=1000; i++) {
txtView1.setText(String.valueOf(i));
try {
Thread.sleep(1000);
} catch (InterruptedException e) {
Log.d("Threading", e.getLocalizedMessage());
}
}
}
}).start();
}In the preceding code, you first create a class that implements the Runnable interface. Within this class, you put your long-running code within the run() method. The Runnable block is then started using the Thread class.
However, the preceding application will not work, and it will crash if you try to run it. This code that is placed inside the Runnable block is on a separate thread, and in the preceding example you are trying to update the UI from another thread, which is not a safe thing to do because Android UIs are not thread-safe. To resolve this, you need to use the post() method of a View to create another Runnable block to be added to the message queue. In short, the new Runnable block created will be executed in the UI thread, so it would now be safe to execute your application:
public void startCounter(View view) {
new Thread(new Runnable() {
@Override
public void run() {
for (int i=0; i<=1000; i++) {
final int valueOfi = i;
//---update UI---
txtView1.post(new Runnable() {
public void run() {
//---UI thread for updating---
txtView1.setText(String.valueOf(valueOfi));
}
});
//---insert a delay
try {
Thread.sleep(1000);
} catch (InterruptedException e) {
Log.d("Threading", e.getLocalizedMessage());
}
}
}
}).start();
}This application will now work correctly, but it is complicated and makes your code difficult to maintain.
A second option to update the UI from another thread is to use the Handler class. A Handler enables you to send and process messages, similar to using the post() method of a View. The following code snippet shows a Handler class called UIupdater that updates the UI using the message that it receives:
//---used for updating the UI on the main activity---
static Handler UIupdater = new Handler() {
@Override
public void handleMessage(Message msg) {
byte[] buffer = (byte[]) msg.obj;
//---convert the entire byte array to string---
String strReceived = new String(buffer);
//---display the text received on the TextView---
txtView1.setText(strReceived);
Log.d("Threading", "running");
}
};
public void startCounter(View view) {
new Thread(new Runnable() {
@Override
public void run() {
for (int i=0; i<=1000; i++) {
//---update the main activity UI---
ThreadingActivity.UIupdater.obtainMessage(
0, String.valueOf(i).getBytes() ).sendToTarget();
//---insert a delay
try {
Thread.sleep(1000);
} catch (InterruptedException e) {
Log.d("Threading", e.getLocalizedMessage());
}
}
}
}).start();
}
}A detailed discussion of the Handler class is beyond the scope of this book. For more details, check out the documentation at https://developer.android.com/reference/android/os/Handler.html.
So far, the two methods just described enable you to update the UI from a separate thread. In Android, you could use the simpler AsyncTask class to do this. Using the AsyncTask, you could rewrite the preceding code as follows:
private class DoCountingTask extends AsyncTask<Void, Integer, Void> {
protected Void doInBackground(Void… params) {
for (int i = 0; i < 1000; i++) {
//---report its progress---
publishProgress(i);
try {
Thread.sleep(1000);
} catch (InterruptedException e) {
Log.d("Threading", e.getLocalizedMessage());
}
}
return null;
}
protected void onProgressUpdate(Integer… progress) {
txtView1.setText(progress[0].toString());
Log.d("Threading", "updating…");
}
}
public void startCounter(View view) {
new DoCountingTask().execute();
}The preceding code will update the UI safely from another thread. What about stopping the task? If you run the preceding application and then click the Start button, the counter will start to display from zero. However, if you press the back button on the emulator/device, the task will continue to run even though the activity has been destroyed. You can verify this through the LogCat window. If you want to stop the task, use the following code snippets:
public class ThreadingActivity extends Activity {
static TextView txtView1;
DoCountingTask task;
/** Called when the activity is first created. */
@Override
public void onCreate(Bundle savedInstanceState) {
super.onCreate(savedInstanceState);
setContentView(R.layout.main);
txtView1 = (TextView) findViewById(R.id.textView1);
}
public void startCounter(View view) {
task = (DoCountingTask) new DoCountingTask().execute();
}
public void stopCounter(View view) {
task.cancel(true);
}
private class DoCountingTask extends AsyncTask<Void, Integer, Void> {
protected Void doInBackground(Void… params) {
for (int i = 0; i < 1000; i++) {
//---report its progress---
publishProgress(i);
try {
Thread.sleep(1000);
} catch (InterruptedException e) {
Log.d("Threading", e.getLocalizedMessage());
}
if (isCancelled()) break;
}
return null;
}
protected void onProgressUpdate(Integer… progress) {
txtView1.setText(progress[0].toString());
Log.d("Threading", "updating…");
}
}
@Override
protected void onPause() {
super.onPause();
stopCounter(txtView1);
}
}To stop the AsyncTask subclass, you need to get an instance of it first. To stop the task, call its cancel() method. Within the task, you call the isCancelled() method to check whether the task should be terminated.
In this chapter, you learned how to create a service in your Android project to execute long-running tasks. You have seen the many approaches you can use to ensure that the background task is executed in an asynchronous fashion, without tying up the main calling activity. You have also learned how an activity can pass data into a service, and how you can alternatively bind to an activity so that it can access a service more directly.
IntentService class?AsyncTask class.You can find answers to the exercises in the appendix.
| TOPIC | KEY CONCEPTS |
| Creating a service | Create a class and extend the Service class. |
| Implementing the methods in a service | Implement the following methods: onBind(), onStartCommand(), and onDestroy(). |
| Starting a service | Use the startService() method. |
| Stopping a service | Use the stopService() method. |
| Performing long-running tasks | Use the AsyncTask class and implement three methods: doInBackground(), onProgressUpdate(), and onPostExecute(). |
| Performing repeated tasks | Use the Timer class and call its scheduleAtFixedRate() method. |
| Executing tasks on a separate thread and auto-stopping a service | Use the IntentService class. |
| Enabling communication between an activity and a service | Use the Intent object to pass data into the service. For a service, broadcast an Intent to notify an activity. |
| Binding an activity to a service | Use the Binder class in your service and implement the ServiceConnection class in your calling activity. |
Updating the UI from a Runnable block |
Use the post() method of a view to update the UI. Alternatively, you can also use a Handler class. The recommended way is to use the AsyncTask class. |
This appendix includes the answers to the end-of-chapter exercises.
android:theme onCreateDialog()startActivityForResult()dp unit is density independent and 1dp is equivalent to one pixel on a 160-dpi screen. The px unit corresponds to an actual pixel on screen. You should always use the dp unit because it enables your activity to scale properly when run on devices of varying screen size.AbsoluteLayout makes it difficult for your application to have a consistent look and feel across devices.onPause() event is fired whenever an activity is killed or sent to the background. The onSaveInstanceState() event is similar to the onPause() event, except that it is not always called, such as when the user presses the Back button to kill the activity.onPause(), onSaveInstanceState(), and onRetainNonConfigurationInstance(). onPause() method to preserve the activity's state because the method is always called when the activity is about to be destroyed.onSaveInstanceState() method to save the state of the activity (such as the data entered by the user) using a Bundle object.onRetainNonConfigurationInstance() method is useful for momentarily saving data (such as images or files downloaded from a web service) that might be too large to fit into a Bundle object.onCreateOptionsMenu() and onOptionsItemSelected() events.isChecked() method of each RadioButton to determine whether it has been selected.getResources() method. //—-get the current date—-
Calendar today = Calendar.getInstance();
yr = today.get(Calendar.YEAR);
month = today.get(Calendar.MONTH);
day = today.get(Calendar.DAY_OF_MONTH);
showDialog(DATE_DIALOG_ID);ListFragment, DialogFragment, and PreferenceFragment. ListFragment is useful for displaying a list of items, such as an RSS listing of news items.DialogFragment allows you to display a dialog window modally and is useful when you want a response from the user before allowing him to continue with your application.PreferenceFragment displays a window containing your application's preferences and allows the user to edit them directly in your application.ImageSwitcher enables images to be displayed with animation. You can animate the image when it is being displayed, as well as when it is being replaced by another image.onCreateOptionsMenu() and onOptionsItemSelected().onCreateContextMenu() and onContextItemSelected().WebViewClient class and override the shouldOverrideUrlLoading() method.PreferenceActivity class.getExternalStorageDirectory().WRITE_EXTERNAL_STORAGE. Cursor c;
if (android.os.Build.VERSION.SDK_INT <11) {
//---before Honeycomb---
c = managedQuery(allContacts, projection,
ContactsContract.Contacts.DISPLAY_NAME + " LIKE ?",
new String[] {"%jack"},
ContactsContract.Contacts.DISPLAY_NAME + " ASC");
} else {
//---Honeycomb and later---
CursorLoader cursorLoader = new CursorLoader(
this,
allContacts,
projection,
ContactsContract.Contacts.DISPLAY_NAME + " LIKE ?",
new String[] {"%jack"},
ContactsContract.Contacts.DISPLAY_NAME + " ASC");
c = cursorLoader.loadInBackground();
}getType(), onCreate(), query(), insert(), delete(), and update(). <provider android:name="BooksProvider"
android:authorities="net.learn2develop.provider.Books"/>SEND_SMS and RECEIVE_SMS.onUpgrade()<uses-library> element in the AndroidManifest.xml fileINTERNET permission in the AndroidManifest.xml fileLocationManager.GPS_PROVIDERLocationManager.NETWORK_PROVIDERaddProximityAlert().INTERNET.JSONArray and JSONObject.AsyncTask.IntentService class is similar to the Service class except that it runs the tasks in a separate thread and automatically stops the service when the task has finished execution.doInBackground(), onProgressUpdate(), and onPostExecute().IntentFilter class.AsyncTask. This ensures that the UI is updated in a thread-safe manner.Beginning Android® Programming with Android Studio
Published by
John Wiley & Sons, Inc.
10475 Crosspoint Boulevard
Indianapolis, IN 46256
Copyright © 2017 by John Wiley & Sons, Inc., Indianapolis, Indiana
Published simultaneously in Canada
ISBN: 978-1-118-70559-9
ISBN: 978-1-118- 70742-5 (ebk)
ISBN: 978-1-119-19609-9 (ebk)
No part of this publication may be reproduced, stored in a retrieval system or transmitted in any form or by any means, electronic, mechanical, photocopying, recording, scanning or otherwise, except as permitted under Sections 107 or 108 of the 1976 United States Copyright Act, without either the prior written permission of the Publisher, or authorization through payment of the appropriate per-copy fee to the Copyright Clearance Center, 222 Rosewood Drive, Danvers, MA 01923, (978) 750-8400, fax (978) 646-8600. Requests to the Publisher for permission should be addressed to the Permissions Department, John Wiley & Sons, Inc., 111 River Street, Hoboken, NJ 07030, (201) 748-6011, fax (201) 748-6008, or online at http://www.wiley.com/go/permissions.
Limit of Liability/Disclaimer of Warranty: The publisher and the author make no representations or warranties with respect to the accuracy or completeness of the contents of this work and specifically disclaim all warranties, including without limitation warranties of fitness for a particular purpose. No warranty may be created or extended by sales or promotional materials. The advice and strategies contained herein may not be suitable for every situation. This work is sold with the understanding that the publisher is not engaged in rendering legal, accounting, or other professional services. If professional assistance is required, the services of a competent professional person should be sought. Neither the publisher nor the author shall be liable for damages arising herefrom. The fact that an organization or Web site is referred to in this work as a citation and/or a potential source of further information does not mean that the author or the publisher endorses the information the organization or Web site may provide or recommendations it may make. Further, readers should be aware that Internet Web sites listed in this work may have changed or disappeared between when this work was written and when it is read.
For general information on our other products and services please contact our Customer Care Department within the United States at (877) 762-2974, outside the United States at (317) 572-3993 or fax (317) 572-4002.
Wiley publishes in a variety of print and electronic formats and by print-on-demand. Some material included with standard print versions of this book may not be included in e-books or in print-on-demand. If this book refers to media such as a CD or DVD that is not included in the version you purchased, you may download this material at http://booksupport.wiley.com. For more information about Wiley products, visit www.wiley.com.
Library of Congress Control Number: 2016952673
Trademarks: Wiley, the Wiley logo, Wrox, the Wrox logo, Programmer to Programmer, and related trade dress are trademarks or registered trademarks of John Wiley & Sons, Inc. and/or its affiliates, in the United States and other countries, and may not be used without written permission. Android is a registered trademark of Google, Inc. All other trademarks are the property of their respective owners. John Wiley & Sons, Inc., is not associated with any product or vendor mentioned in this book.
To my children Christian, Sophia, and Giovanni;
Katie, Sarah, and Joe; and my love Jennifer.
J. F. DIMARZIO began developing computer programs—specifically games—in 1984 as a wide-eyed, curious child of the Atari age. Starting on the TRS-80 Color Computer II, in BASIC, he wrote several small text-based games and simple inventory applications. After leaving the Music program at the University of Massachusetts, J. F. moved into professional computer development; working for the United States Department of Defense, Walt Disney Imagineering, TechData, and The Walt Disney Company. In 2008, he started developing apps on the newly introduced Android platform (then on version 0.8). He has had 14 books published to date, 7 of which are on Android and Android game development.
CHÁD (SHOD) DARBY is an author, instructor, and speaker in the Java development world. As a recognized authority on Java applications and architectures, he has presented technical sessions at software development conferences worldwide (in the U.S., U.K., India, Italy, Russia, Netherlands, Singapore, Japan, and Australia). In his 20 years as a professional software architect, he's had the opportunity to work for Blue Cross/Blue Shield, Merck, Boeing, Red Hat, and a handful of startup companies.
Chád is a contributing author to several Java books, including Professional Java E-Commerce (Wrox Press), Beginning Java Networking (Wrox Press), and XML and Web Services Unleashed (Sams Publishing). Chád has Java certifications from Oracle and IBM. He holds a B.S. in Computer Science from Carnegie Mellon University.
J. F. DIMARZIO would like to thank Charlotte Kughen, Jim Minatel, Rick Kughen, and the team at John Wiley & Sons publishing; and Stacey Czarnowski, Katrina Bevan, and the team at Studio B.
Go to www.wiley.com/go/eula to access Wiley's ebook EULA.
