Table of Contents for
Arch Linux Environment Setup How-to
 Arch Linux Environment Setup How-to
Published by
Packt Publishing, 2012
Arch Linux Environment Setup How-to
Published by
Packt Publishing, 2012
- Cover
- Table of Contents
- Arch Linux Environment Setup How-to
- Arch Linux Environment Setup How-to
- Credits
- About the Author
- About the Reviewers
- www.PacktPub.com
- Preface
- The Arch Way
- Bleeding edge
- What this book covers
- What you need for this book
- Who this book is for
- Conventions
- Reader feedback
- Customer support
- 1. Arch Linux Environment Setup How-to
- Installing Arch Linux using the Archboot ISO (Should know)
- Configuring your system (Should know)
- Installing and removing packages (Must know)
- Booting and managing services with systemd (Should know)
- Booting and managing services using initscripts (Should know)
- Configuring GUI using Xorg (Should know)
In this recipe we'll learn about the installation of Arch Linux. It might seem a little scary because of the manual installation process, but it is not difficult at all. The installation script will practically guide you all the way through the installation, and you can have a system capable of booting in even less than 10 minutes. In the Arch Linux ecosystem, the installation is something that is usually done once and then never again because of the rolling release of packages. Also see the Beginner's Guide at https://wiki.archlinux.org/index.php/Beginners'_Guide to get a grasp of what Arch Linux is all about. As Arch Linux is an ever moving target, the preferred method of installation is when you are connected to the Internet so you can fetch all the latest and greatest software available. Even before downloading, it is a must to read the latest news at http://www.archlinux.org/news/ about any new developments.
When we only want a taste of Arch Linux and are probably far from sure that this is what we want for all day use, consider learning how the system works by installing it in a virtual machine. In the Beginner's Guide there is a useful section about it at https://wiki.archlinux.org/index.php/Beginners'_Guide#Install_on_a_virtual_machine.
We can get the Archboot ISO from http://wiki.archlinux.org/index.php/Archboot. On this page we will find a download link to the latest release. We can select to download the torrent files or the ISO immediately.
The following list describes the main tasks that we will perform in this recipe:
- Preparing the installation media: We are going to download the ISO file from the Archboot wiki page and save it on the preferred media of our choice. At the time of writing, there is a choice to download an architecture-specific ISO or a dual ISO that contains both i686 and x86-64 architectures on one disk. I would suggest downloading the dual ISO, which makes installing on any PC and any of these architectures possible without any hassle.
- Booting the install media and starting installation: Start your PC using your preferred installation media (CD or USB drive). On most PC systems, you can get into the boot menu by pressing one of the function keys, usually between F8 and F12 depending on the motherboard manufacturer. On older machines where you do not yet have a boot menu, you might need to change the boot order in the BIOS where the CD-ROM (or DVD/Blu-ray) has to be chosen as the first device to try booting from.
- Setting keyboard and console font: When using a different keyboard layout than the default one, you will for sure need this recipe to configure your specific keyboard layout and optionally the console font you like. If you have configured both, the installer will also bring these settings into the configuration of our installed system.
- Setting date and time: In this recipe we will also configure three small parts—we'll set our time zone, the current time, and the current date.
- Auto preparing hard drive: The Auto-Prepare option will guide you with the creation of a default partition scheme. When we can't have our entire drive erased, or we want to differ from the default partition scheme chosen by the installer, we should skip to the steps for Manually preparing hard drive.
- Manually preparing hard drive: Manual partition gives you full control over how many partitions you create. This can also concern multiple disks, so there is total freedom. Use the manual preparation when you are used to partitioning.
- Selecting source: We can select if we want to install from the repositories available on the Internet, or to install immediately from the packages available on the installation media. It would be best to opt for FTP/HTTP as this would ensure we have the latest packages available.
- Selecting packages: From my point of view the best way to select your packages is by first installing the base system. And when we are done and the system is booting standalone, add packages along the way as we need them. The installer will ask if you want to add the extra repository so you will be able to install everything at once. I would say the safe option here is not to include the extra repository and start with the base system. In general, it will be faster to install applications when you need them. After the installation, we should only check some automatically created configuration files just to make sure the installer created them correctly, and we will get a bootable system when rebooting after installing the boot loader. The more extensive configuration will be explained later on. If you want to change anything here during the installation procedure, I would suggest you skip forward to the Configuring your system recipe where the configuration is explained in depth.
- Installing boot loader: By the end of the recipe we'll have almost everything that we need. However, for our machine to be really usable, we'll have to install the boot loader as this piece of software will enable us to get into Arch Linux when we reboot.
Let's perform the following steps for preparing the installation media:
- Once we have downloaded the ISO image file, we must verify its integrity by also downloading the
md5sum.txtfile from thearchbootfolder. - We will verify the integrity by issuing the
md5sum -c md5sum.txtcommand and checking whether our download was successful: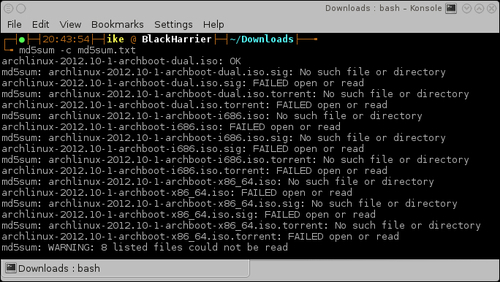
- As we can see, all the ISOs were downloaded but the torrent files were not. This leads to some successful checks and others state that the files are not found, but in the end we know the ISO file we downloaded is ok.
- Now that we are sure our ISO is ok, we can burn this to a CD with our favorite burning program.
The following steps will guide you in booting the install media and starting the installation:
- Insert the CD in the drive or insert the USB stick in the USB port of your PC.
- Enter the boot menu or let your computer automatically boot from the inserted installation media.
- If the previous steps went fine, we should see the following screenshot:
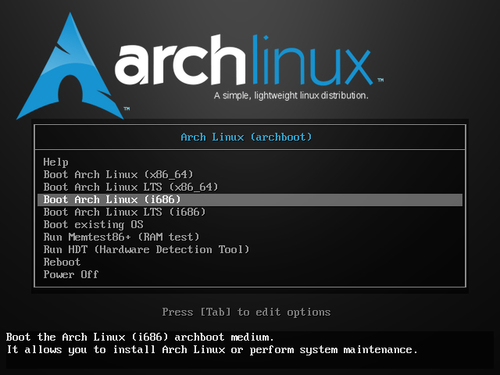
- Select the architecture depending on whether we want to boot the Long Term Supported (LTS) or the default kernel. The default kernel should be fine, but if we want to run the LTS kernel for stability reasons, we can select it. Press Enter and we'll be on our way.
- When the installation media is completely started, we get some initial information about the Archboot environment. When we press Enter, the installation scripts will be started:
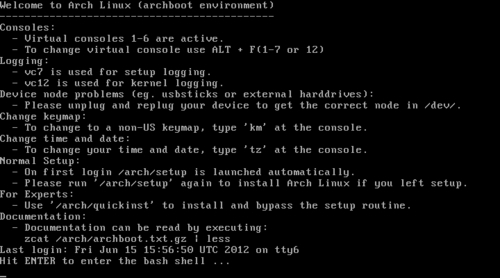
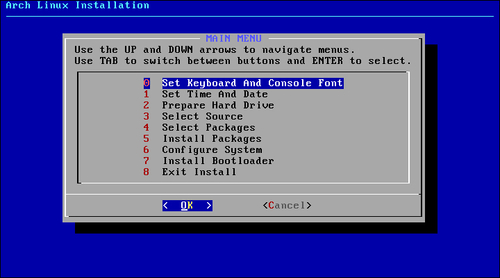
- When ready to go, press Enter and we will be presented with the MAIN MENU screen. The menu contains several steps that are followed in a chronological order for a fresh installation:
Let's perform the following steps to set keyboard and console font:
- We are presented with the keyboard layout choice, where you get a list with all the possible keyboard layouts that Arch Linux supports. Select your keyboard layout and continue.
- Optionally, you can also select a console font of your liking. If you have no idea or don't want to do this, just go back to the main installer menu and continue with the next step. If you have a preference, then select the Set Console Font option and select your font.
Let's set our time zone, the current time, and the current date:
- Select the time zone. This is something similar to Continent/Capital. For example, Europe/Brussels.
- Select UTC for your hardware clock. This will make sure the daylight saving changes will be applied correctly.
- Set your current system time. This is actually the time it is now in your time zone.
- Set your current system date.
The following steps should be performed for auto preparing the hard drive:
- First of all, you are presented with a choice of using the old MBR partition tables or the new GUID (GPT) partition tables. The choice is entirely yours; however, for older machines the safe choice is MBR. For newer machines and machines with UEFI bootups, it's recommended to use the GPT partition tables.
- Select the size you want to be used for the boot
(/boot) partition. - Select the size you want to be used for the swap
(/swap) partition. - Select the size you want to be used for the root
(/root) partition. - The remaining disk space will automatically be claimed for your home (
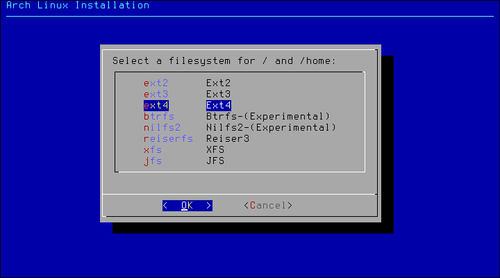
/home) partition where all the users' data will be residing. - Select the filesystem you want to be used for the root partition and for the home partition. The safest choice here is ext4. If you are an adventurous spirit, you could go with Btrfs or NILFS. Do your research before making a choice for using a currently marked experimental filesystem, if it really is the thing you want to use.
- Choose the naming system you want to be used in the configuration files.
- When we are completely sure everything is ok, we continue and the installer will prepare the entire drive. If all goes well, the installer will state that the preparation was successful.
The following steps should be performed for manually preparing the hard drive:
- Select the partition type (MBR or GPT). For extended information see step 1 performed for Auto preparing hard drive.
- Select a disk to partition.
- The installer presents you with cfdisk or cgdisk depending on whether you have selected to use MBR or GPT partitioning.
- After the partitions are created, we need to go back to the partitioning menu and use the Set Filesystem Mountpoints option.
- First you need to select what partition you will be using as swap.
- The installer will then ask you to select the root partition for your system.
- After these required partitions are selected, you can keep on selecting partitions and set their mount points to the location you want.
The following steps are needed to select your source:
- Select CD-ROM or FTP/HTTP.
- Configure your network.
- Select the mirror you want to use (this only has to be done when FTP/HTTP is selected).
The following steps are needed to select your packages:
- Don't enable the extra repository.
- Only select base; this contains all the packages needed to get a working system after the installation.
- Select the packages you want to install.
- Let the installation script do its job of installing the packages.
Finally, let's install the boot loader:
- Choose the boot loader you like the best.
The best known will be GRUB and Syslinux—those are probably also the best supported. There are also other boot loaders available such as LILO.
- The installer will suggest you check the configuration file it has created. In most cases this configuration will be correct, but you should always check if it is correct. See if the correct devices are used in the configuration file. You can verify the correct devices by checking your filesystem's layout.
- Install the boot loader.
Now that you have taken all the steps needed to install a basic working Arch Linux system on your computer, the only thing left in the installation procedure is to reboot your system and remove the installation media. Then you can enjoy the first boot of your freshly installed Arch Linux.
- Reboot the system.
We downloaded the Archboot ISO via the torrent files or directly using a web browser, and the md5sum command lets us verify the integrity of the downloaded ISO. So now, we can rest assured that the downloaded file is the real one.
The Archboot ISO contains a fully working operating system so first we boot that. We are automatically logged into the live system on pressing the Enter key. Next, the installation scripts are called and we get dropped in the Archboot installation scripts.
The installation scripts will call the correct application to set the keyboard layout and the console font, and the selected date and time settings. The installation scripts will also keep track of the selected values to put them in the appropriate configuration files.
If we have selected the Auto-Prepare option, then based on the configuration we have made, the installer will run fdisk and create the partition scheme that we want.
If we have chosen to do a manual partition of the disk, then we can select any layout we want. Once we are satisfied with the partition scheme, the installer will ask some questions (for example: Where to mount? What filesystem?), and uses our answers to mount the partitions we have made to the correct mount points. The installation scripts will also keep track of the answers given so that they can be used later on for the generation of a configuration file.
The installation script will show you a list of packages that pacman has made available for you to install. When you have selected all the packages you want on your system, the installation script will pass these packages with some extra parameters back to pacman, which will do the actual installing.
At the end of the installation, a list of configuration files will be prepared for you. These configuration files are there for you to review. When you are satisfied with the configuration file, save it. The installation script will now use the configuration file to put the selected boot loader into place.
When we want to divert from the default settings, we might need some extra knowledge. So let's discuss them one by one.
The ISOs downloaded from Arch Linux are all "hybrid" images, which means you can save them on a USB drive and they will be bootable. Installing from a USB drive is also very simple. Just connect a USB drive to your machine and issue the following command:
dd if=archlinux-2012.04-2-archboot-dual.iso of=/dev/sdX bs=1M
We need to make sure that we set the correct input file, our ISO, to the if parameter. Also the output file parameter must be the device and not some partition of the device, such as of=/dev/sdX. The X stands for the letter assigned by the system to your USB drive.
There are some rare cases where the choice for local time on your hardware clock is the best choice. For example, when installing Arch Linux next to Windows XP, which is an operating system not capable of handling a different time on a hardware clock and system clock. More recent versions of the Windows operating system can handle the hardware clock being set to UTC.
Partitioning is a very wide topic. It can be done in an endless number of combinations. We will now discuss some extra information required to understand the partitioning. Also some nice defaults to have a system up and running quickly.
The following list is a selection for normal desktop use. For people wanting to play a lot of games, these size selections will not fit your needs:
- Boot partition: 50 MB
- Swap partition:
- When your RAM is less than 4 GB: RAM + one third of RAM
- When your RAM is more than 4 GB: Fix it on 4 GB (there is actually no real need to make it bigger)
- Root partition: 10 GB (gamers might want to go to 50 GB here)
- Home partition: These days you'll end up having 300 to 400 GB and even more
When selecting which filesystem to use for your root and home partitions, you should be well informed about the possibilities of the filesystems. When you have no idea, the best choice is ext4 as this is the default filesystem these days with modern features, nice speed, and robustness, so you don't lose any data.
The boot partition will automatically be formatted with the ext2 filesystem. This is the safest choice, as all boot loaders you can find out there will be able to get your system to boot when you have a boot partition formatted as ext2.
There are three ways to point to a block device (partition):
- UUID scheme: This is a unique ID that we can use to point to a block device
- LABEL scheme: Here we can point to a partition by using its label
- KERNEL scheme: This is the oldest method used to point to a block device by directly pointing to the device node
Using the UUID scheme might look ugly in your configuration but this is the most certain way you will always point to the correct device. Say you have some hardware changes and the devices are ordered in a new way; with this you will still have the correct block device selected.
The LABEL scheme is looking very elegant and simple but there might be some name collisions as multiple physical disk partitions can have the same name.
The KERNEL scheme is actually the oldest and here we are just pointing to some device node (such as /dev/sda1), but this could fail someday after some hardware changes, which could lead to a different order of the device nodes.

On a desktop system, especially on Arch Linux, I suggest having a separate /var partition. Depending on the other goals you have for this partition (for example, running a huge MySQL database, other databases, and so on), the appropriate value would be 5 GB and up. Don't overdo it or you will have a lot of empty space in the /var partition. Why so big? Pacman keeps its cache in /var and you don't really want your root filesystem being deadlocked by a disk that's filled up with package cache.
When installing Arch Linux from the Internet, it is best to choose a mirror close to our home for the best download speeds:
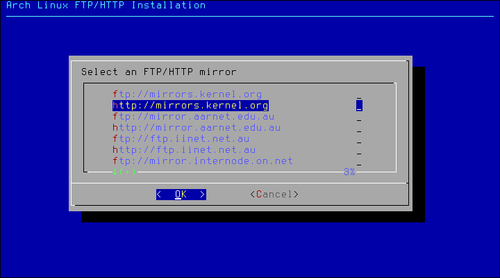
When your network is up and running, you can select a mirror and select one that is as close as possible to your location. We will get the best performance this way. Should you be in doubt what the closest mirror is for you, you can always select a global mirror such as mirrors.kernel.org, which will automatically choose a server close to you.
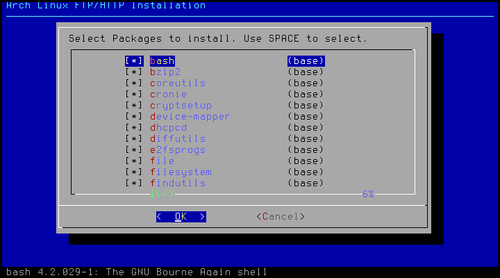
During the installation of Arch Linux, we can select a list of packages to install. I will now share my own preferred way. When this is a first time installation, my personal preference would be to leave all the packages selected from the base group. If you really insist on removing some packages from the base group, go ahead and remove them, but you should really know what you are doing in that case.
If this is not the first install of Arch Linux, you can definitely enable the use of the extra repository so that you can select a whole bunch of applications, which you know for sure you want to have installed on your system. For example, you can immediately install Xorg, GNOME, XFce, KDE, and so on. For a first time install, I would go step-by-step and leave the extra as it is for now.