Table of Contents for
Arch Linux Environment Setup How-to
 Arch Linux Environment Setup How-to
Published by
Packt Publishing, 2012
Arch Linux Environment Setup How-to
Published by
Packt Publishing, 2012
- Cover
- Table of Contents
- Arch Linux Environment Setup How-to
- Arch Linux Environment Setup How-to
- Credits
- About the Author
- About the Reviewers
- www.PacktPub.com
- Preface
- The Arch Way
- Bleeding edge
- What this book covers
- What you need for this book
- Who this book is for
- Conventions
- Reader feedback
- Customer support
- 1. Arch Linux Environment Setup How-to
- Installing Arch Linux using the Archboot ISO (Should know)
- Configuring your system (Should know)
- Installing and removing packages (Must know)
- Booting and managing services with systemd (Should know)
- Booting and managing services using initscripts (Should know)
- Configuring GUI using Xorg (Should know)
Welcome to Arch Linux Environment Setup How-to. Arch Linux is a very flexible distribution and this book will guide you to the point where you can get a basic system in place. From there on you can go in any direction you want. A simple server, a full-blown desktop system with all the bells and whistles. In the end, Arch Linux is always what you make of it.
These days the installation of Arch Linux might look like a work of insanity, as there is no installer available in the official media, just a guideline to follow. The installation without an installer is as easy as it can be. For experienced users, installing without an installer is even more convenient. The newest ISOs require that you have your machine connected to the Internet, as there are no longer packages available on the installation media.
You can get the official ISO image file from https://www.archlinux.org/download/. On this page you will find a download link to the latest release. Depending on your preference, download the torrent file or the ISO image file immediately.
The following list describes the main tasks that we will perform in this recipe:
- Preparing, booting, and setting keyboard layout: We are going to get the ISO file from the download page of the Arch Linux website and store it on the preferred media of our choice. At the time of writing this book, there is a dual ISO image file that contains both i686 and x86-64 architectures on one disk. Start your PC with your preferred installation media (CD or USB stick). On most PC systems, you can access the boot menu by pressing one of the function keys, usually between F8 and F12 depending on the motherboard manufacturer. On older machines where you do not yet have a boot menu, you might need to change the boot order in the BIOS where the CD-ROM (or DVD/Blu-ray) has to be chosen as the first device to try booting from. We'll also explain how to use a different keyboard layout than the default one in this recipe.
- Creating, formatting, and mounting partitions: You can partition the disks the way you want using cfdisk (for MBR disk partitioning) or cgdisk (for GUID disk partitioning). After creating the partitions, we can choose to format our created partitions with specific filesystems. When all partitions are formatted, we need to mount the partitions. First we will mount the root partition to
/mnt. The other partitions will be mounted later on after you have created the specific folders. We'll designate our device with/dev/sdX; in your case this can be/dev/sda, and so on. - Connecting to the Internet: To be able to continue installing the ISO you need to connect to the Internet, because there are no packages available for installation on the ISO. For a wireless network you will need to use netcfg. When connected to a wired network, just use dhcpcd or dhclient.
- Installing the base system and boot loader: These days the base system gets installed by running a simple script pacstrap. Pacstrap takes multiple parameters, the target location, and the packages or groups you want to install. For people who want to develop on their machines, the best
baseinstall is addingbase-develto the default installation. For normal end users, justbasewill be sufficient to start. - Configuring the system: In this recipe, we'll describe the flow of what to do during the configuration. For more extensive information on how to configure your system, refer to the Configuring your system recipe.
The following steps will guide you in preparing, booting, and setting keyboard layout:
- Once you have downloaded the ISO image file, you should also verify its integrity by downloading the
sha1sums.txtfile from the download page. - Verify the integrity by issuing the
sha1sum -c sha1sums.txtcommand and you'll see whether your download was successful or not. Also check if the signature of the ISO is correct by runninggpg -v archlinux-...iso.sig:sha1sum -c sha1sums.txt gpg -v archlinux-2012-08-04-dual.iso.sig
The following screenshot shows the execution of this step:
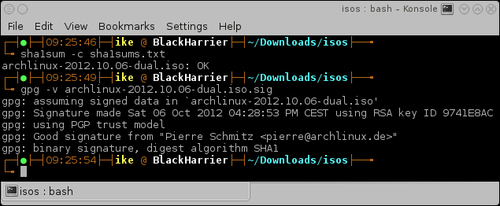
- As you can see in the previous screenshot, the ISO's checksum is ok and the signature is valid.
- Now that we are sure our ISO is ok, we can burn this to a CD with our favorite burning program.
- Insert the CD into the drive, or insert the USB stick into the USB port of your PC.
- Enter the boot menu, or let your computer automatically boot from the inserted installation media.
- If the previous steps are performed correctly, you will see the following screenshot:
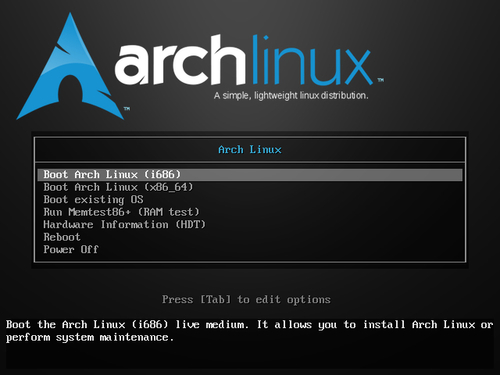
- Select the architecture you want and press Enter, and we'll be on our way.
- Search the keyboard layout desired for your region. The available keyboard layouts can be found at
/usr/share/kbd/keymaps/. - Set the desired keyboard layout with
loadkeys keyboardlayout.
Now let's perform the following steps to create, format, and mount partitions:
- Start cfdisk or cgdisk, having the first parameter as the device you want to partition:
cfdisk /dev/sdX
cgdisk /dev/sdX
- Create your partition scheme.
- Store the partition scheme.
- Use the
mkfscommand to create a filesystem on a specific partition:mkfs -t vfat /dev/sdX mkfs.ext4 -L root /dev/sdX
- Mount your root partition to
/mnt:mount /dev/sdX3 /mnt - Make directories under
mountfor your other partitions:mkdir -p /mnt/boot - Mount the other partitions:
mount /dev/sdX1 /mnt/boot
The following steps are needed to connect to the Internet:
- When we need a wireless network, create a netcfg profile and run
netcfg mywireless. - Use dhclient or dhcpcd to get an IP address.
The following steps should be performed for installing the base system and boot loader:
- Run pacstrap with the desired parameters:
pacstrap /mnt base base-devel - Install the desired boot loader: the best choice at this moment is Syslinux.
- The final installation of the boot loader will be done in a chroot during the initial configuration (discussed later in the book).
We'll now list the steps to do during the configuration:
- Generate
fstabwithgenfstab:genfstab -p /mnt >> /mnt/etc/fstab - Change the root into the system location:
arch-chroot /mnt - Set your hostname in
/etc/hostname. - Create
/etc/localtime symlink. - Set your locale in
/etc/locale.conf. - Uncomment the configured locale in
/etc/locale.gen. - Run
locale-gen. - Configure
/etc/mkinitcpio.conf. - Generate your initial ramdisk:
mkinitcpio -p linux - Finish installation of your boot loader.
- Set the root password with
passwd. - Leave the chroot environment (
exit).
We downloaded the ISO image file via torrent, or via HTTP from the mirror sites listed on the download page. The sha1sum command lets us verify the integrity of the downloaded ISO. On top of the checksum, we can also check the integrity by verifying the signature available for the ISO. So now, we can rest assured that the downloaded file is the real one. The ISO contains a fully working operating system. It also contains all the necessary tools to perform system recovery and installation.
The keyboard configuration set with loadkeys will make sure that the key you press on your keyboard will be translated to the correct letter on your screen. Using a different keyboard layout from the one on your physical keyboard might be confusing.
We then created a partition scheme on the selected disk with the appropriate tool (cfdisk or cgdisk). Make Filesystem (mkfs) is a unified frontend to create a filesystem. Using it we created our filesystem layout manually under /mnt by creating our default partition layout in our root, and mounting the specific partitions accordingly.
You can make a connection with your wireless network (if needed), and then use dhcpcd or dhclient to obtain an IP address that enables you to access the Internet.
Pacstrap will run pacman with a modified root location to install the desired packages into the newly created system.
For example, installing Syslinux:
pacstrap /mnt syslinux
The specific configuration files will ensure we don't have to do all those steps over and over again on every boot.
You can use the official ISO directly from the USB stick if you prefer. There might be some issues with the verification of the ISO. The next two sections discuss them and provide you with the solution.
The ISOs downloaded for Arch Linux are all 'hybrid' images, which means you can put them on a USB drive and they will be bootable. So installing from a USB drive is also very simple. Place a USB drive in your machine (warning: it will lose all its data) and issue the following command:
dd if=archlinux-2012.08.04-dual.iso of=/dev/sdX bs=1M
When you don't have the signer's public key in your gpg keyring you will get an error like gpg: Can't check signature: No public key. This means you will first have to import the signer's public key before verification of the signature is possible:
gpg --keyserver wwwkeys.pgp.net --recv-keys 0x9741E8AC
Import the public key, in this case the public key of Pierre Schmitz. Then you can run the verification of the ISO again. The verification should now give you gpg: Good signature from "Pierre Schmitz <pierre@archlinux.de>". When you have done the steps described here, you will get a warning that the key is not certified with a trusted signature. In the case of verifying the integrity of the ISO, this is of no importance. For more information about GPG and signatures, see http://www.gnupg.org/.
The next section talks about a common sample of a good desktop partition scheme.
On a desktop system, especially Arch Linux, I personally suggest having a separate /var partition. Depending on the other goals you might have for this partition (for example, running a huge MySQL database, other databases, and so on), a sensible value would be 5 GB and above. Don't overdo it or you will have a lot of empty space in the /var partition. Why make /var so big? Pacman keeps its cache in /var, and you don't really want your root filesystem being deadlocked by a filled up disk with package cache.
- Boot partition: 50 MB
- Swap partition:
- When your RAM is less than 4 GB: RAM + one third of RAM
- When your RAM is greater than 4 GB: Fix it on 4 GB (there is actually no real need to make it bigger)
- Root partition: 10 GB (gamers might want to go to 50 GB here)
- Var partition: 5 GB (if only used for cache) when having some data from databases stored on it; I would go up depending on the need
- Home partition: These days you'll end up having 300 to 400 GB and even more
The netcfg tool originally developed by Arch Linux provides us with tons of options, which we will discuss in the next section.
The sample configurations can be found in the /etc/network.d/examples folder. In the following table, we have given a list of sample configurations provided by the netcfg package:
|
Connection type |
Example profile |
|---|---|
|
Wireless/WEP hex key |
|
|
Wireless/WEP string key |
|
|
Wireless/WPA-Personal (passphrase/preshared key) |
|
|
Wireless/WPA-Enterprise |
|
|
Wired/DHCP |
|
|
Wired/static IP |
|
|
Wired/iproute configuration |
|
If you prefer the use of UUID or label in your fstab file, you can pass an extra parameter to the genfstab script: U for UUID or L for labels.
The final installation of Syslinux has to be done from within the chrooted environment.
/usr/sbin/syslinux-install_update -iam
Should the previous command fail while trying to set the boot flag, use the following command:
/usr/sbin/syslinux-install_update -im
After a successful installation of Syslinux, configure the way your system will boot by editing /boot/syslinux/syslinux.cfg.