Copyright © 2012 Packt Publishing
All rights reserved. No part of this book may be reproduced, stored in a retrieval system, or transmitted in any form or by any means, without the prior written permission of the publisher, except in the case of brief quotations embedded in critical articles or reviews.
Every effort has been made in the preparation of this book to ensure the accuracy of the information presented. However, the information contained in this book is sold without warranty, either express or implied. Neither the author, nor Packt Publishing, and its dealers and distributors will be held liable for any damages caused or alleged to be caused directly or indirectly by this book.
Packt Publishing has endeavored to provide trademark information about all of the companies and products mentioned in this book by the appropriate use of capitals. However, Packt Publishing cannot guarantee the accuracy of this information.
First published: November 2012
Production Reference: 1161112
Published by Packt Publishing Ltd.
Livery Place
35 Livery Street
Birmingham B3 2PB, UK.
ISBN 978-1-84951-972-4
Author
Ike Devolder
Reviewers
David Couzelis
Michael Driscoll
Acquisition Editor
Joanna Finchen
Commissioning Editors
Maria D'souza
Shreerang Deshpande
Technical Editor
Manmeet Singh Vasir
Copy Editor
Alfida Paiva
Project Coordinator
Shraddha Bagadia
Proofreaders
Maria Gould
Aaron Nash
Production Coordinator
Prachali Bhiwandkar
Cover Work
Prachali Bhiwandkar
Cover Image
Aditi Gajjar
Ike Devolder started playing around with Linux in 1999 and became a full-time Linux user in 2002. At that time his preferred distribution was Slackware, which he used for many years without complaints. In 2005 he rediscovered Arch Linux (he had already played around with it in the past) and started considering switching all his desktops from Slackware to Arch Linux. In 2006 it was done, with his laptop and desktop both running smoothly on Arch Linux, and since then he has gradually stopped being a distrohopper.
These days Ike is a Web Developer for Studio Emma in Belgium. He uses Arch Linux in his day job too.
David Couzelis is a professional Software Developer who fell in love with GNU/Linux over a decade ago. As a hobby he makes video games, and hopes to someday make one that's actually fun. He's also one of those free and open source software advocates, the type who teaches people about software freedoms even if they didn't ask.
Michael Driscoll has been programming in Python since spring 2006. He enjoys writing about Python on his blog at http://www.blog.pythonlibrary.org/. Mike also occasionally writes for the Python Software Foundation (PSF), IProgrammer, and Developer Zone. He enjoys photography and sitting down with a good book.
You might want to visit www.PacktPub.com for support files and downloads related to your book.
Did you know that Packt offers eBook versions of every book published, with PDF and ePub files available? You can upgrade to the eBook version at www.PacktPub.com and as a print book customer, you are entitled to a discount on the eBook copy. Get in touch with us at <service@packtpub.com> for more details.
At www.PacktPub.com, you can also read a collection of free technical articles, sign up for a range of free newsletters and receive exclusive discounts and offers on Packt books and eBooks.

Do you need instant solutions to your IT questions? PacktLib is Packt's online digital book library. Here, you can access, read and search across Packt's entire library of books.
If you have an account with Packt at www.PacktPub.com, you can use this to access PacktLib today and view nine entirely free books. Simply use your login credentials for immediate access.
I would like to dedicate this book to my daughter Moyra.
Arch Linux is an independently developed, general purpose GNU/Linux distribution, optimized for i686/x86-64 systems. The distribution is versatile enough to suit you in any role/need. It has been designed focusing on simplicity, code elegance, and "do-it-yourself" principles. The basic installation of Arch Linux is a very minimal base system. From the base system, everything can and will be configured by the user to suit their ideal environment, suited for their own unique purposes. The supported method of configuration is from the shell editing simple text files. Being a rolling-release distribution, there are no fixed releases. From time to time there are new install images provided by the Release Engineering Team, so that the installation media suits the new features introduced over time. Because of this rolling-release model, Arch Linux provides you with bleeding-edge software, typically the latest stable versions available. Pacman is the package manager of Arch Linux, which is designed to be an easy to use binary package manager.
Arch Linux was founded in 2002 by Judd Vinet who was inspired by the elegance and simplicity of some other Linux distributions such as Slackware, Polish Linux Distribution, and CRUX. But this simplicity came without a package manager, which was a big disappointment. Basically, to make his own life easier, Judd Vinet started Arch Linux with pacman as the package manager that can automatically handle the installation, upgrade, or removal of packages. Over the years Arch Linux kept on gaining more users, more developers, and has now been in the top 10 used distributions on DistroWatch for a pretty long time. Arch Linux is still being developed by volunteers and is not backed by some big company; the goal is to stay free in every sense of the word. In 2007 Judd Vinet passed the Project Lead to Aaron Griffin, who remains the Lead Arch Linux Developer to this day.
The Arch Linux philosophy, also described as "The Arch Way", is in general summarized as being KISS (keep it simple stupid). There are five core principles defined in this core: philosophy, simplicity, code-correctness over convenience, user-centric, openness, and freedom.
Simplicity is definitely the base objective for Arch development, with the idea that a lightweight base structure with high quality code will have lower system resource demands. The base system found in Arch Linux has no clutter that might hide parts of the system, or make it difficult to access parts of the system. All configuration files are simple, nicely documented, easy to read, and nicely arranged for quick editing. There are no special configuration tools that might hide possibilities from the user, which leads to a system configurable to the very last detail. The Arch Linux Developers believe that trying to hide the complexity of a system results in an even more complex system, and this should always be avoided.
Arch Linux defines simplicity as without unnecessary additions, modifications, or complications, and provides a lightweight UNIX-like base structure that allows an individual user to shape the system according to their own needs. In short: an elegant, minimalist approach.
Code-correctness over convenience implies clean, correct, simple code and not unneeded patching, automation, eye candy or "newbie-friendliness". Software patches are only introduced when needed. Packages found in Arch Linux are really the way the Developers created them, nothing more, nothing less.
Simplicity of implementation, code-elegance, and minimalism shall always remain the reigning priorities of Arch development.
Being user-centric means that the users fully manage the system on their own. The system will offer no, to little assistance. There is a simple set of maintenance tools that are simply relaying the commands given by the user. Arch Linux is founded on simple, sensible design, and excellent documentation. As a user, you need more of a "do-it-yourself" approach rather than asking the Developers to implement a new feature. Most Arch users have indeed the tendency to solve their problems and share them with the entire community, which also leads to a friendly and helpful community of developers and users.
Arch Linux targets and accommodates competent GNU/Linux users by giving them complete control and responsibility over the system.
Openness is also briefly touched upon in the just discussed principle, saying most Arch users share the solutions to the problems they have encountered. Also, the Arch Linux Developers strive for an open system, which goes hand in hand with simplicity. Openness is intended to make things simple. It also removes the abstraction of things, which might lead to a steeper learning curve, but in the end it leads to an easily controllable and maintainable system. More experienced Arch users find some of the helper tools provided by other distributions cumbersome, and things that are sitting in the way of easy and fast configuration. The Arch Linux community is also known to be very open and willing to give advice.
Arch Linux uses simple tools, that are selected or built with openness of the sources and their output in mind.
Freedom is probably one of the most important things you get when you start using a Linux-based operating system. This is where Arch Linux is one of the leading distributions where all configurations and decisions regarding the system are taken by the user. In the end, the user defines the system. Arch Linux is built in such a way that you can—if you really want to—rebuild the entire system. It even provides a simple tool to do so. The entire system and all of the components are 100 percent transparent, so you can replace everything with something else providing the same functionality. In addition to this, Arch Linux also provides the freedom to use exclusively open source software, but you can also without hassle use proprietary software packages.
By keeping the system simple, Arch Linux provides the freedom to make any choice about the system.
Ending with a final quote from Judd Vinet:
[Arch Linux] is what you make it.
Arch Linux strives to maintain and have the latest and greatest software available in its repositories. Being a rolling-release distribution, it allows a one-time install with continuous updates without ever having to reinstall or having to go to massive procedures for getting the system upgraded. The goal of bleeding edge is also to provide for the newest features popping up in the Linux world—be it in the field of filesystems (ext4, ReiserFS, XFS, JFS, Btrfs, NILFS, and so on), software RAID, or boot scripts (systemd)—along with supporting the latest features of the newest hardware because of the immediate availability of the newest kernels.
Installing Arch Linux using the official ISO (Should know), explains the procedure to get Arch Linux installed on your system using the official installation media.
Installing Arch Linux using the Archboot ISO (Should know), explains the procedure to get Arch Linux installed on your system using the Archboot installation media.
Configuring your system (Should know), explains where to set your hostname, load special modules, and have a different keyboard layout than QUERTY.
Installing and removing packages (Must know), explains how to use the package manager (pacman) for adding and removing packages.
Booting and managing services with systemd (Should know), explains configuring and managing how your system starts up and what services are being started automatically, but using systemd and not sysvinit.
Booting and managing services using initscripts (Should know), explains configuring and managing how your system starts up and what services are being started automatically using initscripts.
Configuring GUI using Xorg (Should know), briefly explains how to get your GUI up and running.
In general when reading this book, we assume you already have a basic knowledge of how to install and use a Linux distribution such as Ubutnu, openSUSE, Fedora, and so on.
Arch Linux in general aims at more experienced users and also users with a big "do-it-yourself" mentality.
In this book, you will find a number of styles of text that distinguish between different kinds of information. Here are some examples of these styles, and an explanation of their meaning.
Code words in text are shown as follows: "Add the nomodeset parameter to the kernel command line to make sure that the open source drivers will not kick in."
A block of code is set as follows:
Section "InputClass"
    Identifier "evdev keyboard catchall"
    MatchIsKeyboard "on"
    MatchDevicePath "/dev/input/event*"
    Driver "evdev"
    Option "XkbModel" "pc105"
    Option "XkbLayout" "be"
EndSection
When we wish to draw your attention to a particular part of a code block, the relevant lines or items are set in bold:
DAEMONS=(syslog-ng !network crond)Any command-line input or output is written as follows:
systemctl list-units --type=service
systemctl list-units -a --type=service
New terms and important words are shown in bold. Words that you see on the screen, in menus or dialog boxes for example, appear in the text like this: "The Auto-Prepare option will guide you with the creation for a default partition scheme."
Feedback from our readers is always welcome. Let us know what you think about this book—what you liked or may have disliked. Reader feedback is important for us to develop titles that you really get the most out of.
To send us general feedback, simply send an e-mail to <feedback@packtpub.com>, and mention the book title through the subject of your message.
If there is a topic that you have expertise in and you are interested in either writing or contributing to a book, see our author guide on www.packtpub.com/authors.
Now that you are the proud owner of a Packt book, we have a number of things to help you to get the most from your purchase.
Although we have taken every care to ensure the accuracy of our content, mistakes do happen. If you find a mistake in one of our books—maybe a mistake in the text or the code—we would be grateful if you would report this to us. By doing so, you can save other readers from frustration and help us improve subsequent versions of this book. If you find any errata, please report them by visiting http://www.packtpub.com/support, selecting your book, clicking on the errata submission form link, and entering the details of your errata. Once your errata are verified, your submission will be accepted and the errata will be uploaded to our website, or added to any list of existing errata, under the Errata section of that title.
Piracy of copyright material on the Internet is an ongoing problem across all media. At Packt, we take the protection of our copyright and licenses very seriously. If you come across any illegal copies of our works, in any form, on the Internet, please provide us with the location address or website name immediately so that we can pursue a remedy.
Please contact us at <copyright@packtpub.com> with a link to the suspected pirated material.
We appreciate your help in protecting our authors, and our ability to bring you valuable content.
You can contact us at <questions@packtpub.com> if you are having a problem with any aspect of the book, and we will do our best to address it.
Welcome to Arch Linux Environment Setup How-to. Arch Linux is a very flexible distribution and this book will guide you to the point where you can get a basic system in place. From there on you can go in any direction you want. A simple server, a full-blown desktop system with all the bells and whistles. In the end, Arch Linux is always what you make of it.
These days the installation of Arch Linux might look like a work of insanity, as there is no installer available in the official media, just a guideline to follow. The installation without an installer is as easy as it can be. For experienced users, installing without an installer is even more convenient. The newest ISOs require that you have your machine connected to the Internet, as there are no longer packages available on the installation media.
You can get the official ISO image file from https://www.archlinux.org/download/. On this page you will find a download link to the latest release. Depending on your preference, download the torrent file or the ISO image file immediately.
The following list describes the main tasks that we will perform in this recipe:
/mnt. The other partitions will be mounted later on after you have created the specific folders. We'll designate our device with /dev/sdX; in your case this can be /dev/sda, and so on.base install is adding base-devel to the default installation. For normal end users, just base will be sufficient to start.The following steps will guide you in preparing, booting, and setting keyboard layout:
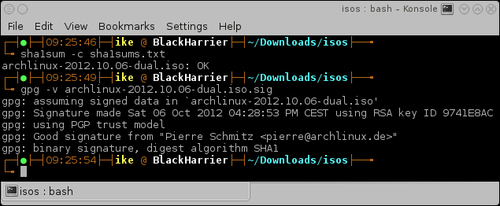
sha1sums.txt file from the download page.sha1sum -c sha1sums.txt command and you'll see whether your download was successful or not. Also check if the signature of the ISO is correct by running gpg -v archlinux-...iso.sig:sha1sum -c sha1sums.txt gpg -v archlinux-2012-08-04-dual.iso.sig
The following screenshot shows the execution of this step:
/usr/share/kbd/keymaps/.loadkeys keyboardlayout.Now let's perform the following steps to create, format, and mount partitions:
cfdisk /dev/sdX
cgdisk /dev/sdX
mkfs command to create a filesystem on a specific partition:mkfs -t vfat /dev/sdX mkfs.ext4 -L root /dev/sdX
/mnt:
mount /dev/sdX3 /mnt
mount for your other partitions:
mkdir -p /mnt/boot
mount /dev/sdX1 /mnt/boot
The following steps are needed to connect to the Internet:
netcfg mywireless.The following steps should be performed for installing the base system and boot loader:
pacstrap /mnt base base-devel
We'll now list the steps to do during the configuration:
fstab with genfstab:
genfstab -p /mnt >> /mnt/etc/fstab
arch-chroot /mnt
/etc/hostname./etc/localtime symlink./etc/locale.conf./etc/locale.gen.locale-gen./etc/mkinitcpio.conf.
mkinitcpio -p linux
passwd.exit).We downloaded the ISO image file via torrent, or via HTTP from the mirror sites listed on the download page. The sha1sum command lets us verify the integrity of the downloaded ISO. On top of the checksum, we can also check the integrity by verifying the signature available for the ISO. So now, we can rest assured that the downloaded file is the real one. The ISO contains a fully working operating system. It also contains all the necessary tools to perform system recovery and installation.
The keyboard configuration set with loadkeys will make sure that the key you press on your keyboard will be translated to the correct letter on your screen. Using a different keyboard layout from the one on your physical keyboard might be confusing.
We then created a partition scheme on the selected disk with the appropriate tool (cfdisk or cgdisk). Make Filesystem (mkfs) is a unified frontend to create a filesystem. Using it we created our filesystem layout manually under /mnt by creating our default partition layout in our root, and mounting the specific partitions accordingly.
You can make a connection with your wireless network (if needed), and then use dhcpcd or dhclient to obtain an IP address that enables you to access the Internet.
Pacstrap will run pacman with a modified root location to install the desired packages into the newly created system.
For example, installing Syslinux:
pacstrap /mnt syslinux
The specific configuration files will ensure we don't have to do all those steps over and over again on every boot.
You can use the official ISO directly from the USB stick if you prefer. There might be some issues with the verification of the ISO. The next two sections discuss them and provide you with the solution.
The ISOs downloaded for Arch Linux are all 'hybrid' images, which means you can put them on a USB drive and they will be bootable. So installing from a USB drive is also very simple. Place a USB drive in your machine (warning: it will lose all its data) and issue the following command:
dd if=archlinux-2012.08.04-dual.iso of=/dev/sdX bs=1M
When you don't have the signer's public key in your gpg keyring you will get an error like gpg: Can't check signature: No public key. This means you will first have to import the signer's public key before verification of the signature is possible:
gpg --keyserver wwwkeys.pgp.net --recv-keys 0x9741E8AC
Import the public key, in this case the public key of Pierre Schmitz. Then you can run the verification of the ISO again. The verification should now give you gpg: Good signature from "Pierre Schmitz <pierre@archlinux.de>". When you have done the steps described here, you will get a warning that the key is not certified with a trusted signature. In the case of verifying the integrity of the ISO, this is of no importance. For more information about GPG and signatures, see http://www.gnupg.org/.
The next section talks about a common sample of a good desktop partition scheme.
On a desktop system, especially Arch Linux, I personally suggest having a separate /var partition. Depending on the other goals you might have for this partition (for example, running a huge MySQL database, other databases, and so on), a sensible value would be 5 GB and above. Don't overdo it or you will have a lot of empty space in the /var partition. Why make /var so big? Pacman keeps its cache in /var, and you don't really want your root filesystem being deadlocked by a filled up disk with package cache.
The netcfg tool originally developed by Arch Linux provides us with tons of options, which we will discuss in the next section.
The sample configurations can be found in the /etc/network.d/examples folder. In the following table, we have given a list of sample configurations provided by the netcfg package:
|
Connection type |
Example profile |
|---|---|
|
Wireless/WEP hex key |
|
|
Wireless/WEP string key |
|
|
Wireless/WPA-Personal (passphrase/preshared key) |
|
|
Wireless/WPA-Enterprise |
|
|
Wired/DHCP |
|
|
Wired/static IP |
|
|
Wired/iproute configuration |
|
If you prefer the use of UUID or label in your fstab file, you can pass an extra parameter to the genfstab script: U for UUID or L for labels.
The final installation of Syslinux has to be done from within the chrooted environment.
/usr/sbin/syslinux-install_update -iam
Should the previous command fail while trying to set the boot flag, use the following command:
/usr/sbin/syslinux-install_update -im
After a successful installation of Syslinux, configure the way your system will boot by editing /boot/syslinux/syslinux.cfg.
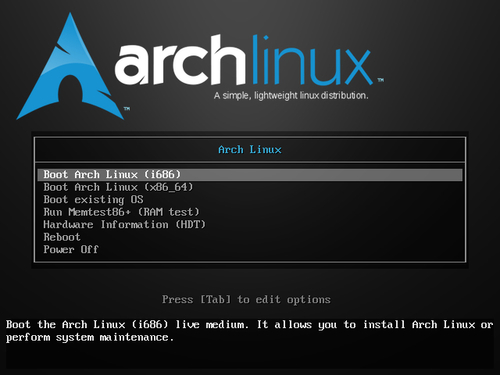
In this recipe we'll learn about the installation of Arch Linux. It might seem a little scary because of the manual installation process, but it is not difficult at all. The installation script will practically guide you all the way through the installation, and you can have a system capable of booting in even less than 10 minutes. In the Arch Linux ecosystem, the installation is something that is usually done once and then never again because of the rolling release of packages. Also see the Beginner's Guide at https://wiki.archlinux.org/index.php/Beginners'_Guide to get a grasp of what Arch Linux is all about. As Arch Linux is an ever moving target, the preferred method of installation is when you are connected to the Internet so you can fetch all the latest and greatest software available. Even before downloading, it is a must to read the latest news at http://www.archlinux.org/news/ about any new developments.
When we only want a taste of Arch Linux and are probably far from sure that this is what we want for all day use, consider learning how the system works by installing it in a virtual machine. In the Beginner's Guide there is a useful section about it at https://wiki.archlinux.org/index.php/Beginners'_Guide#Install_on_a_virtual_machine.
We can get the Archboot ISO from http://wiki.archlinux.org/index.php/Archboot. On this page we will find a download link to the latest release. We can select to download the torrent files or the ISO immediately.
The following list describes the main tasks that we will perform in this recipe:
Let's perform the following steps for preparing the installation media:
md5sum.txt file from the archboot folder.md5sum -c md5sum.txt command and checking whether our download was successful: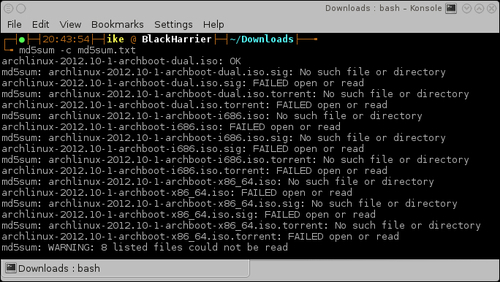
The following steps will guide you in booting the install media and starting the installation:
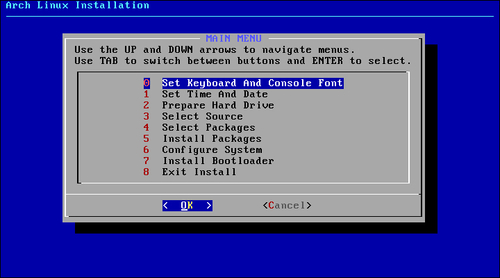
Let's perform the following steps to set keyboard and console font:
Let's set our time zone, the current time, and the current date:
The following steps should be performed for auto preparing the hard drive:
(/boot) partition.(/swap) partition.(/root) partition./home) partition where all the users' data will be residing.The following steps should be performed for manually preparing the hard drive:
The following steps are needed to select your source:
The following steps are needed to select your packages:
Finally, let's install the boot loader:
The best known will be GRUB and Syslinux—those are probably also the best supported. There are also other boot loaders available such as LILO.
Now that you have taken all the steps needed to install a basic working Arch Linux system on your computer, the only thing left in the installation procedure is to reboot your system and remove the installation media. Then you can enjoy the first boot of your freshly installed Arch Linux.
We downloaded the Archboot ISO via the torrent files or directly using a web browser, and the md5sum command lets us verify the integrity of the downloaded ISO. So now, we can rest assured that the downloaded file is the real one.
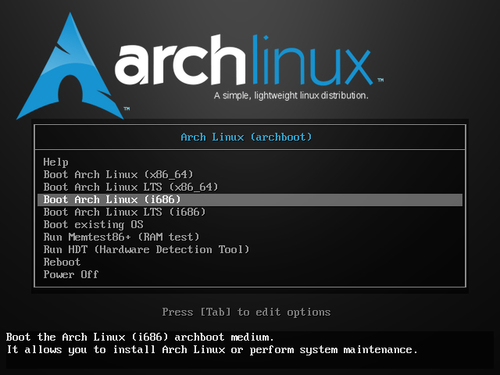
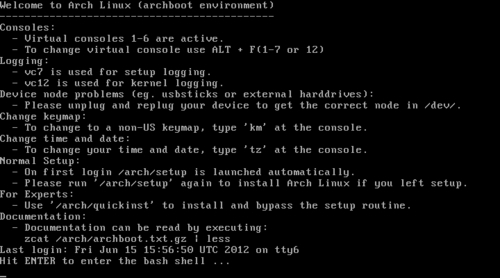
The Archboot ISO contains a fully working operating system so first we boot that. We are automatically logged into the live system on pressing the Enter key. Next, the installation scripts are called and we get dropped in the Archboot installation scripts.
The installation scripts will call the correct application to set the keyboard layout and the console font, and the selected date and time settings. The installation scripts will also keep track of the selected values to put them in the appropriate configuration files.
If we have selected the Auto-Prepare option, then based on the configuration we have made, the installer will run fdisk and create the partition scheme that we want.
If we have chosen to do a manual partition of the disk, then we can select any layout we want. Once we are satisfied with the partition scheme, the installer will ask some questions (for example: Where to mount? What filesystem?), and uses our answers to mount the partitions we have made to the correct mount points. The installation scripts will also keep track of the answers given so that they can be used later on for the generation of a configuration file.
The installation script will show you a list of packages that pacman has made available for you to install. When you have selected all the packages you want on your system, the installation script will pass these packages with some extra parameters back to pacman, which will do the actual installing.
At the end of the installation, a list of configuration files will be prepared for you. These configuration files are there for you to review. When you are satisfied with the configuration file, save it. The installation script will now use the configuration file to put the selected boot loader into place.
When we want to divert from the default settings, we might need some extra knowledge. So let's discuss them one by one.
The ISOs downloaded from Arch Linux are all "hybrid" images, which means you can save them on a USB drive and they will be bootable. Installing from a USB drive is also very simple. Just connect a USB drive to your machine and issue the following command:
dd if=archlinux-2012.04-2-archboot-dual.iso of=/dev/sdX bs=1M
We need to make sure that we set the correct input file, our ISO, to the if parameter. Also the output file parameter must be the device and not some partition of the device, such as of=/dev/sdX. The X stands for the letter assigned by the system to your USB drive.
There are some rare cases where the choice for local time on your hardware clock is the best choice. For example, when installing Arch Linux next to Windows XP, which is an operating system not capable of handling a different time on a hardware clock and system clock. More recent versions of the Windows operating system can handle the hardware clock being set to UTC.
Partitioning is a very wide topic. It can be done in an endless number of combinations. We will now discuss some extra information required to understand the partitioning. Also some nice defaults to have a system up and running quickly.
The following list is a selection for normal desktop use. For people wanting to play a lot of games, these size selections will not fit your needs:
When selecting which filesystem to use for your root and home partitions, you should be well informed about the possibilities of the filesystems. When you have no idea, the best choice is ext4 as this is the default filesystem these days with modern features, nice speed, and robustness, so you don't lose any data.
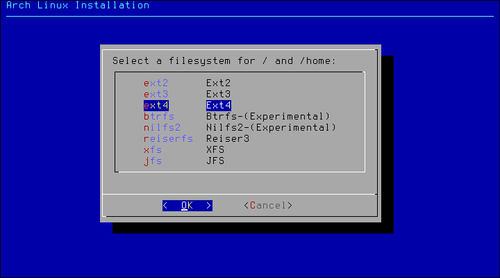
The boot partition will automatically be formatted with the ext2 filesystem. This is the safest choice, as all boot loaders you can find out there will be able to get your system to boot when you have a boot partition formatted as ext2.
There are three ways to point to a block device (partition):
Using the UUID scheme might look ugly in your configuration but this is the most certain way you will always point to the correct device. Say you have some hardware changes and the devices are ordered in a new way; with this you will still have the correct block device selected.
The LABEL scheme is looking very elegant and simple but there might be some name collisions as multiple physical disk partitions can have the same name.
The KERNEL scheme is actually the oldest and here we are just pointing to some device node (such as /dev/sda1), but this could fail someday after some hardware changes, which could lead to a different order of the device nodes.

On a desktop system, especially on Arch Linux, I suggest having a separate /var partition. Depending on the other goals you have for this partition (for example, running a huge MySQL database, other databases, and so on), the appropriate value would be 5 GB and up. Don't overdo it or you will have a lot of empty space in the /var partition. Why so big? Pacman keeps its cache in /var and you don't really want your root filesystem being deadlocked by a disk that's filled up with package cache.
When installing Arch Linux from the Internet, it is best to choose a mirror close to our home for the best download speeds:
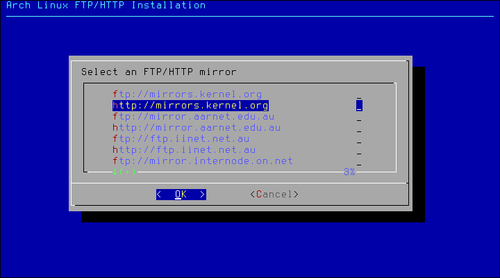
When your network is up and running, you can select a mirror and select one that is as close as possible to your location. We will get the best performance this way. Should you be in doubt what the closest mirror is for you, you can always select a global mirror such as mirrors.kernel.org, which will automatically choose a server close to you.
During the installation of Arch Linux, we can select a list of packages to install. I will now share my own preferred way. When this is a first time installation, my personal preference would be to leave all the packages selected from the base group. If you really insist on removing some packages from the base group, go ahead and remove them, but you should really know what you are doing in that case.
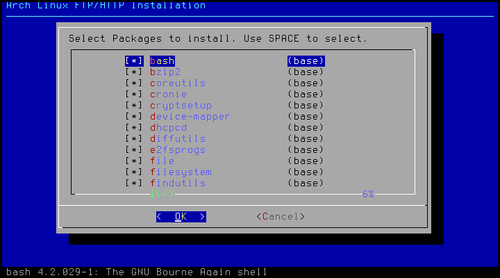
If this is not the first install of Arch Linux, you can definitely enable the use of the extra repository so that you can select a whole bunch of applications, which you know for sure you want to have installed on your system. For example, you can immediately install Xorg, GNOME, XFce, KDE, and so on. For a first time install, I would go step-by-step and leave the extra as it is for now.
In this recipe we'll explain the configuration files used to identify your system. Usually, these files only need to be configured once and stay the same for the entire life of the system.
The following list describes the main tasks that we will perform in this recipe:
locale.conf file. In the most common cases, we only set LANG and LC_COLLATE in this file. If you want to narrow it down, you can get more information by typing man locale.conf. However, LC_COLLATE is the fallback when everything else fails./etc/localtime. Actually, they have to be changed together so for your own safety change the /etc/localtime symlink, and then immediately add the new time zone to /etc/timezone./etc/modules-load.d/with a list of modules. The modules have to be separated by newlines. When you want to add some comments in those files, you can do that by starting your line with # or ;. The files placed in the directory only need one extra requirement; the name has to end with *.conf.The following step configures the hostname:
vim /etc/hostname to configure it.Let's list the steps required to configure the console:
/etc/vconsole.conf.KEYMAP=us FONT=lat9w-16 FONT_MAP=8859-1_to_uni
Let's list the steps required to configure the localization:
/etc/locale.gen.locale.gen file, run locale-gen./etc/locale.conf:LANG=en_US.UTF-8 LC_COLLATE=C
Let's list the steps required to configure the time zone:
/etc/localtime pointing to your time zone:
ln -s /usr/share/zoneinfo/Europe/Brussels /etc/localtimevim /etc/timezone
/etc/timezone.Let's list the steps required to configure modules:
On boot, the system will read the content of the /etc/hostname file. This content will be used to identify the system to us as the user, and also to identify the machine in a network. The hostname is mostly for user convenience because it's much easier to remember than a big list of numbers.
The terminal will allow you to type on your localized keyboard. The output on your screen will correspond with the button pressed on your keyboard. Also, the terminal will show you the text output in the selected font. Lastly, it will do a translation of text encoding where needed. In the example shown in the steps to configure the console, the output will be translated from ISO-8859-1 to Unicode.
All applications supporting the localization will bring you their output in American English, if LANG=en_US. When the application does not have the selected language, it will fall back to the "C language". The C language is the default language in computer systems, so this will also be in English.
The time shown on your system will be the one from your time zone. When you are in a time zone where you have daylight saving changes, your PC will automatically adjust to it.
All files residing in /etc/modules-load.d/ ending with *.conf will be used to load extra modules. All *.conf files residing in /etc/modprobe.d/ will be used to determine if the modules must be blacklisted, or used with some special options.
Let's look at some tips and tricks for easier configuration of your desired keymap and console font and also, an easy way to find the available time zones.
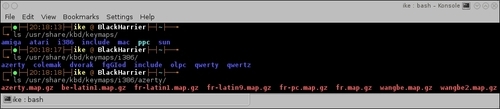
We can get a list of all the available keyboard layout mappings by listing the folder /usr/share/kbd/keymaps. From the following screenshot, we can see we have found the Belgian layout so we can add KEYMAP=be-latin1 to our configuration file:
We can find a list of all the available fonts for the console by listing /usr/share/kbd/consolefonts. When we find the desired font, we can add this to our configuration file. For example, CONSOLEFONT=Lat2-Terminus16.psfu.gz.
To get a list of possible transformations, we can take a list of /usr/share/kbd/consoletrans. Optionally, we can add this to our configuration file, but this is not always needed. For example, CONSOLEMAP=8859-1_to_uni.
In this recipe we will see how package management in Arch Linux revolves around pacman. Pacman is just short for package manager, and not a joke that package management is a game. The complete guide to pacman can be found on the wiki at https://wiki.archlinux.org/index.php/Pacman. Arch Linux has three official repositories: [core], [extra], and [community]. Both [core] and [extra] are maintained by the Arch Linux Developers, while the [community] repository is maintained by the Trusted Users. There are also a lot of unofficial repositories maintained by the Arch Linux enthusiasts, which install specific types of software not found in the official repositories, thereby making your life much easier. The list of unofficial repositories can be found at https://wiki.archlinux.org/index.php/Unofficial_User_Repositories.
Arch Linux is using a complete open model, which means every piece of software provided in the official repositories can be rebuilt by the user. This is what we call the Arch Build System or ABS. Arch Linux also gives the users a very easy way to share buildscripts for other software not found in the repositories by means of the Arch User Repository or AUR. And finally, there is also a nice list of commonly used software on the wiki at https://wiki.archlinux.org/index.php/Common_Applications. This list might help you find the ultimate application to fit your needs.
The following list describes the main tasks that we will perform in this recipe:
/etc/pacman.conf. Secondly, you also have /etc/pacman.d/mirrorlist installed on your system by default, which contains the selected mirror used during the installation. The mirrorlist contains all the official mirrors of Arch Linux. The default configuration that you get after the installation works perfectly fine. You can find all the information related to pacman on the wiki page at https://wiki.archlinux.org/index.php/Pacman.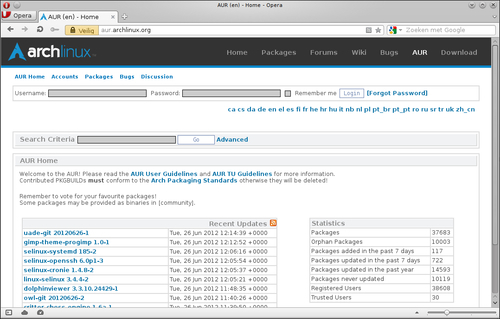
PKGBUILD.Let's list the steps required to configure pacman:
/etc/pacman.conf to modify options or add/remove some repositories./etc/pacman.d/mirrorlist to change or add a mirror with the official repositories in it.pacman -Syu as root for the full system upgrade.pacman -S somepackage as root.pacman -Ss somepackage for searching packages in the repositories.pacman -U somepackage.pkg.tar.xz as root in a terminal for installing a package from disk.pacman -R somepackage for removing a package.pacman -Sc as root and answer the questions.Let's list the steps required to configure official and unofficial repositories:
/etc/pacman.conf.Let's list the steps required to use the ABS:
pacman -Syu base-devel abs
/etc/abs.conf.abs scripts. You must run abs as root.Let's list the steps required to use the AUR:
pacman -Syu base-devel
Let's list the steps required to use makepkg:
PKGBUILD).makepkg.The options set in pacman.conf will determine the behavior of pacman. These vary from ignoring packages or groups, from updates to extra repositories. What we have defined in the mirrorlist will determine where our packages come from (from which server).
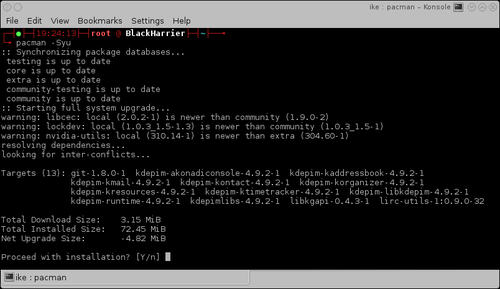
The full system upgrade command will synchronize your local package databases with the remote ones, and depending on the packages you have installed it will ask you if you want to continue with the installation of some upgraded packages.
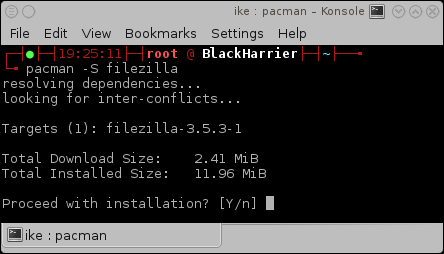
The pacman -S somepackage command will look for the package name or group you have passed, and if it exists, it will continue to try and install it.
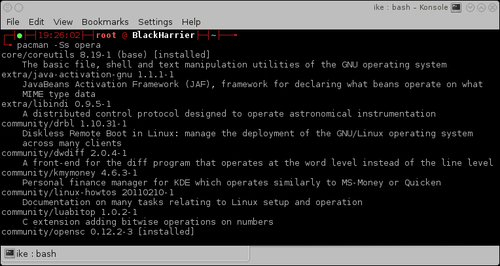
On executing the pacman -Ss somepackage command, pacman will search in the locally synced databases if the package we are looking for is available somewhere. If that is the case, we will see what version is available for us to install.
On executing the pacman -U somepackage.pkg.tar.xz command, pacman will check the dependencies of the package and try to install these alongside the package you want to install. When all goes well, it will install the package inside the tarball on the correct location.
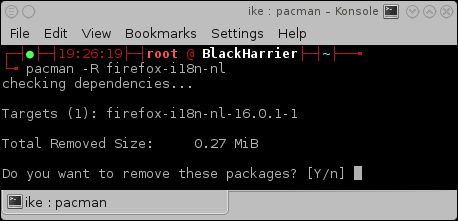
The package will be removed from the system on executing the pacman -R somepackage command. The only thing left of the package will be an entry in the cache.
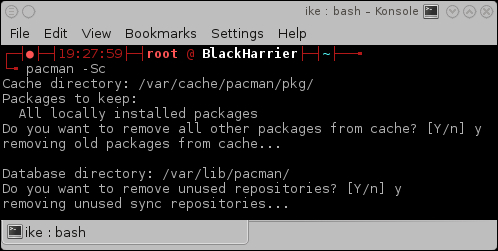
On executing the pacman -Sc command, pacman will look for old package files and ask you if you want those to be removed from the filesystem.
Pacman uses pacman.conf for the options and the repositories. All enabled repositories will be used for package installation now. Should we have some configuration mismatches, pacman will notify us.
Abs will use rsync to synchronize the buildscripts used in the official repositories to your local computer. This will facilitate you, for example, to build an officially supported package with other options enabled or disabled.
The AUR is actually just a website with a collection of user contributed buildscripts. If your favorite application is already available there, you can benefit from the work that someone else has already done. It is also very easy to contribute improvements via comments.
Makepkg will read the information described in the PKGBUILD file to get the package built correctly, and have it in the correct format for pacman to install it on your system.

The pacman.conf file has sections defined by [section]. These sections can have some options defined inside them. There is one special section called [options] where the global options can be configured for pacman. The other sections are the repositories defined by default or the user. In regards to the repositories, the order of the declaration is important. The repository nearest to the top of the file will take precedence, in descending order. This is of great importance for repositories that provide packages with the same name. The order is also important so as to understand why [testing] must be defined above [core]. Generally the pacman.conf file is very well documented by means of comments that explain the options provided, but here we'll try to explain them in depth.
The mirrorlist is a file with all official Arch Linux mirrors listed. Let's find a mirror closer to home so we can get the best download speeds. We can define more than one server here. Note that this will not give us the packages from the most up-to-date server, but when the first in the list is unreachable then the second can be used, so we are still able to update our system.
The pacman.conf options can be found at https://www.archlinux.org/pacman/pacman.conf.5.html. By default, everything should be working out of the box. The default should also be sufficient for new users.
The following is a sample of the [core] repository. We can see that signature checking is required for the packages, and we use the mirrorlist for the configured servers.
[core]
SigLevel = PackageRequired
Include = /etc/pacman.d/mirrorlist
The following sample will use the default SigLevel defined in the [options] section, and when used, it will first try to use FTP, and when this is not available it will fall back to HTTP:
[otherrepository]
Server = ftp://10.0.0.1/$repo/$arch
Server = http://10.0.0.1/$repo/$arch
In the following sample, we have a local repository where you can see all possible URLs that can be used to fill in the Server option:
[somelocalrepository]
Server = file:///home/packages/$repo/$arch
By default, the official repositories are listed in pacman.conf. Not all of them are enabled by default. There is also a nice list of unofficial repositories where you can find some very high quality software.
For complete information about the official repositories and in what cases you should enable or disable them, check out https://wiki.archlinux.org/index.php/The_Arch_Linux_Repositories.
Due to the fact that it is easy to set up your own repository, there are a lot of users who are building a set of specific packages and providing them as unofficial repositories for everyone. The complete list of unofficial repositories can be found on https://wiki.archlinux.org/index.php/Unofficial_User_Repositories.
By using the ABS, we as users get a great deal of flexibility over our system. For first time users of ABS, you would want to check the ABS wiki page at https://wiki.archlinux.org/index.php/ABS. For a simplified introduction, you can also refer to https://wiki.archlinux.org/index.php/ABS_FAQ.
Systemd provides us with a more modern approach of booting. It also benefits from the modern multicore processors and relies on very aggressive parallelization to get the job done very quickly. Arch Linux provides systemd by default. Systemd uses "the so-called service files" to define how and when a certain service or "a so-called daemon" has to be started.
The following list describes the main tasks that we will perform in this recipe:
systemctl command, we can start and stop services on demand.Let's list the steps required to install systemd:
pacman -S systemd systemd-arch-units.init=/bin/systemd to your kernel command line by editing /boot/syslinux/syslinux.cfg:APPEND initrd=/initramfs-linux.img root=/dev/sda2rootfstype=ext4 ro init=/bin/systemd
Let's list the steps required to set the default target:
systemctl enable graphical.target
systemctl enable multi-user.target
systemctl start service
systemctl enable service
We need the systemd-arch-units package, because not all packages providing services are providing the service files needed to be able to use them with systemd. Due to the fact that we added init=/bin/systemd to the kernel command line, the system will use systemd for startup.
These days only two targets can be set automatically as the default target, as only graphical.target and multi-user.target provide the default target installation.
In the systemctl start service command, service is actually the name of a file. For example, NetworkManager has a systemd service file called NetworkManager.service, and it is this full name we need to pass to the systemctl command. For example:
systemctl start NetworkManager.service
To be able to know what services to start during boot time, systemctl will create symlinks to the specific service files in the correct locations where systemd will search them during boot.
Once we are satisfied with systemd booting our system, we can eventually fine-tune it a little more.
The following command will provide symlinks for initscripts' compatibility:
pacman -S systemd-sysvcompat
The result is that you can omit the extra parameter init=/bin/systemd on your kernel command line.
We can easily change the desired target by changing the kernel command line in our boot loader configuration. This makes it easy to test if some specific target suits our needs.
Similar to the appending of a number to the kernel command line when using initscripts, we can also do this for systemd using the systemd.unit parameter.
For example, considering Syslinux as the boot loader, open /boot/syslinux/syslinux.cfg and add systemd.unit=multi-user.target to the kernel command line:
APPEND initrd=/initramfs-linux.img root=/dev/sda2 rootfstype=ext4ro systemd.unit=multi-user.target
The previous example is valid for a system with only systemd, otherwise we also would require init=/bin/systemd.
We might want to know what services we have available on our system, and of course we want to know what we can do with those services.
We can list all the used services or choose the list all the available services by running the following commands:
systemctl list-units --type=service
systemctl list-units -a --type=service
By default systemd supports actions such as start, stop, restart, reload, and status. There are more actions available, which can be found by issuing man systemctl.
Before enabling a service, we might want to check if the service is not already enabled. We can check if a service is already enabled for startup during the boot process by using the is-enabled action:
systemctl is-enabled service
In this recipe we will learn about initscripts. Initscripts is a collection of scripts that make sure your computer starts up fine. It also provides the necessary functions and tools to manage services on your system. Initscripts' services are often referred to as daemons (https://wiki.archlinux.org/index.php/Daemon). These days, booting using initscripts can still be used in conjunction with systemd, but over time the use of initscripts will be discouraged and phased out. Systemd is a daemon that controls the startup of your system and also manages the services running on them. The initscripts are written in Bash, so they are easy to read and modify when needed. Extended information about the boot process of Arch Linux can be found at https://wiki.archlinux.org/index.php/Arch_Boot_Process.
The following list describes the main tasks that we will perform in this recipe:
3. This is the multiuser runlevel without starting X.rc.conf file within the DAEMONS array.The following step changes the runlevel:
telinit runlevel to change the runlevel, where runlevel is a number from 0 to 6.Let's list the steps required to set the default runlevel:
/etc/inittab.id:3:initdefault:. Here you will already see that the default selected runlevel is 3.telinit q.
/etc/rc.d/somedaemon start
Let's list the steps required to automatically start a service (daemon):
The telinit command will change the runlevel and depending on what number you switch to, some running applications and daemons might get stopped or just get started.
The default selected runlevel set in the inittab file determines what scripts will be used during the startup of your PC. This is also the reason why you always need to check if the configuration is correct by running telinit q, because if the inittab file is corrupted somehow your system will become unbootable.
The Bash script sitting in the /etc/rc.d/ folder will be executable. It will by default also provide three actions: start, stop, and restart.
During startup, the initscripts will read the DAEMONS array defined in the rc.conf file, and in the order they are defined all the daemons will be started during boot.
Now let's talk about some general information that is relevant to this recipe.
The runlevels are just numbers, but for us humans it is easier to remember sentences. So we do some matching of an action versus the runlevel number.
The following list defines each runlevel number:
0: Poweroff1: Single-user mode (rescue mode)2 and 4: These are user defined, but as on any other system they are the same as 3 by default3: Multi-user mode; users can log in via a terminal or network5: Multi-user graphical mode; this is runlevel 3 + X (some display manager)6: Rebootemergency: Emergency shell (you will encounter this during boot failures)The modification of the /etc/inittab file can lead to an unbootable system. So there are other ways to configure the default runlevel.
We can set the default runlevel we want in the kernel command line configured in our boot loader configuration file. This will allow us to safely switch runlevels.
Lets perform the following step to set the default runlevel via the boot loader (Syslinux in this example):
/boot/syslinux/syslinux.cfg.APPEND initrd=/initramfs-linux.img root=/dev/sda2rooftfstype=ext4 ro 5
We have set the default runlevel to 5 (graphical mode).
Arch Linux provides a helper application that makes it easy to start multiple daemons in one command.
The scripts that facilitate the starting of the daemons usually provide three actions by default:
start: Starts the daemonstop: Stops the daemonrestart: Restarts the daemonAnother common action is reload, which facilitates the running daemon to actually reload its configuration without really stopping.
Arch Linux provides a helper that can start and stop multiple services in one command. The helper comes with a nice man page, which you can read by issuing man rc.d.
rc.d action daemon1 daemon2 ...
The actions you can provide to rc.d are the same that you can pass to the scripts directly. So if a script provides the reload action, rc.d can use it.
Now, the default way of starting the daemons is sequential. The first has to be started correctly before the next can be started. We can improve our boot time by configuring the DAEMONS array a little differently.
If we want some service to be started in parallel with the one's following it, you can add @ in front of the entry in the DAEMONS array:
DAEMONS=(syslog-ng network @crond)We can also leave a service in the DAEMONS array but still disable it from automatically being started. For this we need to add ! in front of the service:
DAEMONS=(syslog-ng !network crond)In this recipe we will learn how to configure GUI using Xorg. When we want to use our system as a desktop system, we will need Xorg one way or the other. These days Xorg is the de facto standard for displaying and using graphical interfaces on Linux-based systems. Also for most single-screen setups, you don't need to configure anything. Multi-screen setups and setups with proprietary drivers are the exceptions to this rule. Some distributions provide you with tools to install the correct video driver; Arch Linux does not. So, eventually we will need to find out which driver to install. In relation to the keyboard, mouse, and a lot of other input devices, Xorg can find them mostly automatically. In some cases the input devices need an additional Xorg driver installed.
The following list describes the main tasks that we will perform in this recipe:
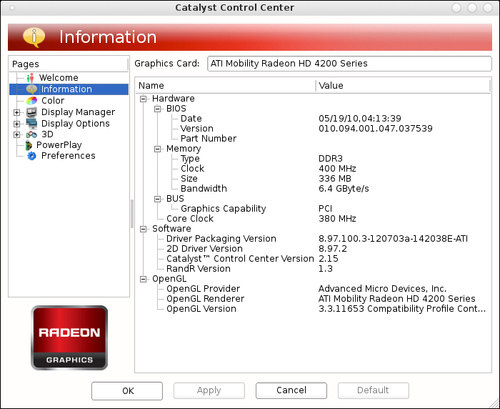
https://wiki.archlinux.org/index.php/ATI_Catalyst
On this page we find a whole bunch of information needed to get the Catalyst drivers working nicely on your hardware.
pacman -S xorg-server
Let's change the keyboard layout now:
setxkbmap command followed by the desired keyboard layout:
setxkbmap be
pacman -S xf86-input-synaptics
Let's list the steps required to install video drivers:
pacman -Ss xf86-video
pacman -S xf86-video-driver
Let's list the steps required to use the proprietary NVIDIA drivers:
pacman -S nvidia nvidia-utils
/etc/X11/xorg.conf.d/20-nvidia.conf.Let's list the steps required to use the proprietary AMD drivers:
pacman -S catalyst-dkms catalyst-utils
nomodeset parameter to the kernel command line to make sure that the open source drivers will not kick in:APPEND initrd=/initramfs-linux.img root=/dev/sda3rootfstype=btrfs ro vga=773 nomodeset
/etc/X11/xorg.conf.d/20-catalyst.conf so that Xorg knows it has to use the proprietary driver.Section "Device" Identifier "aticard" Driver "fglrx" EndSection
Pacman will download and install the xorg-server package and its minimally needed dependencies.
The setxkbmap command will change the selected keyboard layout. For example, we had a US layout by default, and after running setxkbmap be it will be the Belgian AZERTY layout.
The specific drivers get installed to your system by pacman, which will provide Xorg with the means to understand the input from a touchpad and handle it correctly.
The NVIDIA driver should be automatically detected by Xorg, but to be sure you can add a file to /etc/X11/xorg.conf.d/, such as /etc/X11/xorg.conf.d/20-nvidia.conf:
Section "Device"
  Identifier  "NVIDIAcard"
  Driver      "nvidia"
EndSection
You could when needed have a default configuration created by issuing the following command:
nvidia-xconfig
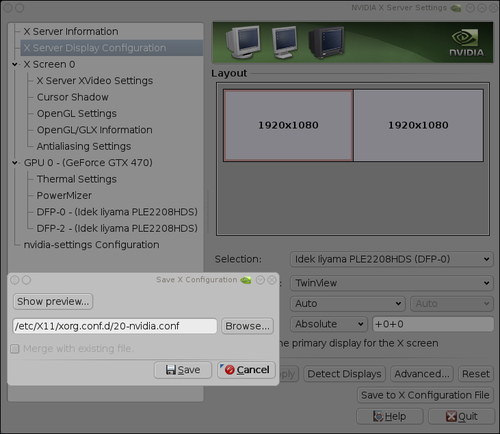
When having two connected screens, you can also autogenerate a twinview default configuration:
nvidia-xconfig –twinview
When we are using the AMD proprietary drivers, setting the nomodeset parameter makes sure that the built-in kernel drivers don't start to conflict with the proprietary driver. The Xorg configuration file will make sure that Xorg will start without errors. Although not entirely necessary, we make sure that Xorg uses the driver and serves us well.
We can opt to use our graphical environment directly, which will imply the installation of xorg-xinit, or we could use our Xorg environment with a display manager. A display manager is a graphical login screen so we can use Xorg all the way.
In order to start Xorg directly from the terminal, we first need to install the xorg-xinit package to facilitate this:
pacman -S xorg-xinit
Then the startx command will get us into the X server. When using this directly without configuration, X will not start as we will have some missing applications requested by the default configuration. So let's go forward and install:
pacman -S xorg-twm xorg-xclock xterm
For our own convenience it's best to install a window manager (WM) or a desktop environment. For a complete list of window managers go to https://wiki.archlinux.org/index.php/Window_manager. And for a full list of desktop environments go to https://wiki.archlinux.org/index.php/Desktop_Environment.
In this section we'll install Xfce (https://wiki.archlinux.org/index.php/Xfce):
pacman -S xfce
Pacman will ask if we want to install all the packages from the Xfce group. We say yes as this is most convenient.
As Xfce is installed now, we can issue startxfce4 from a started Xorg session or modify our ~/.xinitrc. In the .xinitrc file we can uncomment the line # exec startxfce4 and save the file. When logged in, we can now issue startx and enjoy the Xfce desktop environment.
For desktop users this is the common usage as they need a graphical login screen and continue from there to the desired desktop environment or window manager. There are several display managers available in Arch Linux. In this section we'll only describe LXDM, which is a fairly simple display manager. For a list of other display managers available for Arch Linux you can read https://wiki.archlinux.org/index.php/Display_Manager.
To install LXDM we issue pacman with the following command:
pacman -S lxdm
When using initscripts, we can add LXDM at the end of our DAEMONS array. When we are using systemd, we can issue systemctl enable lxdm.service to enable the startup of LXDM on boot. When we have rebooted, the LXDM display manager shows up and we can select, for example, Xfce Session from the Desktop Session drop-down list.
As we want our keyboard and mouse automatically configured every time our computer starts, we can set the keyboard layout in a configuration file, so we don't have to run setxkbmap every time we come into Xorg. We already have xf86-input-evdev installed, so we can put our keyboard settings in the same file 10-evdev.conf, such as /etc/X11/xorg.conf.d/10-evdev.conf (only the keyboard section):
Section "InputClass"
    Identifier "evdev keyboard catchall"
    MatchIsKeyboard "on"
    MatchDevicePath "/dev/input/event*"
    Driver "evdev"
    Option "XkbModel" "pc105"
    Option "XkbLayout" "be"
EndSection
The highlighted parts are added and do the following:
XkbModel: What keyboard model are we using? In our example, pc105.XkbLayout: What keyboard layout are we using? In our example, be (Belgian AZERTY).We can find all the possible models, layouts, and options in /usr/share/X11/xkb/rules/evdev.lst.
By default we have limited support for our graphics card. To enhance our Xorg experience, we must find what graphics card we have, and what drivers to install for them. With matching drivers for our hardware, we will get far better performance than before.
The easiest way to find which drivers to install is by using the application lspci:
lspci | grep VGA
Example output:
01:05.0 VGA compatible controller: Advanced Micro Devices [AMD] neeATI RS880M [Mobility Radeon HD 4200 Series]
Now we already know that we have an ATI card. In some cases we will need the driver used by the kernel to determine what Xorg driver to use exactly. In this example we already know it will be xf86-video-ati.
Now we can install the driver we need for our specific system. In this example it will be xf86-video-ati, but it can be any of the drivers available (replace ati with what you need in the following example).
pacman -S xf86-video-ati
NVIDIA does not really want us to struggle with the configuration of our graphics card. So they have provided us with a nice GUI to create a fine-tuned configuration.
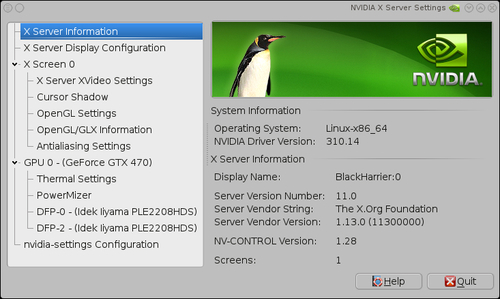
The simplest way to configure your NVIDIA infrastructure is by configuring everything with nvidia-settings. You can issue this application as root so that you can write the global configuration file.
Using the GUI you also can store a configuration file. Do so by entering /etc/X11/xorg.conf.d/20-nvidia.conf:
AMD also provides us with some helpful tools to make the configuration very easy. Let's discuss them now.
If you want to do some extended configuration, you can start a new configuration file by running:
aticonfig --initial
This will create a new configuration file, /etc/X11/xorg.conf.
Copyright © 2012 Packt Publishing
All rights reserved. No part of this book may be reproduced, stored in a retrieval system, or transmitted in any form or by any means, without the prior written permission of the publisher, except in the case of brief quotations embedded in critical articles or reviews.
Every effort has been made in the preparation of this book to ensure the accuracy of the information presented. However, the information contained in this book is sold without warranty, either express or implied. Neither the author, nor Packt Publishing, and its dealers and distributors will be held liable for any damages caused or alleged to be caused directly or indirectly by this book.
Packt Publishing has endeavored to provide trademark information about all of the companies and products mentioned in this book by the appropriate use of capitals. However, Packt Publishing cannot guarantee the accuracy of this information.
First published: November 2012
Production Reference: 1161112
Published by Packt Publishing Ltd.
Livery Place
35 Livery Street
Birmingham B3 2PB, UK.
ISBN 978-1-84951-972-4
Author
Ike Devolder
Reviewers
David Couzelis
Michael Driscoll
Acquisition Editor
Joanna Finchen
Commissioning Editors
Maria D'souza
Shreerang Deshpande
Technical Editor
Manmeet Singh Vasir
Copy Editor
Alfida Paiva
Project Coordinator
Shraddha Bagadia
Proofreaders
Maria Gould
Aaron Nash
Production Coordinator
Prachali Bhiwandkar
Cover Work
Prachali Bhiwandkar
Cover Image
Aditi Gajjar
Ike Devolder started playing around with Linux in 1999 and became a full-time Linux user in 2002. At that time his preferred distribution was Slackware, which he used for many years without complaints. In 2005 he rediscovered Arch Linux (he had already played around with it in the past) and started considering switching all his desktops from Slackware to Arch Linux. In 2006 it was done, with his laptop and desktop both running smoothly on Arch Linux, and since then he has gradually stopped being a distrohopper.
These days Ike is a Web Developer for Studio Emma in Belgium. He uses Arch Linux in his day job too.
David Couzelis is a professional Software Developer who fell in love with GNU/Linux over a decade ago. As a hobby he makes video games, and hopes to someday make one that's actually fun. He's also one of those free and open source software advocates, the type who teaches people about software freedoms even if they didn't ask.
Michael Driscoll has been programming in Python since spring 2006. He enjoys writing about Python on his blog at http://www.blog.pythonlibrary.org/. Mike also occasionally writes for the Python Software Foundation (PSF), IProgrammer, and Developer Zone. He enjoys photography and sitting down with a good book.
You might want to visit www.PacktPub.com for support files and downloads related to your book.
Did you know that Packt offers eBook versions of every book published, with PDF and ePub files available? You can upgrade to the eBook version at www.PacktPub.com and as a print book customer, you are entitled to a discount on the eBook copy. Get in touch with us at <service@packtpub.com> for more details.
At www.PacktPub.com, you can also read a collection of free technical articles, sign up for a range of free newsletters and receive exclusive discounts and offers on Packt books and eBooks.
Do you need instant solutions to your IT questions? PacktLib is Packt's online digital book library. Here, you can access, read and search across Packt's entire library of books.
If you have an account with Packt at www.PacktPub.com, you can use this to access PacktLib today and view nine entirely free books. Simply use your login credentials for immediate access.
I would like to dedicate this book to my daughter Moyra.
Arch Linux is an independently developed, general purpose GNU/Linux distribution, optimized for i686/x86-64 systems. The distribution is versatile enough to suit you in any role/need. It has been designed focusing on simplicity, code elegance, and "do-it-yourself" principles. The basic installation of Arch Linux is a very minimal base system. From the base system, everything can and will be configured by the user to suit their ideal environment, suited for their own unique purposes. The supported method of configuration is from the shell editing simple text files. Being a rolling-release distribution, there are no fixed releases. From time to time there are new install images provided by the Release Engineering Team, so that the installation media suits the new features introduced over time. Because of this rolling-release model, Arch Linux provides you with bleeding-edge software, typically the latest stable versions available. Pacman is the package manager of Arch Linux, which is designed to be an easy to use binary package manager.
Arch Linux was founded in 2002 by Judd Vinet who was inspired by the elegance and simplicity of some other Linux distributions such as Slackware, Polish Linux Distribution, and CRUX. But this simplicity came without a package manager, which was a big disappointment. Basically, to make his own life easier, Judd Vinet started Arch Linux with pacman as the package manager that can automatically handle the installation, upgrade, or removal of packages. Over the years Arch Linux kept on gaining more users, more developers, and has now been in the top 10 used distributions on DistroWatch for a pretty long time. Arch Linux is still being developed by volunteers and is not backed by some big company; the goal is to stay free in every sense of the word. In 2007 Judd Vinet passed the Project Lead to Aaron Griffin, who remains the Lead Arch Linux Developer to this day.
The Arch Linux philosophy, also described as "The Arch Way", is in general summarized as being KISS (keep it simple stupid). There are five core principles defined in this core: philosophy, simplicity, code-correctness over convenience, user-centric, openness, and freedom.
Simplicity is definitely the base objective for Arch development, with the idea that a lightweight base structure with high quality code will have lower system resource demands. The base system found in Arch Linux has no clutter that might hide parts of the system, or make it difficult to access parts of the system. All configuration files are simple, nicely documented, easy to read, and nicely arranged for quick editing. There are no special configuration tools that might hide possibilities from the user, which leads to a system configurable to the very last detail. The Arch Linux Developers believe that trying to hide the complexity of a system results in an even more complex system, and this should always be avoided.
Arch Linux defines simplicity as without unnecessary additions, modifications, or complications, and provides a lightweight UNIX-like base structure that allows an individual user to shape the system according to their own needs. In short: an elegant, minimalist approach.
Code-correctness over convenience implies clean, correct, simple code and not unneeded patching, automation, eye candy or "newbie-friendliness". Software patches are only introduced when needed. Packages found in Arch Linux are really the way the Developers created them, nothing more, nothing less.
Simplicity of implementation, code-elegance, and minimalism shall always remain the reigning priorities of Arch development.
Being user-centric means that the users fully manage the system on their own. The system will offer no, to little assistance. There is a simple set of maintenance tools that are simply relaying the commands given by the user. Arch Linux is founded on simple, sensible design, and excellent documentation. As a user, you need more of a "do-it-yourself" approach rather than asking the Developers to implement a new feature. Most Arch users have indeed the tendency to solve their problems and share them with the entire community, which also leads to a friendly and helpful community of developers and users.
Arch Linux targets and accommodates competent GNU/Linux users by giving them complete control and responsibility over the system.
Openness is also briefly touched upon in the just discussed principle, saying most Arch users share the solutions to the problems they have encountered. Also, the Arch Linux Developers strive for an open system, which goes hand in hand with simplicity. Openness is intended to make things simple. It also removes the abstraction of things, which might lead to a steeper learning curve, but in the end it leads to an easily controllable and maintainable system. More experienced Arch users find some of the helper tools provided by other distributions cumbersome, and things that are sitting in the way of easy and fast configuration. The Arch Linux community is also known to be very open and willing to give advice.
Arch Linux uses simple tools, that are selected or built with openness of the sources and their output in mind.
Freedom is probably one of the most important things you get when you start using a Linux-based operating system. This is where Arch Linux is one of the leading distributions where all configurations and decisions regarding the system are taken by the user. In the end, the user defines the system. Arch Linux is built in such a way that you can—if you really want to—rebuild the entire system. It even provides a simple tool to do so. The entire system and all of the components are 100 percent transparent, so you can replace everything with something else providing the same functionality. In addition to this, Arch Linux also provides the freedom to use exclusively open source software, but you can also without hassle use proprietary software packages.
By keeping the system simple, Arch Linux provides the freedom to make any choice about the system.
Ending with a final quote from Judd Vinet:
[Arch Linux] is what you make it.
Arch Linux strives to maintain and have the latest and greatest software available in its repositories. Being a rolling-release distribution, it allows a one-time install with continuous updates without ever having to reinstall or having to go to massive procedures for getting the system upgraded. The goal of bleeding edge is also to provide for the newest features popping up in the Linux world—be it in the field of filesystems (ext4, ReiserFS, XFS, JFS, Btrfs, NILFS, and so on), software RAID, or boot scripts (systemd)—along with supporting the latest features of the newest hardware because of the immediate availability of the newest kernels.
Installing Arch Linux using the official ISO (Should know), explains the procedure to get Arch Linux installed on your system using the official installation media.
Installing Arch Linux using the Archboot ISO (Should know), explains the procedure to get Arch Linux installed on your system using the Archboot installation media.
Configuring your system (Should know), explains where to set your hostname, load special modules, and have a different keyboard layout than QUERTY.
Installing and removing packages (Must know), explains how to use the package manager (pacman) for adding and removing packages.
Booting and managing services with systemd (Should know), explains configuring and managing how your system starts up and what services are being started automatically, but using systemd and not sysvinit.
Booting and managing services using initscripts (Should know), explains configuring and managing how your system starts up and what services are being started automatically using initscripts.
Configuring GUI using Xorg (Should know), briefly explains how to get your GUI up and running.
In general when reading this book, we assume you already have a basic knowledge of how to install and use a Linux distribution such as Ubutnu, openSUSE, Fedora, and so on.
Arch Linux in general aims at more experienced users and also users with a big "do-it-yourself" mentality.
In this book, you will find a number of styles of text that distinguish between different kinds of information. Here are some examples of these styles, and an explanation of their meaning.
Code words in text are shown as follows: "Add the nomodeset parameter to the kernel command line to make sure that the open source drivers will not kick in."
A block of code is set as follows:
Section "InputClass"
    Identifier "evdev keyboard catchall"
    MatchIsKeyboard "on"
    MatchDevicePath "/dev/input/event*"
    Driver "evdev"
    Option "XkbModel" "pc105"
    Option "XkbLayout" "be"
EndSection
When we wish to draw your attention to a particular part of a code block, the relevant lines or items are set in bold:
DAEMONS=(syslog-ng !network crond)Any command-line input or output is written as follows:
systemctl list-units --type=service
systemctl list-units -a --type=service
New terms and important words are shown in bold. Words that you see on the screen, in menus or dialog boxes for example, appear in the text like this: "The Auto-Prepare option will guide you with the creation for a default partition scheme."
Feedback from our readers is always welcome. Let us know what you think about this book—what you liked or may have disliked. Reader feedback is important for us to develop titles that you really get the most out of.
To send us general feedback, simply send an e-mail to <feedback@packtpub.com>, and mention the book title through the subject of your message.
If there is a topic that you have expertise in and you are interested in either writing or contributing to a book, see our author guide on www.packtpub.com/authors.
Now that you are the proud owner of a Packt book, we have a number of things to help you to get the most from your purchase.
Although we have taken every care to ensure the accuracy of our content, mistakes do happen. If you find a mistake in one of our books—maybe a mistake in the text or the code—we would be grateful if you would report this to us. By doing so, you can save other readers from frustration and help us improve subsequent versions of this book. If you find any errata, please report them by visiting http://www.packtpub.com/support, selecting your book, clicking on the errata submission form link, and entering the details of your errata. Once your errata are verified, your submission will be accepted and the errata will be uploaded to our website, or added to any list of existing errata, under the Errata section of that title.
Piracy of copyright material on the Internet is an ongoing problem across all media. At Packt, we take the protection of our copyright and licenses very seriously. If you come across any illegal copies of our works, in any form, on the Internet, please provide us with the location address or website name immediately so that we can pursue a remedy.
Please contact us at <copyright@packtpub.com> with a link to the suspected pirated material.
We appreciate your help in protecting our authors, and our ability to bring you valuable content.
You can contact us at <questions@packtpub.com> if you are having a problem with any aspect of the book, and we will do our best to address it.
Welcome to Arch Linux Environment Setup How-to. Arch Linux is a very flexible distribution and this book will guide you to the point where you can get a basic system in place. From there on you can go in any direction you want. A simple server, a full-blown desktop system with all the bells and whistles. In the end, Arch Linux is always what you make of it.
These days the installation of Arch Linux might look like a work of insanity, as there is no installer available in the official media, just a guideline to follow. The installation without an installer is as easy as it can be. For experienced users, installing without an installer is even more convenient. The newest ISOs require that you have your machine connected to the Internet, as there are no longer packages available on the installation media.
You can get the official ISO image file from https://www.archlinux.org/download/. On this page you will find a download link to the latest release. Depending on your preference, download the torrent file or the ISO image file immediately.
The following list describes the main tasks that we will perform in this recipe:
/mnt. The other partitions will be mounted later on after you have created the specific folders. We'll designate our device with /dev/sdX; in your case this can be /dev/sda, and so on.base install is adding base-devel to the default installation. For normal end users, just base will be sufficient to start.The following steps will guide you in preparing, booting, and setting keyboard layout:
sha1sums.txt file from the download page.sha1sum -c sha1sums.txt command and you'll see whether your download was successful or not. Also check if the signature of the ISO is correct by running gpg -v archlinux-...iso.sig:sha1sum -c sha1sums.txt gpg -v archlinux-2012-08-04-dual.iso.sig
The following screenshot shows the execution of this step:
/usr/share/kbd/keymaps/.loadkeys keyboardlayout.Now let's perform the following steps to create, format, and mount partitions:
cfdisk /dev/sdX
cgdisk /dev/sdX
mkfs command to create a filesystem on a specific partition:mkfs -t vfat /dev/sdX mkfs.ext4 -L root /dev/sdX
/mnt:
mount /dev/sdX3 /mnt
mount for your other partitions:
mkdir -p /mnt/boot
mount /dev/sdX1 /mnt/boot
The following steps are needed to connect to the Internet:
netcfg mywireless.The following steps should be performed for installing the base system and boot loader:
pacstrap /mnt base base-devel
We'll now list the steps to do during the configuration:
fstab with genfstab:
genfstab -p /mnt >> /mnt/etc/fstab
arch-chroot /mnt
/etc/hostname./etc/localtime symlink./etc/locale.conf./etc/locale.gen.locale-gen./etc/mkinitcpio.conf.
mkinitcpio -p linux
passwd.exit).We downloaded the ISO image file via torrent, or via HTTP from the mirror sites listed on the download page. The sha1sum command lets us verify the integrity of the downloaded ISO. On top of the checksum, we can also check the integrity by verifying the signature available for the ISO. So now, we can rest assured that the downloaded file is the real one. The ISO contains a fully working operating system. It also contains all the necessary tools to perform system recovery and installation.
The keyboard configuration set with loadkeys will make sure that the key you press on your keyboard will be translated to the correct letter on your screen. Using a different keyboard layout from the one on your physical keyboard might be confusing.
We then created a partition scheme on the selected disk with the appropriate tool (cfdisk or cgdisk). Make Filesystem (mkfs) is a unified frontend to create a filesystem. Using it we created our filesystem layout manually under /mnt by creating our default partition layout in our root, and mounting the specific partitions accordingly.
You can make a connection with your wireless network (if needed), and then use dhcpcd or dhclient to obtain an IP address that enables you to access the Internet.
Pacstrap will run pacman with a modified root location to install the desired packages into the newly created system.
For example, installing Syslinux:
pacstrap /mnt syslinux
The specific configuration files will ensure we don't have to do all those steps over and over again on every boot.
You can use the official ISO directly from the USB stick if you prefer. There might be some issues with the verification of the ISO. The next two sections discuss them and provide you with the solution.
The ISOs downloaded for Arch Linux are all 'hybrid' images, which means you can put them on a USB drive and they will be bootable. So installing from a USB drive is also very simple. Place a USB drive in your machine (warning: it will lose all its data) and issue the following command:
dd if=archlinux-2012.08.04-dual.iso of=/dev/sdX bs=1M
When you don't have the signer's public key in your gpg keyring you will get an error like gpg: Can't check signature: No public key. This means you will first have to import the signer's public key before verification of the signature is possible:
gpg --keyserver wwwkeys.pgp.net --recv-keys 0x9741E8AC
Import the public key, in this case the public key of Pierre Schmitz. Then you can run the verification of the ISO again. The verification should now give you gpg: Good signature from "Pierre Schmitz <pierre@archlinux.de>". When you have done the steps described here, you will get a warning that the key is not certified with a trusted signature. In the case of verifying the integrity of the ISO, this is of no importance. For more information about GPG and signatures, see http://www.gnupg.org/.
The next section talks about a common sample of a good desktop partition scheme.
On a desktop system, especially Arch Linux, I personally suggest having a separate /var partition. Depending on the other goals you might have for this partition (for example, running a huge MySQL database, other databases, and so on), a sensible value would be 5 GB and above. Don't overdo it or you will have a lot of empty space in the /var partition. Why make /var so big? Pacman keeps its cache in /var, and you don't really want your root filesystem being deadlocked by a filled up disk with package cache.
The netcfg tool originally developed by Arch Linux provides us with tons of options, which we will discuss in the next section.
The sample configurations can be found in the /etc/network.d/examples folder. In the following table, we have given a list of sample configurations provided by the netcfg package:
|
Connection type |
Example profile |
|---|---|
|
Wireless/WEP hex key |
|
|
Wireless/WEP string key |
|
|
Wireless/WPA-Personal (passphrase/preshared key) |
|
|
Wireless/WPA-Enterprise |
|
|
Wired/DHCP |
|
|
Wired/static IP |
|
|
Wired/iproute configuration |
|
If you prefer the use of UUID or label in your fstab file, you can pass an extra parameter to the genfstab script: U for UUID or L for labels.
The final installation of Syslinux has to be done from within the chrooted environment.
/usr/sbin/syslinux-install_update -iam
Should the previous command fail while trying to set the boot flag, use the following command:
/usr/sbin/syslinux-install_update -im
After a successful installation of Syslinux, configure the way your system will boot by editing /boot/syslinux/syslinux.cfg.
In this recipe we'll learn about the installation of Arch Linux. It might seem a little scary because of the manual installation process, but it is not difficult at all. The installation script will practically guide you all the way through the installation, and you can have a system capable of booting in even less than 10 minutes. In the Arch Linux ecosystem, the installation is something that is usually done once and then never again because of the rolling release of packages. Also see the Beginner's Guide at https://wiki.archlinux.org/index.php/Beginners'_Guide to get a grasp of what Arch Linux is all about. As Arch Linux is an ever moving target, the preferred method of installation is when you are connected to the Internet so you can fetch all the latest and greatest software available. Even before downloading, it is a must to read the latest news at http://www.archlinux.org/news/ about any new developments.
When we only want a taste of Arch Linux and are probably far from sure that this is what we want for all day use, consider learning how the system works by installing it in a virtual machine. In the Beginner's Guide there is a useful section about it at https://wiki.archlinux.org/index.php/Beginners'_Guide#Install_on_a_virtual_machine.
We can get the Archboot ISO from http://wiki.archlinux.org/index.php/Archboot. On this page we will find a download link to the latest release. We can select to download the torrent files or the ISO immediately.
The following list describes the main tasks that we will perform in this recipe:
Let's perform the following steps for preparing the installation media:
md5sum.txt file from the archboot folder.md5sum -c md5sum.txt command and checking whether our download was successful:The following steps will guide you in booting the install media and starting the installation:
Let's perform the following steps to set keyboard and console font:
Let's set our time zone, the current time, and the current date:
The following steps should be performed for auto preparing the hard drive:
(/boot) partition.(/swap) partition.(/root) partition./home) partition where all the users' data will be residing.The following steps should be performed for manually preparing the hard drive:
The following steps are needed to select your source:
The following steps are needed to select your packages:
Finally, let's install the boot loader:
The best known will be GRUB and Syslinux—those are probably also the best supported. There are also other boot loaders available such as LILO.
Now that you have taken all the steps needed to install a basic working Arch Linux system on your computer, the only thing left in the installation procedure is to reboot your system and remove the installation media. Then you can enjoy the first boot of your freshly installed Arch Linux.
We downloaded the Archboot ISO via the torrent files or directly using a web browser, and the md5sum command lets us verify the integrity of the downloaded ISO. So now, we can rest assured that the downloaded file is the real one.
The Archboot ISO contains a fully working operating system so first we boot that. We are automatically logged into the live system on pressing the Enter key. Next, the installation scripts are called and we get dropped in the Archboot installation scripts.
The installation scripts will call the correct application to set the keyboard layout and the console font, and the selected date and time settings. The installation scripts will also keep track of the selected values to put them in the appropriate configuration files.
If we have selected the Auto-Prepare option, then based on the configuration we have made, the installer will run fdisk and create the partition scheme that we want.
If we have chosen to do a manual partition of the disk, then we can select any layout we want. Once we are satisfied with the partition scheme, the installer will ask some questions (for example: Where to mount? What filesystem?), and uses our answers to mount the partitions we have made to the correct mount points. The installation scripts will also keep track of the answers given so that they can be used later on for the generation of a configuration file.
The installation script will show you a list of packages that pacman has made available for you to install. When you have selected all the packages you want on your system, the installation script will pass these packages with some extra parameters back to pacman, which will do the actual installing.
At the end of the installation, a list of configuration files will be prepared for you. These configuration files are there for you to review. When you are satisfied with the configuration file, save it. The installation script will now use the configuration file to put the selected boot loader into place.
When we want to divert from the default settings, we might need some extra knowledge. So let's discuss them one by one.
The ISOs downloaded from Arch Linux are all "hybrid" images, which means you can save them on a USB drive and they will be bootable. Installing from a USB drive is also very simple. Just connect a USB drive to your machine and issue the following command:
dd if=archlinux-2012.04-2-archboot-dual.iso of=/dev/sdX bs=1M
We need to make sure that we set the correct input file, our ISO, to the if parameter. Also the output file parameter must be the device and not some partition of the device, such as of=/dev/sdX. The X stands for the letter assigned by the system to your USB drive.
There are some rare cases where the choice for local time on your hardware clock is the best choice. For example, when installing Arch Linux next to Windows XP, which is an operating system not capable of handling a different time on a hardware clock and system clock. More recent versions of the Windows operating system can handle the hardware clock being set to UTC.
Partitioning is a very wide topic. It can be done in an endless number of combinations. We will now discuss some extra information required to understand the partitioning. Also some nice defaults to have a system up and running quickly.
The following list is a selection for normal desktop use. For people wanting to play a lot of games, these size selections will not fit your needs:
When selecting which filesystem to use for your root and home partitions, you should be well informed about the possibilities of the filesystems. When you have no idea, the best choice is ext4 as this is the default filesystem these days with modern features, nice speed, and robustness, so you don't lose any data.
The boot partition will automatically be formatted with the ext2 filesystem. This is the safest choice, as all boot loaders you can find out there will be able to get your system to boot when you have a boot partition formatted as ext2.
There are three ways to point to a block device (partition):
Using the UUID scheme might look ugly in your configuration but this is the most certain way you will always point to the correct device. Say you have some hardware changes and the devices are ordered in a new way; with this you will still have the correct block device selected.
The LABEL scheme is looking very elegant and simple but there might be some name collisions as multiple physical disk partitions can have the same name.
The KERNEL scheme is actually the oldest and here we are just pointing to some device node (such as /dev/sda1), but this could fail someday after some hardware changes, which could lead to a different order of the device nodes.
On a desktop system, especially on Arch Linux, I suggest having a separate /var partition. Depending on the other goals you have for this partition (for example, running a huge MySQL database, other databases, and so on), the appropriate value would be 5 GB and up. Don't overdo it or you will have a lot of empty space in the /var partition. Why so big? Pacman keeps its cache in /var and you don't really want your root filesystem being deadlocked by a disk that's filled up with package cache.
When installing Arch Linux from the Internet, it is best to choose a mirror close to our home for the best download speeds:
When your network is up and running, you can select a mirror and select one that is as close as possible to your location. We will get the best performance this way. Should you be in doubt what the closest mirror is for you, you can always select a global mirror such as mirrors.kernel.org, which will automatically choose a server close to you.
During the installation of Arch Linux, we can select a list of packages to install. I will now share my own preferred way. When this is a first time installation, my personal preference would be to leave all the packages selected from the base group. If you really insist on removing some packages from the base group, go ahead and remove them, but you should really know what you are doing in that case.
If this is not the first install of Arch Linux, you can definitely enable the use of the extra repository so that you can select a whole bunch of applications, which you know for sure you want to have installed on your system. For example, you can immediately install Xorg, GNOME, XFce, KDE, and so on. For a first time install, I would go step-by-step and leave the extra as it is for now.
In this recipe we'll explain the configuration files used to identify your system. Usually, these files only need to be configured once and stay the same for the entire life of the system.
The following list describes the main tasks that we will perform in this recipe:
locale.conf file. In the most common cases, we only set LANG and LC_COLLATE in this file. If you want to narrow it down, you can get more information by typing man locale.conf. However, LC_COLLATE is the fallback when everything else fails./etc/localtime. Actually, they have to be changed together so for your own safety change the /etc/localtime symlink, and then immediately add the new time zone to /etc/timezone./etc/modules-load.d/with a list of modules. The modules have to be separated by newlines. When you want to add some comments in those files, you can do that by starting your line with # or ;. The files placed in the directory only need one extra requirement; the name has to end with *.conf.The following step configures the hostname:
vim /etc/hostname to configure it.Let's list the steps required to configure the console:
/etc/vconsole.conf.KEYMAP=us FONT=lat9w-16 FONT_MAP=8859-1_to_uni
Let's list the steps required to configure the localization:
/etc/locale.gen.locale.gen file, run locale-gen./etc/locale.conf:LANG=en_US.UTF-8 LC_COLLATE=C
Let's list the steps required to configure the time zone:
/etc/localtime pointing to your time zone:
ln -s /usr/share/zoneinfo/Europe/Brussels /etc/localtimevim /etc/timezone
/etc/timezone.Let's list the steps required to configure modules:
On boot, the system will read the content of the /etc/hostname file. This content will be used to identify the system to us as the user, and also to identify the machine in a network. The hostname is mostly for user convenience because it's much easier to remember than a big list of numbers.
The terminal will allow you to type on your localized keyboard. The output on your screen will correspond with the button pressed on your keyboard. Also, the terminal will show you the text output in the selected font. Lastly, it will do a translation of text encoding where needed. In the example shown in the steps to configure the console, the output will be translated from ISO-8859-1 to Unicode.
All applications supporting the localization will bring you their output in American English, if LANG=en_US. When the application does not have the selected language, it will fall back to the "C language". The C language is the default language in computer systems, so this will also be in English.
The time shown on your system will be the one from your time zone. When you are in a time zone where you have daylight saving changes, your PC will automatically adjust to it.
All files residing in /etc/modules-load.d/ ending with *.conf will be used to load extra modules. All *.conf files residing in /etc/modprobe.d/ will be used to determine if the modules must be blacklisted, or used with some special options.
Let's look at some tips and tricks for easier configuration of your desired keymap and console font and also, an easy way to find the available time zones.
We can get a list of all the available keyboard layout mappings by listing the folder /usr/share/kbd/keymaps. From the following screenshot, we can see we have found the Belgian layout so we can add KEYMAP=be-latin1 to our configuration file:
We can find a list of all the available fonts for the console by listing /usr/share/kbd/consolefonts. When we find the desired font, we can add this to our configuration file. For example, CONSOLEFONT=Lat2-Terminus16.psfu.gz.
To get a list of possible transformations, we can take a list of /usr/share/kbd/consoletrans. Optionally, we can add this to our configuration file, but this is not always needed. For example, CONSOLEMAP=8859-1_to_uni.
In this recipe we will see how package management in Arch Linux revolves around pacman. Pacman is just short for package manager, and not a joke that package management is a game. The complete guide to pacman can be found on the wiki at https://wiki.archlinux.org/index.php/Pacman. Arch Linux has three official repositories: [core], [extra], and [community]. Both [core] and [extra] are maintained by the Arch Linux Developers, while the [community] repository is maintained by the Trusted Users. There are also a lot of unofficial repositories maintained by the Arch Linux enthusiasts, which install specific types of software not found in the official repositories, thereby making your life much easier. The list of unofficial repositories can be found at https://wiki.archlinux.org/index.php/Unofficial_User_Repositories.
Arch Linux is using a complete open model, which means every piece of software provided in the official repositories can be rebuilt by the user. This is what we call the Arch Build System or ABS. Arch Linux also gives the users a very easy way to share buildscripts for other software not found in the repositories by means of the Arch User Repository or AUR. And finally, there is also a nice list of commonly used software on the wiki at https://wiki.archlinux.org/index.php/Common_Applications. This list might help you find the ultimate application to fit your needs.
The following list describes the main tasks that we will perform in this recipe:
/etc/pacman.conf. Secondly, you also have /etc/pacman.d/mirrorlist installed on your system by default, which contains the selected mirror used during the installation. The mirrorlist contains all the official mirrors of Arch Linux. The default configuration that you get after the installation works perfectly fine. You can find all the information related to pacman on the wiki page at https://wiki.archlinux.org/index.php/Pacman.PKGBUILD.Let's list the steps required to configure pacman:
/etc/pacman.conf to modify options or add/remove some repositories./etc/pacman.d/mirrorlist to change or add a mirror with the official repositories in it.pacman -Syu as root for the full system upgrade.pacman -S somepackage as root.pacman -Ss somepackage for searching packages in the repositories.pacman -U somepackage.pkg.tar.xz as root in a terminal for installing a package from disk.pacman -R somepackage for removing a package.pacman -Sc as root and answer the questions.Let's list the steps required to configure official and unofficial repositories:
/etc/pacman.conf.Let's list the steps required to use the ABS:
pacman -Syu base-devel abs
/etc/abs.conf.abs scripts. You must run abs as root.Let's list the steps required to use the AUR:
pacman -Syu base-devel
Let's list the steps required to use makepkg:
PKGBUILD).makepkg.The options set in pacman.conf will determine the behavior of pacman. These vary from ignoring packages or groups, from updates to extra repositories. What we have defined in the mirrorlist will determine where our packages come from (from which server).
The full system upgrade command will synchronize your local package databases with the remote ones, and depending on the packages you have installed it will ask you if you want to continue with the installation of some upgraded packages.
The pacman -S somepackage command will look for the package name or group you have passed, and if it exists, it will continue to try and install it.
On executing the pacman -Ss somepackage command, pacman will search in the locally synced databases if the package we are looking for is available somewhere. If that is the case, we will see what version is available for us to install.
On executing the pacman -U somepackage.pkg.tar.xz command, pacman will check the dependencies of the package and try to install these alongside the package you want to install. When all goes well, it will install the package inside the tarball on the correct location.
The package will be removed from the system on executing the pacman -R somepackage command. The only thing left of the package will be an entry in the cache.
On executing the pacman -Sc command, pacman will look for old package files and ask you if you want those to be removed from the filesystem.
Pacman uses pacman.conf for the options and the repositories. All enabled repositories will be used for package installation now. Should we have some configuration mismatches, pacman will notify us.
Abs will use rsync to synchronize the buildscripts used in the official repositories to your local computer. This will facilitate you, for example, to build an officially supported package with other options enabled or disabled.
The AUR is actually just a website with a collection of user contributed buildscripts. If your favorite application is already available there, you can benefit from the work that someone else has already done. It is also very easy to contribute improvements via comments.
Makepkg will read the information described in the PKGBUILD file to get the package built correctly, and have it in the correct format for pacman to install it on your system.
The pacman.conf file has sections defined by [section]. These sections can have some options defined inside them. There is one special section called [options] where the global options can be configured for pacman. The other sections are the repositories defined by default or the user. In regards to the repositories, the order of the declaration is important. The repository nearest to the top of the file will take precedence, in descending order. This is of great importance for repositories that provide packages with the same name. The order is also important so as to understand why [testing] must be defined above [core]. Generally the pacman.conf file is very well documented by means of comments that explain the options provided, but here we'll try to explain them in depth.
The mirrorlist is a file with all official Arch Linux mirrors listed. Let's find a mirror closer to home so we can get the best download speeds. We can define more than one server here. Note that this will not give us the packages from the most up-to-date server, but when the first in the list is unreachable then the second can be used, so we are still able to update our system.
The pacman.conf options can be found at https://www.archlinux.org/pacman/pacman.conf.5.html. By default, everything should be working out of the box. The default should also be sufficient for new users.
The following is a sample of the [core] repository. We can see that signature checking is required for the packages, and we use the mirrorlist for the configured servers.
[core]
SigLevel = PackageRequired
Include = /etc/pacman.d/mirrorlist
The following sample will use the default SigLevel defined in the [options] section, and when used, it will first try to use FTP, and when this is not available it will fall back to HTTP:
[otherrepository]
Server = ftp://10.0.0.1/$repo/$arch
Server = http://10.0.0.1/$repo/$arch
In the following sample, we have a local repository where you can see all possible URLs that can be used to fill in the Server option:
[somelocalrepository]
Server = file:///home/packages/$repo/$arch
By default, the official repositories are listed in pacman.conf. Not all of them are enabled by default. There is also a nice list of unofficial repositories where you can find some very high quality software.
For complete information about the official repositories and in what cases you should enable or disable them, check out https://wiki.archlinux.org/index.php/The_Arch_Linux_Repositories.
Due to the fact that it is easy to set up your own repository, there are a lot of users who are building a set of specific packages and providing them as unofficial repositories for everyone. The complete list of unofficial repositories can be found on https://wiki.archlinux.org/index.php/Unofficial_User_Repositories.
By using the ABS, we as users get a great deal of flexibility over our system. For first time users of ABS, you would want to check the ABS wiki page at https://wiki.archlinux.org/index.php/ABS. For a simplified introduction, you can also refer to https://wiki.archlinux.org/index.php/ABS_FAQ.
Systemd provides us with a more modern approach of booting. It also benefits from the modern multicore processors and relies on very aggressive parallelization to get the job done very quickly. Arch Linux provides systemd by default. Systemd uses "the so-called service files" to define how and when a certain service or "a so-called daemon" has to be started.
The following list describes the main tasks that we will perform in this recipe:
systemctl command, we can start and stop services on demand.Let's list the steps required to install systemd:
pacman -S systemd systemd-arch-units.init=/bin/systemd to your kernel command line by editing /boot/syslinux/syslinux.cfg:APPEND initrd=/initramfs-linux.img root=/dev/sda2rootfstype=ext4 ro init=/bin/systemd
Let's list the steps required to set the default target:
systemctl enable graphical.target
systemctl enable multi-user.target
systemctl start service
systemctl enable service
We need the systemd-arch-units package, because not all packages providing services are providing the service files needed to be able to use them with systemd. Due to the fact that we added init=/bin/systemd to the kernel command line, the system will use systemd for startup.
These days only two targets can be set automatically as the default target, as only graphical.target and multi-user.target provide the default target installation.
In the systemctl start service command, service is actually the name of a file. For example, NetworkManager has a systemd service file called NetworkManager.service, and it is this full name we need to pass to the systemctl command. For example:
systemctl start NetworkManager.service
To be able to know what services to start during boot time, systemctl will create symlinks to the specific service files in the correct locations where systemd will search them during boot.
Once we are satisfied with systemd booting our system, we can eventually fine-tune it a little more.
The following command will provide symlinks for initscripts' compatibility:
pacman -S systemd-sysvcompat
The result is that you can omit the extra parameter init=/bin/systemd on your kernel command line.
We can easily change the desired target by changing the kernel command line in our boot loader configuration. This makes it easy to test if some specific target suits our needs.
Similar to the appending of a number to the kernel command line when using initscripts, we can also do this for systemd using the systemd.unit parameter.
For example, considering Syslinux as the boot loader, open /boot/syslinux/syslinux.cfg and add systemd.unit=multi-user.target to the kernel command line:
APPEND initrd=/initramfs-linux.img root=/dev/sda2 rootfstype=ext4ro systemd.unit=multi-user.target
The previous example is valid for a system with only systemd, otherwise we also would require init=/bin/systemd.
We might want to know what services we have available on our system, and of course we want to know what we can do with those services.
We can list all the used services or choose the list all the available services by running the following commands:
systemctl list-units --type=service
systemctl list-units -a --type=service
By default systemd supports actions such as start, stop, restart, reload, and status. There are more actions available, which can be found by issuing man systemctl.
Before enabling a service, we might want to check if the service is not already enabled. We can check if a service is already enabled for startup during the boot process by using the is-enabled action:
systemctl is-enabled service
In this recipe we will learn about initscripts. Initscripts is a collection of scripts that make sure your computer starts up fine. It also provides the necessary functions and tools to manage services on your system. Initscripts' services are often referred to as daemons (https://wiki.archlinux.org/index.php/Daemon). These days, booting using initscripts can still be used in conjunction with systemd, but over time the use of initscripts will be discouraged and phased out. Systemd is a daemon that controls the startup of your system and also manages the services running on them. The initscripts are written in Bash, so they are easy to read and modify when needed. Extended information about the boot process of Arch Linux can be found at https://wiki.archlinux.org/index.php/Arch_Boot_Process.
The following list describes the main tasks that we will perform in this recipe:
3. This is the multiuser runlevel without starting X.rc.conf file within the DAEMONS array.The following step changes the runlevel:
telinit runlevel to change the runlevel, where runlevel is a number from 0 to 6.Let's list the steps required to set the default runlevel:
/etc/inittab.id:3:initdefault:. Here you will already see that the default selected runlevel is 3.telinit q.
/etc/rc.d/somedaemon start
Let's list the steps required to automatically start a service (daemon):
The telinit command will change the runlevel and depending on what number you switch to, some running applications and daemons might get stopped or just get started.
The default selected runlevel set in the inittab file determines what scripts will be used during the startup of your PC. This is also the reason why you always need to check if the configuration is correct by running telinit q, because if the inittab file is corrupted somehow your system will become unbootable.
The Bash script sitting in the /etc/rc.d/ folder will be executable. It will by default also provide three actions: start, stop, and restart.
During startup, the initscripts will read the DAEMONS array defined in the rc.conf file, and in the order they are defined all the daemons will be started during boot.
Now let's talk about some general information that is relevant to this recipe.
The runlevels are just numbers, but for us humans it is easier to remember sentences. So we do some matching of an action versus the runlevel number.
The following list defines each runlevel number:
0: Poweroff1: Single-user mode (rescue mode)2 and 4: These are user defined, but as on any other system they are the same as 3 by default3: Multi-user mode; users can log in via a terminal or network5: Multi-user graphical mode; this is runlevel 3 + X (some display manager)6: Rebootemergency: Emergency shell (you will encounter this during boot failures)The modification of the /etc/inittab file can lead to an unbootable system. So there are other ways to configure the default runlevel.
We can set the default runlevel we want in the kernel command line configured in our boot loader configuration file. This will allow us to safely switch runlevels.
Lets perform the following step to set the default runlevel via the boot loader (Syslinux in this example):
/boot/syslinux/syslinux.cfg.APPEND initrd=/initramfs-linux.img root=/dev/sda2rooftfstype=ext4 ro 5
We have set the default runlevel to 5 (graphical mode).
Arch Linux provides a helper application that makes it easy to start multiple daemons in one command.
The scripts that facilitate the starting of the daemons usually provide three actions by default:
start: Starts the daemonstop: Stops the daemonrestart: Restarts the daemonAnother common action is reload, which facilitates the running daemon to actually reload its configuration without really stopping.
Arch Linux provides a helper that can start and stop multiple services in one command. The helper comes with a nice man page, which you can read by issuing man rc.d.
rc.d action daemon1 daemon2 ...
The actions you can provide to rc.d are the same that you can pass to the scripts directly. So if a script provides the reload action, rc.d can use it.
Now, the default way of starting the daemons is sequential. The first has to be started correctly before the next can be started. We can improve our boot time by configuring the DAEMONS array a little differently.
If we want some service to be started in parallel with the one's following it, you can add @ in front of the entry in the DAEMONS array:
DAEMONS=(syslog-ng network @crond)We can also leave a service in the DAEMONS array but still disable it from automatically being started. For this we need to add ! in front of the service:
DAEMONS=(syslog-ng !network crond)In this recipe we will learn how to configure GUI using Xorg. When we want to use our system as a desktop system, we will need Xorg one way or the other. These days Xorg is the de facto standard for displaying and using graphical interfaces on Linux-based systems. Also for most single-screen setups, you don't need to configure anything. Multi-screen setups and setups with proprietary drivers are the exceptions to this rule. Some distributions provide you with tools to install the correct video driver; Arch Linux does not. So, eventually we will need to find out which driver to install. In relation to the keyboard, mouse, and a lot of other input devices, Xorg can find them mostly automatically. In some cases the input devices need an additional Xorg driver installed.
The following list describes the main tasks that we will perform in this recipe:
https://wiki.archlinux.org/index.php/ATI_Catalyst
On this page we find a whole bunch of information needed to get the Catalyst drivers working nicely on your hardware.
pacman -S xorg-server
Let's change the keyboard layout now:
setxkbmap command followed by the desired keyboard layout:
setxkbmap be
pacman -S xf86-input-synaptics
Let's list the steps required to install video drivers:
pacman -Ss xf86-video
pacman -S xf86-video-driver
Let's list the steps required to use the proprietary NVIDIA drivers:
pacman -S nvidia nvidia-utils
/etc/X11/xorg.conf.d/20-nvidia.conf.Let's list the steps required to use the proprietary AMD drivers:
pacman -S catalyst-dkms catalyst-utils
nomodeset parameter to the kernel command line to make sure that the open source drivers will not kick in:APPEND initrd=/initramfs-linux.img root=/dev/sda3rootfstype=btrfs ro vga=773 nomodeset
/etc/X11/xorg.conf.d/20-catalyst.conf so that Xorg knows it has to use the proprietary driver.Section "Device" Identifier "aticard" Driver "fglrx" EndSection
Pacman will download and install the xorg-server package and its minimally needed dependencies.
The setxkbmap command will change the selected keyboard layout. For example, we had a US layout by default, and after running setxkbmap be it will be the Belgian AZERTY layout.
The specific drivers get installed to your system by pacman, which will provide Xorg with the means to understand the input from a touchpad and handle it correctly.
The NVIDIA driver should be automatically detected by Xorg, but to be sure you can add a file to /etc/X11/xorg.conf.d/, such as /etc/X11/xorg.conf.d/20-nvidia.conf:
Section "Device"
  Identifier  "NVIDIAcard"
  Driver      "nvidia"
EndSection
You could when needed have a default configuration created by issuing the following command:
nvidia-xconfig
When having two connected screens, you can also autogenerate a twinview default configuration:
nvidia-xconfig –twinview
When we are using the AMD proprietary drivers, setting the nomodeset parameter makes sure that the built-in kernel drivers don't start to conflict with the proprietary driver. The Xorg configuration file will make sure that Xorg will start without errors. Although not entirely necessary, we make sure that Xorg uses the driver and serves us well.
We can opt to use our graphical environment directly, which will imply the installation of xorg-xinit, or we could use our Xorg environment with a display manager. A display manager is a graphical login screen so we can use Xorg all the way.
In order to start Xorg directly from the terminal, we first need to install the xorg-xinit package to facilitate this:
pacman -S xorg-xinit
Then the startx command will get us into the X server. When using this directly without configuration, X will not start as we will have some missing applications requested by the default configuration. So let's go forward and install:
pacman -S xorg-twm xorg-xclock xterm
For our own convenience it's best to install a window manager (WM) or a desktop environment. For a complete list of window managers go to https://wiki.archlinux.org/index.php/Window_manager. And for a full list of desktop environments go to https://wiki.archlinux.org/index.php/Desktop_Environment.
In this section we'll install Xfce (https://wiki.archlinux.org/index.php/Xfce):
pacman -S xfce
Pacman will ask if we want to install all the packages from the Xfce group. We say yes as this is most convenient.
As Xfce is installed now, we can issue startxfce4 from a started Xorg session or modify our ~/.xinitrc. In the .xinitrc file we can uncomment the line # exec startxfce4 and save the file. When logged in, we can now issue startx and enjoy the Xfce desktop environment.
For desktop users this is the common usage as they need a graphical login screen and continue from there to the desired desktop environment or window manager. There are several display managers available in Arch Linux. In this section we'll only describe LXDM, which is a fairly simple display manager. For a list of other display managers available for Arch Linux you can read https://wiki.archlinux.org/index.php/Display_Manager.
To install LXDM we issue pacman with the following command:
pacman -S lxdm
When using initscripts, we can add LXDM at the end of our DAEMONS array. When we are using systemd, we can issue systemctl enable lxdm.service to enable the startup of LXDM on boot. When we have rebooted, the LXDM display manager shows up and we can select, for example, Xfce Session from the Desktop Session drop-down list.
As we want our keyboard and mouse automatically configured every time our computer starts, we can set the keyboard layout in a configuration file, so we don't have to run setxkbmap every time we come into Xorg. We already have xf86-input-evdev installed, so we can put our keyboard settings in the same file 10-evdev.conf, such as /etc/X11/xorg.conf.d/10-evdev.conf (only the keyboard section):
Section "InputClass"
    Identifier "evdev keyboard catchall"
    MatchIsKeyboard "on"
    MatchDevicePath "/dev/input/event*"
    Driver "evdev"
    Option "XkbModel" "pc105"
    Option "XkbLayout" "be"
EndSection
The highlighted parts are added and do the following:
XkbModel: What keyboard model are we using? In our example, pc105.XkbLayout: What keyboard layout are we using? In our example, be (Belgian AZERTY).We can find all the possible models, layouts, and options in /usr/share/X11/xkb/rules/evdev.lst.
By default we have limited support for our graphics card. To enhance our Xorg experience, we must find what graphics card we have, and what drivers to install for them. With matching drivers for our hardware, we will get far better performance than before.
The easiest way to find which drivers to install is by using the application lspci:
lspci | grep VGA
Example output:
01:05.0 VGA compatible controller: Advanced Micro Devices [AMD] neeATI RS880M [Mobility Radeon HD 4200 Series]
Now we already know that we have an ATI card. In some cases we will need the driver used by the kernel to determine what Xorg driver to use exactly. In this example we already know it will be xf86-video-ati.
Now we can install the driver we need for our specific system. In this example it will be xf86-video-ati, but it can be any of the drivers available (replace ati with what you need in the following example).
pacman -S xf86-video-ati
NVIDIA does not really want us to struggle with the configuration of our graphics card. So they have provided us with a nice GUI to create a fine-tuned configuration.
The simplest way to configure your NVIDIA infrastructure is by configuring everything with nvidia-settings. You can issue this application as root so that you can write the global configuration file.
Using the GUI you also can store a configuration file. Do so by entering /etc/X11/xorg.conf.d/20-nvidia.conf:
AMD also provides us with some helpful tools to make the configuration very easy. Let's discuss them now.
If you want to do some extended configuration, you can start a new configuration file by running:
aticonfig --initial
This will create a new configuration file, /etc/X11/xorg.conf.