Table of Contents for
Practical Forensic Imaging
 Practical Forensic Imaging
Published by
No Starch Press, 2016
Practical Forensic Imaging
Published by
No Starch Press, 2016
- Practical Forensic Imaging
- Practical Forensic Imaging
- Practical Forensic Imaging
- Practical Forensic Imaging
- Practical Forensic Imaging
- Practical Forensic Imaging
- Practical Forensic Imaging
- Practical Forensic Imaging
- Practical Forensic Imaging
- Practical Forensic Imaging
- Practical Forensic Imaging
- Practical Forensic Imaging
- Practical Forensic Imaging
- Practical Forensic Imaging
- Practical Forensic Imaging
- Practical Forensic Imaging
- Practical Forensic Imaging
- Practical Forensic Imaging
- Practical Forensic Imaging
- Practical Forensic Imaging
- Practical Forensic Imaging
- Practical Forensic Imaging
- Practical Forensic Imaging
- Practical Forensic Imaging
- Practical Forensic Imaging
6
FORENSIC IMAGE ACQUISITION
This chapter explains the forensic imaging of storage media, with an emphasis on performing forensically sound image acquisition. This means maximizing the amount of data extracted from a particular storage medium, minimizing the disturbance to the storage device and medium, preserving the collected evidence, and documenting the process (including errors).
You’ll read about several tools and approaches here, as well as the strengths and weaknesses of each. As a result, you’ll be able to make an informed decision about which tool is most appropriate in a particular situation. You’ll learn how to use a variety of free or open source forensic imaging tools, such as dd, dcfldd, dc3dd, ewfacquire, and ftkimager-cli. In addition, I describe the sfsimage tool as a script that uses existing acquisition tools to create a SquashFS forensic evidence container.
How do you choose which tool to use when imaging a disk? To some extent, it’s a matter of personal preference. You may know one tool better than another or trust one particular tool based on past experience (or distrust a tool based on past experience). Each tool has its strengths and unique features. Forensic labs that use EnCase or FTK extensively might choose ewfacquire or ftkimager-cli for compatibility and policy reasons. Dcfldd and dc3dd are based on mature and well-tested software, and they were designed to forensically acquire raw images with extensive hashing and logging. For disks with many bad blocks, GNU ddrescue might be a good choice. For integrated hashing, encryption, and compression during acquisition, recent versions of dd_rescue might be an interesting alternative. Ultimately, the tool used will depend on the forensic lab’s organizational policy, the type of examination, your personal preferences, and other circumstances. No particular tool is recommended in this book.
All the examples in this chapter make the following assumptions:
• The subject storage device is physically attached to the forensics exam-iner’s acquisition workstation.
• The subject storage device has been positively identified.
• The appropriate write-blocking mitigation is in place to prevent modification of the subject drive.
• Disk capacity planning has been performed to ensure disk space is not an issue.
Acquire an Image with dd Tools
The resulting image file from dd-based tools is not a “format” in the same sense as other forensic formats, such as EnCase EWF or FTK SMART. Images created by dd-based tools don’t have a header, a footer, internal markers, or descriptive metadata about a case or incident. They are simply a raw mirror image of a chunk of data, in this case, a mirror image of a subject disk or other mass storage.
NOTE
Warning: the dd tools are unforgiving if you make any mistakes and will irrevocably overwrite any unprotected disk if instructed.
To reduce the risk of damaging evidence or an examiner workstation, always double-check the following:
• A write blocker is protecting the evidence/subject drive.
• The serial number of the input device (if=) matches the serial number on the physical subject disk label.
• Confirm the output file (of=) is a regular file located on the examiner system or a program that can handle the expected input to stdin.
Standard Unix dd and GNU dd
The command syntax for dd simply specifies an input file and an output file, and it may include other options that modify the command’s behavior. The following example shows the use of dd to copy a disk block device to a file:
# dd if=/dev/sde of=image.raw
15466496+0 records in
15466496+0 records out
7918845952 bytes (7.9 GB) copied, 130.952 s, 60.5 MB/s
Here if= specifies the input file, which in this case is a raw disk device attached to the acquisition system. The of= parameter is the output file, which is a normal file that contains the raw data copied from the disk device. On completion, dd reports how many bytes were transferred. You can divide the number of bytes transferred by the sector size, and the result should exactly match the number of sectors identified when you attached the device.
There can be challenges when using dd to forensically image a disk. If read errors occur in the middle of an acquisition, dd will abort with an “Input/output error.” Address this issue by adding conv=noerror, which will force dd to skip over the unreadable block and continue. The problem with skipping over unreadable blocks is that the sector offset on the destination file changes for filesystem blocks on the rest of the disk, causing the rest of the filesystem on the disk to appear corrupted. To illustrate, consider the pages of a book. Suppose page 99 is ripped out. If the table of contents points to a chapter starting at page 200, it’s still possible to find it. The book’s page numbers are intact, even with the missing page. But this is not the case when sector 99 is ripped out of a disk image (due to a read error). The rest of the sectors are renumbered, and the filesystem’s “table of contents” will point to the wrong blocks after sector 99.
The sync parameter corrects this by padding the unreadable output block with zeros, essentially creating a “fake” sector or block (full of zeros) to represent the missing one. The rest of the disk image will then have the correct sector numbers (offsets) expected by the filesystem it contains.
Using the previous example, but this time with protection from unreadable blocks (skipping and padding them with zeros), gives this result:
# dd if=/dev/sde of=image.raw conv=noerror,sync
15466496+0 records in
15466496+0 records out
7918845952 bytes (7.9 GB) copied, 136.702 s, 57.9 MB/s
Padding the output impacts the forensic acquisition in that the image is modified and new data (the zeros) has been added. Cryptographic checksums of the disk will not match the original data on the disk (especially if there are new or changing unreadable areas of a disk). This problem can be managed by logging hash windows. This is discussed in “Hash Windows” on page 152.
Another issue with dd is that the transfer block size can be larger than the physical media sector size. This is problematic when a read error occurs, because the remaining sectors in the larger block are padded with zeros, not just the one unreadable sector. This means some normal readable sectors might be excluded from the forensic image. A block size larger than the sector size could also cause additional padding sectors to be added to the end of a forensic image (if the image size is not divisible by the block size). The potential performance gained from increasing the block size must be weighed against the risk of losing evidence from a large padded block.
Traditional dd has no capability for hashing, logging to a file, or other features you would expect of a forensic acquisition tool. Because the raw image contains no metadata about the original subject disk, you must separately document any information that describes the disk (or partially embed some information in the filename).
The dcfldd and dc3dd Tools
Two popular dd derivatives, dcfldd and dc3dd, were independently developed specifically for use in a forensic context.
Because dcfldd and dc3dd originate from GNU dd, they use a similar command syntax. Neither tool has built-in support for writing to forensic formats (FTK, EnCase, AFF), compression, or image encryption. But you can achieve these functions through the use of command piping, which I’ll demonstrate in subsequent sections.
The following example uses dcfldd to image a disk, ensuring blocks containing unreadable sectors are padded and don’t cause an abort:
# dcfldd if=/dev/sde of=image.raw conv=noerror,sync errlog=error.log
241664 blocks (7552Mb) written.
241664+0 records in
241664+0 records out
Errors are written to a separate error log file. The dcfldd tool does not use conv=noerror,sync by default; you must add it manually.
A similar imaging command for dc3dd is shown in the next example. By default, dc3dd does a good job of managing errors during acquisition. No conv=noerror,sync flag is needed because it’s built in. The output is well documented, both to stdout and to the log file. Here is a simple example acquisition:
# dc3dd if=/dev/sde of=image.raw log=error.log
dc3dd 7.2.641 started at 2016-05-07 14:37:10 +0200
compiled options:
command line: dc3dd if=/dev/sde of=image.raw log=error.log
device size: 15466496 sectors (probed), 7,918,845,952 bytes
sector size: 512 bytes (probed)
7918845952 bytes ( 7.4 G ) copied ( 100% ), 80 s, 95 M/s
input results for device `/dev/sde':
15466496 sectors in
0 bad sectors replaced by zeros
output results for file `image.raw':
15466496 sectors out
dc3dd completed at 2016-05-07 14:38:30 +0200
You can also configure the sfsimage script to use either dcfldd or dc3dd for imaging into a SquashFS forensic container. In the following example, a 4K native (4096-byte native sector size) drive is imaged using sfsimage:
# sfsimage -i /dev/sdd 4Knative.sfs
Started: 2016-05-07T17:16:54
Sfsimage version: Sfsimage Version 0.8
Sfsimage command: /usr/bin/sfsimage -i /dev/sdd
Current working directory: /exam
Forensic evidence source: if=/dev/sdd
Destination squashfs container: 4Knative.sfs
Image filename inside container: image.raw
Aquisition command: sudo dc3dd if=/dev/sdd log=errorlog.txt hlog=hashlog.txt
hash=md5 2>/dev/null | pv -s 3000592982016
2.73TiB 5:29:31 [ 144MiB/s] [==========================================>] 100%
Completed: 2016-05-07T22:47:42
# cat /sys/block/sdd/queue/logical_block_size
4096
# cat /sys/block/sdd/queue/physical_block_size
4096
This example also illustrates that the physical and logical sector size of a drive does not impact the acquisition when using dd-style imaging tools.
Both dcfldd and dc3dd have additional features for cryptographic hashing, image splitting, and piping to external programs. I’ll demonstrate these features in various situations throughout the rest of the book.
Acquire an Image with Forensic Formats
Several imaging formats were specifically designed with forensics in mind. Some of these, FTK and EnCase for example, are commercial proprietary formats and have been reverse engineered to allow development of open source–compatible tools. The next two sections describe tools for acquisition using these proprietary formats.
The ewfacquire Tool
An acquisition tool that specializes in Guidance EnCase Expert Witness formats is ewfacquire from libewf (https://github.com/libyal/libewf/). This tool accepts informational parameters on the command line or asks for them interactively. You can choose from a number of commercial formats, including the various EnCase formats as well as FTK. The ewfacquire tool creates acquisition files that enable interoperability with EnCase, FTK, and Sleuth Kit. The tool can also convert raw images into other formats.
This example shows ewfacquire acquiring an attached disk device (a MacBook Air connected to the examiner workstation in Target Disk Mode with a Thunderbolt-to-FireWire adapter):
# ewfacquire -c best -t /exam/macbookair /dev/sdf
ewfacquire 20160424
Device information:
Bus type: FireWire (IEEE1394)
Vendor:
Model:
Serial:
Storage media information:
Type: Device
Media type: Fixed
Media size: 121 GB (121332826112 bytes)
Bytes per sector: 512
Acquiry parameters required, please provide the necessary input
Case number: 42
Description: The case of the missing vase
Evidence number: 1
Examiner name: holmes
Notes: The vase was blue.
Media type (fixed, removable, optical, memory) [fixed]:
Media characteristics (logical, physical) [physical]:
Use EWF file format (ewf, smart, ftk, encase1, encase2, encase3, encase4, encase5,
encase6, encase7, encase7-v2, linen5, linen6, linen7, ewfx) [encase6]:
Start to acquire at offset (0 <= value <= 121332826112) [0]:
The number of bytes to acquire (0 <= value <= 121332826112) [121332826112]:
Evidence segment file size in bytes (1.0 MiB <= value <= 7.9 EiB) [1.4 GiB]:
The number of bytes per sector (1 <= value <= 4294967295) [512]:
The number of sectors to read at once (16, 32, 64, 128, 256, 512, 1024, 2048, 4096,
8192, 16384, 32768) [64]:
The number of sectors to be used as error granularity (1 <= value <= 64) [64]:
The number of retries when a read error occurs (0 <= value <= 255) [2]:
Wipe sectors on read error (mimic EnCase like behavior) (yes, no) [no]:
The following acquiry parameters were provided:
Image path and filename: /exam/macbookair.E01
Case number: 42
Description: The case of the missing vase
Evidence number: 1
Examiner name: holmes
Notes: The vase was blue.
Media type: fixed disk
Is physical: yes
EWF file format: EnCase 6 (.E01)
Compression method: deflate
Compression level: best
Acquiry start offset: 0
Number of bytes to acquire: 113 GiB (121332826112 bytes)
Evidence segment file size: 1.4 GiB (1572864000 bytes)
Bytes per sector: 512
Block size: 64 sectors
Error granularity: 64 sectors
Retries on read error: 2
Zero sectors on read error: no
Continue acquiry with these values (yes, no) [yes]:
Acquiry started at: May 07, 2016 14:54:52
This could take a while.
Status: at 0.0%
acquired 60 MiB (62914560 bytes) of total 113 GiB (121332826112 bytes)
completion in 2 hour(s), 8 minute(s) and 38 second(s) with 14 MiB/s
(15712616 bytes/second)
...
Status: at 99.9%
acquired 112 GiB (121329188864 bytes) of total 113 GiB (121332826112 bytes)
completion in 0 second(s) with 51 MiB/s (54069886 bytes/second)
Acquiry completed at: May 07, 2016 15:32:16
Written: 113 GiB (121332826300 bytes) in 37 minute(s) and 24 second(s) with
51 MiB/s (54069886 bytes/second)
MD5 hash calculated over data: 083e2131d0a59a9e3b59d48dbc451591
ewfacquire: SUCCESS
The ewfacquire acquisition completed successfully in 37 minutes, and the 120GB file was split into 54 compressed *.E0 files totaling 79GB.
AccessData ftkimager
AccessData provides free, precompiled, command line versions of the FTK Imager. The tool is called ftkimager and binaries (no source code) are available for Debian Linux, Fedora Linux, OS X, and Windows, which you can download from the AccessData website at http://accessdata.com/product-download/digital-forensics/.
The ftkimager tool can take input from a raw device, a file, or stdin. It outputs to an FTK SMART format, an EnCase EWF format, or stdout. The stdin and stdout streams are especially useful for piping to and from other programs. A number of other features are supported, including the addition of case metadata into the saved formats, compression, output file splitting (“image fragments”), hashing, and encrypted images.
The following basic example shows the use of ftkimager to acquire an attached disk:
# ftkimager /dev/sdf --s01 --description "SN4C53000120 Ultra Fit" sandisk
AccessData FTK Imager v3.1.1 CLI (Aug 24 2012)
Copyright 2006-2012 AccessData Corp., 384 South 400 West, Lindon, UT 84042
All rights reserved.
Creating image...
Image creation complete.
In this example, the source device was a SanDisk thumb drive accessible via /dev/sdf, and the destination filename was sandisk. Because the default format is raw, adding the --s01 flag saves it to FTK’s SMART format. A serial number and model string was added to the metadata using the --description flag.
The ftkimager creates a log file with basic metadata and any additional information that was added using flags on the command line, as shown here:
# cat sandisk.s01.txt
Case Information:
Acquired using: ADI3
Case Number:
Evidence Number:
Unique description: SN4C53000120 Ultra Fit
Examiner:
Notes:
--------------------------------------------------------------
Information for sandisk:
Physical Evidentiary Item (Source) Information:
[Device Info]
Source Type: Physical
[Drive Geometry]
Cylinders: 14832
Heads: 64
Sectors per Track: 32
Bytes per Sector: 512
Sector Count: 30375936
Source data size: 14832 MB
Sector count: 30375936
[Computed Hashes]
MD5 checksum: a2a9a891eed92edbf47ffba9f4fad402
SHA1 checksum: 2e73cc2a2c21c9d4198e93db04303f9b38e0aefe
Image Information:
Acquisition started: Sat May 7 15:49:07 2016
Acquisition finished: Sat May 7 15:53:07 2016
Segment list:
sandisk.s01
sandisk.s02
You can extract this same information using the --print-info flag together with the filename.
SquashFS Forensic Evidence Container
The sfsimage tool is simply a shell wrapper script that you can configure to use any imaging tool that supports writing an image cleanly to stdout. The script takes this stream of imaged bytes and places them inside a SquashFS compressed filesystem.
In this example, sfsimage was configured to use dc3dd as the imaging tool by editing the DD variable in the beginning of the shell script:
DD="dc3dd if=$DDIN log=errorlog.txt hlog=hashlog.txt hash=md5"
Then the block device is imaged using the -i flag:
$ sfsimage -i /dev/sde philips-usb-drive.sfs
Started: 2016-05-07T15:40:03
Sfsimage version: Sfsimage Version 0.8
Sfsimage command: /usr/bin/sfsimage -i /dev/sde
Current working directory: /exam
Forensic evidence source: if=/dev/sde
Destination squashfs container: philips-usb-drive.sfs
Image filename inside container: image.raw
Aquisition command: sudo dc3dd if=/dev/sde log=errorlog.txt hlog=hashlog.txt
hash=md5 2>/dev/null | pv -s 7918845952
7.38GiB 0:01:18 [95.7MiB/s] [=====================================>] 100%
Completed: 2016-05-07T15:41:22
The following output shows the size of the compressed *.sfs file:
$ ls -lh *.sfs
-rw-r----- 1 holmes holmes 4.5G May 7 15:41 philips-usb-drive.sfs
You can list the contents of the SquashFS container file using sfsimage -l or mount it (read-only) using sfsimage -m. During the acquisition process, sfsimage saves the error log, hash log, and its own log together with the raw image file. You can add additional files to the sfsimage container using sfsimage -a.
Acquire an Image to Multiple Destinations
The flexibility of the Unix piping mechanism allows the completion of multiple complex tasks in a single unattended step. Both dc3dd and dcfldd can specify multiple destination filenames, allowing you to make simultaneous image copies. The following example shows imaging a disk and simultaneously writing to multiple destination drives: a local copy on the acquisition host and a second copy on a mounted, external third-party drive. These two output files are specified using multiple of= flags as follows:
# dc3dd if=/dev/sde of=/exam/local-lab.raw of=/ext/third-party.raw
dc3dd 7.2.641 started at 2016-05-07 15:56:10 +0200
compiled options:
command line: dc3dd if=/dev/sde of=/exam/local-lab.raw of=/ext/third-party.raw
device size: 15466496 sectors (probed), 7,918,845,952 bytes
sector size: 512 bytes (probed)
7918845952 bytes ( 7.4 G ) copied ( 100% ), 79 s, 95 M/s
input results for device `/dev/sde':
15466496 sectors in
0 bad sectors replaced by zeros
output results for file `/exam/local-lab.raw':
15466496 sectors out
output results for file `/ext/third-party.raw':
15466496 sectors out
dc3dd completed at 2016-05-07 15:57:30 +0200
This technique is useful if you’re creating one image for analysis and another for backup, when you’re creating an additional image for a third party, or for any other situation where multiple copies of the image are needed. The two images should be identical, and you can verify them by comparing cryptographic checksums.
Preserve Digital Evidence with Cryptography
Preserving the integrity of evidence is fundamental to the digital forensics process. Integrity can be maintained by using cryptographic hashes and further enhanced with cryptographic signatures by the technicians who performed the acquisition. The purpose of hashing or signing images is to verify that the image has not changed since it was acquired. Because court proceedings and the presentation of evidence can take months or even years, it’s useful to confirm that evidence has not been modified during that time. This can be viewed as somewhat of a digital chain of custody.
The next few sections demonstrate the use of hash windows, signing with PGP and S/MIME, and RFC-3161 timestamping to preserve digital evidence. Let’s begin with some examples of basic cryptographic hashing.
Basic Cryptographic Hashing
The cryptographic hashing of forensic images is typically included as part of the imaging process. The entire media image (each sector in sequence) is passed through a one-way hash function. As of this writing, the four primary forensic imaging tools discussed in this book support the cryptographic hashing algorithms shown in Table 6-1.
Table 6-1: Supported Cryptographic Hashing Algorithms
Tool |
Hashing algorithms supported |
dcfldd |
MD5, SHA1, SHA256, SHA384, SHA512 |
dc3dd |
MD5, SHA1, SHA256, SHA512 |
ewfacquire |
MD5, SHA1, SHA256 |
ftkimager |
MD5, SHA1 |
The tools using forensic formats usually produce a hash by default. Both ftkimager and ewfacquire automatically generate hashes during the acquisition process, which you saw in previous examples.
To create a hash (or multiple hashes) with dcfldd, you specify the desired hash algorithms on the command line, as follows:
# dcfldd if=/dev/sde of=image.raw conv=noerror,sync hash=md5,sha256
241664 blocks (7552Mb) written.Total (md5): ebda11ffb776f183325cf1d8941109f8
Total (sha256): 792996cb7f54cbfd91b5ea9d817546f001f5f8ac05f2d9140fc0778fa60980a2
241664+0 records in
241664+0 records out
With dc3dd, you specify hash algorithms using hash= multiple times, as shown here:
# dc3dd if=/dev/sde of=image.raw hash=md5 hash=sha1 hash=sha512
dc3dd 7.2.641 started at 2016-05-07 16:02:56 +0200
compiled options:
command line: dc3dd if=/dev/sde of=image.raw hash=md5 hash=sha1 hash=sha512
device size: 15466496 sectors (probed), 7,918,845,952 bytes
sector size: 512 bytes (probed)
7918845952 bytes ( 7.4 G ) copied ( 100% ), 80 s, 94 M/s
input results for device `/dev/sde':
15466496 sectors in
0 bad sectors replaced by zeros
ebda11ffb776f183325cf1d8941109f8 (md5)
62e5045fbf6a07fa77c48f82eddb59dfaf7d4d81 (sha1)
f0d1132bf569b68d900433aa52bfc08da10a4c45f6b89847f244834ef20bb04f8c35dd625a31c2e3
a29724e18d9abbf924b16d8f608f0ff0944dcb35e7387b8d (sha512)
output results for file `image.raw':
15466496 sectors out
dc3dd completed at 2016-05-07 16:04:17 +0200
The traditional dd command doesn’t support hashing. Instead, you must pipe the image into a separate program during the acquisition process, which you can do by using the Unix tee command:
# dd if=/dev/sde | tee image.raw | md5sum
15466496+0 records in
15466496+0 records out
7918845952 bytes (7.9 GB, 7.4 GiB) copied, 108.822 s, 72.8 MB/s
ebda11ffb776f183325cf1d8941109f8 -
When dd has no of= specified, the data is sent to stdout where it can be redirected or piped into another program. In this example, it’s piped into the Unix tee command, which simultaneously saves the data to a file and sends it to stdout. Then it’spiped into an independent hashing tool, md5sum, where it produces the hash. In addition to md5sum, the Linux coreutils software package includes other hashing programs: sha1sum, sha224sum, sha256sum, sha384sum, and sha512sum.
I explain the process of verifying the hashes produced in “Verify the Integrity of a Forensic Image” on page 197.
Hash Windows
When you image an older or damaged disk, block read errors can occur. These errors can happen in random places during the acquisition, and the frequency can increase over time. This creates a challenge when you’re preserving the integrity of evidence, because the cryptographic hash might be different each time the disk is read (reacquired, duplicated, verified, and so on).
The solution to this problem is to use hash windows, or piecewise hashing. A hash window is a separate cryptographic hash taken over a smaller sequence of sectors on a disk. For example, a hash window size of 10MB during acquisition will generate a separate hash for every 10MB sequence of sectors and generate a list of hashes for a disk. If one sector becomes unreadable (or is modified for some reason), the hash of that window will be invalid. But all the other hash windows on the disk will maintain their integrity. So even if the hash of the full disk is invalid, if a hash window matches, the integrity of the data found within it will be preserved.
Among the commercial forensic formats, early versions of the Expert Witness Format (EWF) only use cyclic redundancy check (CRC) checksums for individual blocks of data. More recent versions are not open formats, and the ftkimager has no options for creating or viewing hash windows.
To create hash windows with dcfldd, you need to add the hashwindow= parameter to specify the window size. You can save the list of hash windows to a file during acquisition using the hashlog= parameter with a filename. The following example specifies a hash window size of 1MB, and the hashes for each sector range are logged to stdout:
# dcfldd if=/dev/sde of=image.raw conv=noerror,sync hashwindow=1M
0 - 1048576: e0796359399e85ecc03b9ca2fae7b9cf
1048576 - 2097152: 5f44a2407d244c24e261b00de65949d7
2097152 - 3145728: d6d8c4ae64b464dc77658730aec34a01
3145728 - 4194304: 0eae942f041ea38d560e26dc3cbfac48
4194304 - 5242880: 382897281f396b70e76b79dd042cfa7f
5242880 - 6291456: 17664a919d533a91df8d26dfb3d84fb9
6291456 - 7340032: ce29d3ca2c459c311eb8c9d08391a446
7340032 - 8388608: cd0ac7cbbd58f768cd949b082de18d55
256 blocks (8Mb) written.8388608 - 9437184: 31ca089fce536aea91d957e070b189d8
9437184 - 10485760: 48586d6dde4c630ebb168b0276bec0e3
10485760 - 11534336: 0969f7533736e7a2ee480d0ca8d9fad1
...
Groups of identical disk sectors will have the same hash value. This often occurs when large portions of a disk are zeroes or a repeating pattern.
With dc3dd, hash windows are referred to as piecewise hashing, and hashes can be created, not by sector range but per split file. In the following example, the hashes for the sector ranges in each split file are logged:
# dc3dd if=/dev/sda hof=image.raw ofs=image.000 ofsz=1G hlog=hash.log hash=md5
dc3dd 7.2.641 started at 2016-05-07 17:10:31 +0200
compiled options:
command line: dc3dd if=/dev/sda hof=image.raw ofs=image.000 ofsz=1G hlog=hash.log
hash=md5
device size: 15466496 sectors (probed), 7,918,845,952 bytes
sector size: 512 bytes (probed)
7918845952 bytes ( 7.4 G ) copied ( 100% ), 114 s, 66 M/s
7918845952 bytes ( 7.4 G ) hashed ( 100% ), 24 s, 314 M/s
input results for device `/dev/sda':
15466496 sectors in
0 bad sectors replaced by zeros
5dfe68597f8ad9f20600a453101f2c57 (md5)
c250163554581d94958018d8cca61db6, sectors 0 - 2097151
cd573cfaace07e7949bc0c46028904ff, sectors 2097152 - 4194303
83d63636749194bcc7152d9d1f4b9df1, sectors 4194304 - 6291455
da961f072998b8897c4fbed4c0f74e0e, sectors 6291456 - 8388607
4cd5560038faee09da94a0c829f07f7a, sectors 8388608 - 10485759
516ba0bdf8d969fd7e86cd005c992600, sectors 10485760 - 12582911
c19f8c710088b785c3f2ad2fb636cfcd, sectors 12582912 - 14680063
fb2eb5b178839878c1778453805b8bf6, sectors 14680064 - 15466495
output results for file `image.raw':
15466496 sectors out
[ok] 5dfe68597f8ad9f20600a453101f2c57 (md5)
output results for files `image.000':
15466496 sectors out
dc3dd completed at 2016-05-07 17:12:25 +0200
If there is only one image file (that is, not split), there are no separate hash windows, just a single hash for the entire image. In the previous example, eight image files were created, and the MD5 hashes of each file match those reported during acquisition. This can be easily confirmed with md5sum as follows:
# md5sum image.*
c250163554581d94958018d8cca61db6 image.000
cd573cfaace07e7949bc0c46028904ff image.001
83d63636749194bcc7152d9d1f4b9df1 image.002
da961f072998b8897c4fbed4c0f74e0e image.003
4cd5560038faee09da94a0c829f07f7a image.004
516ba0bdf8d969fd7e86cd005c992600 image.005
c19f8c710088b785c3f2ad2fb636cfcd image.006
fb2eb5b178839878c1778453805b8bf6 image.007
Sign an Image with PGP or S/MIME
The hash value is useful to preserve the integrity of an image over time, but anyone can take a cryptographic hash of an image at any time. Consider a disk modified by an unauthorized person who creates a new hash for the disk image. Unless the original hash was properly secured at the original time of acquisition, it’s difficult to prove which hash (the old or the new) is the correct one. Cryptographic signing of forensic images binds a person (or that person’s key) to the integrity of the image. The forensic examiner, a superior, or an external neutral party can sign the image at the time of acquisition.
This doesn’t mean that you need to pass around multiterabyte images for people to sign. It’s enough to sign the hash of the drive or the list of hash windows. The best option is to sign the entire output log containing the timestamps, bytes acquired, and all resulting cryptographic hashes.
In the same way an authorized individual signs paper forms with a pen, they can sign digital forms with a digital signature. Unlike pen and paper signatures, digital signatures are difficult to fake (unless the private key is stolen). Two popular standards for signing digital information are Pretty Good Privacy (PGP) and Secure/Multipurpose Internet Mail Extensions (S/MIME).
The most common Linux implementation of the OpenPGP standard is GnuPG (GPG).1 The three different signing methods include a regular binary signature, a clear text signature, and a detached signature. Using a clear text signature is the most beneficial, because it shows the text together with the signature and can be easily embedded into other documents and reports.
In the following example, S. Holmes has performed a forensic acquisition of a disk and signs the log output containing the MD5 hash and other details:
$ gpg --clearsign hash.log
You need a passphrase to unlock the secret key for
user: "Sherlock Holmes <holmes@digitalforensics.ch>"
2048-bit RSA key, ID CF87856B, created 2016-01-11
Enter passphrase:
The previous command created the hash.log.asc file, which contains the contents of the file together with the signature:
$ cat hash.log.asc
-----BEGIN PGP SIGNED MESSAGE-----
Hash: SHA1
dc3dd 7.2.641 started at 2016-05-07 17:23:49 +0200
compiled options:
command line: dc3dd if=/dev/sda hof=image.raw ofs=image.000 ofsz=1G hlog=hash.log
hash=md5
input results for device `/dev/sda':
5dfe68597f8ad9f20600a453101f2c57 (md5)
c250163554581d94958018d8cca61db6, sectors 0 - 2097151
cd573cfaace07e7949bc0c46028904ff, sectors 2097152 - 4194303
83d63636749194bcc7152d9d1f4b9df1, sectors 4194304 - 6291455
da961f072998b8897c4fbed4c0f74e0e, sectors 6291456 - 8388607
4cd5560038faee09da94a0c829f07f7a, sectors 8388608 - 10485759
516ba0bdf8d969fd7e86cd005c992600, sectors 10485760 - 12582911
c19f8c710088b785c3f2ad2fb636cfcd, sectors 12582912 - 14680063
fb2eb5b178839878c1778453805b8bf6, sectors 14680064 - 15466495
output results for file `image.raw':
[ok] 5dfe68597f8ad9f20600a453101f2c57 (md5)
output results for files `image.000':
dc3dd completed at 2016-05-07 17:25:40 +0200
-----BEGIN PGP SIGNATURE-----
Version: GnuPG v1
iQEcBAEBAgAGBQJXLgnoAAoJEEg0vvzPh4VrdeAH/0EhCLFSWwTZDNUrIn++1rI3
XI6KuwES19EKR18PrK/Nhf5MsF3xyy3c/j7tjopkfnDGLYRA615ycWEvIJlevNh7
k7QHJoPTDnyJcF29uuTINPWk2MsBlkNdTTiyA6ab3U4Qm+DMC4wVKpOp/io52qq3
KP7Kh558aw8m+0Froc0/4sF7rer9xvBThA2cw+ZiyF5a8wTCBmavDchCfWm+NREr
RIncJV45nuHrQW8MObPOK6G34mruT9nSQFH1LR1FL830m/W69WHS2JX+shfk5g5X
I6I7jNEn6FgiRyhm+BizoSl5F6mv3ff6mRlVysGDJ+FXE3CiE6ZzK+jNB7Pw+Zg=
=6GrG
-----END PGP SIGNATURE-----
This signed text can be verified at a later date by any third party using a copy of Holmes’s GPG public key.
Another encryption standard you can use to sign files is S/MIME. The use of S/MIME relies on X.509 certificates from a public key infrastructure (PKI), either privately within an organization or from a public certificate authority (CA). If an authorized person has a personal certificate (typically, the same one they use for signing and encrypting S/MIME email), they can use it to sign files containing acquisition details.
The gpgsm tool is part of GnuPG2 and supports managing X.509 keys, encryption, and signatures using the S/MIME standard. Once the necessary keys have been generated and certificates have been installed, you can use gpgsm to sign files in a similar manner to GPG. The following command produces a signature of a specified file:
$ gpgsm -a -r holmes@digitalforensics.ch -o hash.log.pem --sign hash.log
The -a flag specifies it should use ASCII armor, a method of encoding binary data in a plaintext format, instead of binary (because it’s easier to copy into reports or emails). The -r flag specifies which recipient key to use for signing. In this command example, the email address is used, but the key can also be specified by key ID, fingerprint, or matching components of X.509 strings. The -o specifies the output file for the signature, and --sign instructs gpgsm to create a signature over the specified hash.log file.
When used for signing, gpgsm will create a PEM2 signature file that looks similar to the following:
-----BEGIN SIGNED MESSAGE-----
MIAGCSqGSIb3DQEHAqCAMIACAQExDzANBglghkgBZQMEAgEFADCABgkqhkiG9w0B
BwGggCSABIICIApkYzNkZCA3LjIuNjQxIHN0YXJ0ZWQgYXQgMjAxNi0wMS0xMSAy
...
GR2YC4Mx5xQ63Kbxg/5BxT7rlC7DBjHOVMCMJzVPy4OVUOXPnL2IdP2dhvkOtojk
UKIjSw40xIIAAAAAAAA=
-----END SIGNED MESSAGE-----
Once a signature has been created by an authorized party, the hash values and details of the original forensic acquisition cannot be changed. Only the person who created the signature can make changes and sign it again.3 With these signatures, it’s possible to verify the integrity of the acquisition details without involving the person who signed it. I describe the signature verification process in Chapter 7.
You can purchase personal S/MIME certificates similar to SSL certificates for websites. You’ll find an overview of CAs who offer personal S/MIME certificates at https://www.sslshopper.com/email-certificates-smime-certificates.html. Using a personal S/MIME certificate, you can also sign the acquisition details simply by sending a signed email message containing the contents of the output log.
The examples shown in this section are simple and use GNU Privacy Guard tools. There are other command line tools you can use to perform cryptographic signing. The OpenSSL command line tool provides a rich cryptographic toolkit that includes the ability to sign files using X.509 certificates and S/MIME. OpenSSL is used in the next section to demonstrate cryptographic timestamping.
RFC-3161 Timestamping
Signatures with PGP or S/MIME strongly bind an authorized individual (or multiple individuals) to the integrity of a file containing forensic acquisition results. In some cases, it’s also useful to strongly bind the forensic acquisition results to a specific point in time. You can do this by using an independent timestamping service.
Timestamping is a formal standard defined in RFC-3161, which describes the format of a timestamp request and response. OpenSSL can create and send timestamp requests and verify responses. In the following example, an RFC-3161 compliant timestamp request for the acquisition log is created, producing a request file with a *.tsq extension:
$ openssl ts -query -data hash.log -out hash.log.tsq -cert
This time stamp request contains a hash of the hash.log file, not the actual file. The file is not sent to the timestamping server. This is important from an information security perspective. The timestamp service provider is only trusted with timestamp information, not the contents of the files being timestamped.
The generated request can then be sent to a timestamping service using the tsget command included with OpenSSL.4 The following example uses the FreeTSA service:
$ tsget -h https://freetsa.org/tsr hash.log.tsq
On some Linux distributions, this script might be missing or broken. You can work around it by manually submitting the timestamp request with the curl command as follows:
$ curl -s -H "Content-Type: application/timestamp-query" --data-binary
"@hash.log.tsq" https://freetsa.org/tsr > hash.log.tsr
If the timestamping server accepts the request, it returns an RFC-3161 compliant timestamp. In this example, the timestamp is saved with the *.tsr file extension to hash.log.tsr. You can view the contents of the timestamp using the OpenSSL ts command:
$ openssl ts -reply -in hash.log.tsr -text
Status info:
Status: Granted.
Status description: unspecified
Failure info: unspecified
TST info:
Version: 1
Policy OID: 1.2.3.4.1
Hash Algorithm: sha1
Message data:
0000 - 63 5a 86 52 01 24 72 43-8e 10 24 bc 24 97 d0 50 cZ.R.$rC..$.$..P
0010 - 4a 69 ad a9 Ji..
Serial number: 0x0AF4
Time stamp: May 7 22:03:49 2016 GMT
Accuracy: 0x01 seconds, 0x01F4 millis, 0x64 micros
Ordering: yes
Nonce: 0xBC6F68553A3E5EF5
TSA: DirName:/O=Free TSA/OU=TSA/description=This certificate digitally signs
documents and time stamp requests made using the freetsa.org online
services/CN=www.freetsa.org/emailAddress=busilezas@gmail.com/L=Wuerzburg/
C=DE/ST=Bayern
Extensions:
A copy of the hash.log.tsr file provides proof that the acquisition results existed at a specific point intime. An independent third party can also verify the validity of the timestamp. I’ll demonstrate the validation of timestamps in Chapter 7.
A number of free and commercial timestamping services are available on the internet. Here are a few examples:
• Comodo RFC-3161 Timestamping Service: http://timestamp.comodoca.com/?td=sha256
• FreeTSA: http://freetsa.org/index_en.php
• Polish CERTUM PCC - General Certification Authority: http://time.certum.pl/
• Safe Creative Timestamping Authority (TSA) server: http://tsa.safecreative.org/
• StartCom Free RFC-3161 Timestamping Service: http://tsa.startssl.com/rfc3161
• Zeitstempeldienst der DFN-PKI: http://www.pki.dfn.de/zeitstempeldienst/
The examples in the last two sections strongly bind an individual and a time to the integrity of an image. Cryptographic tokens such as smartcards or hardware security modules (HSMs) can be used to secure the private keys and guarantee physical possession of the token to sign the image. Cryptographic keys on hard tokens cannot be copied or stolen. Some examples of hard tokens that can be used to make cryptographic signatures include Nitrokey, Yubikey, and GnuPG OpenPGP smartcards.
Manage Drive Failure and Errors
Occasionally, a forensic lab receives a problematic hard disk to analyze. The disk might be old, damaged, or failing. It may have interface errors, platter read errors, head errors, motor resets, and other errors. In some cases, you can still acquire a partial forensic image of the drive. Depending on the disk size, the block size, and the number of unreadable sectors, imaging a bad disk could take several days.
It’s important to understand that errors described here refer to the drive hardware. They don’t refer to software errors such as corrupt filesystems, destroyed partition tables, and so on.
This section shows examples of different tools and how they handle error conditions. The dmsetup tool is useful for simulating disk errors and testing how forensic tools behave under various failing conditions, and was used in several of the following examples (the disk device is /dev/mapper/errdisk). An overview of how dc3dd, dcfldd, ewfacquire, and ftkimager manage and report errors is shown in the following section.
Forensic Tool Error Handling
The following example shows the dcfldd tool encountering a disk with two errors. The locations (block offsets) of the errors on a disk are reported to stdout and logged to the specified file, as follows:
# dcfldd if=/dev/mapper/errdisk of=errdisk.raw conv=noerror,sync errlog=error.log
...
# cat error.log
dcfldd:/dev/mapper/errdisk: Input/output error
(null)+15 records in
(null)+16 records out
dcfldd:/dev/mapper/errdisk: Input/output error
(null)+29 records in
(null)+32 records out
(null)+62496 records in
(null)+62501 records out
Several bugs were encountered when testing dcfldd under Debian Linux. The block size used for padding remained at 4K, even when a 512-byte block size was specified (dd showed the same behavior). On some errors, dcfldd went into an endless loop and had to be manually terminated.
The dc3dd tool provides a very detailed overview of the errors encountered. Errors are sent to stout and saved in the specified log file, as follows:
# dc3dd if=/dev/mapper/errdisk of=errdisk.raw log=error.log
...
# cat error.log
dc3dd 7.2.641 started at 2016-01-12 19:42:26 +0100
compiled options:
command line: dc3dd if=/dev/mapper/errdisk of=errdisk.raw log=error.log
device size: 4000000 sectors (probed), 2,048,000,000 bytes
sector size: 512 bytes (probed)
[!!] reading `/dev/mapper/errdisk' at sector 1000 : Input/output error
[!!] 4 occurences while reading `/dev/mapper/errdisk' from sector 2001 to sector 2004
: Input/output error
2048000000 bytes ( 1.9 G ) copied ( 100% ), 5.74919 s, 340 M/s
input results for device `/dev/mapper/errdisk':
4000000 sectors in
5 bad sectors replaced by zeros
output results for file `errdisk.raw':
4000000 sectors out
dc3dd completed at 2016-01-12 19:42:31 +0100
The ewfacquire tool offers a default error granularity of 64 sectors, and this can be changed to 1 to reduce the number of sectors padded to zero. In this example, ewfacquire only detected two read errors (similar to dcfldd; it skipped and padded a 4k block without checking the other sectors):
# ewfacquire -t errdisk /dev/mapper/errdisk
ewfacquire 20150126
...
The number of bytes per sector (1 <= value <= 4294967295) [512]:
The number of sectors to read at once (16, 32, 64, 128, 256, 512, 1024, 2048, 4096,
8192, 16384, 32768) [64]:
The number of sectors to be used as error granularity (1 <= value <= 64) [64]: 1
The number of retries when a read error occurs (0 <= value <= 255) [2]: 1
Wipe sectors on read error (mimic EnCase like behavior) (yes, no) [no]: yes
...
Acquiry completed at: Jan 12, 2016 19:57:58
Written: 1.9 GiB (2048000804 bytes) in 14 second(s) with 139 MiB/s (146285771
bytes/second).
Errors reading device:
total number: 2
at sector(s): 1000 - 1008 number: 8 (offset: 0x0007d000 of size: 4096)
at sector(s): 2000 - 2008 number: 8 (offset: 0x000fa000 of size: 4096)
MD5 hash calculated over data: 4d319b12088b3990bded7834211308eb
ewfacquire: SUCCESS
The ftkimager reports errors and logs them. The following example uses an actual physically defective disk (an original first-generation iPod) because the ftkimager didn’t work with simulated errors created with dmsetup:
# ftkimager /dev/sdg ipod
AccessData FTK Imager v3.1.1 CLI (Aug 24 2012)
Copyright 2006-2012 AccessData Corp., 384 South 400 West, Lindon, UT 84042
All rights reserved.
Creating image...
234.25 / 4775.76 MB (11.71 MB/sec) - 0:06:27 left
Image creation complete.
# cat ipod.001.txt
Case Information:
Acquired using: FTK
...
ATTENTION:
The following sector(s) on the source drive could not be read:
491584 through 491591
491928 through 491935
The contents of these sectors were replaced with zeros in the image.
...
Each of the forensic acquisition tools had some error detection, handling, and logging capabilities. However, for disks with a significant number of errors or hardware damage, using more specialized tools might be more appropriate. The next section describes the use of data recovery tools for this purpose.
Data Recovery Tools
Several disk block recovery tools are worth mentioning because of their robust error handling and aggressive recovery methods. Although these tools were not written with forensics in mind, they are useful in situations in which other forensic tools have failed.
The ddrescue tool (by Antonio Diaz Diaz) was designed to recover blocks from damaged disks. Unlike the dd family of tools, it has a multiphase recovery algorithm, and you can run it against a disk multiple times to fill gaps in the image. The algorithm includes reading problematic parts of the disk backward to increase the number of recovered sectors and performing various retry operations over multiple passes.
A completed ddrescue operation results in statistics that describe the recovery success rate:
# ddrescue /dev/sda image.raw image.log
rescued: 40968 MB, errsize: 2895 kB, current rate: 0 B/s
ipos: 39026 MB, errors: 38, average rate: 563 kB/s
opos: 39026 MB, run time: 20.18 h, successful read: 8.04 h ago
Finished
The log file that ddrescue produces shows the start and end times and a detailed overview of the disk’s problem areas:
# Rescue Logfile. Created by GNU ddrescue version 1.19
# Command line: ddrescue /dev/sda image.raw image.log
# Start time: 2015-06-13 22:57:39
# Current time: 2015-06-14 19:09:03
# Finished
# current_pos current_status
0x9162CAC00 +
# pos size status
0x00000000 0x4F29D000 +
0x4F29D000 0x00002000 -
0x4F29F000 0x00253000 +
...
The dd_rescue tool (note the underscore) was developed by Kurt Garloff in the late 1990s, and although the name contains dd, the command syntax is completely different and it doesn’t perform data conversion (same with ddrescue). But it does transfer blocks of data similar to dd. Several features make this tool a possible option for use in a digital forensic laboratory. The block size is dynamically changed when disk errors occur, automatically decreasing to a physical block size. After a period without errors, the block size is changed again to improve performance. You can also image the disk backwards, from the end of the disk to the beginning. This technique is useful if the drive has difficulty reading past a certain point on the disk.
The myrescue tool is designed to initially avoid unreadable areas (no retries) and focuses on recovering as much of the readable areas as possible. After the readable sectors are copied, it works on the failed ranges. The tool documentation recommends letting difficult drives rest for a couple of hours between retries.
Another tool called recoverdm also performs data recovery. It is problematicdisksproblematicdisksproblematicdisksunique in that it can recover data from a damaged disk at the sector level or at an individual file level. The tool has additional features for floppies and optical media.
SMART and Kernel Errors
The SMART information on the disk can provide additional indicators about the health of the drive and the likelihood of a successful recovery. For example:
# smartctl -x /dev/sda
smartctl 6.4 2014-10-07 r4002 [x86_64-linux-3.19.0-18-generic] (local build)
Copyright (C) 2002-14, Bruce Allen, Christian Franke, www.smartmontools.org
=== START OF INFORMATION SECTION ===
Model Family: Maxtor DiamondMax D540X-4K
Device Model: MAXTOR 4K040H2
Serial Number: 672136472275
Firmware Version: A08.1500
User Capacity: 40,971,571,200 bytes [40.9 GB]
Sector Size: 512 bytes logical/physical
...
Vendor Specific SMART Attributes with Thresholds:
ID# ATTRIBUTE_NAME FLAGS VALUE WORST THRESH FAIL RAW_VALUE
1 Raw_Read_Error_Rate P--R-K 100 253 020 - 0
3 Spin_Up_Time POS--K 087 086 020 - 1678
4 Start_Stop_Count -O--CK 078 078 008 - 14628
5 Reallocated_Sector_Ct PO--CK 003 001 020 NOW 486
7 Seek_Error_Rate PO-R-- 100 100 023 - 0
9 Power_On_Hours -O--C- 073 073 001 - 17814
10 Spin_Retry_Count -OS--K 100 100 000 - 0
11 Calibration_Retry_Count PO--C- 100 080 020 - 0
12 Power_Cycle_Count -O--CK 100 100 008 - 294
13 Read_Soft_Error_Rate PO-R-- 100 100 023 - 0
194 Temperature_Celsius -O---K 094 083 042 - 17
195 Hardware_ECC_Recovered -O-RC- 100 031 000 - 7137262
196 Reallocated_Event_Count ----C- 100 253 020 - 0
197 Current_Pending_Sector -O--CK 003 001 020 NOW 486
198 Offline_Uncorrectable ----C- 100 253 000 - 0
199 UDMA_CRC_Error_Count -O-RC- 199 199 000 - 1
||||||_ K auto-keep
|||||__ C event count
||||___ R error rate
|||____ S speed/performance
||_____ O updated online
|______ P prefailure warning
Read SMART Log Directory failed: scsi error badly formed scsi parameters
ATA_READ_LOG_EXT (addr=0x00:0x00, page=0, n=1) failed: scsi error aborted command
Read GP Log Directory failed
...
ATA Error Count: 9883 (device log contains only the most recent five errors)
...
Error 9883 occurred at disk power-on lifetime: 17810 hours (742 days + 2 hours)
...
Error 9882 occurred at disk power-on lifetime: 17810 hours (742 days + 2 hours)
...
Error 9881 occurred at disk power-on lifetime: 17810 hours (742 days + 2 hours)
...
When performing forensic acquisition, you should note any error and failure messages appearing in dmesg or tool output. In cases where sectors could not be read and zeroed padding has been added, this needs to be recorded (depending on the forensic acquisition tool used, it will be logged).
Other Options for Failed Drives
In this section, I provide a few additional tips and comments to help you acquire problematic disks.
In some cases, a disk might only operate correctly for a few minutes when it’s cold before it becomes inaccessible or unstable. If the disk functions properly for a few minutes before failing, you might still be able to make an image over time by repeatedly restarting the recovery. Some of the tools mentioned in “Data Recovery Tools” on page 162 maintain a file that contains the recovery state from the last attempt. A recovery operation can be interrupted and later restarted where it left off.
After attempting to image a drive for a while, let the drive cool down and try again. Sometimes as a drive overheats, the access problems can get worse. Again, the disk recovery tools’ restart features are useful in this situation.
If you suspect the drive electronics are faulty and a second identical (meaning the same make, model, and firmware revision) functioning drive is available,5 you might be able to swap the drive electronics temporarily to recover the data. You don’t need to open the disk to perform this action, so the risk of damage (due to dust and so on) is minimal.
Professional data recovery firms have cleanrooms where trained staff can open drives, unstick drive heads, replace actuators, and perform other delicate operations on a drive. Do not attempt these procedures without the proper environment, equipment, and training. Just opening a drive outside of a cleanroom will expose it to dust particles, causing damage to the disk.
Damaged Optical Discs
Most of the tools mentioned earlier should also function on optical media. Some tools have added features or special behavior for optical media.
The ddrescue tool suggests specifying a 2048-byte sector size for optical media. Here’s an example of ddrescue in the process of recovering a damaged CD-ROM disc:
# ddrescue -b 2048 /dev/cdrom cdrom.raw
GNU ddrescue 1.19
Press Ctrl-C to interrupt
rescued: 15671 kB, errsize: 3878 kB, current rate: 0 B/s
ipos: 408485 kB, errors: 126, average rate: 12557 B/s
opos: 408485 kB, run time: 20.80 m, successful read: 31 s ago
Copying non-tried blocks... Pass 2 (backwards)
Notice that ddrescue reads the CD-ROM backwards in an attempt to recover blocks.
For optical discs that are partially recoverable but have a corrupt file-system, you can use carving tools to extract files. A data carver designed for optical discs is the dares carver (ftp://ftp.heise.de/pub/ct/ctsi/dares.tgz), which supports various optical disc filesystem formats.
This section has covered the management of drive failure and errors. Drive failure and errors do happen and can result in partial or total data loss. In cases where you experience problems with a drive, be sure you document the nature of the error and, wherever possible, the sector that was impacted.
Image Acquisition over a Network
Imaging a disk over a network can be useful for a number of reasons:
• A disk may be located in a remote location, and it might not be feasible to physically seize and ship the disk to a central forensic lab (possibly due to disruption of business, lack of resources, or other logistical issues).
• A time-critical incident might require a remote drive image as soon as possible without delays due to shipping (depending on network bandwidth, disk size, and shipping times, shipping a disk might still be faster).6
• A machine in a local forensic lab may have a disk in a PC that cannot be feasibly physically removed. This could be due to the design of the PC, the lack of tools needed, or the risk of causing damage or destroying evidence.
In general, seizing disks does not scale well in large organizations, and having a broadly deployed enterprise solution for remote disk triage and acquisition is common. EnCase Enterprise is a classic example, with many newer firms bringing similar products to the market.
As with disk imaging, many possibilities exist to perform forensic acquisition over a network. Most solutions involve booting a forensic CD on a remote machine, establishing a network connection, and piping the dd output over the network to a local file. You can do this simply by using a combination of dd and netcat. Secure connections can also be made using ssh or secure netcat alternatives, such as socat and cryptcat.
This section provides several examples that use ssh for a secure network connection. But first, let’s start by looking at rdd, which was specifically designed with forensic acquisition in mind.
Remote Forensic Imaging with rdd
Designed for acquiring disk images over a network, the rdd tool was developed by the Netherlands Forensic Institute (NFI). The rdd tool has a number of useful features, including hashing, logging, compression, error handling, file splitting, progress indicators, and statistics. Support for EWF output can be included at compile time. The rdd tool uses a client-server model, where the subject PC (booted from a forensic boot CD) is the client and the examiner PC is the server. You perform an acquisition by starting a listening process on the server (examiner PC) and running the acquisition command on the client.
The rdd tool does not have built-in security; it must be added using a VPN, a secure shell, or the equivalent. When you are using rdd over untrusted or hostile networks, the network traffic needs to be encrypted, and listening TCP ports should not be exposed. You can do this by using a two-step process of establishing a secure network channel and using it for the acquisition.
Without security, the rdd tool is still useful on a trusted network segment in a protected lab setting, when using crossed Ethernet cables, or when connecting two PCs with a FireWire cable. (FireWire interfaces can be used as network interfaces.)
On the examiner’s workstation, run the server mode of rdd-copy by specifying -S, as shown in the following example. This needs to be started before the client starts. Make sure no firewalls or iptables packet filtering is blocking TCP port 4832 (the default port).
# rdd-copy -S --md5 -l server.log
# cat server.log
2016-01-13 01:34:21 +0100:
2016-01-13 01:34:21 +0100: 2016-01-13 01:34:21 CET
2016-01-13 01:34:21 +0100: rdd version 3.0.4
...
2016-01-13 01:34:21 +0100: rdd-copy -S --md5 -l server.log
2016-01-13 01:34:21 +0100: ========== Parameter settings ==========
2016-01-13 01:34:21 +0100: mode: server
2016-01-13 01:34:21 +0100: verbose: no
2016-01-13 01:34:21 +0100: quiet: no
2016-01-13 01:34:21 +0100: server port: 4832
2016-01-13 01:34:21 +0100: input file: <none>
2016-01-13 01:34:21 +0100: log file: server.log
...
2016-01-13 01:37:05 +0100: === done ***
2016-01-13 01:37:05 +0100: seconds: 147.787
2016-01-13 01:37:05 +0100: bytes written: 7918845952
2016-01-13 01:37:05 +0100: bytes lost: 0
2016-01-13 01:37:05 +0100: read errors: 0
2016-01-13 01:37:05 +0100: zero-block substitutions: 0
2016-01-13 01:37:05 +0100: MD5: a3fa962816227e35f954bb0b5be893ea
...
On the remote subject PC, run the client mode of rdd-copy using -C. Specify the input device using -I. The input device can be any locally attached storage device (it was a remote USB stick in this example). The output file, -O, has an additional option to indicate a network destination. The client tells the server which file to use for the acquired image, using the traditional Unix convention of hostname:/path/to/filename:
# rdd-copy -C --md5 -l client.log -I /dev/sde -O -N lab-pc:/evi/image.raw
# cat client.log
2016-01-13 01:34:37 +0100:
2016-01-13 01:34:37 +0100: 2016-01-13 01:34:37 CET
2016-01-13 01:34:37 +0100: rdd version 3.0.4
...
2016-01-13 01:34:37 +0100: rdd-copy -C --md5 -l client.log -I /dev/sde -O -N
lab-pc:/evi/image.raw
2016-01-13 01:34:37 +0100: ========== Parameter settings ==========
2016-01-13 01:34:37 +0100: mode: client
2016-01-13 01:34:37 +0100: verbose: no
2016-01-13 01:34:37 +0100: quiet: no
2016-01-13 01:34:37 +0100: server port: 4832
2016-01-13 01:34:37 +0100: input file: /dev/sde
2016-01-13 01:34:37 +0100: log file: client.log
2016-01-13 01:34:37 +0100: output #0
2016-01-13 01:34:37 +0100: output file: /evi/image.raw
2016-01-13 01:34:37 +0100: segment size: 0
2016-01-13 01:34:37 +0100: output as ewf compression: no ewf
2016-01-13 01:34:37 +0100: output host: lab-pc
2016-01-13 01:34:37 +0100: output port: 4832
...
2016-01-13 01:37:05 +0100: === done ***
2016-01-13 01:37:05 +0100: seconds: 147.787
2016-01-13 01:37:05 +0100: bytes written: 7918845952
2016-01-13 01:37:05 +0100: bytes lost: 0
2016-01-13 01:37:05 +0100: read errors: 0
2016-01-13 01:37:05 +0100: zero-block substitutions: 0
2016-01-13 01:37:05 +0100: MD5: a3fa962816227e35f954bb0b5be893ea
...
Both client and server specify log files using -l and a hash algorithm that can be verified at the end of the transfer. You can monitor the progress of the client and the server by adding -P 1 to either side (or both).
Secure Remote Imaging with ssh
In situations where rdd is not available, you can perform a basic acquisition using a single ssh command either on the remote PC containing the subject drive or on the examiner PC. The following example shows imaging a disk (a USB stick plugged into the remote PC in this example) over the network using a secure shell session originating from the remote PC:
# dd if=/dev/sdb | ssh lab-pc "cat > sandisk-02028302BCA1D848.raw"
7856127+0 records in
7856127+0 records out
4022337024 bytes (4.0 GB) copied, 347.411 s, 11.6 MB/s
The dd command is run locally, and the output is piped into the ssh command. Secure shell will pipe this data stream into the cat program on the examiner PC. The output from the cat program is redirected into a file residing on the examiner PC. Upon completion, a raw image will be available to examine with other forensic tools.
You could also acquire the image with secure shell originating from the examiner workstation and connecting to the remote PC with the attached subject disk. The following example demonstrates this from the examiner PC, imaging the same USB again:
# ssh remote-pc "dd if=/dev/sdb" > sandisk-02028302BCA1D848.raw
7856127+0 records in
7856127+0 records out
4022337024 bytes (4.0 GB) copied, 343.991 s, 11.7 MB/s
Here secure shell is instructed to run the dd command on the remote (subject) machine. The output from the remote dd command becomes the output of the local ssh command and is redirected to a local file. On completion, a raw image file is available for analysis on the examiner’sPC.
You can replace the basic dd commands shown in this section with dcfldd, dc3dd, or any of the other acquisition tools that image to stdout. You can use this method to collect other information about a remote (subject) machine. To illustrate, here are some examples of collecting data about a remote PC that has been started with the DEFT Linux boot CD. In this example, hdparm, smartctl, and lshw data are collected and saved on the examiner workstation:
# ssh remote-pc "hdparm --dco-identify /dev/sda" > dco.lenovo-W38237SJ.txt
# ssh remote-pc "hdparm -I /dev/sda" > hdparm.lenovo-W38237SJ.txt
# ssh remote-pc "smartctl -x /dev/sda" > smartctl.lenovo-W38237SJ.txt
# ssh remote-pc "lshw" > lshw.lenovo-W38237SJ.txt
As in the previous example, ssh executes various commands on the remote machine, and the output is redirected to files on the local (examiner) workstation. The serial number of the disk is included in the file-name to ensure an obvious link between the physical disk and the data files collected.
Remote Acquisition to a SquashFS Evidence Container
As demonstrated previously, SquashFS can be used as a forensic evidence container, with sfsimage used to image local disks. The sfsimage script can also image a disk on a remote machine directly into a SquashFS evidence container. Two examples are shown here.
The remote dd output can be piped via ssh into a local sfsimage command, creating a SquashFS forensic evidence container with the raw image:
$ ssh root@remote-pc "dd if=/dev/mmcblk0" | sfsimage -i - remote-pc.sfs
Started: 2016-05-08T10:30:34
Sfsimage version: Sfsimage Version 0.8
Sfsimage command: /usr/bin/sfsimage -i -
Current working directory: /home/holmes
Forensic evidence source:
Destination squashfs container: remote-pc.sfs
Image filename inside container: image.raw
Aquisition command: sudo dc3dd log=errorlog.txt hlog=hashlog.txt hash=md5
2>/dev/null | pv -s 0
31116288+0 records inMiB/s] [ <=> ]
31116288+0 records out
15931539456 bytes (16 GB, 15 GiB) copied, 597.913 s, 26.6 MB/s
14.8GiB 0:09:58 [25.4MiB/s] [ <=> ]
Completed: 2016-05-08T10:40:32
In this example, the remote PC is accessed by the root user (root@remote-pc), and a remote media card (/dev/mmcblk0) is imaged to stdout with a dd command. The stdout stream is transported over the ssh connection to the local sfsimage command where - (stdin) is the input file.
A second method uses the same principle, but with variables for the sfsimage shell script. In the sfsimage config() block or in a separate sfsimage.conf file, you can specify variables and configuration settings that control sfsimage behavior. Setting the DD variable to an ssh command will cause mksquashfs to take input from a remote machine via ssh. A config file in the current working directory is shown here:
$ cat sfsimage.conf
DD="ssh root@remote-pc \"dd if=/dev/mmcblk0\""
SQSUDO=""
The double quotes in the DD variable need to be escaped. The SQSUDO variable is set to an empty string, because no local root privileges are needed. When you run sfsimage with this config file in your local working directory, your configuration settings will override the default sfsimage settings.
It is important to note, that the input file should still be specified as a dash (-), because input is piped to stdin internally by the ssh command in the DD variable. The remote acquisition using sfsimage in this way looks like this:
$ sfsimage -i - remote-pc.sfs
Started: 2016-05-08T10:56:30
Sfsimage version: Sfsimage Version 0.8
Sfsimage command: /usr/bin/sfsimage -i -
Current working directory: /home/holmes
Forensic evidence source:
Destination squashfs container: remote-pc.sfs
Image filename inside container: image.raw
Aquisition command: ssh root@remote-pc "dd if=/dev/mmcblk0" 2>/dev/null | pv -s 0
14.8GiB 0:09:03 [ 28MiB/s] [ <=> ]
Completed: 2016-05-08T11:05:33
I showed this DD configuration example primarily to illustrate the possibility of embedding remote network-imaging commands into sfsimage. The embedding of complex acquisition commands into config files can generally be used to change the operation of the sfsimage script.
Acquire a Remote Disk to EnCase or FTK Format
You can also pipe remote ssh commands into other programs to perform tasks or conversions to other formats. A useful example is to remotely acquire a raw image and convert it to Encase/EWF as it’s being written to disk. This example shows a remote PC being remotely imaged to an examiner workstation and saved as *.ewf files:
# ssh remote-pc "dd if=/dev/sda" | ewfacquirestream -D 16048539022588504422 -t
eepc-16048539022588504422
ewfacquirestream 20140608
Using the following acquiry parameters:
Image path and filename: eepc-16048539022588504422.E01
Case number: case_number
Description: 16048539022588504422
Evidence number: evidence_number
Examiner name: examiner_name
Notes: notes
Media type: fixed disk
Is physical: yes
EWF file format: EnCase 6 (.E01)
Compression method: deflate
Compression level: none
Acquiry start offset: 0
Number of bytes to acquire: 0 (until end of input)
Evidence segment file size: 1.4 GiB (1572864000 bytes)
Bytes per sector: 512
Block size: 64 sectors
Error granularity: 64 sectors
Retries on read error: 2
Zero sectors on read error: no
Acquiry started at: Jun 22, 2015 21:22:47
This could take a while.
...
Status: acquired 3.7 GiB (3999301632 bytes)
in 7 minute(s) and 38 second(s) with 8.3 MiB/s (8732099 bytes/second).
7815024+0 records in
7815024+0 records out
4001292288 bytes (4.0 GB) copied, 451.948 s, 8.9 MB/s
Acquiry completed at: Jun 22, 2015 21:30:25
Written: 3.7 GiB (4001526432 bytes) in 7 minute(s) and 38 second(s) with 8.3 MiB/s
(8736957 bytes/second).
MD5 hash calculated over data: e86d952a68546fbdab55d0b205cd1c6e
ewfacquirestream: SUCCESS
In this example, a description of the PC (eepc) and the serial number (16048539022588504422) are embedded into the filename of the image. The final output from the dd command is shown on completion, directly followed by the ewfacquirestream completion message.
You can use EnCase, Sleuth Kit, or any other tool that supports EWF to forensically analyze the resulting acquired image.
# ls -l eepc-16048539022588504422.*
-rw-r----- 1 root root 1572852270 Jun 22 21:30 eepc-16048539022588504422.E01
-rw-r----- 1 root root 1572851461 Jun 22 21:30 eepc-16048539022588504422.E02
-rw-r----- 1 root root 857059301 Jun 22 21:30 eepc-16048539022588504422.E03
Using additional flags with ewfacquirestream can provide more case metadata details, increase the compression, and provide other features. See the ewfacquirestream(1) manual page for more information.
Live Imaging with Copy-On-Write Snapshots
In general, it doesn’t make sense to create a forensic image of a live system when the disks you need to acquire contain the running OS. Blocks are constantly changing on a live system. During the time needed to acquire a sector-by-sector image, the filesystem will change significantly, causing the imaged filesystem copy to be corrupt and inconsistent.
Sometimes it may not be feasible to boot a system with a forensic boot CD to remotely acquire an image. On live servers that cannot be shut down, the same method used to freeze the filesystem for backups might be leveraged in some situations. On systems that have Copy-on-Write (CoW) filesystems, you might be able to do a certain amount of forensic imaging if filesystem snapshots have associated block devices (Logical Volume Manager [LVM] for example). This will provide a consistent snapshot of the filesystem blocks at a certain point in time. If a CoW filesystem has no associated block device for a snapshot, the files will at least be frozen for a file-level acquisition.
If the subject system is a cloud-based virtual machine, imaging the live system over a network might be your only option, unless the cloud provider can provide snapshot images.
Acquire Removable Media
Removable media are unique in that the drive device can be attached to a system and operate without any media. Block devices that can be forensically acquired only become available upon insertion of the media. USB thumb drives can be described as removable devices but not removable media. The medium is not removed from the USB thumb drive unless it is a memory card adapter or card reader.
This section covers basic removable media types, including memory cards, optical discs, and magnetic tapes.
Memory Cards
Most memory cards behave similarly to regular drives. Their storage is represented as a linear sequence of blocks, giving the appearance of a regular drive with sectors that you can access using any tool that operates on block devices.
In Figure 6-1, a Micro SD card is inserted into an SD card adapter, which is inserted into an SD card reader, which is inserted into a PC. Here, several items of removable media are stacked and still appear as a block device that you can image normally.
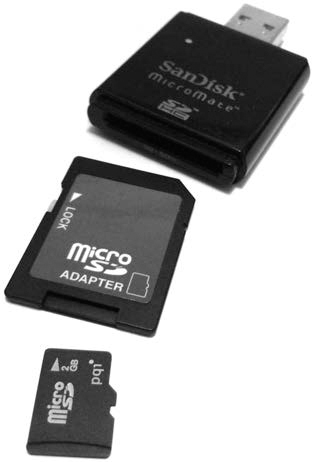
Figure 6-1: Removable memory card adapters
In this example, all three items were inserted and attached to the acquisition host. The kernel detected them and created a /dev/sdg block device:
# dmesg
...
[65396.394080] usb-storage 3-2:1.0: USB Mass Storage device detected
[65396.394211] scsi host21: usb-storage 3-2:1.0
[65397.392652] scsi 21:0:0:0: Direct-Access SanDisk SDDR-113 1.00 PQ:
0 ANSI: 0
[65397.393098] sd 21:0:0:0: Attached scsi generic sg5 type 0
[65398.073649] sd 21:0:0:0: [sdf] 3911680 512-byte logical blocks: (2.00 GB/1.87
GiB)
[65398.074060] sd 21:0:0:0: [sdf] Write Protect is on
...
The SD adapter has a write-protect tab enabled, which isvisible in the dmesg output.
In this example, the Micro SD card is imaged into a SquashFS evidence container using the sfsimage script:
$ sfsimage -i /dev/sdf MicroSD.sfs
Started: 2016-05-08T11:19:35
Sfsimage version: Sfsimage Version 0.8
Sfsimage command: /usr/bin/sfsimage -i /dev/sdf
Current working directory: /home/holmes
Forensic evidence source: if=/dev/sdf
Destination squashfs container: MicroSD.sfs
Image filename inside container: image.raw
Aquisition command: sudo dc3dd if=/dev/sdf log=errorlog.txt hlog=hashlog.txt hash=md5
2>/dev/null | pv -s 2002780160
1.87GiB 0:02:34 [12.3MiB/s] [================================================>] 100%
Completed: 2016-05-08T11:22:10
After imaging, a memory card can be safely removed from the card reader (assuming it has not been mounted).
Optical Discs
The different types of optical media vary in their physical and chemical properties; however, once you insert them into an attached optical drive, they have more similarities than differences. The three most common discs (DVD, CD-ROM, and Blu-ray) have a 2048-byte sector size and appear as a linear sequence of sectors (similar to a tape, but inaspiral). The primary difference is the density of the data bits (which is abstracted by the device hardware) and the disc capacity.
Imaging data discs is straightforward and similar to imaging hard disks or flash media. An example of an optical disc being imaged with dc3dd is shown here:
# dc3dd if=/dev/cdrom of=datacd.raw
dc3dd 7.2.641 started at 2016-01-13 23:04:31 +0100
compiled options:
command line: dc3dd if=/dev/cdrom of=datacd.raw
device size: 331414 sectors (probed), 678,735,872 bytes
sector size: 2048 bytes (probed)
678735872 bytes ( 647 M ) copied ( 100% ), 142 s, 4.5 M/s
input results for device `/dev/cdrom':
331414 sectors in
0 bad sectors replaced by zeros
output results for file `datacd.raw':
331414 sectors out
dc3dd completed at 2016-01-13 23:06:53 +0100
Using common forensic tools, you can then analyze the datacd.raw image file.
The recovery of Compact Disc Digital Audio (CDDA), or music CDs, is different from that of data discs. They contain a set of music tracks that are linear streams of pulse-code modulation (PCM) encoded bits. Unlike with data CDs, there is some tolerance for errors. For this reason, tools have been created to attempt the recovery of CDDA and manage drive issues such as misalignment and frame jitter.7 Most CDDA tools are simple music CD rippers that convert the CD tracks into audio files (reencoded into some other audio format). In this example, cdparanoia performs a raw extraction of the PCM data:
# cdparanoia --output-raw --log-summary 1- cdda.raw
cdparanoia III release 10.2 (September 11, 2008)
Ripping from sector 0 (track 1 [0:00.00])
to sector 251487 (track 15 [4:58.72])
outputting to cdda.raw
(== PROGRESS == [ | 251487 00 ] == :^D * ==)
Done.
This command rips the entire music CD into a single raw PCM audio image file containing all the audio tracks. You can then import this file into audio analysis software. Because the audio data has not been modified or reencoded, there is no audio quality loss or degradation.
DVD and Blu-ray discs with digital rights management (DRM) and region protection are a challenge to recover. Linux tools and instructions to recover encrypted content exist but have been deliberately left outside the scope of this book.
Magnetic Tapes
Tapes have essentially disappeared from home environments. But they are still used in small, medium, and enterprise environments for backup and archiving. On rare occasions, you might receive a request to recover data from tapes. In corporate forensic labs for example, old tapes are sometimes found when company departments are reorganizing or moving locations.
Historically, popular tapes used have been 4mm DAT, 8mm Exabyte, and DLT tapes. Today, the most common types used are LTO and 8mm DAT. The maximum native/compressed capacities of these tapes is 160GB/320GB for DAT-320 and 6TB/15TB for LTO-7. Modern LTO drives also support encrypted tapes.
Modern tape drives are attached to host systems using a SAS or Fibre Channel interface. Historically, nearly all tape drives followed the SCSI Stream Command (SSC) standards (SSC-5 is the latest).
Tape technologies use their own concept of “files,” which are placed in sequential order on a tape. Typically, a tape file consists of a backup archive created by backup or archiving software. Tape files are not randomly accessible like disk drives and optical discs. Instead, you access them by moving or spacing forward or backward to the beginning of a file number and then reading logical blocks until the end of the file.
Tapes have different markers that tell the tape drive information about the position of the head on the tape (see Figure 6-2). The interesting markers to understand here are as follows:
BOT or BOM (Beginning of Tape or Media) Tells the drive where it can start reading or writing data.
EOF (End of File) Tells the drive that the end of a tape file has been reached.
EOD (End of Data) Tells the drive that the end of the written data has been reached (found immediately after the last tape file). This is the logical end of the tape.
PEOT, EOT, or EOM ([Physical] End of Tape or Media) Tells the drive that the end of the physical tape length has been reached.
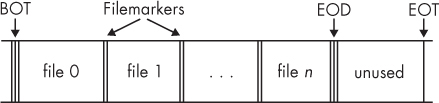
Figure 6-2: Files and markers on a tape
When you’re acquiring tapes for forensic purposes, it’s essential to copy every file on the tape up to the EOD marker (the last readable file on the tape). It’s impossible to read past the EOD on a tape using standard SCSI commands. Some forensic firms offer specialized hardware and services which are able to recover data beyond the EOD.
You can extract files from a tape using dd variants. In the example that follows, three tape files are recovered from a tape. The nonrewinding device for tape access is chosen, typically /dev/nst0 on Linux, to prevent the drive from rewinding before all the files have been copied. The command is run repeatedly, always using the same input device (it takes the next file on the tape), until it reaches “0+0 records in,” indicating that all files have been extracted:
# dcfldd if=/dev/nst0 of=file0.tape hashlog=hash0.log
0+46 records in
14+1 records out
# dcfldd if=/dev/nst0 of=file1.tape hashlog=hash1.log
22016 blocks (688Mb) written.
0+70736 records in
22105+0 records out
# dcfldd if=/dev/nst0 of=file2.tape hashlog=hash2.log
256 blocks (8Mb) written.
0+1442 records in
450+1 records out
# dcfldd if=/dev/nst0 of=file3.tape hashlog=hash3.log
0+0 records in
0+0 records out
After the tape files have been recovered, you can analyze the file type. Often, you can just use a basic file type program to determine which archive or backup format was used. In this example, two .tar files and one .dump file were extracted:
# ls -l
total 722260
-rw-r----- 1 root root 471040 Jan 14 01:46 file0.tape
-rw-r----- 1 root root 724336640 Jan 14 01:46 file1.tape
-rw-r----- 1 root root 14766080 Jan 14 01:47 file2.tape
-rw-r----- 1 root root 0 Jan 14 01:47 file3.tape
-rw-r----- 1 root root 46 Jan 14 01:46 hash0.log
-rw-r----- 1 root root 46 Jan 14 01:46 hash1.log
-rw-r----- 1 root root 46 Jan 14 01:47 hash2.log
-rw-r----- 1 root root 46 Jan 14 01:47 hash3.log
# file *.tape
file0.tape: POSIX tar archive (GNU)
file1.tape: POSIX tar archive (GNU)
file2.tape: new-fs dump file (little endian), Previous dump Thu Jan 14 01:39:29
2016, This dump Thu Jan 1 01:00:00 1970, Volume 1, Level zero, type: tape
header, Label none, Filesystem / (dir etc), Device /dev/sdf1, Host lab-pc,
Flags 3
file3.tape: empty
Each of the hash*.log files contains a separate MD5 hash for each tape file extracted. In this example, file3.tape is empty and can be ignored.
RAID and Multidisk Systems
The forensic acquisition of Redundant Array of Independent Disks (RAID) systems brings a number of challenges and might require additional steps to complete. Capacity planning is important, because it may involve imaging a large number of disks.
This section assumes the individual disks in a RAID have been imaged separately and exist on the acquisition workstation. The goal here is to assemble the imaged disks and make the meta device layer accessible as a file or block device, allowing you to use forensic analysis tools.
Typically, RAID systems create their own header information at the beginning of a disk (and sometimes at the end of a disk). The header is for unique identifiers (UUIDs), array names, timestamps, RAID configuration details, and other housekeeping information.
Proprietary RAID Acquisition
In situations where a hardware RAID controller was used and no software exists to assemble the RAID offline, you may need to clone the RAID disks and boot an examination system with the controller physically installed.
The examples in this section focus on Linux software RAID, but a number of open source tools are available that can support acquiring and analyzing proprietary RAID systems.
For example, the following packages contain such tools and are available from the Debian software repository:
dpt-i2o-raidutils Adaptec I2O hardware RAID management utilities
array-info A command line tool for reporting RAID status for several RAID types
cciss-vol-status HP SmartArray RAID Volume Status Checker
cpqarrayd A monitoring tool for HP (Compaq) SmartArray controllers
dpt-i2o-raidutils Adaptec I2O hardware RAID management utilities
mpt-status A tool to get RAID status out of mpt (and other) HW RAID controllers
varmon VA RAID monitor
In addition to these software packages, the dmraid tool is able to identify RAID metadata for a number of proprietary formats. You can find a list of supported formats by using the -l flag, as follows:
# dmraid -l
asr : Adaptec HostRAID ASR (0,1,10)
ddf1 : SNIA DDF1 (0,1,4,5,linear)
hpt37x : Highpoint HPT37X (S,0,1,10,01)
hpt45x : Highpoint HPT45X (S,0,1,10)
isw : Intel Software RAID (0,1,5,01)
jmicron : JMicron ATARAID (S,0,1)
lsi : LSI Logic MegaRAID (0,1,10)
nvidia : NVidia RAID (S,0,1,10,5)
pdc : Promise FastTrack (S,0,1,10)
sil : Silicon Image(tm) Medley(tm) (0,1,10)
via : VIA Software RAID (S,0,1,10)
dos : DOS partitions on SW RAIDs
The dmraid tool uses the same device mapper facility shown in “Manage Drive Failure and Errors” on page 159 (where the dmsetup tool was used to simulate errors). The dmraid(8) manual page provides a number of examples for reassembling various proprietary RAID configurations.8
JBOD and RAID-0 Striped Disks
Just a Bunch Of Disks (JBOD) is the term used to indicate that a number of disks have been concatenated into one logical drive (without any RAID configuration for performance or redundancy). To assemble a group of disks into a single JBOD device, you can use the dmsetup command.
When you’re building devices from multiple disks, it’s useful to have a separate table file to define the device, offsets, and mappings. In this simple text file, you can also include comments with information about the disks.
The following example has a JBOD with three disks of different sizes (a charactaristic of JBOD systems is that any combination of drive sizes can be used). The JBOD device mapper table file (jbod-table.txt in this example) defines how they are concatenated. Run the dmsetup command with the table file as input to create the device in /dev/mapper:
# cat jbod-table.txt
0 15589376 linear /dev/sdm 0
15589376 15466496 linear /dev/sdn 0
31055872 15728640 linear /dev/sdo 0
# dmsetup create jbod < jbod-table.txt
This table defines three mappings that construct the device file, which will appear in /dev/mapper. Each line defines the offset in the mapper device, the number of sectors to map, the target type (linear), and the target device with an offset (sector zero here, because we want the whole device). Getting the offsets right can be tricky and may require some calculation. Double-check the offsets first if there are problems.
The table is piped into the dmsetup create command, specifying the name of the mapper device. After the device is created, you can use regular forensic tools to operate on it. The following example shows the Sleuth Kit fsstat command being used on the newly created device:
# fsstat /dev/mapper/jbod
FILE SYSTEM INFORMATION
--------------------------------------------
File System Type: Ext4
Volume Name:
Volume ID: cfd74d32abd105b18043840bfd2743b3
...
When you no longer need the mapper device, remove it by using the dmsetup command, as follows:
# dmsetup remove /dev/mapper/jbod
See the dmsetup(8) manual page for more information about the different device mapper types the dmsetup tool uses. You can use device mappings for encryption, snapshots, RAID systems, and even simulating errors and failing devices (which is useful for testing the behavior of forensic tools).
RAID-0 striped disks are created for performance, not redundancy. A group of disks in a RAID-0 configuration has the combined capacity of all the drives, and disk access is distributed across the array (performance increases as disks are added).
If you know the offsets and chunk size of a striped RAID-0 array, the dmsetup tool can create a mapper device to represent the assembled array.
In the following example, a RAID-0 consisting of two striped disks is attached to the acquisition host. It is known that the subject RAID system has 2048 initial sectors containing metadata and that the chunk size is 128 sectors. You can then assemble the RAID as follows:
# dmsetup create striped --table '0 117243904 striped 2 128 /dev/sda 2048 /dev/sdb
2048'
You can analyze this /dev/mapper device using regular filesystem forensic tools. An example using Sleuth Kit’s fls command on the newly created device is shown here:
# fls /dev/mapper/striped
r/r 4-128-4: $AttrDef
r/r 8-128-2: $BadClus
r/r 8-128-1: $BadClus:$Bad
Don’t forget to remove the device when the tasks are completed.
Microsoft Dynamic Disks
Microsoft created the Logical Disk Manager (LDM) to manage logical volumes, and you can use the Linux-based tool ldmtool to analyze Microsoft dynamic disks. The goal here is to make the volume available for block-level access by forensic tools.
In this example, two subject disks with a volume created by Microsoft LDM are attached to the acquisition host. An LDM disk group is identified by its Globally Unique Identifier (GUID). You can scan the disks for the disk group GUID, which will lead to more information about the disk group when the ldmtool show command is used:
# ldmtool scan /dev/sda /dev/sdb
[
"04729fd9-bac0-11e5-ae3c-c03fd5eafb47"
]
# ldmtool show diskgroup 04729fd9-bac0-11e5-ae3c-c03fd5eafb47
{
"name" : "LENNY-Dg0",
"guid" : "04729fd9-bac0-11e5-ae3c-c03fd5eafb47",
"volumes" : [
"Volume1"
],
"disks" : [
"Disk1",
"Disk2"
]
}
The show command provides the disk group name and GUID, the volume names, and the names of disks. This is enough information to create a mapper device.
Knowing the GUID and the volume name, you can create a volume device:
# ldmtool create volume 04729fd9-bac0-11e5-ae3c-c03fd5eafb47 Volume1
[
"ldm_vol_LENNY-Dg0_Volume1"
]
This creates a device in /dev/mapper that corresponds to the filesystem on the dynamic disk (this is equivalent to a partition device like /dev/sda1). Then you can use regular forensic analysis tools to operate on this device. An example using the Sleuth Kit fsstat command is shown as follows:
# fsstat /dev/mapper/ldm_vol_LENNY-Dg0_Volume1
FILE SYSTEM INFORMATION
--------------------------------------------
File System Type: NTFS
Volume Serial Number: 0CD28FC0D28FAD10
OEM Name: NTFS
Version: Windows XP
METADATA INFORMATION
--------------------------------------------
First Cluster of MFT: 786432
First Cluster of MFT Mirror: 2
Size of MFT Entries: 1024 bytes
Size of Index Records: 4096 bytes
...
When you no longer need the device, remove it using the dmsetup command, as shown in “JBOD and RAID-0 Striped Disks” on page 179.
RAID-1 Mirrored Disks
Mirrored disks are simple and consist of two identical disks (or should be if they were synchronized). Image both disks into separate image files. Depending on the mirroring software or hardware, a header might be in the beginning sectors of the disk that you need to skip when you’re performing analysis work.
The following example shows mirrored disks containing an EXT4 partition. The mirroring software (Linux Software RAID) used the first 32,768 sectors, and the mirrored filesystem starts at that offset on the physical disks and without an offset for the multiple device,9 md0:
# fsstat /dev/md0
FILE SYSTEM INFORMATION
--------------------------------------------
File System Type: Ext4
Volume Name:
Volume ID: f45d47511e6a2db2db4a5e9778c60685
...
# fsstat -o 32768 /dev/sde
FILE SYSTEM INFORMATION
--------------------------------------------
File System Type: Ext4
Volume Name:
Volume ID: f45d47511e6a2db2db4a5e9778c60685
...
# fsstat -o 32768 /dev/sdg
FILE SYSTEM INFORMATION
--------------------------------------------
File System Type: Ext4
Volume Name:
Volume ID: f45d47511e6a2db2db4a5e9778c60685
In this example, the same filesystem on md0 is also found at the 32k offset of the two physical devices (sde and sdg). The cryptographic checksums of mirrored disks will probably not match each other, because the RAID header information might be different (unique disk UUIDs and so on) and the disks might not be perfectly synchronized.
Linux RAID-5
If multiple disks are part of a Linux RAID array, you can acquire them individually and then assemble them using several methods. The dmsetup tool provides an interface to mdadm using tables. The mdadm tool can operate on devices that have been mapped or looped. In the following example, three acquired drive images from a Linux MD RAID-5 setup are used.
An mmls analysis of the individual partition tables reveals a Linux RAID partition at sector 2048 of each disk image (sda.raw, sdb.raw, and sdc.raw). This sector offset is converted (using Bash math expansion) to a byte offset for the losetup command:
# mmls sda.raw
DOS Partition Table
Offset Sector: 0
Units are in 512-byte sectors
Slot Start End Length Description
00: Meta 0000000000 0000000000 0000000001 Primary Table (#0)
01: ----- 0000000000 0000002047 0000002048 Unallocated
02: 00:00 0000002048 0312580095 0312578048 Linux RAID (0xfd)
03: ----- 0312580096 0312581807 0000001712 Unallocated
# echo $((2048*512))
1048576
A read-only loop device is created for each of the disks in the array using the calculated byte offset (2048 sectors, which is 1048576 bytes):
# losetup --read-only --find --show -o 1048576 sda.raw
/dev/loop0
# losetup --read-only --find --show -o 1048576 sdb.raw
/dev/loop1
# losetup --read-only --find --show -o 1048576 sdc.raw
/dev/loop2
The preceding commands create loop devices corresponding to the three acquired image files. You can assemble an array using mdadm, as follows:
# mdadm -A --readonly /dev/md0 /dev/loop0 /dev/loop1 /dev/loop2
mdadm: /dev/md0 has been started with 3 drives.
Now you can access and analyze the RAID meta disk device using regular forensic tools on the /dev/md0 device. An example using Sleuth Kit’s fsstat command is shown here:
# fsstat /dev/md0
FILE SYSTEM INFORMATION
--------------------------------------------
File System Type: Ext4
Volume Name:
Volume ID: 37b9d96d8ba240b446894383764412
...
You can also mount the newly created device and access it using regular file tools. The normal Linux mount command can be used as follows:
# mkdir mnt
# mount /dev/md0 mnt
mount: /dev/md0 is write-protected, mounting read-only
When you’ve completed the analysis, reverse the steps for the cleanup process, including using the stop command with the mdadm system:
# umount mnt
# rmdir mnt
# mdadm --stop /dev/md0
# losetup -d /dev/loop2
# losetup -d /dev/loop1
# losetup -d /dev/loop0
Depending on the system configuration, the Linux kernel may automatically attempt to reassemble attached RAID devices if they’re detected, possibly starting a rebuild operation that could destroy evidence. It’s important to use write blocking with live devices and ensure that read-only loop devices and arrays are created.
Many of the techniques described in this chapter apply to loop devices mapping to image files. More examples of creating and using loop devices are shown in Chapter 8.
Closing Thoughts
In this chapter, I covered the main topic of the book—forensic acquisition. You learned how to use the different dd-based tools, create images with forensic formats, and use SquashFS as a forensic evidence container. Various aspects of evidence preservation using cryptography were shown, including hashing, hash windows, signing, and timestamping. You now have a deeper understanding of error management and recovery when imaging problematic media. You are able to image over a network and image removable media and multi-disk (RAID) systems. This is the core of the forensic acquisition process.