© Vladimir Silva 2018
Vladimir SilvaPractical Quantum Computing for Developershttps://doi.org/10.1007/978-1-4842-4218-6_6

6. Fun with Quantum Games

Vladimir Silva1 
(1)
CARY, NC, USA
 
In this chapter you will learn how to implement a basic game in a quantum computer. For this purpose we use the quintessential Quantum Battleship distributed with the QISKit Python tutorial. The first part looks at the mechanics of the game including
  • Using qubits to represent ship positions in the board

  • How to calculate damage percentages using a quantum program to be run in the local, remote simulator or real quantum device

  • How to perform rotations on the X-axis of a single qubit using a partial NOT quantum gate

Yet we don’t stop there. The second part of this chapter takes things to the next level. The game is given a major face lift by showing you how to implement a cloud-based Quantum Battleship with the following features:
  • A browser-based user interface with interactive boards to place ship or bombs. The game mechanics remain the same nonetheless.

  • A CGI-based script using the Apache Web Server to consume game events and dispatch them to the quantum program.

  • A modified version of the original quantum program to perform partial NOT rotations on the qubits to calculate ship damage. Most of the original code remains intact.

You will learn how the original code can be modularized and reused for a different take of Quantum Battleship in the cloud. Let’s get started.

Quantum Battleship with a Twist

In this section we look at a game distributed with the QISKit tutorial called Quantum Battleship. The program uses 5 qubits to represent a board where each player places three ships. It then asks each player to place a bomb in a position 0-5. Finally, damage for each ship is calculated by a quantum program that uses a two-pulse single-qubit gate: U3(theta, phi, lambda). This gate is called a partial NOT gate and performs rotation on axes X, Y, Z by theta, phi, or lambda radians.
 4       0
 |\     /|
 | \   / |
 |  \ /  |
 |   2  |
 |  / \  |
 | /   \ |
 |/     \|
 3        1

In this particular case, ship damage is calculated by doing a series of partial rotations on the X-axis (theta) using the number of bombs for that position. If the damage for a position (or ship) exceeds 95%, the ship is destroyed, and once the entire player’s fleet is smashed, a winner is declared and the game is over. This is just the standard battleship game we all played as children but using a quantum computer or simulator in the background.

Note

The game was written by James Wootton from the University of Basel and contributed to the QISKit Python tutorial. A modified version of the original code by Wootton is available from the source of this book at Workspace\Ch06\battleship\BattleShip.py (minus some unnecessary fancy text).

Let’s run the program and take a look at the game mechanics.

Setup Instructions

From the book source, execute the program BattleShip.py as described in the following paragraphs:
  • For CentOS 6 or 7 or any Fedora-like OS, activate your Python virtual environment. This is required only if you have multiple versions of Python, for example, 2.7 and 3.6. Remember that you must use 3.5 or later. Instructions on how to set up a virtual Python environment were covered in Chapter 3.

  • Copy the script Workspace/Ch06/battleship/BattleShip.py and the configuration file Qconfig.py from the book source to your workspace and execute it (as shown in the next fragment).

# Activate Python3 virtual environment at $HOME/qiskit/qiskit
$ source $HOME/qiskit/qiskit/bin/activate
$ python BattleShip.py
############### Quantum Battle Ship ##################
Do you want to play on the real device? (y/n) n

Let’s look at how the program works.

Initialization

Listing 6-1 shows the script initialization. It starts by doing basic Python tasks:
  • It loads system libraries: sys and QuantumProgram required for all QISKit operations.

  • It makes sure you are using Python 3.5 or later.

  • It asks if you wish to use a simulator or a real quantum computer. It then sets the number of shots for the execution to the default 1024.

#################################
# Quantum Battleship from tutorial @
# https://github.com/QISKit/qiskit-tutorial
##################################
import sys
# Checking the version of PYTHON; we only support > 3.5
if sys.version_info < (3,5):
    raise Exception('Please use Python version 3.5 or greater.')
from qiskit import QuantumProgram
import Qconfig
import getpass, random, numpy, math
## 1. Select a backend: IBM simulator (ibmqx_qasm_simulator) or real chip ibmqx2
d = input("Do you want to play on the real device? (y/n)\n").upper()
if (d=="Y"):
    device = 'ibmqx2'
else:
    device = 'ibmqx_qasm_simulator'
# note that device should be 'ibmqx_qasm_simulator', 'ibmqx2' or 'local_qasm_simulator'
# while we are at it, let's set the number of shots
shots = 1024
Listing 6-1

Script Initialization

Tip

To run a quantum program on a real device, you must place the configuration file (Qconfig.py) in the same location as the main script. The configuration contains your required API token and IBM Q Experience end point.

APItoken = 'YOUR API TOKEN'
config = {
    'url': 'https://quantumexperience.ng.bluemix.net/api',
}

Now let’s place some ships in the board.

Set Ships in the Board

The program uses a rudimentary text-based interface for all user input. Listing 6-2 shows the logic to enter ships for each player. Press ENTER to start, and type the position for up to three ships per player (the positions are zero based).
  • The script can bypass user choice and select random positions, or else the player must enter positions for three ships.

  • Positions are stored in the two-dimensional list shipPos where shipPos[0] contains the positions for player 1 and shipPos[1] contains positions for player 2. Remember that only three ships are allowed per player.

#######  2. players to set up their boards.
randPlace = input("> Press Enter to start placing ships...\n").upper()
# The variable ship[X][Y] will hold the position of the Yth ship of player X+1
shipPos = [ [-1]*3 for _ in range(2)]
# loop over both players and all three ships for each
for player in [0,1]:
    # if we chose to bypass player choice and do random, we do that
    if ((randPlace=="r")|(randPlace=="R")):
        randPos = random.sample(range(5), 3)
        for ship in [0,1,2]:
            shipPos[player][ship] = randPos[ship]
    else:
        for ship in [0,1,2]:
            # ask for a position for each ship,
            choosing = True
            while (choosing):
                # get player input
                position = getpass.getpass("Player " + str(player+1)
                  + ", choose a position for ship " + str(ship+1) + " (0-4)\n" )
                # see if the valid input and ask for another if not
                if position.isdigit(): # valid answers  have to be integers
                    position = int(position)
           # they need to be between 0 and 5
                    if (position in [0,1,2,3,4]) and (not position in shipPos[player]):
                        shipPos[player][ship] = position
                        choosing = False
                        print ("\n")
                    elif position in shipPos[player]:
                        print("\nYou already have a ship there. Try again.\n")
                    else:
                        print("\nThat's not a valid position. Try again.\n")
                else:
                    print("\nThat's not a valid position. Try again.\n")
Listing 6-2

Setting Ships on the Board

The following section shows the standard output, very rudimentary but so far so good.
Do you want to play on the real device? (y/n)
n
Player 1, choose a position for ship 1 (0, 1, 2, 3 or 4)
0
Player 1, choose a position for ship 2 (0, 1, 2, 3 or 4)
1
Player 1, choose a position for ship 3 (0, 1, 2, 3 or 4)
2
Player 2, choose a position for ship 1 (0, 1, 2, 3 or 4)
0
Player 2, choose a position for ship 2 (0, 1, 2, 3 or 4)
1
Player 2, choose a position for ship 3 (0, 1, 2, 3 or 4)
2

The interesting stuff occurs in the main loop. Let’s take a look.

Main Loop and Results

The main loop performs the following tasks:
  • It asks both players to place one bomb in position [0-4]. A count of the bomb is stored in a two-dimensional list of five elements (two players, five bomb counts). Note that the player can bomb the same position multiple times; thus if player 1 bombs position 0 twice, then bombs = [[2,0,0,0,0],[0,0,0,0,0]].

  • It creates a QuantumProgram to hold 5 qubits (1 per position in the board) and five classical registers to hold the measurement results.

  • If a bomb position matches the opposing player’s ship position (from the shipPos list), the damage is calculated by performing one rotation over the X-axis per bomb count using a single-qubit partial NOT gate: gridScript.u3(1/(ship +1) * math.pi, 0.0, 0.0, q[position]). Note that the effectiveness of the bomb also depends on which ship is bombed (0, 1, 2).

  • To complete the circuit, a measurement is performed in the qubit for the position and the result stored in the respective classical register: gridScript.measure(q[position], c[position]).

  • Next, the program is executed in the target device, and the results stored in the two-dimensional list grid. For example, if position 0 for player 1 is bombed, then grid = [[1,0,0,0,0],[0,0,0,0,0]]. The following paragraph shows how this is done:
    results = Q_program.execute(["gridScript"], backend=device, shots=shots)
    grid[player] = results.get_counts("gridScript")
  • The results are checked for errors. If no errors, then a damage percentage between [0, 1] is calculated if the grid list contains a 1 for that position. The percentages are kept in the two-dimensional list damage. Thus damage [[0.95, 0, 0, 0, 0], [0, 0, 0, 0, 0]] indicates that player 1 ship in position 0 has been destroyed.

  • It finally presents the results to the players in a simple text-based interface. The process repeats itself until all ships are destroyed and a winner is declared (see Listing 6-3).

?      100%
|\     /|
| \   / |
|  \ /  |
|   ?   |
|  / \  |
| /   \ |
|/     \|
?        ?
########### 3. Main loop.
# Each iteration starts by asking players where on the opposing grid they want a bomb.
# The quantum computer calculates the effects of the bombing, and the results are presented.
# The game continues until all the ships of one player are destroyed.
game = True
# the variable bombs[X][Y] holds the number of times position Y has been bombed by player X+1
bomb = [ [0]*5 for _ in range(2)] # all values are initialized to zero
# the variable grid[player] will hold the results for the grid of each player
grid = [{},{}]
while (game):
    input("> Press Enter to place some bombs...\n")
    # ask both players where they want to bomb
    for player in range(2):
        print("\n\nIt's now Player " + str(player+1) + "'s turn.\n")
        # keep asking until a valid answer is given
        choosing = True
        while (choosing):
            # get player input
            position = input("Choose a position to bomb (0, 1, 2, 3 or 4)\n")
            # see if this is a valid input. ask for another if not
            if position.isdigit(): # valid answers  have to be integers
                position = int(position)
                if position in range(5):
                    bomb[player][position] = bomb[player][position] + 1
                    choosing = False
                    print ("\n")
                else:
                    print("\nThat's not a valid position. Try again.\n")
            else:
                print("\nThat's not a valid position. Try again.\n")
    # now we create and run the quantum program for each player
    for player in range(2):
        if device=='ibmqx2':
            print("\nUsing a quantum computer for Player " + str(player+1) + "'s ships.\n")
        else:
            print("\nUsing the simulator for Player " + str(player+1) + "'s ships.\n")
        # now to set up the quantum program (QASM) to simulate the grid for this player
        Q_program = QuantumProgram()
        # set the APIToken and API url
        Q_program.set_api(Qconfig.APItoken, Qconfig.config["url"])
        # declare register of 5 qubits
        q = Q_program.create_quantum_register("q", 5)
        # declare register of 5 classical bits to hold measurement results
        c = Q_program.create_classical_register("c", 5)
        # create circuit
        gridScript = Q_program.create_circuit("gridScript", [q], [c])
        # add the bombs (of the opposing player)
        for position in range(5):
            # add as many bombs as have been placed at this position
            for n in range( bomb[(player+1)%2][position] ):
                # the effectiveness of the bomb
                # (which means the quantum operation we apply)
                # depends on which ship it is
                for ship in [0,1,2]:
                    if ( position == shipPos[player][ship] ):
                        frac = 1/(ship+1)
                        # add this fraction of a NOT to the QASM
                        gridScript.u3(frac * math.pi, 0.0, 0.0, q[position])
        #finally, measure them
        for position in range(5):
            gridScript.measure(q[position], c[position])
        # to see what the quantum computer is asked to do, we can print the QASM file
        # this lines is typically commented out
        #print( Q_program.get_qasm("gridScript") )
        # compile and run the QASM
        results = Q_program.execute(["gridScript"], backend=device, shots=shots)
        # extract data
        grid[player] = results.get_counts("gridScript")
    # we can check up on the data if we want
    # these lines are typically commented out
    #print( grid[0] )
    #print( grid[1] )
    # if one of the runs failed, tell the players and start the round again
    if ( ( 'Error' in grid[0].values() ) or ( 'Error' in grid[1].values() ) ):
        print("\nThe process timed out. Try this round again.\n")
    else:
        # look at the damage on all qubits (we'll even do ones with no ships)
        # # this will hold the prob of a 1 for each qubit for each player
        damage = [ [0]*5 for _ in range(2)]
        # for this we loop over all 5 bit strings for each player
        for player in range(2):
            for bitString in grid[player].keys():
                # and then over all positions
                for position in range(5):
                    # if the string has a 1 at that position, we add a contribution to the damage
                    # remember that the bit for position 0 is the rightmost one, and so at bitString[4]
                    if (bitString[4-position]=="1"):
                        damage[player][position] += grid[player][bitString]/shots
        # give results to players
        for player in [0,1]:
            input("\nPress Enter to see the results for Player " + str(player+1) + "'s ships...\n")
            # report damage for qubits that are ships, with significant damage
            # ideally this would be non-zero damage,
            # so we choose 5% as the threshold
            display = [" ?  "]*5
            # loop over all qubits that are ships
            for position in shipPos[player]:
                # if the damage is high enough, display the damage
                if ( damage[player][position] > 0.1 ):
                    if (damage[player][position]>0.9):
                         display[position] = "100%"
                    else:
                        display[position] = str(int( 100*damage[player][position] )) + "% "
            print("Here is the percentage damage for ships that have been bombed.\n")
            print(display[ 4 ] + "    " + display[ 0 ])
            print(" |\     /|")
            print(" | \   / |")
            print(" |  \ /  |")
            print(" |  " + display[ 2 ] + " |")
            print(" |  / \  |")
            print(" | /   \ |")
            print(" |/     \|")
            print(display[ 3 ] + "    " + display[ 1 ])
            print("\n")
            print("Ships with 95% damage or more have been destroyed\n")
            print("\n")
            # if a player has all their ships destroyed, the game is over
            # ideally this would mean 100% damage, but we go for 90% because of noise again
            if (damage[player][ shipPos[player][0] ]>.9) and (damage[player][ shipPos[player][1] ]>.9)
              and (damage[player][ shipPos[player][2] ]>.9):
                print ("***All Player " + str(player+1) + "'s ships have been destroyed!***\n\n")
                game = False
        if (game is False):
            print("")
            print("=======GAME OVER=======")
            print("")
Listing 6-3

Battleship Main Loop

Note that if the damage exceeds 90%, the ship is marked as destroyed. Listing 6-4 shows the results of one game interaction.
> Press Enter to place some bombs...
It's now Player 1's turn.
Choose a position to bomb (0, 1, 2, 3 or 4)
0
It's now Player 2's turn.
Choose a position to bomb (0, 1, 2, 3 or 4)
0
We'll now get the simulator to see what happens to Player 1's ships.
We'll now get the simulator to see what happens to Player 2's ships.
Press Enter to see the results for Player 1's ships...
Here is the percentage damage for ships that have been bombed.
 ?      100%
 |\     /|
 | \   / |
 |  \ /  |
 |   ?   |
 |  / \  |
 | /   \ |
 |/     \|
 ?       ?
Ships with 95% damage or more have been destroyed
Press Enter to see the results for Player 2's ships...
Here is the percentage damage for ships that have been bombed.
 ?      100%
 |\     /|
 | \   / |
 |  \ /  |
 |   ?   |
 |  / \  |
 | /   \ |
 |/     \|
 ?       ?
Ships with 95% damage or more have been destroyed
Listing 6-4

Game Standard Output for One Game Interaction

Thus the main loop continues until a winner is declared. All in all you have learned how a simple game can be implemented to make use of a quantum computer to perform simple damage calculations via rotations in the X-axis of a qubit. This version is rudimentary but interesting nonetheless. However we can do better; in the next section, we give this game an improved look and feel.

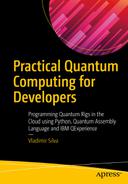
Cloud Battleship: Modifying for Remote Access

It is really cool being able to play Battleship in quantum computer via a simple text interface, but it is much cooler playing the same game on a web browser in the cloud. In this section we modify the Quantum Battleship and give it a much-needed face lift (see Figure 6-1).
../images/469026_1_En_6_Chapter/469026_1_En_6_Fig1_HTML.jpg
Figure 6-1

Layout for Quantum Battleship in the cloud

The idea is to
  • Ditch the boring text-based interface in favor of an HTML page that can be deployed in the cloud.

  • Use the Apache HTTP Server Common Gateway Interface (CGI) to deploy the quantum logic in a script using Python’s excellent CGI support.

  • Let the player select the device where to run the calculations: local simulator, remote simulator, or real quantum device.

Let’s do this in a series of exercises described in the next sections.

Exercise 1: Decouple the User Interface from the Game Logic

A basic principle of object-oriented design: Never mix the presentation (user interface) with the business logic. This is so that modularized components can be built and reused all over. It saves a ton of time and money. In the case of Battleship, we need to remove or comment
  • The first section of the script which reads the position of the ships for each player (a good chunk of code), being careful not to remove any data structures or variables.

  • All print statements and keyboard input statements.

  • The main while loop of the game that keeps asking for a position to bomb must be removed also. The script must terminate after it consumes data from the HTTP request. It cannot have infinite loops or else the request will hang.

  • Add Python’s CGI support to the script so the data can be read from the HTTP request including
    • Ship positions for each player

    • Bomb positions and count for each player

    • Device where to run the quantum computations

  • The script must return a damage report (preferably in JSON) via the HTTP response for the browser to render in Javascript.

Note that most of the code will be reused: data structures, local variables, and quantum logic; it is just a matter of commenting all input and print statements. The solution to this (and each) exercise is shown at the end of this section.

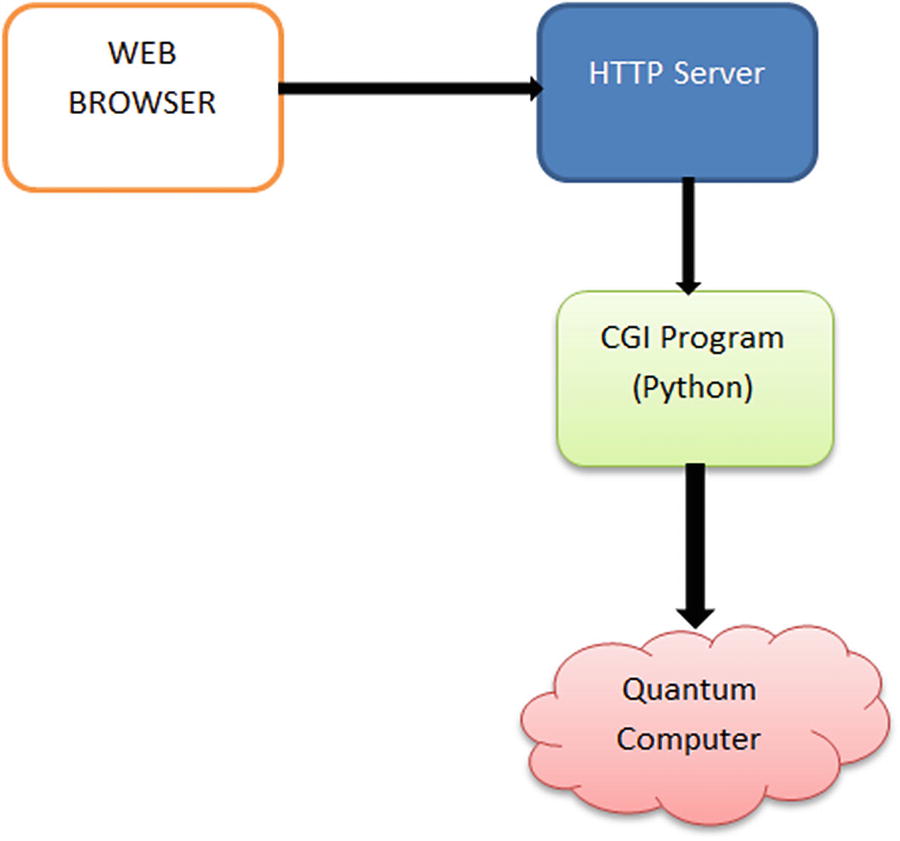
Exercise 2: Build a Web Interface for the Ship-Bomb Boards

Build an HTML graphical user interface similar to the text-based UI, and use AJAX to send requests asynchronously to the CGI script. Get the damage results back and finally update the player boards. The improved looks are shown in Figure 6-2.
../images/469026_1_En_6_Chapter/469026_1_En_6_Fig2_HTML.jpg
Figure 6-2

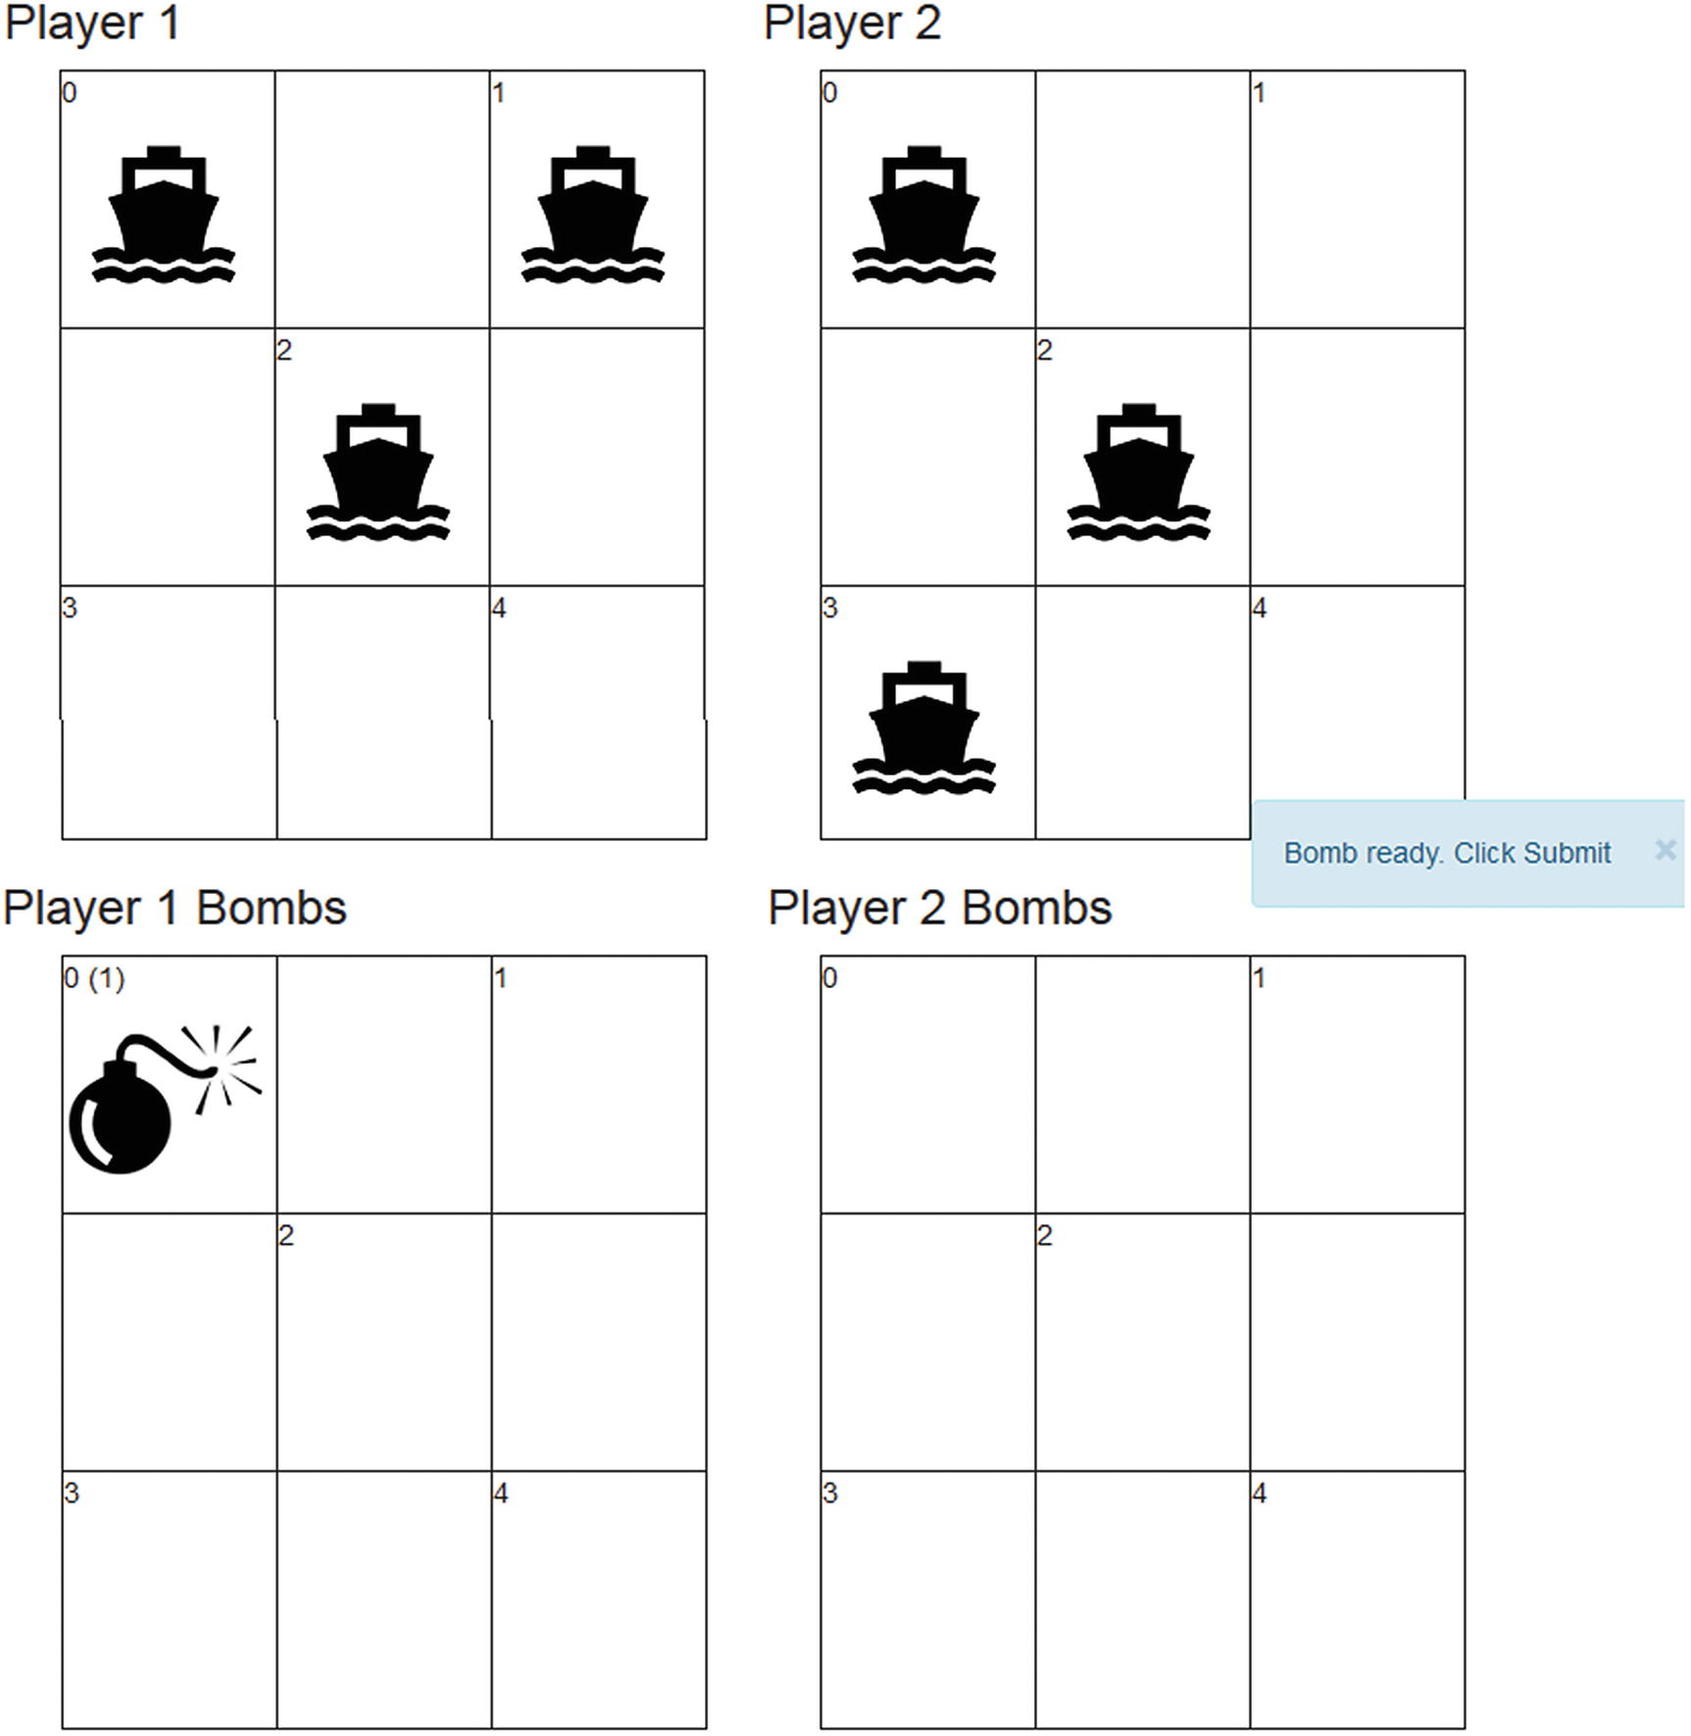
User interface for the new Quantum Battleship

  • The HTML file will have four 3x3 boards. The top boards will be used to place three ships in five qubit locations. These will be implemented as HTML checkboxes (<INPUT TYPE=“checkbox”>). We will use CSS to replace the toggle button with an image, so when the player clicks the box, the ship image will be toggled instead.

  • The bottom boards will allow the players to place bombs in five locations, using the same CSS in the preceding paragraph, but they will be implemented as <INPUT TYPE=“radio”> so that multiple bombs can be placed per location.

  • Even though the boards are 3x3, only five locations are allowed for user input corresponding to each qubit in the quantum program.

  • Each ship location will display a qubit number and a colorized damage percentage returned by the backend.

  • The game mechanics are exactly the same as the text-based version. Each player places three ships in the board, and then each takes a turn placing a bomb and clicks Submit. The Python CGI script will receive the request via AJAX, run the quantum program created in exercise 1, and return a damage result to be rendered in Javascript.

  • Note that all game state, arrays, variables, and other data, is kept in the client HTML; therefore we must use AJAX to send the request asynchronously, or else the data will be lost every time a player submits. There will be no page refreshes.

../images/469026_1_En_6_Chapter/469026_1_En_6_Fig3_HTML.jpg
Figure 6-3

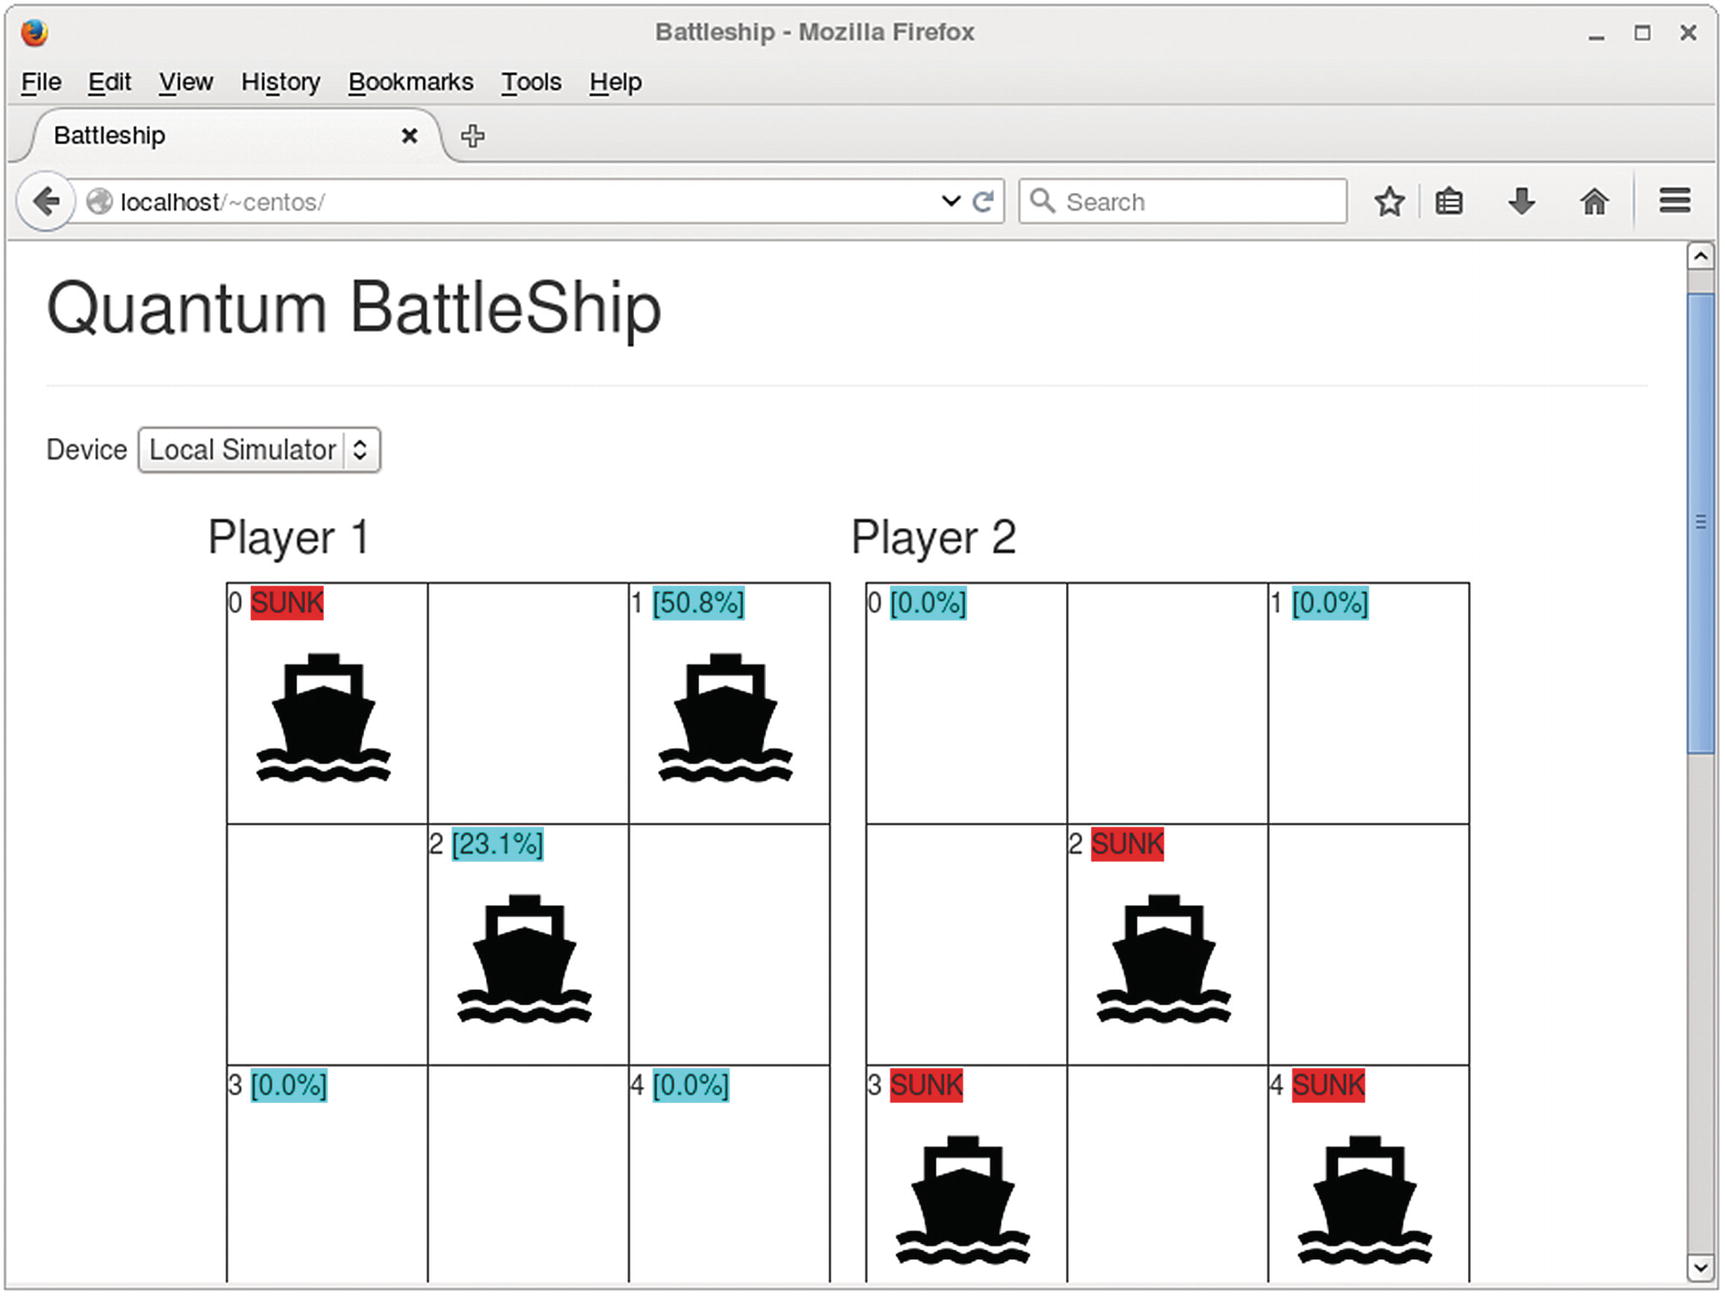
Quantum Battleship showing the bomb boards

Figure 6-3 shows the bottom 3x3 boards displaying a qubit number, a click count per bomb, and the image radio buttons rendered using CSS. Once each player places three ships and selects a location to bomb, the Submit button is clicked to send the AJAX request to the server. A Reset button is also available to restart the game at any point. Note that all state is kept in the client (browser). No data will be kept in the Python script as HTTP is a stateless request-response protocol. This means that when a request is received, the program is executed by the Web Server, a response is printed to the request output buffer, and the program terminates. As with the previous exercise, the solution is at the end of this section.

Exercise 3: Deploy and Troubleshoot in Apache HTTPD

Once all the pieces are in place, it’s time to deploy to the Web Server. I will use Apache HTTPD in CentOS 6, but this should work for any CentOS, Fedora, or Red Hat flavor (probably for any current Linux distribution with Apache HTTPD). Note that each flavor has its own idiosyncrasies when it comes to configuring system software. For example, CentOS focuses in stability and security which gave me a lot of headaches configuring HTTPD and Python.

Solution 1: A Reusable Python Program

This section presents the Python CGI script that receives the HTTPD request from the browser and replies with a JSON string containing the damage report and other information as well. The first part of the program remains the same except that the input now must be parsed from the HTTP request using Python’s cgi library (see Listing 6-5).
import sys
from qiskit import QuantumProgram
import Qconfig
import getpass, random, numpy, math
import cgi
import cgitb
# solve the relative dependencies if you clone QISKit from the Git repo and use like a global.
sys.path.append('../../qiskit-sdk-py/')
# debug
cgitb.enable(display=0, logdir=".")
# The variable ship[X][Y] will hold the position of the Yth ship of player X+1
# all values are initialized to the impossible position -1|
shipPos = [ [-1]*3 for _ in range(2)]
# the variable bombs[X][Y] will hold the number of times position Y has been bombed by player X+1
bomb = [ [0]*5 for _ in range(2)] # all values are initialized to zero
Listing 6-5

Modularized Quantum Battleship Initialization

Listing 6-5 shows the first section of the script. Lines 6 and 7 import the Python libraries: cgi and cgitb (CGI Toolbox) used to read from the HTTP request and debug the CGI program, respectively.

Tip

The lines in the following paragraph activate a special exception handler that will display detailed reports in the web browser if any error occurs.

import cgitb
cgitb.enable()
Keep in mind that, if an error occurs, we cannot show the guts of the program as the client expects a response in JSON format, so we must save any error report to the current working directory instead, with code like this:
cgitb.enable(display=0, logdir=".")
The preceding code will save a lot of headaches during development as any exception will be dumped into a neat HTML document in the current working directory. The format of this document is shown in the “Troubleshooting” section of this chapter. Listing 6-5 also shows the data structures used to store the game state. These are the same as the old version:
  • shipPos: A two-dimensional list that stores the positions for three ships per player initialized to -1; thus shipPos = [[-1, -1, -1], [-1, -1, -1]].

  • bomb: A two-dimensional list that stores bomb counts per position per player initialized to 0: bomb = [[0,0,0,0,0], [0,0,0,0,0]]. Note that the same position can be bombed multiple times; therefore the need to store counts. This list will be used to calculate ship damage.

Next, the script reads the game data from the HTTP request (see Listing 6-6).
# CGI - parse HTTP request
form = cgi.FieldStorage()
ships1 = form["ships1"].value
ships2 = form["ships2"].value
bombs1 = form["bombs1"].value
bombs2 = form["bombs2"].value
#  'local_qasm_simulator', 'ibmqx_qasm_simulator'
device = str(form["device"].value)
shipPos[0] = list(map(int, ships1.split(","))) # [0,1,2]
shipPos[1] = list(map(int, ships2.split(","))) # [0,1,2]
bomb[0] = list(map(int, bombs1.split(",")))
bomb[1] = list(map(int, bombs2.split(",")))
stdout = "Ship Pos: " + str(shipPos) +  " Bomb counts: " + str(bomb) + "<br>"
Listing 6-6

Reading Data from the HTTP Request

  • To read data from the HTTP request, use form = cgi.FieldStorage(). This CGI call returns a dictionary or hash map of key-value pairs used to extract query string parameters from the request. In this particular case, the values expected are
    • ships1: A three-element JSON array of player 1 ship positions.

    • ships2: A three-element JSON array of player 2 ship positions.

    • bombs1: A five-element JSON array of bomb counts for player 1.

    • bombs2: A five-element JSON array of bomb counts for player 2.

    • device: The device where the quantum program will be executed. This can be
      • local_qasm_simulator: Local simulator packed with the QISKit

      • ibmq_qasm_simulator: Remote simulator provided by IBM

      • ibmqx2: 5-qubit quantum processor provided by IBM Q Experience

  • The great thing about Python is that the JSON provided by the HTTP request can be mapped to its excellent collection support in a snap:

    shipPos[0] = list(map(int, ships1.split(",")))
    bomb[0] = list(map(int, bombs1.split(",")))

Tip

In Python, the split(SEPARATOR) system call is used to create a list of elements of type String. But we need a list of integers instead. For that purpose we use the map(DATA-TYPE, LIST) system call. Note that in Python 3, map returns a hash map (dictionary); therefore we must use the list system call to convert to a list of integers we need. This is great because it allows the script to reuse the old data structures and keep most of the quantum logic intact.

The last line of Listing 6-6 is simply a string buffer of standard output that will be returned to the browser for debugging purposes. Finally Listing 6-7 shows the guts of the script which remain mostly intact.
# the variable grid[player] will hold the results for the grid of each player
grid = [{},{}]
# now we create and run the quantum programs that implement this on the grid for each player
for player in range(2):
    # now to set up the quantum program (QASM) to simulate the grid for this player
    Q_program = QuantumProgram()
    Q_program.set_api(Qconfig.APItoken, Qconfig.config["url"])
    # declare register of 5 qubits
    q = Q_program.create_quantum_register("q", 5)
    # declare register of 5 classical bits to hold measurement results
    c = Q_program.create_classical_register("c", 5)
    # create circuit
    gridScript = Q_program.create_circuit("gridScript", [q], [c])
    # add the bombs (of the opposing player)
    for position in range(5):
        # add as many bombs as have been placed at this position
        for n in range( bomb[(player+1)%2][position] ):
            # the effectiveness of the bomb
            # (which means the quantum operation we apply)
            # depends on which ship it is
            for ship in [0,1,2]:
                if ( position == shipPos[player][ship] ):
                    frac = 1/(ship+1)
                    # add this fraction of a NOT to the QASM
                    gridScript.u3(frac * math.pi, 0.0, 0.0, q[position])
    #finally, measure them
    for position in range(5):
        gridScript.measure(q[position], c[position])
    # to see what the quantum computer is asked to do, we can print the QASM file
    # this lines is typically commented out
    #print( Q_program.get_qasm("gridScript") )
    # compile and run the QASM
    results = Q_program.execute(["gridScript"], backend=device, shots=shots)
    # extract data
    grid[player] = results.get_counts("gridScript")
# if one of the runs failed, tell the players and start the round again
if ( ( 'Error' in grid[0].values() ) or ( 'Error' in grid[1].values() ) ):
    stdout += "The process timed out. Try this round again.<br>"
else:
    # look at the damage on all qubits (we'll even do ones with no ships)
    damage = [ [0]*5 for _ in range(2)]
    # for this we loop over all 5 bit strings for each player
    for player in range(2):
        for bitString in grid[player].keys():
            # and then over all positions
            for position in range(5):
                # if the string has a 1 at that position, we add a contribution to the damage
                # remember that the bit for position 0 is the rightmost one, and so at bitString[4]
                if (bitString[4-position]=="1"):
                    damage[player][position] += grid[player][bitString]/shots
    stdout += "Damage: " + str(damage) + "<br>"
Listing 6-7

Quantum Script Main Section

A few minor changes have been made to the main section of the original script:
  • All print statements have been removed. Instead, a standard output string buffer is used to return information back to the client. This is done because Python’s print will dump information directly into the HTTP response which will mess up the JSON format we must return back (Javascript expects proper JSON from AJAX). Note that this is a purely optional but helpful step meant to return debug information back to the client. All in all, you can get away by simply commenting all print statements (of course, if an error occurs, you’ll have a hard time figuring out what went wrong).

  • All user input statements (read bomb position, Press enter to continue, and others) have been removed. Remember that ship positions and bomb counts are mapped from the HTTP request.

  • The original script uses an endless while loop to read bomb positions. This loop has been removed, or else the script will run forever and hang the HTTP request.

Finally, the script returns a JSON document back to the browser for UI updates as shown in Listing 6-8.
# Response
print ("Content-type: application/json\n\n")
print ("{\"status\": 200, \"message\": \"" + stdout + "\", \"damage\":" + str(damage) + "}")
Listing 6-8

Sending the Response Back to the Browser

To send a response back to the browser using Python CGI, simply print the standard HTTP response to standard output. That is, one or more HTTP headers followed by two line feeds and the response body. For example, to send a JSON document for the damage, we use the fragment:
Content-type: application/json
{ "status" : 200, "message": "Device ibmqx_qasm_simulator", "damage": [[0.5, 0, 0, 0, 0], [0, 0.9, 0, 0, 0]]}

The preceding JSON document indicates damage for player 1 qubit(0) and player 2 qubit(1). This document will be parsed by the browser AJAX code and the values updated on screen.

Tip

The code for this exercise is available from the book source at Workspace\Ch06\battleship\cgi-bin\qbattleship.py.

Solution 2: User Interface

The web page uses a 2x2 HTML table to render four 3x3 inner tables representing the ship and bomb boards for each player as shown in Figure 6-4 and Listing 6-9.
../images/469026_1_En_6_Chapter/469026_1_En_6_Fig4_HTML.jpg
Figure 6-4

Quantum Battleship user interface

<form id="frm1">
Device
<select id="device" name="device">
  <option value="local_qasm_simulator">Local Simulator</option>
  <option value="ibmqx_qasm_simulator">IBM Simulator</option>
  <option value="ibmqx2">ibmqx2</option>
</select>
&nbsp;&nbsp;&nbsp;Place 3 ships per player, place a bomb & click submit.
<table>
    <tr>
    <td>
        <div><h3>Player 1</h3></div>
        <script type="text/javascript"> table(1, 's')</script>
    </td>
    <td>
        <div><h3>Player 2</h3></div>
        <script type="text/javascript"> table(2, 's')</script>
    </td>
    </tr>
    <tr>
    <td>
        <div><h3>Player 1 Bombs</h3></div>
        <script type="text/javascript"> table(1, 'b')</script>
    </td>
    <td>
        <div><h3>Player 2 Bombs</h3></div>
        <script type="text/javascript"> table(2, 'b')</script>
    </td>
    </tr>
</table>
</form>
Listing 6-9

HTML Code for Figure 6-4

The 3x3 boards are rendered dynamically using the document.write() system call as shown in Listing 6-10.
// type: 's' (ship) = checkbox, 'b' (bomb) = radio
function table (player, type) {
  var d     = document;
  var html  = '<table border="1">\n';
  var qubit = 0;
  for ( var i = 0 ; i < 3 ; i ++) {
    html += '<tr>';
    for ( var j = 0 ; j < 3 ; j ++) {
      if ( (i + j) % 2 == 0) {
        var id    = 'p' + player + type + qubit++;
        // checkbox = ship , radio = bomb
        var itype = type == 's' ? 'checkbox' : 'radio';
        var extra = type == 'b' ? ' onclick="cell_click_bomb(this)"'
             : ' onclick="return cell_click_ship(this)"';
        // <TD> SHIP-INDEX DAMAGE IMAGE </TD>
        html += '<td>' + (qubit - 1)
            + ' <span id="' + type + player + (qubit -1 ) + '"></span>'
            + '<input id="' + id + '" name="' + id + '" type="' + itype + '"' + extra + '>'
            + '<label for="' + id + '" class="ship">&nbsp;</label></td>'
      }
      else {
        html += '<td>&nbsp;</td>';
      }
    }
    html += '</tr>\n';
  }
  html += '</table>';
  d.write(html);
}
Listing 6-10

Dynamically Rendered Table Using document.write()

Table 6-1 shows the major highlights of the user interface.
Table 6-1

Cloud Battleship User Interface Tips and Tricks

We hide the checkboxes and radio buttons using stylesheets. The selectors in lines 1 and 2 use the negation pseudo-class to hide the rule from older browsers. Lines 3 to 5 set the width, margin, and padding, in order to be able to position the alternative graphics accurately. Line 6 sets the opacity to render the standard user interface invisible.

input[type=checkbox]:not(old),

input[type=radio   ]:not(old){

width   : 104px;

margin  : 0;

padding : 0;

opacity : 0;

}

Each cell in the ships table displays

    •A qubit number

    •HTML span element to show damage percentage

    •An <INPUT type=”checkbox”> modified to use a 100x100 pixel image instead of the usual control../images/469026_1_En_6_Chapter/469026_1_En_6_Figa_HTML.jpg

input[type=checkbox]:not(old) + label {

display      : inline-block;

margin-left  : -104px;

padding-left : 104px;

background   : url('img/ship.png') no-repeat 0 0;

line-height  : 100px;

}

We position the label and display the unchecked image. Line 2 sets the label to display as an inline-block element, allowing line 6 to set its height to the height of the alternative graphics and center the text vertically. Line 3 uses a negative margin to cover the space where the standard user interface would be displayed, and line 4 then uses padding to restore the label text to the correct position. The 104-pixel value used here is equal to the width of the image plus some additional padding so that the label text is not too close to the image. Line 5 displays the unchecked image in the space before the label text.

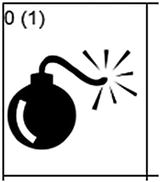
Each bomb cell contains

    •A qubit number

    •HTML span element to show bomb counts for that position

    •An <INPUT type=”radio”> modified with CSS to use a 100x100 pixel image instead of the usual control

../images/469026_1_En_6_Chapter/469026_1_En_6_Figb_HTML.jpg

The style used to format the bomb is shown in the following fragment:

input[type=radio   ]:not(old) + label{

display      : inline-block;

margin-left  : -104px;

padding-left : 104x;

background   : url('img/bomb.png') no-repeat 0 0;

line-height  : 100px;

}

Next, we display the selected images when the checkboxes and radio buttons are selected:

input[type=checkbox]:not(old):checked + label{

background-position : 0 -100px;

}

input[type=radio]:not(old):checked + label{

background-position : 0 -100px;

}

Because we have combined the images for the various states into a single image, the preceding rules modify the background position to show the appropriate image.

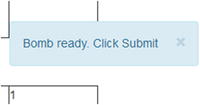
The slick jQuery, Bootstrap, and Bootstrap-Growl libraries are used to render messages and debug information into the JS console:

<script type="text/javascript" src="js/log.js"></script>

<script type="text/javascript" src="js/jquery.js"></script>

<script type="text/javascript" src="js/bootstrap.js"></script>

<script type="text/javascript" src="js/bootstrap-growl.js"></script>

<script type="text/javascript" src="js/notify.js"></script>

The HTML is beautified using the quintessential Bootstrap library for GUI design. Messages are displayed on screen using the great JS library Bootstrap-Growl:

notify('Bomb ready. Click Submit', info);

../images/469026_1_En_6_Chapter/469026_1_En_6_Figc_HTML.jpg

Game Rules and Validation

Because HTTP is a stateless protocol, all data structures and validation logic must be moved to the client. For example:
  • Players cannot be allowed to place more than three ships on the board.

  • No ship changes must be allowed after a bomb is placed.

  • Bombs cannot be placed before all players place their ships.

  • A global array of bomb counts is used to track user clicks: var BOMBS = [[0,0,0,0,0], [0,0,0,0,0]]. This array matches its Python counterpart: bomb = [[0]*5 for _ in range(2)].

These rules can be enforced by adding a callback when a ship or bomb cell is clicked, respectively, as shown in Listing 6-11.
// Fires when a ship cell is clicked
function cell_click_ship ( obj ) {
    var id     = obj.id;
    var player = parseInt(id.charAt(1));
    var qubit  = parseInt(id.charAt(3));
    var json = countShipsBombs();
    LOGD('Cell Clicked ' + id  + ' Counts:' + JSON.stringify(json));
    if ( json.ships[0] > 3 || json.ships[1] > 3) {
        return error('All Players must place only 3 ships.');
    }
    // no ship changes after bombs are placed
    if ( json.bombs[0] > 0 || json.bombs[1] > 0 ) {
        return error('No ship changes after bombs are placed.');
    }
    return true;
}
// Fires when a bomb cell is clicked
function cell_click_bomb ( obj ) {
    var id     = obj.id;     // For Bombs: p[PLAYER]b[QUBIT]
    var player = parseInt(id.charAt(1));
    var qubit  = parseInt(id.charAt(3));
    // validate: { 'ships': [s1, s2], 'bombs': [b1, b2]}
    var json = countShipsBombs();
    LOGD('Bomb Clicked ' + id  + ' Counts:' + JSON.stringify(json));
    if ( json.ships[0] < 3 || json.ships[1] < 3) {
        $('#' + id).attr('checked', false);
        return error('All Players must place 3 ships first.');
    }
    if ( mustSubmit) {
        return error('Bomb in place already. Click Submit.');
    }
    // check player turn. Buggy?
    var dif = (json.bombs[player - 1] + 1) - json.bombs[ 1 - (player - 1)];
    if ( dif >= 2 ) {
      if ( BOMBS[player - 1 ][qubit] < 1 ) {
       $('#' + id).attr('checked', false);
      }
      return error("Not your turn. It's player " + ((1-(player-1)) + 1) );
    }
    // Count bomb
    BOMBS[player - 1 ][qubit]++;
    // Assign counts to: d[PLAYER][QUBIT]
    $('#b' + player + qubit).html("(" + BOMBS[player - 1 ][qubit] + ")");
    // bomb in place, click submit
    notify('Bomb ready. Click Submit', 'info');
    mustSubmit = true;
}
function error (msg) {
    notify(msg, 'danger');
    return false
}
Listing 6-11

Enforcing Game Rules Using Click Callbacks from Book Source index.html

Now the data can be sent to the backend for consumption.

End Point and Response Format

Each request must be sent to the Web Server asynchronously using AJAX. Furthermore a specific format must be used for the query string. Thus the request-response format is as follows:

Given the end point http://localhost/~centos/battleship/cgi-bin/qiskit-driver.sh, we assume that
  • The username is centos.

  • The code has been deployed into the user’s home folder: $HOME/centos/public_html/battleship.

  • Python 3 must be activated by using the wrapper script qiskit-driver.sh. This is required only if multiple versions of Python are present in the host (see “Running Multiple Versions of Python” section).

The following values are required in the request query string:
  • ships1: comma-separated list of three positions for player 1 ships

  • ships2: comma-separated list of three positions for player 2 ships

  • bombs1: comma-separated list of five bomb counts for player 1

  • bombs2: comma-separated list of five bomb counts for player 2

  • device: quantum device. For example, local_qasm_simulator, ibmq_qasm_simulator, or ibmqx2.

For example, here is a full AJAX request to be run in the IBM remote simulator:
http://localhost/~centos/battleship/cgi-bin/qiskit-driver.sh?ships1=0,1,2&ships2=0,1,2&bombs1=0,1,0,0,0&bombs2=0,0,0,0,0&device=ibmqx_qasm_simulator
When the player clicks Submit, the ship positions, ships1 and ships2, and bomb counts, bombs1 and bombs2, are assembled from the DOM tree and the global BOMBS array. The request end point and query string are defined, and the HTTP GET request is sent via AJAX as shown in Listing 6-12.
function submit() {
  var frm  = $('#frm1');
  var url  = "cgi-bin/qiskit-driver.sh";
  // Data format: ships1=0,1,2&ships2=0,1,2&bombs1=0,1,0,0,0&bombs2=0,0,0,0,0
  // ships has the positions per player, bombs has the bomb position counts per player
  // ships: 3 ships per player, bombs: 5 position counts
  var data = ";
  var s1   = ";
  var s2   = ";
  for ( var i = 0 ; i < 5 ; i++) {
    if ( $('#p1s' + i).prop('checked') ) s1 += ',' + i;
    if ( $('#p2s' + i).prop('checked') ) s2 += ',' + i;
  }
  // remove 1st comma
  if (s1.length > 0) s1 = s1.substring(1);
  if (s2.length > 0) s2 = s2.substring(1);
  // query string
  data = 'ships1=' + s1 + '&ships2=' + s2
      + '&bombs1=' + BOMBS[0].join(',') + '&bombs2=' + BOMBS[1].join(',')
      + '&device=' + $('#device').val();
  LOGD('Url:' + url + ' data=' + data);
  // https://api.jquery.com/jquery.get/
  $.get( url, data)
  .done(function (json) {
    handleResponse (json);
  })
  .fail(function() {
      LOGD( "error" );
      notify('Internal Server Error. Check logs.', 'danger');
  })
}
Listing 6-12

Submitting Data to the Backend from Book Source index.html

If something goes wrong, an error notification will be displayed on screen, else the expected response JSON will be sent to a handler for consumption. Let’s see how.

Response Handler

The job of the response handler is to consume the backend response and update damage counts, display error messages if any, or repeat this process until a winner is declared. Listing 6-13 shows this process, but before we do, let’s take a look at the critical format of the response JSON:
{"status":200,"message":"OK","damage":[[0.475,0,0,0.70,0],[0.786,0.90,0,0,0.]]}
The most important key is damage. It contains a 2D array representing ship damage positions for each player. The damage is a percentage between 0 and 1. This data is used by the response handler to update the user interface.
function handleResponse (json) {
  LOGD("Got: " + JSON.stringify(json))
  var damage   = json.damage;
  var d1      = damage[0];  // damage P1
  var d2      = damage[1];  // damage P2
  for ( var i = 0 ; i < 5 ; i++) {
      var pct1 = (d1[i] * 100).toFixed(1);
      var pct2 = (d2[i] * 100).toFixed(1);
      var s1, c1, s2, c2;
      if ( pct1 < 90 ) {
          s1 = '['  + pct1 + '%]';
          c1 = 'cyan';
      }
      else {
          s1 = 'SUNK';
          c1 = 'red';
          notify('Player 1 Ship ' + i + ' sunk.', 'warning');
      }
      if ( pct2 < 90 ) {
          s2 = '['  + pct2 + '%]';
          c2 = 'cyan';
      }
      else {
          s2 = 'SUNK';
          c2 = 'red';
          notify('Player 2 Ship ' + i + ' sunk.', 'warning');
      }
            //LOGD(i + ' s1=' + s1 + ' s2=' + s2 + ' d1=' + d1[i] + ' d2=' + d2[i]);
      $('#s1' + i).html(s1).css('background-color', c1);
      $('#s2' + i).html(s2).css('background-color', c2);
  }
  // Game Result: damage sum > 2.85 (0.95 * 3) = loss
  // https://www.w3schools.com/jsref/jsref_reduce.asp
  // array.reduce(function(total, currentValue, currentIndex, arr), initialValue)
  var s1 = d1.reduce(function(total, currentValue, currentIndex, arr)
       { return total + currentValue}, 0);
  var s2 = d2.reduce(function(total, currentValue, currentIndex, arr)
       { return total + currentValue}, 0);
  var winner = 0;
  if ( s1 > 2.85) winner = 2;
  if ( s2 > 2.85) winner = 1;
  LOGD ("Results Damage sums s1:" + s1 + " s2:" + s2);
  if ( winner != 0) {
      notify ('** G.A.M.E O.V.E.R Player ' + winner + ' wins **', 'success');
      gameover = true;
  }
  // enable submit
  $("#btnSubmit").prop("disabled", false);
}
Listing 6-13

Response Handler from Book Source index.html

  • The handler extracts the damage array and loops for each position converting the damage for each player to a 1-100 percentage.

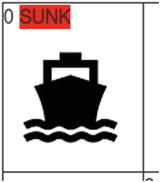
  • Colorization is used to display the damage percentage for a dramatic effect. Messages are displayed on screen for each ship sunk (see Figure 6-5).
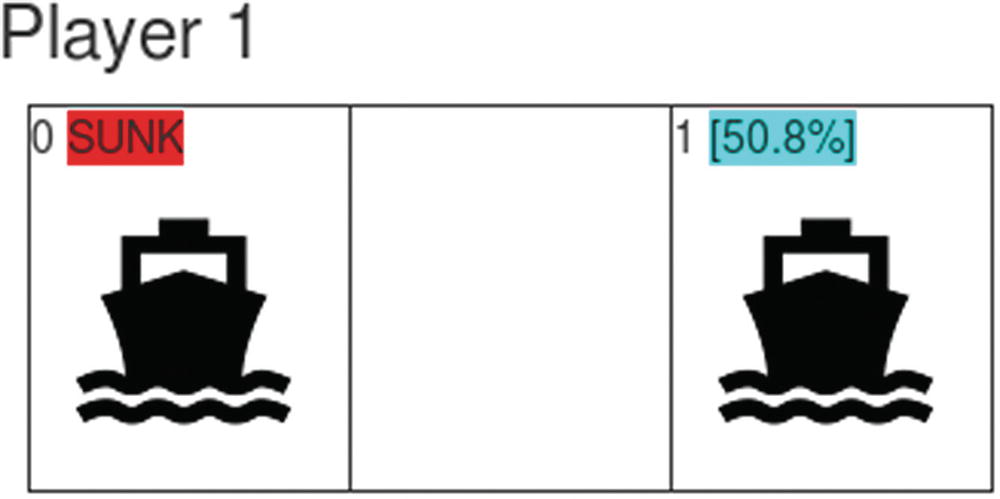
    ../images/469026_1_En_6_Chapter/469026_1_En_6_Fig5_HTML.jpg
    Figure 6-5

    Damage colorization

  • If the damage sum exceeds a 90% threshold for all ships of a player, a winner is declared and the game is over. Click the Reset button to start a new game.

To reset the game, we just uncheck all checkboxes and radio buttons and reset the global BOMBS array as shown in Listing 6-14.
// Restart game: fires when the reset button is clicked
function reset_click () {
  if ( ! confirm("Are you sure?")) {
    return;
  }
  gameover = false;
  for ( var i = 0 ; i < 5 ; i++) {
    $('#p1s' + i).attr('checked', false);
    $('#p2s' + i).attr('checked', false);
    $('#p1b' + i).attr('checked', false);
    $('#p2b' + i).attr('checked', false);
    // info spans
    $('#s1' + i).html(");
    $('#s2' + i).html(");
    $('#b1' + i).html(");
    $('#b2' + i).html(");
    BOMBS[0][i] = 0;
    BOMBS[1][i] = 0;
  }
}
Listing 6-14

Game Reset from Book Source index.html

Now it is time to run, deploy, test, and troubleshoot if necessary. I use CentOS 6 for development which bundles Python 2.7 as default. Remember that we must run in Python 3.5 or later.

Tip

Listings 6-9 thru 6-12 can be found at the book source under Workspace\Ch06\battleship\index.html as well as all resources required to deploy the game on the cloud.

Running Multiple Versions of Python

Chapter 3 explains how to install and run both Python 3.6 and Python 2.7 separately. In this particular case, a wrapper script is used to activate Python 3 in the CGI backend before invoking the quantum program.
#!/bin/sh
# home dir
root=/home/centos
program=qbattleship.py
# Activate python 3
source $root/qiskit/qiskit/bin/activate
# execute python quantum program
python $program
The previous script simply activates Python 3 and invokes the real quantum program qbattleship.py. It is required, or else the Web Server will use the default Python installation (2.7) and the program will fail as the QISKit requires Python 3.5 or later. Remember that a Python 3 environment was created in the user’s home as follows:
$ mkdir –p $HOME/qiskit
$ cd $HOME/qiskit
$ python3.6 -m venv qiskit
To activate the virtual environment:
$ source qiskit/bin/activate

Now finally deploy and test. Hopefully troubleshooting won’t be necessary.

Solution 3: Deploy and Test

In this section we deploy the game in the Apache HTTPD server and look at the game in action. The full source for the game including all support files, styles, images, CGI wrapper, and quantum program, can be found in the book source under Workspace\Ch06\battleship. The folder layout is shown in Figure 6-6.

Note

This section assumes that you already have installed Apache HTTPD in your system and that the default service has been configured and it is running properly. If this is not the case, there are plenty of tutorials up there. For example, for CentOS 7 I like www.liquidweb.com/kb/how-to-install-apache-on-centos-7/ .

../images/469026_1_En_6_Chapter/469026_1_En_6_Fig6_HTML.jpg
Figure 6-6

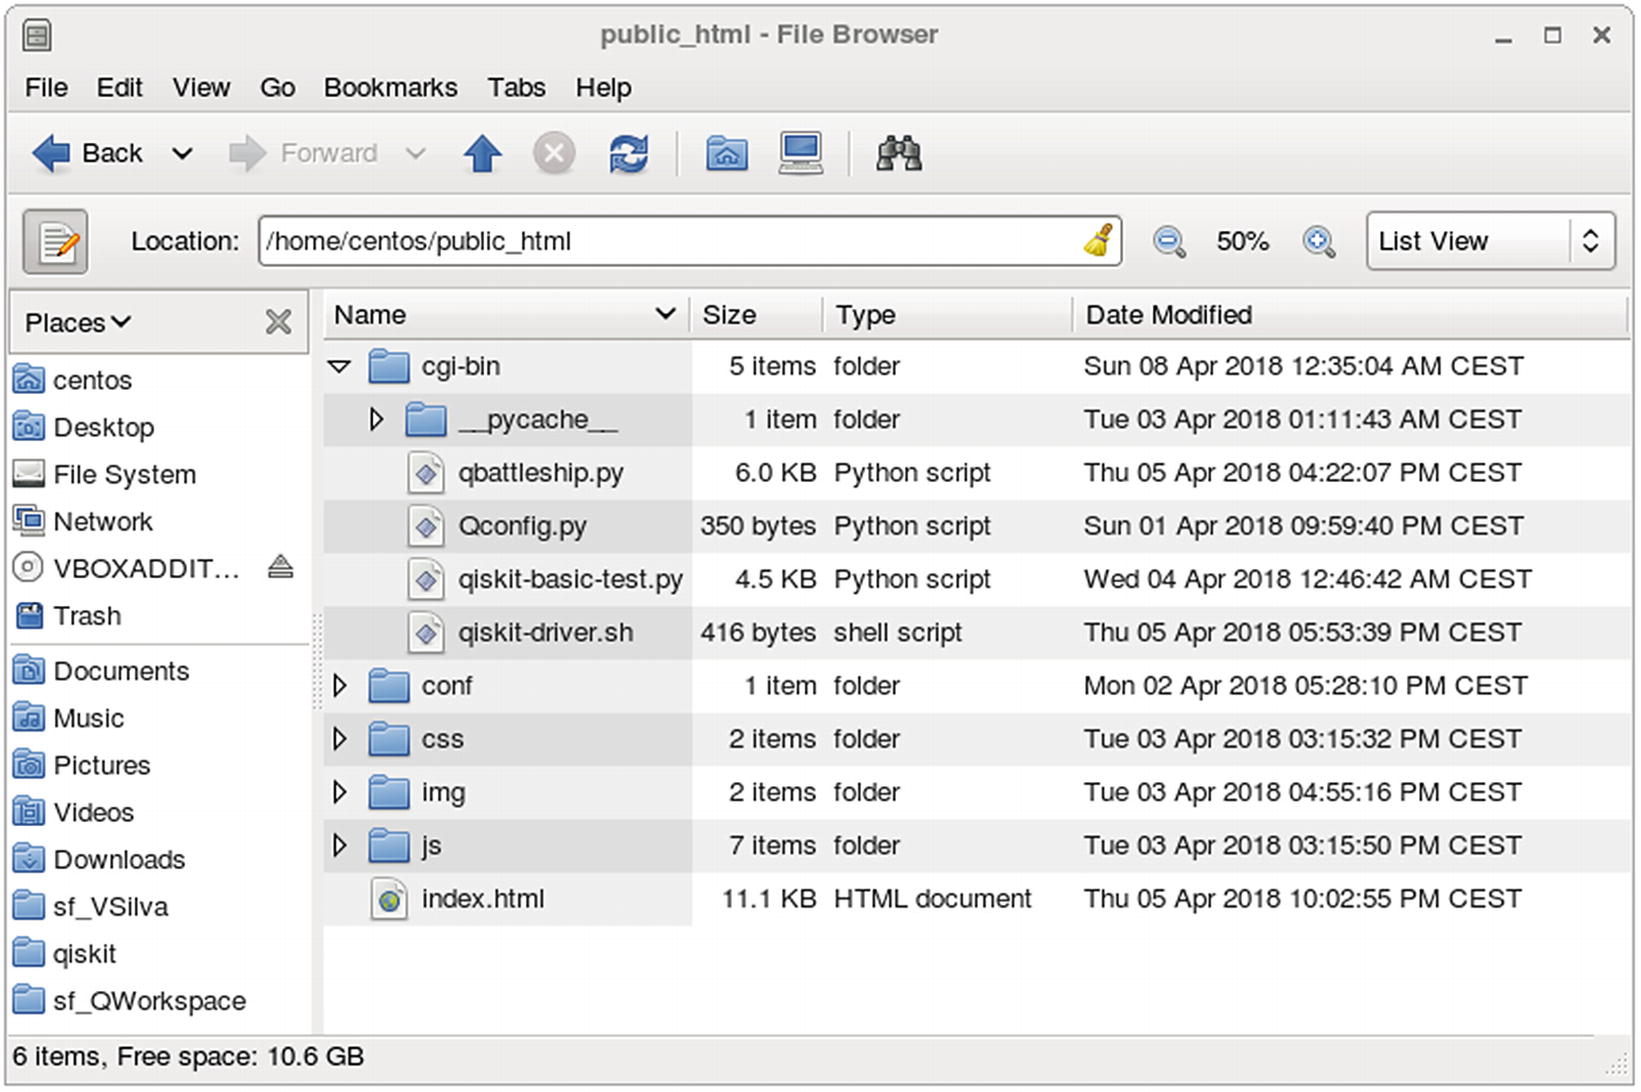
Folder layout for the Cloud Quantum Battleship

  1. 1.

    Create a folder called public_html in your user’s home.

    $ mkdir $HOME/public_html
     
  1. 2.

    Create the cgi-bin folder under public_html to contain the CGI Python scripts.

    $ mkdir $HOME/public_html/cgi-bin
     
  1. 3.

    Configure the HTTPD server to enable access from the user’s public_html as well as public_html/cgi-bin folders (see Listing 6-15). Note that cgi-bin needs a special permission to allow for CGI script execution.

     
  2. 4.

    If you wish to use the book source, copy all files from Workspace\Ch06\battleship to public_html/battleship.

     
  3. 5.

    Make sure the file permissions are correct for the public_html folder and all subfolders and files. This is very important; if the permissions are incorrect, the browser will give a “500 – Internal Server Error” response. This was a major source of headaches when I was testing in my CentOS 6 desktop: $ chmod -R 755 public_html.

     
<IfModule mod_userdir.c>
    #UserDir disabled
    #
    # To enable requests to /~user/ to serve the user's public_html
    # directory, remove the "UserDir disabled" line above, and uncomment
    # the following line instead:
    #
    UserDir public_html
</IfModule>
<Directory /home/*/public_html>
    AllowOverride FileInfo AuthConfig Limit
    Options MultiViews Indexes SymLinksIfOwnerMatch IncludesNoExec +ExecCGI
    AddHandler cgi-script .cgi
    <Limit GET POST OPTIONS>
        Order allow,deny
        Allow from all
    </Limit>
</Directory>
<Directory "/home/*/public_html/cgi-bin">
    AllowOverride None
    Options ExecCGI
    SetHandler cgi-script
</Directory>
Listing 6-15

Configuration to Enable HTTP Requests from the User’s public_html Directory (CentOS 6/Apache HTTPD 2.2)

Tip

Enabling requests from public_html (Listing 6-15) requires the Apache module userdir to be enabled in httpd.conf (uncomment LoadModule userdir_module modules/mod_userdir.so). This module may not be enabled by default.

Copy the script in Listing 6-15 to the system folder /etc/httpd/conf.d. This folder contains configuration files loaded automatically by Apache HTTPD at startup. Now start the HTTPD server, in CentOS (note that this assumes that you already have Apache HTTPD installed in your system):
$ sudo service httpd start       (CentOS 6)
$ sudo systemctl start httpd     (CentOS 7)

Finally, for the grand finale, start your browser and open the URL http://localhost/~centos/battleship/ (assuming the username is centos). Hopefully there will be no issues and you can start playing Quantum Battleship in the cloud; however if something goes wrong, here is a list of issues that I came across setting things up.

Troubleshooting

Most of the issues I faced were related to file permissions due to my rustiness using the good old Apache HTTPD:
  • Apache HTTPD idiosyncrasies: Enabling requests from the user’s home (Listing 6-15) requires the module userdir to be enabled in the daemon configuration httpd.conf. Depending on your OS, this module may not be enabled by default. Also HTTPD 2.4 users: Listing 6-15 is for Apache v2.2; v2.4 may require a different syntax.

  • HTTP status 500 - Internal Server Error in the Browser: Make sure the file permissions for public_html and all files and subfolders are set to 755. You can diagnose this by looking at the HTTPD log files located at

    /var/log/httpd/error_log
    /var/log/httpd/suexec.log
For example, here is a snippet from suexec.log telling me my permissions were messed up:
$ tail -f /var/log/httpd/suexec.log
[2018-04-02 17:03:45]: cannot get docroot information (/home/centos)
[2018-04-02 17:10:13]: uid: (500/centos) gid: (500/centos) cmd: first.cgi
[2018-04-02 17:10:13]: directory is writable by others: (/home/centos/public_html)

Tip

Apache suEXEC is a feature of the Apache Web Server. It allows users to run CGI and SSI applications as a different user. In CentOS suEXEC writes a log to /var/log/httpd/suexec.log.

  • SELinux headaches: This is a Linux kernel security module that provides a mechanism for supporting access control security policies. In CentOS this feature is enabled by default. It can be disabled temporarily from the command line using the command:

    $ sudo setenforce 0
or permanently by editing the file /etc/sysconfig/selinux and setting the value of the SELINUX key to disabled .
$ sudo vi /etc/sysconfig/selinux
SELINUX=disabled
SELINUXTYPE=targeted
Note that SELinux can cause trouble when invoking the CGI scripts or when the quantum program attempts to execute remote code against the IBM simulator or real device.
  • Python bugs: If any error occurs in the Python script, the CGI exception handler will catch it and dump a nice HTML page in the current working directory (cgi-bin). Figure 6-7 shows the output from a timeout error occurred when executing in the real quantum device ibmqx2.
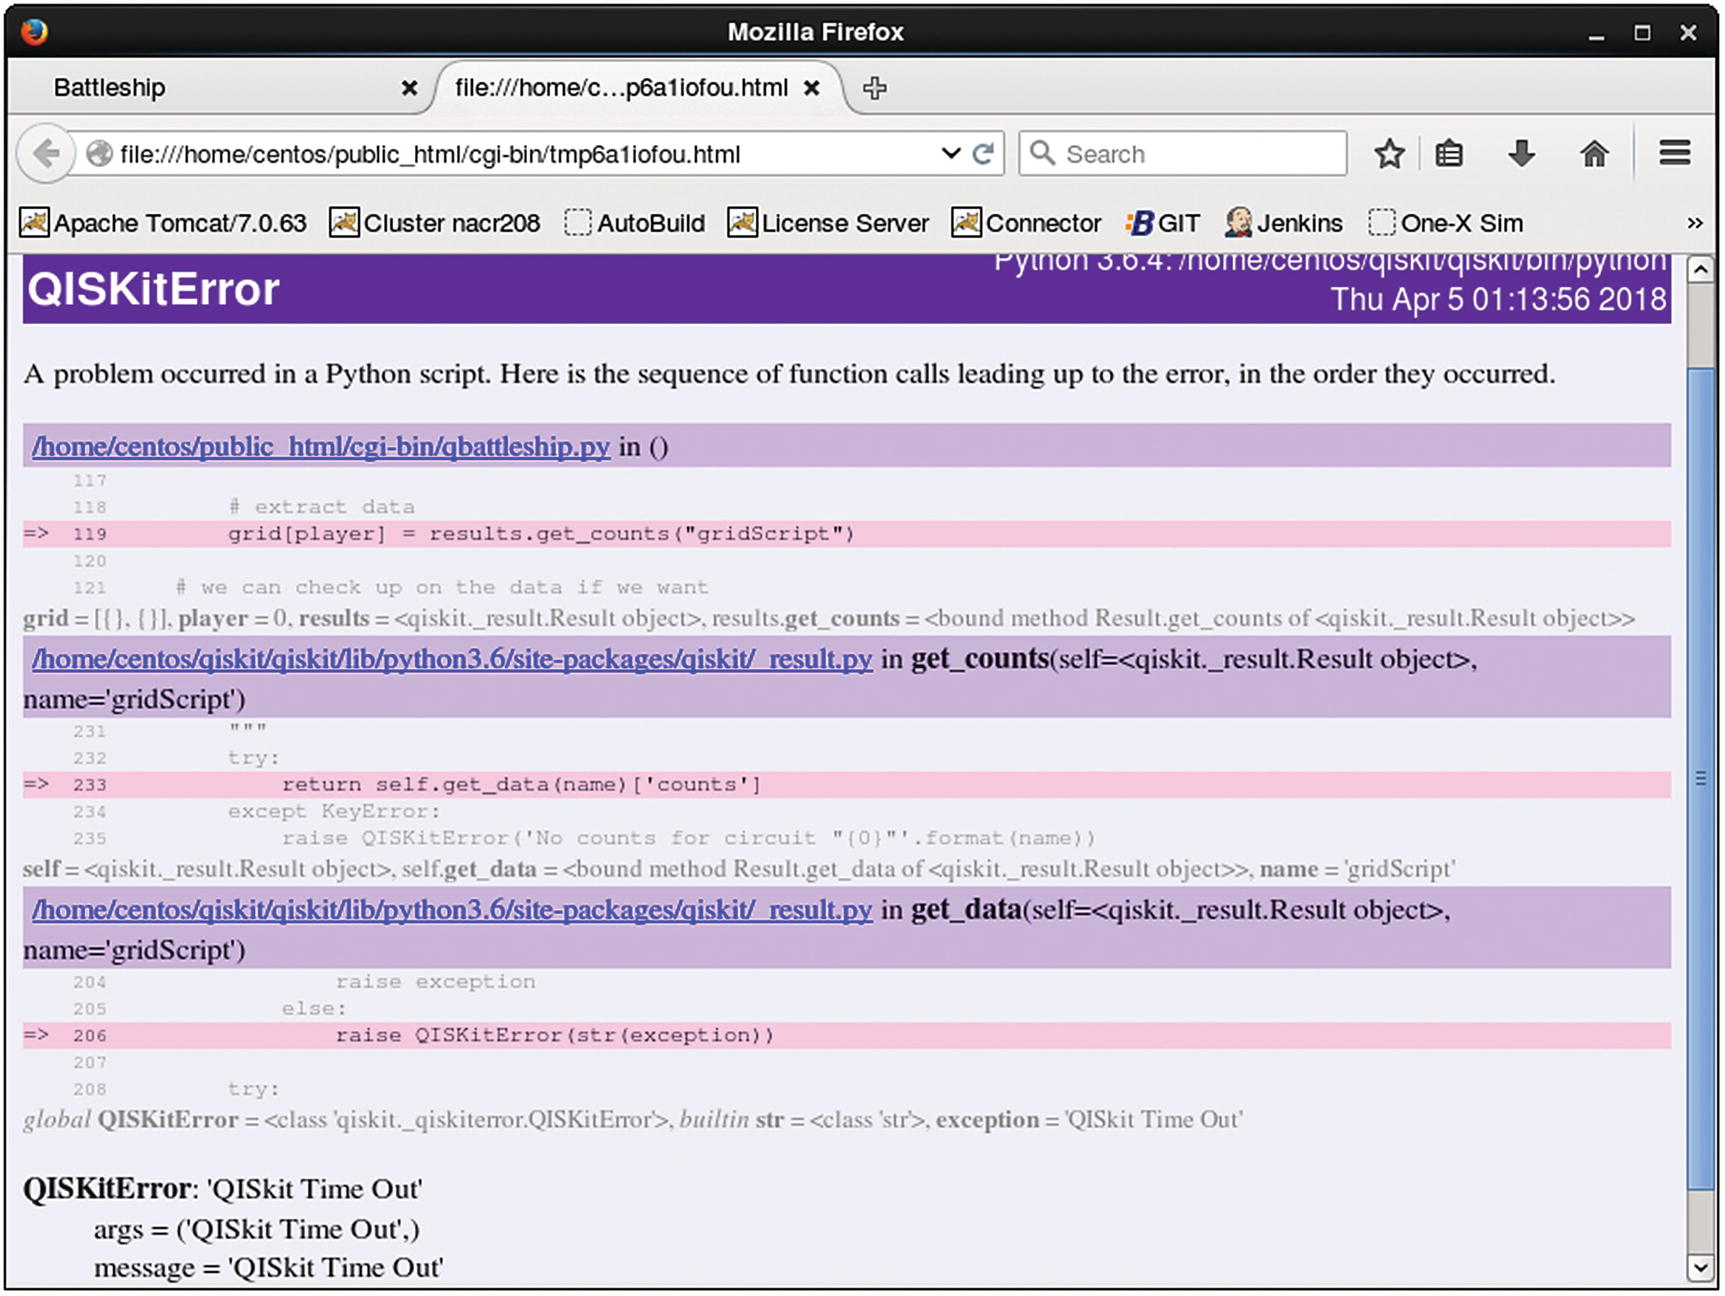
    ../images/469026_1_En_6_Chapter/469026_1_En_6_Fig7_HTML.jpg
    Figure 6-7

    Python error dump created by the cgi package

  • API configuration issues: Finally if running in a real quantum device, make sure the configuration is correct in Qconfig.py (including the API token for your Q Experience account) as shown in the next fragment:

APItoken = 'YOUR-API-TOKEN'
config = {
    'url': 'https://quantumexperience.ng.bluemix.net/api',
}

Note that Qconfig.py must live in the same location as the quantum program qbattleship.py, that is, the cgi-bin folder. Still, further improvements can be made to the game; let’s discuss them in the next section.

Further Improvements

Cloud Battleship from the previous section can use some improvements which you could probably notice after playing the game for a while. Here is a list of my ideas:
  • The user interface shows the ship and bomb boards for both players. In a real battleship game each player should open its own browser window, set his ships, and start bombing the opponent.

  • Gate state : ship, bomb positions, and quantum device are all kept in the client due to the fact that HTTP is a stateless protocol. That is, a request comes, the python program runs, and a response is sent back. After that, all memory disappears. A real game should use a server-based player lobby to host all the game state (e.g., using an application server) and coordinate communication between browser windows.

A Better Cloud Battleship

The ultimate Cloud Quantum Battleship game should use two browser windows for each player with ship and bomb boards each. Furthermore the Apache HTTPD should be replaced with an application server (such as Apache Tomcat) which is capable of storing game state in the server. The layout for this is shown in Figure 6-8.
../images/469026_1_En_6_Chapter/469026_1_En_6_Fig8_HTML.jpg
Figure 6-8

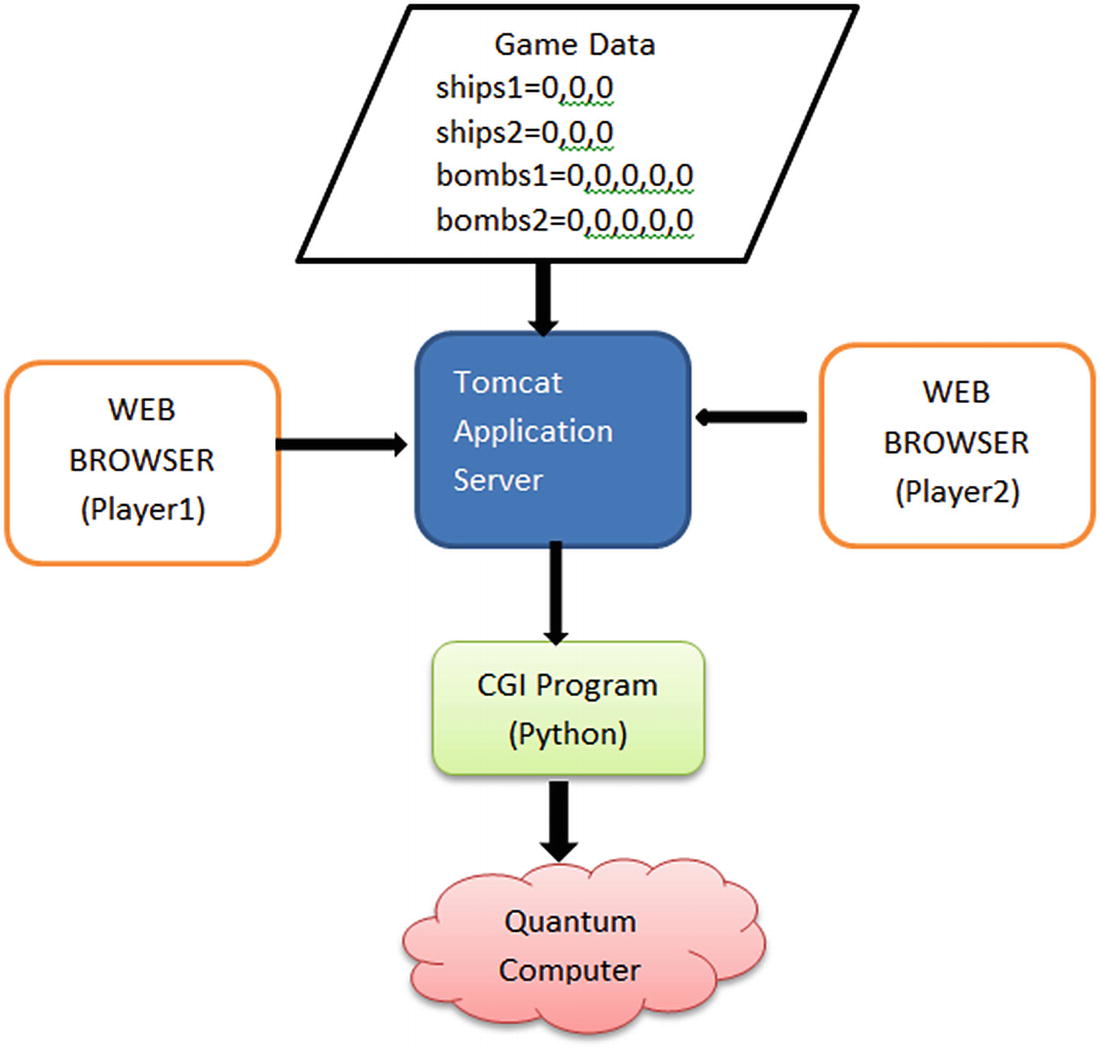
Improved Cloud Quantum Battleship

  • A rudimentary game lobby can be implemented as a Tomcat web application to store ship, bomb positions, and quantum device.

  • The web application can use the host OS runtime facilities (in this case Java’s runtime API) to invoke the quantum Python script, get damage results back, and dispatch them to each player.

  • To avoid the always-annoying browser page refreshes, each browser can connect via WebSocket to the application server. This will keep a permanent connection open where JSON text messages can be sent quickly between clients.

Connecting via WebSocket

The UI web page needs to be modified slightly to connect via WebSocket instead of AJAX as shown in Listing 6-16.

Tip

An Eclipse project for this section is provided in the book source under Workspace\Ch06_BattleShip. Given all the complex parts of this web app, I recommend that you open the workspace in your IDE and read along. Note that I assume that you have a good level of proficiency on writing apps with the Eclipse/Tomcat combo.

// Server WS endpoint (file: websocket.js)
var END_POINT = "ws://localhost:8080/BattleShip/WSBattleship";
// Random ID used to track a client
var CLIENT_ID = Math.floor(Math.random() * 10000);
function WS_connect(host) {
  LOGD("WS Connect " + host);
  if ('WebSocket' in window) {
    this.socket = new WebSocket(host);
  } else if ('MozWebSocket' in window) {
    this.socket = new MozWebSocket(host);
  } else {
    LOGE('Error: WebSocket is not supported by this browser.');
    return;
  }
  this.socket.onopen = function() {
    LOGD('WS Opened ' + host);
  };
  this.socket.onclose = function() {
    LOGD('WS Closed ' + host);
  };
  this.socket.onmessage = function(message) {
    // { status: 200 , message :'...'}
    LOGD('OnMessage: ' + message.data);
    var json = JSON.parse(message.data);
    if ( json.status >= 300 && json.status < 400) {
      // warning
      notify(json.message, 'warning');
    }
    if ( json.status >= 400 ) {
      // error
      notify(json.message, 'danger');
      return;
    }
    handleResponse (json);
  };
}
function WS_initialize () {
  var clientId = CLIENT_ID;
  var host     = END_POINT;
  this.url     = host + '?clientId=' + clientId;
  WS_connect(this.url);
};
function WS_send (text) {
  this.socket.send(text);
};
Listing 6-16

WebSocket Javascript Client Code Under WebContent/js/websocket.js

In the client:
  • All major browsers implement the WebSocket standard used to keep a persistent connection against a capable server. For this, an end point URL of the form ws://localhost:8080/BattleShip/WSBattleship is created in line 2. Note that parameters can be sent in WebSocket end points just like regular URLs. Thus the final WS URL is ws://localhost:8080/BattleShip/WSBattleship?clientId=RANDOM-ID where a random ID is used to track each player.

  • WebSocket in Javascript uses a callback system to receive events such as
    • socket.onopen: It fires when the socket is opened. Line 23 shows the callback used to handle this event.

    • socket.onclose: It fires when the connection is broken: when the browser is closed or refreshed or the server dies for example.

    • socket.onmessage: This is the most important callback. It fires when a message is received, and it is used to consume the JSON message sent by Python, just as AJAX does in the previous version.

When the player browser page loads, the client connects using the DOM window.onload callback:
function win_onload () {
    WS_initialize ();
}
window.onload = win_onload;
In the server we need a WebSocket-capable application server. Luckily for us, Tomcat fully implements the WebSocket standard in all operating systems. Listing 6-17 shows a basic implementation of a WebSocket handler in Java.
@ServerEndpoint(value = "/WSBattleship")
public class WSConnector {
  // connections
  private static final List<WSConnectionDescriptor> connections =
    new CopyOnWriteArrayList<WSConnectionDescriptor>();
  // Game data Player-ID => {name: 'Player-1', ships: "0,0,0:, bombs: "0,0,0,0,0 }
  private static final Map<String, JSONObject> data =
   new HashMap<String, JSONObject>();
  /** The client id for this WS */
  String clientId;
  private String getSessionParameter (Session session, String key) {
    if ( ! session.getRequestParameterMap().containsKey(key)) {
      return null;
    }
    return session.getRequestParameterMap().get(key).get(0);
  }
  @OnOpen
  public void open(Session session) {
    clientId = getSessionParameter(session, "clientId");
    // no duplicates?
    WSConnectionDescriptor conn = findConnection(clientId);
    if ( conn != null) {
      unicast(conn.session,
        WSMessages.createStatusMessage(400
            , "Rejected duplicate session.").toString());
    }
    else {
      connections.add(new WSConnectionDescriptor(clientId, session));
    }
    dumpConnections("ONOPEN " +  clientId );
  }
  @OnClose
  public void end() {
  }
  @OnMessage
  public void incoming(String message) {
    WSConnectionDescriptor d = findConnection(clientId);
    try {
          JSONObject root = new JSONObject(message);
          String name    = root.getString("name");
          String action  = root.optString("action");
      .  // reset game?
          if ( action.equalsIgnoreCase("reset")) {
              multicat(WSMessages.createStatusMessage(300
                , "Game reset by " + name).toString());
              data.clear();
              return;
          }
          // Validate game rules...
          // Execute python script
          linuxExecPython(args);
    } catch (Exception e) {
      LOGE("OnMessage", e);
    }
  }
  @OnError
  public void onError(Throwable t) throws Throwable {
    LOGE("WSError: " + t.toString());
  }
}
Listing 6-17

WebSocket Server Handler Skeleton (WSConnector.java)

In Java, WebSocket server handlers are implemented using the J2EE annotation standard. This makes code reusable across all vendors.
  • In Listing 6-17 line 1, the Java class WSConnector defines the annotation @ServerEndpoint(value = "/WSBattleship"). This powerful instruction is all we need to build a server handler. The value WSBattleship is the name of the handler; thus the full server end point will be ws://host:POT/Battleship/WSvattleship?QUERY-STRING.

  • Callbacks for open, close, and message events are declared using the annotations: @OnOpen, @OnClose, and @OnMessage, respectively. Note that the method names are irrelevant, what matters are the parameters:
    • OnOpen: Receives a Session object which contains information about the connection.

    • OnClose: No parameters in this one. It fires when the browser connection dies.

    • OnMessage: The most important of the lot. It fires when a text message is sent by a client with the data as the argument.

  • Keep in mind that a single instance of the WSConnector class will be created for each client connection; thus in line 5, we use a thread safe static list List<WSConnectionDescriptor> connections to track all client connections. Line 8 declares a static hash map to track game data with the key being a player id and the value, a JSON object sent by the browser. For example, [Player-1 => {name: 'Player-1', ships: "0,0,0:, bombs: "0,0,0,0,0”, device: "local_qasm_simulator"}].

  • When the message callback fires (file WSConnector.java lines 201-253), the text message is parsed as JSON, the data is stored in memory, game rules applied, and if everything is correct, the Python script is invoked with ship and bomb positions. Finally the results are collected and sent back to each client for update.

To send a message back to the client, the Session object can be used:
session.getBasicRemote().sendText("Some Text")
To send a message to everybody (multicast), the connections list can be used:
static void multicast ( String message ) {
  for ( WSConnectionDescriptor conn : connections) {
    conn.session.getBasicRemote().sendText(message)
  }
}

Invoking Python and Setting File Permissions from Java

Even though the Java language is designed to be OS agnostic, invoking operating system commands is possible via the Runtime.getRuntime().exec("command") system call. Listing 6-18 shows a very simple class to execute a command and read its standard output into a string buffer.
public class SysRunner {
  final String command;
  final StringBuffer stdout = new StringBuffer();
  final StringBuffer stderr = new StringBuffer();
  public SysRunner(String command) {
    this.command = command;
  }
  public void run () throws IOException, InterruptedException {
    final Process process   = Runtime.getRuntime().exec(command);
    pipeStream(process.getInputStream(), stdout);
    pipeStream(process.getErrorStream(), stderr);
    process.waitFor();
  }
  private void pipeStream (InputStream is, StringBuffer buf) throws IOException {
    BufferedReader br = new BufferedReader(new InputStreamReader(is));
    String line;
    while ((line = br.readLine()) != null) {
      buf.append(line);
    }
  }
  public StringBuffer getStdOut () {
    return stdout;
  }
  public StringBuffer getStdErr () {
    return stderr;
  }
}
Listing 6-18

Executing OS Commands and Extracting Results (SysRunner.java)

To get the output from a command, use the process input stream, read from it, and store the data in a string buffer (lines 17-24 of Listing 6-18): pipeStream(process.getInputStream(), stdout). Now we have the tool to execute the Python program but still need to deal with the Linux file permissions. Remember that the Python script must be included in the web application itself (see Figure 6-9). Therefore when the application server extracts the Battleship web app in the file system along with the Python code, the script will take the default file permission of 644 (not world executable). This will cause the script to fail when run.
../images/469026_1_En_6_Chapter/469026_1_En_6_Fig9_HTML.jpg
Figure 6-9

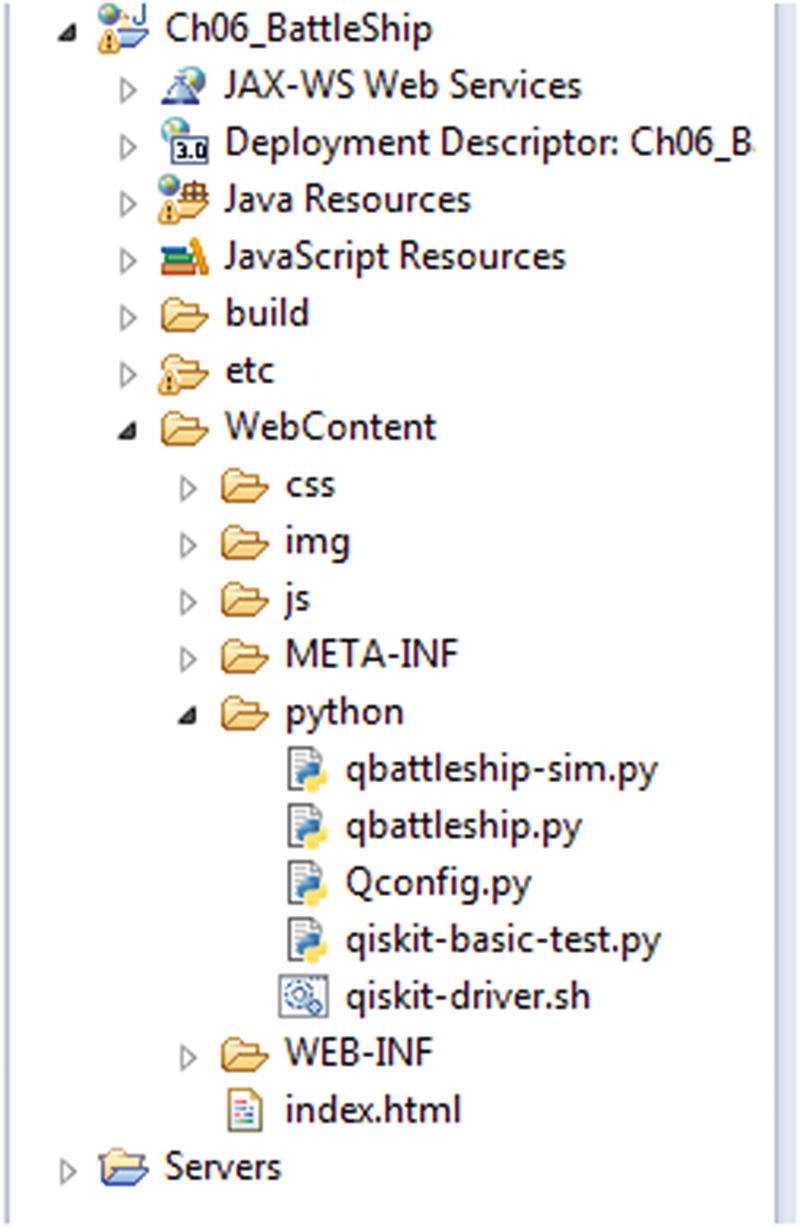
Project layout of the Cloud Battleship J2EE project

To fix the file permissions for the Python code within a web app, execute a chmod OS command with the file names as shown in the next paragraph:
// Get the base path for the python code
// ...webapps/BattleShip/python/
String root = IOTools.getResourceAbsolutePath("/") + "../../";
// Special *&$# chars don't work
String cmd = "/bin/chmod 755 " + base +  "python" + File.separator;
String[] names = { "Qconfig.py", "qiskit-basic-test.py"
  , "qiskit-driver.sh", "qbattleship-sim.py", "qbattleship.py"};
for (int i = 0; i < names.length; i++) {
  SysRunner r = new SysRunner(cmd + names[i]);
  r.run();
}
The base path of the app installation can be obtained in Java using reflection as shown in the following:
public static String getResourceAbsolutePath(String resourceName) throws UnsupportedEncodingException {
    URL url   = IOTools.class.getResource(resourceName);
    String path = URLDecoder.decode(url.getFile(), DEFAULT_ENCODING);
    // path -> Windows: /C:/.../Workspaces/.../
    // path-> Linux:  /home/users/foo...
    if ( path.startsWith("/") && OS_IS_WINDOWS) {
      // gotta remove the first / in Windows only!
      path = path.replaceFirst("/", "");
    }
    return path;
}
Finally the Python quantum program can be executed from the WebSocket message callback as shown in Listing 6-19.
// Args: ships1=0,0,0 ships2=0,0,0 bombs1=0,0,0,0,0 bombs2=0,0,0,0,0
// device=local_qasm_simulator
private void linuxExecPython (String args) throws Exception {
   // STDOUT {status: 200, message: 'Some text', damage: [[0,0,0,0,0],[0,0,0,0,0]]}
  StringBuffer stdout = IOTools.executePython(SCRIPT_ROOT, args);
  JSONObject resp = new JSONObject(stdout.toString());
  // send back to clients in reverse order
  JSONArray damage = resp.getJSONArray("damage");
  resp.remove("damage");
  final int size = damage.length() - 1;
  for (int i = 0; i < connections.size(); i++) {
    resp.put("damage", damage.get( size - i));
    unicast(connections.get(i).session, resp.toString());
    resp.remove("damage");
  }
}
// base: WEPAPP_PATH/python/qiskit-driver.sh
// args: WEPAPP_PATH/python/qbattleship.py
//         0,0,0 0,0,0 0,0,0,0,0 0,0,0,0,0 device
public static StringBuffer executePython (String base, String args)
throws IOException, InterruptedException {
  String driver = base + File.separator + "python" + File.separator + "qiskit-driver.sh";
  String program = base + File.separator + "python" + File.separator + "qbattleship.py";
  String cmd = driver + " " + program + ( args != null ? " " + args : "");
  SysRunner r = new SysRunner(cmd);
  r.run();
  return r.getStdOut();
}
Listing 6-19

Executing the Quantum Program and Sending Results Back

To execute the Python quantum program , the code in Listing 6-19
  • Obtains the LOCATION of the python folder within the web app. That is TOMCAT-ROOT/webapps/Battleship/python

  • Executes the driver script LOCATION/qiskit-driver.sh LOCATION/qbattleship.py with the arguments:
    • ships1: Ship locations for player 1

    • ships2: Ship locations for player 2

    • bombs1: Bomb counts for player 1

    • bombs2: Bomb counts for player 2

    • device: Quantum device

  • Dispatches the results back to the clients

Finally, from your IDE, export the Cloud Quantum Battleship web archive (WAR), deploy it in your Tomcat container, and game on with two web browsers at http://localhost:8080/BattleShip/ (see Figure 6-10). I have assumed that you are proficient in doing this but just in case:
  1. 1.

    Export the web app as a web archive WAR, and right-click the Ch06_Battleship project in your IDE (see Figure 6-9). Click Export > Web Archive, and select a name/destination (e.g., Ch06_Battleship.war).

     
  2. 2.
    Make sure the Tomcat service is up and running. If not installed by default in your system, here is some help:
    yum -y install java (CentOS 6,7)
    yum -y install tomcat7 tomcat7-webapps tomcat7-admin-webapps (CentOS 6,7)
    service tomcat7 start (CentOS 6)
    systemctl start tomcat7 (CentOS 7)
     
  3. 3.

    Use the Tomcat manager UI at http://yourhost:8080/manager/ to upload and deploy the archive into your Linux Tomcat container. (Tip: The manager will ask for a user/password; if you don’t have them, edit the file /etc/tomcat7/tomcat-users.xml).

     
  4. 4.

    You should now be able to point two browsers to http://localhost:8080/BattleShip/ (Tip: Tomcat web apps are deployed into the folder /var/lib/tomcat7/webapps). Having trouble? Check the container logs at /var/log/tomcat7/catalina.out.

     
../images/469026_1_En_6_Chapter/469026_1_En_6_Fig10_HTML.jpg
Figure 6-10

Improved Cloud Battleship with two browsers

This chapter has shown how the popular game Battleship can be run in a quantum computer using a single-qubit partial NOT gate to compute ship damage. For this purpose, the Quantum Battleship sample from the QISKit tutorial has been used. Furthermore, the game has been taken to the next level by giving it a major face lift. You have learned how this quantum code can be invoked in the cloud using CGI scripting via the Apache HTTPD server. Further improvements have been made to play using two browsers via the Tomcat J2EE container. The code for both projects is available as Eclipse projects from the book source at Workspace\Ch06 and Workspace\Ch06_BattleShip, respectively.

The next chapter explores two game puzzles that show the remarkable power of quantum algorithms over their classical counterparts: the counterfeit coin puzzle and the Mermin-Peres Magic Square. These are examples of quantum pseudo-telepathy or the ability of players to achieve outcomes only possible if they were reading each other’s minds during the game.