Table of Contents for
Regular Expressions Cookbook, 2nd Edition
 Regular Expressions Cookbook, 2nd Edition
Published by
O'Reilly Media, Inc., 2012
Regular Expressions Cookbook, 2nd Edition
Published by
O'Reilly Media, Inc., 2012
- Cover
- Regular Expressions Cookbook
- Preface
- Caught in the Snarls of Different Versions
- Intended Audience
- Technology Covered
- Organization of This Book
- Conventions Used in This Book
- Using Code Examples
- Safari® Books Online
- How to Contact Us
- Acknowledgments
- 1. Introduction to Regular Expressions
- Regular Expressions Defined
- Search and Replace with Regular Expressions
- Tools for Working with Regular Expressions
- 2. Basic Regular Expression Skills
- 2.1. Match Literal Text
- 2.2. Match Nonprintable Characters
- 2.3. Match One of Many Characters
- 2.4. Match Any Character
- 2.5. Match Something at the Start and/or the End of a Line
- 2.6. Match Whole Words
- 2.7. Unicode Code Points, Categories, Blocks, and Scripts
- 2.8. Match One of Several Alternatives
- 2.9. Group and Capture Parts of the Match
- 2.10. Match Previously Matched Text Again
- 2.11. Capture and Name Parts of the Match
- 2.12. Repeat Part of the Regex a Certain Number of Times
- 2.13. Choose Minimal or Maximal Repetition
- 2.14. Eliminate Needless Backtracking
- 2.15. Prevent Runaway Repetition
- 2.16. Test for a Match Without Adding It to the Overall Match
- 2.17. Match One of Two Alternatives Based on a Condition
- 2.18. Add Comments to a Regular Expression
- 2.19. Insert Literal Text into the Replacement Text
- 2.20. Insert the Regex Match into the Replacement Text
- 2.21. Insert Part of the Regex Match into the Replacement Text
- 2.22. Insert Match Context into the Replacement Text
- 3. Programming with Regular Expressions
- Programming Languages and Regex Flavors
- 3.1. Literal Regular Expressions in Source Code
- 3.2. Import the Regular Expression Library
- 3.3. Create Regular Expression Objects
- 3.4. Set Regular Expression Options
- 3.5. Test If a Match Can Be Found Within a Subject String
- 3.6. Test Whether a Regex Matches the Subject String Entirely
- 3.7. Retrieve the Matched Text
- 3.8. Determine the Position and Length of the Match
- 3.9. Retrieve Part of the Matched Text
- 3.10. Retrieve a List of All Matches
- 3.11. Iterate over All Matches
- 3.12. Validate Matches in Procedural Code
- 3.13. Find a Match Within Another Match
- 3.14. Replace All Matches
- 3.15. Replace Matches Reusing Parts of the Match
- 3.16. Replace Matches with Replacements Generated in Code
- 3.17. Replace All Matches Within the Matches of Another Regex
- 3.18. Replace All Matches Between the Matches of Another Regex
- 3.19. Split a String
- 3.20. Split a String, Keeping the Regex Matches
- 3.21. Search Line by Line
- Construct a Parser
- 4. Validation and Formatting
- 4.1. Validate Email Addresses
- 4.2. Validate and Format North American Phone Numbers
- 4.3. Validate International Phone Numbers
- 4.4. Validate Traditional Date Formats
- 4.5. Validate Traditional Date Formats, Excluding Invalid Dates
- 4.6. Validate Traditional Time Formats
- 4.7. Validate ISO 8601 Dates and Times
- 4.8. Limit Input to Alphanumeric Characters
- 4.9. Limit the Length of Text
- 4.10. Limit the Number of Lines in Text
- 4.11. Validate Affirmative Responses
- 4.12. Validate Social Security Numbers
- 4.13. Validate ISBNs
- 4.14. Validate ZIP Codes
- 4.15. Validate Canadian Postal Codes
- 4.16. Validate U.K. Postcodes
- 4.17. Find Addresses with Post Office Boxes
- 4.18. Reformat Names From “FirstName LastName” to “LastName, FirstName”
- 4.19. Validate Password Complexity
- 4.20. Validate Credit Card Numbers
- 4.21. European VAT Numbers
- 5. Words, Lines, and Special Characters
- 5.1. Find a Specific Word
- 5.2. Find Any of Multiple Words
- 5.3. Find Similar Words
- 5.4. Find All Except a Specific Word
- 5.5. Find Any Word Not Followed by a Specific Word
- 5.6. Find Any Word Not Preceded by a Specific Word
- 5.7. Find Words Near Each Other
- 5.8. Find Repeated Words
- 5.9. Remove Duplicate Lines
- 5.10. Match Complete Lines That Contain a Word
- 5.11. Match Complete Lines That Do Not Contain a Word
- 5.12. Trim Leading and Trailing Whitespace
- 5.13. Replace Repeated Whitespace with a Single Space
- 5.14. Escape Regular Expression Metacharacters
- 6. Numbers
- 6.1. Integer Numbers
- 6.2. Hexadecimal Numbers
- 6.3. Binary Numbers
- 6.4. Octal Numbers
- 6.5. Decimal Numbers
- 6.6. Strip Leading Zeros
- 6.7. Numbers Within a Certain Range
- 6.8. Hexadecimal Numbers Within a Certain Range
- 6.9. Integer Numbers with Separators
- 6.10. Floating-Point Numbers
- 6.11. Numbers with Thousand Separators
- 6.12. Add Thousand Separators to Numbers
- 6.13. Roman Numerals
- 7. Source Code and Log Files
- Keywords
- Identifiers
- Numeric Constants
- Operators
- Single-Line Comments
- Multiline Comments
- All Comments
- Strings
- Strings with Escapes
- Regex Literals
- Here Documents
- Common Log Format
- Combined Log Format
- Broken Links Reported in Web Logs
- 8. URLs, Paths, and Internet Addresses
- 8.1. Validating URLs
- 8.2. Finding URLs Within Full Text
- 8.3. Finding Quoted URLs in Full Text
- 8.4. Finding URLs with Parentheses in Full Text
- 8.5. Turn URLs into Links
- 8.6. Validating URNs
- 8.7. Validating Generic URLs
- 8.8. Extracting the Scheme from a URL
- 8.9. Extracting the User from a URL
- 8.10. Extracting the Host from a URL
- 8.11. Extracting the Port from a URL
- 8.12. Extracting the Path from a URL
- 8.13. Extracting the Query from a URL
- 8.14. Extracting the Fragment from a URL
- 8.15. Validating Domain Names
- 8.16. Matching IPv4 Addresses
- 8.17. Matching IPv6 Addresses
- 8.18. Validate Windows Paths
- 8.19. Split Windows Paths into Their Parts
- 8.20. Extract the Drive Letter from a Windows Path
- 8.21. Extract the Server and Share from a UNC Path
- 8.22. Extract the Folder from a Windows Path
- 8.23. Extract the Filename from a Windows Path
- 8.24. Extract the File Extension from a Windows Path
- 8.25. Strip Invalid Characters from Filenames
- 9. Markup and Data Formats
- Processing Markup and Data Formats with Regular Expressions
- 9.1. Find XML-Style Tags
- 9.2. Replace Tags with
- 9.3. Remove All XML-Style Tags Except and
- 9.4. Match XML Names
- 9.5. Convert Plain Text to HTML by Adding
and
Tags - 9.6. Decode XML Entities
- 9.7. Find a Specific Attribute in XML-Style Tags
- 9.8. Add a cellspacing Attribute to
Tags That Do Not Already Include It
- 9.9. Remove XML-Style Comments
- 9.10. Find Words Within XML-Style Comments
- 9.11. Change the Delimiter Used in CSV Files
- 9.12. Extract CSV Fields from a Specific Column
- 9.13. Match INI Section Headers
- 9.14. Match INI Section Blocks
- 9.15. Match INI Name-Value Pairs
- Index
- Index
- Index
- Index
- Index
- Index
- Index
- Index
- Index
- Index
- Index
- Index
- Index
- Index
- Index
- Index
- Index
- Index
- Index
- Index
- Index
- Index
- Index
- Index
- Index
- Index
- About the Authors
- Colophon
- Copyright
Unless you have been programming with regular expressions for some time, we recommend that you first experiment with regular expressions in a tool rather than in source code. The sample regexes in this chapter and Chapter 2 are plain regular expressions that don’t contain the extra escaping that a programming language (even a Unix shell) requires. You can type these regular expressions directly into an application’s search box.
Chapter 3 explains how to mix regular expressions into your source code. Quoting a literal regular expression as a string makes it even harder to read, because string escaping rules compound regex escaping rules. We leave that until Recipe 3.1. Once you understand the basics of regular expressions, you’ll be able to see the forest through the backslashes.
The tools described in this section also provide debugging, syntax checking, and other feedback that you won’t get from most programming environments. Therefore, as you develop regular expressions in your applications, you may find it useful to build a complicated regular expression in one of these tools before you plug it in to your program.
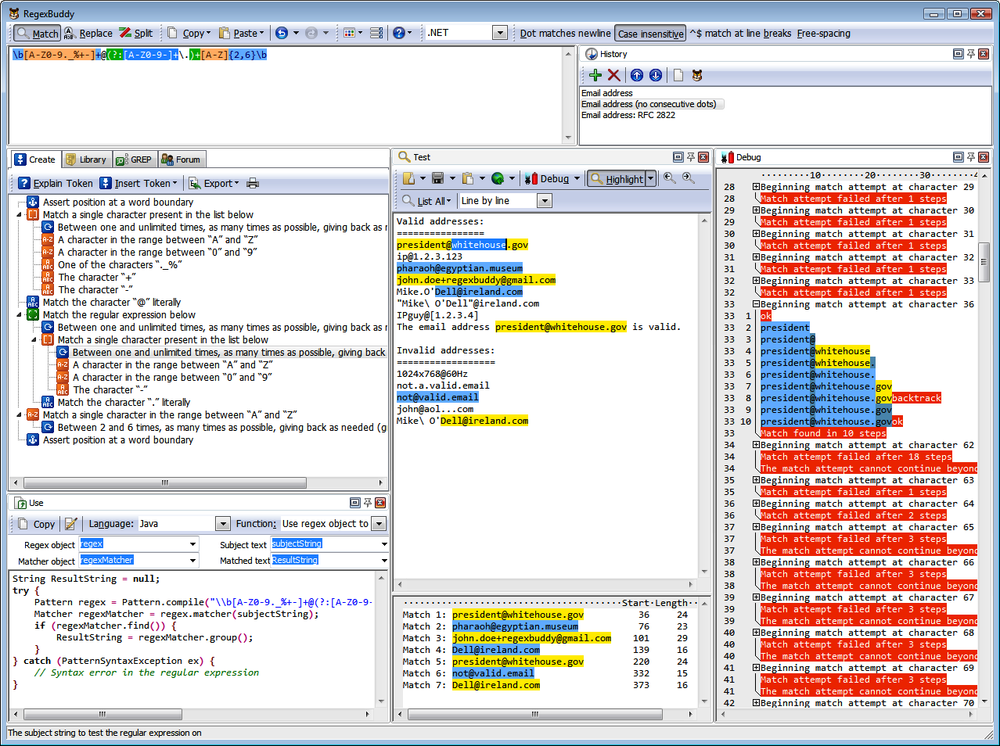
RegexBuddy (Figure 1-1) is the most full-featured tool available at the time of this writing for creating, testing, and implementing regular expressions. It has the unique ability to emulate all the regular expression flavors discussed in this book, and even convert among the different flavors.
RegexBuddy was designed and developed by Jan Goyvaerts, one of this book’s authors. Designing and developing RegexBuddy made Jan an expert on regular expressions, and using RegexBuddy helped get coauthor Steven hooked on regular expressions to the point where he pitched this book to O’Reilly.
If the screenshot (Figure 1-1) looks a little busy, that’s because we’ve arranged most of the panels side by side to show off RegexBuddy’s extensive functionality. The default view tucks all the panels neatly into a row of tabs. You also can drag panels off to a secondary monitor.
To try one of the regular expressions shown in this book, simply type it into the edit box at the top of RegexBuddy’s window. RegexBuddy automatically applies syntax highlighting to your regular expression, making errors and mismatched brackets obvious.
The Create panel automatically builds a detailed English-language analysis while you type in the regex. Double-click on any description in the regular expression tree to edit that part of your regular expression. You can insert new parts to your regular expression by hand, or by clicking the Insert Token button and selecting what you want from a menu. For instance, if you don’t remember the complicated syntax for positive lookahead, you can ask RegexBuddy to insert the proper characters for you.
Type or paste in some sample text on the Test panel. When the Highlight button is active, RegexBuddy automatically highlights the text matched by the regex.
Some of the buttons you’re most likely to use are:
- List All
Displays a list of all matches.
- Replace
The Replace button at the top displays a new window that lets you enter replacement text. The Replace button in the Test box then lets you view the subject text after the replacements are made.
- Split (The button on the Test panel, not the one at the top)
Treats the regular expression as a separator, and splits the subject into tokens based on where matches are found in your subject text using your regular expression.
Click any of these buttons and select Update Automatically to make RegexBuddy keep the results dynamically in sync as you edit your regex or subject text.
To see exactly how your regex works (or doesn’t), click on a highlighted match or at the spot where the regex fails to match on the Test panel, and click the Debug button. RegexBuddy will switch to the Debug panel, showing the entire matching processes step by step. Click anywhere on the debugger’s output to see which regex token matched the text you clicked on. Click on your regular expression to highlight that part of the regex in the debugger.
On the Use panel, select your favorite programming language. Then, select a function to instantly generate source code to implement your regex. RegexBuddy’s source code templates are fully editable with the built-in template editor. You can add new functions and even new languages, or change the provided ones.
To test your regex on a larger set of data, switch to the GREP panel to search (and replace) through any number of files and folders.
When you find a regex in source code you’re maintaining, copy it to the clipboard, including the delimiting quotes or slashes. In RegexBuddy, click the Paste button at the top and select the string style of your programming language. Your regex will then appear in RegexBuddy as a plain regex, without the extra quotes and escapes needed for string literals. Use the Copy button at the top to create a string in the desired syntax, so you can paste it back into your source code.
As your experience grows, you can build up a handy library of regular expressions on the Library panel. Make sure to add a detailed description and a test subject when you store a regex. Regular expressions can be cryptic, even for experts.
If you really can’t figure out a regex, click on the Forum panel and then the Login button. If you’ve purchased RegexBuddy, the login screen appears. Click OK and you are instantly connected to the RegexBuddy user forum. Steven and Jan often hang out there.
RegexBuddy runs on Windows 98, ME, 2000, XP, Vista, 7, and 8. For Linux and Apple fans, RegexBuddy also runs well on VMware, Parallels, CrossOver Office, and with a few issues on WINE. You can download a free evaluation copy of RegexBuddy at http://www.regexbuddy.com/RegexBuddyCookbook.exe. Except for the user forum, the trial is fully functional for seven days of actual use.
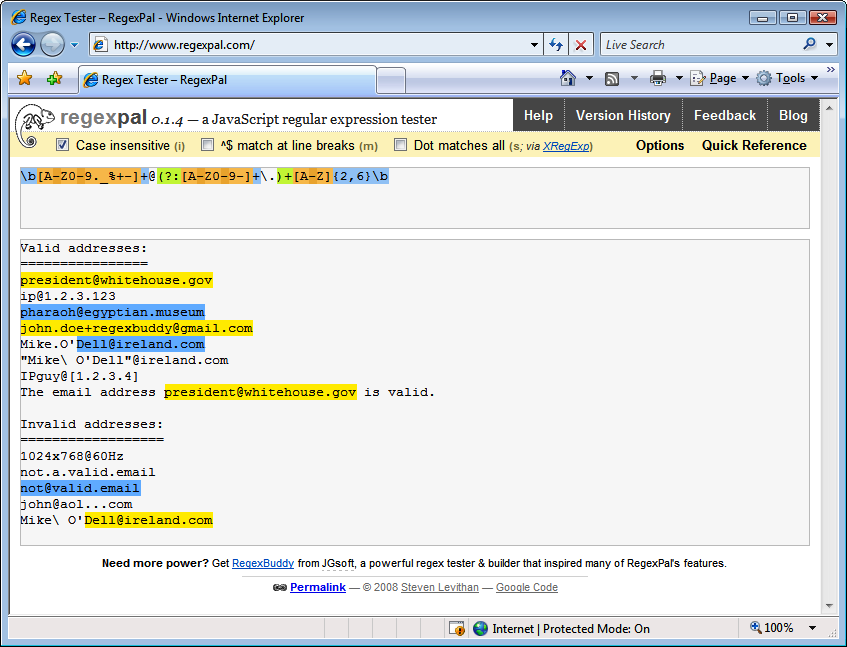
RegexPal (Figure 1-2) is an online regular expression tester created by Steven Levithan, one of this book’s authors. All you need to use it is a modern web browser. RegexPal is written entirely in JavaScript. Therefore, it supports only the JavaScript regex flavor, as implemented in the web browser you’re using to access it.
To try one of the regular expressions shown in this book, browse to http://regexpal.com. Type the regex into the box at the top. RegexPal automatically applies syntax highlighting to your regular expression, which immediately reveals any syntax errors in the regex. RegexPal is aware of the cross-browser issues that can ruin your day when dealing with JavaScript regular expressions. If certain syntax doesn’t work correctly in some browsers, RegexPal will highlight it as an error.
Now type or paste some sample text into the large box at the center. RegexPal automatically highlights the text matched by your regex.
There are no buttons to click, making RegexPal one of the most convenient online regular expression testers.
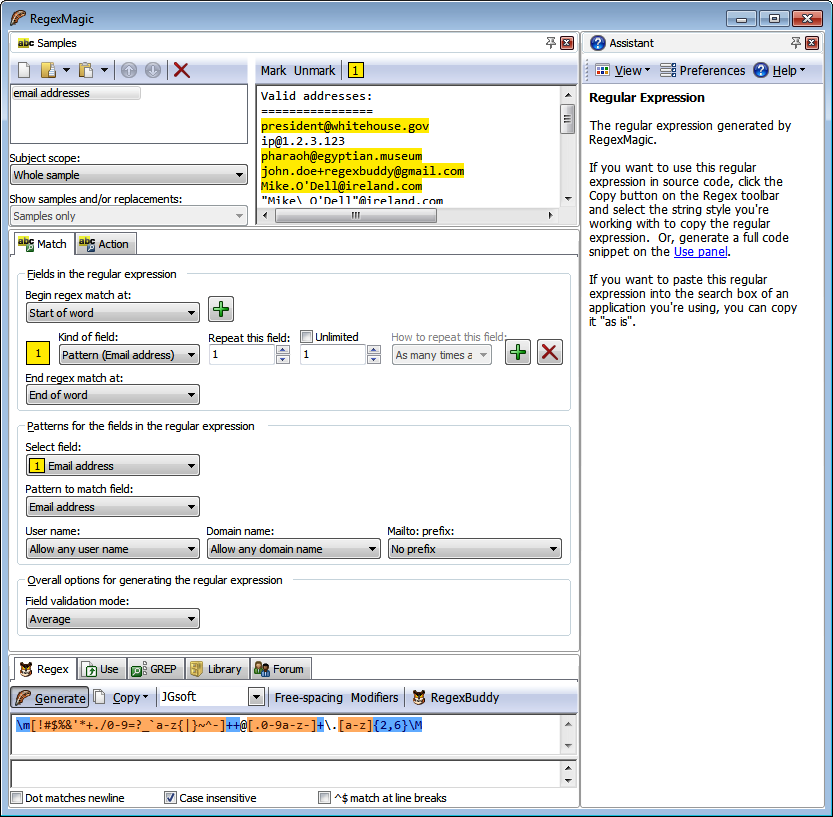
RegexMagic (Figure 1-3) is another tool designed and developed by Jan Goyvaerts. Where RegexBuddy makes it easy to work with the regular expression syntax, RegexMagic is primarily designed for people who do not want to deal with the regular expression syntax, and certainly won’t read 500-page books on the topic.
With RegexMagic, you describe the text you want to match based on sample text and RegexMagic’s high-level patterns. The screen shot shows that selecting the “email address” pattern is all you need to do to get a regular expression to match an email address. You can customize the pattern to limit the allowed user names and domain names, and you can choose whether to allow or require the
mailto:prefix.Since you are reading this book, you are on your way to becoming well versed in regular expressions. RegexMagic will not be your primary tool for working with them. But there will still be situations where it comes in handy. In Recipe 6.7 we explain how you can create a regular expression to match a range of numbers. Though a regular expression is not the best way to see if a number is within a certain range, there are situations where a regular expression is all you can use. There are far more applications with a built-in regex engine than with a built-in scripting language. There is nothing difficult about the technique described in Recipe 6.7. But it can be quite tedious to do this by hand.
Imagine that instead of the simple examples given in Recipe 6.7, you need to match a number between 2,147,483,648 (231) and 4,294,967,295 (2321/n 1) in decimal notation. With RegexMagic, you just select the “Integer” pattern, select the “decimal” option, and limit the range to
2147483648..4294967295. In “strict” mode, RegexMagic will instantly generate this beast:\b(?:429496729[0-5]|42949672[0-8][0-9]|4294967[01][0-9]{2}|429496[0-6]↵ [0-9]{3}|42949[0-5][0-9]{4}|4294[0-8][0-9]{5}|429[0-3][0-9]{6}|42[0-8]↵ [0-9]{7}|4[01][0-9]{8}|3[0-9]{9}|2[2-9][0-9]{8}|21[5-9][0-9]{7}|214[89]↵ [0-9]{6}|2147[5-9][0-9]{5}|214749[0-9]{4}|214748[4-9][0-9]{3}|2147483↵ [7-9][0-9]{2}|21474836[5-9][0-9]|214748364[89])\bRegex options: None Regex flavors: .NET, Java, JavaScript, PCRE, Perl, Python, Ruby RegexMagic runs on Windows 98, ME, 2000, XP, Vista, 7, and 8. For Linux and Apple fans, RegexMagic also runs well on VMware, Parallels, CrossOver Office, and with a few issues on WINE. You can download a free evaluation copy of RegexMagic at http://www.regexmagic.com/RegexMagicCookbook.exe. Except for the user forum, the trial is fully functional for seven days of actual use.
Creating a simple online regular expression tester is easy. If you have some basic web development skills, the information in Chapter 3 is all you need to roll your own. Hundreds of people have already done this; a few have added some extra features that make them worth mentioning.
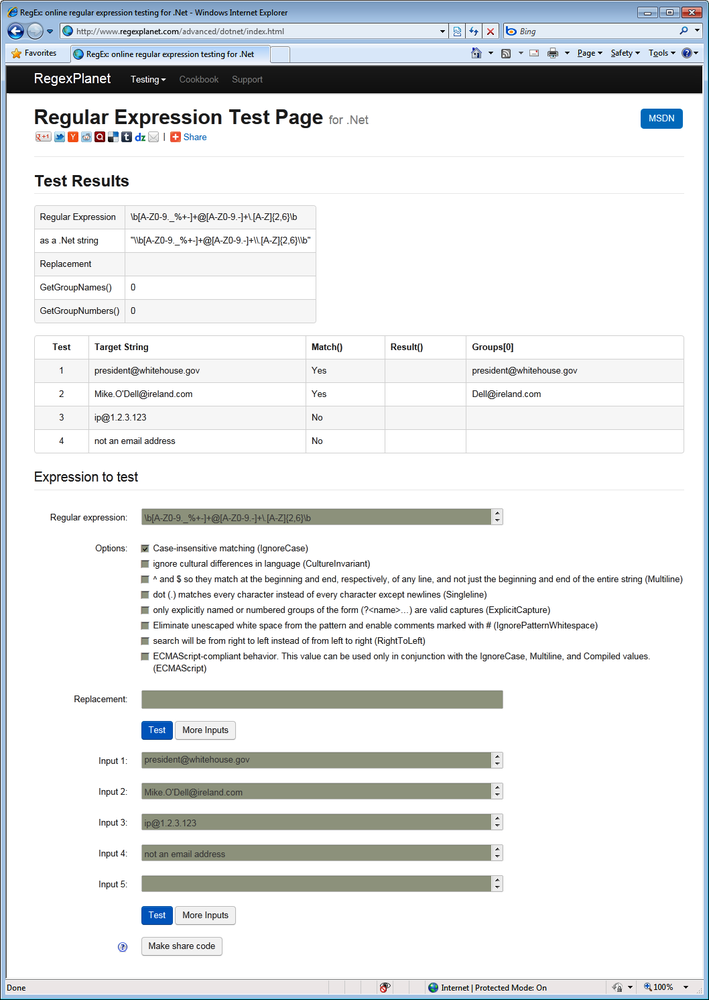
RegexPlanet is a website developed by Andrew Marcuse. Its claim to fame is that it allows you to test your regexes against a larger variety of regular expression libraries than any other regex tester we are aware of. On the home page you’ll find links to testers for Java, JavaScript, .NET, Perl, PHP, Python, and Ruby. They all use the same basic interface. Only the list of options is adapted to those of each programming language. Figure 1-4 shows the .NET version.
Type or paste your regular expression into the “regular expression” box. If you want to test a search-and-replace, paste the replacement text into the “replacement” box. You can test your regex against as many different subject strings as you like. Paste your subject strings into the “input” boxes. Click “more inputs” if you need more than five. The “regex” and “input” boxes allow you to type or paste in multiple lines of text, even though they only show one line at a time. The arrows at the right are the scrollbar.
When you’re done, click the “test” button to send all your strings to the regexplanet.com server. The resulting page, as shown in Figure 1-4, lists the test results at the top. The first two columns repeat your input. The remaining columns show the results of various function calls. These columns are different for the various programming languages that the site supports.
Lars Olav Torvik has put a great little regular expression tester online at http://regex.larsolavtorvik.com (see Figure 1-5).
To start, select the regular expression flavor you’re working with by clicking on the flavor’s name at the top of the page. Lars offers PHP PCRE, PHP POSIX, and JavaScript. PHP PCRE, the PCRE regex flavor discussed in this book, is used by PHP’s
pregfunctions. POSIX is an old and limited regex flavor used by PHP’seregfunctions, which are not discussed in this book. If you select JavaScript, you’ll be working with your browser’s JavaScript implementation.Type your regular expression into the Pattern field and your subject text into the Subject field. A moment later, the Matches field displays your subject text with highlighted regex matches. The Code field displays a single line of source code that applies your regex to your subject text. Copying and pasting this into your code editor saves you the tedious job of manually converting your regex into a string literal. Any string or array returned by the code is displayed in the Result field. Because Lars used Ajax technology to build his site, results are updated in just a few moments for all flavors. To use the tool, you have to be online, as PHP is processed on the server rather than in your browser.
The second column displays a list of regex commands and regex options. These depend on the regex flavor. The regex commands typically include match, replace, and split operations. The regex options consist of common options such as case insensitivity, as well as implementation-specific options. These commands and options are described in Chapter 3.
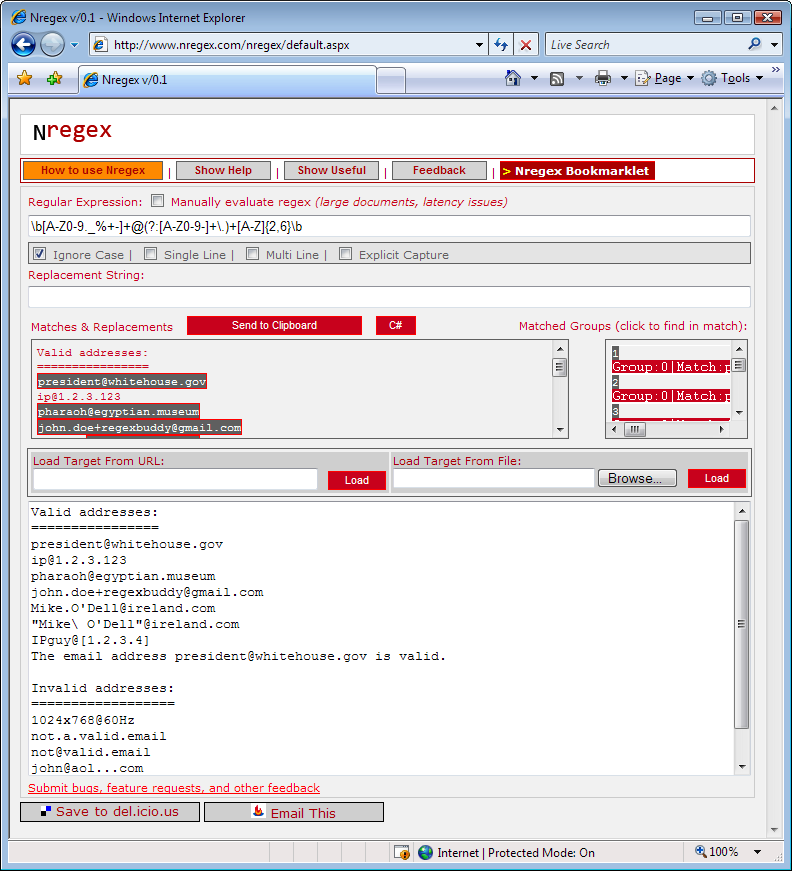
http://www.nregex.com (Figure 1-6) is a straightforward online regex tester built on .NET technology by David Seruyange. It supports the .NET 2.0 regex flavor, which is also used by .NET 3.0, 3.5, and 4.0.
The layout of the page is somewhat confusing. Enter your regular expression into the field under the Regular Expression label, and set the regex options using the checkboxes below that. Enter your subject text in the large box at the bottom, replacing the default
If I just had $5.00 then "she"
        wouldn't be so @#$! mad.
. If your subject is a web page, type the URL in the Load Target From URL field, and click the Load button under that input field. If your subject is a file on your hard disk, click the Browse button, find the file you want, and then click the Load button under that input field.Your subject text will appear duplicated in the “Matches & Replacements” field at the center of the web page, with the regex matches highlighted. If you type something into the Replacement String field, the result of the search-and-replace is shown instead. If your regular expression is invalid,
...appears.The regex matching is done in .NET code running on the server, so you need to be online for the site to work. If the automatic updates are slow, perhaps because your subject text is very long, tick the Manually Evaluate Regex checkbox above the field for your regular expression to show the Evaluate button. Click that button to update the “Matches & Replacements” display.
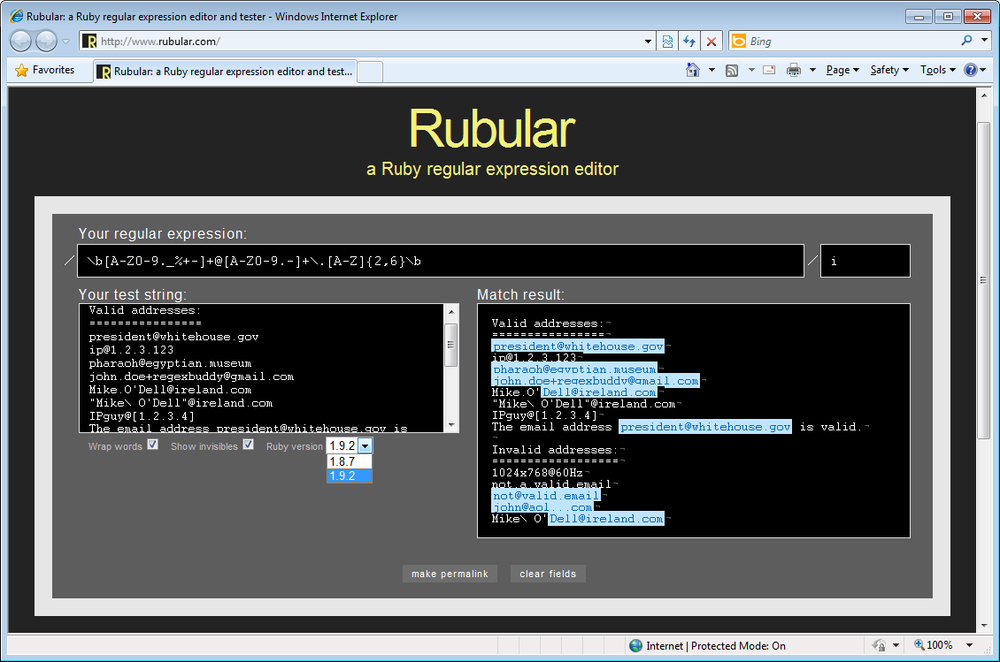
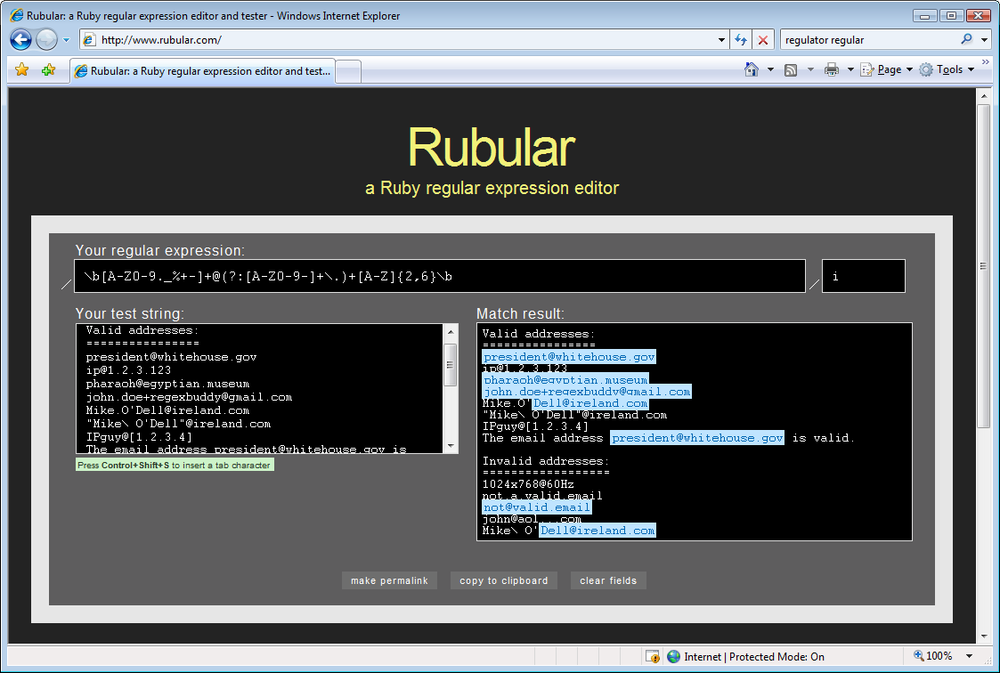
Michael Lovitt put a minimalistic regex tester online at http://www.rubular.com (Figure 1-7). At the time of writing, it lets you choose between Ruby 1.8.7 and Ruby 1.9.2. This allows you to test both the Ruby 1.8 and Ruby 1.9 regex flavors used in this book.
Enter your regular expression in the box between the two forward slashes under “Your regular expression.” You can turn on case insensitivity by typing an
iin the small box after the second slash. Similarly, if you like, turn on the option “the dot matches line breaks” by typing anmin the same box.imturns on both options. Though these conventions may seem a bit user-unfriendly if you’re new to Ruby, they conform to the/regex/imsyntax used to specify a regex in Ruby source code.Type or paste your subject text into the “Your test string” box, and wait a moment. A new “Match result” box appears to the right, showing your subject text with all regex matches highlighted.
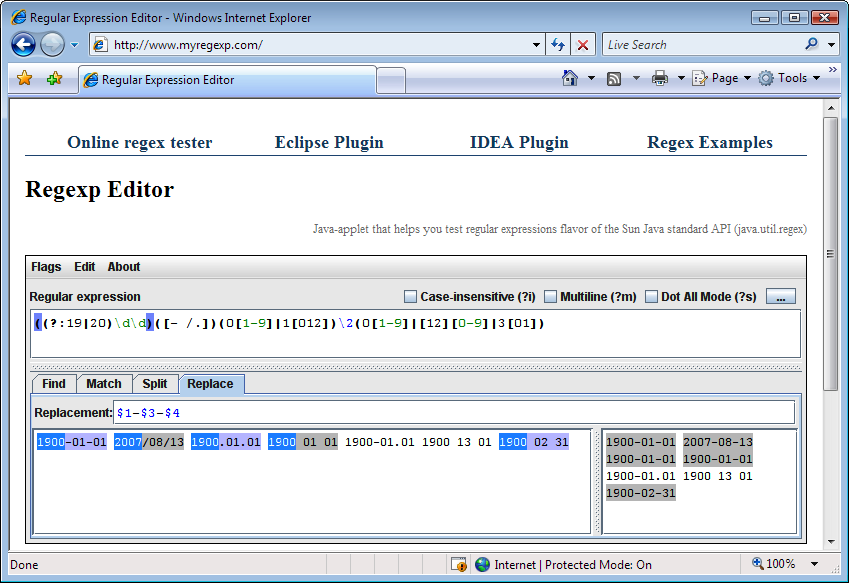
Sergey Evdokimov created several regular expression testers for Java developers. The home page at http://www.myregexp.com (Figure 1-8) offers an online regex tester. It’s a Java applet that runs in your browser. The Java 4 (or later) runtime needs to be installed on your computer. The applet uses the
java.util.regexpackage to evaluate your regular expressions, which is new in Java 4. In this book, the “Java” regex flavor refers to this package.Type your regular expression into the Regular Expression box. Use the Flags menu to set the regex options you want. Three of the options also have direct checkboxes.
If you want to test a regex that already exists as a string in Java code, copy the whole string to the clipboard. In the myregexp.com tester, click on the Edit menu, and then “Paste Regex from Java String.” In the same menu, pick “Copy Regex for Java Source” when you’re done editing the regular expression. The Edit menu has similar commands for JavaScript and XML as well.
Below the regular expression, there are four tabs that run four different tests:
- Find
Highlights all regular expression matches in the sample text. These are the matches found by the
Matcher.find()method in Java.- Match
Tests whether the regular expression matches the sample text entirely. If it does, the whole text is highlighted. This is what the
String.matches()andMatcher.matches()methods do.- Split
The second box at the right shows the array of strings returned by
String.split()orPattern.split()when used with your regular expression and sample text.- Replace
Type in a replacement text, and the box at the right shows the text returned by
String.replaceAll()orMatcher.replaceAll().
At the top of the page at http://www.myregexp.com, you can click the link to get Sergey’s regex tester as a plug-in for Eclipse.
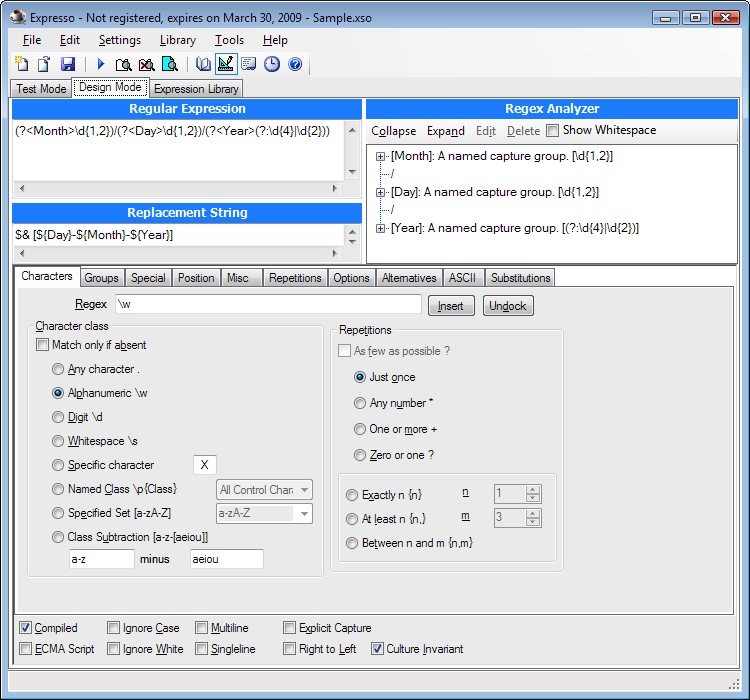
Expresso (not to be confused with caffeine-laden espresso) is a .NET application for creating and testing regular expressions. You can download it at http://www.ultrapico.com/Expresso.htm. The .NET Framework 2.0 or later must be installed on your computer.
The download is a free 60-day trial. After the trial, you have to register or Expresso will (mostly) stop working. Registration is free, but requires you to give the Ultrapico folks your email address. The registration key is sent by email.
Expresso displays a screen like the one shown in Figure 1-9. The Regular Expression box where you type in your regular expression is permanently visible. No syntax highlighting is available. The Regex Analyzer box automatically builds a brief English-language analysis of your regular expression. It too is permanently visible.
In Design Mode, you can set matching options such as “Ignore Case” at the bottom of the screen. Most of the screen space is taken up by a row of tabs where you can select the regular expression token you want to insert. If you have two monitors or one large monitor, click the Undock button to float the row of tabs. Then you can build up your regular expression in the other mode (Test Mode) as well.
In Test Mode, type or paste your sample text in the lower-left corner. Then, click the Run Match button to get a list of all matches in the Search Results box. No highlighting is applied to the sample text. Click on a match in the results to select that match in the sample text.
The Expression Library shows a list of sample regular expressions and a list of recent regular expressions. Your regex is added to that list each time you press Run Match. You can edit the library through the Library menu in the main menu bar.
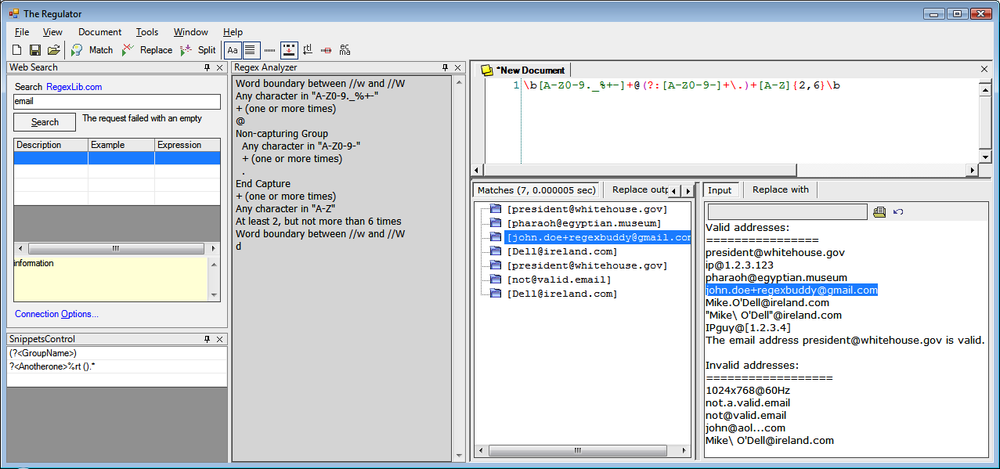
The Regulator, which you can download from http://sourceforge.net/projects/regulator/, is not safe for SCUBA diving or cooking-gas canisters; it is another .NET application for creating and testing regular expressions. The latest version requires .NET 2.0 or later. Older versions for .NET 1.x can still be downloaded. The Regulator is open source, and no payment or registration is required.
The Regulator does everything in one screen (Figure 1-10). The New Document tab is where you enter your regular expression. Syntax highlighting is automatically applied, but syntax errors in your regex are not made obvious. Right-click to select the regex token you want to insert from a menu. You can set regular expression options via the buttons on the main toolbar. The icons are a bit cryptic. Wait for the tool tip to see which option you’re setting with each button.
Below the area for your regex and to the right, click on the Input button to display the area for pasting in your sample text. Click the “Replace with” button to type in the replacement text, if you want to do a search-and-replace. Below the regex and to the left, you can see the results of your regex operation. Results are not updated automatically; you must click the Match, Replace, or Split button in the toolbar to update the results. No highlighting is applied to the input. Click on a match in the results to select it in the subject text.
The Regex Analyzer panel shows a simple English-language analysis of your regular expression, but it is not automatic or interactive. To update the analysis, select Regex Analyzer in the View menu, even if it is already visible. Clicking on the analysis only moves the text cursor.
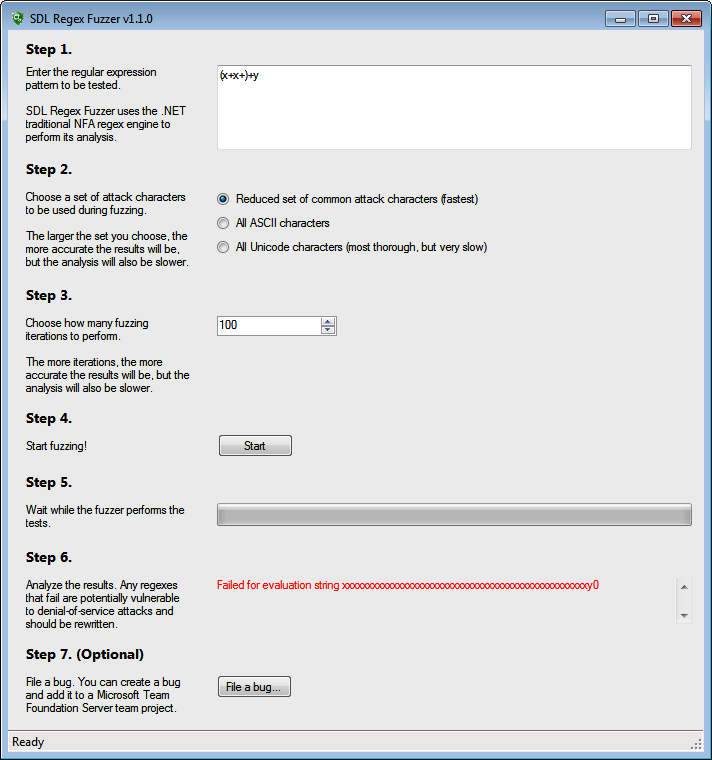
SDL Regex Fuzzer’s fuzzy name does not make its purpose obvious. Microsoft bills it as “a tool to help test regular expressions for potential denial of service vulnerabilities.” You can download it for free at http://www.microsoft.com/en-us/download/details.aspx?id=20095. It requires .NET 3.5 to run.
What SDL Regex Fuzzer really does is to check whether there exists a subject string that causes your regular expression to execute in exponential time. In our book we call this “catastrophic backtracking.” We explain this in detail along with potential solutions in Recipe 2.15. Basically, a regex that exhibits catastrophic backtracking will cause your application to run forever or to crash. If your application is a server, that could be exploited in a denial-of-service attack.
Figure 1-11 shows the results of a test in SDL Regex Fuzzer. In Step 1 we pasted in a regular expression from Recipe 2.15. Since this regex can never match non-ASCII characters, there’s no need to select that option in Step 2. Otherwise, we should have. We left Step 3 set to the default of 100 iterations. About five seconds after clicking the Start button in Step 4, SDL Regex Fuzzer showed a sample string that will cause our regex to fail in .NET 3.5.
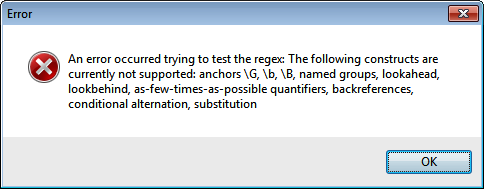
Unfortunately, the usefulness of this tool is greatly limited because it only supports a small subset of the .NET regex syntax. When we tried to test the naïve solution from Recipe 2.15, which would definitely fail this test, we received the error message shown in Figure 1-12. Proper understanding of the concepts discussed in Recipe 2.15 is still the only way to make sure you don’t bring down your applications with overly complex regular expressions.
The name grep is derived from the
g/re/pcommand that performed a regular expression search in the Unix text editor ed, one of the first applications to support regular expressions. This command was so popular that all Unix systems now have a dedicated grep utility for searching through files using a regular expression. If you’re using Unix, Linux, or OS X, typeman grepinto a terminal window to learn all about it.The following three tools are Windows applications that do what grep does, and more.
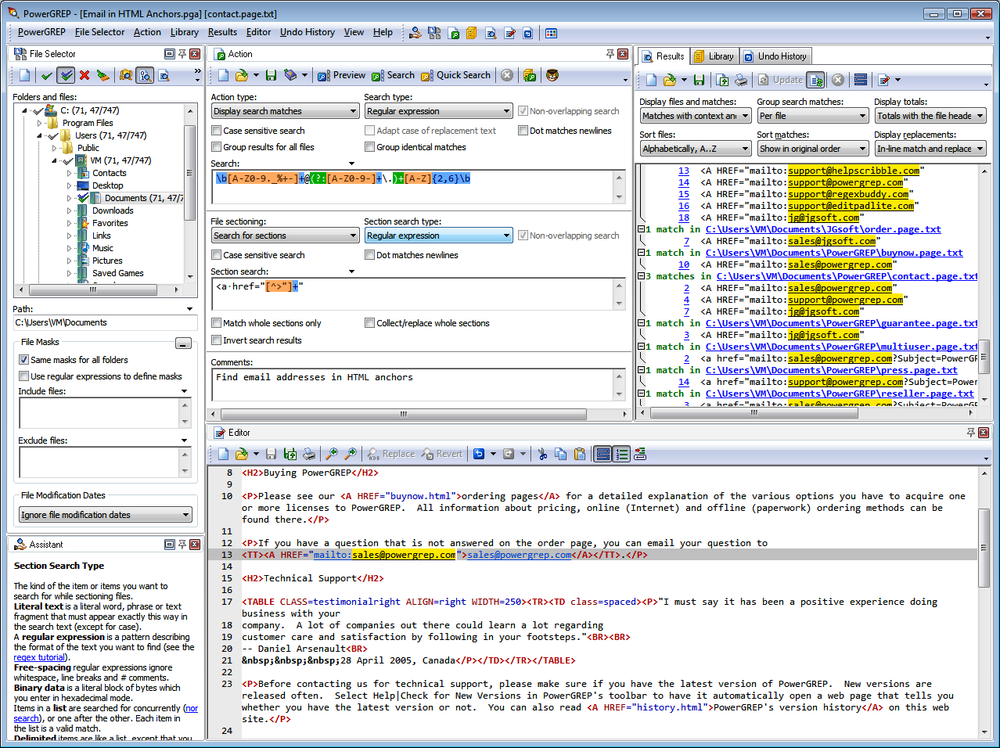
PowerGREP, developed by Jan Goyvaerts, one of this book’s authors, is probably the most feature-rich grep tool available for the Microsoft Windows platform (Figure 1-13). PowerGREP uses a custom regex flavor that combines the best of the flavors discussed in this book. This flavor is labeled “JGsoft” in RegexBuddy.
To run a quick regular expression search, simply select Clear in the Action menu and type your regular expression into the Search box on the Action panel. Click on a folder in the File Selector panel, and select “Include File or Folder” or “Include Folder and Subfolders” in the File Selector menu. Then, select Execute in the Action menu to run your search.
To run a search-and-replace, select “search-and-replace” in the “action type” drop-down list at the top-left corner of the Action panel after clearing the action. A Replace box will appear below the Search box. Enter your replacement text there. All the other steps are the same as for searching.
PowerGREP has the unique ability to use up to five lists of regular expressions at the same time, with any number of regular expressions in each list. While the previous two paragraphs provide all you need to run simple searches like you can in any grep tool, unleashing PowerGREP’s full potential will take a bit of reading through the tool’s comprehensive documentation.
PowerGREP runs on Windows 2000, XP, Vista, 7, and 8. You can download a free evaluation copy at http://www.powergrep.com/PowerGREPCookbook.exe. Except for saving results and libraries, the trial is fully functional for 15 days of actual use. Though the trial won’t save the results shown on the Results panel, it will modify all your files for search-and-replace actions, just like the full version does.
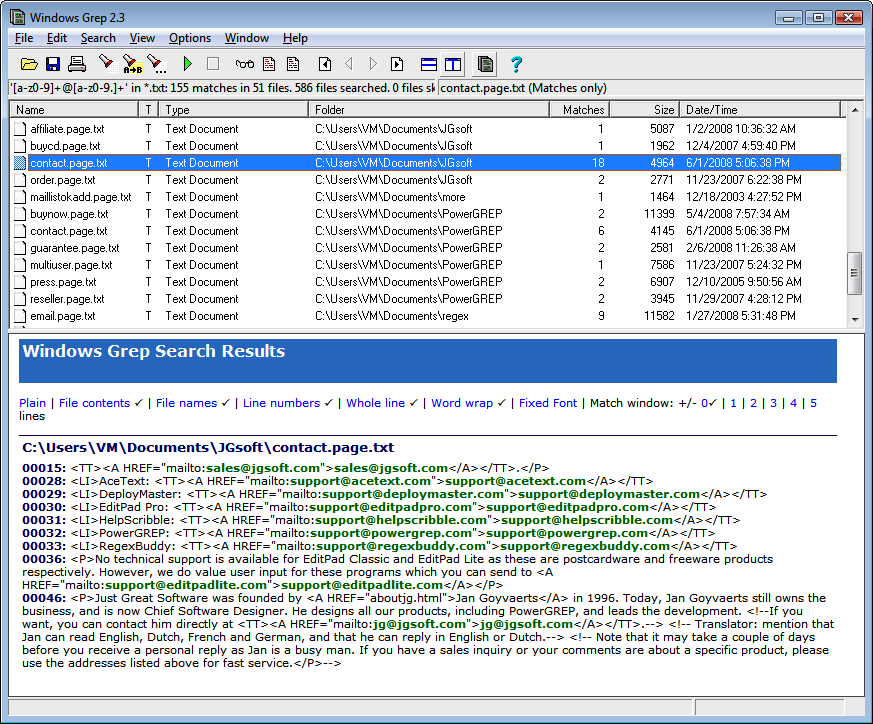
Windows Grep (http://www.wingrep.com) is one of the oldest grep tools for Windows. Its age shows a bit in its user interface (Figure 1-14), but it does what it says on the tin just fine. It supports a limited regular expression flavor called POSIX ERE. For the features that it supports, it uses the same syntax as the flavors in this book. Windows Grep is shareware, which means you can download it for free, but payment is expected if you want to keep it.
To prepare a search, select Search in the Search menu. The screen that appears differs depending on whether you’ve selected Beginner Mode or Expert Mode in the Options menu. Beginners get a step-by-step wizard, whereas experts get a tabbed dialog.
When you’ve set up the search, Windows Grep immediately executes it, presenting you with a list of files in which matches were found. Click once on a file to see its matches in the bottom panel, and double-click to open the file. Select “All Matches” in the View menu to make the bottom panel show everything.
To run a search-and-replace, select Replace in the Search menu.
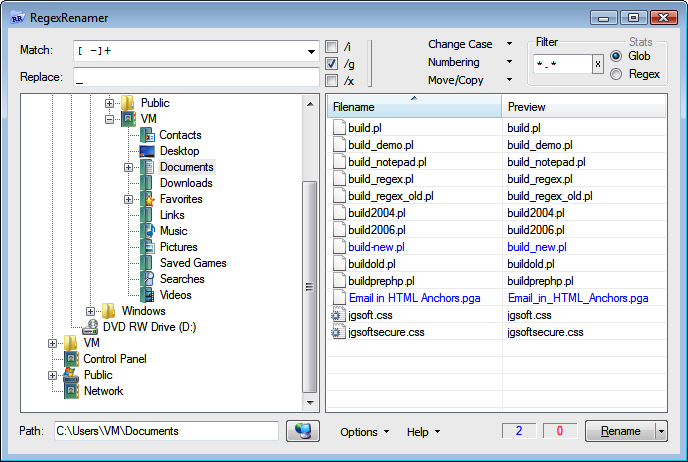
RegexRenamer (Figure 1-15) is not really a grep tool. Instead of searching through the contents of files, it searches and replaces through the names of files. You can download it at http://regexrenamer.sourceforge.net. RegexRenamer requires version 2.0 or later of the Microsoft .NET Framework.
Type your regular expression into the Match box and the replacement text into the Replace box. Click
/ito turn on case insensitivity, and/gto replace all matches in each filename rather than just the first./xturns on free-spacing syntax, which isn’t very useful, since you have only one line to type in your regular expression.Use the tree at the left to select the folder that holds the files you want to rename. You can set a file mask or a regex filter in the top-right corner. This restricts the list of files to which your search-and-replace regex will be applied. Using one regex to filter and another to replace is much handier than trying to do both tasks with just one regex.
Most modern text editors have at least basic support for regular expressions. In the search or search-and-replace panel, you’ll typically find a checkbox to turn on regular expression mode. Some editors, such as EditPad Pro, also use regular expressions for various features that process text, such as syntax highlighting or class and function lists. The documentation with each editor explains all these features. Some popular text editors with regular expression support include:
BBEdit (PCRE)
Boxer Text Editor (PCRE)
Dreamweaver (JavaScript)
EditPad Pro (custom flavor that combines the best of the flavors discussed in this book; labeled “JGsoft” in RegexBuddy)
Multi-Edit (PCRE, if you select the “Perl” option)
Nisus Writer Pro (Ruby 1.9 [Oniguruma])
Notepad++ (PCRE)
NoteTab (PCRE)
UltraEdit (PCRE)