Table of Contents for
Hacking Exposed Malware & Rootkits: Security Secrets and Solutions, Second Edition, 2nd Edition
 Hacking Exposed Malware & Rootkits: Security Secrets and Solutions, Second Edition, 2nd Edition
Published by
McGraw-Hill, 2016
Hacking Exposed Malware & Rootkits: Security Secrets and Solutions, Second Edition, 2nd Edition
Published by
McGraw-Hill, 2016
- Cover
- Hacking Exposed Malware & Rootkits: Security Secrets and Solutions, Second Edition Davis
- Title Page
- Copyright Page
- Dedication
- Hacking Exposed Malware & Rootkits: Security Secrets and Solutions, Second Edition Davis
- Hacking Exposed Malware & Rootkits: Security Secrets and Solutions, Second Edition Davis
- Contents
- Foreword
- Acknowledgments
- Introduction
- Part I Malware
- 1 Malware Propagation
- 2 Malware Functionality
- Part II Rootkits
- 3 User-Mode Rootkits
- 4 Kernel-Mode Rootkits
- 5 Virtual Rootkits
- 6 The Future of Rootkits
- Part III Prevention Technologies
- 7 Antivirus
- 8 Host Protection Systems
- 9 Host-Based Intrusion Prevention
- 10 Rootkit Detection
- 11 General Security Practices
- Appendix System Integrity Analysis: Building Your Own Rootkit Detector
- Index
CHAPTER 4
KERNEL-MODE ROOTKITS
Perhaps the most widely used rootkit technology in the wild, kernel-mode rootkits represent the most visible rootkit threat to computers today. StormWorm, which devastated hundreds of thousands of machines in 2007, had a kernel-mode rootkit component (see http://recon.cx/2008/a/pierre-marc_bureau/storm-recon.pdf). This component allowed the worm to do more damage and infect systems at a very deep level: the operating system.
For that reason, we’ll spend a considerable amount of time discussing the internals of the Windows operating system. Kernel mode means being on the same level as the operating system, so a kernel-mode rootkit must understand how to use the same functions, structures, and techniques that other kernel-mode components (e.g., drivers) and the operating system itself use. It must also coexist with the operating system under the same set of constraints. To truly appreciate this interaction and understand the threat posed by kernel-mode rootkits, you have to understand these OS-level details as well.
But the complexity doesn’t begin and end with the operating system. As you’ll learn in this chapter, so much of kernel-mode technology depends on the intricacies of the underlying hardware. As a result, your PC is formed from a system of layered technologies that must all interact and coexist. The major components of this layered system include the processor and its instruction set, the operating system, and software.
Because kernel-mode rootkits infect the system at the operating-system level and rely on low-level interaction with hardware, we’ll also discuss what controls hardware in most PCs: x86 architecture. Although this chapter focuses solely on x86 and Windows, do not be fooled into thinking other instruction sets and operating systems do not share the same difficulties. Kernel-mode rootkit technology also exists for Linux and OS X. We merely focus on these technologies for x86 and Windows because they are the most prolific today, causing the most damage.
The flow of this chapter is as follows:
• A thorough discussion of x86 architecture basics
• A detailed tour of Windows internals
• An overview of Windows kernel driver concepts and how drivers work
• Challenges, goals, and tactics of kernel-mode rootkits
• A survey of kernel-mode rootkit methods and techniques along with examples of each
If you are an x86/Windows pro, you may want to skip ahead to “Kernel Driver Concepts.”
Ground Level: x86 Architecture Basics
This section will cover the fundamentals of x86 architecture necessary to prepare you for advanced kernel-mode rootkits. Instruction set architectures influence everything from hardware (e.g., chip design) to software (e.g., the operating system), and the implications to overall system security and stability begin at this low level.
Instruction Set Architectures and the Operating System
x86 is an instruction set architecture used by many brands of processors for personal computers. An instruction set is a collection of commands that tell the processor what operations to perform to achieve a task. You may not realize it, but you use instruction sets every day, whether you own a Mac, a PC, or a cell phone. At this architectural level, your processor understands a limited set of commands that represent mathematical operations (add, multiply, divide), control flow constructs (loops, jumps, conditional branches), data operations (move, store, read), and other rudimentary functionality. This minimalist set of capabilities is intentional because the processor can calculate millions of these instructions per second, all of which combined can form a complex task such as playing a video game or folding proteins in genetic software. The technical complexity required to translate those high-level tasks into simple instructions and data for your CPU to process and display on your screen is immense.
That’s where the operating system comes to the rescue. In this contrived example, the OS handles the complexity required to deconstruct complex tasks into simple x86 instructions for the CPU. It is responsible for coordinating, synchronizing, securing, and directing all of the components required to carry out the task. Here are just a few of those components:
• A low-level keyboard driver that processes electrical signals that correspond to characters
• A chain of intermediate file-system drivers and low-level disk drivers that save the content/data to a physical drive
• A plethora of Windows subsystems and management mechanisms to deal with I/O (input/output, as in reading and writing to and from media), access permissions, graphics display, and character encodings and conversions
The instruction set architecture provided by the CPU exposes mechanisms necessary for the operating system to use the hardware in your computer. These mechanisms include the following:
• Physical memory (RAM) with segmentation and addressing modes (how the OS can reference memory locations)
• Physical CPU registers used for rudimentary calculations and storage of variables for quick retrieval during processing
• Operating modes that evolved as system bus widths increased to 64-bit
• Extensions for gaming and high-end graphics (MMX, 3D NOW, and so on) and physical address extension (PAE) to allow systems with 32-bit bus width to read and translate 64-bit addresses
• Virtualization support
• And, most importantly, hardware-enforced protection rings for access to privileged capabilities and resources
The protection rings enable operating systems to maintain control over applications and authority on the system by limiting access to the most privileged ring to the operating system. Let’s take a closer look at this protection ring concept.
Protection Rings
In x86 architecture, the protection rings (numbered 0–3) are simply privilege levels enforced by the CPU (and implemented by the OS) on executing code (see Figure 4-1). Because all binary code, from operating system procedures to user applications, runs on the same processor(s), a mechanism must exist to differentiate between system code and user code and restrict privileges accordingly. The OS executes at the highest privilege level, in Ring 0 (referred to as kernel mode or kernel land), whereas user programs and applications run in the lowest privilege level, Ring 3 (referred to as user mode or userland). The details of how this protection is enforced in hardware and in the OS, as well as many other rings and operating modes supplied by x86 but not used by Windows, are complicated and not further explored here. What’s important to understand now is that the CPU and the OS implement protection rings cooperatively, and they exist solely for maintaining security and system integrity. As a simple example, you can think of the protection ring as a simple bit value in a CPU flag that is either set to indicate that code has Ring 0 (OS code) privileges or not set to indicate Ring 3 (user code) privileges.
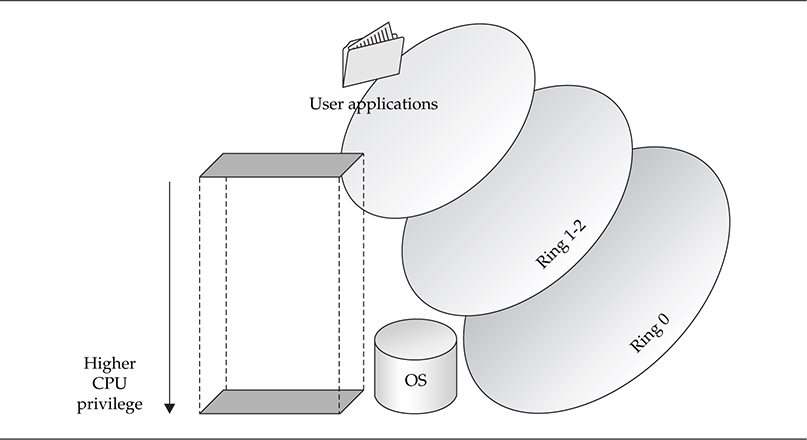
As a side note, research has been revitalized in this area, making the ring protection concept critical to understanding the challenges of privilege separation. Virtualization technologies have exploded in popularity in the past few years, as chip manufacturers race to lead the industry in hardware support for virtualized operating systems. As a result, a new protection ring has been added to some instruction sets, essentially a Ring –1 (ring negative one) that allows the hypervisor (in most cases, a sleek and minimal host OS) to monitor guest operating systems running in Ring 0, but not “true Ring 0” (thus they are not allowed to use actual hardware, but rather virtualized hardware). These new concepts have also led to significant advancement in rootkit technology, resulting in virtualized rootkits, which is the topic of Chapter 5.
Bridging the Rings
A critical feature of protection rings is the ability for the CPU to change its privilege level based on the needs of the executing code, allowing less-privileged applications to execute higher-privileged code in order to perform a necessary task. In other words, the CPU can elevate privileges from Ring 3 to Ring 0 dynamically as needed. This transition occurs when a user-mode thread, either directly or as a result of requesting access to a privileged system resource, issues one of the following:
• A special CPU instruction called SYSENTER
• A system call
• An interrupt or other installed call gate
This transition, brokered by the operating system and implemented by the CPU instruction set, is performed whenever the thread needs to use a restricted CPU instruction or perform a privileged operation, such as directly accessing hardware. When the system call or call gate is issued, the operating system transfers control of the request to the corresponding kernel-mode component (such as a driver), which performs the privileged operation on behalf of the requesting user-mode thread and returns any results. This operation usually results in one or more thread context switches, as operating system code swaps out with user code to complete the higher-privilege request.
Normally, a call gate is implemented as an interrupt, represented by the x86 CPU instruction INT, although the OS can install a number of call gates that are accessible via the Global Descriptor Table (GDT) or Local Descriptor Table (LDT) for a specific process. These tables store addresses of memory segment descriptors that point to preinstalled executable code that is executed when the call gate is called.
An example of a system call in action is when a program issues an INT instruction along with a numeric argument indicating which interrupt it is issuing. When this occurs, the operating system processes the instruction and transfers control to the appropriate kernel-mode component(s) that are registered to handle that interrupt.
A more modern instruction, SYSENTER, is optimized for transitioning directly into kernel mode from user mode, without the overhead of registering and handling an interrupt.
Kernel Mode: The Digital Wild West
To quickly recap, kernel mode is the privileged mode the processor runs in when it is executing operating system code (including device drivers). User applications run in user mode, where the processor runs at a lower privilege level. At this lesser privilege level, user applications cannot use the same CPU instructions and physical hardware that kernel-mode code can. Since both user-mode and kernel-mode programs must utilize system memory to run, the memory spaces of the two are logically separated, and every page in memory is marked with the appropriate access mode the processor must be running in to use that memory page. User-mode programs must spend part of their life in kernel mode to perform various operations (not the least of which is to utilize kernel-mode graphics libraries for windowing), so special processor instructions such as SYSENTER are used to make the transition, as discussed previously. The operating system traps the instruction when it is used by a user-mode program and performs basic validation on the parameters being provided to the called function before allowing it to proceed at the higher-privileged processor access mode (i.e., Ring 0).
Kernel land is an extremely volatile environment where all executing code has equal privileges, access rights, and capabilities. Because memory address space is not separated, as implemented in processes in user mode, any program in kernel mode can access the memory, data, and stack of any other program (including that of the operating system itself). In fact, any component can register itself as a handler of any type of data—network traffic, keyboard strokes, file-system information, and so on—regardless of whether it needs access to that information. The only restriction: You have to “promise” to play by the rules. If you don’t, you will cause a conflict and crash the entire system.
This makes for a very convoluted and free-for-all environment. Anyone who knows the basic requirements and enough C to be dangerous can develop a kernel driver, load it, and start poking around. The problem is there is no runtime, big-brother validation of your code—no built-in exception handler to catch your logic flaws or coding errors. If you dereference a null pointer, you will blue screen the system (crash it). Period. Although Microsoft makes extensive efforts to document the kernel-mode architecture and provide very clear advice to kernel developers on best practices, it truly does come down to relying on software developers to write code that is bug free and with no malicious intent. And we know where that sort of thinking gets us.
The Target: Windows Kernel Components
Now that we’ve set the stage for a chaotic kernel-mode environment, let’s discuss the dinosaur subsystems and executive components that make the operating system tick—like a time bomb. We’ll cover these components in a top-down fashion and point out weaknesses and/or common places where kernel-mode rootkits hide. We’ll frequently refer to Figure 4-2, which illustrates Windows kernel-mode architecture from a high-level view.
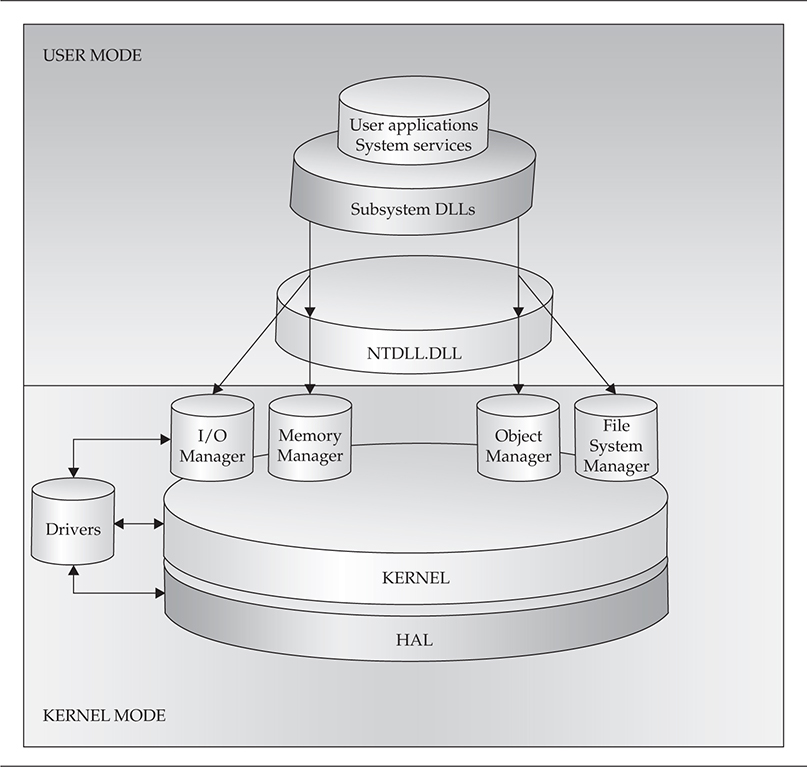
Figure 4-2 Windows kernel-mode architecture
The Win32 Subsystem
There are three environment subsystems available in Windows:
• Win32
• POSIX
• OS/2
For this book, we will concentrate more on the Win32 subsystem. The Win32 environment subsystem is responsible for proxying kernel-mode functionality in the Windows Executive layer to user-mode applications and services. The subsystem has kernel-mode components, primarily Win32k.sys, and user-mode components, most notably csrss.exe (Client/Server Run-Time Subsystem) and subsystem DLLs.
The subsystem DLLs act as a gateway for 32-bit programs that need to use a range of functionality provided in kernel mode. This functionality is provided by the Windows Executive. Although they are not kernel-mode components, the Win32 subsystem DLLs remain a high-value target for kernel-mode rootkits. These DLLs provide entry points for user applications and even system service processes. Therefore, contaminating these entry points will extend the rootkit’s power over any user-mode application.
Win32k.sys is the kernel driver that handles graphics manipulation calls from user mode, implemented in the Graphics Device Interface (GDI). This driver handles the core of the user experience—such as menus, drawing windows, mouse and keyboard graphics, and screen effects. External graphics drivers are also considered part of the Win32 subsystem.
What Are These APIs Anyway?
Windows has two major types of Application Programming Interfaces, or API: the Win32 API used mainly by user-mode programs and the Native API used by kernel-mode programs. As it turns out, most of the Win32 APIs are simply stubs (very small binary programs that simply check arguments before calling into the real function) for calling Native APIs, some of which, in turn, call undocumented internal functions buried in the Windows kernel.
The Win32 API is implemented in the four major Win32 subsystem DLLs alluded to earlier:
• kernel32.dll Provides base services for accessing the file system, devices, creating threads and processes, and memory management
• advapi32.dll Provides advanced services to manipulate Windows components like the Registry and user accounts
• user32.dll Implements windowing and graphical constructs like buttons, mouse pointers, and so on
• gdi32.dll Provides access to monitors and output devices
Some of the functions inside these DLLs are implemented in user mode directly inside the DLL itself. However, a significant portion of the functions inside these DLLs require reaching a service inside the Windows Executive in kernel mode. An example is basic file input/output (I/O), such as the Win32 API functions ReadFile() and WriteFile(). The IO Manager inside the Windows Executive is responsible for managing all I/O requests. Thus, when a user-mode application calls ReadFile() inside kernel32.dll, ReadFile() actually calls another function called NtReadFile(), which is a function exported by the IO Manager in kernel mode. Whenever an application needs to use a function inside any of these subsystem DLLs, the Windows loader will dynamically import the library into the application’s address space.
As mentioned before, these DLLs are often targeted by rootkits because of the core functionality they expose to user-mode applications. By hooking or subverting any of these DLLs or the kernel-mode components that implement functionality exposed by DLLs, the rootkit instantly gains an entrenched foothold on the system.
The Concierge: NTDLL.DLL
If the subsystem DLLs are the entry points into kernel land, NTDLL.DLL would be the bridge they must first cross before reaching land. This DLL holds small program stubs for calling system services from user mode, as well as internal, undocumented support functions used by Windows components. Every function call from user mode to kernel mode must pass through NTDLL.DLL, and the stubs that are called perform a few basic tasks
• Validate any passed-in buffers or parameters
• Find and call the corresponding system service function in the Executive
• Transition into kernel mode by issuing a SYSENTER or other architecture-specific instruction
Along with the subsystem DLLs, this DLL is also a place for kernel-mode rootkits to hook and hide.
Functionality by Committee: The Windows Executive (NTOSKRNL.EXE)
The Windows Executive exists in the file NTOSKRNL.EXE, which implements the functions exported by NTDLL.DLL. These functions are often called system services and are what the entries in the System Service Dispatch Table (SSDT) point to. The SSDT is one of the most prolific locations for both malware/rootkits and legitimate security products to insert themselves to control program execution flow.
The Executive is actually made up of numerous subcomponents that implement the core of the various system services. These subcomponents include Configuration Manager, Power Manager, I/O Manager, Plug and Play Manager, and many more. All of these components can be reached indirectly from user mode through the Win32 API and directly from kernel mode via the Native API functions that begin with Rtl, Mm, Ps, and so on.
The Executive is also where device drivers interface to their user-mode counterparts. The Executive exports a wealth of functions that only drivers can call. These functions are collectively called the Windows Native API.
The kernel, described next, contains a wealth of undocumented features and functions, a fact that kernel-mode rootkits take advantage of.
The Windows Kernel (NTOSKRNL.EXE)
The second major piece of NTOSKRNL.EXE is the actual Windows kernel. The kernel is responsible for managing system resources and scheduling threads to use those resources. To aid in scheduling and functionality, the kernel exposes functions and data structures such as synchronization primitives for kernel programs to use. The kernel also interfaces with hardware through the Hardware Abstraction Layer (HAL) and uses assembly code to execute special architecture-dependent CPU instructions.
The kernel itself exports a set of functions for other kernel programs to use. These functions begin with Ke and are documented in the Windows Driver Development Kit (DDK). Another job of the kernel is to abstract some low-level hardware details for drivers.
These kernel-provided functions help drivers achieve their tasks more easily, but they also help rootkit authors who write drivers to exploit the system. The simple fact is that the Windows kernel is exposed by design, intended to help hardware manufacturers and software developers extend the capabilities and features of the operating system. Although the kernel is somewhat protected in its isolation from the rest of the Windows Executive and undocumented internal data structures and routines, it is still largely exposed to any other kernel components, including rootkits.
Device Drivers
Device drivers exist, first and foremost, to interface with physical hardware devices through the HAL. A simple example is a keyboard driver that reads and interprets key scan codes from the device and translates that into a usable data structure or event for the operating system. Device drivers come in many flavors, but are typically written in C or assembly and have a .sys or .ocx extension. A loadable kernel module is similar, but typically contains only support routines (rather than core functionality) and is implemented in a DLL that is imported by a driver.
However, aside from the role of running hardware, device drivers are also written solely to access kernel-mode components and operating system data structures for various reasons. This role is a legitimate one for a device driver, and Windows includes many drivers that do just that. This means that many drivers don’t correspond to any physical device at all.
Device drivers are a unique component in the Windows operating system architecture because they have the capability to talk directly to hardware or use functions exported by the kernel and Windows Executive. Note in Figure 4-2 how drivers do not sit on top of the kernel or even the HAL; they sit next to them. This means they are on equal footing and have little to no dependency on those components to interact with hardware. While they can opt to use the Executive for tasks like memory mapping (converting a virtual address to a physical address) and I/O processing and to use the kernel for thread context switching, device drivers can also implement these capabilities in their own routines and export that functionality to user mode.
This extreme flexibility is both empowering and endangering to the system. While this allows Windows to be very flexible and “pluggable,” it also puts the system at risk from faulty or malicious drivers.
The Windows Hardware Abstraction Layer (HAL)
The kernel (NTOSKRNL.EXE) is also greatly concerned with portability and nuances in instruction set architectures that affect system performance issues, such as caching and multiprocessor environments. The HAL takes care of implementing code to handle these different configurations and architectures. The HAL is contained in the file hal.dll, which NTOSKRNL.EXE imports when the kernel is loaded during system boot-up. Because the Windows kernel is designed to support multiple platforms, the appropriate HAL type and HAL parameters are chosen at startup based on the detected platform (PC, embedded device, and so on).
Very few kernel rootkits in the wild today mess with the HAL, simply because it is more work than is necessary. There are many other easier locations in the kernel to hide.
Kernel Driver Concepts
This section will cover the details of what a driver is, the types of drivers, the Windows driver model and framework, and various aspects of the needs that drivers fulfill in the usability of a system. These topics are crucial to understanding the finer details of kernel-mode rootkits and appreciating the power they wield over the system. As we cover the details of the driver framework, we’ll point out areas that are frequently abused by rootkit authors.
Although we’ll cover the basic components of a kernel driver, we won’t provide sample code. Refer to the appendix, “System Integrity Analysis: Building Your Own Rootkit Detector,” for source code and details on how to write a kernel driver.

An important notice and warning: This section does not intend to let the user think that he or she is prepared to start loading custom-written device drivers. You must consider literally hundreds of nuances, caveats, and “if-then” issues when developing a driver. Please consult the Windows Driver Development Kit documentation for required prerequisite reading before ever coding or loading a driver (especially on a production system).
Kernel-Mode Driver Architecture
Starting with Windows Vista, Windows drivers can operate in user mode or kernel mode. User-mode drivers are typically printer drivers that do not need low-level operating system features. Kernel-mode drivers, however, interact with the Windows Executive for I/O management and other capabilities to control a device.
All Windows drivers must conform to a driver model and supply standard driver routines. Some drivers also implement the Windows Driver Model (WDM), a standardized set of rules and routines defined in the WDM documentation. This model requires drivers to provide routines for power management, plug and play, and other features. We won’t cover all of the various types of WDM drivers in great detail, but they are bus, function, and filter drivers.
Bus drivers service a bus controller or adapter and handle enumerating attached devices (think of how many devices can be attached to the numerous USB ports on your computer). They alert higher-level drivers of power operations and insertion/removal. Function drivers are the next layer up and handle operations for specific devices on the bus such as read/write. The subtypes of function drivers include class, miniclass, port, and miniport. Finally, filter drivers are unique drivers that can be inserted at any level above the bus driver to filter out certain I/O requests.
These bus, function, and filter drivers are layered (also referred to as chained or stacked). The idea behind a layered architecture is abstraction: Each driver removes complexity from the underlying hardware as you travel up the stack. The lowest-level drivers deal with firmware and direct communication with the hardware but pass only necessary and requested information up to the next higher-level driver. In general, there are up to three types of drivers in a driver chain:
• Highest-level drivers such as file-system drivers
• Intermediate drivers such as WDM class driver or filter drivers
• Lowest-level drivers such as WDM bus drivers
To illustrate this architecture, think of the hard drive in your computer. Let’s say it’s plugged into the motherboard via a SCSI connector. The onboard connector bus is implemented in a lowest-level bus driver that is programmed to respond to hardware events in the hard drive—such as power on/off, sleep/awake, and so on. The bus driver also passes other duties up the driver stack to intermediate drivers that handle disk read/writes and other device-specific functions (since a SCSI bus can run several types of devices). Your system may also include intermediate filter drivers for disk encryption and higher-level drivers for defining a file system (such as NTFS).
Rootkits rarely manifest as lowest-level drivers (i.e., bus drivers) because they deal with details specific to certain manufacturers’ hardware, and developing and testing such a driver is extremely complex and resource intensive (requiring much talent, time, and funding). To develop a reliable lowest-level driver, you would require a sophisticated, well-funded, and well-targeted objective. Plus, some lowest-level bus drivers like the system-supplied SCSI and video port drivers simply cannot be replaced because the operating system does not allow it and will not function with a modified version. Rootkits are much more likely to infect the system as intermediate or higher-level drivers because the payoff is proportional with the required effort.
This layered design lends itself to being abused by kernel-mode rootkits. A dedicated rootkit author could craft a driver as low in the chain as desired and modify data in transit to any drivers above or below it. To extend our hard drive example, imagine if a rootkit author wrote a filter drive to intercept and modify data before it was encrypted by the intermediate encryption filter driver. Since filter drivers can be inserted at any level (low, intermediate, or high), the rootkit author could read data before it is encrypted and transmit it over the network. Consequently, the rootkit could modify the encrypted data just after it leaves the encrypting filter driver to store extra information inside the encrypted data.
Another type of driver that is often abused by rootkit authors due to its layered complexity is the network driver. Network drivers have the additional overhead of various networking interoperability standards such as the OSI model (e.g., as in the case of the TCP/IP stack). As such, there are two additional types of driver called a protocol driver, which sits above the highest-level drivers in the driver stack, and a filter-hook driver, which allows programs to filter packets. The Network Device Interface Standard (NDIS) API developed by Microsoft allows network driver developers to implement lower-level NIC drivers with higher-level layers of the OSI reference model easily. The Transport Driver Interface (TDI) sits above NDIS and implements the OSI transport layer.
NDIS and TDI offer numerous opportunities for rootkits to install custom protocol stacks, such as a TCP/IP stack that is not registered with any Windows Executive component. They also afford rootkit authors the opportunity to insert filter drivers and filter-hook drivers into the existing driver stack and sniff (and modify on-the-fly) network packets at an intermediate level.
Gross Anatomy: A Skeleton Driver
The tools used to develop a driver are not special. Drivers are typically written in C or C++ and compiled using the Windows Driver Development Kit (DDK) compiler and linker. Although this build environment is command-line based, you can also develop drivers in Visual Studio and other IDEs, as long as they are configured to use the DDK build environment to actually compile the driver. Drivers should include the standard header files ntddk.h or wdm.h, depending on whether the driver is WDM. The build environment comes in two flavors: the checked build (for debugging) and the free build (for release).
For a driver to load properly, it must contain the required driver routines. These vary depending on the driver model in use (we are assuming WDM), but all drivers must contain the following:
• DriverEntry() Initializes the driver and data structures it uses; this function is automatically called by the operating system when the driver is being loaded.
• AddDevice() Attaches the driver to a device in the system; a device can be a physical or virtual entity, such as a keyboard or a logical volume.
• Dispatch routines Handles I/O Request Packets (IRPs), the major underlying data structure that defines the I/O model in Windows.
• Unload() Called when the driver unloads and releases system resources.
Many other system-defined routines are available that drivers can optionally include and extend as necessary. Which of these should be used depends on what type of device the driver intends to service, as well as where the driver is inserting itself in the driver chain.
Each one of these required routines represents an area for rootkits to take over other drivers in kernel mode. By using AddDevice(), rootkits can attach to existing driver stacks; this is the primary method for filter drivers to attach to a device. Dispatch routines, which are called when a driver receives an IRP from a lower or higher driver, process the data in an IRP. IRP hooking takes advantage of dispatch routines by overwriting the function codes for a driver’s dispatch routine to point to the rootkit’s dispatch routine. This effectively redirects any IRPs intended for the original driver to the rootkit driver.
Drivers also rely on standard Windows data structures to do something meaningful. All drivers must deal with three critical structures, which also happen to be relevant to rootkits:
• I/O Request Packet (IRP) All I/O requests (e.g., keyboard, mouse, disk operation) are represented by an IRP data structure that the operating system creates (specifically, the I/O Manager in the Windows Executive). An IRP is a massive structure containing such fields as a request code, pointer to user buffer, pointer to kernel buffer, and many other parameters.
• DRIVER_OBJECT Contains a table of addresses for entry points to functions that the I/O Manager must know about in order to send IRPs to this driver. This data structure is populated by the driver itself inside the DriverEntry() function.
• DEVICE_OBJECT A device (keyboard, mouse, hard drive, or even virtual devices that represent no physical hardware) is represented by one or more DEVICE_OBJECT structures that are organized into a device stack. Whenever an IRP is created for a device (a key is pressed or a file-read operation is initiated), the OS passes the IRP to the top driver in the driver’s device stack. Each driver that has a device registered in the device stack has a chance to do something with the IRP before passing it on or completing it.
Each of these data structures represents a target for kernel-mode rootkits. Certainly, the I/O Manager itself also becomes a target because it manages these data structures. A common technique used by keylogger rootkits is to create a DEVICE_OBJECT and attach it to the operating system’s keyboard device stack. Now that the rootkit driver is registered to handle keyboard device IRPs, it will receive every IRP created by the keyboard I/O. This means the rootkit will have a chance to inspect those packets and copy them to a log file, for example. The same technique can be applied to network and hard-drive device stacks.
WDF, KMDF, and UMDF
WDM isn’t the only driver model supported by Windows. In fact, Microsoft suggests seasoned kernel driver developers migrate to the redesigned kernel driver framework, aptly named the Windows Driver Foundation (WDF). Coined by Microsoft as “the next-generation driver model,” the WDF is composed of two subframeworks: Kernel-Mode Driver Framework (KMDF) and User-Mode Driver Framework (UMDF).
The primary goal behind this kernel driver architecture redesign is abstracting some of the lower-level details of driver development to make it easier for developers to write sustainable, stable kernel code. In short, the APIs and interfaces provided in each framework library are simpler to use than traditional WDM interfaces and also require fewer mandatory service routines. KMDF achieves this by essentially acting as a wrapper around WDM. UMDF is Microsoft’s attempt to start moving some of the unnecessary drivers out of kernel mode and into user mode. Such drivers include cameras, portable music players, and embedded devices.
Kernel-Mode Rootkits
Now that we’ve covered the x86 instruction set, Windows architecture, and the driver framework in sufficient detail, let’s get down to the real issue at hand: kernel-mode rootkits. In this section, we’ll discuss the known techniques that rootkits use to break into and subvert the Windows kernel. Although some techniques contain permutations that are too numerous to enumerate (such as hooking), most of the popular techniques in the wild reduce to a few standard tricks.
What Are Kernel-Mode Rootkits?
Kernel-mode rootkits are simply malicious binaries that run at the highest privilege level available on the CPU that is implemented by the operating system (i.e., Ring 0). Just as a rootkit in user mode must have an executing binary, a rootkit in kernel mode must also have a binary program. This can be in the form of a loadable kernel module (DLL) or a device driver (sys) that is either loaded directly by a loader program or somehow called by the operating system (it may be registered to handle an interrupt or inserted into a driver chain for the file system, for example). Once the driver is loaded, the rootkit is in kernel land and can begin altering operating system functionality to solidify its presence on the system.
Most kernel-mode rootkits have some defining attributes that tend to make them difficult to catch and remove. These include
• Stealth Gaining kernel-mode access can be difficult, so typically the author is savvy enough to do so with stealth. Also, because many antivirus, host intrusion detection systems (HIDS), host intrusion prevention systems (HIPS), and firewall products watch kernel-mode closely, the rootkit must be careful not to set off alarms or leave obvious footprints.
• Persistence One of the overarching goals of writing a rootkit is to gain a persistent presence on the system. Otherwise, there is no need to go through the trouble of writing a kernel driver. Thus, kernel-mode rootkits are typically well thought out and include some feature or set of features that ensures the rootkit survives reboot and even discovery and cleansing by replicating its foothold using multiple techniques.
• Severity Kernel-mode rootkits use advanced techniques to violate the integrity of a user’s computer at the operating-system level. This is not only detrimental to system stability (the user may experience frequent crashes or performance impacts), but also removing the infection and restoring the system to normal operation are much harder.
Challenges Faced by Kernel-Mode Rootkits
Rootkit authors face some of the same software development issues that legitimate kernel driver developers face:
• Kernel mode has no error-handling system per se; a logic error will result in a blue screen of death and crash the system.
• Because kernel drivers are much closer to hardware, operations in kernel mode are much more prone to portability issues, such as operating system version/build, underlying hardware, and architecture (PAE, non-PAE, x64, and so on).
• Other drivers competing for the same resource(s) could cause system instability.
• The unpredictable and volatile nature and diversity of kernel land demands extensive field testing.
Aside from legitimate development issues, rootkit authors must get creative with loading their driver and staying hidden. In essence,
• They must find a way to get loaded
• They must find a way to get executed
• They must do so in such a manner as to remain stealthy and ensure persistence
These challenges do not exist in userland because the entire operating system is built around sustaining user mode and keeping it from crashing.
Getting Loaded
We’ve demonstrated how a driver can abuse the kernel-mode driver architecture once it is loaded by the I/O Manager, but how does the driver get into the kernel in the first place? This question has many interesting answers, and the possibilities are numerous.
The rootkit doesn’t just start in the kernel. A user-mode binary or piece of malware that initiates the loading process is required. This program is usually called the loader. The loader has several options, depending on where it is starting from (on disk or injected straight into memory) and the permissions of the current account in use. It can choose to load legitimately, through a choice of one or more undocumented API functions, or via an exploit.
The operating system inherently allows drivers to load because drivers are a critical, legitimate part of the operating system. This loading process is handled by the Service Control Manager (SCM) or services.exe (child processes are named svchost.exe). Typically, well-behaved programs would contact the SCM using the Win32 API to load the driver. However, drivers can only be loaded this way by users with administrator rights, and rootkits do not always have the luxury of assuming administrator rights will be available during load time. Of course, by using Direct Kernel Object Manipulation (DKOM) and other known techniques, user-mode malware can elevate the privileges needed for its process and gain administrator rights.
Loading a driver using this method also creates registry entries, which leaves footprints. This is why rootkits typically begin covering their tracks after being loaded.
One method used by Migbot, a rootkit written by Greg Hoglund in the late 1990s, involves an undocumented Windows API function ZwSetSystemInformation() exported by NTDLL.DLL. This function allows loading a binary into memory using an arbitrary module name. Once the module is loaded, it cannot be unloaded without rebooting the system. This method is unreliable and can cause the system to crash because the driver is loaded into pageable kernel memory (that is, kernel memory that can be written to disk and erased from memory). When the driver’s code or data is in a paged-out state, there are circumstances when that code or data is inaccessible. If an attempt is made to reference the memory, the system will crash.
This behavior is a result of an operating-system design principle known as interruptibility. For an operating system to be interruptible, it must be able to defer execution of a currently executing thread to a higher-priority thread that requests CPU time. In Windows, this concept is implemented in what is known as the interrupt request level (IRQL). The system can be running in various IRQLs at any given time, and at higher IRQLs, most of the system services are not executing. One such service is the page fault handler of the Memory Manager. Thus, if a driver is running at too high of an IRQL and causes a page fault (by requesting a piece of code or data that has been paged out at an earlier time), the Memory Manager is not running and will not catch the problem. This results in a system bug check (blue screen).
It’s worth noting this is just one of many subtleties of kernel driver development that makes the profession extremely tedious and hazardous. Most application developers are used to writing buggy code because the operating system will catch their mistakes at runtime. When developing a kernel driver, the developer must remember that there is potentially nothing to keep the system from crashing.
Gaining Execution
Once loaded as a kernel driver, the rootkit operates under the rules of the Windows driver architecture. It must wait for I/O to occur before its code is executed. This is in contrast to user-mode processes, which are constantly running until the work is done and the process terminates itself. Kernel drivers are executed as needed and run in the context of the calling thread that initiated the I/O or an arbitrary context if the driver was called as the result of an interrupt request.
This means the rootkit author must understand these execution parameters and structure the rootkit around kernel-mode rules.
Communicating with User Mode
Typically, rootkits have a user-mode component that acts as the command-and-control agent (sometimes called the controller). This is because something needs to execute the driver code, as mentioned in the previous section. If left alone, the operating system is essentially driving the rootkit. A user-mode controller issues commands to the rootkit and analyzes information passed back. For stealthy rootkits, the controller is typically on another machine and communicates infrequently so as to not raise any suspicions. The controller can also be a single sleeping thread in user mode that has gained persistence in an application such as Internet Explorer. The thread can cycle through tasks such as polling a remote drop site for new commands, retrieving and issuing those commands to the rootkit driver, and then sleeping again for a set period of time.
Remaining Stealthy and Persistent
Once a rootkit is loaded, it typically covers its tracks by hiding registry keys, processes, and files. Hiding is becoming less necessary, however, as rootkit and anti-rootkit techniques alike are constantly advancing. Malicious code can be directly injected into memory; you don’t need to use the registry or disk.
Rootkits can take many actions to gain a persistent foothold on the system. This usually includes installing several hooks on multiple system functions and/or services, as well as modifying the registry to reload the rootkit at startup. Even more advanced rootkits can hide in higher memory regions (i.e., kernel memory), where antivirus scanners may not look, or in unpartitioned space on disk. Some rootkits will infect the boot sector, so they are executed before the operating system the next time the system boots.
Methods and Techniques
Over the past ten years, a number of techniques have been documented in the rootkit community. Literally dozens of variations exist on some of these techniques, so we’ll address the broad methods used by most of them. Following the discussion of techniques, we’ll survey common rootkit samples using these techniques.
 Table Hooking
The operating system must keep track of thousands of objects, handles, pointers, and other data structures to carry out routine tasks. A common data structure used in Windows resembles a lookup table that has rows and columns. Since Windows is a task-driven, symmetric, multiprocessing operating system, many of these data structures and tables are part of the applications themselves in user mode. Almost all of the critical tables reside in kernel mode, so a kernel driver is usually the best way for an attacker to modify these tables and data structures. We’ll take a look at the major tables that have become a common target for kernel-mode rootkits.
In all of these table-hooking techniques, if a rootkit wishes to achieve stealth, it would have to implement other advanced techniques to hide its presence. Because simply reading the affected tables (SSDT, GDT, and IDT) is trivial for a detection utility, any rootkit that simply alters a table without trying to cover its tracks can be detected easily. Thus, a stealthy rootkit would have to go to great lengths to hide the modification, such as by shadowing the table (keeping a redundant copy of the original table). By monitoring what applications/drivers are about to read the modified table, the rootkit can quickly swap the original table back into memory to fool the application. This shadowing could be implemented using TLB synchronization attacks as used in the Shadow Walker rootkit described in “Kernel Mode Rootkit Samples.”

Rootkits need the original data or code to pass back to resume the original task after the rootkit has executed its directive. If the rootkit is not able to do this, the original task will not be completed; hence, the rootkit is at risk of being discovered due to failure of its stealth mechanisms.
System Service Dispatch Table (SSDT)
When it comes to technology related to writing and detecting rootkits, the SSDT is probably the most widely abused structure in the Windows operating system because the SSDT is the mechanism used to direct a program’s execution flow when a system service is requested. A system service is functionality offered by the operating system, which is implemented in the Windows Executive as discussed previously. Examples of system services include file operations and other I/O, memory management requests, and configuration management operations. In short, user-mode programs need to execute kernel functions, and to do that, they must have a way to transition to kernel mode. The SSDT serves as the operating system’s lookup table on what user-mode requests respond to what system services. This entire process is referred to as system service dispatching.
How a system service request is dispatched depends on the system’s processor architecture. On Pentium II and prior x86 processors, Windows traps the system service request, which is initiated by the application calling a Win32 API function. The API function, in turn, issues an interrupt instruction to the processor using the x86 assembly instruction INT and passes an argument of 0x2e. When INT 0x2E is issued on behalf of the requesting application in user mode, the operating system consults the Interrupt Dispatch Table (IDT) to determine what action to take when a value of 0x2E is passed. This action is filled in by the operating system at boot time. When the OS looks up 0x2E in its IDT, it finds the address of the System Service Dispatcher, a kernel-mode program that handles passing the work along to the appropriate Executive service. Then a context switch occurs, which moves the executing thread of the requesting application into kernel mode, where the work can take place.
This process requires a lot of kernel overhead. So, on later processors, Windows took advantage of the faster SYSENTER CPU instruction and associated register. At boot time, Windows populates the SYSENTER register with the address of the System Service Dispatcher, so when a dispatch request occurs (by the program issuing a SYSENTER instruction instead of an INT 0x2E), the CPU immediately finds the address of the dispatcher and performs the context switch. Windows uses a similar instruction called SYSCALL on x64 systems.
The actual lookup table that the System Service Dispatcher references is called KeServiceDescriptorTable and includes the core Executive functionalities exported by NTOSKRNL.EXE. There are actually four such service tables, which we will not cover here.
Now, let’s talk about how this structure is exploited and abused by kernel-mode rootkits. The objective of hooking this table is to redirect program execution flow, so when a user application (or even a user-mode system service) requests a system call, it gets redirected to the rootkit driver code instead. To do this, the rootkit must hook, or redirect, the appropriate entries in the SSDT for whatever API functions need to be hooked.
To hook individual entries in the SSDT, the rootkit author must first locate the structure during runtime. This can be done in several ways:
• Import the KeServiceDescriptorTable symbol dynamically in the rootkit’s source code by referencing the NTOSKRNL.EXE export.
• Use the ETHREAD structure. Every executing thread has an internal pointer to the SSDT, which is automatically populated by the OS during runtime. The pointer exists at a predictable offset inside the thread’s data structure called ETHREAD. This structure can be obtained by the thread by calling the Win32 API function PsGetCurrentThread().
• Use the kernel’s Processor Control Block (KPRCB) data structure by looking at an OS version-dependent offset.
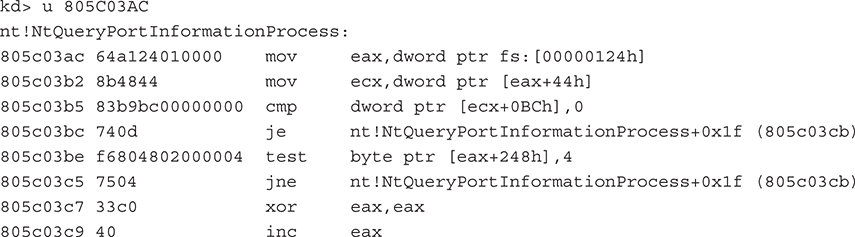
The next step is to get the offset into the SSDT of the function the rootkit author wishes to hook. This can be done by using public sources or by finding the location manually by disassembling the function and finding the first MOV EAX,[index] instruction. The [index] value references the index into the table for that function. Note that this only works for Nt* and Zw* Win32 API functions, both of which are identical system stub programs that call into the System Service Dispatcher. An example of this is shown here. Notice the hex value 124 (the index in the service table) is moved into the EAX register, and a few parameters are validated before the stub calls the real function.
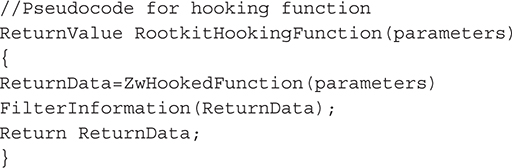
Now armed with the location of the SSDT and the index of the function that the rootkit author wishes to hook, it is simply a matter of assigning the index to the rootkit’s redirect function—in other words,

Then, inside the rootkit driver, the functionality will be implemented to filter the information from calling the “real” API:
Common functions for rootkits to hook in this manner include NtQuerySystemInformation() and NtCreateFile() to hide processes and files. Many rootkits use this technique, such as the He4hook rootkit.
 SSDT Hook Countermeasures
Rootkits face some challenges in implementing SSDT hooks. Windows adds, removes, and changes SSDT entries regularly as the OS is patched, so rootkit authors must take these variances into consideration when trying to look for data structures at assumed offsets. On x64 systems, Windows uses PatchGuard to implement somewhat clever methods to prevent SSDT hooking, as the table inside NTOSKRNL.EXE is checked on system bootup and during runtime. Also, most antivirus, personal firewalls, and HIPS solutions protect the SSDT, usually by constantly monitoring the data structure for changes or restricting access to the structure entirely. Kaspersky Antivirus actually relocates the SSDT dynamically!
Interrupt Dispatch Table (IDT)
Interrupts are a fundamental concept to I/O transactions in operating systems. Most hardware is interrupt-driven, meaning it sends a signal to the processor called an interrupt request (IRQ) when it needs servicing. The processor then consults the Interrupt Dispatch Table (IDT) to find what function and driver (or Interrupt Service Routine [ISR]) is registered to handle the specified IRQ. This process is very similar to the system service dispatching discussed in the “System Service Dispatcher Table (SSDT)” section. One minor difference is that there is one IDT per processor on the system. Interrupts can also be issued from software as previously mentioned with the INT instruction. For example, INT 0x2E tells the processor to enter kernel mode.
The goal of hooking the IDT is to hook whatever function is already registered for a given interrupt. An example is a low-level keylogger. By replacing the interrupt service routine that is stored in the IDT for the keyboard, a rootkit could sniff and record keystrokes.
As with the SSDT-hooking technique, you need to find the IDT in order to hook it. This is trivial to do. An x86 instruction, SIDT, stores the address of the IDT in a CPU register for easy retrieval. After replacing the ISR for the desired interrupt, the entire table can be copied back into location using the x86 instruction LIDT. The following code from Skape, a catalog of local Windows kernel-mode backdoor techniques (http://www.hick.org/~mmiller/), demonstrates this:
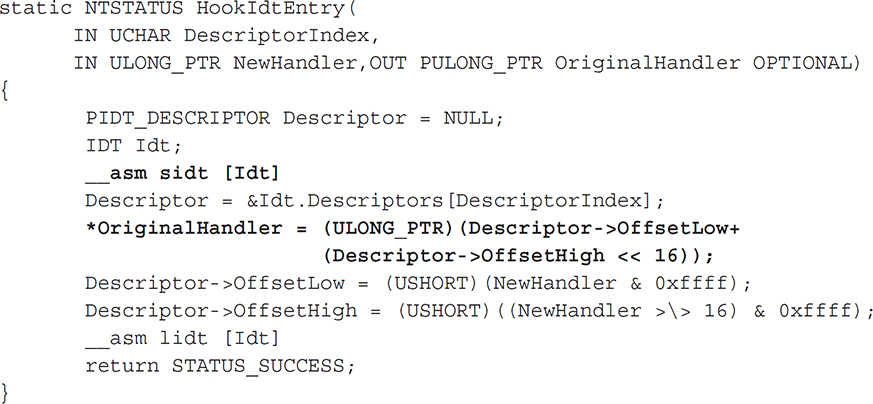
The structure IDT is a custom-defined structure that represents the fields of an x86 IDT. In __asm sidt [Idt], we use the x86 instruction SIDT to copy the current IDT to our local structure and then store the address of the descriptor entry we want to hook (the variable “Descriptor”). Then in

we retrieve the address of the original ISR by combining the low-order 16 bits with the high-order 16 bits to make a 32-bit address. We then set these respective values with the low and high bits of the address of our hooking function (NewHandler). Finally, the IDT is updated using the x86 instruction LIDT.
IDT Countermeasures
Microsoft’s PatchGuard prevents any access to this data structure on x64 systems, and many open-source rootkit utilities such as GMER, RootkitRevealer, and Ice Sword can detect these types of hooks.
Global Descriptor Table (GDT) and Local Descriptor Table (LDT)
The Global Descriptor Table is a per-processor structure used to store segment descriptors that describe the address and access privileges of memory areas. This table is used by the CPU whenever memory is accessed to ensure the executing code has rights to access the memory segments specified in the segment registers. The LDT is essentially the same thing but is per-process instead of per-processor. It is used by individual processes to define protected memory areas internal to the process.
Only a few well-documented methods are available for rootkits to use to abuse these tables, but the implications are obvious: If a rootkit can alter the GDT, it will change the execution privileges of memory segments globally on the system. Changes made to an LDT will only affect a specific process. Modifications to either table could allow user-mode code to load and execute arbitrary kernel-mode code.
One particularly well-known technique involving these tables is installing a custom call gate. Call gates are essentially barriers to entering kernel-mode code from user-mode code. At the assembly level, if you issue a far JMP or CALL command (as opposed to a local CALL or JMP, which the CPU does not validate because it is in the same code segment), you must reference an installed call gate in the GDT or LDT (whereas the SYSENTER call is supported natively by the processor, so no call gate or interrupt gate is necessary). A call gate is a type of descriptor in the GDT that has four fields, one of which is a Descriptor Privilege Level (DPL). This field defines what privilege level (i.e., protection Ring 0, 1, 2, or 3) the requesting code must be at to use the gate. Whenever executing code attempts to use a call gate, the processor checks the DPL. If you are installing your own call gate, however, you can set the DPL to anything you want.
Installing a call gate in the GDT or LDT is easy from kernel mode using any of these three API calls:

The first two API functions allocate and release open slots in the GDT, respectively. Think of this as allocating a new index in an array structure (since these are tables). Once the slot is allocated, KeI386SetGdtSelector() is used to fill the new slot at the specified index (selector) with the supplied descriptor. To install a call gate from kernel mode, a rootkit would first allocate a new slot and then fill the slot with a 16-bit selector that references a memory segment. This memory segment would point to the rootkit code itself or some other routine the rootkit wants to make accessible to a user-mode application. After this is done, any user-mode read or write requests to this memory segment (which is in kernel mode!) will be allowed.
Until Windows XP Service Pack 2, you could also install call gates from user mode; one of the methods for doing so was first mentioned in Phrack Volume 11, Issue 59 (http://www.fsl.cs.sunysb.edu/~dquigley/files/vista_security/p59-0x10_Playing_with_Windows_dev(k)mem.txt). This method uses Direct Kernel Object Manipulation (DKOM).
GDT and LDT Countermeasures
Microsoft’s PatchGuard is configured to monitor the GDT data structure on x64 systems, and many open-source rootkit utilities such as GMER, RootkitRevealer, and IceSword can detect changes to the GDT, such as installing call gates. Fortunately, changes to the operating system implemented after Windows XP Service Pack 2 and Windows Server 2003 Service Pack 1 prevent DKOM.
Model-Specific Registers (MSR) Hooking
MSRs are special CPU registers introduced after Pentium II in the late 1990s to provide advanced features to the operating system and user programs. These features include performance enhancements, most notably the additional SYSENTER/SYSEXIT instructions we have mentioned numerous times throughout this chapter. Since these instructions are meant to be fast alternatives to call gates and other methods of transferring code execution from user mode to kernel mode, they do not require any arguments. As such, there are three special MSRs that the operating system populates during startup, and these are used whenever a SYSENTER instruction is issued. One of these registers, named IA32_SYSENTER_IP, contains the address of the kernel module that will gain execution once the SYSENTER instruction is called. By overwriting this register with a rootkit function, a kernel-mode rootkit can effectively alter execution flow of every system service call, intercepting and altering information as needed. This technique is sometimes called SYSENTER Hooking and was first released in a rootkit by Jamie Butler in 2005.
Because kernel-mode code can read and write to MSRs using the x86 instructions RDMSR and WRMSR, a rootkit could hook SYSENTER trivially using inline assembly in the driver source code:

The code is from the SysEnterHook proof-of-concept rootkit released by Butler.
MSR Countermeasures
MSRs are exactly that: model specific. This means they may not be supported in the future, and a rootkit has a relatively high chance of being loaded on a system that does not implement them. Issuing an unsupported x86 instruction will cause the processor to trap and halt the system. Additionally, PatchGuard on x64 systems monitors the MSRs for tampering.
A problem faced by third-party detection engines is the fact that validating that the target of IA32_SYSENTER_EIP is legitimate is hard. IA32_SYSENTER_EIP is supposed to point to an undocumented kernel function, KiFastCallEntry(), whose symbol (i.e., address in memory) is unknown. Therefore, a detection engine would not know the difference between a legitimate SYSENTER target and a rootkit target.
This is great news for the rootkit author, as stealth is achieved with little effort. PatchGuard itself can be defeated via several documented methods (see http://www.uninformed.org/?v=3&a=3andhttp://www.uninformed.org/?v=6&a=1).
I/O Request Packet (IRP) Hooking
As discussed in “Kernel-Mode Driver Architecture,” IRPs are the major data structures used by kernel drivers and the I/O Manager to process I/O. In order for any kernel-mode driver to process IRPs, it has to initialize its DRIVER_OBJECT data structure when first initialized by the I/O Manager. From Windows header files in the DDK, we know the structure in C looks like this:
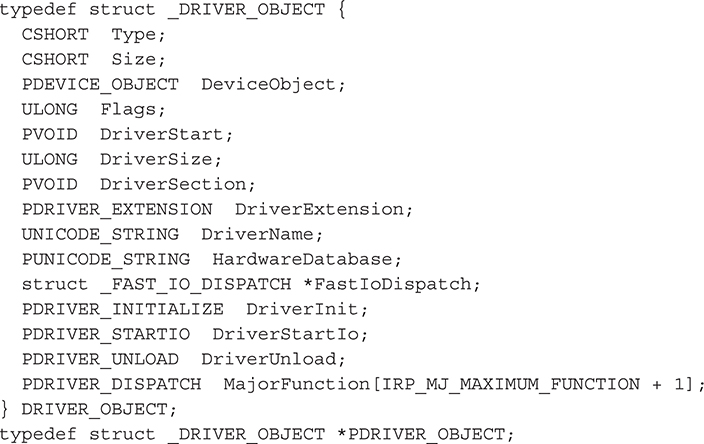
We care about the MajorFunction field (last field in the structure), which is really like a table. Every driver has to populate this table with pointers to internal functions that will handle IRPs destined for the device that driver is attached to. These functions are called dispatch routines, and every driver has them. Their job in life is to process IRPs.
So how does the I/O Manager know where to direct these IRPs? Every IRP contains what’s called a major function code that tells drivers in a driver stack why the IRP exists. These function codes include
• IRP_MJ_CREATE The IRP exists because a create operation was initiated; an example is creating a new file for a file-system driver chain.
• IRP_MJ_READ The IRP exists because a read operation was initiated.
• IRP_MJ_WRITE The IRP exists because a write operation was initiated.
• IRP_MJ_DEVICE_CONTROL The IRP exists because a system-defined or custom IOCTL (I/O Control Code) was issued for a specific device type.
Each driver in the driver chain for a specific device (e.g., a logical volume) inspects the IRP as it is passed down the driver chain and decides what to do with the IRP: do nothing, do some processing and/or complete it, or pass it on. The real work is done in the dispatch routines that the driver has defined to handle each type of major function code it cares about for whatever device it is attached to.
So how does a rootkit manage to hook a driver’s major function table? Before we answer that question, you need to understand why a driver would ever do this. The reason is stealth. A rootkit author could just as easily write a driver, attach it to the device stack, and start examining IRPs, but this would not be stealthy. The rootkit driver would be registered with the system, appear in numerous operating-system housekeeping lists, and be easily spotted by anyone looking. Hooking another driver’s major function table also makes the main rootkit driver seem benign since casual examiners would see that the driver is not attached to any device stack. But, in fact, it is receiving IRPs from the device chain because it has hooked another driver’s major function table. A final reason is that if you attach to a device, your rootkit driver must also unload for the device to be released! Whoops!
An example of a hook on the major function table of the TCP/IP driver in Windows can be found in “IRP Hooking and Device Chains,” by Greg Hoglund (http://www.rootkit.com/newsread.php?newsid=846):
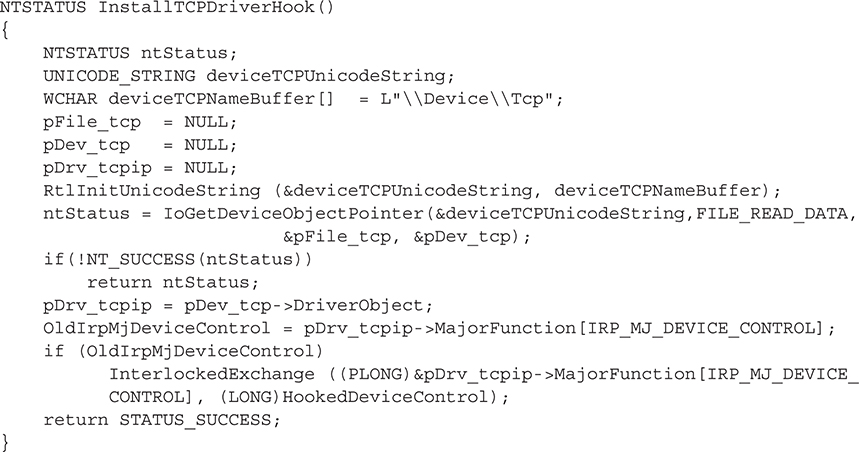
Line 3 reveals the device we’re interested in: the Tcp device—the device exposed by tcpip.sys, the Windows TCP/IP stack. The API call to IoGetDeviceObjectPointer() simply gets us a handle to the Tcp device, which we assign to the variable pDev_tcp. This variable is actually a PDEVICE_OBJECT structure, and the subfield we are interested in is tcpip.sys’s DRIVER_OBJECT data structure. We assign that object to the pDrv_tcpip variable. Now all we need to do is extract the major function code (save it for later use) and reassign it to our rootkit dispatch routine. We use InterlockedExchange() API to synchronize access to the DRIVER_OBJECT object. Note that this sample function hooks the IRP_MJ_DEVICE_CONTROL major function code for tcpip.sys, which handles IOCTLs sent to and from the driver. We could also just as easily hook IRP_MJ_CREATE to watch new TCP sessions being created.
This type of hooking is only as stealthy as the implementation method used by the rootkit author. If the author chooses to use OS routines and processes to register the hooking driver and device, easily detectable traces of the activity will be present in the I/O manager and Object Manager. An advanced technique suggested by Greg Hoglund that would be extremely stealthy is to simply hook the default OS completion routine for major function codes that most drivers do not register at all. For example, a WDM driver that does not implement plug-and-play (PnP) functionality will not specify callback routines for those major function codes (IRP_MJ_PNP). Thus, the default handler in the OS will complete the IRP. Since dozens of drivers will not implement a variety of major functions, a rootkit that hooks this default handler can read a wealth of information passing in and out of the I/O Manager without ever having registered as a driver. In a similar manner, a stealthy IRP hooking rootkit would not use native API functions provided by the OS to register itself in device/driver chains. Instead, the rootkit would simply allocate kernel memory for the necessary DEVICE_OBJECT and DRIVER_OBJECT structures and manually modify the desired chain on its own, adding a pointer to the newly created data structure. Thus, the OS is never notified of the new object in the chain, and any table-walking detectors would miss the hooking rootkit.
I/O Request Packet Hooking Countermeasures
This type of activity is typically caught by personal firewalls and HIDS/HIPS that are already loaded in kernel mode and watching. A driver developed with integrity in mind would implement a callback routine that periodically checks its own function table to make sure all function entries point back to its internal functions. Many of the techniques and free tools in the anti-rootkit technology section of Chapter 10 will detect this type of activity.
Image Modification

Image modification involves editing the binary executables of programs themselves, whether on disk or in memory. While the two representations are similar, a binary on disk greatly differs from its in-memory representation. However, the major sections of an image (text, code, relocatable, and so on) are the same. We will only consider in-memory image modification, as it is the most pertinent to kernel-mode rootkits.
The concept of image modification is common in user-mode rootkits because Import Address Table (IAT) hooking techniques are portable across all PE-formatted executables. Here, however, we’ll focus on two stealthier methods used by kernel-mode rootkits: detours and inline hooks.
Detours/Patches and Inline Hooks
All three of these terms refer to the same basic idea. Microsoft first called it a detour back in 1999 (http://research.microsoft.com/pubs/68568/huntusenixnt99.pdf), so we’ll use that term from here on out. The goal of all three is the same: to overwrite blocks of code in the binary image to redirect program execution flow. Detours and patches typically refer to patching the first few bytes of a function inside the binary (known as the function prologue). Such a patch essentially hooks the entire function. A prologue consists of assembly code that sets up the stack and CPU registers for the function to execute properly. The epilogue does the reverse; it pops the items off the stack and returns. These two constructs are related to calling conventions utilized in the programmer’s code and implemented by the compiler.
An inline patch does the same thing, but instead of overwriting the prologue, it overwrites bytes somewhere else in the function body. This is a much more difficult feat, both to develop and to detect, because of byte alignment issues, disassembling instructions, and maintaining the overall integrity and functionality of the original function (which would need to be restored after patching to remain stealthy).
A detour typically overwrites the prologue with a variation of JMP or CALL instruction, but the exact instruction and parameters depend on the architecture involved and in what memory access mode the processor is running (x86 supports protected mode, real mode, or virtual mode). This is what makes this technique difficult and impacts portability. Instruction sizes also differ from instruction set to instruction set, and CPU manufacturers have various differences when it comes to opcode (shorthand for “operation code”) values for x86 instructions. All of these subtleties make a difference when developing a detour. If the detour is not implemented correctly, the resulting control flow could immediately impact system stability.
A detour targets a function for patching and overwrites the function’s prologue to jump to the detour’s own function. At this point, the detour can perform preprocessing tasks, such as alter parameters that were meant for the original function. The detour’s function then calls what is known as a trampoline function, which calls the original function without detouring it (passing in any modified parameters). The original function then does what it was designed to do and returns to the detoured function, which can perform some post-processing tasks (such as modify the results of the original function, which for file hiding would be to remove certain entries).
Crafting a detour is a very tedious task. The detour must be customized for whatever function will be patched (the target). If the target changes after an operating system patch or an update, the detour will need to be redone.
Thus, the first step in developing a detour is to examine the target function. We’ll quickly look at how Greg Hoglund’s Migbot rootkit patches the SeAccessCheck() function to disable Windows security tokens effectively. To examine the SeAccessCheck function, we can use WinDbg using the unassemble command (u). Migbot relies on the prologue of SeAccessCheck looking like:
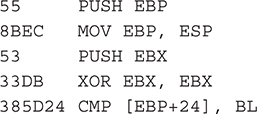
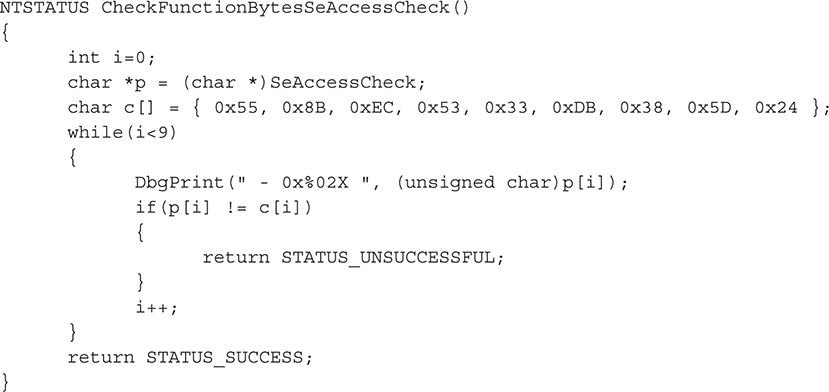
In the output, the digits at the beginning of the line are binary opcodes that encode the instructions that are shown in disassembled form just to the right of the opcodes. Migbot uses the opcodes from this output to create a binary signature of SeAccessCheck. The first thing Migbot does is validate that these opcodes are present in SeAccessCheck. If they aren’t, it doesn’t attempt to patch the function. The function that does this signature check is shown here:
If the function succeeds, then Migbot attempts to patch SeAccessCheck. Now, it has to have some function to call when it does the patch. The function named my_function_detour_seaccesscheck will be the target of the detour patched into SeAccessCheck:

Let’s look at what this function does. It is composed completely of inline assembly and is declared as a naked function (no prologue or stack operations), so as to minimize the overhead of restoring CPU registers, flags, and other stack information. The first block of instructions from push ebp to cmp [ebp+24,bl should look familiar—they are the exact same instructions from SeAccessCheck that are being overwritten. This is essentially the "trampoline" portion of the detour; it sets up the stack for SeAccess-Check. The final block of assembly instructions are emit instructions that force the C compiler to generate a far jump (opcode 0xEA) to the address 0x08:0xAAAAAAAA. This address is just garbage that acts as a placeholder for the real target address to be written in at runtime (because we don’t know what this will be ahead of time). This critical step is performed by the function in Migbot that actually carries out the patching operation, called DetourFunctionSeAccessCheck():
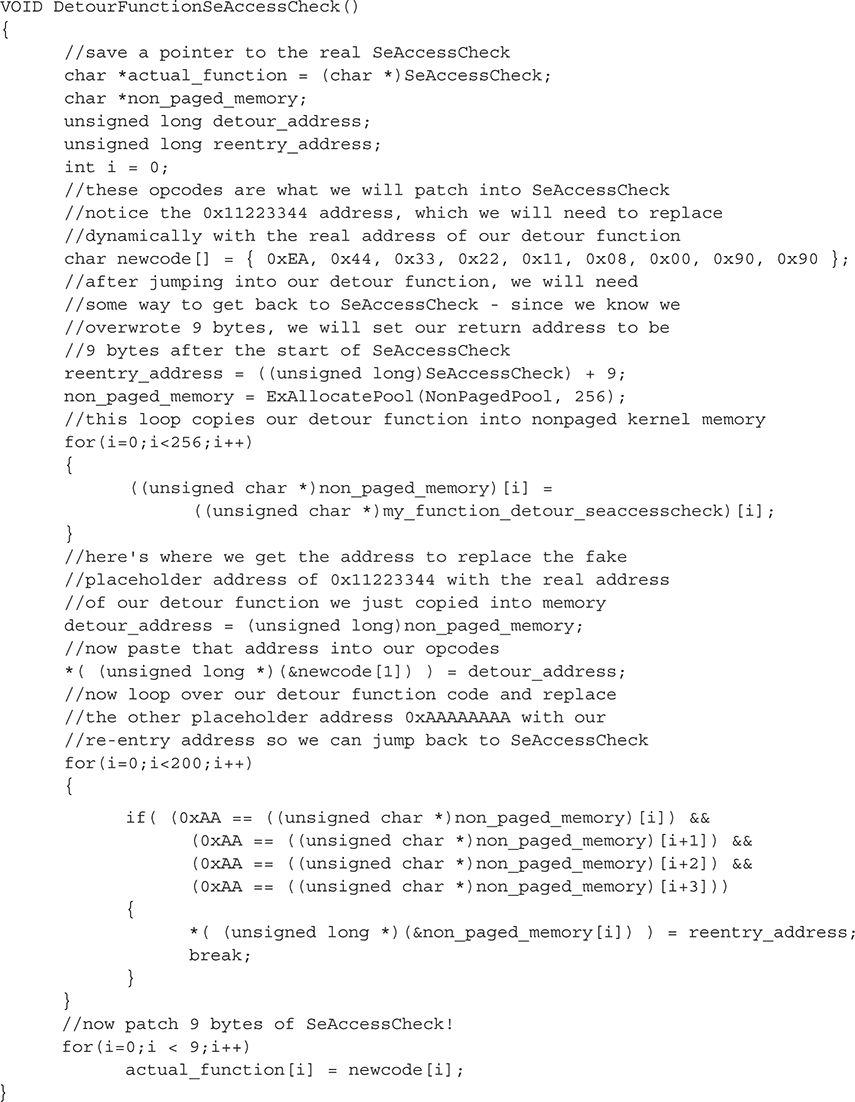
Please see the comments in the code for detailed step-by-step explanations. After executing this function, SeAccessCheck will be patched.
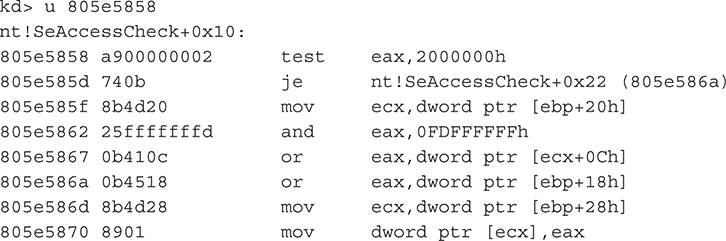
As a final note, it’s worth pointing out that the code for SeAccessCheck has changed since Migbot was released. The first code block, shown in the following WinDbg output, looks much different than the previous one. Thus, the detour in Migbot would not work on this version of SeAccessCheck.
Microsoft Research still maintains the detours program (the free and open-source version is named Detours Express) at http://research.microsoft.com/en-us/projects/detours/. This program can be used as a stable detour/patching library for your own uses.
Detours Countermeasures
Detours can be detected by comparing a known-good version of the binary with what code sections are loaded in memory. Any differences would indicate tampering. Tools such as System Virginity Verifier (SVV) use this method. An obvious limitation is that if the attacker patches both the in-memory image and the image on disk, this method will fail. Hashes of the function can also be used to verify that it has not changed, but this may create false positives because Microsoft patches its functions all the time. Thus, the hash would be constantly changing.
A more common technique to detect detours is to attempt to validate a function’s prologue by disassembling the first few bytes and determining if a CALL or JMP instruction is issued. If such an instruction occurs in the first few bytes, the function is possibly detoured/patched. This method does produce some false positives for functions that are legitimately patched by the operating system. In fact, Microsoft has engineered its code to be hot-patchable by having a 5-byte prologue that can be easily overwritten with a 1-byte JMP/CALL instruction and a 32-bit (4-byte) address. This is useful for Microsoft developers, so when bugs are discovered in a function, a patch can be issued that will overwrite the prologue of the buggy function to jump to a new version of the function (which exists inside the patch binary).
One way to eliminate a large portion of these false positives is to attempt to resolve the target of the JMP/CALL instruction when one is discovered. However, this can be tricky for the reasons just mentioned. For some further enlightening details, please see the appendix.
Filter Drivers and Layered Drivers
As discussed in “Kernel-Mode Driver Architecture,” most Windows drivers are layered (or stacked), meaning several drivers are involved in implementing the features in the underlying hardware. However, drivers do not necessarily have to belong to an existing driver/device stack, nor do they need to service hardware per se. Such drivers are called monolithic drivers and exist independently of other drivers or underlying hardware. An example of a monolithic driver is, ironically, a rootkit. Usually a rootkit doesn’t actually service any hardware. It will typically set up a virtual device that exposes a handle to user-mode applications, such as the rootkit controller application.
Unlike monolithic drivers, filter drivers are a type of layered driver designed to add specific enhancements to devices. This is in contrast to a function or bus driver that implements core capabilities for the hardware. Device filter drivers add enhancements to a specific type of device (such as a keyboard), and class filter drivers enhance an entire family of devices (such as input devices). A contrived example of a device filter driver for a keyboard is a driver that launches a special routine when a certain key sequence is pressed (like CTRL-ALT-DEL). This driver exhibits the qualities of a filter driver because it will insert itself into the keyboard driver chain and add specific enhancements that are not present in the underlying input device.
Because Windows drivers are designed to be layered, the WDM driver specification provides specific API functions for drivers to use to attach to existing driver chains (more correctly referred to as device stacks since each driver in the chain attaches its own device to the existing device stack for whatever device is being serviced). So, if we wanted to load the key sequence filter driver just described to the keyboard device’s device stack, we would do so using those API functions. The general process for attaching to a device stack is as follows:
1. Call IoGetDeviceObjectPointer() to get a pointer to the top device in the stack.
2. Using information from the device object of the next lower driver in the device stack, initialize your own device object with any custom data.
3. Call IoAttachDeviceToDeviceStack(), passing a pointer to your initialized device object and the pointer to the device stack you wish to attach to (as returned from IoGetDeviceObjectPointer()).
After the last step, the driver’s device object is placed at the top of the device stack. If the driver needs to be at the bottom of the stack, it must attach to the device stack before the other drivers. The driver framework does not provide an explicit method to prioritize this ordering. Note that at any time, another keyboard filter driver could load on top of the driver. If that occurs, the driver becomes “glued” in the device chain and has to unload itself properly or the system could crash.
The driver will then begin receiving IRPs to and from the I/O Manager as keyboard operations are carried out (a keystroke is received, a polling event occurs that results in an IRP being issued, and so on). It will have a chance to process the information at the top of the device stack.
Kernel-mode rootkits use this basic operation of device stacks to intercept and modify information that legitimate drivers may need to process (such as file information). The devices most commonly attacked by kernel-mode rootkits utilizing a filter driver include the file system, keyboard, and network stack. Of course, any device in kernel mode is susceptible to a malicious filter driver. Usually the filter driver exists to hide a file, capture keystrokes, or hide active TCP sessions.
Filter Driver Countermeasures
Because layered filter drivers are a fundamental design aspect of Windows, no practical countermeasure exists to prevent a filter driver from attaching to the keyboard, the network stack, the file system, or any other critical system device stack. One countermeasure any driver could conceivably undertake is to query the I/O Manager periodically to see if its next-highest or next-lowest driver has changed since it originally loaded. Any change would be worth investigating; however, false positives may potentially occur because any legitimate filter driver could attach at any time. A filter driver attaching to the device stack isn’t necessarily a cause for alarm, but it could be one of several indicators that suggest a malicious driver is at work.
A rudimentary technique to detect unauthorized drivers in a device stack is to enumerate the list of loaded drivers (using ZwQuerySystemInformation as previously illustrated) and then eliminate “known good” drivers by one or more of the following methods:
• By name Simply check the name of the driver to make sure it is a known Windows driver.
• By hash A unique hash could be computed for well-known system drivers.
• By signature Windows 64-bit operating systems require all drivers to be signed using Microsoft’s Authenticode technology before they are allowed to load into kernel space; a vendor must have a certificate issued from Microsoft that the vendor uses to sign the driver. When the driver attempts to load, the Authenticode service validates the signature cryptographically; thus, this technology could be used to verify that all loaded drivers are Authenticode-signed or at least discount any signed drivers as valid.
Of course, a manual inspection is always an option. Several open-source/free tools are available that will list the devices installed on the system (virtual and physical) and what drivers are attached to them. One such tool is OSR’s DeviceTree (http://www.osronline.com/article.cfm?article=97).
Direct Kernel Object Manipulation (DKOM)

The concept of DKOM was first publicized by Jamie Butler in Rootkits: Subverting the Windows Kernel (Addison-Wesley, 2005), which he co-authored with Greg Hoglund. DKOM has been described as a third-generation rootkit, as it was a major departure from traditional API hooking or image modification. Many of the techniques discussed thus far have involved hooking, or redirecting, the execution flow of a normal system operation (such as how the system processes file I/O) by abusing mechanisms in place to achieve the operation. DKOM is capable of achieving the same effects of hooking, detouring, and many of the techniques previously discussed, but without having to figure out where the rootkit needs to insert itself in the execution flow.
Rather, DKOM directly modifies kernel objects in memory that are used by the kernel and the Executive during this execution flow. Kernel objects are data structures stored in memory, some of which we’ve already discussed, such as the SSDT. The Windows kernel must use memory to operate, just like any other application. When it stores these structures in memory, they are vulnerable to being read and modified by any other kernel-mode driver (because there is no concept of private memory in kernel land).
The beauty of DKOM, though, is that prior to Windows 2003 Service Pack 1, DKOM could be achieved entirely from user mode! Since Windows exposes a section object called \Device\PhysicalMemory, which maps to all of the addressable memory in the system, any user-mode program could open a handle to this object and begin altering kernel structures. This major bug was fixed in Windows XP Service Pack 2.
So what can DKOM accomplish? Some of the major feats include process hiding, driver hiding, and elevating a process’s privileges. Rather than hooking the API functions, DKOM will alter the data structures that represent processes, drivers, and privileges.
The most common example of DKOM is the FU rootkit. It is capable of hiding processes, drivers, and elevating privileges. It hides processes by altering a data structure in kernel memory that keeps track of what processes are actively running. This data structure is reported by several major system APIs, such as ZwQuerySystemInformation(), to programs like Task Manager. By modifying the data structure these APIs read, you are effectively filtering the information without ever installing an execution flow hook.
Once an object has been studied and identified for modification, the next hardest part of DKOM is to find the object in memory that you wish to modify. To hide a process, the structure you need to modify is the EPROCESS structure. The most common way to find this is to call PsGetCurrentProcess() to get a pointer to the currently executing process’s EPROCESS structure and then walk a linked-list structure stored in the LIST_ENTRY field. The LIST_ENTRY field contains two pointers, one to the process in front (the FLINK field) and one to the process behind (the BLINK field). You simply traverse forward (or backward), scanning for the name of the process you wish to hide.
Now that the current EPROCESS structure is the process you wish to hide (let’s say you’ve iterated to it and stopped), you can hide it by changing one field in each of the surrounding process’s EPROCESS structures. Specifically, you must change the FLINK of the process behind you to your FLINK, and the BLINK of the process in front of you to your BLINK. Now the current process (the one you wish to hide) is essentially unlinked from the active process chain, and the chain is kept valid by adjusting pointers of the surrounding two processes to point to each other. The FU rootkit achieves this swap in two lines of the driver source code:

By simply modifying this kernel object, you can achieve the same effect as hooking every individual API function that relies on this object. DKOM is clearly a powerful tool for rootkit authors, as the modification is stealthy and, at the same time, impacts multiple operating system operations.
DKOM Countermeasures
Luckily for computer defenders, DKOM is not very reliable because it takes an enormous amount of foresight and knowledge of operating system internals to implement correctly and in a portable manner, allowing extensibility or compatibility with multiple platforms/architectures. The rootkit author must understand all of the nuances of how the kernel uses the object (from initialization to cleanup) and what side effects would be created by altering the object. This means the rootkit author must spend considerable time reverse engineering the object, which may be completely undocumented. Furthermore, the object is highly likely to change in future releases or patches of the operating system, so DKOM is never guaranteed to stand the test of time.
DKOM is easily detected due to the fact that it can’t reliably alter every kernel object in memory that may represent the same information. For example, multiple components of the Executive keep a list of executing processes, so unless the rootkit alters every object in memory, the rootkit will be discovered by rootkit detection tools that use the cross-view approach, looking for discrepancies in list comparisons.
Network Driver Interface Specification (NDIS) and Transport Driver Interface (TDI) Rootkits

At the very lowest level of the network architecture in Windows are physical network devices such as modems and network cards. Access to lower-level protocols and the hardware components themselves are provided to drivers in the operating system by the Network Driver Interface Specification (NDIS) API. It operates at the upper portion of the data link layer, just below the network layer, and abstracts the technical details of lower-level protocols like Ethernet, Fiber Distributed Data Interface (FDDI), and Asynchronous Transfer Mode (ATM). Just above NDIS is another important interface called Transport Driver Interface (TDI), which further abstracts NDIS details to higher-level or intermediate network drivers. Essentially, NDIS allows a driver to process raw packets (much like raw bytes from a physical hard disk), whereas TDI implements the TCP/IP stack in Windows and allows drivers to operate at the transport layer of the OSI model.
Rootkits can choose to use either interface, but obviously, the lower, the better. Thus, a truly advanced rootkit will use NDIS to operate at layer 2 and below in the OSI model (i.e., raw packets), whereas easily detectable rootkits will hook somewhere in the existing TCP/IP stack using TDI. Even at the TDI level, significant legwork needs to be done to implement socket connectivity and other high-level language concepts most programmers are used to (such as addressing). Fortunately for rootkit authors, the source code for an entire TDI socket library is available online and can be searched easily on the Internet. Most of this legwork involves manually defining structures like local and remote addresses, TCP ports and so on, and then utilizing creation routines already implemented by the Windows built-in TDI-compliant driver.
NDIS rootkits are powerful in that they do not rely on Windows built-in networking functionality (except at the Network Interface Card [NIC] level), so any personal firewall or networking monitoring tool stands no chance of detecting it or any network traffic it generates. This is the case for the uAy rootkit. Other popular NDIS rootkits include eEye’s bootroot and Hoglund’s NT Rootkit.
NDIS Countermeasures
An NDIS rootkit is a formidable opponent, and only firewalls that also run at the raw packet level will catch these beasts. TDI rootkits will be caught by most personal firewalls that also operate at the TDI layer, unless the rootkit implements interference of some sort. Free tools like Sysinternals Suite can be used to detect suspicious rootkit activities of this nature manually. The effectiveness of this approach, however, relies heavily on how knowledgeable the analyst is when it comes to using these tools.
Additionally, these types of rootkits are creating network traffic that can be detected by perimeter devices and intrusion detection systems. Thus, a holistic security policy that includes network security measures (such as Network Intrusion Detection Systems [NIDS] installed in key perimeter locations) as well as host protection systems is the best answer for defeating NDIS rootkits.
Kernel-Mode Rootkit Samples
We’ll now cover a few real-world examples that implement some of the techniques just discussed. An excellent resource for kernel-mode malware examples is available from http://www.f-secure.com/weblog/archives/kasslin_AVAR2006_KernelMalware_paper.pdf.
As we go through these examples, keep in mind that the individual versions of these rootkits may be different than what is seen in variants in the wild. Oftentimes rootkit code is sold, redistributed, revised, and recompiled so as to add or remove features and make a proof-of-concept rootkit into a stable product. Thus, many of the techniques, bugs, and/or features witnessed in our exercises may differ from individual readers’ experiences.
Klog by Clandestiny
Technique: Filter/Layered Drivers
Klog installs a keyboard filter driver to intercept keyboard IRPs as keys are pressed. Whenever a key is pressed, a scan code is sent from the keyboard to the operating system port driver, i8042prt.sys, and then to the class driver, kbdclass.sys. A rootkit could install a port filter driver just above i8042prt.sys or a higher-level filter driver above kbdclass.sys. Klog chooses to use the latter.
Now we must elaborate on the life of a typical IRP in this device stack. You may be asking, How does the operating system know when a key is pressed? The process begins with the I/O Manager sending an empty IRP to the lowest-level driver, where it is queued until a key is pressed. When this happens, that driver fills the IRP with all the necessary parameters to inform the drivers in the keyboard device stack of the operation—including the IRP major function code and the scan code data.
Recall from the discussion in “Kernel-Mode Driver Architecture” that the purpose of an IRP is defined inside the major function field of the data structure. These functions include create, cleanup, read, and write. Thus, other IRPs are sent during the entire process. Because you are logging keystrokes, however, all you’re interested in is “read” IRPs because these correspond to a scan code being read (from which you can derive a keypress). All other IRPs must be simply passed on to the next driver in the device chain.
When the empty IRPs are being passed down the device stack, you “label” the ones you care about by defining which type of IRP you want a specific routine to handle when the IRP is being sent back up the device chain (after a key is pressed). This function is called a completion routine. Because you only care about “read” IRPs, you’ll provide the address of the function you want to be called when the IRP has been populated and sent back up the device chain.
Now that we’ve covered how Klog positions itself in the operating system to intercept keystrokes, let’s see it in action. First it’s worth noting that Klog is a proof-of-concept rootkit that does not attempt to load or hide itself. For this reason, many other rootkits in the wild have simply used the freely available Klog source code as a basis for a more advanced rootkit.
To load the Klog rootkit driver, klog.sys, we’ll use a small graphical utility called InstDrv. This free utility loads/unloads drivers by starting or stopping a temporary service created by the Service Control Manager (SCM). Figure 4-3 demonstrates using this utility to create a service for the Klog driver and loading it into kernel mode using the SCM.
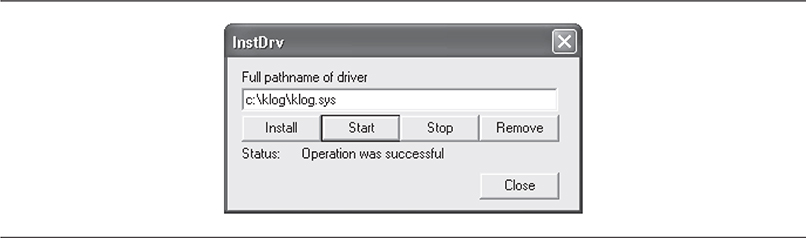
Figure 4-3 Loading the Klog rootkit driver using InstDrv
Klog writes a log file containing the captured keystrokes to C:\Klog.txt. Figure 4-4 shows this log file growing to 1KB after a few words are typed into the Notepad application.
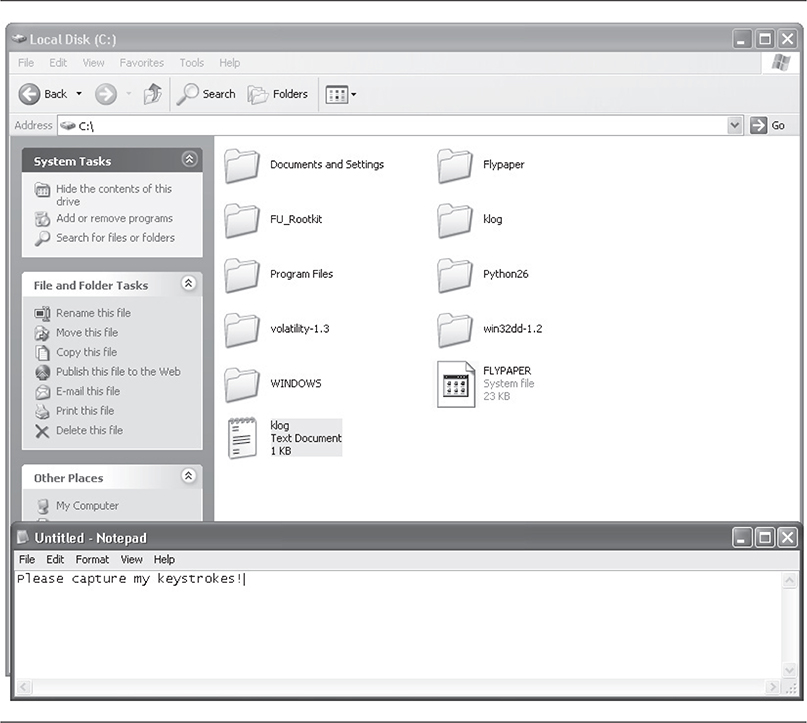
Figure 4-4 Klog log file size grows as keystrokes are captured.
If you want to see the contents of the log file, you have to first stop the Klog service using InstDrv. Otherwise, Windows will alert you that the file is currently in use by another process. This process is actually a kernel-mode system worker thread that Klog initialized to handle the actual logging. By stopping the service and unloading the klog.sys driver, the driver’s Unload() routine gets called, which, as you can see in the source code, terminates this worker thread.
An interesting problem arises when you try to unload the driver using InstDrv. When you click the Stop button in InstDrv, the utility asks the SCM to stop the Klog service and unload the driver. There is a problem, though, and it’s directly related to the “life of an IRP” discussion earlier in this section.
Recall that an empty IRP is created to wait for keypresses and that IRP was labeled so the I/O Manager would send the IRP when it’s been filled with a scan code. This means the IRP is in a pending status until the user has pressed a key. A critical rule in the kernel driver world is a driver cannot be unloaded if it is registered to process IRPs that are still pending. If the driver unloads anyway, the system will blue screen. This is a safety mechanism implemented by the OS because the pointer to the read completion routine that is contained in the pending IRP has now become invalid. When a key is pressed and the IRP is sent up the device stack, it will encounter the address to the function, which is invalid, causing an access violation. Thus, the chain is broken.
So what happens when you click the Stop button in InstDrv? Luckily, the SCM will realize the situation and mark the service as pending unload while it waits for the IRP to complete. You will notice the system becomes sluggish; however, as soon as a key is pressed, the system returns to normal and the driver is unloaded. This is because the IRP went from pending to active, our function processed the resulting IRP, and then the SCM terminated the Klog service and unloaded the driver.
This peculiarity is something to keep in mind when considering the side effects that kernel-mode rootkits can exhibit: frequent and unexplained blue screens may indicate a faulty rootkit.
Using OSR’s DeviceTree utility, you can see that the rootkit device is hooked into the device chain for kbdclass.sys, the operating system’s keyboard class driver. In Figure 4-5, Klog’s device that is attached to the keyboard device stack for KeyboardClass0 is highlighted. KeyboardClass0 is the name of the device exposed by kbdclass.sys, and this device is what all higher-level keyboard drivers will attach their own device object to (Klog’s device object is named \Driver\klog).
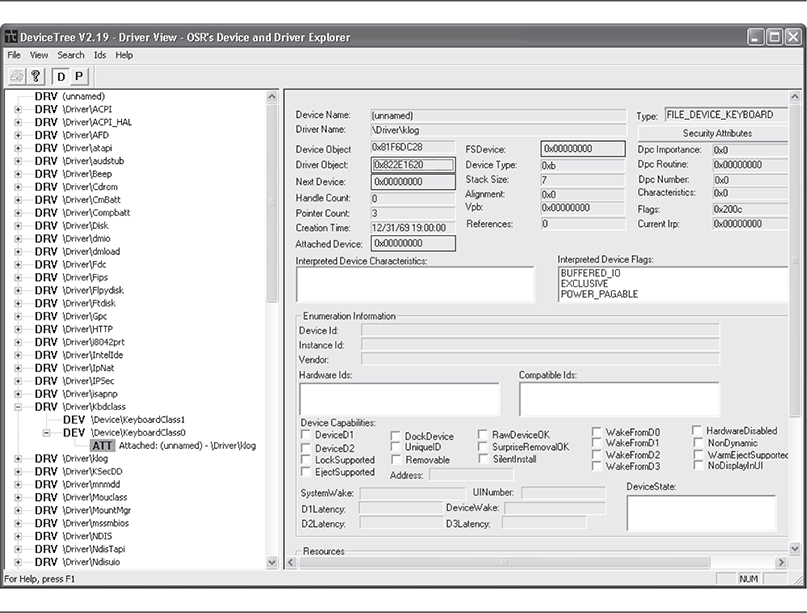
Figure 4-5 DeviceTree shows the rootkit attached to the keyboard class driver.
Again, this rootkit makes no attempt to hide itself. A stealthy rootkit would either attach in a different manner (such as hooking a keyboard driver’s IRP-handling function) or hide the artifacts that allow you to detect its actions. These artifacts include registry entries, driver-specific structures in memory (such as DRIVER_OBJECT and DEVICE_OBJECT), and the named device object \Driver\klog.
AFX by Aphex
Technique: Patches/Detours
The AFX rootkit is a kernel-mode rootkit written in 2005 in Delphi, capable of hiding the following items by patching Windows API functions: processes, handles, modules, files/folders, registry entries, active network connections, and system services.
AFX comes with a loader program called root.exe that extracts an internal resource to a file named hook.dll. This is a helper library that AFX uses to hide all instances of the install folder and load the rootkit driver. The root.exe tool also extracts the driver to a .tmp file in a temporary directory and loads it using Win32 API calls to the Service Control Manager. Root.exe takes two command line parameters: /i to install the rootkit using the SCM and /u to uninstall the service.
AFX is able to hide these items using code injection through CreateRemoteThread() and WriteProcessMemory() API calls and then patching the desired DLLs inside the injected process’s address space. The patches are made by searching inside the process’s copy of Win32 DLLs (kernel32.dll, user32.dll, advapi32.dll, and so on) for certain functions and overwriting those bytes. It saves the old function to a section of memory in its process’s private address space using VirtualProtect() API, so the functions can be unhooked later.
AFX targets the system processes in user mode that display files (explorer.exe). By injecting the patching code into explorer.exe, the files are hidden from any Explorer- or Internet Explorer–based application (including the command line). Figure 4-6 shows the AFX install command and its result: drive C:\ (root drive) becomes hidden from Explorer.
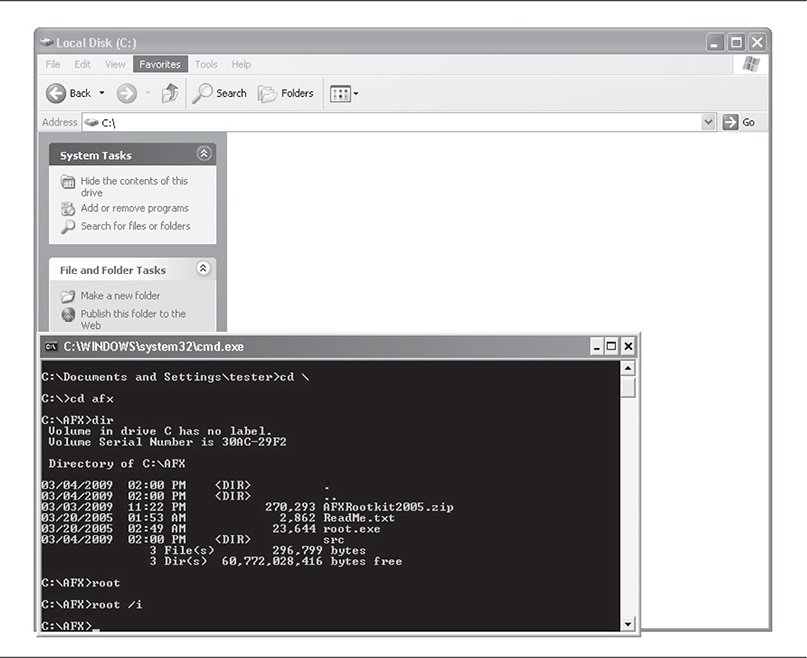
Figure 4-6 AFX immediately hides the install directory.
AFX’s driver then proceeds to patch numerous Windows API functions. The easiest way to show all the patches is to run Joanna Rutkowska’s System Virginity Verifier (SVV), which compares the on-disk and in-memory function exports of various system binaries (such as Native API DLLs, which AFX patches). The code here is an abbreviated version of the output from SVV:
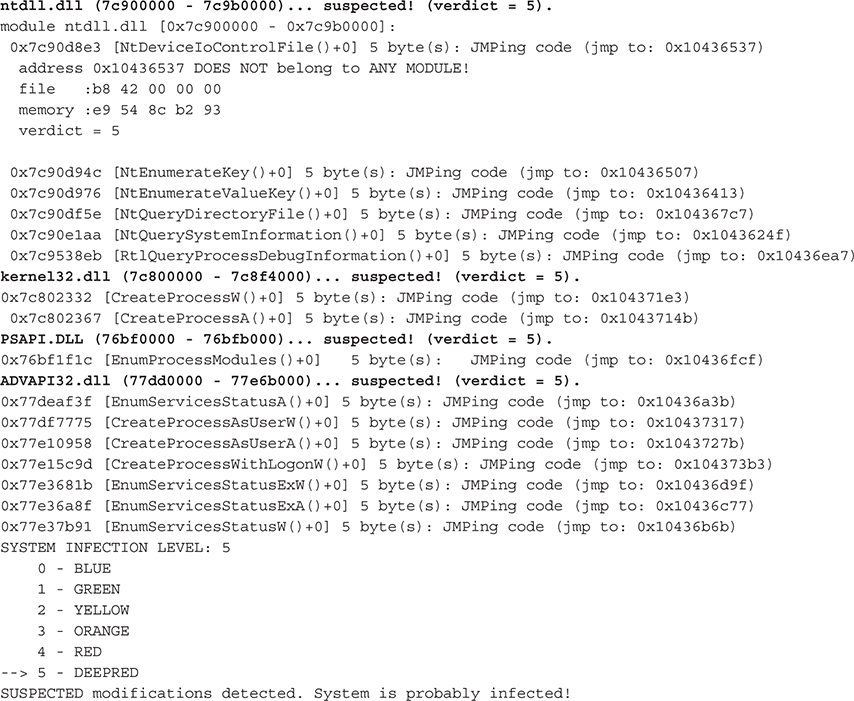
So AFX patched the following system binaries: ntdll.dll, kernel32.dll, PSAPI.DLL, and ADVAPI32.dll. Notice the bytes that AFX overwrote these functions with (a 5-byte JMP+address) are similar in all cases and point to an address roughly in the range 0x10436000–0x10437000. This address range points to the rootkit’s hooking code.
Also notice that SVV indicated that the addresses being pointed to by the overwritten bytes did not belong to any module. This is because AFX hid its process! You can find the hidden process using cross-view techniques, as evidenced in the Helios screenshot in Figure 4-7.
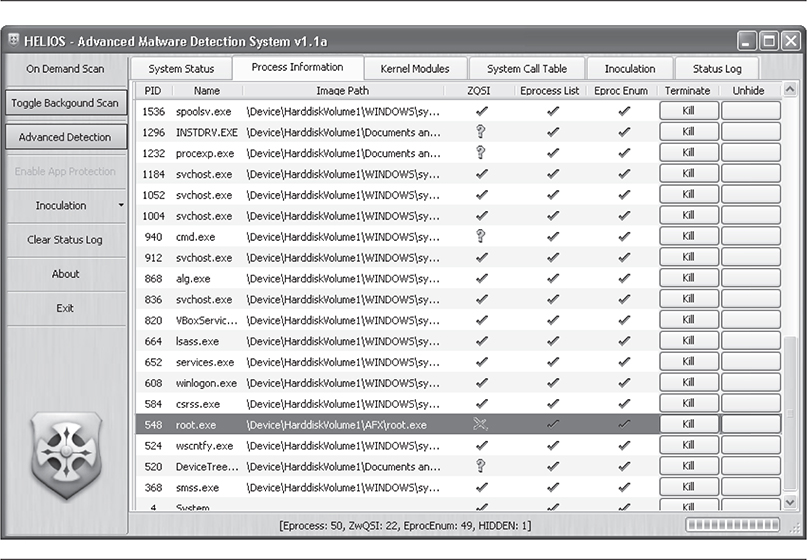
Figure 4-7 Helios detects AFX hidden process.
As a side note, the AFX rootkit is a resource hog because it was compiled by Delphi, which is not optimized for use on Windows systems. The system becomes notably sluggish after AFX is installed.
FU and FUTo by Jamie Butler, Peter Silberman, and C.H.A.O.S
Technique: DKOM
The FU rootkit was named after the Unix/Linux command su, which allows a user to elevate privileges to root-level access if his or her account is enabled to do so. In a completely different fashion, the FU rootkit allows user-mode processes to escalate their privileges to administrator access, as well as hide files, drivers, and processes.
Since we covered the FU technique in detail already, let’s take a look at the additions provided by the FuTo rootkit, coded by Peter Silberman and C.H.A.O.S. It is based on the code base of FU, but rather than alter process list structures, FuTo modifies a table structure called PspCidTable to hide processes. This nonexported structure keeps a housekeeping list of all active processes and threads and is used by the Win32 API function OpenProcess(). The OpenProcess() function is used by many applications to send a handle to an active process, including the popular rootkit detection utility Blacklight. Thus, the authors of FuTo saw an easy way to fool Blacklight: to hide a process from Blacklight, simply remove the process from the PspCidTable. Here is the source code to do this:
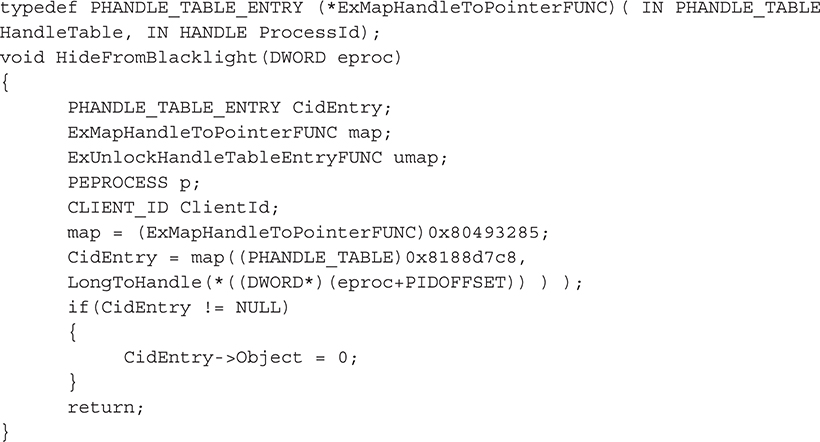
The authors admit to a nasty hack to solve a critical problem caused by altering PspCidTable. When the alteration is made, FuTo sets the process’s entry to null. This means that whenever the process is closed, the system blue screens because a null pointer has been dereferenced in kernel mode. To solve the problem, the FuTo rootkit also installs a notify routine, so whenever a process is closed, the rootkit is notified first. This allows the rootkit to reinsert the hidden process momentarily into the active process table (PspCidTable) so the system doesn’t crash. Then the process can exit normally. FU did not have this problem, because the target structure was a linked list, allowing it to “relink” the surrounding processes to be hidden.
Shadow Walker by Sherri Sparks and Jamie Butler
Technique: IDT Hooking
Shadow Walker is a rootkit that hides its presence by creating “fake views” of system memory. The hypothesis behind this technique is that if a rootkit can fool a detection tool by making it think it is accurately reading memory, neither the program execution flow (i.e., hook, patch, or detour) nor the data structures in memory (DKOM) need to be altered. Essentially, all the other programs on the system will receive an inaccurate mapping of memory, and only the rootkit will know what truly exists. The authors refer to this technique as memory cloaking and the “fourth generation of rootkit technology” (http://www.phrack.org/issues.html?issue=63&id=8#article). Typically the goal of memory cloaking is to hide the rootkit’s own code or some other module. We’ll refer to this code as the cloaked code.
This rootkit is heavily based on an existing Linux stack overflow protection product called PaX (https://pax.grssecurity.net/) and research published by Joanna Rutkowska.
This type of deception is achieved by distinguishing execution requests (which would most likely be initiated by the rootkit itself needing to run its own code) for the cloaked code from read/write requests for the cloaked code (which could be initiated by a rootkit detector). Thus, the goal of Shadow Walker is to “fake” rootkit detectors that are scanning through memory looking for rootkit code, while still allowing the rootkit itself to execute.
As with many of the more advanced rootkit techniques, this technique is based on an architectural oddity of the underlying processor. In this case, Shadow Walker is able to distinguish between memory read/write operations and execution operations by leveraging a synchronization issue with the way the Pentium processor caches page mappings. A page mapping is how the processor maps a virtual address to a physical address.
x86 assembly instructions are made up of instructions (such as INT for issuing an interrupt) and data (the operands accompanying the instruction). To save trips to memory, the processor stores recently used instructions and data in two parallel cache structures (a special type of storage location that’s faster than system RAM) called translation lookaside buffers (i.e., Instruction Translation Lookaside Buffer [ITLB] and Data Translation Lookaside Buffer [DTLB]). This organization of parallel instruction and data caches is called Split TLB.
Whenever the CPU has to execute an instruction data pair, it has to perform significant processing overhead to consult the page table directory for the virtual address and then calculate the physical address in RAM for the given data. This takes time that could be saved if it only had to look in the ITLB for recently used instructions and the DTLB for recently used data (operands). The processor has slight overhead to make sure both caches are synchronized and hold the same mappings of virtual to physical memory.
So how does Shadow Walker use this split TLB architecture to differentiate memory access requests? In short, it forces the instruction cache to be flushed but leaves the data cache alone, so the caches are desynchronized and hold different values for the same virtual-to-physical mapping for a given page. In this manner, rootkit detectors that are trying to read the cloaked memory page actually get garbage back (or maybe some data that says “no rootkit here!”) because they are reading the data TLB, while the rootkit itself, which is trying to execute the code at the protected memory page, is allowed to do so because it’s reading the instruction TLB.
The logic for what to place in the respective TLBs to achieve these “different views of the same physical page” is inside a custom fault handler. To initiate the fault handler and thus control access to the protected memory pages (i.e., the rootkit code), Shadow Walker flushes the instruction TLB entry of the memory page it wishes to filter access rights to (i.e., hide). This effectively forces any requests to go through the custom page fault.
Shadow Walker is implemented in two kernel drivers: mmhook.sys that does the split TLB trick and a slightly modified msdirectx.sys driver that holds the core of the FU rootkit. The mmhook driver hooks the Interrupt Dispatch Table (IDT) inside NTOSKRNL.EXE. This installs the custom exception handler (at IDT entry 0x0E) that is crucial to making the technique work. No user-mode controller program is used, so you have to use InstDrv or some other loader program to get the drivers into kernel land (first load msdirectx.sys and then load mmhook.sys). Once they are loaded, the drivers take care of the rest by installing the exception handler in the IDT, so the rootkit is automatically kicked off when a page fault occurs.
You can see the technique working by trying to access the memory address of the msdirectx.sys driver. You should expect to get garbage back—this means the mmhook driver is tainting the view. In order to test this, you need to find the base address of misdirectx.sys using a tool such as DeviceTree. In the screenshot of DeviceTree shown in Figure 4-8, you might notice something very odd about the msdirectx driver: no major function codes or entry points are supported, nor does it have a device attached to it (every other driver does)! Hmm, or does it? Something is definitely up.
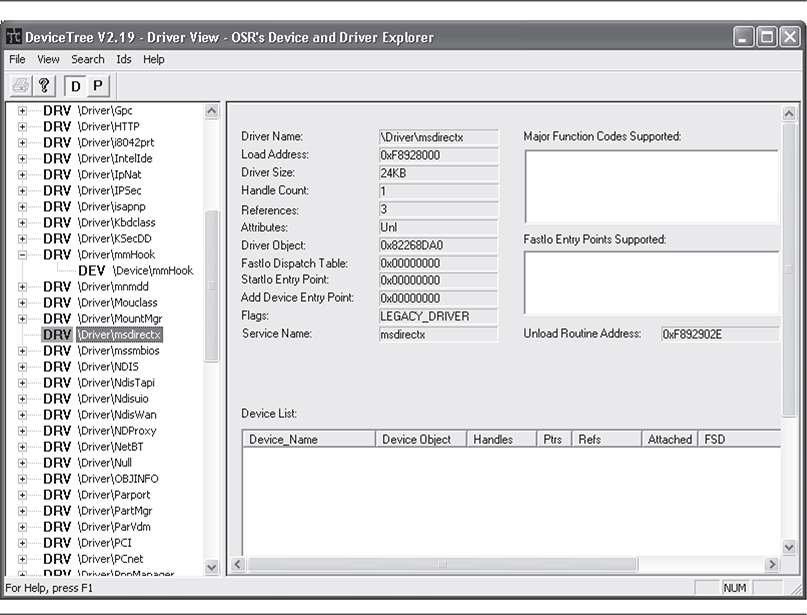
Figure 4-8 DeviceTree shows us something is amiss with msdirectx.
Using WinHex (or a similar tool that can read arbitrary physical memory, such as Sysinternals PhysMem), you can verify the memory pages for the FU rootkit are being hidden by the mmhook driver by doing an in-memory byte-pattern search for an arbitrary sequence of bytes from the binary file msdirectx.sys. You would attempt this before and after loading the drivers. Before loading mmhook, you should be able to find the signature (and hence the rootkit code) in physical memory; however, after loading the driver, you should not find the code.
Shadow Walker is another example of a proof-of-concept rootkit that demonstrates a technique and does not attempt to hide itself. It also doesn’t support major architecture features such as multiprocessors, PAE, or varying page sizes. Perhaps the most limiting aspect of this rootkit is the restrictive requirements that are imposed on drivers that wish to use this technique to hide themselves. A readme file accompanies the rootkit that explains a “protocol” such drivers must follow, such as manually raising/lowering Interrupt Request Levels (IRQL) for hiding, flushing the TLBs, and other legwork. However, this rootkit is a very good example of the kind of low-level advanced rootkit that makes use of very low-level hardware devices.
He4Hook by He4 Team
Technique: IRP Hooking
Even though the He4Hook project was abandoned by its authors in 2002, there are many versions of He4Hook available in the wild, each with varying levels of capabilities. Under the hood, all versions either use SSDT modification or IRP hooking to hide files, drivers, and registry entries. Most versions utilize IRP hooking on the file-system drivers for Windows, ntfs.sys, and fastfat.sys. It overwrites the entries in the major function table of all drivers and devices attached to the file-system drivers for the following functions:
• IRP_MJ_CREATE
• IRP_MJ_CREATE_NAMED_PIPE
• IRP_MJ_CREATE_MAILSLOT
• IRP_MJ_DIRECTORY_CONTROL
He4Hook replaces the pointers to the real OS functions with pointers to the rootkit’s functions. It also replaces the driver’s unload routine. The rootkit achieves this by directly modifying the DRIVER_OBJECT structures in memory and replacing the pointers as necessary.
After the He4Hook rootkit driver is loaded, it queues a system thread to scan the directory objects, \\Drivers and \\FileSystem, using the Windows API function ZwOpenDirectoryObject(). For each driver file it can read from these lists (using an undocumented Windows API function, ZwQueryDirectoryObject(), it gets a pointer to the driver’s DRIVER_OBJECT using an undocumented exported Windows kernel function, ObReferenceObjectByName(). After it retrieves this pointer, the rootkit inspects the device chain for that driver, looping through each device and ensuring its DEVICE_OBJECT is an appropriate type of device to hook (i.e., file-system-related devices). The code from DriverObjectHook.c is shown here:
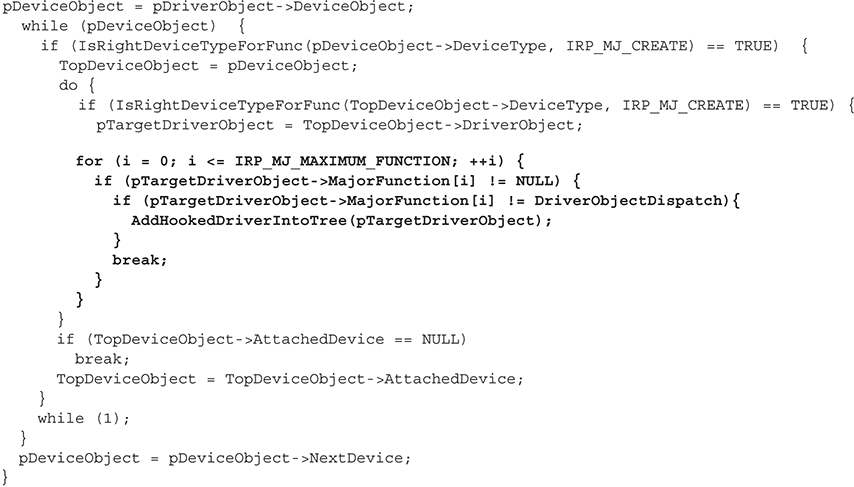
The most important part of this code is highlighted in bold. This FOR loop iterates through all possible IRP major function codes for the given driver and device, and if there is a corresponding dispatch function in the driver, the rootkit replaces that function pointer with its own dispatch routine, DriverObjectDispatch(). This is the definition of IRP hooking. Note how the rootkit also makes sure the functions aren’t already hooked.
Thus, the rootkit has succeeded in redirecting IRPs destined for the dispatch functions of these various drivers to its own dispatch function. Great, now it’s going to get literally hundreds of IRPs per microsecond for all sorts of devices, from network named pipes to symbolic links. To find the melody from the noise, the rootkit filters these IRPs inside its dispatch function.
So let’s take a closer look at the dispatch function’s source code to explore how He4Hook utilizes IRP hooking to hide files by hooking IRP_MJ_DIRECTORY_CONTROL. Keep in mind that this function is used by the rootkit as an IRP dispatch function, so every time a file read request, for example, is issued, this function will get a chance to inspect the resulting IRP. The rootkit has already hooked the necessary IRPs; the dispatch function is where it does something with those IRPs (like hide a file!).
The first 70 lines of the function set up data structures and ensure the IRP is the one that it wants to filter. It does this by validating that the IRP’s major function code matches one of the four codes that it cares about and that its device type is appropriate (CD-ROM, disk, and so on):

If all of these conditions match, the rootkit then copies some data from the IRP that it cares about (such as the filename being requested for creating, reading, deleting, and so on) and calls two functions: TreatmentIrpThread() and TreatmentQueryDirectoryIRP (or TreatmentCreateObjectIRP() for all other major functions). These two functions handle modifying the IRP before the rootkit passes it on to the next driver in the driver stack. To hide a file, the dispatch routine simply removes the directory information from the resulting IRP, so when other drivers receive the IRP, the information is missing. Thus, whenever a program calls into NtQueryDirectoryFile(), or any other API that relies on a file-system driver, whichever files were configured to be hidden will not be returned by these functions.
The technique used by He4Hook relies on some still undocumented functions that may not exist in recent versions of Windows. Since these functions are undocumented, they are not guaranteed to exist between patches and major releases. Furthermore, most versions of He4Hook that implement kernel-function hooking in addition to IRP hooking can be trivially detected by tools that scan the SSDT.
He4Hook is a fairly sophisticated rootkit that pays attention to detail. This makes it a very stealthy rootkit. Its meticulous nature is evident in the use of undocumented functions (in an impressively small, 38KB header file called NtoskrnlUndoc.h) and crafty pointer reassignments throughout the source code. It also makes extensive use of preprocessor directives to exclude certain code sections from compilation. That way, if the rootkit user doesn’t want that functionality, it won’t appear in the resulting driver, minimizing the suspicious code inside the resulting driver.
Perhaps the stealthiest aspect of He4Hook is how it loads the driver initially. All Windows drivers must implement a function called DriverEntry() that represents the entry point when the driver is loaded. All well-behaved drivers initialize required housekeeping structures and fill in the driver’s major function table. However, He4Hook calls a function InstallDriver() inside its DriverEntry() routine. This function extracts the driver binary at a predefined offset from its image base address in memory. It allocates some non-paged kernel pool memory and copies the driver into that buffer. It then calls a custom function to get the address of an unexported internal function, which it then calls as the “real” DriverEntry() routine.
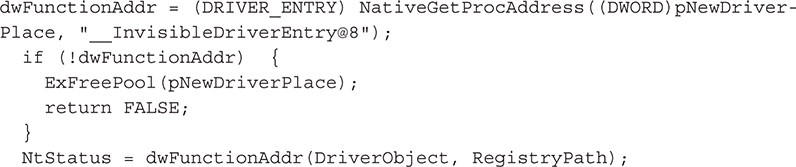
The unexported function __InvisibleDriverEntry is the actual DriverEntry() routine that is immediately called inside InstallDriver() once it is assigned to the pointer variable dwFunctionAddr. This technique provides two primary benefits: (1) The driver is not loaded using the Service Control Manager (SCM), thus no disk or registry footprints exist; and (2) the function redirection helps disguise its real functionality, rather than advertising it inside well-known driver routines such as DriverEntry().
Sebek by The Honeynet Project
Technique: IRP Hooking, SSDT Hooking, Filter/Layered Drivers, and DKOM
It is important to mention that not all kernel-mode rootkits are written for “evil” or malicious purposes. Sebek, written by Michael A. Davis, an author of this book, for the Honeynet Project, is a kernel-mode rootkit that uses the same techniques as malicious rootkits to help analyze, detect, and capture information about attackers who break into honeypots. Sebek uses a variety of methods to avoid detection by attackers and to ensure that it can send the information it captures to the remote sebek server in a stealthy, covert manner.
Because the goal of the Honeynet Project is “to learn the tools, tactics and motives involved in computer and network attacks, and share the lessons learned,” sebek was written to monitor and capture the keystrokes and functions that an attacker executes on a Windows system once he or she breaks into it. Monitoring all of the required portions of Windows to obtain this information posed an interesting problem. The keystroke loggers that already existed in the mainstream worked by hooking the keyboard and used methods talked about earlier in the chapter. These methods are easily detectable though. Stealth from the attackers was very important, as we didn’t want our subjects under test (the attackers) to modify their behavior because they knew they were being watched. Therefore, we decided to use the same techniques as other kernel rootkits (specifically SSDT hooking and filter drivers) to implement a set of functions in the kernel to capture access to registry keys, files, and all commands and keystrokes sent to console-based applications.
When sebek was first released, no one really took notice, but since the source code for the tool was freely available, others have begun leveraging the code in their own projects. The recent releases of sebek for Windows add new functionality, including monitoring and hooking of all incoming and outgoing TCP/IP connections and additional GUI hooking. The information that sebek collects has been invaluable in analyzing attackers who break into Windows-based honeypots. Sadly, because of a lack of interest by the community and the author’s lack of time availability, sebek for Windows has not been updated for several years.
Sebek is not the only “friendly” rootkit out there. Many of the keystroke loggers, dataloggers, and even anti-malware and antivirus software utilize kernel-mode rootkit methods to remain stealthy and detect malware. The same tools and techniques are being used by the good guys, which is a great example of how intent is what distinguishes a tool, driver, or software as malware. This is a problem that every major security vendor is facing, and we’ll discuss it even more in Chapter 7, when we talk about the antivirus industry and its response to rootkits and malware.
Summary
Kernel-mode rootkit technology is fundamentally based on the complex instruction-set architecture design and kernel-mode architecture on which the Windows OS is based. Simply understanding and accounting for the wealth of nuances of these technologies poses an insurmountable task to the anti-rootkit protagonist. There will always be a backdoor in kernel mode, simply due to the enormous complexities involved in the Windows OS’s design and implementation.
Kernel-mode rootkits represent the most advanced and persistent cyberthreat in the wild today. They continue to be a formidable enemy to basic system hygiene and remain ahead of commercial antivirus and HIPS products.
Small samples of kernel-mode rootkits were illustrated at the end of this chapter to drive home the techniques discussed in the first part of the book. We want to stress to the reader that this is a very small sampling and only includes what is publically known and researched. More advanced rootkits surely exist in other spaces not available to the public. This includes technology even deeper in the system than the operating system, such as firmware and BIOS-level rootkits. Furthermore, the techniques used by the individual tools have already started to be clustered together such that a single rootkit will eventually leverage more and more hooking methods to reduce its chance of exposure.
Lastly, not all kernel-mode rootkits are evil! You learned that other tools such as sebek, antivirus, and enterprise keystroke loggers used by corporations all employ the same “big-brother” techniques as the malicious kernel rootkits themselves to detect rootkits.
Summary of Countermeasures
A malware classification system was suggested by recognized industry researcher Joanna Rutkowska at Black Hat Europe 2006 (http://www.blackhat.com/presentations/bh-europe-06/bh-eu-06-Rutkowska.pdf). It involved four types of malware:
• Type 0 Malware that doesn’t modify the operating system or other processes
• Type I Malware that modifies things that should never be modified outside of approved operating system code (i.e., the operating system itself, CPU registers, and so on)
• Type II Malware that modifies things that were designed to be modified, such as self-modifying code in data sections of binary files
• Type III Virtual rootkits that can subvert a running operating system without modifying anything at all inside it
To combat these types of malware, Joanna suggested several methods and tools available, along with sample malware in the wild. The following table details these countermeasures.