Learn WebAssembly
Build web applications with native performance using Wasm and C/C++

BIRMINGHAM - MUMBAI

Copyright © 2018 Packt Publishing
All rights reserved. No part of this book may be reproduced, stored in a retrieval system, or transmitted in any form or by any means, without the prior written permission of the publisher, except in the case of brief quotations embedded in critical articles or reviews.
Every effort has been made in the preparation of this book to ensure the accuracy of the information presented. However, the information contained in this book is sold without warranty, either express or implied. Neither the author, nor Packt Publishing or its dealers and distributors, will be held liable for any damages caused or alleged to have been caused directly or indirectly by this book.
Packt Publishing has endeavored to provide trademark information about all of the companies and products mentioned in this book by the appropriate use of capitals. However, Packt Publishing cannot guarantee the accuracy of this information.
Commissioning Editor: Kunal Chaudhari
Acquisition Editor: Trusha Shriyan
Content Development Editor: Aishwarya Gawankar
Technical Editor: Surabhi Kulkarni
Copy Editor: Safis Editing
Project Coordinator: Sheejal Shah
Proofreader: Safis Editing
Indexer: Priyanka Dhadke
Graphics: Alishon Mendonsa
Production Coordinator: Nilesh Mohite
First published: September 2018
Production reference: 1240918
Published by Packt Publishing Ltd.
Livery Place
35 Livery Street
Birmingham
B3 2PB, UK.
ISBN 978-1-78899-737-9

Mapt is an online digital library that gives you full access to over 5,000 books and videos, as well as industry leading tools to help you plan your personal development and advance your career. For more information, please visit our website.
Spend less time learning and more time coding with practical eBooks and Videos from over 4,000 industry professionals
Improve your learning with Skill Plans built especially for you
Get a free eBook or video every month
Mapt is fully searchable
Copy and paste, print, and bookmark content
Did you know that Packt offers eBook versions of every book published, with PDF and ePub files available? You can upgrade to the eBook version at www.packt.com and as a print book customer, you are entitled to a discount on the eBook copy. Get in touch with us at customercare@packtpub.com for more details.
At www.packt.com, you can also read a collection of free technical articles, sign up for a range of free newsletters, and receive exclusive discounts and offers on Packt books and eBooks.
Mike Rourke has been writing code for over a decade. He got his start creating Microsoft Access applications using VBA and decided he wanted to work with JavaScript full-time after building a Mozilla Firefox extension. He has a B.S. in mechanical engineering technology and worked primarily in product design/manufacturing engineering roles before starting a career as a software engineer in 2017. Currently, he works for a Chicago-based consulting company and is focused primarily on frontend JavaScript development. When's he not writing code, he's out in the woods camping with his wolf brothers.
Dan Ruta is a fresh graduate, about to start an MSc in computer vision. He got started with WebAssembly by implementing a small web-based deep learning library, and messing around with WebAssembly and GPGPU.
Other publications he has worked on include occasional technical blogs on Medium, and a team research paper combining AI, AR, and WebGL shaders to assist the visually impaired, which he presented at a conference.
His projects can be followed on GitHub and Medium (DanRuta), or on his website and tweets (Dan_Ruta).
Maxim Shaydo aka Moreas MaxGraey is an independent developer, consultant, system architect from Ukraine, he has worked with at LaSoft as a CTO and is a big fan of open source community.
He continues to be an enduring contributor for open source projects dedicated to WebAssembly, such as AssemblyScript language that has been gaining a lot of attention lately. He happens to be very interested in development of WebGL, WebVR technologies, and Flow Based Programming as well.
This project could not have been completed without being reviewed by Alon Zakai (kripken) known for his work on emscripten and binaryen. Special thanks to Daniel Wirtz (dcodeIO) who is the main contributor of AssemplyScript and an incredibly productive mate. Last but not the least, I would like to thank my parents — Mr. and Mrs Shaydo, without them none of this would indeed be possible.
If you're interested in becoming an author for Packt, please visit authors.packtpub.com and apply today. We have worked with thousands of developers and tech professionals, just like you, to help them share their insight with the global tech community. You can make a general application, apply for a specific hot topic that we are recruiting an author for, or submit your own idea.
This book introduces readers to WebAssembly, a new and exciting technology capable of executing languages other than JavaScript in the browser. The book describes how to build a C/JavaScript application from scratch that uses WebAssembly and the process for porting an existing C++ code base to run in the browser with the help of Emscripten.
WebAssembly represents an important shift for the web platform. As a compilation target for languages such as C, C++, and Rust, it provides the ability to build a new class of application. WebAssembly is supported by all of the major browser vendors and represents a collaborative effort.
In this book, we'll describe the elements that make up WebAssembly, as well as its origins. We'll walk through the process of installing the required tools, setting up a development environment, and interacting with WebAssembly. We'll work through simple examples and progress through increasingly advanced use cases. By the end of this book, you'll be well-equipped to use WebAssembly in your C, C++, or JavaScript project.
If you are a C/C++ programmer who wishes to build applications for the web, or a web developer who wishes to improve the performance of their JavaScript applications, then this book is for you. The book is intended for developers familiar with JavaScript who wouldn't mind learning some C and C++ (and vice versa). This book accommodates for C/C++ programmers and JavaScript programmers alike by providing two example applications.
Chapter 1, What is WebAssembly?, describes the origins of WebAssembly and provides a high-level overview of the technology. It covers how WebAssembly can be used, which programming languages are supported, and its current limitations.
Chapter 2, Elements of WebAssembly – Wat, Wasm, and the JavaScript API, outlines the elements that comprise WebAssembly. It provides a detailed explanation of the text and binary formats, as well as the corresponding JavaScript and Web APIs.
Chapter 3, Setting Up a Development Environment, walks through the tooling used to develop with WebAssembly. It provides the installation instructions for each platform and provides recommendations for improving the development experience.
Chapter 4, Installing the Required Dependencies, provides instructions for installing the toolchain requirements for each platform. By the end of this chapter, you'll be able to compile C and C++ to WebAssembly modules.
Chapter 5, Creating and Loading a WebAssembly Module, explains how to generate a WebAssembly module using Emscripten and how flags are passed to the compiler affect the resulting output. It describes the techniques for loading a WebAssembly module in the browser.
Chapter 6, Interacting with JavaScript and Debugging, elaborates on the differences between Emscripten's Module object and the browser's global WebAssembly object. This chapter describes the features Emscripten provides as well as instructions for generating source maps.
Chapter 7, Creating an Application from Scratch, walks through the creation of a JavaScript accounting application that interacts with a WebAssembly module. We will write C code to calculate values from accounting transactions and pass the data between JavaScript and the compiled WebAssembly module.
Chapter 8, Porting a Game with Emscripten, takes a step-by-step approach to porting an existing C++ game to WebAssembly using Emscripten. After reviewing the existing C++ code base, changes are made to the appropriate files to enable the game to run in the browser.
Chapter 9, Integrating with Node.js, demonstrates how Node.js and npm can be used with WebAssembly on the server and client side. The chapter covers the use of WebAssembly in an Express application, integrating WebAssembly with webpack, and testing a WebAssembly module using Jest.
Chapter 10, Advanced Tools and Upcoming Features, covers advanced tools, use cases, and new WebAssembly features currently in the process of standardization. This chapter describes WABT, Binaryen, and the tooling available online. In this chapter, you'll learn how to compile WebAssembly modules using LLVM and how WebAssembly modules can be used with Web Workers. The chapter wraps up with a description of the standardization process and a review of some of the exciting features in the process of being added to the specification.
You should have some programming experience and understand concepts such as variables, and functions. If you've never seen a line of JavaScript or C/C++ code, you may want to do some preliminary research before working through the examples in this book. I've chosen to use JavaScript ES6/7 features such as destructuring and arrow functions, so if you haven't worked with JavaScript in the last 3 - 4 years, the syntax may look slightly different.
You can download the example code files for this book from your account at www.packtpub.com. If you purchased this book elsewhere, you can visit www.packt.com/support and register to have the files emailed directly to you.
You can download the code files by following these steps:
Once the file is downloaded, please make sure that you unzip or extract the folder using the latest version of:
The code bundle for the book is also hosted on GitHub at https://github.com/PacktPublishing/Learn-WebAssembly. In case there's an update to the code, it will be updated on the existing GitHub repository.
We also have other code bundles from our rich catalog of books and videos available at https://github.com/PacktPublishing/. Check them out!
We also provide a PDF file that has color images of the screenshots/diagrams used in this book. You can download it here: https://www.packtpub.com/sites/default/files/downloads/9781788997379_ColorImages.pdf.
There are a number of text conventions used throughout this book.
CodeInText: Indicates code words in text, database table names, folder names, filenames, file extensions, pathnames, dummy URLs, user input, and Twitter handles. Here is an example: "instantiate() is the primary API for compiling and instantiating WebAssembly code."
A block of code is set as follows:
int addTwo(int num) {
 return num + 2;
}
When we wish to draw your attention to a particular part of a code block, the relevant lines or items are set in bold:
int calculate(int firstVal, int secondVal) {
return firstVal - secondVal;
}
Any command-line input or output is written as follows:
npm install -g webassembly
Bold: Indicates a new term, an important word, or words that you see onscreen. For example, words in menus or dialog boxes appear in the text like this. Here is an example: "You can do this by pressing the Start menu button, and right-clicking on the Command Prompt application and selecting Run as administrator."
Feedback from our readers is always welcome.
General feedback: Email customercare@packtpub.com and mention the book title in the subject of your message. If you have questions about any aspect of this book, please email us at customercare@packtpub.com.
Errata: Although we have taken every care to ensure the accuracy of our content, mistakes do happen. If you have found a mistake in this book, we would be grateful if you would report this to us. Please visit www.packt.com/submit-errata, selecting your book, clicking on the Errata Submission Form link, and entering the details.
Piracy: If you come across any illegal copies of our works in any form on the Internet, we would be grateful if you would provide us with the location address or website name. Please contact us at copyright@packt.com with a link to the material.
If you are interested in becoming an author: If there is a topic that you have expertise in and you are interested in either writing or contributing to a book, please visit authors.packtpub.com.
Please leave a review. Once you have read and used this book, why not leave a review on the site that you purchased it from? Potential readers can then see and use your unbiased opinion to make purchase decisions, we at Packt can understand what you think about our products, and our authors can see your feedback on their book. Thank you!
For more information about Packt, please visit packt.com.
WebAssembly (Wasm) represents an important stepping stone for the web platform. Enabling a developer to run compiled code on the web without a plugin or browser lock-in presents many new opportunities. Some confusion exists about what WebAssembly is, as does some skepticism about its staying power.
In this chapter, we will discuss how WebAssembly came to be, what WebAssembly is with regard to the official definition, and the technologies it encompasses. The potential use cases, supported languages, and limitations will be covered, as well as where to find additional information.
Our goal for this chapter is to understand the following:
Web development has had an interesting history, to say the least. Several (failed) attempts have been made to expand the platform to support different languages. Clunky solutions such as plugins failed to stand the test of time, and limiting a user to a single browser is a recipe for disaster.
WebAssembly was developed as an elegant solution to a problem that has existed since browsers were first able to execute code: If you want to develop for the web, you have to use JavaScript. Fortunately, using JavaScript doesn't have the same negative connotations it had back in the early 2000s, but it continues to have certain limitations as a programming language. In this section, we're going to discuss the technologies that led to WebAssembly to get a better grasp of why this new technology is needed.
JavaScript was created by Brendan Eich in just 10 days back in 1995. Originally seen as a toy language by programmers, it was used primarily to make buttons flash or banners appear on a web page. The last decade has seen JavaScript evolve from a toy to a platform with profound capabilities and a massive following.
In 2008 heavy competition in the browser market resulted in the addition of just-in-time (JIT) compilers, which increased the execution speed of JavaScript by a factor of 10. Node.js debuted in 2009 and represented a paradigm shift in web development. Ryan Dahl combined Google's V8 JavaScript engine, an event loop, and a low-level I/O API to build a platform that allowed for the use of JavaScript across the server and client side. Node.js led to npm, a package manager that allowed for the development of libraries to be used within the Node.js ecosystem. As of the time of writing, there are over 600,000 packages available with hundreds being added every day:

It's not just the Node.js ecosystem that is growing; JavaScript itself is being actively developed. The ECMA Technical Committee 39 (TC39), which dictates the standards for JavaScript and oversees the addition of new language features, releases yearly updates to JavaScript with a community-driven proposal process. Between its wealth of libraries and tooling, constant improvements to the language, and possessing one of the largest communities of programmers, JavaScript has become a force to be reckoned with.
But the language does have some shortcomings:
To avoid having to write more than a few lines of JavaScript, some developers built transpilers to convert other languages to JavaScript. Transpilers (or source-to-source compilers) are types of compilers that convert source code in one programming language to equivalent source code in another programming language. TypeScript, which is a popular tool for frontend JavaScript development, transpiles TypeScript to valid JavaScript targeted for browsers or Node.js. Pick any programming language and there's a good chance that someone created a JavaScript transpiler for it. For example, if you prefer to write Python, you have about 15 different tools that you can use to generate JavaScript. In the end, though, it's still JavaScript, so you're still subject to the idiosyncrasies of the language.
As the web evolved into a valid platform for building and distributing applications, more and more complex and resource-intensive applications were created. In order to meet the demands of these applications, browser vendors began working on new technologies to integrate into their software without disrupting the normal course of web development. Google and Mozilla, creators of Chrome and Firefox, respectively, took two different paths to achieve this goal, culminating in the creation of WebAssembly.
Google developed Native Client (NaCl) with the intent to safely run native code within a web browser. The executable code would run in a sandbox and offered the performance advantages of native code execution.
NaCl was tied to a specific architecture, while Portable Native Client (PNaCl) was an architecture-independent version of NaCl developed to run on any platform. The technology consisted of two elements:
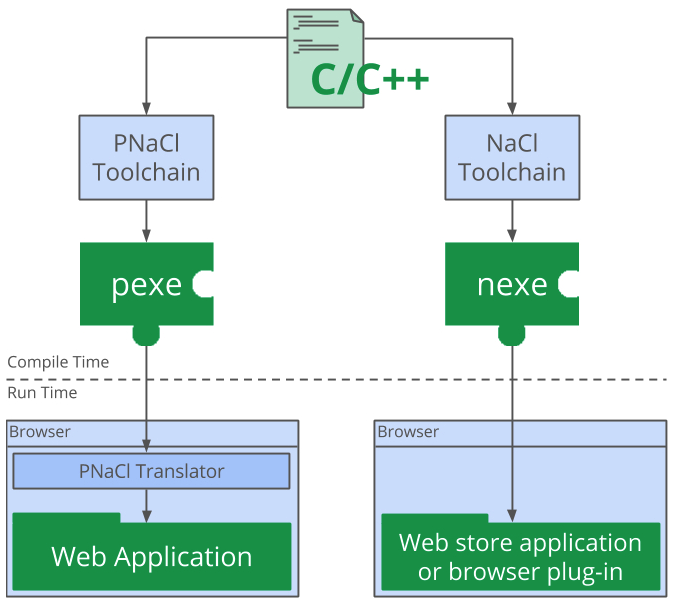
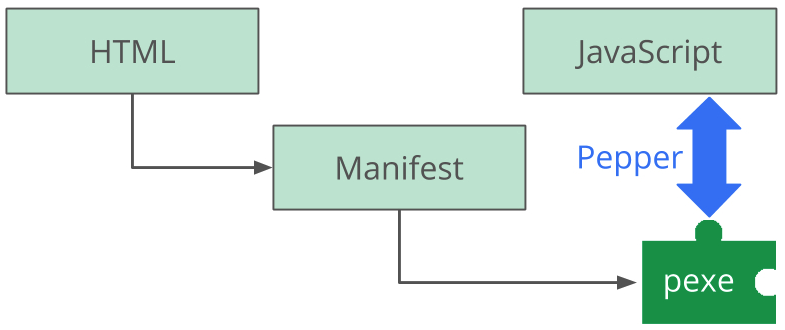
NaCl's architecture-specific executable (nexe) was limited to applications and extensions that were installed from Google's Chrome Web Store, but PNaCl executables (pexe) can be freely distributed on the web and embedded in web applications. Portability was made possible with Pepper, an open source API for creating NaCl modules, and its corresponding plugin API (PPAPI). Pepper enabled communication between NaCl modules and the hosting browser, and allowed for access to system-level functions in a safe and portable way. Applications could be easily distributed by including a manifest file and a compiled module (pexe) with the corresponding HTML, CSS, and JavaScript:
NaCl offered promising opportunities to overcome the performance limitations of the web, but it had some drawbacks. Although Chrome had built-in support for PNaCl executables and Pepper, other major browser did not. Detractors of the technology took issue with the black-box nature of the applications as well as the potential security risks and complexity.
Mozilla focused its efforts on improving the performance of JavaScript with asm.js. They wouldn't add support for Pepper to Firefox due to the incompleteness of its API specification and limited documentation. In the end, NaCl was deprecated in May, 2017, in favor of WebAssembly.
Mozilla debuted asm.js in 2013 and provided a way for developers to translate their C and C++ source code to JavaScript. The official specification for asm.js defines it as a strict subset of JavaScript that can be used as a low-level, efficient target language for compilers. It's still valid JavaScript, but the language features are limited to those that are amenable to ahead-of-time (AOT) optimization. AOT is a technique that the browser's JavaScript engine uses to execute code more efficiently by compiling it down to native machine code. asm.js achieves these performance gains by having 100% type consistency and manual memory management.
Using a tool such as Emscripten, C/C++ code can be transpiled down to asm.js and easily distributed using the same means as normal JavaScript. Accessing the functions in an asm.js module requires linking, which involves calling its function to obtain an object with the module's exports.
asm.js is incredibly flexible, however, certain interactions with the module can cause a loss of performance. For example, if an asm.js module is given access to a custom JavaScript function that fails dynamic or static validation, the code can't take advantage of AOT and falls back to the interpreter:
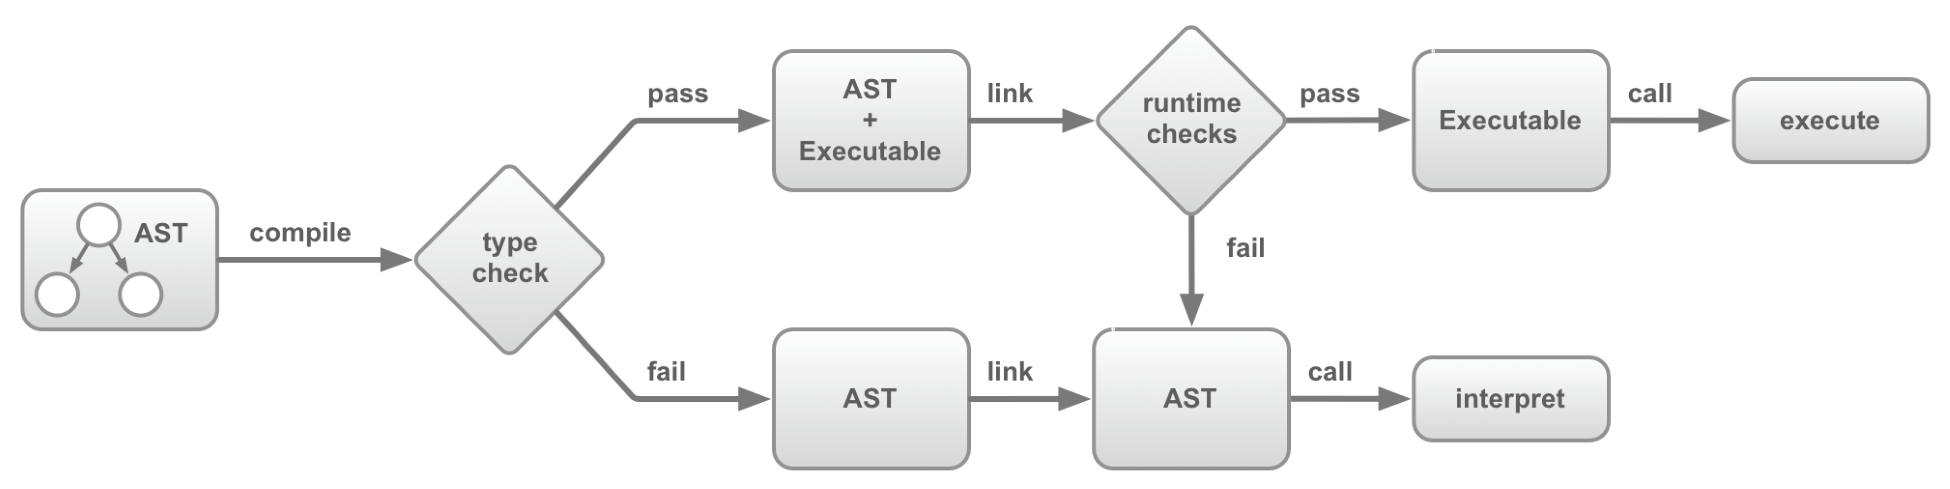
asm.js isn't just a stepping stone. It forms the basis for WebAssembly's Minimum Viable Product (MVP). The official WebAssembly site explicitly mentions asm.js in the section entitled WebAssembly High-Level Goals.
So why create WebAssembly when you could use asm.js? Aside from the potential performance loss, an asm.js module is a text file that must be transferred over the network before any compilation can take place. A WebAssembly module is in a binary format, which makes it much more efficient to transfer due to its smaller size.
WebAssembly modules use a promise-based approach to instantiation, which takes advantage of modern JavaScript and eliminates the need for any is this loaded yet? code.
The World Wide Web Consortium (W3C), an international community built to develop web standards, formed the WebAssembly Working Group in April, 2015, to standardize WebAssembly and oversee the specification and proposal process. Since then, the Core Specification and corresponding JavaScript API and Web API have been released. The initial implementation of WebAssembly support in browsers was based on the feature set of asm.js. WebAssembly's binary format and corresponding .wasm file combined facets of asm.js output with PNaCl's concept of a distributed executable.
So how will WebAssembly succeed where NaCl failed? According to Dr. Axel Rauschmayer, there are three reasons detailed at http://2ality.com/2015/06/web-assembly.html#what-is-different-this-time:
WebAssembly has a succinct and descriptive definition on the official site, but it's only a piece of the puzzle. There are several other components that fall under the umbrella of WebAssembly. Understanding the role each component plays will give you a better understanding of the technology as a whole. In this section, we will provide a detailed breakdown of WebAssembly's definition and describe potential use cases.
The official WebAssembly website (https://webassembly.org) offers this definition:
Let's break that definition down into parts to add some clarification.
WebAssembly actually encompasses several elements—a binary format and text format, which are documented in the Core Specification, the corresponding APIs (JavaScript and web), and a compilation target. The binary and text format both map to a common structure in the form of an abstract syntax. To better understand abstract syntax, it can be explained in the context of an abstract syntax tree (AST). An AST is a tree representation of the structure of source code for a programming language. Tools such as ESLint use JavaScript's AST to find linting errors. The following example contains a function and the corresponding AST for JavaScript (taken from https://astexplorer.net).
A simple JavaScript function follows:
function doStuff(thingToDo) {
  console.log(thingToDo);
}
The corresponding AST is as follows:
{
  "type": "Program",
  "start": 0,
  "end": 57,
  "body": [
    {
      "type": "FunctionDeclaration",
      "start": 9,
      "end": 16,
      "id": {
        "type": "Identifier",
        "start": 17,
        "end": 26,
        "name": "doStuff"
      },
      "generator": false,
      "expression": false,
      "params": [
        {
          "type": "Identifier",
          "start": 28,
          "end": 57,
          "name": "thingToDo"
        }
      ],
      "body": {
        "type": "BlockStatement",
        "start": 32,
        "end": 55,
        "body": [
          {
            "type": "ExpressionStatement",
            "start": 32,
            "end": 55,
            "expression": {
              "type": "CallExpression",
              "start": 32,
              "end": 54,
              "callee": {
                "type": "MemberExpression",
                "start": 32,
                "end": 43,
                "object": {
                  "type": "Identifier",
                  "start": 32,
                  "end": 39,
                  "name": "console"
                },
                "property": {
                  "type": "Identifier",
                  "start": 40,
                  "end": 43,
                  "name": "log"
                },
                "computed": false
              },
              "arguments": [
                {
                  "type": "Identifier",
                  "start": 44,
                  "end": 53,
                  "name": "thingToDo"
                }
              ]
            }
          }
        ]
      }
    }
  ],
  "sourceType": "module"
}
An AST may be verbose, but it does an excellent job at describing the components of a program. Representing source code in an AST makes verification and compilation simple and efficient. WebAssembly code in text format is serialized into an AST and compiled to the binary format (as a .wasm file), which is fetched, loaded, and utilized by a web page. When the module is loaded, the browser's JavaScript engine utilizes a decoding stack to decode the .wasm file into an AST, perform type checking, and interpret it to execute functions. WebAssembly started as a binary instruction format for an AST. Due to the performance implications of verifying Wasm expressions that return void, the binary instruction format was updated to target a stack machine.
A stack machine consists of two elements: a stack and instructions. A stack is a data structure with two operations: push and pop. Items are pushed onto the stack and subsequently popped from the stack in last in, first out (LIFO) order. A stack also includes a pointer, which points to the item at the top of the stack. Instructions represent actions to perform on the items in the stack. For example, an ADD instruction might pop the top two items from the stack (the values 100 and 10), and push a single item with the sum back onto the stack (the value 110):
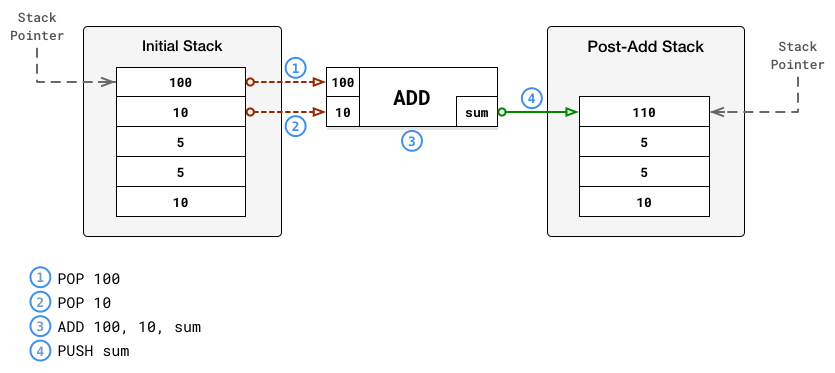
WebAssembly's stack machine operates in the same way. A program counter (pointer) maintains the execution position within the code and a virtual control stack keeps track of blocks and if constructs as they are entered (pushed) and exited (popped). The instructions are executed with no reference to an AST. Thus, the binary instruction format portion of the definition refers to a binary representation of instructions that are in a format readable by the decoding stack in the browser.
WebAssembly was designed from the beginning with portability in mind. Portability in this context means that WebAssembly's binary format can be executed efficiently on a variety of operating systems and instruction set architectures, on and off the web. The specification for WebAssembly defines portability in the context of an execution environment. WebAssembly was designed to run efficiently in environments that meet certain characteristics, most of which are related to memory. WebAssembly's portability can also be attributed to the absence of a specific API around the core technologies. Instead, it defines an import mechanism where the set of available imports is defined by the host environment.
In a nutshell, this means that WebAssembly isn't tied to a specific environment, such as the web or desktop. The WebAssembly Working Group has defined a Web API, but that's separate from the Core Specification. The Web API caters to WebAssembly, not the other way around.
The compilation aspect of the definition indicates that WebAssembly will be simple to compile down to its binary format from source code written in high-level languages. The MVP focuses on two languages, C and C++, but Rust can also be used given its similarities to C++. Compilation will be achieved through the use of a Clang/LLVM backend, although we'll be using Emscripten in this book to generate our Wasm modules. The plan is to eventually add support for other languages and compilers (such as GCC), but the MVP is focused on LLVM.
The official definition gives some high-level insight into the overall technology, but for the sake of completeness, it's worth digging a little deeper. WebAssembly's Core Specification is the official document to reference if you want to understand WebAssembly at a very granular level. If you're interested in learning about the characteristics of the runtime structure with regard to the execution environment, check out section 4: Execution. We won't cover that here, but understanding where the Core Specification fits in will help in establishing a complete definition of WebAssembly.
The Core Specification states WebAssembly encodes a low-level, assembly-like programming language. The specification defines the structure, execution, and validation of this language as well as the details of the binary and text formats. The language itself is structured around the following concepts:
Functions, tables, memory, and modules have direct correlations with the JavaScript API and are important to be aware of. These concepts describe the underlying structure of the language itself and how to write or encode WebAssembly. With regard to usage, understanding the corresponding semantic phases of WebAssembly provides a complete definition of the technology:
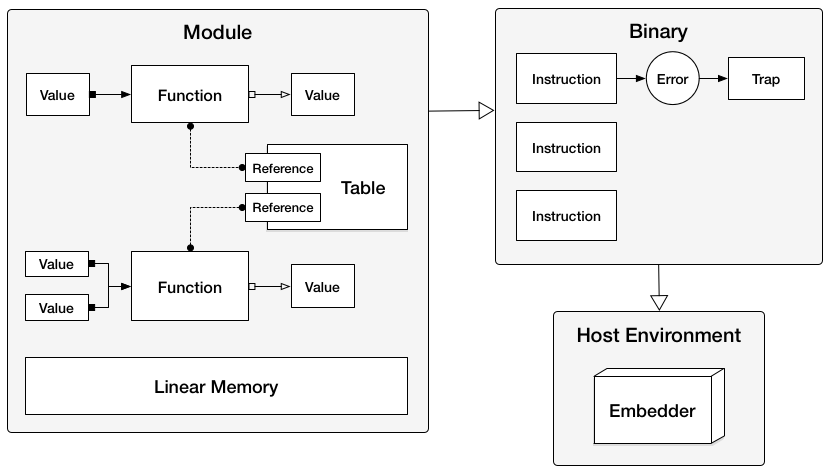
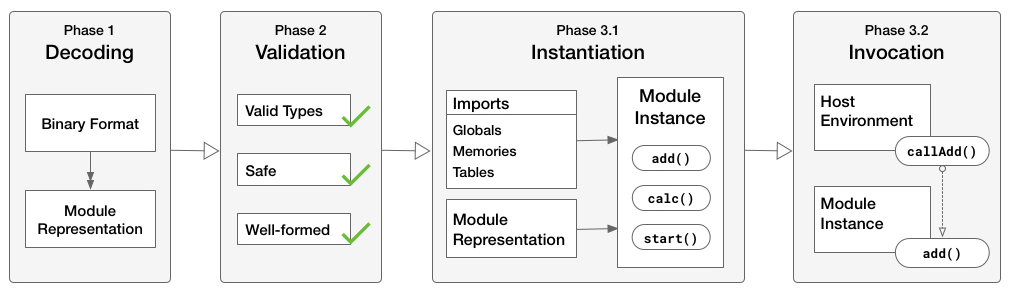
The Core Specification describes the different phases an encoded module (.wasm file) undergoes when it is being utilized in a host environment (such as a web browser). This aspect of the specification represents how the output is handled and executed:
The following diagram provides a visual representation of the semantic phases:
The WebAssembly Working Group also released API specifications for interacting with JavaScript and the web, which qualifies them for inclusion in the WebAssembly technology space. The JavaScript API is scoped to the JavaScript language itself, without being specifically tied to an environment (for example, web browsers or Node.js). It defines classes, methods, and objects for interacting with WebAssembly and managing the compilation and instantiation processes. The Web API is an extension of the JavaScript API that defines functionality specific to web browsers. The Web API specification currently only defines two methods, compileStreaming and instantiateStreaming, which are convenience methods that simplify the use of Wasm modules in the browser. These will be covered in greater detail in Chapter 2, Elements of WebAssembly - Wat, Wasm, and the JavaScript API.
WebAssembly's ultimate goal is not to replace JavaScript, but rather to complement it. JavaScript's rich ecosystem and flexibility still makes it the ideal language for the web. WebAssembly's JavaScript API makes interoperability between the two technologies relatively simple. So will you be able to build a web application using just WebAssembly? One of the explicit goals of WebAssembly is portability, and replicating all of JavaScript's functionality could inhibit that goal. However, the official site includes a goal to execute and integrate well with the existing web platform, so only time will tell. It may not be practical to write the entire code base in a language that compiles down to WebAssembly, but moving some of the application logic to Wasm modules could be beneficial in terms of performance and load times.
WebAssembly's official site has an extensive list of potential use cases. I'm not going to cover them all here, but there are several that represent significant enhancements to the capabilities of the web platform:
Although some of these use cases are technically feasible with JavaScript, HTML, and CSS, using WebAssembly can offer significant performance gains. Serving up a binary file (instead of a single JavaScript file) can greatly reduce the bundle size, and instantiating the Wasm module on page load speeds up code execution.
WebAssembly isn't just limited to the browser. Outside the browser, you could use it to build hybrid native apps on mobile devices or perform server-side computations of untrusted code. Using Wasm modules for phone apps could be incredibly beneficial in terms of power usage and performance.
WebAssembly also offers flexibility with regard to how it can be used. You can write your entire code base in WebAssembly, although this may not be practical in its current form or in the context of a web application. Given WebAssembly's robust JavaScript API, you could write the UI in JavaScript/HTML and use Wasm modules for functionality that doesn't directly access the DOM. Once additional languages are supported, objects can be easily passed between the Wasm module and JavaScript code, which will greatly simplify integration and increase developer adoption.
WebAssembly's high-level goals for their MVP was to provide roughly the same functionality as asm.js. The two technologies are very closely related. C, C++, and Rust are very popular languages that support manual memory allocation, which made them ideal candidates for the initial implementation. In this section, we're going to provide a brief overview of each programming language.
C and C++ are low-level programming languages that have been around for over 30 years. C is procedural and doesn't inherently support object-oriented programming concepts such as classes and inheritance, but it's fast, portable, and widely used.
C++ was built to fill the gaps in C by adding features such as operator overloading and improved type checking. Both languages consistently rank in the top 10 most popular programming languages, which make them ideally suited for the MVP:
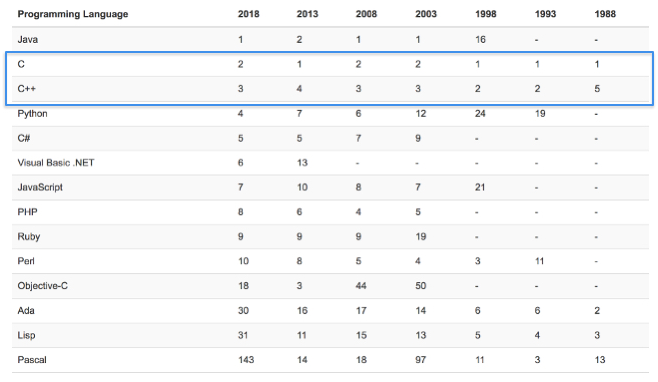
C and C++ support is also baked into Emscripten, so in addition to simplifying the compilation process, it allows you to take advantage of WebAssembly's full capabilities. It is also possible to compile C/C++ code down to a .wasm file using LLVM. LLVM is a collection of modular and reusable compiler and toolchain technologies. In a nutshell, it's a framework that simplifies the configuration of a compilation process from source code to machine code. If you made your own programming language and would like to build a compiler, LLVM has tools to simplify the process. I'll cover how to compile C/C++ into .wasm files using LLVM in Chapter 10, Advanced Tools and Upcoming Features.
The following snippet demonstrates how to print Hello World! to the console using C++:
#include <iostream>

int main() {
    std::cout << "Hello, World!\n";
    return 0;
}
C and C++ were intended to be the primary languages used for WebAssembly, but Rust is a perfectly suitable substitute. Rust is a systems programming language that is syntactically similar to C++. It was designed with memory safety in mind, but still retains the performance advantages of C and C++. The current nightly build of Rust's compiler can generate .wasm files from Rust source code, so if you prefer Rust and are familiar with C++, you should be able to use Rust for most of the examples in this book.
The following snippet demonstrates how to print Hello World! to the console using Rust:
fn main() {
    println!("Hello World!");
}
Various tooling exists to enable the use of WebAssembly with some of the other popular programming languages, although they are mostly experimental:
It is also technically possible to transpile a language to C and consequently compile that to a Wasm module, but the success of compilation is contingent on the output of the transpiler. More than likely, you'd have to make significant changes to the code to get it to work.
Admittedly, WebAssembly is not without its limitations. New features are being actively developed and the technology is constantly evolving, but the MVP functionality represents only a portion of WebAssembly's capabilities. In this section, we'll cover some of these limitations and how they impact the development process.
WebAssembly supports a flat linear memory, which isn't a limitation per se, but requires some understanding of how to explicitly allocate memory to execute code. C and C++ were logical choices for the MVP because memory management is built into the language. The reason why some of the more popular high-level languages such as Java weren't included initially is due to something called garbage collection (GC).
GC is a form of automated memory management wherein memory occupied by objects that are no longer in use by the program is reclaimed automatically. GC is analogous to an automatic transmission on a car. It has been heavily optimized by skilled engineers to operate as efficiently as possible, but limits the amount of control the driver has. Manually allocating memory is like driving a car with a manual transmission. It affords greater control over speed and torque, but misuse or lack of experience can leave you stranded with a severely damaged car. Part of C and C++'s excellent performance and speed can be attributed to the manual allocation of memory.
GC languages allow you to program without having to worry about memory availability or allocation. JavaScript is an example of a GC language. The browser engine employs something called a mark-and-sweep algorithm to collect unreachable objects and free up the corresponding memory. Support for GC languages is currently being worked on in WebAssembly, but it's hard to say exactly when it will be completed.
WebAssembly is unable to access the DOM, so any DOM manipulation needs to be done indirectly through JavaScript or using a tool such as Emscripten. There are plans to add the ability to reference DOM and other Web API objects directly, but that's still in the proposal phase. DOM manipulation will likely go hand in hand with GC languages, since it will allow the seamless passing of objects between WebAssembly and JavaScript code.
Older browsers don't have the global WebAssembly object available to instantiate and load Wasm modules. There are experimental polyfills that utilize asm.js if the object isn't found, but the WebAssembly Working Group currently has no plans to create one. Since asm.js and WebAssembly are closely related, simply serving up an asm.js file if the WebAssembly object is unavailable will still offer performance gains while accommodating for backward compatibility. You can see which browsers currently support WebAssembly at https://caniuse.com/#feat=wasm.
Emscripten is the source-to-source compiler that can generate asm.js from C and C++ source code. We'll use it as a build tool to generate the Wasm modules. In this section, we'll quickly review how Emscripten relates to WebAssembly.
Emscripten is an LLVM-to-JavaScript compiler, which means it takes LLVM bitcode output of a compiler such as Clang (for C and C++), and converts that to JavaScript. It isn't one specific technology, but rather a combination of technologies that work together to build, compile, and run asm.js. To generate Wasm modules, we'll use the Emscripten SDK (EMSDK) Manager:
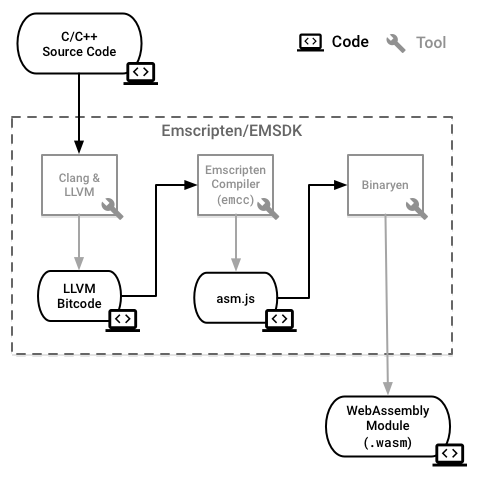
In Chapter 4, Installing the Required Dependencies, we'll install the EMSDK and use it to manage the dependencies required to compile C and C++ to Wasm modules. Emscripten uses Binaryen's asm2wasm tool to compile the asm.js output by Emscripten to a .wasm file. Binaryen is a compiler and toolchain infrastructure library that includes tools to compile various formats to WebAssembly modules and vice versa. Understanding the inner workings of Binaryen isn't required to use WebAssembly, but it is important to be aware of the underlying technologies and how they work together. By passing certain flags into the compile command for Emscripten (emcc), we can pipe the resultant asm.js code to Binaryen to output our .wasm file.
In this chapter, we discussed the history of WebAssembly with regard to the technologies that led to its creation. A detailed overview of the definition of WebAssembly was provided to allow for a greater understanding of the underlying technologies involved.
The Core Specification, JavaScript API, and Web API were presented as important elements of WebAssembly and demonstrate how the technology will evolve. We also reviewed potentials use cases, currently supported languages, and tools that enable the use of non-supported languages.
The limitations of WebAssembly are the absence of GC, the inability to communicate directly with the DOM, and the lack of support for older browsers. These were discussed to convey the newness of the technology and shed light on some of its shortcomings. Finally, we discussed Emscripten's role in the development process and where it fits into the WebAssembly development workflow.
In Chapter 2, Elements of WebAssembly - Wat, Wasm, and the JavaScript API, we'll be diving deeper into the elements that make up WebAssembly: the WebAssembly text format (Wat), binary format (Wasm), JavaScript, and Web APIs.
Chapter 1, What is WebAssembly?, described the history of WebAssembly and provided a high-level overview of the technology as well as the potential use cases and limitations. WebAssembly was described as being composed of multiple elements, not just the binary instruction format specified in the official definition.
In this chapter, we will dig into the elements that correspond to the official specifications created by the WebAssembly Working Group. We will examine the Wat and the binary format in greater detail to gain a better understanding of how they relate to modules. We will review the JavaScript API and Web API to ensure you're able to utilize the WebAssembly effectively in the browser.
Our goal for this chapter is to understand the following:
In Chapter 1, What is WebAssembly?, we talked about how the binary and text formats of WebAssembly both map to a common structure in the form of an abstract syntax. Before getting into the nuts and bolts of these formats, it's worth mentioning how these are related within the Core Specification. The following diagram is a visual representation of the table of contents (with some sections excluded for clarity):
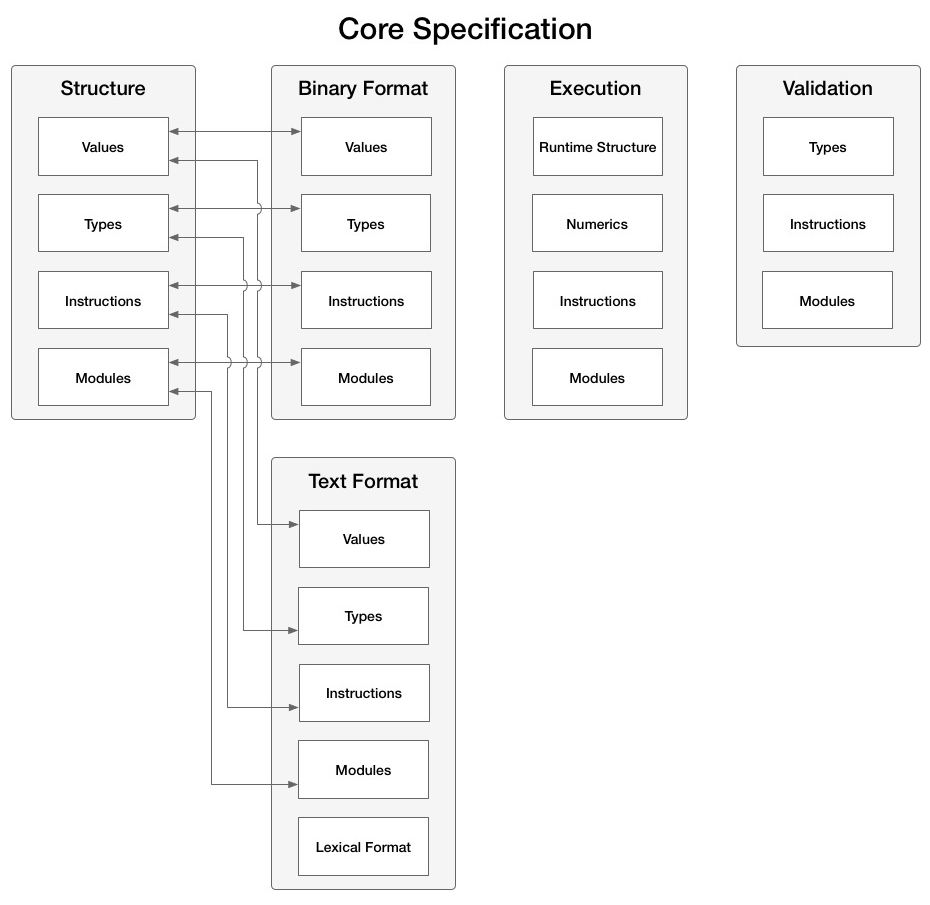
As you can see, the Text Format and Binary Format sections contain subsections for Values, Types, Instructions, and Modules that correlate with the Structure section. Consequently, much of what we cover in the next section for the text format have direct corollaries with the binary format. With that in mind, let's dive into the text format.
The Text Format section of the Core Specification provides technical descriptions for common language concepts such as values, types, and instructions. These are important concepts to know and understand if you're planning on building tooling for WebAssembly, but not necessary if you just plan on using it in your applications. That being said, the text format is an important part of WebAssembly, so there are concepts you should be aware of. In this section, we will dig into some of the details of the text format and highlight important points from the Core Specification.
To understand Wat, let's start with the first sentence of the description taken directly from the WebAssembly Core Specification:
So what are symbolic expressions (S-expressions)? S-expressions are notations for nested list (tree-structured) data. Essentially, they provide a simple and elegant way to represent list-based data in textual form. To understand how textual representations of nested lists map to a tree structure, let's extrapolate the tree structure from an HTML page. The following example contains a simple HTML page and the corresponding tree structure diagram.
A simple HTML page:
<html>
<head>
  <link rel="icon" href="favicon.ico">
  <title>Page Title</title>
</head>
<body>
  <div>
    <h1>Header</h1>
    <p>This is a paragraph.</p>
  </div>
  <div>Some content</div>
  <nav>
    <ul>
      <li>Item 1</li>
      <li>Item 2</li>
      <li>Item 3</li>
    </ul>
  </nav>
</body>
</html>
The corresponding tree structure is:
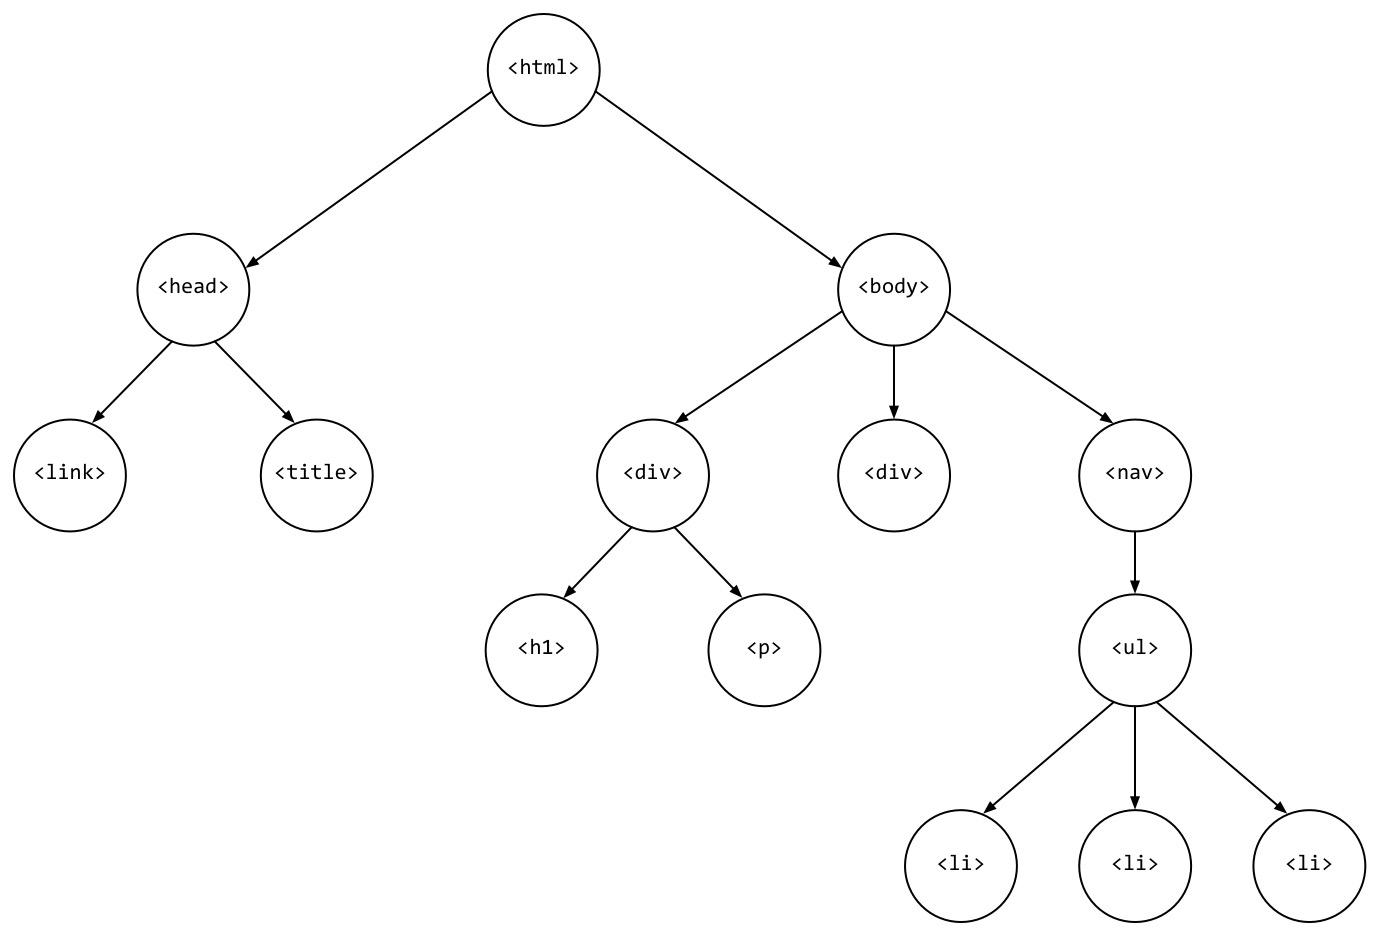
Even if you've never seen a tree structure before, it's still clear to see how the HTML maps to the tree in terms of structure and hierarchy. Mapping HTML elements is relatively simple because it's a markup language with well-defined tags and no actual logic.
Wat represents modules that can have multiple functions with varying parameters. To demonstrate the relationship between source code, Wat, and the corresponding tree structure, let's start with a simple C function that adds 2 to the number that is passed in as a parameter:
Here is a C function that adds 2 to the num argument passed in and returns the result:
int addTwo(int num) {
    return num + 2;
}
Converting the addTwo function to valid Wat produces this result:
(module
  (table 0 anyfunc)
  (memory $0 1)
  (export "memory" (memory $0))
  (export "addTwo" (func $addTwo))
  (func $addTwo (; 0 ;) (param $0 i32) (result i32)
    (i32.add
      (get_local $0)
      (i32.const 2)
    )
  )
)
In Chapter 1, What is WebAssembly?, we talked about language concepts associated with the Core Specification (Functions, Linear Memory, Tables, and so on). Within that specification, the Structure section defines each of these concepts in the context of an abstract syntax. The Text Format section of the specification corresponds with these concepts as well, and you can see them defined by their keywords in the preceding snippet (func, memory, table).
Tree Structure:
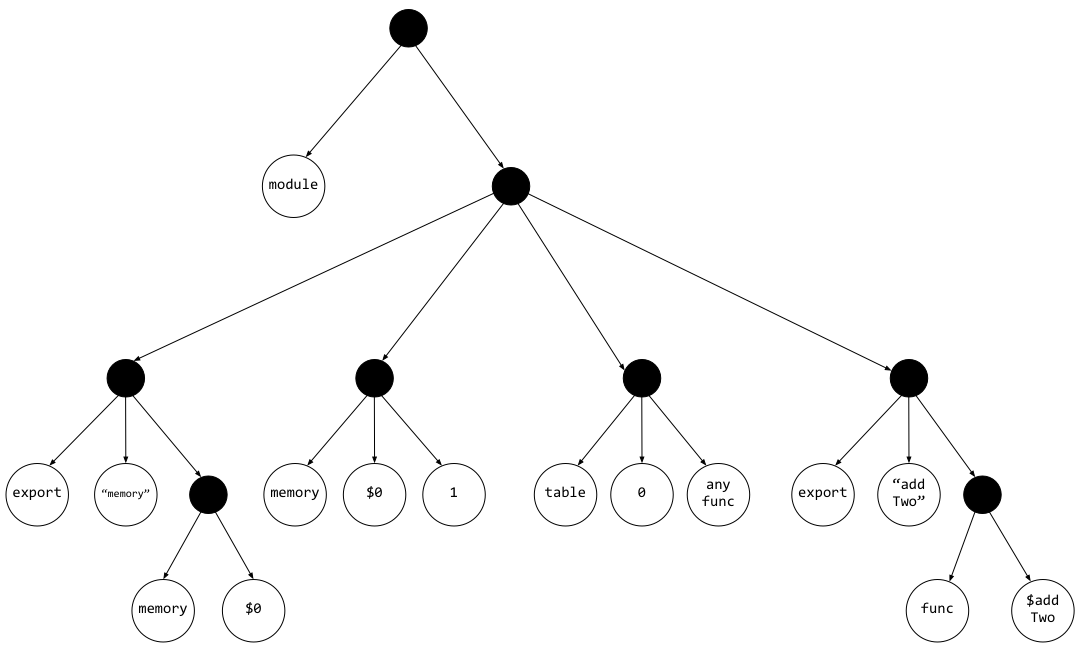
The entire tree would be too large to fit on a page, so this diagram is limited to the first five lines of the Wat source text. Each filled-in dot represents a list node (or the contents of a set of parentheses). As you can see, code written in s-expressions can be clearly and concisely expressed in a tree structure, which is why s-expressions were chosen for WebAssembly's text format.
Although detailed coverage of the Text Format section of the Core Specification is out of the scope of this text, it's worth demonstrating how some of the language concepts map to the corresponding Wat. The following diagram demonstrates these mappings in a sample Wat snippet. The C code that this was compiled from represents a function that takes a word as a parameter and returns the square root of the character count:
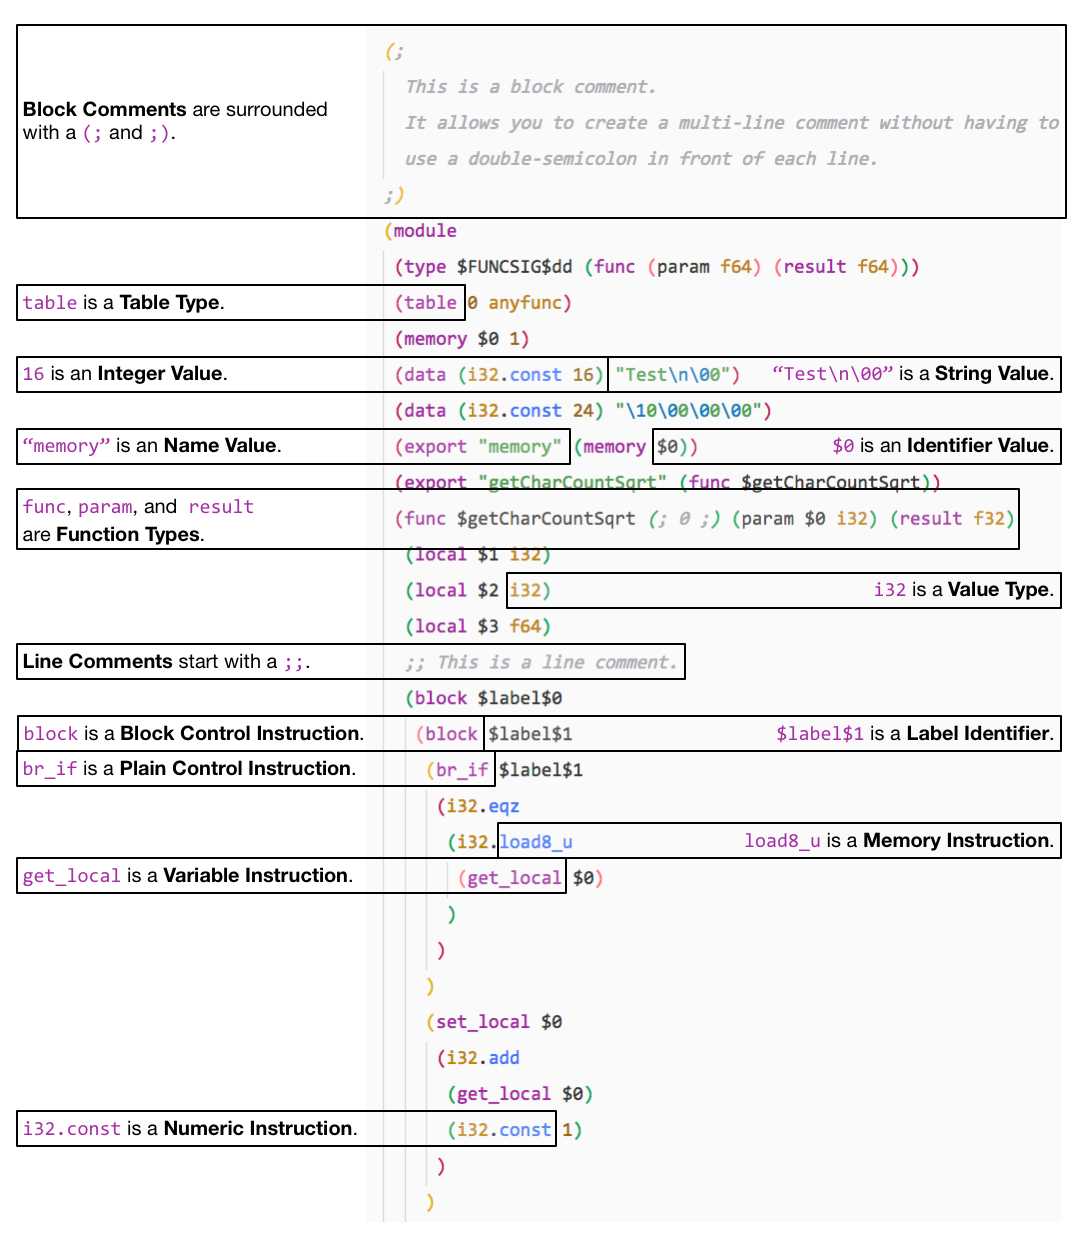
If you intend on writing or editing Wat, note that it supports block and line comments. The instructions are split up into blocks and consist of setting and getting memory associated with variables with valid types. You are able to control the flow of logic using if statements and loops are supported using the loop keyword.
The text format allows for the representation of a binary Wasm module in textual form. This has some profound implications with regard to the ease of development and debugging. Having a textual representation of a WebAssembly module allows developers to view the source of a loaded module in a browser, which eliminates the black-box issues that inhibited the adoption of NaCl. It also allows for tooling to be built around troubleshooting modules. The official website describes the use cases that drove the design of the text format:
The last item in the list reflects that the text format isn't intended to be written by hand in the course of normal development, but rather generated from a tool like Emscripten. You probably won't see or manipulate any .wat files when you're generating modules, but you may be viewing them in a debugging context.
Not only is the text format valuable with regards to debugging, but having this intermediate format reduces the amount of reliance on a single tool for compilation. Several different tools currently exist to consume and emit this s-expression syntax, some of which are used by Emscripten to compile your code down to a .wasm file.
The Binary Format section of the Core Specification provides the same level of detail with regard to language concepts as the Text format section. In this section, we will briefly cover some high-level details about the binary format and discuss the various sections that make up a Wasm module.
The binary format is defined as a dense linear encoding of the abstract syntax. Without getting too technical, that essentially means it's an efficient form of binary that allows for fast decoding, small file size, and reduced memory usage. The file representation of the binary format is a .wasm file, which will be the compilation output from Emscripten that we'll use for our examples.
The Values, Types, and Instructions subsections of the Core Specification for the binary format correlate directly to the Text Format section. Each of these concepts is covered in the context of encoding. For example, according to the specification, the Integer types are encoded using the LEB128 variable-length integer encoding, in either unsigned or signed variant. These are important details to know if you wish to develop tooling for WebAssembly, but not necessary if you just plan on using it on your website.
The Structure, Binary Format, and Text Format (wat) sections of the Core Specification have a Module subsection. We didn't cover aspects of the module in the previous section because it's more prudent to describe them in the context of a binary. The official WebAssembly site offers the following description for a module:
We will discuss how to interact with the module using the JavaScript and Web APIs later in this chapter, so let's establish some context to understand how the module elements map to the API methods.
A module is made up of several sections, some of which you'll be interacting with through the JavaScript API:
Some of the keywords (import, export, and so on) should look familiar; they're present in the contents of the Wat file in the previous section. WebAssembly's components follow a logical mapping that directly correspond to the APIs (for example, you pass a memory and table instance into JavaScript's WebAssembly.instantiate() function). Your primary interaction with a module in binary format will be through these APIs.
In addition to the WebAssembly Core Specification, there are two API specifications for interacting with WebAssembly modules: the WebAssembly JavaScript Interface (JavaScript API) and the WebAssembly Web API. In the previous sections, we covered pertinent aspects of the Core Specification to become familiar with the underlying technology. If you never read the Core Specification (or if you skipped the first few sections of this chapter), it wouldn't inhibit the use of WebAssembly in your application. That is not the case for the APIs, as they describe the methods and interface required to instantiate and interact with your compiled Wasm module. In this section, we will review the Web and JavaScript APIs and describe how to load and communicate with a Wasm module using JavaScript.
Before digging into interactions, let's discuss the relationship between JavaScript and WebAssembly in the context of execution. The Core Specification contains the following description in the Execution section:
Under the hood, JavaScript uses something called agents to manage execution. The store being referred to in the definition is contained within an agent. The following diagram represents a JavaScript agent:
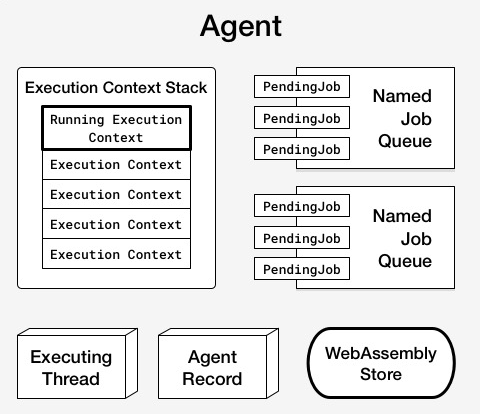
The store represents the state of the abstract machine. WebAssembly operations take a store and return an updated store. Each agent is associated with caches that map JavaScript objects to WebAssembly addresses. So why is this important? It represents the underlying method of interaction between WebAssembly modules and JavaScript. The JavaScript objects correspond to the WebAssembly namespace within the JavaScript API. With that in mind, let's dig into the interface.
The JavaScript API covers the various objects available on the global WebAssembly object in the browser. Before we discuss those, we'll start with the methods available on the WebAssembly object, with a brief overview of their intended purposes:
The instantiateStreaming() and compileStreaming() methods are currently only present in the Web API. In fact, these two methods comprise the entire specification. The methods available on the WebAssembly object are focused primarily on compiling and instantiating modules. With that in mind, let's discuss how to fetch and instantiate a Wasm module.
When you perform a fetch call to get a module, it returns a Promise that resolves with the raw bytes of that module, which need to be loaded into an ArrayBuffer and instantiated. Going forward, we will refer to this process as loading a module.
The following diagram demonstrates this process:
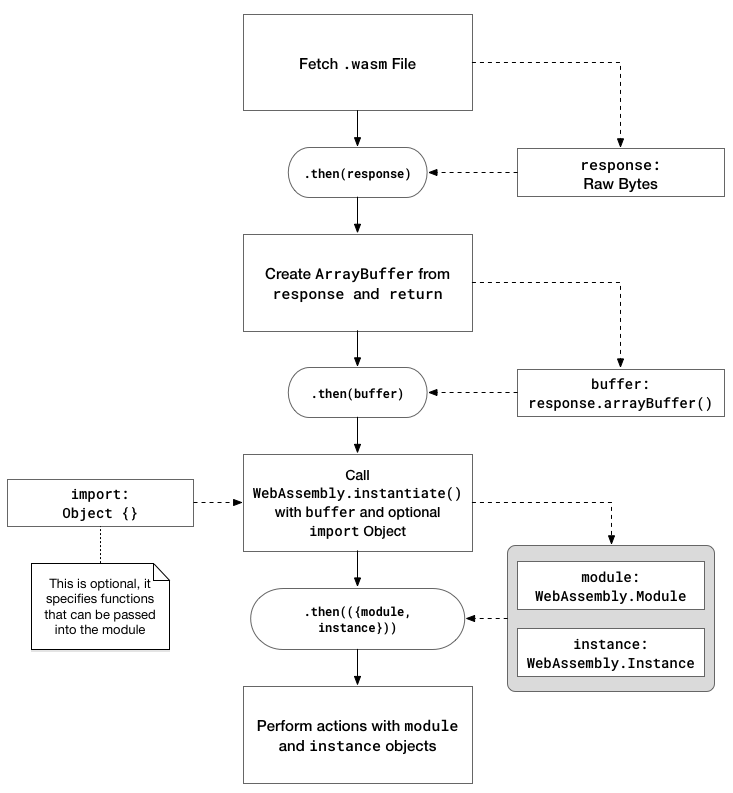
This process is actually quite simple using Promises. The following code demonstrates how a module is loaded. The importObj argument passes any data or functions to the Wasm module. You can disregard it for now, as we'll be discussing it in greater detail in Chapter 5, Creating and Loading a WebAssembly Module:
fetch('example.wasm')
  .then(response => response.arrayBuffer())
  .then(buffer => WebAssembly.instantiate(buffer, importObj))
  .then(({ module, instance }) => {
    // Do something with module or instance
  });
The preceding example dictates the method for loading the module using the instantiate() method. The instantiateStreaming() method is a little different and simplifies the process even more by fetching, compiling, and instantiating a module in a single step. The following code achieves the same goal (loading a module) using this method:
WebAssembly.instantiateStreaming(fetch('example.wasm'), importObj)
  .then(({ module, instance }) => {
    // Do something with module or instance
  });
The instantiation methods return a Promise that resolves with an object containing a compiled WebAssembly.Module (module) and WebAssembly.Instance (instance), both of which will be covered later in this section. In most cases, you will use one of these methods to load a Wasm module on your site. The instance contains all of the exported WebAssembly functions that you can call from your JavaScript code.
The compile() and compileStreaming() methods return a Promise that only resolves with a compiled WebAssembly.Module. This is useful if you want to compile a module and instantiate it at a later time. Mozilla Developer Network (MDN), the web docs site managed by Mozilla, provides an example in which the compiled module is passed to a Web Worker.
As far as the validate() method is concerned, its only purpose is to test whether the typed array or ArrayBuffer passed in as a parameter is valid. This would be called after the raw bytes of the response are loaded into an ArrayBuffer. This method wasn't included in the code examples because attempting to instantiate or compile an invalid Wasm module will throw either a TypeError or one of the Error objects present on the WebAssembly object. We will cover these Error objects later in this section.
In addition to the methods covered in the Loading a module and the WebAssembly namespace methods section, the global WebAssembly object has child objects that are used to interact with and troubleshoot WebAssembly. These objects correlate directly to the concepts we discussed in the sections on the WebAssembly binary and text formats. The following list contains these objects as well as their definitions taken from MDN:
Let's dig into each one individually, starting with the WebAssembly.Module object.
The WebAssembly.Module object is the intermediate step between the ArrayBuffer and the instantiated module. The compile() and instantiate() methods (and their streaming counterparts) return a Promise that resolves with a module (module in lowercase represents the compiled Module). A module can also be created synchronously by passing a typed array or ArrayBuffer directly into the constructor, but this is discouraged for large modules.
The Module object also has three static methods: exports(), imports(), and customSections(). All three take a module as a parameter, but customSections() takes a string representing the section name as its second parameter. Custom sections are described in the Binary Format section of the Core Specification and are intended to be used for debugging information or third-party extensions. In most cases, you won't need to define these. The exports() function is useful if you're using a Wasm module that you didn't create, although you'll only be able to see the name and kind (for example, function) of each export.
For simple use cases, you won't be dealing directly with the Module object or compiled module. Most of the interaction will take place with an Instance.
The WebAssembly.Instance object is the instantiated WebAssembly module, which means you can call exported WebAssembly functions from it. Calling instantiate() or instantiateStreaming() returns a Promise that resolves with an object containing an instance. You call WebAssembly functions by referencing the name of the function on the instance's export property. For example, if a module contained an exported function named sayHello(), you'd call the function using instance.exports.sayHello().
The WebAssembly.Memory object holds the memory accessed by a WebAssembly Instance. This memory can be accessed and changed from both JavaScript and WebAssembly. To create a new instance of Memory, you need to pass an object with an initial and (optional) maximum value to the WebAssembly.Memory() constructor. These values are in units of WebAssembly pages, where one page is 64 KB. You increase the size of the memory instance by calling the grow() function with a single parameter that represents the number of WebAssembly pages to grow by. You can also access the current buffer contained in the memory instance through its buffer property.
MDN describes two ways to get to a WebAssembly.Memory object. The first way is to construct it from JavaScript (var memory = new WebAssembly.Memory(...)), while the second way is to have it exported by a WebAssembly module. The important takeaway is that memory can be passed easily between JavaScript and WebAssembly.
The WebAssembly.Table object is an array-like structure that is used to store function references. Just as with WebAssembly.Memory, a Table can be accessed and changed from both JavaScript and WebAssembly. As of the time of writing, tables can only store function references, but it's likely that, as the technology evolves, additional entities will be able to be stored in tables as well.
To create a new Table instance, you need to pass an object with an element, initial, and (optional) maximum value. The element member is a string that represents the type of value stored in the table; currently the only valid value is "anyfunc" (for functions). The initial and maximum values represent the number of elements in the WebAssembly Table.
You can access the number of elements in the Table instance using the length property. The instance also includes methods to manipulate and query elements in the table. The get() method allows you to access the element at the given index, which is passed in as a parameter. The set() method allows you to set an element at the index specified as the first parameter to the value specified as the second parameter (per the preceding note, only functions are supported). Finally, grow() allows you to increase the size of the Table instance (number of elements) by the number passed in as a parameter.
The JavaScript API provides constructors to create instances of the Error objects specific to WebAssembly, but we won't spend too much time covering these objects. The object definition list at the beginning of this section describes the nature of each error, which may be raised if the specified condition is met. All three errors can be constructed with a message, filename, and line number parameter (all of which are optional), and has the same properties and methods as the standard JavaScript Error object.
We spent this chapter reviewing the various elements of WebAssembly and the corresponding JavaScript and Web APIs, but understanding how the pieces fit together can still be confusing. As we progress through the examples in this book and you're able to see how C/C++, WebAssembly, and JavaScript interact, these concepts will become clearer.
That being said, a demonstration of this interaction may help in clearing up some of the confusion. In this section, we're going to use an online tool called WasmFiddle to demonstrate the relationship between these elements so you can see WebAssembly in action and get a high-level overview of the development workflow.
WasmFiddle, located at https://wasdk.github.io/WasmFiddle/, is an online code editing tool that allows you to write some C or C++ code and convert it to Wat, compile it to Wasm, or interact with it directly using JavaScript. The C/C++ and JavaScript editors are minimal and aren't intended to be used as your primary development environment, but it offers a valuable service in the Wasm compiler. In Chapter 3, Setting Up A Development Environment, you'll discover that going from square one to generating Wasm files requires a little bit of work—being able to paste your C code into the browser and hitting a couple of buttons makes things much more convenient. The following diagram gives a quick overview of the interface:
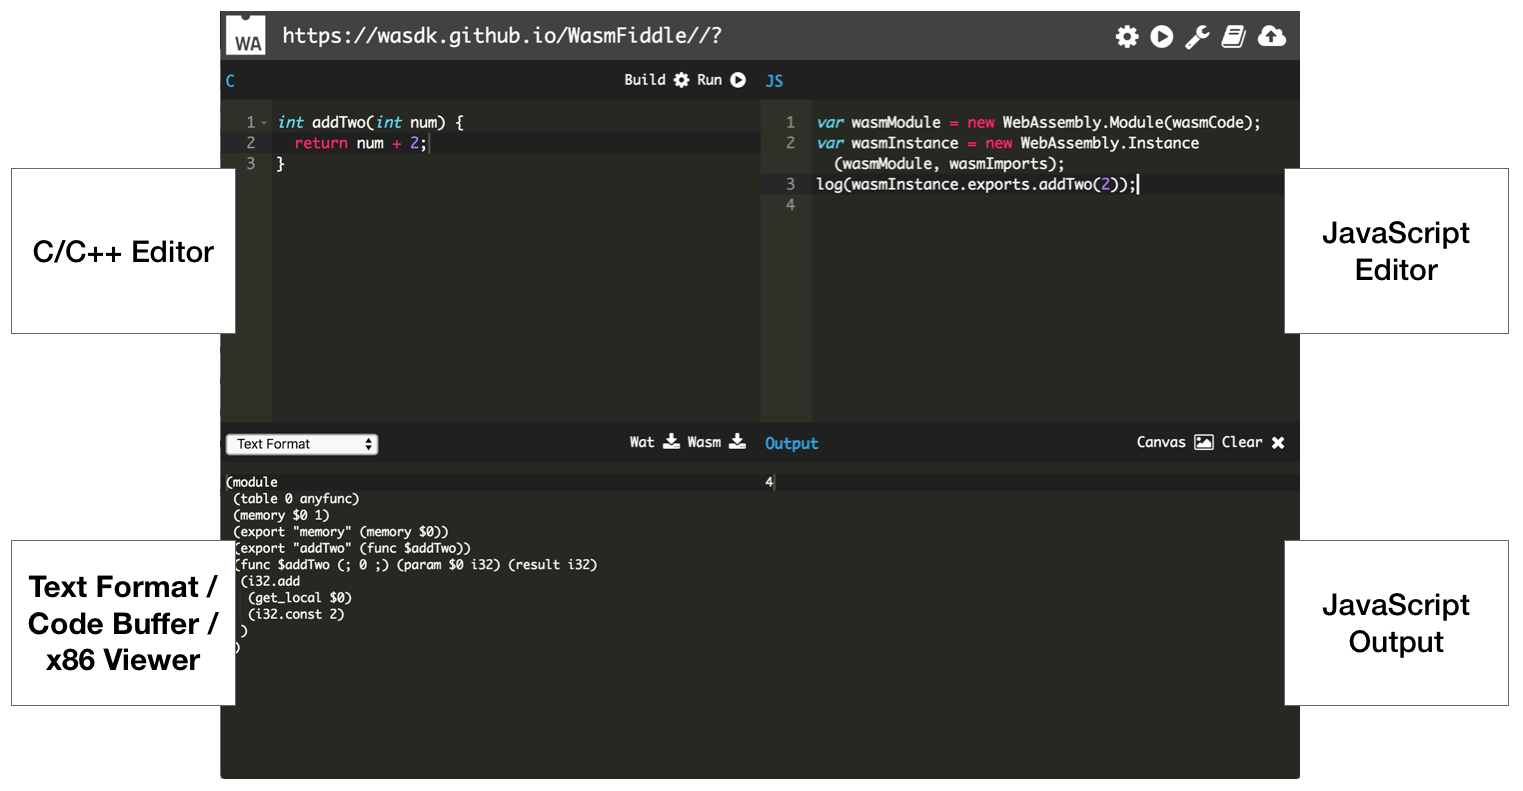
As you can see, the interface is relatively simple. Let's try out some code!
The upper-left pane in the following screenshot contains a simple C function that adds 2 to the number specified as a parameter. The lower-left pane contains the corresponding Wat:
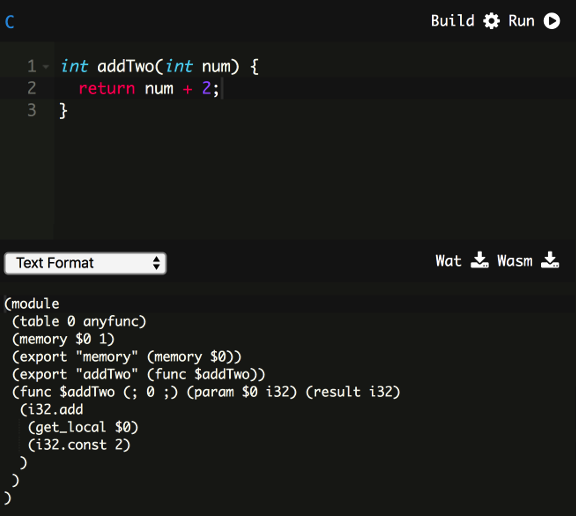
If this looks familiar, it's because this same code was used for the explanation of Wat's s-expressions in the beginning of this chapter. Digging a little deeper, you can see how the C code corresponds to the Wat output. The addTwo() function is exported from the module as a string on line 5. Line 5 also contains (func $addTwo), which references the $addTwo function on line 6. Line 6 specifies that a single parameter of type i32 (an integer) can be passed in and the result returned is also an i32. Pressing the Build button in the upper-right corner (or above the C/C++ editor) will compile the C code into a Wasm file. The Wasm will be available for download or interaction with JavaScript once the build is completed.
The upper-right pane in the following screenshot contains some JavaScript code to compile the Wasm that was generated in the previous step. The wasmCode was generated when the build finished, so it should be available automatically. Rather than use the instantiate() method, WasmFiddle creates a compiled WebAssembly.Module instance and passes that into the constructor of a new WebAssembly.Instance. The wasmImports object is currently empty, although we could pass in a WebAssembly.Memory and WebAssembly.Table instance if desired:
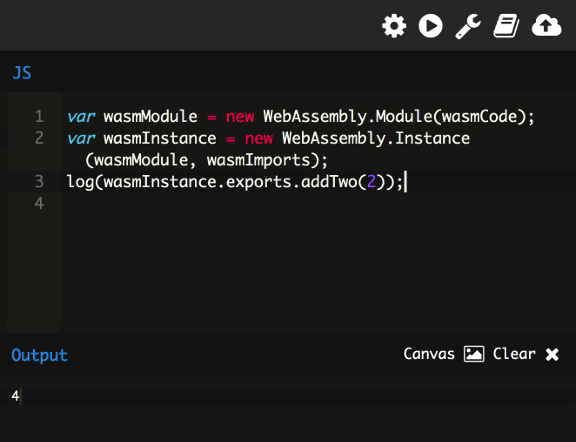
The final line of JavaScript prints the result of addTwo() to the output in the lower-right pane when passed the number 2. The log() method is a custom function that ensures the output is printed to the lower-right pane (the number 4). Note how the JavaScript code interacts with wasmInstance. The addTwo() function is called from the instance's exports object. Although this was a contrived example, it demonstrates the steps C or C++ code goes through before it can be used by JavaScript as a Wasm module.
In this chapter, we discussed the elements of WebAssembly and their relationship. The structure of the Core Specification was used to describe the mapping of the text and binary formats to a common abstract syntax. We highlighted aspects of the text format (Wat) that can be useful in the context of debugging and development, as well as why s-expressions are an excellent fit for the textual representation of the abstract syntax. We also reviewed details pertaining to the binary format and the various elements that make up a module. The methods and objects within the JavaScript and Web APIs were defined with descriptions of their roles with regard to WebAssembly interaction. Finally, a simple example of the relationship between source code, Wat, and JavaScript was presented using the WasmFiddle tool.
In Chapter 3, Setting Up a Development Environment, we'll install the development tooling we'll use to work effectively with WebAssembly.
Now that you're familiar with the elements of WebAssembly, it's time to set up a suitable development environment. Developing with WebAssembly is tantamount to developing in C or C++. The difference lies in the build process and the output. In this chapter, we will cover the development tooling, and how to install and configure it on your system.
Our goal for this chapter is to understand the following:
You'll need to install some applications and tooling to start developing WebAssembly. We will use Visual Studio Code, a text editor, to write our C/C++, JavaScript, HTML, and Wat. We'll also use Node.js for serving up the files and Git to manage our code. We will use package managers to install these tools, which makes the installation process much simpler than downloading and installing them manually. In this section, we will cover the operating systems, as well as the package managers for each platform. We'll also review each of the applications, with a brief overview of their role in the development process.
To ensure that the installation and configuration process goes smoothly, it's important to be aware of the operating systems I will use for the examples in this book. If you encounter an issue, it may be due to an incompatibility between the platform you're using and the one I'm using. In most cases, you shouldn't have an issue. For the sake of eliminating the OS version as a potential problem causer, I've provided details for the operating systems I'm using in the following list:
Package managers are tools that simplify the installation process for software. They allow us to upgrade, configure, uninstall, and search for available software from the command line without having to go to a website to download and run the installer. They also simplify the installation process for software that may have multiple dependencies or require manual configuration before use. In this section, I'll cover the package manager for each platform.
Homebrew is an excellent package manager for macOS that allows us to install most of the tools we will use out of the box. Homebrew is as simple as pasting the following command in Terminal and running it:
/usr/bin/ruby -e "$(curl -fsSL https://raw.githubusercontent.com/Homebrew/install/master/install)"
You'll see messages in Terminal that will walk you through the installation process. Once that's complete, you'll need to install an extension for Homebrew called Homebrew-Cask that allows you to install macOS applications without having to download the installer, mount it, and drag the application into the Applications folder. You can install this by running the following command:
brew tap caskroom/cask
That's it! You're now able to install applications by running either of these commands:
# For command line tools:
brew install <Tool Name>

# For desktop applications:
brew cask install <Application Name>
Apt is the package manager provided with Ubuntu; there's no need to install it. It allows you to install both command-line tools and applications out of the box. If an application isn't available from Apt's repository, you can add a repository using the following command:
add-apt-repository
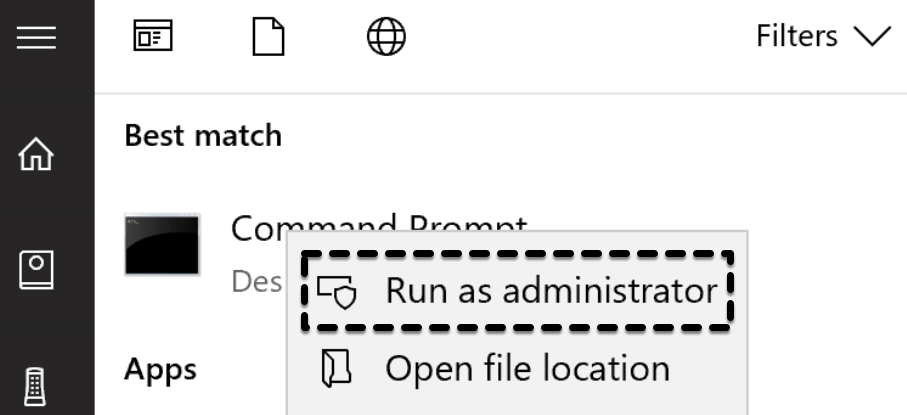
Chocolatey is a package manager for Windows. It's similar to Apt in that it lets you install both command-line tools and applications. To install Chocolatey, you need to run the command prompt (cmd.exe) as an administrator. You can do this by pressing the Start menu button, typing cmd, and right-clicking on the Command Prompt application and selecting Run as administrator:
Then just run the following command:
@"%SystemRoot%\System32\WindowsPowerShell\v1.0\powershell.exe" -NoProfile -InputFormat None -ExecutionPolicy Bypass -Command "iex ((New-Object System.Net.WebClient).DownloadString('https://chocolatey.org/install.ps1'))" && SET "PATH=%PATH%;%ALLUSERSPROFILE%\chocolatey\bin"
Git is a version control system (VCS) that allows you to track changes to files and manage work between multiple developers contributing to the same code base. Git is the VCS powering GitHub and GitLab, and is also available on Bitbucket (they also offer Mercurial, which is another VCS). Git will allow us to clone repositories from GitHub, and is a prerequisite for the EMSDK, which we'll cover in the next chapter. In this section, we will cover the installation process for Git.
Git is probably already available if you're using macOS. macOS comes bundled with Apple Git, which will probably be a few versions behind the most recent version. For the purposes of this book, the version you already have installed should be sufficient. If you wish to upgrade, you can install the most recent version of Git using Homebrew by running the following commands in Terminal:
# Install Git to the Homebrew installation folder (/usr/local/bin/git):
brew install git

# Ensure the default Git is pointing to the Homebrew installation:
sudo mv /usr/bin/git /usr/bin/git-apple
If you run this command, you should see /usr/local/bin/git:
which git
You can check to ensure that the installation was successful by running this command:
git --version
You can use apt to install Git; just run the following command in Terminal:
sudo apt install git
You can check to ensure that the installation was successful by running this command:
git --version
You can install Git using Chocolatey. Open up Command Prompt or PowerShell and run this command:
choco install git
You can check to ensure that the installation was successful by running this command:
git --version
The official website for Node.js describes it as an asynchronous event-driven JavaScript runtime. Node is designed to build scalable network applications. We will use it in this book to serve up our files and work with them in a browser. Node.js comes packaged with npm, a package manager for JavaScript, which will allow us to install packages globally and access them through the command line. In this section, we'll cover the installation process for each platform using the Node Version Manager (nvm).
We will use the long-term stable (LTS) release of Node.js (Version 8) to ensure that we're using the most stable version of the platform. We will use nvm to manage Node.js versions. This will prevent conflicts if you already have a higher (or lower) version of Node.js installed on your computer. nvm allows you to have multiple versions of Node.js installed that you can quickly switch to and isolate in the context of a single terminal window.
Run the following command in Terminal:
brew install nvm
Follow the post-installation steps Homebrew specifies to ensure that you can start using it (you may have to restart your Terminal session). If you cleared your Terminal contents before performing the steps, you can run this command to see the installation steps again:
brew info nvm
You can check to ensure that the installation was successful by running this command:
nvm --version
Ubuntu comes bundled with wget, which can retrieve files using HTTP/S and FTP/S protocols. The GitHub page for nvm (https://github.com/creationix/nvm) contains the following command to install it using wget:
wget -qO- https://raw.githubusercontent.com/creationix/nvm/v0.33.11/install.sh | bash
Once installed, restart Terminal to complete the installation. You can check to ensure that the installation was successful by running the following command:
nvm --version
nvm doesn't currently support Windows, so you're actually installing a different application named nvm-windows. The GitHub page for nvm-windows can be found at https://github.com/coreybutler/nvm-windows. Some of the commands are slightly different, but the installation command we run will be the same. To install nvm-windows, open up Command Prompt or PowerShell and run this command:
choco install nvm
You can check to ensure that the installation was successful by running the following command:
nvm --version
After installing nvm, you need to install the version of Node.js we will use in this book: version 8.11.1. To install it, run this command:
nvm install 8.11.1
If you didn't have Node.js or nvm previously installed, it will automatically set this to your default Node.js installation, so the output of this command should be v8.11.1:
node --version
If you have existing Node.js versions installed, you can either use v8.11.1 as a default, or ensure that you run this command to use v8.11.1 when working through the examples in this book:
nvm use 8.11.1
In the learn-webassembly repository, the code examples use GNU Make and VS Code's Tasks feature (which we'll cover in Chapter 5, Creating and Loading a WebAssembly Module) to perform the build tasks defined throughout the book. GNU Make is an excellent cross-platform tool for automating build processes. You can read more about GNU Make at https://www.gnu.org/software/make. Let's review the installation steps for each platform.
If you're using macOS or Linux, GNU make should already be installed. To validate this, run the following command in Terminal:
make -v
If you see version information, you're ready to go. Skip ahead to the Installing rimraf section. Otherwise, follow the GNU Make installation instructions for your platform.
To install GNU Make on macOS, run the following command from Terminal:
brew install make
You can check to ensure that the installation was successful by running this command:
make -v
If you see version information, skip to the Installing rimraf section.
To install GNU Make on Ubuntu, run the following command from Terminal:
sudo apt-get install make
You can check to ensure that the installation was successful by running this command:
make -v
If you see version information, skip to the Installing rimraf section.
You can install GNU make on Windows using Chocolatey. Open up Command Prompt or PowerShell and run the following command:
choco install make
You may need to restart the CLI to use the make command. Once restarted, run the following command to validate the installation:
make -v
If you see version information, continue to the next section. If you encounter issues, you may need to download and install the setup package at http://gnuwin32.sourceforge.net/packages/make.htm.
Some of the build steps defined in the Makefiles or VS Code Tasks delete files or directories. The commands required to delete a file or folder differ based on your platform and shell. To address this issue we'll use the rimraf npm package (https://www.npmjs.com/package/rimraf). Installing the package globally provides a rimraf command that performs the correct deletion operation for the operating system and shell.
To install rimraf, ensure that Node.js is installed and run the following command from a CLI:
npm install -g rimraf
To ensure that the installation was successful, run the following command:
rimraf --help
You should see usage instructions and a list of command line flags. Let's move on to the VS Code installation.
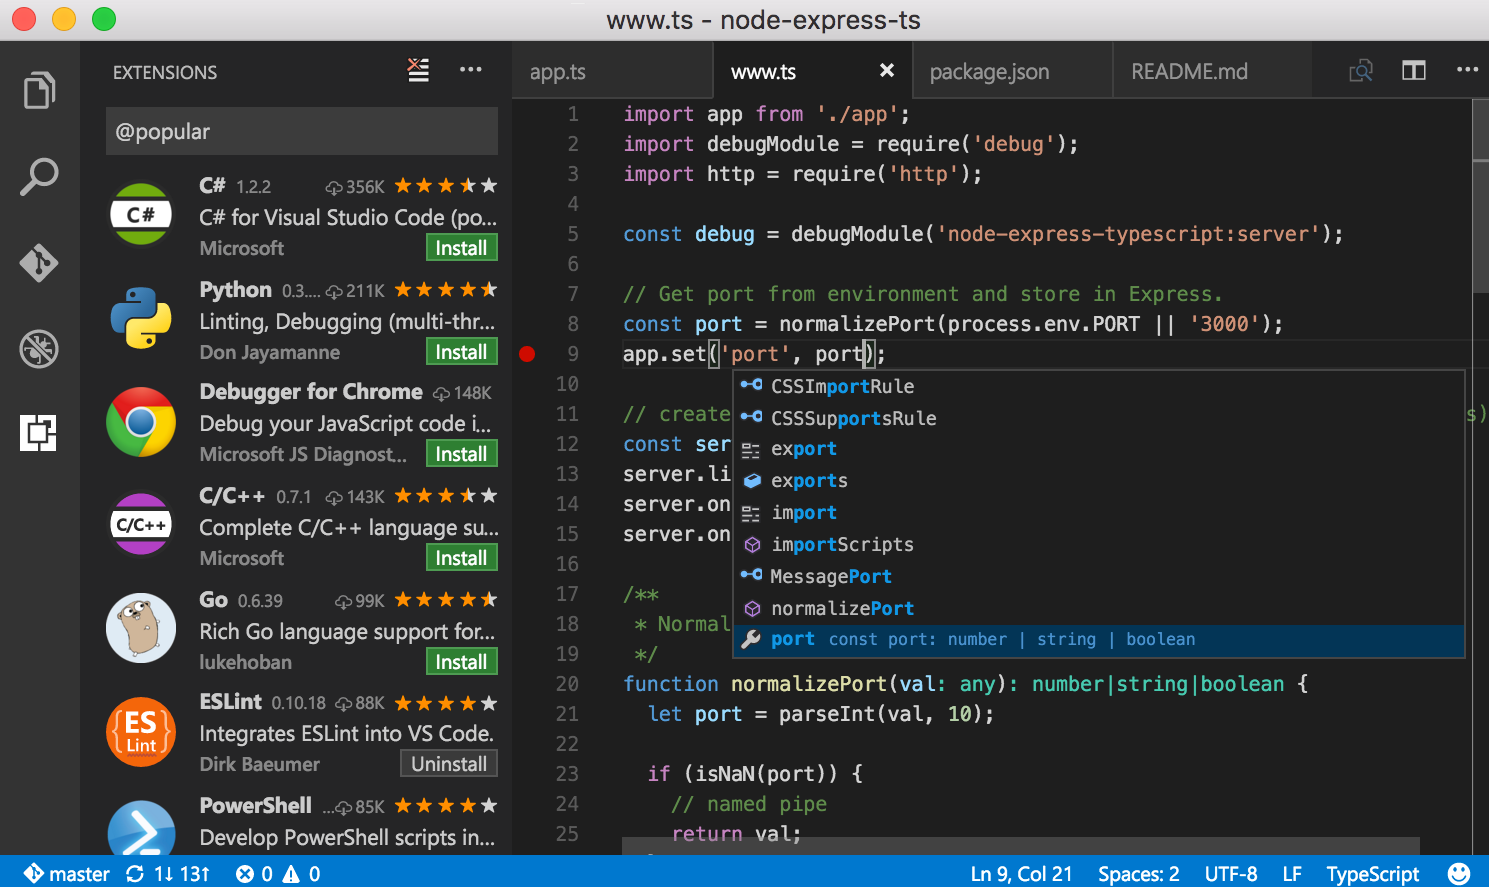
VS Code is a cross-platform text editor with multiple-language support and a rich extensions ecosystem. Integrated debugging and Git support are built in, and new features are being added all the time. We're able to use it for the entire WebAssembly development process throughout the course of this book. In this section, we will cover the installation steps for each platform:
Use Homebrew-Cask to install VS Code. Run the following command in Terminal to install:
brew cask install visual-studio-code
Once it's complete, you should be able to launch it from the Applications folder or the Launchpad.
The process for installing VS Code on Ubuntu has a few extra steps, but is still relatively simple. First, download the .deb file from VS Code's download page (https://code.visualstudio.com/Download). Once the download completes, run the following commands to complete the installation:
# Change directories to the Downloads folder
cd ~/Downloads

# Replace <file> with the name of the downloaded file
sudo dpkg -i <file>.deb

# Complete installation
sudo apt-get install -f
If you get a missing dependency error, you can fix it by running the following command before sudo dpkg:
sudo apt-get install libgconf-2-4
sudo apt --fix-broken install
You should now be able to open VS Code from the Launcher.
You can install VS Code using Chocolatey. Run this command from Command Prompt or PowerShell:
choco install visualstudiocode
Once installed, you can access it from the Start menu.
Out of the box, VS Code is a powerful text editor with a lot of great functionality. In addition to being highly configurable and customizable, it possesses an incredibly rich extensions ecosystem. We'll need to install some of these extensions so we won't need to use different editors for different programming languages. In this section, we will cover how to configure VS Code and which extensions to install to simplify the WebAssembly development process.
Customizing and configuring VS Code is simple and intuitive. You can manage custom settings such as editor font and tab sizes by selecting Code | Preferences | Settings on macOS or File | Preferences | Settings on Windows. User and workspace settings are managed separately in JSON files and auto completion is provided in case you can't remember the exact name of a setting. You can also change the themes or keyboard shortcuts by selecting the appropriate option in the Preferences menu. The settings file is also where you can set custom settings for any extensions you install. Some settings are added by default when you install an extension, so changing them is as simple as updating and saving this file.
We'll need to install some extensions as part of the configuration process. There are multiple ways to find and install extensions in VS Code. I prefer to click on the Extensions button (fourth button from the top in the Activity bar on the left-hand side of the editor), enter what I'm looking for in the Search box, and press the green Install button for the extension I'd like to install. You could also visit the VS Code Marketplace at https://marketplace.visualstudio.com/vscode, search for and select an extension you'd like to install, and press the green Install button on the extension's page. You can manage extensions through the command line as well. For more information, visit https://code.visualstudio.com/docs/editor/extension-gallery:

VS Code doesn't support C and C++ out of the box, but there is an excellent extension that allows you to work with these languages. It also doesn't support syntax highlighting for the WebAssembly text format, but there is an extension that adds that functionality as well. In this section, we will cover the installation and configuration of the C/C++ for VS Code and WebAssembly Toolkit for VSCode extensions.
The C/C++ extension for VS Code includes several features for writing and debugging C and C++ code, such as auto completion, symbol searching, class/method navigation, line-by-line code stepping, and many others. To install the extension, search for C/C++ in the Extensions and install the extension titled C/C++ (it's created by Microsoft) or navigate to the extension's official page at https://marketplace.visualstudio.com/items?itemName=ms-vscode.cpptools and press the green Install button.
Once installed, you can view configuration details for the extension by selecting the extension from the Extensions list in VS Code and selecting the Contributions tab. This tab contains the various settings, commands, and debugger details:
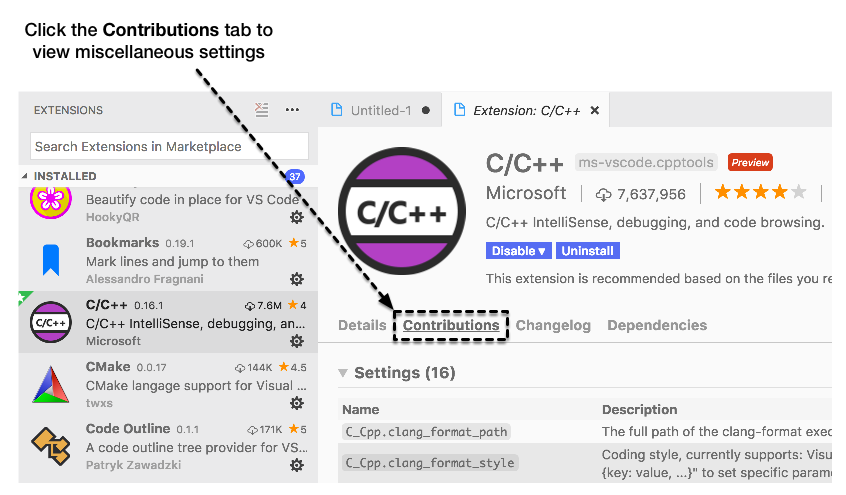
Microsoft has an official page for the extension, which you can view at https://code.visualstudio.com/docs/languages/cpp. This page describes, among other things, how to configure through the use of JSON files. Let's start by creating a new configuration file to manage our C/C++ environment. You can generate a new configuration file by pressing the F1 key, typing C/C, and selecting C/Cpp: Edit Configurations…:
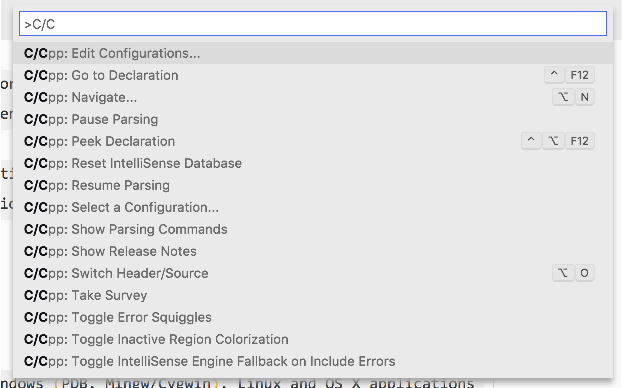
This will generate a new c_cpp_properties.json in a .vscode folder within your current project. The file will contain configuration options for your C/C++ compiler based on your platform, the C and C++ standards to use, and the include paths for header files. You can close this file once it's generated. We will revisit it when we configure the EMSDK.
There are a few different WebAssembly extensions for VS Code currently available. I'm using the WebAssembly Toolkit for VSCode extension because it allows you to right-click on a .wasm file and select Show WebAssembly, which displays the Wat representation of the file. You can install this extension through the Extensions panel (search for WebAssembly), or from the official extension page in the VS Code Marketplace (https://marketplace.visualstudio.com/items?itemName=dtsvet.vscode-wasm):
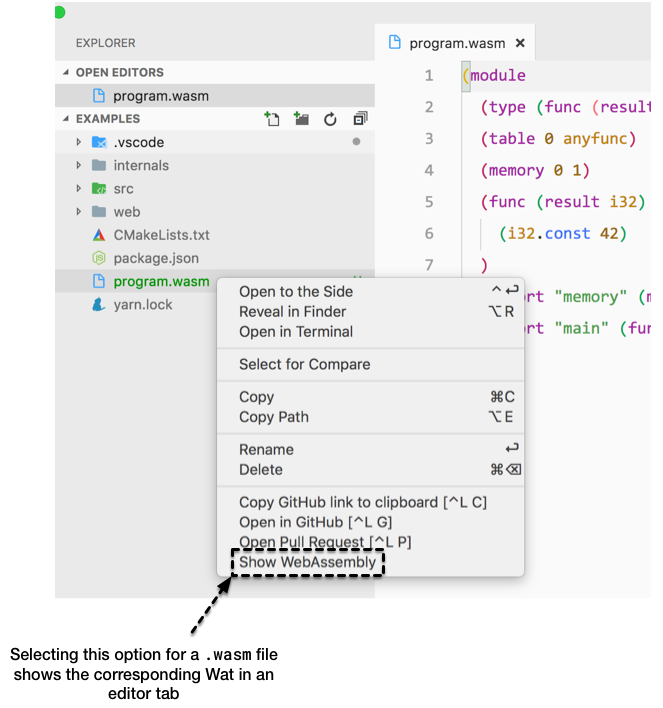
Once installed, you're ready to go! Now that you've got all of the required extensions, let's evaluate some optional extensions that can simplify common tasks.
VS Code has some great extensions to improve efficiency and customize the interface. In this section, I will cover some of the extensions I have installed that simplify common tasks as well as the user interface/icon themes. You don't need to install any of these extensions for the examples in this book, but you may find some of them useful.
This extension is incredibly helpful when working with HTML. It automatically changes the name of the closing tag if you change the tag type. For example, if you have a <div> element and you want to make it a <span>, changing the text of the opening element to span will update the closing element text (</div> to </span>):
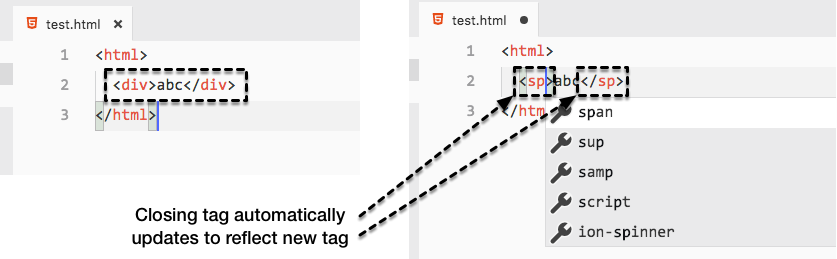
This extension colorizes the brackets, braces, and parentheses in your code so you can quickly identify the opening and closing brackets. WebAssembly's text format uses parentheses extensively, so being able to determine which elements are enclosed in which list makes debugging and evaluation much simpler:
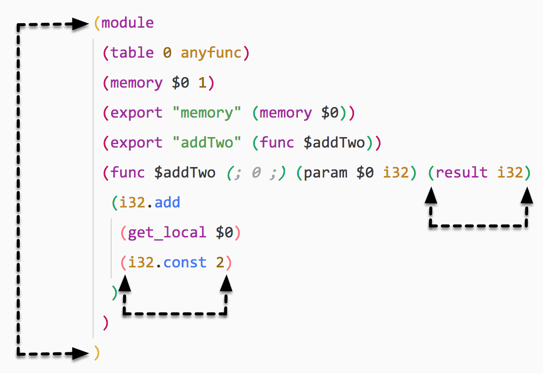
There are over 1,000 icon and interface themes available on the VS Code Marketplace. I'm including the Material Icon theme and Atom One Light theme in this section because they're being used in the screenshots in this book. The Material Icon theme is incredibly popular, with over 2 million downloads, while the Atom One Light theme has over 70,000 downloads:
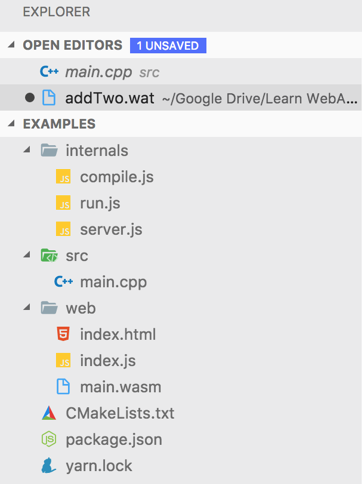
Interacting with and debugging Wasm modules will be done in the browser, which means we'll need a way to serve up a folder containing our example files. As we discussed in Chapter 2, Elements of WebAssembly - Wat, Wasm, and the JavaScript API, WebAssembly is integrated into the browser's JavaScript engine, but you'll need to make sure you're using a browser that supports it. In this section, we will provide instructions for cloning the book examples repository. We will also review how to quickly set up a local web server for testing and evaluating browser options to ensure that you're able to develop locally.
You may want to clone the GitHub repository now with all of the examples contained in this book. You'll definitely need to have the code available for Chapter 7, Creating an Application from Scratch, because the application's code base is too large to fit into a single chapter. Select a folder on your hard drive and run the following command to clone the repository:
git clone https://github.com/mikerourke/learn-webassembly
Once the clone process is complete, you'll find that the examples are organized by chapter. If there are several examples in a chapter, they're broken down by subfolders within the chapter folder.
We will use an npm package, serve, for serving up the files. To install, simply run this command:
npm install -g serve
Once installation is completed, you can serve up the files in any folder. To ensure that it's working, let's try serving up a local folder. The code for this section is located in the /chapter-03-dev-env folder of the learn-webassembly repository. Follow these instructions to validate your server installation:
<!doctype html>
<html lang="en-us">
  <title>Test Server</title>
</head>
<body>
  <h1>Test</h1>
  <div>
    This is some text on the main page. Click <a href="stuff.html">here</a>
    to check out the stuff page.
  </div>
</body>
</html>
<!doctype html>
<html lang="en-us">
<head>
  <title>Test Server</title>
</head>
<body>
  <h1>Stuff</h1>
  <div>
    This is some text on the stuff page. Click <a href="index.html">here</a>
    to go back to the index page.
  </div>
</body>
</html>
serve -l 8080 chapter-03-dev-env
You should see the following:
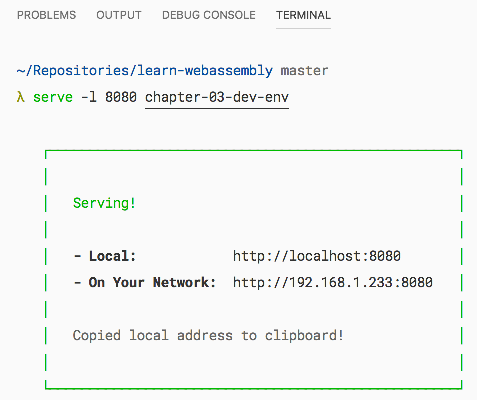
The -l 8080 flag tells serve to serve the folder on port 8080. The first link (http://127.0.0.1:8080) is only accessible on your computer. Any links below that can be used to access the page from another computer on your local network. If you navigate to the first link (http://127.0.0.1:8080/index.html) in your browser, you should see this:
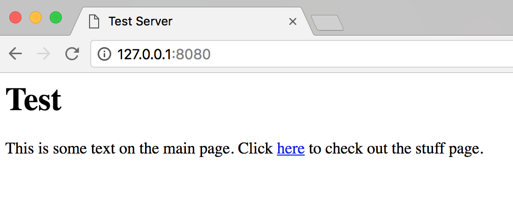
Clicking on the here link should bring you to the Stuff page (the address bar will show 127.0.0.1:8080/stuff.html. If everything is working correctly, it's time to validate your browser.
To ensure that you're able to test out the examples in a browser, you need to make sure that there's a global WebAssembly object available. To prevent any issues related to browser compatibility, I recommend that you have either Google Chrome or Mozilla Firefox installed for development. If you had either of these browsers installed beforehand, there's a very good chance that your browser is already valid. For the sake of being thorough, we will still cover the validation process. In this section, I will review the steps you can take to ensure that your browser supports WebAssembly.
The process for validating Chrome pretty straightforward. Select the button that looks like three vertical dots (next to the address bar) and select More Tools | Developer Tools or use the keyboard shortcut Cmd/Ctrl + Shift + I:
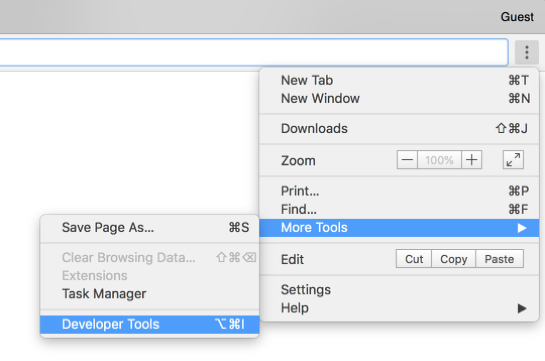
Once the Developer Tools window appears, select the Console tab, type WebAssembly, and press Enter. If you see this, your browser is valid:

The process for validating Firefox is almost identical to that for Google Chrome. Select Tools | Web Developer | Toggle Tools from the menu bar or use the keyboard shortcut Cmd/Ctrl + Shift + I:
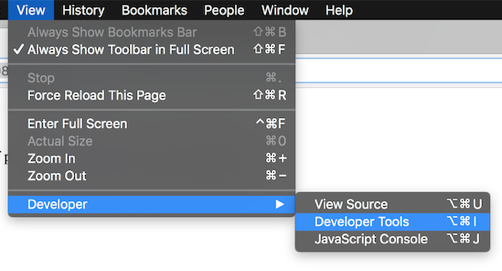
Select the Console tab, click inside the command input box, type WebAssembly, and press Enter. You'll see this if your version of Firefox is valid:
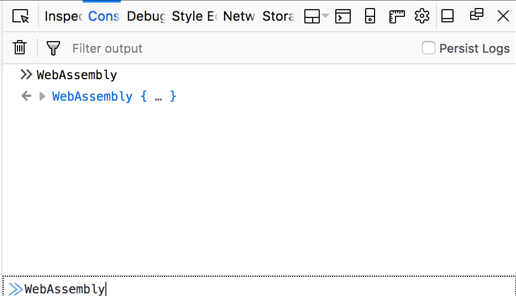
The validation process for other browsers is essentially the same; the only aspect of validation that differs across browsers is how to access the developer tools. If a WebAssembly object is available through the console of the browser you're using, you can use that browser for WebAssembly development.
In addition to the applications and tools we covered in the previous sections, there are some great tools that are free to use and rich in functionality that can greatly improve your development process. I won't have time to cover them all, but I'd like to highlight the ones I use regularly. In this section, I will briefly review some of the popular tooling and applications that are available for each platform.
The default macOS installation includes Terminal application, Terminal, that is sufficient for use in this book. If you want a more full-featured Terminal, iTerm2 is an excellent option. It offers features such as splitting windows, extensive customization, multiple profiles, and a Toolbelt feature that can display notes, running jobs, command history, and so on. You can download the image file from the official website (https://www.iterm2.com/) and install it manually, or install iTerm with Homebrew-Cask using this command:
brew cask install iterm2
Here is iTerm2 running with the Toolbelt open and multiple editor windows:
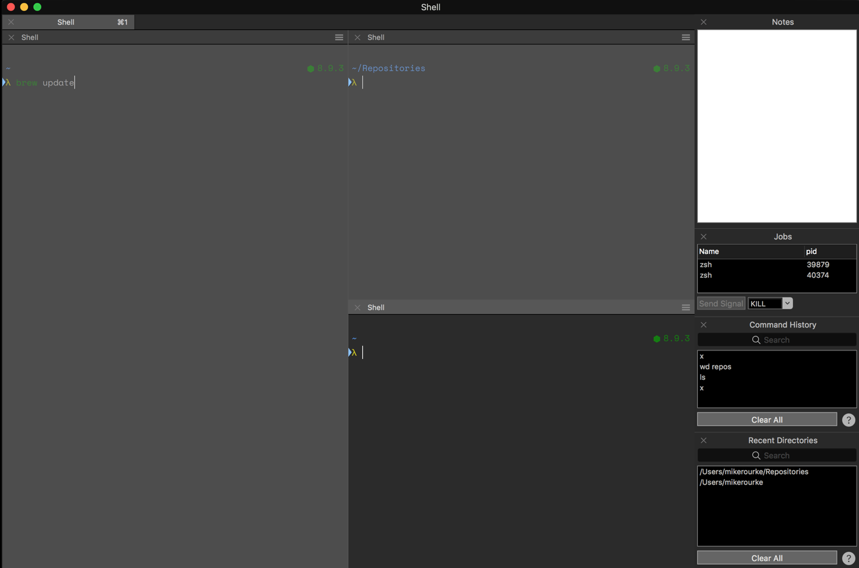
Terminator is the iTerm and cmder of Ubuntu, Terminal emulator that allows for multiple tabs and panes within a single window. Terminator also provides features such as drag and drop, find functionality, and a wide array of plugins and themes. You can install Terminator through apt. To ensure that you're using the most recent version, run the following commands in Terminal:
sudo add-apt-repository ppa:gnome-terminator
sudo apt-get update
sudo apt-get install terminator
Refer the screenshot:
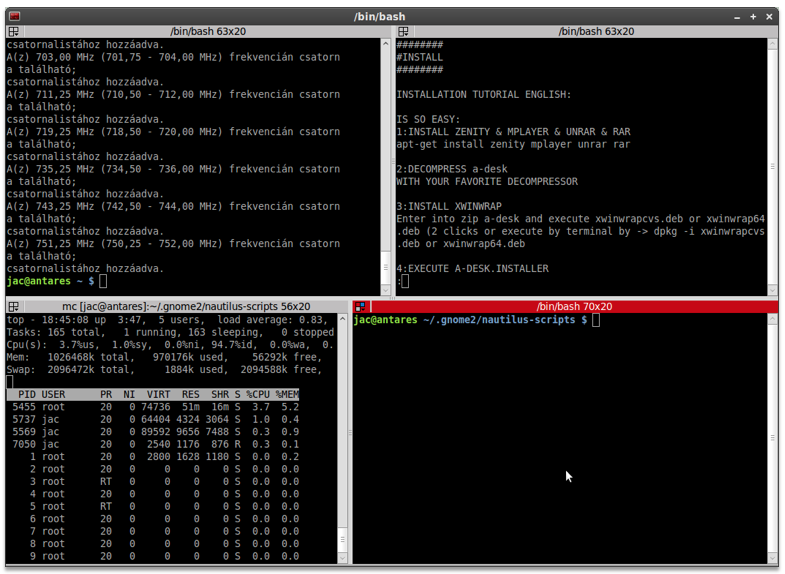
cmder is a console emulator for Windows that adds a lot of functionality and features to the standard Command Prompt or PowerShell. It offers features such as multiple tabs and customizability. It allows you to open up instances of different shells within the same program. You can download and install it from the official website (cmder.net) or install it with Chocolatey using this command:
choco install cmder
This is how it looks:
Zsh is an interactive shell that improves upon Bash. Oh-My-Zsh is a configuration manager for Zsh that has a wide array of useful plugins. You can see the whole list on their website (https://github.com/robbyrussell/oh-my-zsh). For example, if you want powerful autocomplete and syntax highlighting functionality in your CLI, there are plugins such as zsh-autosuggestion and zsh-syntax-highlighting. You can install and configure Zsh and Oh-My-Zsh on macOS, Linux, and Windows. The Oh-My-Zsh page has installation instructions as well as a list of themes and plugins.
In this chapter, we covered the installation and configuration process for the development tooling we will use to start working with WebAssembly. We discussed how to install Git, Node.js, and VS Code quickly and easily using a package manager for your operating systems (for example, Homebrew for macOS). The steps to configure VS Code were presented as well as the required and optional extensions you can add to enhance the development experience. We discussed how to install a local web server for testing and how to validate your browser to ensure that WebAssembly is supported. Finally, we briefly reviewed some additional tools you can install for your platform to aid in development.
In Chapter 4, Installing the Required Dependencies, we'll install the required dependencies and test out the toolchain.
Now that you have your development environment set up and you're ready to start writing C, C++, and JavaScript, it's time to add the final piece of the puzzle. In order to generate .wasm files from our C/C++ code, we need to install and configure the Emscripten SDK (EMSDK).
In this chapter, we'll discuss the development workflow and talk about how the EMSDK fits into the development process. Detailed instructions will be provided on how to install and configure the EMSDK on each platform, as well as any prerequisites. Once the installation and configuration process is complete, you'll test it out by writing and compiling some C code.
Our goal for this chapter is to understand the following:
The development workflow for WebAssembly is comparable to most other languages that require compilation and a build process. Before getting into the tooling setup, we will cover the development cycle. In this section, we will establish some context for the tooling we will install and configure in the rest of this chapter.
For this book, we will write C and C++ code and compile it down to a Wasm module, but the workflow will be applicable to any programming language that compiles down to a .wasm file. The following diagram gives an overview of the process:
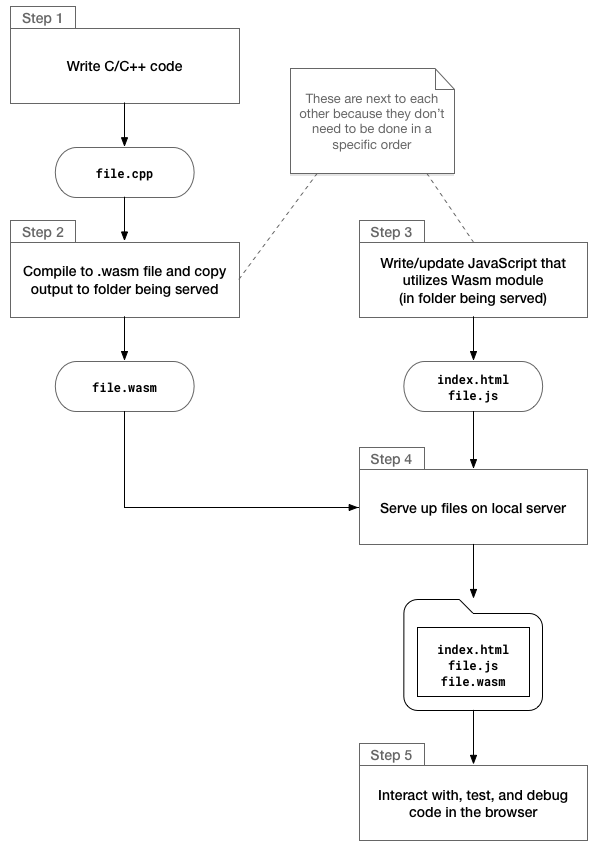
This process will be used throughout the book for our examples, so you'll get an idea of how the project structure corresponds to the workflow. We'll use some of the tooling available to expedite and simplify the process, but the steps will still be the same.
There are many editors and tools available to simplify the development process. Fortunately, C/C++ and JavaScript have been around for quite some time, so you can take advantage of the options that suit you best. The list of tools for WebAssembly is considerably shorter, given the shorter duration of which the technology has existed, but they are out there.
The primary tool we'll use, VS Code, offers some excellent and useful features for simplifying the build and development process. In addition to using it for writing our code, we'll utilize VS Code's built-in Tasks feature to build the .wasm file from C/C++. By creating a .vscode/tasks.json file in the project root folder, we're able to specify all of the parameters associated with the build step and run it quickly using a keyboard shortcut. In addition to performing a build, we can start and stop a running Node.js process (that is, the local server in the workflow diagram). We'll cover how to add and configure these features in the next chapter.
We'll use Emscripten to compile our C/C++ code down to .wasm files. Up to this point, Emscripten has only briefly been mentioned in a general context. Since we'll use this tool and the corresponding Emscripten SDK (EMSDK) in the build process, it's important to understand what each technology is and the part it plays in the development workflow. In this section, we'll describe Emscripten's purpose and discuss its relationship to the EMSDK.
So what is Emscripten? Wikipedia provides the following definition:
We discussed source-to-source compilers (or transpilers) in the first chapter and used TypeScript as an example. Transpilers convert source code in one programming language to equivalent source code in another programming language. To elaborate on Emscripten running as a backend to the LLVM compiler, we need to provide some additional details about LLVM.
The official website for LLVM (https://llvm.org) defines the LLVM as a collection of modular and reusable compiler and toolchain technologies. There are several sub-projects that make up LLVM, but we'll be focusing on the two that Emscripten utilizes: Clang and the LLVM Core libraries. To understand how these pieces fit together, let's review the design of a three-stage compiler:
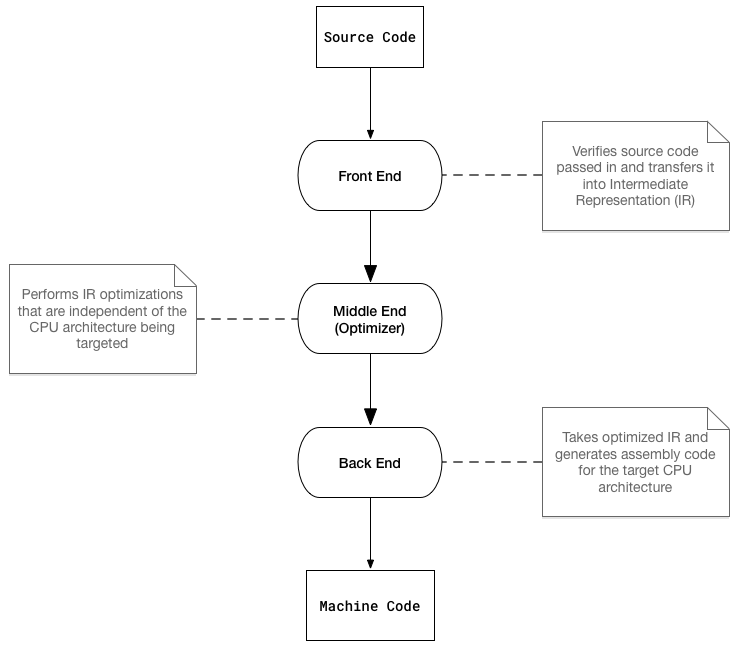
The process is relatively straightforward: three separate stages or ends handle the compilation process. This design allows for different frontends and backends for various programming languages and target architectures and completely decouples the machine code from the source code by using an intermediate representation. Now let's associate each compilation stage with a component of the toolchain we'll use to generate WebAssembly:
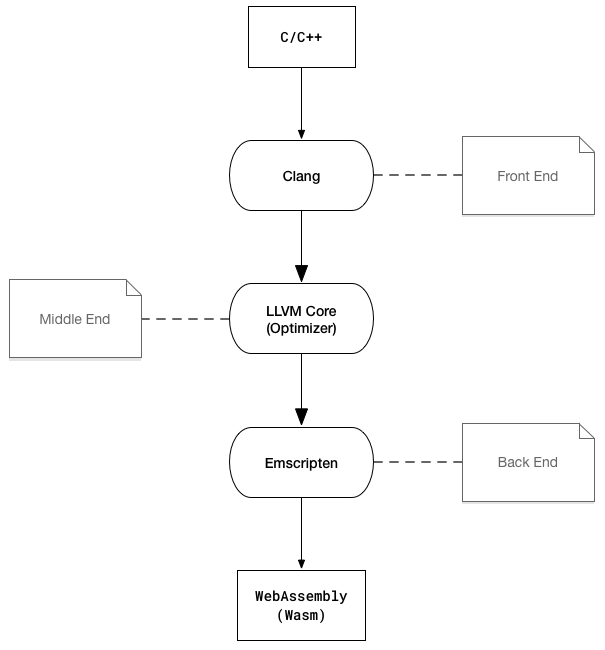
Clang is used to compile C/C++ down to LLVM's Intermediate Representation (IR), which Emscripten compiles to a Wasm module (binary format). The two diagrams also demonstrate the relationship between Wasm and machine code. You can think of WebAssembly as a CPU in the browser, with Wasm being the machine code on which it runs.
Emscripten refers to the toolchain used to compile C and C++ down to asm.js or WebAssembly. The EMSDK is used to manage the tools in the toolchain and the corresponding configuration. This eliminates the need for complex environment setup and prevents issues with incompatible versions of tooling. By installing the EMSDK, we have all of the tooling we need (with the exception of the prerequisites) to use the Emscripten compiler. The following diagram is a visual representation of the Emscripten toolchain (with the EMSDK shown in dark gray):
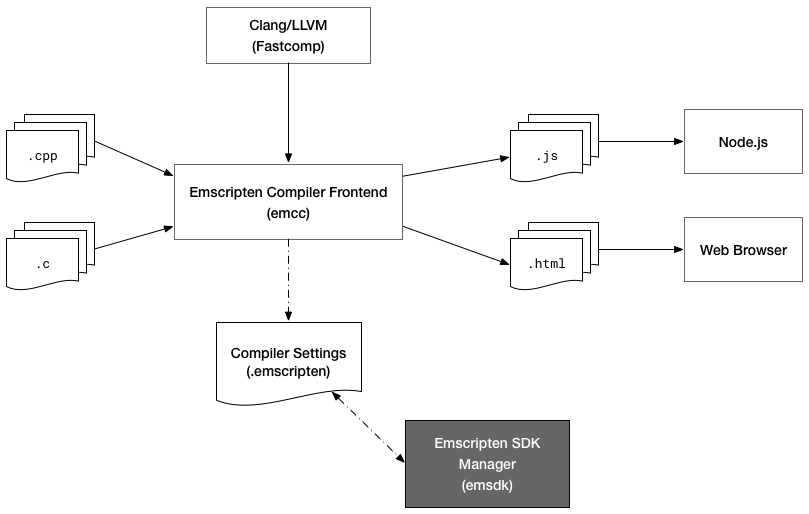
Now that you have a better understanding of Emscripten and the EMSDK, let's move on to the installation process for the prerequisites.
Before installing and configuring the EMSDK, we'll need to install some prerequisites. You installed two of the prerequisites in Chapter 3, Setting Up a Development Environment: Node.js and Git. Each platform has slightly different installation processes and tooling requirements. In this section, we cover the installation process for the prerequisite tooling for each platform.
It's possible that you already have all of the prerequisites installed. Here are the three that you'll need regardless of the platform:
Note the Python version; this is important because installing the wrong version could cause the installation process to fail. If you followed along in Chapter 2, Elements of WebAssembly - Wat, Wasm, and the JavaScript API, and installed Node.js and Git, all that's left is to install Python 2.7 and any additional prerequisites specified for your platform. The Python installation process for each platform will be specified in the following subsections.
There are three additional tools you'll need to install prior to installing the EMSDK:
You can install Xcode from the macOS App Store. If you already had Xcode installed, you can check if the Command Line Tools are installed by going to Xcode | Preferences | Locations and checking if the Command Line Tools option has a value. The Command Line Tools should have already been installed if you installed the Homebrew package manager:
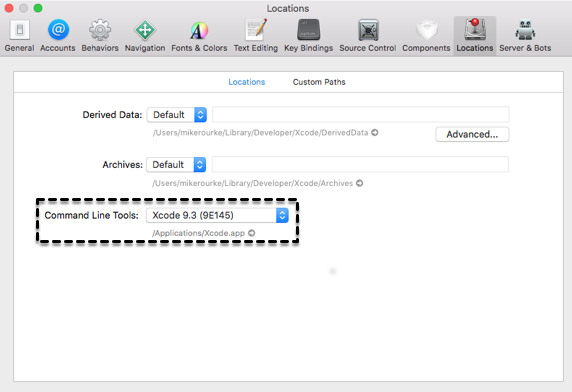
If you don't see that, open up Terminal and run this command:
xcode-select --install
Once complete, you can install CMake by running this command:
brew install cmake
Prior to installing Python, run this command:
python --version
If you see Python 2.7.xx (where xx is the patch version and can be any number), you're ready to install the EMSDK. If you get an error saying the Python command wasn't found or you see Python 3.x.xx, I recommend you install pyenv, a Python Version manager. To install pyenv, run this command:
brew install pyenv
You'll need to take some additional configuration steps to finalize the installation. Follow the installation instructions for Homebrew at https://github.com/pyenv/pyenv#homebrew-on-mac-os-x. After installing and configuring pyenv, run this command to install Python 2.7:
pyenv install 2.7.15
After the installation is complete, run this command:
pyenv global 2.7.15
To ensure you're using the correct version of Python, run this command:
python --version
You should see Python 2.7.xx, where xx is the patch version (I was seeing 2.7.10, which will work fine).
Ubuntu should already have Python 2.7 installed. You can confirm this by running this command:
python --version
If you see Python 2.7.xx (where xx is the patch version and can be any number), you're ready to install the EMSDK. If you get an error saying the python command wasn't found or you see Python 3.x.xx, I recommend you install pyenv, a Python version manager. Before installing pyenv, check if you have curl installed. You can do this by running the following command:
curl --version
If you see a version number and other information, curl is installed. If not, you can install curl by running the following command:
sudo apt-get install curl
Once the curl installation is complete, run this command to install pyenv:
curl -L https://github.com/pyenv/pyenv-installer/raw/master/bin/pyenv-installer | bash
After installing and configuring pyenv, run this command to install Python 2.7:
pyenv install 2.7.15
If you encounter build issues, navigate to the Common build problems page at https://github.com/pyenv/pyenv/wiki/common-build-problems. After the installation is complete, run this command:
pyenv global 2.7.15
To ensure you're using the correct version of Python, run this command:
python --version
You should see Python 2.7.xx, where xx is the patch version (I was seeing 2.7.10, which will work fine).
The only additional prerequisite for Windows is Python 2.7. Before attempting the installation, run this command:
python --version
If you see Python 2.7.xx (where xx is the patch version and can be any number), you're ready to install the EMSDK. If you get an error saying the Python command wasn't found, or you see Python 3.x.xx and Python 2.7 isn't installed on your system, run this command to install Python 2.7:
choco install python2 -y
If you saw Python 3.x.xx prior to installing Python 2.7, you should be able to change the current Python version by updating your path. Before attempting the EMSDK installation, run this command to set Python to 2.7:
SET PATH=C:\Python27\python.exe
If you have all of the prerequisites installed, you're ready to install the EMSDK. The process for getting the EMSDK up and running is relatively straightforward. In this section, we cover the installation process for the EMSDK and demonstrate how to update your VS Code C/C++ configuration to accommodate for Emscripten.
First, select a folder to install the EMSDK. I created a folder at ~/Tooling (or C:\Users\Mike\Tooling on Windows). In a terminal, cd into the folder you just created and run this command:
git clone https://github.com/juj/emsdk.git
Once the clone process is complete, follow the instructions to complete the installation from the section below that corresponds to your platform.
Once the clone process is complete, run each of the commands from the following code snippet. If you see a message recommending that you run git pull instead of ./emsdk update, use the git pull command prior to running the ./emsdk install latest command:
# Change directory into the EMSDK installation folder
cd emsdk

# Fetch the latest registry of available tools
./emsdk update

# Download and install the latest SDK tools
./emsdk install latest

# Make the latest SDK active for the current user (writes ~/.emscripten file)
./emsdk activate latest

# Activate PATH and other environment variables in the current Terminal
source ./emsdk_env.sh
The source ./emsdk_env.sh command will activate the environment variables in the current Terminal, which means every time you create a new Terminal instance, you'd have to re-run it. To prevent having to take this step, you can add the following line to your Bash or Zsh configuration file (that is, ~/.bash_profile or ~/.zshrc):
source ~/Tooling/emsdk/emsdk_env.sh > /dev/null
If you installed the EMSDK in a different location, make sure that you update the path to reflect this. Adding this line to your configuration file will run that environment update command automatically so you can start using the EMSDK immediately. To ensure you can use the Emscripten compiler, run this command:
emcc --version
If you see a message with version information, the setup was successful. If you see an error message stating that the command was not found, double-check your configuration. You may have specified an invalid path for the emsdk_env.sh in your Bash or Zsh configuration file.
Before completing the installation, I recommend you use PowerShell going forward. The examples in this book will be using PowerShell inside cmder. Once the clone process is complete, run each of the commands given in the following code snippet. If you see a message recommending that you run git pull instead of ./emsdk update, use the git pull command prior to running the ./emsdk install latest command:
# Change directory into the EMSDK installation folder
cd emsdk

# Fetch the latest registry of available tools
.\emsdk update

# Download and install the latest SDK tools
.\emsdk install latest

# Make the latest SDK active for the current user (writes ~/.emscripten file)
.\emsdk activate --global latest
The --global flag in the .\emsdk activate command allows you to run emcc without having to run a script to set the environment variables each session. To ensure you can use the Emscripten compiler, restart your CLI and run this command:
emcc --version
If you see a message with version information, the setup was successful.
If you haven't already done so, create a folder that will contain the code samples we'll be working through (the examples use the name book-examples). Open this folder in VS Code, press the F1 key, and select C/Cpp: Edit Configurations… to create a .vscode/c_cpp_properties.json file in the root of your project. It should open the file automatically. Add the following line to the browse.path array: "${env:EMSCRIPTEN}/system/include". This will prevent errors being thrown if you include the emscripten.h header. You may need to manually create the browse object with a path entry if it didn't generate one automatically. The following snippet represents the updated configuration file on Ubuntu:
{
  "name": "Linux",
  "includePath": [
    "/usr/include",
    "/usr/local/include",
    "${workspaceFolder}",
    "${env:EMSCRIPTEN}/system/include"
  ],
  "defines": [],
  "intelliSenseMode": "clang-x64",
  "browse": {
    "path": [
      "/usr/include",
      "/usr/local/include",
      "${workspaceFolder}"
      ],
    "limitSymbolsToIncludedHeaders": true,
    "databaseFilename": ""
  }
}
After installing and configuring the EMSDK, you'll need to test it to ensure you're able to generate Wasm modules from C/C++ code. The easiest way to test it is to compile some code using the emcc command and try running it in a browser. In this section, we'll validate the EMSDK installation by writing and compiling some simple C code and evaluating the Wat associated with the .wasm output.
We'll use some very simple C code to test our compiler installation. We won't need to import any headers or external libraries. We won't use C++ for this test because we need to perform an extra step with C++ to prevent name mangling, which we'll describe in greater detail in Chapter 6, Interacting with JavaScript and Debugging. The code for this section is located in the /chapter-04-installing-deps folder of the learn-webassembly repository. Follow the instructions listed here to test out the EMSDK.
Create a subfolder named /chapter-04-installing-deps in your /book-examples folder. Next, create a new file in this folder named main.c and populate it with the following contents:
int addTwoNumbers(int leftValue, int rightValue) {
    return leftValue + rightValue;
}
In order to compile a C/C++ file with Emscripten, we'll use the emcc command. We need to pass some arguments to the compiler to ensure we get a valid output that we can utilize in the browser. To generate a Wasm file from a C/C++ file, the command follows this format:
emcc <file.c> -Os -s WASM=1 -s SIDE_MODULE=1 -s BINARYEN_ASYNC_COMPILATION=0 -o <file.wasm>
Here's a breakdown of each of the arguments for the emcc command:
| Argument | Description |
| <file.c> | Path of the C or C++ input file that will be compiled down to a Wasm module; we'll replace this with the actual file path when we run the command. |
| -Os | Compiler optimization level. This optimization flag allows for module instantiation without requiring Emscripten's glue code. |
| -s WASM=1 | Tells the compiler to compile code to WebAssembly. |
| -s SIDE_MODULE=1 | Ensures only a WebAssembly module is output (no glue code). |
| -s BINARYEN_ASYNC_COMPILATION=0 |
From official docs: Whether to compile the wasm asynchronously, which is more efficient and does not block the main thread. This is currently required for all but the smallest modules to run in V8.
|
| -o <file.wasm> | Path of output file .wasm file. We'll replace this with the desired output path when we run the command. |
To test if Emscripten is working correctly, open the integrated terminal in VS Code and run the following commands:
# Ensure you're in the /chapter-04-installing-deps folder:
cd chapter-04-installing-deps

# Compile the main.c file to main.wasm:
emcc main.c -Os -s WASM=1 -s SIDE_MODULE=1 -s BINARYEN_ASYNC_COMPILATION=0 -o main.wasm
It may take a minute to compile the file the first time, but subsequent builds will be much faster. If the compilation was successful, you should see a main.wasm file in the /chapter-04-installing-deps folder. If you encounter an error, Emscripten's error message should be descriptive enough to help you correct the issue.
If everything completed successfully, you can view the Wat associated with the main.wasm file by right-clicking main.wasm in VS Code's file explorer and selecting Show WebAssembly from the context menu. The output should look like this:
(module
  (type $t0 (func (param i32)))
  (type $t1 (func (param i32 i32) (result i32)))
  (type $t2 (func))
  (type $t3 (func (result f64)))
  (import "env" "table" (table $env.table 2 anyfunc))
  (import "env" "memoryBase" (global $env.memoryBase i32))
  (import "env" "tableBase" (global $env.tableBase i32))
  (import "env" "abort" (func $env.abort (type $t0)))
  (func $_addTwoNumbers (type $t1) (param $p0 i32) (param $p1 i32) (result i32)
    get_local $p1
    get_local $p0
    i32.add)
  (func $runPostSets (type $t2)
    nop)
  (func $__post_instantiate (type $t2)
     get_global $env.memoryBase
    set_global $g2
    get_global $g2
    i32.const 5242880
    i32.add
    set_global $g3)
  (func $f4 (type $t3) (result f64)
    i32.const 0
    call $env.abort
    f64.const 0x0p+0 (;=0;))
  (global $g2 (mut i32) (i32.const 0))
  (global $g3 (mut i32) (i32.const 0))
  (global $fp$_addTwoNumbers i32 (i32.const 1))
  (export "__post_instantiate" (func $__post_instantiate))
  (export "_addTwoNumbers" (func $_addTwoNumbers))
  (export "runPostSets" (func $runPostSets))
  (export "fp$_addTwoNumbers" (global 4))
  (elem (get_global $env.tableBase) $f4 $_addTwoNumbers))
If the compiler ran successfully, you're ready to move on to the next step and write JavaScript code to interact with the module, which we'll cover in the next chapter.
In this chapter, we covered the overall development workflow when working with WebAssembly. In order to generate our .wasm files, we're using Emscripten, which requires the installation of the EMSDK. Prior to reviewing any installation details, we discussed the technologies under the hood and described how they relate to each other and to WebAssembly. We covered each of the steps required to get EMDSK working locally on your computer. The installation process for the EMSDK on each platform was presented, as well as the installation and configuration instructions for the EMSDK. After installing the EMSDK , we tested the compiler (no to). That was the emcc command we ran in the previous section. Using the emcc command on a simple C code file to ensure Emscripten was working correctly. In the next chapter, we'll walk through the process of creating and loading your first module!
The flags we passed to the emcc command in Chapter 4, Installing the Required Dependencies, produced a single .wasm file that could be loaded and instantiated in the browser using the native WebAssembly object. The C code was a very simple example intended to test the compiler without having to accommodate for included libraries or WebAssembly's limitations. We can overcome some of the limitations of WebAssembly in our C / C++ code with minimal performance loss by utilizing some of Emscripten's capabilities.
In this chapter, we'll cover the compilation and loading steps that correspond with the use of Emscripten's glue code. We'll also describe the process for compiling/outputting strictly .wasm files and loading them using the browser's WebAssembly object.
Our goal for this chapter is to understand the following:
In Chapter 4, Installing the Required Dependencies, you wrote and compiled a simple three-line program to ensure your Emscripten installation was valid. We passed several flags to the emcc command that were required to only output a single .wasm file. By passing other flags to the emcc command, we can output JavaScript glue code alongside the .wasm file as well as an HTML file to handle the loading process. In this section, we're going to write a more complex C program and compile it with the output options that Emscripten offers.
We didn't include any header files or pass in any functions in the example we covered in Chapter 4, Installing the Required Dependencies. Since the intention of the code was solely to test if the compiler installation was valid, there wasn't much need. Emscripten offers a lot of extra functionality that enables us to interact with our C and C++ code with JavaScript and vice versa. Some of these capabilities are Emscripten-specific and don't correspond to the Core Specification or its APIs. In our first example, we'll take advantage of one of Emscripten's ported libraries and a function provided by Emscripten's API.
The following program uses a Simple DirectMedia Layer (SDL2) to move a rectangle diagonally across a canvas in an infinite loop. It was taken from https://github.com/timhutton/sdl-canvas-wasm, but I converted it from C++ to C and modified the code slightly. The code for this section is located in the /chapter-05-create-load-module folder of the learn-webassembly repository. Follow the following instructions to compile C with Emscripten.
Create a folder in your /book-examples folder named /chapter-05-create-load-module. Create a new file in this folder named with-glue.c and populate it with the following contents:
/*
 * Converted to C code taken from:
 * https://github.com/timhutton/sdl-canvas-wasm
 * Some of the variable names and comments were also
 * slightly updated.
 */
#include <SDL2/SDL.h>
#include <emscripten.h>
#include <stdlib.h>

// This enables us to have a single point of reference
// for the current iteration and renderer, rather than
// have to refer to them separately.
typedef struct Context {
  SDL_Renderer *renderer;
  int iteration;
} Context;

/*
 * Looping function that draws a blue square on a red
 * background and moves it across the <canvas>.
 */
void mainloop(void *arg) {
    Context *ctx = (Context *)arg;
    SDL_Renderer *renderer = ctx->renderer;
    int iteration = ctx->iteration;

    // This sets the background color to red:
    SDL_SetRenderDrawColor(renderer, 255, 0, 0, 255);
    SDL_RenderClear(renderer);

    // This creates the moving blue square, the rect.x
    // and rect.y values update with each iteration to move
    // 1px at a time, so the square will move down and
    // to the right infinitely:
    SDL_Rect rect;
    rect.x = iteration;
    rect.y = iteration;
    rect.w = 50;
    rect.h = 50;
    SDL_SetRenderDrawColor(renderer, 0, 0, 255, 255);
    SDL_RenderFillRect(renderer, &rect);

    SDL_RenderPresent(renderer);

    // This resets the counter to 0 as soon as the iteration
    // hits the maximum canvas dimension (otherwise you'd
    // never see the blue square after it travelled across
    // the canvas once).
    if (iteration == 255) {
        ctx->iteration = 0;
    } else {
        ctx->iteration++;
    }
}

int main() {
    SDL_Init(SDL_INIT_VIDEO);
    SDL_Window *window;
    SDL_Renderer *renderer;

    // The first two 255 values represent the size of the <canvas>
    // element in pixels.
    SDL_CreateWindowAndRenderer(255, 255, 0, &window, &renderer);

    Context ctx;
    ctx.renderer = renderer;
    ctx.iteration = 0;

    // Call the function repeatedly:
    int infinite_loop = 1;

    // Call the function as fast as the browser wants to render
    // (typically 60fps):
    int fps = -1;

    // This is a function from emscripten.h, it sets a C function
    // as the main event loop for the calling thread:
    emscripten_set_main_loop_arg(mainloop, &ctx, fps, infinite_loop);

    SDL_DestroyRenderer(renderer);
    SDL_DestroyWindow(window);
    SDL_Quit();

    return EXIT_SUCCESS;
}
The emscripten_set_main_loop_arg() toward the end of the main() function is available because we included emscripten.h at the top of the file. The variables and functions prefixed with SDL_ are available because of the #include <SDL2/SDL.h> at the top of the file. If you're seeing a squiggly red error line under the <SDL2/SDL.h> statement, you can disregard it. It's due to SDL's include path not being present in your c_cpp_properties.json file.
Now that we have our C code written, we'll need to compile it. One of the required flags you must pass to the emcc command is -o <target>, where <target> is the path to the desired output file. The extension of that file will do more than just output that file; it impacts some of the decisions the compiler makes. The following table, taken from Emscripten's emcc documentation at http://kripken.github.io/emscripten-site/docs/tools_reference/emcc.html#emcc-o-target, defines the generated output types based on the file extension specified:
| Extension | Output |
| <name>.js |
JavaScript glue code (and .wasm if the s WASM=1 flag is specified). |
| <name>.html |
HTML and separate JavaScript file (<name>.js). Having the separate JavaScript file improves page load time. |
| <name>.bc |
LLVM bitcode (default). |
| <name>.o |
LLVM bitcode (same as .bc). |
| <name>.wasm |
Wasm file only (with flags specified from Chapter 4, Installing the Required Dependencies). |
You can disregard the .bc and .o file extensions—we won't need to output LLVM bitcode. The .wasm extension isn't on the emcc Tools Reference page, but it is a valid option if you pass the correct compiler flags. These output options factor into the C/C++ code we write.
If you specify an HTML file extension (for example, -o with-glue.html) for the output, you'll end up with a with-glue.html, with-glue.js, and with-glue.wasm file (assuming you also specified -s WASM=1). If you have a main() function in the source C/C++ file, it'll execute that function as soon as the HTML loads. Let's compile our example C code to see this in action. To compile it with the HTML file and JavaScript glue code, cd into the /chapter-05-create-load-module folder and run the following command:
emcc with-glue.c -O3 -s WASM=1 -s USE_SDL=2 -o with-glue.html
The first time you run this command, Emscripten is going to download and build the SDL2 library. It could take several minutes to complete this, but you'll only need to wait once. Emscripten caches the library so subsequent builds will be much faster. Once the build is complete, you'll see three new files in the folder: HTML, JavaScript, and Wasm files. Run the following command to serve the file locally:
serve -l 8080
If you open your browser up to http://127.0.0.1:8080/with-glue.html, you should see the following:
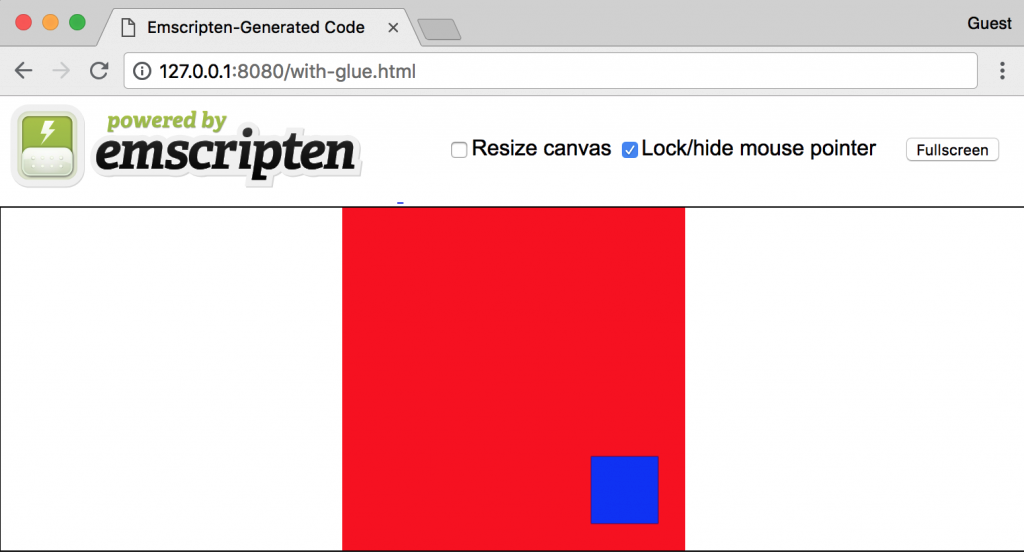
The blue rectangle should be moving diagonally from the upper-left corner of the red rectangle to the lower-right. Since you specified a main() function in the C file, Emscripten knows it should execute it right away. If you open up the with-glue.html file in VS code and scroll to the bottom of the file, you will see the loading code. You won't see any references to the WebAssembly object; that's being handled in the JavaScript glue code file.
The loading code that Emscripten generates in the HTML file contains error handling and other helpful functions to ensure the module is loading before executing the main() function. If you specify .js for the extension of the output file, you'll have to create an HTML file and write the loading code yourself. In the next section, we're going to dig into the loading code in more detail.
Loading and interacting with a module that utilizes Emscripten's glue code is considerably different from WebAssembly's JavaScript API. This is because Emscripten provides additional functionality for interacting with the JavaScript code. In this section, we're going to discuss the loading code that Emscripten provides when outputting an HTML file and review the process for loading an Emscripten module in the browser.
If you specify -o <target>.html when running the emcc command, Emscripten generates an HTML file and automatically adds code to load the module to the end of the file. Here's what the loading code in the HTML file looks like with the contents of each Module function excluded:
var statusElement = document.getElementById('status');
var progressElement = document.getElementById('progress');
var spinnerElement = document.getElementById('spinner');

var Module = {
  preRun: [],
  postRun: [],
  print: (function() {...})(),
  printErr: function(text) {...},
  canvas: (function() {...})(),
  setStatus: function(text) {...},
  totalDependencies: 0,
  monitorRunDependencies: function(left) {...}
};

Module.setStatus('Downloading...');

window.onerror = function(event) {
  Module.setStatus('Exception thrown, see JavaScript console');
  spinnerElement.style.display = 'none';
  Module.setStatus = function(text) {
    if (text) Module.printErr('[post-exception status] ' + text);
  };
};
The functions within the Module object are present to detect and address errors, monitor the loading status of the Module, and optionally execute some functions before or after the run() method from the corresponding glue code file executes. The canvas function, shown in the following snippet, returns the <canvas> element from the DOM that was specified in the HTML file before the loading code:
canvas: (function() {
  var canvas = document.getElementById('canvas');
  canvas.addEventListener(
    'webglcontextlost',
    function(e) {
      alert('WebGL context lost. You will need to reload the page.');
      e.preventDefault();
    },
    false
  );

  return canvas;
})(),
This code is convenient for detecting errors and ensuring the Module is loaded, but for our purposes, we won't need to be as verbose.
Emscripten's generated loading code provides helpful error handling. If you're using Emscripten's output in production, I would recommend that you include it to ensure you're handling errors correctly. However, we don't actually need all the code to utilize our Module. Let's write some much simpler code and test it out. First, let's compile our C file down to glue code with no HTML output. To do that, run the following command:
emcc with-glue.c -O3 -s WASM=1 -s USE_SDL=2 -s MODULARIZE=1 -o custom-loading.js
The -s MODULARIZE=1 compiler flag allows us to use a Promise-like API to load our Module. Once the compilation is complete, create a file in the /chapter-05-create-load-module folder named custom-loading.html and populate it with the following contents:
<!doctype html>
<html lang="en-us">
<head>
  <title>Custom Loading Code</title>
</head>
<body>
  <h1>Using Custom Loading Code</h1>
  <canvas id="canvas"></canvas>
  <script type="application/javascript" src="custom-loading.js"></script>
  <script type="application/javascript">
    Module({
      canvas: (() => document.getElementById('canvas'))(),
    })
      .then(() => {
        console.log('Loaded!');
      });
  </script>
</body>
</html>
The loading code is now using ES6's arrow function syntax for the canvas loading function, which reduces the lines of code required. Start your local server by running the serve command within the /chapter-05-create-load-module folder:
serve -l 8080
When you navigate to http://127.0.0.1:8080/custom-loading.html in your browser, you should see this:
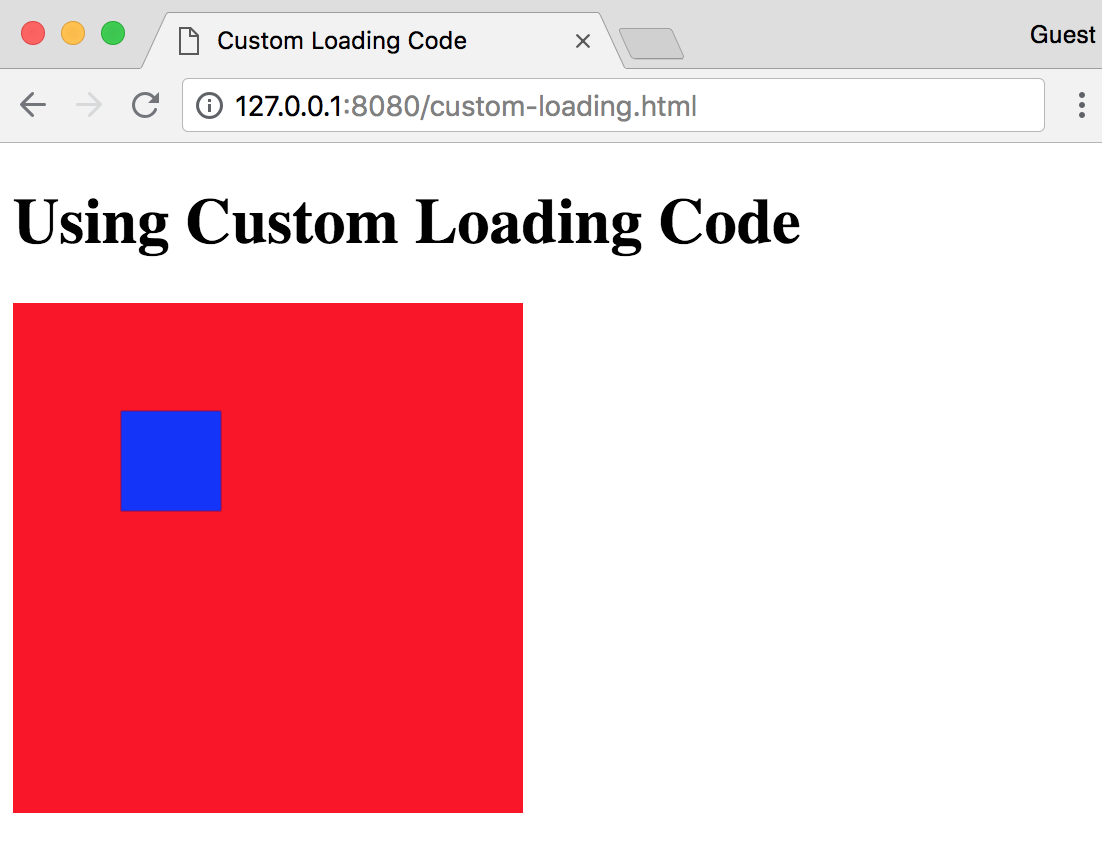
Of course, the function we're running isn't very complex, but it demonstrates the bare-bones requirements for loading Emscripten's Module. We will examine the Module object in much greater detail in Chapter 6, Interacting with JavaScript and Debugging, but for now just be aware that the loading process is different from WebAssembly, which we'll cover in the next section.
If we want to use WebAssembly according to the official specification, without the extra features that Emscripten provides, we need to pass some flags to the emcc command and ensure we're writing code that can be used by WebAssembly with relative ease. In the Writing the example C code section, we wrote a program that rendered a blue rectangle that moved diagonally across a red canvas. It utilized one of Emscripten's ported libraries, SDL2. In this section, we're going to write and compile some C code that doesn't rely on Emscripten's helper methods and ported libraries.
Before we get to the C code we'll use for our WebAssembly module, let's try an experiment. Open the CLI in the /chapter-05-create-load-module folder, and try running this command:
emcc with-glue.c -Os -s WASM=1 -s USE_SDL=2 -s SIDE_MODULE=1 -s BINARYEN_ASYNC_COMPILATION=0 -o try-with-glue.wasm
You should see a try-with-glue.wasm file appear in VS Code's file explorer panel after the compilation is complete. Right-click on the file and select Show WebAssembly. The beginning of the corresponding Wat representation should resemble the following code:
(module
  (type $t0 (func (param i32)))
  (type $t1 (func (param i32 i32 i32 i32 i32) (result i32)))
  (type $t2 (func (param i32) (result i32)))
  (type $t3 (func))
  (type $t4 (func (param i32 i32) (result i32)))
  (type $t5 (func (param i32 i32 i32 i32)))
  (type $t6 (func (result i32)))
  (type $t7 (func (result f64)))
  (import "env" "memory" (memory $env.memory 256))
  (import "env" "table" (table $env.table 4 anyfunc))
  (import "env" "memoryBase" (global $env.memoryBase i32))
  (import "env" "tableBase" (global $env.tableBase i32))
  (import "env" "abort" (func $env.abort (type $t0)))
  (import "env" "_SDL_CreateWindowAndRenderer" (func $env._SDL_CreateWindowAndRenderer (type $t1)))
  (import "env" "_SDL_DestroyRenderer" (func $env._SDL_DestroyRenderer (type $t0)))
  (import "env" "_SDL_DestroyWindow" (func $env._SDL_DestroyWindow (type $t0)))
  (import "env" "_SDL_Init" (func $env._SDL_Init (type $t2)))
  (import "env" "_SDL_Quit" (func $env._SDL_Quit (type $t3)))
  (import "env" "_SDL_RenderClear" (func $env._SDL_RenderClear (type $t2)))
  (import "env" "_SDL_RenderFillRect" (func $env._SDL_RenderFillRect (type $t4)))
  (import "env" "_SDL_RenderPresent" (func $env._SDL_RenderPresent (type $t0)))
  (import "env" "_SDL_SetRenderDrawColor" (func $env._SDL_SetRenderDrawColor (type $t1)))
  (import "env" "_emscripten_set_main_loop_arg" (func $env._emscripten_set_main_loop_arg (type $t5)))
  ...
If you wanted to load this in a browser and execute it, you'd have to pass in an importObj object to WebAssembly's instantiate() or compile() function with an env object containing each of those import "env" functions. Emscripten handles all of this for us behind the scenes with the glue code, which makes it an incredibly valuable tool. However, we can replace the SDL2 functionality by using the DOM while still tracking the rectangle's location in C.
We will write the C code differently to ensure we only have to pass a few functions into the importObj.env object to execute the code. Create a file named without-glue.c in the /chapter-05-create-load-module folder and populate it with the following contents:
/*
 * This file interacts with the canvas through imported functions.
 * It moves a blue rectangle diagonally across the canvas
 * (mimics the SDL example).
 */
#include <stdbool.h>

#define BOUNDS 255
#define RECT_SIDE 50
#define BOUNCE_POINT (BOUNDS - RECT_SIDE)

// These functions are passed in through the importObj.env object
// and update the rectangle on the <canvas>:
extern int jsClearRect();
extern int jsFillRect(int x, int y, int width, int height);

bool isRunning = true;

typedef struct Rect {
  int x;
  int y;
  char direction;
} Rect;

struct Rect rect;

/*
 * Updates the rectangle location by 1px in the x and y in a
 * direction based on its current position.
 */
void updateRectLocation() {
    // Since we want the rectangle to "bump" into the edge of the
    // canvas, we need to determine when the right edge of the
    // rectangle encounters the bounds of the canvas, which is why
    // we're using the canvas width - rectangle width:
    if (rect.x == BOUNCE_POINT) rect.direction = 'L';

    // As soon as the rectangle "bumps" into the left side of the
    // canvas, it should change direction again.
    if (rect.x == 0) rect.direction = 'R';

    // If the direction has changed based on the x and y
    // coordinates, ensure the x and y points update
    // accordingly:
    int incrementer = 1;
    if (rect.direction == 'L') incrementer = -1;
    rect.x = rect.x + incrementer;
    rect.y = rect.y + incrementer;
}

/*
 * Clear the existing rectangle element from the canvas and draw a
 * new one in the updated location.
 */
void moveRect() {
    jsClearRect();
    updateRectLocation();
    jsFillRect(rect.x, rect.y, RECT_SIDE, RECT_SIDE);
}

bool getIsRunning() {
    return isRunning;
}

void setIsRunning(bool newIsRunning) {
    isRunning = newIsRunning;
}

void init() {
    rect.x = 0;
    rect.y = 0;
    rect.direction = 'R';
    setIsRunning(true);
}
We will call the functions from the C code to determine the x and y coordinates. The setIsRunning() function can be used to pause the rectangle's movement. Now that our C code is ready, let's compile it. In the VS Code terminal, cd into the /chapter-05-create-load-module folder, and run the following command:
emcc without-glue.c -Os -s WASM=1 -s SIDE_MODULE=1 -s BINARYEN_ASYNC_COMPILATION=0 -o without-glue.wasm
Once the compilation is complete, you can right-click on the resultant without-glue.wasm file and select Show WebAssembly to see the Wat representation. You should see the following at the top of the file for the import "env" items:
(module
  (type $t0 (func (param i32)))
  (type $t1 (func (result i32)))
  (type $t2 (func (param i32 i32 i32 i32) (result i32)))
  (type $t3 (func))
  (type $t4 (func (result f64)))
  (import "env" "memory" (memory $env.memory 256))
  (import "env" "table" (table $env.table 8 anyfunc))
  (import "env" "memoryBase" (global $env.memoryBase i32))
  (import "env" "tableBase" (global $env.tableBase i32))
  (import "env" "abort" (func $env.abort (type $t0)))
  (import "env" "_jsClearRect" (func $env._jsClearRect (type $t1)))
  (import "env" "_jsFillRect" (func $env._jsFillRect (type $t2)))
  ...
We need to pass in the _jsClearRect and _jsFillRect functions within the importObj object. We'll cover how to do that in the section on the HTML file with JavaScript interaction code.
The emcc command is a little verbose, and having to manually run this on the command line for different files can get cumbersome. To expedite the compilation process, we can use VS Code's Tasks feature to create a build task for the files we'll use. To create a build task, select Tasks | Configure Default Build Task…, select the Create tasks.json from template option, and select Others to generate a simple tasks.json file in the .vscode folder. Update the contents of the file to contain the following:
{
  // See https://go.microsoft.com/fwlink/?LinkId=733558
  // for the documentation about the tasks.json format
  "version": "2.0.0",
  "tasks": [
    {
      "label": "Build",
      "type": "shell",
      "command": "emcc",
      "args": [
        "${file}",
        "-Os",
        "-s", "WASM=1",
        "-s", "SIDE_MODULE=1",
        "-s", "BINARYEN_ASYNC_COMPILATION=0",
        "-o", "${fileDirname}/${fileBasenameNoExtension}.wasm"
       ],
      "group": {
        "kind": "build",
        "isDefault": true
       },
       "presentation": {
         "panel": "new"
       }
     }
  ]
}
The label value is simply a name to refer to when running a task. The type and command values indicate that it should run the emcc command in a shell (terminal). The args value is an array of arguments to be passed to the emcc command (based on space separation). The "${file}" argument tells VS Code to compile the currently open file. The "${fileDirname}/${fileBasenameNoExtension}.wasm" argument indicates that the .wasm output will have the same name as the currently open file (with a .wasm extension), and it should be placed in the active folder of the currently open file. If you don't specify ${fileDirname}, the output file will be placed in the root folder (rather than /chapter-05-create-load-module in this case).
The group object indicates that this task is the default build step, so if you use the keyboard shortcut Cmd/Ctrl + Shift + B, this is the task that will be run. The presentation.panel value of "new" tells VS Code to open up a new CLI instance when the build step runs. This is a personal preference and can be omitted.
You can save and close the tasks.json file once it's fully populated. To test it out, first delete the without-glue.wasm file that you generated with the emcc command in the previous section. Next, ensure you have without-glue.c open with the cursor in the file and run the build task by either selecting Tasks | Run Build Task… or using the keyboard shortcut Cmd/Ctrl + Shift + B. A new panel in the integrated terminal will perform the compilation and a without-glue.wasm file should appear after a second or two.
Now that we have a Wasm file, we'll need some JavaScript code to compile and execute it. There's a few steps we'll have to follow to ensure the code can be successfully utilized in the browser. In this section, we will write some common JavaScript loading code that we can reuse for other examples, create an HTML file that demonstrates the use of the Wasm module, and test the results in the browser.
We will fetch and instantiate a .wasm file in several of the examples, so it makes sense to move the JavaScript loading code to a common file. The actual fetch and instantiation code is only a few lines, but having to repeatedly redefine the importObj object that Emscripten expects is a waste of time. We'll make this code available in a commonly accessible file to expedite the code-writing process. Create a new folder named /common in the /book-examples folder and add a file named load-wasm.js with the following contents:
/**
 * Returns a valid importObj.env object with default values to pass
 * into the WebAssembly.Instance constructor for Emscripten's
 * Wasm module.
 */
const getDefaultEnv = () => ({
  memoryBase: 0,
  tableBase: 0,
  memory: new WebAssembly.Memory({ initial: 256 }),
  table: new WebAssembly.Table({ initial: 2, element: 'anyfunc' }),
  abort: console.log
});

/**
 * Returns a WebAssembly.Instance instance compiled from the specified
 * .wasm file.
 */
function loadWasm(fileName, importObj = { env: {} }) {
  // Override any default env values with the passed in importObj.env
  // values:
  const allEnv = Object.assign({}, getDefaultEnv(), importObj.env);

  // Ensure the importObj object includes the valid env value:
  const allImports = Object.assign({}, importObj, { env: allEnv });

  // Return the result of instantiating the module (instance and module):
  return fetch(fileName)
    .then(response => {
      if (response.ok) return response.arrayBuffer();
      throw new Error(`Unable to fetch WebAssembly file ${fileName}`);
    })
    .then(bytes => WebAssembly.instantiate(bytes, allImports));
}
The getDefaultEnv() function provides the required importObj.env contents for Emscripten's Wasm module. We want the ability to pass in any additional imports, which is why the Object.assign() statement is used. With the addition of any other imports the Wasm module expects, Emscripten's Wasm output will always require these five import statements for the "env" object:
(import "env" "memory" (memory $env.memory 256))
(import "env" "table" (table $env.table 8 anyfunc))
(import "env" "memoryBase" (global $env.memoryBase i32))
(import "env" "tableBase" (global $env.tableBase i32))
(import "env" "abort" (func $env.abort (type $t0)))
We need to pass those into the instantiate() function to ensure the Wasm module loads successfully, otherwise the browser will throw an error. Now that we have our loading code ready, let's move on to the HTML and rectangle-rendering code.
We're going to need an HTML page with a <canvas> element and JavaScript code to interact with the Wasm module. Create a file named without-glue.html in the /chapter-05-create-load-module folder and populate it with the following contents:
<!doctype html>
<html lang="en-us">
<head>
  <title>No Glue Code</title>
  <script type="application/javascript" src="../common/load-wasm.js"></script>
</head>
<body>
  <h1>No Glue Code</h1>
  <canvas id="myCanvas" width="255" height="255"></canvas>
  <div style="margin-top: 16px;">
    <button id="actionButton" style="width: 100px; height: 24px;">
      Pause
    </button>
  </div>
  <script type="application/javascript">
    const canvas = document.querySelector('#myCanvas');
    const ctx = canvas.getContext('2d');

    const env = {
      table: new WebAssembly.Table({ initial: 8, element: 'anyfunc' }),
      _jsFillRect: function (x, y, w, h) {
        ctx.fillStyle = '#0000ff';
        ctx.fillRect(x, y, w, h);
      },
      _jsClearRect: function() {
        ctx.fillStyle = '#ff0000';
        ctx.fillRect(0, 0, 255, 255);
      },
    };

    loadWasm('without-glue.wasm', { env }).then(({ instance }) => {
      const m = instance.exports;
      m._init();

      // Move the rectangle by 1px in the x and y every 20 milliseconds:
      const loopRectMotion = () => {
        setTimeout(() => {
          m._moveRect();
          if (m._getIsRunning()) loopRectMotion();
        }, 20)
      };

      // Enable you to pause and resume the rectangle movement:
      document.querySelector('#actionButton')
        .addEventListener('click', event => {
          const newIsRunning = !m._getIsRunning();
          m._setIsRunning(newIsRunning);
          event.target.innerHTML = newIsRunning ? 'Pause' : 'Start';
          if (newIsRunning) loopRectMotion();
        });

      loopRectMotion();
    });
  </script>
</body>
</html>
This code will replicate the SDL example we created in the previous sections with some added functionality. When the rectangle bumps into the lower-right hand corner, it changes direction. You're also able to pause and resume the rectangle's movement using a button under the <canvas> element. You can see how we passed the _jsFillRect and _jsClearRect functions into the importObj.env object so they can be referenced by the Wasm module.
Let's test our code out in the browser. From the VS Code terminal, make sure you're in the /book-examples folder and run the command to start up a local server:
serve -l 8080
It's important that you're in the /book-examples folder. If you try serving up the code in the /chapter-05-create-load-module folder only, you won't be able to use the loadWasm() function. If you open up your browser to http://127.0.0.1:8080/chapter-05-create-load-module/without-glue.html, you should see this:
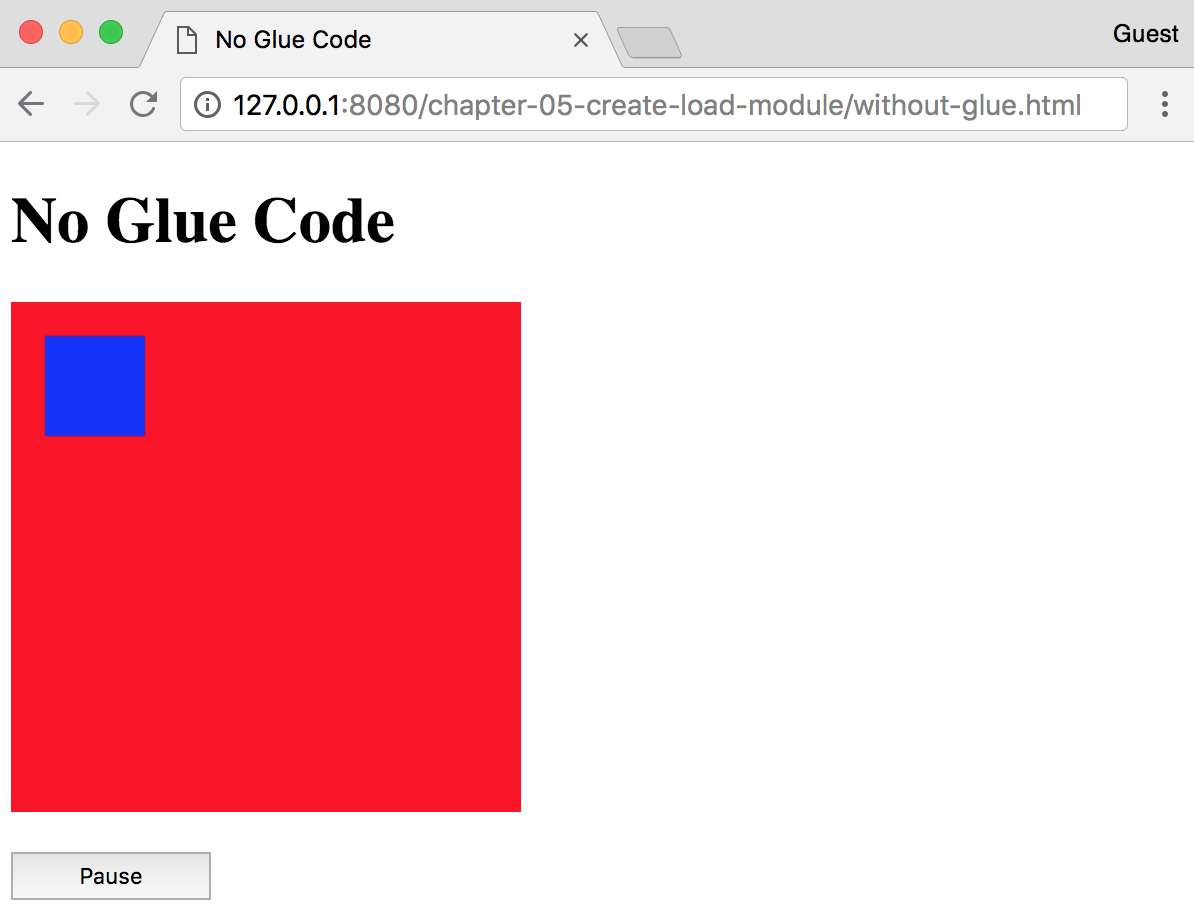
Try pressing the Pause button; the caption should change to Start and the rectangle should stop moving. Clicking it again should cause the rectangle to start moving again.
In this chapter, we covered the compilation and loading processes for modules that utilize the Emscripten glue code alongside the Wasm modules. By utilizing some of Emscripten's built-in features, such as ported libraries and helper methods, we were able to demonstrate the advantages Emscripten offers. We discussed some of the compiler flags that you can pass to the emcc command and how that will affect your output. By utilizing VS Code's Tasks feature, we were able to set up a build command to expedite the build process going forward. We also reviewed the process for compiling and loading a Wasm module without the glue code. We wrote some reusable JavaScript code to load the module as well as code to interact with our compiled Wasm module.
In Chapter 6, Interacting with JavaScript and Debugging, we're going to cover interacting with JavaScript and debugging techniques in the browser.
There's a great deal of exciting features and proposals in the works for WebAssembly. However, at the time of writing this book, the feature set is rather limited. As it stands, you can benefit greatly from using some of the features Emscripten provides. The process for interacting with C/C++ from JavaScript (and vice versa) will differ depending on whether you decide to use Emscripten.
In this chapter, we will cover how to utilize JavaScript functions with C/C++ code as well as how to interact with the compiled output of your C/C++ code from JavaScript. We'll also describe how Emscripten's glue code affects the ways a Wasm instance is utilized and how to debug compiled code in the browser.
Our goal for this chapter is to understand the following:
In the previous chapter, we briefly covered Emscripten's Module object and how to load it in the browser. The Module object provides several convenient methods and differs significantly from the browser's WebAssembly object. In this section, we're going to review Emscripten's Module object in greater detail. We'll also discuss the difference between Emscripten's Module and the objects described in WebAssembly's JavaScript API.
Emscripten's official site provides the following definition for the Module object:
Not only is the loading procedure different from WebAssembly's compile and instantiate functions, but the Module provides some helpful functionality out of the box that would otherwise require a custom implementation in WebAssembly. The Module is available in a global scope (window.Module) after fetching and loading Emscripten's JavaScript glue code.
Emscripten's Module object provides some default methods and properties to aid in debugging and ensuring the successful execution of your compiled code. You can utilize the preRun and postRun properties to execute JavaScript code before or after the Module's run() function is called, or pipe the output of the print() and printErr() functions to an HTML element on the page. We'll utilize some of these methods later in this book. You can read more about them at https://kripken.github.io/emscripten-site/docs/api_reference/module.html.
We covered the browser's WebAssembly object and the corresponding loading procedures in Chapter 5, Creating and Loading a WebAssembly Module. WebAssembly's JavaScript and Web APIs define the objects and methods available in the browser's window.WebAssembly object. Emscripten's Module can be seen as a combination of WebAssembly's Module and Instance objects, which are present in the result object that WebAssembly's instantiation function returns. By passing the -s MODULARIZE=1 flag to the emcc command, we're able to replicate WebAssembly's instantiation method (to a degree). We will examine the differences between Emscripten's Module and the browser's WebAssembly object in greater detail as we evaluate the methods of integrating JavaScript and C/C++ in the upcoming sections.
Calling functions from a Wasm instance is a relatively straightforward process with or without Emscripten's glue code. Utilizing Emscripten's API affords a wider range of functionality and integration at the expense of including the glue code alongside the .wasm file. In this section, we will review the means of interacting with the compiled Wasm instance through JavaScript and the added tooling Emscripten provides.
Emscripten provides two functions for calling compiled C/C++ functions from JavaScript: ccall() and cwrap(). Both of these functions are present in the Module object. Deciding which one to use is contingent on whether the function will be called more than once. The content in the following sections was taken from Emscripten's API reference documentation for preamble.js, which can be viewed at http://kripken.github.io/emscripten-site/docs/api_reference/preamble.js.html.
Module.ccall() calls a compiled C function from JavaScript and returns the result of that function. The function signature for Module.ccall() is as follows:
ccall(ident, returnType, argTypes, args, opts)
You must specify a type name for the returnType and argTypes parameters. The possible types are "number", "string", "array", and "boolean", which correspond to the appropriate JavaScript types. You cannot specify "array" for the returnType parameter because there is no way to know the length of the array. If the function doesn't return anything, you can specify null for the returnType (note the absence of quotation marks).
The opts parameter is an optional options object that can contain a Boolean property named async. Specifying a value of true for this property implies that the call will perform an async operation. We won't use this parameter for any of our examples, but if you wish to learn more about it, the documentation is available at http://kripken.github.io/emscripten-site/docs/api_reference/preamble.js.html#calling-compiled-c-functions-from-javascript.
Let's look at an example of ccall(). The following code, taken from the Emscripten site, demonstrates how to call a function named c_add() from the compiled output of a C file:
// Call C from JavaScript
var result = Module.ccall(
  'c_add', // name of C function
  'number', // return type
  ['number', 'number'], // argument types
  [10, 20] // arguments
);

// result is 30
Module.cwrap() is similar to ccall() in that it calls a compiled C function. However, rather than returning a value, it returns a JavaScript function that can be reused as many times as needed. The function signature for Module.cwrap() is as follows:
cwrap(ident, returnType, argTypes)
Just as with ccall(), you can specify string values that represent types for the returnType and argTypes parameters. You cannot use the "array" type in argTypes because there is no way to know the length of the array when the function is called. For a function that doesn't return a value, use null (with no quotation marks) for the returnType parameter.
The following code, taken from the Emscripten site, demonstrates the use of cwrap() to create a reusable function:
// Call C from JavaScript
var c_javascript_add = Module.cwrap(
  'c_add', // name of C function
  'number', // return type
  ['number', 'number'] // argument types
);

// Call c_javascript_add normally
console.log(c_javascript_add(10, 20)); // 30
console.log(c_javascript_add(20, 30)); // 50
You may have noticed that the descriptions of ccall() and cwrap() specified that both are used to call a compiled C function. The omission of C++ was intentional because an additional step is needed to call functions from a C++ file. C++ supports function overloading, which means that you can use the same function name multiple times, but pass different arguments to each one to get a different result. Here's an example of some code that uses function overloading:
int addNumbers(int num1, int num2) {
    return num1 + num2;
}

int addNumbers(int num1, int num2, int num3) {
    return num1 + num2 + num3;
}

int addNumbers(int num1, int num2, int num3, int num4) {
    return num1 + num2 + num3 + num4;
}

// The function will return a value based on how many
// arguments you pass it:
int getSumOfTwoNumbers = addNumbers(1, 2);
// returns 3

int getSumOfThreeNumbers = addNumbers(1, 2, 3);
// returns 6

int getSumOfFourNumbers = addNumbers(1, 2, 3, 4);
// returns 10
The compiler needs to differentiate between these functions. If it used the name addNumbers and you tried calling the function in one place with two arguments and another with three, it would fail. To call the function by name in your compiled Wasm, you need to wrap the function in an extern block. One implication of wrapping the function is that you would have to explicitly define functions for each condition. The following code snippet demonstrates how to implement the previous functions without name mangling:
extern "C" {
int addTwoNumbers(int num1, int num2) {
    return num1 + num2;
}

int addThreeNumbers(int num1, int num2, int num3) {
    return num1 + num2 + num3;
}

int addFourNumbers(int num1, int num2, int num3, int num4) {
    return num1 + num2 + num3 + num4;
}
}
We demonstrated how to call a function in a Wasm instance from JavaScript in the previous chapter, but that was assuming you instantiated a module in the browser with no glue code. Emscripten provides the ability to call functions from the Wasm instance as well. After a module is instantiated, you call functions by invoking them from the instance.exports object, which is accessible from the result of the resolved Promise. MDN's documentation provides the following function signature for WebAssembly.instantiateStreaming:
Promise<ResultObject> WebAssembly.instantiateStreaming(source, importObject);
The ResultObject contains the instance object that we need to reference to call exported functions from the module. Here's some code that calls a function named _addTwoNumbers from the compiled Wasm instance:
// Assume the importObj is already defined.
WebAssembly.instantiateStreaming(
  fetch('simple.wasm'),
  importObj
)
  .then(result => {
    const addedNumbers = result.instance.exports._addTwoNumbers(1, 2);
    // result is 3
  });
Emscripten provides a way to perform function calls in much the same way, albeit in a slightly different implementation. If you use the Promise-like API, you can access the function from an asm object that the promise of the Module() resolves with. The following example demonstrates how to utilize this functionality:
// Using Emscripten's Module
Module()
  .then(result => {
    // "asm" is essentially "instance"
    const exports = result.asm;
    const addedNumbers = exports._addTwoNumbers(1, 2);
    // result is 3
  });
Replicating the WebAssembly's Web API syntax with Emscripten simplifies any future refactoring. You can easily replace Module() with WebAssembly's instantiateStreaming() method and result.asm with result.instance in the future if you decide to use WebAssembly's Web API.
Accessing JavaScript's functionality from C/C++ code allows for added flexibility when working with WebAssembly. The methodologies and means of utilizing JavaScript differ considerably between Emscripten's glue code and Wasm-only implementations. In this section, we will cover the various ways you can integrate JavaScript into your C/C++ code with and without Emscripten.
Emscripten provides several techniques for integrating JavaScript with your C/C++ code. The techniques available differ in implementation and complexity, and some only apply to specific execution environments (for example, the browser). Deciding which one to use is contingent on your specific use case. We'll focus on the emscripten_run_script() function and inlining JavaScript with EM_* wrappers. The content in the following sections was taken from the Interacting with Code section of Emscripten's site, which can be viewed at https://kripken.github.io/emscripten-site/docs/porting/connecting_cpp_and_javascript/Interacting-with-code.html#interacting-with-code.
The Emscripten site describes the emscripten_run_script() function as the most direct, but slightly slower approach for calling JavaScript for C/C++. It's a technique that is well suited for a single line of JavaScript code and can be useful for debugging. The documentation states that it effectively runs the code using eval(), which is a JavaScript function that executes a string as code. The following code taken from the Emscripten site demonstrates the use of emscripten_run_script() to call the browser's alert() function with the text 'hi':
emscripten_run_script("alert('hi')");
For more complex use cases where performance is a factor, using inline JavaScript provides a better solution.
You can wrap JavaScript code inside your C/C++ file with EM_ASM() and it will execute when the compiled code is run in the browser. The following code demonstrates basic usage:
#include <emscripten.h>

int main() {
    EM_ASM(
        console.log('This is some JS code.');
    );
    return 0;
}
The JavaScript code is executed immediately and cannot be reused within the C/C++ file in which it is contained. Arguments can be passed into the JavaScript code block where they arrive as variables $0, $1, and so on. These arguments can either be of type int32_t or double. The following code snippet, taken from the Emscripten site, demonstrates how to utilize arguments in an EM_ASM() block:
EM_ASM({
    console.log('I received: ' + [ $0, $1 ]);
}, 100, 35.5);
If you need a reusable function within your C/C++ file, you can wrap JavaScript code within an EM_JS() block and execute it like a normal C/C++ function. The definition for EM_JS() is described in the following code snippet:
EM_JS(return_type, function_name, arguments, code)
The return_type parameter represents the C type that corresponds with the JavaScript code's output (for example, int or float). If nothing is returned from the JavaScript code, specify void for the return_type. The next parameter, function_name, represents the name to use when calling the JavaScript code from other locations in the C/C++ file. The arguments parameter is used to define arguments that can be passed into the JavaScript code from the C calling function. The code parameter is the JavaScript code that's wrapped in curly braces. The following code snippet, taken from the Emscripten site, demonstrates the use of EM_JS() in a C file:
#include <emscripten.h>

EM_JS(void, take_args, (int x, float y), {
    console.log(`I received ${x} and ${y}`);
});

int main() {
    take_args(100, 35.5);
    return 0;
}
Let's write some code that utilizes all of these features. In this section, we will modify the code we used in the Compiling C without the glue code and Fetching and instantiating a Wasm file sections of Chapter 5, Creating and Loading a WebAssembly Module. This was the code that displayed a moving blue rectangle on a red canvas and could be paused and restarted with the click of a button. The code for this section is located in the /chapter-06-interact-with-js folder in the learn-webassembly repository. Let's start by updating the C code.
Create a new folder in your /book-examples folder named /chapter-06-interact-with-js. Create a new file in the /chapter-06-interact-with-js folder named js-with-glue.c and populate it with the following contents:
/*
 * This file interacts with the canvas through imported functions.
 * It moves a blue rectangle diagonally across the canvas
 * (mimics the SDL example).
 */
#include <emscripten.h>
#include <stdbool.h>

#define BOUNDS 255
#define RECT_SIDE 50
#define BOUNCE_POINT (BOUNDS - RECT_SIDE)

bool isRunning = true;

typedef struct Rect {
  int x;
  int y;
  char direction;
} Rect;

struct Rect rect;

/*
 * Updates the rectangle location by 1px in the x and y in a
 * direction based on its current position.
 */
void updateRectLocation() {
    // Since we want the rectangle to "bump" into the edge of the
    // canvas, we need to determine when the right edge of the
    // rectangle encounters the bounds of the canvas, which is why
    // we're using the canvas width - rectangle width:
    if (rect.x == BOUNCE_POINT) rect.direction = 'L';

    // As soon as the rectangle "bumps" into the left side of the
    // canvas, it should change direction again.
    if (rect.x == 0) rect.direction = 'R';

    // If the direction has changed based on the x and y
    // coordinates, ensure the x and y points update
    // accordingly:
    int incrementer = 1;
    if (rect.direction == 'L') incrementer = -1;
    rect.x = rect.x + incrementer;
    rect.y = rect.y + incrementer;
}

EM_JS(void, js_clear_rect, (), {
    // Clear the rectangle to ensure there's no color where it
    // was before:
    var canvas = document.querySelector('#myCanvas');
    var ctx = canvas.getContext('2d');
    ctx.fillStyle = '#ff0000';
    ctx.fillRect(0, 0, 255, 255);
});

EM_JS(void, js_fill_rect, (int x, int y, int width, int height), {
    // Fill the rectangle with blue in the specified coordinates:
    var canvas = document.querySelector('#myCanvas');
    var ctx = canvas.getContext('2d');
    ctx.fillStyle = '#0000ff';
    ctx.fillRect(x, y, width, height);
});

/*
 * Clear the existing rectangle element from the canvas and draw a
 * new one in the updated location.
 */
EMSCRIPTEN_KEEPALIVE
void moveRect() {
    // Event though the js_clear_rect doesn't have any
    // parameters, we pass 0 in to prevent a compiler warning:
    js_clear_rect(0);
    updateRectLocation();
    js_fill_rect(rect.x, rect.y, RECT_SIDE, RECT_SIDE);
}

EMSCRIPTEN_KEEPALIVE
bool getIsRunning() {
    return isRunning;
}

EMSCRIPTEN_KEEPALIVE
void setIsRunning(bool newIsRunning) {
    isRunning = newIsRunning;
    EM_ASM({
        // isRunning is either 0 or 1, but in JavaScript, 0
        // is "falsy", so we can set the status text based
        // without explicitly checking if the value is 0 or 1:
        var newStatus = $0 ? 'Running' : 'Paused';
        document.querySelector('#runStatus').innerHTML = newStatus;
    }, isRunning);
}

EMSCRIPTEN_KEEPALIVE
void init() {
    emscripten_run_script("console.log('Initializing rectangle...')");
    rect.x = 0;
    rect.y = 0;
    rect.direction = 'R';
    setIsRunning(true);
    emscripten_run_script("console.log('Rectangle should be moving!')");
}
You can see that we used all three of the JavaScript integrations that Emscripten provides. There are two functions, js_clear_rect() and js_fill_rect(), that are defined in EM_JS() blocks that take the place of the imported functions from the original example. The EM_ASM() block within the setIsRunning() function updates the text of a new status element we'll add to the HTML code. The emscripten_run_script() functions simply log out some status messages. We need to specify EMSCRIPTEN_KEEPALIVE above the functions we're planning to utilize outside of the module. If you don't specify this, the compiler will treat the functions as dead code and remove them.
Let's create a file named js-with-glue.html in the /chapter-06-interact-with-js folder and populate it with the following contents:
<!doctype html>
<html lang="en-us">
<head>
  <title>Interact with JS using Glue Code</title>
</head>
<body>
  <h1>Interact with JS using Glue Code</h1>
  <canvas id="myCanvas" width="255" height="255"></canvas>
  <div style="margin-top: 16px;">
    <button id="actionButton" style="width: 100px; height: 24px;">Pause</button>
    <span style="width: 100px; margin-left: 8px;">Status:</span>
    <span id="runStatus" style="width: 100px;"></span>
  </div>
  <script type="application/javascript" src="js-with-glue.js"></script>
  <script type="application/javascript">
    Module()
      .then(result => {
        const m = result.asm;
        m._init();

        // Move the rectangle by 1px in the x and y every 20 milliseconds:
        const loopRectMotion = () => {
          setTimeout(() => {
            m._moveRect();
            if (m._getIsRunning()) loopRectMotion();
          }, 20)
        };

        // Enable you to pause and resume the rectangle movement:
        document.querySelector('#actionButton')
          .addEventListener('click', event => {
            const newIsRunning = !m._getIsRunning();
            m._setIsRunning(newIsRunning);
            event.target.innerHTML = newIsRunning ? 'Pause' : 'Start';
            if (newIsRunning) loopRectMotion();
          });

        loopRectMotion();
      });
  </script>
</body>
</html>
We added two <span> elements to display the status of the rectangle's movement, along with a corresponding label. We're using Emscripten's Promise-like API to load the module and reference the functions from the compiled code. We're no longer passing in the _jsFillRect and _jsClearRect functions to the module because we're handling that within the js-with-glue.c file.
To compile the code, ensure that you're in the /chapter-06-interact-with-js folder and run the following command:
emcc js-with-glue.c -O3 -s WASM=1 -s MODULARIZE=1 -o js-with-glue.js
Once complete, run the following command to start your local server:
serve -l 8080
Open up a browser and navigate to http://127.0.0.1:8080/js-with-glue.html. You should see something like this:
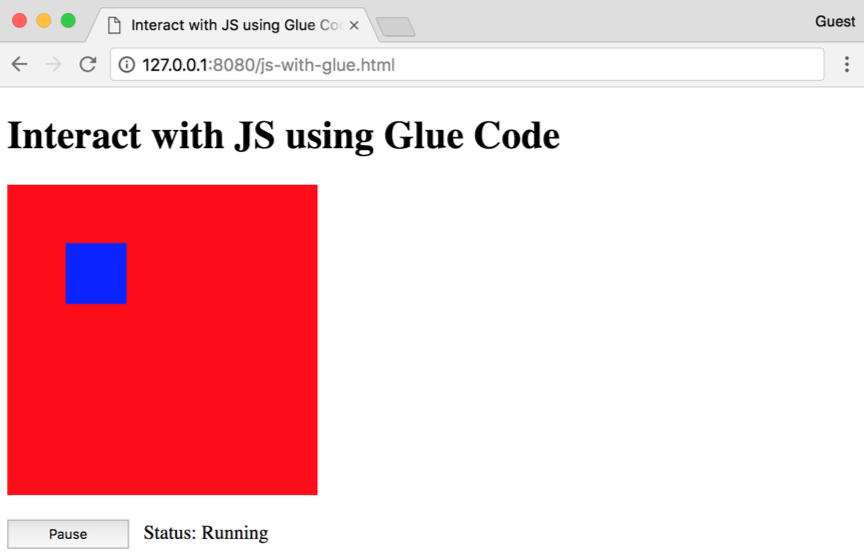
If you press the Pause button, the caption on the button should change to Start, the text next to Status should change to Paused, and the rectangle should stop moving.
Utilizing JavaScript code in C/C++ files follows a different paradigm than the techniques used for Emscripten. Rather than writing JavaScript within the C/C++ files, you pass the functions into your WebAssembly instantiation code. In this section, we will describe this process in greater detail.
In order to utilize JavaScript's functionality in your C/C++ code, you need to add a function definition to the importObj.env argument that gets passed into WebAssembly's instantiation function. You can either define the function outside of the importObj.env or inline. The following code snippet demonstrates each option:
// You can define the function inside of the env object:
const env = {
  // Make sure you prefix the function name with "_"!
  _logValueToConsole: value => {
    console.log(`'The value is ${value}'`);
  }
};

// Or define it outside of env and reference it within env:
const logValueToConsole = value => {
  console.log(`'The value is ${value}'`);
};

const env = {
  _logValueToConsole: logValueToConsole
};
Given the manual memory management and strict typing requirements of C, C++, and Rust, you're limited in what can be passed in and utilized in a Wasm module. JavaScript allows you to easily add, remove, and change the values of properties on an object over the course of code execution. You can even extend the language by adding functions to the prototype of a built-in language feature. C, C++, and Rust are much more restrictive, and it can be difficult to take full advantage of WebAssembly if you're not familiar with these languages.
You need to define the JavaScript function you passed into importObj.env within the C/C++ code that utilizes it. The function signature must match what you passed in. The following example demonstrates this in greater detail. Here's the JavaScript code that interacts with the compiled C file (index.html):
// index.html <script> contents
const env = {
  _logAndMultiplyTwoNums: (num1, num2) => {
    const result = num1 * num2;
    console.log(result);
    return result;
  },
};

loadWasm('main.wasm', { env })
  .then(({ instance }) => {
    const result = instance.exports._callMultiply(5.5, 10);
    console.log(result);
    // 55 is logged to the console twice
  });
This is the contents of main.c, which is compiled to main.wasm and used within index.html:
// main.c (compiled to main.wasm)
extern float logAndMultiplyTwoNums(float num1, float num2);

float callMultiply(float num1, float num2) {
    return logAndMultiplyTwoNums(num1, num2);
}
You call the JavaScript function in your C/C++ the same way you'd call a normal C/C++ function. Although you prefix your function with a _ when you pass it into the importObj.env, you don't need to include the prefix when defining it in the C/C++ file.
The example code from the Compiling C without the glue code and Fetching and instantiating a Wasm file sections of Chapter 5, Creating and Loading a WebAssembly Module, demonstrated how to integrate JavaScript in our C file without using Emscripten's glue code. In this section, we will modify the example code slightly and change the file type to C++.
Create a file named js-without-glue.cpp in your /chapter-06-interact-with-js folder and populate it with the following contents:
/*
 * This file interacts with the canvas through imported functions.
 * It moves a circle diagonally across the canvas.
 */
#define BOUNDS 255
#define CIRCLE_RADIUS 50
#define BOUNCE_POINT (BOUNDS - CIRCLE_RADIUS)

bool isRunning = true;

typedef struct Circle {
  int x;
  int y;
  char direction;
} Circle;

struct Circle circle;

/*
 * Updates the circle location by 1px in the x and y in a
 * direction based on its current position.
 */
void updateCircleLocation() {
    // Since we want the circle to "bump" into the edge of the canvas,
    // we need to determine when the right edge of the circle
    // encounters the bounds of the canvas, which is why we're using
    // the canvas width - circle width:
    if (circle.x == BOUNCE_POINT) circle.direction = 'L';

    // As soon as the circle "bumps" into the left side of the
    // canvas, it should change direction again.
    if (circle.x == CIRCLE_RADIUS) circle.direction = 'R';

    // If the direction has changed based on the x and y
    // coordinates, ensure the x and y points update accordingly:
    int incrementer = 1;
    if (circle.direction == 'L') incrementer = -1;
    circle.x = circle.x + incrementer;
    circle.y = circle.y - incrementer;
}

// We need to wrap any imported or exported functions in an
// extern block, otherwise the function names will be mangled.
extern "C" {
// These functions are passed in through the importObj.env object
// and update the circle on the <canvas>:
extern int jsClearCircle();
extern int jsFillCircle(int x, int y, int radius);

/*
 * Clear the existing circle element from the canvas and draw a
 * new one in the updated location.
 */
void moveCircle() {
    jsClearCircle();
    updateCircleLocation();
    jsFillCircle(circle.x, circle.y, CIRCLE_RADIUS);
}

bool getIsRunning() {
    return isRunning;
}

void setIsRunning(bool newIsRunning) {
    isRunning = newIsRunning;
}

void init() {
    circle.x = 0;
    circle.y = 255;
    circle.direction = 'R';
    setIsRunning(true);
}
}
This code is similar to the previous example, but the shape and direction of the element on the canvas has changed. Now, the element is a circle that starts in the lower-left corner of the canvas and moves diagonally toward the upper-right.
Next, create a file named js-without-glue.html in your /chapter-06-interact-with-js folder and populate it with the following contents:
<!doctype html>
<html lang="en-us">
<head>
  <title>Interact with JS without Glue Code</title>
  <script
    type="application/javascript"
    src="../common/load-wasm.js">
  </script>
  <style>
    #myCanvas {
      border: 2px solid black;
    }
    #actionButtonWrapper {
      margin-top: 16px;
    }
    #actionButton {
      width: 100px;
      height: 24px;
    }
  </style>
</head>
<body>
  <h1>Interact with JS without Glue Code</h1>
  <canvas id="myCanvas" width="255" height="255"></canvas>
  <div id="actionButtonWrapper">
    <button id="actionButton">Pause</button>
  </div>
  <script type="application/javascript">
    const canvas = document.querySelector('#myCanvas');
    const ctx = canvas.getContext('2d');

    const fillCircle = (x, y, radius) => {
      ctx.fillStyle = '#fed530';
      // Face outline:
      ctx.beginPath();
      ctx.arc(x, y, radius, 0, 2 * Math.PI);
      ctx.fill();
      ctx.stroke();
      ctx.closePath();

      // Eyes:
      ctx.fillStyle = '#000000';
      ctx.beginPath();
      ctx.arc(x - 15, y - 15, 6, 0, 2 * Math.PI);
      ctx.arc(x + 15, y - 15, 6, 0, 2 * Math.PI);
      ctx.fill();
      ctx.closePath();

      // Mouth:
      ctx.beginPath();
      ctx.moveTo(x - 20, y + 10);
      ctx.quadraticCurveTo(x, y + 30, x + 20, y + 10);
      ctx.lineWidth = 4;
      ctx.stroke();
      ctx.closePath();
    };

    const env = {
      table: new WebAssembly.Table({ initial: 8, element: 'anyfunc' }),
      _jsFillCircle: fillCircle,
      _jsClearCircle: function() {
        ctx.fillStyle = '#fff';
        ctx.fillRect(0, 0, 255, 255);
      },
    };

    loadWasm('js-without-glue.wasm', { env }).then(({ instance }) => {
      const m = instance.exports;
      m._init();

      // Move the circle by 1px in the x and y every 20 milliseconds:
      const loopCircleMotion = () => {
        setTimeout(() => {
          m._moveCircle();
          if (m._getIsRunning()) loopCircleMotion();
        }, 20)
      };

      // Enable you to pause and resume the circle movement:
      document.querySelector('#actionButton')
        .addEventListener('click', event => {
          const newIsRunning = !m._getIsRunning();
          m._setIsRunning(newIsRunning);
          event.target.innerHTML = newIsRunning ? 'Pause' : 'Start';
          if (newIsRunning) loopCircleMotion();
        });

      loopCircleMotion();
    });
  </script>
</body>
</html>
Instead of using the rect() element, we can manually draw paths using the functions available on the canvas element's 2D context.
We're only generating a Wasm module, so we can use the build task we set up in the previous chapter to compile our code. Select Tasks | Run Build Task… or use the keyboard shortcut Ctrl/Cmd + Shift + B to compile the code. If you're not using VS Code, open a CLI instance in the /chapter-06-interact-with-js folder and run the following command:
emcc js-without-glue.cpp -Os -s WASM=1 -s SIDE_MODULE=1 -s BINARYEN_ASYNC_COMPILATION=0 -o js-without-glue.wasm
Once complete, open a terminal in the /book-examples folder, and run the following command to start your local server:
serve -l 8080
Open up a browser and navigate to http://127.0.0.1:8080/chapter-06-interact-with-js/js-without-glue.html. You should see something like this:
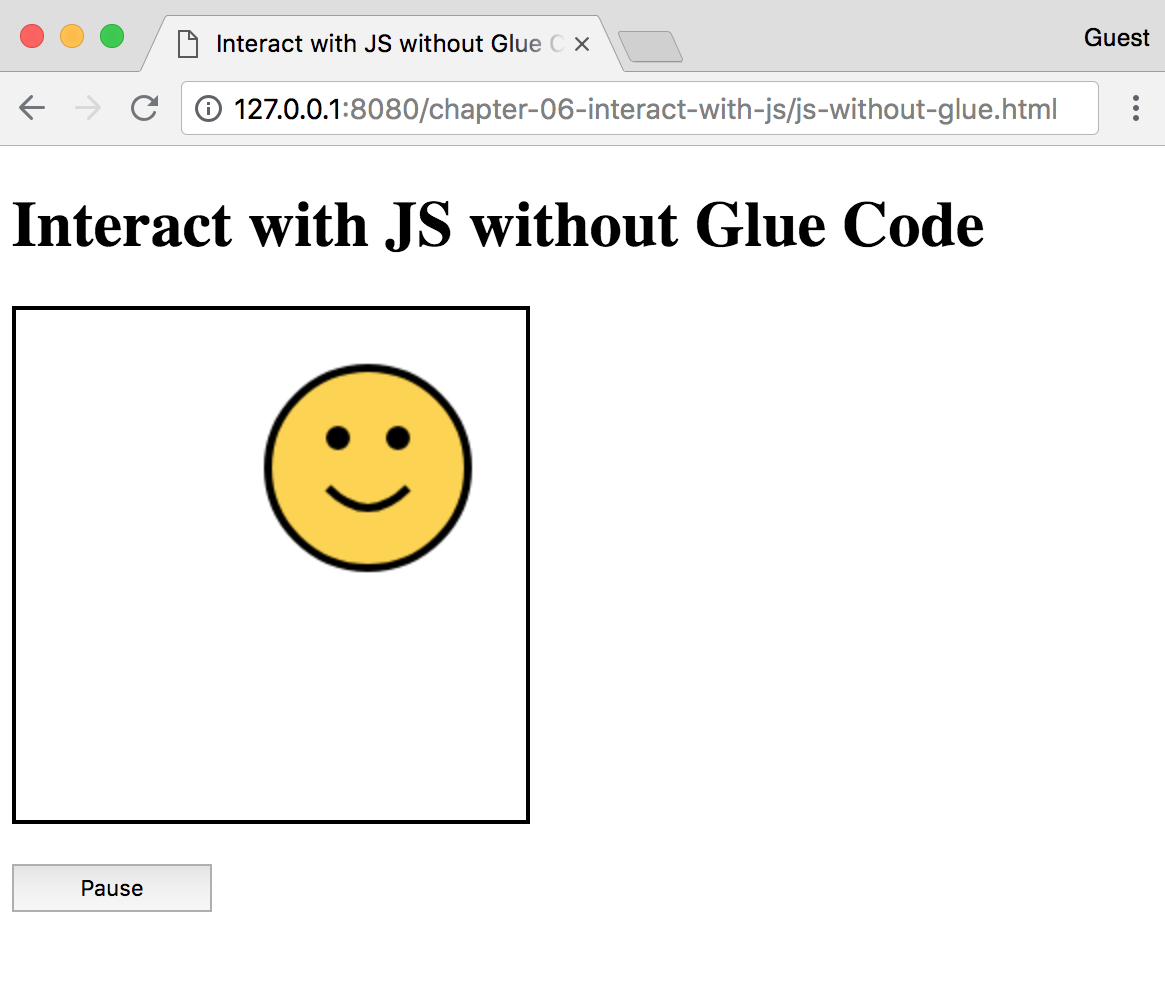
Just as with the previous examples, if you press the Pause button, the caption on the button should change to Start and the circle should stop moving.
We covered the Emscripten features we'll be using most frequently for communicating between JavaScript and C/C++ in the previous sections, but those aren't the only capabilities Emscripten provides. There are advanced features and additional APIs that you need to be aware of, especially if you plan on adding more complex functionality to your application. In this section, we'll briefly review some of these advanced features and provide details about where you can learn more.
Embind is an additional feature that Emscripten offers for connecting JavaScript and C++. Emscripten's site provides the following description:
Embind is a powerful feature that allows for tight integration between JavaScript and C++. You can wrap some C++ code in an EMSCRIPTEN_BINDINGS() block and reference it through the Module object in your browser. Let's look at an example from Emscripten's site. The following file, example.cpp, is compiled with the --bind flag of emcc:
// example.cpp
#include <emscripten/bind.h>

using namespace emscripten;

float lerp(float a, float b, float t) {
    return (1 - t) * a + t * b;
}

EMSCRIPTEN_BINDINGS(my_module) {
    function("lerp", &lerp);
}
The resultant module is loaded in example.html and the lerp() function is called:
<!-- example.html -->
<!doctype html>
<html>
<script src="example.js"></script>
<script>
  // example.js was generated by running this command:
  // emcc --bind -o example.js example.cpp
  console.log('lerp result: ' + Module.lerp(1, 2, 0.5));
</script>
</html>
The preceding example represents a small portion of Embind's capabilities. You can learn more about Embind at https://kripken.github.io/emscripten-site/docs/porting/connecting_cpp_and_javascript/embind.html.
Emscripten provides support for file operations by using the FS library and exposes an API for working with the filesystem. However, it's not included by default when you compile your project because it could increase the file's size significantly. If your C/C++ code uses files, the library will be added automatically. The filesystem types vary based on the execution environment. For example, if you're running code inside a worker, the WORKERFS filesystem can be used. By default, MEMFS is used, which stores the data in memory, and any data written to memory is lost when the page is reloaded. You can read more about the File System API at https://kripken.github.io/emscripten-site/docs/api_reference/Filesystem-API.html#filesystem-api.
Emscripten provides a Fetch API as well. The following is taken from the documentation:
The Fetch API can be used to integrate with Emscripten's other features. If you need to fetch data that isn't utilized by Emscripten, you should use the browser's Fetch API (https://developer.mozilla.org/en-US/docs/Web/API/Fetch_API). You can read more about the Fetch API at https://kripken.github.io/emscripten-site/docs/api_reference/fetch.html.
Effectively debugging JavaScript code in the browser has not always been easy. However, development tooling has markedly improved in the browser and in editors/IDEs with built-in debugging capabilities. Unfortunately, adding WebAssembly to a web application adds an additional level of complexity to the debugging process. In this section, we will review some techniques for debugging JavaScript that utilizes Wasm as well as some of the additional capabilities Emscripten offers.
Debugging Emscripten's Module is relatively straightforward. Emscripten's error messages are well formed and descriptive, so you'll usually discover what's causing the issue right away. You can view these messages in your browser's development tools console.
If you specified a .html output when running the emcc command, some debugging code will already be built in (Module.print and Module.printErr). Within the HTML file, the loading code sets the window.onerror event to call the Module.printErr event, so you can see details about the error that occurred when loading.
One common error you may encounter is calling the wrong function name. If you're using Emscripten's Promise-like API, you can print out the available functions by running the following code in your browser's console:
console.log(Module().asm);
The following screenshot shows the output for the js-with-glue.js example we used in the Calling JavaScript functions from C/C++ section of this chapter:
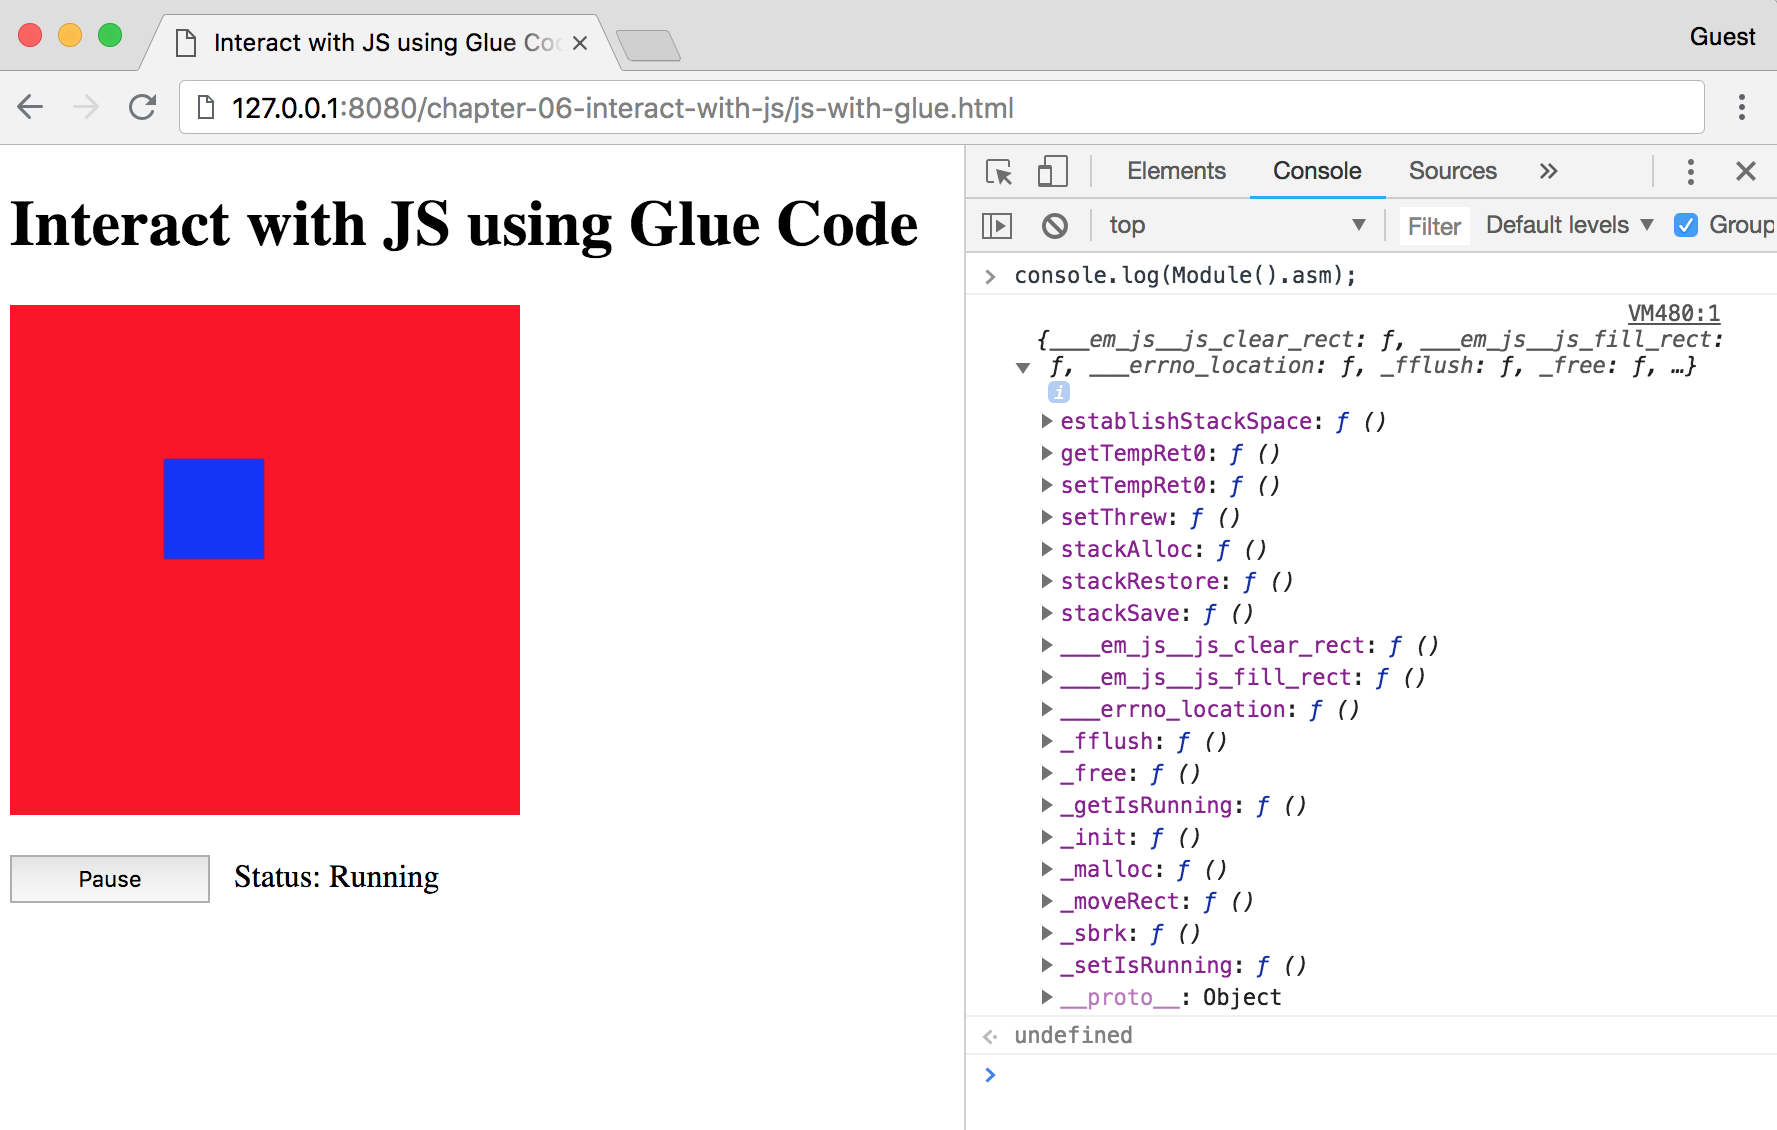
Your functions, as well as some functions that Emscripten generates, will be prefixed with a _. The advantage of writing code that gets compiled is that the compiler will catch most errors up front. Given the extensive tooling available for languages such as C and C++, you should be able to understand and address these errors quickly.
If you're not using any glue code and instantiating a Wasm file using WebAssembly's JavaScript and Web APIs, debugging can get a little more complex. As previously stated, you have the advantage of catching most errors at compile time in your C or C++ code. Just as with Emscripten, the error messages printed out in your browser's development tools console provide a stack trace and a relatively clear description of the issue. However, logging to the console may become cumbersome and difficult to manage if you're troubleshooting a particularly difficult bug. Fortunately, you can use source maps to improve your debugging capabilities.
Emscripten has the ability to generate source maps by passing some additional flags to the compiler. Source maps allow your browser to map the source of a file to the file being utilized in an application. For example, you can use a JavaScript build tool such Webpack to minify the code as part of your build process. However, it's incredibly difficult to navigate and troubleshoot the minified code if you're trying to find a bug. By generating a source map, you can view the code in its original form within the browser's development tools and set breakpoints for debugging. Let's generate a source map for our /chapter-06-interact-with-js/js-without-glue.cpp file. Within the /book-examples folder, run the following command in a terminal:
emcc chapter-06-interact-with-js/js-without-glue.cpp -O1 -g4 -s WASM=1 -s SIDE_MODULE=1 -s BINARYEN_ASYNC_COMPILATION=0 -o chapter-06-interact-with-js/js-without-glue.wasm --source-map-base http://localhost:8080/chapter-06-interact-with-js/
The -g4 argument enables source maps, while the --source-map-base argument tells the browser where to find the source map file. Once compiled, start your local server up from the /book-examples folder by running the following command:
serve -l 8080
Navigate to http://127.0.0.1:8080/chapter-06-interact-with-js/js-without-glue.html, open the Developer Tools, and select the Sources tab (in Chrome) or Debugger tab (in Firefox). If you're using Chrome, you should see the following:
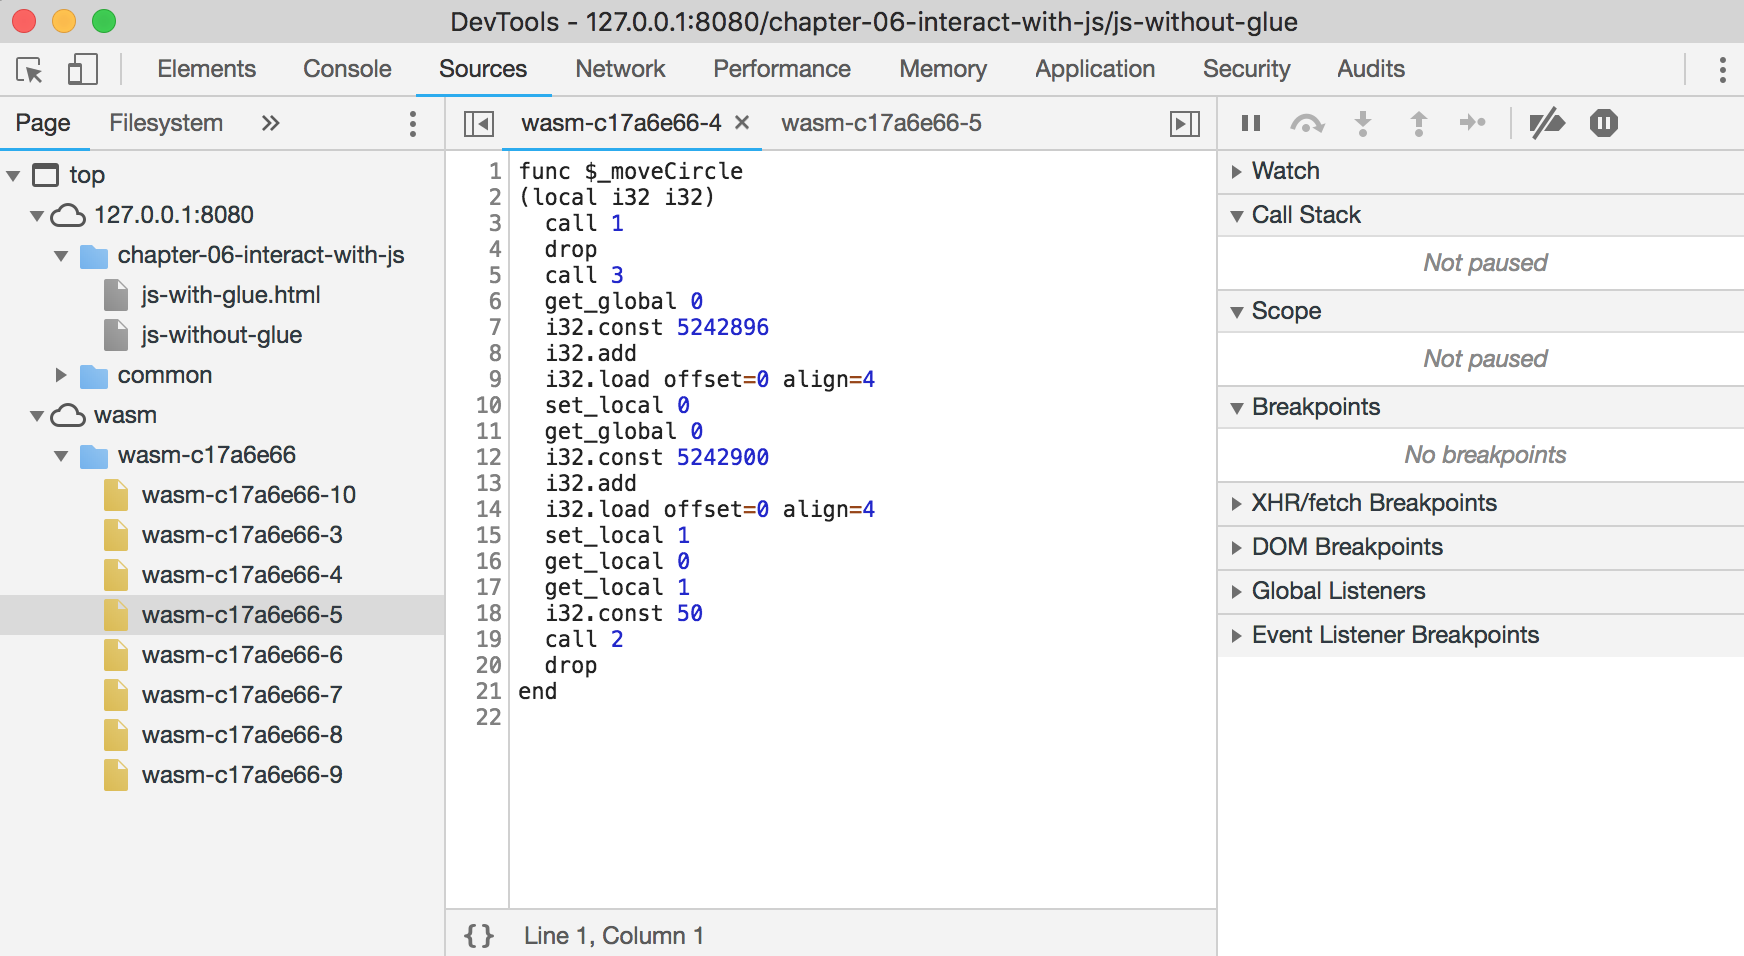
As you can see, the filenames aren't very helpful. Each file should include the function name at the top, although some of the names may have been mangled. You can set breakpoints if you encounter errors, and Chrome's debugging functionality allows you to navigate the call stack. Firefox handles their source maps differently. The following screenshot shows the Debugger view in Firefox's Developer Tools:
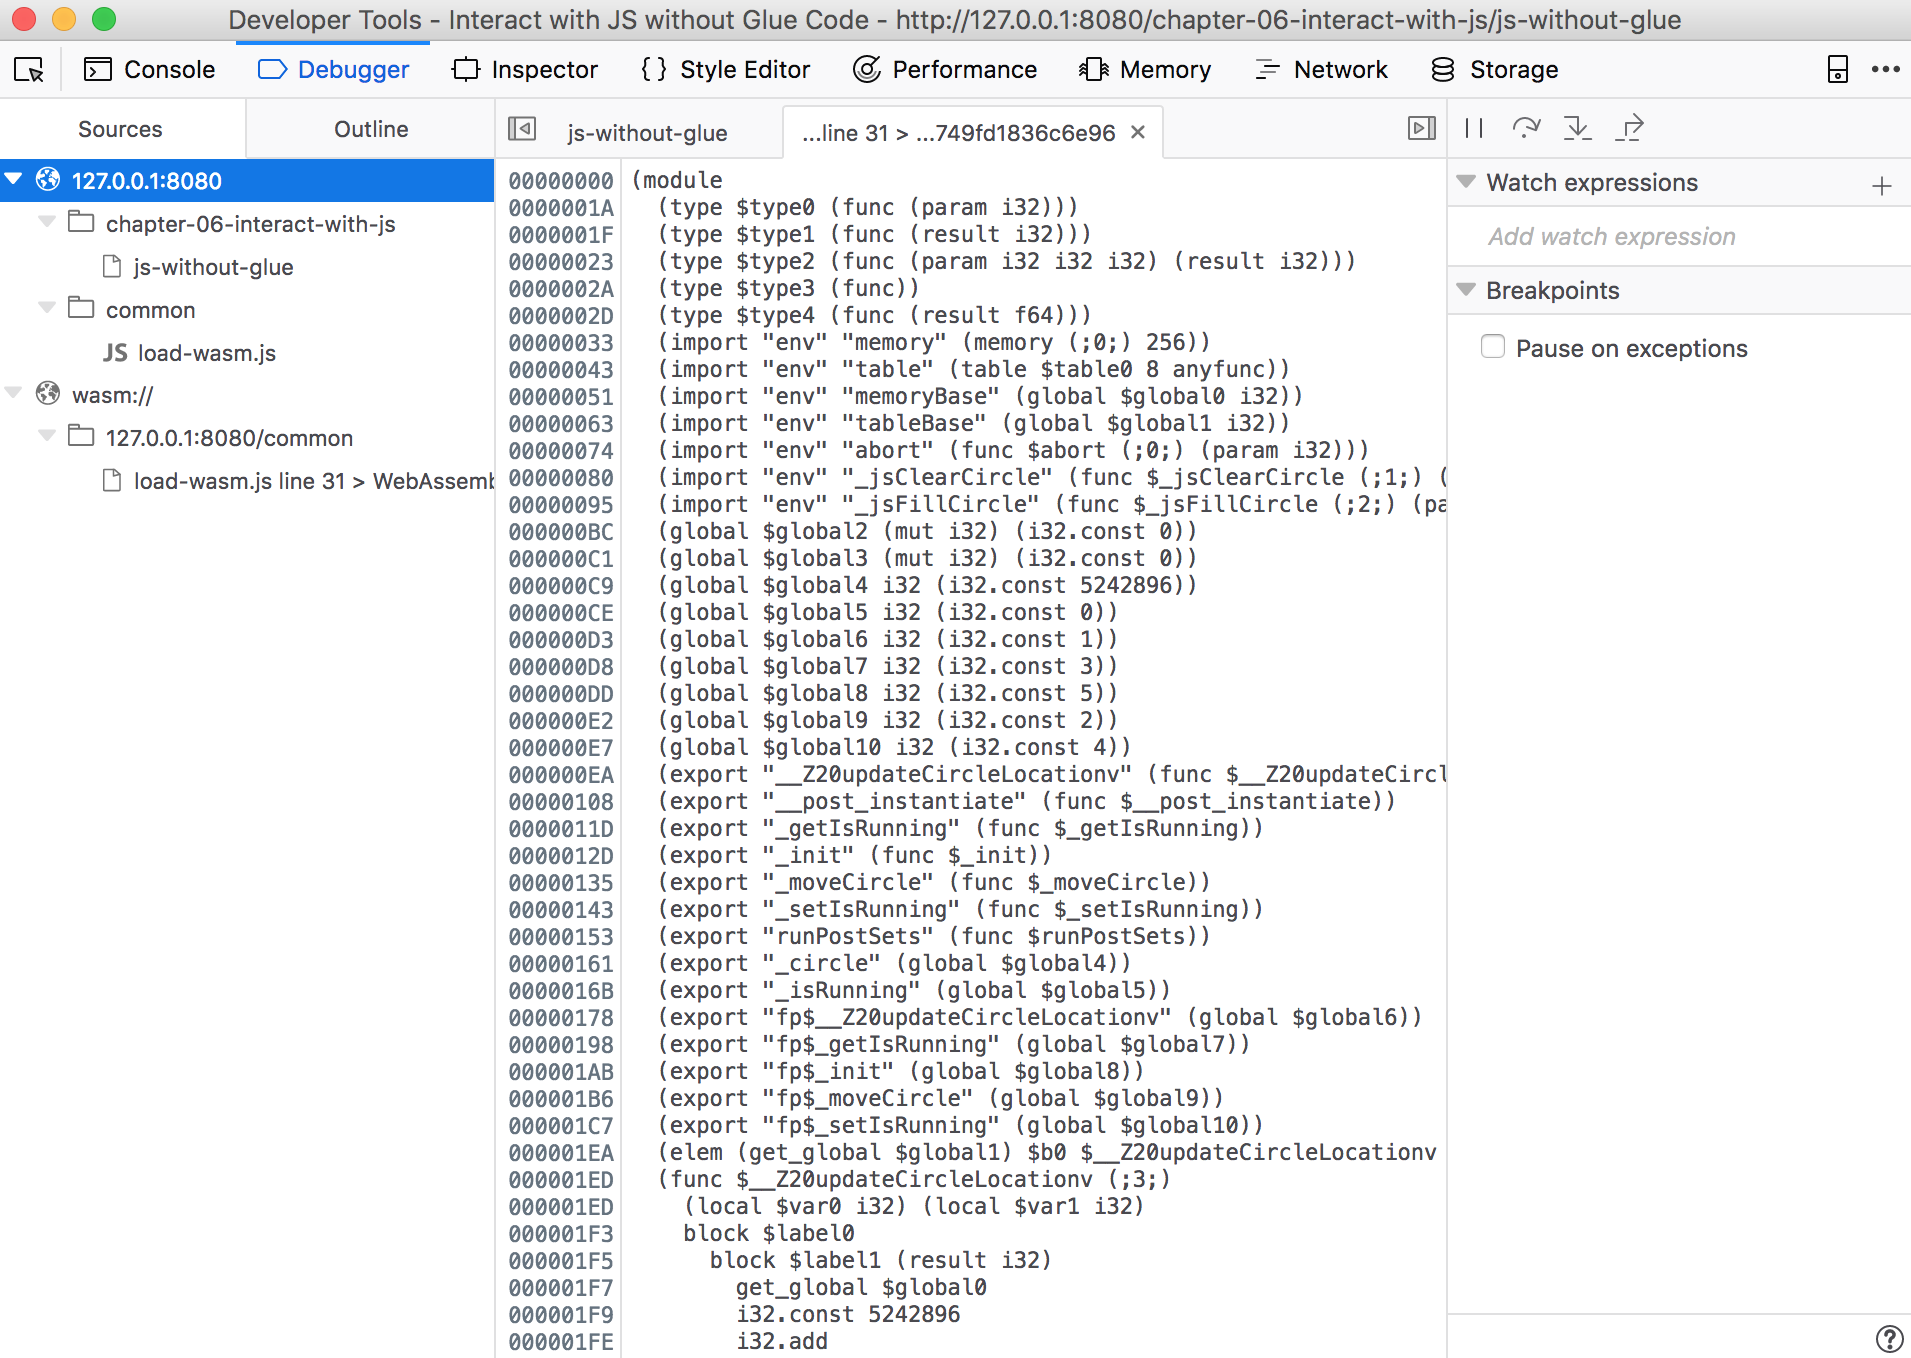
The source map is a single file that contains the Wat representation of the Wasm file. You can set breakpoints and debug code here as well. As WebAssembly evolves, more (and better) tooling will become available. In the meantime, logging to the console and utilizing source maps are the current debugging methods you can use.
In this chapter, we focused on the intercommunication of JavaScript and C/C++, some of the features Emscripten offers, and how to effectively debug web applications that utilize Wasm in the browser. We reviewed the various means of calling compiled C/C++ functions from JavaScript, and how to integrate JavaScript with your C/C++ code. Emscripten's APIs were presented as a way to understand how you can overcome some of WebAssembly's current limitations by including glue code with your compiled Wasm files. Even though the capabilities Emscripten provides are not present in the official WebAssembly Core Specification (and may never be), that shouldn't deter you from taking advantage of them. Finally, we briefly covered how to debug Wasm files in the browser in the context of an Emscripten module or a WebAssembly instance.
In the next chapter, we'll build a real-world WebAssembly application from scratch.
Now it's time to apply your knowledge! Since one of WebAssembly's primary design goals is to execute within and integrate well with the existing web platform, it makes sense to build a web application to test it out. Even though WebAssembly's current feature set is rather limited, we can utilize the technology at a basic level. In this chapter, we will build a single-page application from scratch that utilizes Wasm modules within the context of the Core Specification.
By the end of this chapter, you'll know how to:
As mentioned before, WebAssembly's current feature set is rather limited. We can use Emscripten to greatly extend the capabilities of a web application, but that carries the cost of noncompliance with the official specification and the addition of glue code. We can still use WebAssembly effectively today, which brings us to the application we'll build in this chapter. In this section, we will review the libraries and tools we'll use to build the application, as well as a brief overview of its functionality.
In WebAssembly's current form, we can pass numbers between a Wasm module and JavaScript code with relative ease. An accounting application seems like a logical choice in terms of real-world applicability. The only contention I have with accounting software is that it's a little boring (no offense). We're going to spice it up a bit by building in some unethical accounting practices. The application is named Cook the Books, a term associated with accounting fraud. Investopedia provides the following definition of Cook the Books:
The Investopedia page at https://www.investopedia.com/terms/c/cookthebooks.asp offers detailed examples of what constitutes cooking the books. We'll take a simple approach for our application. We will allow the user to enter a transaction with a raw and cooked amount. The raw amount represents the actual amount of money that was either deposited or withdrawn, while the cooked amount is what everyone else will see. The application will generate pie charts that display expenses and income by category for either the raw or cooked transactions. The user will be able to easily toggle between the two views. The application consists of the following components:
The JavaScript portion of the application will use several libraries served from a CDN. It will also use one locally installed library to watch for changes in the code. The following sections will describe each library and its purpose in the application.
Vue is a JavaScript framework that allows you to split an application into individual components for ease of development and debugging. We're using it to avoid having one monolithic JavaScript file with all of our application logic and another monolithic HTML file with the entire UI. Vue was chosen because it doesn't require the added complexity of a build system and allows us to use HTML, CSS, and JavaScript without having to do any transpiling. The official website is https://vuejs.org.
UIkit is the frontend framework we will use to add styling and layout to our application. There are dozens of alternatives, like Bootstrap or Bulma, that offer comparable components and functionality. But I chose UIkit because of the helpful utility classes and added JavaScript functionality. You can view the documentation at https://getuikit.com.
Lodash is an excellent utility library that provides methods for performing common actions in JavaScript that aren't already built into the language. We will use it to perform calculations and manipulate the transactions data. Documentation and installation instructions can be found at https://lodash.com.
Data-driven documents (D3) is a multi-faceted library that allows you to translate data into impressive visualizations. D3's API consists of several modules that range from array manipulation to charting and transitions. We will use D3 primarily to create the pie charts, but we'll also take advantage of some of the utility methods it provides. You can find more information at https://d3js.org.
In order to display currency values in the correct format and ensure the user enters a valid dollar amount, we will utilize the accounting.js (http://openexchangerates.github.io/accounting.js) and vue-numeric (https://kevinongko.github.io/vue-numeric) libraries. To simplify development, we'll set up a basic npm project and use browser-sync (https://www.browsersync.io) to immediately see code changes reflected in the running application.
The application uses C since we're performing simple calculations with basic algebra. It wouldn't make sense to use C++ in this case. That would introduce the added step of ensuring the functions we need to call from JavaScript are wrapped in an extern block. We'll write the calculation functions in a single C file and compile it down to a single Wasm module. We can continue to use VS Code's Tasks functionality to perform the build, but the arguments will need to be updated since we'll only compile a single file. Let's move on to project configuration.
WebAssembly hasn't been around long enough to have established best practices with regard to folder structure, file naming conventions, and so on. If you were to search for best practices for C/C++ or JavaScript projects, you'd encounter a great deal of conflicting advice and strongly held opinions. With that in mind, let's spend this section setting up our project with the required configuration files.
The code for this project is located in the /chapter-07-cook-the-books folder in the learn-webassembly repository. You must have this code available when we get to the JavaScript portion of the application. I won't be providing the source code for all of the Vue components in the book, so you need to copy them from the repository.
In the interest of keeping the application as simple as possible, we'll avoid a build/bundling tool like Webpack or Rollup.js. This allows us to cut down on the number of required dependencies and ensures that any issues you run into aren't caused by a breaking change in a build dependency.
We'll create a Node.js project because it allows us to run scripts and install a dependency locally for development purposes. We've used the /book-examples folder up to this point, but we'll create a new project folder outside of /book-examples to configure a different default build task in VS Code. Open a terminal, cd into the desired folder, and enter the following commands:
// Create a new directory and cd into it:
mkdir cook-the-books
cd cook-the-books

// Create a package.json file with default values
npm init -y
The -y command forgoes the prompts and populates the package.json file with sensible defaults. Once completed, run the following command to install browser-sync:
npm install -D browser-sync@^2.24.4
The -D is optional and indicates that the library is a development dependency. You would use the -D flag if you were building and distributing the application, so I included it to adhere to common practice. I'd recommend installing that specific version to ensure the start script runs without any issues. After browser-sync installs, add the following entry to the scripts entry in the package.json file:
...
"scripts": {
 ...
 "start": "browser-sync start --server \"src\" --files \"src/**\" --single --no-open --port 4000"
},
…
You can populate the "description" and "author" keys if desired. The file should end up looking similar to this:
{
  "name": "cook-the-books",
  "version": "1.0.0",
  "description": "Example application for Learn WebAssembly",
  "main": "src/index.js",
  "scripts": {
    "start": "browser-sync start --server \"src\" --files \"src/**\" --single --no-open --port 4000",
    "test": "echo \"Error: no test specified\" && exit 1"
  },
  "keywords": [],
  "author": "Mike Rourke",
  "license": "MIT",
  "devDependencies": {
    "browser-sync": "^2.24.4"
  }
}
Create two new folders within the root folder: /lib and /src. The JavaScript, HTML, CSS, and Wasm files will be located in the /src folder while the C file will be in /lib. I only want to include files that are used by the web application in /src. We'll never use the C file directly from the application, only the compiled output.
Copy the /.vscode folder from your /book-examples project into the root folder. This will ensure you're using the existing C/C++ settings and give you a good starting point for the build task.
We need to modify the default build step in the /.vscode/tasks.json file to accommodate our updated workflow. The arguments for the build step we used in our /book-examples project allowed us to compile whichever file was currently active in the editor. It also output the .wasm file into the same folder as the source C file. However, this configuration doesn't make sense for this project. We'll always compile the same C file that is output to the compiled .wasm file in a specific folder. To accomplish this, update the args array in the Build task in /.vscode/tasks.json with the following contents:
"args": [
  "${workspaceFolder}/lib/main.c",
  "-Os",
  "-s", "WASM=1",
  "-s", "SIDE_MODULE=1",
  "-s", "BINARYEN_ASYNC_COMPILATION=0",
  "-o", "${workspaceFolder}/src/assets/main.wasm"
],
We changed the input and output paths, which are the first and last elements in the args array. Now both are static paths that always compile and output the same files regardless of which file is open in the active editor.
We need some mock data and a means of persisting any updates. If you store the data locally in a JSON file, any changes you make to the transactions will be lost as soon as you refresh the page. We could set up a local server with a library like Express, mock a database, write routes, and so on. But instead we're going to take advantage of the excellent development tooling available online. The online too jsonstore.io is allows you to store JSON data for small projects and provides endpoints out of the box. Take the following steps to get your mock API up and running:
Keep that jsonstore.io endpoint handy—you'll need it when we build the JavaScript portion of the app.
We need the malloc() and free() functions from C's standard library for the functionality in our C code. WebAssembly doesn't have these functions built in, so we need to provide our own implementation.
Fortunately, someone has already built that for us; we just need to download the module and include it in the instantiation step. The module can be downloaded from Guy Bedford's wasm-stdlib-hack GitHub repository at https://github.com/guybedford/wasm-stdlib-hack. You need the memory.wasm file from the /dist folder. Once the file is downloaded, create a folder named /assets in the /src folder of your project and copy the memory.wasm file there.
After performing these steps, your project should look like this:
├── /.vscode
│    ├── tasks.json
│    └── c_cpp_properties.json
├── /lib
├── /src
│    └── /assets
│         └── memory.wasm
├── package.json
└── package-lock.json
The C portion of the application will aggregate transaction and category amounts. The calculations we perform in C could be done just as easily in JavaScript, but WebAssembly is ideal for computation. We'll dive deeper into more complex usage of C/C++ in Chapter 8, Porting a Game with Emscripten, but for now we're trying to limit our scope to what can be done within the confines of the Core Specification. In this section, we'll write some C code to demonstrate how to integrate WebAssembly with a web application without the use of Emscripten.
We will write some C functions that calculate the grand totals as well as the ending balances for raw and cooked transactions. In addition to calculating the grand totals, we need to calculate the totals for each category for display in the pie charts. All of these calculations will be performed in a single C file and compiled down to a single Wasm file that will be instantiated when the application loads. C can be a little daunting for the uninitiated, so our code will be sacrificing some efficiency for the sake of clarity. I'd like to take a moment to apologize to the C/C++ programmers reading this book; you're not going to like what you C.
In order to perform calculations dynamically, we need to allocate and deallocate memory as transactions are added and deleted. To accomplish this, we'll use a doubly linked list. A doubly linked list is a data structure that allows us to remove items or nodes inside a list and add and edit nodes as needed. Nodes are added using malloc() and removed using free(), both of which are provided by the memory.wasm module you downloaded in the previous section.
The order of operations in terms of development doesn't reflect how you would normally build an application that uses WebAssembly. The workflow would consist of jumping between C/C++ and JavaScript to achieve the desired results. In this case, the functionality that we're offloading from JavaScript into WebAssembly is already known, so we'll write the C code up front.
Let's walk through each section of the C file. Create a file in the /lib folder named main.c and populate it with the following contents in each section. It'll be easier to comprehend what's happening in the C file if we break it into smaller chunks. Let's start with the Declarations section.
The first section contains declarations we will use to create and traverse the doubly linked list, as follows:
#include <stdlib.h>

struct Node {
  int id;
  int categoryId;
  float rawAmount;
  float cookedAmount;
  struct Node *next;
  struct Node *prev;
};

typedef enum {
  RAW = 1,
  COOKED = 2
} AmountType;

struct Node *transactionsHead = NULL;
struct Node *categoriesHead = NULL;
The Node struct is used to represent a transaction or category. The transactionsHead and categoriesHead node instances represent the first node in each linked list we'll use (one for transactions and one for categories). The AmountType the enum isn't required, but we'll discuss how it's useful when we get to the section of code that utilizes it.
The second section contains the two functions used to add and delete nodes from the linked list:
void deleteNode(struct Node **headNode, struct Node *delNode) {
    // Base case:
    if (*headNode == NULL || delNode == NULL) return;

    // If node to be deleted is head node:
    if (*headNode == delNode) *headNode = delNode->next;

    // Change next only if node to be deleted is NOT the last node:
    if (delNode->next != NULL) delNode->next->prev = delNode->prev;

    // Change prev only if node to be deleted is NOT the first node:
    if (delNode->prev != NULL) delNode->prev->next = delNode->next;

    // Finally, free the memory occupied by delNode:
    free(delNode);
}

void appendNode(struct Node **headNode, int id, int categoryId,
                float rawAmount, float cookedAmount) {
    // 1. Allocate node:
    struct Node *newNode = (struct Node *) malloc(sizeof(struct Node));
    struct Node *last = *headNode; // Used in Step 5

    // 2. Populate with data:
    newNode->id = id;
    newNode->categoryId = categoryId;
    newNode->rawAmount = rawAmount;
    newNode->cookedAmount = cookedAmount;

    // 3. This new node is going to be the last node, so make next NULL:
    newNode->next = NULL;

    // 4. If the linked list is empty, then make the new node as head:
    if (*headNode == NULL) {
        newNode->prev = NULL;
        *headNode = newNode;
        return;
    }

    // 5. Otherwise, traverse till the last node:
    while (last->next != NULL) {
        last = last->next;
    }

    // 6. Change the next of last node:
    last->next = newNode;

    // 7. Make last node as previous of new node:
    newNode->prev = last;
}
The comments within the code describe what's happening at each step. When we need to add a Node to the list, we have to allocate the memory taken up by the struct Node using malloc() and append it to the last node in the linked list. If we need to delete a node, we have to remove it from the linked list and deallocate the memory that the node was using by calling the free() function.
The third section contains functions to add, edit, and remove transactions from the transactions linked list, as follows:
struct Node *findNodeById(int id, struct Node *withinNode) {
    struct Node *node = withinNode;
    while (node != NULL) {
        if (node->id == id) return node;
        node = node->next;
    }
    return NULL;
}

void addTransaction(int id, int categoryId, float rawAmount,
                    float cookedAmount) {
    appendNode(&transactionsHead, id, categoryId, rawAmount, cookedAmount);
}

void editTransaction(int id, int categoryId, float rawAmount,
                     float cookedAmount) {
    struct Node *foundNode = findNodeById(id, transactionsHead);
    if (foundNode != NULL) {
        foundNode->categoryId = categoryId;
        foundNode->rawAmount = rawAmount;
        foundNode->cookedAmount = cookedAmount;
    }
}

void removeTransaction(int id) {
    struct Node *foundNode = findNodeById(id, transactionsHead);
    if (foundNode != NULL) deleteNode(&transactionsHead, foundNode);
}
The appendNode() and deleteNode() functions we reviewed in the previous section aren't intended to be called from the JavaScript code. Instead, calls to addTransaction(), editTransaction(), and removeTransaction() are used to update the local linked list. The addTransaction() function calls the appendNode() function to add the data passed in as arguments to a new node in the local linked list. The removeTransaction() calls the deleteNode() function to delete the corresponding transaction node. The findNodeById() function is used to determine which node needs to be updated or deleted within the linked list based on the specified ID.
The fourth section contains functions to calculate the grand totals and final balances for raw and cooked transactions, as follows:
void calculateGrandTotals(float *totalRaw, float *totalCooked) {
    struct Node *node = transactionsHead;
    while (node != NULL) {
        *totalRaw += node->rawAmount;
        *totalCooked += node->cookedAmount;
        node = node->next;
    }
}

float getGrandTotalForType(AmountType type) {
    float totalRaw = 0;
    float totalCooked = 0;
    calculateGrandTotals(&totalRaw, &totalCooked);

    if (type == RAW) return totalRaw;
    if (type == COOKED) return totalCooked;
    return 0;
}

float getFinalBalanceForType(AmountType type, float initialBalance) {
    float totalForType = getGrandTotalForType(type);
    return initialBalance + totalForType;
}
The AmountType enum we declared in the declarations section is used here to avoid magic numbers. It makes it easy to remember that 1 represents raw transactions and 2 represents cooked transactions. The grand totals for both raw and cooked transactions are calculated in the calculateGrandTotals() function, even though we're only asking for one type in getGrandTotalForType(). Since we can only return a single value from a Wasm function, we end up looping through all of the transactions twice when we call getGrandTotalForType() for both raw and cooked transactions. With a relatively small amount of transactions and the simplicity of the calculation, this doesn't present any issues. The getFinalBalanceForType() returns the grand total plus the specified initialBalance. You'll see this in action when we add the ability to change initial balances in the web application.
The fifth and final section contains functions to calculate totals by category, which we'll utilize in the pie charts, as follows:
void upsertCategoryNode(int categoryId, float transactionRaw,
                        float transactionCooked) {
    struct Node *foundNode = findNodeById(categoryId, categoriesHead);
    if (foundNode != NULL) {
        foundNode->rawAmount += transactionRaw;
        foundNode->cookedAmount += transactionCooked;
    } else {
        appendNode(&categoriesHead, categoryId, categoryId, transactionRaw,
                   transactionCooked);
    }
}

void buildValuesByCategoryList() {
    struct Node *node = transactionsHead;
    while (node != NULL) {
        upsertCategoryNode(node->categoryId, node->rawAmount,
                           node->cookedAmount);
        node = node->next;
    }
}

void recalculateForCategories() {
    categoriesHead = NULL;
    buildValuesByCategoryList();
}

float getCategoryTotal(AmountType type, int categoryId) {
    // Ensure the category totals have been calculated:
    if (categoriesHead == NULL) buildValuesByCategoryList();

    struct Node *categoryNode = findNodeById(categoryId, categoriesHead);
    if (categoryNode == NULL) return 0;

    if (type == RAW) return categoryNode->rawAmount;
    if (type == COOKED) return categoryNode->cookedAmount;
    return 0;
}
The buildValuesByCategoryList() function is called whenever the recalculateForCategories() or getCategoryTotal() functions are called. The function loops through all of the transactions in the transactions linked list and creates a node in a separate linked list for each corresponding category with the aggregated raw and total amounts. The upsertCategoryNode() function looks for a node that corresponds to the categoryId in the categories linked list. If it finds it, the raw and cooked transaction amounts are added to the existing amounts on that node, otherwise a new node is created for said category. The recalculateForCategories() function is called to ensure the category totals are up to date with any transactions changes.
After populating the file, we need to compile it down to Wasm for use in the JavaScript portion of the application. Run the build task by selecting Tasks | Run Build Task... from the menu or using the keyboard shortcut Cmd/Ctrl + Shift + B. If the build was successful, you'll see a file named main.wasm in the /src/assets folder. If an error occurred, the terminal should provide details on how to resolve it.
If you're not using VS Code, open a terminal instance in the /cook-the-books folder and run the following command:
emcc lib/main.c -Os -s WASM=1 -s SIDE_MODULE=1 -s BINARYEN_ASYNC_COMPILATION=0 -o src/assets/main.wasm
That's it for the C code. Let's move on to the JavaScript portion.
The JavaScript portion of the application presents the transactions data to the user and allows them to easily add, edit, and remove transactions. The application is split across several files to simplify the development process and uses the libraries described in the JavaScript libraries used section of this chapter. In this section, we will build the application step by step, starting with the API and global state interaction layer. We'll write functions to instantiate and interact with our Wasm module and review the Vue components required to build the user interface.
The application is broken down into contexts to simplify the development process. We'll build the application from the bottom up to ensure we don't have to bounce back and forth between the different contexts when writing code. We'll start with the Wasm interaction code, then move on to the global store and API interaction. I'll describe the purpose of each Vue component, but the source code will only be provided for a select few. If you're following along and wish to run the application locally, you'll need to copy the /src/components folder from the /chapter-07-cook-the-books folder in the learn-webassembly repository into the /src folder of your project.
Before we start writing any code, you must ensure your browser supports the newer JavaScript features we'll use in the application. Your browser has to support ES Modules (import and export), the Fetch API, and async / await. You need at least Version 61 of Google Chrome or Version 60 of Firefox. You can check which version you're currently using by selecting About Chrome or About Firefox from the menu bar. I'm currently running the application with Chrome Version 67 and Firefox Version 61 without any issues.
You should have two compiled Wasm files in the /src/assets folder of your project: main.wasm and memory.wasm. Since we need to utilize the malloc() and free() functions exported from memory.wasm in the main.wasm code, our loading code is going to look different from the earlier examples. Create a file in the /src/store folder named initializeWasm.js and populate it with the following contents:
/**
 * Returns an array of compiled (not instantiated!) Wasm modules.
 * We need the main.wasm file we created, as well as the memory.wasm file
 * that allows us to use C functions like malloc() and free().
 */
const fetchAndCompileModules = () =>
  Promise.all(
    ['../assets/main.wasm', '../assets/memory.wasm'].map(fileName =>
      fetch(fileName)
        .then(response => {
          if (response.ok) return response.arrayBuffer();
          throw new Error(`Unable to fetch WebAssembly file: ${fileName}`);
        })
        .then(bytes => WebAssembly.compile(bytes))
    )
  );

/**
 * Returns an instance of the compiled "main.wasm" file.
 */
const instantiateMain = (compiledMain, memoryInstance, wasmMemory) => {
  const memoryMethods = memoryInstance.exports;
  return WebAssembly.instantiate(compiledMain, {
    env: {
      memoryBase: 0,
      tableBase: 0,
      memory: wasmMemory,
      table: new WebAssembly.Table({ initial: 16, element: 'anyfunc' }),
      abort: console.log,
      _consoleLog: value => console.log(value),
      _malloc: memoryMethods.malloc,
      _free: memoryMethods.free
    }
  });
};

/**
 * Compiles and instantiates the "memory.wasm" and "main.wasm" files and
 * returns the `exports` property from main's `instance`.
 */
export default async function initializeWasm() {
  const wasmMemory = new WebAssembly.Memory({ initial: 1024 });
  const [compiledMain, compiledMemory] = await fetchAndCompileModules();

  const memoryInstance = await WebAssembly.instantiate(compiledMemory, {
    env: {
      memory: wasmMemory
    }
  });

  const mainInstance = await instantiateMain(
    compiledMain,
    memoryInstance,
    wasmMemory
  );

  return mainInstance.exports;
}
The file's default export function, initializeWasm(), performs the following steps:
As you can see, the process is more complex when you have dependencies within Wasm modules.
We will use JavaScript's class syntax to create a wrapper that encapsulates the Wasm interaction functions. This allows us to make changes to the C code quickly without having to search through the entire application to find where Wasm functions are being called. If you rename a method in the C file, you only need to rename it one place. Create a new file in the /src/store folder named WasmTransactions.js and populate it with the following contents:
import initializeWasm from './initializeWasm.js';

/**
 * Class used to wrap the functionality from the Wasm module (rather
 * than access it directly from the Vue components or store).
 * @class
 */
export default class WasmTransactions {
  constructor() {
    this.instance = null;
    this.categories = [];
  }

  async initialize() {
    this.instance = await initializeWasm();
    return this;
  }

  getCategoryId(category) {
    return this.categories.indexOf(category);
  }

  // Ensures the raw and cooked amounts have the proper sign (withdrawals
  // are negative and deposits are positive).
  getValidAmounts(transaction) {
    const { rawAmount, cookedAmount, type } = transaction;
    const getAmount = amount =>
      type === 'Withdrawal' ? -Math.abs(amount) : amount;
    return {
      validRaw: getAmount(rawAmount),
      validCooked: getAmount(cookedAmount)
    };
  }

  // Adds the specified transaction to the linked list in the Wasm module.
  addToWasm(transaction) {
    const { id, category } = transaction;
    const { validRaw, validCooked } = this.getValidAmounts(transaction);
    const categoryId = this.getCategoryId(category);
    this.instance._addTransaction(id, categoryId, validRaw, validCooked);
  }

  // Updates the transaction node in the Wasm module:
  editInWasm(transaction) {
    const { id, category } = transaction;
    const { validRaw, validCooked } = this.getValidAmounts(transaction);
    const categoryId = this.getCategoryId(category);
    this.instance._editTransaction(id, categoryId, validRaw, validCooked);
  }

  // Removes the transaction node from the linked list in the Wasm module:
  removeFromWasm(transactionId) {
    this.instance._removeTransaction(transactionId);
  }

  // Populates the linked list in the Wasm module. The categories are
  // needed to set the categoryId in the Wasm module.
  populateInWasm(transactions, categories) {
    this.categories = categories;
    transactions.forEach(transaction => this.addToWasm(transaction));
  }

  // Returns the balance for raw and cooked transactions based on the
  // specified initial balances.
  getCurrentBalances(initialRaw, initialCooked) {
    const currentRaw = this.instance._getFinalBalanceForType(
      AMOUNT_TYPE.raw,
      initialRaw
    );
    const currentCooked = this.instance._getFinalBalanceForType(
      AMOUNT_TYPE.cooked,
      initialCooked
    );
    return { currentRaw, currentCooked };
  }

  // Returns an object that has category totals for all income (deposit)
  // and expense (withdrawal) transactions.
  getCategoryTotals() {
    // This is done to ensure the totals reflect the most recent
    // transactions:
    this.instance._recalculateForCategories();
    const categoryTotals = this.categories.map((category, idx) => ({
      category,
      id: idx,
      rawTotal: this.instance._getCategoryTotal(AMOUNT_TYPE.raw, idx),
      cookedTotal: this.instance._getCategoryTotal(AMOUNT_TYPE.cooked, idx)
    }));

    const totalsByGroup = { income: [], expenses: [] };
    categoryTotals.forEach(categoryTotal => {
      if (categoryTotal.rawTotal < 0) {
        totalsByGroup.expenses.push(categoryTotal);
      } else {
        totalsByGroup.income.push(categoryTotal);
      }
    });
    return totalsByGroup;
  }
}
When the initialize() function is called on an instance of the class, the return value of the initializeWasm() function is assigned to the instance property of the class. The class methods call functions from this.instance and, if applicable, return the desired results. Note the AMOUNT_TYPE object referenced in the getCurrentBalances() and getCategoryTotals() functions. This corresponds to the AmountType enum in our C file. The AMOUNT_TYPE object is declared globally in the /src/main.js file where the application is loaded. Now that we have our Wasm interaction code written, let's move on to API interaction code.
The API provides means for adding, editing, removing, and querying transactions in the form of HTTP methods defined on a fetch call. To simplify the process of performing these actions, we'll write some API wrapper functions. Create a file in the /src/store folder named api.js and populate it with the following contents:
// Paste your jsonstore.io endpoint here (no ending slash):
const API_URL = '[JSONSTORE.IO ENDPOINT]';

/**
 * Wrapper for performing API calls. We don't want to call response.json()
 * each time we make a fetch call.
 * @param {string} endpoint Endpoint (e.g. "/transactions" to make API call to
 * @param {Object} init Fetch options object containing any custom settings
 * @returns {Promise<*>}
 * @see https://developer.mozilla.org/en-US/docs/Web/API/WindowOrWorkerGlobalScope/fetch
 */
const performApiFetch = (endpoint = '', init = {}) =>
  fetch(`${API_URL}${endpoint}`, {
    headers: {
      'Content-type': 'application/json'
    },
    ...init
  }).then(response => response.json());

export const apiFetchTransactions = () =>
  performApiFetch('/transactions').then(({ result }) =>
    /*
     * The response object looks like this:
     * {
     *   "result": {
     *     "1": {
     *       "category": "Sales Revenue",
     *       ...
     *     },
     *     "2": {
     *       "category": "Hotels",
     *       ...
     *     },
     *     ...
     *   }
     * }
     * We need the "1" and "2" values for deleting or editing existing
     * records, so we store that in the transaction record as "apiId".
     */
    Object.keys(result).map(apiId => ({
      ...result[apiId],
      apiId
    }))
  );

export const apiEditTransaction = transaction =>
  performApiFetch(`/transactions/${transaction.apiId}`, {
    method: 'POST',
    body: JSON.stringify(transaction)
  });

export const apiRemoveTransaction = transaction =>
  performApiFetch(`/transactions/${transaction.apiId}`, {
    method: 'DELETE'
  });

export const apiAddTransaction = transaction =>
  performApiFetch(`/transactions/${transaction.apiId}`, {
    method: 'POST',
    body: JSON.stringify(transaction)
  });
You'll need the jsonstore.io endpoint you created in the Setting up the project section in order to interact with the API. Replace [JSONSTORE.IO ENDPOINT] with your jsonstore.io endpoint. Ensure the endpoint doesn't end with a forward slash or the word transactions.
The file that manages global state in the application has a lot of moving parts. Consequently, we will break the code down into smaller chunks and walk through each section individually. Create a file in the /src/store folder named store.js and populate it with the contents from each of the following sections.
The first section contains import statements and the wasm and state properties on the exported store object, as follows:
import {
  apiFetchTransactions,
  apiAddTransaction,
  apiEditTransaction,
  apiRemoveTransaction
} from './api.js';
import WasmTransactions from './WasmTransactions.js';

export const store = {
  wasm: null,
  state: {
    transactions: [],
    activeTransactionId: 0,
    balances: {
      initialRaw: 0,
      currentRaw: 0,
      initialCooked: 0,
      currentCooked: 0
    }
  },
  ...
All API interaction is limited to the store.js file. Since we need to manipulate, add, and search transactions, all of the exported functions from api.js are imported. The store object holds the WasmTransactions instance in the wasm property and initial state in the state property. The values in state are referenced in multiple locations throughout the application. The store object will be added to the global window object when the application loads, so all components have access to the global state.
The second section contains functions that manage transactions in the Wasm instance (through the WasmTransactions instance) and the API, as follows:
...
  getCategories() {
    const categories = this.state.transactions.map(
      ({ category }) => category
    );
    // Remove duplicate categories and sort the names in ascending order:
    return _.uniq(categories).sort();
  },

  // Populate global state with the transactions from the API response:
  populateTransactions(transactions) {
    const sortedTransactions = _.sortBy(transactions, [
      'transactionDate',
      'id'
    ]);
    this.state.transactions = sortedTransactions;
    store.wasm.populateInWasm(sortedTransactions, this.getCategories());
    this.recalculateBalances();
  },

  addTransaction(newTransaction) {
    // We need to assign a new ID to the transaction, so this just adds
    // 1 to the current maximum transaction ID:
    newTransaction.id = _.maxBy(this.state.transactions, 'id').id + 1;
    store.wasm.addToWasm(newTransaction);
    apiAddTransaction(newTransaction).then(() => {
      this.state.transactions.push(newTransaction);
      this.hideTransactionModal();
    });
  },

  editTransaction(editedTransaction) {
    store.wasm.editInWasm(editedTransaction);
    apiEditTransaction(editedTransaction).then(() => {
      this.state.transactions = this.state.transactions.map(
        transaction => {
          if (transaction.id === editedTransaction.id) {
            return editedTransaction;
          }
          return transaction;
        }
      );
      this.hideTransactionModal();
    });
  },

  removeTransaction(transaction) {
    const transactionId = transaction.id;
    store.wasm.removeFromWasm(transactionId);

    // We're passing the whole transaction record into the API call
    // for the sake of consistency:
    apiRemoveTransaction(transaction).then(() => {
      this.state.transactions = this.state.transactions.filter(
        ({ id }) => id !== transactionId
      );
      this.hideTransactionModal();
    });
  },
...
The populateTransactions() function fetches all of the transactions from the API and loads them into the global state and the Wasm instance. The category names are extrapolated from the transactions array in the getCategories() function. The results are passed to the WasmTransactions instance when store.wasm.populateInWasm() is called.
The addTransaction(), editTransaction(), and removeTransaction() functions perform the actions that correspond with their names. All three functions manipulate the Wasm instance and update the data on the API through a fetch call. Each of the functions call this.hideTransactionModal() because changes to a transaction can only be made through the TransactionModal component. Once the change is successfully made, the modal should close. Let's look at the TransactionModal management code next.
The third section contains functions to manage the visibility and content of the TransactionModal component (located in /src/components/TransactionsTab/TransactionModal.js) as follows:
...
  showTransactionModal(transactionId) {
    this.state.activeTransactionId = transactionId || 0;
    const transactModal = document.querySelector('#transactionModal');
    UIkit.modal(transactModal).show();
  },

  hideTransactionModal() {
    this.state.activeTransactionId = 0;
    const transactModal = document.querySelector('#transactionModal');
    UIkit.modal(transactModal).hide();
  },

  getActiveTransaction() {
    const { transactions, activeTransactionId } = this.state;
    const foundTransaction = transactions.find(transaction =>
      transaction.id === activeTransactionId);
    return foundTransaction || { id: 0 };
  },
...
The showTransactionModal() and hideTransactionModal() functions should be self-explanatory. The hide() or show() method of UIkit.modal() is called on the DOM element representing the TransactionModal. The getActiveTransaction() function returns the transaction record associated with the activeTransactionId value in global state.
The fourth section contains functions that calculate and update the balances object in global state:
...
  updateInitialBalance(amount, fieldName) {
    this.state.balances[fieldName] = amount;
  },

  // Update the "balances" object in global state based on the current
  // initial balances:
  recalculateBalances() {
    const { initialRaw, initialCooked } = this.state.balances;
    const { currentRaw, currentCooked } = this.wasm.getCurrentBalances(
      initialRaw,
      initialCooked
    );
    this.state.balances = {
      initialRaw,
      currentRaw,
      initialCooked,
      currentCooked
    };
  }
};
The updateInitialBalance() function sets the property value in the balances object in global state based on the amount and fieldName arguments. The recalculateBalances() function updates all of the fields on the balances object to reflect any changes made to the initial balances or transactions.
The final section of code in the file initializes the store:
/**
 * This function instantiates the Wasm module, fetches the transactions
 * from the API endpoint, and loads them into state and the Wasm
 * instance.
 */
export const initializeStore = async () => {
  const wasmTransactions = new WasmTransactions();
  store.wasm = await wasmTransactions.initialize();
  const transactions = await apiFetchTransactions();
  store.populateTransactions(transactions);
};
The initializeStore() function instantiates the Wasm module, fetches all transactions from the API, and populates the contents of state. This function is called from the application loading code in /src/main.js, which we'll cover in the next section.
We need an entry point to load our application. Create a file in the /src folder named main.js and populate it with the following contents:
import App from './components/App.js';
import { store, initializeStore } from './store/store.js';

// This allows us to use the <vue-numeric> component globally:
Vue.use(VueNumeric.default);

// Create a globally accessible store (without having to pass it down
// as props):
window.$store = store;

// Since we can only pass numbers into a Wasm function, these flags
// represent the amount type we're trying to calculate:
window.AMOUNT_TYPE = {
  raw: 1,
  cooked: 2
};

// After fetching the transactions and initializing the Wasm module,
// render the app.
initializeStore()
  .then(() => {
    new Vue({ render: h => h(App), el: '#app' });
  })
  .catch(err => {
    console.error(err);
  });
This file is loaded after the libraries are fetched and loaded from CDNs in /src/index.html. We use the global Vue object to specify that we want to use the VueNumeric component. We add the store object exported from /store/store.js to window as $store. This isn't the most robust solution, but will be sufficient given the scope of the application. If you were creating a production application, you'd use a library like Vuex or Redux for global state management. We'll forego this approach in the interest of keeping things simple.
We also added AMOUNT_TYPE to the window object. This was done to ensure the entire application can reference the AMOUNT_TYPE value, rather than specify a magic number. After values are assigned to window, the initializeStore() function is called. If the initializeStore() function fired successfully, a new Vue instance is created to render the application. Let's add the web assets next, then move on to the Vue components.
Before we start adding Vue components to the application, let's create the HTML and CSS files that house our markup and styles. Create a file in the /src folder named index.html and populate it with the following contents:
<!doctype html>
<html lang="en-us">
<head>
  <title>Cook the Books</title>
  <link
    rel="stylesheet"
    type="text/css"
    href="https://cdnjs.cloudflare.com/ajax/libs/uikit/3.0.0-rc.6/css/uikit.min.css"
  />
  <link rel="stylesheet" type="text/css" href="styles.css" />
  <script src="https://cdnjs.cloudflare.com/ajax/libs/uikit/3.0.0-rc.6/js/uikit.min.js"></script>
  <script src="https://cdnjs.cloudflare.com/ajax/libs/uikit/3.0.0-rc.6/js/uikit-icons.min.js"></script>
  <script src="https://unpkg.com/accounting-js@1.1.1/dist/accounting.umd.js"></script>
  <script src="https://unpkg.com/lodash@4.17.10/lodash.min.js"></script>
  <script src="https://unpkg.com/d3@5.5.0/dist/d3.min.js"></script>
  <script src="https://unpkg.com/vue@2.5.16/dist/vue.min.js"></script>
  <script src="https://unpkg.com/vue-numeric@2.3.0/dist/vue-numeric.min.js"></script>
  <script src="main.js" type="module"></script>
</head>
<body>
  <div id="app"></div>
</body>
</html>
We're only using the HTML file to fetch libraries from CDNs, specify a <div> that Vue can render to, and load main.js to start the application. Note the type="module" attribute on the final <script> element. This allows us to use ES modules throughout our application. Now let's add the CSS file. Create a file in the /src folder named styles.css and populate it with the following contents:
@import url("https://fonts.googleapis.com/css?family=Quicksand");

:root {
  --blue: #2889ed;
}

* {
  font-family: "Quicksand", Helvetica, Arial, sans-serif !important;
}

#app {
  -webkit-font-smoothing: antialiased;
  -moz-osx-font-smoothing: grayscale;
}

.addTransactionButton {
  color: white;
  height: 64px;
  width: 64px;
  background: var(--blue);
  position: fixed;
  bottom: 24px;
  right: 24px;
}

.addTransactionButton:hover {
  color: white;
  background-color: var(--blue);
  opacity: .6;
}

.errorText {
  color: white;
  font-size: 36px;
}

.appHeader {
  height: 80px;
  margin: 0;
}

.balanceEntry {
  font-size: 2rem;
}

.tableAmount {
  white-space: pre;
}
This file has only a few classes because most of the styling will be handled at the component level. In the next section, we'll review the Vue components that make up our application.
With Vue, we can create separate components that encapsulate their own functionality, then compose these components to build an application. This makes debugging, extensibility, and change management much easier than storing the application in a single monolithic file.
The application uses a single-component-per-file development methodology. Before we start reviewing the component files, let's look at the finished product. The following screenshot is of the application with the TRANSACTIONS tab selected:
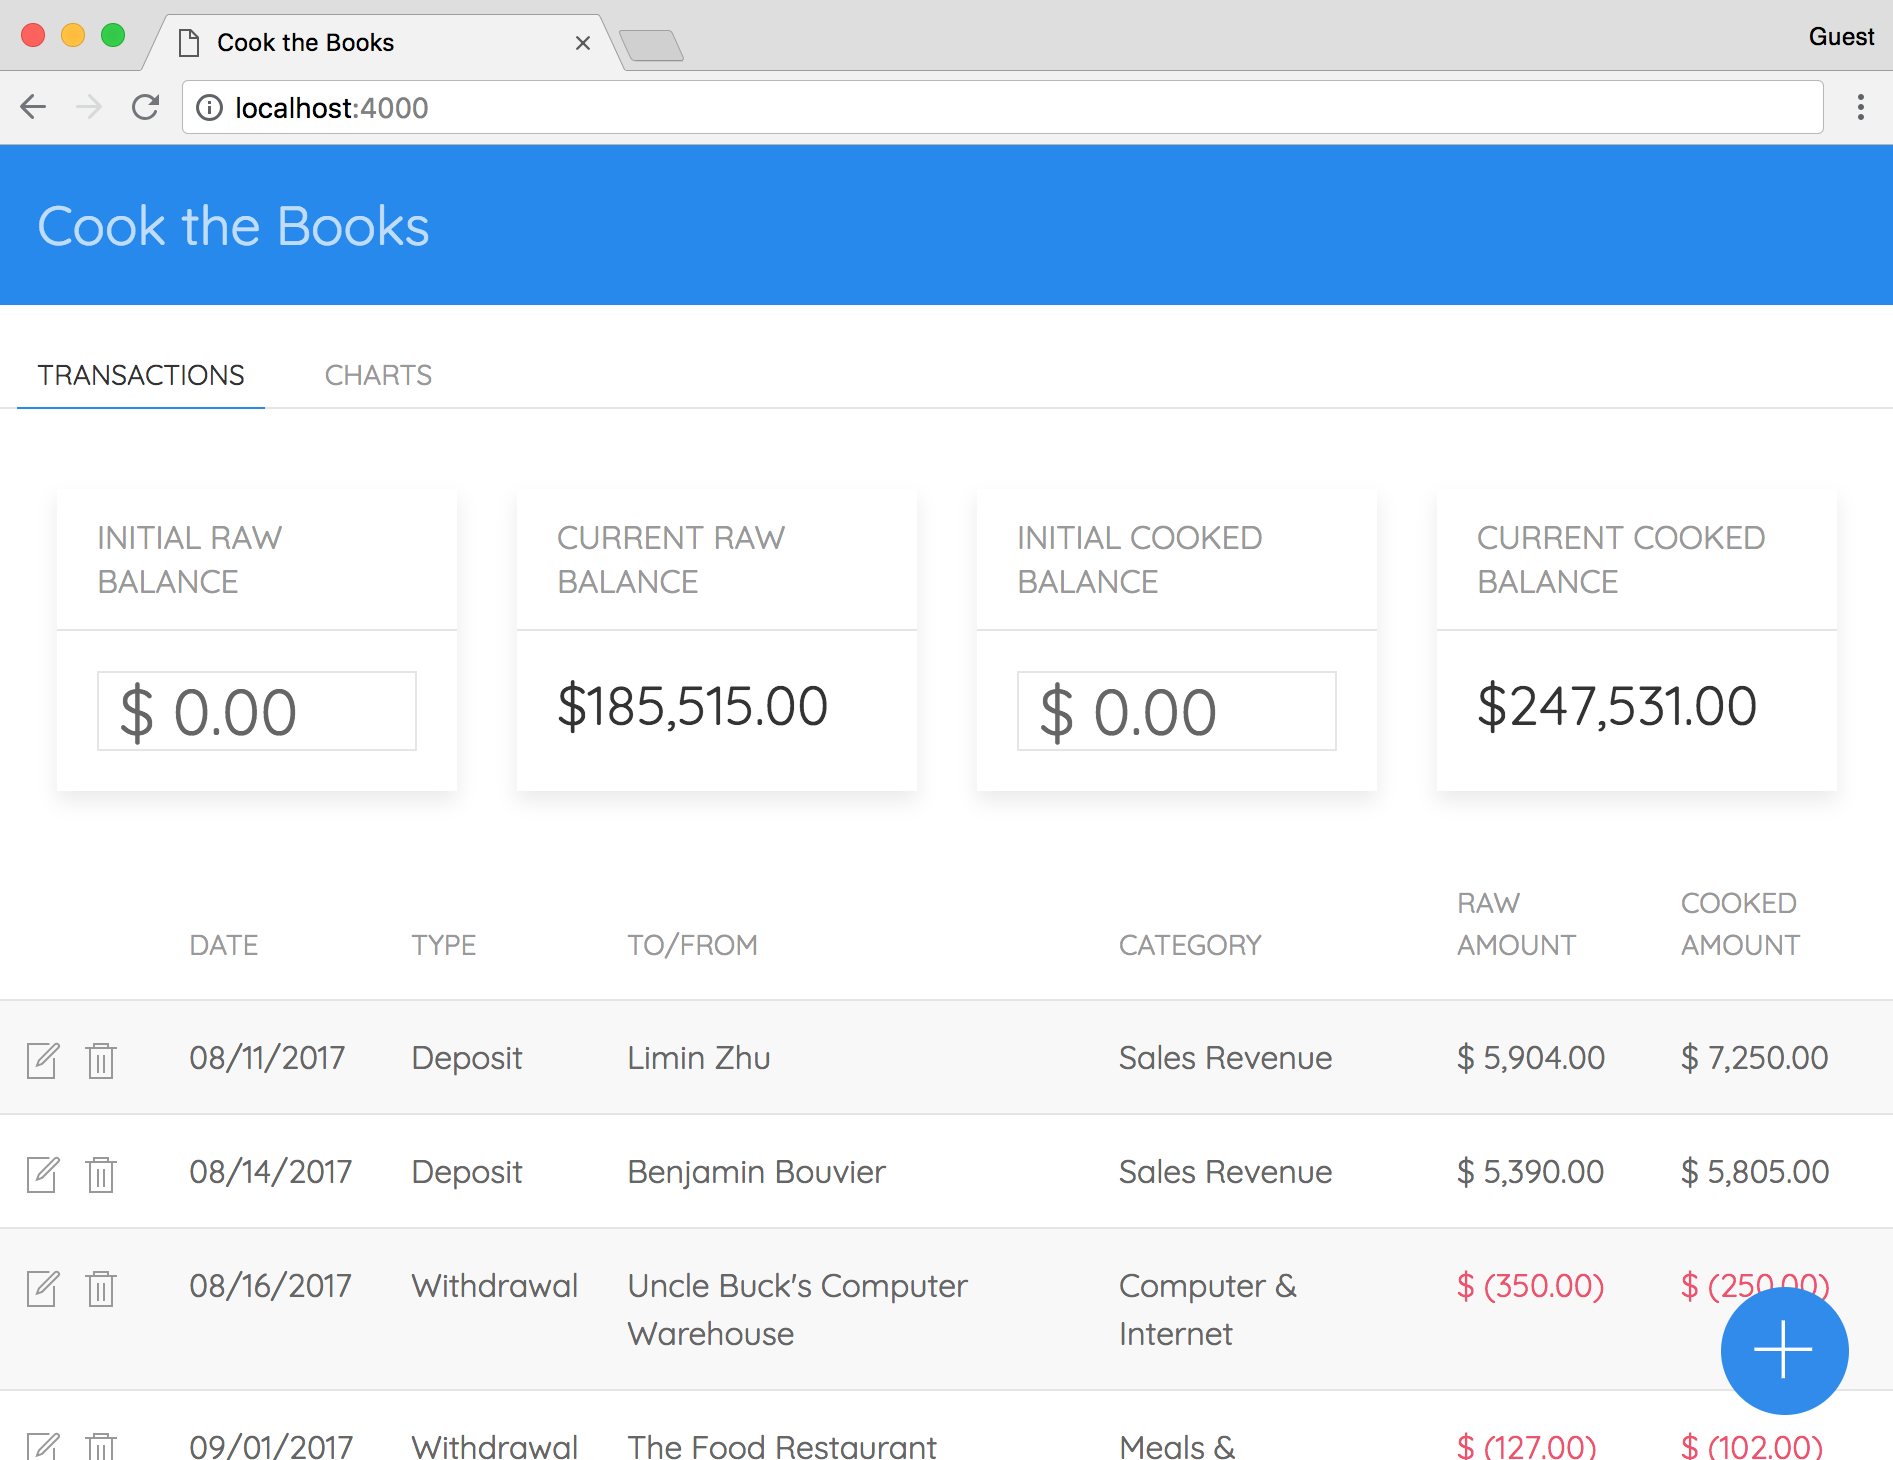
Here's a screenshot of the application with the CHARTS tab selected:

A Vue component is simply a file with an exported object containing properties that define how that component should look and behave. The properties must be given names that adhere to the Vue API. You can read about these properties and other aspects of the Vue API at https://vuejs.org/v2/api. The following code represents an example component containing the elements of the Vue API used in this application:
import SomeComponent from './SomeComponent.js';

export default {
  name: 'dummy-component',

  // Props passed from other components:
  props: {
    label: String,
  },

  // Other Vue components to render within the template:
  components: {
    SomeComponent
  },

  // Used to store local data/state:
  data() {
    return {
      amount: 0
    }
  },

  // Used to store complex logic that outside of the `template`:
  computed: {
    negativeClass() {
      return {
        'negative': this.amount < 0
      };
    }
  },

  // Methods that can be performed within the component:
  methods: {
    addOne() {
      this.amount += 1;
    }
  },

  // Perform actions if the local data changes:
  watch: {
    amount(val, oldVal) {
      console.log(`New: ${val} | Old: ${oldVal}`);
    }
  },

  // Contains the HTML to render the component:
  template: `
    <div>
      <some-component></some-component>
      <label for="someAmount">{{ label }}</label>
      <input
        id="someAmount"
        :class="negativeClass"
        v-model="amount"
        type="number"
      />
      <button @click="addOne">Add One</button>
    </div>
  `
};
The comments above each property describe its purpose, albeit at a very high level. Let's see Vue in action by reviewing the App component.
The App component is the base component that renders all of the child components in the application. We'll briefly review the App component's code to gain a better understanding of Vue. Going forward, we'll describe the role each remaining component plays, but only review sections of the corresponding code. The contents of the App component file, located at /src/components/App.js, are shown as follows:
import BalancesBar from './BalancesBar/BalancesBar.js';
import ChartsTab from './ChartsTab/ChartsTab.js';
import TransactionsTab from './TransactionsTab/TransactionsTab.js';

/**
 * This component is the entry point for the application. It contains the
 * header, tabs, and content.
 */
export default {
  name: 'app',
  components: {
    BalancesBar,
    ChartsTab,
    TransactionsTab
  },
  data() {
    return {
      balances: $store.state.balances,
      activeTab: 0
    };
  },
  methods: {
    // Any time a transaction is added, edited, or removed, we need to
    // ensure the balance is updated:
    onTransactionChange() {
      $store.recalculateBalances();
      this.balances = $store.state.balances;
    },

    // When the "Charts" tab is activated, this ensures that the charts
    // get automatically updated:
    onTabClick(event) {
      this.activeTab = +event.target.dataset.tab;
    }
  },
  template: `
    <div>
      <div class="appHeader uk-background-primary uk-flex uk-flex-middle">
        <h2 class="uk-light uk-margin-remove-bottom uk-margin-left">
          Cook the Books
        </h2>
      </div>
      <div class="uk-position-relative">
        <ul uk-tab class="uk-margin-small-bottom uk-margin-top">
          <li class="uk-margin-small-left">
            <a href="#" data-tab="0" @click="onTabClick">Transactions</a>
          </li>
          <li>
            <a href="#" data-tab="1" @click="onTabClick">Charts</a>
          </li>
        </ul>
        <balances-bar
          :balances="balances"
          :onTransactionChange="onTransactionChange">
        </balances-bar>
        <ul class="uk-switcher">
          <li>
            <transactions-tab :onTransactionChange="onTransactionChange">
            </transactions-tab>
          </li>
          <li>
            <charts-tab :isActive="this.activeTab === 1"></charts-tab>
          </li>
        </ul>
      </div>
    </div>
  `
};
We use the components property to specify the other Vue components we'll render in the template for the App component. The data() function, which returns the local state, is used to keep track of balances and which tab is active (TRANSACTIONS or CHARTS). The methods property contains two functions: onTransactionChange() and onTabClick(). The onTransactionChange() function calls $store.recalculateBalances() and updates balances in local state if a change is made to a transaction record. The onTabClick() function changes the value of activeTab in the local state to the data-tab attribute of the clicked tab. Finally, the template property contains the markup used to render the component.
The /components/BalancesBar folder contains two component files: BalanceCard.js and BalancesBar.js. The BalancesBar component persists across the TRANSACTIONS and CHARTS tabs and is located directly under the tab control. It contains four of the BalanceCard components, one for each balance type: initial raw, current raw, initial cooked, and current cooked. The first and third cards representing the initial balances contain inputs so the balance can be changed. The second and fourth cards representing the current balances are calculated dynamically in the Wasm module (using the getFinalBalanceForType() function). The following snippet, taken from the BalancesBar component, demonstrates Vue's binding syntax:
<balance-card
  title="Initial Raw Balance"
  :value="balances.initialRaw"
  :onChange="amount => onBalanceChange(amount, 'initialRaw')">
</balance-card>
The : preceding the value and onChange attributes indicate that these properties are bound to the Vue component. If the value of balances.initialRaw changes, the value displayed in the BalanceCard will update as well. The onBalanceChange() function for this card updates the value of balances.initialRaw in global state.
The /components/TransactionsTab folder contains the following four component files:
The TransactionsTab component contains the TransactionsTable and TransactionsModal components, as well as a button used to add new transactions. Changes and additions are done through the TransactionModal component. The TransactionsTable contains all of the current transactions with buttons on each row to either edit or delete the transaction. If the user presses the Delete button, the ConfirmationModal component appears and prompts the user to proceed. If the user presses Yes, the transaction is deleted. The following snippet, taken from the methods property in the TransactionsTable component, demonstrates how display values are formatted:
getFormattedTransactions() {
  const getDisplayAmount = (type, amount) => {
    if (amount === 0) return accounting.formatMoney(amount);
    return accounting.formatMoney(amount, {
      format: { pos: '%s %v', neg: '%s (%v)' }
    });
  };

  const getDisplayDate = transactionDate => {
    if (!transactionDate) return '';
    const parsedTime = d3.timeParse('%Y-%m-%d')(transactionDate);
    return d3.timeFormat('%m/%d/%Y')(parsedTime);
  };

  return $store.state.transactions.map(
    ({
      type,
      rawAmount,
      cookedAmount,
      transactionDate,
      ...transaction
    }) => ({
      ...transaction,
      type,
      rawAmount: getDisplayAmount(type, rawAmount),
      cookedAmount: getDisplayAmount(type, cookedAmount),
      transactionDate: getDisplayDate(transactionDate)
    })
  );
}
The preceding getFormattedTransactions() function shown applies formatting to the rawAmount, cookedAmount, and transactionDate fields within each transaction record. This is done to ensure the value being displayed includes a dollar sign (for amounts) and is presented in a user-friendly format.
The /components/ChartsTab folder contains two component files: ChartsTab.js and PieChart.js. The ChartsTab component contains two instances of the PieChart component, one for income and one for expenses. Each PieChart component displays either the raw or cooked percentages by category. The user can switch between raw or cooked views via buttons directly above the chart. The drawChart() method in PieChart.js uses D3 to render the pie chart and legend. It uses D3's built-in animations to animate each piece of the pie when loading:
arc
  .append('path')
  .attr('fill', d => colorScale(d.data.category))
  .transition()
  .delay((d, i) => i * 100)
  .duration(500)
  .attrTween('d', d => {
    const i = d3.interpolate(d.startAngle + 0.1, d.endAngle);
    return t => {
      d.endAngle = i(t);
      return arcPath(d);
    };
  });
The preceding snippet, taken from drawChart() in PieChart.js, defines the animation for the pie piece in only a few lines of code. If you're interested in learning more about D3's capabilities, check out some the examples at https://bl.ocks.org. That's it for the components review; let's try running the application.
You've written and compiled the C code and added the frontend logic. It's time to start the application and interact with it. In this section, we will validate your application's /src folder, run the application, and test out the features to ensure everything is working correctly.
Before starting the application, reference the following structure to ensure your /src folder is structured correctly and contains the following contents:
├── /assets
│    ├── main.wasm
│    └── memory.wasm
├── /components
│    ├── /BalancesBar
│    │    ├── BalanceCard.js
│    │    └── BalancesBar.js
│    ├── /ChartsTab
│    │    ├── ChartsTab.js
│    │    └── PieChart.js
│    ├── /TransactionsTab
│    │    ├── ConfirmationModal.js
│    |    ├── TransactionModal.js
│    |    ├── TransactionsTab.js
│    |    └── TransactionsTable.js
│    └── App.js
├── /store
│    ├── api.js
│    ├── initializeWasm.js
│    ├── store.js
│    └── WasmTransactions.js
├── index.html
├── main.js
└── styles.css
If everything matches up, you're ready to proceed.
To start the application, open up a terminal in the /cook-the-books folder and run the following command:
npm start
browser-sync the development dependency we installed in the first section of this chapter, acts as a local server (like the serve library). It makes the application accessible in the browser from the port specified in the package.json file (in this case, 4000). If you navigate to http://localhost:4000/index.html in your browser, you should see this:

To ensure everything is working correctly, let's test out the application. Each of the following sections describes an action and expected behavior for a particular function of the application. Follow along to see if you're getting the expected results. If you run into an issue, you can always refer back to the /chapter-07-cook-the-books folder in the learn-webassembly repository.
Try changing the input values on the INITIAL RAW BALANCE and INITIAL COOKED BALANCE BalanceCard components. The CURRENT RAW BALANCE and CURRENT COOKED BALANCE card values should update to reflect your changes.
Make a note of the current raw and cooked balances, then press the blue Add button at the bottom-right corner of the window. It should load the TransactionModal component. Populate the inputs, make a note of the Type, Raw Amount, and Cooked Amount you entered, then press the Save button.
The balances should have updated to reflect the new amounts. If you picked Withdrawal for the Type, the balances should decrease, otherwise, they increase (for Deposit) as shown in the following screenshot:
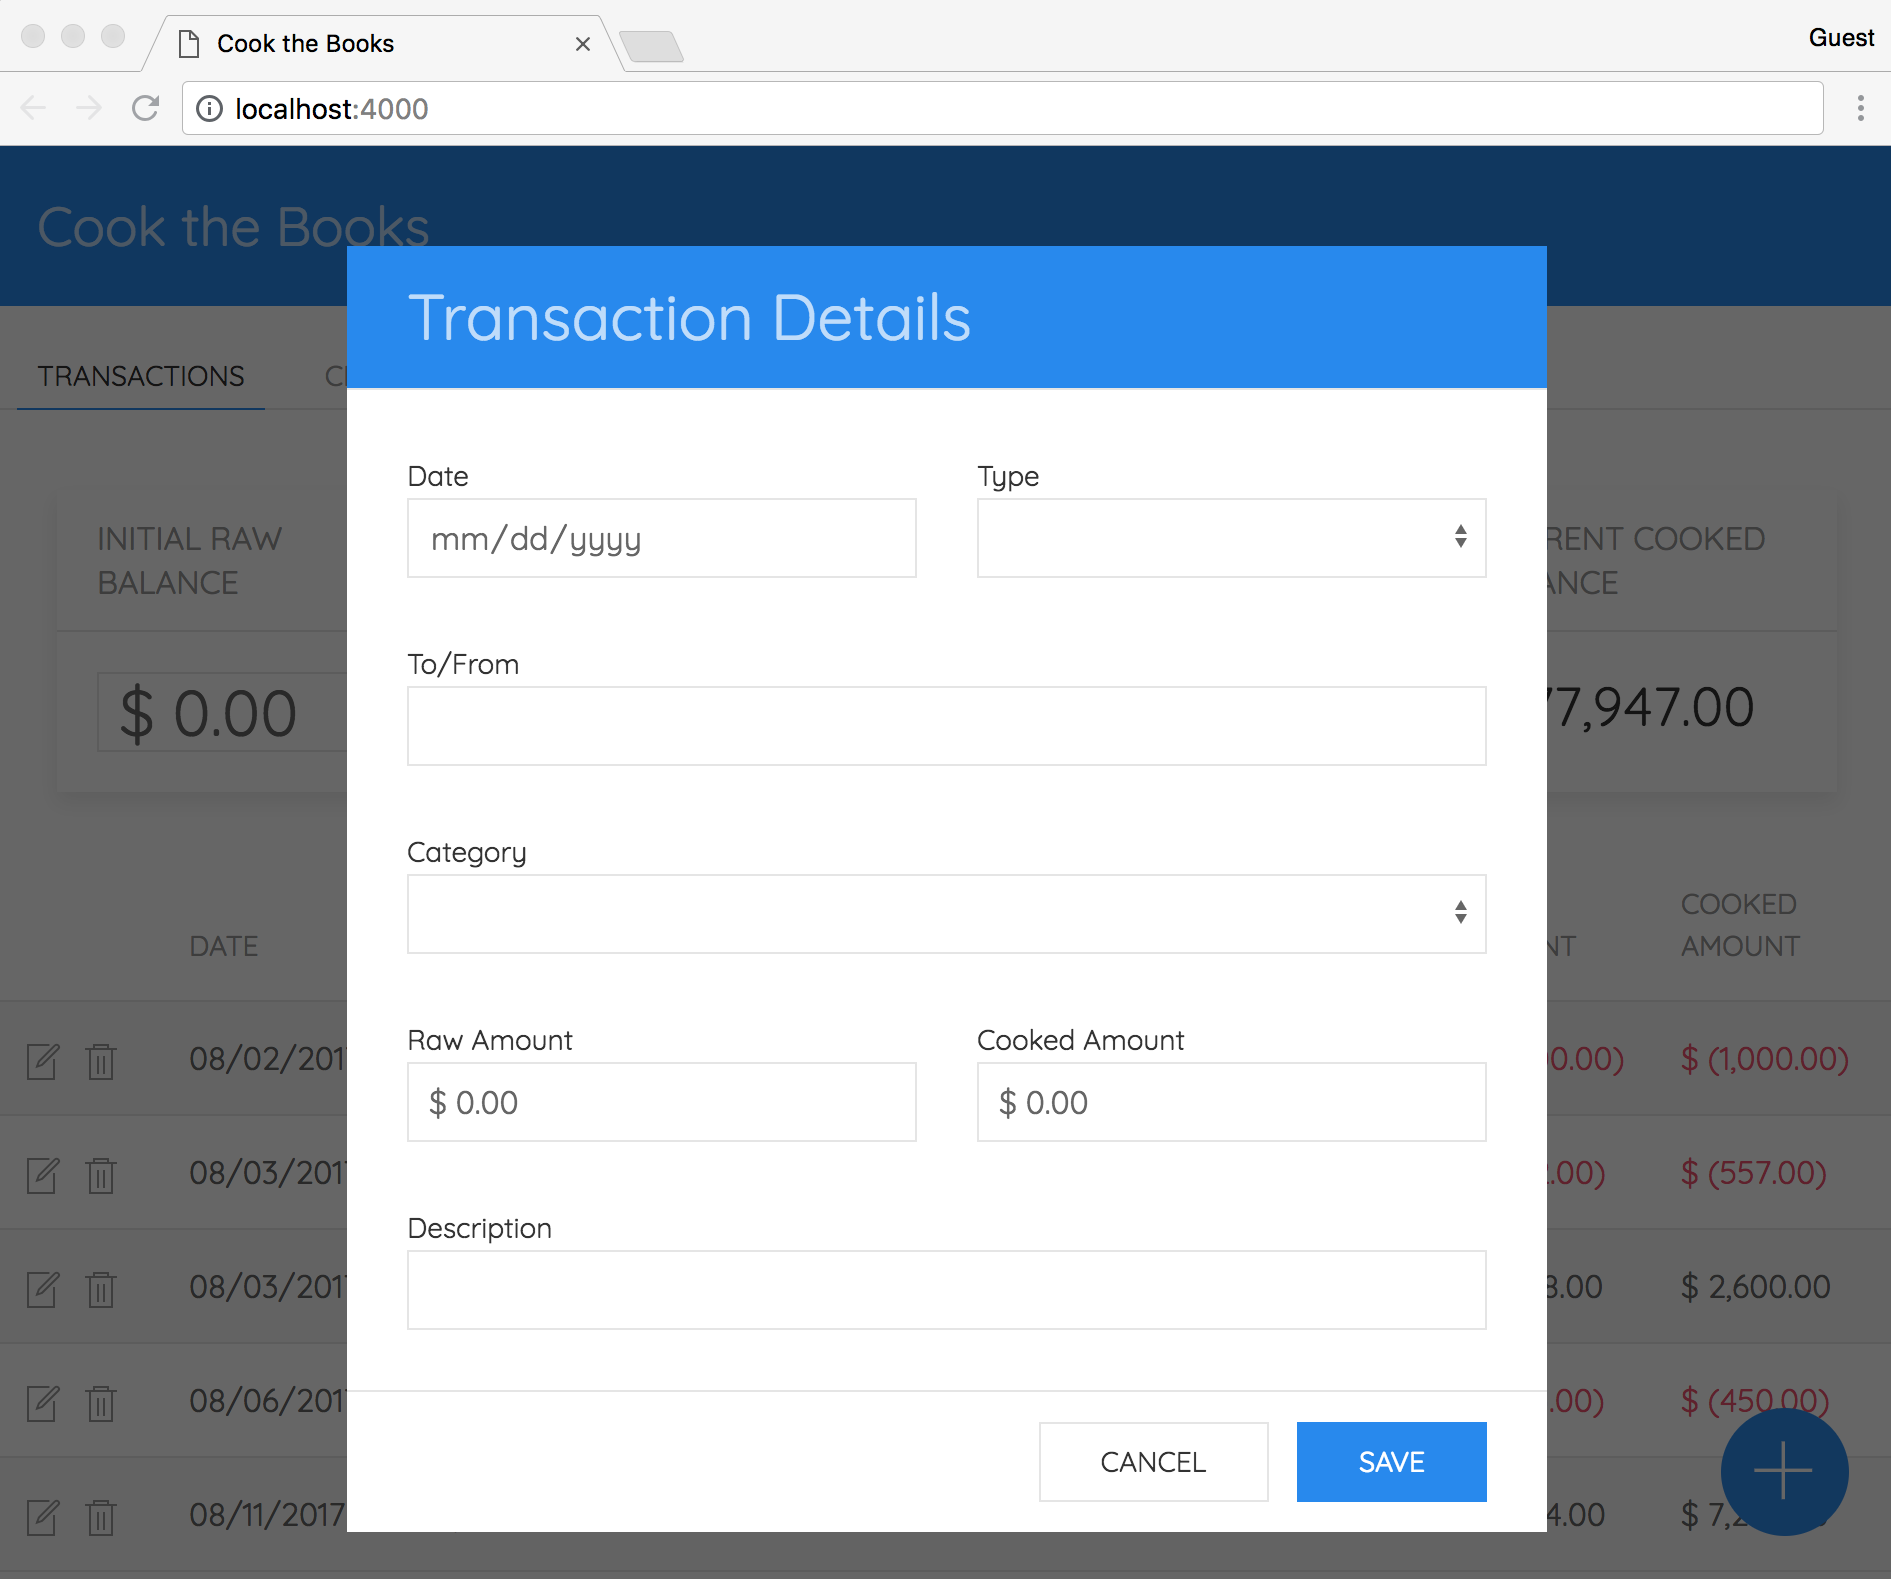
Pick a row within the TransactionsTable component, note the amounts, and press the button that looks like a trash can for that record. The ConfirmationModal component should appear. When you press the Yes button, the transaction record should no longer be present in the table and the current balances should update to reflect the amounts associated with the deleted transaction as shown in the following screenshot:

Follow the same procedure as you did for creating a new transaction, except change the existing amounts. Check the current balances to ensure they reflect the updated transaction amounts.
Select the Charts tab to load the ChartsTab component. Press the buttons in each PieChart component to switch between the raw and cooked views. The pie charts should re-render with the updated values:

Congratulations, you just built an application that uses WebAssembly! Tell your friends! Now that you understand the capabilities and limitations of WebAssembly, it's time to expand our horizons and use some of the excellent features Emscripten provides.
In this chapter, we built an accounting application from scratch that uses WebAssembly without any of the extra features Emscripten provides. By adhering to the Core Specification, we demonstrated the limitations of WebAssembly in its current form. However, we were able to perform computation quickly through the use of Wasm modules, which is well suited for accounting. We used Vue to split our application into components, UIkit for the design and layout, and D3 to create pie charts from our transactions data. In Chapter 8, Porting a Game with Emscripten, we'll take full advantage of Emscripten to port an existing C++ code base to WebAssembly.
As demonstrated in Chapter 7, Creating an Application from Scratch, WebAssembly is still relatively limited in its current form. Emscripten provides powerful APIs for extending WebAssembly's capabilities to add functionality to your application. Compiling to a WebAssembly module and JavaScript glue code (instead of an executable) can, in some cases, only require minor changes to the existing C or C++ source.
In this chapter, we're going to take a code base written in C++ that gets compiled to a traditional executable, and update the code so that it can be compiled to Wasm/JavaScript. We'll also add some additional features for tighter integration with the browser.
By the end of this chapter, you'll know how to do the following:
In this chapter, we're taking a Tetris clone written in C++ and updating the code to integrate Emscripten and compile to Wasm/JS. The code base in its original form compiled to an executable utilizes SDL2 and can be loaded from the command line. In this section, we're going to briefly review what Tetris is, how to get the code (without having to write it from scratch), and how to get it running.
In Tetris, the main objective of the game is to rotate and move pieces (Tetriminos) of various shapes within a playing field (well or matrix) to create a row of blocks without gaps. When a full row is created, it is deleted from the playing field and your score is increased by one. In our version of the game, there won't be a win condition (although it would be simple to add it).
It's important to understand the rules and mechanics of the game because the code uses algorithms for concepts such as collision detection and scoring. Understanding the goal of a function helps you understand the code within. I recommend you give it a try online if you need to brush up on your Tetris skills. You can play it at https://emulatoronline.com/nes-games/classic-tetris/ without having to install Adobe Flash. It looks just like the original Nintendo Version:
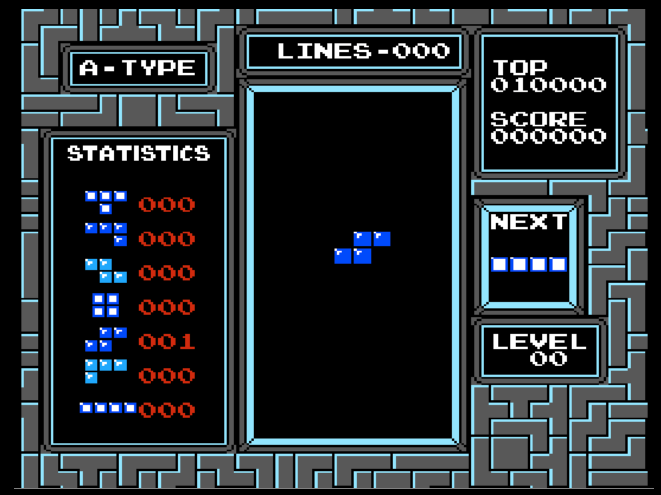
The version we'll be working with won't contain the piece counters, levels, or points (we're sticking to line counts), but it will operate in the same way.
It turns out that a search for Tetris C++ provides a multitude of tutorials and example repositories to choose from. In the interest of sticking to the formatting and naming conventions that I've been using up to this point, I combined these resources to create my own version of the game. The Further reading section at the end of this chapter has links to these resources if you're interested in learning more. The concepts and process for porting a code base are applicable, regardless of the source. On that note, let's take a brief step-aside to discuss porting in general.
Porting an existing code base to Emscripten is not always a simple task. There are several variables to take into account when evaluating whether a C, C++, or Rust application is amenable to conversion. For example, games that make use of several third-party libraries or even a few third-party libraries that are of considerable complexity may require a significant amount of effort. Emscripten provides the following commonly used libraries out of the box:
If the library isn't already ported, you will need to do it yourself. This would benefit the community, but requires a significant investment of time and resources. Our Tetris example only uses SDL2, which makes the porting process relatively simple.
The code for this chapter is located in the /chapter-08-tetris folder of the learn-webassembly repository. There are two directories within /chapter-08-tetris: the /output-native folder, which contains the original (pre-ported) code and the /output-wasm folder, which contains the ported code.
The /cmake folder and CMakeLists.txt file within the /output-native folder are required to build the project. The README.md file contains instructions to get the code up and running on each platform. Building the project isn't necessary to work through the porting process. The process for installing the required dependencies and getting the project to build successfully on your platform can be time-consuming and complex. If you still wish to proceed, you can build the executable through VS Code's Task feature by selecting Tasks | Run Task... from the menu and selecting Build Executable from the list after following the instructions in the README.md file.
If you were successful in building the project, you should be able to run it by selecting Tasks | Run Task... from the VS Code menu and selecting the Start Executable task from the list. If everything was successful, you should see something like this:
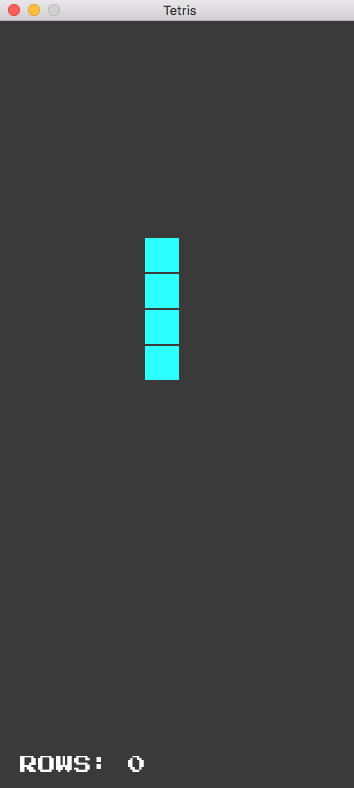
Our version of the game doesn't have a losing condition; it just increments the ROWS count by one for each row you clear. If one of the Tetriminos touches the top of the board, the game is over and the board resets. It's a rudimentary implementation of the game, but additional features increase the complexity and amount of code required. Let's review the code base in more detail.
Now that you have the code available, you'll need to familiarize yourself with the code base. Without having a good understanding of the code you want to port, you'll have a much harder time porting it successfully. In this chapter, we're going to walk through each of the C++ class and header files and describe their roles in the application.
C++ was designed around an object-oriented paradigm, which is what the Tetris code base uses to simplify management of the application. The code base consists of C++ class files
(.cpp) and header files (.h) that represent objects within the context of the game. I used the gameplay summary from the What is Tetris? section to extrapolate which objects I needed.
The game pieces (Tetriminos) and playing field (referred to as a well or matrix) are good candidates for classes. Maybe less intuitively, but still just as valid, is the game itself. Classes don't necessarily need to be as concrete as actual objects — they're excellent for storing shared code. I'm a big fan of less typing, so I opted to use Piece to represent a Tetrimino and Board for the playing field (although the word well is shorter, it just doesn't quite fit). I created a header file to store global variables (constants.h), a Game class to manage gameplay, and a main.cpp file, which acts as the entry point for the game. Here's the contents of the /src folder:
├── board.cpp
├── board.h
├── constants.h
├── game.cpp
├── game.h
├── main.cpp
├── piece.cpp
└── piece.h
Each file (with the exception of main.cpp and constants.h) has a class (.cpp) and header (.h) file. Header files allow you to reuse code across multiple files and prevent code duplication. The Further reading section contains resources for you to learn more about header files if you're interested. The constants.h file is used in almost all of the other files within the application, so let's review that first.
Rather than have confusing magic numbers sprinkled throughout the code base, I opted for a header file containing the constants we'll be using (constants.h). The contents of this file are shown here:
#ifndef TETRIS_CONSTANTS_H
#define TETRIS_CONSTANTS_H

namespace Constants {
    const int BoardColumns = 10;
    const int BoardHeight = 720;
    const int BoardRows = 20;
    const int BoardWidth = 360;
    const int Offset = BoardWidth / BoardColumns;
    const int PieceSize = 4;
    const int ScreenHeight = BoardHeight + 50;
}

#endif // TETRIS_CONSTANTS_H
The #ifndef statement in the first line of the file is an #include guard, which prevents the header file from being included multiple times during compilation. These guards are used in all of the application's header files. The purpose of each of these constants will become clear when we step through each of the classes. I included it first to provide context around the various element sizes and how they relate to each other.
Let's move on to the various classes that represent aspects of the game. The Piece class represents an object at the lowest level, so we'll start there and work our way up to the Board and Game classes.
The piece, or Tetrimino, is the element that can be moved and rotated on the board. There are seven kinds of Tetriminos — each is represented by a letter and has a corresponding color:
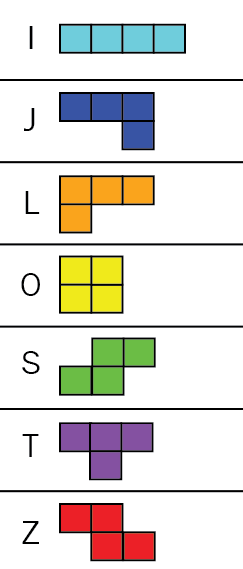
We need a way to define each piece in terms of shape, color, and current orientation. Each piece has four different orientations (at 90 degree increments), which results in 28 total variations for all pieces. The color doesn't change, so that only needs to be assigned once. With that in mind, let's first take a look at the header file (piece.h):
#ifndef TETRIS_PIECE_H
#define TETRIS_PIECE_H

#include <SDL2/SDL.h>
#include "constants.h"

class Piece {
 public:
  enum Kind { I = 0, J, L, O, S, T, Z };

  explicit Piece(Kind kind);

  void draw(SDL_Renderer *renderer);
  void move(int columnDelta, int rowDelta);
  void rotate();
  bool isBlock(int column, int row) const;
  int getColumn() const;
  int getRow() const;

 private:
  Kind kind_;
  int column_;
  int row_;
  int angle_;
};

#endif // TETRIS_PIECE_H
The game uses SDL2 to render the various graphical elements and handle keyboard input, which is why we're passing a SDL_Renderer into the draw() function. You'll see how SDL2 is used in the Game class, but for now just be aware of its inclusion. The header file defines the interface for the Piece class; let's review the implementation in piece.cpp. We'll walk through each section of code and describe the functionality.
The first section of code defines the constructor of the Piece class and the draw() function:
#include "piece.h"

using namespace Constants;

Piece::Piece(Piece::Kind kind) :
    kind_(kind),
    column_(BoardColumns / 2 - PieceSize / 2),
    row_(0),
    angle_(0) {
}

void Piece::draw(SDL_Renderer *renderer) {
    switch (kind_) {
        case I:
            SDL_SetRenderDrawColor(renderer,
                /* Cyan: */ 45, 254, 254, 255);
            break;
        case J:
            SDL_SetRenderDrawColor(renderer,
                /* Blue: */ 11, 36, 251, 255);
            break;
        case L:
            SDL_SetRenderDrawColor(renderer,
                /* Orange: */ 253, 164, 41, 255);
            break;
        case O:
            SDL_SetRenderDrawColor(renderer,
                /* Yellow: */ 255, 253, 56, 255);
            break;
       case S:
            SDL_SetRenderDrawColor(renderer,
                /* Green: */ 41, 253, 47, 255);
            break;
        case T:
            SDL_SetRenderDrawColor(renderer,
                /* Purple: */ 126, 15, 126, 255);
            break;
        case Z:
            SDL_SetRenderDrawColor(renderer,
                /* Red: */ 252, 13, 28, 255);
            break;
        }

        for (int column = 0; column < PieceSize; ++column) {
            for (int row = 0; row < PieceSize; ++row) {
                if (isBlock(column, row)) {
                    SDL_Rect rect{
                        (column + column_) * Offset + 1,
                        (row + row_) * Offset + 1,
                        Offset - 2,
                        Offset - 2
                    };
                SDL_RenderFillRect(renderer, &rect);
            }
        }
    }
}
The constructor initializes the class with default values. The BoardColumns and PieceSize values are constants from the constants.h file. BoardColumns represents the amount of columns that can fit on a board, which is 10 in this case. The PieceSize constant represents the area or block that a piece takes up in columns, which is 4. The initial value assigned to the private columns_ variable represents the center of the board.
The draw() function loops through all of the possible rows and columns on the board and fills in any cells that are populated by a piece with the color that corresponds to its kind. The determination for whether a cell is populated by a piece is performed in the isBlock() function, which we'll discuss next.
The second section contains the logic to move or rotate the piece and determine its current location:
void Piece::move(int columnDelta, int rowDelta) {
    column_ += columnDelta;
    row_ += rowDelta;
}

void Piece::rotate() {
    angle_ += 3;
    angle_ %= 4;
}

bool Piece::isBlock(int column, int row) const {
    static const char *Shapes[][4] = {
        // I
        {
            " *  "
            " *  "
            " *  "
            " *  ",
            "    "
            "****"
            "    "
            "    ",
            " *  "
            " *  "
            " *  "
            " *  ",
            "    "
            "****"
            "    "
            "    ",
        },
        // J
        {
            "  * "
            "  * "
            " ** "
            "    ",
            "    "
            "*   "
            "*** "
            "    ",
            " ** "
            " *  "
            " *  "
            "    ",
            "    "
            "    "
            "*** "
            " *  ",
        },
        ...
    };
    return Shapes[kind_][angle_][column + row * PieceSize] == '*';
}

int Piece::getColumn() const {
 return column_;
}
int Piece::getRow() const {
 return row_;
}
The move() function updates the values of the private column_ and row_ variables, which dictates the piece's location on the board. The rotate() function sets the value of the private angle_ variable to either 0, 1, 2, or 3 (which is why %= 4 is used).
Determination for which kind of piece is shown, its location, and rotation is performed in the isBlock() function. I omitted all but the first two elements of the Shapes multi-dimensional array to avoid cluttering up the file, but the remaining five piece kinds are present in the actual code. I will admit that this isn't the most elegant implementation, but it suits our purposes just fine.
The private kind_ and angle_ values are specified as dimensions in the Shapes array to pick the four corresponding char* elements. These four elements represent the four possible orientations of the piece. If the index of column + row * PieceSize in the string is an asterisk, the piece is present in the specified row and column. If you decide to work through one of the Tetris tutorials available on the web (or look at one of the many Tetris repositories on GitHub), you'll find that there are several different ways to calculate whether a cell is populated by a piece. I chose this method because it's easier to visualize the pieces.
The final section of code contains functions to get the row and column of the piece:
int Piece::getColumn() const {
    return column_;
}

int Piece::getRow() const {
    return row_;
}
These functions simply return the value of the private column_ or row_ variable. Now that you have a better understanding of the Piece class, let's move on to the Board.
The Board contains instances of the Piece class and needs to detect collisions among the pieces, when rows are filled, and when the game is over. Let's start with the contents of the header file (board.h):
#ifndef TETRIS_BOARD_H
#define TETRIS_BOARD_H

#include <SDL2/SDL.h>
#include <SDL2/SDL2_ttf.h>
#include "constants.h"
#include "piece.h"

using namespace Constants;

class Board {
 public:
  Board();
  void draw(SDL_Renderer *renderer, TTF_Font *font);
  bool isCollision(const Piece &piece) const;
  void unite(const Piece &piece);

 private:
  bool isRowFull(int row);
  bool areFullRowsPresent();
  void updateOffsetRow(int fullRow);
  void displayScore(SDL_Renderer *renderer, TTF_Font *font);

  bool cells_[BoardColumns][BoardRows];
  int currentScore_;
};

#endif // TETRIS_BOARD_H
The Board has a draw() function like the Piece class as well as several other functions for managing rows and keeping track of which cells are populated on the board. The SDL2_ttf library is used to render the ROWS: text at the bottom of the window with the current score (count of rows cleared). Now, let's take a look at each section of the implementation file (board.cpp).
The first section of code defines the constructor of the Board class and the draw() function:
#include <sstream>
#include "board.h"

using namespace Constants;

Board::Board() : cells_{{ false }}, currentScore_(0) {}

void Board::draw(SDL_Renderer *renderer, TTF_Font *font) {
    displayScore(renderer, font);
    SDL_SetRenderDrawColor(
        renderer,
        /* Light Gray: */ 140, 140, 140, 255);
    for (int column = 0; column < BoardColumns; ++column) {
        for (int row = 0; row < BoardRows; ++row) {
            if (cells_[column][row]) {
                SDL_Rect rect{
                    column * Offset + 1,
                    row * Offset + 1,
                    Offset - 2,
                    Offset - 2
                };
                SDL_RenderFillRect(renderer, &rect);
            }
        }
    }
}
The Board constructor initializes the values of the private cells_ and currentScore_ variables to default values. The cells_ variable is a two-dimensional array of Booleans, with the first dimension representing columns and the second rows. If a piece occupies a specific column and row, the corresponding value in the array is true. The draw() function behaves similarly to the draw() function of Piece in that it fills cells that contain pieces with color. However, this function only fills in cells that are occupied by pieces that have reached the bottom of the board with a light gray color, regardless of what kind of piece it is.
The second section of code contains logic to detect collisions:
bool Board::isCollision(const Piece &piece) const {
    for (int column = 0; column < PieceSize; ++column) {
        for (int row = 0; row < PieceSize; ++row) {
            if (piece.isBlock(column, row)) {
                int columnTarget = piece.getColumn() + column;
                int rowTarget = piece.getRow() + row;
                if (
                    columnTarget < 0
                    || columnTarget >= BoardColumns
                    || rowTarget < 0
                    || rowTarget >= BoardRows
                ) {
                    return true;
                }
                if (cells_[columnTarget][rowTarget]) return true;
            }
        }
    }
    return false;
}
The isCollision() function loops through each cell on the board until it reaches one populated by the &piece passed as an argument. If the piece is about to collide with either side of the board or it has reached the bottom, the function returns true, otherwise it returns false.
The third section of code contains logic to unite a piece with the top row when it comes to rest:
void Board::unite(const Piece &piece) {
    for (int column = 0; column < PieceSize; ++column) {
        for (int row = 0; row < PieceSize; ++row) {
            if (piece.isBlock(column, row)) {
                int columnTarget = piece.getColumn() + column;
                int rowTarget = piece.getRow() + row;
                cells_[columnTarget][rowTarget] = true;
            }
        }
    }

    // Continuously loops through each of the rows until no full rows are
    // detected and ensures the full rows are collapsed and non-full rows
    // are shifted accordingly:
    while (areFullRowsPresent()) {
        for (int row = BoardRows - 1; row >= 0; --row) {
            if (isRowFull(row)) {
                updateOffsetRow(row);
                currentScore_ += 1;
                for (int column = 0; column < BoardColumns; ++column) {
                    cells_[column][0] = false;
                }
            }
        }
    }
}

bool Board::isRowFull(int row) {
    for (int column = 0; column < BoardColumns; ++column) {
        if (!cells_[column][row]) return false;
    }
    return true;
}

bool Board::areFullRowsPresent() {
    for (int row = BoardRows - 1; row >= 0; --row) {
        if (isRowFull(row)) return true;
    }
    return false;
}

void Board::updateOffsetRow(int fullRow) {
    for (int column = 0; column < BoardColumns; ++column) {
        for (int rowOffset = fullRow - 1; rowOffset >= 0; --rowOffset) {
            cells_[column][rowOffset + 1] =
            cells_[column][rowOffset];
        }
    }
}
The unite() function and the corresponding isRowFull(), areFullRowsPresent(), and updateOffsetRow() functions perform several operations. It updates the private cells_ variable with the rows and columns that the specified &piece argument occupies by setting the appropriate array location to true. It also clears any full rows (all columns filled) from the board by setting the corresponding cells_ array locations to false and increments the currentScore_. After the row is cleared, the cells_ array is updated to shift the row above the cleared row down by 1.
The final section of code displays the score at the bottom of the game window:
void Board::displayScore(SDL_Renderer *renderer, TTF_Font *font) {
    std::stringstream message;
    message << "ROWS: " << currentScore_;
    SDL_Color white = { 255, 255, 255 };
    SDL_Surface *surface = TTF_RenderText_Blended(
        font,
        message.str().c_str(),
        white);
    SDL_Texture *texture = SDL_CreateTextureFromSurface(
        renderer,
        surface);
    SDL_Rect messageRect{ 20, BoardHeight + 15, surface->w, surface->h };
    SDL_FreeSurface(surface);
    SDL_RenderCopy(renderer, texture, nullptr, &messageRect);
    SDL_DestroyTexture(texture);
}
The displayScore() function uses the SDL2_ttf library to display the current score at the bottom of the window (underneath the board). The TTF_Font *font argument is passed in from the Game class to avoid initializing the font every time the score is updated. The stringstream message variable is used to create the text value and set it to a C char* within the TTF_RenderText_Blended() function. The rest of the code draws the text on a SDL_Rect to ensure that it's properly displayed.
That's it for the Board class; let's move on to the Game to see how it all fits together.
The Game class contains the looping function that enables you to move pieces around the board with key presses. Here's the contents of the header file (game.h):
#ifndef TETRIS_GAME_H
#define TETRIS_GAME_H

#include <SDL2/SDL.h>
#include <SDL2/SDL2_ttf.h>
#include "constants.h"
#include "board.h"
#include "piece.h"

class Game {
 public:
  Game();
  ~Game();
  bool loop();

 private:
  Game(const Game &);
  Game &operator=(const Game &);

  void checkForCollision(const Piece &newPiece);
  void handleKeyEvents(SDL_Event &event);

  SDL_Window *window_;
  SDL_Renderer *renderer_;
  TTF_Font *font_;
  Board board_;
  Piece piece_;
  uint32_t moveTime_;
};

#endif // TETRIS_GAME_H
The loop() function contains the game logic and manages state based on events. The first two lines under the private: header prevent more than one instance of the game from being created, which could cause a memory leak. The private methods reduce the amount of code lines in the loop() function, which simplifies maintenance and debugging. Let's move on to the implementation in game.cpp.
The first section of code defines the actions to perform when the class instance is loaded (constructor) and unloaded (destructor):
#include <cstdlib>
#include <iostream>
#include <stdexcept>
#include "game.h"

using namespace std;
using namespace Constants;

Game::Game() :
    // Create a new random piece:
    piece_{ static_cast<Piece::Kind>(rand() % 7) },
    moveTime_(SDL_GetTicks())
{
    if (SDL_Init(SDL_INIT_VIDEO) != 0) {
        throw runtime_error(
            "SDL_Init(SDL_INIT_VIDEO): " + string(SDL_GetError()));
        }
        SDL_CreateWindowAndRenderer(
            BoardWidth,
            ScreenHeight,
            SDL_WINDOW_OPENGL,
            &window_,
            &renderer_);
        SDL_SetWindowPosition(
            window_,
            SDL_WINDOWPOS_CENTERED,
            SDL_WINDOWPOS_CENTERED);
        SDL_SetWindowTitle(window_, "Tetris");

    if (TTF_Init() != 0) {
        throw runtime_error("TTF_Init():" + string(TTF_GetError()));
    }
    font_ = TTF_OpenFont("PressStart2P.ttf", 18);
    if (font_ == nullptr) {
        throw runtime_error("TTF_OpenFont: " + string(TTF_GetError()));
    }
}

Game::~Game() {
    TTF_CloseFont(font_);
    TTF_Quit();
    SDL_DestroyRenderer(renderer_);
    SDL_DestroyWindow(window_);
    SDL_Quit();
}
The constructor represents the entry point for the application, so all of the required resources are allocated and initialized within it. The TTF_OpenFont() function is referencing a TrueType font file downloaded from Google Fonts named Press Start 2P. You can view the font at https://fonts.google.com/specimen/Press+Start+2P. It's present in the /resources folder of the repository and gets copied into the same folder as the executable when the project is built. If at any point an error occurs when initializing the SDL2 resources, a runtime_error is thrown with details of the error. The destructor (~Game()) frees up the resources we allocated for SDL2 and SDL2_ttf before the application exits. This is done to avoid a memory leak.
The final section of code represents the Game::loop:
bool Game::loop() {
    SDL_Event event;
    while (SDL_PollEvent(&event)) {
        switch (event.type) {
            case SDL_KEYDOWN:
                handleKeyEvents(event);
                break;
            case SDL_QUIT:
                return false;
            default:
                return true;
        }
    }

    SDL_SetRenderDrawColor(renderer_, /* Dark Gray: */ 58, 58, 58, 255);
    SDL_RenderClear(renderer_);
    board_.draw(renderer_, font_);
    piece_.draw(renderer_);

    if (SDL_GetTicks() > moveTime_) {
        moveTime_ += 1000;
        Piece newPiece = piece_;
        newPiece.move(0, 1);
        checkForCollision(newPiece);
    }
    SDL_RenderPresent(renderer_);
    return true;
}

void Game::checkForCollision(const Piece &newPiece) {
    if (board_.isCollision(newPiece)) {
        board_.unite(piece_);
        piece_ = Piece{ static_cast<Piece::Kind>(rand() % 7) };
        if (board_.isCollision(piece_)) board_ = Board();
    } else {
        piece_ = newPiece;
    }
}

void Game::handleKeyEvents(SDL_Event &event) {
    Piece newPiece = piece_;
    switch (event.key.keysym.sym) {
        case SDLK_DOWN:
            newPiece.move(0, 1);
            break;
        case SDLK_RIGHT:
            newPiece.move(1, 0);
            break;
        case SDLK_LEFT:
            newPiece.move(-1, 0);
            break;
        case SDLK_UP:
            newPiece.rotate();
            break;
        default:
            break;
     }
     if (!board_.isCollision(newPiece)) piece_ = newPiece;
}
The loop() function returns a Boolean as long as the SDL_QUIT event hasn't fired. Every 1 second, the draw() functions for the Piece and Board instances are executed, and the piece locations on the board are updated accordingly. The left, right, and down arrow keys control the piece's movement while the up arrow key rotates the piece by 90 degrees. Appropriate responses to key presses are handled in the handleKeyEvents() function. The checkForCollision() function determines if a new instance of the active piece collided with either side of the board or came to rest on top of the other pieces. If it did, a new piece is created. The logic for clearing the rows (via the unite() function of Board) is also handled in this function. We're almost done! Let's move on to the main.cpp file.
There's no header file associated with main.cpp because its only purpose is to act as an entry point to the application. In fact, the file is only seven lines long:
#include "game.h"

int main() {
    Game game;
    while (game.loop());
    return 0;
}
The while statement is exited when the loop() function returns false, which occurs when the SDL_QUIT event fires. All this file is doing is creating a new instance of Game and starting the loop. That's it for the codebase; let's start porting!
You have a good understanding of the code base, so now it's time to start porting it over with Emscripten. Fortunately, we're able to leverage some of the browser's features to simplify the code and completely remove a third-party library. In this section, we're going to update the code to compile to a Wasm module and JavaScript glue file and update some of the functionality to utilize the browser.
The /output-wasm folder contains the end result, but I recommend that you create a copy of the /output-native folder so that you can follow along with the porting process. There are VS Code Tasks set up for both native compilation and Emscripten compilation. If you get stuck, you can always reference the /output-wasm contents. Make sure you open your copied folder in VS Code (File | Open and select your copied folder), otherwise you won't be able to use the Tasks feature.
This game is an ideal candidate for porting because it uses SDL2, a widely used library with an existing Emscripten port. Including SDL2 in the compilation step requires only one additional argument passed to the emcc command. An Emscripten port of the SDL2_ttf library also exists, but keeping it in the code base doesn't make much sense. Its sole purpose is to render the score (amount of rows cleared) as text. We would need to include the TTF file with the application and complicate the build process. Emscripten provides the means for using JavaScript code within our C++, so we're going to take a much simpler route: show the score in the DOM.
In addition to changing the existing code, we'll need to create an HTML and CSS file for displaying and styling the game in the browser. The JavaScript code we write will be minimal — we just need to load the Emscripten module and all our functionality is handled in the C++ code base. We'll also need to add a few <div> elements and lay them out accordingly to display the score. Let's start porting!
Create a folder in your project folder named /public. Add a new file named index.html to the /public folder and populate it with the following contents:
<!doctype html>
<html lang="en-us">
<head>
  <title>Tetris</title>
  <link rel="stylesheet" type="text/css" href="styles.css" />
</head>
<body>
  <div class="wrapper">
    <h1>Tetris</h1>
    <div>
      <canvas id="canvas"></canvas>
      <div class="scoreWrapper">
        <span>ROWS:</span><span id="score"></span>
      </div>
    </div>
  </div>
  <script type="application/javascript" src="index.js"></script>
  <script type="application/javascript">
    Module({ canvas: (() => document.getElementById('canvas'))() })
  </script>
</body>
</html>
The index.js file being loaded in the first <script> tag doesn't exist yet; that'll be generated in the compilation step. Let's add some styles to the elements. Create a styles.css file in the /public folder and populate it with the following contents:
@import url("https://fonts.googleapis.com/css?family=Press+Start+2P");

* {
  font-family: "Press Start 2P", sans-serif;
}

body {
  margin: 24px;
}

h1 {
  font-size: 36px;
}

span {
  color: white;
  font-size: 24px;
}

.wrapper {
  display: flex;
  align-items: center;
  flex-direction: column;
}

.titleWrapper {
  display: flex;
  align-items: center;
  justify-content: center;
}

.header {
  font-size: 24px;
  margin-left: 16px;
}

.scoreWrapper {
  background-color: #3A3A3A;
  border-top: 1px solid white;
  padding: 16px 0;
  width: 360px;
}

span:first-child {
  margin-left: 16px;
  margin-right: 8px;
}
Since the Press Start 2P font we're using is hosted on Google Fonts, we can import it for use on the site. The CSS rules in this file handle simple layout and styling. That's it for the web-related files we needed to create. Now, it's time to update the C++ code.
We only need to edit a few files to get Emscripten working correctly. For the sake of simplicity and compactness, only the affected sections of code will be included (rather than the entire file). Let's work through the files in the same order as the previous section and start with constants.h.
We'll display the rows cleared count on the DOM instead of in the game window itself, so you can delete the ScreenHeight constant from the file. We no longer need additional space to accommodate for the score text:
namespace Constants {
    const int BoardColumns = 10;
    const int BoardHeight = 720;
    const int BoardRows = 20;
    const int BoardWidth = 360;
    const int Offset = BoardWidth / BoardColumns;
    const int PieceSize = 4;
    // const int ScreenHeight = BoardHeight + 50; <----- Delete this line
}
No changes need to be made to the Piece class files (piece.cpp/piece.h). However, we will need to update the Board class. Let's start with the header file (board.h). Starting with the bottom and working our way up, let's update the displayScore() function. In the <body> section of the index.html file, there's a <span> element with id="score". We're going to update this element using the emscripten_run_script command to display the current score. As a result, the displayScore() function becomes much shorter. The before and after is shown as follows.
Here is the original version of the Board class's displayScore() function:
void Board::displayScore(SDL_Renderer *renderer, TTF_Font *font) {
    std::stringstream message;
    message << "ROWS: " << currentScore_;
    SDL_Color white = { 255, 255, 255 };
    SDL_Surface *surface = TTF_RenderText_Blended(
        font,
        message.str().c_str(),
        white);
    SDL_Texture *texture = SDL_CreateTextureFromSurface(
        renderer,
        surface);
    SDL_Rect messageRect{ 20, BoardHeight + 15, surface->w, surface->h };
    SDL_FreeSurface(surface);
    SDL_RenderCopy(renderer, texture, nullptr, &messageRect);
    SDL_DestroyTexture(texture);
 }
Here is the ported version of the displayScore() function:
void Board::displayScore(int newScore) {
    std::stringstream action;
    action << "document.getElementById('score').innerHTML =" << newScore;
    emscripten_run_script(action.str().c_str());
 }
The emscripten_run_script action simply finds the <span> element on the DOM and sets the innerHTML to the current score. We can't use the EM_ASM() function here because Emscripten doesn't recognize the document object. Since we have access to the private currentScore_ variable in the class, we're going to move the displayScore() call in the draw() function into the unite() function. This limits the amount of calls to displayScore() to ensure that the function is called only when the score has actually changed. We only need to add one line of code to accomplish this. Here's what the unite() function looks like now:
void Board::unite(const Piece &piece) {
    for (int column = 0; column < PieceSize; ++column) {
        for (int row = 0; row < PieceSize; ++row) {
            if (piece.isBlock(column, row)) {
                int columnTarget = piece.getColumn() + column;
                int rowTarget = piece.getRow() + row;
                cells_[columnTarget][rowTarget] = true;
            }
        }
    }

    // Continuously loops through each of the rows until no full rows are
    // detected and ensures the full rows are collapsed and non-full rows
    // are shifted accordingly:
    while (areFullRowsPresent()) {
        for (int row = BoardRows - 1; row >= 0; --row) {
            if (isRowFull(row)) {
                updateOffsetRow(row);
                currentScore_ += 1;
                for (int column = 0; column < BoardColumns; ++column) {
                    cells_[column][0] = false;
                }
            }
        }
        displayScore(currentScore_); // <----- Add this line
    }
}
Since we're no longer using the SDL2_ttf library, we can update the draw() function signature and remove the displayScore() function call. Here's the updated draw() function:
void Board::draw(SDL_Renderer *renderer/*, TTF_Font *font */) {
                                        // ^^^^^^^^^^^^^^ <-- Remove this argument
    // displayScore(renderer, font); <----- Delete this line
    SDL_SetRenderDrawColor(
        renderer,
        /* Light Gray: */ 140, 140, 140, 255);
    for (int column = 0; column < BoardColumns; ++column) {
        for (int row = 0; row < BoardRows; ++row) {
            if (cells_[column][row]) {
                SDL_Rect rect{
                    column * Offset + 1,
                    row * Offset + 1,
                    Offset - 2,
                    Offset - 2
                };
                SDL_RenderFillRect(renderer, &rect);
            }
        }
    }
 }
The displayScore() function call was removed from the first line of the function and the TTF_Font *font argument was removed as well. Let's add a call to displayScore() in the constructor to ensure that the initial value is set to 0 when the game ends and a new one begins:
Board::Board() : cells_{{ false }}, currentScore_(0) {
    displayScore(0); // <----- Add this line
}
That's it for the class file. Since we changed the signatures for the displayScore() and draw() functions, and removed the dependency for SDL2_ttf, we'll need to update the header file. Remove the following lines from board.h:
#ifndef TETRIS_BOARD_H
#define TETRIS_BOARD_H

#include <SDL2/SDL.h>
// #include <SDL2/SDL2_ttf.h> <----- Delete this line
#include "constants.h"
#include "piece.h"

using namespace Constants;

class Board {
 public:
  Board();
  void draw(SDL_Renderer *renderer /*, TTF_Font *font */);
                                    // ^^^^^^^^^^^^^^ <-- Remove this
  bool isCollision(const Piece &piece) const;
  void unite(const Piece &piece);

 private:
  bool isRowFull(int row);
  bool areFullRowsPresent();
  void updateOffsetRow(int fullRow);
  void displayScore(SDL_Renderer *renderer, TTF_Font *font);
                                         // ^^^^^^^^^^^^^^ <-- Remove this
  bool cells_[BoardColumns][BoardRows];
  int currentScore_;
};

#endif // TETRIS_BOARD_H
We're moving right along! The final change we need to make is the also the biggest one. The existing code base has a Game class that manages the application logic and a main.cpp file that calls the Game.loop() function in the main() function. The looping mechanism is a while loop that continues to run as long as the SDL_QUIT event hasn't fired. We need to change our approach to accommodate for Emscripten.
Emscripten provides an emscripten_set_main_loop function that accepts an em_callback_func looping function, fps, and a simulate_infinite_loop flag. We can't include the Game class and pass Game.loop() as the em_callback_func argument, because the build will fail. Instead, we're going to eliminate the Game class completely and move the logic into the main.cpp file. Copy the contents of game.cpp into main.cpp (overwriting the existing contents) and delete the Game class files (game.cpp/game.h). Since we're not declaring a class for Game, remove the Game:: prefixes from the functions. The constructor and destructor are no longer valid (they're no longer part of a class), so we need to move that logic to a different location. We also need to reorder the file to ensure that our called functions come before the calling functions. The final result looks like this:
#include <emscripten/emscripten.h>
#include <SDL2/SDL.h>
#include <stdexcept>
#include "constants.h"
#include "board.h"
#include "piece.h"

using namespace std;
using namespace Constants;

static SDL_Window *window = nullptr;
static SDL_Renderer *renderer = nullptr;
static Piece currentPiece{ static_cast<Piece::Kind>(rand() % 7) };
static Board board;
static int moveTime;

void checkForCollision(const Piece &newPiece) {
    if (board.isCollision(newPiece)) {
        board.unite(currentPiece);
        currentPiece = Piece{ static_cast<Piece::Kind>(rand() % 7) };
        if (board.isCollision(currentPiece)) board = Board();
    } else {
        currentPiece = newPiece;
    }
}

void handleKeyEvents(SDL_Event &event) {
    Piece newPiece = currentPiece;
    switch (event.key.keysym.sym) {
        case SDLK_DOWN:
            newPiece.move(0, 1);
            break;
        case SDLK_RIGHT:
            newPiece.move(1, 0);
            break;
        case SDLK_LEFT:
            newPiece.move(-1, 0);
            break;
        case SDLK_UP:
            newPiece.rotate();
            break;
        default:
            break;
    }
    if (!board.isCollision(newPiece)) currentPiece = newPiece;
}

void loop() {
    SDL_Event event;
    while (SDL_PollEvent(&event)) {
        switch (event.type) {
            case SDL_KEYDOWN:
                handleKeyEvents(event);
                break;
            case SDL_QUIT:
                break;
            default:
                break;
        }
    }

    SDL_SetRenderDrawColor(renderer, /* Dark Gray: */ 58, 58, 58, 255);
    SDL_RenderClear(renderer);
    board.draw(renderer);
    currentPiece.draw(renderer);

    if (SDL_GetTicks() > moveTime) {
        moveTime += 1000;
        Piece newPiece = currentPiece;
        newPiece.move(0, 1);
        checkForCollision(newPiece);
    }
    SDL_RenderPresent(renderer);
}

int main() {
    moveTime = SDL_GetTicks();
    if (SDL_Init(SDL_INIT_VIDEO) != 0) {
        throw std::runtime_error("SDL_Init(SDL_INIT_VIDEO)");
    }
    SDL_CreateWindowAndRenderer(
        BoardWidth,
        BoardHeight,
        SDL_WINDOW_OPENGL,
        &window,
        &renderer);

    emscripten_set_main_loop(loop, 0, 1);

    SDL_DestroyRenderer(renderer);
    renderer = nullptr;
    SDL_DestroyWindow(window);
    window = nullptr;
    SDL_Quit();
    return 0;
}
The handleKeyEvents() and checkForCollision() functions haven't changed; we simply moved them to the top of the file. The loop() function return type was changed from bool to void as required by emscripten_set_main_loop. Finally, the code from the constructor and destructor was moved into the main() function and any references to SDL2_ttf were removed. Instead of the while statement that called the loop() function of Game, we have the emscripten_set_main_loop(loop, 0, 1) call. We changed the #include statements at the top of the file to accommodate for Emscripten, SDL2, and our Board and Piece classes. That's it for changes — now it's time to configure the build and test out the game.
With the code updated and the required web assets present, it's time to build and test out the game. The compilation step is similar to the previous examples in this book, but we're going to use a different technique to run the game. In this section, we're going to configure the build task to accommodate for the C++ files and run the application using a feature provided by Emscripten.
We're going to configure the build in two ways: with VS Code tasks and a Makefile. Makefiles are nice if you prefer to use a different editor than VS Code. The /.vscode/tasks.json file already contains the tasks you'll need to build the project. The Emscripten build step is the default (a set of native build tasks is also present). Let's walk through each task in the tasks array and review what's taking place. The first task deletes any existing compiled output files prior to building:
{
  "label": "Remove Existing Web Files",
  "type": "shell",
  "command": "rimraf",
  "options": {
    "cwd": "${workspaceRoot}/public"
  },
  "args": [
    "index.js",
    "index.wasm"
  ]
}
The second task performs the build with the emcc command:
{
  "label": "Build WebAssembly",
  "type": "shell",
  "command": "emcc",
  "args": [
    "--bind", "src/board.cpp", "src/piece.cpp", "src/main.cpp",
    "-std=c++14",
    "-O3",
    "-s", "WASM=1",
    "-s", "USE_SDL=2",
    "-s", "MODULARIZE=1",
    "-o", "public/index.js"
  ],
  "group": {
    "kind": "build",
    "isDefault": true
  },
  "problemMatcher": [],
  "dependsOn": ["Remove Existing Web Files"]
}
The related arguments are placed on the same line. The only new and unfamiliar addition to the args array is the --bind argument with the corresponding .cpp files. This tells Emscripten that all the files after --bind are required to build the project. Test out the build by selecting Tasks | Run Build Task... from the menu or using the keyboard shortcut Cmd/Ctrl + Shift + B. It takes a few seconds to build, but the terminal will let you know when the compilation process is complete. If successful, you should see an index.js and index.wasm file in the /public folder.
If you prefer not to use VS Code, you can use a Makefile to accomplish the same goal as the VS Code tasks. Create a file named Makefile in your project folder and populate it with the following contents (make sure that the file is using tabs, not spaces):
# This allows you to just run the "make" command without specifying
# arguments:
.DEFAULT_GOAL := build

# Specifies which files to compile as part of the project:
CPP_FILES = $(wildcard src/*.cpp)

# Flags to use for Emscripten emcc compile command:
FLAGS = -std=c++14 -O3 -s WASM=1 -s USE_SDL=2 -s MODULARIZE=1 \
        --bind $(CPP_FILES)

# Name of output (the .wasm file is created automatically):
OUTPUT_FILE = public/index.js

# This is the target that compiles our executable
compile: $(CPP_FILES)
    emcc  $(FLAGS) -o $(OUTPUT_FILE)

# Removes the existing index.js and index.wasm files:
clean:
    rimraf $(OUTPUT_FILE)
    rimraf public/index.wasm

# Removes the existing files and builds the project:
build: clean compile
    @echo "Build Complete!"
The operations being performed are identical to the VS Code tasks, just in a different format using more universal tooling. The default build step is set in the file, so you can run the following command within your project folder to compile the project:
make
Now that you have a compiled Wasm file and JavaScript glue code, let's try running the game.
Instead of using serve or browser-sync, we're going to use a built-in feature of Emscripten's toolchain, emrun. It provides the added benefit of capturing stdout and stderr (if you pass the --emrun linker flag to the emcc command) and printing them to the terminal if desired. We're not going to use the --emrun flag, but having a local web server available without having to install any additional dependencies is a nice added feature to be aware of. Open up a terminal instance within your project folder and run the following command to start the game:
emrun --browser chrome --no_emrun_detect public/index.html
You can specify firefox for the browser if that's what you're using for development. The --no_emrun_detect flag hides a message in the terminal stating that the HTML page is not emrun capable. If you navigate to http://localhost:6931/index.html, you should see the following:
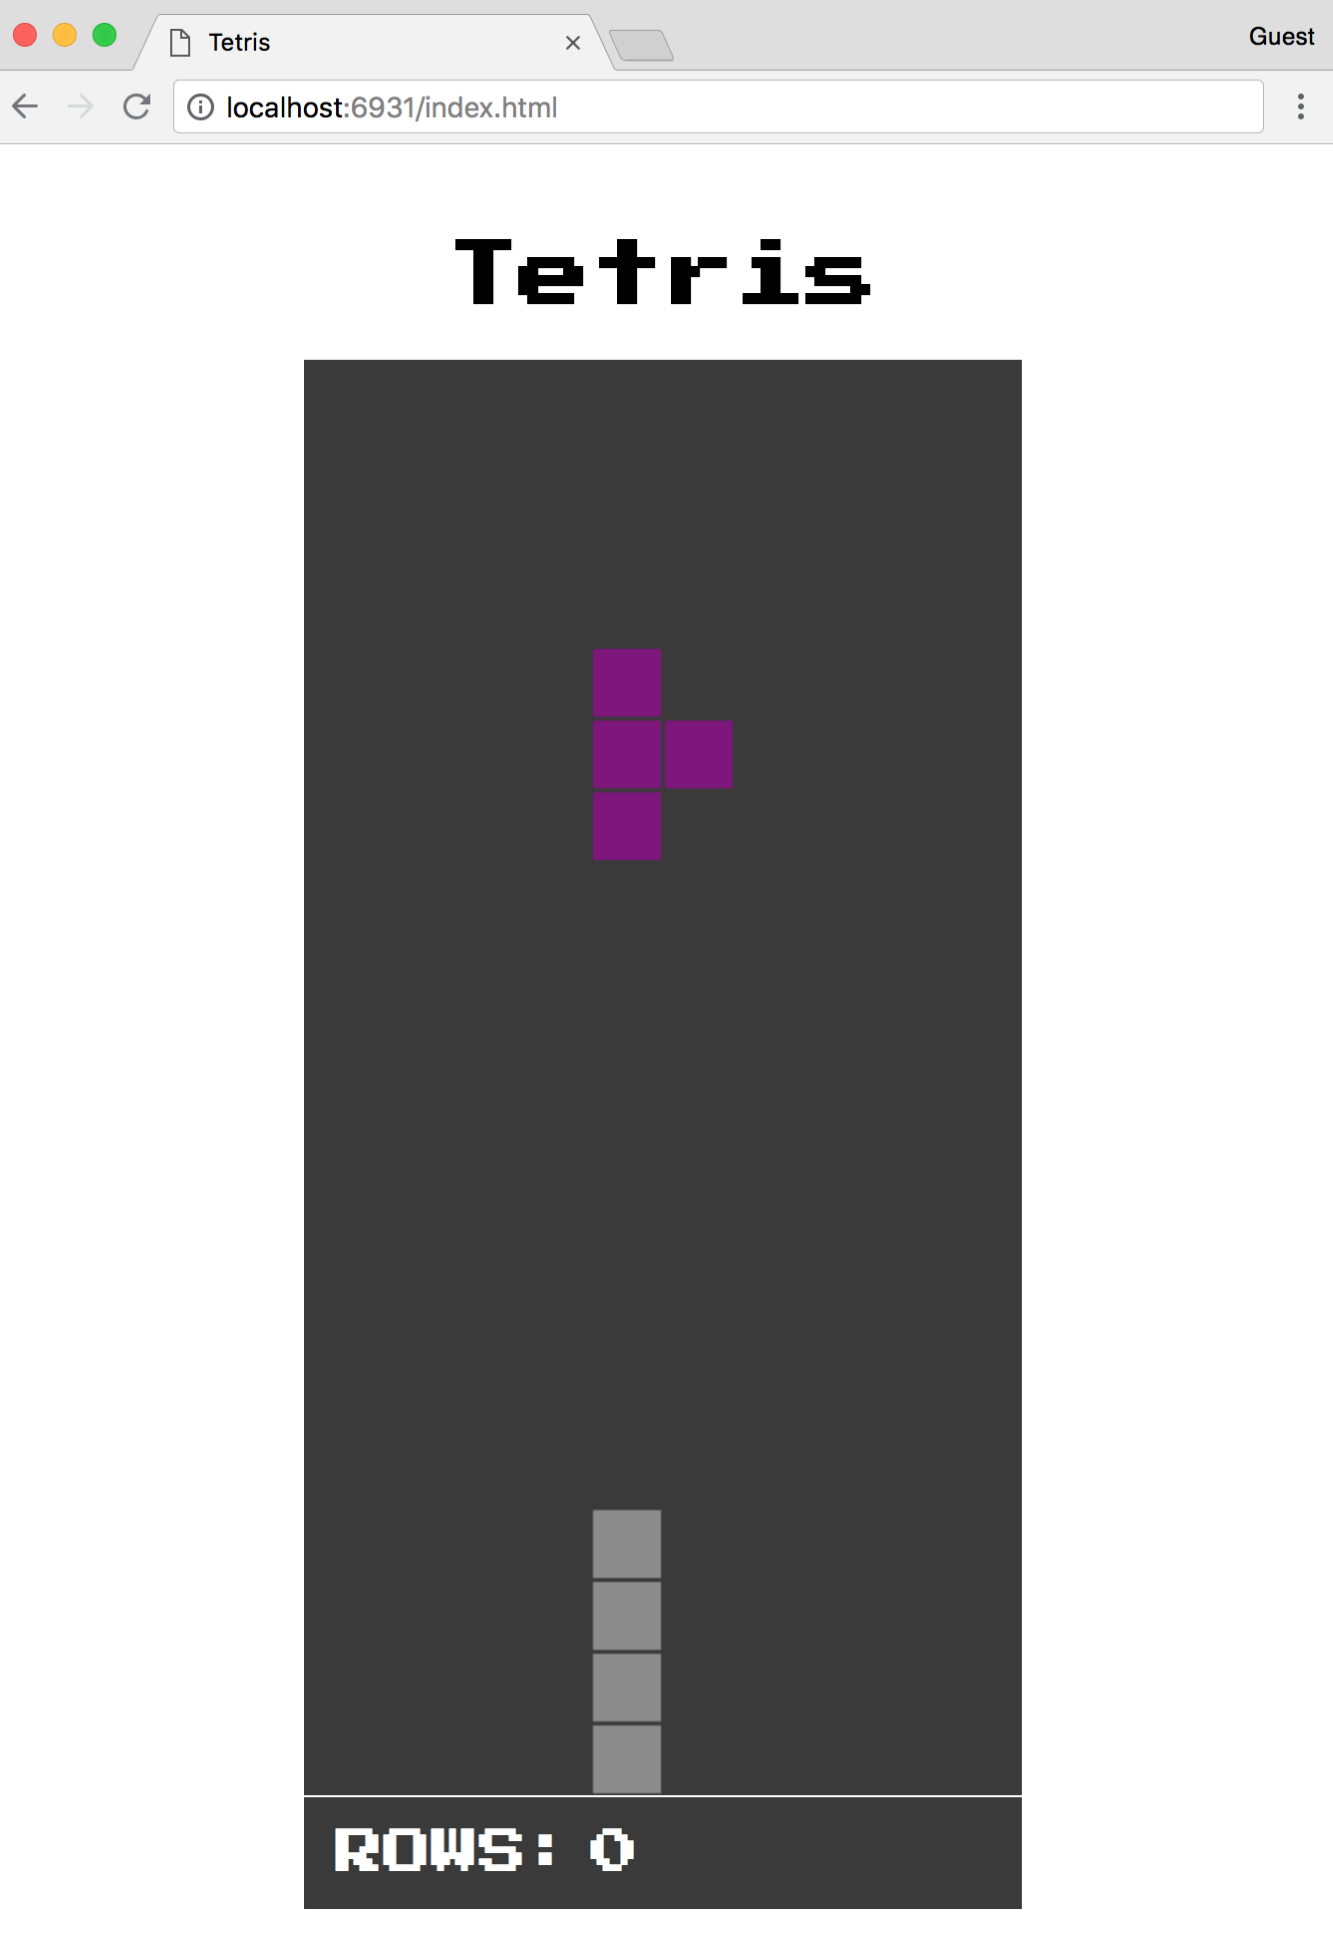
Try rotating and moving the pieces to ensure that everything is working correctly. The ROWS count should increment by one when you've successfully cleared a row. You may also notice that if you're too close to the edge of the board, you won't be able to rotate some of the pieces. Congratulations, you've successfully ported a C++ game over to Emscripten!
In this chapter, we ported a Tetris clone written in C++ that used SDL2 to Emscripten so it could be run in the browser with WebAssembly. We covered the rules of Tetris and how they map to the logic within the existing codebase. We also reviewed each file in the existing code base individually and which changes had to be made to successfully compile to a Wasm file and JavaScript glue code. After updating the existing code, we created the required HTML and CSS files, then configured a build step with the appropriate emcc flags. Once built, the game was run using Emscripten's emrun command.
In Chapter 9, Integrating with Node.js, we're going to discuss how to integrate WebAssembly into Node.js and the benefits this integration provides.
The modern web leans heavily on Node.js for both development and server-side management. With the advent of increasingly complex browser applications that perform computationally expensive operations, performance increases can be incredibly beneficial. In this chapter, we're going to describe the various ways you can integrate WebAssembly with Node.js through the use of various examples.
Our goal for this chapter is to understand the following:
In Chapter 3, Setting Up a Development Environment, Node.js was described as an asynchronous event-driven JavaScript runtime, which is the definition taken from the official website. What Node.js represents, however, is a profound shift in the way we build and manage web applications. In this section, we will discuss the relationship between WebAssembly and Node.js, and why the two technologies complement each other so well.
Node.js runs on Google's V8 JavaScript engine, which powers Google Chrome. Since V8's WebAssembly implementation adheres to the Core Specification, you can interact with a WebAssembly module using the same API as the browser. Instead of performing a fetch call for a .wasm file, you can use Node.js's fs module to read the contents into a buffer, then call instantiate() on the result.
JavaScript has limitations on the server side as well. Expensive computation or working with large numbers can be optimized with WebAssembly's superior performance. As a scripting language, JavaScript excels at automating simple tasks. You could write a script to compile C/C++ to a Wasm file, copy it to a build folder, and see the changes reflected in the browser if you're using a tool like Browsersync.
Node.js has an extensive ecosystem of tools and libraries in the form of npm. Sven Sauleau and other members of the open source community have created webassemblyjs, an extensive suite of tooling for WebAssembly built with Node.js. The webassemblyjs site at https://webassembly.js.org includes the tagline Toolchain for WebAssembly. There are currently over 20 npm packages to perform various tasks and aid in development, such as an ESLint plugin, an AST validator, and a formatter. AssemblyScript, a TypeScript to WebAssembly compiler, allows you to write performant code that compiles to a Wasm module without having to learn C or C++. The Node.js community is clearly vested in WebAssembly's success.
Node.js can be used in several ways to add value to a WebAssembly project. In this section, we're going to walk through an example Node.js application that integrates WebAssembly. The application uses Express with some simple routes to call functions from a compiled Wasm module.
The project reuses some of the code from the application we built in Chapter 7, Creating an Application from Scratch (Cook the Books) to demonstrate how Node.js can be used with WebAssembly. The code for this section is located in the /chapter-09-node/server-example folder in the learn-webassembly repository. We're going to review portions of the application directly applicable to Node.js. The following structure represents the file structure for the project:
├── /lib
│    └── main.c
├── /src
|    ├── Transaction.js
|    ├── /assets
|    │   ├── db.json
|    │   ├── main.wasm
|    │   └── memory.wasm
|    ├── assign-routes.js
|    ├── index.js
|    └── load-assets.js
├── package.json
├── package-lock.json
└── requests.js
With regard to dependencies, the application uses the express and body-parser libraries to set up routes and parse JSON from the body of requests. For data management, it uses lowdb, a library that provides methods for reading and updating a JSON file. The JSON file is located in /src/assets/db.json and contains data that was slightly modified from the Cook the Books dataset. We're using nodemon to watch for changes in the /src folder and reload the application automatically. We're using rimraf to manage file deletion. The library is included as a dependency in the event that you didn't install it globally in Chapter 3, Setting Up a Development Environment. Finally, the node-fetch library allows us to use the fetch API to make HTTP requests when testing the application.
The application is loaded in /src/index.js. The contents of this file are shown as follows:
const express = require('express');
const bodyParser = require('body-parser');
const loadAssets = require('./load-assets');
const assignRoutes = require('./assign-routes');

// If you preface the npm start command with PORT=[Your Port] on
// macOS/Ubuntu or set PORT=[Your Port] on Windows, it will change the port
// that the server is running on, so PORT=3001 will run the app on
// port 3001:
const PORT = process.env.PORT || 3000;

const startApp = async () => {
  const app = express();

  // Use body-parser for parsing JSON in the body of a request:
  app.use(bodyParser.urlencoded({ extended: true }));
  app.use(bodyParser.json());

  // Instantiate the Wasm module and local database:
  const assets = await loadAssets();

  // Setup routes that can interact with Wasm and the database:
  assignRoutes(app, assets);

  // Start the server with the specified port:
  app.listen(PORT, (err) => {
    if (err) return Promise.reject(err);
    return Promise.resolve();
  });
};

startApp()
  .then(() => console.log(`Server is running on port ${PORT}`))
  .catch(err => console.error(`An error occurred: ${err}`));
This file sets up a new Express app, adds the body-parser middleware, loads the mock database and Wasm instance, and assigns routes. Let's move on to discussing the difference between instantiating a Wasm module in the browser and Node.js.
The Wasm files are instantiated in /src/load-assets.js. We're using the memory.wasm file from Cook the Books, but the /assets/main.wasm file is compiled from a slightly different version of main.c, which is located in the /lib folder. The loadWasm() function performs the same operation as the Wasm initialization code from Cook the Books, but the method for passing in the bufferSource to WebAssembly.instantiate() is different. Let's examine this further by reviewing a portion of the code in the loadWasm() function of the load-assets.js file:
const fs = require('fs');
const path = require('path');

const assetsPath = path.resolve(__dirname, 'assets');

const getBufferSource = fileName => {
  const filePath = path.resolve(assetsPath, fileName);
  return fs.readFileSync(filePath); // <- Replaces the fetch() and .arrayBuffer()
};

// We're using async/await because it simplifies the Promise syntax
const loadWasm = async () => {
  const wasmMemory = new WebAssembly.Memory({ initial: 1024 });
  const memoryBuffer = getBufferSource('memory.wasm');
  const memoryInstance = await WebAssembly.instantiate(memoryBuffer, {
    env: {
      memory: wasmMemory
    }
  });
  ...
To elaborate on the differences, here's some code that instantiates a module using fetch:
fetch('main.wasm')
  .then(response => {
    if (response.ok) return response.arrayBuffer();
    throw new Error('Unable to fetch WebAssembly file');
  })
  .then(bytes => WebAssembly.instantiate(bytes, importObj));
When using Node.js, the fetch call is replaced by the fs.readFileSync() function and the arrayBuffer() function is no longer required because fs.readFileSync() returns a buffer that can be passed directly into the instantiate() function. Once the Wasm module is instantiated, we can start interacting with the instance.
The load-assets.js file also contains a method for creating a mock database instance:
const loadDb = () => {
  const dbPath = path.resolve(assetsPath, 'db.json');
  const adapter = new FileSync(dbPath);
  return low(adapter);
};
The loadDb() function loads the contents of /assets/db.json into an instance of lowdb. The default function exported from load-assets.js calls the loadWasm() and loadDb() functions and returns an object containing the mock database and Wasm instance:
module.exports = async function loadAssets() {
  const db = loadDb();
  const wasmInstance = await loadWasm();
  return {
    db,
    wasmInstance
  };
};
Going forward, I'll use the term database to refer to the lowdb instance that accesses the db.json file. Now that the assets are loaded, let's review how the application interacts with them.
Interaction with the database and Wasm instance takes place across two files in the /src folder: Transaction.js and assign-routes.js. In our example application, all communication with the API is performed via HTTP requests. Sending a request to a specific endpoint will trigger some interaction with the database/Wasm instance on the server. Let's start by reviewing Transaction.js, which interacts directly with the database and Wasm instance.
Just as with Cook the Books, there's a class that wraps the Wasm interaction code and provides a clean interface. The contents of Transaction.js are very similar to the contents of /src/store/WasmTransactions.js from Cook the Books. Most of the changes accommodate for the categoryId being present in a transaction record and a single amount field (no more raw and cooked amounts). Additional functionality was added to interact with the database. For example, here's a function that edits an existing transaction, both in the database and the linked list from the Wasm instance:
getValidAmount(transaction) {
  const { amount, type } = transaction;
  return type === 'Withdrawal' ? -Math.abs(amount) : amount;
}

edit(transactionId, contents) {
  const updatedTransaction = this.db.get('transactions')
    .find({ id: transactionId })
    .assign(contents)
    .write();

  const { categoryId, ...transaction } = updatedTransaction;
  const amount = this.getValidAmount(transaction);
  this.wasmInstance._editTransaction(transactionId, categoryId, amount);

  return updatedTransaction;
}
The edit() function updates the database record that corresponds to the transactionId argument with the values in the contents argument. this.db is the database instance that was created in the load-assets.js file. Since the categoryId field is available on the updatedTransaction record, we can pass it directly to this.wasmInstance._editTransaction(). It gets passed into the constructor when a new instance of Transaction is created.
The assign-routes.js file defines routes and adds them to the express instance (app) created in index.js. In Express, routes can be defined directly on app (for example, app.get()), or through the use of a Router. In this case, a Router was used to add multiple methods to the same route path. The following code, taken from the assign-routes.js file, creates a Router instance and adds two routes: a GET route that returns all transactions, and a POST route that creates a new transaction:
module.exports = function assignRoutes(app, assets) {
  const { db, wasmInstance } = assets;
  const transaction = new Transaction(db, wasmInstance);
  const transactionsRouter = express.Router();

  transactionsRouter
    .route('/')
    .get((req, res) => {
      const transactions = transaction.findAll();
      res.status(200).send(transactions);
    })
    .post((req, res) => {
      const { body } = req;
      if (!body) {
        return res.status(400).send('Body of request is empty');
      }
      const newRecord = transaction.add(body);
      res.status(200).send(newRecord);
    });

  ...

  // Set the base path for all routes on transactionsRouter:
  app.use('/api/transactions', transactionsRouter);
}
The app.use() function at the end of the snippet specifies that all routes defined on the transactionsRouter instance are prefixed with /api/transactions. If you were running the application locally on port 3000, you could navigate to http://localhost:3000/api/transactions in your browser and see an array of all the transactions in JSON format.
As you can see from the body of the get() and post() functions, interactions with any transaction records are being delegated to the Transaction instance created in line 3. That completes our review of pertinent sections of the code base. Each of the files contain comments describing the file's functionality and purpose, so you may want to review those before moving on to the next section. In the next section, we'll build, run, and interact with the application.
Before we build and test out the project, you'll need to install the npm dependencies. Open a terminal within the /server-example folder and run the following command:
npm install
Once that's complete, you're ready to move on to the build step.
In the case of this application, building refers to compiling the lib/main.c to a .wasm file using the emcc command. Since this is a Node.js project, we can use the scripts key in our package.json file to define Tasks. You can still use VS Code's Tasks feature because it automatically detects the scripts from your package.json file and presents them in the list of tasks when you select Tasks | Run Task... from the menu. The following code contains the contents of the scripts section in this project's package.json file:
"scripts": {
  "prebuild": "rimraf src/assets/main.wasm",
  "build": "emcc lib/main.c -Os -s WASM=1 -s SIDE_MODULE=1
           -s BINARYEN_ASYNC_COMPILATION=0 -s ALLOW_MEMORY_GROWTH=1
           -o src/assets/main.wasm",
  "start": "node src/index.js",
  "watch": "nodemon src/* --exec 'npm start'"
},
The build script was split across multiple lines for display purposes, so you'd have to combine those lines for valid JSON. The prebuild script removes the existing Wasm file, and the build script runs the emcc command with the required flags to compile lib/main.c and output the result to src/assets/main.wasm. To run the script, open a terminal within the /server-example folder and run the following command:
npm run build
If the /src/assets folder contains a file named main.wasm, the build completed successfully. If an error has occurred, the terminal should provide a description of the error, as well as a stack trace.
If you're making changes to the application or trying to fix a bug, you could use the watch script to watch for any changes to the contents of the /src folder and automatically restart the application if a change was made. Since we're just running and testing out the application, we can use the start command instead. In the terminal, ensure you're in the /server-example folder and run the following command:
npm start
You should see a message that says Server is running on port 3000. You're now able to send HTTP requests to the server. To test the application, open a new terminal instance within the server-example directory and run the following command:
node ./requests.js 1
This should log out the response body of the GET call to the /api/transactions endpoint. The requests.js file contains functionality that allows you to make requests to all of the available routes. The getFetchActionForId() function returns an object with an endpoint and options value, which corresponds to a route in the assign-routes.js file. The actionId is an arbitrary number to simplify testing and reduce the amount of typing for running commands. For example, you could run the following command:
node ./requests.js 5
It will log out the sum of all transactions for the Computer & Internet category. You can pass an additional argument to the node command if you want the total for a different category. To get the sum of all transactions in the Insurance category, run this command:
node ./requests.js 5 3
Try going through each of the requests (there are eight in total). If you make a request that adds, removes, or edits a transaction, you should see the changes in the /src/assets/db.json file. That's it for the Node.js example project. In the next section, we'll utilize Webpack to load and interact with a Wasm module.
Web applications continue to grow in complexity and size. Simply serving up a few handwritten HTML, CSS, and JavaScript files is not feasible for large applications. To manage this complexity, web developers use bundlers to allow for modularization, ensure browser compatibility, and reduce the size of JavaScript files. In this section, we're going to be using a popular bundler, Webpack, to utilize Wasm without using emcc.
The example Webpack application extends the functionality of the C code we wrote in the Compiling C without the glue code section of Chapter 5, Creating and Loading a WebAssembly Module. Instead of showing a blue rectangle bouncing around a red background, we'll show an alien in a spaceship bouncing around the Horsehead Nebula. The collision detection functionality has been modified to accommodate for bouncing within a rectangle, so the movement of the spaceship will be random. The code for this section is located in the /chapter-09-node/webpack-example folder in the learn-webassembly repository. The file structure for the project is shown in the following code:
├── /src
│    ├── /assets
│    │    ├── background.jpg
│    │    └── spaceship.svg
│    ├── App.js
│    ├── index.html
│    ├── index.js
│    ├── main.c
│    └── styles.css
├── package.json
├── package-lock.json
└── webpack.config.js
We'll review the Webpack configuration file in a later section. For now, let's take a moment to discuss Webpack in more detail.
The JavaScript ecosystem has been rapidly evolving over the past several years, resulting in new frameworks and libraries popping up constantly. Bundlers came about as a way to enable developers to split a JavaScript application into several files without having to worry about managing global namespaces, script loading order, or an incredibly long list of <script> tags in the HTML file. A bundler combines all of the files into one and resolves any naming collisions.
Webpack is, at the time of writing, one of the most popular bundlers for frontend development. It does much more than combine JavaScript files, however. It also performs complex tasks such as code-splitting and tree shaking (dead-code elimination). Webpack was designed with a plugin architecture, which resulted in a massive amount of community-developed plugins. A search for Webpack on npm currently returns over 12,000 packages! This exhaustive list of plugins, along with its powerful built-in feature set, makes Webpack a full-fledged build tool.
Before we begin the application walk-through, open up a terminal within the /webpack-example folder and run the following command:
npm install
The application uses Version 4 of Webpack (the most recent version as of writing this) to build our application. We need to use Webpack plugins to load the various file types used in the application and Babel to utilize newer JavaScript features. The following snippet lists the devDependencies we're using in the project (taken from package.json):
...
"devDependencies": {
  "@babel/core": "^7.0.0-rc.1",
  "@babel/preset-env": "^7.0.0-rc.1",
  "babel-loader": "^8.0.0-beta.4",
  "cpp-wasm-loader": "0.7.7",
  "css-loader": "1.0.0",
  "file-loader": "1.1.11",
  "html-loader": "0.5.5",
  "html-webpack-plugin": "3.2.0",
  "mini-css-extract-plugin": "0.4.1",
  "rimraf": "2.6.2",
  "webpack": "4.16.5",
  "webpack-cli": "3.1.0",
  "webpack-dev-server": "3.1.5"
},
...
I specified exact versions for some of the libraries to ensure the application builds and runs successfully. Any libraries with a name ending in -loader or -plugin are used in conjunction with Webpack. The cpp-wasm-loader library allows us to import a C or C++ file directly, without having to compile it to Wasm first. Webpack 4 has built-in support for importing .wasm files, but you can't specify an importObj argument, which is required for modules generated with Emscripten.
We're using several different file types in addition to JavaScript for the application: CSS, SVG, HTML, and so on. Installing the -loader dependencies is only part of the equation—you also need to tell Webpack how to load them. You also need to specify configuration details for any plugins you have installed. You can specify the loading and configuration details in a webpack.config.js file in the root folder of your project. The following snippet contains the contents of /webpack-example/webpack.config.js:
const HtmlWebpackPlugin = require('html-webpack-plugin');
const MiniCssExtractPlugin = require('mini-css-extract-plugin');

module.exports = {
  module: {
    rules: [
      {
        test: /\.js$/,
        exclude: /node_modules/,
        use: {
          loader: 'babel-loader',
          options: {
            // We need this to use async/await:
            presets: [
              [
                '@babel/preset-env', {
                  targets: { node: '10' }
                }
              ]
            ]
          }
        }
      },
      {
        test: /\.html$/,
        use: {
          loader: 'html-loader',
          options: { minimize: true }
        }
      },
      {
        test: /\.css$/,
        use: [MiniCssExtractPlugin.loader, 'css-loader']
      },
      {
        test: /\.(c|cpp)$/,
        use: {
          loader: 'cpp-wasm-loader',
          options: {
            emitWasm: true
          }
        }
      },
      {
        test: /\.(png|jpg|gif|svg)$/,
        use: {
          loader: 'file-loader',
          options: {
            name: 'assets/[name].[ext]'
          }
        }
      }
    ]
  },
  plugins: [
    new HtmlWebpackPlugin({
      template: './src/index.html',
      filename: './index.html'
    }),
    // This is used for bundling (building for production):
    new MiniCssExtractPlugin({
      filename: '[name].css',
      chunkFilename: '[id].css'
    })
  ]
};
The rules section tells Webpack which loader to use for a file extension. The fourth item in the array handles C/C++ files (note the test field value containing c|cpp). The HtmlWebpackPlugin takes the contents of /src/index.html, adds any required <script> tags, minifies it, and creates an index.html in the build folder, which defaults to /dist. The MiniCssExtractPlugin copies any imported CSS into a single CSS file in the /dist folder. We'll review how to build the project in a later section, so let's move on to the application code, starting with the C file.
Since we're allowed to import C and C++ files directly, the C file is located within the /src folder. This file, main.c, contains logic to manage collision detection and move the spaceship around the <canvas>. The code is based on the without-glue.c file we created in Chapter 5, Creating and Loading a WebAssembly Module. We're not going to review the entire file, only the sections that have changed and merit explanation. Let's begin with the definitions and declarations section, which includes a new struct: Bounds.
The code containing the definitions and declarations sections is shown as follows:
typedef struct Bounds {
  int width;
  int height;
} Bounds;

// We're using the term "Rect" to represent the rectangle the
// image occupies:
typedef struct Rect {
  int x;
  int y;
  int width;
  int height;
  // Horizontal direction of travel (L/R):
  char horizDir;
  // Vertical direction of travel (U/D):
  char vertDir;
} Rect;

struct Bounds bounds;
struct Rect rect;
New properties were added to the existing Rect definition to accommodate for flexible sizing and tracking movement in the x and y directions. We defined a new struct, Bounds, and removed the existing #define statements because the <canvas> element is no longer a square with static dimensions. A new instance of both elements is declared when the module loads. The dimensional properties of these instances are assigned in the start() function, which we'll cover next.
The updated start() function, which acts as the entry point to the module, is shown as follows:
EMSCRIPTEN_KEEPALIVE
void start(int boundsWidth, int boundsHeight, int rectWidth,
           int rectHeight) {
    rect.x = 0;
    rect.y = 0;
    rect.horizDir = 'R';
    rect.vertDir = 'D';
    rect.width = rectWidth;
    rect.height = rectHeight;
    bounds.width = boundsWidth;
    bounds.height = boundsHeight;
    setIsRunning(true);
}
Any functions that are called from JavaScript are prepended with the EMSCRIPTEN_KEEPALIVE statement. We're now passing the width and height of both the Bounds and Rect elements as arguments to the start() function, which we assign to the local bounds and rect variables. This allows us to easily change the dimensions of either one without having to make any changes to the collision detection logic. In the context of this application, the rect represents the rectangle in which the spaceship image resides. We set the default horizontal and vertical direction for the rect so the image initially moves to the right and down. Let's move on to the rect movement/collision detection code.
The code related to collision detection and the Rect movement is handled in the updateRectLocation() function, which is shown as follows:
/**
 * Updates the rectangle location by +/- 1px in the x or y based on
 * the current location.
 */
void updateRectLocation() {
    // Determine if the bounding rectangle has "bumped" into either
    // the left/right side or top/bottom side. Depending on which side,
    // flip the direction:
    int xBouncePoint = bounds.width - rect.width;
    if (rect.x == xBouncePoint) rect.horizDir = 'L';
    if (rect.x == 0) rect.horizDir = 'R';

    int yBouncePoint = bounds.height - rect.height;
    if (rect.y == yBouncePoint) rect.vertDir = 'U';
    if (rect.y == 0) rect.vertDir = 'D';

    // If the direction has changed based on the x and y
    // coordinates, ensure the x and y points update
    // accordingly:
    int horizIncrement = 1;
    if (rect.horizDir == 'L') horizIncrement = -1;
    rect.x = rect.x + horizIncrement;

    int vertIncrement = 1;
    if (rect.vertDir == 'U') vertIncrement = -1;
    rect.y = rect.y + vertIncrement;
}
The primary difference between this code and the code we wrote in Chapter 5, Creating and Loading a WebAssembly Module, is the collision detection logic. Instead of simply tracking the location of the rect instance horizontally and changing direction when it hits the right boundary, the function now tracks the horizontal and vertical directions and manages each independently. Although this isn't the most performant algorithm, it does achieve the goal of ensuring the spaceship changes direction when it encounters the edge of the <canvas>.
The only production dependency we're using for the application is Vue. Although the application consists of a single component, Vue makes managing data, functions, and the component life-cycle much simpler than trying to do it manually. The index.js file contains the Vue initialization code, while the rendering and application logic is in /src/App.js. This file has a lot of moving parts, so we're going to review the code in chunks, as we did in the previous section. Let's start with the import statements.
The following code demonstrates the Webpack loaders in action:
// This is loaded using the css-loader dependency:
import './styles.css';

// This is loaded using the cpp-wasm-loader dependency:
import wasm from './main.c';

// These are loaded using the file-loader dependency:
import backgroundImage from './assets/background.jpg';
import spaceshipImage from './assets/spaceship.svg';
The loaders we configured in the webpack.config.js file understand how to handle CSS, C, and image files. Now that we have the required resources available, we can start defining our component state.
The following code initializes the local state in the data() function for our component:
export default {
  data() {
    return {
      instance: null,
      bounds: { width: 800, height: 592 },
      rect: { width: 200, height: 120 },
      speed: 5
    };
  },
  ...
Although the bounds and rect properties never change, we defined them in the local state to keep all the data used by the component in a single location. The speed property dictates how quickly the spaceship moves across the <canvas> and has a range of 1 to 10. The instance property is initialized to null, but will be used to access the compiled Wasm module's exported functions. Let's move on to the Wasm initialization code that compiles the Wasm file and populates the <canvas>.
The code to compile the Wasm file and populate the <canvas> element is shown as follows:
methods: {
  // Create a new Image instance to pass into the drawImage function
  // for the <canvas> element's context:
  loadImage(imageSrc) {
    const loadedImage = new Image();
    loadedImage.src = imageSrc;
    return new Promise((resolve, reject) => {
      loadedImage.onload = () => resolve(loadedImage);
      loadedImage.onerror = () => reject();
    });
  },

  // Compile/load the contents of main.c and assign the resulting
  // Wasm module instance to the components this.instance property:
  async initializeWasm() {
    const ctx = this.$refs.canvas.getContext('2d');

    // Create Image instances of the background and spaceship.
    // These are required to pass into the ctx.drawImage() function:
    const [bouncer, background] = await Promise.all([
      this.loadImage(spaceshipImage),
      this.loadImage(backgroundImage)
    ]);

    // Compile the C code to Wasm and assign the resulting
    // module.exports to this.instance:
    const { width, height } = this.bounds;
    return wasm
      .init(imports => ({
        ...imports,
        _jsFillRect(x, y, w, h) {
          ctx.drawImage(bouncer, x, y, w, h);
        },
        _jsClearRect() {
          ctx.drawImage(background, 0, 0, width, height);
        }
      }))
        .then(module => {
          this.instance = module.exports;
          return Promise.resolve();
        });
  },
  ...
There are additional functions defined in the methods key of the component, but for now we'll focus on the code that compiles the imported C file to Wasm. After Image instances are created for the spaceship and background images, the main.c file (imported as .wasm) is compiled to a Wasm module and the resulting exports is assigned to this.instance. Once these operations complete, the start() function can be called from the exported Wasm module. Since the initializeWasm() function calls the <canvas> element's getContext() function, the component needs to be mounted before this function can be called. Let's review the rest of the methods definitions and the mounted() event handler.
The remaining methods definitions and mounted() event handler function are shown as follows:
  ...
  // Looping function to move the spaceship across the canvas.
  loopRectMotion() {
    setTimeout(() => {
      this.instance.moveRect();
      if (this.instance.getIsRunning()) this.loopRectMotion();
    }, 15 - this.speed);
  },
  // Pauses/resumes the spaceship's movement when the button is
  // clicked:
  onActionClick(event) {
    const newIsRunning = !this.instance.getIsRunning();
    this.instance.setIsRunning(newIsRunning);
    event.target.innerHTML = newIsRunning ? 'Pause' : 'Resume';
    if (newIsRunning) this.loopRectMotion();
  }
},
mounted() {
  this.initializeWasm().then(() => {
    this.instance.start(
      this.bounds.width,
      this.bounds.height,
      this.rect.width,
      this.rect.height
    );
    this.loopRectMotion();
  });
},
Once the Wasm module is compiled, the start() function is accessible on this.instance. The bounds and rect dimensions are passed into the start() function, and then the loopRectFunction() is called to start moving the spaceship. The onActionClick() event handler function pauses or resumes the movement of the spaceship based on whether or not it's currently in motion.
The loopRectMotion() functions in the same way as the example code from Chapter 5, Creating and Loading a WebAssembly Module, except the speed is now adjustable. The 15 - this.speed calculation, which dictates the timeout length, may look a little strange. Since the movement speed of the image is based on the amount of time that elapses between function calls, increasing this number would actually slow down the spaceship. Consequently, this.speed is subtracted from 15, which was chosen because it's slightly greater than 10 but won't turn the spaceship into a blur if this.speed is increased to the maximum. That's it for the component logic; let's move on to the rendering section of the code where the template is defined.
The contents of the template property, which dictates what to render, are shown as follows:
template: `
  <div class="flex column">
   <h1>SPACE WASM!</h1>
    <canvas
      ref="canvas"
      :height="bounds.height"
      :width="bounds.width">
    </canvas>
    <div class="flex controls">
      <div>
        <button class="defaultText" @click="onActionClick">
          Pause
        </button>
      </div>
    <div class="flex column">
      <label class="defaultText" for="speed">Speed: {{speed}}</label>
      <input
        v-model="speed"
        id="speed"
        type="range"
        min="1"
        max="10"
        step="1">
    </div>
  </div>
</div>
Since we're using Vue, we can bind the attributes and event handlers of HTML elements to properties and methods defined in our component. In addition to a PAUSE/RESUME button, there's a range <input> that allows you to change the speed. By sliding it to the left or right, you're able to slow down or speed up the spaceship and see the changes reflected immediately. That concludes our review; let's see how Webpack can be used to build or run the application.
Using the cpp-wasm-loader library eliminates the need for a build step to generate a Wasm module, but we still need to bundle up our application for distribution. In the scripts section of package.json, there's a build and start script. Running the build script executes the webpack command that generates the bundle. To ensure this is working correctly, open a terminal instance in the /webpack-example folder and run the following command:
npm run build
It may take a minute to build the project the first time you run it. This can be attributed to the Wasm compilation step. However, subsequent builds should be much faster. If the build was successful, you should see a newly created /dist folder with these contents:
├── /assets
│    ├── background.jpg
│    └── spaceship.svg
├── index.html
├── main.css
├── main.js
└── main.wasm
Let's try out the build to ensure everything is working correctly. Run the following command in your terminal instance to start the application:
serve -l 8080 dist
If you navigate to http://127.0.0.1:8080/index.html in your browser, you should see this:
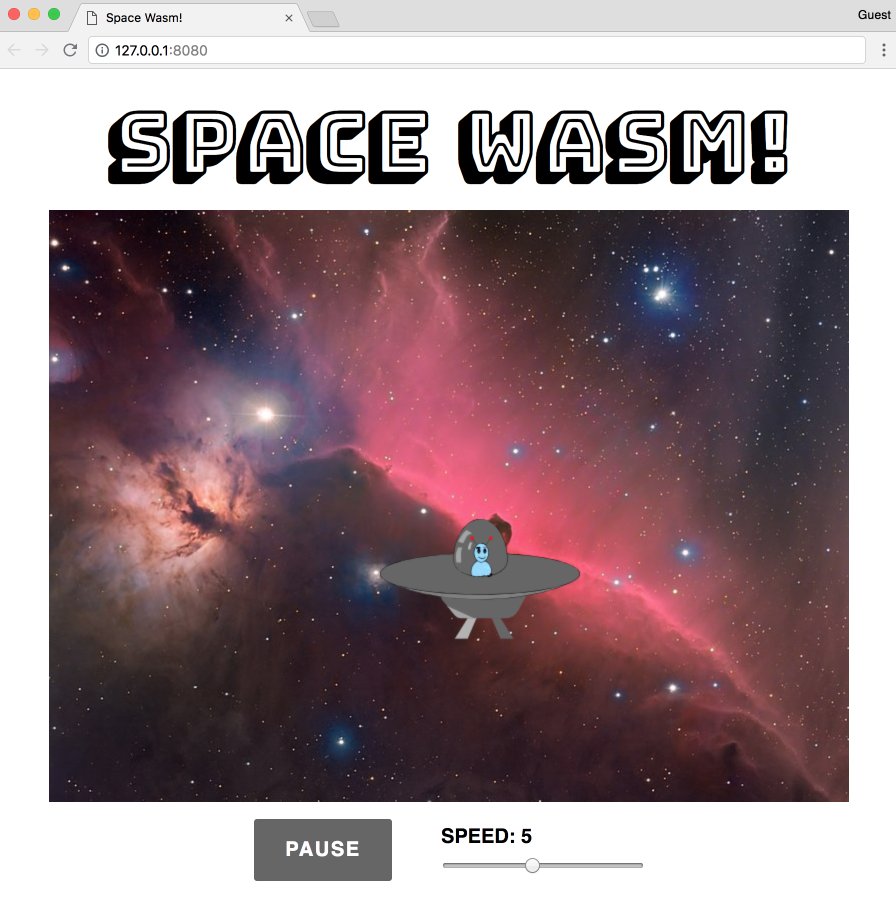
The spaceship image (taken from https://commons.wikimedia.org/wiki/File:Alien_Spaceship_-_SVG_Vector.svg) bounces around within the bounds of the Horsehead Nebula background image (taken from https://commons.wikimedia.org/wiki/File:Horsehead_Nebula_Christmas_2017_Deography.jpg). When the PAUSE button is pressed, the button's caption changes to RESUME and the ship stops moving. Pressing the button again will change the caption back to PAUSE and the ship will start moving again. Adjusting the SPEED slider increases or decreases the speed of the ship.
The application has the webpack-dev-server library installed, which operates like Browsersync. The library uses LiveReloading, which automatically updates the application when you make any changes to the files in /src. Since we're using a Webpack loader for C and C++ files, the automatic update event will trigger if you change the C file as well. Run the following the command to start the application and watch for changes:
npm start
A browser window should open automatically when the build completes, and then direct you to the running application. To see the live-reloading feature in action, try setting the value of the isRunning variable in the setIsRunning() function in main.c to false instead of newIsRunning:
EMSCRIPTEN_KEEPALIVE
void setIsRunning(bool newIsRunning) {
    // isRunning = newIsRunning;

    // Set the value to always false:
    isRunning = false;
}
The spaceship should be stuck in the upper-left corner. If you change it back, the spaceship starts moving again. In the next section, we will write unit tests in JavaScript to test WebAssembly modules.
Well-tested code prevents regression bugs, simplifies refactoring, and alleviates some of the frustrations that go along with adding new features. Once you've compiled a Wasm module, you should write tests to ensure it's functioning as expected, even if you've written tests for C, C++, or Rust code you compiled it from. In this section, we'll use Jest, a JavaScript testing framework, to test the functions in a compiled Wasm module.
All of the code used in this example is located in the /chapter-09-node/testing-example folder. The code and corresponding tests are very simple and are not representative of real-world applications, but they're intended to demonstrate how to use Jest for testing. The following code represents the file structure of the /testing-example folder:
├── /src
|    ├── /__tests__
|    │    └── main.test.js
|    └── main.c
├── package.json
└── package-lock.json
The contents of the C file that we'll test, /src/main.c, is shown as follows:
int addTwoNumbers(int leftValue, int rightValue) {
    return leftValue + rightValue;
}

float divideTwoNumbers(float leftValue, float rightValue) {
    return leftValue / rightValue;
}

double findFactorial(float value) {
    int i;
    double factorial = 1;

    for (i = 1; i <= value; i++) {
        factorial = factorial * i;
    }
    return factorial;
}
All three functions in the file are performing simple mathematical operations. The package.json file includes a script to compile the C file to a Wasm file for testing. Run the following command to compile the C file:
npm run build
There should be a file named main.wasm in the /src directory. Let's move on to describing the testing configuration step.
The only dependency we'll use for this example is Jest, a JavaScript testing framework built by Facebook. Jest is an excellent choice for testing because it includes most of the features you'll need out of the box, such as coverage, assertions, and mocking. In most cases, you can use it with zero configuration, depending on the complexity of your application. If you're interested in learning more, check out Jest's website at https://jestjs.io. Open a terminal instance in the /chapter-09-node/testing-example folder and run the following command to install Jest:
npm install
In the package.json file, there are three entries in the scripts section: build, pretest, and test. The build script executes the emcc command with the required flags to compile /src/main.c to /src/main.wasm. The test script executes the jest command with the --verbose flag, which provides additional details for each of the test suites. The pretest script simply runs the build script to ensure /src/main.wasm exists prior to running any tests.
Let's walk through the test file, located at /src/__tests__/main.test.js, and review the purpose of each section of code. The first section of the test file instantiates the main.wasm file and assigns the result to the local wasmInstance variable:
const fs = require('fs');
const path = require('path');

describe('main.wasm Tests', () => {
  let wasmInstance;

  beforeAll(async () => {
    const wasmPath = path.resolve(__dirname, '..', 'main.wasm');
    const buffer = fs.readFileSync(wasmPath);
    const results = await WebAssembly.instantiate(buffer, {
      env: {
        memoryBase: 0,
        tableBase: 0,
        memory: new WebAssembly.Memory({ initial: 1024 }),
        table: new WebAssembly.Table({ initial: 16, element: 'anyfunc' }),
        abort: console.log
      }
    });
    wasmInstance = results.instance.exports;
  });
 ...
Jest provides life-cycle methods to perform any setup or teardown actions prior to running tests. You can specify functions to run before or after all of the tests (beforeAll()/afterAll()), or before or after each test (beforeEach()/afterEach()). We need a compiled instance of the Wasm module from which we can call exported functions, so we put the instantiation code in the beforeAll() function.
We're wrapping the entire test suite in a describe() block for the file. Jest uses a describe() function to encapsulate suites of related tests and test() or it() to represent a single test. Here's a simple example of this concept:
const add = (a, b) => a + b;

describe('the add function', () => {
  test('returns 6 when 4 and 2 are passed in', () => {
    const result = add(4, 2);
    expect(result).toEqual(6);
  });

  test('returns 20 when 12 and 8 are passed in', () => {
    const result = add(12, 8);
    expect(result).toEqual(20);
  });
});
The next section of code contains all the test suites and tests for each exported function:
...
  describe('the _addTwoNumbers function', () => {
    test('returns 300 when 100 and 200 are passed in', () => {
      const result = wasmInstance._addTwoNumbers(100, 200);
      expect(result).toEqual(300);
    });

    test('returns -20 when -10 and -10 are passed in', () => {
      const result = wasmInstance._addTwoNumbers(-10, -10);
      expect(result).toEqual(-20);
    });
  });

  describe('the _divideTwoNumbers function', () => {
    test.each([
      [10, 100, 10],
      [-2, -10, 5],
    ])('returns %f when %f and %f are passed in', (expected, a, b) => {
      const result = wasmInstance._divideTwoNumbers(a, b);
      expect(result).toEqual(expected);
    });

    test('returns ~3.77 when 20.75 and 5.5 are passed in', () => {
      const result = wasmInstance._divideTwoNumbers(20.75, 5.5);
      expect(result).toBeCloseTo(3.77, 2);
    });
  });

  describe('the _findFactorial function', () => {
    test.each([
      [120, 5],
      [362880, 9.2],
    ])('returns %p when %p is passed in', (expected, input) => {
      const result = wasmInstance._findFactorial(input);
      expect(result).toEqual(expected);
    });
  });
});
The first describe() block, for the _addTwoNumbers() function, has two test() instances to ensure that the function returns the sum of the two numbers passed in as arguments. The next two describe() blocks, for the _divideTwoNumbers() and _findFactorial() functions, use Jest's .each feature, which allows you to run the same test with different data. The expect() function allows you to make assertions on the value passed in as an argument. The .toBeCloseTo() assertion in the last _divideTwoNumbers() test checks whether the result is within two decimal places of 3.77. The rest use the .toEqual() assertion to check for equality.
Writing tests with Jest is relatively simple, and running them is even easier! Let's try running our tests and reviewing some of the CLI flags that Jest provides.
To run the tests, open a terminal instance in the /chapter-09-node/testing-example folder and run the following command:
npm test
You should see the following output in your terminal:
main.wasm Tests
  the _addTwoNumbers function
    ✓ returns 300 when 100 and 200 are passed in (4ms)
    ✓ returns -20 when -10 and -10 are passed in
  the _divideTwoNumbers function
    ✓ returns 10 when 100 and 10 are passed in
    ✓ returns -2 when -10 and 5 are passed in (1ms)
    ✓ returns ~3.77 when 20.75 and 5.5 are passed in
  the _findFactorial function
    ✓ returns 120 when 5 is passed in (1ms)
    ✓ returns 362880 when 9.2 is passed in

Test Suites: 1 passed, 1 total
Tests: 7 passed, 7 total
Snapshots: 0 total
Time: 1.008s
Ran all test suites.
If you have a large number of tests, you could remove the --verbose flag from the test script in package.json and only pass the flag to the npm test command if needed. There are several other CLI flags you can pass to the jest command. The following list contains some of the more commonly used flags:
You can pass these flags to the npm test command by adding them after a --. For example, if you wanted to use the --bail flag, you'd run this command:
npm test -- --bail
You can view the entire list of CLI options on the official site at https://jestjs.io/docs/en/cli.
In this chapter, we discussed the advantages of integrating WebAssembly with Node.js and demonstrated how Node.js could be used on the server and client side. We evaluated an Express application that uses a Wasm module to perform calculations on accounting transactions. We then reviewed a browser-based application that utilizes Webpack to import and call functions from a C file without having to write any Wasm instantiation code. Finally, we saw how the Jest testing framework can be leveraged to test a compiled module and ensure it's functioning correctly. In Chapter 10, Advanced Tools and Upcoming Features, we'll cover advanced tools and discuss the features that are on the horizon for WebAssembly.
WebAssembly's ecosystem is constantly growing and evolving. Developers have seen the potential for WebAssembly. They build tools to improve the development experience or output Wasm modules from their language of choice (albeit with some limitations).
In this chapter, we'll evaluate the underlying technologies that make WebAssembly tick. We'll also review tools you can use in the browser and cover an advanced use case that utilizes Web Workers. Finally, we'll quickly review upcoming features and proposals that are on the roadmap for WebAssembly.
Our goal for this chapter is to understand the following:
WABT and Binaryen allow developers to work with source files and develop tooling for WebAssembly. If you're interested in working with WebAssembly at a lower level, these tools provide the means for accomplishing such a goal. In this section, we'll evaluate these tools in greater detail and review the purpose and capabilities of each one.
WABT's focus is on the manipulation of WebAssembly binary (.wasm) files and text (.wat) files, as well as conversion between the two formats. WABT provides tools to translate Wat to Wasm (wat2wasm) and vice versa (wasm2wat), as well as a tool to convert a Wasm file to a C source and header file (wasm2c). You can view the entire list of tools in the README file of the WABT GitHub repository at https://github.com/WebAssembly/wabt.
One example use case of WABT is the WebAssembly Toolkit for VS Code extension we installed in Chapter 3, Setting Up a Development Environment. The extension depends on WABT to view the text format associated with a .wasm file. The repository provides links to wat2wasm and wasm2wat demos, which you can use to test the validity of a Wat program or interact with a compiled binary using JavaScript. The following screenshot contains the Wat and JavaScript instantiation code from the wat2wasm demo:
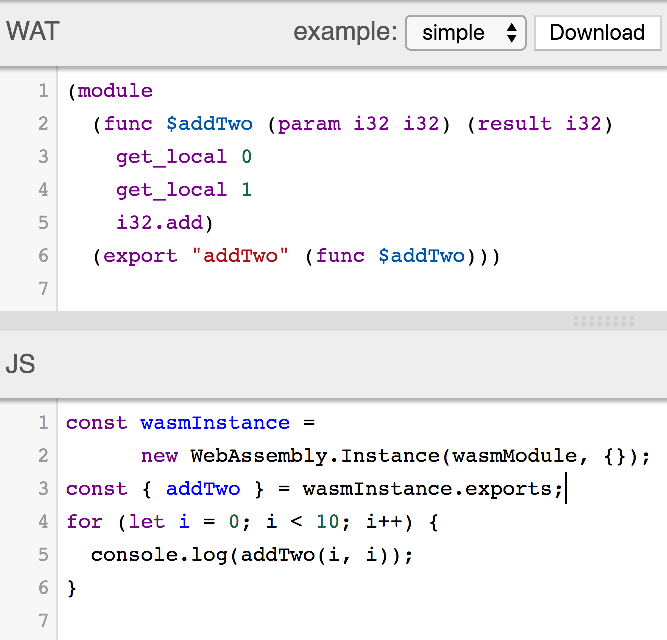
In line 3 of the JS panel, you may have noticed that the addTwo() function from wasmInstance.exports isn't prefixed with a _. Emscripten adds the _ automatically in the compilation process. You could omit the _ by converting the .wasm file to a .wat, updating the function names, and converting it back to .wasm using the WABT, although this wouldn't be very practical. The WABT simplifies the process of transforming text format to binary format and vice versa. If you want to build compilation tooling for WebAssembly, you'd use Binaryen, which we will cover next.
Binaryen's GitHub page at https://github.com/WebAssembly/binaryen describes Binaryen as a compiler and toolchain infrastructure library for WebAssembly, written in C++. It aims to make compiling to WebAssembly easy, fast, and effective. It achieves these aims by providing a simple C API, an internal IR, and an optimizer. Just as with the WABT, Binaryen provides an extensive suite of tools for developing WebAssembly tooling. The following list describes a subset of the tools that Binaryen provides:
The wasm.js and binaryen.js tools are of particular interest for JavaScript developers interested in building WebAssembly tooling. The binaryen.js library is available as an npm package (https://www.npmjs.com/package/binaryen).
An excellent example of binaryen.js usage is AssemblyScript (https://github.com/AssemblyScript/assemblyscript). AssemblyScript is a strictly typed subset of TypeScript that generates WebAssembly modules. The library comes packaged with a CLI to quickly scaffold new projects and manage the build step. In the Compiling with LLVM section, we'll cover how to compile Wasm modules using LLVM.
In Chapter 1, What is WebAssembly?, we discussed the relationship between Emscripten's EMSDK and LLVM. Emscripten uses LLVM and Clang to compile C/C++ down to LLVM bitcode. The Emscripten compiler (emcc) compiles that bitcode to asm.js, which is passed to Binaryen to generate a Wasm file. If you're interested in using LLVM, you can compile C/C++ to Wasm without installing the EMSDK. In this section, we will review the process for enabling Wasm compilation using LLVM. After compiling some example C++ code to a Wasm file, we'll try it out in the browser.
If you want to compile WebAssembly modules using LLVM, several tools need to be installed and configured. Getting these tools working together correctly can be an arduous and time-consuming process. Fortunately, someone went through the trouble of making this process much simpler. Daniel Wirtz created an npm package named webassembly (https://www.npmjs.com/package/webassembly) that can perform the following operations (with the corresponding CLI commands):
The library is using Binaryen, Clang, LLVM, and additional LLVM tools behind the scenes. We'll install this package globally to ensure we have access to the wa command. To install, open a terminal instance and run the following command:
npm install -g webassembly
It may take a few minutes to install any required dependencies. Once complete, run the following command to validate the installation:
wa
You should see the following in terminal:

You should be ready to start compiling Wasm modules. Let's move on to the example code.
To test out the compiler, we're going to use a slightly modified version of the without-glue.c file from the Interacting with JavaScript without glue code section of Chapter 5, Creating and Loading a WebAssembly Module. The code for this section is located in the /chapter-10-advanced-tools/compile-with-llvm directory of the learn-webassembly repository. Follow the following instructions to create the files necessary for the compiler test. Let's start with the C++ file.
Create a new directory in your /book-examples directory named /compile-with-llvm. Create a new file in the /compile-with-llvm directory named main.cpp and populate it with the following contents:
#include <stdbool.h>

#define BOUNDS 255
#define RECT_SIDE 50
#define BOUNCE_POINT (BOUNDS - RECT_SIDE)

bool isRunning = true;

typedef struct Rect {
  int x;
  int y;
  char direction;
} Rect;

struct Rect rect;

void updateRectLocation() {
    if (rect.x == BOUNCE_POINT) rect.direction = 'L';
    if (rect.x == 0) rect.direction = 'R';
    int incrementer = 1;
    if (rect.direction == 'L') incrementer = -1;
    rect.x = rect.x + incrementer;
    rect.y = rect.y + incrementer;
}

extern "C" {
extern int jsClearRect();
extern int jsFillRect(int x, int y, int width, int height);

__attribute__((visibility("default")))
void moveRect() {
    jsClearRect();
    updateRectLocation();
    jsFillRect(rect.x, rect.y, RECT_SIDE, RECT_SIDE);
}

__attribute__((visibility("default")))
bool getIsRunning() {
    return isRunning;
}

__attribute__((visibility("default")))
void setIsRunning(bool newIsRunning) {
    isRunning = newIsRunning;
}

__attribute__((visibility("default")))
void init() {
    rect.x = 0;
    rect.y = 0;
    rect.direction = 'R';
    setIsRunning(true);
}
}
The code in this file is almost identical to the contents of without-glue.c from Chapter 5, Creating and Loading a WebAssembly Module. The comments have been removed from the file and the imported/exported functions are wrapped in an extern "C" block. The __attribute__((visibility("default"))) lines are macro statements (similar to EMSCRIPTEN_KEEPALIVE) that ensure the functions aren't removed from the compiled output during the dead-code elimination step. Just as with prior examples, we'll interact with the compiled Wasm module through an HTML file. Let's create that next.
Create a file named index.html in the /compile-with-llvm directory and populate it with the following contents:
<!doctype html>
<html lang="en-us">
<head>
  <title>LLVM Test</title>
</head>
<body>
  <h1>LLVM Test</h1>
  <canvas id="myCanvas" width="255" height="255"></canvas>
  <div style="margin-top: 16px;">
    <button id="actionButton" style="width: 100px; height: 24px;">
      Pause
    </button>
  </div>
  <script type="application/javascript">
    const canvas = document.querySelector('#myCanvas');
    const ctx = canvas.getContext('2d');

    const importObj = {
      env: {
        memoryBase: 0,
        tableBase: 0,
        memory: new WebAssembly.Memory({ initial: 256 }),
        table: new WebAssembly.Table({ initial: 8, element: 'anyfunc' }),
        abort: console.log,
        jsFillRect: function(x, y, w, h) {
          ctx.fillStyle = '#0000ff';
          ctx.fillRect(x, y, w, h);
        },
        jsClearRect: function() {
          ctx.fillStyle = '#ff0000';
          ctx.fillRect(0, 0, 255, 255);
        }
      }
    };

    WebAssembly.instantiateStreaming(fetch('main.wasm'), importObj)
      .then(({ instance }) => {
        const m = instance.exports;
        m.init();

        const loopRectMotion = () => {
          setTimeout(() => {
            m.moveRect();
            if (m.getIsRunning()) loopRectMotion();
          }, 20)
        };

    document.querySelector('#actionButton')
      .addEventListener('click', event => {
        const newIsRunning = !m.getIsRunning();
        m.setIsRunning(newIsRunning);
        event.target.innerHTML = newIsRunning ? 'Pause' : 'Start';
        if (newIsRunning) loopRectMotion();
      });

      loopRectMotion();
    });
  </script>
</body>
</html>
The contents of this file are very similar to the without-glue.html file from Chapter 5, Creating and Loading a WebAssembly Module. Instead of using the loadWasm() function from the /common/load-wasm.js file, we're using the WebAssembly.instantiateStreaming() function. This allows us to omit an additional <script> element and serve the files directly from the /compile-with-llvm directory.
The _ is omitted from the jsFillRect and jsClearRect functions passed into the importObj. We can omit the _ for the functions present on the instance.exports object as well. LLVM doesn't prefix any of the data/functions passed in or out of the module with a _. In the next section, we'll compile main.cpp and interact with the resultant Wasm file in the browser.
We installed the webassembly npm package with the -g flag, so the wa command should be available in the terminal. Open a terminal instance in the /compile-with-llvm directory and run the following command:
wa compile main.cpp -o main.wasm
You should see a file named main.wasm appear in the compile-with-llvm folder of VS Code's file explorer. To ensure the Wasm module compiled correctly, run the following command within the /compile-with-llvm directory:
serve -l 8080
If you navigate to http://127.0.0.1:8080/index.html in your browser, you should see the following:
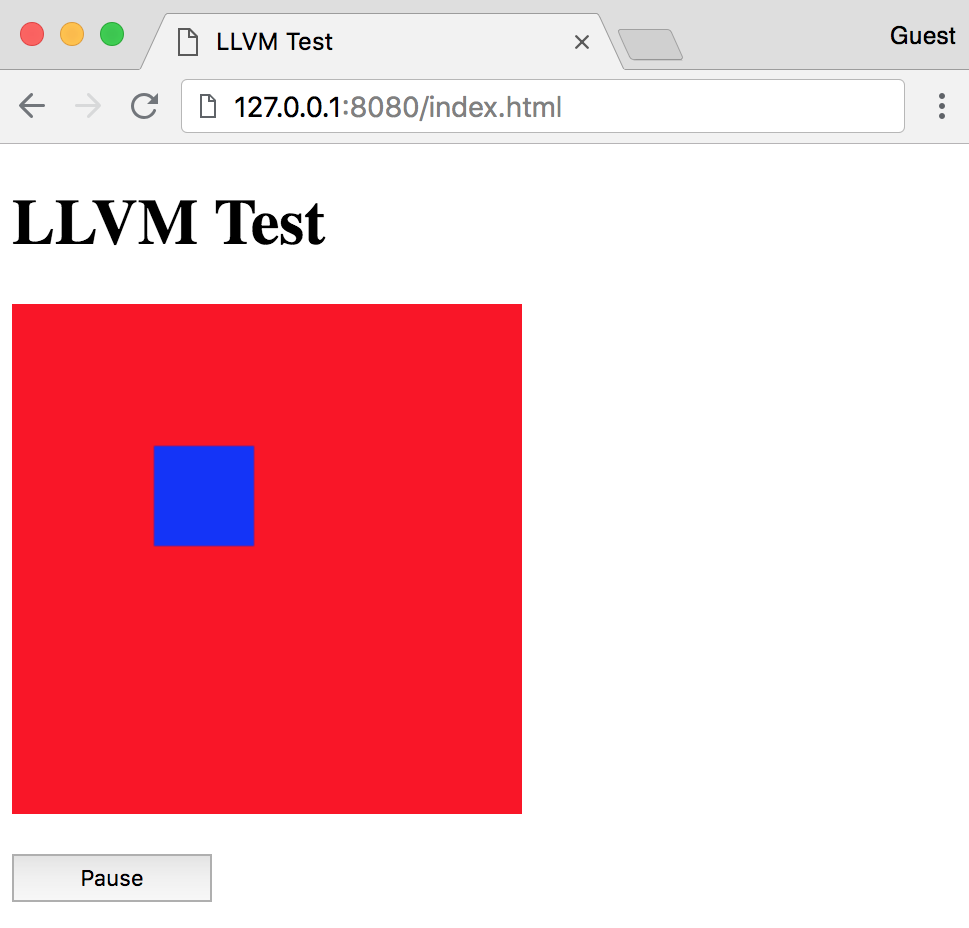
The installation and configuration process for compiling WebAssembly modules locally is, admittedly, a little cumbersome. Fortunately, there are several online tools available that allow you to develop and interact with WebAssembly in the browser. In this section, we'll review those tools and discuss the functionality each one provides.
In the Connecting the dots with WasmFiddle section in Chapter 2, Elements of WebAssembly - Wat, Wasm, and the JavaScript API, we used WasmFiddle to compile a simple C function to Wasm and interact with it using JavaScript. WasmFiddle provides a C/C++ editor, JavaScript editor, Wat/x86 viewer, and JavaScript output panel. You can also interact with the <canvas> if desired. WasmFiddle uses LLVM to generate the Wasm modules, which is why the imports and exports aren't prefixed with a _. You can interact with WasmFiddle at https://wasdk.github.io/WasmFiddle.
WebAssembly Explorer, located at https://mbebenita.github.io/WasmExplorer, provides similar functionality to WasmFiddle. It allows you to compile C or C++ to a Wasm module and view the corresponding Wat. However, WebAssembly Explorer provides additional functionality not present in WasmFiddle. For example, you can compile C or C++ to Wasm and view the corresponding Firefox x86 and LLVM x86 code. You can select from a list of code examples and specify the optimization level (-O flag in emcc). It also provides a button that allows you to import the code into WasmFiddle:
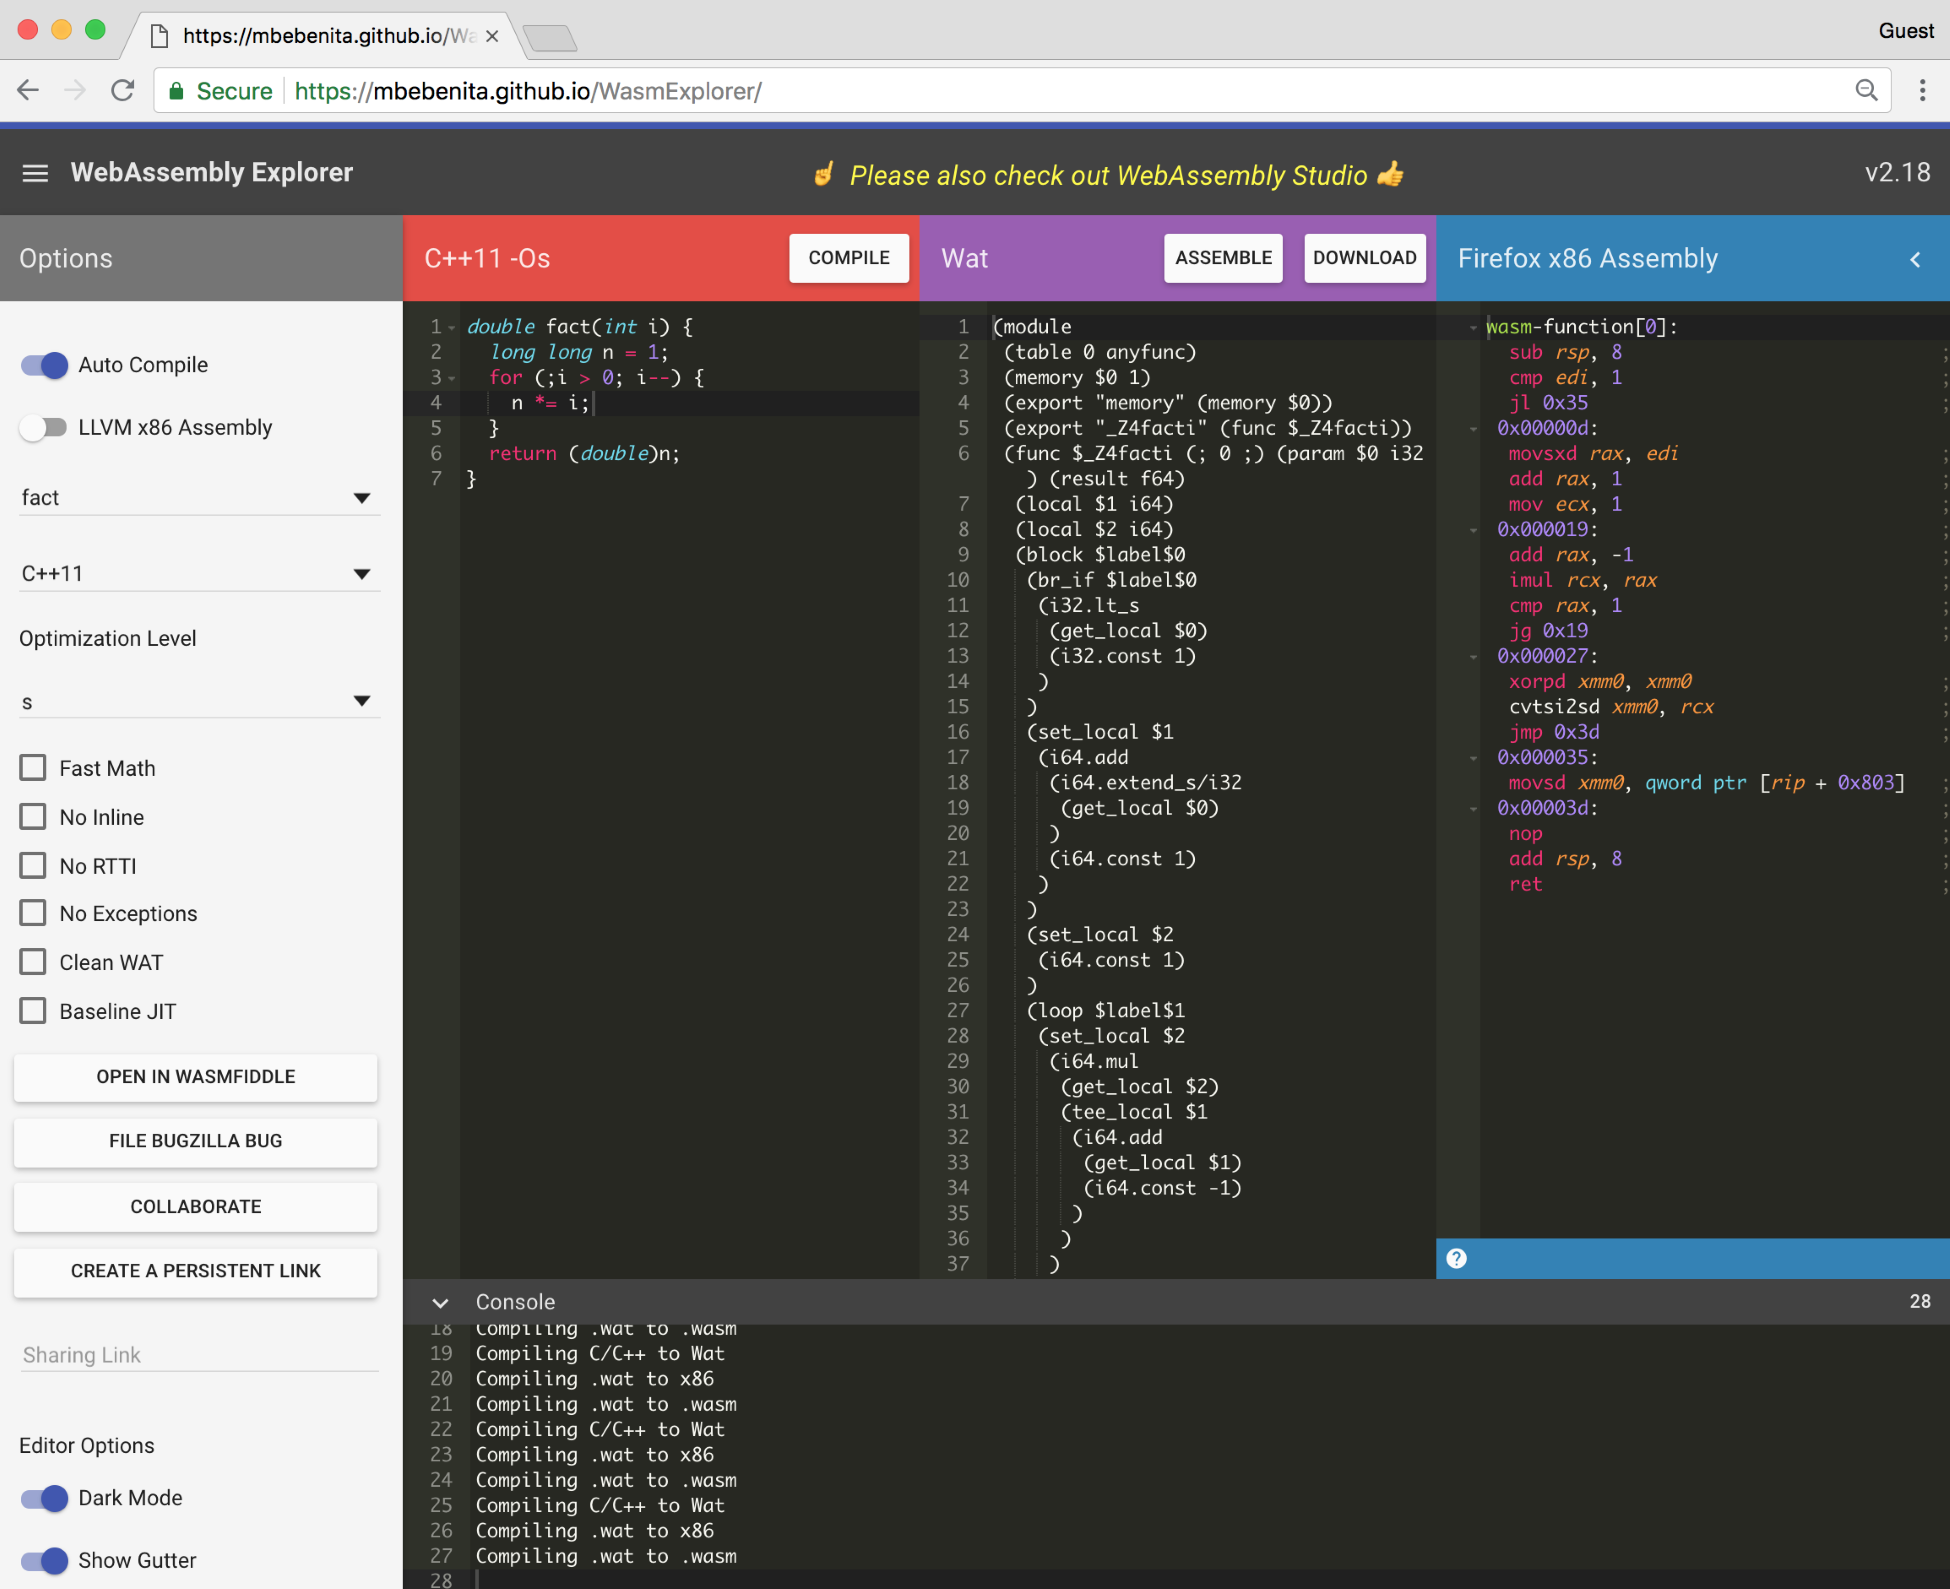
WebAssembly Studio, located at https://webassembly.studio, is a feature-rich editor and development environment. You can create C, Rust, and AssemblyScript projects. It provides the capabilities to build and run code within the browser and integrates well with GitHub. WebAssembly Studio enables you to build a web application without having to install and configure the required WebAssembly tooling locally:
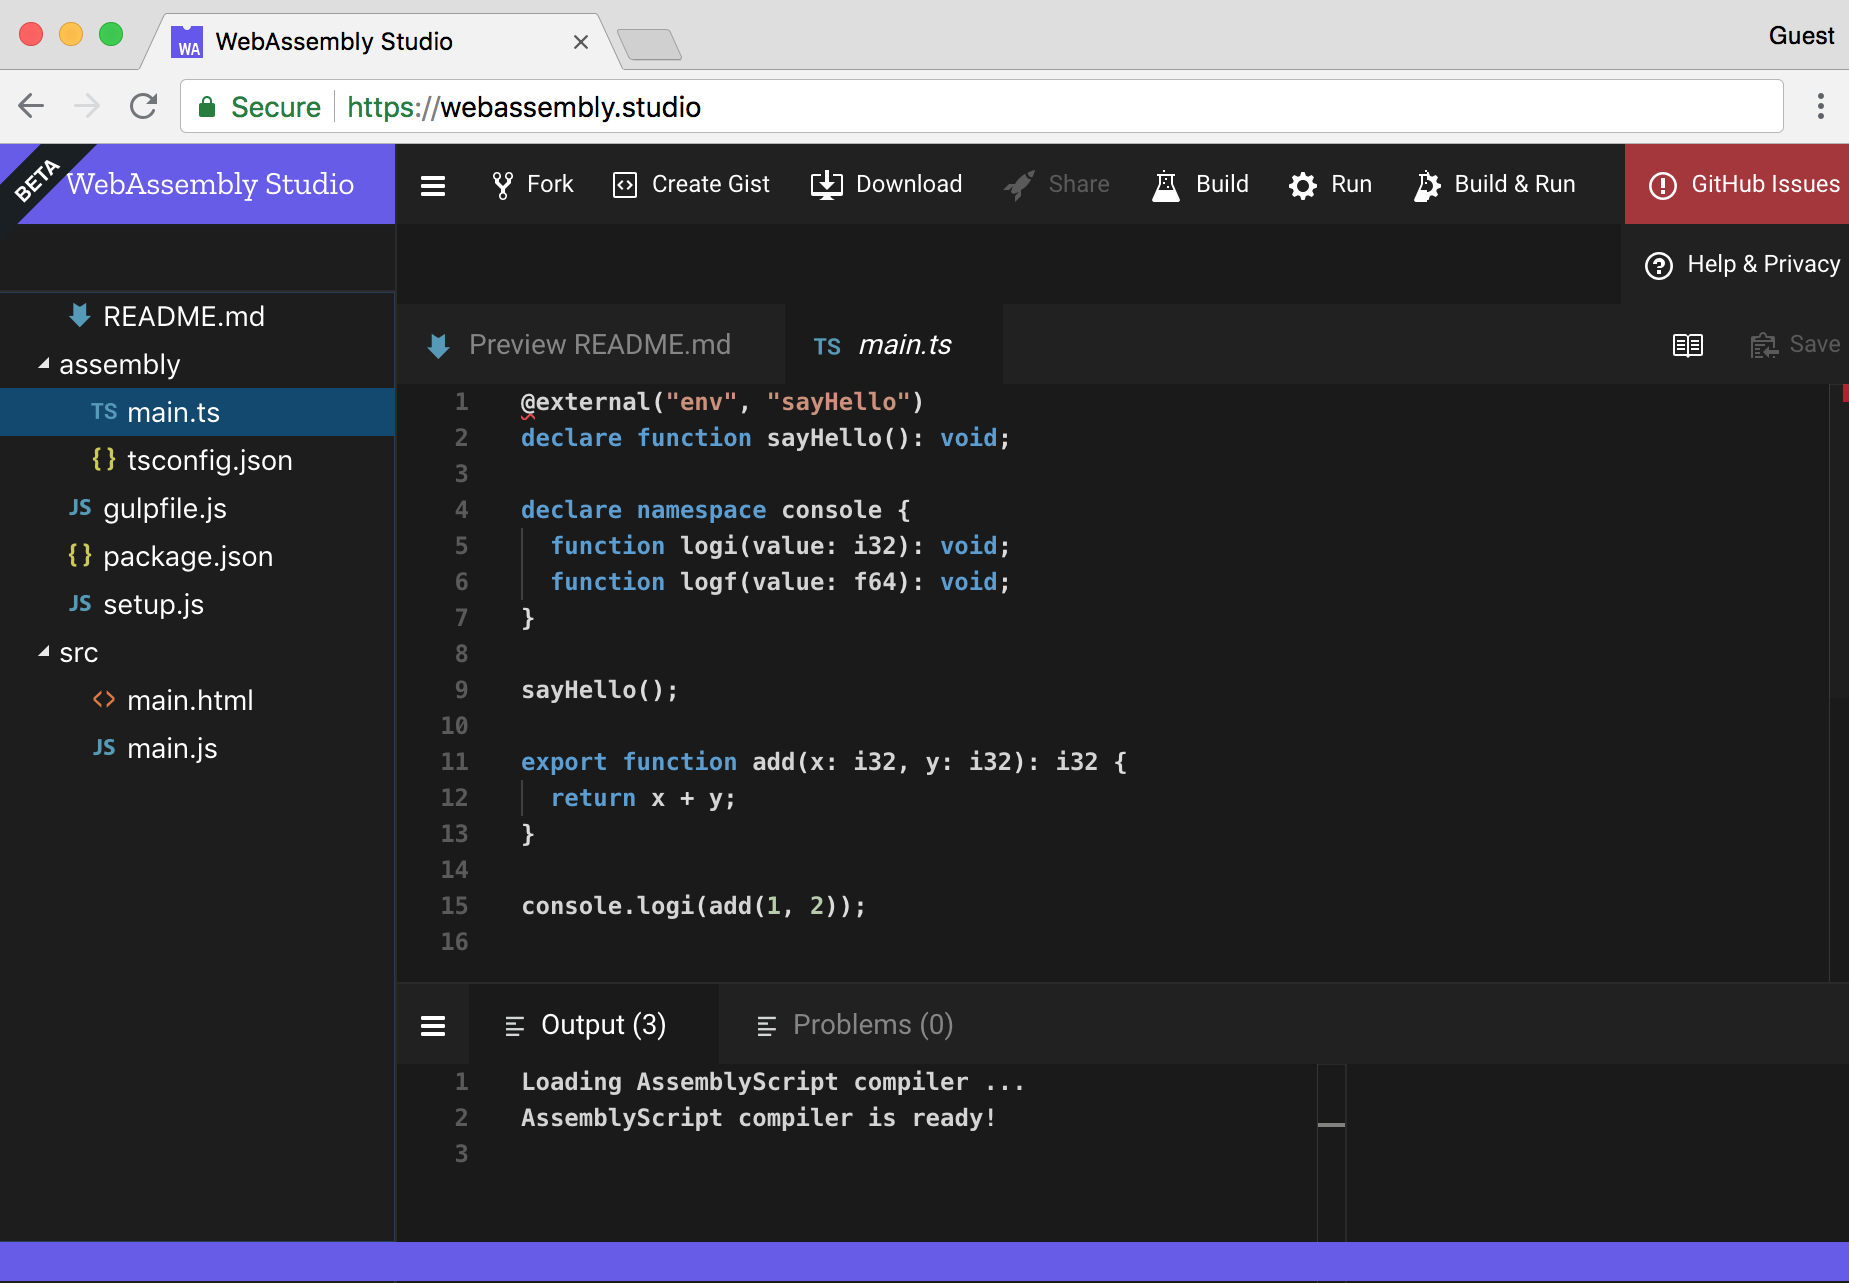
In the next section, we'll demonstrate how to add parallelism to your WebAssembly application with Web Workers.
The process of building a complex application that performs heavy computation or other resource-intensive work can benefit greatly from using threads. Threads allow you to perform operations in parallel by dividing functionality among tasks that run independently. At of writing this, support for threads in WebAssembly is in the Feature Proposal phase. In this phase, the specification hasn't been written and the feature isn't implemented. Fortunately, JavaScript provides threading capabilities in the form of Web Workers. In this section, we'll demonstrate how to use JavaScript's Web Workers API to interact with Wasm modules in separate threads.
Web Workers allow you to utilize threads in the browser, which can improve the performance of your application by offloading some of the logic from the main (UI) thread. Worker threads are also capable of performing I/O using XMLHttpRequest. Worker threads communicate with the main thread by posting messages to an event handler.
Web Workers allow us to load Wasm modules into separate threads and perform operations that don't hinder the performance of the UI. Web Workers do have some limitations. They're unable to directly manipulate the DOM or access some of the methods and properties on the window object. The messages passed between threads must be serialized objects, which means you can't pass functions. Now that you know what a worker is, let's discuss how to create one.
Before you can create a worker, you need a JavaScript file with code that runs in the worker thread. You can see a simple example of a worker definition file at https://github.com/mdn/simple-web-worker/blob/gh-pages/worker.js. The file should contain a message event listener that performs operations when messages are received from other threads and responds accordingly.
Once that file is created, you're ready to use it with a worker. A worker is created by passing a URL argument to the Worker() constructor. The URL can be a string representing the name of the file with your worker definition code, or constructed using a Blob. The Blob technique can be useful if you're fetching the worker definition code from a server. The example application demonstrates how to use both approaches. Let's move on to the process of integrating WebAssembly with Web Workers.
In order to utilize Wasm modules in separate threads, the Wasm file must be compiled in the main thread and instantiated in a Web Worker. Let's review this process in more detail:
To call a function from the wasmWorker Wasm instance, you post a message to the worker thread with any arguments to pass to the Wasm function. Then, wasmWorker executes the function and passes the results back to the main thread. That's the crux of how threads are utilized in the context of Web Workers. Before we move on to the example application, you may need to address a limitation that Google Chrome imposes. Follow the instructions in the Limitations in Google Chrome section to ensure the example application works successfully.
Google Chrome places a restriction on what can be included in the body of a Web Worker's postMessage() function. If you tried to send a compiled WebAssembly.Module to a worker, you'd get an error and the operation would be unsuccessful. You can override this by setting a flag. To enable this functionality, open Google Chrome and enter chrome://flags in the address bar. Type cloning in the search box at the top of the page. You should see a list item titled WebAssembly structured cloning support. Select the Enabled option from the dropdown next to the list item and press the RELAUNCH NOW button when prompted:
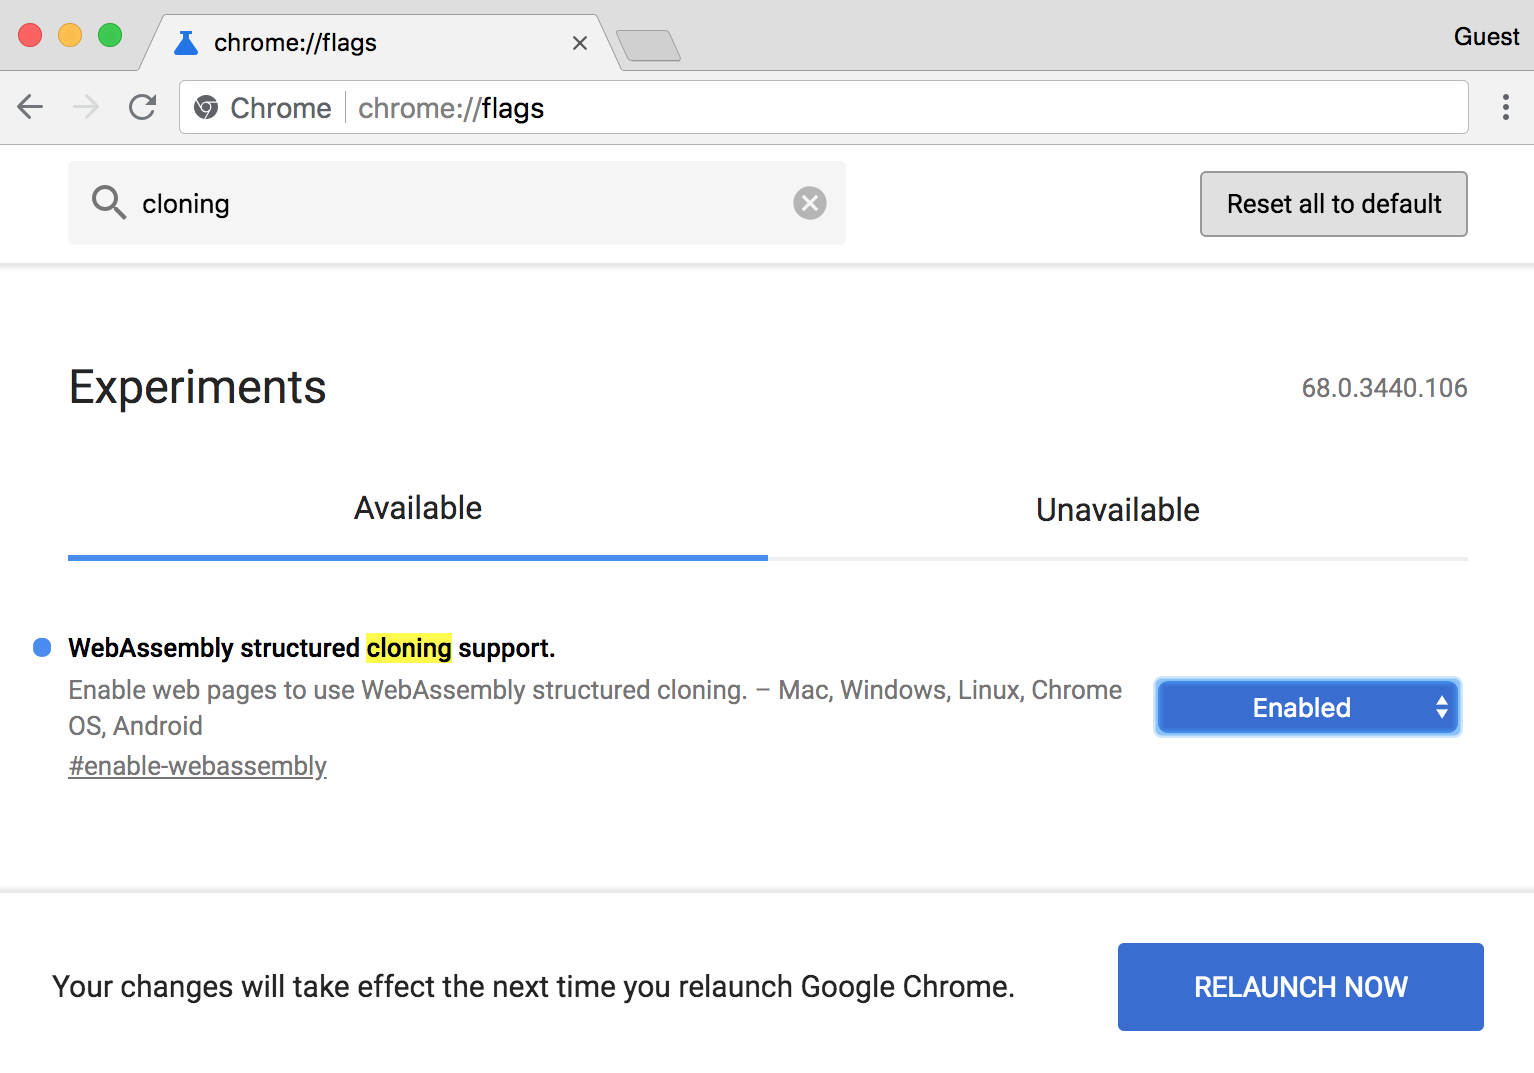
After Chrome restarts, you can run the example application without issue. If you're using Mozilla Firefox, no action is required. It supports this feature by default. Let's move on to the example application that demonstrates the use of WebAssembly in threads.
The example application isn't much of an application. It's a simple form that accepts two input values and returns the sum or difference of these two values. The add and subtract operations are each exported from their own Wasm module instantiated in a worker thread. The example may be contrived, but it effectively demonstrates how to integrate WebAssembly into Web Workers.
The code for this section is located in the /chapter-10-advanced-tools/parallel-wasm directory of the learn-webassembly repository. The following sections walk through each section of the code base and describe how to build the application from scratch. If you wish to follow along, create a folder in your /book-examples directory named /parallel-wasm.
The example uses two worker threads: one for addition and another for subtraction. Consequently, we'll need two separate Wasm modules. Create a folder named /lib in your /parallel-wasm directory. Within the /lib directory, create a file named add.c and populate it with the following contents:
int calculate(int firstVal, int secondVal) {
    return firstVal + secondVal;
}
Create another file in /lib named subtract.c and populate it with the following contents:
int calculate(int firstVal, int secondVal) {
    return firstVal - secondVal;
}
Note that the function name in both files is calculate. This was done so we don't have to write any conditional logic within the worker code to determine the Wasm function to call. The algebraic operation is tied to a worker, so when we need to add two numbers, the _calculate() function will be called in the addWorker. This will become clearer when we review the JavaScript portion of the code, which we'll cover next.
Before we dig into the JavaScript code, create a folder named /src in your /parallel-wasm directory. Let's start with the file containing the code that runs in the worker thread.
Create a new file in the /src directory named worker.js and populate it with the following contents:
var wasmInstance = null;

self.addEventListener('message', event => {
  /**
   * Once the WebAssembly compilation is complete, this posts a message
   * back with whether or not the instantiation was successful. If the
   * payload is null, the compilation succeeded.
   */
  const sendCompilationMessage = (error = null) => {
    self.postMessage({
      type: 'COMPILE_WASM_RESPONSE',
      payload: error
    });
  };

  const { type, payload } = event.data;
  switch (type) {
    // Instantiates the compiled Wasm module and posts a message back to
    // the main thread indicating if the instantiation was successful:
    case 'COMPILE_WASM_REQUEST':
      const importObj = {
        env: {
          memoryBase: 0,
          tableBase: 0,
          memory: new WebAssembly.Memory({ initial: 256 }),
          table: new WebAssembly.Table({ initial: 2, element: 'anyfunc' }),
          abort: console.log
        }
      };

      WebAssembly.instantiate(payload, importObj)
        .then(instance => {
          wasmInstance = instance.exports;
          sendCompilationMessage();
        })
        .catch(error => {
          sendCompilationMessage(error);
        });
      break;

    // Calls the `calculate` method associated with the instance (add or
    // subtract, and posts the result back to the main thread:
    case 'CALC_REQUEST':
      const { firstVal, secondVal } = payload;
      const result = wasmInstance._calculate(firstVal, secondVal);

      self.postMessage({
        type: 'CALC_RESPONSE',
        payload: result
      });
      break;

    default:
      break;
  }
}, false);
The code is encapsulated within the event listener for the message event (self.addEventListener(...)), which is raised when the postMessage() function is called on the corresponding worker. The event parameter in the event listener's callback function contains a data property with the contents of the message. All of the messages passed between threads in the application follow the Flux Standard Action (FSA) convention. Objects that adhere to this convention have a type and payload property, where type is a string and payload can be of any type. You can read more about the FSA at https://github.com/redux-utilities/flux-standard-action.
The switch statement executes an action based on the message's type value, which is a string. If the type is 'COMPILE_WASM_REQUEST', the WebAssembly.instantiate() function is called with the payload from the message and importObj. The exports object of the result is assigned to the local wasmInstance variable for later use. If the type is 'CALC_REQUEST', the wasmInstance._calculate() function is called with the firstVal and secondVal values from the payload object. The calculation code should shed some light on why the function was named _calculate() instead of _add() or _subtract(). By using a general name, the worker doesn't care what operation it's performing, it just calls the function to get the result.
In both cases, the worker posts a message back to the main thread using the postMessage() function. I used a REQUEST/RESPONSE convention for the type property value. This allows you to quickly identify which thread the messages are originating from. Messages sent from the main thread end with _REQUEST in the type while responses coming from the worker threads end with _RESPONSE. Let's move on to the WebAssembly interaction code.
Create a new file in the /src directory named WasmWorker.js and populate it with the following contents:
/**
 * Web Worker associated with an instantiated Wasm module.
 * @class
 */
export default class WasmWorker {
  constructor(workerUrl) {
    this.worker = new Worker(workerUrl);
    this.listenersByType = {};
    this.addListeners();
  }

  // Add a listener associated with the `type` value from the
  // Worker message:
  addListenerForType(type, listener) {
    this.listenersByType[type] = listener;
  }

  // Add event listeners for error and message handling.
  addListeners() {
    this.worker.addEventListener('error', event => {
      console.error(`%cError: ${event.message}`, 'color: red;');
    }, false);

    // If a handler was specified using the `addListener` method,
    // fire that method if the `type` matches:
    this.worker.addEventListener('message', event => {
      if (
        event.data instanceof Object &&
        event.data.hasOwnProperty('type') &&
        event.data.hasOwnProperty('payload')
      ) {
        const { type, payload } = event.data;
        if (this.listenersByType[type]) {
          this.listenersByType[type](payload);
        }
      } else {
        console.log(event.data);
      }
    }, false);
  }

  // Fetches the Wasm file, compiles it, and passes the compiled result
  // to the corresponding worker. The compiled module is instantiated
  // in the worker.
  initialize(name) {
    return fetch(`calc-${name}.wasm`)
      .then(response => response.arrayBuffer())
      .then(bytes => WebAssembly.compile(bytes))
      .then(wasmModule => {
        this.worker.postMessage({
          type: 'COMPILE_WASM_REQUEST',
          payload: wasmModule
      });
      return Promise.resolve();
    });
  }

  // Posts a message to the worker thread to call the `calculate`
  // method from the Wasm instance:
  calculate(firstVal, secondVal) {
    this.worker.postMessage({
      type: 'CALC_REQUEST',
        payload: {
        firstVal,
        secondVal
      }
    });
  }
}
The WasmWorker class manages a worker thread associated with a Wasm file. In the WasmWorker constructor, a new Worker is created and default event listeners are added for the error and message events. The initialize() function fetches the .wasm file associated with the name argument, compiles it, and sends the resultant WebAssembly.Module instance to the worker thread to be instantiated.
The addListenerForType() function is used to specify a callback function (listener) to execute when the type field in the message response matches the type argument passed to the function. This is required to capture the result of the _calculate() function from the worker thread.
Finally, the calculate() function in WasmWorker posts a message to the worker thread with the firstVal and secondVal arguments passed in from the <input> elements on the <form>. Let's move on to the application loading code to see how WasmWorker interacts with the UI.
Create a new file in the /src directory named index.js and populate it with the following contents:
import WasmWorker from './WasmWorker.js';

/**
 * If you add ?blob=true to the end of the URL (e.g.
 * http://localhost:8080/index.html?blob=true), the worker will be
 * created from a Blob rather than a URL. This returns the
 * URL to use for the Worker either as a string or created from a Blob.
 */
const getWorkerUrl = async () => {
  const url = new URL(window.location);
  const isBlob = url.searchParams.get('blob');
  var workerUrl = 'worker.js';
  document.title = 'Wasm Worker (String URL)';

  // Create a Blob instance from the text contents of `worker.js`:
  if (isBlob === 'true') {
    const response = await fetch('worker.js');
    const results = await response.text();
    const workerBlob = new Blob([results]);
    workerUrl = window.URL.createObjectURL(workerBlob);
    document.title = 'Wasm Worker (Blob URL)';
  }

  return Promise.resolve(workerUrl);
};

/**
 * Instantiates the Wasm module associated with the specified worker
 * and adds event listeners to the "Add" and "Subtract" buttons.
 */
const initializeWorker = async (wasmWorker, name) => {
  await wasmWorker.initialize(name);
  wasmWorker.addListenerForType('CALC_RESPONSE', payload => {
    document.querySelector('#result').value = payload;
  });

  document.querySelector(`#${name}`).addEventListener('click', () => {
    const inputs = document.querySelectorAll('input');
    var [firstInput, secondInput] = inputs.values();
    wasmWorker.calculate(+firstInput.value, +secondInput.value);
  });
};

/**
 * Spawns (2) workers: one associated with calc-add.wasm and another
 * with calc-subtract.wasm. Adds an event listener to the "Reset"
 * button to clear all the input values.
 */
const loadPage = async () => {
  document.querySelector('#reset').addEventListener('click', () => {
    const inputs = document.querySelectorAll('input');
    inputs.forEach(input => (input.value = 0));
  });

  const workerUrl = await getWorkerUrl();
  const addWorker = new WasmWorker(workerUrl);
  await initializeWorker(addWorker, 'add');

  const subtractWorker = new WasmWorker(workerUrl);
  await initializeWorker(subtractWorker, 'subtract');
};

loadPage()
  .then(() => console.log('%cPage loaded!', 'color: green;'))
  .catch(error => console.error(error));
The application entry point is the loadPage() function. Before we dig into the worker initialization code, let's discuss the getWorkerUrl() function. Earlier in this section, we learned that you can pass a string representing a filename or a URL created from a Blob to the Worker() constructor. The following example code demonstrates the first technique:
var worker = new Worker('worker.js');
The second technique is demonstrated in the if (isBlob === 'true') block of the getWorkerUrl() function. If the current window.location value ends with ?blob=true, the URL passed to the Worker() constructor is created from a Blob. The only noticeable difference is the document.title value, which updates to reflect the URL type. Let's jump back to the loadPage() function to discuss the initialization code.
After an event listener is added to the Reset button in the loadPage() function, two WasmWorker instances are created: addWorker and subtractWorker. Each worker is passed to the initializeWorker() function as the wasmWorker argument. In initializeWorker(), the wasmWorker.initialize() function is called to instantiate the Wasm module. The wasmWorker.addListenerForType() function is called to set the value of the Result <input> to the value returned from the _calculate() function in the corresponding worker. Finally, an event listener is added to the click event of the <button> that either adds or subtracts the firstVal and secondVal <input> values (based on the name argument). That's it for the JavaScript code. Let's create an HTML and CSS file, then move on to the build step.
We need an HTML file to act as the entry point to the application. Create a file in the /src directory named index.html and populate it with the following contents:
<!DOCTYPE html>
<html>
<head>
  <meta charset="utf-8">
  <title>Wasm Workers</title>
  <link rel="stylesheet" type="text/css" href="styles.css" />
</head>
<body>
  <form class="valueForm">
    <div class="valueForm">
      <label for="firstVal">First Value:</label>
      <input id="firstVal" type="number" value="0" />
    </div>
    <div class="valueForm">
      <label for="secondVal">Second Value:</label>
      <input id="secondVal" type="number" value="0" />
    </div>
    <div class="valueForm">
      <label for="result">Result:</label>
      <input id="result" type="number" value="0" readonly />
    </div>
  </form>
  <div>
    <button id="add">Add</button>
    <button id="subtract">Subtract</button>
    <button id="reset">Reset</button>
  </div>
  <script type="module" src="index.js"></script>
</body>
</html>
The application consists of a <form> with three <input> elements and a block of three <button> elements. The first two <input> elements correspond to the firstVal and secondVal properties included in the payload sent to either worker thread. The final <input> is read-only and displays the result of either operation.
The block of <button> elements below the <form> perform operations on the <input> values. The first two <button> elements send the <input> values to either the addWorker or subtractWorker thread (depending on which button was pressed). The final <button> sets all of the <input> values to 0.
The application is initialized in the <script> tag in the last line before the </body> closing tag. Just as with Cook the Books, the type="module" attribute allows us to use the import/export syntax available in newer browsers. Finally, we need to add some styles to the application. Create a file in the /src directory named styles.css and populate it with the following contents:
* {
  font-family: sans-serif;
  font-size: 14px;
}

body {
  margin: 16px;
}

form.valueForm {
  display: table;
}

div.valueForm {
  display: table-row;
}

label, input {
  display: table-cell;
  margin-bottom: 16px;
}

label {
  font-weight: bold;
  padding-right: 16px;
}

button {
  border: 1px solid black;
  border-radius: 4px;
  cursor: pointer;
  font-weight: bold;
  height: 24px;
  margin-right: 4px;
  width: 80px;
}

button:hover {
  background: lightgray;
}
That's the last file we need to create, but not the last one required to run the application. We still need to generate Wasm files from the C files in the /lib directory. Let's move on to the build step.
With the code written, it's time to build and test the application. After completing the build step, we'll interact with the running application and review how to troubleshoot Web Workers using the browser's development tools.
We need to compile each C file to a separate .wasm file, which means the command needed to perform the compilation step is verbose. To perform the build, open a terminal instance in your /parallel-wasm directory and run the following commands:
# First, compile the add.c file:
emcc -Os -s WASM=1 -s SIDE_MODULE=1 -s BINARYEN_ASYNC_COMPILATION=0 lib/add.c -o src/calc-add.wasm

# Next, compile the subtract.c file
emcc -Os -s WASM=1 -s SIDE_MODULE=1 -s BINARYEN_ASYNC_COMPILATION=0 lib/subtract.c -o src/calc-subtract.wasm
You should see two new files in the /src directory: calc-add.wasm and calc-subtract.wasm. With the required files in place, it's time to test out the application.
Open a terminal instance in the /parallel-wasm directory and run the following command:
serve -l 8080 src
If you navigate to http://127.0.0.1:8080/index.html in your browser, you should see this:
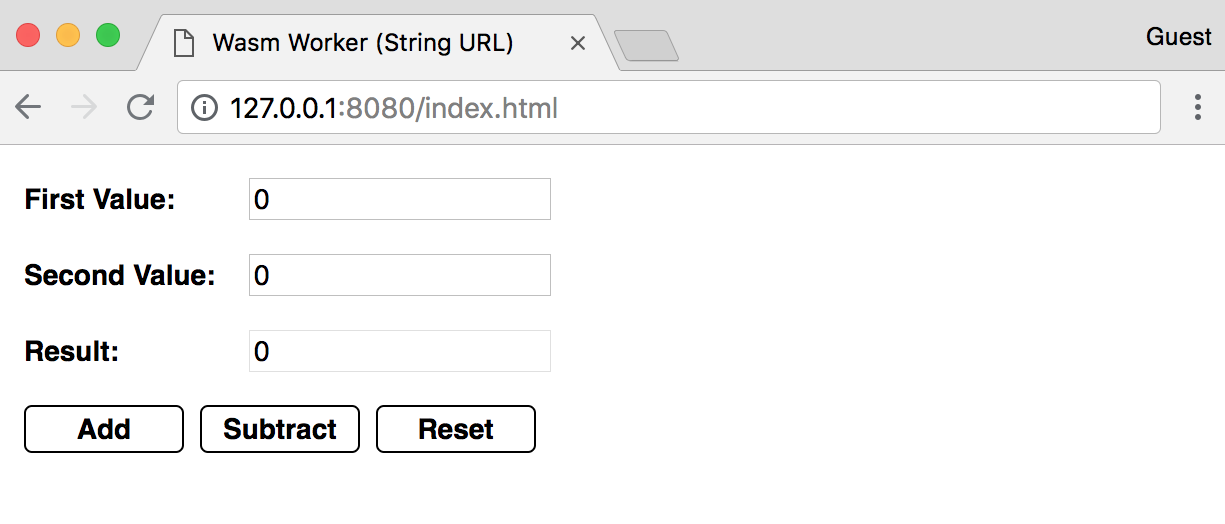
Try changing the values in the First Value and Second Value inputs and pressing the Add and Subtract buttons. The Result input should update with the calculated result. If you navigate to http://127.0.0.1:8080/index.html?blob=true, the URL argument passed to the Worker() constructor will use a Blob instead of the filename. The tab should change to reflect that the Blob technique is used to construct the URL:
You can set breakpoints and interact with worker threads using the browser's development tools. In Google Chrome, open Developer Tools and select the Sources tab. The file list panel should contain two instances of worker.js. The debugger panel contains a Threads section with the main thread and two worker.js threads. The following screenshot indicates the thread debugging elements within the Chrome Developer Tools panel for the running application:
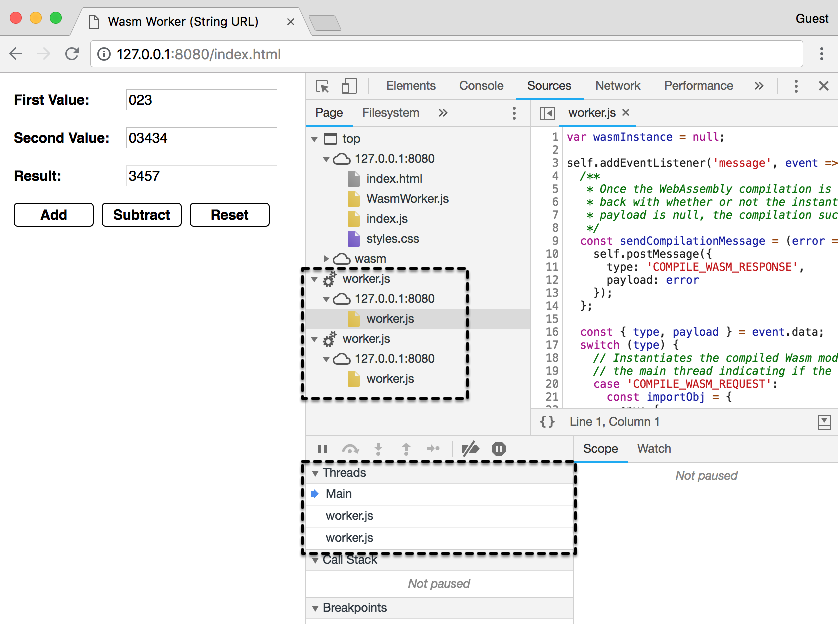
In Firefox, worker debugging is done in separate Developer Tools windows. To see this in action, open Developer Tools in Firefox and select the Debugger panel. Click on one of the worker.js list items in the Workers panel. A new Developer Tools window should appear that corresponds with the selected worker. The following screenshot shows a separate Developer Tools window for one of the worker.js instances selected from the Workers panel:
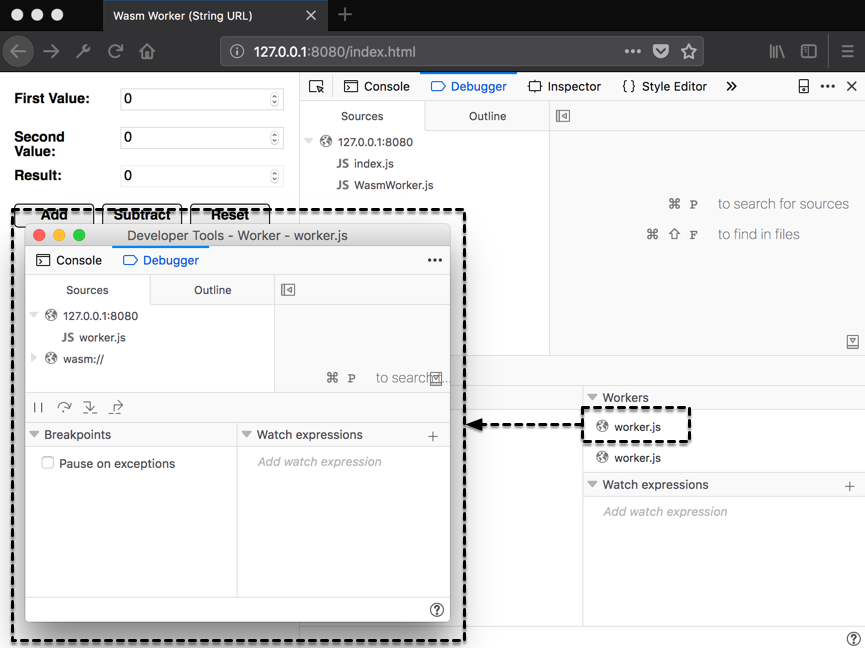
In the next section, we'll discuss some of the upcoming features of WebAssembly.
There are several upcoming WebAssembly features in various phases of the standardization process. Some of them are more impactful than others, but all of them are valuable improvements. In this section, we'll describe the standardization process and review a subset of the features that represent a significant shift in WebAssembly's capabilities. Most of the content in this section was referenced from Colin Eberhardt's blog post titled The future of WebAssembly - A look at upcoming features and proposals. The post can be found at https://blog.scottlogic.com/2018/07/20/wasm-future.html.
The WebAssembly W3C Process documentation at https://github.com/WebAssembly/meetings/blob/master/process/phases.md describes the six phases (from 0 to 5) of the standardization process. The following list provides brief descriptions of each of these phases:
Now that you're familiar with the phases associated with the standardization process, let's move on to the threads proposal.
In the previous section, we used Web Workers to move Wasm modules into worker threads, which allowed us to call Wasm functions without blocking the main thread. However, passing messages between worker threads has performance limitations. In an effort to address this issue, a threads feature was proposed for WebAssembly.
The proposal, currently in Phase 1, is described in detail at https://github.com/WebAssembly/threads/blob/master/proposals/threads/Overview.md. Per the proposal documentation, the threads feature adds a new shared linear memory type and some new operations for atomic memory access. This proposal is relatively limited in scope. Eberhardt provides the following elaboration in his blog post:
Although the feature wouldn't allow for the creation of threads, it provides a simpler way of sharing data between the worker threads we create in JavaScript.
The host bindings proposal, which is also in Phase 1, would address a significant limitation of WebAssembly when used in the browser: DOM manipulation. The proposal documentation at https://github.com/WebAssembly/host-bindings/blob/master/proposals/host-bindings/Overview.md provides the following list of goals for this feature:
Improving WebAssembly's interoperability with JavaScript and Web APIs would simplify the development process considerably. It would also eliminate the need for the "glue" code that tools such as Emscripten provide.
The garbage collection (GC) proposal is currently in Phase 1. We discussed garbage collection in the What are the Limitations? section of Chapter 1, What is WebAssembly? The proposal documentation at https://github.com/WebAssembly/gc/blob/master/proposals/gc/Overview.md provides an extensive overview of the feature and describes the elements that need to be added to the specification. Eberhardt provides the following description of the proposal in his blog post:
This feature will require a great deal of effort to implement, but adding it to WebAssembly will be worth the effort. Let's wrap up this section with a feature currently in the implementation phase: reference types.
Reference types, currently in Phase 3, form the basis for the host bindings and GC features. The proposal documentation at https://github.com/WebAssembly/reference-types/blob/master/proposals/reference-types/Overview.md describes the addition of a new type, anyref, which can be used as both a value type and a table element type. The anyref type allows you to pass a JavaScript object to a Wasm module. Eberhardt describes the implications of this feature in his blog post:
There are several other exciting features in the pipeline for WebAssembly. The WebAssembly CG and WG are devoting their time and resources to making these features a reality. You can view all of the proposals at the WebAssembly organization page on GitHub, located at https://github.com/WebAssembly.
In this chapter, we reviewed advanced tools and an alternate compilation method for WebAssembly. We learned about WABT and Binaryen's role in the WebAssembly development process and the functionality they provide. We compiled a Wasm module with LLVM through the use of the WebAssembly npm package and interacted with the result in the browser. We reviewed some of the WebAssembly tooling available online and created a simple application that uses Web Workers to store Wasm modules in separate threads. Finally, we discussed the upcoming features of WebAssembly and the standardization process. Now that you've gained a greater understanding of WebAssembly, go out there and build something!
If you enjoyed this book, you may be interested in these other books by Packt:

Angular 6 for Enterprise-Ready Web Applications
Doguhan Uluca
ISBN: 9781786462909
Mastering The Faster Web with PHP, MySQL, and JavaScript
Andrew Caya
ISBN: 9781788392211
Please share your thoughts on this book with others by leaving a review on the site that you bought it from. If you purchased the book from Amazon, please leave us an honest review on this book's Amazon page. This is vital so that other potential readers can see and use your unbiased opinion to make purchasing decisions, we can understand what our customers think about our products, and our authors can see your feedback on the title that they have worked with Packt to create. It will only take a few minutes of your time, but is valuable to other potential customers, our authors, and Packt. Thank you!
Copyright © 2018 Packt Publishing
All rights reserved. No part of this book may be reproduced, stored in a retrieval system, or transmitted in any form or by any means, without the prior written permission of the publisher, except in the case of brief quotations embedded in critical articles or reviews.
Every effort has been made in the preparation of this book to ensure the accuracy of the information presented. However, the information contained in this book is sold without warranty, either express or implied. Neither the author, nor Packt Publishing or its dealers and distributors, will be held liable for any damages caused or alleged to have been caused directly or indirectly by this book.
Packt Publishing has endeavored to provide trademark information about all of the companies and products mentioned in this book by the appropriate use of capitals. However, Packt Publishing cannot guarantee the accuracy of this information.
Commissioning Editor: Kunal Chaudhari
Acquisition Editor: Trusha Shriyan
Content Development Editor: Aishwarya Gawankar
Technical Editor: Surabhi Kulkarni
Copy Editor: Safis Editing
Project Coordinator: Sheejal Shah
Proofreader: Safis Editing
Indexer: Priyanka Dhadke
Graphics: Alishon Mendonsa
Production Coordinator: Nilesh Mohite
First published: September 2018
Production reference: 1240918
Published by Packt Publishing Ltd.
Livery Place
35 Livery Street
Birmingham
B3 2PB, UK.
ISBN 978-1-78899-737-9
Mapt is an online digital library that gives you full access to over 5,000 books and videos, as well as industry leading tools to help you plan your personal development and advance your career. For more information, please visit our website.
Spend less time learning and more time coding with practical eBooks and Videos from over 4,000 industry professionals
Improve your learning with Skill Plans built especially for you
Get a free eBook or video every month
Mapt is fully searchable
Copy and paste, print, and bookmark content
Did you know that Packt offers eBook versions of every book published, with PDF and ePub files available? You can upgrade to the eBook version at www.packt.com and as a print book customer, you are entitled to a discount on the eBook copy. Get in touch with us at customercare@packtpub.com for more details.
At www.packt.com, you can also read a collection of free technical articles, sign up for a range of free newsletters, and receive exclusive discounts and offers on Packt books and eBooks.
Mike Rourke has been writing code for over a decade. He got his start creating Microsoft Access applications using VBA and decided he wanted to work with JavaScript full-time after building a Mozilla Firefox extension. He has a B.S. in mechanical engineering technology and worked primarily in product design/manufacturing engineering roles before starting a career as a software engineer in 2017. Currently, he works for a Chicago-based consulting company and is focused primarily on frontend JavaScript development. When's he not writing code, he's out in the woods camping with his wolf brothers.
Dan Ruta is a fresh graduate, about to start an MSc in computer vision. He got started with WebAssembly by implementing a small web-based deep learning library, and messing around with WebAssembly and GPGPU.
Other publications he has worked on include occasional technical blogs on Medium, and a team research paper combining AI, AR, and WebGL shaders to assist the visually impaired, which he presented at a conference.
His projects can be followed on GitHub and Medium (DanRuta), or on his website and tweets (Dan_Ruta).
Maxim Shaydo aka Moreas MaxGraey is an independent developer, consultant, system architect from Ukraine, he has worked with at LaSoft as a CTO and is a big fan of open source community.
He continues to be an enduring contributor for open source projects dedicated to WebAssembly, such as AssemblyScript language that has been gaining a lot of attention lately. He happens to be very interested in development of WebGL, WebVR technologies, and Flow Based Programming as well.
This project could not have been completed without being reviewed by Alon Zakai (kripken) known for his work on emscripten and binaryen. Special thanks to Daniel Wirtz (dcodeIO) who is the main contributor of AssemplyScript and an incredibly productive mate. Last but not the least, I would like to thank my parents — Mr. and Mrs Shaydo, without them none of this would indeed be possible.
If you're interested in becoming an author for Packt, please visit authors.packtpub.com and apply today. We have worked with thousands of developers and tech professionals, just like you, to help them share their insight with the global tech community. You can make a general application, apply for a specific hot topic that we are recruiting an author for, or submit your own idea.
This book introduces readers to WebAssembly, a new and exciting technology capable of executing languages other than JavaScript in the browser. The book describes how to build a C/JavaScript application from scratch that uses WebAssembly and the process for porting an existing C++ code base to run in the browser with the help of Emscripten.
WebAssembly represents an important shift for the web platform. As a compilation target for languages such as C, C++, and Rust, it provides the ability to build a new class of application. WebAssembly is supported by all of the major browser vendors and represents a collaborative effort.
In this book, we'll describe the elements that make up WebAssembly, as well as its origins. We'll walk through the process of installing the required tools, setting up a development environment, and interacting with WebAssembly. We'll work through simple examples and progress through increasingly advanced use cases. By the end of this book, you'll be well-equipped to use WebAssembly in your C, C++, or JavaScript project.
If you are a C/C++ programmer who wishes to build applications for the web, or a web developer who wishes to improve the performance of their JavaScript applications, then this book is for you. The book is intended for developers familiar with JavaScript who wouldn't mind learning some C and C++ (and vice versa). This book accommodates for C/C++ programmers and JavaScript programmers alike by providing two example applications.
Chapter 1, What is WebAssembly?, describes the origins of WebAssembly and provides a high-level overview of the technology. It covers how WebAssembly can be used, which programming languages are supported, and its current limitations.
Chapter 2, Elements of WebAssembly – Wat, Wasm, and the JavaScript API, outlines the elements that comprise WebAssembly. It provides a detailed explanation of the text and binary formats, as well as the corresponding JavaScript and Web APIs.
Chapter 3, Setting Up a Development Environment, walks through the tooling used to develop with WebAssembly. It provides the installation instructions for each platform and provides recommendations for improving the development experience.
Chapter 4, Installing the Required Dependencies, provides instructions for installing the toolchain requirements for each platform. By the end of this chapter, you'll be able to compile C and C++ to WebAssembly modules.
Chapter 5, Creating and Loading a WebAssembly Module, explains how to generate a WebAssembly module using Emscripten and how flags are passed to the compiler affect the resulting output. It describes the techniques for loading a WebAssembly module in the browser.
Chapter 6, Interacting with JavaScript and Debugging, elaborates on the differences between Emscripten's Module object and the browser's global WebAssembly object. This chapter describes the features Emscripten provides as well as instructions for generating source maps.
Chapter 7, Creating an Application from Scratch, walks through the creation of a JavaScript accounting application that interacts with a WebAssembly module. We will write C code to calculate values from accounting transactions and pass the data between JavaScript and the compiled WebAssembly module.
Chapter 8, Porting a Game with Emscripten, takes a step-by-step approach to porting an existing C++ game to WebAssembly using Emscripten. After reviewing the existing C++ code base, changes are made to the appropriate files to enable the game to run in the browser.
Chapter 9, Integrating with Node.js, demonstrates how Node.js and npm can be used with WebAssembly on the server and client side. The chapter covers the use of WebAssembly in an Express application, integrating WebAssembly with webpack, and testing a WebAssembly module using Jest.
Chapter 10, Advanced Tools and Upcoming Features, covers advanced tools, use cases, and new WebAssembly features currently in the process of standardization. This chapter describes WABT, Binaryen, and the tooling available online. In this chapter, you'll learn how to compile WebAssembly modules using LLVM and how WebAssembly modules can be used with Web Workers. The chapter wraps up with a description of the standardization process and a review of some of the exciting features in the process of being added to the specification.
You should have some programming experience and understand concepts such as variables, and functions. If you've never seen a line of JavaScript or C/C++ code, you may want to do some preliminary research before working through the examples in this book. I've chosen to use JavaScript ES6/7 features such as destructuring and arrow functions, so if you haven't worked with JavaScript in the last 3 - 4 years, the syntax may look slightly different.
You can download the example code files for this book from your account at www.packtpub.com. If you purchased this book elsewhere, you can visit www.packt.com/support and register to have the files emailed directly to you.
You can download the code files by following these steps:
Once the file is downloaded, please make sure that you unzip or extract the folder using the latest version of:
The code bundle for the book is also hosted on GitHub at https://github.com/PacktPublishing/Learn-WebAssembly. In case there's an update to the code, it will be updated on the existing GitHub repository.
We also have other code bundles from our rich catalog of books and videos available at https://github.com/PacktPublishing/. Check them out!
We also provide a PDF file that has color images of the screenshots/diagrams used in this book. You can download it here: https://www.packtpub.com/sites/default/files/downloads/9781788997379_ColorImages.pdf.
There are a number of text conventions used throughout this book.
CodeInText: Indicates code words in text, database table names, folder names, filenames, file extensions, pathnames, dummy URLs, user input, and Twitter handles. Here is an example: "instantiate() is the primary API for compiling and instantiating WebAssembly code."
A block of code is set as follows:
int addTwo(int num) {
 return num + 2;
}
When we wish to draw your attention to a particular part of a code block, the relevant lines or items are set in bold:
int calculate(int firstVal, int secondVal) {
return firstVal - secondVal;
}
Any command-line input or output is written as follows:
npm install -g webassembly
Bold: Indicates a new term, an important word, or words that you see onscreen. For example, words in menus or dialog boxes appear in the text like this. Here is an example: "You can do this by pressing the Start menu button, and right-clicking on the Command Prompt application and selecting Run as administrator."
Feedback from our readers is always welcome.
General feedback: Email customercare@packtpub.com and mention the book title in the subject of your message. If you have questions about any aspect of this book, please email us at customercare@packtpub.com.
Errata: Although we have taken every care to ensure the accuracy of our content, mistakes do happen. If you have found a mistake in this book, we would be grateful if you would report this to us. Please visit www.packt.com/submit-errata, selecting your book, clicking on the Errata Submission Form link, and entering the details.
Piracy: If you come across any illegal copies of our works in any form on the Internet, we would be grateful if you would provide us with the location address or website name. Please contact us at copyright@packt.com with a link to the material.
If you are interested in becoming an author: If there is a topic that you have expertise in and you are interested in either writing or contributing to a book, please visit authors.packtpub.com.
Please leave a review. Once you have read and used this book, why not leave a review on the site that you purchased it from? Potential readers can then see and use your unbiased opinion to make purchase decisions, we at Packt can understand what you think about our products, and our authors can see your feedback on their book. Thank you!
For more information about Packt, please visit packt.com.
WebAssembly (Wasm) represents an important stepping stone for the web platform. Enabling a developer to run compiled code on the web without a plugin or browser lock-in presents many new opportunities. Some confusion exists about what WebAssembly is, as does some skepticism about its staying power.
In this chapter, we will discuss how WebAssembly came to be, what WebAssembly is with regard to the official definition, and the technologies it encompasses. The potential use cases, supported languages, and limitations will be covered, as well as where to find additional information.
Our goal for this chapter is to understand the following:
Web development has had an interesting history, to say the least. Several (failed) attempts have been made to expand the platform to support different languages. Clunky solutions such as plugins failed to stand the test of time, and limiting a user to a single browser is a recipe for disaster.
WebAssembly was developed as an elegant solution to a problem that has existed since browsers were first able to execute code: If you want to develop for the web, you have to use JavaScript. Fortunately, using JavaScript doesn't have the same negative connotations it had back in the early 2000s, but it continues to have certain limitations as a programming language. In this section, we're going to discuss the technologies that led to WebAssembly to get a better grasp of why this new technology is needed.
JavaScript was created by Brendan Eich in just 10 days back in 1995. Originally seen as a toy language by programmers, it was used primarily to make buttons flash or banners appear on a web page. The last decade has seen JavaScript evolve from a toy to a platform with profound capabilities and a massive following.
In 2008 heavy competition in the browser market resulted in the addition of just-in-time (JIT) compilers, which increased the execution speed of JavaScript by a factor of 10. Node.js debuted in 2009 and represented a paradigm shift in web development. Ryan Dahl combined Google's V8 JavaScript engine, an event loop, and a low-level I/O API to build a platform that allowed for the use of JavaScript across the server and client side. Node.js led to npm, a package manager that allowed for the development of libraries to be used within the Node.js ecosystem. As of the time of writing, there are over 600,000 packages available with hundreds being added every day:
It's not just the Node.js ecosystem that is growing; JavaScript itself is being actively developed. The ECMA Technical Committee 39 (TC39), which dictates the standards for JavaScript and oversees the addition of new language features, releases yearly updates to JavaScript with a community-driven proposal process. Between its wealth of libraries and tooling, constant improvements to the language, and possessing one of the largest communities of programmers, JavaScript has become a force to be reckoned with.
But the language does have some shortcomings:
To avoid having to write more than a few lines of JavaScript, some developers built transpilers to convert other languages to JavaScript. Transpilers (or source-to-source compilers) are types of compilers that convert source code in one programming language to equivalent source code in another programming language. TypeScript, which is a popular tool for frontend JavaScript development, transpiles TypeScript to valid JavaScript targeted for browsers or Node.js. Pick any programming language and there's a good chance that someone created a JavaScript transpiler for it. For example, if you prefer to write Python, you have about 15 different tools that you can use to generate JavaScript. In the end, though, it's still JavaScript, so you're still subject to the idiosyncrasies of the language.
As the web evolved into a valid platform for building and distributing applications, more and more complex and resource-intensive applications were created. In order to meet the demands of these applications, browser vendors began working on new technologies to integrate into their software without disrupting the normal course of web development. Google and Mozilla, creators of Chrome and Firefox, respectively, took two different paths to achieve this goal, culminating in the creation of WebAssembly.
Google developed Native Client (NaCl) with the intent to safely run native code within a web browser. The executable code would run in a sandbox and offered the performance advantages of native code execution.
NaCl was tied to a specific architecture, while Portable Native Client (PNaCl) was an architecture-independent version of NaCl developed to run on any platform. The technology consisted of two elements:
NaCl's architecture-specific executable (nexe) was limited to applications and extensions that were installed from Google's Chrome Web Store, but PNaCl executables (pexe) can be freely distributed on the web and embedded in web applications. Portability was made possible with Pepper, an open source API for creating NaCl modules, and its corresponding plugin API (PPAPI). Pepper enabled communication between NaCl modules and the hosting browser, and allowed for access to system-level functions in a safe and portable way. Applications could be easily distributed by including a manifest file and a compiled module (pexe) with the corresponding HTML, CSS, and JavaScript:
NaCl offered promising opportunities to overcome the performance limitations of the web, but it had some drawbacks. Although Chrome had built-in support for PNaCl executables and Pepper, other major browser did not. Detractors of the technology took issue with the black-box nature of the applications as well as the potential security risks and complexity.
Mozilla focused its efforts on improving the performance of JavaScript with asm.js. They wouldn't add support for Pepper to Firefox due to the incompleteness of its API specification and limited documentation. In the end, NaCl was deprecated in May, 2017, in favor of WebAssembly.
Mozilla debuted asm.js in 2013 and provided a way for developers to translate their C and C++ source code to JavaScript. The official specification for asm.js defines it as a strict subset of JavaScript that can be used as a low-level, efficient target language for compilers. It's still valid JavaScript, but the language features are limited to those that are amenable to ahead-of-time (AOT) optimization. AOT is a technique that the browser's JavaScript engine uses to execute code more efficiently by compiling it down to native machine code. asm.js achieves these performance gains by having 100% type consistency and manual memory management.
Using a tool such as Emscripten, C/C++ code can be transpiled down to asm.js and easily distributed using the same means as normal JavaScript. Accessing the functions in an asm.js module requires linking, which involves calling its function to obtain an object with the module's exports.
asm.js is incredibly flexible, however, certain interactions with the module can cause a loss of performance. For example, if an asm.js module is given access to a custom JavaScript function that fails dynamic or static validation, the code can't take advantage of AOT and falls back to the interpreter:
asm.js isn't just a stepping stone. It forms the basis for WebAssembly's Minimum Viable Product (MVP). The official WebAssembly site explicitly mentions asm.js in the section entitled WebAssembly High-Level Goals.
So why create WebAssembly when you could use asm.js? Aside from the potential performance loss, an asm.js module is a text file that must be transferred over the network before any compilation can take place. A WebAssembly module is in a binary format, which makes it much more efficient to transfer due to its smaller size.
WebAssembly modules use a promise-based approach to instantiation, which takes advantage of modern JavaScript and eliminates the need for any is this loaded yet? code.
The World Wide Web Consortium (W3C), an international community built to develop web standards, formed the WebAssembly Working Group in April, 2015, to standardize WebAssembly and oversee the specification and proposal process. Since then, the Core Specification and corresponding JavaScript API and Web API have been released. The initial implementation of WebAssembly support in browsers was based on the feature set of asm.js. WebAssembly's binary format and corresponding .wasm file combined facets of asm.js output with PNaCl's concept of a distributed executable.
So how will WebAssembly succeed where NaCl failed? According to Dr. Axel Rauschmayer, there are three reasons detailed at http://2ality.com/2015/06/web-assembly.html#what-is-different-this-time:
WebAssembly has a succinct and descriptive definition on the official site, but it's only a piece of the puzzle. There are several other components that fall under the umbrella of WebAssembly. Understanding the role each component plays will give you a better understanding of the technology as a whole. In this section, we will provide a detailed breakdown of WebAssembly's definition and describe potential use cases.
The official WebAssembly website (https://webassembly.org) offers this definition:
Let's break that definition down into parts to add some clarification.
WebAssembly actually encompasses several elements—a binary format and text format, which are documented in the Core Specification, the corresponding APIs (JavaScript and web), and a compilation target. The binary and text format both map to a common structure in the form of an abstract syntax. To better understand abstract syntax, it can be explained in the context of an abstract syntax tree (AST). An AST is a tree representation of the structure of source code for a programming language. Tools such as ESLint use JavaScript's AST to find linting errors. The following example contains a function and the corresponding AST for JavaScript (taken from https://astexplorer.net).
A simple JavaScript function follows:
function doStuff(thingToDo) {
  console.log(thingToDo);
}
The corresponding AST is as follows:
{
  "type": "Program",
  "start": 0,
  "end": 57,
  "body": [
    {
      "type": "FunctionDeclaration",
      "start": 9,
      "end": 16,
      "id": {
        "type": "Identifier",
        "start": 17,
        "end": 26,
        "name": "doStuff"
      },
      "generator": false,
      "expression": false,
      "params": [
        {
          "type": "Identifier",
          "start": 28,
          "end": 57,
          "name": "thingToDo"
        }
      ],
      "body": {
        "type": "BlockStatement",
        "start": 32,
        "end": 55,
        "body": [
          {
            "type": "ExpressionStatement",
            "start": 32,
            "end": 55,
            "expression": {
              "type": "CallExpression",
              "start": 32,
              "end": 54,
              "callee": {
                "type": "MemberExpression",
                "start": 32,
                "end": 43,
                "object": {
                  "type": "Identifier",
                  "start": 32,
                  "end": 39,
                  "name": "console"
                },
                "property": {
                  "type": "Identifier",
                  "start": 40,
                  "end": 43,
                  "name": "log"
                },
                "computed": false
              },
              "arguments": [
                {
                  "type": "Identifier",
                  "start": 44,
                  "end": 53,
                  "name": "thingToDo"
                }
              ]
            }
          }
        ]
      }
    }
  ],
  "sourceType": "module"
}
An AST may be verbose, but it does an excellent job at describing the components of a program. Representing source code in an AST makes verification and compilation simple and efficient. WebAssembly code in text format is serialized into an AST and compiled to the binary format (as a .wasm file), which is fetched, loaded, and utilized by a web page. When the module is loaded, the browser's JavaScript engine utilizes a decoding stack to decode the .wasm file into an AST, perform type checking, and interpret it to execute functions. WebAssembly started as a binary instruction format for an AST. Due to the performance implications of verifying Wasm expressions that return void, the binary instruction format was updated to target a stack machine.
A stack machine consists of two elements: a stack and instructions. A stack is a data structure with two operations: push and pop. Items are pushed onto the stack and subsequently popped from the stack in last in, first out (LIFO) order. A stack also includes a pointer, which points to the item at the top of the stack. Instructions represent actions to perform on the items in the stack. For example, an ADD instruction might pop the top two items from the stack (the values 100 and 10), and push a single item with the sum back onto the stack (the value 110):
WebAssembly's stack machine operates in the same way. A program counter (pointer) maintains the execution position within the code and a virtual control stack keeps track of blocks and if constructs as they are entered (pushed) and exited (popped). The instructions are executed with no reference to an AST. Thus, the binary instruction format portion of the definition refers to a binary representation of instructions that are in a format readable by the decoding stack in the browser.
WebAssembly was designed from the beginning with portability in mind. Portability in this context means that WebAssembly's binary format can be executed efficiently on a variety of operating systems and instruction set architectures, on and off the web. The specification for WebAssembly defines portability in the context of an execution environment. WebAssembly was designed to run efficiently in environments that meet certain characteristics, most of which are related to memory. WebAssembly's portability can also be attributed to the absence of a specific API around the core technologies. Instead, it defines an import mechanism where the set of available imports is defined by the host environment.
In a nutshell, this means that WebAssembly isn't tied to a specific environment, such as the web or desktop. The WebAssembly Working Group has defined a Web API, but that's separate from the Core Specification. The Web API caters to WebAssembly, not the other way around.
The compilation aspect of the definition indicates that WebAssembly will be simple to compile down to its binary format from source code written in high-level languages. The MVP focuses on two languages, C and C++, but Rust can also be used given its similarities to C++. Compilation will be achieved through the use of a Clang/LLVM backend, although we'll be using Emscripten in this book to generate our Wasm modules. The plan is to eventually add support for other languages and compilers (such as GCC), but the MVP is focused on LLVM.
The official definition gives some high-level insight into the overall technology, but for the sake of completeness, it's worth digging a little deeper. WebAssembly's Core Specification is the official document to reference if you want to understand WebAssembly at a very granular level. If you're interested in learning about the characteristics of the runtime structure with regard to the execution environment, check out section 4: Execution. We won't cover that here, but understanding where the Core Specification fits in will help in establishing a complete definition of WebAssembly.
The Core Specification states WebAssembly encodes a low-level, assembly-like programming language. The specification defines the structure, execution, and validation of this language as well as the details of the binary and text formats. The language itself is structured around the following concepts:
Functions, tables, memory, and modules have direct correlations with the JavaScript API and are important to be aware of. These concepts describe the underlying structure of the language itself and how to write or encode WebAssembly. With regard to usage, understanding the corresponding semantic phases of WebAssembly provides a complete definition of the technology:
The Core Specification describes the different phases an encoded module (.wasm file) undergoes when it is being utilized in a host environment (such as a web browser). This aspect of the specification represents how the output is handled and executed:
The following diagram provides a visual representation of the semantic phases:
The WebAssembly Working Group also released API specifications for interacting with JavaScript and the web, which qualifies them for inclusion in the WebAssembly technology space. The JavaScript API is scoped to the JavaScript language itself, without being specifically tied to an environment (for example, web browsers or Node.js). It defines classes, methods, and objects for interacting with WebAssembly and managing the compilation and instantiation processes. The Web API is an extension of the JavaScript API that defines functionality specific to web browsers. The Web API specification currently only defines two methods, compileStreaming and instantiateStreaming, which are convenience methods that simplify the use of Wasm modules in the browser. These will be covered in greater detail in Chapter 2, Elements of WebAssembly - Wat, Wasm, and the JavaScript API.
WebAssembly's ultimate goal is not to replace JavaScript, but rather to complement it. JavaScript's rich ecosystem and flexibility still makes it the ideal language for the web. WebAssembly's JavaScript API makes interoperability between the two technologies relatively simple. So will you be able to build a web application using just WebAssembly? One of the explicit goals of WebAssembly is portability, and replicating all of JavaScript's functionality could inhibit that goal. However, the official site includes a goal to execute and integrate well with the existing web platform, so only time will tell. It may not be practical to write the entire code base in a language that compiles down to WebAssembly, but moving some of the application logic to Wasm modules could be beneficial in terms of performance and load times.
WebAssembly's official site has an extensive list of potential use cases. I'm not going to cover them all here, but there are several that represent significant enhancements to the capabilities of the web platform:
Although some of these use cases are technically feasible with JavaScript, HTML, and CSS, using WebAssembly can offer significant performance gains. Serving up a binary file (instead of a single JavaScript file) can greatly reduce the bundle size, and instantiating the Wasm module on page load speeds up code execution.
WebAssembly isn't just limited to the browser. Outside the browser, you could use it to build hybrid native apps on mobile devices or perform server-side computations of untrusted code. Using Wasm modules for phone apps could be incredibly beneficial in terms of power usage and performance.
WebAssembly also offers flexibility with regard to how it can be used. You can write your entire code base in WebAssembly, although this may not be practical in its current form or in the context of a web application. Given WebAssembly's robust JavaScript API, you could write the UI in JavaScript/HTML and use Wasm modules for functionality that doesn't directly access the DOM. Once additional languages are supported, objects can be easily passed between the Wasm module and JavaScript code, which will greatly simplify integration and increase developer adoption.
WebAssembly's high-level goals for their MVP was to provide roughly the same functionality as asm.js. The two technologies are very closely related. C, C++, and Rust are very popular languages that support manual memory allocation, which made them ideal candidates for the initial implementation. In this section, we're going to provide a brief overview of each programming language.
C and C++ are low-level programming languages that have been around for over 30 years. C is procedural and doesn't inherently support object-oriented programming concepts such as classes and inheritance, but it's fast, portable, and widely used.
C++ was built to fill the gaps in C by adding features such as operator overloading and improved type checking. Both languages consistently rank in the top 10 most popular programming languages, which make them ideally suited for the MVP:
C and C++ support is also baked into Emscripten, so in addition to simplifying the compilation process, it allows you to take advantage of WebAssembly's full capabilities. It is also possible to compile C/C++ code down to a .wasm file using LLVM. LLVM is a collection of modular and reusable compiler and toolchain technologies. In a nutshell, it's a framework that simplifies the configuration of a compilation process from source code to machine code. If you made your own programming language and would like to build a compiler, LLVM has tools to simplify the process. I'll cover how to compile C/C++ into .wasm files using LLVM in Chapter 10, Advanced Tools and Upcoming Features.
The following snippet demonstrates how to print Hello World! to the console using C++:
#include <iostream>

int main() {
    std::cout << "Hello, World!\n";
    return 0;
}
C and C++ were intended to be the primary languages used for WebAssembly, but Rust is a perfectly suitable substitute. Rust is a systems programming language that is syntactically similar to C++. It was designed with memory safety in mind, but still retains the performance advantages of C and C++. The current nightly build of Rust's compiler can generate .wasm files from Rust source code, so if you prefer Rust and are familiar with C++, you should be able to use Rust for most of the examples in this book.
The following snippet demonstrates how to print Hello World! to the console using Rust:
fn main() {
    println!("Hello World!");
}
Various tooling exists to enable the use of WebAssembly with some of the other popular programming languages, although they are mostly experimental:
It is also technically possible to transpile a language to C and consequently compile that to a Wasm module, but the success of compilation is contingent on the output of the transpiler. More than likely, you'd have to make significant changes to the code to get it to work.
Admittedly, WebAssembly is not without its limitations. New features are being actively developed and the technology is constantly evolving, but the MVP functionality represents only a portion of WebAssembly's capabilities. In this section, we'll cover some of these limitations and how they impact the development process.
WebAssembly supports a flat linear memory, which isn't a limitation per se, but requires some understanding of how to explicitly allocate memory to execute code. C and C++ were logical choices for the MVP because memory management is built into the language. The reason why some of the more popular high-level languages such as Java weren't included initially is due to something called garbage collection (GC).
GC is a form of automated memory management wherein memory occupied by objects that are no longer in use by the program is reclaimed automatically. GC is analogous to an automatic transmission on a car. It has been heavily optimized by skilled engineers to operate as efficiently as possible, but limits the amount of control the driver has. Manually allocating memory is like driving a car with a manual transmission. It affords greater control over speed and torque, but misuse or lack of experience can leave you stranded with a severely damaged car. Part of C and C++'s excellent performance and speed can be attributed to the manual allocation of memory.
GC languages allow you to program without having to worry about memory availability or allocation. JavaScript is an example of a GC language. The browser engine employs something called a mark-and-sweep algorithm to collect unreachable objects and free up the corresponding memory. Support for GC languages is currently being worked on in WebAssembly, but it's hard to say exactly when it will be completed.
WebAssembly is unable to access the DOM, so any DOM manipulation needs to be done indirectly through JavaScript or using a tool such as Emscripten. There are plans to add the ability to reference DOM and other Web API objects directly, but that's still in the proposal phase. DOM manipulation will likely go hand in hand with GC languages, since it will allow the seamless passing of objects between WebAssembly and JavaScript code.
Older browsers don't have the global WebAssembly object available to instantiate and load Wasm modules. There are experimental polyfills that utilize asm.js if the object isn't found, but the WebAssembly Working Group currently has no plans to create one. Since asm.js and WebAssembly are closely related, simply serving up an asm.js file if the WebAssembly object is unavailable will still offer performance gains while accommodating for backward compatibility. You can see which browsers currently support WebAssembly at https://caniuse.com/#feat=wasm.
Emscripten is the source-to-source compiler that can generate asm.js from C and C++ source code. We'll use it as a build tool to generate the Wasm modules. In this section, we'll quickly review how Emscripten relates to WebAssembly.
Emscripten is an LLVM-to-JavaScript compiler, which means it takes LLVM bitcode output of a compiler such as Clang (for C and C++), and converts that to JavaScript. It isn't one specific technology, but rather a combination of technologies that work together to build, compile, and run asm.js. To generate Wasm modules, we'll use the Emscripten SDK (EMSDK) Manager:
In Chapter 4, Installing the Required Dependencies, we'll install the EMSDK and use it to manage the dependencies required to compile C and C++ to Wasm modules. Emscripten uses Binaryen's asm2wasm tool to compile the asm.js output by Emscripten to a .wasm file. Binaryen is a compiler and toolchain infrastructure library that includes tools to compile various formats to WebAssembly modules and vice versa. Understanding the inner workings of Binaryen isn't required to use WebAssembly, but it is important to be aware of the underlying technologies and how they work together. By passing certain flags into the compile command for Emscripten (emcc), we can pipe the resultant asm.js code to Binaryen to output our .wasm file.
In this chapter, we discussed the history of WebAssembly with regard to the technologies that led to its creation. A detailed overview of the definition of WebAssembly was provided to allow for a greater understanding of the underlying technologies involved.
The Core Specification, JavaScript API, and Web API were presented as important elements of WebAssembly and demonstrate how the technology will evolve. We also reviewed potentials use cases, currently supported languages, and tools that enable the use of non-supported languages.
The limitations of WebAssembly are the absence of GC, the inability to communicate directly with the DOM, and the lack of support for older browsers. These were discussed to convey the newness of the technology and shed light on some of its shortcomings. Finally, we discussed Emscripten's role in the development process and where it fits into the WebAssembly development workflow.
In Chapter 2, Elements of WebAssembly - Wat, Wasm, and the JavaScript API, we'll be diving deeper into the elements that make up WebAssembly: the WebAssembly text format (Wat), binary format (Wasm), JavaScript, and Web APIs.
Chapter 1, What is WebAssembly?, described the history of WebAssembly and provided a high-level overview of the technology as well as the potential use cases and limitations. WebAssembly was described as being composed of multiple elements, not just the binary instruction format specified in the official definition.
In this chapter, we will dig into the elements that correspond to the official specifications created by the WebAssembly Working Group. We will examine the Wat and the binary format in greater detail to gain a better understanding of how they relate to modules. We will review the JavaScript API and Web API to ensure you're able to utilize the WebAssembly effectively in the browser.
Our goal for this chapter is to understand the following:
In Chapter 1, What is WebAssembly?, we talked about how the binary and text formats of WebAssembly both map to a common structure in the form of an abstract syntax. Before getting into the nuts and bolts of these formats, it's worth mentioning how these are related within the Core Specification. The following diagram is a visual representation of the table of contents (with some sections excluded for clarity):
As you can see, the Text Format and Binary Format sections contain subsections for Values, Types, Instructions, and Modules that correlate with the Structure section. Consequently, much of what we cover in the next section for the text format have direct corollaries with the binary format. With that in mind, let's dive into the text format.
The Text Format section of the Core Specification provides technical descriptions for common language concepts such as values, types, and instructions. These are important concepts to know and understand if you're planning on building tooling for WebAssembly, but not necessary if you just plan on using it in your applications. That being said, the text format is an important part of WebAssembly, so there are concepts you should be aware of. In this section, we will dig into some of the details of the text format and highlight important points from the Core Specification.
To understand Wat, let's start with the first sentence of the description taken directly from the WebAssembly Core Specification:
So what are symbolic expressions (S-expressions)? S-expressions are notations for nested list (tree-structured) data. Essentially, they provide a simple and elegant way to represent list-based data in textual form. To understand how textual representations of nested lists map to a tree structure, let's extrapolate the tree structure from an HTML page. The following example contains a simple HTML page and the corresponding tree structure diagram.
A simple HTML page:
<html>
<head>
  <link rel="icon" href="favicon.ico">
  <title>Page Title</title>
</head>
<body>
  <div>
    <h1>Header</h1>
    <p>This is a paragraph.</p>
  </div>
  <div>Some content</div>
  <nav>
    <ul>
      <li>Item 1</li>
      <li>Item 2</li>
      <li>Item 3</li>
    </ul>
  </nav>
</body>
</html>
The corresponding tree structure is:
Even if you've never seen a tree structure before, it's still clear to see how the HTML maps to the tree in terms of structure and hierarchy. Mapping HTML elements is relatively simple because it's a markup language with well-defined tags and no actual logic.
Wat represents modules that can have multiple functions with varying parameters. To demonstrate the relationship between source code, Wat, and the corresponding tree structure, let's start with a simple C function that adds 2 to the number that is passed in as a parameter:
Here is a C function that adds 2 to the num argument passed in and returns the result:
int addTwo(int num) {
    return num + 2;
}
Converting the addTwo function to valid Wat produces this result:
(module
  (table 0 anyfunc)
  (memory $0 1)
  (export "memory" (memory $0))
  (export "addTwo" (func $addTwo))
  (func $addTwo (; 0 ;) (param $0 i32) (result i32)
    (i32.add
      (get_local $0)
      (i32.const 2)
    )
  )
)
In Chapter 1, What is WebAssembly?, we talked about language concepts associated with the Core Specification (Functions, Linear Memory, Tables, and so on). Within that specification, the Structure section defines each of these concepts in the context of an abstract syntax. The Text Format section of the specification corresponds with these concepts as well, and you can see them defined by their keywords in the preceding snippet (func, memory, table).
Tree Structure:
The entire tree would be too large to fit on a page, so this diagram is limited to the first five lines of the Wat source text. Each filled-in dot represents a list node (or the contents of a set of parentheses). As you can see, code written in s-expressions can be clearly and concisely expressed in a tree structure, which is why s-expressions were chosen for WebAssembly's text format.
Although detailed coverage of the Text Format section of the Core Specification is out of the scope of this text, it's worth demonstrating how some of the language concepts map to the corresponding Wat. The following diagram demonstrates these mappings in a sample Wat snippet. The C code that this was compiled from represents a function that takes a word as a parameter and returns the square root of the character count:
If you intend on writing or editing Wat, note that it supports block and line comments. The instructions are split up into blocks and consist of setting and getting memory associated with variables with valid types. You are able to control the flow of logic using if statements and loops are supported using the loop keyword.
The text format allows for the representation of a binary Wasm module in textual form. This has some profound implications with regard to the ease of development and debugging. Having a textual representation of a WebAssembly module allows developers to view the source of a loaded module in a browser, which eliminates the black-box issues that inhibited the adoption of NaCl. It also allows for tooling to be built around troubleshooting modules. The official website describes the use cases that drove the design of the text format:
The last item in the list reflects that the text format isn't intended to be written by hand in the course of normal development, but rather generated from a tool like Emscripten. You probably won't see or manipulate any .wat files when you're generating modules, but you may be viewing them in a debugging context.
Not only is the text format valuable with regards to debugging, but having this intermediate format reduces the amount of reliance on a single tool for compilation. Several different tools currently exist to consume and emit this s-expression syntax, some of which are used by Emscripten to compile your code down to a .wasm file.
The Binary Format section of the Core Specification provides the same level of detail with regard to language concepts as the Text format section. In this section, we will briefly cover some high-level details about the binary format and discuss the various sections that make up a Wasm module.
The binary format is defined as a dense linear encoding of the abstract syntax. Without getting too technical, that essentially means it's an efficient form of binary that allows for fast decoding, small file size, and reduced memory usage. The file representation of the binary format is a .wasm file, which will be the compilation output from Emscripten that we'll use for our examples.
The Values, Types, and Instructions subsections of the Core Specification for the binary format correlate directly to the Text Format section. Each of these concepts is covered in the context of encoding. For example, according to the specification, the Integer types are encoded using the LEB128 variable-length integer encoding, in either unsigned or signed variant. These are important details to know if you wish to develop tooling for WebAssembly, but not necessary if you just plan on using it on your website.
The Structure, Binary Format, and Text Format (wat) sections of the Core Specification have a Module subsection. We didn't cover aspects of the module in the previous section because it's more prudent to describe them in the context of a binary. The official WebAssembly site offers the following description for a module:
We will discuss how to interact with the module using the JavaScript and Web APIs later in this chapter, so let's establish some context to understand how the module elements map to the API methods.
A module is made up of several sections, some of which you'll be interacting with through the JavaScript API:
Some of the keywords (import, export, and so on) should look familiar; they're present in the contents of the Wat file in the previous section. WebAssembly's components follow a logical mapping that directly correspond to the APIs (for example, you pass a memory and table instance into JavaScript's WebAssembly.instantiate() function). Your primary interaction with a module in binary format will be through these APIs.
In addition to the WebAssembly Core Specification, there are two API specifications for interacting with WebAssembly modules: the WebAssembly JavaScript Interface (JavaScript API) and the WebAssembly Web API. In the previous sections, we covered pertinent aspects of the Core Specification to become familiar with the underlying technology. If you never read the Core Specification (or if you skipped the first few sections of this chapter), it wouldn't inhibit the use of WebAssembly in your application. That is not the case for the APIs, as they describe the methods and interface required to instantiate and interact with your compiled Wasm module. In this section, we will review the Web and JavaScript APIs and describe how to load and communicate with a Wasm module using JavaScript.
Before digging into interactions, let's discuss the relationship between JavaScript and WebAssembly in the context of execution. The Core Specification contains the following description in the Execution section:
Under the hood, JavaScript uses something called agents to manage execution. The store being referred to in the definition is contained within an agent. The following diagram represents a JavaScript agent:
The store represents the state of the abstract machine. WebAssembly operations take a store and return an updated store. Each agent is associated with caches that map JavaScript objects to WebAssembly addresses. So why is this important? It represents the underlying method of interaction between WebAssembly modules and JavaScript. The JavaScript objects correspond to the WebAssembly namespace within the JavaScript API. With that in mind, let's dig into the interface.
The JavaScript API covers the various objects available on the global WebAssembly object in the browser. Before we discuss those, we'll start with the methods available on the WebAssembly object, with a brief overview of their intended purposes:
The instantiateStreaming() and compileStreaming() methods are currently only present in the Web API. In fact, these two methods comprise the entire specification. The methods available on the WebAssembly object are focused primarily on compiling and instantiating modules. With that in mind, let's discuss how to fetch and instantiate a Wasm module.
When you perform a fetch call to get a module, it returns a Promise that resolves with the raw bytes of that module, which need to be loaded into an ArrayBuffer and instantiated. Going forward, we will refer to this process as loading a module.
The following diagram demonstrates this process:
This process is actually quite simple using Promises. The following code demonstrates how a module is loaded. The importObj argument passes any data or functions to the Wasm module. You can disregard it for now, as we'll be discussing it in greater detail in Chapter 5, Creating and Loading a WebAssembly Module:
fetch('example.wasm')
  .then(response => response.arrayBuffer())
  .then(buffer => WebAssembly.instantiate(buffer, importObj))
  .then(({ module, instance }) => {
    // Do something with module or instance
  });
The preceding example dictates the method for loading the module using the instantiate() method. The instantiateStreaming() method is a little different and simplifies the process even more by fetching, compiling, and instantiating a module in a single step. The following code achieves the same goal (loading a module) using this method:
WebAssembly.instantiateStreaming(fetch('example.wasm'), importObj)
  .then(({ module, instance }) => {
    // Do something with module or instance
  });
The instantiation methods return a Promise that resolves with an object containing a compiled WebAssembly.Module (module) and WebAssembly.Instance (instance), both of which will be covered later in this section. In most cases, you will use one of these methods to load a Wasm module on your site. The instance contains all of the exported WebAssembly functions that you can call from your JavaScript code.
The compile() and compileStreaming() methods return a Promise that only resolves with a compiled WebAssembly.Module. This is useful if you want to compile a module and instantiate it at a later time. Mozilla Developer Network (MDN), the web docs site managed by Mozilla, provides an example in which the compiled module is passed to a Web Worker.
As far as the validate() method is concerned, its only purpose is to test whether the typed array or ArrayBuffer passed in as a parameter is valid. This would be called after the raw bytes of the response are loaded into an ArrayBuffer. This method wasn't included in the code examples because attempting to instantiate or compile an invalid Wasm module will throw either a TypeError or one of the Error objects present on the WebAssembly object. We will cover these Error objects later in this section.
In addition to the methods covered in the Loading a module and the WebAssembly namespace methods section, the global WebAssembly object has child objects that are used to interact with and troubleshoot WebAssembly. These objects correlate directly to the concepts we discussed in the sections on the WebAssembly binary and text formats. The following list contains these objects as well as their definitions taken from MDN:
Let's dig into each one individually, starting with the WebAssembly.Module object.
The WebAssembly.Module object is the intermediate step between the ArrayBuffer and the instantiated module. The compile() and instantiate() methods (and their streaming counterparts) return a Promise that resolves with a module (module in lowercase represents the compiled Module). A module can also be created synchronously by passing a typed array or ArrayBuffer directly into the constructor, but this is discouraged for large modules.
The Module object also has three static methods: exports(), imports(), and customSections(). All three take a module as a parameter, but customSections() takes a string representing the section name as its second parameter. Custom sections are described in the Binary Format section of the Core Specification and are intended to be used for debugging information or third-party extensions. In most cases, you won't need to define these. The exports() function is useful if you're using a Wasm module that you didn't create, although you'll only be able to see the name and kind (for example, function) of each export.
For simple use cases, you won't be dealing directly with the Module object or compiled module. Most of the interaction will take place with an Instance.
The WebAssembly.Instance object is the instantiated WebAssembly module, which means you can call exported WebAssembly functions from it. Calling instantiate() or instantiateStreaming() returns a Promise that resolves with an object containing an instance. You call WebAssembly functions by referencing the name of the function on the instance's export property. For example, if a module contained an exported function named sayHello(), you'd call the function using instance.exports.sayHello().
The WebAssembly.Memory object holds the memory accessed by a WebAssembly Instance. This memory can be accessed and changed from both JavaScript and WebAssembly. To create a new instance of Memory, you need to pass an object with an initial and (optional) maximum value to the WebAssembly.Memory() constructor. These values are in units of WebAssembly pages, where one page is 64 KB. You increase the size of the memory instance by calling the grow() function with a single parameter that represents the number of WebAssembly pages to grow by. You can also access the current buffer contained in the memory instance through its buffer property.
MDN describes two ways to get to a WebAssembly.Memory object. The first way is to construct it from JavaScript (var memory = new WebAssembly.Memory(...)), while the second way is to have it exported by a WebAssembly module. The important takeaway is that memory can be passed easily between JavaScript and WebAssembly.
The WebAssembly.Table object is an array-like structure that is used to store function references. Just as with WebAssembly.Memory, a Table can be accessed and changed from both JavaScript and WebAssembly. As of the time of writing, tables can only store function references, but it's likely that, as the technology evolves, additional entities will be able to be stored in tables as well.
To create a new Table instance, you need to pass an object with an element, initial, and (optional) maximum value. The element member is a string that represents the type of value stored in the table; currently the only valid value is "anyfunc" (for functions). The initial and maximum values represent the number of elements in the WebAssembly Table.
You can access the number of elements in the Table instance using the length property. The instance also includes methods to manipulate and query elements in the table. The get() method allows you to access the element at the given index, which is passed in as a parameter. The set() method allows you to set an element at the index specified as the first parameter to the value specified as the second parameter (per the preceding note, only functions are supported). Finally, grow() allows you to increase the size of the Table instance (number of elements) by the number passed in as a parameter.
The JavaScript API provides constructors to create instances of the Error objects specific to WebAssembly, but we won't spend too much time covering these objects. The object definition list at the beginning of this section describes the nature of each error, which may be raised if the specified condition is met. All three errors can be constructed with a message, filename, and line number parameter (all of which are optional), and has the same properties and methods as the standard JavaScript Error object.
We spent this chapter reviewing the various elements of WebAssembly and the corresponding JavaScript and Web APIs, but understanding how the pieces fit together can still be confusing. As we progress through the examples in this book and you're able to see how C/C++, WebAssembly, and JavaScript interact, these concepts will become clearer.
That being said, a demonstration of this interaction may help in clearing up some of the confusion. In this section, we're going to use an online tool called WasmFiddle to demonstrate the relationship between these elements so you can see WebAssembly in action and get a high-level overview of the development workflow.
WasmFiddle, located at https://wasdk.github.io/WasmFiddle/, is an online code editing tool that allows you to write some C or C++ code and convert it to Wat, compile it to Wasm, or interact with it directly using JavaScript. The C/C++ and JavaScript editors are minimal and aren't intended to be used as your primary development environment, but it offers a valuable service in the Wasm compiler. In Chapter 3, Setting Up A Development Environment, you'll discover that going from square one to generating Wasm files requires a little bit of work—being able to paste your C code into the browser and hitting a couple of buttons makes things much more convenient. The following diagram gives a quick overview of the interface:
As you can see, the interface is relatively simple. Let's try out some code!
The upper-left pane in the following screenshot contains a simple C function that adds 2 to the number specified as a parameter. The lower-left pane contains the corresponding Wat:
If this looks familiar, it's because this same code was used for the explanation of Wat's s-expressions in the beginning of this chapter. Digging a little deeper, you can see how the C code corresponds to the Wat output. The addTwo() function is exported from the module as a string on line 5. Line 5 also contains (func $addTwo), which references the $addTwo function on line 6. Line 6 specifies that a single parameter of type i32 (an integer) can be passed in and the result returned is also an i32. Pressing the Build button in the upper-right corner (or above the C/C++ editor) will compile the C code into a Wasm file. The Wasm will be available for download or interaction with JavaScript once the build is completed.
The upper-right pane in the following screenshot contains some JavaScript code to compile the Wasm that was generated in the previous step. The wasmCode was generated when the build finished, so it should be available automatically. Rather than use the instantiate() method, WasmFiddle creates a compiled WebAssembly.Module instance and passes that into the constructor of a new WebAssembly.Instance. The wasmImports object is currently empty, although we could pass in a WebAssembly.Memory and WebAssembly.Table instance if desired:
The final line of JavaScript prints the result of addTwo() to the output in the lower-right pane when passed the number 2. The log() method is a custom function that ensures the output is printed to the lower-right pane (the number 4). Note how the JavaScript code interacts with wasmInstance. The addTwo() function is called from the instance's exports object. Although this was a contrived example, it demonstrates the steps C or C++ code goes through before it can be used by JavaScript as a Wasm module.
In this chapter, we discussed the elements of WebAssembly and their relationship. The structure of the Core Specification was used to describe the mapping of the text and binary formats to a common abstract syntax. We highlighted aspects of the text format (Wat) that can be useful in the context of debugging and development, as well as why s-expressions are an excellent fit for the textual representation of the abstract syntax. We also reviewed details pertaining to the binary format and the various elements that make up a module. The methods and objects within the JavaScript and Web APIs were defined with descriptions of their roles with regard to WebAssembly interaction. Finally, a simple example of the relationship between source code, Wat, and JavaScript was presented using the WasmFiddle tool.
In Chapter 3, Setting Up a Development Environment, we'll install the development tooling we'll use to work effectively with WebAssembly.
Now that you're familiar with the elements of WebAssembly, it's time to set up a suitable development environment. Developing with WebAssembly is tantamount to developing in C or C++. The difference lies in the build process and the output. In this chapter, we will cover the development tooling, and how to install and configure it on your system.
Our goal for this chapter is to understand the following:
You'll need to install some applications and tooling to start developing WebAssembly. We will use Visual Studio Code, a text editor, to write our C/C++, JavaScript, HTML, and Wat. We'll also use Node.js for serving up the files and Git to manage our code. We will use package managers to install these tools, which makes the installation process much simpler than downloading and installing them manually. In this section, we will cover the operating systems, as well as the package managers for each platform. We'll also review each of the applications, with a brief overview of their role in the development process.
To ensure that the installation and configuration process goes smoothly, it's important to be aware of the operating systems I will use for the examples in this book. If you encounter an issue, it may be due to an incompatibility between the platform you're using and the one I'm using. In most cases, you shouldn't have an issue. For the sake of eliminating the OS version as a potential problem causer, I've provided details for the operating systems I'm using in the following list:
Package managers are tools that simplify the installation process for software. They allow us to upgrade, configure, uninstall, and search for available software from the command line without having to go to a website to download and run the installer. They also simplify the installation process for software that may have multiple dependencies or require manual configuration before use. In this section, I'll cover the package manager for each platform.
Homebrew is an excellent package manager for macOS that allows us to install most of the tools we will use out of the box. Homebrew is as simple as pasting the following command in Terminal and running it:
/usr/bin/ruby -e "$(curl -fsSL https://raw.githubusercontent.com/Homebrew/install/master/install)"
You'll see messages in Terminal that will walk you through the installation process. Once that's complete, you'll need to install an extension for Homebrew called Homebrew-Cask that allows you to install macOS applications without having to download the installer, mount it, and drag the application into the Applications folder. You can install this by running the following command:
brew tap caskroom/cask
That's it! You're now able to install applications by running either of these commands:
# For command line tools:
brew install <Tool Name>

# For desktop applications:
brew cask install <Application Name>
Apt is the package manager provided with Ubuntu; there's no need to install it. It allows you to install both command-line tools and applications out of the box. If an application isn't available from Apt's repository, you can add a repository using the following command:
add-apt-repository
Chocolatey is a package manager for Windows. It's similar to Apt in that it lets you install both command-line tools and applications. To install Chocolatey, you need to run the command prompt (cmd.exe) as an administrator. You can do this by pressing the Start menu button, typing cmd, and right-clicking on the Command Prompt application and selecting Run as administrator:
Then just run the following command:
@"%SystemRoot%\System32\WindowsPowerShell\v1.0\powershell.exe" -NoProfile -InputFormat None -ExecutionPolicy Bypass -Command "iex ((New-Object System.Net.WebClient).DownloadString('https://chocolatey.org/install.ps1'))" && SET "PATH=%PATH%;%ALLUSERSPROFILE%\chocolatey\bin"
Git is a version control system (VCS) that allows you to track changes to files and manage work between multiple developers contributing to the same code base. Git is the VCS powering GitHub and GitLab, and is also available on Bitbucket (they also offer Mercurial, which is another VCS). Git will allow us to clone repositories from GitHub, and is a prerequisite for the EMSDK, which we'll cover in the next chapter. In this section, we will cover the installation process for Git.
Git is probably already available if you're using macOS. macOS comes bundled with Apple Git, which will probably be a few versions behind the most recent version. For the purposes of this book, the version you already have installed should be sufficient. If you wish to upgrade, you can install the most recent version of Git using Homebrew by running the following commands in Terminal:
# Install Git to the Homebrew installation folder (/usr/local/bin/git):
brew install git

# Ensure the default Git is pointing to the Homebrew installation:
sudo mv /usr/bin/git /usr/bin/git-apple
If you run this command, you should see /usr/local/bin/git:
which git
You can check to ensure that the installation was successful by running this command:
git --version
You can use apt to install Git; just run the following command in Terminal:
sudo apt install git
You can check to ensure that the installation was successful by running this command:
git --version
You can install Git using Chocolatey. Open up Command Prompt or PowerShell and run this command:
choco install git
You can check to ensure that the installation was successful by running this command:
git --version
The official website for Node.js describes it as an asynchronous event-driven JavaScript runtime. Node is designed to build scalable network applications. We will use it in this book to serve up our files and work with them in a browser. Node.js comes packaged with npm, a package manager for JavaScript, which will allow us to install packages globally and access them through the command line. In this section, we'll cover the installation process for each platform using the Node Version Manager (nvm).
We will use the long-term stable (LTS) release of Node.js (Version 8) to ensure that we're using the most stable version of the platform. We will use nvm to manage Node.js versions. This will prevent conflicts if you already have a higher (or lower) version of Node.js installed on your computer. nvm allows you to have multiple versions of Node.js installed that you can quickly switch to and isolate in the context of a single terminal window.
Run the following command in Terminal:
brew install nvm
Follow the post-installation steps Homebrew specifies to ensure that you can start using it (you may have to restart your Terminal session). If you cleared your Terminal contents before performing the steps, you can run this command to see the installation steps again:
brew info nvm
You can check to ensure that the installation was successful by running this command:
nvm --version
Ubuntu comes bundled with wget, which can retrieve files using HTTP/S and FTP/S protocols. The GitHub page for nvm (https://github.com/creationix/nvm) contains the following command to install it using wget:
wget -qO- https://raw.githubusercontent.com/creationix/nvm/v0.33.11/install.sh | bash
Once installed, restart Terminal to complete the installation. You can check to ensure that the installation was successful by running the following command:
nvm --version
nvm doesn't currently support Windows, so you're actually installing a different application named nvm-windows. The GitHub page for nvm-windows can be found at https://github.com/coreybutler/nvm-windows. Some of the commands are slightly different, but the installation command we run will be the same. To install nvm-windows, open up Command Prompt or PowerShell and run this command:
choco install nvm
You can check to ensure that the installation was successful by running the following command:
nvm --version
After installing nvm, you need to install the version of Node.js we will use in this book: version 8.11.1. To install it, run this command:
nvm install 8.11.1
If you didn't have Node.js or nvm previously installed, it will automatically set this to your default Node.js installation, so the output of this command should be v8.11.1:
node --version
If you have existing Node.js versions installed, you can either use v8.11.1 as a default, or ensure that you run this command to use v8.11.1 when working through the examples in this book:
nvm use 8.11.1
In the learn-webassembly repository, the code examples use GNU Make and VS Code's Tasks feature (which we'll cover in Chapter 5, Creating and Loading a WebAssembly Module) to perform the build tasks defined throughout the book. GNU Make is an excellent cross-platform tool for automating build processes. You can read more about GNU Make at https://www.gnu.org/software/make. Let's review the installation steps for each platform.
If you're using macOS or Linux, GNU make should already be installed. To validate this, run the following command in Terminal:
make -v
If you see version information, you're ready to go. Skip ahead to the Installing rimraf section. Otherwise, follow the GNU Make installation instructions for your platform.
To install GNU Make on macOS, run the following command from Terminal:
brew install make
You can check to ensure that the installation was successful by running this command:
make -v
If you see version information, skip to the Installing rimraf section.
To install GNU Make on Ubuntu, run the following command from Terminal:
sudo apt-get install make
You can check to ensure that the installation was successful by running this command:
make -v
If you see version information, skip to the Installing rimraf section.
You can install GNU make on Windows using Chocolatey. Open up Command Prompt or PowerShell and run the following command:
choco install make
You may need to restart the CLI to use the make command. Once restarted, run the following command to validate the installation:
make -v
If you see version information, continue to the next section. If you encounter issues, you may need to download and install the setup package at http://gnuwin32.sourceforge.net/packages/make.htm.
Some of the build steps defined in the Makefiles or VS Code Tasks delete files or directories. The commands required to delete a file or folder differ based on your platform and shell. To address this issue we'll use the rimraf npm package (https://www.npmjs.com/package/rimraf). Installing the package globally provides a rimraf command that performs the correct deletion operation for the operating system and shell.
To install rimraf, ensure that Node.js is installed and run the following command from a CLI:
npm install -g rimraf
To ensure that the installation was successful, run the following command:
rimraf --help
You should see usage instructions and a list of command line flags. Let's move on to the VS Code installation.
VS Code is a cross-platform text editor with multiple-language support and a rich extensions ecosystem. Integrated debugging and Git support are built in, and new features are being added all the time. We're able to use it for the entire WebAssembly development process throughout the course of this book. In this section, we will cover the installation steps for each platform:
Use Homebrew-Cask to install VS Code. Run the following command in Terminal to install:
brew cask install visual-studio-code
Once it's complete, you should be able to launch it from the Applications folder or the Launchpad.
The process for installing VS Code on Ubuntu has a few extra steps, but is still relatively simple. First, download the .deb file from VS Code's download page (https://code.visualstudio.com/Download). Once the download completes, run the following commands to complete the installation:
# Change directories to the Downloads folder
cd ~/Downloads

# Replace <file> with the name of the downloaded file
sudo dpkg -i <file>.deb

# Complete installation
sudo apt-get install -f
If you get a missing dependency error, you can fix it by running the following command before sudo dpkg:
sudo apt-get install libgconf-2-4
sudo apt --fix-broken install
You should now be able to open VS Code from the Launcher.
You can install VS Code using Chocolatey. Run this command from Command Prompt or PowerShell:
choco install visualstudiocode
Once installed, you can access it from the Start menu.
Out of the box, VS Code is a powerful text editor with a lot of great functionality. In addition to being highly configurable and customizable, it possesses an incredibly rich extensions ecosystem. We'll need to install some of these extensions so we won't need to use different editors for different programming languages. In this section, we will cover how to configure VS Code and which extensions to install to simplify the WebAssembly development process.
Customizing and configuring VS Code is simple and intuitive. You can manage custom settings such as editor font and tab sizes by selecting Code | Preferences | Settings on macOS or File | Preferences | Settings on Windows. User and workspace settings are managed separately in JSON files and auto completion is provided in case you can't remember the exact name of a setting. You can also change the themes or keyboard shortcuts by selecting the appropriate option in the Preferences menu. The settings file is also where you can set custom settings for any extensions you install. Some settings are added by default when you install an extension, so changing them is as simple as updating and saving this file.
We'll need to install some extensions as part of the configuration process. There are multiple ways to find and install extensions in VS Code. I prefer to click on the Extensions button (fourth button from the top in the Activity bar on the left-hand side of the editor), enter what I'm looking for in the Search box, and press the green Install button for the extension I'd like to install. You could also visit the VS Code Marketplace at https://marketplace.visualstudio.com/vscode, search for and select an extension you'd like to install, and press the green Install button on the extension's page. You can manage extensions through the command line as well. For more information, visit https://code.visualstudio.com/docs/editor/extension-gallery:
VS Code doesn't support C and C++ out of the box, but there is an excellent extension that allows you to work with these languages. It also doesn't support syntax highlighting for the WebAssembly text format, but there is an extension that adds that functionality as well. In this section, we will cover the installation and configuration of the C/C++ for VS Code and WebAssembly Toolkit for VSCode extensions.
The C/C++ extension for VS Code includes several features for writing and debugging C and C++ code, such as auto completion, symbol searching, class/method navigation, line-by-line code stepping, and many others. To install the extension, search for C/C++ in the Extensions and install the extension titled C/C++ (it's created by Microsoft) or navigate to the extension's official page at https://marketplace.visualstudio.com/items?itemName=ms-vscode.cpptools and press the green Install button.
Once installed, you can view configuration details for the extension by selecting the extension from the Extensions list in VS Code and selecting the Contributions tab. This tab contains the various settings, commands, and debugger details:
Microsoft has an official page for the extension, which you can view at https://code.visualstudio.com/docs/languages/cpp. This page describes, among other things, how to configure through the use of JSON files. Let's start by creating a new configuration file to manage our C/C++ environment. You can generate a new configuration file by pressing the F1 key, typing C/C, and selecting C/Cpp: Edit Configurations…:
This will generate a new c_cpp_properties.json in a .vscode folder within your current project. The file will contain configuration options for your C/C++ compiler based on your platform, the C and C++ standards to use, and the include paths for header files. You can close this file once it's generated. We will revisit it when we configure the EMSDK.
There are a few different WebAssembly extensions for VS Code currently available. I'm using the WebAssembly Toolkit for VSCode extension because it allows you to right-click on a .wasm file and select Show WebAssembly, which displays the Wat representation of the file. You can install this extension through the Extensions panel (search for WebAssembly), or from the official extension page in the VS Code Marketplace (https://marketplace.visualstudio.com/items?itemName=dtsvet.vscode-wasm):
Once installed, you're ready to go! Now that you've got all of the required extensions, let's evaluate some optional extensions that can simplify common tasks.
VS Code has some great extensions to improve efficiency and customize the interface. In this section, I will cover some of the extensions I have installed that simplify common tasks as well as the user interface/icon themes. You don't need to install any of these extensions for the examples in this book, but you may find some of them useful.
This extension is incredibly helpful when working with HTML. It automatically changes the name of the closing tag if you change the tag type. For example, if you have a <div> element and you want to make it a <span>, changing the text of the opening element to span will update the closing element text (</div> to </span>):
This extension colorizes the brackets, braces, and parentheses in your code so you can quickly identify the opening and closing brackets. WebAssembly's text format uses parentheses extensively, so being able to determine which elements are enclosed in which list makes debugging and evaluation much simpler:
There are over 1,000 icon and interface themes available on the VS Code Marketplace. I'm including the Material Icon theme and Atom One Light theme in this section because they're being used in the screenshots in this book. The Material Icon theme is incredibly popular, with over 2 million downloads, while the Atom One Light theme has over 70,000 downloads:
Interacting with and debugging Wasm modules will be done in the browser, which means we'll need a way to serve up a folder containing our example files. As we discussed in Chapter 2, Elements of WebAssembly - Wat, Wasm, and the JavaScript API, WebAssembly is integrated into the browser's JavaScript engine, but you'll need to make sure you're using a browser that supports it. In this section, we will provide instructions for cloning the book examples repository. We will also review how to quickly set up a local web server for testing and evaluating browser options to ensure that you're able to develop locally.
You may want to clone the GitHub repository now with all of the examples contained in this book. You'll definitely need to have the code available for Chapter 7, Creating an Application from Scratch, because the application's code base is too large to fit into a single chapter. Select a folder on your hard drive and run the following command to clone the repository:
git clone https://github.com/mikerourke/learn-webassembly
Once the clone process is complete, you'll find that the examples are organized by chapter. If there are several examples in a chapter, they're broken down by subfolders within the chapter folder.
We will use an npm package, serve, for serving up the files. To install, simply run this command:
npm install -g serve
Once installation is completed, you can serve up the files in any folder. To ensure that it's working, let's try serving up a local folder. The code for this section is located in the /chapter-03-dev-env folder of the learn-webassembly repository. Follow these instructions to validate your server installation:
<!doctype html>
<html lang="en-us">
  <title>Test Server</title>
</head>
<body>
  <h1>Test</h1>
  <div>
    This is some text on the main page. Click <a href="stuff.html">here</a>
    to check out the stuff page.
  </div>
</body>
</html>
<!doctype html>
<html lang="en-us">
<head>
  <title>Test Server</title>
</head>
<body>
  <h1>Stuff</h1>
  <div>
    This is some text on the stuff page. Click <a href="index.html">here</a>
    to go back to the index page.
  </div>
</body>
</html>
serve -l 8080 chapter-03-dev-env
You should see the following:
The -l 8080 flag tells serve to serve the folder on port 8080. The first link (http://127.0.0.1:8080) is only accessible on your computer. Any links below that can be used to access the page from another computer on your local network. If you navigate to the first link (http://127.0.0.1:8080/index.html) in your browser, you should see this:
Clicking on the here link should bring you to the Stuff page (the address bar will show 127.0.0.1:8080/stuff.html. If everything is working correctly, it's time to validate your browser.
To ensure that you're able to test out the examples in a browser, you need to make sure that there's a global WebAssembly object available. To prevent any issues related to browser compatibility, I recommend that you have either Google Chrome or Mozilla Firefox installed for development. If you had either of these browsers installed beforehand, there's a very good chance that your browser is already valid. For the sake of being thorough, we will still cover the validation process. In this section, I will review the steps you can take to ensure that your browser supports WebAssembly.
The process for validating Chrome pretty straightforward. Select the button that looks like three vertical dots (next to the address bar) and select More Tools | Developer Tools or use the keyboard shortcut Cmd/Ctrl + Shift + I:
Once the Developer Tools window appears, select the Console tab, type WebAssembly, and press Enter. If you see this, your browser is valid:
The process for validating Firefox is almost identical to that for Google Chrome. Select Tools | Web Developer | Toggle Tools from the menu bar or use the keyboard shortcut Cmd/Ctrl + Shift + I:
Select the Console tab, click inside the command input box, type WebAssembly, and press Enter. You'll see this if your version of Firefox is valid:
The validation process for other browsers is essentially the same; the only aspect of validation that differs across browsers is how to access the developer tools. If a WebAssembly object is available through the console of the browser you're using, you can use that browser for WebAssembly development.
In addition to the applications and tools we covered in the previous sections, there are some great tools that are free to use and rich in functionality that can greatly improve your development process. I won't have time to cover them all, but I'd like to highlight the ones I use regularly. In this section, I will briefly review some of the popular tooling and applications that are available for each platform.
The default macOS installation includes Terminal application, Terminal, that is sufficient for use in this book. If you want a more full-featured Terminal, iTerm2 is an excellent option. It offers features such as splitting windows, extensive customization, multiple profiles, and a Toolbelt feature that can display notes, running jobs, command history, and so on. You can download the image file from the official website (https://www.iterm2.com/) and install it manually, or install iTerm with Homebrew-Cask using this command:
brew cask install iterm2
Here is iTerm2 running with the Toolbelt open and multiple editor windows:
Terminator is the iTerm and cmder of Ubuntu, Terminal emulator that allows for multiple tabs and panes within a single window. Terminator also provides features such as drag and drop, find functionality, and a wide array of plugins and themes. You can install Terminator through apt. To ensure that you're using the most recent version, run the following commands in Terminal:
sudo add-apt-repository ppa:gnome-terminator
sudo apt-get update
sudo apt-get install terminator
Refer the screenshot:
cmder is a console emulator for Windows that adds a lot of functionality and features to the standard Command Prompt or PowerShell. It offers features such as multiple tabs and customizability. It allows you to open up instances of different shells within the same program. You can download and install it from the official website (cmder.net) or install it with Chocolatey using this command:
choco install cmder
This is how it looks:
Zsh is an interactive shell that improves upon Bash. Oh-My-Zsh is a configuration manager for Zsh that has a wide array of useful plugins. You can see the whole list on their website (https://github.com/robbyrussell/oh-my-zsh). For example, if you want powerful autocomplete and syntax highlighting functionality in your CLI, there are plugins such as zsh-autosuggestion and zsh-syntax-highlighting. You can install and configure Zsh and Oh-My-Zsh on macOS, Linux, and Windows. The Oh-My-Zsh page has installation instructions as well as a list of themes and plugins.
In this chapter, we covered the installation and configuration process for the development tooling we will use to start working with WebAssembly. We discussed how to install Git, Node.js, and VS Code quickly and easily using a package manager for your operating systems (for example, Homebrew for macOS). The steps to configure VS Code were presented as well as the required and optional extensions you can add to enhance the development experience. We discussed how to install a local web server for testing and how to validate your browser to ensure that WebAssembly is supported. Finally, we briefly reviewed some additional tools you can install for your platform to aid in development.
In Chapter 4, Installing the Required Dependencies, we'll install the required dependencies and test out the toolchain.
Now that you have your development environment set up and you're ready to start writing C, C++, and JavaScript, it's time to add the final piece of the puzzle. In order to generate .wasm files from our C/C++ code, we need to install and configure the Emscripten SDK (EMSDK).
In this chapter, we'll discuss the development workflow and talk about how the EMSDK fits into the development process. Detailed instructions will be provided on how to install and configure the EMSDK on each platform, as well as any prerequisites. Once the installation and configuration process is complete, you'll test it out by writing and compiling some C code.
Our goal for this chapter is to understand the following:
The development workflow for WebAssembly is comparable to most other languages that require compilation and a build process. Before getting into the tooling setup, we will cover the development cycle. In this section, we will establish some context for the tooling we will install and configure in the rest of this chapter.
For this book, we will write C and C++ code and compile it down to a Wasm module, but the workflow will be applicable to any programming language that compiles down to a .wasm file. The following diagram gives an overview of the process:
This process will be used throughout the book for our examples, so you'll get an idea of how the project structure corresponds to the workflow. We'll use some of the tooling available to expedite and simplify the process, but the steps will still be the same.
There are many editors and tools available to simplify the development process. Fortunately, C/C++ and JavaScript have been around for quite some time, so you can take advantage of the options that suit you best. The list of tools for WebAssembly is considerably shorter, given the shorter duration of which the technology has existed, but they are out there.
The primary tool we'll use, VS Code, offers some excellent and useful features for simplifying the build and development process. In addition to using it for writing our code, we'll utilize VS Code's built-in Tasks feature to build the .wasm file from C/C++. By creating a .vscode/tasks.json file in the project root folder, we're able to specify all of the parameters associated with the build step and run it quickly using a keyboard shortcut. In addition to performing a build, we can start and stop a running Node.js process (that is, the local server in the workflow diagram). We'll cover how to add and configure these features in the next chapter.
We'll use Emscripten to compile our C/C++ code down to .wasm files. Up to this point, Emscripten has only briefly been mentioned in a general context. Since we'll use this tool and the corresponding Emscripten SDK (EMSDK) in the build process, it's important to understand what each technology is and the part it plays in the development workflow. In this section, we'll describe Emscripten's purpose and discuss its relationship to the EMSDK.
So what is Emscripten? Wikipedia provides the following definition:
We discussed source-to-source compilers (or transpilers) in the first chapter and used TypeScript as an example. Transpilers convert source code in one programming language to equivalent source code in another programming language. To elaborate on Emscripten running as a backend to the LLVM compiler, we need to provide some additional details about LLVM.
The official website for LLVM (https://llvm.org) defines the LLVM as a collection of modular and reusable compiler and toolchain technologies. There are several sub-projects that make up LLVM, but we'll be focusing on the two that Emscripten utilizes: Clang and the LLVM Core libraries. To understand how these pieces fit together, let's review the design of a three-stage compiler:
The process is relatively straightforward: three separate stages or ends handle the compilation process. This design allows for different frontends and backends for various programming languages and target architectures and completely decouples the machine code from the source code by using an intermediate representation. Now let's associate each compilation stage with a component of the toolchain we'll use to generate WebAssembly:
Clang is used to compile C/C++ down to LLVM's Intermediate Representation (IR), which Emscripten compiles to a Wasm module (binary format). The two diagrams also demonstrate the relationship between Wasm and machine code. You can think of WebAssembly as a CPU in the browser, with Wasm being the machine code on which it runs.
Emscripten refers to the toolchain used to compile C and C++ down to asm.js or WebAssembly. The EMSDK is used to manage the tools in the toolchain and the corresponding configuration. This eliminates the need for complex environment setup and prevents issues with incompatible versions of tooling. By installing the EMSDK, we have all of the tooling we need (with the exception of the prerequisites) to use the Emscripten compiler. The following diagram is a visual representation of the Emscripten toolchain (with the EMSDK shown in dark gray):
Now that you have a better understanding of Emscripten and the EMSDK, let's move on to the installation process for the prerequisites.
Before installing and configuring the EMSDK, we'll need to install some prerequisites. You installed two of the prerequisites in Chapter 3, Setting Up a Development Environment: Node.js and Git. Each platform has slightly different installation processes and tooling requirements. In this section, we cover the installation process for the prerequisite tooling for each platform.
It's possible that you already have all of the prerequisites installed. Here are the three that you'll need regardless of the platform:
Note the Python version; this is important because installing the wrong version could cause the installation process to fail. If you followed along in Chapter 2, Elements of WebAssembly - Wat, Wasm, and the JavaScript API, and installed Node.js and Git, all that's left is to install Python 2.7 and any additional prerequisites specified for your platform. The Python installation process for each platform will be specified in the following subsections.
There are three additional tools you'll need to install prior to installing the EMSDK:
You can install Xcode from the macOS App Store. If you already had Xcode installed, you can check if the Command Line Tools are installed by going to Xcode | Preferences | Locations and checking if the Command Line Tools option has a value. The Command Line Tools should have already been installed if you installed the Homebrew package manager:
If you don't see that, open up Terminal and run this command:
xcode-select --install
Once complete, you can install CMake by running this command:
brew install cmake
Prior to installing Python, run this command:
python --version
If you see Python 2.7.xx (where xx is the patch version and can be any number), you're ready to install the EMSDK. If you get an error saying the Python command wasn't found or you see Python 3.x.xx, I recommend you install pyenv, a Python Version manager. To install pyenv, run this command:
brew install pyenv
You'll need to take some additional configuration steps to finalize the installation. Follow the installation instructions for Homebrew at https://github.com/pyenv/pyenv#homebrew-on-mac-os-x. After installing and configuring pyenv, run this command to install Python 2.7:
pyenv install 2.7.15
After the installation is complete, run this command:
pyenv global 2.7.15
To ensure you're using the correct version of Python, run this command:
python --version
You should see Python 2.7.xx, where xx is the patch version (I was seeing 2.7.10, which will work fine).
Ubuntu should already have Python 2.7 installed. You can confirm this by running this command:
python --version
If you see Python 2.7.xx (where xx is the patch version and can be any number), you're ready to install the EMSDK. If you get an error saying the python command wasn't found or you see Python 3.x.xx, I recommend you install pyenv, a Python version manager. Before installing pyenv, check if you have curl installed. You can do this by running the following command:
curl --version
If you see a version number and other information, curl is installed. If not, you can install curl by running the following command:
sudo apt-get install curl
Once the curl installation is complete, run this command to install pyenv:
curl -L https://github.com/pyenv/pyenv-installer/raw/master/bin/pyenv-installer | bash
After installing and configuring pyenv, run this command to install Python 2.7:
pyenv install 2.7.15
If you encounter build issues, navigate to the Common build problems page at https://github.com/pyenv/pyenv/wiki/common-build-problems. After the installation is complete, run this command:
pyenv global 2.7.15
To ensure you're using the correct version of Python, run this command:
python --version
You should see Python 2.7.xx, where xx is the patch version (I was seeing 2.7.10, which will work fine).
The only additional prerequisite for Windows is Python 2.7. Before attempting the installation, run this command:
python --version
If you see Python 2.7.xx (where xx is the patch version and can be any number), you're ready to install the EMSDK. If you get an error saying the Python command wasn't found, or you see Python 3.x.xx and Python 2.7 isn't installed on your system, run this command to install Python 2.7:
choco install python2 -y
If you saw Python 3.x.xx prior to installing Python 2.7, you should be able to change the current Python version by updating your path. Before attempting the EMSDK installation, run this command to set Python to 2.7:
SET PATH=C:\Python27\python.exe
If you have all of the prerequisites installed, you're ready to install the EMSDK. The process for getting the EMSDK up and running is relatively straightforward. In this section, we cover the installation process for the EMSDK and demonstrate how to update your VS Code C/C++ configuration to accommodate for Emscripten.
First, select a folder to install the EMSDK. I created a folder at ~/Tooling (or C:\Users\Mike\Tooling on Windows). In a terminal, cd into the folder you just created and run this command:
git clone https://github.com/juj/emsdk.git
Once the clone process is complete, follow the instructions to complete the installation from the section below that corresponds to your platform.
Once the clone process is complete, run each of the commands from the following code snippet. If you see a message recommending that you run git pull instead of ./emsdk update, use the git pull command prior to running the ./emsdk install latest command:
# Change directory into the EMSDK installation folder
cd emsdk

# Fetch the latest registry of available tools
./emsdk update

# Download and install the latest SDK tools
./emsdk install latest

# Make the latest SDK active for the current user (writes ~/.emscripten file)
./emsdk activate latest

# Activate PATH and other environment variables in the current Terminal
source ./emsdk_env.sh
The source ./emsdk_env.sh command will activate the environment variables in the current Terminal, which means every time you create a new Terminal instance, you'd have to re-run it. To prevent having to take this step, you can add the following line to your Bash or Zsh configuration file (that is, ~/.bash_profile or ~/.zshrc):
source ~/Tooling/emsdk/emsdk_env.sh > /dev/null
If you installed the EMSDK in a different location, make sure that you update the path to reflect this. Adding this line to your configuration file will run that environment update command automatically so you can start using the EMSDK immediately. To ensure you can use the Emscripten compiler, run this command:
emcc --version
If you see a message with version information, the setup was successful. If you see an error message stating that the command was not found, double-check your configuration. You may have specified an invalid path for the emsdk_env.sh in your Bash or Zsh configuration file.
Before completing the installation, I recommend you use PowerShell going forward. The examples in this book will be using PowerShell inside cmder. Once the clone process is complete, run each of the commands given in the following code snippet. If you see a message recommending that you run git pull instead of ./emsdk update, use the git pull command prior to running the ./emsdk install latest command:
# Change directory into the EMSDK installation folder
cd emsdk

# Fetch the latest registry of available tools
.\emsdk update

# Download and install the latest SDK tools
.\emsdk install latest

# Make the latest SDK active for the current user (writes ~/.emscripten file)
.\emsdk activate --global latest
The --global flag in the .\emsdk activate command allows you to run emcc without having to run a script to set the environment variables each session. To ensure you can use the Emscripten compiler, restart your CLI and run this command:
emcc --version
If you see a message with version information, the setup was successful.
If you haven't already done so, create a folder that will contain the code samples we'll be working through (the examples use the name book-examples). Open this folder in VS Code, press the F1 key, and select C/Cpp: Edit Configurations… to create a .vscode/c_cpp_properties.json file in the root of your project. It should open the file automatically. Add the following line to the browse.path array: "${env:EMSCRIPTEN}/system/include". This will prevent errors being thrown if you include the emscripten.h header. You may need to manually create the browse object with a path entry if it didn't generate one automatically. The following snippet represents the updated configuration file on Ubuntu:
{
  "name": "Linux",
  "includePath": [
    "/usr/include",
    "/usr/local/include",
    "${workspaceFolder}",
    "${env:EMSCRIPTEN}/system/include"
  ],
  "defines": [],
  "intelliSenseMode": "clang-x64",
  "browse": {
    "path": [
      "/usr/include",
      "/usr/local/include",
      "${workspaceFolder}"
      ],
    "limitSymbolsToIncludedHeaders": true,
    "databaseFilename": ""
  }
}
After installing and configuring the EMSDK, you'll need to test it to ensure you're able to generate Wasm modules from C/C++ code. The easiest way to test it is to compile some code using the emcc command and try running it in a browser. In this section, we'll validate the EMSDK installation by writing and compiling some simple C code and evaluating the Wat associated with the .wasm output.
We'll use some very simple C code to test our compiler installation. We won't need to import any headers or external libraries. We won't use C++ for this test because we need to perform an extra step with C++ to prevent name mangling, which we'll describe in greater detail in Chapter 6, Interacting with JavaScript and Debugging. The code for this section is located in the /chapter-04-installing-deps folder of the learn-webassembly repository. Follow the instructions listed here to test out the EMSDK.
Create a subfolder named /chapter-04-installing-deps in your /book-examples folder. Next, create a new file in this folder named main.c and populate it with the following contents:
int addTwoNumbers(int leftValue, int rightValue) {
    return leftValue + rightValue;
}
In order to compile a C/C++ file with Emscripten, we'll use the emcc command. We need to pass some arguments to the compiler to ensure we get a valid output that we can utilize in the browser. To generate a Wasm file from a C/C++ file, the command follows this format:
emcc <file.c> -Os -s WASM=1 -s SIDE_MODULE=1 -s BINARYEN_ASYNC_COMPILATION=0 -o <file.wasm>
Here's a breakdown of each of the arguments for the emcc command:
| Argument | Description |
| <file.c> | Path of the C or C++ input file that will be compiled down to a Wasm module; we'll replace this with the actual file path when we run the command. |
| -Os | Compiler optimization level. This optimization flag allows for module instantiation without requiring Emscripten's glue code. |
| -s WASM=1 | Tells the compiler to compile code to WebAssembly. |
| -s SIDE_MODULE=1 | Ensures only a WebAssembly module is output (no glue code). |
| -s BINARYEN_ASYNC_COMPILATION=0 |
From official docs: Whether to compile the wasm asynchronously, which is more efficient and does not block the main thread. This is currently required for all but the smallest modules to run in V8.
|
| -o <file.wasm> | Path of output file .wasm file. We'll replace this with the desired output path when we run the command. |
To test if Emscripten is working correctly, open the integrated terminal in VS Code and run the following commands:
# Ensure you're in the /chapter-04-installing-deps folder:
cd chapter-04-installing-deps

# Compile the main.c file to main.wasm:
emcc main.c -Os -s WASM=1 -s SIDE_MODULE=1 -s BINARYEN_ASYNC_COMPILATION=0 -o main.wasm
It may take a minute to compile the file the first time, but subsequent builds will be much faster. If the compilation was successful, you should see a main.wasm file in the /chapter-04-installing-deps folder. If you encounter an error, Emscripten's error message should be descriptive enough to help you correct the issue.
If everything completed successfully, you can view the Wat associated with the main.wasm file by right-clicking main.wasm in VS Code's file explorer and selecting Show WebAssembly from the context menu. The output should look like this:
(module
  (type $t0 (func (param i32)))
  (type $t1 (func (param i32 i32) (result i32)))
  (type $t2 (func))
  (type $t3 (func (result f64)))
  (import "env" "table" (table $env.table 2 anyfunc))
  (import "env" "memoryBase" (global $env.memoryBase i32))
  (import "env" "tableBase" (global $env.tableBase i32))
  (import "env" "abort" (func $env.abort (type $t0)))
  (func $_addTwoNumbers (type $t1) (param $p0 i32) (param $p1 i32) (result i32)
    get_local $p1
    get_local $p0
    i32.add)
  (func $runPostSets (type $t2)
    nop)
  (func $__post_instantiate (type $t2)
     get_global $env.memoryBase
    set_global $g2
    get_global $g2
    i32.const 5242880
    i32.add
    set_global $g3)
  (func $f4 (type $t3) (result f64)
    i32.const 0
    call $env.abort
    f64.const 0x0p+0 (;=0;))
  (global $g2 (mut i32) (i32.const 0))
  (global $g3 (mut i32) (i32.const 0))
  (global $fp$_addTwoNumbers i32 (i32.const 1))
  (export "__post_instantiate" (func $__post_instantiate))
  (export "_addTwoNumbers" (func $_addTwoNumbers))
  (export "runPostSets" (func $runPostSets))
  (export "fp$_addTwoNumbers" (global 4))
  (elem (get_global $env.tableBase) $f4 $_addTwoNumbers))
If the compiler ran successfully, you're ready to move on to the next step and write JavaScript code to interact with the module, which we'll cover in the next chapter.
In this chapter, we covered the overall development workflow when working with WebAssembly. In order to generate our .wasm files, we're using Emscripten, which requires the installation of the EMSDK. Prior to reviewing any installation details, we discussed the technologies under the hood and described how they relate to each other and to WebAssembly. We covered each of the steps required to get EMDSK working locally on your computer. The installation process for the EMSDK on each platform was presented, as well as the installation and configuration instructions for the EMSDK. After installing the EMSDK , we tested the compiler (no to). That was the emcc command we ran in the previous section. Using the emcc command on a simple C code file to ensure Emscripten was working correctly. In the next chapter, we'll walk through the process of creating and loading your first module!
The flags we passed to the emcc command in Chapter 4, Installing the Required Dependencies, produced a single .wasm file that could be loaded and instantiated in the browser using the native WebAssembly object. The C code was a very simple example intended to test the compiler without having to accommodate for included libraries or WebAssembly's limitations. We can overcome some of the limitations of WebAssembly in our C / C++ code with minimal performance loss by utilizing some of Emscripten's capabilities.
In this chapter, we'll cover the compilation and loading steps that correspond with the use of Emscripten's glue code. We'll also describe the process for compiling/outputting strictly .wasm files and loading them using the browser's WebAssembly object.
Our goal for this chapter is to understand the following:
In Chapter 4, Installing the Required Dependencies, you wrote and compiled a simple three-line program to ensure your Emscripten installation was valid. We passed several flags to the emcc command that were required to only output a single .wasm file. By passing other flags to the emcc command, we can output JavaScript glue code alongside the .wasm file as well as an HTML file to handle the loading process. In this section, we're going to write a more complex C program and compile it with the output options that Emscripten offers.
We didn't include any header files or pass in any functions in the example we covered in Chapter 4, Installing the Required Dependencies. Since the intention of the code was solely to test if the compiler installation was valid, there wasn't much need. Emscripten offers a lot of extra functionality that enables us to interact with our C and C++ code with JavaScript and vice versa. Some of these capabilities are Emscripten-specific and don't correspond to the Core Specification or its APIs. In our first example, we'll take advantage of one of Emscripten's ported libraries and a function provided by Emscripten's API.
The following program uses a Simple DirectMedia Layer (SDL2) to move a rectangle diagonally across a canvas in an infinite loop. It was taken from https://github.com/timhutton/sdl-canvas-wasm, but I converted it from C++ to C and modified the code slightly. The code for this section is located in the /chapter-05-create-load-module folder of the learn-webassembly repository. Follow the following instructions to compile C with Emscripten.
Create a folder in your /book-examples folder named /chapter-05-create-load-module. Create a new file in this folder named with-glue.c and populate it with the following contents:
/*
 * Converted to C code taken from:
 * https://github.com/timhutton/sdl-canvas-wasm
 * Some of the variable names and comments were also
 * slightly updated.
 */
#include <SDL2/SDL.h>
#include <emscripten.h>
#include <stdlib.h>

// This enables us to have a single point of reference
// for the current iteration and renderer, rather than
// have to refer to them separately.
typedef struct Context {
  SDL_Renderer *renderer;
  int iteration;
} Context;

/*
 * Looping function that draws a blue square on a red
 * background and moves it across the <canvas>.
 */
void mainloop(void *arg) {
    Context *ctx = (Context *)arg;
    SDL_Renderer *renderer = ctx->renderer;
    int iteration = ctx->iteration;

    // This sets the background color to red:
    SDL_SetRenderDrawColor(renderer, 255, 0, 0, 255);
    SDL_RenderClear(renderer);

    // This creates the moving blue square, the rect.x
    // and rect.y values update with each iteration to move
    // 1px at a time, so the square will move down and
    // to the right infinitely:
    SDL_Rect rect;
    rect.x = iteration;
    rect.y = iteration;
    rect.w = 50;
    rect.h = 50;
    SDL_SetRenderDrawColor(renderer, 0, 0, 255, 255);
    SDL_RenderFillRect(renderer, &rect);

    SDL_RenderPresent(renderer);

    // This resets the counter to 0 as soon as the iteration
    // hits the maximum canvas dimension (otherwise you'd
    // never see the blue square after it travelled across
    // the canvas once).
    if (iteration == 255) {
        ctx->iteration = 0;
    } else {
        ctx->iteration++;
    }
}

int main() {
    SDL_Init(SDL_INIT_VIDEO);
    SDL_Window *window;
    SDL_Renderer *renderer;

    // The first two 255 values represent the size of the <canvas>
    // element in pixels.
    SDL_CreateWindowAndRenderer(255, 255, 0, &window, &renderer);

    Context ctx;
    ctx.renderer = renderer;
    ctx.iteration = 0;

    // Call the function repeatedly:
    int infinite_loop = 1;

    // Call the function as fast as the browser wants to render
    // (typically 60fps):
    int fps = -1;

    // This is a function from emscripten.h, it sets a C function
    // as the main event loop for the calling thread:
    emscripten_set_main_loop_arg(mainloop, &ctx, fps, infinite_loop);

    SDL_DestroyRenderer(renderer);
    SDL_DestroyWindow(window);
    SDL_Quit();

    return EXIT_SUCCESS;
}
The emscripten_set_main_loop_arg() toward the end of the main() function is available because we included emscripten.h at the top of the file. The variables and functions prefixed with SDL_ are available because of the #include <SDL2/SDL.h> at the top of the file. If you're seeing a squiggly red error line under the <SDL2/SDL.h> statement, you can disregard it. It's due to SDL's include path not being present in your c_cpp_properties.json file.
Now that we have our C code written, we'll need to compile it. One of the required flags you must pass to the emcc command is -o <target>, where <target> is the path to the desired output file. The extension of that file will do more than just output that file; it impacts some of the decisions the compiler makes. The following table, taken from Emscripten's emcc documentation at http://kripken.github.io/emscripten-site/docs/tools_reference/emcc.html#emcc-o-target, defines the generated output types based on the file extension specified:
| Extension | Output |
| <name>.js |
JavaScript glue code (and .wasm if the s WASM=1 flag is specified). |
| <name>.html |
HTML and separate JavaScript file (<name>.js). Having the separate JavaScript file improves page load time. |
| <name>.bc |
LLVM bitcode (default). |
| <name>.o |
LLVM bitcode (same as .bc). |
| <name>.wasm |
Wasm file only (with flags specified from Chapter 4, Installing the Required Dependencies). |
You can disregard the .bc and .o file extensions—we won't need to output LLVM bitcode. The .wasm extension isn't on the emcc Tools Reference page, but it is a valid option if you pass the correct compiler flags. These output options factor into the C/C++ code we write.
If you specify an HTML file extension (for example, -o with-glue.html) for the output, you'll end up with a with-glue.html, with-glue.js, and with-glue.wasm file (assuming you also specified -s WASM=1). If you have a main() function in the source C/C++ file, it'll execute that function as soon as the HTML loads. Let's compile our example C code to see this in action. To compile it with the HTML file and JavaScript glue code, cd into the /chapter-05-create-load-module folder and run the following command:
emcc with-glue.c -O3 -s WASM=1 -s USE_SDL=2 -o with-glue.html
The first time you run this command, Emscripten is going to download and build the SDL2 library. It could take several minutes to complete this, but you'll only need to wait once. Emscripten caches the library so subsequent builds will be much faster. Once the build is complete, you'll see three new files in the folder: HTML, JavaScript, and Wasm files. Run the following command to serve the file locally:
serve -l 8080
If you open your browser up to http://127.0.0.1:8080/with-glue.html, you should see the following:
The blue rectangle should be moving diagonally from the upper-left corner of the red rectangle to the lower-right. Since you specified a main() function in the C file, Emscripten knows it should execute it right away. If you open up the with-glue.html file in VS code and scroll to the bottom of the file, you will see the loading code. You won't see any references to the WebAssembly object; that's being handled in the JavaScript glue code file.
The loading code that Emscripten generates in the HTML file contains error handling and other helpful functions to ensure the module is loading before executing the main() function. If you specify .js for the extension of the output file, you'll have to create an HTML file and write the loading code yourself. In the next section, we're going to dig into the loading code in more detail.
Loading and interacting with a module that utilizes Emscripten's glue code is considerably different from WebAssembly's JavaScript API. This is because Emscripten provides additional functionality for interacting with the JavaScript code. In this section, we're going to discuss the loading code that Emscripten provides when outputting an HTML file and review the process for loading an Emscripten module in the browser.
If you specify -o <target>.html when running the emcc command, Emscripten generates an HTML file and automatically adds code to load the module to the end of the file. Here's what the loading code in the HTML file looks like with the contents of each Module function excluded:
var statusElement = document.getElementById('status');
var progressElement = document.getElementById('progress');
var spinnerElement = document.getElementById('spinner');

var Module = {
  preRun: [],
  postRun: [],
  print: (function() {...})(),
  printErr: function(text) {...},
  canvas: (function() {...})(),
  setStatus: function(text) {...},
  totalDependencies: 0,
  monitorRunDependencies: function(left) {...}
};

Module.setStatus('Downloading...');

window.onerror = function(event) {
  Module.setStatus('Exception thrown, see JavaScript console');
  spinnerElement.style.display = 'none';
  Module.setStatus = function(text) {
    if (text) Module.printErr('[post-exception status] ' + text);
  };
};
The functions within the Module object are present to detect and address errors, monitor the loading status of the Module, and optionally execute some functions before or after the run() method from the corresponding glue code file executes. The canvas function, shown in the following snippet, returns the <canvas> element from the DOM that was specified in the HTML file before the loading code:
canvas: (function() {
  var canvas = document.getElementById('canvas');
  canvas.addEventListener(
    'webglcontextlost',
    function(e) {
      alert('WebGL context lost. You will need to reload the page.');
      e.preventDefault();
    },
    false
  );

  return canvas;
})(),
This code is convenient for detecting errors and ensuring the Module is loaded, but for our purposes, we won't need to be as verbose.
Emscripten's generated loading code provides helpful error handling. If you're using Emscripten's output in production, I would recommend that you include it to ensure you're handling errors correctly. However, we don't actually need all the code to utilize our Module. Let's write some much simpler code and test it out. First, let's compile our C file down to glue code with no HTML output. To do that, run the following command:
emcc with-glue.c -O3 -s WASM=1 -s USE_SDL=2 -s MODULARIZE=1 -o custom-loading.js
The -s MODULARIZE=1 compiler flag allows us to use a Promise-like API to load our Module. Once the compilation is complete, create a file in the /chapter-05-create-load-module folder named custom-loading.html and populate it with the following contents:
<!doctype html>
<html lang="en-us">
<head>
  <title>Custom Loading Code</title>
</head>
<body>
  <h1>Using Custom Loading Code</h1>
  <canvas id="canvas"></canvas>
  <script type="application/javascript" src="custom-loading.js"></script>
  <script type="application/javascript">
    Module({
      canvas: (() => document.getElementById('canvas'))(),
    })
      .then(() => {
        console.log('Loaded!');
      });
  </script>
</body>
</html>
The loading code is now using ES6's arrow function syntax for the canvas loading function, which reduces the lines of code required. Start your local server by running the serve command within the /chapter-05-create-load-module folder:
serve -l 8080
When you navigate to http://127.0.0.1:8080/custom-loading.html in your browser, you should see this:
Of course, the function we're running isn't very complex, but it demonstrates the bare-bones requirements for loading Emscripten's Module. We will examine the Module object in much greater detail in Chapter 6, Interacting with JavaScript and Debugging, but for now just be aware that the loading process is different from WebAssembly, which we'll cover in the next section.
If we want to use WebAssembly according to the official specification, without the extra features that Emscripten provides, we need to pass some flags to the emcc command and ensure we're writing code that can be used by WebAssembly with relative ease. In the Writing the example C code section, we wrote a program that rendered a blue rectangle that moved diagonally across a red canvas. It utilized one of Emscripten's ported libraries, SDL2. In this section, we're going to write and compile some C code that doesn't rely on Emscripten's helper methods and ported libraries.
Before we get to the C code we'll use for our WebAssembly module, let's try an experiment. Open the CLI in the /chapter-05-create-load-module folder, and try running this command:
emcc with-glue.c -Os -s WASM=1 -s USE_SDL=2 -s SIDE_MODULE=1 -s BINARYEN_ASYNC_COMPILATION=0 -o try-with-glue.wasm
You should see a try-with-glue.wasm file appear in VS Code's file explorer panel after the compilation is complete. Right-click on the file and select Show WebAssembly. The beginning of the corresponding Wat representation should resemble the following code:
(module
  (type $t0 (func (param i32)))
  (type $t1 (func (param i32 i32 i32 i32 i32) (result i32)))
  (type $t2 (func (param i32) (result i32)))
  (type $t3 (func))
  (type $t4 (func (param i32 i32) (result i32)))
  (type $t5 (func (param i32 i32 i32 i32)))
  (type $t6 (func (result i32)))
  (type $t7 (func (result f64)))
  (import "env" "memory" (memory $env.memory 256))
  (import "env" "table" (table $env.table 4 anyfunc))
  (import "env" "memoryBase" (global $env.memoryBase i32))
  (import "env" "tableBase" (global $env.tableBase i32))
  (import "env" "abort" (func $env.abort (type $t0)))
  (import "env" "_SDL_CreateWindowAndRenderer" (func $env._SDL_CreateWindowAndRenderer (type $t1)))
  (import "env" "_SDL_DestroyRenderer" (func $env._SDL_DestroyRenderer (type $t0)))
  (import "env" "_SDL_DestroyWindow" (func $env._SDL_DestroyWindow (type $t0)))
  (import "env" "_SDL_Init" (func $env._SDL_Init (type $t2)))
  (import "env" "_SDL_Quit" (func $env._SDL_Quit (type $t3)))
  (import "env" "_SDL_RenderClear" (func $env._SDL_RenderClear (type $t2)))
  (import "env" "_SDL_RenderFillRect" (func $env._SDL_RenderFillRect (type $t4)))
  (import "env" "_SDL_RenderPresent" (func $env._SDL_RenderPresent (type $t0)))
  (import "env" "_SDL_SetRenderDrawColor" (func $env._SDL_SetRenderDrawColor (type $t1)))
  (import "env" "_emscripten_set_main_loop_arg" (func $env._emscripten_set_main_loop_arg (type $t5)))
  ...
If you wanted to load this in a browser and execute it, you'd have to pass in an importObj object to WebAssembly's instantiate() or compile() function with an env object containing each of those import "env" functions. Emscripten handles all of this for us behind the scenes with the glue code, which makes it an incredibly valuable tool. However, we can replace the SDL2 functionality by using the DOM while still tracking the rectangle's location in C.
We will write the C code differently to ensure we only have to pass a few functions into the importObj.env object to execute the code. Create a file named without-glue.c in the /chapter-05-create-load-module folder and populate it with the following contents:
/*
 * This file interacts with the canvas through imported functions.
 * It moves a blue rectangle diagonally across the canvas
 * (mimics the SDL example).
 */
#include <stdbool.h>

#define BOUNDS 255
#define RECT_SIDE 50
#define BOUNCE_POINT (BOUNDS - RECT_SIDE)

// These functions are passed in through the importObj.env object
// and update the rectangle on the <canvas>:
extern int jsClearRect();
extern int jsFillRect(int x, int y, int width, int height);

bool isRunning = true;

typedef struct Rect {
  int x;
  int y;
  char direction;
} Rect;

struct Rect rect;

/*
 * Updates the rectangle location by 1px in the x and y in a
 * direction based on its current position.
 */
void updateRectLocation() {
    // Since we want the rectangle to "bump" into the edge of the
    // canvas, we need to determine when the right edge of the
    // rectangle encounters the bounds of the canvas, which is why
    // we're using the canvas width - rectangle width:
    if (rect.x == BOUNCE_POINT) rect.direction = 'L';

    // As soon as the rectangle "bumps" into the left side of the
    // canvas, it should change direction again.
    if (rect.x == 0) rect.direction = 'R';

    // If the direction has changed based on the x and y
    // coordinates, ensure the x and y points update
    // accordingly:
    int incrementer = 1;
    if (rect.direction == 'L') incrementer = -1;
    rect.x = rect.x + incrementer;
    rect.y = rect.y + incrementer;
}

/*
 * Clear the existing rectangle element from the canvas and draw a
 * new one in the updated location.
 */
void moveRect() {
    jsClearRect();
    updateRectLocation();
    jsFillRect(rect.x, rect.y, RECT_SIDE, RECT_SIDE);
}

bool getIsRunning() {
    return isRunning;
}

void setIsRunning(bool newIsRunning) {
    isRunning = newIsRunning;
}

void init() {
    rect.x = 0;
    rect.y = 0;
    rect.direction = 'R';
    setIsRunning(true);
}
We will call the functions from the C code to determine the x and y coordinates. The setIsRunning() function can be used to pause the rectangle's movement. Now that our C code is ready, let's compile it. In the VS Code terminal, cd into the /chapter-05-create-load-module folder, and run the following command:
emcc without-glue.c -Os -s WASM=1 -s SIDE_MODULE=1 -s BINARYEN_ASYNC_COMPILATION=0 -o without-glue.wasm
Once the compilation is complete, you can right-click on the resultant without-glue.wasm file and select Show WebAssembly to see the Wat representation. You should see the following at the top of the file for the import "env" items:
(module
  (type $t0 (func (param i32)))
  (type $t1 (func (result i32)))
  (type $t2 (func (param i32 i32 i32 i32) (result i32)))
  (type $t3 (func))
  (type $t4 (func (result f64)))
  (import "env" "memory" (memory $env.memory 256))
  (import "env" "table" (table $env.table 8 anyfunc))
  (import "env" "memoryBase" (global $env.memoryBase i32))
  (import "env" "tableBase" (global $env.tableBase i32))
  (import "env" "abort" (func $env.abort (type $t0)))
  (import "env" "_jsClearRect" (func $env._jsClearRect (type $t1)))
  (import "env" "_jsFillRect" (func $env._jsFillRect (type $t2)))
  ...
We need to pass in the _jsClearRect and _jsFillRect functions within the importObj object. We'll cover how to do that in the section on the HTML file with JavaScript interaction code.
The emcc command is a little verbose, and having to manually run this on the command line for different files can get cumbersome. To expedite the compilation process, we can use VS Code's Tasks feature to create a build task for the files we'll use. To create a build task, select Tasks | Configure Default Build Task…, select the Create tasks.json from template option, and select Others to generate a simple tasks.json file in the .vscode folder. Update the contents of the file to contain the following:
{
  // See https://go.microsoft.com/fwlink/?LinkId=733558
  // for the documentation about the tasks.json format
  "version": "2.0.0",
  "tasks": [
    {
      "label": "Build",
      "type": "shell",
      "command": "emcc",
      "args": [
        "${file}",
        "-Os",
        "-s", "WASM=1",
        "-s", "SIDE_MODULE=1",
        "-s", "BINARYEN_ASYNC_COMPILATION=0",
        "-o", "${fileDirname}/${fileBasenameNoExtension}.wasm"
       ],
      "group": {
        "kind": "build",
        "isDefault": true
       },
       "presentation": {
         "panel": "new"
       }
     }
  ]
}
The label value is simply a name to refer to when running a task. The type and command values indicate that it should run the emcc command in a shell (terminal). The args value is an array of arguments to be passed to the emcc command (based on space separation). The "${file}" argument tells VS Code to compile the currently open file. The "${fileDirname}/${fileBasenameNoExtension}.wasm" argument indicates that the .wasm output will have the same name as the currently open file (with a .wasm extension), and it should be placed in the active folder of the currently open file. If you don't specify ${fileDirname}, the output file will be placed in the root folder (rather than /chapter-05-create-load-module in this case).
The group object indicates that this task is the default build step, so if you use the keyboard shortcut Cmd/Ctrl + Shift + B, this is the task that will be run. The presentation.panel value of "new" tells VS Code to open up a new CLI instance when the build step runs. This is a personal preference and can be omitted.
You can save and close the tasks.json file once it's fully populated. To test it out, first delete the without-glue.wasm file that you generated with the emcc command in the previous section. Next, ensure you have without-glue.c open with the cursor in the file and run the build task by either selecting Tasks | Run Build Task… or using the keyboard shortcut Cmd/Ctrl + Shift + B. A new panel in the integrated terminal will perform the compilation and a without-glue.wasm file should appear after a second or two.
Now that we have a Wasm file, we'll need some JavaScript code to compile and execute it. There's a few steps we'll have to follow to ensure the code can be successfully utilized in the browser. In this section, we will write some common JavaScript loading code that we can reuse for other examples, create an HTML file that demonstrates the use of the Wasm module, and test the results in the browser.
We will fetch and instantiate a .wasm file in several of the examples, so it makes sense to move the JavaScript loading code to a common file. The actual fetch and instantiation code is only a few lines, but having to repeatedly redefine the importObj object that Emscripten expects is a waste of time. We'll make this code available in a commonly accessible file to expedite the code-writing process. Create a new folder named /common in the /book-examples folder and add a file named load-wasm.js with the following contents:
/**
 * Returns a valid importObj.env object with default values to pass
 * into the WebAssembly.Instance constructor for Emscripten's
 * Wasm module.
 */
const getDefaultEnv = () => ({
  memoryBase: 0,
  tableBase: 0,
  memory: new WebAssembly.Memory({ initial: 256 }),
  table: new WebAssembly.Table({ initial: 2, element: 'anyfunc' }),
  abort: console.log
});

/**
 * Returns a WebAssembly.Instance instance compiled from the specified
 * .wasm file.
 */
function loadWasm(fileName, importObj = { env: {} }) {
  // Override any default env values with the passed in importObj.env
  // values:
  const allEnv = Object.assign({}, getDefaultEnv(), importObj.env);

  // Ensure the importObj object includes the valid env value:
  const allImports = Object.assign({}, importObj, { env: allEnv });

  // Return the result of instantiating the module (instance and module):
  return fetch(fileName)
    .then(response => {
      if (response.ok) return response.arrayBuffer();
      throw new Error(`Unable to fetch WebAssembly file ${fileName}`);
    })
    .then(bytes => WebAssembly.instantiate(bytes, allImports));
}
The getDefaultEnv() function provides the required importObj.env contents for Emscripten's Wasm module. We want the ability to pass in any additional imports, which is why the Object.assign() statement is used. With the addition of any other imports the Wasm module expects, Emscripten's Wasm output will always require these five import statements for the "env" object:
(import "env" "memory" (memory $env.memory 256))
(import "env" "table" (table $env.table 8 anyfunc))
(import "env" "memoryBase" (global $env.memoryBase i32))
(import "env" "tableBase" (global $env.tableBase i32))
(import "env" "abort" (func $env.abort (type $t0)))
We need to pass those into the instantiate() function to ensure the Wasm module loads successfully, otherwise the browser will throw an error. Now that we have our loading code ready, let's move on to the HTML and rectangle-rendering code.
We're going to need an HTML page with a <canvas> element and JavaScript code to interact with the Wasm module. Create a file named without-glue.html in the /chapter-05-create-load-module folder and populate it with the following contents:
<!doctype html>
<html lang="en-us">
<head>
  <title>No Glue Code</title>
  <script type="application/javascript" src="../common/load-wasm.js"></script>
</head>
<body>
  <h1>No Glue Code</h1>
  <canvas id="myCanvas" width="255" height="255"></canvas>
  <div style="margin-top: 16px;">
    <button id="actionButton" style="width: 100px; height: 24px;">
      Pause
    </button>
  </div>
  <script type="application/javascript">
    const canvas = document.querySelector('#myCanvas');
    const ctx = canvas.getContext('2d');

    const env = {
      table: new WebAssembly.Table({ initial: 8, element: 'anyfunc' }),
      _jsFillRect: function (x, y, w, h) {
        ctx.fillStyle = '#0000ff';
        ctx.fillRect(x, y, w, h);
      },
      _jsClearRect: function() {
        ctx.fillStyle = '#ff0000';
        ctx.fillRect(0, 0, 255, 255);
      },
    };

    loadWasm('without-glue.wasm', { env }).then(({ instance }) => {
      const m = instance.exports;
      m._init();

      // Move the rectangle by 1px in the x and y every 20 milliseconds:
      const loopRectMotion = () => {
        setTimeout(() => {
          m._moveRect();
          if (m._getIsRunning()) loopRectMotion();
        }, 20)
      };

      // Enable you to pause and resume the rectangle movement:
      document.querySelector('#actionButton')
        .addEventListener('click', event => {
          const newIsRunning = !m._getIsRunning();
          m._setIsRunning(newIsRunning);
          event.target.innerHTML = newIsRunning ? 'Pause' : 'Start';
          if (newIsRunning) loopRectMotion();
        });

      loopRectMotion();
    });
  </script>
</body>
</html>
This code will replicate the SDL example we created in the previous sections with some added functionality. When the rectangle bumps into the lower-right hand corner, it changes direction. You're also able to pause and resume the rectangle's movement using a button under the <canvas> element. You can see how we passed the _jsFillRect and _jsClearRect functions into the importObj.env object so they can be referenced by the Wasm module.
Let's test our code out in the browser. From the VS Code terminal, make sure you're in the /book-examples folder and run the command to start up a local server:
serve -l 8080
It's important that you're in the /book-examples folder. If you try serving up the code in the /chapter-05-create-load-module folder only, you won't be able to use the loadWasm() function. If you open up your browser to http://127.0.0.1:8080/chapter-05-create-load-module/without-glue.html, you should see this:
Try pressing the Pause button; the caption should change to Start and the rectangle should stop moving. Clicking it again should cause the rectangle to start moving again.
In this chapter, we covered the compilation and loading processes for modules that utilize the Emscripten glue code alongside the Wasm modules. By utilizing some of Emscripten's built-in features, such as ported libraries and helper methods, we were able to demonstrate the advantages Emscripten offers. We discussed some of the compiler flags that you can pass to the emcc command and how that will affect your output. By utilizing VS Code's Tasks feature, we were able to set up a build command to expedite the build process going forward. We also reviewed the process for compiling and loading a Wasm module without the glue code. We wrote some reusable JavaScript code to load the module as well as code to interact with our compiled Wasm module.
In Chapter 6, Interacting with JavaScript and Debugging, we're going to cover interacting with JavaScript and debugging techniques in the browser.
There's a great deal of exciting features and proposals in the works for WebAssembly. However, at the time of writing this book, the feature set is rather limited. As it stands, you can benefit greatly from using some of the features Emscripten provides. The process for interacting with C/C++ from JavaScript (and vice versa) will differ depending on whether you decide to use Emscripten.
In this chapter, we will cover how to utilize JavaScript functions with C/C++ code as well as how to interact with the compiled output of your C/C++ code from JavaScript. We'll also describe how Emscripten's glue code affects the ways a Wasm instance is utilized and how to debug compiled code in the browser.
Our goal for this chapter is to understand the following:
In the previous chapter, we briefly covered Emscripten's Module object and how to load it in the browser. The Module object provides several convenient methods and differs significantly from the browser's WebAssembly object. In this section, we're going to review Emscripten's Module object in greater detail. We'll also discuss the difference between Emscripten's Module and the objects described in WebAssembly's JavaScript API.
Emscripten's official site provides the following definition for the Module object:
Not only is the loading procedure different from WebAssembly's compile and instantiate functions, but the Module provides some helpful functionality out of the box that would otherwise require a custom implementation in WebAssembly. The Module is available in a global scope (window.Module) after fetching and loading Emscripten's JavaScript glue code.
Emscripten's Module object provides some default methods and properties to aid in debugging and ensuring the successful execution of your compiled code. You can utilize the preRun and postRun properties to execute JavaScript code before or after the Module's run() function is called, or pipe the output of the print() and printErr() functions to an HTML element on the page. We'll utilize some of these methods later in this book. You can read more about them at https://kripken.github.io/emscripten-site/docs/api_reference/module.html.
We covered the browser's WebAssembly object and the corresponding loading procedures in Chapter 5, Creating and Loading a WebAssembly Module. WebAssembly's JavaScript and Web APIs define the objects and methods available in the browser's window.WebAssembly object. Emscripten's Module can be seen as a combination of WebAssembly's Module and Instance objects, which are present in the result object that WebAssembly's instantiation function returns. By passing the -s MODULARIZE=1 flag to the emcc command, we're able to replicate WebAssembly's instantiation method (to a degree). We will examine the differences between Emscripten's Module and the browser's WebAssembly object in greater detail as we evaluate the methods of integrating JavaScript and C/C++ in the upcoming sections.
Calling functions from a Wasm instance is a relatively straightforward process with or without Emscripten's glue code. Utilizing Emscripten's API affords a wider range of functionality and integration at the expense of including the glue code alongside the .wasm file. In this section, we will review the means of interacting with the compiled Wasm instance through JavaScript and the added tooling Emscripten provides.
Emscripten provides two functions for calling compiled C/C++ functions from JavaScript: ccall() and cwrap(). Both of these functions are present in the Module object. Deciding which one to use is contingent on whether the function will be called more than once. The content in the following sections was taken from Emscripten's API reference documentation for preamble.js, which can be viewed at http://kripken.github.io/emscripten-site/docs/api_reference/preamble.js.html.
Module.ccall() calls a compiled C function from JavaScript and returns the result of that function. The function signature for Module.ccall() is as follows:
ccall(ident, returnType, argTypes, args, opts)
You must specify a type name for the returnType and argTypes parameters. The possible types are "number", "string", "array", and "boolean", which correspond to the appropriate JavaScript types. You cannot specify "array" for the returnType parameter because there is no way to know the length of the array. If the function doesn't return anything, you can specify null for the returnType (note the absence of quotation marks).
The opts parameter is an optional options object that can contain a Boolean property named async. Specifying a value of true for this property implies that the call will perform an async operation. We won't use this parameter for any of our examples, but if you wish to learn more about it, the documentation is available at http://kripken.github.io/emscripten-site/docs/api_reference/preamble.js.html#calling-compiled-c-functions-from-javascript.
Let's look at an example of ccall(). The following code, taken from the Emscripten site, demonstrates how to call a function named c_add() from the compiled output of a C file:
// Call C from JavaScript
var result = Module.ccall(
  'c_add', // name of C function
  'number', // return type
  ['number', 'number'], // argument types
  [10, 20] // arguments
);

// result is 30
Module.cwrap() is similar to ccall() in that it calls a compiled C function. However, rather than returning a value, it returns a JavaScript function that can be reused as many times as needed. The function signature for Module.cwrap() is as follows:
cwrap(ident, returnType, argTypes)
Just as with ccall(), you can specify string values that represent types for the returnType and argTypes parameters. You cannot use the "array" type in argTypes because there is no way to know the length of the array when the function is called. For a function that doesn't return a value, use null (with no quotation marks) for the returnType parameter.
The following code, taken from the Emscripten site, demonstrates the use of cwrap() to create a reusable function:
// Call C from JavaScript
var c_javascript_add = Module.cwrap(
  'c_add', // name of C function
  'number', // return type
  ['number', 'number'] // argument types
);

// Call c_javascript_add normally
console.log(c_javascript_add(10, 20)); // 30
console.log(c_javascript_add(20, 30)); // 50
You may have noticed that the descriptions of ccall() and cwrap() specified that both are used to call a compiled C function. The omission of C++ was intentional because an additional step is needed to call functions from a C++ file. C++ supports function overloading, which means that you can use the same function name multiple times, but pass different arguments to each one to get a different result. Here's an example of some code that uses function overloading:
int addNumbers(int num1, int num2) {
    return num1 + num2;
}

int addNumbers(int num1, int num2, int num3) {
    return num1 + num2 + num3;
}

int addNumbers(int num1, int num2, int num3, int num4) {
    return num1 + num2 + num3 + num4;
}

// The function will return a value based on how many
// arguments you pass it:
int getSumOfTwoNumbers = addNumbers(1, 2);
// returns 3

int getSumOfThreeNumbers = addNumbers(1, 2, 3);
// returns 6

int getSumOfFourNumbers = addNumbers(1, 2, 3, 4);
// returns 10
The compiler needs to differentiate between these functions. If it used the name addNumbers and you tried calling the function in one place with two arguments and another with three, it would fail. To call the function by name in your compiled Wasm, you need to wrap the function in an extern block. One implication of wrapping the function is that you would have to explicitly define functions for each condition. The following code snippet demonstrates how to implement the previous functions without name mangling:
extern "C" {
int addTwoNumbers(int num1, int num2) {
    return num1 + num2;
}

int addThreeNumbers(int num1, int num2, int num3) {
    return num1 + num2 + num3;
}

int addFourNumbers(int num1, int num2, int num3, int num4) {
    return num1 + num2 + num3 + num4;
}
}
We demonstrated how to call a function in a Wasm instance from JavaScript in the previous chapter, but that was assuming you instantiated a module in the browser with no glue code. Emscripten provides the ability to call functions from the Wasm instance as well. After a module is instantiated, you call functions by invoking them from the instance.exports object, which is accessible from the result of the resolved Promise. MDN's documentation provides the following function signature for WebAssembly.instantiateStreaming:
Promise<ResultObject> WebAssembly.instantiateStreaming(source, importObject);
The ResultObject contains the instance object that we need to reference to call exported functions from the module. Here's some code that calls a function named _addTwoNumbers from the compiled Wasm instance:
// Assume the importObj is already defined.
WebAssembly.instantiateStreaming(
  fetch('simple.wasm'),
  importObj
)
  .then(result => {
    const addedNumbers = result.instance.exports._addTwoNumbers(1, 2);
    // result is 3
  });
Emscripten provides a way to perform function calls in much the same way, albeit in a slightly different implementation. If you use the Promise-like API, you can access the function from an asm object that the promise of the Module() resolves with. The following example demonstrates how to utilize this functionality:
// Using Emscripten's Module
Module()
  .then(result => {
    // "asm" is essentially "instance"
    const exports = result.asm;
    const addedNumbers = exports._addTwoNumbers(1, 2);
    // result is 3
  });
Replicating the WebAssembly's Web API syntax with Emscripten simplifies any future refactoring. You can easily replace Module() with WebAssembly's instantiateStreaming() method and result.asm with result.instance in the future if you decide to use WebAssembly's Web API.
Accessing JavaScript's functionality from C/C++ code allows for added flexibility when working with WebAssembly. The methodologies and means of utilizing JavaScript differ considerably between Emscripten's glue code and Wasm-only implementations. In this section, we will cover the various ways you can integrate JavaScript into your C/C++ code with and without Emscripten.
Emscripten provides several techniques for integrating JavaScript with your C/C++ code. The techniques available differ in implementation and complexity, and some only apply to specific execution environments (for example, the browser). Deciding which one to use is contingent on your specific use case. We'll focus on the emscripten_run_script() function and inlining JavaScript with EM_* wrappers. The content in the following sections was taken from the Interacting with Code section of Emscripten's site, which can be viewed at https://kripken.github.io/emscripten-site/docs/porting/connecting_cpp_and_javascript/Interacting-with-code.html#interacting-with-code.
The Emscripten site describes the emscripten_run_script() function as the most direct, but slightly slower approach for calling JavaScript for C/C++. It's a technique that is well suited for a single line of JavaScript code and can be useful for debugging. The documentation states that it effectively runs the code using eval(), which is a JavaScript function that executes a string as code. The following code taken from the Emscripten site demonstrates the use of emscripten_run_script() to call the browser's alert() function with the text 'hi':
emscripten_run_script("alert('hi')");
For more complex use cases where performance is a factor, using inline JavaScript provides a better solution.
You can wrap JavaScript code inside your C/C++ file with EM_ASM() and it will execute when the compiled code is run in the browser. The following code demonstrates basic usage:
#include <emscripten.h>

int main() {
    EM_ASM(
        console.log('This is some JS code.');
    );
    return 0;
}
The JavaScript code is executed immediately and cannot be reused within the C/C++ file in which it is contained. Arguments can be passed into the JavaScript code block where they arrive as variables $0, $1, and so on. These arguments can either be of type int32_t or double. The following code snippet, taken from the Emscripten site, demonstrates how to utilize arguments in an EM_ASM() block:
EM_ASM({
    console.log('I received: ' + [ $0, $1 ]);
}, 100, 35.5);
If you need a reusable function within your C/C++ file, you can wrap JavaScript code within an EM_JS() block and execute it like a normal C/C++ function. The definition for EM_JS() is described in the following code snippet:
EM_JS(return_type, function_name, arguments, code)
The return_type parameter represents the C type that corresponds with the JavaScript code's output (for example, int or float). If nothing is returned from the JavaScript code, specify void for the return_type. The next parameter, function_name, represents the name to use when calling the JavaScript code from other locations in the C/C++ file. The arguments parameter is used to define arguments that can be passed into the JavaScript code from the C calling function. The code parameter is the JavaScript code that's wrapped in curly braces. The following code snippet, taken from the Emscripten site, demonstrates the use of EM_JS() in a C file:
#include <emscripten.h>

EM_JS(void, take_args, (int x, float y), {
    console.log(`I received ${x} and ${y}`);
});

int main() {
    take_args(100, 35.5);
    return 0;
}
Let's write some code that utilizes all of these features. In this section, we will modify the code we used in the Compiling C without the glue code and Fetching and instantiating a Wasm file sections of Chapter 5, Creating and Loading a WebAssembly Module. This was the code that displayed a moving blue rectangle on a red canvas and could be paused and restarted with the click of a button. The code for this section is located in the /chapter-06-interact-with-js folder in the learn-webassembly repository. Let's start by updating the C code.
Create a new folder in your /book-examples folder named /chapter-06-interact-with-js. Create a new file in the /chapter-06-interact-with-js folder named js-with-glue.c and populate it with the following contents:
/*
 * This file interacts with the canvas through imported functions.
 * It moves a blue rectangle diagonally across the canvas
 * (mimics the SDL example).
 */
#include <emscripten.h>
#include <stdbool.h>

#define BOUNDS 255
#define RECT_SIDE 50
#define BOUNCE_POINT (BOUNDS - RECT_SIDE)

bool isRunning = true;

typedef struct Rect {
  int x;
  int y;
  char direction;
} Rect;

struct Rect rect;

/*
 * Updates the rectangle location by 1px in the x and y in a
 * direction based on its current position.
 */
void updateRectLocation() {
    // Since we want the rectangle to "bump" into the edge of the
    // canvas, we need to determine when the right edge of the
    // rectangle encounters the bounds of the canvas, which is why
    // we're using the canvas width - rectangle width:
    if (rect.x == BOUNCE_POINT) rect.direction = 'L';

    // As soon as the rectangle "bumps" into the left side of the
    // canvas, it should change direction again.
    if (rect.x == 0) rect.direction = 'R';

    // If the direction has changed based on the x and y
    // coordinates, ensure the x and y points update
    // accordingly:
    int incrementer = 1;
    if (rect.direction == 'L') incrementer = -1;
    rect.x = rect.x + incrementer;
    rect.y = rect.y + incrementer;
}

EM_JS(void, js_clear_rect, (), {
    // Clear the rectangle to ensure there's no color where it
    // was before:
    var canvas = document.querySelector('#myCanvas');
    var ctx = canvas.getContext('2d');
    ctx.fillStyle = '#ff0000';
    ctx.fillRect(0, 0, 255, 255);
});

EM_JS(void, js_fill_rect, (int x, int y, int width, int height), {
    // Fill the rectangle with blue in the specified coordinates:
    var canvas = document.querySelector('#myCanvas');
    var ctx = canvas.getContext('2d');
    ctx.fillStyle = '#0000ff';
    ctx.fillRect(x, y, width, height);
});

/*
 * Clear the existing rectangle element from the canvas and draw a
 * new one in the updated location.
 */
EMSCRIPTEN_KEEPALIVE
void moveRect() {
    // Event though the js_clear_rect doesn't have any
    // parameters, we pass 0 in to prevent a compiler warning:
    js_clear_rect(0);
    updateRectLocation();
    js_fill_rect(rect.x, rect.y, RECT_SIDE, RECT_SIDE);
}

EMSCRIPTEN_KEEPALIVE
bool getIsRunning() {
    return isRunning;
}

EMSCRIPTEN_KEEPALIVE
void setIsRunning(bool newIsRunning) {
    isRunning = newIsRunning;
    EM_ASM({
        // isRunning is either 0 or 1, but in JavaScript, 0
        // is "falsy", so we can set the status text based
        // without explicitly checking if the value is 0 or 1:
        var newStatus = $0 ? 'Running' : 'Paused';
        document.querySelector('#runStatus').innerHTML = newStatus;
    }, isRunning);
}

EMSCRIPTEN_KEEPALIVE
void init() {
    emscripten_run_script("console.log('Initializing rectangle...')");
    rect.x = 0;
    rect.y = 0;
    rect.direction = 'R';
    setIsRunning(true);
    emscripten_run_script("console.log('Rectangle should be moving!')");
}
You can see that we used all three of the JavaScript integrations that Emscripten provides. There are two functions, js_clear_rect() and js_fill_rect(), that are defined in EM_JS() blocks that take the place of the imported functions from the original example. The EM_ASM() block within the setIsRunning() function updates the text of a new status element we'll add to the HTML code. The emscripten_run_script() functions simply log out some status messages. We need to specify EMSCRIPTEN_KEEPALIVE above the functions we're planning to utilize outside of the module. If you don't specify this, the compiler will treat the functions as dead code and remove them.
Let's create a file named js-with-glue.html in the /chapter-06-interact-with-js folder and populate it with the following contents:
<!doctype html>
<html lang="en-us">
<head>
  <title>Interact with JS using Glue Code</title>
</head>
<body>
  <h1>Interact with JS using Glue Code</h1>
  <canvas id="myCanvas" width="255" height="255"></canvas>
  <div style="margin-top: 16px;">
    <button id="actionButton" style="width: 100px; height: 24px;">Pause</button>
    <span style="width: 100px; margin-left: 8px;">Status:</span>
    <span id="runStatus" style="width: 100px;"></span>
  </div>
  <script type="application/javascript" src="js-with-glue.js"></script>
  <script type="application/javascript">
    Module()
      .then(result => {
        const m = result.asm;
        m._init();

        // Move the rectangle by 1px in the x and y every 20 milliseconds:
        const loopRectMotion = () => {
          setTimeout(() => {
            m._moveRect();
            if (m._getIsRunning()) loopRectMotion();
          }, 20)
        };

        // Enable you to pause and resume the rectangle movement:
        document.querySelector('#actionButton')
          .addEventListener('click', event => {
            const newIsRunning = !m._getIsRunning();
            m._setIsRunning(newIsRunning);
            event.target.innerHTML = newIsRunning ? 'Pause' : 'Start';
            if (newIsRunning) loopRectMotion();
          });

        loopRectMotion();
      });
  </script>
</body>
</html>
We added two <span> elements to display the status of the rectangle's movement, along with a corresponding label. We're using Emscripten's Promise-like API to load the module and reference the functions from the compiled code. We're no longer passing in the _jsFillRect and _jsClearRect functions to the module because we're handling that within the js-with-glue.c file.
To compile the code, ensure that you're in the /chapter-06-interact-with-js folder and run the following command:
emcc js-with-glue.c -O3 -s WASM=1 -s MODULARIZE=1 -o js-with-glue.js
Once complete, run the following command to start your local server:
serve -l 8080
Open up a browser and navigate to http://127.0.0.1:8080/js-with-glue.html. You should see something like this:
If you press the Pause button, the caption on the button should change to Start, the text next to Status should change to Paused, and the rectangle should stop moving.
Utilizing JavaScript code in C/C++ files follows a different paradigm than the techniques used for Emscripten. Rather than writing JavaScript within the C/C++ files, you pass the functions into your WebAssembly instantiation code. In this section, we will describe this process in greater detail.
In order to utilize JavaScript's functionality in your C/C++ code, you need to add a function definition to the importObj.env argument that gets passed into WebAssembly's instantiation function. You can either define the function outside of the importObj.env or inline. The following code snippet demonstrates each option:
// You can define the function inside of the env object:
const env = {
  // Make sure you prefix the function name with "_"!
  _logValueToConsole: value => {
    console.log(`'The value is ${value}'`);
  }
};

// Or define it outside of env and reference it within env:
const logValueToConsole = value => {
  console.log(`'The value is ${value}'`);
};

const env = {
  _logValueToConsole: logValueToConsole
};
Given the manual memory management and strict typing requirements of C, C++, and Rust, you're limited in what can be passed in and utilized in a Wasm module. JavaScript allows you to easily add, remove, and change the values of properties on an object over the course of code execution. You can even extend the language by adding functions to the prototype of a built-in language feature. C, C++, and Rust are much more restrictive, and it can be difficult to take full advantage of WebAssembly if you're not familiar with these languages.
You need to define the JavaScript function you passed into importObj.env within the C/C++ code that utilizes it. The function signature must match what you passed in. The following example demonstrates this in greater detail. Here's the JavaScript code that interacts with the compiled C file (index.html):
// index.html <script> contents
const env = {
  _logAndMultiplyTwoNums: (num1, num2) => {
    const result = num1 * num2;
    console.log(result);
    return result;
  },
};

loadWasm('main.wasm', { env })
  .then(({ instance }) => {
    const result = instance.exports._callMultiply(5.5, 10);
    console.log(result);
    // 55 is logged to the console twice
  });
This is the contents of main.c, which is compiled to main.wasm and used within index.html:
// main.c (compiled to main.wasm)
extern float logAndMultiplyTwoNums(float num1, float num2);

float callMultiply(float num1, float num2) {
    return logAndMultiplyTwoNums(num1, num2);
}
You call the JavaScript function in your C/C++ the same way you'd call a normal C/C++ function. Although you prefix your function with a _ when you pass it into the importObj.env, you don't need to include the prefix when defining it in the C/C++ file.
The example code from the Compiling C without the glue code and Fetching and instantiating a Wasm file sections of Chapter 5, Creating and Loading a WebAssembly Module, demonstrated how to integrate JavaScript in our C file without using Emscripten's glue code. In this section, we will modify the example code slightly and change the file type to C++.
Create a file named js-without-glue.cpp in your /chapter-06-interact-with-js folder and populate it with the following contents:
/*
 * This file interacts with the canvas through imported functions.
 * It moves a circle diagonally across the canvas.
 */
#define BOUNDS 255
#define CIRCLE_RADIUS 50
#define BOUNCE_POINT (BOUNDS - CIRCLE_RADIUS)

bool isRunning = true;

typedef struct Circle {
  int x;
  int y;
  char direction;
} Circle;

struct Circle circle;

/*
 * Updates the circle location by 1px in the x and y in a
 * direction based on its current position.
 */
void updateCircleLocation() {
    // Since we want the circle to "bump" into the edge of the canvas,
    // we need to determine when the right edge of the circle
    // encounters the bounds of the canvas, which is why we're using
    // the canvas width - circle width:
    if (circle.x == BOUNCE_POINT) circle.direction = 'L';

    // As soon as the circle "bumps" into the left side of the
    // canvas, it should change direction again.
    if (circle.x == CIRCLE_RADIUS) circle.direction = 'R';

    // If the direction has changed based on the x and y
    // coordinates, ensure the x and y points update accordingly:
    int incrementer = 1;
    if (circle.direction == 'L') incrementer = -1;
    circle.x = circle.x + incrementer;
    circle.y = circle.y - incrementer;
}

// We need to wrap any imported or exported functions in an
// extern block, otherwise the function names will be mangled.
extern "C" {
// These functions are passed in through the importObj.env object
// and update the circle on the <canvas>:
extern int jsClearCircle();
extern int jsFillCircle(int x, int y, int radius);

/*
 * Clear the existing circle element from the canvas and draw a
 * new one in the updated location.
 */
void moveCircle() {
    jsClearCircle();
    updateCircleLocation();
    jsFillCircle(circle.x, circle.y, CIRCLE_RADIUS);
}

bool getIsRunning() {
    return isRunning;
}

void setIsRunning(bool newIsRunning) {
    isRunning = newIsRunning;
}

void init() {
    circle.x = 0;
    circle.y = 255;
    circle.direction = 'R';
    setIsRunning(true);
}
}
This code is similar to the previous example, but the shape and direction of the element on the canvas has changed. Now, the element is a circle that starts in the lower-left corner of the canvas and moves diagonally toward the upper-right.
Next, create a file named js-without-glue.html in your /chapter-06-interact-with-js folder and populate it with the following contents:
<!doctype html>
<html lang="en-us">
<head>
  <title>Interact with JS without Glue Code</title>
  <script
    type="application/javascript"
    src="../common/load-wasm.js">
  </script>
  <style>
    #myCanvas {
      border: 2px solid black;
    }
    #actionButtonWrapper {
      margin-top: 16px;
    }
    #actionButton {
      width: 100px;
      height: 24px;
    }
  </style>
</head>
<body>
  <h1>Interact with JS without Glue Code</h1>
  <canvas id="myCanvas" width="255" height="255"></canvas>
  <div id="actionButtonWrapper">
    <button id="actionButton">Pause</button>
  </div>
  <script type="application/javascript">
    const canvas = document.querySelector('#myCanvas');
    const ctx = canvas.getContext('2d');

    const fillCircle = (x, y, radius) => {
      ctx.fillStyle = '#fed530';
      // Face outline:
      ctx.beginPath();
      ctx.arc(x, y, radius, 0, 2 * Math.PI);
      ctx.fill();
      ctx.stroke();
      ctx.closePath();

      // Eyes:
      ctx.fillStyle = '#000000';
      ctx.beginPath();
      ctx.arc(x - 15, y - 15, 6, 0, 2 * Math.PI);
      ctx.arc(x + 15, y - 15, 6, 0, 2 * Math.PI);
      ctx.fill();
      ctx.closePath();

      // Mouth:
      ctx.beginPath();
      ctx.moveTo(x - 20, y + 10);
      ctx.quadraticCurveTo(x, y + 30, x + 20, y + 10);
      ctx.lineWidth = 4;
      ctx.stroke();
      ctx.closePath();
    };

    const env = {
      table: new WebAssembly.Table({ initial: 8, element: 'anyfunc' }),
      _jsFillCircle: fillCircle,
      _jsClearCircle: function() {
        ctx.fillStyle = '#fff';
        ctx.fillRect(0, 0, 255, 255);
      },
    };

    loadWasm('js-without-glue.wasm', { env }).then(({ instance }) => {
      const m = instance.exports;
      m._init();

      // Move the circle by 1px in the x and y every 20 milliseconds:
      const loopCircleMotion = () => {
        setTimeout(() => {
          m._moveCircle();
          if (m._getIsRunning()) loopCircleMotion();
        }, 20)
      };

      // Enable you to pause and resume the circle movement:
      document.querySelector('#actionButton')
        .addEventListener('click', event => {
          const newIsRunning = !m._getIsRunning();
          m._setIsRunning(newIsRunning);
          event.target.innerHTML = newIsRunning ? 'Pause' : 'Start';
          if (newIsRunning) loopCircleMotion();
        });

      loopCircleMotion();
    });
  </script>
</body>
</html>
Instead of using the rect() element, we can manually draw paths using the functions available on the canvas element's 2D context.
We're only generating a Wasm module, so we can use the build task we set up in the previous chapter to compile our code. Select Tasks | Run Build Task… or use the keyboard shortcut Ctrl/Cmd + Shift + B to compile the code. If you're not using VS Code, open a CLI instance in the /chapter-06-interact-with-js folder and run the following command:
emcc js-without-glue.cpp -Os -s WASM=1 -s SIDE_MODULE=1 -s BINARYEN_ASYNC_COMPILATION=0 -o js-without-glue.wasm
Once complete, open a terminal in the /book-examples folder, and run the following command to start your local server:
serve -l 8080
Open up a browser and navigate to http://127.0.0.1:8080/chapter-06-interact-with-js/js-without-glue.html. You should see something like this:
Just as with the previous examples, if you press the Pause button, the caption on the button should change to Start and the circle should stop moving.
We covered the Emscripten features we'll be using most frequently for communicating between JavaScript and C/C++ in the previous sections, but those aren't the only capabilities Emscripten provides. There are advanced features and additional APIs that you need to be aware of, especially if you plan on adding more complex functionality to your application. In this section, we'll briefly review some of these advanced features and provide details about where you can learn more.
Embind is an additional feature that Emscripten offers for connecting JavaScript and C++. Emscripten's site provides the following description:
Embind is a powerful feature that allows for tight integration between JavaScript and C++. You can wrap some C++ code in an EMSCRIPTEN_BINDINGS() block and reference it through the Module object in your browser. Let's look at an example from Emscripten's site. The following file, example.cpp, is compiled with the --bind flag of emcc:
// example.cpp
#include <emscripten/bind.h>

using namespace emscripten;

float lerp(float a, float b, float t) {
    return (1 - t) * a + t * b;
}

EMSCRIPTEN_BINDINGS(my_module) {
    function("lerp", &lerp);
}
The resultant module is loaded in example.html and the lerp() function is called:
<!-- example.html -->
<!doctype html>
<html>
<script src="example.js"></script>
<script>
  // example.js was generated by running this command:
  // emcc --bind -o example.js example.cpp
  console.log('lerp result: ' + Module.lerp(1, 2, 0.5));
</script>
</html>
The preceding example represents a small portion of Embind's capabilities. You can learn more about Embind at https://kripken.github.io/emscripten-site/docs/porting/connecting_cpp_and_javascript/embind.html.
Emscripten provides support for file operations by using the FS library and exposes an API for working with the filesystem. However, it's not included by default when you compile your project because it could increase the file's size significantly. If your C/C++ code uses files, the library will be added automatically. The filesystem types vary based on the execution environment. For example, if you're running code inside a worker, the WORKERFS filesystem can be used. By default, MEMFS is used, which stores the data in memory, and any data written to memory is lost when the page is reloaded. You can read more about the File System API at https://kripken.github.io/emscripten-site/docs/api_reference/Filesystem-API.html#filesystem-api.
Emscripten provides a Fetch API as well. The following is taken from the documentation:
The Fetch API can be used to integrate with Emscripten's other features. If you need to fetch data that isn't utilized by Emscripten, you should use the browser's Fetch API (https://developer.mozilla.org/en-US/docs/Web/API/Fetch_API). You can read more about the Fetch API at https://kripken.github.io/emscripten-site/docs/api_reference/fetch.html.
Effectively debugging JavaScript code in the browser has not always been easy. However, development tooling has markedly improved in the browser and in editors/IDEs with built-in debugging capabilities. Unfortunately, adding WebAssembly to a web application adds an additional level of complexity to the debugging process. In this section, we will review some techniques for debugging JavaScript that utilizes Wasm as well as some of the additional capabilities Emscripten offers.
Debugging Emscripten's Module is relatively straightforward. Emscripten's error messages are well formed and descriptive, so you'll usually discover what's causing the issue right away. You can view these messages in your browser's development tools console.
If you specified a .html output when running the emcc command, some debugging code will already be built in (Module.print and Module.printErr). Within the HTML file, the loading code sets the window.onerror event to call the Module.printErr event, so you can see details about the error that occurred when loading.
One common error you may encounter is calling the wrong function name. If you're using Emscripten's Promise-like API, you can print out the available functions by running the following code in your browser's console:
console.log(Module().asm);
The following screenshot shows the output for the js-with-glue.js example we used in the Calling JavaScript functions from C/C++ section of this chapter:
Your functions, as well as some functions that Emscripten generates, will be prefixed with a _. The advantage of writing code that gets compiled is that the compiler will catch most errors up front. Given the extensive tooling available for languages such as C and C++, you should be able to understand and address these errors quickly.
If you're not using any glue code and instantiating a Wasm file using WebAssembly's JavaScript and Web APIs, debugging can get a little more complex. As previously stated, you have the advantage of catching most errors at compile time in your C or C++ code. Just as with Emscripten, the error messages printed out in your browser's development tools console provide a stack trace and a relatively clear description of the issue. However, logging to the console may become cumbersome and difficult to manage if you're troubleshooting a particularly difficult bug. Fortunately, you can use source maps to improve your debugging capabilities.
Emscripten has the ability to generate source maps by passing some additional flags to the compiler. Source maps allow your browser to map the source of a file to the file being utilized in an application. For example, you can use a JavaScript build tool such Webpack to minify the code as part of your build process. However, it's incredibly difficult to navigate and troubleshoot the minified code if you're trying to find a bug. By generating a source map, you can view the code in its original form within the browser's development tools and set breakpoints for debugging. Let's generate a source map for our /chapter-06-interact-with-js/js-without-glue.cpp file. Within the /book-examples folder, run the following command in a terminal:
emcc chapter-06-interact-with-js/js-without-glue.cpp -O1 -g4 -s WASM=1 -s SIDE_MODULE=1 -s BINARYEN_ASYNC_COMPILATION=0 -o chapter-06-interact-with-js/js-without-glue.wasm --source-map-base http://localhost:8080/chapter-06-interact-with-js/
The -g4 argument enables source maps, while the --source-map-base argument tells the browser where to find the source map file. Once compiled, start your local server up from the /book-examples folder by running the following command:
serve -l 8080
Navigate to http://127.0.0.1:8080/chapter-06-interact-with-js/js-without-glue.html, open the Developer Tools, and select the Sources tab (in Chrome) or Debugger tab (in Firefox). If you're using Chrome, you should see the following:
As you can see, the filenames aren't very helpful. Each file should include the function name at the top, although some of the names may have been mangled. You can set breakpoints if you encounter errors, and Chrome's debugging functionality allows you to navigate the call stack. Firefox handles their source maps differently. The following screenshot shows the Debugger view in Firefox's Developer Tools:
The source map is a single file that contains the Wat representation of the Wasm file. You can set breakpoints and debug code here as well. As WebAssembly evolves, more (and better) tooling will become available. In the meantime, logging to the console and utilizing source maps are the current debugging methods you can use.
In this chapter, we focused on the intercommunication of JavaScript and C/C++, some of the features Emscripten offers, and how to effectively debug web applications that utilize Wasm in the browser. We reviewed the various means of calling compiled C/C++ functions from JavaScript, and how to integrate JavaScript with your C/C++ code. Emscripten's APIs were presented as a way to understand how you can overcome some of WebAssembly's current limitations by including glue code with your compiled Wasm files. Even though the capabilities Emscripten provides are not present in the official WebAssembly Core Specification (and may never be), that shouldn't deter you from taking advantage of them. Finally, we briefly covered how to debug Wasm files in the browser in the context of an Emscripten module or a WebAssembly instance.
In the next chapter, we'll build a real-world WebAssembly application from scratch.
Now it's time to apply your knowledge! Since one of WebAssembly's primary design goals is to execute within and integrate well with the existing web platform, it makes sense to build a web application to test it out. Even though WebAssembly's current feature set is rather limited, we can utilize the technology at a basic level. In this chapter, we will build a single-page application from scratch that utilizes Wasm modules within the context of the Core Specification.
By the end of this chapter, you'll know how to:
As mentioned before, WebAssembly's current feature set is rather limited. We can use Emscripten to greatly extend the capabilities of a web application, but that carries the cost of noncompliance with the official specification and the addition of glue code. We can still use WebAssembly effectively today, which brings us to the application we'll build in this chapter. In this section, we will review the libraries and tools we'll use to build the application, as well as a brief overview of its functionality.
In WebAssembly's current form, we can pass numbers between a Wasm module and JavaScript code with relative ease. An accounting application seems like a logical choice in terms of real-world applicability. The only contention I have with accounting software is that it's a little boring (no offense). We're going to spice it up a bit by building in some unethical accounting practices. The application is named Cook the Books, a term associated with accounting fraud. Investopedia provides the following definition of Cook the Books:
The Investopedia page at https://www.investopedia.com/terms/c/cookthebooks.asp offers detailed examples of what constitutes cooking the books. We'll take a simple approach for our application. We will allow the user to enter a transaction with a raw and cooked amount. The raw amount represents the actual amount of money that was either deposited or withdrawn, while the cooked amount is what everyone else will see. The application will generate pie charts that display expenses and income by category for either the raw or cooked transactions. The user will be able to easily toggle between the two views. The application consists of the following components:
The JavaScript portion of the application will use several libraries served from a CDN. It will also use one locally installed library to watch for changes in the code. The following sections will describe each library and its purpose in the application.
Vue is a JavaScript framework that allows you to split an application into individual components for ease of development and debugging. We're using it to avoid having one monolithic JavaScript file with all of our application logic and another monolithic HTML file with the entire UI. Vue was chosen because it doesn't require the added complexity of a build system and allows us to use HTML, CSS, and JavaScript without having to do any transpiling. The official website is https://vuejs.org.
UIkit is the frontend framework we will use to add styling and layout to our application. There are dozens of alternatives, like Bootstrap or Bulma, that offer comparable components and functionality. But I chose UIkit because of the helpful utility classes and added JavaScript functionality. You can view the documentation at https://getuikit.com.
Lodash is an excellent utility library that provides methods for performing common actions in JavaScript that aren't already built into the language. We will use it to perform calculations and manipulate the transactions data. Documentation and installation instructions can be found at https://lodash.com.
Data-driven documents (D3) is a multi-faceted library that allows you to translate data into impressive visualizations. D3's API consists of several modules that range from array manipulation to charting and transitions. We will use D3 primarily to create the pie charts, but we'll also take advantage of some of the utility methods it provides. You can find more information at https://d3js.org.
In order to display currency values in the correct format and ensure the user enters a valid dollar amount, we will utilize the accounting.js (http://openexchangerates.github.io/accounting.js) and vue-numeric (https://kevinongko.github.io/vue-numeric) libraries. To simplify development, we'll set up a basic npm project and use browser-sync (https://www.browsersync.io) to immediately see code changes reflected in the running application.
The application uses C since we're performing simple calculations with basic algebra. It wouldn't make sense to use C++ in this case. That would introduce the added step of ensuring the functions we need to call from JavaScript are wrapped in an extern block. We'll write the calculation functions in a single C file and compile it down to a single Wasm module. We can continue to use VS Code's Tasks functionality to perform the build, but the arguments will need to be updated since we'll only compile a single file. Let's move on to project configuration.
WebAssembly hasn't been around long enough to have established best practices with regard to folder structure, file naming conventions, and so on. If you were to search for best practices for C/C++ or JavaScript projects, you'd encounter a great deal of conflicting advice and strongly held opinions. With that in mind, let's spend this section setting up our project with the required configuration files.
The code for this project is located in the /chapter-07-cook-the-books folder in the learn-webassembly repository. You must have this code available when we get to the JavaScript portion of the application. I won't be providing the source code for all of the Vue components in the book, so you need to copy them from the repository.
In the interest of keeping the application as simple as possible, we'll avoid a build/bundling tool like Webpack or Rollup.js. This allows us to cut down on the number of required dependencies and ensures that any issues you run into aren't caused by a breaking change in a build dependency.
We'll create a Node.js project because it allows us to run scripts and install a dependency locally for development purposes. We've used the /book-examples folder up to this point, but we'll create a new project folder outside of /book-examples to configure a different default build task in VS Code. Open a terminal, cd into the desired folder, and enter the following commands:
// Create a new directory and cd into it:
mkdir cook-the-books
cd cook-the-books

// Create a package.json file with default values
npm init -y
The -y command forgoes the prompts and populates the package.json file with sensible defaults. Once completed, run the following command to install browser-sync:
npm install -D browser-sync@^2.24.4
The -D is optional and indicates that the library is a development dependency. You would use the -D flag if you were building and distributing the application, so I included it to adhere to common practice. I'd recommend installing that specific version to ensure the start script runs without any issues. After browser-sync installs, add the following entry to the scripts entry in the package.json file:
...
"scripts": {
...
"start": "browser-sync start --server \"src\" --files \"src/**\" --single --no-open --port 4000"
},
…
You can populate the "description" and "author" keys if desired. The file should end up looking similar to this:
{
"name": "cook-the-books",
"version": "1.0.0",
"description": "Example application for Learn WebAssembly",
"main": "src/index.js",
"scripts": {
"start": "browser-sync start --server \"src\" --files \"src/**\" --single --no-open --port 4000",
"test": "echo \"Error: no test specified\" && exit 1"
},
"keywords": [],
"author": "Mike Rourke",
"license": "MIT",
"devDependencies": {
"browser-sync": "^2.24.4"
}
}
Create two new folders within the root folder: /lib and /src. The JavaScript, HTML, CSS, and Wasm files will be located in the /src folder while the C file will be in /lib. I only want to include files that are used by the web application in /src. We'll never use the C file directly from the application, only the compiled output.
Copy the /.vscode folder from your /book-examples project into the root folder. This will ensure you're using the existing C/C++ settings and give you a good starting point for the build task.
We need to modify the default build step in the /.vscode/tasks.json file to accommodate our updated workflow. The arguments for the build step we used in our /book-examples project allowed us to compile whichever file was currently active in the editor. It also output the .wasm file into the same folder as the source C file. However, this configuration doesn't make sense for this project. We'll always compile the same C file that is output to the compiled .wasm file in a specific folder. To accomplish this, update the args array in the Build task in /.vscode/tasks.json with the following contents:
"args": [
"${workspaceFolder}/lib/main.c",
"-Os",
"-s", "WASM=1",
"-s", "SIDE_MODULE=1",
"-s", "BINARYEN_ASYNC_COMPILATION=0",
"-o", "${workspaceFolder}/src/assets/main.wasm"
],
We changed the input and output paths, which are the first and last elements in the args array. Now both are static paths that always compile and output the same files regardless of which file is open in the active editor.
We need some mock data and a means of persisting any updates. If you store the data locally in a JSON file, any changes you make to the transactions will be lost as soon as you refresh the page. We could set up a local server with a library like Express, mock a database, write routes, and so on. But instead we're going to take advantage of the excellent development tooling available online. The online too jsonstore.io is allows you to store JSON data for small projects and provides endpoints out of the box. Take the following steps to get your mock API up and running:
Keep that jsonstore.io endpoint handy—you'll need it when we build the JavaScript portion of the app.
We need the malloc() and free() functions from C's standard library for the functionality in our C code. WebAssembly doesn't have these functions built in, so we need to provide our own implementation.
Fortunately, someone has already built that for us; we just need to download the module and include it in the instantiation step. The module can be downloaded from Guy Bedford's wasm-stdlib-hack GitHub repository at https://github.com/guybedford/wasm-stdlib-hack. You need the memory.wasm file from the /dist folder. Once the file is downloaded, create a folder named /assets in the /src folder of your project and copy the memory.wasm file there.
After performing these steps, your project should look like this:
├── /.vscode
│ ├── tasks.json
│ └── c_cpp_properties.json
├── /lib
├── /src
│ └── /assets
│ └── memory.wasm
├── package.json
└── package-lock.json
The C portion of the application will aggregate transaction and category amounts. The calculations we perform in C could be done just as easily in JavaScript, but WebAssembly is ideal for computation. We'll dive deeper into more complex usage of C/C++ in Chapter 8, Porting a Game with Emscripten, but for now we're trying to limit our scope to what can be done within the confines of the Core Specification. In this section, we'll write some C code to demonstrate how to integrate WebAssembly with a web application without the use of Emscripten.
We will write some C functions that calculate the grand totals as well as the ending balances for raw and cooked transactions. In addition to calculating the grand totals, we need to calculate the totals for each category for display in the pie charts. All of these calculations will be performed in a single C file and compiled down to a single Wasm file that will be instantiated when the application loads. C can be a little daunting for the uninitiated, so our code will be sacrificing some efficiency for the sake of clarity. I'd like to take a moment to apologize to the C/C++ programmers reading this book; you're not going to like what you C.
In order to perform calculations dynamically, we need to allocate and deallocate memory as transactions are added and deleted. To accomplish this, we'll use a doubly linked list. A doubly linked list is a data structure that allows us to remove items or nodes inside a list and add and edit nodes as needed. Nodes are added using malloc() and removed using free(), both of which are provided by the memory.wasm module you downloaded in the previous section.
The order of operations in terms of development doesn't reflect how you would normally build an application that uses WebAssembly. The workflow would consist of jumping between C/C++ and JavaScript to achieve the desired results. In this case, the functionality that we're offloading from JavaScript into WebAssembly is already known, so we'll write the C code up front.
Let's walk through each section of the C file. Create a file in the /lib folder named main.c and populate it with the following contents in each section. It'll be easier to comprehend what's happening in the C file if we break it into smaller chunks. Let's start with the Declarations section.
The first section contains declarations we will use to create and traverse the doubly linked list, as follows:
#include <stdlib.h>
struct Node {
int id;
int categoryId;
float rawAmount;
float cookedAmount;
struct Node *next;
struct Node *prev;
};
typedef enum {
RAW = 1,
COOKED = 2
} AmountType;
struct Node *transactionsHead = NULL;
struct Node *categoriesHead = NULL;
The Node struct is used to represent a transaction or category. The transactionsHead and categoriesHead node instances represent the first node in each linked list we'll use (one for transactions and one for categories). The AmountType the enum isn't required, but we'll discuss how it's useful when we get to the section of code that utilizes it.
The second section contains the two functions used to add and delete nodes from the linked list:
void deleteNode(struct Node **headNode, struct Node *delNode) {
// Base case:
if (*headNode == NULL || delNode == NULL) return;
// If node to be deleted is head node:
if (*headNode == delNode) *headNode = delNode->next;
// Change next only if node to be deleted is NOT the last node:
if (delNode->next != NULL) delNode->next->prev = delNode->prev;
// Change prev only if node to be deleted is NOT the first node:
if (delNode->prev != NULL) delNode->prev->next = delNode->next;
// Finally, free the memory occupied by delNode:
free(delNode);
}
void appendNode(struct Node **headNode, int id, int categoryId,
float rawAmount, float cookedAmount) {
// 1. Allocate node:
struct Node *newNode = (struct Node *) malloc(sizeof(struct Node));
struct Node *last = *headNode; // Used in Step 5
// 2. Populate with data:
newNode->id = id;
newNode->categoryId = categoryId;
newNode->rawAmount = rawAmount;
newNode->cookedAmount = cookedAmount;
// 3. This new node is going to be the last node, so make next NULL:
newNode->next = NULL;
// 4. If the linked list is empty, then make the new node as head:
if (*headNode == NULL) {
newNode->prev = NULL;
*headNode = newNode;
return;
}
// 5. Otherwise, traverse till the last node:
while (last->next != NULL) {
last = last->next;
}
// 6. Change the next of last node:
last->next = newNode;
// 7. Make last node as previous of new node:
newNode->prev = last;
}
The comments within the code describe what's happening at each step. When we need to add a Node to the list, we have to allocate the memory taken up by the struct Node using malloc() and append it to the last node in the linked list. If we need to delete a node, we have to remove it from the linked list and deallocate the memory that the node was using by calling the free() function.
The third section contains functions to add, edit, and remove transactions from the transactions linked list, as follows:
struct Node *findNodeById(int id, struct Node *withinNode) {
struct Node *node = withinNode;
while (node != NULL) {
if (node->id == id) return node;
node = node->next;
}
return NULL;
}
void addTransaction(int id, int categoryId, float rawAmount,
float cookedAmount) {
appendNode(&transactionsHead, id, categoryId, rawAmount, cookedAmount);
}
void editTransaction(int id, int categoryId, float rawAmount,
float cookedAmount) {
struct Node *foundNode = findNodeById(id, transactionsHead);
if (foundNode != NULL) {
foundNode->categoryId = categoryId;
foundNode->rawAmount = rawAmount;
foundNode->cookedAmount = cookedAmount;
}
}
void removeTransaction(int id) {
struct Node *foundNode = findNodeById(id, transactionsHead);
if (foundNode != NULL) deleteNode(&transactionsHead, foundNode);
}
The appendNode() and deleteNode() functions we reviewed in the previous section aren't intended to be called from the JavaScript code. Instead, calls to addTransaction(), editTransaction(), and removeTransaction() are used to update the local linked list. The addTransaction() function calls the appendNode() function to add the data passed in as arguments to a new node in the local linked list. The removeTransaction() calls the deleteNode() function to delete the corresponding transaction node. The findNodeById() function is used to determine which node needs to be updated or deleted within the linked list based on the specified ID.
The fourth section contains functions to calculate the grand totals and final balances for raw and cooked transactions, as follows:
void calculateGrandTotals(float *totalRaw, float *totalCooked) {
struct Node *node = transactionsHead;
while (node != NULL) {
*totalRaw += node->rawAmount;
*totalCooked += node->cookedAmount;
node = node->next;
}
}
float getGrandTotalForType(AmountType type) {
float totalRaw = 0;
float totalCooked = 0;
calculateGrandTotals(&totalRaw, &totalCooked);
if (type == RAW) return totalRaw;
if (type == COOKED) return totalCooked;
return 0;
}
float getFinalBalanceForType(AmountType type, float initialBalance) {
float totalForType = getGrandTotalForType(type);
return initialBalance + totalForType;
}
The AmountType enum we declared in the declarations section is used here to avoid magic numbers. It makes it easy to remember that 1 represents raw transactions and 2 represents cooked transactions. The grand totals for both raw and cooked transactions are calculated in the calculateGrandTotals() function, even though we're only asking for one type in getGrandTotalForType(). Since we can only return a single value from a Wasm function, we end up looping through all of the transactions twice when we call getGrandTotalForType() for both raw and cooked transactions. With a relatively small amount of transactions and the simplicity of the calculation, this doesn't present any issues. The getFinalBalanceForType() returns the grand total plus the specified initialBalance. You'll see this in action when we add the ability to change initial balances in the web application.
The fifth and final section contains functions to calculate totals by category, which we'll utilize in the pie charts, as follows:
void upsertCategoryNode(int categoryId, float transactionRaw,
float transactionCooked) {
struct Node *foundNode = findNodeById(categoryId, categoriesHead);
if (foundNode != NULL) {
foundNode->rawAmount += transactionRaw;
foundNode->cookedAmount += transactionCooked;
} else {
appendNode(&categoriesHead, categoryId, categoryId, transactionRaw,
transactionCooked);
}
}
void buildValuesByCategoryList() {
struct Node *node = transactionsHead;
while (node != NULL) {
upsertCategoryNode(node->categoryId, node->rawAmount,
node->cookedAmount);
node = node->next;
}
}
void recalculateForCategories() {
categoriesHead = NULL;
buildValuesByCategoryList();
}
float getCategoryTotal(AmountType type, int categoryId) {
// Ensure the category totals have been calculated:
if (categoriesHead == NULL) buildValuesByCategoryList();
struct Node *categoryNode = findNodeById(categoryId, categoriesHead);
if (categoryNode == NULL) return 0;
if (type == RAW) return categoryNode->rawAmount;
if (type == COOKED) return categoryNode->cookedAmount;
return 0;
}
The buildValuesByCategoryList() function is called whenever the recalculateForCategories() or getCategoryTotal() functions are called. The function loops through all of the transactions in the transactions linked list and creates a node in a separate linked list for each corresponding category with the aggregated raw and total amounts. The upsertCategoryNode() function looks for a node that corresponds to the categoryId in the categories linked list. If it finds it, the raw and cooked transaction amounts are added to the existing amounts on that node, otherwise a new node is created for said category. The recalculateForCategories() function is called to ensure the category totals are up to date with any transactions changes.
After populating the file, we need to compile it down to Wasm for use in the JavaScript portion of the application. Run the build task by selecting Tasks | Run Build Task... from the menu or using the keyboard shortcut Cmd/Ctrl + Shift + B. If the build was successful, you'll see a file named main.wasm in the /src/assets folder. If an error occurred, the terminal should provide details on how to resolve it.
If you're not using VS Code, open a terminal instance in the /cook-the-books folder and run the following command:
emcc lib/main.c -Os -s WASM=1 -s SIDE_MODULE=1 -s BINARYEN_ASYNC_COMPILATION=0 -o src/assets/main.wasm
That's it for the C code. Let's move on to the JavaScript portion.
The JavaScript portion of the application presents the transactions data to the user and allows them to easily add, edit, and remove transactions. The application is split across several files to simplify the development process and uses the libraries described in the JavaScript libraries used section of this chapter. In this section, we will build the application step by step, starting with the API and global state interaction layer. We'll write functions to instantiate and interact with our Wasm module and review the Vue components required to build the user interface.
The application is broken down into contexts to simplify the development process. We'll build the application from the bottom up to ensure we don't have to bounce back and forth between the different contexts when writing code. We'll start with the Wasm interaction code, then move on to the global store and API interaction. I'll describe the purpose of each Vue component, but the source code will only be provided for a select few. If you're following along and wish to run the application locally, you'll need to copy the /src/components folder from the /chapter-07-cook-the-books folder in the learn-webassembly repository into the /src folder of your project.
Before we start writing any code, you must ensure your browser supports the newer JavaScript features we'll use in the application. Your browser has to support ES Modules (import and export), the Fetch API, and async / await. You need at least Version 61 of Google Chrome or Version 60 of Firefox. You can check which version you're currently using by selecting About Chrome or About Firefox from the menu bar. I'm currently running the application with Chrome Version 67 and Firefox Version 61 without any issues.
You should have two compiled Wasm files in the /src/assets folder of your project: main.wasm and memory.wasm. Since we need to utilize the malloc() and free() functions exported from memory.wasm in the main.wasm code, our loading code is going to look different from the earlier examples. Create a file in the /src/store folder named initializeWasm.js and populate it with the following contents:
/**
* Returns an array of compiled (not instantiated!) Wasm modules.
* We need the main.wasm file we created, as well as the memory.wasm file
* that allows us to use C functions like malloc() and free().
*/
const fetchAndCompileModules = () =>
Promise.all(
['../assets/main.wasm', '../assets/memory.wasm'].map(fileName =>
fetch(fileName)
.then(response => {
if (response.ok) return response.arrayBuffer();
throw new Error(`Unable to fetch WebAssembly file: ${fileName}`);
})
.then(bytes => WebAssembly.compile(bytes))
)
);
/**
* Returns an instance of the compiled "main.wasm" file.
*/
const instantiateMain = (compiledMain, memoryInstance, wasmMemory) => {
const memoryMethods = memoryInstance.exports;
return WebAssembly.instantiate(compiledMain, {
env: {
memoryBase: 0,
tableBase: 0,
memory: wasmMemory,
table: new WebAssembly.Table({ initial: 16, element: 'anyfunc' }),
abort: console.log,
_consoleLog: value => console.log(value),
_malloc: memoryMethods.malloc,
_free: memoryMethods.free
}
});
};
/**
* Compiles and instantiates the "memory.wasm" and "main.wasm" files and
* returns the `exports` property from main's `instance`.
*/
export default async function initializeWasm() {
const wasmMemory = new WebAssembly.Memory({ initial: 1024 });
const [compiledMain, compiledMemory] = await fetchAndCompileModules();
const memoryInstance = await WebAssembly.instantiate(compiledMemory, {
env: {
memory: wasmMemory
}
});
const mainInstance = await instantiateMain(
compiledMain,
memoryInstance,
wasmMemory
);
return mainInstance.exports;
}
The file's default export function, initializeWasm(), performs the following steps:
As you can see, the process is more complex when you have dependencies within Wasm modules.
We will use JavaScript's class syntax to create a wrapper that encapsulates the Wasm interaction functions. This allows us to make changes to the C code quickly without having to search through the entire application to find where Wasm functions are being called. If you rename a method in the C file, you only need to rename it one place. Create a new file in the /src/store folder named WasmTransactions.js and populate it with the following contents:
import initializeWasm from './initializeWasm.js';
/**
* Class used to wrap the functionality from the Wasm module (rather
* than access it directly from the Vue components or store).
* @class
*/
export default class WasmTransactions {
constructor() {
this.instance = null;
this.categories = [];
}
async initialize() {
this.instance = await initializeWasm();
return this;
}
getCategoryId(category) {
return this.categories.indexOf(category);
}
// Ensures the raw and cooked amounts have the proper sign (withdrawals
// are negative and deposits are positive).
getValidAmounts(transaction) {
const { rawAmount, cookedAmount, type } = transaction;
const getAmount = amount =>
type === 'Withdrawal' ? -Math.abs(amount) : amount;
return {
validRaw: getAmount(rawAmount),
validCooked: getAmount(cookedAmount)
};
}
// Adds the specified transaction to the linked list in the Wasm module.
addToWasm(transaction) {
const { id, category } = transaction;
const { validRaw, validCooked } = this.getValidAmounts(transaction);
const categoryId = this.getCategoryId(category);
this.instance._addTransaction(id, categoryId, validRaw, validCooked);
}
// Updates the transaction node in the Wasm module:
editInWasm(transaction) {
const { id, category } = transaction;
const { validRaw, validCooked } = this.getValidAmounts(transaction);
const categoryId = this.getCategoryId(category);
this.instance._editTransaction(id, categoryId, validRaw, validCooked);
}
// Removes the transaction node from the linked list in the Wasm module:
removeFromWasm(transactionId) {
this.instance._removeTransaction(transactionId);
}
// Populates the linked list in the Wasm module. The categories are
// needed to set the categoryId in the Wasm module.
populateInWasm(transactions, categories) {
this.categories = categories;
transactions.forEach(transaction => this.addToWasm(transaction));
}
// Returns the balance for raw and cooked transactions based on the
// specified initial balances.
getCurrentBalances(initialRaw, initialCooked) {
const currentRaw = this.instance._getFinalBalanceForType(
AMOUNT_TYPE.raw,
initialRaw
);
const currentCooked = this.instance._getFinalBalanceForType(
AMOUNT_TYPE.cooked,
initialCooked
);
return { currentRaw, currentCooked };
}
// Returns an object that has category totals for all income (deposit)
// and expense (withdrawal) transactions.
getCategoryTotals() {
// This is done to ensure the totals reflect the most recent
// transactions:
this.instance._recalculateForCategories();
const categoryTotals = this.categories.map((category, idx) => ({
category,
id: idx,
rawTotal: this.instance._getCategoryTotal(AMOUNT_TYPE.raw, idx),
cookedTotal: this.instance._getCategoryTotal(AMOUNT_TYPE.cooked, idx)
}));
const totalsByGroup = { income: [], expenses: [] };
categoryTotals.forEach(categoryTotal => {
if (categoryTotal.rawTotal < 0) {
totalsByGroup.expenses.push(categoryTotal);
} else {
totalsByGroup.income.push(categoryTotal);
}
});
return totalsByGroup;
}
}
When the initialize() function is called on an instance of the class, the return value of the initializeWasm() function is assigned to the instance property of the class. The class methods call functions from this.instance and, if applicable, return the desired results. Note the AMOUNT_TYPE object referenced in the getCurrentBalances() and getCategoryTotals() functions. This corresponds to the AmountType enum in our C file. The AMOUNT_TYPE object is declared globally in the /src/main.js file where the application is loaded. Now that we have our Wasm interaction code written, let's move on to API interaction code.
The API provides means for adding, editing, removing, and querying transactions in the form of HTTP methods defined on a fetch call. To simplify the process of performing these actions, we'll write some API wrapper functions. Create a file in the /src/store folder named api.js and populate it with the following contents:
// Paste your jsonstore.io endpoint here (no ending slash):
const API_URL = '[JSONSTORE.IO ENDPOINT]';
/**
* Wrapper for performing API calls. We don't want to call response.json()
* each time we make a fetch call.
* @param {string} endpoint Endpoint (e.g. "/transactions" to make API call to
* @param {Object} init Fetch options object containing any custom settings
* @returns {Promise<*>}
* @see https://developer.mozilla.org/en-US/docs/Web/API/WindowOrWorkerGlobalScope/fetch
*/
const performApiFetch = (endpoint = '', init = {}) =>
fetch(`${API_URL}${endpoint}`, {
headers: {
'Content-type': 'application/json'
},
...init
}).then(response => response.json());
export const apiFetchTransactions = () =>
performApiFetch('/transactions').then(({ result }) =>
/*
* The response object looks like this:
* {
* "result": {
* "1": {
* "category": "Sales Revenue",
* ...
* },
* "2": {
* "category": "Hotels",
* ...
* },
* ...
* }
* }
* We need the "1" and "2" values for deleting or editing existing
* records, so we store that in the transaction record as "apiId".
*/
Object.keys(result).map(apiId => ({
...result[apiId],
apiId
}))
);
export const apiEditTransaction = transaction =>
performApiFetch(`/transactions/${transaction.apiId}`, {
method: 'POST',
body: JSON.stringify(transaction)
});
export const apiRemoveTransaction = transaction =>
performApiFetch(`/transactions/${transaction.apiId}`, {
method: 'DELETE'
});
export const apiAddTransaction = transaction =>
performApiFetch(`/transactions/${transaction.apiId}`, {
method: 'POST',
body: JSON.stringify(transaction)
});
You'll need the jsonstore.io endpoint you created in the Setting up the project section in order to interact with the API. Replace [JSONSTORE.IO ENDPOINT] with your jsonstore.io endpoint. Ensure the endpoint doesn't end with a forward slash or the word transactions.
The file that manages global state in the application has a lot of moving parts. Consequently, we will break the code down into smaller chunks and walk through each section individually. Create a file in the /src/store folder named store.js and populate it with the contents from each of the following sections.
The first section contains import statements and the wasm and state properties on the exported store object, as follows:
import {
apiFetchTransactions,
apiAddTransaction,
apiEditTransaction,
apiRemoveTransaction
} from './api.js';
import WasmTransactions from './WasmTransactions.js';
export const store = {
wasm: null,
state: {
transactions: [],
activeTransactionId: 0,
balances: {
initialRaw: 0,
currentRaw: 0,
initialCooked: 0,
currentCooked: 0
}
},
...
All API interaction is limited to the store.js file. Since we need to manipulate, add, and search transactions, all of the exported functions from api.js are imported. The store object holds the WasmTransactions instance in the wasm property and initial state in the state property. The values in state are referenced in multiple locations throughout the application. The store object will be added to the global window object when the application loads, so all components have access to the global state.
The second section contains functions that manage transactions in the Wasm instance (through the WasmTransactions instance) and the API, as follows:
...
getCategories() {
const categories = this.state.transactions.map(
({ category }) => category
);
// Remove duplicate categories and sort the names in ascending order:
return _.uniq(categories).sort();
},
// Populate global state with the transactions from the API response:
populateTransactions(transactions) {
const sortedTransactions = _.sortBy(transactions, [
'transactionDate',
'id'
]);
this.state.transactions = sortedTransactions;
store.wasm.populateInWasm(sortedTransactions, this.getCategories());
this.recalculateBalances();
},
addTransaction(newTransaction) {
// We need to assign a new ID to the transaction, so this just adds
// 1 to the current maximum transaction ID:
newTransaction.id = _.maxBy(this.state.transactions, 'id').id + 1;
store.wasm.addToWasm(newTransaction);
apiAddTransaction(newTransaction).then(() => {
this.state.transactions.push(newTransaction);
this.hideTransactionModal();
});
},
editTransaction(editedTransaction) {
store.wasm.editInWasm(editedTransaction);
apiEditTransaction(editedTransaction).then(() => {
this.state.transactions = this.state.transactions.map(
transaction => {
if (transaction.id === editedTransaction.id) {
return editedTransaction;
}
return transaction;
}
);
this.hideTransactionModal();
});
},
removeTransaction(transaction) {
const transactionId = transaction.id;
store.wasm.removeFromWasm(transactionId);
// We're passing the whole transaction record into the API call
// for the sake of consistency:
apiRemoveTransaction(transaction).then(() => {
this.state.transactions = this.state.transactions.filter(
({ id }) => id !== transactionId
);
this.hideTransactionModal();
});
},
...
The populateTransactions() function fetches all of the transactions from the API and loads them into the global state and the Wasm instance. The category names are extrapolated from the transactions array in the getCategories() function. The results are passed to the WasmTransactions instance when store.wasm.populateInWasm() is called.
The addTransaction(), editTransaction(), and removeTransaction() functions perform the actions that correspond with their names. All three functions manipulate the Wasm instance and update the data on the API through a fetch call. Each of the functions call this.hideTransactionModal() because changes to a transaction can only be made through the TransactionModal component. Once the change is successfully made, the modal should close. Let's look at the TransactionModal management code next.
The third section contains functions to manage the visibility and content of the TransactionModal component (located in /src/components/TransactionsTab/TransactionModal.js) as follows:
...
showTransactionModal(transactionId) {
this.state.activeTransactionId = transactionId || 0;
const transactModal = document.querySelector('#transactionModal');
UIkit.modal(transactModal).show();
},
hideTransactionModal() {
this.state.activeTransactionId = 0;
const transactModal = document.querySelector('#transactionModal');
UIkit.modal(transactModal).hide();
},
getActiveTransaction() {
const { transactions, activeTransactionId } = this.state;
const foundTransaction = transactions.find(transaction =>
transaction.id === activeTransactionId);
return foundTransaction || { id: 0 };
},
...
The showTransactionModal() and hideTransactionModal() functions should be self-explanatory. The hide() or show() method of UIkit.modal() is called on the DOM element representing the TransactionModal. The getActiveTransaction() function returns the transaction record associated with the activeTransactionId value in global state.
The fourth section contains functions that calculate and update the balances object in global state:
...
updateInitialBalance(amount, fieldName) {
this.state.balances[fieldName] = amount;
},
// Update the "balances" object in global state based on the current
// initial balances:
recalculateBalances() {
const { initialRaw, initialCooked } = this.state.balances;
const { currentRaw, currentCooked } = this.wasm.getCurrentBalances(
initialRaw,
initialCooked
);
this.state.balances = {
initialRaw,
currentRaw,
initialCooked,
currentCooked
};
}
};
The updateInitialBalance() function sets the property value in the balances object in global state based on the amount and fieldName arguments. The recalculateBalances() function updates all of the fields on the balances object to reflect any changes made to the initial balances or transactions.
The final section of code in the file initializes the store:
/**
* This function instantiates the Wasm module, fetches the transactions
* from the API endpoint, and loads them into state and the Wasm
* instance.
*/
export const initializeStore = async () => {
const wasmTransactions = new WasmTransactions();
store.wasm = await wasmTransactions.initialize();
const transactions = await apiFetchTransactions();
store.populateTransactions(transactions);
};
The initializeStore() function instantiates the Wasm module, fetches all transactions from the API, and populates the contents of state. This function is called from the application loading code in /src/main.js, which we'll cover in the next section.
We need an entry point to load our application. Create a file in the /src folder named main.js and populate it with the following contents:
import App from './components/App.js';
import { store, initializeStore } from './store/store.js';
// This allows us to use the <vue-numeric> component globally:
Vue.use(VueNumeric.default);
// Create a globally accessible store (without having to pass it down
// as props):
window.$store = store;
// Since we can only pass numbers into a Wasm function, these flags
// represent the amount type we're trying to calculate:
window.AMOUNT_TYPE = {
raw: 1,
cooked: 2
};
// After fetching the transactions and initializing the Wasm module,
// render the app.
initializeStore()
.then(() => {
new Vue({ render: h => h(App), el: '#app' });
})
.catch(err => {
console.error(err);
});
This file is loaded after the libraries are fetched and loaded from CDNs in /src/index.html. We use the global Vue object to specify that we want to use the VueNumeric component. We add the store object exported from /store/store.js to window as $store. This isn't the most robust solution, but will be sufficient given the scope of the application. If you were creating a production application, you'd use a library like Vuex or Redux for global state management. We'll forego this approach in the interest of keeping things simple.
We also added AMOUNT_TYPE to the window object. This was done to ensure the entire application can reference the AMOUNT_TYPE value, rather than specify a magic number. After values are assigned to window, the initializeStore() function is called. If the initializeStore() function fired successfully, a new Vue instance is created to render the application. Let's add the web assets next, then move on to the Vue components.
Before we start adding Vue components to the application, let's create the HTML and CSS files that house our markup and styles. Create a file in the /src folder named index.html and populate it with the following contents:
<!doctype html>
<html lang="en-us">
<head>
<title>Cook the Books</title>
<link
rel="stylesheet"
type="text/css"
href="https://cdnjs.cloudflare.com/ajax/libs/uikit/3.0.0-rc.6/css/uikit.min.css"
/>
<link rel="stylesheet" type="text/css" href="styles.css" />
<script src="https://cdnjs.cloudflare.com/ajax/libs/uikit/3.0.0-rc.6/js/uikit.min.js"></script>
<script src="https://cdnjs.cloudflare.com/ajax/libs/uikit/3.0.0-rc.6/js/uikit-icons.min.js"></script>
<script src="https://unpkg.com/accounting-js@1.1.1/dist/accounting.umd.js"></script>
<script src="https://unpkg.com/lodash@4.17.10/lodash.min.js"></script>
<script src="https://unpkg.com/d3@5.5.0/dist/d3.min.js"></script>
<script src="https://unpkg.com/vue@2.5.16/dist/vue.min.js"></script>
<script src="https://unpkg.com/vue-numeric@2.3.0/dist/vue-numeric.min.js"></script>
<script src="main.js" type="module"></script>
</head>
<body>
<div id="app"></div>
</body>
</html>
We're only using the HTML file to fetch libraries from CDNs, specify a <div> that Vue can render to, and load main.js to start the application. Note the type="module" attribute on the final <script> element. This allows us to use ES modules throughout our application. Now let's add the CSS file. Create a file in the /src folder named styles.css and populate it with the following contents:
@import url("https://fonts.googleapis.com/css?family=Quicksand");
:root {
--blue: #2889ed;
}
* {
font-family: "Quicksand", Helvetica, Arial, sans-serif !important;
}
#app {
-webkit-font-smoothing: antialiased;
-moz-osx-font-smoothing: grayscale;
}
.addTransactionButton {
color: white;
height: 64px;
width: 64px;
background: var(--blue);
position: fixed;
bottom: 24px;
right: 24px;
}
.addTransactionButton:hover {
color: white;
background-color: var(--blue);
opacity: .6;
}
.errorText {
color: white;
font-size: 36px;
}
.appHeader {
height: 80px;
margin: 0;
}
.balanceEntry {
font-size: 2rem;
}
.tableAmount {
white-space: pre;
}
This file has only a few classes because most of the styling will be handled at the component level. In the next section, we'll review the Vue components that make up our application.
With Vue, we can create separate components that encapsulate their own functionality, then compose these components to build an application. This makes debugging, extensibility, and change management much easier than storing the application in a single monolithic file.
The application uses a single-component-per-file development methodology. Before we start reviewing the component files, let's look at the finished product. The following screenshot is of the application with the TRANSACTIONS tab selected:
Here's a screenshot of the application with the CHARTS tab selected:
A Vue component is simply a file with an exported object containing properties that define how that component should look and behave. The properties must be given names that adhere to the Vue API. You can read about these properties and other aspects of the Vue API at https://vuejs.org/v2/api. The following code represents an example component containing the elements of the Vue API used in this application:
import SomeComponent from './SomeComponent.js';
export default {
name: 'dummy-component',
// Props passed from other components:
props: {
label: String,
},
// Other Vue components to render within the template:
components: {
SomeComponent
},
// Used to store local data/state:
data() {
return {
amount: 0
}
},
// Used to store complex logic that outside of the `template`:
computed: {
negativeClass() {
return {
'negative': this.amount < 0
};
}
},
// Methods that can be performed within the component:
methods: {
addOne() {
this.amount += 1;
}
},
// Perform actions if the local data changes:
watch: {
amount(val, oldVal) {
console.log(`New: ${val} | Old: ${oldVal}`);
}
},
// Contains the HTML to render the component:
template: `
<div>
<some-component></some-component>
<label for="someAmount">{{ label }}</label>
<input
id="someAmount"
:class="negativeClass"
v-model="amount"
type="number"
/>
<button @click="addOne">Add One</button>
</div>
`
};
The comments above each property describe its purpose, albeit at a very high level. Let's see Vue in action by reviewing the App component.
The App component is the base component that renders all of the child components in the application. We'll briefly review the App component's code to gain a better understanding of Vue. Going forward, we'll describe the role each remaining component plays, but only review sections of the corresponding code. The contents of the App component file, located at /src/components/App.js, are shown as follows:
import BalancesBar from './BalancesBar/BalancesBar.js';
import ChartsTab from './ChartsTab/ChartsTab.js';
import TransactionsTab from './TransactionsTab/TransactionsTab.js';
/**
* This component is the entry point for the application. It contains the
* header, tabs, and content.
*/
export default {
name: 'app',
components: {
BalancesBar,
ChartsTab,
TransactionsTab
},
data() {
return {
balances: $store.state.balances,
activeTab: 0
};
},
methods: {
// Any time a transaction is added, edited, or removed, we need to
// ensure the balance is updated:
onTransactionChange() {
$store.recalculateBalances();
this.balances = $store.state.balances;
},
// When the "Charts" tab is activated, this ensures that the charts
// get automatically updated:
onTabClick(event) {
this.activeTab = +event.target.dataset.tab;
}
},
template: `
<div>
<div class="appHeader uk-background-primary uk-flex uk-flex-middle">
<h2 class="uk-light uk-margin-remove-bottom uk-margin-left">
Cook the Books
</h2>
</div>
<div class="uk-position-relative">
<ul uk-tab class="uk-margin-small-bottom uk-margin-top">
<li class="uk-margin-small-left">
<a href="#" data-tab="0" @click="onTabClick">Transactions</a>
</li>
<li>
<a href="#" data-tab="1" @click="onTabClick">Charts</a>
</li>
</ul>
<balances-bar
:balances="balances"
:onTransactionChange="onTransactionChange">
</balances-bar>
<ul class="uk-switcher">
<li>
<transactions-tab :onTransactionChange="onTransactionChange">
</transactions-tab>
</li>
<li>
<charts-tab :isActive="this.activeTab === 1"></charts-tab>
</li>
</ul>
</div>
</div>
`
};
We use the components property to specify the other Vue components we'll render in the template for the App component. The data() function, which returns the local state, is used to keep track of balances and which tab is active (TRANSACTIONS or CHARTS). The methods property contains two functions: onTransactionChange() and onTabClick(). The onTransactionChange() function calls $store.recalculateBalances() and updates balances in local state if a change is made to a transaction record. The onTabClick() function changes the value of activeTab in the local state to the data-tab attribute of the clicked tab. Finally, the template property contains the markup used to render the component.
The /components/BalancesBar folder contains two component files: BalanceCard.js and BalancesBar.js. The BalancesBar component persists across the TRANSACTIONS and CHARTS tabs and is located directly under the tab control. It contains four of the BalanceCard components, one for each balance type: initial raw, current raw, initial cooked, and current cooked. The first and third cards representing the initial balances contain inputs so the balance can be changed. The second and fourth cards representing the current balances are calculated dynamically in the Wasm module (using the getFinalBalanceForType() function). The following snippet, taken from the BalancesBar component, demonstrates Vue's binding syntax:
<balance-card
title="Initial Raw Balance"
:value="balances.initialRaw"
:onChange="amount => onBalanceChange(amount, 'initialRaw')">
</balance-card>
The : preceding the value and onChange attributes indicate that these properties are bound to the Vue component. If the value of balances.initialRaw changes, the value displayed in the BalanceCard will update as well. The onBalanceChange() function for this card updates the value of balances.initialRaw in global state.
The /components/TransactionsTab folder contains the following four component files:
The TransactionsTab component contains the TransactionsTable and TransactionsModal components, as well as a button used to add new transactions. Changes and additions are done through the TransactionModal component. The TransactionsTable contains all of the current transactions with buttons on each row to either edit or delete the transaction. If the user presses the Delete button, the ConfirmationModal component appears and prompts the user to proceed. If the user presses Yes, the transaction is deleted. The following snippet, taken from the methods property in the TransactionsTable component, demonstrates how display values are formatted:
getFormattedTransactions() {
const getDisplayAmount = (type, amount) => {
if (amount === 0) return accounting.formatMoney(amount);
return accounting.formatMoney(amount, {
format: { pos: '%s %v', neg: '%s (%v)' }
});
};
const getDisplayDate = transactionDate => {
if (!transactionDate) return '';
const parsedTime = d3.timeParse('%Y-%m-%d')(transactionDate);
return d3.timeFormat('%m/%d/%Y')(parsedTime);
};
return $store.state.transactions.map(
({
type,
rawAmount,
cookedAmount,
transactionDate,
...transaction
}) => ({
...transaction,
type,
rawAmount: getDisplayAmount(type, rawAmount),
cookedAmount: getDisplayAmount(type, cookedAmount),
transactionDate: getDisplayDate(transactionDate)
})
);
}
The preceding getFormattedTransactions() function shown applies formatting to the rawAmount, cookedAmount, and transactionDate fields within each transaction record. This is done to ensure the value being displayed includes a dollar sign (for amounts) and is presented in a user-friendly format.
The /components/ChartsTab folder contains two component files: ChartsTab.js and PieChart.js. The ChartsTab component contains two instances of the PieChart component, one for income and one for expenses. Each PieChart component displays either the raw or cooked percentages by category. The user can switch between raw or cooked views via buttons directly above the chart. The drawChart() method in PieChart.js uses D3 to render the pie chart and legend. It uses D3's built-in animations to animate each piece of the pie when loading:
arc
.append('path')
.attr('fill', d => colorScale(d.data.category))
.transition()
.delay((d, i) => i * 100)
.duration(500)
.attrTween('d', d => {
const i = d3.interpolate(d.startAngle + 0.1, d.endAngle);
return t => {
d.endAngle = i(t);
return arcPath(d);
};
});
The preceding snippet, taken from drawChart() in PieChart.js, defines the animation for the pie piece in only a few lines of code. If you're interested in learning more about D3's capabilities, check out some the examples at https://bl.ocks.org. That's it for the components review; let's try running the application.
You've written and compiled the C code and added the frontend logic. It's time to start the application and interact with it. In this section, we will validate your application's /src folder, run the application, and test out the features to ensure everything is working correctly.
Before starting the application, reference the following structure to ensure your /src folder is structured correctly and contains the following contents:
├── /assets
│ ├── main.wasm
│ └── memory.wasm
├── /components
│ ├── /BalancesBar
│ │ ├── BalanceCard.js
│ │ └── BalancesBar.js
│ ├── /ChartsTab
│ │ ├── ChartsTab.js
│ │ └── PieChart.js
│ ├── /TransactionsTab
│ │ ├── ConfirmationModal.js
│ | ├── TransactionModal.js
│ | ├── TransactionsTab.js
│ | └── TransactionsTable.js
│ └── App.js
├── /store
│ ├── api.js
│ ├── initializeWasm.js
│ ├── store.js
│ └── WasmTransactions.js
├── index.html
├── main.js
└── styles.css
If everything matches up, you're ready to proceed.
To start the application, open up a terminal in the /cook-the-books folder and run the following command:
npm start
browser-sync the development dependency we installed in the first section of this chapter, acts as a local server (like the serve library). It makes the application accessible in the browser from the port specified in the package.json file (in this case, 4000). If you navigate to http://localhost:4000/index.html in your browser, you should see this:
To ensure everything is working correctly, let's test out the application. Each of the following sections describes an action and expected behavior for a particular function of the application. Follow along to see if you're getting the expected results. If you run into an issue, you can always refer back to the /chapter-07-cook-the-books folder in the learn-webassembly repository.
Try changing the input values on the INITIAL RAW BALANCE and INITIAL COOKED BALANCE BalanceCard components. The CURRENT RAW BALANCE and CURRENT COOKED BALANCE card values should update to reflect your changes.
Make a note of the current raw and cooked balances, then press the blue Add button at the bottom-right corner of the window. It should load the TransactionModal component. Populate the inputs, make a note of the Type, Raw Amount, and Cooked Amount you entered, then press the Save button.
The balances should have updated to reflect the new amounts. If you picked Withdrawal for the Type, the balances should decrease, otherwise, they increase (for Deposit) as shown in the following screenshot:
Pick a row within the TransactionsTable component, note the amounts, and press the button that looks like a trash can for that record. The ConfirmationModal component should appear. When you press the Yes button, the transaction record should no longer be present in the table and the current balances should update to reflect the amounts associated with the deleted transaction as shown in the following screenshot:
Follow the same procedure as you did for creating a new transaction, except change the existing amounts. Check the current balances to ensure they reflect the updated transaction amounts.
Select the Charts tab to load the ChartsTab component. Press the buttons in each PieChart component to switch between the raw and cooked views. The pie charts should re-render with the updated values:
Congratulations, you just built an application that uses WebAssembly! Tell your friends! Now that you understand the capabilities and limitations of WebAssembly, it's time to expand our horizons and use some of the excellent features Emscripten provides.
In this chapter, we built an accounting application from scratch that uses WebAssembly without any of the extra features Emscripten provides. By adhering to the Core Specification, we demonstrated the limitations of WebAssembly in its current form. However, we were able to perform computation quickly through the use of Wasm modules, which is well suited for accounting. We used Vue to split our application into components, UIkit for the design and layout, and D3 to create pie charts from our transactions data. In Chapter 8, Porting a Game with Emscripten, we'll take full advantage of Emscripten to port an existing C++ code base to WebAssembly.
As demonstrated in Chapter 7, Creating an Application from Scratch, WebAssembly is still relatively limited in its current form. Emscripten provides powerful APIs for extending WebAssembly's capabilities to add functionality to your application. Compiling to a WebAssembly module and JavaScript glue code (instead of an executable) can, in some cases, only require minor changes to the existing C or C++ source.
In this chapter, we're going to take a code base written in C++ that gets compiled to a traditional executable, and update the code so that it can be compiled to Wasm/JavaScript. We'll also add some additional features for tighter integration with the browser.
By the end of this chapter, you'll know how to do the following:
In this chapter, we're taking a Tetris clone written in C++ and updating the code to integrate Emscripten and compile to Wasm/JS. The code base in its original form compiled to an executable utilizes SDL2 and can be loaded from the command line. In this section, we're going to briefly review what Tetris is, how to get the code (without having to write it from scratch), and how to get it running.
In Tetris, the main objective of the game is to rotate and move pieces (Tetriminos) of various shapes within a playing field (well or matrix) to create a row of blocks without gaps. When a full row is created, it is deleted from the playing field and your score is increased by one. In our version of the game, there won't be a win condition (although it would be simple to add it).
It's important to understand the rules and mechanics of the game because the code uses algorithms for concepts such as collision detection and scoring. Understanding the goal of a function helps you understand the code within. I recommend you give it a try online if you need to brush up on your Tetris skills. You can play it at https://emulatoronline.com/nes-games/classic-tetris/ without having to install Adobe Flash. It looks just like the original Nintendo Version:
The version we'll be working with won't contain the piece counters, levels, or points (we're sticking to line counts), but it will operate in the same way.
It turns out that a search for Tetris C++ provides a multitude of tutorials and example repositories to choose from. In the interest of sticking to the formatting and naming conventions that I've been using up to this point, I combined these resources to create my own version of the game. The Further reading section at the end of this chapter has links to these resources if you're interested in learning more. The concepts and process for porting a code base are applicable, regardless of the source. On that note, let's take a brief step-aside to discuss porting in general.
Porting an existing code base to Emscripten is not always a simple task. There are several variables to take into account when evaluating whether a C, C++, or Rust application is amenable to conversion. For example, games that make use of several third-party libraries or even a few third-party libraries that are of considerable complexity may require a significant amount of effort. Emscripten provides the following commonly used libraries out of the box:
If the library isn't already ported, you will need to do it yourself. This would benefit the community, but requires a significant investment of time and resources. Our Tetris example only uses SDL2, which makes the porting process relatively simple.
The code for this chapter is located in the /chapter-08-tetris folder of the learn-webassembly repository. There are two directories within /chapter-08-tetris: the /output-native folder, which contains the original (pre-ported) code and the /output-wasm folder, which contains the ported code.
The /cmake folder and CMakeLists.txt file within the /output-native folder are required to build the project. The README.md file contains instructions to get the code up and running on each platform. Building the project isn't necessary to work through the porting process. The process for installing the required dependencies and getting the project to build successfully on your platform can be time-consuming and complex. If you still wish to proceed, you can build the executable through VS Code's Task feature by selecting Tasks | Run Task... from the menu and selecting Build Executable from the list after following the instructions in the README.md file.
If you were successful in building the project, you should be able to run it by selecting Tasks | Run Task... from the VS Code menu and selecting the Start Executable task from the list. If everything was successful, you should see something like this:
Our version of the game doesn't have a losing condition; it just increments the ROWS count by one for each row you clear. If one of the Tetriminos touches the top of the board, the game is over and the board resets. It's a rudimentary implementation of the game, but additional features increase the complexity and amount of code required. Let's review the code base in more detail.
Now that you have the code available, you'll need to familiarize yourself with the code base. Without having a good understanding of the code you want to port, you'll have a much harder time porting it successfully. In this chapter, we're going to walk through each of the C++ class and header files and describe their roles in the application.
C++ was designed around an object-oriented paradigm, which is what the Tetris code base uses to simplify management of the application. The code base consists of C++ class files
(.cpp) and header files (.h) that represent objects within the context of the game. I used the gameplay summary from the What is Tetris? section to extrapolate which objects I needed.
The game pieces (Tetriminos) and playing field (referred to as a well or matrix) are good candidates for classes. Maybe less intuitively, but still just as valid, is the game itself. Classes don't necessarily need to be as concrete as actual objects — they're excellent for storing shared code. I'm a big fan of less typing, so I opted to use Piece to represent a Tetrimino and Board for the playing field (although the word well is shorter, it just doesn't quite fit). I created a header file to store global variables (constants.h), a Game class to manage gameplay, and a main.cpp file, which acts as the entry point for the game. Here's the contents of the /src folder:
├── board.cpp
├── board.h
├── constants.h
├── game.cpp
├── game.h
├── main.cpp
├── piece.cpp
└── piece.h
Each file (with the exception of main.cpp and constants.h) has a class (.cpp) and header (.h) file. Header files allow you to reuse code across multiple files and prevent code duplication. The Further reading section contains resources for you to learn more about header files if you're interested. The constants.h file is used in almost all of the other files within the application, so let's review that first.
Rather than have confusing magic numbers sprinkled throughout the code base, I opted for a header file containing the constants we'll be using (constants.h). The contents of this file are shown here:
#ifndef TETRIS_CONSTANTS_H
#define TETRIS_CONSTANTS_H
namespace Constants {
const int BoardColumns = 10;
const int BoardHeight = 720;
const int BoardRows = 20;
const int BoardWidth = 360;
const int Offset = BoardWidth / BoardColumns;
const int PieceSize = 4;
const int ScreenHeight = BoardHeight + 50;
}
#endif // TETRIS_CONSTANTS_H
The #ifndef statement in the first line of the file is an #include guard, which prevents the header file from being included multiple times during compilation. These guards are used in all of the application's header files. The purpose of each of these constants will become clear when we step through each of the classes. I included it first to provide context around the various element sizes and how they relate to each other.
Let's move on to the various classes that represent aspects of the game. The Piece class represents an object at the lowest level, so we'll start there and work our way up to the Board and Game classes.
The piece, or Tetrimino, is the element that can be moved and rotated on the board. There are seven kinds of Tetriminos — each is represented by a letter and has a corresponding color:
We need a way to define each piece in terms of shape, color, and current orientation. Each piece has four different orientations (at 90 degree increments), which results in 28 total variations for all pieces. The color doesn't change, so that only needs to be assigned once. With that in mind, let's first take a look at the header file (piece.h):
#ifndef TETRIS_PIECE_H
#define TETRIS_PIECE_H
#include <SDL2/SDL.h>
#include "constants.h"
class Piece {
public:
enum Kind { I = 0, J, L, O, S, T, Z };
explicit Piece(Kind kind);
void draw(SDL_Renderer *renderer);
void move(int columnDelta, int rowDelta);
void rotate();
bool isBlock(int column, int row) const;
int getColumn() const;
int getRow() const;
private:
Kind kind_;
int column_;
int row_;
int angle_;
};
#endif // TETRIS_PIECE_H
The game uses SDL2 to render the various graphical elements and handle keyboard input, which is why we're passing a SDL_Renderer into the draw() function. You'll see how SDL2 is used in the Game class, but for now just be aware of its inclusion. The header file defines the interface for the Piece class; let's review the implementation in piece.cpp. We'll walk through each section of code and describe the functionality.
The first section of code defines the constructor of the Piece class and the draw() function:
#include "piece.h"
using namespace Constants;
Piece::Piece(Piece::Kind kind) :
kind_(kind),
column_(BoardColumns / 2 - PieceSize / 2),
row_(0),
angle_(0) {
}
void Piece::draw(SDL_Renderer *renderer) {
switch (kind_) {
case I:
SDL_SetRenderDrawColor(renderer,
/* Cyan: */ 45, 254, 254, 255);
break;
case J:
SDL_SetRenderDrawColor(renderer,
/* Blue: */ 11, 36, 251, 255);
break;
case L:
SDL_SetRenderDrawColor(renderer,
/* Orange: */ 253, 164, 41, 255);
break;
case O:
SDL_SetRenderDrawColor(renderer,
/* Yellow: */ 255, 253, 56, 255);
break;
case S:
SDL_SetRenderDrawColor(renderer,
/* Green: */ 41, 253, 47, 255);
break;
case T:
SDL_SetRenderDrawColor(renderer,
/* Purple: */ 126, 15, 126, 255);
break;
case Z:
SDL_SetRenderDrawColor(renderer,
/* Red: */ 252, 13, 28, 255);
break;
}
for (int column = 0; column < PieceSize; ++column) {
for (int row = 0; row < PieceSize; ++row) {
if (isBlock(column, row)) {
SDL_Rect rect{
(column + column_) * Offset + 1,
(row + row_) * Offset + 1,
Offset - 2,
Offset - 2
};
SDL_RenderFillRect(renderer, &rect);
}
}
}
}
The constructor initializes the class with default values. The BoardColumns and PieceSize values are constants from the constants.h file. BoardColumns represents the amount of columns that can fit on a board, which is 10 in this case. The PieceSize constant represents the area or block that a piece takes up in columns, which is 4. The initial value assigned to the private columns_ variable represents the center of the board.
The draw() function loops through all of the possible rows and columns on the board and fills in any cells that are populated by a piece with the color that corresponds to its kind. The determination for whether a cell is populated by a piece is performed in the isBlock() function, which we'll discuss next.
The second section contains the logic to move or rotate the piece and determine its current location:
void Piece::move(int columnDelta, int rowDelta) {
column_ += columnDelta;
row_ += rowDelta;
}
void Piece::rotate() {
angle_ += 3;
angle_ %= 4;
}
bool Piece::isBlock(int column, int row) const {
static const char *Shapes[][4] = {
// I
{
" * "
" * "
" * "
" * ",
" "
"****"
" "
" ",
" * "
" * "
" * "
" * ",
" "
"****"
" "
" ",
},
// J
{
" * "
" * "
" ** "
" ",
" "
"* "
"*** "
" ",
" ** "
" * "
" * "
" ",
" "
" "
"*** "
" * ",
},
...
};
return Shapes[kind_][angle_][column + row * PieceSize] == '*';
}
int Piece::getColumn() const {
return column_;
}
int Piece::getRow() const {
return row_;
}
The move() function updates the values of the private column_ and row_ variables, which dictates the piece's location on the board. The rotate() function sets the value of the private angle_ variable to either 0, 1, 2, or 3 (which is why %= 4 is used).
Determination for which kind of piece is shown, its location, and rotation is performed in the isBlock() function. I omitted all but the first two elements of the Shapes multi-dimensional array to avoid cluttering up the file, but the remaining five piece kinds are present in the actual code. I will admit that this isn't the most elegant implementation, but it suits our purposes just fine.
The private kind_ and angle_ values are specified as dimensions in the Shapes array to pick the four corresponding char* elements. These four elements represent the four possible orientations of the piece. If the index of column + row * PieceSize in the string is an asterisk, the piece is present in the specified row and column. If you decide to work through one of the Tetris tutorials available on the web (or look at one of the many Tetris repositories on GitHub), you'll find that there are several different ways to calculate whether a cell is populated by a piece. I chose this method because it's easier to visualize the pieces.
The final section of code contains functions to get the row and column of the piece:
int Piece::getColumn() const {
return column_;
}
int Piece::getRow() const {
return row_;
}
These functions simply return the value of the private column_ or row_ variable. Now that you have a better understanding of the Piece class, let's move on to the Board.
The Board contains instances of the Piece class and needs to detect collisions among the pieces, when rows are filled, and when the game is over. Let's start with the contents of the header file (board.h):
#ifndef TETRIS_BOARD_H
#define TETRIS_BOARD_H
#include <SDL2/SDL.h>
#include <SDL2/SDL2_ttf.h>
#include "constants.h"
#include "piece.h"
using namespace Constants;
class Board {
public:
Board();
void draw(SDL_Renderer *renderer, TTF_Font *font);
bool isCollision(const Piece &piece) const;
void unite(const Piece &piece);
private:
bool isRowFull(int row);
bool areFullRowsPresent();
void updateOffsetRow(int fullRow);
void displayScore(SDL_Renderer *renderer, TTF_Font *font);
bool cells_[BoardColumns][BoardRows];
int currentScore_;
};
#endif // TETRIS_BOARD_H
The Board has a draw() function like the Piece class as well as several other functions for managing rows and keeping track of which cells are populated on the board. The SDL2_ttf library is used to render the ROWS: text at the bottom of the window with the current score (count of rows cleared). Now, let's take a look at each section of the implementation file (board.cpp).
The first section of code defines the constructor of the Board class and the draw() function:
#include <sstream>
#include "board.h"
using namespace Constants;
Board::Board() : cells_{{ false }}, currentScore_(0) {}
void Board::draw(SDL_Renderer *renderer, TTF_Font *font) {
displayScore(renderer, font);
SDL_SetRenderDrawColor(
renderer,
/* Light Gray: */ 140, 140, 140, 255);
for (int column = 0; column < BoardColumns; ++column) {
for (int row = 0; row < BoardRows; ++row) {
if (cells_[column][row]) {
SDL_Rect rect{
column * Offset + 1,
row * Offset + 1,
Offset - 2,
Offset - 2
};
SDL_RenderFillRect(renderer, &rect);
}
}
}
}
The Board constructor initializes the values of the private cells_ and currentScore_ variables to default values. The cells_ variable is a two-dimensional array of Booleans, with the first dimension representing columns and the second rows. If a piece occupies a specific column and row, the corresponding value in the array is true. The draw() function behaves similarly to the draw() function of Piece in that it fills cells that contain pieces with color. However, this function only fills in cells that are occupied by pieces that have reached the bottom of the board with a light gray color, regardless of what kind of piece it is.
The second section of code contains logic to detect collisions:
bool Board::isCollision(const Piece &piece) const {
for (int column = 0; column < PieceSize; ++column) {
for (int row = 0; row < PieceSize; ++row) {
if (piece.isBlock(column, row)) {
int columnTarget = piece.getColumn() + column;
int rowTarget = piece.getRow() + row;
if (
columnTarget < 0
|| columnTarget >= BoardColumns
|| rowTarget < 0
|| rowTarget >= BoardRows
) {
return true;
}
if (cells_[columnTarget][rowTarget]) return true;
}
}
}
return false;
}
The isCollision() function loops through each cell on the board until it reaches one populated by the &piece passed as an argument. If the piece is about to collide with either side of the board or it has reached the bottom, the function returns true, otherwise it returns false.
The third section of code contains logic to unite a piece with the top row when it comes to rest:
void Board::unite(const Piece &piece) {
for (int column = 0; column < PieceSize; ++column) {
for (int row = 0; row < PieceSize; ++row) {
if (piece.isBlock(column, row)) {
int columnTarget = piece.getColumn() + column;
int rowTarget = piece.getRow() + row;
cells_[columnTarget][rowTarget] = true;
}
}
}
// Continuously loops through each of the rows until no full rows are
// detected and ensures the full rows are collapsed and non-full rows
// are shifted accordingly:
while (areFullRowsPresent()) {
for (int row = BoardRows - 1; row >= 0; --row) {
if (isRowFull(row)) {
updateOffsetRow(row);
currentScore_ += 1;
for (int column = 0; column < BoardColumns; ++column) {
cells_[column][0] = false;
}
}
}
}
}
bool Board::isRowFull(int row) {
for (int column = 0; column < BoardColumns; ++column) {
if (!cells_[column][row]) return false;
}
return true;
}
bool Board::areFullRowsPresent() {
for (int row = BoardRows - 1; row >= 0; --row) {
if (isRowFull(row)) return true;
}
return false;
}
void Board::updateOffsetRow(int fullRow) {
for (int column = 0; column < BoardColumns; ++column) {
for (int rowOffset = fullRow - 1; rowOffset >= 0; --rowOffset) {
cells_[column][rowOffset + 1] =
cells_[column][rowOffset];
}
}
}
The unite() function and the corresponding isRowFull(), areFullRowsPresent(), and updateOffsetRow() functions perform several operations. It updates the private cells_ variable with the rows and columns that the specified &piece argument occupies by setting the appropriate array location to true. It also clears any full rows (all columns filled) from the board by setting the corresponding cells_ array locations to false and increments the currentScore_. After the row is cleared, the cells_ array is updated to shift the row above the cleared row down by 1.
The final section of code displays the score at the bottom of the game window:
void Board::displayScore(SDL_Renderer *renderer, TTF_Font *font) {
std::stringstream message;
message << "ROWS: " << currentScore_;
SDL_Color white = { 255, 255, 255 };
SDL_Surface *surface = TTF_RenderText_Blended(
font,
message.str().c_str(),
white);
SDL_Texture *texture = SDL_CreateTextureFromSurface(
renderer,
surface);
SDL_Rect messageRect{ 20, BoardHeight + 15, surface->w, surface->h };
SDL_FreeSurface(surface);
SDL_RenderCopy(renderer, texture, nullptr, &messageRect);
SDL_DestroyTexture(texture);
}
The displayScore() function uses the SDL2_ttf library to display the current score at the bottom of the window (underneath the board). The TTF_Font *font argument is passed in from the Game class to avoid initializing the font every time the score is updated. The stringstream message variable is used to create the text value and set it to a C char* within the TTF_RenderText_Blended() function. The rest of the code draws the text on a SDL_Rect to ensure that it's properly displayed.
That's it for the Board class; let's move on to the Game to see how it all fits together.
The Game class contains the looping function that enables you to move pieces around the board with key presses. Here's the contents of the header file (game.h):
#ifndef TETRIS_GAME_H
#define TETRIS_GAME_H
#include <SDL2/SDL.h>
#include <SDL2/SDL2_ttf.h>
#include "constants.h"
#include "board.h"
#include "piece.h"
class Game {
public:
Game();
~Game();
bool loop();
private:
Game(const Game &);
Game &operator=(const Game &);
void checkForCollision(const Piece &newPiece);
void handleKeyEvents(SDL_Event &event);
SDL_Window *window_;
SDL_Renderer *renderer_;
TTF_Font *font_;
Board board_;
Piece piece_;
uint32_t moveTime_;
};
#endif // TETRIS_GAME_H
The loop() function contains the game logic and manages state based on events. The first two lines under the private: header prevent more than one instance of the game from being created, which could cause a memory leak. The private methods reduce the amount of code lines in the loop() function, which simplifies maintenance and debugging. Let's move on to the implementation in game.cpp.
The first section of code defines the actions to perform when the class instance is loaded (constructor) and unloaded (destructor):
#include <cstdlib>
#include <iostream>
#include <stdexcept>
#include "game.h"
using namespace std;
using namespace Constants;
Game::Game() :
// Create a new random piece:
piece_{ static_cast<Piece::Kind>(rand() % 7) },
moveTime_(SDL_GetTicks())
{
if (SDL_Init(SDL_INIT_VIDEO) != 0) {
throw runtime_error(
"SDL_Init(SDL_INIT_VIDEO): " + string(SDL_GetError()));
}
SDL_CreateWindowAndRenderer(
BoardWidth,
ScreenHeight,
SDL_WINDOW_OPENGL,
&window_,
&renderer_);
SDL_SetWindowPosition(
window_,
SDL_WINDOWPOS_CENTERED,
SDL_WINDOWPOS_CENTERED);
SDL_SetWindowTitle(window_, "Tetris");
if (TTF_Init() != 0) {
throw runtime_error("TTF_Init():" + string(TTF_GetError()));
}
font_ = TTF_OpenFont("PressStart2P.ttf", 18);
if (font_ == nullptr) {
throw runtime_error("TTF_OpenFont: " + string(TTF_GetError()));
}
}
Game::~Game() {
TTF_CloseFont(font_);
TTF_Quit();
SDL_DestroyRenderer(renderer_);
SDL_DestroyWindow(window_);
SDL_Quit();
}
The constructor represents the entry point for the application, so all of the required resources are allocated and initialized within it. The TTF_OpenFont() function is referencing a TrueType font file downloaded from Google Fonts named Press Start 2P. You can view the font at https://fonts.google.com/specimen/Press+Start+2P. It's present in the /resources folder of the repository and gets copied into the same folder as the executable when the project is built. If at any point an error occurs when initializing the SDL2 resources, a runtime_error is thrown with details of the error. The destructor (~Game()) frees up the resources we allocated for SDL2 and SDL2_ttf before the application exits. This is done to avoid a memory leak.
The final section of code represents the Game::loop:
bool Game::loop() {
SDL_Event event;
while (SDL_PollEvent(&event)) {
switch (event.type) {
case SDL_KEYDOWN:
handleKeyEvents(event);
break;
case SDL_QUIT:
return false;
default:
return true;
}
}
SDL_SetRenderDrawColor(renderer_, /* Dark Gray: */ 58, 58, 58, 255);
SDL_RenderClear(renderer_);
board_.draw(renderer_, font_);
piece_.draw(renderer_);
if (SDL_GetTicks() > moveTime_) {
moveTime_ += 1000;
Piece newPiece = piece_;
newPiece.move(0, 1);
checkForCollision(newPiece);
}
SDL_RenderPresent(renderer_);
return true;
}
void Game::checkForCollision(const Piece &newPiece) {
if (board_.isCollision(newPiece)) {
board_.unite(piece_);
piece_ = Piece{ static_cast<Piece::Kind>(rand() % 7) };
if (board_.isCollision(piece_)) board_ = Board();
} else {
piece_ = newPiece;
}
}
void Game::handleKeyEvents(SDL_Event &event) {
Piece newPiece = piece_;
switch (event.key.keysym.sym) {
case SDLK_DOWN:
newPiece.move(0, 1);
break;
case SDLK_RIGHT:
newPiece.move(1, 0);
break;
case SDLK_LEFT:
newPiece.move(-1, 0);
break;
case SDLK_UP:
newPiece.rotate();
break;
default:
break;
}
if (!board_.isCollision(newPiece)) piece_ = newPiece;
}
The loop() function returns a Boolean as long as the SDL_QUIT event hasn't fired. Every 1 second, the draw() functions for the Piece and Board instances are executed, and the piece locations on the board are updated accordingly. The left, right, and down arrow keys control the piece's movement while the up arrow key rotates the piece by 90 degrees. Appropriate responses to key presses are handled in the handleKeyEvents() function. The checkForCollision() function determines if a new instance of the active piece collided with either side of the board or came to rest on top of the other pieces. If it did, a new piece is created. The logic for clearing the rows (via the unite() function of Board) is also handled in this function. We're almost done! Let's move on to the main.cpp file.
There's no header file associated with main.cpp because its only purpose is to act as an entry point to the application. In fact, the file is only seven lines long:
#include "game.h"
int main() {
Game game;
while (game.loop());
return 0;
}
The while statement is exited when the loop() function returns false, which occurs when the SDL_QUIT event fires. All this file is doing is creating a new instance of Game and starting the loop. That's it for the codebase; let's start porting!
You have a good understanding of the code base, so now it's time to start porting it over with Emscripten. Fortunately, we're able to leverage some of the browser's features to simplify the code and completely remove a third-party library. In this section, we're going to update the code to compile to a Wasm module and JavaScript glue file and update some of the functionality to utilize the browser.
The /output-wasm folder contains the end result, but I recommend that you create a copy of the /output-native folder so that you can follow along with the porting process. There are VS Code Tasks set up for both native compilation and Emscripten compilation. If you get stuck, you can always reference the /output-wasm contents. Make sure you open your copied folder in VS Code (File | Open and select your copied folder), otherwise you won't be able to use the Tasks feature.
This game is an ideal candidate for porting because it uses SDL2, a widely used library with an existing Emscripten port. Including SDL2 in the compilation step requires only one additional argument passed to the emcc command. An Emscripten port of the SDL2_ttf library also exists, but keeping it in the code base doesn't make much sense. Its sole purpose is to render the score (amount of rows cleared) as text. We would need to include the TTF file with the application and complicate the build process. Emscripten provides the means for using JavaScript code within our C++, so we're going to take a much simpler route: show the score in the DOM.
In addition to changing the existing code, we'll need to create an HTML and CSS file for displaying and styling the game in the browser. The JavaScript code we write will be minimal — we just need to load the Emscripten module and all our functionality is handled in the C++ code base. We'll also need to add a few <div> elements and lay them out accordingly to display the score. Let's start porting!
Create a folder in your project folder named /public. Add a new file named index.html to the /public folder and populate it with the following contents:
<!doctype html>
<html lang="en-us">
<head>
<title>Tetris</title>
<link rel="stylesheet" type="text/css" href="styles.css" />
</head>
<body>
<div class="wrapper">
<h1>Tetris</h1>
<div>
<canvas id="canvas"></canvas>
<div class="scoreWrapper">
<span>ROWS:</span><span id="score"></span>
</div>
</div>
</div>
<script type="application/javascript" src="index.js"></script>
<script type="application/javascript">
Module({ canvas: (() => document.getElementById('canvas'))() })
</script>
</body>
</html>
The index.js file being loaded in the first <script> tag doesn't exist yet; that'll be generated in the compilation step. Let's add some styles to the elements. Create a styles.css file in the /public folder and populate it with the following contents:
@import url("https://fonts.googleapis.com/css?family=Press+Start+2P");
* {
font-family: "Press Start 2P", sans-serif;
}
body {
margin: 24px;
}
h1 {
font-size: 36px;
}
span {
color: white;
font-size: 24px;
}
.wrapper {
display: flex;
align-items: center;
flex-direction: column;
}
.titleWrapper {
display: flex;
align-items: center;
justify-content: center;
}
.header {
font-size: 24px;
margin-left: 16px;
}
.scoreWrapper {
background-color: #3A3A3A;
border-top: 1px solid white;
padding: 16px 0;
width: 360px;
}
span:first-child {
margin-left: 16px;
margin-right: 8px;
}
Since the Press Start 2P font we're using is hosted on Google Fonts, we can import it for use on the site. The CSS rules in this file handle simple layout and styling. That's it for the web-related files we needed to create. Now, it's time to update the C++ code.
We only need to edit a few files to get Emscripten working correctly. For the sake of simplicity and compactness, only the affected sections of code will be included (rather than the entire file). Let's work through the files in the same order as the previous section and start with constants.h.
We'll display the rows cleared count on the DOM instead of in the game window itself, so you can delete the ScreenHeight constant from the file. We no longer need additional space to accommodate for the score text:
namespace Constants {
const int BoardColumns = 10;
const int BoardHeight = 720;
const int BoardRows = 20;
const int BoardWidth = 360;
const int Offset = BoardWidth / BoardColumns;
const int PieceSize = 4;
// const int ScreenHeight = BoardHeight + 50; <----- Delete this line
}
No changes need to be made to the Piece class files (piece.cpp/piece.h). However, we will need to update the Board class. Let's start with the header file (board.h). Starting with the bottom and working our way up, let's update the displayScore() function. In the <body> section of the index.html file, there's a <span> element with id="score". We're going to update this element using the emscripten_run_script command to display the current score. As a result, the displayScore() function becomes much shorter. The before and after is shown as follows.
Here is the original version of the Board class's displayScore() function:
void Board::displayScore(SDL_Renderer *renderer, TTF_Font *font) {
std::stringstream message;
message << "ROWS: " << currentScore_;
SDL_Color white = { 255, 255, 255 };
SDL_Surface *surface = TTF_RenderText_Blended(
font,
message.str().c_str(),
white);
SDL_Texture *texture = SDL_CreateTextureFromSurface(
renderer,
surface);
SDL_Rect messageRect{ 20, BoardHeight + 15, surface->w, surface->h };
SDL_FreeSurface(surface);
SDL_RenderCopy(renderer, texture, nullptr, &messageRect);
SDL_DestroyTexture(texture);
}
Here is the ported version of the displayScore() function:
void Board::displayScore(int newScore) {
std::stringstream action;
action << "document.getElementById('score').innerHTML =" << newScore;
emscripten_run_script(action.str().c_str());
}
The emscripten_run_script action simply finds the <span> element on the DOM and sets the innerHTML to the current score. We can't use the EM_ASM() function here because Emscripten doesn't recognize the document object. Since we have access to the private currentScore_ variable in the class, we're going to move the displayScore() call in the draw() function into the unite() function. This limits the amount of calls to displayScore() to ensure that the function is called only when the score has actually changed. We only need to add one line of code to accomplish this. Here's what the unite() function looks like now:
void Board::unite(const Piece &piece) {
for (int column = 0; column < PieceSize; ++column) {
for (int row = 0; row < PieceSize; ++row) {
if (piece.isBlock(column, row)) {
int columnTarget = piece.getColumn() + column;
int rowTarget = piece.getRow() + row;
cells_[columnTarget][rowTarget] = true;
}
}
}
// Continuously loops through each of the rows until no full rows are
// detected and ensures the full rows are collapsed and non-full rows
// are shifted accordingly:
while (areFullRowsPresent()) {
for (int row = BoardRows - 1; row >= 0; --row) {
if (isRowFull(row)) {
updateOffsetRow(row);
currentScore_ += 1;
for (int column = 0; column < BoardColumns; ++column) {
cells_[column][0] = false;
}
}
}
displayScore(currentScore_); // <----- Add this line
}
}
Since we're no longer using the SDL2_ttf library, we can update the draw() function signature and remove the displayScore() function call. Here's the updated draw() function:
void Board::draw(SDL_Renderer *renderer/*, TTF_Font *font */) {
// ^^^^^^^^^^^^^^ <-- Remove this argument
// displayScore(renderer, font); <----- Delete this line
SDL_SetRenderDrawColor(
renderer,
/* Light Gray: */ 140, 140, 140, 255);
for (int column = 0; column < BoardColumns; ++column) {
for (int row = 0; row < BoardRows; ++row) {
if (cells_[column][row]) {
SDL_Rect rect{
column * Offset + 1,
row * Offset + 1,
Offset - 2,
Offset - 2
};
SDL_RenderFillRect(renderer, &rect);
}
}
}
}
The displayScore() function call was removed from the first line of the function and the TTF_Font *font argument was removed as well. Let's add a call to displayScore() in the constructor to ensure that the initial value is set to 0 when the game ends and a new one begins:
Board::Board() : cells_{{ false }}, currentScore_(0) {
displayScore(0); // <----- Add this line
}
That's it for the class file. Since we changed the signatures for the displayScore() and draw() functions, and removed the dependency for SDL2_ttf, we'll need to update the header file. Remove the following lines from board.h:
#ifndef TETRIS_BOARD_H
#define TETRIS_BOARD_H
#include <SDL2/SDL.h>
// #include <SDL2/SDL2_ttf.h> <----- Delete this line
#include "constants.h"
#include "piece.h"
using namespace Constants;
class Board {
public:
Board();
void draw(SDL_Renderer *renderer /*, TTF_Font *font */);
// ^^^^^^^^^^^^^^ <-- Remove this
bool isCollision(const Piece &piece) const;
void unite(const Piece &piece);
private:
bool isRowFull(int row);
bool areFullRowsPresent();
void updateOffsetRow(int fullRow);
void displayScore(SDL_Renderer *renderer, TTF_Font *font);
// ^^^^^^^^^^^^^^ <-- Remove this
bool cells_[BoardColumns][BoardRows];
int currentScore_;
};
#endif // TETRIS_BOARD_H
We're moving right along! The final change we need to make is the also the biggest one. The existing code base has a Game class that manages the application logic and a main.cpp file that calls the Game.loop() function in the main() function. The looping mechanism is a while loop that continues to run as long as the SDL_QUIT event hasn't fired. We need to change our approach to accommodate for Emscripten.
Emscripten provides an emscripten_set_main_loop function that accepts an em_callback_func looping function, fps, and a simulate_infinite_loop flag. We can't include the Game class and pass Game.loop() as the em_callback_func argument, because the build will fail. Instead, we're going to eliminate the Game class completely and move the logic into the main.cpp file. Copy the contents of game.cpp into main.cpp (overwriting the existing contents) and delete the Game class files (game.cpp/game.h). Since we're not declaring a class for Game, remove the Game:: prefixes from the functions. The constructor and destructor are no longer valid (they're no longer part of a class), so we need to move that logic to a different location. We also need to reorder the file to ensure that our called functions come before the calling functions. The final result looks like this:
#include <emscripten/emscripten.h>
#include <SDL2/SDL.h>
#include <stdexcept>
#include "constants.h"
#include "board.h"
#include "piece.h"
using namespace std;
using namespace Constants;
static SDL_Window *window = nullptr;
static SDL_Renderer *renderer = nullptr;
static Piece currentPiece{ static_cast<Piece::Kind>(rand() % 7) };
static Board board;
static int moveTime;
void checkForCollision(const Piece &newPiece) {
if (board.isCollision(newPiece)) {
board.unite(currentPiece);
currentPiece = Piece{ static_cast<Piece::Kind>(rand() % 7) };
if (board.isCollision(currentPiece)) board = Board();
} else {
currentPiece = newPiece;
}
}
void handleKeyEvents(SDL_Event &event) {
Piece newPiece = currentPiece;
switch (event.key.keysym.sym) {
case SDLK_DOWN:
newPiece.move(0, 1);
break;
case SDLK_RIGHT:
newPiece.move(1, 0);
break;
case SDLK_LEFT:
newPiece.move(-1, 0);
break;
case SDLK_UP:
newPiece.rotate();
break;
default:
break;
}
if (!board.isCollision(newPiece)) currentPiece = newPiece;
}
void loop() {
SDL_Event event;
while (SDL_PollEvent(&event)) {
switch (event.type) {
case SDL_KEYDOWN:
handleKeyEvents(event);
break;
case SDL_QUIT:
break;
default:
break;
}
}
SDL_SetRenderDrawColor(renderer, /* Dark Gray: */ 58, 58, 58, 255);
SDL_RenderClear(renderer);
board.draw(renderer);
currentPiece.draw(renderer);
if (SDL_GetTicks() > moveTime) {
moveTime += 1000;
Piece newPiece = currentPiece;
newPiece.move(0, 1);
checkForCollision(newPiece);
}
SDL_RenderPresent(renderer);
}
int main() {
moveTime = SDL_GetTicks();
if (SDL_Init(SDL_INIT_VIDEO) != 0) {
throw std::runtime_error("SDL_Init(SDL_INIT_VIDEO)");
}
SDL_CreateWindowAndRenderer(
BoardWidth,
BoardHeight,
SDL_WINDOW_OPENGL,
&window,
&renderer);
emscripten_set_main_loop(loop, 0, 1);
SDL_DestroyRenderer(renderer);
renderer = nullptr;
SDL_DestroyWindow(window);
window = nullptr;
SDL_Quit();
return 0;
}
The handleKeyEvents() and checkForCollision() functions haven't changed; we simply moved them to the top of the file. The loop() function return type was changed from bool to void as required by emscripten_set_main_loop. Finally, the code from the constructor and destructor was moved into the main() function and any references to SDL2_ttf were removed. Instead of the while statement that called the loop() function of Game, we have the emscripten_set_main_loop(loop, 0, 1) call. We changed the #include statements at the top of the file to accommodate for Emscripten, SDL2, and our Board and Piece classes. That's it for changes — now it's time to configure the build and test out the game.
With the code updated and the required web assets present, it's time to build and test out the game. The compilation step is similar to the previous examples in this book, but we're going to use a different technique to run the game. In this section, we're going to configure the build task to accommodate for the C++ files and run the application using a feature provided by Emscripten.
We're going to configure the build in two ways: with VS Code tasks and a Makefile. Makefiles are nice if you prefer to use a different editor than VS Code. The /.vscode/tasks.json file already contains the tasks you'll need to build the project. The Emscripten build step is the default (a set of native build tasks is also present). Let's walk through each task in the tasks array and review what's taking place. The first task deletes any existing compiled output files prior to building:
{
"label": "Remove Existing Web Files",
"type": "shell",
"command": "rimraf",
"options": {
"cwd": "${workspaceRoot}/public"
},
"args": [
"index.js",
"index.wasm"
]
}
The second task performs the build with the emcc command:
{
"label": "Build WebAssembly",
"type": "shell",
"command": "emcc",
"args": [
"--bind", "src/board.cpp", "src/piece.cpp", "src/main.cpp",
"-std=c++14",
"-O3",
"-s", "WASM=1",
"-s", "USE_SDL=2",
"-s", "MODULARIZE=1",
"-o", "public/index.js"
],
"group": {
"kind": "build",
"isDefault": true
},
"problemMatcher": [],
"dependsOn": ["Remove Existing Web Files"]
}
The related arguments are placed on the same line. The only new and unfamiliar addition to the args array is the --bind argument with the corresponding .cpp files. This tells Emscripten that all the files after --bind are required to build the project. Test out the build by selecting Tasks | Run Build Task... from the menu or using the keyboard shortcut Cmd/Ctrl + Shift + B. It takes a few seconds to build, but the terminal will let you know when the compilation process is complete. If successful, you should see an index.js and index.wasm file in the /public folder.
If you prefer not to use VS Code, you can use a Makefile to accomplish the same goal as the VS Code tasks. Create a file named Makefile in your project folder and populate it with the following contents (make sure that the file is using tabs, not spaces):
# This allows you to just run the "make" command without specifying
# arguments:
.DEFAULT_GOAL := build
# Specifies which files to compile as part of the project:
CPP_FILES = $(wildcard src/*.cpp)
# Flags to use for Emscripten emcc compile command:
FLAGS = -std=c++14 -O3 -s WASM=1 -s USE_SDL=2 -s MODULARIZE=1 \
--bind $(CPP_FILES)
# Name of output (the .wasm file is created automatically):
OUTPUT_FILE = public/index.js
# This is the target that compiles our executable
compile: $(CPP_FILES)
emcc $(FLAGS) -o $(OUTPUT_FILE)
# Removes the existing index.js and index.wasm files:
clean:
rimraf $(OUTPUT_FILE)
rimraf public/index.wasm
# Removes the existing files and builds the project:
build: clean compile
@echo "Build Complete!"
The operations being performed are identical to the VS Code tasks, just in a different format using more universal tooling. The default build step is set in the file, so you can run the following command within your project folder to compile the project:
make
Now that you have a compiled Wasm file and JavaScript glue code, let's try running the game.
Instead of using serve or browser-sync, we're going to use a built-in feature of Emscripten's toolchain, emrun. It provides the added benefit of capturing stdout and stderr (if you pass the --emrun linker flag to the emcc command) and printing them to the terminal if desired. We're not going to use the --emrun flag, but having a local web server available without having to install any additional dependencies is a nice added feature to be aware of. Open up a terminal instance within your project folder and run the following command to start the game:
emrun --browser chrome --no_emrun_detect public/index.html
You can specify firefox for the browser if that's what you're using for development. The --no_emrun_detect flag hides a message in the terminal stating that the HTML page is not emrun capable. If you navigate to http://localhost:6931/index.html, you should see the following:
Try rotating and moving the pieces to ensure that everything is working correctly. The ROWS count should increment by one when you've successfully cleared a row. You may also notice that if you're too close to the edge of the board, you won't be able to rotate some of the pieces. Congratulations, you've successfully ported a C++ game over to Emscripten!
In this chapter, we ported a Tetris clone written in C++ that used SDL2 to Emscripten so it could be run in the browser with WebAssembly. We covered the rules of Tetris and how they map to the logic within the existing codebase. We also reviewed each file in the existing code base individually and which changes had to be made to successfully compile to a Wasm file and JavaScript glue code. After updating the existing code, we created the required HTML and CSS files, then configured a build step with the appropriate emcc flags. Once built, the game was run using Emscripten's emrun command.
In Chapter 9, Integrating with Node.js, we're going to discuss how to integrate WebAssembly into Node.js and the benefits this integration provides.
The modern web leans heavily on Node.js for both development and server-side management. With the advent of increasingly complex browser applications that perform computationally expensive operations, performance increases can be incredibly beneficial. In this chapter, we're going to describe the various ways you can integrate WebAssembly with Node.js through the use of various examples.
Our goal for this chapter is to understand the following:
In Chapter 3, Setting Up a Development Environment, Node.js was described as an asynchronous event-driven JavaScript runtime, which is the definition taken from the official website. What Node.js represents, however, is a profound shift in the way we build and manage web applications. In this section, we will discuss the relationship between WebAssembly and Node.js, and why the two technologies complement each other so well.
Node.js runs on Google's V8 JavaScript engine, which powers Google Chrome. Since V8's WebAssembly implementation adheres to the Core Specification, you can interact with a WebAssembly module using the same API as the browser. Instead of performing a fetch call for a .wasm file, you can use Node.js's fs module to read the contents into a buffer, then call instantiate() on the result.
JavaScript has limitations on the server side as well. Expensive computation or working with large numbers can be optimized with WebAssembly's superior performance. As a scripting language, JavaScript excels at automating simple tasks. You could write a script to compile C/C++ to a Wasm file, copy it to a build folder, and see the changes reflected in the browser if you're using a tool like Browsersync.
Node.js has an extensive ecosystem of tools and libraries in the form of npm. Sven Sauleau and other members of the open source community have created webassemblyjs, an extensive suite of tooling for WebAssembly built with Node.js. The webassemblyjs site at https://webassembly.js.org includes the tagline Toolchain for WebAssembly. There are currently over 20 npm packages to perform various tasks and aid in development, such as an ESLint plugin, an AST validator, and a formatter. AssemblyScript, a TypeScript to WebAssembly compiler, allows you to write performant code that compiles to a Wasm module without having to learn C or C++. The Node.js community is clearly vested in WebAssembly's success.
Node.js can be used in several ways to add value to a WebAssembly project. In this section, we're going to walk through an example Node.js application that integrates WebAssembly. The application uses Express with some simple routes to call functions from a compiled Wasm module.
The project reuses some of the code from the application we built in Chapter 7, Creating an Application from Scratch (Cook the Books) to demonstrate how Node.js can be used with WebAssembly. The code for this section is located in the /chapter-09-node/server-example folder in the learn-webassembly repository. We're going to review portions of the application directly applicable to Node.js. The following structure represents the file structure for the project:
├── /lib
│ └── main.c
├── /src
| ├── Transaction.js
| ├── /assets
| │ ├── db.json
| │ ├── main.wasm
| │ └── memory.wasm
| ├── assign-routes.js
| ├── index.js
| └── load-assets.js
├── package.json
├── package-lock.json
└── requests.js
With regard to dependencies, the application uses the express and body-parser libraries to set up routes and parse JSON from the body of requests. For data management, it uses lowdb, a library that provides methods for reading and updating a JSON file. The JSON file is located in /src/assets/db.json and contains data that was slightly modified from the Cook the Books dataset. We're using nodemon to watch for changes in the /src folder and reload the application automatically. We're using rimraf to manage file deletion. The library is included as a dependency in the event that you didn't install it globally in Chapter 3, Setting Up a Development Environment. Finally, the node-fetch library allows us to use the fetch API to make HTTP requests when testing the application.
The application is loaded in /src/index.js. The contents of this file are shown as follows:
const express = require('express');
const bodyParser = require('body-parser');
const loadAssets = require('./load-assets');
const assignRoutes = require('./assign-routes');
// If you preface the npm start command with PORT=[Your Port] on
// macOS/Ubuntu or set PORT=[Your Port] on Windows, it will change the port
// that the server is running on, so PORT=3001 will run the app on
// port 3001:
const PORT = process.env.PORT || 3000;
const startApp = async () => {
const app = express();
// Use body-parser for parsing JSON in the body of a request:
app.use(bodyParser.urlencoded({ extended: true }));
app.use(bodyParser.json());
// Instantiate the Wasm module and local database:
const assets = await loadAssets();
// Setup routes that can interact with Wasm and the database:
assignRoutes(app, assets);
// Start the server with the specified port:
app.listen(PORT, (err) => {
if (err) return Promise.reject(err);
return Promise.resolve();
});
};
startApp()
.then(() => console.log(`Server is running on port ${PORT}`))
.catch(err => console.error(`An error occurred: ${err}`));
This file sets up a new Express app, adds the body-parser middleware, loads the mock database and Wasm instance, and assigns routes. Let's move on to discussing the difference between instantiating a Wasm module in the browser and Node.js.
The Wasm files are instantiated in /src/load-assets.js. We're using the memory.wasm file from Cook the Books, but the /assets/main.wasm file is compiled from a slightly different version of main.c, which is located in the /lib folder. The loadWasm() function performs the same operation as the Wasm initialization code from Cook the Books, but the method for passing in the bufferSource to WebAssembly.instantiate() is different. Let's examine this further by reviewing a portion of the code in the loadWasm() function of the load-assets.js file:
const fs = require('fs');
const path = require('path');
const assetsPath = path.resolve(__dirname, 'assets');
const getBufferSource = fileName => {
const filePath = path.resolve(assetsPath, fileName);
return fs.readFileSync(filePath); // <- Replaces the fetch() and .arrayBuffer()
};
// We're using async/await because it simplifies the Promise syntax
const loadWasm = async () => {
const wasmMemory = new WebAssembly.Memory({ initial: 1024 });
const memoryBuffer = getBufferSource('memory.wasm');
const memoryInstance = await WebAssembly.instantiate(memoryBuffer, {
env: {
memory: wasmMemory
}
});
...
To elaborate on the differences, here's some code that instantiates a module using fetch:
fetch('main.wasm')
.then(response => {
if (response.ok) return response.arrayBuffer();
throw new Error('Unable to fetch WebAssembly file');
})
.then(bytes => WebAssembly.instantiate(bytes, importObj));
When using Node.js, the fetch call is replaced by the fs.readFileSync() function and the arrayBuffer() function is no longer required because fs.readFileSync() returns a buffer that can be passed directly into the instantiate() function. Once the Wasm module is instantiated, we can start interacting with the instance.
The load-assets.js file also contains a method for creating a mock database instance:
const loadDb = () => {
const dbPath = path.resolve(assetsPath, 'db.json');
const adapter = new FileSync(dbPath);
return low(adapter);
};
The loadDb() function loads the contents of /assets/db.json into an instance of lowdb. The default function exported from load-assets.js calls the loadWasm() and loadDb() functions and returns an object containing the mock database and Wasm instance:
module.exports = async function loadAssets() {
const db = loadDb();
const wasmInstance = await loadWasm();
return {
db,
wasmInstance
};
};
Going forward, I'll use the term database to refer to the lowdb instance that accesses the db.json file. Now that the assets are loaded, let's review how the application interacts with them.
Interaction with the database and Wasm instance takes place across two files in the /src folder: Transaction.js and assign-routes.js. In our example application, all communication with the API is performed via HTTP requests. Sending a request to a specific endpoint will trigger some interaction with the database/Wasm instance on the server. Let's start by reviewing Transaction.js, which interacts directly with the database and Wasm instance.
Just as with Cook the Books, there's a class that wraps the Wasm interaction code and provides a clean interface. The contents of Transaction.js are very similar to the contents of /src/store/WasmTransactions.js from Cook the Books. Most of the changes accommodate for the categoryId being present in a transaction record and a single amount field (no more raw and cooked amounts). Additional functionality was added to interact with the database. For example, here's a function that edits an existing transaction, both in the database and the linked list from the Wasm instance:
getValidAmount(transaction) {
const { amount, type } = transaction;
return type === 'Withdrawal' ? -Math.abs(amount) : amount;
}
edit(transactionId, contents) {
const updatedTransaction = this.db.get('transactions')
.find({ id: transactionId })
.assign(contents)
.write();
const { categoryId, ...transaction } = updatedTransaction;
const amount = this.getValidAmount(transaction);
this.wasmInstance._editTransaction(transactionId, categoryId, amount);
return updatedTransaction;
}
The edit() function updates the database record that corresponds to the transactionId argument with the values in the contents argument. this.db is the database instance that was created in the load-assets.js file. Since the categoryId field is available on the updatedTransaction record, we can pass it directly to this.wasmInstance._editTransaction(). It gets passed into the constructor when a new instance of Transaction is created.
The assign-routes.js file defines routes and adds them to the express instance (app) created in index.js. In Express, routes can be defined directly on app (for example, app.get()), or through the use of a Router. In this case, a Router was used to add multiple methods to the same route path. The following code, taken from the assign-routes.js file, creates a Router instance and adds two routes: a GET route that returns all transactions, and a POST route that creates a new transaction:
module.exports = function assignRoutes(app, assets) {
const { db, wasmInstance } = assets;
const transaction = new Transaction(db, wasmInstance);
const transactionsRouter = express.Router();
transactionsRouter
.route('/')
.get((req, res) => {
const transactions = transaction.findAll();
res.status(200).send(transactions);
})
.post((req, res) => {
const { body } = req;
if (!body) {
return res.status(400).send('Body of request is empty');
}
const newRecord = transaction.add(body);
res.status(200).send(newRecord);
});
...
// Set the base path for all routes on transactionsRouter:
app.use('/api/transactions', transactionsRouter);
}
The app.use() function at the end of the snippet specifies that all routes defined on the transactionsRouter instance are prefixed with /api/transactions. If you were running the application locally on port 3000, you could navigate to http://localhost:3000/api/transactions in your browser and see an array of all the transactions in JSON format.
As you can see from the body of the get() and post() functions, interactions with any transaction records are being delegated to the Transaction instance created in line 3. That completes our review of pertinent sections of the code base. Each of the files contain comments describing the file's functionality and purpose, so you may want to review those before moving on to the next section. In the next section, we'll build, run, and interact with the application.
Before we build and test out the project, you'll need to install the npm dependencies. Open a terminal within the /server-example folder and run the following command:
npm install
Once that's complete, you're ready to move on to the build step.
In the case of this application, building refers to compiling the lib/main.c to a .wasm file using the emcc command. Since this is a Node.js project, we can use the scripts key in our package.json file to define Tasks. You can still use VS Code's Tasks feature because it automatically detects the scripts from your package.json file and presents them in the list of tasks when you select Tasks | Run Task... from the menu. The following code contains the contents of the scripts section in this project's package.json file:
"scripts": {
"prebuild": "rimraf src/assets/main.wasm",
"build": "emcc lib/main.c -Os -s WASM=1 -s SIDE_MODULE=1
-s BINARYEN_ASYNC_COMPILATION=0 -s ALLOW_MEMORY_GROWTH=1
-o src/assets/main.wasm",
"start": "node src/index.js",
"watch": "nodemon src/* --exec 'npm start'"
},
The build script was split across multiple lines for display purposes, so you'd have to combine those lines for valid JSON. The prebuild script removes the existing Wasm file, and the build script runs the emcc command with the required flags to compile lib/main.c and output the result to src/assets/main.wasm. To run the script, open a terminal within the /server-example folder and run the following command:
npm run build
If the /src/assets folder contains a file named main.wasm, the build completed successfully. If an error has occurred, the terminal should provide a description of the error, as well as a stack trace.
If you're making changes to the application or trying to fix a bug, you could use the watch script to watch for any changes to the contents of the /src folder and automatically restart the application if a change was made. Since we're just running and testing out the application, we can use the start command instead. In the terminal, ensure you're in the /server-example folder and run the following command:
npm start
You should see a message that says Server is running on port 3000. You're now able to send HTTP requests to the server. To test the application, open a new terminal instance within the server-example directory and run the following command:
node ./requests.js 1
This should log out the response body of the GET call to the /api/transactions endpoint. The requests.js file contains functionality that allows you to make requests to all of the available routes. The getFetchActionForId() function returns an object with an endpoint and options value, which corresponds to a route in the assign-routes.js file. The actionId is an arbitrary number to simplify testing and reduce the amount of typing for running commands. For example, you could run the following command:
node ./requests.js 5
It will log out the sum of all transactions for the Computer & Internet category. You can pass an additional argument to the node command if you want the total for a different category. To get the sum of all transactions in the Insurance category, run this command:
node ./requests.js 5 3
Try going through each of the requests (there are eight in total). If you make a request that adds, removes, or edits a transaction, you should see the changes in the /src/assets/db.json file. That's it for the Node.js example project. In the next section, we'll utilize Webpack to load and interact with a Wasm module.
Web applications continue to grow in complexity and size. Simply serving up a few handwritten HTML, CSS, and JavaScript files is not feasible for large applications. To manage this complexity, web developers use bundlers to allow for modularization, ensure browser compatibility, and reduce the size of JavaScript files. In this section, we're going to be using a popular bundler, Webpack, to utilize Wasm without using emcc.
The example Webpack application extends the functionality of the C code we wrote in the Compiling C without the glue code section of Chapter 5, Creating and Loading a WebAssembly Module. Instead of showing a blue rectangle bouncing around a red background, we'll show an alien in a spaceship bouncing around the Horsehead Nebula. The collision detection functionality has been modified to accommodate for bouncing within a rectangle, so the movement of the spaceship will be random. The code for this section is located in the /chapter-09-node/webpack-example folder in the learn-webassembly repository. The file structure for the project is shown in the following code:
├── /src
│ ├── /assets
│ │ ├── background.jpg
│ │ └── spaceship.svg
│ ├── App.js
│ ├── index.html
│ ├── index.js
│ ├── main.c
│ └── styles.css
├── package.json
├── package-lock.json
└── webpack.config.js
We'll review the Webpack configuration file in a later section. For now, let's take a moment to discuss Webpack in more detail.
The JavaScript ecosystem has been rapidly evolving over the past several years, resulting in new frameworks and libraries popping up constantly. Bundlers came about as a way to enable developers to split a JavaScript application into several files without having to worry about managing global namespaces, script loading order, or an incredibly long list of <script> tags in the HTML file. A bundler combines all of the files into one and resolves any naming collisions.
Webpack is, at the time of writing, one of the most popular bundlers for frontend development. It does much more than combine JavaScript files, however. It also performs complex tasks such as code-splitting and tree shaking (dead-code elimination). Webpack was designed with a plugin architecture, which resulted in a massive amount of community-developed plugins. A search for Webpack on npm currently returns over 12,000 packages! This exhaustive list of plugins, along with its powerful built-in feature set, makes Webpack a full-fledged build tool.
Before we begin the application walk-through, open up a terminal within the /webpack-example folder and run the following command:
npm install
The application uses Version 4 of Webpack (the most recent version as of writing this) to build our application. We need to use Webpack plugins to load the various file types used in the application and Babel to utilize newer JavaScript features. The following snippet lists the devDependencies we're using in the project (taken from package.json):
...
"devDependencies": {
"@babel/core": "^7.0.0-rc.1",
"@babel/preset-env": "^7.0.0-rc.1",
"babel-loader": "^8.0.0-beta.4",
"cpp-wasm-loader": "0.7.7",
"css-loader": "1.0.0",
"file-loader": "1.1.11",
"html-loader": "0.5.5",
"html-webpack-plugin": "3.2.0",
"mini-css-extract-plugin": "0.4.1",
"rimraf": "2.6.2",
"webpack": "4.16.5",
"webpack-cli": "3.1.0",
"webpack-dev-server": "3.1.5"
},
...
I specified exact versions for some of the libraries to ensure the application builds and runs successfully. Any libraries with a name ending in -loader or -plugin are used in conjunction with Webpack. The cpp-wasm-loader library allows us to import a C or C++ file directly, without having to compile it to Wasm first. Webpack 4 has built-in support for importing .wasm files, but you can't specify an importObj argument, which is required for modules generated with Emscripten.
We're using several different file types in addition to JavaScript for the application: CSS, SVG, HTML, and so on. Installing the -loader dependencies is only part of the equation—you also need to tell Webpack how to load them. You also need to specify configuration details for any plugins you have installed. You can specify the loading and configuration details in a webpack.config.js file in the root folder of your project. The following snippet contains the contents of /webpack-example/webpack.config.js:
const HtmlWebpackPlugin = require('html-webpack-plugin');
const MiniCssExtractPlugin = require('mini-css-extract-plugin');
module.exports = {
module: {
rules: [
{
test: /\.js$/,
exclude: /node_modules/,
use: {
loader: 'babel-loader',
options: {
// We need this to use async/await:
presets: [
[
'@babel/preset-env', {
targets: { node: '10' }
}
]
]
}
}
},
{
test: /\.html$/,
use: {
loader: 'html-loader',
options: { minimize: true }
}
},
{
test: /\.css$/,
use: [MiniCssExtractPlugin.loader, 'css-loader']
},
{
test: /\.(c|cpp)$/,
use: {
loader: 'cpp-wasm-loader',
options: {
emitWasm: true
}
}
},
{
test: /\.(png|jpg|gif|svg)$/,
use: {
loader: 'file-loader',
options: {
name: 'assets/[name].[ext]'
}
}
}
]
},
plugins: [
new HtmlWebpackPlugin({
template: './src/index.html',
filename: './index.html'
}),
// This is used for bundling (building for production):
new MiniCssExtractPlugin({
filename: '[name].css',
chunkFilename: '[id].css'
})
]
};
The rules section tells Webpack which loader to use for a file extension. The fourth item in the array handles C/C++ files (note the test field value containing c|cpp). The HtmlWebpackPlugin takes the contents of /src/index.html, adds any required <script> tags, minifies it, and creates an index.html in the build folder, which defaults to /dist. The MiniCssExtractPlugin copies any imported CSS into a single CSS file in the /dist folder. We'll review how to build the project in a later section, so let's move on to the application code, starting with the C file.
Since we're allowed to import C and C++ files directly, the C file is located within the /src folder. This file, main.c, contains logic to manage collision detection and move the spaceship around the <canvas>. The code is based on the without-glue.c file we created in Chapter 5, Creating and Loading a WebAssembly Module. We're not going to review the entire file, only the sections that have changed and merit explanation. Let's begin with the definitions and declarations section, which includes a new struct: Bounds.
The code containing the definitions and declarations sections is shown as follows:
typedef struct Bounds {
int width;
int height;
} Bounds;
// We're using the term "Rect" to represent the rectangle the
// image occupies:
typedef struct Rect {
int x;
int y;
int width;
int height;
// Horizontal direction of travel (L/R):
char horizDir;
// Vertical direction of travel (U/D):
char vertDir;
} Rect;
struct Bounds bounds;
struct Rect rect;
New properties were added to the existing Rect definition to accommodate for flexible sizing and tracking movement in the x and y directions. We defined a new struct, Bounds, and removed the existing #define statements because the <canvas> element is no longer a square with static dimensions. A new instance of both elements is declared when the module loads. The dimensional properties of these instances are assigned in the start() function, which we'll cover next.
The updated start() function, which acts as the entry point to the module, is shown as follows:
EMSCRIPTEN_KEEPALIVE
void start(int boundsWidth, int boundsHeight, int rectWidth,
int rectHeight) {
rect.x = 0;
rect.y = 0;
rect.horizDir = 'R';
rect.vertDir = 'D';
rect.width = rectWidth;
rect.height = rectHeight;
bounds.width = boundsWidth;
bounds.height = boundsHeight;
setIsRunning(true);
}
Any functions that are called from JavaScript are prepended with the EMSCRIPTEN_KEEPALIVE statement. We're now passing the width and height of both the Bounds and Rect elements as arguments to the start() function, which we assign to the local bounds and rect variables. This allows us to easily change the dimensions of either one without having to make any changes to the collision detection logic. In the context of this application, the rect represents the rectangle in which the spaceship image resides. We set the default horizontal and vertical direction for the rect so the image initially moves to the right and down. Let's move on to the rect movement/collision detection code.
The code related to collision detection and the Rect movement is handled in the updateRectLocation() function, which is shown as follows:
/**
* Updates the rectangle location by +/- 1px in the x or y based on
* the current location.
*/
void updateRectLocation() {
// Determine if the bounding rectangle has "bumped" into either
// the left/right side or top/bottom side. Depending on which side,
// flip the direction:
int xBouncePoint = bounds.width - rect.width;
if (rect.x == xBouncePoint) rect.horizDir = 'L';
if (rect.x == 0) rect.horizDir = 'R';
int yBouncePoint = bounds.height - rect.height;
if (rect.y == yBouncePoint) rect.vertDir = 'U';
if (rect.y == 0) rect.vertDir = 'D';
// If the direction has changed based on the x and y
// coordinates, ensure the x and y points update
// accordingly:
int horizIncrement = 1;
if (rect.horizDir == 'L') horizIncrement = -1;
rect.x = rect.x + horizIncrement;
int vertIncrement = 1;
if (rect.vertDir == 'U') vertIncrement = -1;
rect.y = rect.y + vertIncrement;
}
The primary difference between this code and the code we wrote in Chapter 5, Creating and Loading a WebAssembly Module, is the collision detection logic. Instead of simply tracking the location of the rect instance horizontally and changing direction when it hits the right boundary, the function now tracks the horizontal and vertical directions and manages each independently. Although this isn't the most performant algorithm, it does achieve the goal of ensuring the spaceship changes direction when it encounters the edge of the <canvas>.
The only production dependency we're using for the application is Vue. Although the application consists of a single component, Vue makes managing data, functions, and the component life-cycle much simpler than trying to do it manually. The index.js file contains the Vue initialization code, while the rendering and application logic is in /src/App.js. This file has a lot of moving parts, so we're going to review the code in chunks, as we did in the previous section. Let's start with the import statements.
The following code demonstrates the Webpack loaders in action:
// This is loaded using the css-loader dependency:
import './styles.css';
// This is loaded using the cpp-wasm-loader dependency:
import wasm from './main.c';
// These are loaded using the file-loader dependency:
import backgroundImage from './assets/background.jpg';
import spaceshipImage from './assets/spaceship.svg';
The loaders we configured in the webpack.config.js file understand how to handle CSS, C, and image files. Now that we have the required resources available, we can start defining our component state.
The following code initializes the local state in the data() function for our component:
export default {
data() {
return {
instance: null,
bounds: { width: 800, height: 592 },
rect: { width: 200, height: 120 },
speed: 5
};
},
...
Although the bounds and rect properties never change, we defined them in the local state to keep all the data used by the component in a single location. The speed property dictates how quickly the spaceship moves across the <canvas> and has a range of 1 to 10. The instance property is initialized to null, but will be used to access the compiled Wasm module's exported functions. Let's move on to the Wasm initialization code that compiles the Wasm file and populates the <canvas>.
The code to compile the Wasm file and populate the <canvas> element is shown as follows:
methods: {
// Create a new Image instance to pass into the drawImage function
// for the <canvas> element's context:
loadImage(imageSrc) {
const loadedImage = new Image();
loadedImage.src = imageSrc;
return new Promise((resolve, reject) => {
loadedImage.onload = () => resolve(loadedImage);
loadedImage.onerror = () => reject();
});
},
// Compile/load the contents of main.c and assign the resulting
// Wasm module instance to the components this.instance property:
async initializeWasm() {
const ctx = this.$refs.canvas.getContext('2d');
// Create Image instances of the background and spaceship.
// These are required to pass into the ctx.drawImage() function:
const [bouncer, background] = await Promise.all([
this.loadImage(spaceshipImage),
this.loadImage(backgroundImage)
]);
// Compile the C code to Wasm and assign the resulting
// module.exports to this.instance:
const { width, height } = this.bounds;
return wasm
.init(imports => ({
...imports,
_jsFillRect(x, y, w, h) {
ctx.drawImage(bouncer, x, y, w, h);
},
_jsClearRect() {
ctx.drawImage(background, 0, 0, width, height);
}
}))
.then(module => {
this.instance = module.exports;
return Promise.resolve();
});
},
...
There are additional functions defined in the methods key of the component, but for now we'll focus on the code that compiles the imported C file to Wasm. After Image instances are created for the spaceship and background images, the main.c file (imported as .wasm) is compiled to a Wasm module and the resulting exports is assigned to this.instance. Once these operations complete, the start() function can be called from the exported Wasm module. Since the initializeWasm() function calls the <canvas> element's getContext() function, the component needs to be mounted before this function can be called. Let's review the rest of the methods definitions and the mounted() event handler.
The remaining methods definitions and mounted() event handler function are shown as follows:
...
// Looping function to move the spaceship across the canvas.
loopRectMotion() {
setTimeout(() => {
this.instance.moveRect();
if (this.instance.getIsRunning()) this.loopRectMotion();
}, 15 - this.speed);
},
// Pauses/resumes the spaceship's movement when the button is
// clicked:
onActionClick(event) {
const newIsRunning = !this.instance.getIsRunning();
this.instance.setIsRunning(newIsRunning);
event.target.innerHTML = newIsRunning ? 'Pause' : 'Resume';
if (newIsRunning) this.loopRectMotion();
}
},
mounted() {
this.initializeWasm().then(() => {
this.instance.start(
this.bounds.width,
this.bounds.height,
this.rect.width,
this.rect.height
);
this.loopRectMotion();
});
},
Once the Wasm module is compiled, the start() function is accessible on this.instance. The bounds and rect dimensions are passed into the start() function, and then the loopRectFunction() is called to start moving the spaceship. The onActionClick() event handler function pauses or resumes the movement of the spaceship based on whether or not it's currently in motion.
The loopRectMotion() functions in the same way as the example code from Chapter 5, Creating and Loading a WebAssembly Module, except the speed is now adjustable. The 15 - this.speed calculation, which dictates the timeout length, may look a little strange. Since the movement speed of the image is based on the amount of time that elapses between function calls, increasing this number would actually slow down the spaceship. Consequently, this.speed is subtracted from 15, which was chosen because it's slightly greater than 10 but won't turn the spaceship into a blur if this.speed is increased to the maximum. That's it for the component logic; let's move on to the rendering section of the code where the template is defined.
The contents of the template property, which dictates what to render, are shown as follows:
template: `
<div class="flex column">
<h1>SPACE WASM!</h1>
<canvas
ref="canvas"
:height="bounds.height"
:width="bounds.width">
</canvas>
<div class="flex controls">
<div>
<button class="defaultText" @click="onActionClick">
Pause
</button>
</div>
<div class="flex column">
<label class="defaultText" for="speed">Speed: {{speed}}</label>
<input
v-model="speed"
id="speed"
type="range"
min="1"
max="10"
step="1">
</div>
</div>
</div>
Since we're using Vue, we can bind the attributes and event handlers of HTML elements to properties and methods defined in our component. In addition to a PAUSE/RESUME button, there's a range <input> that allows you to change the speed. By sliding it to the left or right, you're able to slow down or speed up the spaceship and see the changes reflected immediately. That concludes our review; let's see how Webpack can be used to build or run the application.
Using the cpp-wasm-loader library eliminates the need for a build step to generate a Wasm module, but we still need to bundle up our application for distribution. In the scripts section of package.json, there's a build and start script. Running the build script executes the webpack command that generates the bundle. To ensure this is working correctly, open a terminal instance in the /webpack-example folder and run the following command:
npm run build
It may take a minute to build the project the first time you run it. This can be attributed to the Wasm compilation step. However, subsequent builds should be much faster. If the build was successful, you should see a newly created /dist folder with these contents:
├── /assets
│ ├── background.jpg
│ └── spaceship.svg
├── index.html
├── main.css
├── main.js
└── main.wasm
Let's try out the build to ensure everything is working correctly. Run the following command in your terminal instance to start the application:
serve -l 8080 dist
If you navigate to http://127.0.0.1:8080/index.html in your browser, you should see this:
The spaceship image (taken from https://commons.wikimedia.org/wiki/File:Alien_Spaceship_-_SVG_Vector.svg) bounces around within the bounds of the Horsehead Nebula background image (taken from https://commons.wikimedia.org/wiki/File:Horsehead_Nebula_Christmas_2017_Deography.jpg). When the PAUSE button is pressed, the button's caption changes to RESUME and the ship stops moving. Pressing the button again will change the caption back to PAUSE and the ship will start moving again. Adjusting the SPEED slider increases or decreases the speed of the ship.
The application has the webpack-dev-server library installed, which operates like Browsersync. The library uses LiveReloading, which automatically updates the application when you make any changes to the files in /src. Since we're using a Webpack loader for C and C++ files, the automatic update event will trigger if you change the C file as well. Run the following the command to start the application and watch for changes:
npm start
A browser window should open automatically when the build completes, and then direct you to the running application. To see the live-reloading feature in action, try setting the value of the isRunning variable in the setIsRunning() function in main.c to false instead of newIsRunning:
EMSCRIPTEN_KEEPALIVE
void setIsRunning(bool newIsRunning) {
// isRunning = newIsRunning;
// Set the value to always false:
isRunning = false;
}
The spaceship should be stuck in the upper-left corner. If you change it back, the spaceship starts moving again. In the next section, we will write unit tests in JavaScript to test WebAssembly modules.
Well-tested code prevents regression bugs, simplifies refactoring, and alleviates some of the frustrations that go along with adding new features. Once you've compiled a Wasm module, you should write tests to ensure it's functioning as expected, even if you've written tests for C, C++, or Rust code you compiled it from. In this section, we'll use Jest, a JavaScript testing framework, to test the functions in a compiled Wasm module.
All of the code used in this example is located in the /chapter-09-node/testing-example folder. The code and corresponding tests are very simple and are not representative of real-world applications, but they're intended to demonstrate how to use Jest for testing. The following code represents the file structure of the /testing-example folder:
├── /src
| ├── /__tests__
| │ └── main.test.js
| └── main.c
├── package.json
└── package-lock.json
The contents of the C file that we'll test, /src/main.c, is shown as follows:
int addTwoNumbers(int leftValue, int rightValue) {
return leftValue + rightValue;
}
float divideTwoNumbers(float leftValue, float rightValue) {
return leftValue / rightValue;
}
double findFactorial(float value) {
int i;
double factorial = 1;
for (i = 1; i <= value; i++) {
factorial = factorial * i;
}
return factorial;
}
All three functions in the file are performing simple mathematical operations. The package.json file includes a script to compile the C file to a Wasm file for testing. Run the following command to compile the C file:
npm run build
There should be a file named main.wasm in the /src directory. Let's move on to describing the testing configuration step.
The only dependency we'll use for this example is Jest, a JavaScript testing framework built by Facebook. Jest is an excellent choice for testing because it includes most of the features you'll need out of the box, such as coverage, assertions, and mocking. In most cases, you can use it with zero configuration, depending on the complexity of your application. If you're interested in learning more, check out Jest's website at https://jestjs.io. Open a terminal instance in the /chapter-09-node/testing-example folder and run the following command to install Jest:
npm install
In the package.json file, there are three entries in the scripts section: build, pretest, and test. The build script executes the emcc command with the required flags to compile /src/main.c to /src/main.wasm. The test script executes the jest command with the --verbose flag, which provides additional details for each of the test suites. The pretest script simply runs the build script to ensure /src/main.wasm exists prior to running any tests.
Let's walk through the test file, located at /src/__tests__/main.test.js, and review the purpose of each section of code. The first section of the test file instantiates the main.wasm file and assigns the result to the local wasmInstance variable:
const fs = require('fs');
const path = require('path');
describe('main.wasm Tests', () => {
let wasmInstance;
beforeAll(async () => {
const wasmPath = path.resolve(__dirname, '..', 'main.wasm');
const buffer = fs.readFileSync(wasmPath);
const results = await WebAssembly.instantiate(buffer, {
env: {
memoryBase: 0,
tableBase: 0,
memory: new WebAssembly.Memory({ initial: 1024 }),
table: new WebAssembly.Table({ initial: 16, element: 'anyfunc' }),
abort: console.log
}
});
wasmInstance = results.instance.exports;
});
...
Jest provides life-cycle methods to perform any setup or teardown actions prior to running tests. You can specify functions to run before or after all of the tests (beforeAll()/afterAll()), or before or after each test (beforeEach()/afterEach()). We need a compiled instance of the Wasm module from which we can call exported functions, so we put the instantiation code in the beforeAll() function.
We're wrapping the entire test suite in a describe() block for the file. Jest uses a describe() function to encapsulate suites of related tests and test() or it() to represent a single test. Here's a simple example of this concept:
const add = (a, b) => a + b;
describe('the add function', () => {
test('returns 6 when 4 and 2 are passed in', () => {
const result = add(4, 2);
expect(result).toEqual(6);
});
test('returns 20 when 12 and 8 are passed in', () => {
const result = add(12, 8);
expect(result).toEqual(20);
});
});
The next section of code contains all the test suites and tests for each exported function:
...
describe('the _addTwoNumbers function', () => {
test('returns 300 when 100 and 200 are passed in', () => {
const result = wasmInstance._addTwoNumbers(100, 200);
expect(result).toEqual(300);
});
test('returns -20 when -10 and -10 are passed in', () => {
const result = wasmInstance._addTwoNumbers(-10, -10);
expect(result).toEqual(-20);
});
});
describe('the _divideTwoNumbers function', () => {
test.each([
[10, 100, 10],
[-2, -10, 5],
])('returns %f when %f and %f are passed in', (expected, a, b) => {
const result = wasmInstance._divideTwoNumbers(a, b);
expect(result).toEqual(expected);
});
test('returns ~3.77 when 20.75 and 5.5 are passed in', () => {
const result = wasmInstance._divideTwoNumbers(20.75, 5.5);
expect(result).toBeCloseTo(3.77, 2);
});
});
describe('the _findFactorial function', () => {
test.each([
[120, 5],
[362880, 9.2],
])('returns %p when %p is passed in', (expected, input) => {
const result = wasmInstance._findFactorial(input);
expect(result).toEqual(expected);
});
});
});
The first describe() block, for the _addTwoNumbers() function, has two test() instances to ensure that the function returns the sum of the two numbers passed in as arguments. The next two describe() blocks, for the _divideTwoNumbers() and _findFactorial() functions, use Jest's .each feature, which allows you to run the same test with different data. The expect() function allows you to make assertions on the value passed in as an argument. The .toBeCloseTo() assertion in the last _divideTwoNumbers() test checks whether the result is within two decimal places of 3.77. The rest use the .toEqual() assertion to check for equality.
Writing tests with Jest is relatively simple, and running them is even easier! Let's try running our tests and reviewing some of the CLI flags that Jest provides.
To run the tests, open a terminal instance in the /chapter-09-node/testing-example folder and run the following command:
npm test
You should see the following output in your terminal:
main.wasm Tests
the _addTwoNumbers function
✓ returns 300 when 100 and 200 are passed in (4ms)
✓ returns -20 when -10 and -10 are passed in
the _divideTwoNumbers function
✓ returns 10 when 100 and 10 are passed in
✓ returns -2 when -10 and 5 are passed in (1ms)
✓ returns ~3.77 when 20.75 and 5.5 are passed in
the _findFactorial function
✓ returns 120 when 5 is passed in (1ms)
✓ returns 362880 when 9.2 is passed in
Test Suites: 1 passed, 1 total
Tests: 7 passed, 7 total
Snapshots: 0 total
Time: 1.008s
Ran all test suites.
If you have a large number of tests, you could remove the --verbose flag from the test script in package.json and only pass the flag to the npm test command if needed. There are several other CLI flags you can pass to the jest command. The following list contains some of the more commonly used flags:
You can pass these flags to the npm test command by adding them after a --. For example, if you wanted to use the --bail flag, you'd run this command:
npm test -- --bail
You can view the entire list of CLI options on the official site at https://jestjs.io/docs/en/cli.
In this chapter, we discussed the advantages of integrating WebAssembly with Node.js and demonstrated how Node.js could be used on the server and client side. We evaluated an Express application that uses a Wasm module to perform calculations on accounting transactions. We then reviewed a browser-based application that utilizes Webpack to import and call functions from a C file without having to write any Wasm instantiation code. Finally, we saw how the Jest testing framework can be leveraged to test a compiled module and ensure it's functioning correctly. In Chapter 10, Advanced Tools and Upcoming Features, we'll cover advanced tools and discuss the features that are on the horizon for WebAssembly.
WebAssembly's ecosystem is constantly growing and evolving. Developers have seen the potential for WebAssembly. They build tools to improve the development experience or output Wasm modules from their language of choice (albeit with some limitations).
In this chapter, we'll evaluate the underlying technologies that make WebAssembly tick. We'll also review tools you can use in the browser and cover an advanced use case that utilizes Web Workers. Finally, we'll quickly review upcoming features and proposals that are on the roadmap for WebAssembly.
Our goal for this chapter is to understand the following:
WABT and Binaryen allow developers to work with source files and develop tooling for WebAssembly. If you're interested in working with WebAssembly at a lower level, these tools provide the means for accomplishing such a goal. In this section, we'll evaluate these tools in greater detail and review the purpose and capabilities of each one.
WABT's focus is on the manipulation of WebAssembly binary (.wasm) files and text (.wat) files, as well as conversion between the two formats. WABT provides tools to translate Wat to Wasm (wat2wasm) and vice versa (wasm2wat), as well as a tool to convert a Wasm file to a C source and header file (wasm2c). You can view the entire list of tools in the README file of the WABT GitHub repository at https://github.com/WebAssembly/wabt.
One example use case of WABT is the WebAssembly Toolkit for VS Code extension we installed in Chapter 3, Setting Up a Development Environment. The extension depends on WABT to view the text format associated with a .wasm file. The repository provides links to wat2wasm and wasm2wat demos, which you can use to test the validity of a Wat program or interact with a compiled binary using JavaScript. The following screenshot contains the Wat and JavaScript instantiation code from the wat2wasm demo:
In line 3 of the JS panel, you may have noticed that the addTwo() function from wasmInstance.exports isn't prefixed with a _. Emscripten adds the _ automatically in the compilation process. You could omit the _ by converting the .wasm file to a .wat, updating the function names, and converting it back to .wasm using the WABT, although this wouldn't be very practical. The WABT simplifies the process of transforming text format to binary format and vice versa. If you want to build compilation tooling for WebAssembly, you'd use Binaryen, which we will cover next.
Binaryen's GitHub page at https://github.com/WebAssembly/binaryen describes Binaryen as a compiler and toolchain infrastructure library for WebAssembly, written in C++. It aims to make compiling to WebAssembly easy, fast, and effective. It achieves these aims by providing a simple C API, an internal IR, and an optimizer. Just as with the WABT, Binaryen provides an extensive suite of tools for developing WebAssembly tooling. The following list describes a subset of the tools that Binaryen provides:
The wasm.js and binaryen.js tools are of particular interest for JavaScript developers interested in building WebAssembly tooling. The binaryen.js library is available as an npm package (https://www.npmjs.com/package/binaryen).
An excellent example of binaryen.js usage is AssemblyScript (https://github.com/AssemblyScript/assemblyscript). AssemblyScript is a strictly typed subset of TypeScript that generates WebAssembly modules. The library comes packaged with a CLI to quickly scaffold new projects and manage the build step. In the Compiling with LLVM section, we'll cover how to compile Wasm modules using LLVM.
In Chapter 1, What is WebAssembly?, we discussed the relationship between Emscripten's EMSDK and LLVM. Emscripten uses LLVM and Clang to compile C/C++ down to LLVM bitcode. The Emscripten compiler (emcc) compiles that bitcode to asm.js, which is passed to Binaryen to generate a Wasm file. If you're interested in using LLVM, you can compile C/C++ to Wasm without installing the EMSDK. In this section, we will review the process for enabling Wasm compilation using LLVM. After compiling some example C++ code to a Wasm file, we'll try it out in the browser.
If you want to compile WebAssembly modules using LLVM, several tools need to be installed and configured. Getting these tools working together correctly can be an arduous and time-consuming process. Fortunately, someone went through the trouble of making this process much simpler. Daniel Wirtz created an npm package named webassembly (https://www.npmjs.com/package/webassembly) that can perform the following operations (with the corresponding CLI commands):
The library is using Binaryen, Clang, LLVM, and additional LLVM tools behind the scenes. We'll install this package globally to ensure we have access to the wa command. To install, open a terminal instance and run the following command:
npm install -g webassembly
It may take a few minutes to install any required dependencies. Once complete, run the following command to validate the installation:
wa
You should see the following in terminal:
You should be ready to start compiling Wasm modules. Let's move on to the example code.
To test out the compiler, we're going to use a slightly modified version of the without-glue.c file from the Interacting with JavaScript without glue code section of Chapter 5, Creating and Loading a WebAssembly Module. The code for this section is located in the /chapter-10-advanced-tools/compile-with-llvm directory of the learn-webassembly repository. Follow the following instructions to create the files necessary for the compiler test. Let's start with the C++ file.
Create a new directory in your /book-examples directory named /compile-with-llvm. Create a new file in the /compile-with-llvm directory named main.cpp and populate it with the following contents:
#include <stdbool.h>
#define BOUNDS 255
#define RECT_SIDE 50
#define BOUNCE_POINT (BOUNDS - RECT_SIDE)
bool isRunning = true;
typedef struct Rect {
int x;
int y;
char direction;
} Rect;
struct Rect rect;
void updateRectLocation() {
if (rect.x == BOUNCE_POINT) rect.direction = 'L';
if (rect.x == 0) rect.direction = 'R';
int incrementer = 1;
if (rect.direction == 'L') incrementer = -1;
rect.x = rect.x + incrementer;
rect.y = rect.y + incrementer;
}
extern "C" {
extern int jsClearRect();
extern int jsFillRect(int x, int y, int width, int height);
__attribute__((visibility("default")))
void moveRect() {
jsClearRect();
updateRectLocation();
jsFillRect(rect.x, rect.y, RECT_SIDE, RECT_SIDE);
}
__attribute__((visibility("default")))
bool getIsRunning() {
return isRunning;
}
__attribute__((visibility("default")))
void setIsRunning(bool newIsRunning) {
isRunning = newIsRunning;
}
__attribute__((visibility("default")))
void init() {
rect.x = 0;
rect.y = 0;
rect.direction = 'R';
setIsRunning(true);
}
}
The code in this file is almost identical to the contents of without-glue.c from Chapter 5, Creating and Loading a WebAssembly Module. The comments have been removed from the file and the imported/exported functions are wrapped in an extern "C" block. The __attribute__((visibility("default"))) lines are macro statements (similar to EMSCRIPTEN_KEEPALIVE) that ensure the functions aren't removed from the compiled output during the dead-code elimination step. Just as with prior examples, we'll interact with the compiled Wasm module through an HTML file. Let's create that next.
Create a file named index.html in the /compile-with-llvm directory and populate it with the following contents:
<!doctype html>
<html lang="en-us">
<head>
<title>LLVM Test</title>
</head>
<body>
<h1>LLVM Test</h1>
<canvas id="myCanvas" width="255" height="255"></canvas>
<div style="margin-top: 16px;">
<button id="actionButton" style="width: 100px; height: 24px;">
Pause
</button>
</div>
<script type="application/javascript">
const canvas = document.querySelector('#myCanvas');
const ctx = canvas.getContext('2d');
const importObj = {
env: {
memoryBase: 0,
tableBase: 0,
memory: new WebAssembly.Memory({ initial: 256 }),
table: new WebAssembly.Table({ initial: 8, element: 'anyfunc' }),
abort: console.log,
jsFillRect: function(x, y, w, h) {
ctx.fillStyle = '#0000ff';
ctx.fillRect(x, y, w, h);
},
jsClearRect: function() {
ctx.fillStyle = '#ff0000';
ctx.fillRect(0, 0, 255, 255);
}
}
};
WebAssembly.instantiateStreaming(fetch('main.wasm'), importObj)
.then(({ instance }) => {
const m = instance.exports;
m.init();
const loopRectMotion = () => {
setTimeout(() => {
m.moveRect();
if (m.getIsRunning()) loopRectMotion();
}, 20)
};
document.querySelector('#actionButton')
.addEventListener('click', event => {
const newIsRunning = !m.getIsRunning();
m.setIsRunning(newIsRunning);
event.target.innerHTML = newIsRunning ? 'Pause' : 'Start';
if (newIsRunning) loopRectMotion();
});
loopRectMotion();
});
</script>
</body>
</html>
The contents of this file are very similar to the without-glue.html file from Chapter 5, Creating and Loading a WebAssembly Module. Instead of using the loadWasm() function from the /common/load-wasm.js file, we're using the WebAssembly.instantiateStreaming() function. This allows us to omit an additional <script> element and serve the files directly from the /compile-with-llvm directory.
The _ is omitted from the jsFillRect and jsClearRect functions passed into the importObj. We can omit the _ for the functions present on the instance.exports object as well. LLVM doesn't prefix any of the data/functions passed in or out of the module with a _. In the next section, we'll compile main.cpp and interact with the resultant Wasm file in the browser.
We installed the webassembly npm package with the -g flag, so the wa command should be available in the terminal. Open a terminal instance in the /compile-with-llvm directory and run the following command:
wa compile main.cpp -o main.wasm
You should see a file named main.wasm appear in the compile-with-llvm folder of VS Code's file explorer. To ensure the Wasm module compiled correctly, run the following command within the /compile-with-llvm directory:
serve -l 8080
If you navigate to http://127.0.0.1:8080/index.html in your browser, you should see the following:
The installation and configuration process for compiling WebAssembly modules locally is, admittedly, a little cumbersome. Fortunately, there are several online tools available that allow you to develop and interact with WebAssembly in the browser. In this section, we'll review those tools and discuss the functionality each one provides.
In the Connecting the dots with WasmFiddle section in Chapter 2, Elements of WebAssembly - Wat, Wasm, and the JavaScript API, we used WasmFiddle to compile a simple C function to Wasm and interact with it using JavaScript. WasmFiddle provides a C/C++ editor, JavaScript editor, Wat/x86 viewer, and JavaScript output panel. You can also interact with the <canvas> if desired. WasmFiddle uses LLVM to generate the Wasm modules, which is why the imports and exports aren't prefixed with a _. You can interact with WasmFiddle at https://wasdk.github.io/WasmFiddle.
WebAssembly Explorer, located at https://mbebenita.github.io/WasmExplorer, provides similar functionality to WasmFiddle. It allows you to compile C or C++ to a Wasm module and view the corresponding Wat. However, WebAssembly Explorer provides additional functionality not present in WasmFiddle. For example, you can compile C or C++ to Wasm and view the corresponding Firefox x86 and LLVM x86 code. You can select from a list of code examples and specify the optimization level (-O flag in emcc). It also provides a button that allows you to import the code into WasmFiddle:
WebAssembly Studio, located at https://webassembly.studio, is a feature-rich editor and development environment. You can create C, Rust, and AssemblyScript projects. It provides the capabilities to build and run code within the browser and integrates well with GitHub. WebAssembly Studio enables you to build a web application without having to install and configure the required WebAssembly tooling locally:
In the next section, we'll demonstrate how to add parallelism to your WebAssembly application with Web Workers.
The process of building a complex application that performs heavy computation or other resource-intensive work can benefit greatly from using threads. Threads allow you to perform operations in parallel by dividing functionality among tasks that run independently. At of writing this, support for threads in WebAssembly is in the Feature Proposal phase. In this phase, the specification hasn't been written and the feature isn't implemented. Fortunately, JavaScript provides threading capabilities in the form of Web Workers. In this section, we'll demonstrate how to use JavaScript's Web Workers API to interact with Wasm modules in separate threads.
Web Workers allow you to utilize threads in the browser, which can improve the performance of your application by offloading some of the logic from the main (UI) thread. Worker threads are also capable of performing I/O using XMLHttpRequest. Worker threads communicate with the main thread by posting messages to an event handler.
Web Workers allow us to load Wasm modules into separate threads and perform operations that don't hinder the performance of the UI. Web Workers do have some limitations. They're unable to directly manipulate the DOM or access some of the methods and properties on the window object. The messages passed between threads must be serialized objects, which means you can't pass functions. Now that you know what a worker is, let's discuss how to create one.
Before you can create a worker, you need a JavaScript file with code that runs in the worker thread. You can see a simple example of a worker definition file at https://github.com/mdn/simple-web-worker/blob/gh-pages/worker.js. The file should contain a message event listener that performs operations when messages are received from other threads and responds accordingly.
Once that file is created, you're ready to use it with a worker. A worker is created by passing a URL argument to the Worker() constructor. The URL can be a string representing the name of the file with your worker definition code, or constructed using a Blob. The Blob technique can be useful if you're fetching the worker definition code from a server. The example application demonstrates how to use both approaches. Let's move on to the process of integrating WebAssembly with Web Workers.
In order to utilize Wasm modules in separate threads, the Wasm file must be compiled in the main thread and instantiated in a Web Worker. Let's review this process in more detail:
To call a function from the wasmWorker Wasm instance, you post a message to the worker thread with any arguments to pass to the Wasm function. Then, wasmWorker executes the function and passes the results back to the main thread. That's the crux of how threads are utilized in the context of Web Workers. Before we move on to the example application, you may need to address a limitation that Google Chrome imposes. Follow the instructions in the Limitations in Google Chrome section to ensure the example application works successfully.
Google Chrome places a restriction on what can be included in the body of a Web Worker's postMessage() function. If you tried to send a compiled WebAssembly.Module to a worker, you'd get an error and the operation would be unsuccessful. You can override this by setting a flag. To enable this functionality, open Google Chrome and enter chrome://flags in the address bar. Type cloning in the search box at the top of the page. You should see a list item titled WebAssembly structured cloning support. Select the Enabled option from the dropdown next to the list item and press the RELAUNCH NOW button when prompted:
After Chrome restarts, you can run the example application without issue. If you're using Mozilla Firefox, no action is required. It supports this feature by default. Let's move on to the example application that demonstrates the use of WebAssembly in threads.
The example application isn't much of an application. It's a simple form that accepts two input values and returns the sum or difference of these two values. The add and subtract operations are each exported from their own Wasm module instantiated in a worker thread. The example may be contrived, but it effectively demonstrates how to integrate WebAssembly into Web Workers.
The code for this section is located in the /chapter-10-advanced-tools/parallel-wasm directory of the learn-webassembly repository. The following sections walk through each section of the code base and describe how to build the application from scratch. If you wish to follow along, create a folder in your /book-examples directory named /parallel-wasm.
The example uses two worker threads: one for addition and another for subtraction. Consequently, we'll need two separate Wasm modules. Create a folder named /lib in your /parallel-wasm directory. Within the /lib directory, create a file named add.c and populate it with the following contents:
int calculate(int firstVal, int secondVal) {
return firstVal + secondVal;
}
Create another file in /lib named subtract.c and populate it with the following contents:
int calculate(int firstVal, int secondVal) {
return firstVal - secondVal;
}
Note that the function name in both files is calculate. This was done so we don't have to write any conditional logic within the worker code to determine the Wasm function to call. The algebraic operation is tied to a worker, so when we need to add two numbers, the _calculate() function will be called in the addWorker. This will become clearer when we review the JavaScript portion of the code, which we'll cover next.
Before we dig into the JavaScript code, create a folder named /src in your /parallel-wasm directory. Let's start with the file containing the code that runs in the worker thread.
Create a new file in the /src directory named worker.js and populate it with the following contents:
var wasmInstance = null;
self.addEventListener('message', event => {
/**
* Once the WebAssembly compilation is complete, this posts a message
* back with whether or not the instantiation was successful. If the
* payload is null, the compilation succeeded.
*/
const sendCompilationMessage = (error = null) => {
self.postMessage({
type: 'COMPILE_WASM_RESPONSE',
payload: error
});
};
const { type, payload } = event.data;
switch (type) {
// Instantiates the compiled Wasm module and posts a message back to
// the main thread indicating if the instantiation was successful:
case 'COMPILE_WASM_REQUEST':
const importObj = {
env: {
memoryBase: 0,
tableBase: 0,
memory: new WebAssembly.Memory({ initial: 256 }),
table: new WebAssembly.Table({ initial: 2, element: 'anyfunc' }),
abort: console.log
}
};
WebAssembly.instantiate(payload, importObj)
.then(instance => {
wasmInstance = instance.exports;
sendCompilationMessage();
})
.catch(error => {
sendCompilationMessage(error);
});
break;
// Calls the `calculate` method associated with the instance (add or
// subtract, and posts the result back to the main thread:
case 'CALC_REQUEST':
const { firstVal, secondVal } = payload;
const result = wasmInstance._calculate(firstVal, secondVal);
self.postMessage({
type: 'CALC_RESPONSE',
payload: result
});
break;
default:
break;
}
}, false);
The code is encapsulated within the event listener for the message event (self.addEventListener(...)), which is raised when the postMessage() function is called on the corresponding worker. The event parameter in the event listener's callback function contains a data property with the contents of the message. All of the messages passed between threads in the application follow the Flux Standard Action (FSA) convention. Objects that adhere to this convention have a type and payload property, where type is a string and payload can be of any type. You can read more about the FSA at https://github.com/redux-utilities/flux-standard-action.
The switch statement executes an action based on the message's type value, which is a string. If the type is 'COMPILE_WASM_REQUEST', the WebAssembly.instantiate() function is called with the payload from the message and importObj. The exports object of the result is assigned to the local wasmInstance variable for later use. If the type is 'CALC_REQUEST', the wasmInstance._calculate() function is called with the firstVal and secondVal values from the payload object. The calculation code should shed some light on why the function was named _calculate() instead of _add() or _subtract(). By using a general name, the worker doesn't care what operation it's performing, it just calls the function to get the result.
In both cases, the worker posts a message back to the main thread using the postMessage() function. I used a REQUEST/RESPONSE convention for the type property value. This allows you to quickly identify which thread the messages are originating from. Messages sent from the main thread end with _REQUEST in the type while responses coming from the worker threads end with _RESPONSE. Let's move on to the WebAssembly interaction code.
Create a new file in the /src directory named WasmWorker.js and populate it with the following contents:
/**
* Web Worker associated with an instantiated Wasm module.
* @class
*/
export default class WasmWorker {
constructor(workerUrl) {
this.worker = new Worker(workerUrl);
this.listenersByType = {};
this.addListeners();
}
// Add a listener associated with the `type` value from the
// Worker message:
addListenerForType(type, listener) {
this.listenersByType[type] = listener;
}
// Add event listeners for error and message handling.
addListeners() {
this.worker.addEventListener('error', event => {
console.error(`%cError: ${event.message}`, 'color: red;');
}, false);
// If a handler was specified using the `addListener` method,
// fire that method if the `type` matches:
this.worker.addEventListener('message', event => {
if (
event.data instanceof Object &&
event.data.hasOwnProperty('type') &&
event.data.hasOwnProperty('payload')
) {
const { type, payload } = event.data;
if (this.listenersByType[type]) {
this.listenersByType[type](payload);
}
} else {
console.log(event.data);
}
}, false);
}
// Fetches the Wasm file, compiles it, and passes the compiled result
// to the corresponding worker. The compiled module is instantiated
// in the worker.
initialize(name) {
return fetch(`calc-${name}.wasm`)
.then(response => response.arrayBuffer())
.then(bytes => WebAssembly.compile(bytes))
.then(wasmModule => {
this.worker.postMessage({
type: 'COMPILE_WASM_REQUEST',
payload: wasmModule
});
return Promise.resolve();
});
}
// Posts a message to the worker thread to call the `calculate`
// method from the Wasm instance:
calculate(firstVal, secondVal) {
this.worker.postMessage({
type: 'CALC_REQUEST',
payload: {
firstVal,
secondVal
}
});
}
}
The WasmWorker class manages a worker thread associated with a Wasm file. In the WasmWorker constructor, a new Worker is created and default event listeners are added for the error and message events. The initialize() function fetches the .wasm file associated with the name argument, compiles it, and sends the resultant WebAssembly.Module instance to the worker thread to be instantiated.
The addListenerForType() function is used to specify a callback function (listener) to execute when the type field in the message response matches the type argument passed to the function. This is required to capture the result of the _calculate() function from the worker thread.
Finally, the calculate() function in WasmWorker posts a message to the worker thread with the firstVal and secondVal arguments passed in from the <input> elements on the <form>. Let's move on to the application loading code to see how WasmWorker interacts with the UI.
Create a new file in the /src directory named index.js and populate it with the following contents:
import WasmWorker from './WasmWorker.js';
/**
* If you add ?blob=true to the end of the URL (e.g.
* http://localhost:8080/index.html?blob=true), the worker will be
* created from a Blob rather than a URL. This returns the
* URL to use for the Worker either as a string or created from a Blob.
*/
const getWorkerUrl = async () => {
const url = new URL(window.location);
const isBlob = url.searchParams.get('blob');
var workerUrl = 'worker.js';
document.title = 'Wasm Worker (String URL)';
// Create a Blob instance from the text contents of `worker.js`:
if (isBlob === 'true') {
const response = await fetch('worker.js');
const results = await response.text();
const workerBlob = new Blob([results]);
workerUrl = window.URL.createObjectURL(workerBlob);
document.title = 'Wasm Worker (Blob URL)';
}
return Promise.resolve(workerUrl);
};
/**
* Instantiates the Wasm module associated with the specified worker
* and adds event listeners to the "Add" and "Subtract" buttons.
*/
const initializeWorker = async (wasmWorker, name) => {
await wasmWorker.initialize(name);
wasmWorker.addListenerForType('CALC_RESPONSE', payload => {
document.querySelector('#result').value = payload;
});
document.querySelector(`#${name}`).addEventListener('click', () => {
const inputs = document.querySelectorAll('input');
var [firstInput, secondInput] = inputs.values();
wasmWorker.calculate(+firstInput.value, +secondInput.value);
});
};
/**
* Spawns (2) workers: one associated with calc-add.wasm and another
* with calc-subtract.wasm. Adds an event listener to the "Reset"
* button to clear all the input values.
*/
const loadPage = async () => {
document.querySelector('#reset').addEventListener('click', () => {
const inputs = document.querySelectorAll('input');
inputs.forEach(input => (input.value = 0));
});
const workerUrl = await getWorkerUrl();
const addWorker = new WasmWorker(workerUrl);
await initializeWorker(addWorker, 'add');
const subtractWorker = new WasmWorker(workerUrl);
await initializeWorker(subtractWorker, 'subtract');
};
loadPage()
.then(() => console.log('%cPage loaded!', 'color: green;'))
.catch(error => console.error(error));
The application entry point is the loadPage() function. Before we dig into the worker initialization code, let's discuss the getWorkerUrl() function. Earlier in this section, we learned that you can pass a string representing a filename or a URL created from a Blob to the Worker() constructor. The following example code demonstrates the first technique:
var worker = new Worker('worker.js');
The second technique is demonstrated in the if (isBlob === 'true') block of the getWorkerUrl() function. If the current window.location value ends with ?blob=true, the URL passed to the Worker() constructor is created from a Blob. The only noticeable difference is the document.title value, which updates to reflect the URL type. Let's jump back to the loadPage() function to discuss the initialization code.
After an event listener is added to the Reset button in the loadPage() function, two WasmWorker instances are created: addWorker and subtractWorker. Each worker is passed to the initializeWorker() function as the wasmWorker argument. In initializeWorker(), the wasmWorker.initialize() function is called to instantiate the Wasm module. The wasmWorker.addListenerForType() function is called to set the value of the Result <input> to the value returned from the _calculate() function in the corresponding worker. Finally, an event listener is added to the click event of the <button> that either adds or subtracts the firstVal and secondVal <input> values (based on the name argument). That's it for the JavaScript code. Let's create an HTML and CSS file, then move on to the build step.
We need an HTML file to act as the entry point to the application. Create a file in the /src directory named index.html and populate it with the following contents:
<!DOCTYPE html>
<html>
<head>
<meta charset="utf-8">
<title>Wasm Workers</title>
<link rel="stylesheet" type="text/css" href="styles.css" />
</head>
<body>
<form class="valueForm">
<div class="valueForm">
<label for="firstVal">First Value:</label>
<input id="firstVal" type="number" value="0" />
</div>
<div class="valueForm">
<label for="secondVal">Second Value:</label>
<input id="secondVal" type="number" value="0" />
</div>
<div class="valueForm">
<label for="result">Result:</label>
<input id="result" type="number" value="0" readonly />
</div>
</form>
<div>
<button id="add">Add</button>
<button id="subtract">Subtract</button>
<button id="reset">Reset</button>
</div>
<script type="module" src="index.js"></script>
</body>
</html>
The application consists of a <form> with three <input> elements and a block of three <button> elements. The first two <input> elements correspond to the firstVal and secondVal properties included in the payload sent to either worker thread. The final <input> is read-only and displays the result of either operation.
The block of <button> elements below the <form> perform operations on the <input> values. The first two <button> elements send the <input> values to either the addWorker or subtractWorker thread (depending on which button was pressed). The final <button> sets all of the <input> values to 0.
The application is initialized in the <script> tag in the last line before the </body> closing tag. Just as with Cook the Books, the type="module" attribute allows us to use the import/export syntax available in newer browsers. Finally, we need to add some styles to the application. Create a file in the /src directory named styles.css and populate it with the following contents:
* {
font-family: sans-serif;
font-size: 14px;
}
body {
margin: 16px;
}
form.valueForm {
display: table;
}
div.valueForm {
display: table-row;
}
label, input {
display: table-cell;
margin-bottom: 16px;
}
label {
font-weight: bold;
padding-right: 16px;
}
button {
border: 1px solid black;
border-radius: 4px;
cursor: pointer;
font-weight: bold;
height: 24px;
margin-right: 4px;
width: 80px;
}
button:hover {
background: lightgray;
}
That's the last file we need to create, but not the last one required to run the application. We still need to generate Wasm files from the C files in the /lib directory. Let's move on to the build step.
With the code written, it's time to build and test the application. After completing the build step, we'll interact with the running application and review how to troubleshoot Web Workers using the browser's development tools.
We need to compile each C file to a separate .wasm file, which means the command needed to perform the compilation step is verbose. To perform the build, open a terminal instance in your /parallel-wasm directory and run the following commands:
# First, compile the add.c file:
emcc -Os -s WASM=1 -s SIDE_MODULE=1 -s BINARYEN_ASYNC_COMPILATION=0 lib/add.c -o src/calc-add.wasm
# Next, compile the subtract.c file
emcc -Os -s WASM=1 -s SIDE_MODULE=1 -s BINARYEN_ASYNC_COMPILATION=0 lib/subtract.c -o src/calc-subtract.wasm
You should see two new files in the /src directory: calc-add.wasm and calc-subtract.wasm. With the required files in place, it's time to test out the application.
Open a terminal instance in the /parallel-wasm directory and run the following command:
serve -l 8080 src
If you navigate to http://127.0.0.1:8080/index.html in your browser, you should see this:
Try changing the values in the First Value and Second Value inputs and pressing the Add and Subtract buttons. The Result input should update with the calculated result. If you navigate to http://127.0.0.1:8080/index.html?blob=true, the URL argument passed to the Worker() constructor will use a Blob instead of the filename. The tab should change to reflect that the Blob technique is used to construct the URL:
You can set breakpoints and interact with worker threads using the browser's development tools. In Google Chrome, open Developer Tools and select the Sources tab. The file list panel should contain two instances of worker.js. The debugger panel contains a Threads section with the main thread and two worker.js threads. The following screenshot indicates the thread debugging elements within the Chrome Developer Tools panel for the running application:
In Firefox, worker debugging is done in separate Developer Tools windows. To see this in action, open Developer Tools in Firefox and select the Debugger panel. Click on one of the worker.js list items in the Workers panel. A new Developer Tools window should appear that corresponds with the selected worker. The following screenshot shows a separate Developer Tools window for one of the worker.js instances selected from the Workers panel:
In the next section, we'll discuss some of the upcoming features of WebAssembly.
There are several upcoming WebAssembly features in various phases of the standardization process. Some of them are more impactful than others, but all of them are valuable improvements. In this section, we'll describe the standardization process and review a subset of the features that represent a significant shift in WebAssembly's capabilities. Most of the content in this section was referenced from Colin Eberhardt's blog post titled The future of WebAssembly - A look at upcoming features and proposals. The post can be found at https://blog.scottlogic.com/2018/07/20/wasm-future.html.
The WebAssembly W3C Process documentation at https://github.com/WebAssembly/meetings/blob/master/process/phases.md describes the six phases (from 0 to 5) of the standardization process. The following list provides brief descriptions of each of these phases:
Now that you're familiar with the phases associated with the standardization process, let's move on to the threads proposal.
In the previous section, we used Web Workers to move Wasm modules into worker threads, which allowed us to call Wasm functions without blocking the main thread. However, passing messages between worker threads has performance limitations. In an effort to address this issue, a threads feature was proposed for WebAssembly.
The proposal, currently in Phase 1, is described in detail at https://github.com/WebAssembly/threads/blob/master/proposals/threads/Overview.md. Per the proposal documentation, the threads feature adds a new shared linear memory type and some new operations for atomic memory access. This proposal is relatively limited in scope. Eberhardt provides the following elaboration in his blog post:
Although the feature wouldn't allow for the creation of threads, it provides a simpler way of sharing data between the worker threads we create in JavaScript.
The host bindings proposal, which is also in Phase 1, would address a significant limitation of WebAssembly when used in the browser: DOM manipulation. The proposal documentation at https://github.com/WebAssembly/host-bindings/blob/master/proposals/host-bindings/Overview.md provides the following list of goals for this feature:
Improving WebAssembly's interoperability with JavaScript and Web APIs would simplify the development process considerably. It would also eliminate the need for the "glue" code that tools such as Emscripten provide.
The garbage collection (GC) proposal is currently in Phase 1. We discussed garbage collection in the What are the Limitations? section of Chapter 1, What is WebAssembly? The proposal documentation at https://github.com/WebAssembly/gc/blob/master/proposals/gc/Overview.md provides an extensive overview of the feature and describes the elements that need to be added to the specification. Eberhardt provides the following description of the proposal in his blog post:
This feature will require a great deal of effort to implement, but adding it to WebAssembly will be worth the effort. Let's wrap up this section with a feature currently in the implementation phase: reference types.
Reference types, currently in Phase 3, form the basis for the host bindings and GC features. The proposal documentation at https://github.com/WebAssembly/reference-types/blob/master/proposals/reference-types/Overview.md describes the addition of a new type, anyref, which can be used as both a value type and a table element type. The anyref type allows you to pass a JavaScript object to a Wasm module. Eberhardt describes the implications of this feature in his blog post:
There are several other exciting features in the pipeline for WebAssembly. The WebAssembly CG and WG are devoting their time and resources to making these features a reality. You can view all of the proposals at the WebAssembly organization page on GitHub, located at https://github.com/WebAssembly.
In this chapter, we reviewed advanced tools and an alternate compilation method for WebAssembly. We learned about WABT and Binaryen's role in the WebAssembly development process and the functionality they provide. We compiled a Wasm module with LLVM through the use of the WebAssembly npm package and interacted with the result in the browser. We reviewed some of the WebAssembly tooling available online and created a simple application that uses Web Workers to store Wasm modules in separate threads. Finally, we discussed the upcoming features of WebAssembly and the standardization process. Now that you've gained a greater understanding of WebAssembly, go out there and build something!
If you enjoyed this book, you may be interested in these other books by Packt:
Angular 6 for Enterprise-Ready Web Applications
Doguhan Uluca
ISBN: 9781786462909
Mastering The Faster Web with PHP, MySQL, and JavaScript
Andrew Caya
ISBN: 9781788392211
Please share your thoughts on this book with others by leaving a review on the site that you bought it from. If you purchased the book from Amazon, please leave us an honest review on this book's Amazon page. This is vital so that other potential readers can see and use your unbiased opinion to make purchasing decisions, we can understand what our customers think about our products, and our authors can see your feedback on the title that they have worked with Packt to create. It will only take a few minutes of your time, but is valuable to other potential customers, our authors, and Packt. Thank you!