Table of Contents for
Learn Robotics with Raspberry Pi
 Learn Robotics with Raspberry Pi
Published by
No Starch Press, 2018
Learn Robotics with Raspberry Pi
Published by
No Starch Press, 2018
- Cover Page
- Title Page
- Copyright Page
- Dedication
- CONTENTS
- CONTENTS IN DETAIL
- ACKNOWLEDGMENTS
- FOREWORD
- INTRODUCTION
- CHAPTER 1: GETTING UP AND RUNNING
- CHAPTER 2: ELECTRONICS BASICS
- CHAPTER 3: BUILDING YOUR ROBOT
- CHAPTER 4: MAKING YOUR ROBOT MOVE
- CHAPTER 5: AVOIDING OBSTACLES
- CHAPTER 6: CUSTOMIZING WITH LIGHTS AND SOUND
- CHAPTER 7: LINE FOLLOWING
- CHAPTER 8: COMPUTER VISION: FOLLOW A COLORED BALL
- NEXT STEPS
- RASPBERRY PI GPIO DIAGRAM
- RESISTOR GUIDE
- HOW TO SOLDER
- RUN PROGRAM ON STARTUP
- Learn Robotics with Raspberry Pi®: Build and Code Your Own Moving, Sensing, Thinking Robots
- Learn Robotics with Raspberry Pi®: Build and Code Your Own Moving, Sensing, Thinking Robots
HOW TO SOLDER
SOLDERING IS THE PROCESS OF PERMANENTLY FUSING TOGETHER ELECTRONIC PARTS. IT INVOLVES MELTING A FILLER METAL ALLOY, CALLED SOLDER, BETWEEN TWO OR MORE COMPONENTS (SEE FIGURE D-1).
This process not only physically bonds the parts together, but also electrically connects them. Unlike using a breadboard, soldering is permanent. Over the course of your adventures in robotics, electronics, and Raspberry Pi, you will come across components that you need to solder (for example, wires onto motor terminals), so it is a key skill for you to learn and practice.
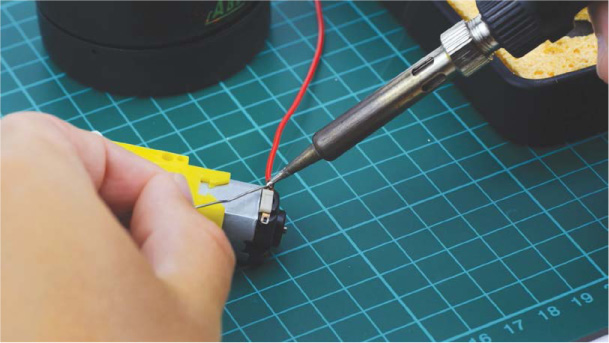
FIGURE D-1 Soldering a wire to a motor terminal—a common task in robotics
WHAT YOU NEED
In order to solder parts together, you’ll need a few tools and materials:
- Soldering iron
- Solder
- Stand and tip cleaner
These should be available from the usual online retailers and local hardware stores. Let’s take a closer look at each part.
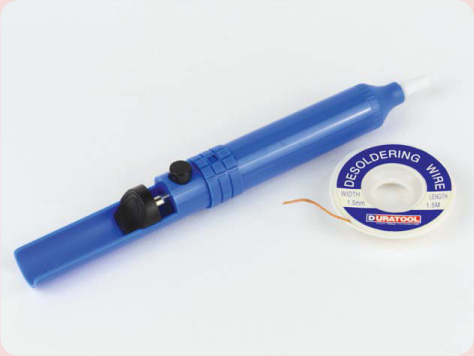
Solder
First, you’ll need the filler metal that you’ll melt to create solder joints. Shown in Figure D-2, solder is a metal alloy with a relatively low melting temperature, usually between 180 and 200 degrees Celsius (356–392 degrees Fahrenheit).
In the past, lead was used in solder, due to its low melting point and fantastic electrical properties. However, we now know that lead is a heavy metal and toxic to humans. Consequently, lead-free solder, primarily made out of tin and copper, is the modern industry standard and what I recommend you purchase. If you’re buying online, just search for “lead-free solder.” It is usually provided in the form of a wire with a diameter between 0.5 and 0.8 mm.
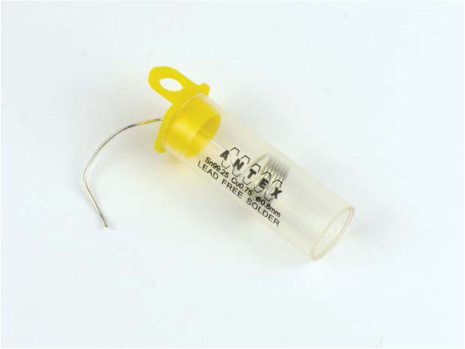
FIGURE D-2 Lead-free solder
Soldering Iron
A soldering iron, shown in Figure D-3, is the tool that heats the solder to its melting point.
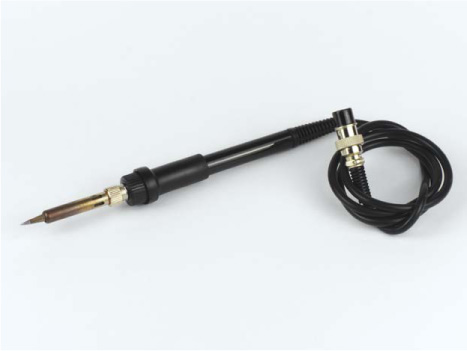
FIGURE D-3 My trusty Tenma soldering iron
Soldering irons are available at a wide range of price points, generally starting as cheap as $10 and going higher than $100! As a beginner, you probably shouldn’t get an expensive one with pro-level features. All you need is a decent iron that works reliably and doesn’t give you any stress.
One common introductory soldering iron is the Antex XS25, which you can pick up for around $30. This is a quick-warming, fixed-temperature, quality tool that will last you many years. Note that for the delicate electronics soldering you’ll most likely be doing, you should use a fine tip on your soldering iron. The majority of soldering irons come with one of these preinstalled, and irons like the XS25 feature an easy-to-replace tip.
I personally use a Tenma 60W Temperature-Adjustable Soldering Station, which retails for around $60.
Stand and Soldering Tip Cleaner
Soldering irons heat up to over 200 degrees Celsius, so it’s critically important that you only touch an iron by its handle. I recommend getting a soldering iron stand, which safely stores and holds your iron between solder joints without burning you, your electronics, or your table surface (Figure D-4)!
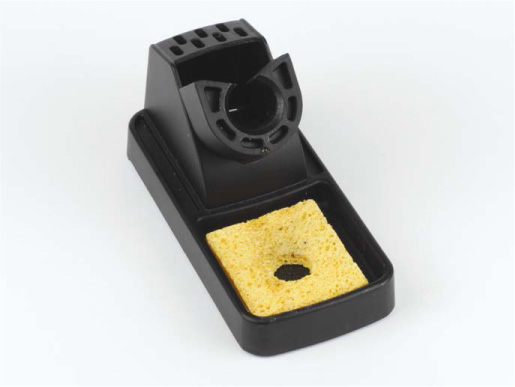
FIGURE D-4 Soldering stand and sponge
Often a stand will have a built-in soldering tip cleaner. This is used to clean the soldering iron between connections so it continues to work as well as possible. The two most common types of cleaner are a damp sponge or an abrasive pot of brass shavings, shown in Figures D-4 and D-5. I recommend using the brass shavings, as they clean more thoroughly.
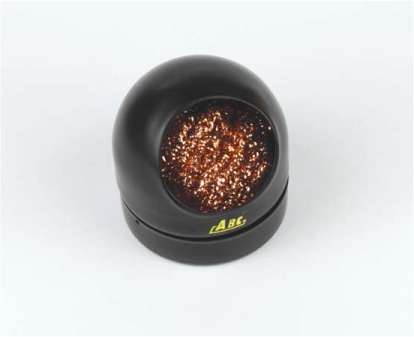
FIGURE D-5 Soldering tip cleaner
OPTIONAL EXTRAS
The tools and materials mentioned so far are the basic necessities for soldering, but there are a few other bits and pieces that can make your life easier!
For example, you may want to remove solder from a joint. You can do so with some desoldering braid (also known as wick) or a solder sucker, as shown here. I won’t be covering desoldering in this guide, so search online for information and videos showing you how to perform it if you want to improve your soldering skills.
If you’re struggling to get solder to flow well, a liquid flux pen will help. By applying a special solution called liquid flux, the pen helps the solder cling to the solder joint.
You may later find that positioning and holding electronic components while soldering proves difficult. In this case, a Helping Hands set, shown here, may be useful.

Often the components that you need to solder together are very small, which can be a problem for those with less-than-perfect eyesight. If this is the case for you, you may find that a magnifying glass (often combined with a Helping Hands) is a vital piece of equipment.
SOLDERING COMPONENTS TOGETHER
Now let’s run through the process of soldering two components together. I’ll demonstrate by soldering some wire to a motor terminal, which you’ll most likely have to do before wiring up the different parts of your robot in Chapter 3.
Preparing to Solder
Before you turn on your soldering iron, first prepare the area. For a soldering space you’ll need:
Well-ventilated area Pick a place that is well ventilated, as soldering produces fumes that you should try not to breathe in.
Suitable work surface As soldering irons get very hot, ensure you have either a heatproof work surface or some scrap material laid out where you are soldering. A piece of cardboard, a cutting mat, or an old piece of wood will suffice.
Eye protection During the process of soldering, little bits of solder and flux can sometimes sputter off. I recommend wearing a set of safety glasses or goggles to protect your eyes.
With everything set, place your soldering iron in its stand and then plug it into a power outlet. Wait for your iron to heat up; this may be a matter of seconds if you have an expensive one or a matter of minutes if you have a beginner model like the Antex XS25. Most importantly, remember to not touch the tip of your soldering iron while it is plugged in. Even if you unplug your iron, don’t touch the tip! It will take a while to cool down.
Once you’ve plugged the iron in, don’t leave your equipment unattended. If you have to leave the room, unplug your soldering iron and wait for it to safely cool down before leaving it. It’s not worth taking any unnecessary risks.
Tinning the Tip
Before starting to solder a joint, always tin your soldering iron tip. Tinning is the process of coating the tip of your soldering iron in solder. This will make the actual soldering easier and help with proper flow.
First, once your soldering iron is hot, clean it by brushing its tip against your damp sponge or inserting it into your pot of brass shavings.
After this, unwind some of your solder and touch the solder to the tip of your hot iron. The solder should melt on contact. Now cover the bottom quarter-inch of your iron in solder. Use your soldering tip cleaner to clean off any excess solder and repeat this process until the tip of your iron is shiny and covered in solder, like mine in Figure D-6.
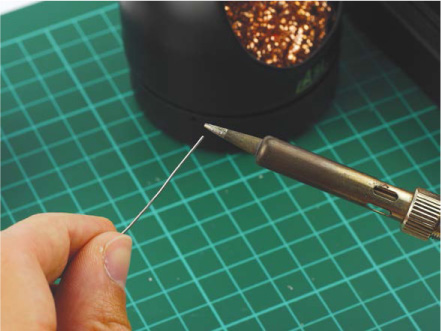
FIGURE D-6 Tinning the tip of my soldering iron
If you are soldering a lot of components, you should re-tin the tip of your soldering iron as appropriate and whenever it’s no longer shiny.
Setting Up the Components
It’s always important that you prepare the components you’re soldering first. Place your parts on your work surface and position them in the way you intend to solder them. For the purpose of soldering some wire to a motor terminal, this involves threading the wire through the terminal, as pictured in Figure D-7. Before you do this, ensure that you have stripped the end of the wire first, which means removing about a quarter of an inch of the wire’s plastic outer layer in order to expose the conductive metal core. You should use a wire stripper for this purpose.
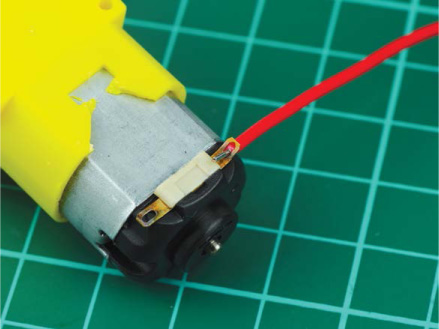
FIGURE D-7 A wire ready to be soldered to my motor terminal
For other components, you may wish to hold them still using a pair of Helping Hands as mentioned previously.
Soldering the Perfect Joint
Now that we have everything ready, it’s time to solder! Spool off about 6 inches of your solder and hold your soldering iron by its handle. It should be in your dominant hand, as if you were holding a pen or pencil. Make sure you’re holding the solder wire at least a few inches from the end so you don’t burn yourself.
The key to a good soldering joint is not to touch the iron to the solder and then melt it onto the components. Instead, apply your hot iron to the components you’re intending to solder for 2 to 3 seconds to heat the component itself. Then, apply solder directly to the heated components.
Solder flows toward the hottest part of the component, so if you don’t preheat the parts you’re trying to solder together, you may find that the solder goes onto your iron and forms a messy ball. If this happens, don’t worry: just clean your iron and go through the process again.
So, in order to solder a perfect joint, like the one in Figure D-8, follow these steps:
WARNING
Don’t touch the components that you have just soldered right away, as they will still be incredibly hot!
- Apply the tinned tip of your hot soldering iron to the components you wish to solder together and hold it there for 2 or 3 seconds.
- With the iron still held against the components, feed the end of your solder into the joint; it should melt upon contact and flow into the joint.
- When you have melted enough solder that the whole joint is filled, remove the solder but keep your iron on the joint for another second. This allows the solder to flow and settle.
- Remove your soldering iron from the joint, clean the tip of any excess, and then place it back into its stand.
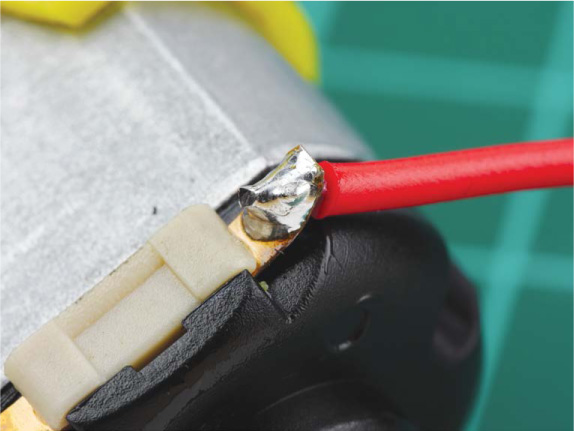
FIGURE D-8 My soldered motor terminal—notice how shiny and cone-shaped the joint is
A good solder joint should be smooth and shiny and resemble a cone, a bit like a tiny volcano. Soldering a wire to a motor terminal is a bit different from soldering a pin to a printed circuit board, for example, so take a look at Figure D-9 to get an idea of what a good PCB soldering connection looks like.
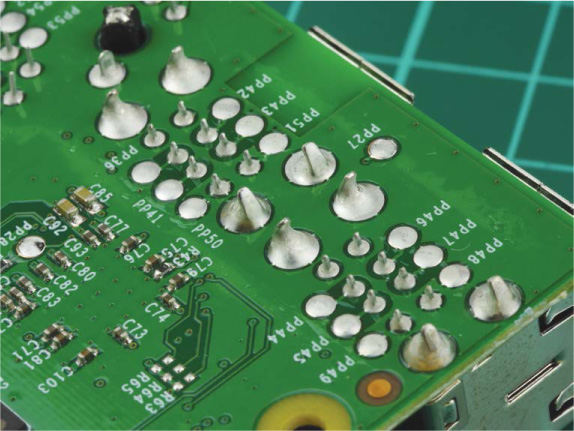
FIGURE D-9 PCB soldering joints on the bottom of a Raspberry Pi (though these have been done by an automated machine, they’re still a good lesson)
If your solder joint isn’t correct, don’t panic! Grab your soldering iron and apply the tip back onto the joint to reheat it. See if the solder flows and settles better, and if not, simply add some more solder to ensure the joint is correct.
Figure D-10 shows a few common soldering mistakes and solutions.
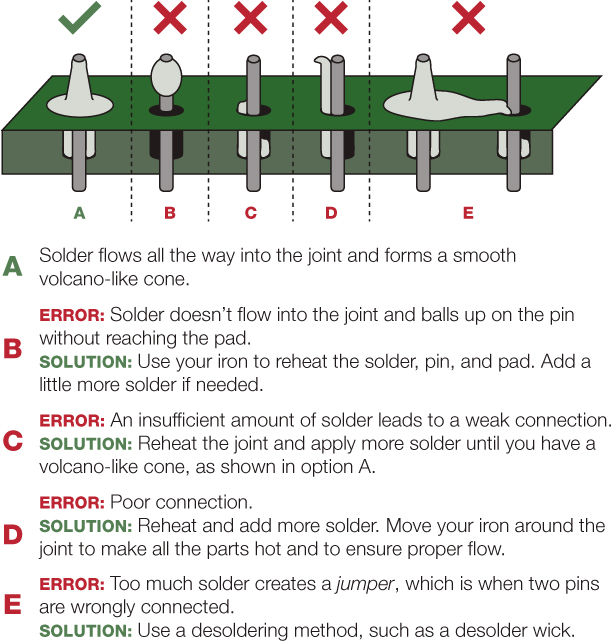
FIGURE D-10 Common soldering mistakes and how to solve them
SUMMARY
The ability to solder is a key maker skill that will serve you well—it just requires a bit of practice! Follow the guidance here, or take a look online at some demonstration videos to perfect your technique.