Table of Contents for
Practical Cloud Security
 Practical Cloud Security
Published by
O'Reilly Media, Inc., 2019
Practical Cloud Security
Published by
O'Reilly Media, Inc., 2019
- Cover
- nav
- Practical Cloud Security
- Practical Cloud Security
- Preface
- 1. Principles and Concepts
- 2. Data Asset Management and Protection
- 3. Cloud Asset Management and Protection
- 4. Identity and Access Management
- 5. Vulnerability Management
- 6. Network Security
- 7. Detecting, Responding, and Recovering from Security Incidents
- Index
- About the Author(s)
- Colophon
Chapter 5. Vulnerability Management
In Greek mythology, Achilles was killed by an arrow to his only weak spot — his heel. Achilles clearly needed a better vulnerability management plan!1 Unlike Achilles, who had only one vulnerable area, your cloud environments will have many different areas where vulnerabilities can appear. After locking down access control, setting up a continuous process for managing potential vulnerabilities is usually the best investment in focus, time, and money that you can make to improve security.
There is considerable overlap between vulnerability management and patch management. For many organizations, the most important reason to install patches is to fix vulnerabilities rather than to fix functional bugs or add features. There is also considerable overlap between vulnerability management and configuration management, since incorrect configurations can often lead to vulnerabilities even if you’ve dutifully installed all security patches. There are sometimes different tools and processes for managing vulnerabilities, configuration, and patches, but in the interests of practicality we’ll cover them all together in this chapter.
Unfortunately, vulnerability management is rarely as easy as turning on automatic patching and walking away. In cloud environments, vulnerabilities may be found in many different layers, including the physical facilities, the compute hardware, the operating system, code you’ve written, or libraries you’ve included. The Cloud Shared Responsibility Model described in Chapter 1 can help you understand where your cloud provider is responsible for vulnerabilities, and the contents of this chapter will help you manage your responsibilities. In most cases, you’ll need several different tools and processes to deal with different types of vulnerabilities.
Differences from Traditional IT
The rate of change is often much higher in cloud environments, and these constant changes can leave traditional vulnerability management processes in the dust. As discussed in Chapter 3, you must use inventory from cloud APIs to feed each system into your vulnerability management tools as it is created, to avoid missing new systems as they come online.
In addition to the rate of change, popular contemporary hosting models such as containers and serverless hosts change the way that you do vulnerability management, because existing tools either aren’t applicable or aren’t efficient. You cannot put a heavyweight vulnerability management tool that uses a few percent of your CPU in every container, like you would in virtual machines. You are likely to end up running hundreds of copies of the agent on the system and have no CPU time left for the real work!
Plus, even though continuous integration (CI), continuous delivery (CD), and microservice architecture are separate from cloud computing, they often happen along with cloud adoption. Adoption of these techniques can also radically change vulnerability management.
For example, a traditional vulnerability management process might look something like this:
-
Discover that security updates or configuration changes are available
-
Prioritize which updates need to be implemented based on the risk of security incidents
-
Test that the updates work, in a test environment
-
Schedule the updates for a production environment
-
Deploy the updates to production
-
Verify that production still works
This type of process is reasonably designed to balance the risk of a security incident against the risk of an availability incident in production environments. As I often like to tell people, security is easy — just turn everything off and bury it in concrete. Securing environments while keeping them running and usable is much more difficult.
However, in our brave new world of cloud, infrastructure as code, CI/CD, and microservice architectures, we have options for reducing the risk of an availability incident and changing the balance:
-
Cloud offerings and “infrastructure as code” allow the definition of the environment to be part of the code. This allows a new environment and new code to be tested together, rather than combining the environment and the code at the end when you install on an existing machine. In addition, because you can create a new production environment for each deployment and switch back to (or recreate) the old one easily if needed, you can reduce the risk of getting into a state where you cannot roll back quickly. This is similar to “blue/green” deployments in traditional environments, but with cloud you don’t need to pay for the “green” environment all the time, so infrastructure as code can be used even for smaller, lower-budget applications.
-
Continuous integration and continuous delivery allow smaller changes to be deployed to production on each iteration. Smaller changes reduce the risk of catastrophic failures, and make troubleshooting easier for problems that do arise.
-
Microservice architectures can decouple services, so that changes in one microservice are less likely to have undesired side effects in other microservices. This is especially true in container-based microservice environments, because each container is isolated from the others.
-
Microservice architectures also tend to scale horizontally, where the application is deployed across more machines and containers as needed to handle the load. This also means that changes can be rolled out in phases across the environment, and potentially disruptive scans2 will take down only some of the capacity of the application.
Each of these items swings the balance towards higher availability, which means that security updates can be more proactive without lowering the overall availability of the system. This in turn reduces your overall risk. The new vulnerability management process looks like:
-
Automatically pull available security updates as part of normal development efforts. For example, this might include updated code libraries or updated operating system components.
-
Test the updates as part of the normal application test flow for a deployment. Only if this stage finds a problem do you need to step back to evaluate whether the updates need to be included.
-
Deploy the new version, which automatically creates a new production environment that includes code changes, security updates, and potentially updates to the configuration. This deployment could be to a subset of systems in production, if you are not confident that it won’t disrupt operation.
-
Discover and address any additional vulnerabilities in test or production environments that aren’t covered as part of the normal delivery process, add them as bugs in the development backlog, and address them in the next iteration (or as a special release if urgent).
You still have some manual vulnerability management work in step 4, but there will be far less than in the standard process. As we’ll see in this chapter, there are many types of vulnerabilities, but this high-level process will work for most.
Vulnerable areas
What types of vulnerabilities do you have to worry about? Imagine that your application is part of a “stack” of components, with the application on top and physical computers and facilities at the bottom. We’ll start at the top of the stack and work downwards. There are many different ways to categorize the items in the stack, but we’ll use the Shared Responsibility Model diagram from Chapter 1.
Figure 5-1. Cloud Shared Responsibility Model
Let’s look at each layer of this diagram in more detail from the perspective of vulnerability management, starting at the top.
Data Access
Deciding how to grant access to the data in the application or service is almost always the customer’s responsibility in a cloud environment. Vulnerabilities at the data access layer almost always boil down to access management problems, such as leaving resources open to the public, leaving access intact for individuals who no longer need it, or using poor credentials. These were discussed in detail in Chapter 4.
Application
If you’re using SaaS, the security of the application code will be your provider’s responsibility, but there may be security-relevant configuration items that you’re responsible for as a customer. For example, if you’re using a web email system, it would be up to you to determine and set reasonable configurations such as two-factor authentication or malware scanning. You also need to track and correct these configurations if they drift from your requirements.
If you’re not using SaaS, you are probably writing some sort of application code, whether it’s hosted on virtual machines, an application platform-as-a-service, or a serverless offering. No matter how good your team is, your code is almost certainly going to have some bugs, and at least some of those bugs are likely to impact security. In addition to your own code, you’re often going to be using frameworks, libraries, and other code provided by third parties that may contain vulnerabilities. Vulnerabilities in this inherited code are often more likely to be exploited by attackers, because the same basic attack will work across many applications.
Warning
Vulnerabilities in popular open source components, such as Apache Struts and OpenSSL, have led to vulnerabilities in many applications that use those components. Exploiting these vulnerabilities is much easier for attackers than researching specific application code, so they tend to be an even higher risk than vulnerabilities in code you’ve written!
The classic example of an application vulnerability is a buffer overflow. However, many applications are now written in languages that make buffer overflows difficult, so while buffer overflows still happen, they don’t make the top of the list any more. Below are a few examples of application vulnerabilities from the OWASP Top 10 - 2017 list. In each of these examples, access controls, firewalls, and other security measures are largely ineffective in protecting the system if these vulnerabilities are present in the application code.
-
Injection attacks, where your application gets a piece of untrusted data from a malicious user and sends it to some sort of interpreter. A classic example is SQL injection, where you send information that causes the query to return everything in the table instead of what was intended.
-
XML External Entities, where an attacker sends XML data that one of your vulnerable libraries processes and that performs undesirable actions.
-
Cross-site scripting, where an attacker fools your application into sending malicious JavaScript to a user.
-
Deserialization attacks, where an attacker sends “packed” objects to your application that cause undesirable side effects when unpacked.
Note that all of these application-level attacks are possible regardless of how your application is deployed — on a virtual machine, or on an application PaaS, or on a serverless platform. Some tools discussed in Chapter 6, such as Web Application Firewalls, may be able to act as a safety net if there is a vulnerability in application code. However, make no mistake — detecting and fixing vulnerable code and dependencies is your first and most important line of defense.
Although frameworks can be a source of vulnerabilities you have to manage, they can also help you avoid vulnerabilities in your own code. Many frameworks have built-in protections against attacks like cross site scripting (XSS), cross site request forgery (CSRF), SQL injection (SQLi), clickjacking, and others. Understanding the protections offered by your framework and using them can easily avoid some of these issues.
Middleware
In many cases, your application code uses middleware or platform components, such as databases, application servers, or message queues. Just as with dependent frameworks or libraries, vulnerabilities here can cause you big problems because they’re attractive to attackers — the attacker can exploit that same vulnerability across many different applications, often without having to understand the applications at all.
If you’re running these components yourself, you’ll need to watch for updates, test them, and apply them. These components might be running directly on your virtual machines, or might be inside containers you’ve deployed. Tools that work for inventorying what’s installed on virtual machines will usually not find items installed in containers.
If these components are provided as-a-service by your cloud provider, your cloud provider will usually have the responsibility for patching. However, there’s a catch! In some cases, the updates won’t be pushed to you automatically, because they could cause an outage. In those cases, you may still be responsible for testing and then pushing the button to deploy the updates during a convenient time.
In addition to applying patches, you also need to worry about how middleware is configured, even in a PaaS environment. Here are some real-world examples of middleware/platform configuration issues that can lead to a security incident or breach:
-
A web server is accidentally configured to allow viewing of the password file.
-
A database is not configured for the correct type of authentication, allowing anyone to act as a database manager.
-
A Java application server is configured to provide debug output, which reveals a password when a bug is encountered.
For each component you use, you need to examine the configuration settings available and make a list of security-relevant settings and what the correct values are. These should be enforced when the component is initially brought into service and then checked regularly afterward to make sure they’re all still set correctly and prevent “configuration drift”. This kind of manual monitoring is often called benchmarking, health checking, or simply configuration management.
Tip
While you can certainly write benchmarks or configuration specifications from scratch, I recommend starting with a common set of best practices, such as the Center for Internet Security’s CIS Benchmarks. You can tailor these for your organization and deployments, and even contribute a change if you find a problem or want to suggest an enhancement. Because the benchmarks are a community-based effort, you’re more likely to benefit from up-to-date configuration checks that take into account new threats and new versions of platform products and operating systems. Several popular products can perform the CIS Benchmarks checks out of the box.
Operating System
Operating system patches are what many people think of when they think of vulnerability management. It’s Patch Tuesday, time to test the patches and roll them out! But while operating system patches are an important part of vulnerability management, they’re not the only consideration.
Just as with the Middleware/Platform layer of the stack, you must perform proper benchmarking when deploying the operating system instance as well as regularly afterwards. In addition, operating systems tend to ship with a lot of different components that are not needed in your environment. Leaving these components in a running instance can be a big source of vulnerabilities, either from bugs or misconfiguration, so it’s important to turn off anything that’s not needed. This is often referred to as “hardening”.
Many cloud providers have a catalog of virtual machine images that are automatically kept up to date, so that you should get a reasonably up to date system when deploying. However, if the cloud provider doesn’t automatically apply patches upon deployment, you should do so as part of your deployment process.
An operating system typically consists of a kernel, which runs all other programs, along with many different userspace programs. Many containers also contain the userspace portions of the operating system, and so operating system vulnerability management and configuration management also factor into container security.
In most cases, the cloud provider is responsible for the hypervisors. However, if you’re responsible for any hypervisors, they’re also included in this category because they’re essentially special-purpose operating systems designed to hold other operating systems. Hypervisors are typically already hardened, but do still require regular patching and have configuration settings that need to be set correctly for your environment.
Network
Vulnerability management at the network layer creates two main tasks: managing the network components themselves, and managing which network communications are allowed.
The network components themselves, such as routers, firewalls, and switches, typically require patch management and security configuration management similar to operating systems, but often through different tools.
Managing the security of the network flows implemented by those devices is discussed in detail in Chapter 6.
Virtualized Infrastructure
In an infrastructure-as-a-service environment, the virtualized infrastructure (virtual network, virtual machines, storage) will be the responsibility of your cloud provider. However, in a container-based environment, you may have security responsibility for the virtualized infrastructure or platform on top of the one offered by the cloud provider. For example, vulnerabilities may be caused by misconfiguration or missing patches of the container runtime, such as Docker, or the orchestration layer, such as Kubernetes.
Physical Infrastructure
In most cases, physical infrastructure will be the responsibility of your cloud provider.
There are a few cases where you may be responsible for configuration or vulnerability management at the physical level, however. If you are running a private cloud, or if you get bare metal systems provisioned as-a-service, you may have some physical infrastructure responsibilities. For example, vulnerabilities can be caused by missing BIOS/microcode updates or poor security configurations of the Baseboard Management Controller that allows remote management of the physical system.
Finding and Fixing Vulnerabilities
Now that you’re armed with an understanding of all of the places vulnerabilities might be hiding, you need to prioritize what types of vulnerabilities are most likely to be a problem in your environment. As I’ve repeated several times in this book, go for the “biggest bang for the buck” first — pick the most important area for your organization and get value from it before moving onto other areas. A common pitfall is having 4-5 different sets of tools and processes in order to check off a box on a list of best practices somewhere, none of which are actually providing a lot of value in finding and fixing vulnerabilities.
If you recall the asset management pipeline discussed in Chapter 3, this is the part where we put our fancy tools into the pipeline (Figure 5-2) to make sure we know about and deal appropriately with our risks. In Chapter 3, we were concerned with the left half of the diagram — watching procurement to find about about shadow IT, and making sure we inventoried the assets from all of the different cloud providers.
Here, the goal is to plug the leaks shown on the right half of the diagram. For example, here’s where we can minimize our “tooling” leaks (which result from not protecting known assets), as well as our “findings” leaks (which result from not properly dealing with known findings).
Figure 5-2. Sample asset management pipeline
First, look at the “tooling leaks” area of the figure. Imagine the size of the pipes in your environment as a combination of how many problems you might find in that area, as well as how critical to the business those problems might be. I’ve found that when I imagine this, I sometimes realize that there is a lot of water gushing out in a particular area, either because there’s no tool in that area or the tool doesn’t have visibility to a lot of assets. This can lead to a lot of unknown risk!
For example, if your environment contains a lot of Windows systems with critical data, fixing leaks in your antivirus pipeline might be near the top of your list. On the other hand, if you have mostly web applications running on Linux, application PaaS, or serverless, you probably want to focus on making sure you find and remediate web application vulnerabilities first before worrying as much about a small number of Windows systems that have less critical data.
Next, look at the “findings leaks” area of the figure. Imagine that the size of this pipe is a combination of the number of findings coming out of your tool, as well as how critical those findings might be. You may realize that you’ve got tools that you’re ignoring a lot of important output from, also leading to a lot of unknown risk.
There are many, many different types of tools, which overlap a lot in the vulnerabilities they search for. Some of the tools have been used in traditional environments for years, and others are newly introduced by cloud environments. Explanations follow of the different categories of vulnerability and configuration management tools, but note that many products will address more than one of these categories.
Network vulnerability scanners
In addition to operating system patches, network vulnerability scans are the other best-known piece of vulnerability management. This is for a good reason—they’re very good at finding some types of vulnerabilities—but it’s important to understand their limitations.
Network vulnerability scanners don’t look at software components. They simply make network requests, try to figure out what’s listening, and check for vulnerable versions of server applications or vulnerable configurations. As an example, a network vulnerability scanner can determine that one of the services on the system is allowing insecure connections, which would make the system vulnerable to a POODLE attack, based on the information in an SSL/TLS handshake. The scanner can’t know, however, about the different web applications or REST APIs served up on that network address, nor can it see components such as library versions inside the system.
Obviously, network vulnerability scanners cannot scan the entire Internet, or your entire cloud provider, and magically know which systems are your responsibility. You have to provide these tools with lists of network addresses to scan, and if you’ve missed any addresses, you’re going to have vulnerabilities you don’t know about. This is where the automated inventory management discussed in Chapter 3 is vital. Because many cloud components are open to the Internet, and because attackers can deploy exploits very quickly to vulnerabilities they discover in common server applications, your cycle time for inventorying Internet-facing components, scanning them, and fixing any findings needs to be as fast as possible.
In addition, don’t make the mistake of thinking network vulnerability scans are unnecessary just because you have isolated components, as will be described in Chapter 6. There is often a debate between network teams and vulnerability scanner teams on whether to poke holes in the firewall to allow the vulnerability scanner in to a restricted area. I maintain that the risk of having an unknown risk is much higher than the risk that an attacker will leverage those specific firewall rules to get into the restricted area, so vulnerability scanners should be allowed to scan every component even if it means weakening the perimeter network controls slightly. I have seen many incidents where the attacker got behind the perimeter and exploited a vulnerable system there. In contrast, although it has probably happened somewhere, I have not personally seen or heard of any incidents where the attacker took over the scanner and used its network access to attack systems.
Network vulnerabilities found on a segment of a protected virtual private cloud network have a lower priority than vulnerabilities on a component directly exposed to the Internet, but you should still discover them and fix them. Attackers have a very inconvenient habit of ending up in parts of the network where they’re not supposed to be.
Depending on how your deployment pipeline works, you should incorporate a network vulnerability scan of the test environment into the deployment process where possible. Any findings in the test environment should feed into a bug tracker, and if not marked as a false positive, should ideally block the deployment.
There are several cloud-based network vulnerability scanners that you can purchase and run as-a-service, without purchasing any infrastructure. However, you may need to create relay systems or containers inside your network for scanning areas that are not open to the Internet.
Warning
Network-based tools can find vulnerabilities without knowing what processes they’re talking to; they just see what answers on different TCP/UDP ports on a given IP address. They’re very useful because they see the same things an external attacker will see. However, this can also generate false positives, because the tool will often use the reported version of a component, which may not be correct or may not indicate that security patches have been installed. You must have a well documented, effective process for masking false positives, or you run the risk of teams ignoring all of the scan results because some of them are incorrect.
Agentless scanners and configuration management
If network vulnerability scans bang on the doors and windows of the house, agentless scanners and configuration management systems come inside the house and poke around. Agentless scanners also connect over the network, but use credentials to get into the systems being tested. In some cases, the same tools may perform both network scans and agentless scans. (The term “agentless” distinguishes these scanners from the ones described in the next section, which require an “agent” to run on each target system.)
Agentless scanners can find vulnerabilities that network vulnerability scanners can’t. For example, if you have a local privilege escalation vulnerability, which allows a normal user to take over the entire system, a network vulnerability scanner doesn’t have “normal user” privileges in order to see it, but an agentless scanner does.
Agentless scanners often perform both missing patch detection and security configuration management. For example:
-
The agentless scanner may run package manager commands to check that installed software is up to date and has important security fixes. For instance, some versions of the Linux kernel or C libraries have problems that allow someone without root privileges to become root; these problems can be detected by up-to-date scanners.
-
The agentless scanner may check that security configurations are correct and meet policy requirements. For example, the system may be configured to allow telnet connections (which could allow someone snooping on the network to see passwords, and therefore should be prohibited by policy); the scanner should detect that telnet is enabled and flag an alert.
In some cases, these tools can actually fix misconfigurations or vulnerable packages in addition to just detecting the problems. As mentioned early, such automated fixes can disrupt availability if they introduce new problems or don’t match your environment’s requirements. Where possible, it’s preferable to roll out an entirely new system that doesn’t have the vulnerability rather than try to fix it in place.
With all of this capability, why would you need both an agentless scanner and a network vulnerability scan? Although there’s a lot of overlap, agentless scanners fundamentally have to understand the system they’re looking at, which means that they don’t function well on operating system versions, software, or other items they don’t recognize. The fact that network vulnerability scans are “dumber” and only bang on network addresses is actually a strength in some cases, because they can find issues with anything on the network—even devices that allow no logins, such as network appliances, IOT devices, or containers.
Agent-based scanners and configuration management
Agent-based scanners and configuration management systems generally perform the same types of checks as agentless scanners. However, rather than having a central “pull” model, where a controller system reaches out to each system to be scanned and pulls the results in, agent-based scanners install a small component on each system—the agent—that “pushes” results to the controller.
There are both benefits and drawbacks to this approach, described in the following subsections.
Credentials
Agent-based scanners eliminate one source of risk inherent to agentless scanners. The agentless scanner consoles must have credentials to all systems—and usually privileged credentials—in order to perform their scans. Although the risk of granting those credentials is generally much less than the risk of unknown vulnerabilities in your environment, it does make the agentless scanner console a really attractive target for attackers. In contrast, agent-based scanners require privileges to deploy initially, but the scanner console just receives reports from the agents and has only whatever privileges the agent permits the console to use (which may still be full privileged access).
Deployment
Agents have to be deployed and kept up to date, and a vulnerability in the agent can put your entire infrastructure at risk. However, a well-designed agent in a “read-only” mode may be able to mitigate much of the risk of an attacker taking over the scanning console; the attacker will get a wealth of vulnerability information but may not get privileged access on all systems.
Agentless scanners don’t require you to deploy any code, but you often have to configure the target systems in order to provide access to the scanner. For example, you may need to create a userid and provide that userid with a certain level of sudo access.
Network
Agentless scanners must have inbound network access in order to work. As previously mentioned, allowing this network access can increase the risk to your environment. Most tools also have the option of deploying a relay system inside your network that makes an outbound connection and allows control via that connection, but the relay system is another system that requires management.
Agent-based systems can make only outbound connections, without allowing any inbound connections.
Some tools can perform checks using either an agent model or an agentless model. Ultimately, there’s no right answer for all deployments, but it’s important to understand the benefits and drawbacks of each when making a decision. I typically favor an agent-based model, but there are good arguments for both sides and the most important thing is that you address configuration and vulnerability management.
Several cloud providers offer agent-based scanners in their support for your cloud environment. These can be simpler to automatically deploy, and you don’t have to manually pull a list of assets from your cloud provider and feed them into the scanner.
Cloud provider security management tools
Tools in this category are typically specific to a particular cloud provider. They will typically gather configuration and vulnerability management information via agents or agentless methods, or pull in that information from a third party tool. They’re typically marketed as a “one stop dashboard” for multiple security functions on the provider, including access management, configuration management, and vulnerability management.
These tools may also offer the ability to manage infrastructure or applications hosted outside the cloud provider—either on-premises or on a different cloud provider—as an incentive to use the tool for your entire infrastructure.
Container scanners
Traditional agent and agentless scans work well for virtual machines, but often don’t work well in container environments. Containers are intended to be very lightweight processes, and deploying an agent designed for a virtual machine environment with each container can lead to crippling performance and scalability issues. Also, if used correctly, containers usually don’t allow a traditional network login, meaning that agentless scanners designed for virtual machines will also fail.
This is still a relatively new area, but two approaches are popular as of this writing. The first approach is to use scanners that pull apart the container images and look through them for vulnerabilities. If an image is rated as vulnerable, you know to avoid deploying new containers based on it, and to replace any existing containers deployed from it. This has the benefit of not requiring any access to the production systems, but has the drawback that once you identify a vulnerable image, you must have good enough inventory information about all of your running containers to ensure you replace all of the vulnerable ones.
In addition, if your containers are mutable (change over time), additional vulnerabilities may have been introduced that won’t be seen by scanning the source image. For this reason and others, I recommend the use of immutable containers that are replaced by a new container whenever any change is needed. Regularly replacing containers can also help keep threat actors from persisting in your network, because even if they compromise a container, it will be wiped out in a week or so — and the new container will hopefully have a fix for the issue that led to the compromise.
The second approach is to concentrate on the running containers, using an agent on each container host that scans the containers on that system and reports which containers are vulnerable so that they may be fixed (or preferably, replaced). The benefit is that, if the agent is deployed everywhere, you cannot end up with “forgotten” containers that are still running a vulnerable image after you have created a new image with the fix. The primary downside, of course, is that you have to have an agent on each host. This can potentially be a performance concern, and may not be supported by your provider if you’re using a container-as-a-service offering.
These approaches are not mutually exclusive, and some tools use both approaches. If you’re using containers, or planning to use containers soon, make sure you have a way to scan for vulnerabilities in the images and/or running containers and feed the results into an issue tracking system.
Dynamic application scanners (DAST)
Network vulnerability scanners run against network addresses, but dynamic web application vulnerability scanners run against specific URLs of running web applications or REST APIs. Dynamic scanners can find issues such as cross-site scripting or SQL injection by using the application or API like a user would. These scanners often require application credentials.
Some of the vulnerabilities found by dynamic scanners can also be blocked by Web Application Firewalls, as discussed in Chapter 6. That may allow you to put a lower priority on fixing the issues, but you should fix them fairly quickly anyway to offer security in depth. If the application systems aren’t configured properly, an attacker might bypass the WAF and attack the application directly.
Dynamic scanners can generally be invoked automatically on a schedule and when changes are made to the application, and feed their results into an issue tracking system.
Static code scanners (SAST)
Where dynamic application scanners look at the running application, static application scanners look directly at the code you’ve written. For this reason they’re a good candidate for running as part of the deployment pipeline as soon as new code is committed, to provide immediate feedback. They can spot security-relevant errors such as memory leaks or off-by-one errors that can be very difficult for humans to see. Because they’re analyzing the source code, you must use a scanner designed for the language that you’re using. Luckily, scanners have developed for a wide range of popular languages, and can be run as-a-service. One example is the SWAMP project, supported by the U.S. Department of Homeland Security.
The biggest problem with static scanners is that they tend to have a high false positive rate, which can lead to “security fatigue” in developers. If you deploy static code scanning as part of your deployment pipeline, make sure that it will work with the languages you’re using and that you can quickly and easily mask false positives.
Software Composition Analysis (SCA)
Arguably an extension of static code scanners, software composition analysis (SCA) tools look primarily at the open source dependencies that you use rather than the code you’ve written. Most applications today make heavy use of open source components such as frameworks and libraries, and vulnerabilities in those can cause big problems. SCA tools automatically identify the open source components and versions you are using, then cross-reference against known vulnerabilities for those versions. Some products can automatically propose code changes that use newer versions. In addition to vulnerability management, some products can look at the licenses the open source components are using to ensure that you don’t use components with unfavorable licensing.
SCA tools have helped mitigate some of the higher impact vulnerabilities in the past few years, such as those found in Apache Struts and the Spring Development Framework.
Interactive code scanners (IAST)
Interactive code scanners do a little bit of both static scanning and dynamic scanning. They see what the code looks like, and also watch it from the inside while it runs. This is done by loading the IAST code alongside the application code to watch while the application is exercised by functional tests, a dynamic scanner, or real users. IAST solutions can often be more effective at finding problems and eliminating false positives than either SAST or DAST solutions.
Just like static code scanners, the specific language and runtime you’re using must be supported by the tool. Because this is running along with the application, it can decrease performance in production environments, although with modern application architectures this can usually be mitigated easily with horizontal scaling.
Runtime application self-protection (RASP)
Although RASP sounds similar to the scanners described previously, it is not a scanning technology. RASP works similarly to IAST in that it is an agent deployed alongside your application code, but RASP is designed to block attacks rather than just detect vulnerabilities. Several products do both—detecting vulnerabilities and block attacks—making them both RASP and IAST products. Just as with IAST products, RASP products can degrade performance in some cases because more code is running on the production environment.
RASP offers some of the same protection as a distributed Web Application Firewall (WAF), because both block attacks in production environments. For this reason, RASP and WAF are discussed in Chapter 6.
Manual code reviews
Manual code reviews can be expensive and time-consuming, but can be better than application testing tools for finding many types of vulnerabilities. In addition, having another person explain why a particular piece of code has a vulnerability can be a more effective way to learn than trying to understand the results from automated tools.
Code reviews are standard practice in many high-security environments. In many other environments, they may be used only for sections of code with special significance to security, such as sections implementing encryption or access control.
Penetration tests
A penetration test (pentest) is performed by someone you’ve engaged to try to get unauthorized access to your systems and tell you where the vulnerabilities are. It’s important to note that automated scans of the types discussed earlier are not penetration tests, although those scans may be used as a starting point for a pentester. Larger organizations may have pentesters on staff, but many organizations contract with an external supplier for penetration tests.
Tip
Penetration tests by an independent third party are required by PCI DSS and FedRAMP moderate/high standards, and may be required for other attestations or certifications.
There are some disagreements on terminology, but typically, in “white box” pentesting you provide the pentester with information about the design of the system, but not usually any secret information such as passwords or API keys. In some cases you may also provide more initial access than an outside attacker would start with, either for testing the system’s strength against a malicious insider or for seeing what would happen if an attacker finds vulnerabilities in the outer defenses. In “black box” pentesting, you point the pentester at the application without any other information. An intermediate approach is “gray box” pentesting, where limited information is available.
White or gray box pentesting is often more effective and a better use of time than black box pentesting, because the pentesters spend less time on reconnaissance and more time on finding actual vulnerabilities. Remember that the real attackers will usually have more time than your pentesters do!
It’s important to note that a pentester will typically find one or two ways into the system, but not all the ways. A pentest with negative or minimal findings gives you some confidence in the security of your environment. However, if you have a major finding and you fix that particular vulnerability, you need to keep retesting until you come back with acceptable results. Pentesting is typically an expensive way to find vulnerabilities, so if the pentesters are coming back with results that an automated scan could have found, you’re probably wasting money. Pentesting is often done near the end of the release cycle, which means that problems found during pentesting are more likely to make a release late.
Automated testing often finds potential vulnerabilities, but penetration testing (when done correctly) shows actual, successful exploitation of vulnerabilities in the system. Because of this, you usually want to prioritize fixing pentest results above other findings.
Warning
Most cloud service providers require you to get approval prior to conducting penetration tests of applications hosted on their infrastructure or platform. Failure to get approval can be a violation of the provider’s terms of service, and may cause an outage depending on the provider’s response to the “intrusion”.
User reports
In a perfect world, all bugs and vulnerabilities would be discovered and fixed before users see them. Now that you’ve stopped laughing, you need to consider that you may get reports of security vulnerabilities from your users or through bug bounty programs.
You need to have a well-defined process to quickly verify whether the vulnerability is real or not, roll out the fix, and communicate to the users. In the case of a bug bounty program, you may have a limited amount of time before the vulnerability is made public, after which the risk of a successful attack increases sharply.
User reports overlap somewhat with incident management processes. If your security leaders are not comfortable dealing with end users, public relations, or legal issues, you may also need to have someone who specializes in communications and/or a lawyer to assist the security team in avoiding a public relations or legal nightmare. Often, a poor response to a reported vulnerability or breach can be much more damaging to an organization’s reputation than the initial problem!
Example tools for vulnerability and configuration management
Most of the tools listed in the previous sections can be integrated into cloud environments, and most cloud providers have partnerships with vendors or their own proprietary vulnerability management tools.
Because so many tools address more than one area, it doesn’t make sense to categorize them into the areas listed earlier. Here is a listing of some representative solutions in the cloud vulnerability and configuration management space, with a very brief explanation of each. Some of these tools also overlap with detection and response (Chapter 7), access management (Chapter 4), inventory and asset management (Chapter 3), or data asset management (Chapter 2).
I’m not endorsing any of these tools by including them, or snubbing other tools by excluding them; these are just some examples so when you get past the initial marketing blitz by the vendor you can realize, “Oh, this tool claims to cover areas x, y, and z.” I’ve included some tools that fit neatly into a single category, some tools that cover many different categories, and some tools that are specific to popular cloud providers. This is a quickly changing space, and different projects and vendors are constantly popping up or adding new capabilities.
In alphabetical order:
-
Ansible is an agentless automation engine that can be used for almost any task, including configuration management.
-
AWS Config checks the detailed configurations of your AWS resources and keeps historical records of those configurations. For example, you can check that all of your security groups restrict SSH access, that all of your EBS volumes are encrypted, or that all of your RDS database instances are encrypted.
-
AWS Inspector is an agent-based scanner that can scan for missing patches and poor configurations on Linux and Windows systems.
-
AWS Systems Manager is a security management tool that covers many areas including inventory, configuration management, and patch management. The State Manager component can be used to enforce configurations and the Patch Manager component can be used to install patches; both of these functions are executed by an SSM agent installed on instances.
-
AWS Trusted Advisor performs checks on several areas such as cost, performance, fault tolerance, and security. In the area of configuration management for AWS resources, Trusted Advisor can perform some high-level checks such as whether a proper IAM password policy or CloudTrail logging is enabled.
-
Azure Security Center is a security management tool that can integrate with partners such as Qualys and Rapid7 to pull in vulnerability information from those agents and consoles.
-
Azure Update Management is agent based and primarily aimed at managing operating system security patches, but can also perform software inventory and configuration management functions.
-
Burp Suite is a dynamic web application scanning suite.
-
Chef is an agent-based automation tool that can be used for configuration management, and the InSpec project specifically targets configuration related to security and compliance.
-
Contrast provides IAST and RASP solutions.
-
Google Cloud Security Command Center is a security management tool that can pull in information from the Google Cloud Security Scanner and other third party tools, and also provide inventory management functions and network anomaly detection.
-
Google Cloud Security Scanner is a DAST tool for applications hosted on Google App Engine.
-
IBM Application Security on Cloud is a SaaS solution that uses several IBM and partner products and provides IAST, SAST, DAST, and SCA.
-
IBM BigFix is an agent-based automation tool that can be used for configuration and patch management.
-
IBM Security Advisor is a security management tool that can pull in vulnerabilities from IBM Vulnerability Advisor as well as network anomaly information.
-
IBM Vulnerability Advisor scans container images and running instances.
-
Puppet is an agent-based automation tool that can be used for configuration management.
-
Qualys has products that cover many of the categories above, including network vulnerability scanning, dynamic web application scanning, and others.
-
Tenable has a range of products including the Nessus network scanner, agent-based and agentless Nessus patch and configuration management scanners, and a container scanner.
-
Twistlock can perform configuration and vulnerability management on container images, running containers, and the hosts where the containers run.
-
Whitesource is an SCA solution.
Tip
Statistically speaking, people are terrible at statistics. When you evaluate marketing claims, it’s important to use tools that have both reasonable false positive and false negative rates. As extreme examples, if a tool flags everything as a problem, it will catch every one of the real problems (100% true positive) but the false positive rate is so high that it’s useless. Similarly, if the tool flags nothing as a problem, its false positive rate is perfect (0%), but it has missed everything. Beware of marketing claims that focus on only one side of the equation!
Risk Management Processes
At this point in the process you should understand where the most vulnerable areas are in your environment, and what tools and processes you can use to find and fix vulnerabilities. Now you need a system to prioritize any vulnerabilities that can’t be fixed quickly, where “quickly” is usually defined as time periods in your security policy.
This is where a risk management program comes in, near the end of the pipeline shown in Figure 5-2. Each vulnerability you find that can’t be addressed within your accepted guidelines needs to be evaluated as a risk, so that you consciously understand the likelihood of something bad happening and the impact if it does. In many cases, you might accept the risk as a cost of doing business. However, the risk evaluation might lead to mitigation strategies, such as putting in some extra detection or prevention tools or processes. Risk evaluation might also lead to avoidance, such as turning off the system entirely in some cases.
A leak in the pipeline here means you found the vulnerabilities, but you couldn’t fix them right away and you also failed to actually understand how bad they could be to your business. A framework for evaluating risk, such as NIST 800-30 or ISO 31000, can be much easier than starting from scratch.
You don’t need a really complicated risk management program to get a lot of value; a simple risk register with an agreed-upon process for assigning severity to the risks goes a long way. However, you’re not finished with vulnerability management until you’ve made a conscious decision about what to do with each unresolved vulnerability. These decisions need to be re-evaluated periodically, such as quarterly, in case circumstances have changed.
Vulnerability Management Metrics
If you can’t measure how you’re doing with your vulnerability management program, you generally can’t justify its usefulness or know whether you need to make changes. Metrics are useful but dangerous things; they help drive continuous improvement and spot problems, but they can also lead to silly decisions. Make sure that part of your process of reviewing metrics and results includes a sanity check on whether there are reasonable extenuating factors to a metric going the wrong direction, or whether the metrics are being manipulated in some way.
There are many different metrics available for vulnerability management, and many tools can automatically calculate metrics for you. Metrics can generally be reported by separate teams or business units. Sometimes a little friendly competition helps motivate teams, but remember that some teams will naturally have a harder job to keep up with vulnerability management than others!
Every organization will be different, but here are some metrics that I’ve found useful in the past.
Tool coverage
For each tool, what percentage of the in-scope systems is it able to cover? For example, for a dynamic application scanner, what percentage of your web applications does it test? For a network scanner, what percentage of your cloud IP addresses does it scan? These metrics can help you spot leaks in your asset and vulnerability management pipeline. These metrics should approach 100% over time if the system scope is defined properly for each tool.
If you have tools with a really low coverage rate on systems or applications that should be in scope for them, you’re not getting much out of them. In many cases, you should either kick off a project to get the coverage percentage up, or retire the tool.
Mean time to remediate
It’s often useful to break this metric down by different severities and different environments. For instance, you may track by severity (where you want to see faster fixes for “critical” items than for “low-severity” items) and break those out by types of systems (internal or Internet-facing). You can then decide whether these time frames are an acceptable risk, given your threat model.
Remember that remediation doesn’t always mean installing a patch; it could also be turning off a feature so that a vulnerability isn’t exploitable. Mitigation through other means than patch installation should count correctly in the metrics.
Note that this metric can be heavily influenced by external factors. For example, when the Spectre/Meltdown vulnerabilities hit, patch availability was delayed for many systems, which caused MTTR metrics to go up. In that particular case, the delays didn’t indicate a problem with the vulnerability management program; it meant that the general computing environment got hit by a severe vulnerability.
Systems/applications with open vulnerabilities
This is usually expressed as a percentage, since the absolute number will tend to go up as additional items are tracked. This metric is often broken down by different system/application classifications, such as internal or Internet-facing, as well as the severity of the vulnerability and whether it’s due to a missing patch or an incorrect configuration.
Note that the patch management component of this metric will naturally be cyclical, because it will balloon as vulnerabilities are announced and shrink as they’re addressed via normal patch management processes. Similarly, changes to the benchmark may cause the configuration management component of this to temporarily balloon until the systems have been configured to match the new benchmark.
Some organizations measure the absolute number of vulnerabilities, rather than systems or applications that have at least one vulnerability. In most cases, measuring systems or applications is more useful than measuring the absolute number of vulnerabilities. A system that has one critical vulnerability poses about the same risk as a system with five critical vulnerabilities—either can be compromised quickly. In addition, the absolute number of vulnerabilities often isn’t much of an indication of the effort required to resolve all issues, which would be useful for prioritization. You might resolve hundreds of vulnerabilities in a few minutes on a Linux system with something like yum -y update; shutdown -r now.
This metric can also be used to derive higher-level metrics around overall risk.
Percentage of false positives
This metric can help you understand how well your tools are doing, and how much administrative burden is being placed on your teams due to issues with tooling. As mentioned earlier, with some types of tooling, false positives are a fact of life. However, a tool with too many false positives may not be useful.
Percentage of false negatives
It may be useful to track how many vulnerabilities should have been detected by a given tool or process, but were instead found by some other means. A tool or process with too many false negatives can lead to a false sense of security.
Vulnerability recurrence rate
If you’re seeing vulnerabilities come back after they’ve been remediated, that can indicate a serious problem with tools or processes.
Change Management
Many organizations have some sort of change management function. In its simplest form, change management should ensure that changes are made only after they’re approved, and that there has been some evaluation of the risk of making a change.
Change management can assist with vulnerability management, by making sure that proposed changes don’t introduce new security vulnerabilities into the system. If done poorly, change management can also hinder vulnerability management and increase overall risk, by slowing down the changes needed to resolve vulnerabilities.
As discussed earlier in the chapter, some of the new technologies in cloud environments may reduce the risk of an overall outage, so that less manual change management is needed to achieve the same level of operational risk. Part of an overall cloud vulnerability management program may be modifying change management processes.
For example, pushing new code along with security fixes to production may be a business-as-usual activity that’s automatically approved by a change control board, provided that there’s a demonstrated process for quickly getting back to a good state. That might be accomplished by pushing another update, rolling back to a previous version, or turning off application traffic to the new version while the issue is being worked. However, larger changes, such as changes to the design of the application, may still need to go through a manual change management process.
Ideally, there should be at least one security practitioner involved with the change control process, either as a change control board member or as an advisor.
Tip
A documented change management process is required for several industry and regulatory certifications, including SOC 2, ISO 27001, and PCI DSS.
Putting it all together in the Sample Application
Remember the really simple three-tier sample application from Chapter 1? It looked like Figure 5-3.
Figure 5-3. Diagram of a sample application
If you’re in an orchestrated, container-based microservice environment, with test and production Kubernetes clusters (Figure 5-4), your sample application may look a bit different. However, you can still spot the same three main tiers in the middle of the diagram.
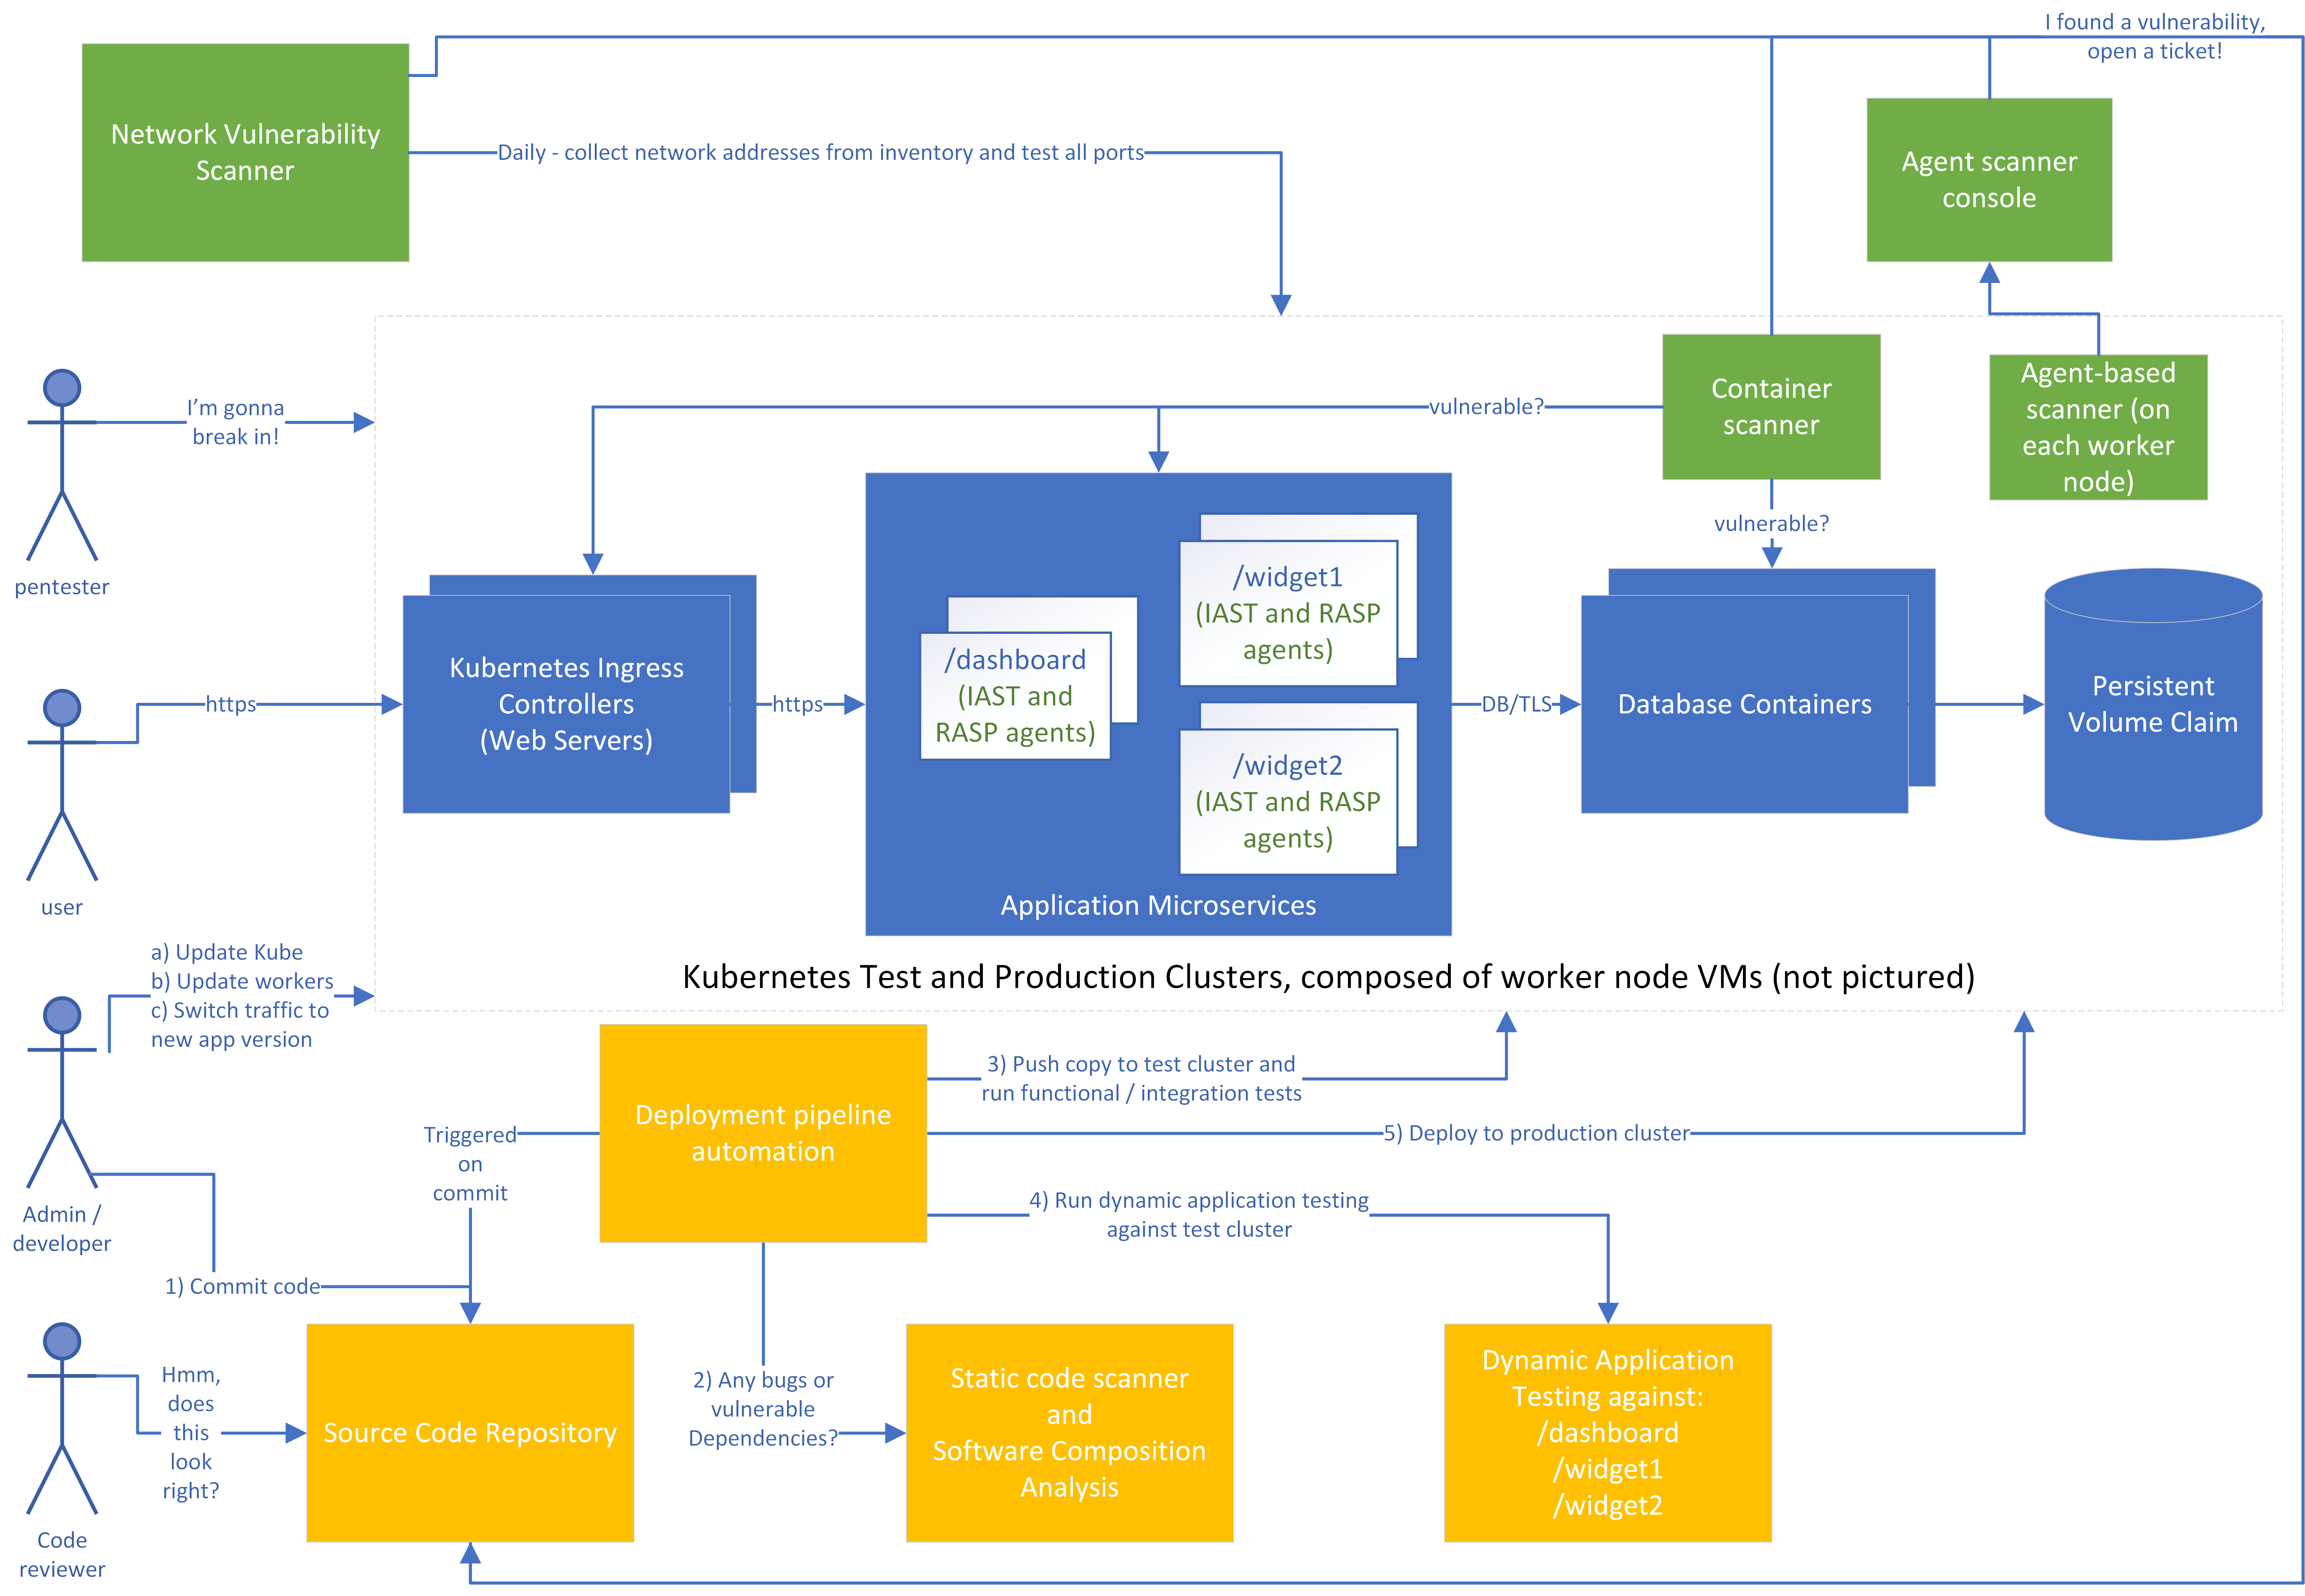
Figure 5-4. Diagram of a sample microservice application
For simplicity, the worker nodes that actually run the containers aren’t shown on the diagram, and only one cluster is pictured rather than separate test and production clusters. Let’s look at how we might design a vulnerability management process in this environment. First, consider the roles shown on the left:
-
Before deployment, a penetration tester (pentester) tries to break in to the system, just like a real attacker would. This might be run by an external team that’s contracted to test this specific system at a given time, an internal red team that roams around doing unannounced testing of systems, or both.
-
The user will use the application, just as in the previous examples. In some cases, end users may report security vulnerabilities in addition to functional bugs.
-
The admin/developer is a role with both development and operations/administration responsibilities. In your organization, these responsibilities might lie with a single person or multiple teams, but the people and teams filling this role must:
-
Ensure that the infrastructure and platform components are up to date, such as the Kubernetes master and the worker nodes.
-
Make code updates. Note that these code updates might also represent changes to the infrastructure, such as new microservices or modifications to the “firewall” for each microservice to allow different connections.
-
Push to production and/or switch traffic to the new version of the application. The process and decision of when to do this will be organization-specific, but should usually include business stakeholders in addition to IT staff.
-
-
The code reviewer may be part of a separate team, but is often simply another developer in the organization. Not every organization uses manual code reviews, but it can be a good way to spot security vulnerabilities in critical areas of code.
Second, let’s look at the pipeline to deploy, in yellow:
-
An admin/developer will commit a change to the codebase, which will trigger the deployment pipeline automation.
-
A static code scanner will flag problems in your proprietary code, such accepting input without validation. A Software Composition Analysis tool will also look at any open source dependencies to see if there are known vulnerabilities in them. Ideally, the developer will get almost immediate feedback if an issue is found, and issues that are severe enough will block deployment of the new code unless overridden.
-
The automation will then start up a copy of the new code in a test environment and run test cases to see that the code functions.
-
The automation will invoke a dynamic application tester to find any problems. Again, ideally the developer will be notified of any issues here, and severe issues will stop the process.
-
If all tests pass, the code will be deployed as a new instance to production, where the administrator can choose to direct some or all of the production traffic to the new instance. If everything works fine, all traffic can be sent to the new instance and the old instances can be deleted.
Third, let’s look at the periodic scanning tools in green. For each of these, if a problem is found, a ticket will automatically be entered as issues in a tracking repository (shown here as part of the source code repository), and will go through the risk management process if they stay around for too long.
-
The network vulnerability scanner will test all of the TCP and UDP3 ports on the IP addresses of the worker nodes that make up the cluster. In a well configured cluster, the scanner should only see the HTTPS (tcp/443) ports open, but it may find problems with those (such as a vulnerable version of a web server or a configuration allowing weak TLS ciphers). It may also spot nodeports opened accidentally that allow traffic in to some other service besides the front end web server. For example, perhaps someone accidentally left the database open to the Internet instead of only to the application microservices!
-
The container scanner will look at each running container to find problems with the containers. Perhaps the operating system components used by the containers have known vulnerabilities, such as binary libraries that can’t be detected by the Software Composition Analysis tools.
-
The agent installed on each worker node (virtual machine) in the cluster will watch to make sure that the operating system components are kept up to date and the CIS benchmarks for that operating system pass.
-
Finally, the IAST agent that’s part of each microservice will notify its console (not pictured) of problems found while the code was executing, and the RASP agent will attempt to block attacks.
There’s a lot going on! Don’t panic, though. This is for educational purposes, and many smaller environments won’t need all the tools pictured here. Also, many products perform multiple functions in the same tool: for example, a single tool might perform static scanning, dynamic scanning, and IAST/RASP. The important thing is to understand what the different types of tools do, so that you can select tools that address your biggest threats.
Just buying a tool and installing it often doesn’t do much unless you actually do something with what the tool is telling you. Concentrate on getting a good feedback loop back to your developers and administrators, that you can measure with some useful metrics, before adding another tool into the mix.
Summary
Vulnerability management, patch management, configuration management, and change management are separate disciplines in their own right, with separate tooling and processes. In this chapter, I’ve combined them together to quickly cover the most important aspects of each, but there are entire books written on each subject.
Vulnerability management in cloud environments is similar in many ways to on-premises vulnerability management. However, with cloud often comes a heightened business focus on rapid deployment of new features. This leads to a need for vulnerability management processes that can keep up with quickly changing infrastructure.
In addition, the philosophies of immutable infrastructure and continuous delivery are often adopted along with cloud, and these can considerably reduce the risk of an outage due to a change. This alters the balance between operational and security risk. Because applying security fixes is a change, and you can make changes more safely, you can afford to roll out security fixes more aggressively without risking bringing the system down. This means that you should usually adopt different vulnerability management, patch management, and change management processes in cloud environments. In addition, there are both cloud-aware and provider-specific tools that can make vulnerability management easier than on-premises.
After access management, vulnerability management is the most critical process to get right for most cloud environments. Attackers can get unauthorized access to your systems through vulnerabilities at many different layers of your application stack. You need to spend some time understanding the different layers, what your vulnerability management responsibility is for each of those layers, and where the biggest risks to your environment are likely to be. You then need to understand the different types of vulnerability management tools available and which ones address the areas that are highest risk for you.
Every vendor will try to convince you that their tool will do everything for you. That’s rarely the case; you’ll usually need at least a few different tools to cover vulnerability management and configuration management across your cloud environment. However, focus on getting value from each tool before throwing more into the mix. For each tool, you should be able to explain clearly what types of vulnerabilities it will find. You should also be able to sketch out a pipeline of how the tool gets valid inputs, how it finds and/or fixes vulnerabilities, how it communicates vulnerabilities back to the teams who are responsible for fixing them, and how you track the vulnerabilities that can’t be fixed right away as risks.
1 Perhaps one that included wearing boots.
2 One of the barriers to vulnerability scanning is that if you actually find a vulnerability, sometimes the scan will crash the affected component. Sure, you found a problem, but at the cost of incurring downtime! The risk of an outage is much lower if the scan can only crash one of the instances of the application at a time.
3 UDP scanning, like any other UDP communications, are somewhat unreliable by design.