Table of Contents for
Programming Alexa Skills
 Programming Alexa Skills
Published by
O'Reilly Media, Inc., 2019
Programming Alexa Skills
Published by
O'Reilly Media, Inc., 2019
- The Tools You Need and Where to Find Them
- Contents
- Getting Familiar with the Alexa Skills Kit (ASK)
- Pick Your Hosting Platform Carefully
- My City Facts – Designing Your New Skill
- Building the MyCity Facts Skill as an AWS Lambda Function
- Building the MyCity Facts Skill as an ASP.NET Web API Service Hosted in Microsoft Azure
6
Building the MyCity Facts Skill as an ASP.NET Web API Service Hosted in Microsoft Azure
Welcome to chapter 6: Building the MyCity Facts Skill as an ASP.NET Web API Service Hosted in Microsoft Azure.
After creating and deploying the skill, I’ll cover publishing it for others to enable and use. If you worked through the previous chapter, you can probably just skin that part.
Implementing Your Design
You created a complete design for your MyCity Facts skill in Chapter 4, and you’ve already created it as an AWS Lambda Function, so this time you will be creating an ASP.NET Web API Service project and then publishing it to Microsoft’s Azure cloud-hosting platform to serve as the backend to your skill.
Download the Skill Files
As mentioned in Chapter 5, the projects in this book can be downloaded from GitHub as a .ZIP file at the following address: http://bit.ly/2yHPsg6 (This file has all of the projects, so you only need to download it once.)
All of the necessary files for the MyCity Facts skill can be found in the AlexaBookRepo project on GitHub, here: http://bit.ly/2AvABF8 (and shown in Figure 6-1.)
If you downloaded a local copy, you can extract the files to the location of your choosing. The files for this project are in the AlexaBookRepo-master/MyCityFacts-AZURE folder.
The architecture for this project significantly different than the previous one. There are a lot more moving parts in this chapter’s solution, so I’m going to walk you through the creation of the project and files, rather just reviewing an existing solution like in the previous chapter.

Figure 6-1: The MyCityFacts-AZURE GitHub Repo
Getting Started
I’m using Microsoft Visual Studio Community 2017 for this project. In addition to being free, it’s an excellent IDE with lots of features, and it makes the deployment to Azure about as close to painless as you can get. If you haven’t already downloaded it, take a look at Chapter 1 for more information on where to find it.
Once you’re up and running in VS2017, perform the following steps to create a new ASP.NET Web API solution.
- Create a new project (File – New – Project)
- Select “ASP.NET Web Application (.NET Framework) – Visual C#” from the New Project dialog (Figure 6-2.) If you can’t find it, make sure you’re looking under the Visual C#/Web templates.
- Give your project a name and a place to live, and then click the OK button.
I usually try to keep all of my projects as close to the root as possible, like: C:\Code\ProjectName or something like that. Saving projects to the desktop can occasionally cause unforeseen issues down the road. When in doubt, let simplicity prevail.
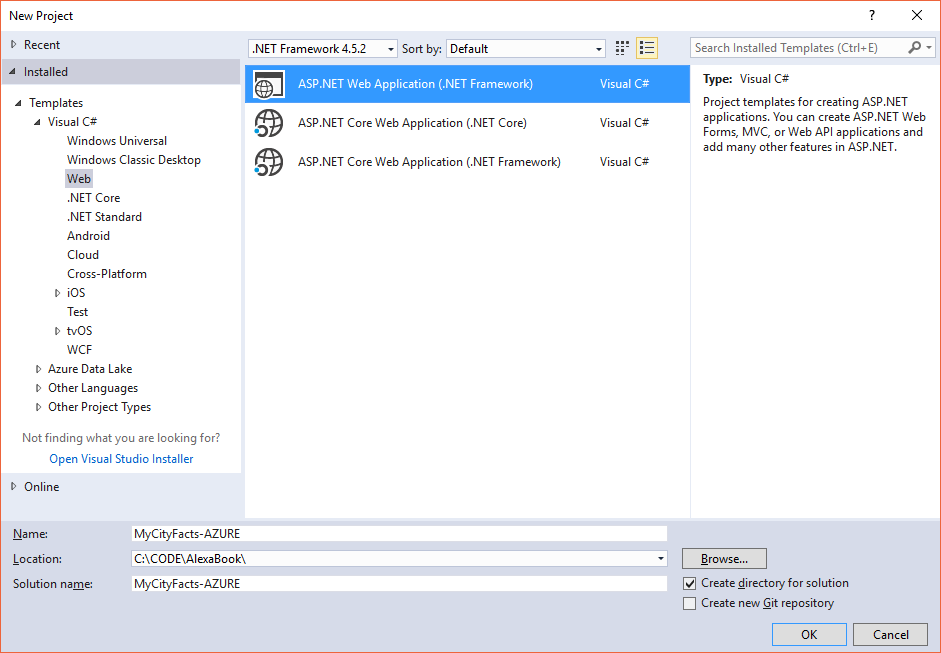
Figure 6-2: The New Project Dialog
I used MyCityFacts-AZURE to distinguish this project from the AWS Lambda-based project in Chapter 5, but you aren’t required to do that.
- Select the Web API template in the next dialog (Figure 6-3) and make sure the MVC and Web API checkboxes are selected, and then click the OK button.
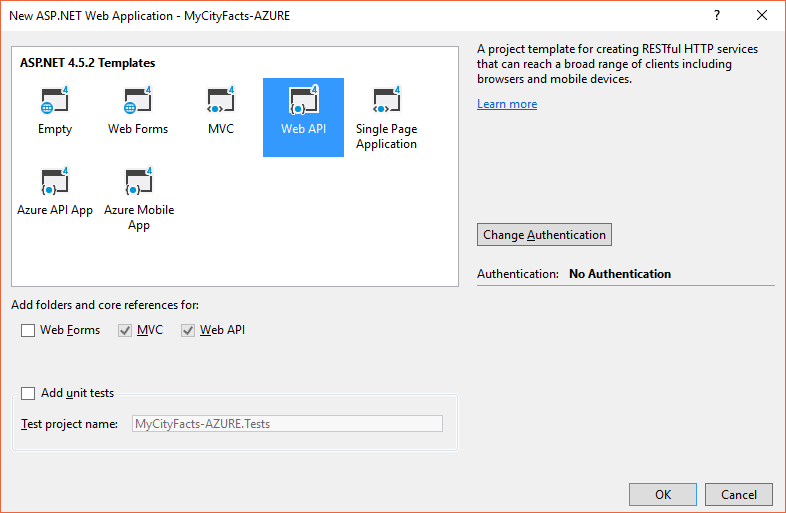
Figure 6-3: New ASP.NET Web Application Dialog
Once you’ve done that, take a sip of your coffee while VS2017 creates your project infrastructure. It’ll only take a few seconds and you’ll be ready to roll.
SpeechAssets
If you’ve been working through the chapters as we go, this should be familiar territory for you. The SpeechAssets folder is where we put the Intent Schema and Sample Utterances files we designed in Chapter 4.
This time, instead of being at the very top of the repo, I’ve put the SpeechAssets folder inside the MyCityFacts-AZURE project.
In the Solution Explorer (Figure 6-4) you can see a complete hierarchy of files in the project.
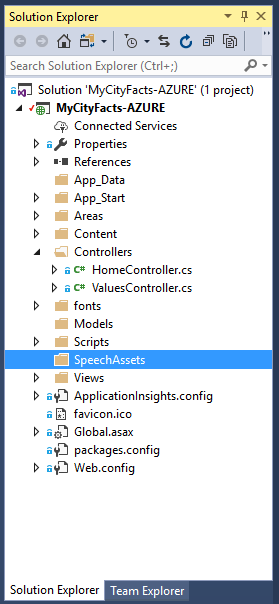
Figure 6-4: VS2017 Solution Explorer
If you’re working along with the book, you’ll need to add this folder manually.
- Create a SpeechAssets folder under the MyCityFacts-AZURE project for your IntentSchema.json and SampleUtterances.txt files.
- Right-Click on the folder you just created and click Add – Existing Item and navigate to where you downloaded the files from GitHub. Select them and Visual Studio will copy them into the right location in your folder structure and add them to the Solution Explorer.
If you didn’t download the project files, you can easily view them on GitHub and copy/paste the contents into the appropriate file within VS2017. You’ll just need to Add – New Item for each of them (a .json file and a .txt file) inside the SpeechAssets folder.
We’ll come back to these in a bit.
Web API
We’re using the ASP.NET Web API template for this project, and the Model View Controller (MVC) Pattern. This means that to serve requests for our skill, we’ll need a controller.
To add a new controller to this project, do the following:
- Right-click on the Controllers folder in the Solution Explorer window.
- Select Add – Web API Controller Class (v2.1), as shown in Figure 6-5.
- Give it a name. I named mine MyCityFactsController.
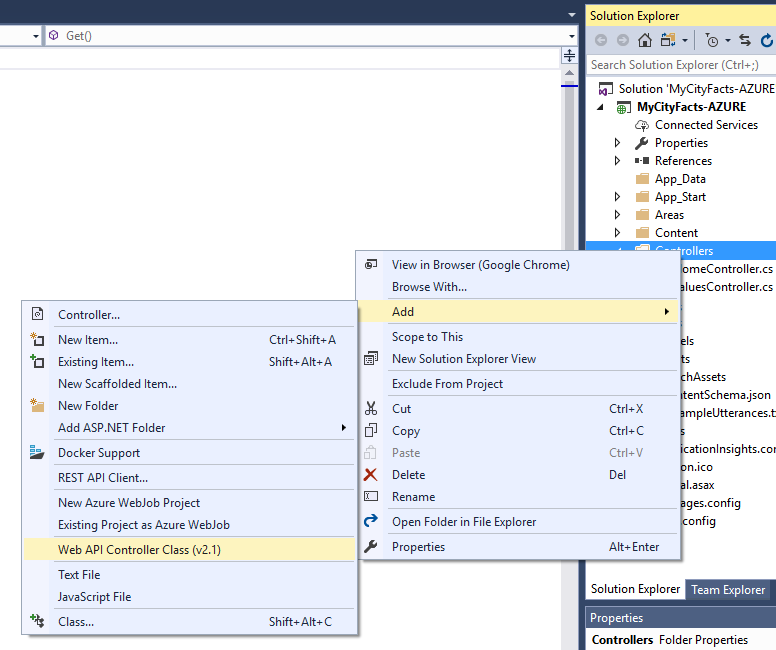
Figure 6-5: Adding a New Controller
When you create a new controller in this fashion, VS2017 will automatically do some of the wiring-up behind the scenes for you.
Take a look at your MyCityFactsController class and you’ll see some stubbed out commands: the usual GET, POST, PUT, and DELETE verbs. We won’t be using all of them, but it’s a great that VS2017 gives you a populated class template to work from as a starting point.
using System;
using System.Collections.Generic;
using System.Linq;
using System.Net;
using System.Net.Http;
using System.Web.Http;
namespace MyCityFacts_AZURE.Controllers
{
public class MyCityFactsController : ApiController
{
// GET api/<controller>
public IEnumerable<string> Get()
{
return new string[] { "value1", "value2" };
}
// GET api/<controller>/5
public string Get(int id)
{
return "value";
}
// POST api/<controller>
public void Post([FromBody]string value)
{
}
// PUT api/<controller>/5
public void Put(int id, [FromBody]string value)
{
}
// DELETE api/<controller>/5
public void Delete(int id)
{
}
}
}
There are a couple of approaches you can take when developing an Alexa skill in C#.
Depending on the architectural needs of the skill, you could build a complex highly scalable n-tier enterprise architecture, or at the other end of the spectrum, you could create a lightweight dynamic C# object that returns the JSON response message your skill needs in order to communicate with Alexa.
I’m a big fan of taking the simplest possible approach that meets the needs of your project, so in this chapter we’ll be creating a dynamic C# object which affords us a few benefits: it’s simple, lightweight, and we can format the message in code to look exactly like the JSON message.
Take a look at the following JSON response, which was generated by our AWS Lambda Alexa Skill:
{
"version": "1.0",
"response": {
"outputSpeech": {
"ssml": "<speak> Here is your fact. The summer carnival is
MyCitys most popular event and raises enough money
to fund the volunteer fire department every year.
</speak>",
"type": "SSML"
},
"speechletResponse": {
"outputSpeech": {
"ssml": "<speak> Here is your fact. The summer carnival is
MyCitys most popular event and raises enough money
to fund the volunteer fire department every year.
</speak>"
},
"shouldEndSession": true
}
},
"sessionAttributes": {}
}
Using a dynamic object, the syntax varies a little bit, but we can format the code to look very close to the message we want to send:
return new
{
version = "1.0",
response = new
{
outputSpeech = new
{
type = "SSML",
text = "<speak>Here is your fact. The summer carnival is
MyCitys most popular event and raises enough money
to fund the volunteer fire department every year.
</speak>"
},
card = new
{
type = "Simple",
title = "MyCity Fact",
content = "<speak>Here is your fact. The summer carnival is
MyCitys most popular event and raises enough money
to fund the volunteer fire department every year.
</speak>"
},
shouldEndSession = true
},
sessionAttributes = new {}
};
In this case, I’ve hardcoded the response for example purposes, but in the code you’ll randomly select a MyCity Fact to inject into the dynamic object, and return to Alexa.
In the previous chapter’s AWS Lambda example, AWS handled the responsibility of creating the JSON request and response documents and ensuring compliance with their standards.
Since you will be creating the response manually, you need to be aware of the following size limitations for the JSON response:
- outputSpeech response can’t exceed 8000 characters.
- of the text included in a card can’t exceed 8000 characters. This includes the title, content, text, and image URLs.
- image URL (smallImageUrl or largeImageUrl) can’t exceed 2000 characters.
- token included in an audioItem.stream for the AudioPlayer.Play directive can’t exceed 1024 characters.
- URL included in an audioItem.stream for the AudioPlayer.Play directive can’t exceed 8000 characters.
- total size of your response can’t exceed 24 kilobytes.
If your response exceeds these limits, the Alexa service returns an error at deployment time.
Now that you have an idea of what a proper response should look like, it’s time to jump back in to VS2017 and start working on the controller you created.
To get started, delete all of the code inside the MyCityFactsController class. It should look like this:
using System;
using System.Collections.Generic;
using System.Linq;
using System.Net;
using System.Net.Http;
using System.Web.Http;
namespace MyCityFacts_AZURE.Controllers
{
public class MyCityFactsController : ApiController
{
}
}
We’ll start with defining the array our MyCity Facts will live in. Much like the AWS project in the previous chapter, we’ll also throw in some code to randomly select one fact and return a string.
Get Random Facts
Add the GetRandomFact() method inside your MyCityFactsController class:
private string GetRandomFact()
{
var RNG = new Random();
var Facts = new string[] {
"MyCity has a population of 123,456 people, 11 bears, 3 alligators, and 7,134 cats.",
"MyCity has several popular attractions, including 3 lakes, 2 mountains, and a 400 acre wildflower sanctuary. On a nice day, you can see the bears playing among the wildflowers, but dont get too close.",
"MyCity was founded in 1873 by settlers who got lost on their way from Virginia to California and decided to stay put and make the best of it.",
"The mayor of MyCity is YourName Goes Here. This is the 14th consecutive term for Mayor Here.",
"MyCity holds a record in the Guinness Book of World Records for the largest man-made neon star on top of a mountain.",
"City Hall has had three locations since first being constructed in 1902. The first move was due to extensive damage from the great flood of 1937, and the second move was due to the needs of the administration outgrowing the previous facilities. This move occurred in 1992, and City Hall now resides at the intersection of Hill Street and Mountain View Blvd.",
"The summer carnival is MyCitys most popular event and raises enough money to fund the volunteer fire department every year.",
"MyCity is home to 237 pizza restaurants, 9 fast food establishments, and 1 frozen banana stand, which is open from the beginning of July to the end of September.",
"One of the prettiest places on Earth, MyCity has four perfect seasons of exactly 3 months each. The leaves change every fall, and winter offers exactly 22.4 inches of snowfall every year. Average summer temp is 76.8, every year.",
"The Mascots are the official football team of MyCity. This is also the name of the local baseball team, basketball team, and soccer team."
};
return Facts[RNG.Next(0, Facts.Length - 1)];
}
The array is pretty straightforward code, and we covered the Random function in the previous chapter. So let’s move on.
Intent Dispatcher
The next function we’ll build is a dispatcher to examine the type of Intent being invoked, and respond accordingly. Add the following IntentDispatcher() method to your controller class:
private void IntentDispatcher(dynamic request)
{
var intentName = "";
if (request != null)
{
intentName = (string)request.request.intent.name;
}
This first part takes a look at the incoming request and makes sure it isn’t null before trying to navigate the JSON to get the intent name. Doing so against a null will blow up, so if it is null we just leave intentName as an empty string, and move on to the switch statement below, which knows how to handle it.
switch (intentName)
{
case "GetMyCityFactIntent":
speech = "Here is your fact: " + GetRandomFact();
break;
case "AMAZON.CancelIntent":
case "AMAZON.StopIntent":
speech = "OK";
break;
case "AMAZON.HelpIntent":
default:
speech = "You can ask for a fact by saying, tell me a fact.";
reprompt = "Try it! Just say tell me a fact.";
break;
}
}
This may look a little odd if you aren’t familiar with C#, but we essentially have 3 scenarios here: a fact request, a cancel or stop request, and a help request. The default case is paired up with help so if the service can’t understand your request, it will roll over to the help message.
In the GetMyCityFactIntent case, you’re calling the GetRandomFact() method you just created, and then returning a concatenated string with the message for Alexa.
Now it’s time to build the entry point to the controller.
The Alexa Voice Service requires the response message from your service to be sent as a POST request (not a GET), so that’s what we’ll be doing.
Handle Requests
Add a HandleRequest() method inside your controller class, to handle your incoming requests, and start it off with a call to the IntentDispatcher() method you just created:
[HttpPost, Route("api/alexa/MyCityFacts")]
public dynamic HandleRequest (dynamic request)
{
IntentDispatcher(request);
}
Notice the attributes, just above the method declaration. The [HttpPost] attribute marks this method as returning a POST request to whoever called the service, and the [Route] attribute defines the path by which this method will be called.
I talked a little bit already about returning a dynamic object, which you can see in the return type for this method, but we’re also accepting a dynamic object, so we don’t have to strongly type anything (and because Amazon could change the message at any time.)
Inside your HandleRequest() method, add the following barebones dynamic object:
return new
{
version = "1.0",
response = new
{
outputSpeech = new {},
card = new {},
shouldEndSession = false
},
reprompt = new
{
outputSpeech = new {},
shouldEndSession = false
},
sessionAttributes = new {}
};
It’s mostly empty right now, but we’ll get to that in a moment.
Inside the response object, you have two objects: outputSpeech and card, which contain the content for the voice response and the visual response (for the Echo Show and Alexa phone app), respectively.
The response object also contains the shouldEndSession property which you’ve seen before.
Many Alexa skills are “one and done” type interactions. You’ve seen the type: ask a question, get an answer, the end.
The shouldEndSession property tells Alexa whether or not to keep listening for a response and that’s the key to really opening up the interactive user experience.
Our outputSpeech object will contain two properties: type and text, and the card object will contain three properties: type, title, and content.
Go ahead and update both objects to look like the following:
outputSpeech = new
{
type = "PlainText",
text = speech
},
card = new
{
type = "Simple",
title = "MyCity Fact",
content = speech
},
See the speech variable? That will contain the actual content of the message, which will be returned from the BuildOutSpeech() method (which called the GetRandomFact() method.)
At this point, you’ve got a couple of errors to fix, so let’s address them by defining the speech and reprompt variables up at the top of the MyCityFactsController class, just like this:
public class MyCityFactsController : ApiController
{
String speech = "";
String reprompt = "";
I’m sure you’ve noticed in addition to the top-level response object, there’s also a reprompt object which will contain the secondary message that Alexa will deliver if the user doesn’t respond when prompted.
Update the reprompt object to look like this:
reprompt = new
{
outputSpeech = new
{
type = "PlainText",
text = reprompt
},
shouldEndSession = reprompt.Length > 0 ? false : true
},
One thing you should notice is that both the response and reprompt objects contain a shouldEndSession flag. When reprompting the user, we give them an opportunity to respond by setting this flag to false.
There’s one last thing to do, and that’s to go back to your response object, and update the shouldEndSession flag to look just like the one in the reprompt object:
shouldEndSession = reprompt.Length > 0 ? false : true
This code, and the identical line in the reprompt object, will look to see if the reprompt message actually contains anything, which implies you’ve received a Help Intent request, and then sets the shouldEndSession flag to false (meaning Alexa will wait for a response.)
Wow, we did a lot of stuff, so let’s recap.
You created a Web API project and added a MyCityFactsController.
This controller will accept requests from Alexa and run them through the HandleRequest() method, where they are passed to the Intent Dispatcher to determine the type of intent being invoked.
Then your response message is created and injected into the dynamic JSON message, and finally returned to Alexa.
Fire It Up
In VS2017, go ahead and start your Web API project by clicking the Start button (the green triangle icon) or by hitting F5. The first time you do this, it may take a moment to build and load everything, but eventually you should be staring at a web page with ASP.NET in huge letters at the top.
Click the API link in the black menu bar at the top of the page and you’ll be looking at the ASP.NET Web API Help Page.
Under MyCityFacts you will see the entry for the api/alexa/MyCityFacts POST request. Go ahead and click on that link and you’ll see the Request Information page for the MyCityFacts POST request.
At this point, the code is complete and running, so let’s push it up to Azure for some testing.
Deploying to Azure
In order to publish to Azure, you’ll need an account.
If you don’t have one, you can go to www.azure.com and sign up for one for free, and depending on what promotions they are running at the time, you can usually get the first 12 months free for most of their services.
Once you have an account, you can publish your project directly from VS2017.
In the Solution Explorer, right-click on your project name (NOT the solution name) and select Publish from the context menu, as shown in Figure 6-6.
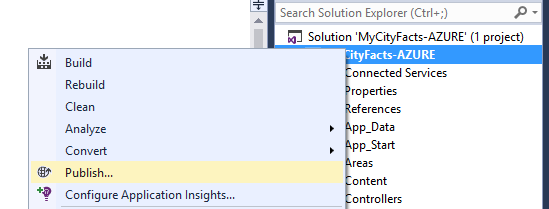
Figure 6-6: Publishing your Project
In the dialog that follows (Figure 6-7), select the Microsoft Azure App Service icon, and select the Create New radio button before clicking Publish to proceed.
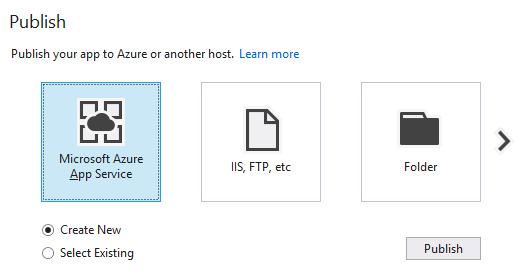
Figure 6-7: Select a Publishing Host
Next you will see the Create App Service dialog (Figure 6-8) where you will:
- Enter your Microsoft account credentials (upper right) if you aren’t already logged in.
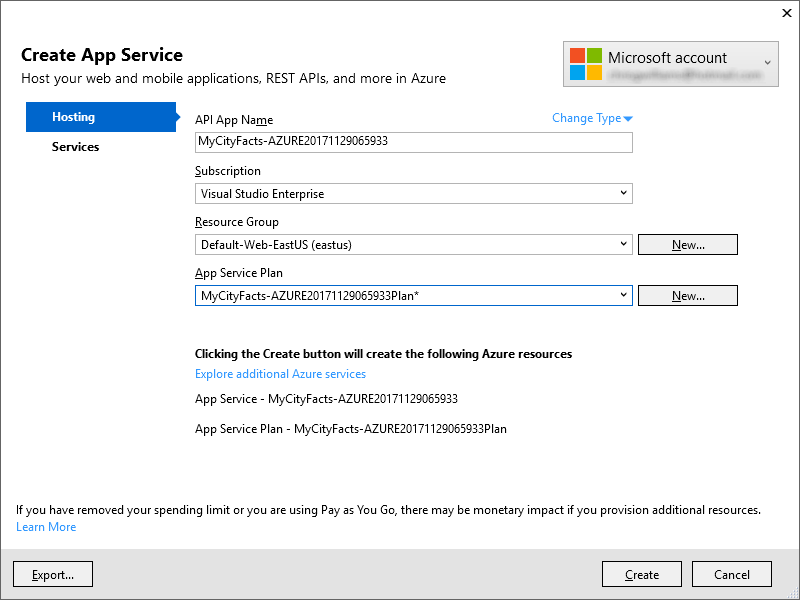
Figure 6-8: Create App Service Dialog
- Select API App from the Change Type dropdown.
- Select or Create your resource group and app service plan.
If you just created your Azure account, you’ll need to select your resource group, and create your app service plan. You will want to select a location geographically close to you. 1. Click the Create button.
Make note of the warning message at the bottom of this dialog. Any time you publish a new resource, depending on your plan, there may be a monetary impact. If you just signed up, you shouldn’t have anything to worry about though.
Your App Name and Plan Name will vary a bit from mine, as the number appended is generated from the date and time it’s created.
Once you click the Create button, it can take a few moments. Your project is being built, uploaded to Azure, and then the starting web page is loaded into your default browser.
When the page finishes loading, it should look just like when you ran it in VS2017.
So far, so good? Awesome… let’s keep going and test it out.
Testing
There’s no UI for your controller, but you can get a response by adding /api/alexa/mycityfacts to the end of your Web API Service Address.
You’re going to get an error stating that the requested resource does not support the GET method, which is expected because we only accept POST requests.
Unfortunately, you can’t do a POST call straight from the address bar, so for that we’re going to be using a 3rd party tool called Swagger.
Before you do that, go ahead and grab a copy of the full URL from your address bar (including the /api/alexa/MyCityFacts part.)
Swagger
Swagger is a collection of tools that help you build and test RESTful APIs. You might have heard of Postman, which is a similarly great tool, but I’m going to focus on Swagger. (If you already have Postman, feel free to use that if you prefer.)
We’re going to use the Swagger Inspector (Figure 6-9) to test the controller, so head over to http://inspector.swagger.io to get started. This will allow us to craft a request to send to our controller, and see what gets sent back.
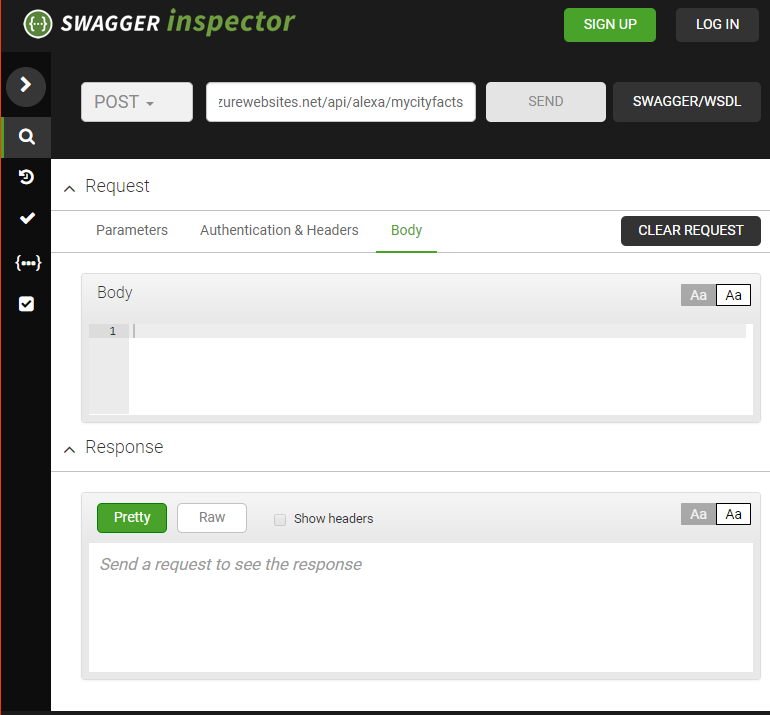
Figure 6-9: The Swagger Inspector
Since the HandleRequest() method is expecting a POST request, make sure the dropdown is set to POST and not GET (the default), otherwise you’ll get the same error message as when you tried to access it via the browser.
Next, paste the URL you copied into Swagger’s address bar (not the browser address bar) and hit the SEND button.
Take a look at the Response box. Click the Pretty button (no, really, that’s what it’s called) if it isn’t already, and you should be looking at a response like this:
{
"version": "1.0",
"response": {
"outputSpeech": {
"type": "PlainText",
"text": "You can ask for a fact by saying, tell me a fact."
},
"card": {
"type": "Simple",
"title": "MyCity Fact",
"content": "You can ask for a fact by saying, tell me a fact."
},
"shouldEndSession": false
},
"reprompt": {
"outputSpeech": {
"type": "PlainText",
"text": "Try it! Just say tell me a fact."
},
"shouldEndSession": false
},
"sessionAttributes": {}
}
This is the desired result when our skill gets a request it doesn’t understand. If you recall, the switch statement shunts anything that doesn’t match an intent into the Help intent. Since we didn’t actually put anything in our request, it was null, and handled accordingly.
To test it further, let’s mock up a simplified request. Click the Body tab on the Request box, paste this in and click the SEND button:
{
"session": {},
"request": {
"type": "IntentRequest",
"intent": {
"name": "AMAZON.HelpIntent",
"slots": {}
}
}
}
You should get the exact same result with AMAZON.HelpIntent as the previous test.
Pretty boring, right? Ok, now try this… in the name field, change the value to each of your other intents and hit the SEND button for each:
AMAZON.StopIntent
AMAZON.CancelIntent
GetMyCityFactIntent
When you get to the last one, click the SEND button a few times and watch your city fact change.
Looks like everything is working as expected, so let’s move on. It’s time to set up your skill in Amazon’s Alexa Dashboard.
There are a couple ways we can approach this next step.
If you worked all the way through Chapter 5, you can opt to just edit your existing skill to point to your Azure service. I’ll cover that first, because it’s super short.
Otherwise, you can skip to the Add a New Skill section and continue from there.
Edit Your Existing Skill
Pull up your existing Alexa skills on the Amazon Developer Console (located at: https://developer.amazon.com/edw/home.html#/skills) and select the skill you wish to edit.
If your skill has been through the certification process and is currently published, you won’t be able to edit it until you click the grey Go to development button at the bottom of the page.
Don’t worry! Clicking the Go to development button on a live skill won’t automatically yank your skill out of production. Even if you make changes and resubmit for certification, the skill will remain live until the new version passes certification and replaces it.
Configuration
Select the Configuration section and update the Endpoint section as follows:
| Service Endpoint Type | HTTPS |
|---|---|
| Default | Your Azure Web API URL |
One quick gotcha here: Make sure your URL has HTTPS (not HTTP) at the beginning, or Amazon will give you a very confusing error about the length of your URL and won’t let you proceed.
Test
Since you’ve changed your service, the test tab will become available again, and even though you tested your intents in Swagger, it’s a good idea to test them here as well.
Under the Service Simulator:
| Enter Utterance | Give Me A Fact |
|---|---|
| Enter Utterance | Help |
| Enter Utterance | Stop |
The Service Simulator will display the JSON Request and the corresponding JSON Response from your service. There shouldn’t be any surprises here.
You can also click the Listen button under the Response box to hear Alexa read your response.
Add a New Skill
The next thing you need to do is add a new skill in your Alexa Skills Kit dashboard (located at: http://amzn.to/2qiiCjJ).
I’m not going to walk through every screen step by step again, since I just covered this process in Chapter 5, but I will highlight anything significant.
Skill Information
| Skill Type | Custom Interaction Model |
|---|---|
| Name | Azure City Facts |
| Invocation Name | Azure City Facts |
Invocation Names should be short & easily distinguishable, and Amazon recommends using no more than 3 words, so we’re changing this one up a little to distinguish it from the previous project.
Interaction Model
Add the contents of your IntentSchema.json and SampleUtterances.txt files on this page. They are available in the GitHub repo for this project.
Configuration
| Service Endpoint Type | HTTPS |
|---|---|
| Default | Your Azure Web API URL |
Again, make sure your URL has HTTPS (not HTTP) at the beginning, or Amazon will give you a very confusing error about the length of your URL and won’t let you proceed.
SSL Certificate
Here’s something you didn’t have to worry about with AWS. Good news though, you don’t have to worry about it here either, because Azure takes care of it for you.
| Certificate for DEFAULT Endpoint | OPTION 2: My development endpoint is a sub-domain of a domain that has a wildcard certificate from a trusted certificate authority. |
|---|---|
Test
Under the Service Simulator:
| Enter Utterance | Give Me A Fact |
|---|---|
| Enter Utterance | Help |
| Enter Utterance | Stop |
Just like in Chapter 5, the Service Simulator will display the JSON Request and the corresponding JSON Response from your service. We’ve already tested these intents in Swagger, so there shouldn’t be any surprises here.
You can also click the Listen button under the Response box to hear Alexa read your response.
Publishing Information
- don’t really recommend publishing this skill as-is. However, if you have modified the project and put in facts about your own city, then go for it. You might even get some cool Alexa swag, like a hoodie or t-shirt.
- Fields section:
| Category | Education & Reference |
|---|---|
| Testing Instructions | none |
| Countries & Region | In all countries and regions where Amazon distributes skills. |
Description section:
| Short Skill Description | Facts about MyCity, USA. |
|---|---|
| Full Skill Description | More info about your skill. |
Example Phrases section:
| Example Phrase 1 | Alexa Open MyCity Facts |
|---|---|
| Example Phrase 2 | Alexa Ask MyCity Facts for a Fact |
| Example Phrase 3 | Alexa Ask MyCity Facts for Help |
You will also need to create and upload small (108x108) and large (512x512) icons for your skill.
Privacy & Compliance
| Does this skill allow users to make purchases or spend real money? | No |
|---|---|
| Does this Alexa skill collect users’ personal information? | No |
| Is this skill directed to or does it target children under the age of 13? | No |
| Export Compliance | Your choice |
| Does this skill contain advertising? | No |
Skill Certification
Click the Submit for Certification button. You should receive a response within 12-18 hours.
While your submission is being evaluated, you can’t edit your skill, so if you think you’ve made a mistake, or just wish to withdraw your skill from the certification process, there’s a button for that, otherwise you can click the Back to the List of Skills button.
Device Testing
If you have an Amazon Echo device handy and connected with the same Amazon account you use for development, you can ask her to give you an Azure City Fact even if you didn’t publish the skill.
Try this:
Say “Alexa, open Azure City Facts”
At this point, Alexa will wait for you to say one of the sample utterances you listed for your GetMyCityFactsIntent. If you take too long to respond, Alexa will prompt you again.
Once you respond with an invocation, Alexa will randomly select a fact about MyCity for you and respond accordingly.
That’s it for this chapter! Coming up next is Part III: Home Automation Skills, where we will look at the Smart Home Skill API and design a home automation skill.