Table of Contents for
Programming Alexa Skills
 Programming Alexa Skills
Published by
O'Reilly Media, Inc., 2019
Programming Alexa Skills
Published by
O'Reilly Media, Inc., 2019
- The Tools You Need and Where to Find Them
- Contents
- Getting Familiar with the Alexa Skills Kit (ASK)
- Pick Your Hosting Platform Carefully
- My City Facts – Designing Your New Skill
- Building the MyCity Facts Skill as an AWS Lambda Function
- Building the MyCity Facts Skill as an ASP.NET Web API Service Hosted in Microsoft Azure
2
Getting Familiar with the Alexa Skills Kit (ASK)
The Alexa Skills Kit (ASK) is Amazon’s API for interacting with the Amazon Echo line of devices, and the Alexa Voice Service. This chapter will serve as your guide to the ASK, and will cover the various skill templates available to you.
If you’re not already there, head on over to https://developer.amazon.com/alexa-skills-kit. On this landing page, you’ll see a bunch of information about “What Is an Alexa Skill?”, “What Is the Alexa Skills Kit?”, “Why Should You Build Skills?” and so on. This is all good information, but not why we’re here.
Click on the Learn link near the top of the page and you will see a collection of categories for the various types of skills you can build, as shown in Figure 2-1.
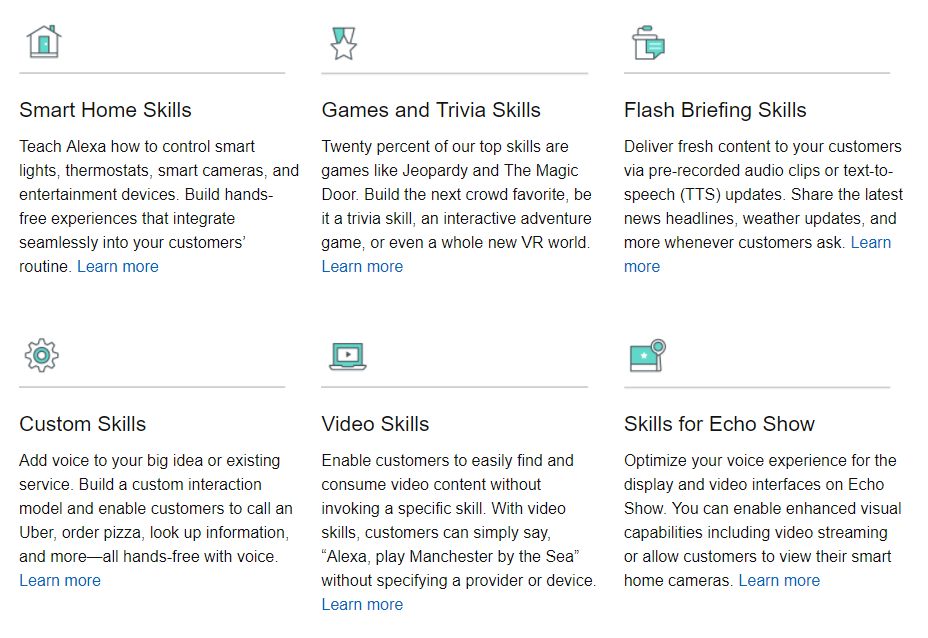
Figure 2-1: The ASK Skills Templates
You’ve already built one custom skill in the previous chapter (surprise!), so I’m going to cover the other types first and then come back to Custom Skills. Don’t worry though, we’ll touch on all of the templates before moving on to Chapter 3.
Smart Home Skills
There are two cases for Smart Home Skill development: you’re either a device manufacturer looking to add voice capabilities to your product, or you’re a developer looking to build skills for connected devices for public or private use. In this book, I’ll focus primarily on the latter case.
Smart Home Skills allow your users to control cloud-connected home automation devices, such as smart thermostats, smart cameras, cloud-enabled lights, smart TVs, and more.
At first glance, these may seem just like Custom Skills, and to the end user there’s not much difference, but the Smart Home Skill API actually makes your job as a developer much easier because it includes a collection of built-in common smart home functions and a specialized workflow that shoulders much of the load when processing user requests. This means you don’t have to design your own voice interaction model, or more specifically, you don’t have to worry about coding for phrases like “Turn on the dining room light” or “Show me the back porch” when creating your own Smart Home Skills.
The API communicates with your skill using a JSON message format, just like with Custom Skills, although the format is a bit different. I’ll cover the message format in detail when you build a Smart Home Skill in Part III of this book.
You can find the Smart Home Skill API Reference here: http://amzn.to/2wxLzay
Game and Trivia Skills
Games account for over 20% of the top Alexa Skills, and the ASK makes it easy for you to create game skills quickly with a variety of templates.
If voice-driven adventure games sound like something you would enjoy working on (or playing), the Interactive Adventure Game Tool is an open source project created and maintained by Amazon that allows you to graphically design the flow of your adventure’s story. You can find the IAG Tool on GitHub at http://bit.ly/2x54myh.
If you’ve spent much time on social media, you’ve likely taken (or at least seen the results of) quizzes of the “Which Harry Potter Character Are You?” or “What Kind Of Dinosaur Am I?” variety. Under the hood, these all run off of a decision tree, and the Decision Tree Skill Template makes it easy to create a skill that allows your users to answer a series of questions to arrive at an answer.
The third game type template I’ll cover is the Trivia Skill Template. This makes it super easy to create a trivia game using the content of your choice. With this kit, you could have a trivia skill up and running on Alexa in under an hour.
I’ll cover all three of these game types in Part VI of this book. In Chapter 17, you’ll build a decision tree skill called “What Kind Of Beer Should I Order?”, Chapter 18 will cover the trivia skill with a fun game called “Who Said It?”, and in Chapter 19 you will create a voice-driven interactive adventure game skill called “Logan’s Quest”.
Flash Briefing Skills
The Flash Briefing Skill API enables you to add your own content feed to Alexa’s daily Flash Briefing.
This can be pre-recorded audio files or text to be read by Alexa to anyone who enables your skill and adds it to their daily Flash Briefing. Once this skill is enabled, there is no voice interaction model beyond the usual Stop, Pause and Resume commands which are part of Alexa’s Flash Briefing functionality.
If you create and provide frequently updated content via JSON or RSS feeds, then this skill will get your content in front of thousands of people every day. You can find the Flash Briefing Skill API documentation at http://amzn.to/2iZGtCB.
I will cover Flash Briefing Skills in more detail, including creating one, in Part IV. In Chapter 11, we will dig into the Flash Briefing Skill API, Chapter 12 will cover designing the skill and creating some content, and in Chapter 13 you’ll create the skill to support your syndicated content: MNN (My News Network).
Video Skills
The Video Skills API is used for creating an interface between your hosted video content and Alexa.
Functionality provided by this API includes searching for and playing content, controlling playback, navigating channels, and inclusion in Alexa’s video catalog.
I will cover Video Skills in more detail in Part V. In Chapter 14, I will cover the Video Skills API and walk through the design and creation of a simple video skill.
Skills for Echo Show
The Echo Show allows you to add image and video capabilities to your Custom Skills, but that’s not all.
All existing Alexa Skills work “out of the box” on the Echo Show and any content provided to the Companion App will also appear onscreen on the Echo Show, but you can take it a step further because the ASK provides visual templates for laying out the user interface of your skill, and gives you the ability to customize the user interaction model.
In addition, the Echo Show offers additional integration with the Smart Home Skill API so you can view your smart camera devices via your Echo Show.
In Part V, I’ll cover best practices for designing skills for voice and touch for use on the Echo Show. In Chapter 15 I will walk you through the design of a new video and touch enabled skill for the Echo Show, and in Chapter 16 we will build it.
Custom Skills
Custom skills are a great way to bring voice interaction to an existing service, or as an integral part of a new product design.
I covered the individual parts of a skill (Intents, Invocation Name, Slots, Utterances, etc.) at a relatively high level in Chapter 1, but there’s more you can do than just voice interaction.
Custom skills can display text and images via the companion app or the Echo Show. If someone uses your skill on an Echo Show, even if it wasn’t designed for it, it will show the same content as the companion app by default.
Additionally, when designing custom skills for the Echo Show, your skill can play video files and respond to touch input. More on that in a bit.
Custom skills can also play MP3 audio files. This enables you to play background music and sound effects as part of your skill, or even provide dramatic audio performances instead of relying on the default Alexa voice to read your content back to the user.
If you have an Alexa, and want to hear something really cool, ask her to “Open the Wayne Investigation.” This popular skill features rich audio and a complex interaction model that puts you in the role of a Gotham City detective trying to solve the murder of Bruce Wayne’s parents.
The “Hello World!” custom skill we built in Chapter 1 is admittedly pretty simple, but it’s fairly easy to add some additional interaction to it. Since we’re going to be exploring the other skill types in more detail in later chapters, let’s modify our custom skill now.
Hello World, Revisited
Currently, the Hello World skill is pretty impersonal, so let’s change it to ask how your day is and wait for a response.
To do this, you’ll need to go back to the developer portal and select your skill, and then go to the Interaction Model screen.
First, you’re going to update the interaction model by adding a pair of Alexa’s built in intents (in bold) to the intent schema section:
{
"intents": [
{
"intent": "HelloWorldIntent"
},
{
"intent": "AMAZON.YesIntent"
},
{
"intent": "AMAZON.NoIntent"
},
{
"intent": "AMAZON.HelpIntent"
}
]
}
Because you’re adding built-in intents, you don’t explicitly need to add sample utterances unless you want to extend them beyond the defaults, but it’s a good practice (and we’ll throw in a couple extra for good measure.)
Add the sample utterances in bold below.
HelloWorldIntent say hello
HelloWorldIntent say hello world
HelloWorldIntent hello
AMAZON.YesIntent Yes
AMAZON.YesIntent Yeah
AMAZON.YesIntent Sure
AMAZON.NoIntent No
AMAZON.NoIntent Nope
AMAZON.NoIntent Not Really
AMAZON.HelpIntent help me
Make sure to click the save button at the bottom of the page. You’re halfway done!
Now you need to log back in to AWS and open up your Hello World lambda function so you can add the code to support the additional intents.
Scroll down until you see the onIntent() function, and add/change the code in bold below:
function onIntent(intentRequest, session, callback) {
var intent = intentRequest.intent,
intentName = intentRequest.intent.name,
repromptText = "Are you having a nice day?";
if (intentName == 'HelloWorldIntent') {
callback(null,
buildSpeechResponse("Hello World! Are you having a nice day?",
repromptText, false));
}
if (intentName == 'AMAZON.YesIntent') {
callback(null,
buildSpeechResponse("I'm so glad.", "", true));
}
if (intentName == 'AMAZON.NoIntent') {
callback(null,
buildSpeechResponse("I'm sorry to hear that. Perhaps it will improve.",
"", true));
}
if (intentName == 'AMAZON.HelpIntent') {
callback(null,
buildSpeechResponse(repromptText, "", true));
}
}
You’re changing the “Hello World!” text to something a bit more interactive, but you’re also changing the endSession parameter of the buildSpeechResponse() method from true to false so that Alexa knows to wait and listen for a response.
You’re also adding support for two more intents: AMAZON.YesIntent and AMAZON.NoIntent. This time you’re setting the endSession parameter to true to let Alexa know she’s done.
Make sure to save your changes, and then you’ll be ready to fire up your skill on Alexa.
Assuming you already enabled the skill when you built it in chapter 1, all you have to do is ask Alexa to open it, and it will automatically run the updated version.
You: Alexa Open Hello World
Alexa: You can ask me to say Hello World!
You: Say Hello World
Alexa: Hello World! Are you having a nice day?
You: Yes
Alexa: I'm so glad.
Try running it a few times and responding with the various sample utterances you added.
This concludes our tour of the various skill types, so now let’s take a look at some other cool features of the ASK that will make your life a lot easier if you plan on creating many skills: the Skill Management API and the Command Line Interface.
Skill Management API
With the Alexa Skill Management API (SMAPI), you can manage your Alexa Skills via RESTful HTTP interfaces, allowing you to programmatically create new skills, update your interaction model, and more. This gives you the ability to create your own build management tools.
The fine folks at Amazon have already created one set of tools for you: the Alexa Skills Kit Command Line Interface (ASK CLI) which allows you to script your build and deployment process instead of having to funnel everything manually through the developer dashboard.
Command Line Interface
The ASK CLI can perform the following functions:
- a new skill project
- skill project to the development stage
- an existing skill into a new project
- SMAPI calls
- and upload AWS Lambda code
In order to use the CLI, you need an Amazon Developer Account (which you should already have) and Node.js which I mentioned in Chapter 1.
If you haven’t downloaded Node.js 4.3 (or higher), go ahead and visit the download page at https://nodejs.org/en/download/ and grab it. You’ll also need the Node Package Manager (NPM), which will install with Node.js.
Once you’ve installed Node.js, you can check your version by typing node --version at a command prompt.
Next you need to install the ASK CLI via NPM. Still got that command prompt open? Awesome! Type this: npm install -g ask-cli
If you’re using Linux, you may need to throw a sudo command in front of that to get it to work, like so: sudo npm install -g ask-cli
After the installation is complete, you’ll need to initialize the CLI once (and provide your Amazon developer credentials) and you’ll be all set.
To initialize the CLI, type ask init at the command prompt. You’ll need to create a new profile, so give it a name and then you’ll be taken to an Amazon login screen to verify your credentials. Once you’ve done that, you can close that browser window.
You might also get a Windows Security Alert (depending on your firewall settings) so be sure to allow access for Node.js.
Now that you’re up and running, I’ll show you how to do a few things:
If you want to see what the ASK CLI has to offer, you can start by typing ask at the command prompt. This will give you a list of supported commands and a brief description of their purpose.
You’ve already run the init command, so to create a new skill from the ASK CLI, you’ll use the new command:
ask new -n skillname --profile profilename --lambda-name lambdaname
All three of these arguments are optional, but at the very least you want to provide a unique skill name. Issuing a new command with no additional information will create a simple hello-world style skill under the default profile in whatever folder you happen to be pointing at, so you may want to create a folder for keeping your projects organized.
For example:
cd c:\
md AlexaSkills
cd AlexaSkills
Now you should be looking at a command prompt like this c:\AlexaSkills>
Go ahead and create your first project from the CLI (you can always delete it later):
ask new -n TestSkill1 --lambda-name TestSkillLambda --profile yourprofilename
A new folder will be created with the same name as your skill. That folder contains a manifest file named skill.json, and two other folders: .ask and models.
The manifest file contains information about your newly created skill, and will be used when deploying your skill to Amazon.
You can open json files with any text editor if you want to take a look, but I’ll include this one below for you.
{
"skillManifest": {
"publishingInformation": {
"locales": {
"en-US": {
"summary": "Sample Short Description",
"examplePhrases": [
"Alexa open hello world",
"Alexa tell hello world I am Jeff",
"Alexa tell hello world my name is Peter"
],
"name": "TestSkill1",
"description": "Sample Full Description"
}
},
"isAvailableWorldwide": true,
"testingInstructions": "Sample Testing Instructions.",
"category": "EDUCATION_AND_REFERENCE",
"distributionCountries": []
},
"apis": {
"custom": {}
},
"manifestVersion": "1.0"
}
}
If you were to look in the Amazon Developer Portal right now, you wouldn’t see this skill listed yet, because the new command only creates a local copy, until you deploy it. (We’ll do that in just a moment.)
Feel free to tweak some of the description values, example phrases, and testing instructions when you generate a new skill project, but be sure to leave the manifestVersion at “1.0”.
Under the .ask folder, you’ll find a config file which looks like the following:
{
"deploy_settings":
{
"default": {
"skill_id": "",
"was_cloned": false
}
}
}
Leave this one alone for now, as it will be modified during the deployment.
Lastly, if you look in the Models folder, you will see a file titled en-US.json, which I have included here:
{
"interactionModel":{
"languageModel":{
"invocationName":"hello world",
"types":[],
"intents":[
{
"name": "AMAZON.CancelIntent",
"samples": []
},
{
"name": "AMAZON.HelpIntent",
"samples": []
},
{
"name": "AMAZON.StopIntent",
"samples": []
},
{
"name":"HelloWorldIntent",
"slots": [],
"samples":[
"hello",
"say hello",
"say hello world"
]
},
{
"name":"MyNameIsIntent",
"slots":[
{
"name":"name",
"type":"AMAZON.US_FIRST_NAME"
}
],
"samples":[
"my name is {name}",
"i am {name}",
"you can call me {name}"
]
}
]
}
}
}
This file shows the various intents in your generated skill, along with the sample utterances. After you deploy your skill, you’ll see this information in the Developer Dashboard.
Now that you’ve examined all of the generated files, it’s time to do a CLI Deploy to your AWS account.
The deploy command looks like this:
ask deploy --no-wait --target target --profile profile --debug
Just like the new command, all of these parameters are optional. The no-wait switch allows you to deploy asynchronously instead of waiting for the skill to build. The target switch allows you to specific which files to deploy (lambda, skill, model, or all) with ‘all’ being the default. Profile lets you provide a profile other than the default to deploy under. The debug switch lets you append a debug message to an error result.
The type of skill you are deploying dictates what files will be uploaded by default:
| Custom Skill | skill.json, model file, and any AWS Lambda Function code |
|---|---|
| Smart Home Skill | skill.json and AWS Lambda Function code |
| Flash Briefing Skill | skill.json |
The first time you deploy a skill, the ASK CLI creates a new skill and lambda function in AWS using the following naming convention:
ask-<skilltype>-<skillname>-<profile>
The lambda function is created with the ask-lambda permission, and an endpoint is generated. The endpoint information is passed back and the skill.json file is updated.
Make sure you’re in the top folder for your skill (the folder that contains your skill.json file) in the command prompt, and type this in:
ask deploy --profile yourprofilename
After the deploy process completes, take a quick look in the config file again, and you’ll see the updated skill ID:
{
"deploy_settings":
{
"default": {
"skill_id": "amzn1.ask.skill.xxxxxxxx-xxxx-xxxx-xxxx-xxxxxxxxxxxx",
"was_cloned": false
}
}
}
In addition to creating skill projects from scratch, you can also clone an existing skill.
ask clone --skill-id skillid --profile profile --debug
If you provide a value for skill-id, the clone command will copy that skill into a new skill. If you do not provide a skill-id, you will be presented with a list of skills to choose from.
Go ahead and give it a shot from your C:\AlexaSkills folder.
cd c:\alexaskills
ask clone --profile yourprofilename
Keep in mind, this doesn’t deploy the clone, it only makes a local copy. You’ll still need to deploy it to AWS for it to show up on the dashboard.
In addition to the three commands I just covered, there’s one more ASK CLI command I’ll cover here, and it’s a doozy. The API command offers up a collection of functions, and to see them all, just type ASK API in your command prompt window.
You’ll notice there’s some overlap with the commands I’ve already shown you, and that’s because they’re just making API calls behind the scenes. Take a look at Figure 2-2 for a complete list.

Figure 2-2: ASK API Commands
For more detailed usage information about any of the ASK CLI commands, you can add a –h switch, like this:
ask api get-model -h
Which gets you a list of parameters and expected values, like Figure 2-3.
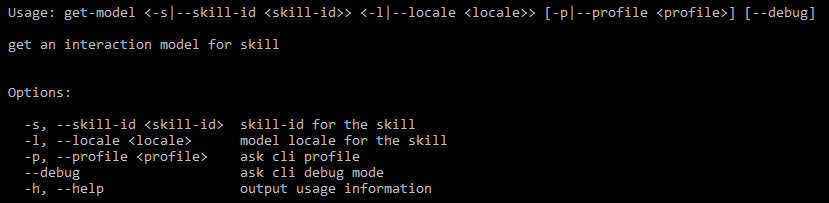 Figure 2-3: The get-model API subcommand*
You can get a list of all of your deployed skills, and their skill-ids, by using the ask api list-skills command.
There’s a lot of power and flexibility here. Being able to create/update and deploy skills as part of a scripted build system is incredibly useful, and there’s more! You can even invoke your skills, test them, and submit them for certification.
You can explore the full set of ASK CLI documentation at this link: http://amzn.to/2fBFe8B
That’s it for this chapter. In Chapter 3, I’ll cover picking your hosting platform, and discuss ways you can host your skill somewhere other than Amazon AWS.